web portal - nmm portal user guide ... the web portal will prompt users to change their passwords...
TRANSCRIPT

Rev. 2018-02 Page | 1
Web Portal
User Guide
for
Allied Pacific and Associated IPAs
Powered by Rulemeister, Inc.
v.3.0.6

Rev. 2018-02 Page | 2
Table of Contents
I. Portal Introduction ..................................................................................................................................... 3
II. Contact Us and Report Issues ................................................................................................................... 4
III. User Accounts ......................................................................................................................................... 5
III.1.Obtaining a Username / New Users .................................................................................................. 5
III.2.Password Policy ................................................................................................................................ 5
IV. Accessing the Web Portal ....................................................................................................................... 6
IV.1. Log In............................................................................................................................................... 6
V. Home Page ............................................................................................................................................... 6
V. Eligibility ................................................................................................................................................. 8
V.1. Searching and Verifying Member Eligibility .................................................................................... 8
V.2. Member Assessment ......................................................................................................................... 9
V.3. GAP Reports ....................................................................................................................................... 9
VI. Authorizations ....................................................................................................................................... 10
VI.1. Creating New Authorizations ........................................................................................................ 11
VI.2.Prenatal Code Package ................................................................................................................... 15
VI.3. Searching Submitted Authorizations ............................................................................................. 17
VI.3.A. Viewing Authorization Details .................................................................................................. 19
VI.3.B. Adding Attachments to Deferred Authorizations....................................................................... 21
VII. Claims .............................................................................................................................................. 22
VII.1. Submitting Claims ........................................................................................................................ 22
VII.1.a Completing Claims Form ........................................................................................................... 23
VII.2. Viewing Submitted Claims........................................................................................................... 24
VII.3. Searching Submitted Claims ........................................................................................................ 25
VIII. Batch Claims ...................................................................................................................................... 27
VIII.1 Submitting Batch Claims ............................................................................................................. 27
VIII.2. Viewing Batch File Contents ...................................................................................................... 29
VIII.3. Interpreting Batch Claim Reports ............................................................................................... 31
IX. Hedis Measures Tool ............................................................................................................................ 35
X. Medicare HCC ....................................................................................................................................... 46
Rev. 2018-02 Page | 3
I. Portal Introduction
Welcome to the User Guide for the Web Portal for Allied Pacific and Associated IPAs,
managed by Network Medical Management.
The Allied Pacific Provider Web Portal is web-based application that enables provider
offices to conveniently verify member eligibility, submit and view authorization requests,
and submit and view claim data from any location with internet access.
This user guide is intended to educate providers on the different features and capabilities of
the web portal. Should you have any questions, comments, or require assistance, please do
not hesitate to contact us – see the following page for contact information details.
Eligibility
Claim Authorization

Rev. 2018-02 Page | 4
II. Contact Us and Report Issues
If at any time you require assistance with the web portal, please contact us at:
Web Portal Support – Allied Pacific and Associated IPAs
Technical Assistance: [email protected]
New Users: [email protected]
Phone: (626) 943-6146
Fax: (626) 943-6350
Please avoid sending Protected Health Information (PHI) through the email addresses above.
This includes member, claim, and authorization information. For inquiries that contain PHI,
please use the “Report Issue” feature detailed below.
At the bottom left of most Portal pages there are “Report Issue” links:
These links will open up the message form shown below. Messages sent through the form
will be received directly by our portal support team, and will be addressed and forwarded
appropriately.
Note that the form is secure and HIPAA compliant, and is the best means of
communicating Protected Health Information (PHI) related to any issues you encounter.
Our staff will respond to your request within 24 hours and provide any necessary assistance.
To ensure efficient support, please include your Portal User ID and a brief description of
your issue in the Remark field.

Rev. 2018-02 Page | 5
III. User Accounts
In most cases, provider offices will be assigned one web portal user account per tax ID, per
location. Providers may also request separate accounts for external billing offices.
III.1.Obtaining a Username / New Users
To obtain a web portal username and password, please
complete a copy of the Web Portal Account Registration
form (see pg. 4 for contact information). The forms can
also be found on the login page for the web portal,
highlighted at right (see pg. 6 for login links):
Please also use the form to request additional office
accounts, accounts for external billers, and changes to
provider rosters.
III.2.Password Policy
All user passwords must meet the following minimum requirements:
1. Cannot be the same as the current password
2. Cannot contain the User ID
3. Must be at least 6 characters
4. Must contain characters that meet at least 3 categories:
a. Uppercase characters [ A through Z ]
b. Lowercase letters [ a through z ]
c. Numbers [ 0 through 9 ]
d. Special characters [ ~!@#$%^&*(\) ]
In addition, the Web Portal will prompt users to change their passwords every ninety
(90) days. The portal will begin reminding you that your password will expire fifteen (15)
days prior to the actual expiration date.

Rev. 2018-02 Page | 6
IV. Accessing the Web Portal
IV.1. Log In
1. Open any modern browser (Chrome, Firefox, Safari, Microsoft Edge, or Internet Explorer
10 or higher) and go to:
http://www.nmm.cc/
2. On the left side of the page, click the link that reads
“Provider Login – APC”. That should take you to the
following link:
https://provider-portal.nmm.cc/
3. Enter your username
4. Enter your password (case sensitive)
5. Click [Log In]
Note: If this is your first time logging in, you may be prompted to
change your password (for details on password requirements, see
pg. 5).
V. Home Page
1. Upon login, the home page will display a dashboard panel alerting of
new members
termed members
members without office visit
members recently discharged from the hospital
postpartum members
pregnant members who are missing an LMP date
termed providers
These alerts will only appear if they contain at least one item. For user accounts that
contain more than one provider, a dropdown is available to display the alerts pertaining to
each primary care physician.

Rev. 2018-02 Page | 7
2. Clicking on any of the buttons and the panels will expand the list displaying the members
under each alert.
3. If the user account contains a primary care physician, then a Hedis progress chart
appears. The first trending graph shows the number of measures that have been
completed. The pie charts break down the measures completed by line of business.
Clicking on the pie charts will navigate the user to the Gap Reports page. Graphs can be
viewed for the current measure year as well as the previous year.
4. Beneath these graphs lies another panel displaying recently uploaded member documents
that have not been viewed by the user. By clicking on the member name (A), you will be
directed to that member’s eligibility page. By clicking on the document category, you
will download the file (B). If there are no unviewed member documents, the panel will
not appear.
5. Next to the Member Document panel is a list of (C) profile doctors that are associated
with this user id.
A B
C

Rev. 2018-02 Page | 8
V. Eligibility
Always confirm eligibility before submitting authorizations or claims through the portal.
Please also verify eligibility with the member’s health plan prior to performing services.
V.1. Searching and Verifying Member Eligibility
Select [Eligibility] located in the left navigation, then click [Search
Eligibility]:
A page titled [Member Eligibility] with fields for Provider, Member ID, Last Name, First
Name, and Date of Birth (DOB) will appear. If you are a PCP, select [By PCP] under the
[Provider] drop-down. Otherwise, select [By Other]:
To find a member, please enter either:
Member’s insurance ID number and complete DOB (mm/dd/yyyy).
Partial last name, partial first name, and complete DOB (mm/dd/yyyy) for member.
Then, click [Search]. See below for examples - note that not all fields need to be filled:
After a successful search, you can click the member’s ID number to view detailed eligibility
information. Note that both the current membership and previously terminated memberships
will be shown. Searches that fail will display “No Records Found” in red.

Rev. 2018-02 Page | 9
V.2. Member Assessment
When searching for members, you may see a spinning coin to the left of the member’s FULL
NAME. This indicates that the member has some pending services to be completed
according to the HEDIS measures.
Click on the member’s ID number to view a list of the measures required for that patient. If
the member does not qualify for any of the measures in the HEDIS program, then the Quality
and Risk Assessment portion will not appear.
*For more details on the HEDIS Measurement Tool please jump to page 35
V.3. GAP Reports
GAP reports are located under Eligibility in the left navigation.
On this page a list of Hedis measures appear. If the user account contains more than one PCP,
then the user can select the appropriate provider from the dropdown. A bar graph shows the
progress for each measure. Clicking on each row will expand to display the members in that
gap. Clicking on the hyperlinked member’s ID will navigate to that member’s detail page.
818-555-1212
818-555-1212 John Smith
Jane Smith
X9995544
X9995543

Rev. 2018-02 Page | 10
Below the interactive gap report, downloadable GAP reports are available in both PDF and Excel
(if the link appears) format.
V.4.Hedis Resources
A Hedis Office Instructions Booklet and a Hedis 2018 Reference Guide are available on the web
portal to provide further education for providers and their staff. To access them, navigate to
Resources/Forms.
Clicking on the hyperlink will download the document to your computer.
Rev. 2018-02 Page | 11
VI. Authorizations
VI.1. Creating New Authorizations
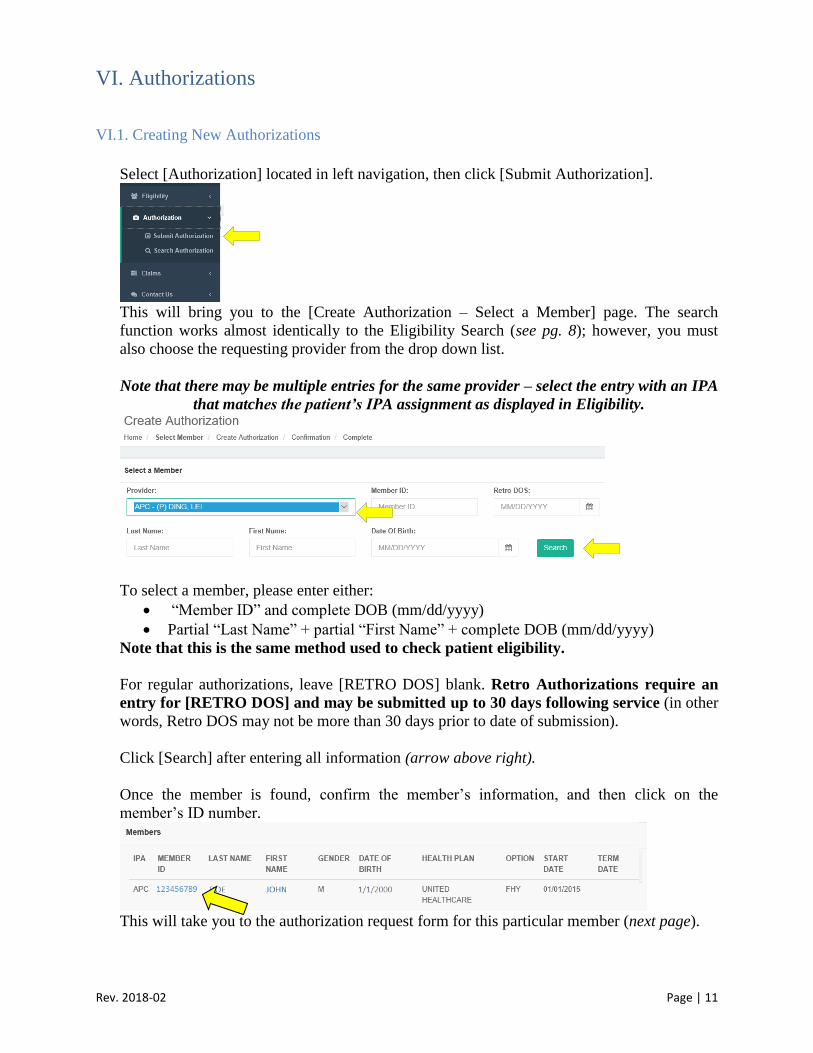
Select [Authorization] located in left navigation, then click [Submit Authorization].
This will bring you to the [Create Authorization – Select a Member] page. The search
function works almost identically to the Eligibility Search (see pg. 8); however, you must
also choose the requesting provider from the drop down list.
Note that there may be multiple entries for the same provider – select the entry with an IPA
that matches the patient’s IPA assignment as displayed in Eligibility.
To select a member, please enter either:
“Member ID” and complete DOB (mm/dd/yyyy)
Partial “Last Name” + partial “First Name” + complete DOB (mm/dd/yyyy)
Note that this is the same method used to check patient eligibility.
For regular authorizations, leave [RETRO DOS] blank. Retro Authorizations require an
entry for [RETRO DOS] and may be submitted up to 30 days following service (in other
words, Retro DOS may not be more than 30 days prior to date of submission).
Click [Search] after entering all information (arrow above right).
Once the member is found, confirm the member’s information, and then click on the
member’s ID number.
This will take you to the authorization request form for this particular member (next page).
Rev. 2018-02 Page | 12
A
A
B C D
E
F
G
H
I
J*
Rev. 2018-02 Page | 13
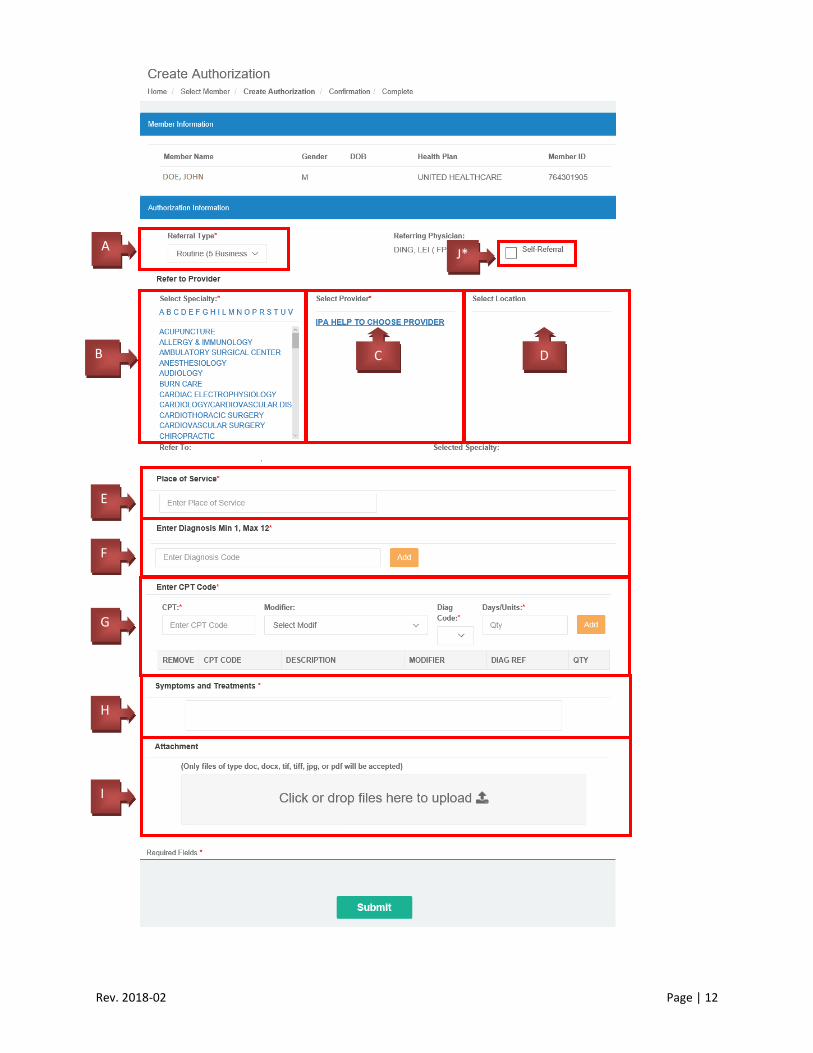
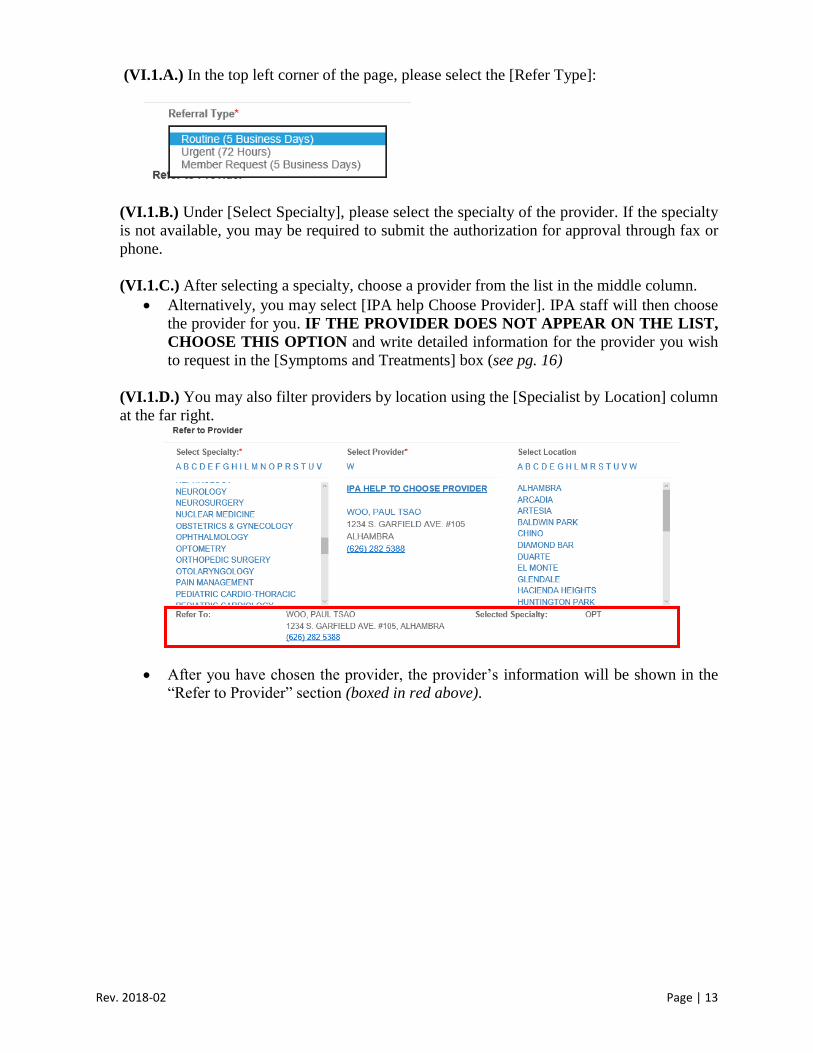
(VI.1.A.) In the top left corner of the page, please select the [Refer Type]:
(VI.1.B.) Under [Select Specialty], please select the specialty of the provider. If the specialty
is not available, you may be required to submit the authorization for approval through fax or
phone.
(VI.1.C.) After selecting a specialty, choose a provider from the list in the middle column.
Alternatively, you may select [IPA help Choose Provider]. IPA staff will then choose
the provider for you. IF THE PROVIDER DOES NOT APPEAR ON THE LIST,
CHOOSE THIS OPTION and write detailed information for the provider you wish
to request in the [Symptoms and Treatments] box (see pg. 16)
(VI.1.D.) You may also filter providers by location using the [Specialist by Location] column
at the far right.
After you have chosen the provider, the provider’s information will be shown in the
“Refer to Provider” section (boxed in red above).
Rev. 2018-02 Page | 14
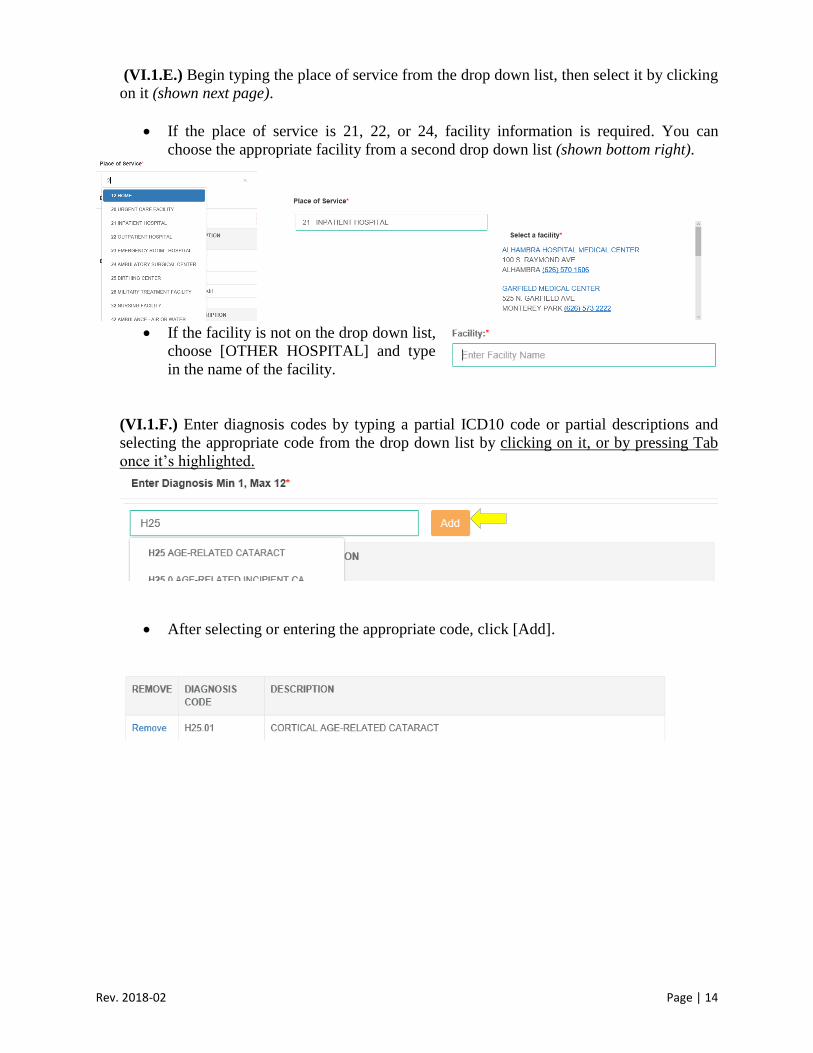
(VI.1.E.) Begin typing the place of service from the drop down list, then select it by clicking
on it (shown next page).
If the place of service is 21, 22, or 24, facility information is required. You can
choose the appropriate facility from a second drop down list (shown bottom right).
If the facility is not on the drop down list,
choose [OTHER HOSPITAL] and type
in the name of the facility.
(VI.1.F.) Enter diagnosis codes by typing a partial ICD10 code or partial descriptions and
selecting the appropriate code from the drop down list by clicking on it, or by pressing Tab
once it’s highlighted.
After selecting or entering the appropriate code, click [Add].

Rev. 2018-02 Page | 15
(VI.1.G.) Enter CPT codes by typing partial codes or partial descriptions, clicking on it OR
pressing Tab once it’s highlighted, and selecting the appropriate code from the drop down
list.
After selecting or entering the appropriate code, click [Add].
VI.2.Prenatal Code Package
Certain CPT codes are packaged with a set of related service codes. For example, when OB
service codes are entered, the user will have the option to add the additional service codes
package.
Upon clicking “Yes, add the codes”, the total OB package service codes (shown below) will be
added. However, the user also has the option to cancel and only add the initial service code.

Rev. 2018-02 Page | 16
(VI.1.H.) Enter Symptoms and Treatments
information in the text box. If you are
requesting for a provider not on the list,
enter the provider information here.
Do not use special characters - ? ! / @
(VI.1.I.) To attach doctor’s notes and other files relating to the authorization, click on the
drop zone to select files. Ensure your file is a DOC, DOCX, TIF, TIFF, JPG, or PDF file.
After selecting the appropriate file click [Upload Attachment] to attach the file.
If the file has been successfully uploaded, the file name will appear and a [Remove
File] button will also be available to remove the selected file (see example above).
For Urgent authorizations attachment is a requirement.
Once you have entered all required information click [Submit] at the bottom of the page.
The portal will prompt you with a submit message - click
[Yes, submit it] to confirm submission.
Rev. 2018-02 Page | 17
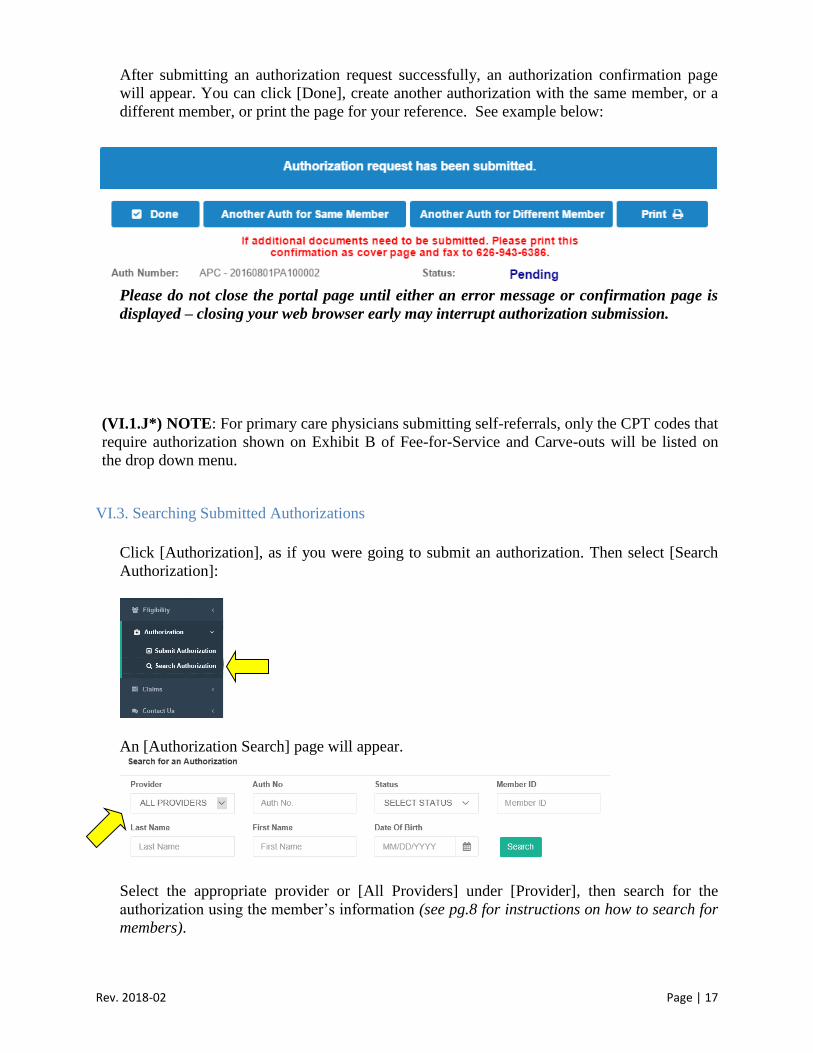
After submitting an authorization request successfully, an authorization confirmation page
will appear. You can click [Done], create another authorization with the same member, or a
different member, or print the page for your reference. See example below:
Please do not close the portal page until either an error message or confirmation page is
displayed – closing your web browser early may interrupt authorization submission.
(VI.1.J*) NOTE: For primary care physicians submitting self-referrals, only the CPT codes that
require authorization shown on Exhibit B of Fee-for-Service and Carve-outs will be listed on
the drop down menu.
VI.3. Searching Submitted Authorizations
Click [Authorization], as if you were going to submit an authorization. Then select [Search
Authorization]:
An [Authorization Search] page will appear.
Select the appropriate provider or [All Providers] under [Provider], then search for the
authorization using the member’s information (see pg.8 for instructions on how to search for
members).

Rev. 2018-02 Page | 18
Note that authorizations may also be searched by [Auth No.] – this is the number
listed on the authorization confirmation page following submission.
Authorizations may also be filtered by [Status] – for example, you may specify that
the portal only display [Denied] or [Deferred] authorizations.
After filling out the appropriate information, click [Search]:
Once the authorization is found, you can either view authorization details by clicking the
[Auth Number] (pg. 19) or add attachments to the authorization by clicking [Add
Attachment] (pg.21).

Rev. 2018-02 Page | 19
VI.3.A. Viewing Authorization Details
On the authorization detail page, you can either:
Print the information by clicking [Print] (above right).
Download attachments for this authorization by clicking on the file name (shown
below).
Auto-extend the authorization by clicking [Extend Auth] (above left). Only the
requesting provider may auto-extend authorizations. Automatic authorization
extensions follow the rules below:
Authorization must be on status [APPROVED].
Place of Service must be 11 – Office.
The date of submission for the extension must be within 15 days before and
30 days after expiration date.
For example, if an authorization is set to expire on July 1st, the
provider can request an extension between June 15th
and July 31st.
The member and requesting provider must still be active with the IPA.
Authorizations are extended for 30 days from the original expiration date.
Authorizations can be extended up to two times, for a total of 60 days.
Non-requesting providers should request extensions via the authorization
modification request feature (see next page).
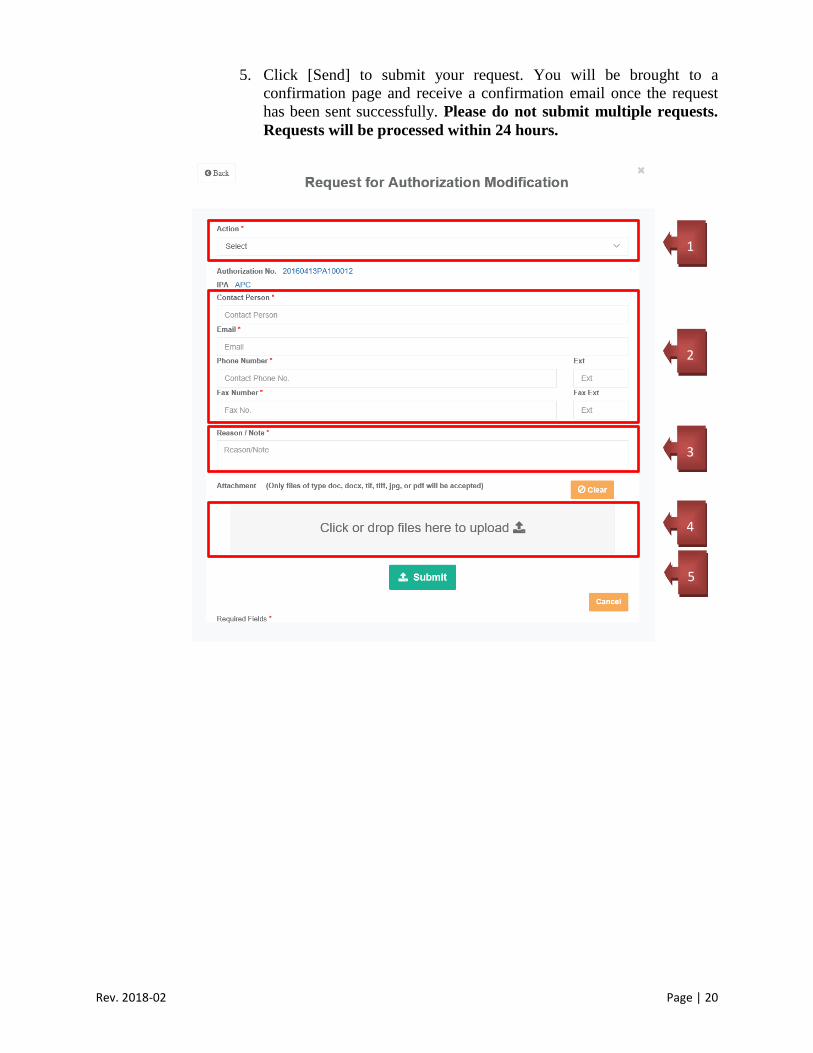
You can also use the [Request Modification to Authorization] button to request changes to
submitted authorizations.
Authorizations must be on status [REQUESTED] or [APPROVED].
The form will automatically include the Authorization Number and IPA
information. You will need to provide the following information to submit:
1. Select the type of modification based on whether you are submitting
an [Authorization Extension] or [Authorization Modification] request.
2. Include your personal contact information so that our staff can contact
you with questions. Note that [Contact Person], [E-mail Address],
[Phone Number], and [Fax Number] are all required. [Ext] and [Fax
Ext] are optional.
3. Include a [Reason / Note] detailing what and why you are requesting.
4. If necessary, upload an attachment by clicking [Add files…].
Rev. 2018-02 Page | 20
5. Click [Send] to submit your request. You will be brought to a
confirmation page and receive a confirmation email once the request
has been sent successfully. Please do not submit multiple requests.
Requests will be processed within 24 hours.
5
4
3
2
1
Rev. 2018-02 Page | 21
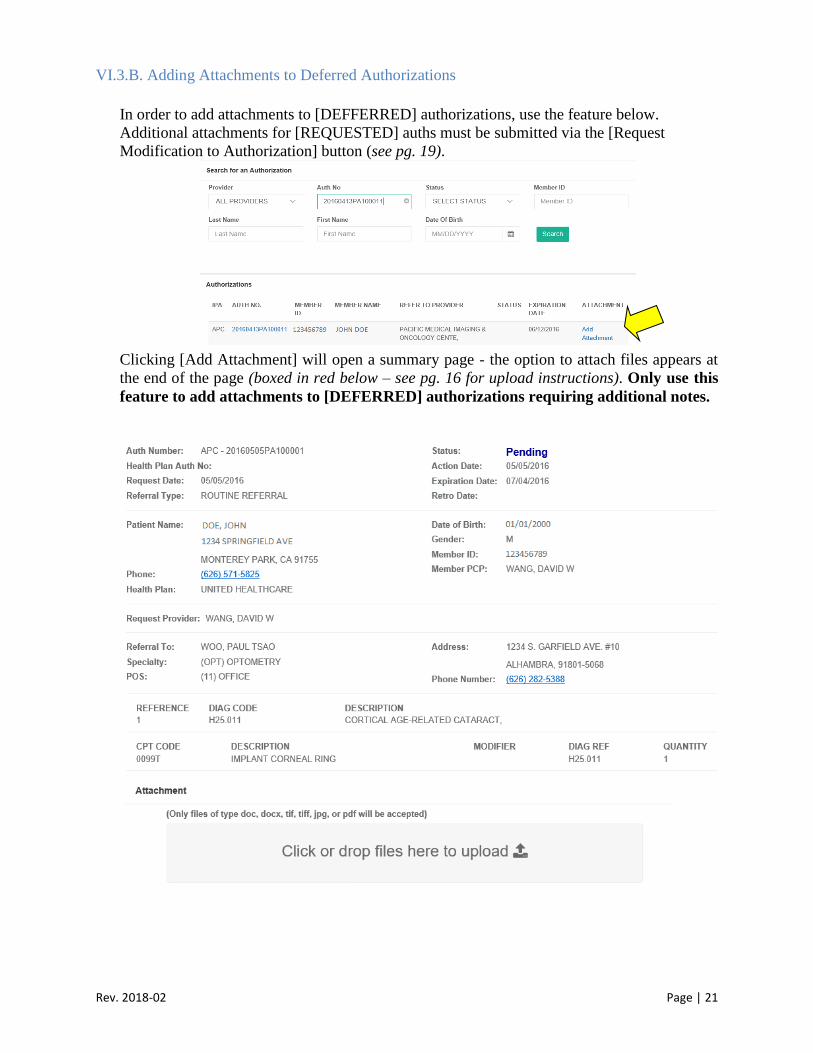
VI.3.B. Adding Attachments to Deferred Authorizations
In order to add attachments to [DEFFERRED] authorizations, use the feature below.
Additional attachments for [REQUESTED] auths must be submitted via the [Request
Modification to Authorization] button (see pg. 19).
Clicking [Add Attachment] will open a summary page - the option to attach files appears at
the end of the page (boxed in red below – see pg. 16 for upload instructions). Only use this
feature to add attachments to [DEFERRED] authorizations requiring additional notes.
Rev. 2018-02 Page | 22
VII. Claims
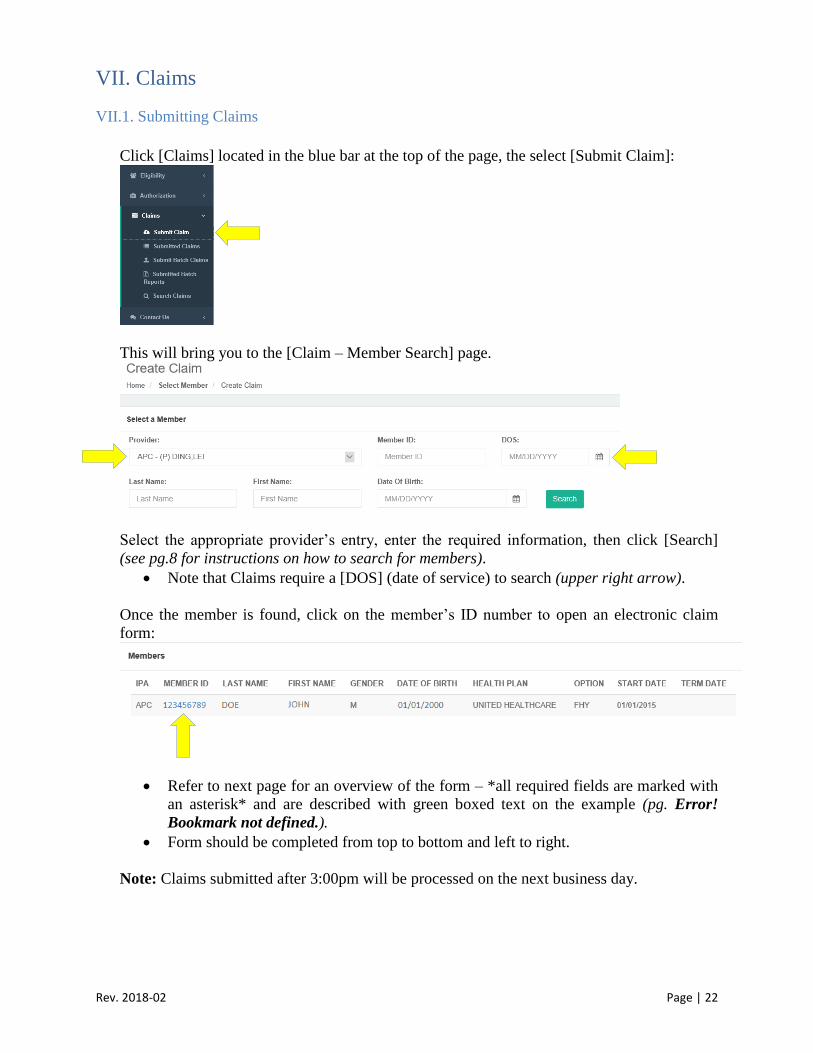
VII.1. Submitting Claims
Click [Claims] located in the blue bar at the top of the page, the select [Submit Claim]:
This will bring you to the [Claim – Member Search] page.
Select the appropriate provider’s entry, enter the required information, then click [Search]
(see pg.8 for instructions on how to search for members).
Note that Claims require a [DOS] (date of service) to search (upper right arrow).
Once the member is found, click on the member’s ID number to open an electronic claim
form:
Refer to next page for an overview of the form – *all required fields are marked with
an asterisk* and are described with green boxed text on the example (pg. Error!
Bookmark not defined.).
Form should be completed from top to bottom and left to right.
Note: Claims submitted after 3:00pm will be processed on the next business day.
Rev. 2018-02 Page | 23
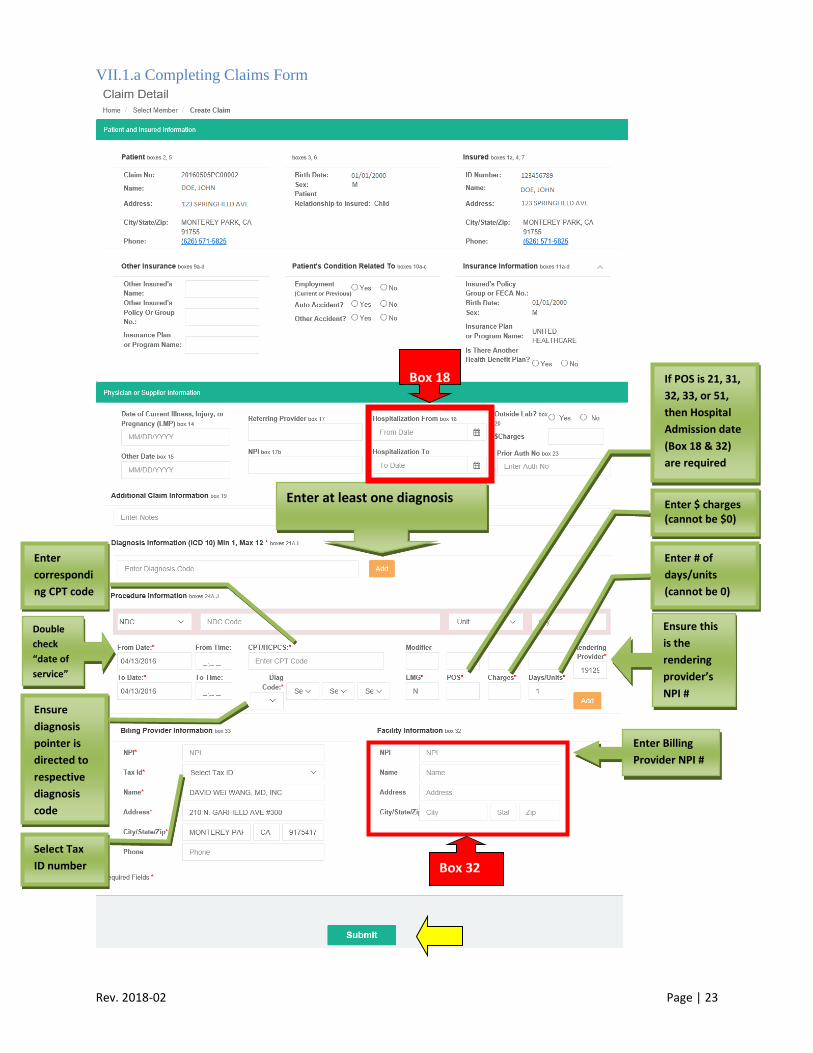
VII.1.a Completing Claims Form
Double
check
“date of
service”
Enter at least one diagnosis
Enter
correspondi
ng CPT code
Enter $ charges (cannot be $0)
Enter # of
days/units
(cannot be 0)
Enter Billing
Provider NPI #
Ensure this
is the
rendering
provider’s
NPI #
Box 32
If POS is 21, 31,
32, 33, or 51,
then Hospital
Admission date
(Box 18 & 32)
are required
Ensure
diagnosis
pointer is
directed to
respective
diagnosis
code
Select Tax
ID number
Box 18
Rev. 2018-02 Page | 24
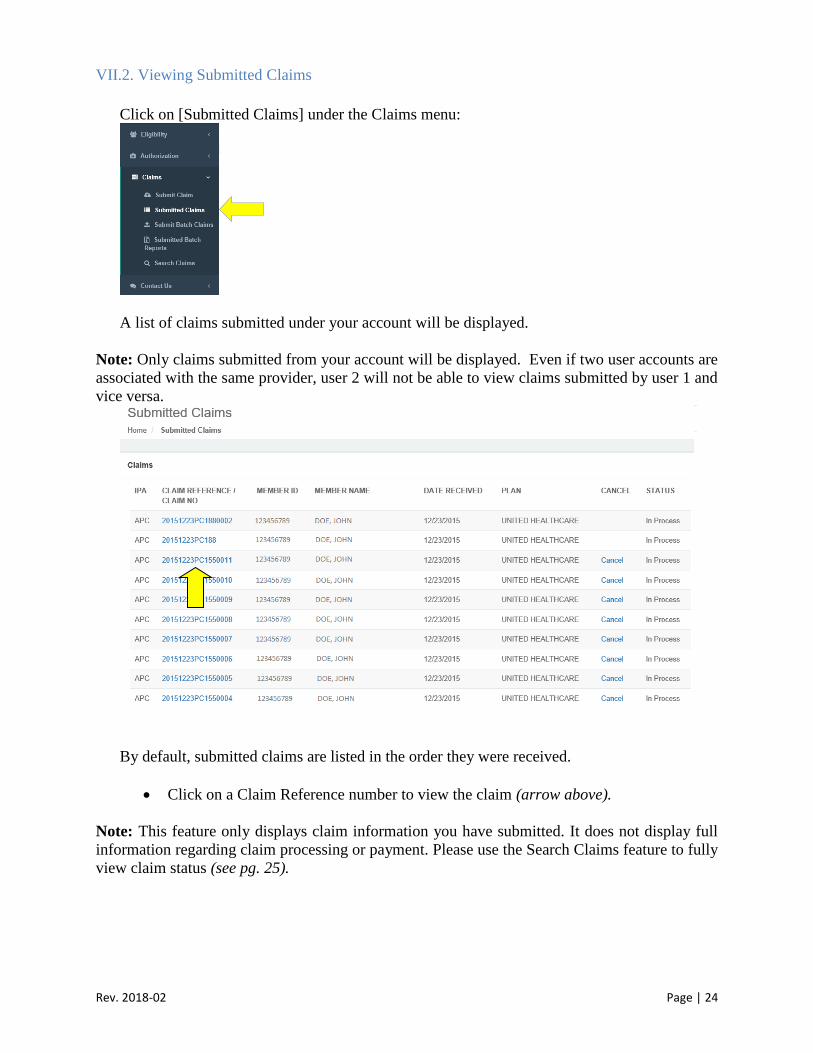
VII.2. Viewing Submitted Claims
Click on [Submitted Claims] under the Claims menu:
A list of claims submitted under your account will be displayed.
Note: Only claims submitted from your account will be displayed. Even if two user accounts are
associated with the same provider, user 2 will not be able to view claims submitted by user 1 and
vice versa.
By default, submitted claims are listed in the order they were received.
Click on a Claim Reference number to view the claim (arrow above).
Note: This feature only displays claim information you have submitted. It does not display full
information regarding claim processing or payment. Please use the Search Claims feature to fully
view claim status (see pg. 25).
Rev. 2018-02 Page | 25
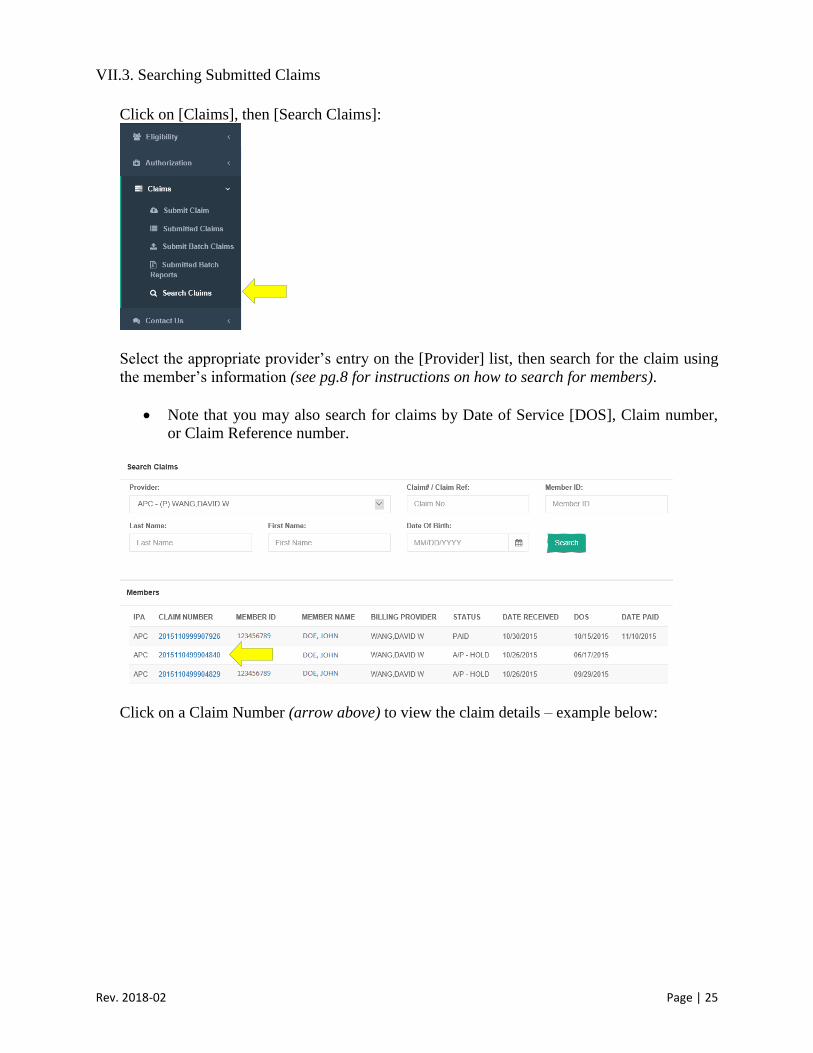
VII.3. Searching Submitted Claims
Click on [Claims], then [Search Claims]:
Select the appropriate provider’s entry on the [Provider] list, then search for the claim using
the member’s information (see pg.8 for instructions on how to search for members).
Note that you may also search for claims by Date of Service [DOS], Claim number,
or Claim Reference number.
Click on a Claim Number (arrow above) to view the claim details – example below:

Rev. 2018-02 Page | 26
Rev. 2018-02 Page | 27
VIII. Batch Claims
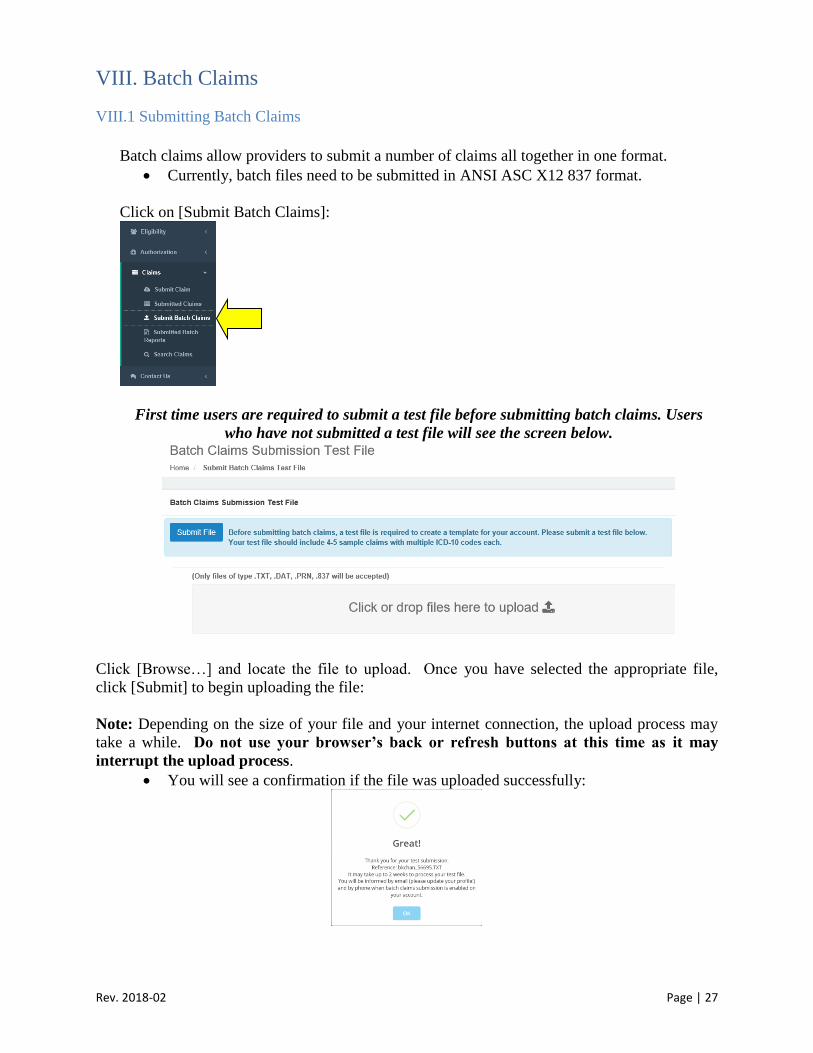
VIII.1 Submitting Batch Claims
Batch claims allow providers to submit a number of claims all together in one format.
Currently, batch files need to be submitted in ANSI ASC X12 837 format.
Click on [Submit Batch Claims]:
First time users are required to submit a test file before submitting batch claims. Users
who have not submitted a test file will see the screen below.
Click [Browse…] and locate the file to upload. Once you have selected the appropriate file,
click [Submit] to begin uploading the file:
Note: Depending on the size of your file and your internet connection, the upload process may
take a while. Do not use your browser’s back or refresh buttons at this time as it may
interrupt the upload process.
You will see a confirmation if the file was uploaded successfully:

Rev. 2018-02 Page | 28
The following screen will be displayed when a test file has been submitted but is still in the
process of being approved:
Once the EDI department approves the test file, the following screen should be shown and
production files may now be submitted.
To submit claims, first select the IPA for which you are submitting (boxed above).
Click [Browse…] and locate the file to upload. Once you have selected the appropriate file,
click [Submit] to begin uploading the file.
Note: Depending on the size of your file and your internet connection, the upload process may
take a while. Do not use your browser’s back or refresh buttons at this time as it may
interrupt the upload process.
You will see a confirmation page if the file was uploaded successfully.
Note: Claims submitted after 3:00pm will be received and processed in the next business day.
If there are any changes to your template, please click [Submit Test file for New Template]
and update with a new test file.

Rev. 2018-02 Page | 29
VIII.2. Viewing Batch File Contents
Click on [Submitted Batch Reports] under the claims menu:
A list of files submitted under your account will be displayed.
Note: Only claims submitted from your account will be displayed. Even if two user accounts are
associated with the same provider, user 2 will not be able to view claims submitted by user 1 and
vice versa.
By default, submitted claims are listed in the order they were received. See below for an
explanation of column titles:
Column Description
Date Submit Date and time the file was submitted by the user
IPA IPA the file was submitted for
ReferenceNo Internal file reference number
File Name Name of the file that was uploaded by the user
Status Current processing status of the file
Result Report of claims accepted and rejected by EDI department. Only
available if status shows “PROCESSED”

Rev. 2018-02 Page | 30
Clicking on the name of the file under the File Name column (arrow above) will open a
separate window containing the original 837 file.
Once a batch claim file has been processed by Network Medical Management’s EDI
Department as indicated under the [STATUS] column, a link to the submission report will be
available.
To view a submitted batch claim report, click on the [View Report] under the [Result]
column (arrow below).

Rev. 2018-02 Page | 31
VIII.3. Interpreting Batch Claim Reports
All Claims Submitted
*ALL CLAIMS ACCEPTED* indicates that all claims submitted within the batch have been
successfully loaded into our system.
Rev. 2018-02 Page | 32
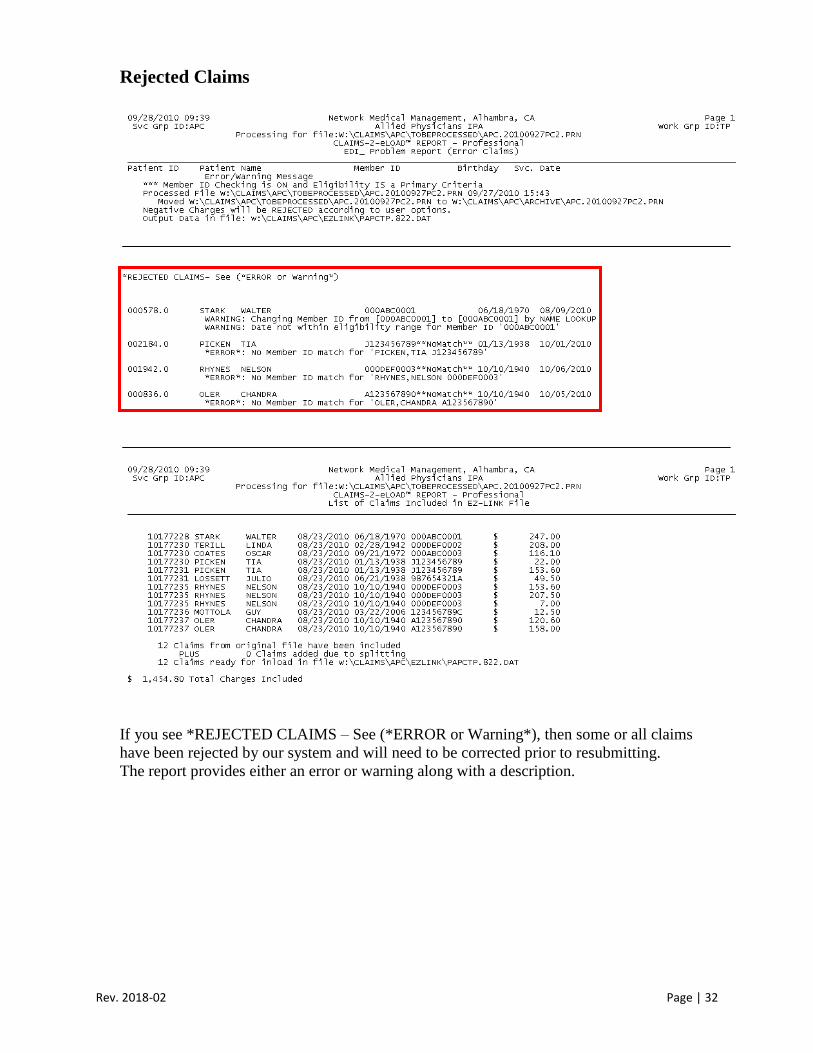
Rejected Claims
If you see *REJECTED CLAIMS – See (*ERROR or Warning*), then some or all claims
have been rejected by our system and will need to be corrected prior to resubmitting.
The report provides either an error or warning along with a description.
Rev. 2018-02 Page | 33
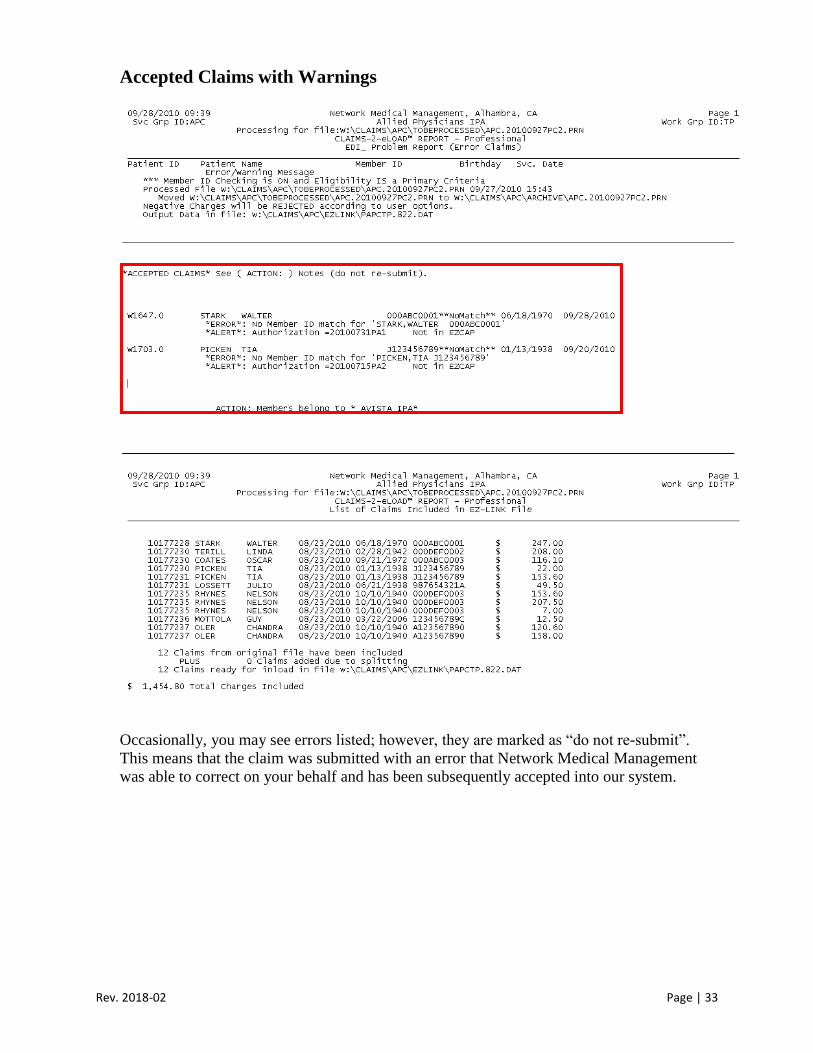
Accepted Claims with Warnings
Occasionally, you may see errors listed; however, they are marked as “do not re-submit”.
This means that the claim was submitted with an error that Network Medical Management
was able to correct on your behalf and has been subsequently accepted into our system.

Rev. 2018-02 Page | 34
Batch Claims Submission Breakdown
Below the results section of the report is a breakdown of each claim included within the
batch regardless of whether or not the claims were submitted or rejected. For each claim, the
member’s name, date or birth, insurance ID, as well as the claim date of service and billed
amount are displayed. In addition, the number of claims in the batch and the total charges
are shown.

Rev. 2018-02 Page | 35
IX. Hedis Measures Tool
The main objective of the Hedis Measure feature is to assist primary care physicians meet the
goals set forth by Hedis in offering the best preventive care to their members. It also provides an
effective way for specialists and primary care physicians (PCPs) to safely upload and review
reports regarding their members.
Procedure
In the Eligibility module, click on “Search Eligibility”, enter your patient’s information, and
click “Search”.
In the result pane a spinning coin next to the member’s name indicates that there are incomplete
measures for that member.
Proceed to the member’s detail page by clicking on the hyperlinked “Member ID”.
Rev. 2018-02 Page | 36
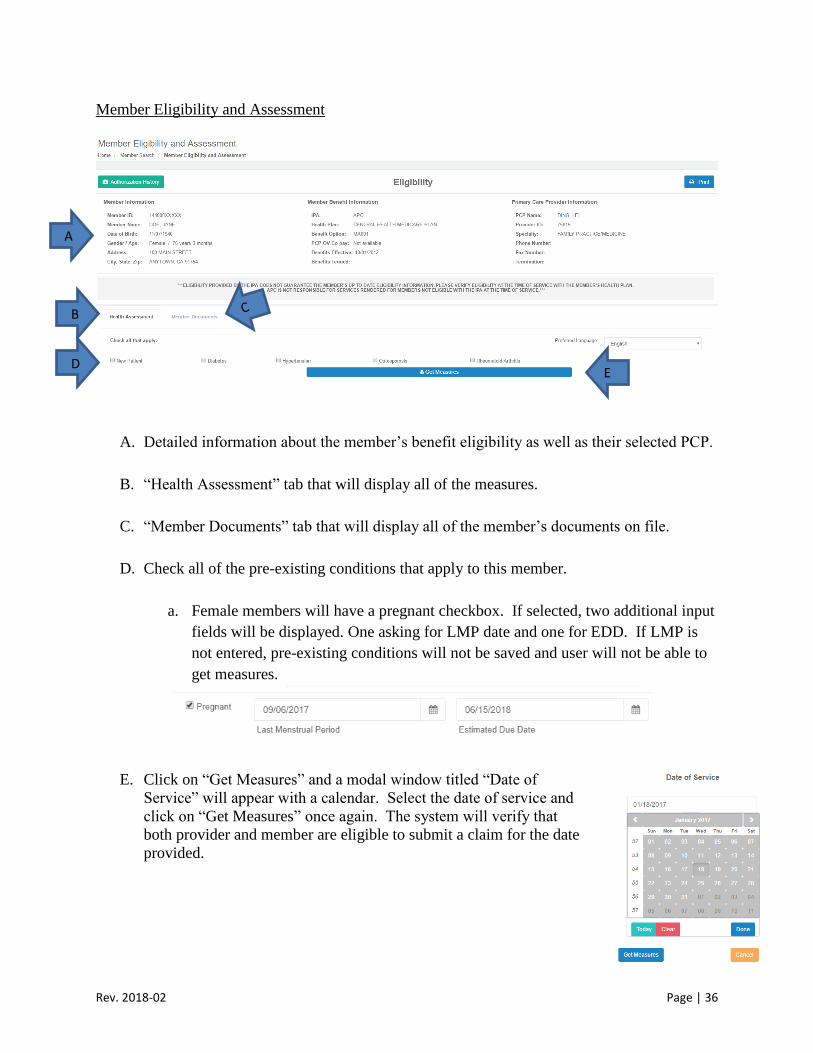
Member Eligibility and Assessment
A. Detailed information about the member’s benefit eligibility as well as their selected PCP.
B. “Health Assessment” tab that will display all of the measures.
C. “Member Documents” tab that will display all of the member’s documents on file.
D. Check all of the pre-existing conditions that apply to this member.
a. Female members will have a pregnant checkbox. If selected, two additional input
fields will be displayed. One asking for LMP date and one for EDD. If LMP is
not entered, pre-existing conditions will not be saved and user will not be able to
get measures.
E. Click on “Get Measures” and a modal window titled “Date of
Service” will appear with a calendar. Select the date of service and
click on “Get Measures” once again. The system will verify that
both provider and member are eligible to submit a claim for the date
provided.
A
B
D E

Rev. 2018-02 Page | 37
OVERVIEW:
A. As a part of the incentive program, points will be assigned to each measure and scores
will be tracked for each measure completed.
B. Clicking on “Print” will open a dialog that will list the “Assessment Form” along with
other questionnaires and educational materials related to the member.
C. “Vital Signs” will display the member’s latest data saved in the portal and will need to be
updated upon each visit.
D. Tailored to the member’s age, gender, and recorded pre-existing conditions, the
“Incomplete Measures” table will list all of the related measures.
E. Claims for completed measures can be conveniently created from this module.
F. Clicking on the “Save” icon will save all incomplete measures.
G. The “Pending Measures” table displays the measures that can only be closed through lab
results, radiology reports, specialists, or verification of uploaded documents. Once the
data is received, the measure will automatically move to the completed table.
G
F
A
B
C
E
D
H

Rev. 2018-02 Page | 38
H. The “Completed Measures” table display all of the measures for which a claim has been
submitted and therefore the measure is marked as complete.
I. If a member has immunization records recorded with the California Immunization
Registry (CAIR), the list of immunizations will be displayed after getting measures. Click
on “Immunization Record” to expand the list of immunizations.
PROCEDURE:
Select “New Patient” if this is a new member to your office. Otherwise, select or update the
documented pre-existing conditions that apply to this member. Click ”Get Measures”.
Click on “Print” and select “Assessment Form” and any other applicable questionnaires and
educational materials. Click “Print”.
The physician will use the print-out to assess the member according to the member’s respecitve
Hedis Measures.
I

Rev. 2018-02 Page | 39
After the member’s visit:
Once the form is completed, an office staff will login to the portal and record the data from this
encounter.
A. Navigate back to “Health Assessment”. Expand the measure completed or alternatively,
click on “Expand All” to reveal the details of all measures.
B. Using the Assessment Form print out as a guide, click on the related circle or square to mark
the measure as “Done.”
***Please note that if the measure has a radio button (ie. circle), you can select only one of the
measures, not both. To uncheck a radio button, click on the “Clear” hyperlink for that measure
and save.
C. As you mark the measures, you can save your progress by clicking on the floppy disk icon.
This will save ALL of the measures for this member.
Notice that once a measure is marked as “Done” then a hyperlink of a paper airplane appears. By
clicking on that link, you’ll see a summary of all of the measures that have been marked as
“Done” and require a claim.
If a measure requires an authorization then a suitcase with a cross icon appears allowing users to
easily create an authorization for the selected member.
If a cloud with an up arrow appears, then users can click on it to upload documents for that
measure.
A
B

Rev. 2018-02 Page | 40
Select a diagnosis to be the primary diagnosis in the claim. If one is not available, select “Other”
and search for a primary diagnosis using keywords or ICD-10 codes.
Click on “Submit Claim.”
A claim form appears with the selected measures’ diagnosis and procedure information pre-
populated, along with the member’s and provider’s information.

Rev. 2018-02 Page | 41
Click on “Submit” and a confirmation appears once the claim is submitted. The measures are
saved with the updated claim information.
Validation errors will
appear for measures that
have the same diagnosis
codes.
Just like creating a
claim in the Claims
module, you will be
able to add, edit, or
remove diagnosis or
procedure codes.

Rev. 2018-02 Page | 42
Get the measures once again and the completed measure is moved to the green “Completed
Measures” table and the member’s score is updated. A link to the claim submitted also appears
for your reference.
Authorizations:
For measures that require authorizations, there is a link to create an authorization from this
module
Uploading Supporting Documents:
For measures that require supporting documents, click on the link “Upload Documents” to open
a modal window.

Rev. 2018-02 Page | 43
Select from the dropdown what measure this document is related to, then add your document.
Click on the checkbox to agree to the terms and conditions. Click “Submit.”
*Please note the types of documents that are accepted.
Once the document is uploaded, close the modal window and select the “Member Documents”
tab.
Viewing Member Documents:
A list of documents related to this member will appear. You can sort the documents by clicking
on the arrows next to each header.
You can also view the document, by clicking on its name.

Rev. 2018-02 Page | 44
Updated Features as of March 3, 2017
Changing Date of Service:
If there’s a need to change the date of service
after getting the measures, users can do so by
clicking on the orange button.
A warning will appear because any unsaved changes to the measures will be lost.
For convenience, users can also change the date of service in the CPT II Expected Measures
window prior to creating a claim. Clicking on the orange button will allow the user to change the
date of service. Clicking anywhere outside of the date box will save the date. Messages will
appear if the date is not valid. When deleting a measure, users can click on the red button.
Uploading Documents:
Users can add tags to documents by typing a limited number of keywords. This will be saved
and aid in the search for documents.
Rev. 2018-02 Page | 45
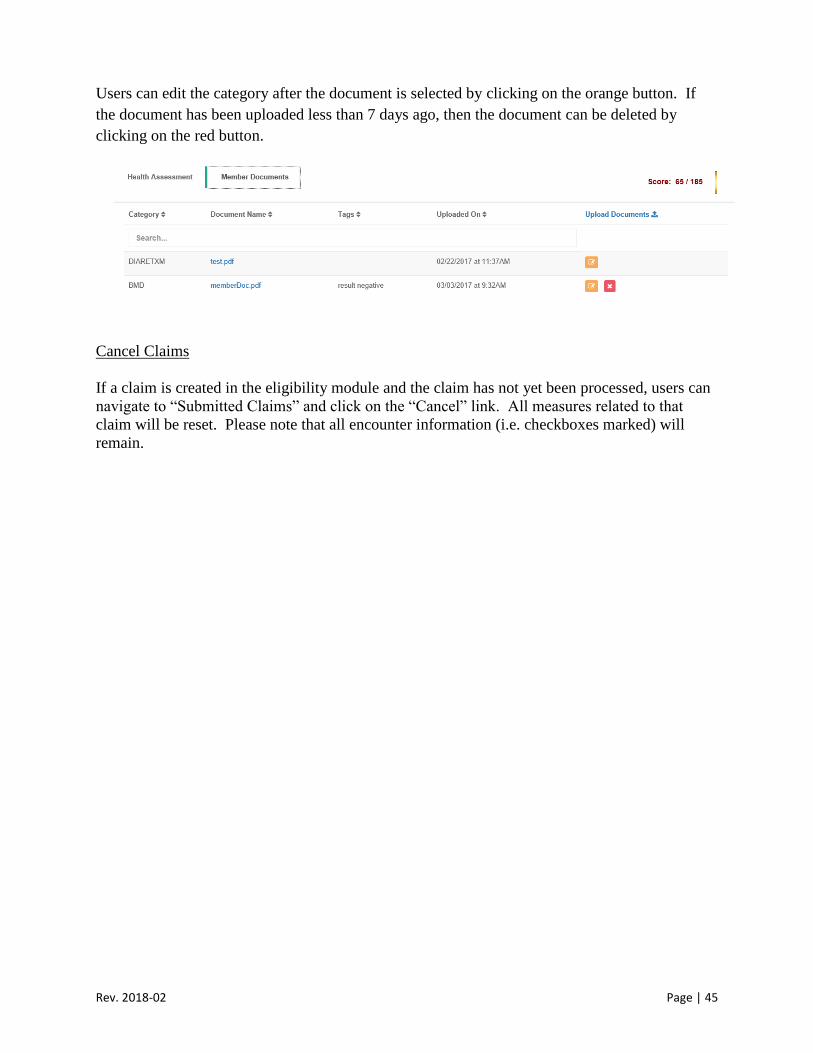
Users can edit the category after the document is selected by clicking on the orange button. If
the document has been uploaded less than 7 days ago, then the document can be deleted by
clicking on the red button.
Cancel Claims
If a claim is created in the eligibility module and the claim has not yet been processed, users can
navigate to “Submitted Claims” and click on the “Cancel” link. All measures related to that
claim will be reset. Please note that all encounter information (i.e. checkboxes marked) will
remain.
Rev. 2018-02 Page | 46
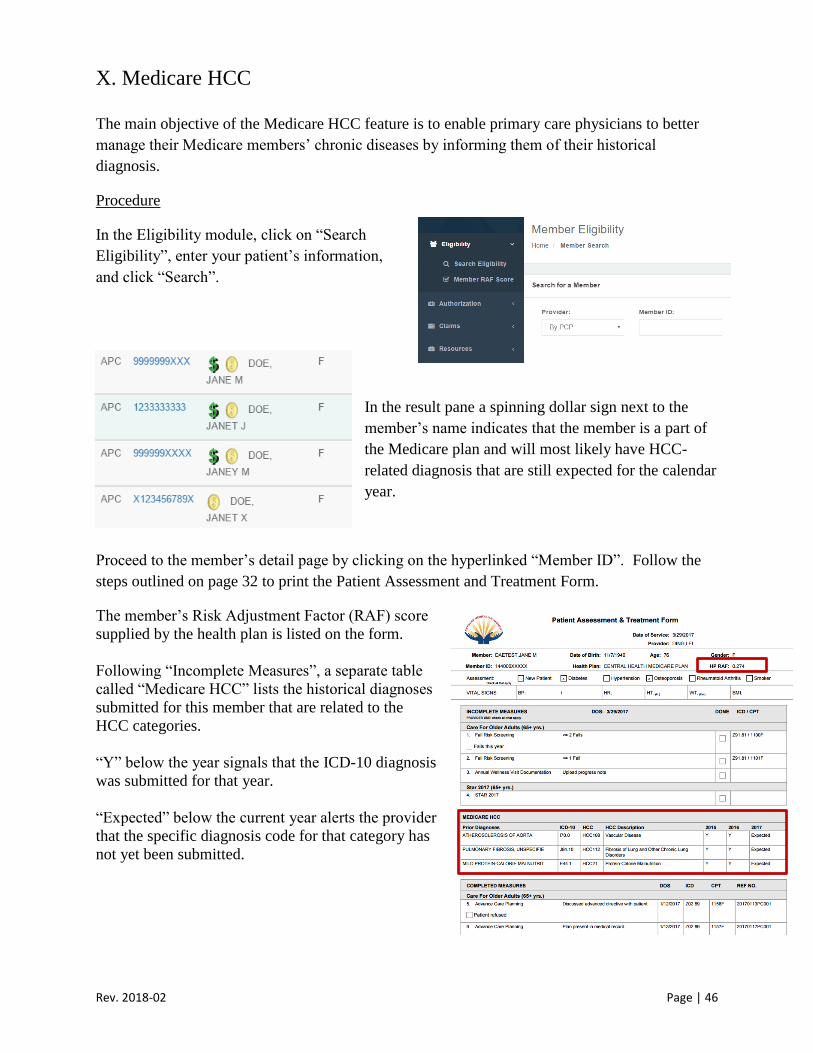
X. Medicare HCC
The main objective of the Medicare HCC feature is to enable primary care physicians to better
manage their Medicare members’ chronic diseases by informing them of their historical
diagnosis.
Procedure
In the Eligibility module, click on “Search
Eligibility”, enter your patient’s information,
and click “Search”.
In the result pane a spinning dollar sign next to the
member’s name indicates that the member is a part of
the Medicare plan and will most likely have HCC-
related diagnosis that are still expected for the calendar
year.
Proceed to the member’s detail page by clicking on the hyperlinked “Member ID”. Follow the
steps outlined on page 32 to print the Patient Assessment and Treatment Form.
The member’s Risk Adjustment Factor (RAF) score
supplied by the health plan is listed on the form.
Following “Incomplete Measures”, a separate table
called “Medicare HCC” lists the historical diagnoses
submitted for this member that are related to the
HCC categories.
“Y” below the year signals that the ICD-10 diagnosis
was submitted for that year.
“Expected” below the current year alerts the provider
that the specific diagnosis code for that category has
not yet been submitted.

Rev. 2018-02 Page | 47
Upon submitting a claim through the portal for the Hedis measures, the user can include
additional diagnoses that relate to the HCC categories.
HCC-related historical data can also be viewed on the Member Eligibility and Assessment page
by clicking on the “Medicare HCC” tab.
Clicking on the hyperlinked HCC category will open a window displaying the diagnoses
submitted for this category.