web services - fortuneminds services.pdfinbound web services allow you to access and modify...
TRANSCRIPT

Web Services
HTTP-based web services allow diverse applications to talk to each other. ServiceNow supports
both inbound (provider) and outbound (consumer) web services.
Inbound Web Services
Inbound web services allow you to access and modify ServiceNow data using a client
application.
Direct Web Services: Query tables and records directly using SOAP, REST, or other web service
formats.
ODBC Driver: Report on ServiceNow data using an ODBC client, such as Microsoft Excel.
Import Set: access the import set tables and import data through a web service interface.
Scripted Web Services: define custom web service endpoints using JavaScript.
Outbound Web Services
Outbound web services allow you to send SOAP and REST messages to external web service
providers.
Outbound REST
Outbound SOAP
Direct web Service
A direct web service is available for any table in the system provided the correct access
control is setup.
The supported format of the incoming message is document style literal XML SOAP
documents (Document/Literal). To retrieve the direct web service WSDL description and XML
schema, point to the relative URL of <tablename>.do?WSDL. For example, to retrieve the WSDL
for the Incident table on the online demo system, use the following URL:
https://<instance name>.service-now.com/incident.do?WSDL

Return display value for reference variables
When you query a record using a get or getRecords function the instance returns all
fields associated with that record. The fields are often reference fields that contain a sys_id for
a record on another table.
Use one of these options if you want the display value for the field to be returned
instead of the sys_id:
1. Add the property glide.soap.return_displayValue to your system properties, and every SOAP
request will return a display value for a reference field.
2. Add the parameter displayvalue=true to your SOAP request URL, and SOAP requests with
that parameter will return a display value for a reference field as a string, instead of thesys_id.
The SOAP URL would look as follows: https://<instance name>.service-
now.com/incident.do?displayvalue=true&SOAP
3. Add the parameter displayvalue=all to your SOAP request URL, and SOAP requests with that
parameter will return a display value for a reference field, in addition to the sys_id. The
response element name for the display value field will be prefixed with dv_ such
as dv_caller_id.
Retrieving journal entries using direct web services
To get the contents of a journal field, make a second soap request against the
sys_journal_field table to pull the appropriate journal records back for the record in question.
The URL for the WSDL would be in the following format
https://instance-name.service-now.com/sys_journal_field.do?WSDL
To retrieve the journal entries, you will first need to query the incident for its sys_id value and
then supply it as the element_id value in a getRecordscall. To sepcify records only for the
"comments" field, specify the value "comments" for the element field. For example, a SOAP
request would look like the following.

<soapenv:Envelope xmlns:soapenv= "http://schemas.xmlsoap.org/soap/envelope/" xmlns:sys=
"http://www.service-now.com/sys_journal_field" ><soapenv:Header
/><soapenv:Body><sys:getRecords><element>comments</element><element_id>9d385017c6
11228701d22104cc95c371</element_id></sys:getRecords></soapenv:Body></soapenv:Envelo
pe>
Import Set Web Service
Web service import sets provides a web service interface for import set tables. By default, this
type of web service will transform the incoming data synchronously based on the associated
transform maps. If the associated import set mode is set to Asynchronous, the behavior is to
save the data for transformation at a later time. Web service import sets tables publish all the
default web service functions in the WSDL.
System Web Services
This plugin also provides these standard import set tables:
- Computer [imp_computer]
- Location [imp_location]
- Notification [imp_notification]
- User [imp_user]
You can access web service import set WSDLs by adding .do?WSDL to the import set table URL.
For example:
http://<instance name>.service-now.com/imp_notification.do?WSDL
Creating a New Web Service
Navigate to System Web Services > Create New.
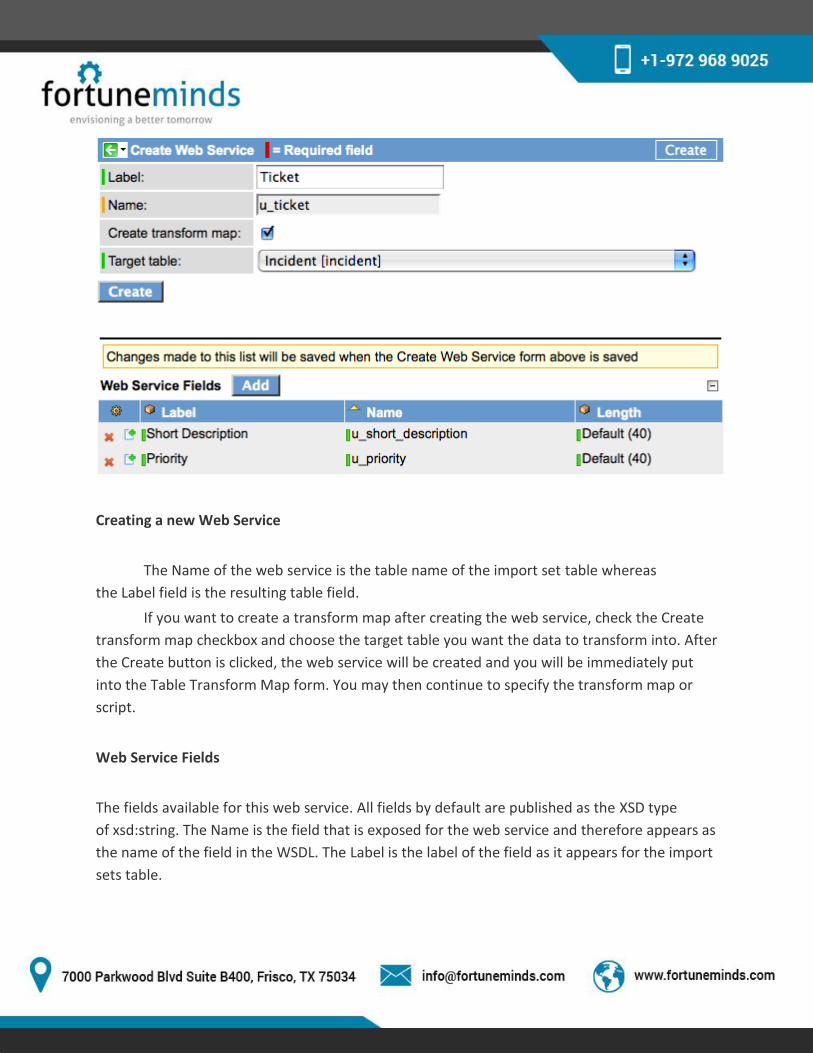
Creating a new Web Service
The Name of the web service is the table name of the import set table whereas
the Label field is the resulting table field.
If you want to create a transform map after creating the web service, check the Create
transform map checkbox and choose the target table you want the data to transform into. After
the Create button is clicked, the web service will be created and you will be immediately put
into the Table Transform Map form. You may then continue to specify the transform map or
script.
Web Service Fields
The fields available for this web service. All fields by default are published as the XSD type
of xsd:string. The Name is the field that is exposed for the web service and therefore appears as
the name of the field in the WSDL. The Label is the label of the field as it appears for the import
sets table.

Mapping
During the creation of the web service import set, you can create the transform map for it. All
transform maps will be run for the service when it is invoked if the import set mode is set
as Synchronous.
The following image is an example of the transform map associated with the notification web
service import set.

SOAP transform map
Adding Web Service Response Values
In the transform map script associated with a web service import set, setting certain
variable values has the effect of changing the response values of the web service. In addition to
the normal variables that are available in a transform map script, the response object holds
dynamically created response elements. You can use this object to customize the response of a
web service import set insert.
For example, the following code snippet inserts the transaction_id and hello variables into the
response.
// create new elements called "transaction_id" // and "hello" in the web service
responseresponse.transaction_id = "abc123";response.hello = "world";
status_message="message 1"; // this is the normal status_message variable
This code snippet results in the following response being sent back to the web service
consumer, depending on the protocol.
SOAP
<soapenv:Envelope xmlns:imp="http://www.service-now.com/imp_notification"
xmlns:soapenv="http://schemas.xmlsoap.org/soap/envelope/">
<soapenv:Header/>
<soapenv:Body>
<insertResponse xmlns="http://www.service-now.com/imp_notification">
<sys_id>969d157c0a0a0baf008ba5770ffa798c</sys_id>
<table>incident</table>
<display_name>number</display_name>
<display_value>INC0010091</display_value>
<status>inserted</status>
<status_message>message 1</status_message>
<transaction_id>abc123</transaction_id>
<hello>world</hello>
</insertResponse>
</soapenv:Body></soapenv:Envelope>

When displaying a mapped web service table, the following related links are available.
Import Sets: The import sets related to this web service import set
Transform Maps: A list of transform maps related to this web service
Transform History: The transformation history
Edit Web Service: Edit the web service
The following image shows a record that was inserted into the web service import set
Notification. The target record is the resulting creation or modification to the Incident table
record as a result of the transform.
Scripted Web Service
Scripted Web Services allow a ServiceNow administrator to create new web services
that are not addressed by the system. You can define input and output parameters for the web
service and use JavaScript to perform operations. Though this feature is very powerful,
use Direct Web Services or Web Service import sets instead whenever possible since they are
simpler to implement and maintain.
Creating a new Web Service
When the Web Services Provider - Scripted plugin is activated, a new module Scripted

Web Services is available under the System Web Services application.
Click the module to display a list of example scripted Web Services.
Example 1: Retrieving a System Property
The first step is to define the incoming and return parameters. This is done by adding an
entry to the Input Parameters and Output Parameters. These parameters are used to construct
and present a meaningful WSDL, and they do not add to the functionality of processing the
actual Web Service itself.

The parameters are referenced in the script of the Web Service. Any of the input parameters
are retrieved using the following syntax:
var a= request.property;
The output parameters are set by using the following syntax:
response.property = "ABC";
The following example demonstrates how to retrieve a system property and return it as
part of the SOAP response. The example shows how to create a custom scripted Web Service to
do something specific that the base ServiceNow system direct Web Services cannot.

REST Web Service
REST (REpresentational State Transfer) is a simple stateless architecture that generally
runs over HTTPS/TLS. The REST style emphasizes that interactions between clients and services
are enhanced by having a limited number of operations. Flexibility is provided by assigning
resources their own unique universal resource indicators (URIs). Because each operation (GET,
POST, PUT, and DELETE) has a specific meaning, REST avoids ambiguity.
The REST API is active by default in all instances, starting with the Eureka release.
RESTful web services offer several advantages, including:
Support for different HTTP methods to perform different actions
Detailed response codes and header information
Pagination support for large data sets
Streaming data on GET requests
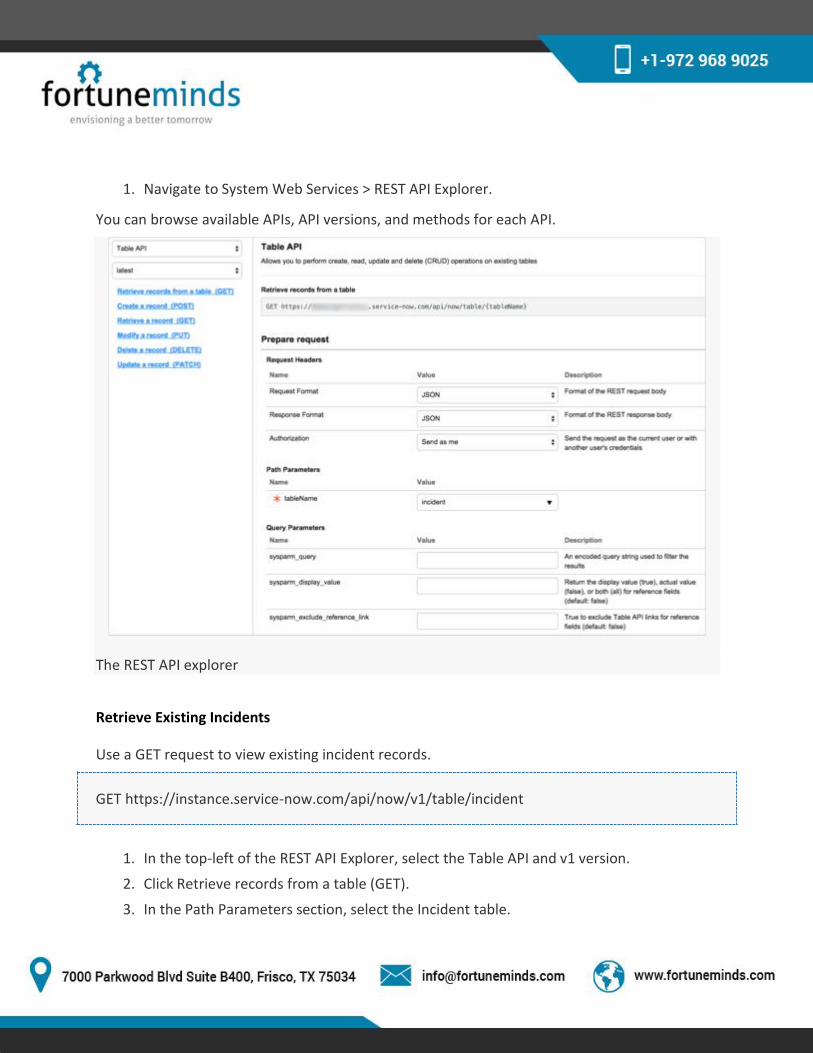
1. Navigate to System Web Services > REST API Explorer.
You can browse available APIs, API versions, and methods for each API.
The REST API explorer
Retrieve Existing Incidents
Use a GET request to view existing incident records.
GET https://instance.service-now.com/api/now/v1/table/incident
1. In the top-left of the REST API Explorer, select the Table API and v1 version.
2. Click Retrieve records from a table (GET).
3. In the Path Parameters section, select the Incident table.
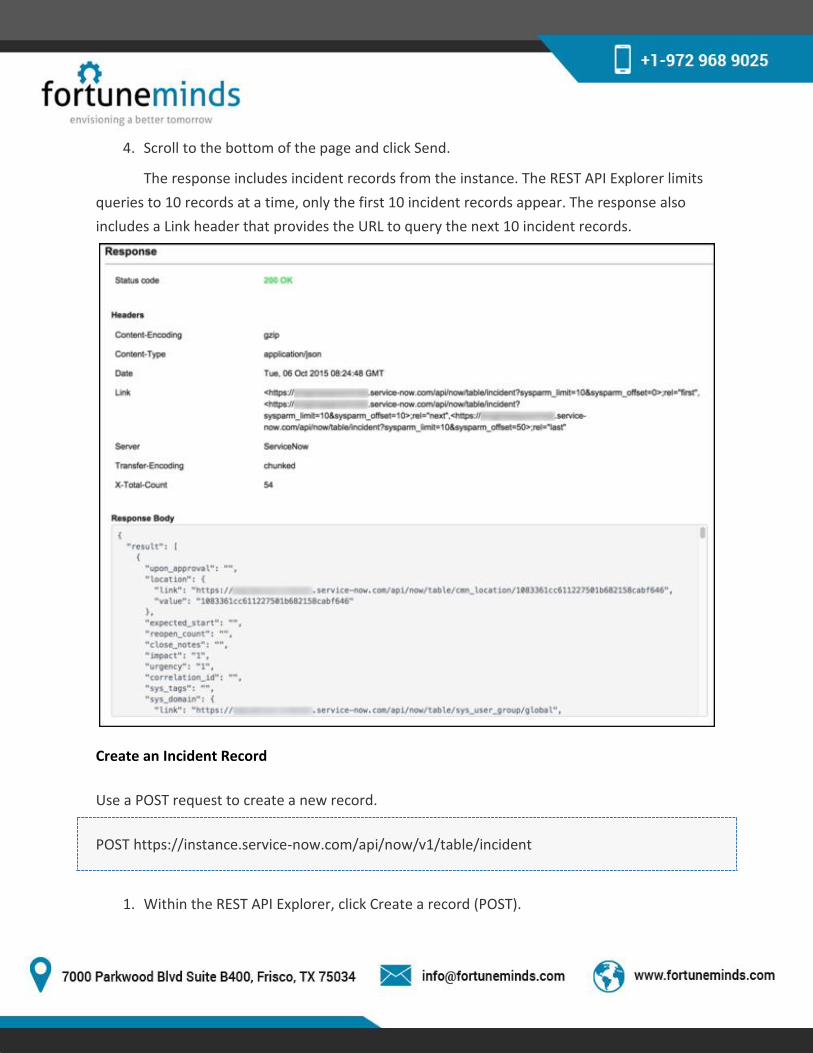
4. Scroll to the bottom of the page and click Send.
The response includes incident records from the instance. The REST API Explorer limits
queries to 10 records at a time, only the first 10 incident records appear. The response also
includes a Link header that provides the URL to query the next 10 incident records.
Create an Incident Record
Use a POST request to create a new record.
POST https://instance.service-now.com/api/now/v1/table/incident
1. Within the REST API Explorer, click Create a record (POST).

2. In the Path Parameters section, select the Incident table.
3. In the Request Body section, click Add a field.
4. Select a field and specify a value for that field.
5. [Optional] Click Add another field and specify additional fields to assign values to.
The request body updates automatically based on your entries, such
as {"short_description":"Test incident creation through REST", "comments":"These are
my comments"}
6. After constructing the request, click Send.
The response includes a Location header that specifies where the incident was created and how
to retrieve the incident. Record this header to use in the next part of this guide.

Read the Inserted Incident
Use the Location header from the previous POST method to run a GET request.
GET https://instance.service-now.com/api/now/v1/table/incident/(sys_id)
1. Within the REST API Explorer, click Retrieve a record (GET).
2. In the Path Parameters section, select the Incident table.
3. In the sys_id field, enter the sys_id of the record you created.
The record sys_id appears as a 32-character string at the end of the POST response

Location header.
4. Click Send.
The response body contains a text representation of the record. You can control the format of
the response, such as JSON or XML, using the Response Format field.
Update the Incident
You can update the incident record using either a PUT or PATCH function.

PUT https://instance.service-now.com/api/now/v1/table/incident/(sys_id)?sysparm_exclude_ref_link=true
1. Within the REST API Explorer, click Modify a record (PUT) or Update a record (PATCH).
2. In the Path Parameters section, select the Incident table.
3. In the sys_id field, enter the sys_id of the record you created.
4. In the Request Body section, click Add a field.
5. Select the short_description field and specify a new value.
6. Click Send.
7. Verify that the response contains the updated short_description value.
For more information on PUT and PATCH, see Table API FAQs (KB0534905).

Delete the Incident
You can delete the incident using a DELETE request.
DELETE https://instance.service-now.com/api/now/v1/table/incident/(sys_id)
1. Within the REST API Explorer, select Delete a record (DELETE).
2. In the Path Parameters section, select the Incident table.

3. In the sys_id field, enter the sys_id of the record you created.
4. Click Send.
5. Verify that the responses status code is 204.