download.microsoft.com€¦ · web viewexchange load generator has two public folder tasks:...
TRANSCRIPT

Microsoft® Exchange Load Generator 2013
Microsoft Corporation
Published: October 2013
This document provides information about working with the Exchange Load Generator tool. This tool helps administrators perform benchmarking, pre-deployment validation, and stress testing tasks that introduce various types of workloads into a test (non-production) Exchange messaging system.
Comments? Send feedback to [email protected]
1

Contents
Microsoft® Exchange Load Generator............................................................................................1Microsoft Exchange Load Generator...........................................................................................5System Requirements for Exchange Load Generator.................................................................6When to Use Exchange Load Generator.....................................................................................7Installing Exchange Load Generator on a Client Computer.........................................................8Creating and Running the Exchange Load Generator Test.........................................................9
How to Start Exchange Load Generator.................................................................................11How to Set Up the Exchange Load Generator Test Topology................................................12How to Configure the Test Properties.....................................................................................14Customizing the Exchange Load Generator Test...................................................................16Specifying Threshold Detection during Simulation.................................................................36How to Enable Remote Control..............................................................................................41How to Enable Stress Mode...................................................................................................43How to Enable RPC over HTTP.............................................................................................43How to Initialize the Exchange Load Generator Test..............................................................44How to Run the Exchange Load Generator Test....................................................................46How to Stop the Simulation Process......................................................................................47How to Repeat the Test..........................................................................................................47
Running Exchange Load Generator as a Command-Line Program..........................................48Running Exchange Load Generator Tasks................................................................................49Using System Monitor and Exchange Load Generator Data.....................................................51
How to Consolidate System Monitor Data..............................................................................52Operational Recommendations for Using Exchange Load Generator.......................................53Specific Features and Behaviors of Exchange Load Generator................................................57
Public Folders........................................................................................................................57Mail Flow and Recipients.......................................................................................................57Task Rate, Concurrency Settings, and Stress Mode..............................................................58Dynamic Mail Generator........................................................................................................59
Performance Counters Reference.............................................................................................62Scripted Load Modules in the Exchange Load Generator Framework......................................70
Exchange Load Generator Configuration XML.......................................................................71Base Script Verbs...................................................................................................................72The POP3 Module..................................................................................................................76The SMTP Module.................................................................................................................78The IMAP4 Module................................................................................................................79The Outlook Web Access Module..........................................................................................84
Frequently Asked Questions about Exchange Load Generator.................................................96Copyright................................................................................................................................. 105
3

Microsoft Exchange Load GeneratorMicrosoft® Exchange Load Generator is a pre-deployment validation, and stress testing tool that introduces various types of workloads into a test (non-production) Exchange messaging system.
Exchange Load Generator lets you simulate the delivery of multiple MAPI client messaging requests to an Exchange server. To simulate the delivery of these messaging requests, you run Exchange Load Generator tests on client computers. These tests send multiple messaging requests to the Exchange server, which causes a mail load.
After the tests are complete, you can use the results to help do the following:
Verify the overall deployment plan
Identify bottlenecks on the server
Validate Exchange settings and server configurations
Exchange Load Generator tests the effect of client load on a server.
There are general tasks such as logoff, logon, and send mail that are common to most protocols. Additionally, there are feature tasks that are available only in certain protocols.
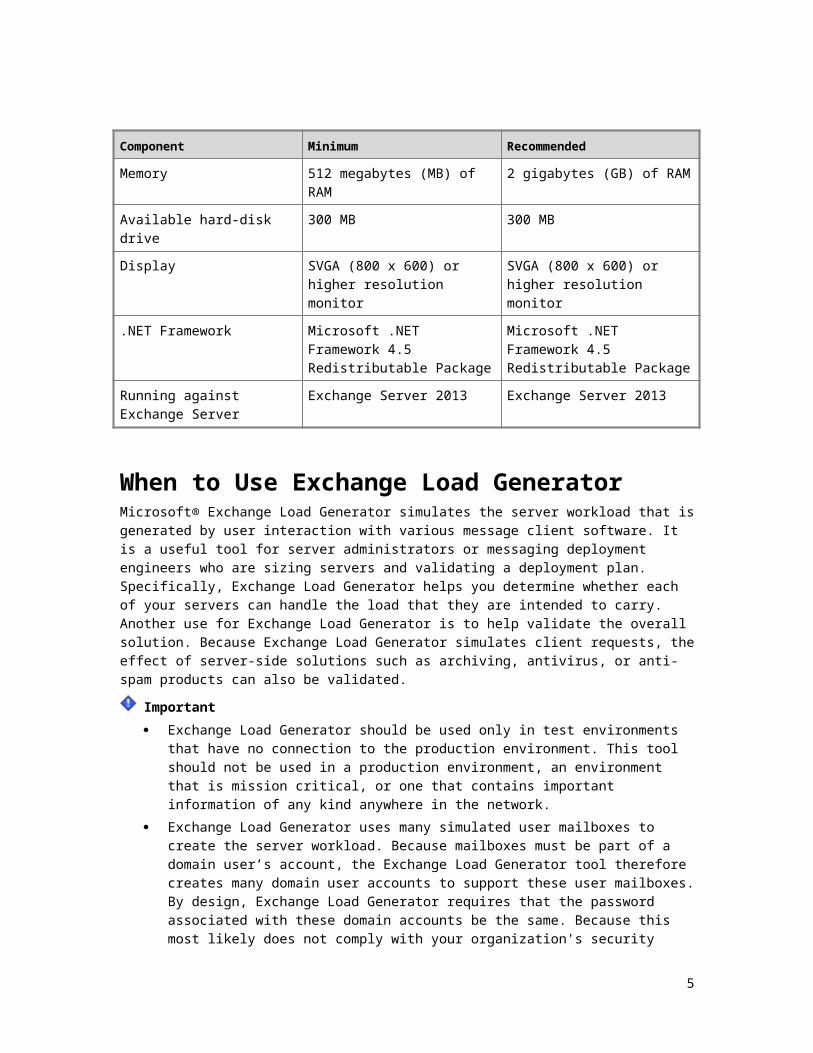
System Requirements for Exchange Load GeneratorTo use Microsoft® Exchange Load Generator, you must meet the minimum and recommended system requirements outlined in the following table.
Component Minimum Recommended
Processor Any of the following processors:
X64 architecture-based processor
Any of the following processors:
x64 architecture-based processor running at 2.2 GHz or faster
Operating system Microsoft Windows Server 2008 R2
Microsoft Windows Server 2012
Windows 7
Windows 8
Microsoft Windows Server 2008 R2
Memory 512 megabytes (MB) of RAM 2 gigabytes (GB) of RAM
Available hard-disk drive 300 MB 300 MB
Display SVGA (800 x 600) or higher resolution monitor
SVGA (800 x 600) or higher resolution monitor
4
Component Minimum Recommended
.NET Framework Microsoft .NET Framework 4.5 Redistributable Package
Microsoft .NET Framework 4.5 Redistributable Package
Running against Exchange Server
Exchange Server 2013 Exchange Server 2013
When to Use Exchange Load GeneratorMicrosoft® Exchange Load Generator simulates the server workload that is generated by user interaction with various message client software. It is a useful tool for server administrators or messaging deployment engineers who are sizing servers and validating a deployment plan. Specifically, Exchange Load Generator helps you determine whether each of your servers can handle the load that they are intended to carry. Another use for Exchange Load Generator is to help validate the overall solution. Because Exchange Load Generator simulates client requests, the effect of server-side solutions such as archiving, antivirus, or anti-spam products can also be validated.
Important Exchange Load Generator should be used only in test environments that have no
connection to the production environment. This tool should not be used in a production environment, an environment that is mission critical, or one that contains important information of any kind anywhere in the network.
Exchange Load Generator uses many simulated user mailboxes to create the server workload. Because mailboxes must be part of a domain user’s account, the Exchange Load Generator tool therefore creates many domain user accounts to support these user mailboxes. By design, Exchange Load Generator requires that the password associated with these domain accounts be the same. Because this most likely does not comply with your organization's security requirements, to lessen any risk this could present, we recommend that this tool be used only on isolated test networks that do not have connectivity to your production network.
Because load simulation works by using system resources, Exchange Load Generator is unsuitable for use on production networks because it could interfere with production operations by competing for those resources.
Additionally, Exchange Load Generator does not account for all factors that are required to size servers completely. The following factors are not simulated by Exchange Load Generator and can affect server capacity planning:
Loadgen will not replicate the correct IOPs per user. For IOP testing, we recommend you use Microsoft Exchange Server Jetstress.
5
Exchange Load Generator also does not provide a complete picture of user experience, and its results should not be interpreted in that manner.
Installing Exchange Load Generator on a Client ComputerTo simulate many clients sending messaging requests to an Exchange server, you must install and configure Exchange Load Generator on one or more client computers. This topic provides the installation procedures for each client computer. The following are some important considerations for installation.
You can install Exchange Load Generator on an Exchange Server but the actual simulation should be run from separate client computers.
If you do not log on as the enterprise administrator (for example if you log on as the local administrator), Exchange Load Generator cannot create users in Active Directory. Exchange Load Generator must have sufficient rights to create users, organizational units, distribution groups, and query-based distribution groups. Exchange Load Generator must be running under an account that is a member of the Enterprise Administrators group. To view the group membership of a user, double-click the user account name in the Active Directory Users and Computers snap-in, and then click Member Of. If you are logged on as a user who has correct permissions, you can add a user to a security group. To add a user to a security group, double-click the group in the Active Directory Users and Computers snap-in, click Members, and then click Add.
We recommend that you join the client computer to the domain where the Exchange servers are located. Exchange Load Generator does not require that the computer experience be domain-joined. However, the user experience will be enhanced if you follow this step.
Follow these steps to install Exchange Load Generator on the client computer.
To install Exchange Load Generator on the client computer
1. Log on to the client computer by using domain credentials. As mentioned, we recommend that you join the client computer to the domain in which the Exchange servers are located.
2. Download and extract the Exchange Load Generator files and installer (Loadgen.msi).
3. Double-click Loadgen.msi. The Microsoft Exchange Load Generator Setup Wizard opens and steps you through the installation. The installer file creates a new folder on the system drive named Exchange Load Generator, and copies the Exchange Load Generator files to that new directory. You can either accept the default settings in the installation or customize the installation location for your requirements.
6
Creating and Running the Exchange Load Generator TestFirst, you will need to configure the storage groups and mailbox stores on the Exchange server. Additionally, since MAPI connectivity to Exchange 2013 occurs via RPC/HTTP (Outlook Anywhere) it is critical to properly configure the CAS servers that LoadGen will connect to, as well as any network infrastructure such as load balancers that may exist between LoadGen clients and the CAS servers. Once server configuration is completed you can create and run the Exchange Load Generator tests. This topic highlights the steps that are required to create and run an Exchange Load Generator test on a client computer. Also included is a table that indicates which method is used to do the various steps.
Each of these steps is described in detail in accompanying topics.
1. How to Configure Exchange RPC/HTTP . Proper configuration of RPC/HTTP connections is critical as MAPI is used to initialize mailboxes, as well as for all Outlook task simulation.
2. How to Start Exchange Load Generator . Start the simulation on the Start menu (Programs), from the new graphical user interface, or from a command-line program.
3. How to Set Up the Exchange Load Generator Test Topology . To set up the test topology, specify the number of users you want to simulate for each mailbox store. Also, create the distribution groups in Active Directory on the Exchange server. You must follow this step on the first client only.
4. How to Configure the Test Properties . To configure the test properties, specify the length of time and the range of simulated users who will run on the client computer.
5. Customizing the Exchange Load Generator Test . Optional. To customize the test, customize the default behaviors of the test tasks, logon processes, and initialization.
6. How to Enable Remote Control . Optional. If you use more than one client for the Exchange Load Generator test, enable Remote Control through the graphical user interface so that you can manage all the clients from one computer. You can enable or disable load balancing as well during the remote control step.
7. How to Initialize the Exchange Load Generator Test . If you use more than one client for the Exchange Load Generator test and you have enabled Remote Control, you must do this step from the client that controls the other clients. The initialization process populates the users with content that is required for running the tests. Only the Outlook client types can be used to initialize users.
8. How to Run the Exchange Load Generator Test . You must manually start the test on each client participating in the test or from the Master Loadgen machine.
9. How to Repeat the Test . Optional. You may want to run the same Exchange Load Generator test to validate the results of your initial test. You may also want to run a test using slightly different client numbers and characteristics.
7

Methods used to do Tasks
Steps and sub steps Method(s) used
Starting the simulation
How to Start Exchange Load Generator
Start menu, graphical user interface, or command-line program
Setting up the topology, which involves specifying the number of users for each mailbox store
How to Set Up the Exchange Load Generator Test Topology
Graphical user interface
Configuring the test properties, which involves generating and editing a configuration file
Running Exchange Load Generator as a Command-Line Program
Command-line program to create file. Edit the configuration file.
Customizing the test by task
Customizing the Exchange Load Generator Test
Edit the configuration file parameters
Common task: Customizing logon and logoff behavior of users
Customizing the Exchange Load Generator Test
Edit the configuration file
Common task: Enabling stress mode
Customizing the Exchange Load Generator Test
Edit the configuration file
Common task: Customizing the initialization of the test
Customizing the Exchange Load Generator Test
Edit the configuration file
Enabling remote control
How to Enable Remote Control
Edit the configuration file. Graphical user interface.
Setting up the test topology
How to Set Up the Exchange Load Generator Test Topology
Graphical user interface
Verify that users were created in Active Directory
How to Set Up the Exchange Load Generator Test Topology
Active Directory Users and Computers
8

Steps and sub steps Method(s) used
Initializing the test
How to Initialize the Exchange Load Generator Test
Edit the configuration file
Monitoring the progress of the initialization
Performance Counters Reference
Run Performance Monitor (Perfmon)
Initializing the mailboxes
Customizing the Exchange Load Generator Test
Edit the configuration file
Initializing public folders
Customizing the Exchange Load Generator Test
Edit the configuration file
Running the test
How to Run the Exchange Load Generator Test
Command-line program. Graphical user interface.
Stopping the simulation test
How to Stop the Simulation Process
Command-line program. Graphical user interface
Repeating the test
How to Repeat the Test
Control Panel > Administrative Tools. Active Directory Users and Computers.
Deleting database and log files
How to Repeat the Test
Control Panel > Administrative Tools
Removing users from Active Directory
How to Repeat the Test
Active Directory Users and Computers
How to Configure Exchange RPC/HTTPPrior to using Exchange Load Generator in a test topology, you must ensure that RPC/HTTP (Outlook Anywhere) connectivity is configured properly. This will typically involve configuring a namespace for Outlook Anywhere connectivity which is consistent across the Client Access Server (CAS) role machines, selecting an authentication method for Outlook Anywhere, installing a certificate that is associated with the namespace, configuring load balancing across the CAS servers, and configuring DNS or the local “hosts” file to map the configured namespace to the load balanced IP address.
Note: When an Outlook Anywhere external namespace is configured in the test topology, Exchange Load Generator will detect that value and use it in the ClientAccessServer list. If Exchange Load
9

Generator is unable to obtain information from the test topology during creation of the initial configuration (this can occur if the Exchange Load Generator clients are not domain-joined), the namespace must be manually added to the ClientAccessServer list.
Note: The following steps which configure a shared external namespace can be skipped if there is only one Exchange 2013 CAS server (or multi-role server) in the test topology, as long as the authentication method has been configured to NTLM on the server (or both the server and Exchange Load Generator have been configured to use Basic authentication), and the self-signed SSL certificate on the CAS server is fully trusted on all Exchange Load Generator client machines.
To configure an external Outlook Anywhere namespace
1. Connect to the Exchange Management Shell on one of the Exchange 2013 servers in the test topology.
2. Utilize the following PowerShell command to configure an external namespace on all CAS servers, as well as select the NTLM authentication method (replace “mail.contoso.com” with the correct external namespace for your test deployment).
Get-OutlookAnywhere |Set-OutlookAnywhere -ExternalHostname mail.contoso.com -DefaultAuthenticationMethod NTLM -ExternalClientsRequireSsl $true
Note: If the Basic authentication method is used, you must manually adjust the RpcHttpAuthenticationType parameter (set to “Basic”) in the Exchange Load Generator configuration file. We recommend using NTLM to simplify the test configuration process.
Note: The new settings will not take effect immediately. We recommend either restarting your Exchange 2013 servers or waiting at least 30 minutes after making these changes before performing any validation steps.
To install a certificate on CAS servers
1. Find a SSL certificate provider such as the one you intend to use for your production deployment, or deploy Active Directory Certificate Services on one of the servers in the test topology.
2. See the Digital Certificates and SSL section of the TechNet Library for details on how to request and apply a certificate with Exchange 2013.
3. Once the SSL certificate has been deployed on all CAS servers, ensure that all
10
Exchange Load Generator client machines fully trust the certificate authority (CA) which issued the certificate. If the certificate was obtained from a public CA it is likely that the CA will already be trusted. Otherwise, obtain the CA certificate and import it into the “Trusted Root Certification Authorities” portion of the Local Computer certificate store.
To configure name resolution on Exchange Load Generator client machines via the hosts file
Note: If the configured namespace is resolvable via DNS in the test topology, this step can be skipped.
1. On each Exchange Load Generator client machine, open the Notepad tool.
2. Using Notepad, open the %systemroot%\system32\drivers\etc\hosts file (%systemroot% is typically c:\windows).
3. Add an entry to the end of the file containing the target IP address followed by the namespace, such as:192.168.1.50 mail.contoso.com
4. Save the file and close Notepad.
To validate that Outlook Anywhere connectivity is working
1. Create a test account in the Exchange 2013 test deployment.
2. Install Microsoft Outlook on one or more of the Exchange Load Generator client machines.
3. Ensure that Outlook can access the test account by configuring a profile, connecting to the account, and sending test mail to another account.
How to Start Exchange Load GeneratorYou can start Exchange Load Generator on the Start menu, from the graphical user interface (LoadGenWin.exe), or from a command-line program (LoadGenCmd.exe).
To start Exchange Load Generator on the Start menu
4. Click Start, and then click All Programs.
5. Open Microsoft Exchange6. Click Exchange Load Generator 2013.
11

Note: This procedure starts the graphical user interface version of Exchange Load Generator.
To start Exchange Load Generator at a command prompt
1. Click Start, click Run, and then type cmd to open a Command Prompt window.
2. Locate the folder in which you installed the Exchange Load Generator files. By default, this is the Exchange Load Generator directory on the system drive.
3. At the command line, type LoadGenCmd.exe.
For more information about starting Exchange Load Generator at a command prompt, see Running Exchange Load Generator as a Command-Line Program.
How to Set Up the Exchange Load Generator Test TopologyThis topic explains how to specify the number of users to simulate for each mailbox store that receives Exchange Load Generator requests. If you use more than one client to run the same Exchange Load Generator test, you have to perform this step on one client only. You do not have to create the topology on every client. You must configure the number of users in the mailbox stores where you want to send requests.
After you specify the topology parameters, you have to create the test topology. This procedure creates the Exchange Load Generator users, distribution groups (also known as DLs or distribution lists), and dynamic distribution groups (also known as DDLs or dynamic distribution lists) in Active Directory.
Important You must configure Exchange Server 2013 before you create the topology. This could
involve, for example, creating the required databases, pointing databases to the correct public folders, or changing distribution group settings.
To set up the topology for an Exchange Load Generator test
1. Log on to the client computer.
2. Start Exchange Load Generator by double-clicking LoadGenWin.exe. For more information, see How to Start Exchange Load Generator.
3. On the Welcome to the Exchange Load Generator page, click Start a new test.4. On the Start a new test page, create a new configuration or use an existing configuration
file by clicking the selection you want. Click Continue.
5. On the Specify test settings page, define the global test settings as well as the Topology permissions and user permissions.
12

You can choose “Skip recipient management and continue with user group configuration” if your users have already been created. Continue to step 8.
If your users have not been created yet and you wish to do so through Loadgen click “Continue with recipient management” and continue to step 6.
6. On the User settings page, set up according to your test requirements. For example, select the user count that corresponds to each mailbox database, and then enter the number of users that you want to simulate.
7. On the Advanced recipient settings page, configure the options of Distribution List Settings, Dynamic Distribution List Settings, Contact Settings, and External Recipient Settings according to your test requirements. Click Continue. The progress bar for Recipient creation is in progress is displayed.
8. When the recipient creation task is completed, the Specify test user groups page will be displayed. From here you can configure one or more groups by Name, Client Type, Action Profile, Mailbox Profile, PreTestLogon or Container. You can edit any of the fields, and you can add or delete user groups as required. Click Continue.
9. The Remote configurations page lets you configure one or more remote load generators. This is an optional task. Click Continue.
10. A Configuration summary Review this summary, and then select an action from the selection in the lower half of the screen. This includes going back and adjusting or re-doing any items that you choose.
To verify that users are created in Active Directory
1. On the Exchange server, start the Active Directory Users and Computers snap-in by clicking Start, click Programs, double-click Administrative Tools, and then click Active Directory Users and Computers.
2. In the console tree, locate the domain you want, and then expand that domain.
3. Expand LoadGen Objects/Users and verify that a subfolder with the Exchange server name exists. The distribution groups are displayed in LoadGen Objects/Distribution Lists, the dynamic distribution groups are displayed in LoadGen Objects/Dynamic Distribution Lists, and the contacts are displayed in LoadGen Objects/Contacts. The following figure shows how everything appears in Active Directory.
13
How to Configure the Test PropertiesThe procedure explains how to configure the test properties by generating a configuration file and then editing it. Tasks include setting up user credentials and specifying parameters such as the length of time that the test should run.
To configure the test properties
1. Log on to the client computer by using domain credentials. If you have not joined the client computer to a domain, log on with a local administrator account. We recommend that you use a domain account to enhance the user experience.
2. Open a Command Prompt window and locate the Exchange Load Generator installation directory.
3. Run the command LoadGenCmd.exe /g which will generate a generic configuration file that is named LoadGenConfig.xml in the current directory. You will need to specify Configuration Arguments in order for the LoadGenConfig.xml to be created.
4. Open the LoadGenConfig.xml file by using Notepad or a similar editor. The section in the XML Configuration File Internals, describes the meaning and purpose of critical
14
parameters listed in the configuration file.
5. Search for the LdapSearchFilter parameter. This parameter is used to restrict the set of users who will be included in the test run. By default, it includes all mail-enabled users in the directory at or below the base domain name that is specified in the LdapBaseDn parameter, which immediately follows LdapSearchFilter. You will notice that LdapBaseDn has already been set to the correct value if you are running LoadGenCmd while logged in with domain credentials. If the LdapBaseDn parameter does not correctly specify the base location of your test users, you will need to manually adjust this parameter.
6. Search for the TargetForest parameter. This parameter specifies which forest should be used to find users and Exchange topology information. The value can be any of the following: a NetBIOS or fully qualified domain name representing a global catalog server, domain controller, domain in the forest, or root of the forest. This parameter has already been set to an acceptable value if you are running LoadGenCmd when logged on with domain credentials. If the value must be changed for any reason, you can edit it at this point. An example of the xml script is as follows, with an accompanying discussion of the parameters.
<TargetForest>E12</TargetForest>
<DirectoryUsername>administrator</DirectoryUsername>
<DirectoryPassword>Manager1</DirectoryPassword>
<DirectoryDomain>E12</DirectoryDomain>
<MasterPassword>Manager1</MasterPassword>
<RunLengthDuration>P0Y0M0DT8H0M0S</RunLengthDuration>
<SimulatedDayLength>P0Y0M0DT8H0M0S</SimulatedDayLength>
The DirectoryUsername, DirectoryPassword, and DirectoryDomain parameters specify the credentials that will be used to access Active Directory during the test. You will minimally need to adjust the DirectoryPassword parameter.
The MasterPassword and MasterDomain parameters specify the domain and password that can be used to authenticate with each test account. You will minimally need to set the MasterPassword parameter equal to the password that you specified when you created the test accounts.
The RunLengthDuration parameter specifies how long a test will run before stopping. By default, this is equal to 1 hour. The parameter is specified by using the ISO 8601 extended format of PaYbMcDTdHeMfS where a equals the number of years, b equals the number of months, c equals the number of days, d equals the number of hours, e equals the number of minutes, and f equals the number of seconds. A value of P0Y0M0DT1H0M0S means 1 hour, as does PT1H. To change this to an 8-hour test, you could use P8HS as the value. If you want the test to run with an infinite duration, specify a duration of 0, for example PT0S.
To define RunLengthDuration at each user group, specify this global RunLengthDuration as 0.
15

7. Save your configuration file.
Customizing the Exchange Load Generator TestMicrosoft Exchange Load Generator simulates some calls that Microsoft Office Outlook makes to the server that is running Exchange Server. The most common user tasks are combined into one Exchange Load Generator task named Read and Process Message. With the Read and Process Message task, the simulated user reads all the e-mail in the Inbox and replies to, replies to all, forwards, moves, deletes, or loads attachment to a certain percentage of the e-mail messages.
This topic lists the parameters, by task alphabetically, that can be changed in the configuration file. These tasks include the common tasks for MAPI and Outlook-specific tasks.
Tables of Simulation Tasks and Their ParametersGenerally, to customize the test, you have to make changes in the XML configuration script file. The following table of tasks, positioned alphabetically by task name, describes the meaning and purpose of each parameter listed in the configuration file.
Browse CalendarBrowseCalendar opens the Calendar folder and performs modify or delete actions on content within the folder. If BrowseCalendarActionCount is 0, no action will be performed on calendar items.
Parameter Comment
MinimumActionMessages The minimum number of calendar items to perform an action on.
MaximumActionMessages The maximum number of calendar items to perform an action on.
ChangePercentage The percentage of calendar items to be changed.
DeletePercentage The percentage of calendar items to be deleted.
Browse ContactsBrowseContacts opens the Contacts folder and performs modify actions on content within the folder.
There are no parameters for this task.
16
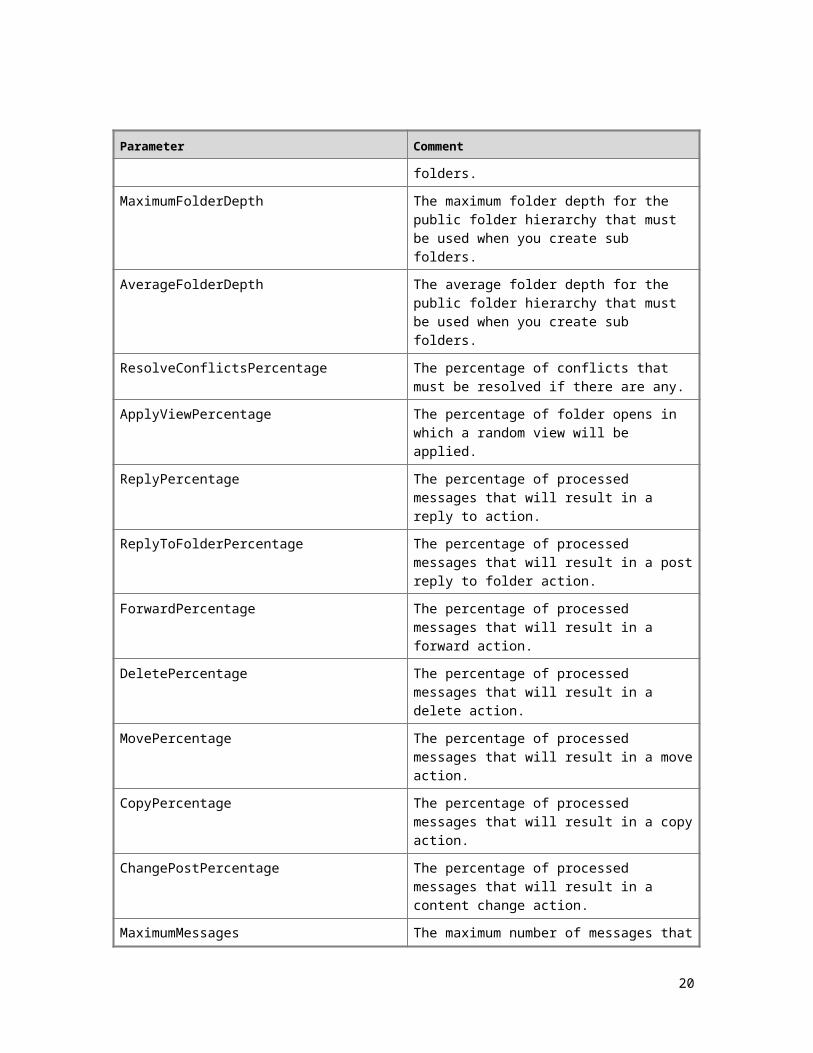
Browse Public FolderBrowsePublicFolder browses Public Folder content. This action can include opening 1 or more (1-n) public folders, reading new content, reading 0 or more (0-n) previously read messages, creating or deleting sub folders, and performing the same processing actions that the ReadAndProcessMessages task performs on mailbox content.
Parameter Comment
FolderOpenCount The number of folders that will be opened.
OldPostReadCount The number of old posts to read, in addition to any new posts, in each folder opened.
CreateSubFolderPercentage The percentage of task invocations in which a new sub folder will be created.
DeleteSubFolderPercentage The percentage of task invocations in which a sub folder will be deleted.
MinimumFolderDepth The minimum folder depth for the public folder hierarchy that must be used when you create sub folders.
MaximumFolderDepth The maximum folder depth for the public folder hierarchy that must be used when you create sub folders.
AverageFolderDepth The average folder depth for the public folder hierarchy that must be used when you create sub folders.
ResolveConflictsPercentage The percentage of conflicts that must be resolved if there are any.
ApplyViewPercentage The percentage of folder opens in which a random view will be applied.
ReplyPercentage The percentage of processed messages that will result in a reply to action.
ReplyToFolderPercentage The percentage of processed messages that will result in a post reply to folder action.
ForwardPercentage The percentage of processed messages that will result in a forward action.
DeletePercentage The percentage of processed messages that will result in a delete action.
MovePercentage The percentage of processed messages that will result in a move action.
17
Parameter Comment
CopyPercentage The percentage of processed messages that will result in a copy action.
ChangePostPercentage The percentage of processed messages that will result in a content change action.
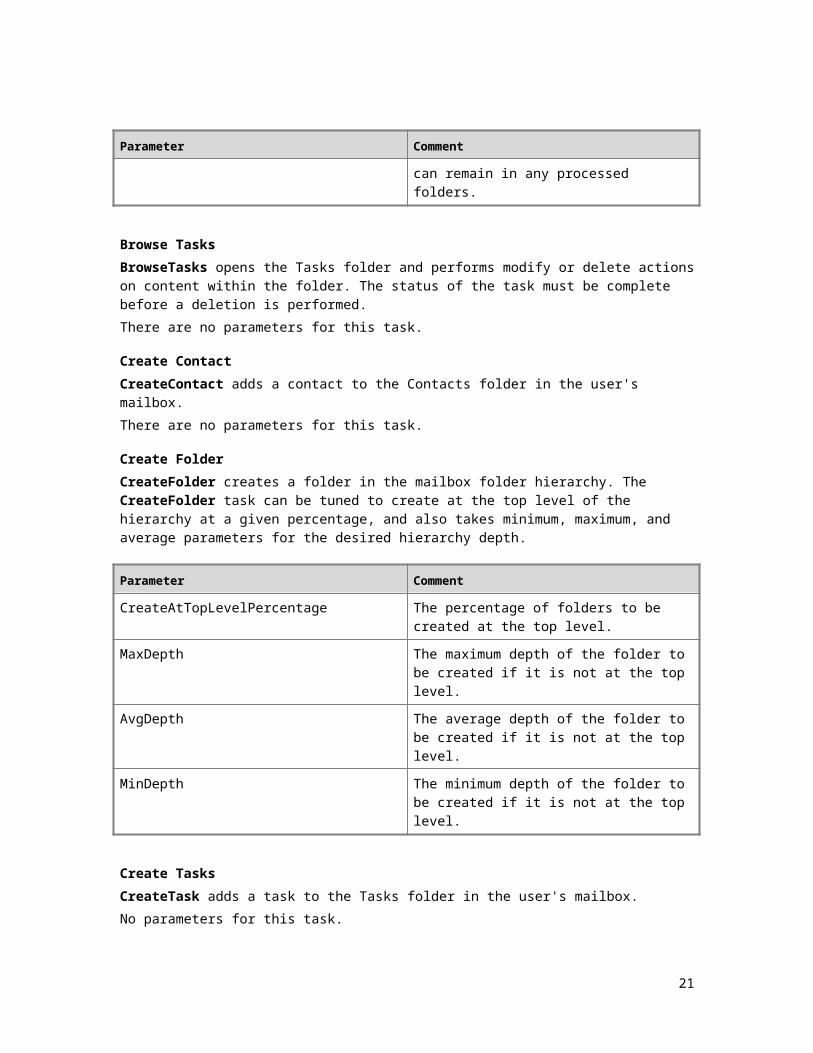
MaximumMessages The maximum number of messages that can remain in any processed folders.
Browse TasksBrowseTasks opens the Tasks folder and performs modify or delete actions on content within the folder. The status of the task must be complete before a deletion is performed.
There are no parameters for this task.
Create ContactCreateContact adds a contact to the Contacts folder in the user's mailbox.
There are no parameters for this task.
Create FolderCreateFolder creates a folder in the mailbox folder hierarchy. The CreateFolder task can be tuned to create at the top level of the hierarchy at a given percentage, and also takes minimum, maximum, and average parameters for the desired hierarchy depth.
Parameter Comment
CreateAtTopLevelPercentage The percentage of folders to be created at the top level.
MaxDepth The maximum depth of the folder to be created if it is not at the top level.
AvgDepth The average depth of the folder to be created if it is not at the top level.
MinDepth The minimum depth of the folder to be created if it is not at the top level.
Create TasksCreateTask adds a task to the Tasks folder in the user's mailbox.
No parameters for this task.
18

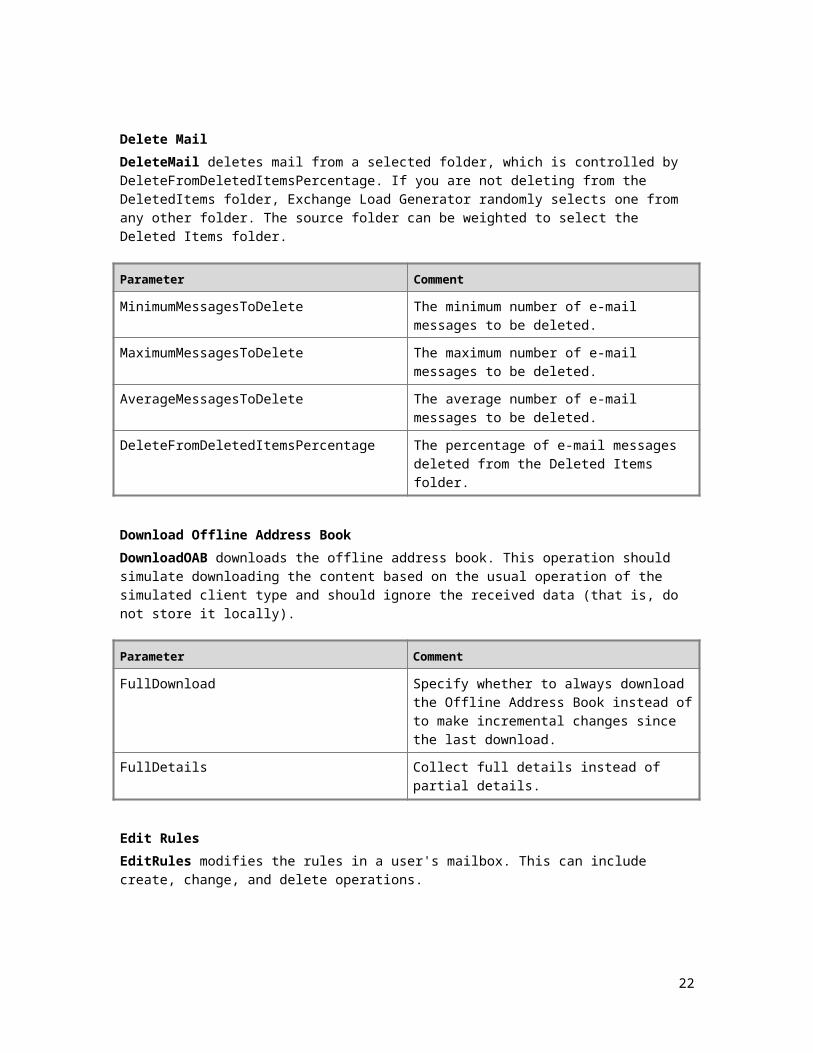
Delete MailDeleteMail deletes mail from a selected folder, which is controlled by DeleteFromDeletedItemsPercentage. If you are not deleting from the DeletedItems folder, Exchange Load Generator randomly selects one from any other folder. The source folder can be weighted to select the Deleted Items folder.
Parameter Comment
MinimumMessagesToDelete The minimum number of e-mail messages to be deleted.
MaximumMessagesToDelete The maximum number of e-mail messages to be deleted.
AverageMessagesToDelete The average number of e-mail messages to be deleted.
DeleteFromDeletedItemsPercentage The percentage of e-mail messages deleted from the Deleted Items folder.
Download Offline Address BookDownloadOAB downloads the offline address book. This operation should simulate downloading the content based on the usual operation of the simulated client type and should ignore the received data (that is, do not store it locally).
Parameter Comment
FullDownload Specify whether to always download the Offline Address Book instead of to make incremental changes since the last download.
FullDetails Collect full details instead of partial details.
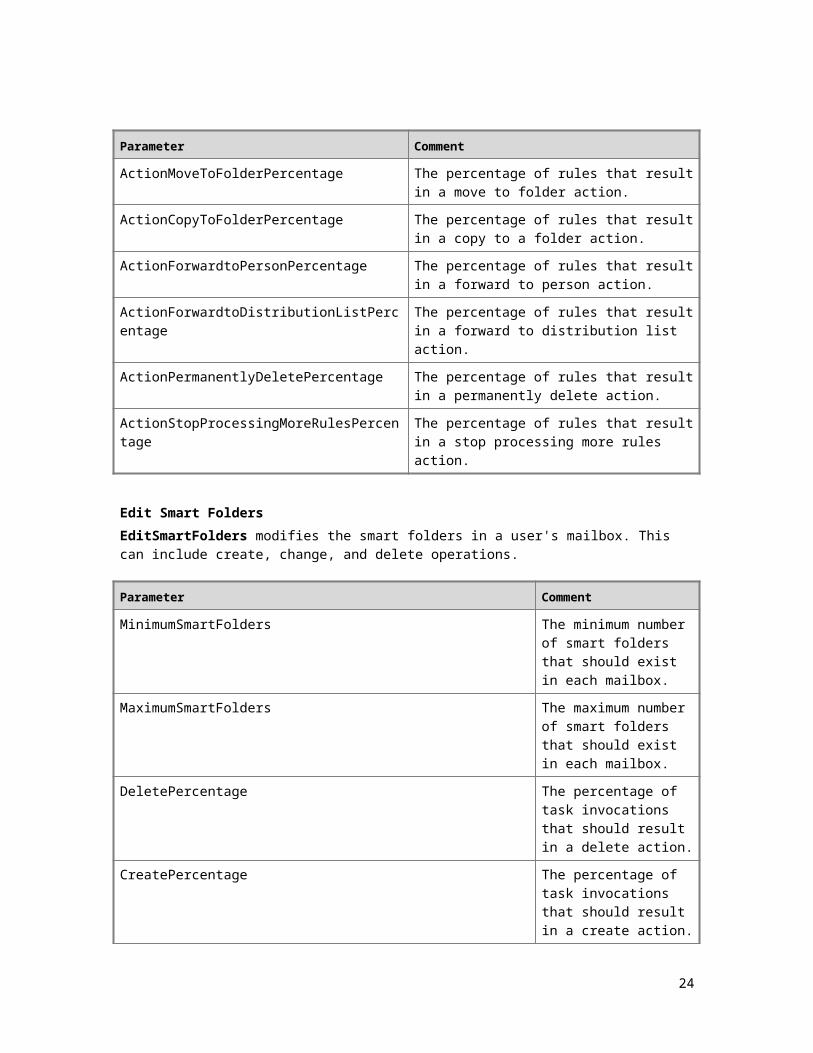
Edit RulesEditRules modifies the rules in a user's mailbox. This can include create, change, and delete operations.
Parameter Comment
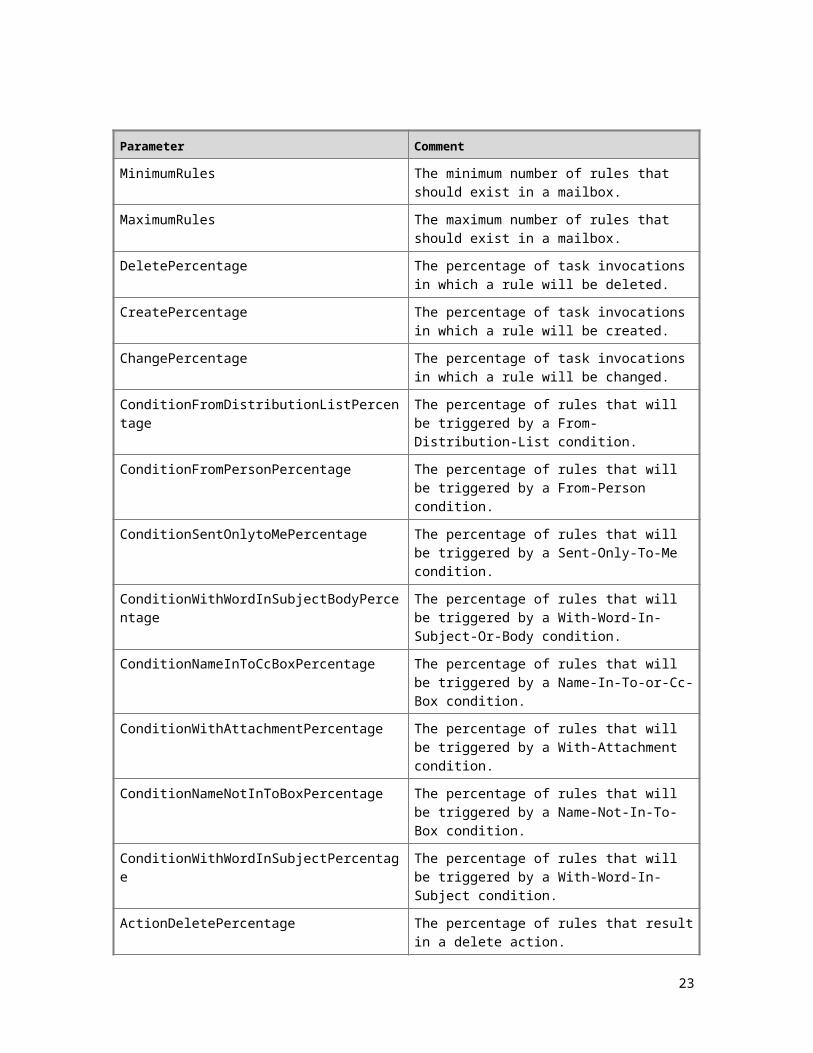
MinimumRules The minimum number of rules that should exist in a mailbox.
MaximumRules The maximum number of rules that should exist in a mailbox.
DeletePercentage The percentage of task invocations in which a
19
Parameter Comment
rule will be deleted.
CreatePercentage The percentage of task invocations in which a rule will be created.
ChangePercentage The percentage of task invocations in which a rule will be changed.
ConditionFromDistributionListPercentage The percentage of rules that will be triggered by a From-Distribution-List condition.
ConditionFromPersonPercentage The percentage of rules that will be triggered by a From-Person condition.
ConditionSentOnlytoMePercentage The percentage of rules that will be triggered by a Sent-Only-To-Me condition.
ConditionWithWordInSubjectBodyPercentage The percentage of rules that will be triggered by a With-Word-In-Subject-Or-Body condition.
ConditionNameInToCcBoxPercentage The percentage of rules that will be triggered by a Name-In-To-or-Cc-Box condition.
ConditionWithAttachmentPercentage The percentage of rules that will be triggered by a With-Attachment condition.
ConditionNameNotInToBoxPercentage The percentage of rules that will be triggered by a Name-Not-In-To-Box condition.
ConditionWithWordInSubjectPercentage The percentage of rules that will be triggered by a With-Word-In-Subject condition.
ActionDeletePercentage The percentage of rules that result in a delete action.
ActionMoveToFolderPercentage The percentage of rules that result in a move to folder action.
ActionCopyToFolderPercentage The percentage of rules that result in a copy to a folder action.
ActionForwardtoPersonPercentage The percentage of rules that result in a forward to person action.
ActionForwardtoDistributionListPercentage The percentage of rules that result in a forward to distribution list action.
ActionPermanentlyDeletePercentage The percentage of rules that result in a permanently delete action.
ActionStopProcessingMoreRulesPercentage The percentage of rules that result in a stop
20
Parameter Comment
processing more rules action.
Edit Smart FoldersEditSmartFolders modifies the smart folders in a user's mailbox. This can include create, change, and delete operations.
Parameter Comment
MinimumSmartFolders The minimum number of smart folders that should exist in each mailbox.
MaximumSmartFolders The maximum number of smart folders that should exist in each mailbox.
DeletePercentage The percentage of task invocations that should result in a delete action.
CreatePercentage The percentage of task invocations that should result in a create action.
BrowsePercentage The percentage of task invocations that should result in a browse action. Be aware that the parameters specified for the browse folder task will be used if a browser action is selected.
CriteriaUnreadPercentage The percentage of smart folders that should use Unread criteria.
CriteriaImportantPercentage The percentage of smart folders that should use Important criteria.
CriteriaOldPercentage The percentage of smart folders that should use Old criteria.
CriteriaForFollowUpPercentage The percentage of smart
21
Parameter Comment
folders that should use For-Follow-Up criteria.
CriteriaConversationWithRandomPersonOrDistributionListPercentage The percentage of smart folders that should use Conversation-With-Person-Or-Distribution-List criteria.
CriteriaUnreadOrForFollowUpPercentage The percentage of smart folders that should use Unread-or-For-Follow-Up criteria.
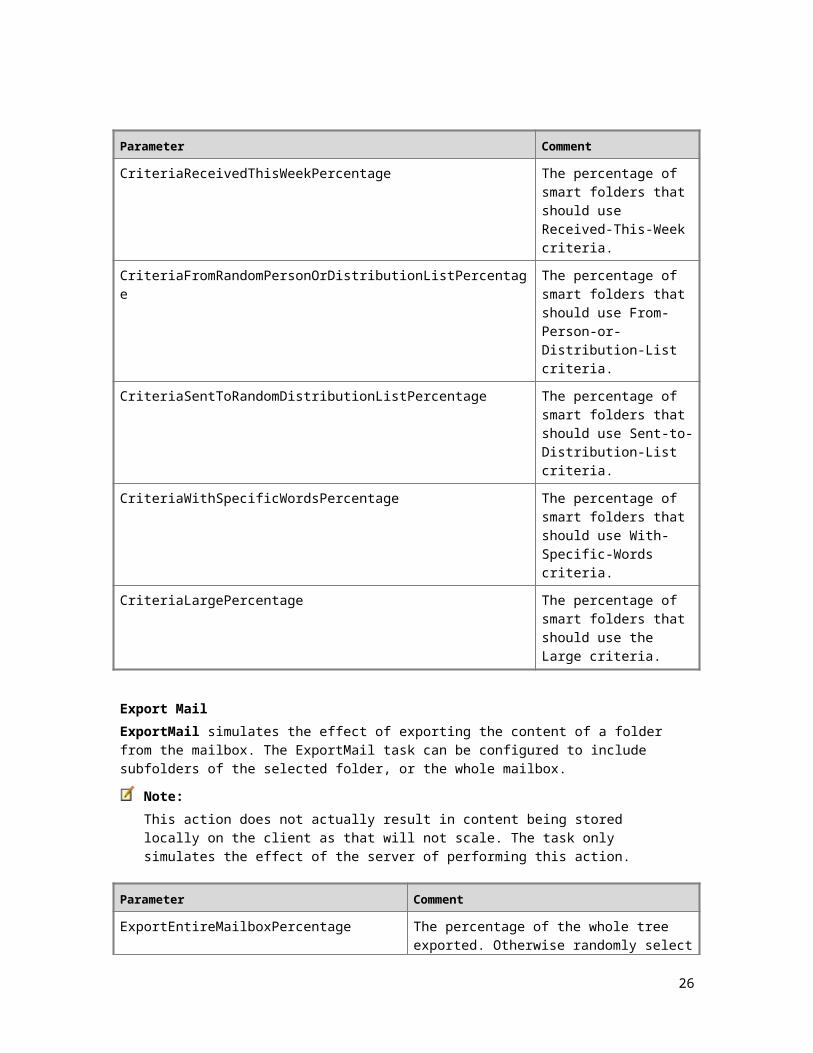
CriteriaReceivedThisWeekPercentage The percentage of smart folders that should use Received-This-Week criteria.
CriteriaFromRandomPersonOrDistributionListPercentage The percentage of smart folders that should use From-Person-or-Distribution-List criteria.
CriteriaSentToRandomDistributionListPercentage The percentage of smart folders that should use Sent-to-Distribution-List criteria.
CriteriaWithSpecificWordsPercentage The percentage of smart folders that should use With-Specific-Words criteria.
CriteriaLargePercentage The percentage of smart folders that should use the Large criteria.
Export MailExportMail simulates the effect of exporting the content of a folder from the mailbox. The ExportMail task can be configured to include subfolders of the selected folder, or the whole mailbox.
22
Note: This action does not actually result in content being stored locally on the client as that will not scale. The task only simulates the effect of the server of performing this action.
Parameter Comment
ExportEntireMailboxPercentage The percentage of the whole tree exported. Otherwise randomly select a top level folder and export.
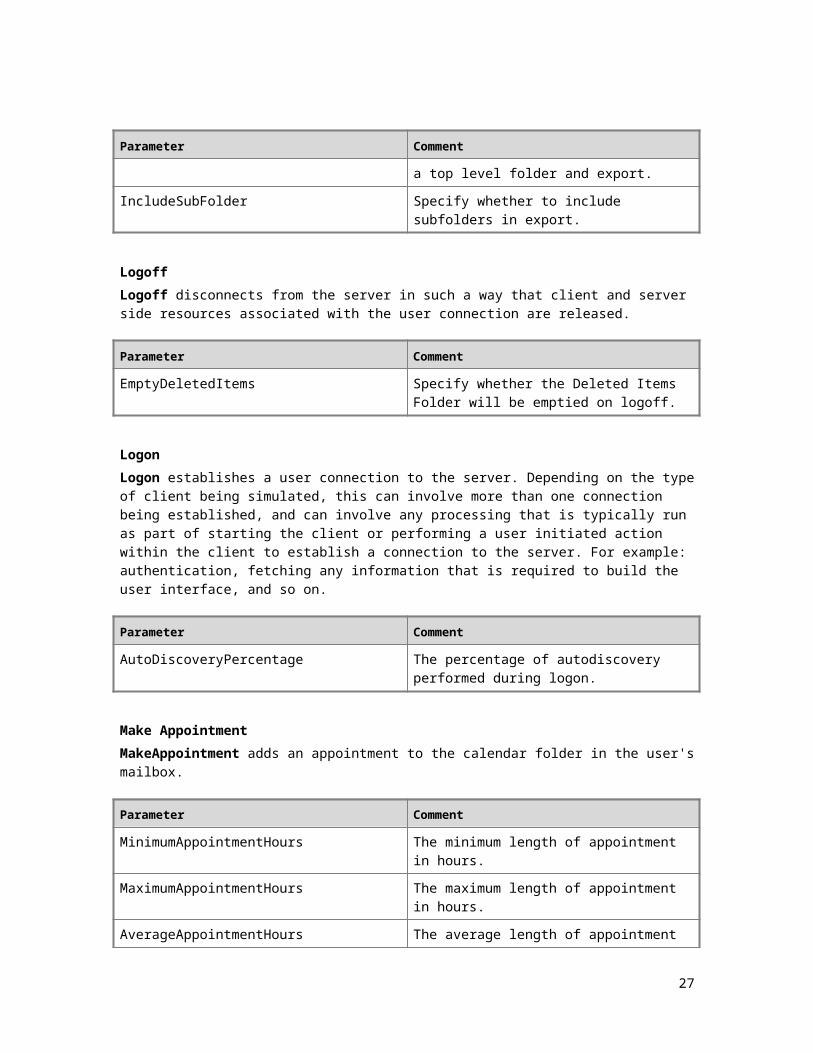
IncludeSubFolder Specify whether to include subfolders in export.
LogoffLogoff disconnects from the server in such a way that client and server side resources associated with the user connection are released.
Parameter Comment
EmptyDeletedItems Specify whether the Deleted Items Folder will be emptied on logoff.
LogonLogon establishes a user connection to the server. Depending on the type of client being simulated, this can involve more than one connection being established, and can involve any processing that is typically run as part of starting the client or performing a user initiated action within the client to establish a connection to the server. For example: authentication, fetching any information that is required to build the user interface, and so on.
Parameter Comment
AutoDiscoveryPercentage The percentage of autodiscovery performed during logon.
Make AppointmentMakeAppointment adds an appointment to the calendar folder in the user's mailbox.
Parameter Comment
MinimumAppointmentHours The minimum length of appointment in hours.
MaximumAppointmentHours The maximum length of appointment in hours.
AverageAppointmentHours The average length of appointment in hours.
23
Parameter Comment
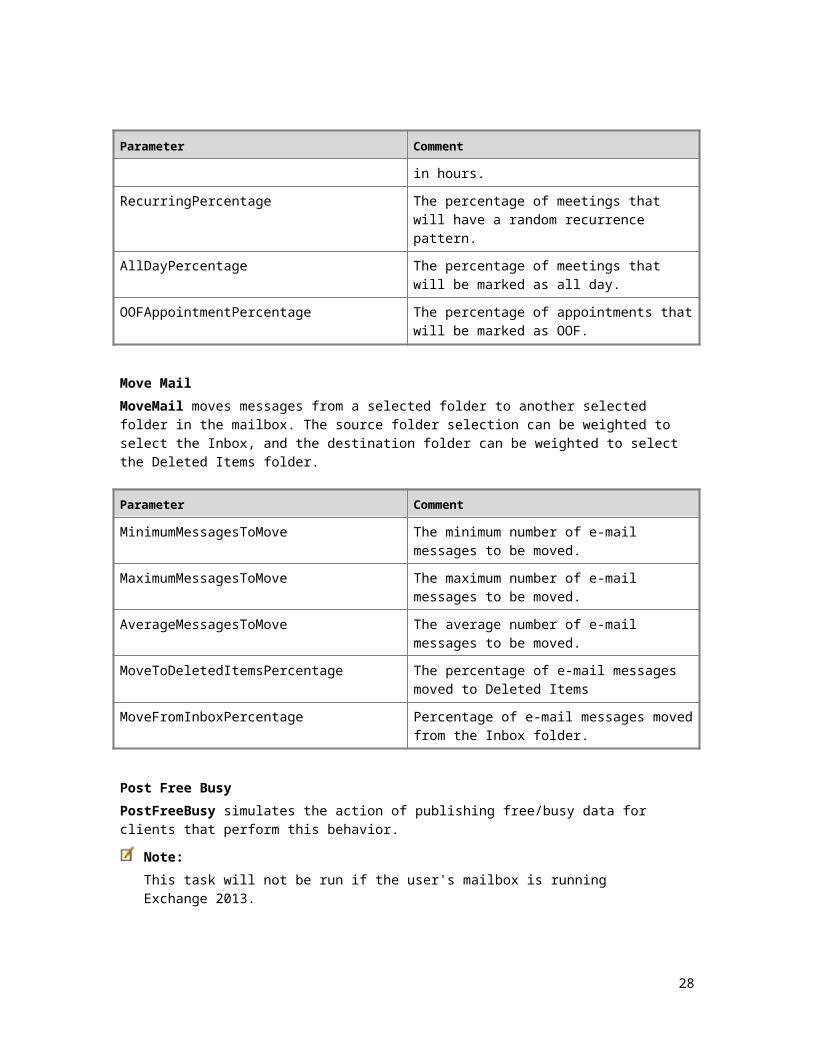
RecurringPercentage The percentage of meetings that will have a random recurrence pattern.
AllDayPercentage The percentage of meetings that will be marked as all day.
OOFAppointmentPercentage The percentage of appointments that will be marked as OOF.
Move MailMoveMail moves messages from a selected folder to another selected folder in the mailbox. The source folder selection can be weighted to select the Inbox, and the destination folder can be weighted to select the Deleted Items folder.
Parameter Comment
MinimumMessagesToMove The minimum number of e-mail messages to be moved.
MaximumMessagesToMove The maximum number of e-mail messages to be moved.
AverageMessagesToMove The average number of e-mail messages to be moved.
MoveToDeletedItemsPercentage The percentage of e-mail messages moved to Deleted Items
MoveFromInboxPercentage Percentage of e-mail messages moved from the Inbox folder.
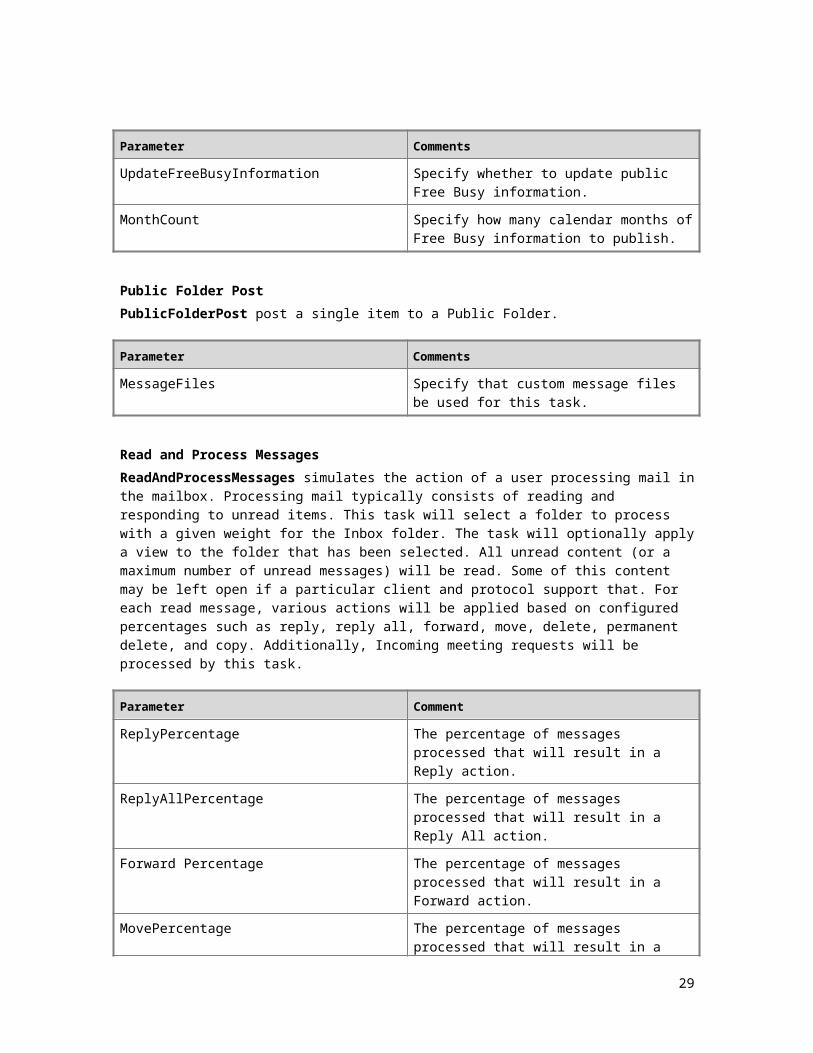
Post Free BusyPostFreeBusy simulates the action of publishing free/busy data for clients that perform this behavior.
Note: This task will not be run if the user's mailbox is running Exchange 2013.
Parameter Comments
UpdateFreeBusyInformation Specify whether to update public Free Busy information.
MonthCount Specify how many calendar months of Free Busy information to publish.
24

Public Folder PostPublicFolderPost post a single item to a Public Folder.
Parameter Comments
MessageFiles Specify that custom message files be used for this task.
Read and Process MessagesReadAndProcessMessages simulates the action of a user processing mail in the mailbox. Processing mail typically consists of reading and responding to unread items. This task will select a folder to process with a given weight for the Inbox folder. The task will optionally apply a view to the folder that has been selected. All unread content (or a maximum number of unread messages) will be read. Some of this content may be left open if a particular client and protocol support that. For each read message, various actions will be applied based on configured percentages such as reply, reply all, forward, move, delete, permanent delete, and copy. Additionally, Incoming meeting requests will be processed by this task.
Parameter Comment
ReplyPercentage The percentage of messages processed that will result in a Reply action.
ReplyAllPercentage The percentage of messages processed that will result in a Reply All action.
Forward Percentage The percentage of messages processed that will result in a Forward action.
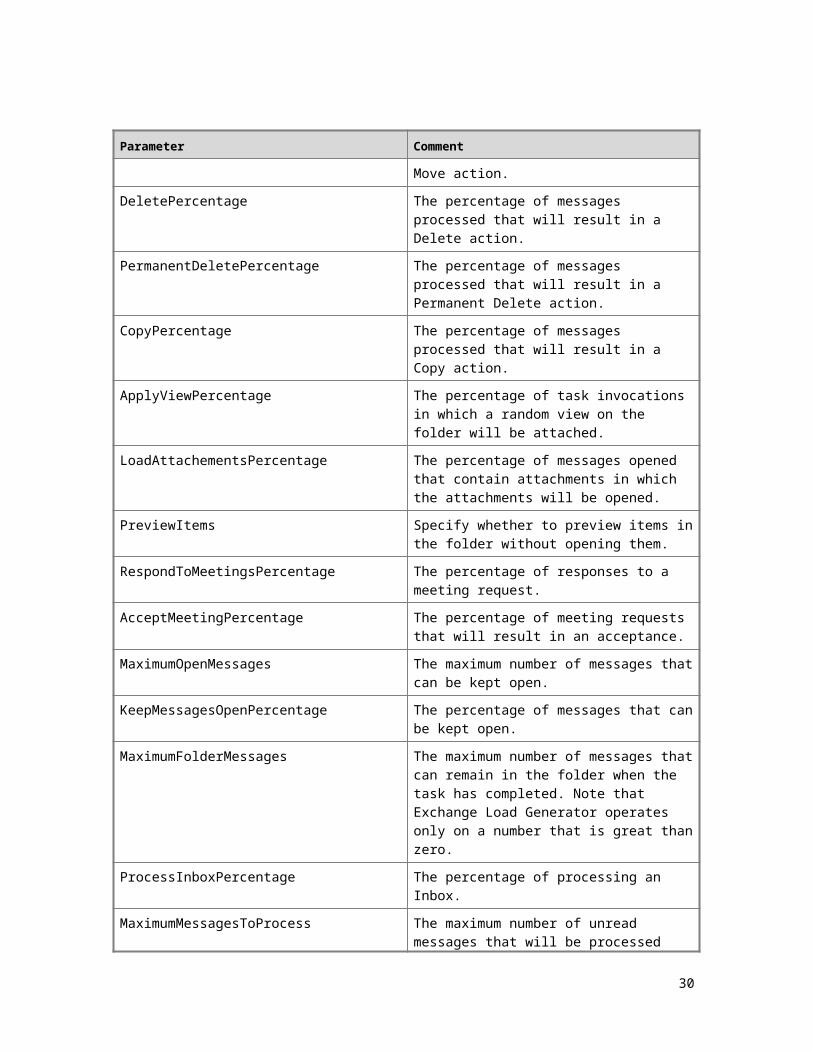
MovePercentage The percentage of messages processed that will result in a Move action.
DeletePercentage The percentage of messages processed that will result in a Delete action.
PermanentDeletePercentage The percentage of messages processed that will result in a Permanent Delete action.
CopyPercentage The percentage of messages processed that will result in a Copy action.
ApplyViewPercentage The percentage of task invocations in which a random view on the folder will be attached.
LoadAttachementsPercentage The percentage of messages opened that contain attachments in which the attachments will be opened.
25
Parameter Comment
PreviewItems Specify whether to preview items in the folder without opening them.
RespondToMeetingsPercentage The percentage of responses to a meeting request.
AcceptMeetingPercentage The percentage of meeting requests that will result in an acceptance.
MaximumOpenMessages The maximum number of messages that can be kept open.
KeepMessagesOpenPercentage The percentage of messages that can be kept open.
MaximumFolderMessages The maximum number of messages that can remain in the folder when the task has completed. Note that Exchange Load Generator operates only on a number that is great than zero.
ProcessInboxPercentage The percentage of processing an Inbox.
MaximumMessagesToProcess The maximum number of unread messages that will be processed during the task.
Request MeetingRequestMeeting sends a meeting request message to a set of recipients.
Parameter Comment
MinimumMeetingHours The minimum meeting length in hours.
MaximumMeetingHours The maximum meeting length in hours.
AverageMeetingHours Average meeting length in hours.
MinimumMeetingAttendees The minimum number of attendees to invite to meetings.
MaximumMeetingAttendees The maximum number of attendees to invite to meetings.
AverageMeetingAttendees The average number of attendees to invite to meetings.
AddDistributionListPercentage The percentage of task invocations in which a distribution list will be added to the attendee list
26
Parameter Comment
of the meeting request.
AddDynamicDistributionListPercentage The percentage of task invocations in which a dynamic distribution list will be added to the attendee list of the meeting request.
AddExternalRecipientPercentage The percentage of task invocations in which an external recipient will be added to the attendee list of the meeting request.
ExternalContactPercentage The percentage of contacts picked as external recipients.
AvailabilityCheckPercentage The percentage of attendee availability checks.
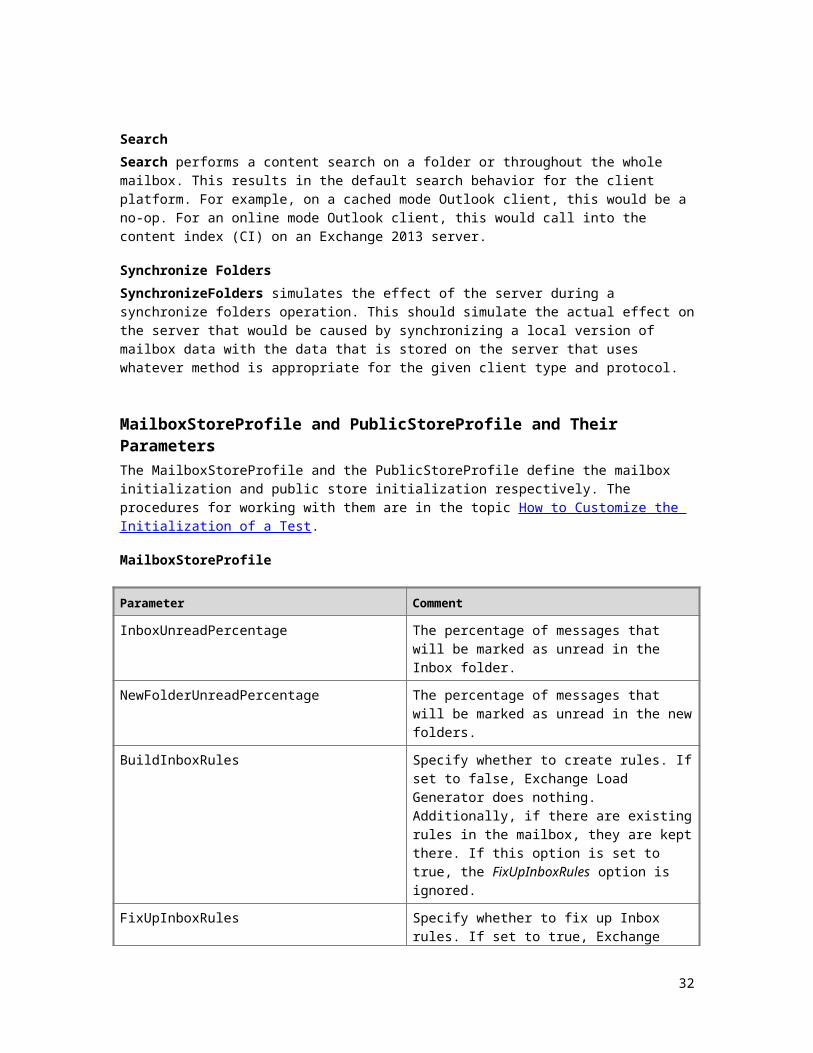
SearchSearch performs a content search on a folder or throughout the whole mailbox. This results in the default search behavior for the client platform. For example, on a cached mode Outlook client, this would be a no-op. For an online mode Outlook client, this would call into the content index (CI) on an Exchange 2013 server.
Synchronize FoldersSynchronizeFolders simulates the effect of the server during a synchronize folders operation. This should simulate the actual effect on the server that would be caused by synchronizing a local version of mailbox data with the data that is stored on the server that uses whatever method is appropriate for the given client type and protocol.
MailboxStoreProfile and PublicStoreProfile and Their ParametersThe MailboxStoreProfile and the PublicStoreProfile define the mailbox initialization and public store initialization respectively. The procedures for working with them are in the topic How to Customize the Initialization of a Test.
MailboxStoreProfile
Parameter Comment
InboxUnreadPercentage The percentage of messages that will be marked as unread in the Inbox folder.
NewFolderUnreadPercentage The percentage of messages that will be marked as unread in the new folders.
BuildInboxRules Specify whether to create rules. If set to false, Exchange Load Generator does nothing.
27
Parameter Comment
Additionally, if there are existing rules in the mailbox, they are kept there. If this option is set to true, the FixUpInboxRules option is ignored.
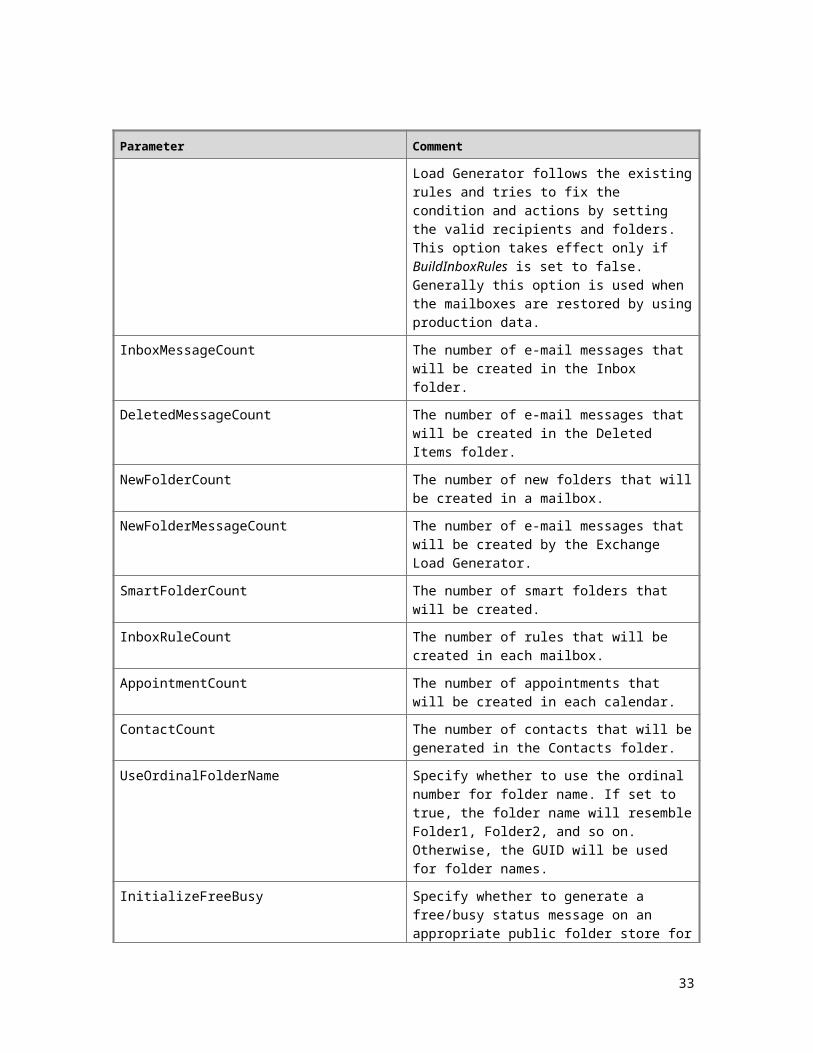
FixUpInboxRules Specify whether to fix up Inbox rules. If set to true, Exchange Load Generator follows the existing rules and tries to fix the condition and actions by setting the valid recipients and folders. This option takes effect only if BuildInboxRules is set to false. Generally this option is used when the mailboxes are restored by using production data.
InboxMessageCount The number of e-mail messages that will be created in the Inbox folder.
DeletedMessageCount The number of e-mail messages that will be created in the Deleted Items folder.
NewFolderCount The number of new folders that will be created in a mailbox.
NewFolderMessageCount The number of e-mail messages that will be created by the Exchange Load Generator.
SmartFolderCount The number of smart folders that will be created.
InboxRuleCount The number of rules that will be created in each mailbox.
AppointmentCount The number of appointments that will be created in each calendar.
ContactCount The number of contacts that will be generated in the Contacts folder.
UseOrdinalFolderName Specify whether to use the ordinal number for folder name. If set to true, the folder name will resemble Folder1, Folder2, and so on. Otherwise, the GUID will be used for folder names.
InitializeFreeBusy Specify whether to generate a free/busy status message on an appropriate public folder store for each mailbox
InitializeIndices Specify whether to pre-create the standard
28
Parameter Comment
indexes, for example, for Contacts.
InitializeCachedModeIndices Specify whether to pre-create the cached mode indexes.
MessagePercentageRecent The percentage of messages that have a delivery date that is within the time frame defined by the <MessageRecentContentTimeFrame> tag.
MessageRecentContentTimeFrame The period of time frame percentage that messages within a delivery time, within this period, are classified as recent.
MessageContentTimeFrame The period of time frame percentage that the delivery times of all messages are within this time frame.
AppointmentPercentageRecent The percentage of calendar items that are scheduled within the time frame that is defined by the <AppointmentRecentContentTimeFrame> tag.
AppointmentRecentContentTimeFrame A time frame from the last day of the current month backward. All calendar items scheduled within this period are classified as recent. The default value is two months.
AppointmentContentTimeFrame The period of time from the last day of the current month that all calendar items are scheduled within this time frame. The default value is two months.
TaskCount The number of tasks in the users' mailboxes. The task completion percentage is defined by <BrowseTasksActionParameters> under <ActionProfile>.
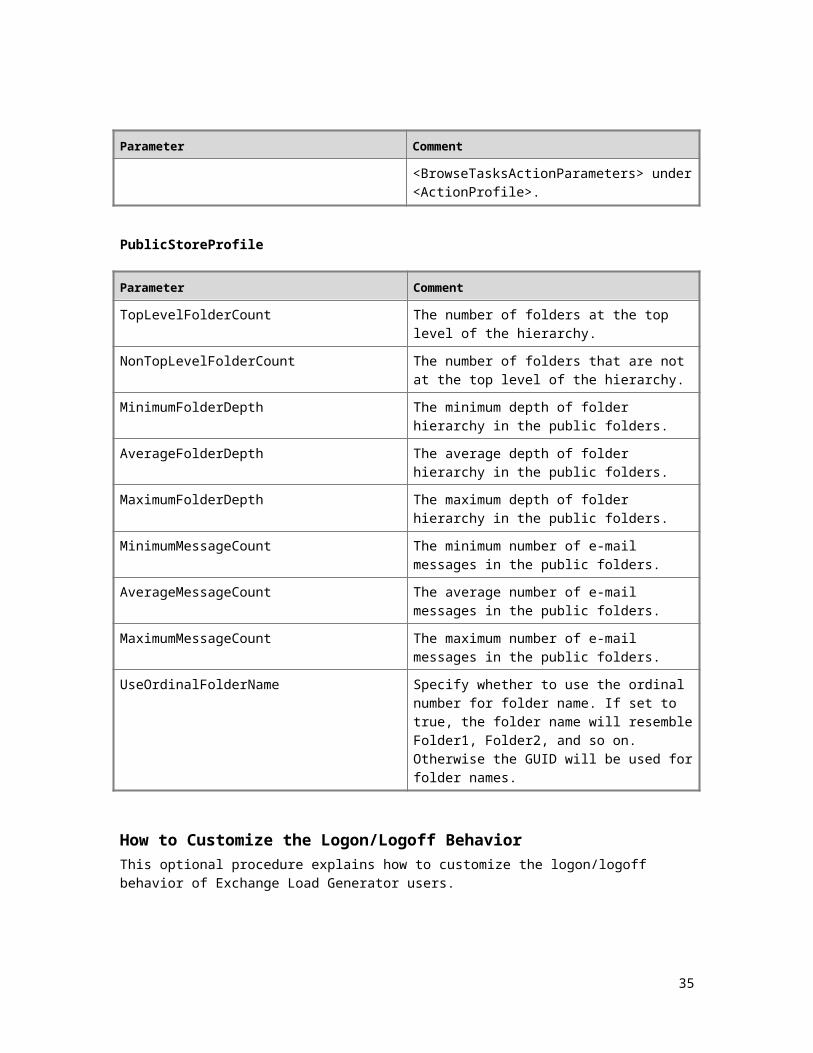
PublicStoreProfile
Parameter Comment
TopLevelFolderCount The number of folders at the top level of the hierarchy.
NonTopLevelFolderCount The number of folders that are not at the top
29
Parameter Comment
level of the hierarchy.
MinimumFolderDepth The minimum depth of folder hierarchy in the public folders.
AverageFolderDepth The average depth of folder hierarchy in the public folders.
MaximumFolderDepth The maximum depth of folder hierarchy in the public folders.
MinimumMessageCount The minimum number of e-mail messages in the public folders.
AverageMessageCount The average number of e-mail messages in the public folders.
MaximumMessageCount The maximum number of e-mail messages in the public folders.
UseOrdinalFolderName Specify whether to use the ordinal number for folder name. If set to true, the folder name will resemble Folder1, Folder2, and so on. Otherwise the GUID will be used for folder names.
How to Customize the Logon/Logoff BehaviorThis optional procedure explains how to customize the logon/logoff behavior of Exchange Load Generator users.
To customize the logon/logoff behavior of Exchange Load Generator users
1. Open the LoadGenConfig.xml file by using Notepad or a similar editor.
2. To log on immediately at the start of the test, provide the <PreTestLogon> tag with a value. For example: <PreTestLogon>true</PreTestLogon>.
3. To empty the Deleted Items folder when you log off, use the applicable LogOff parameter.
How to Customize Simulation Duration for Individual User GroupsThese optional procedures explain how to define the wait duration and the simulation duration for an individual user group.
30

To define the wait duration for a user group
1. Open the LoadGenConfig.xml file by using Notepad or a similar editor.
2. Navigate to the user group of your choice.
3. Set the <StartWaitDuration> tag to the duration of your choice. The user group will not run simulation until the defined duration has passed after the engine has started.
To define the simulation duration for a user group
1. Open the LoadGenConfig.xml file by using Notepad or a similar editor.
2. Navigate to the user group of your choice.
3. Set the <RunLengthDuration> tag to the duration of your choice. The user group will run simulation for the defined duration.
Note: We recommend that you set global <RunLengthDuration/> to 0 if you are going to customize durations for individual user groups. If global <RunLengthDuration/> is defined, individual user groups cannot have a longer duration than the global duration. Otherwise, the duration for the individual user group will be overwritten by the global duration.
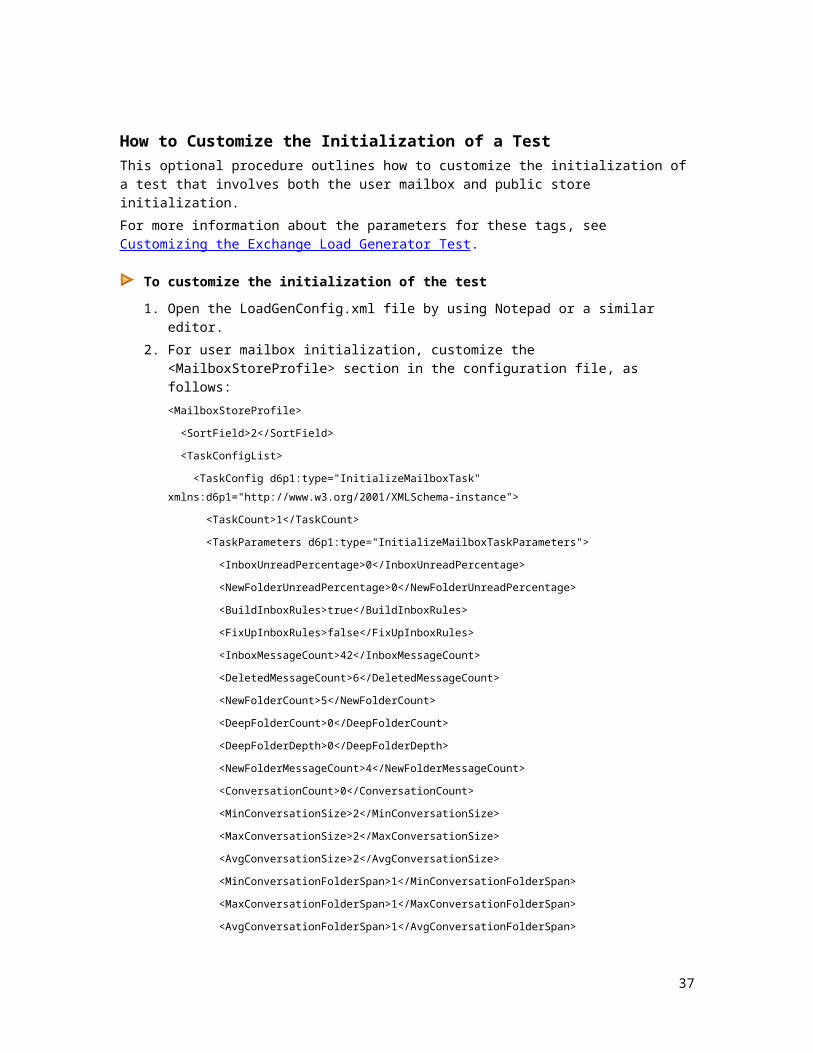
How to Customize the Initialization of a TestThis optional procedure outlines how to customize the initialization of a test that involves both the user mailbox and public store initialization.
For more information about the parameters for these tags, see Customizing the Exchange Load Generator Test.
To customize the initialization of the test
1. Open the LoadGenConfig.xml file by using Notepad or a similar editor.
2. For user mailbox initialization, customize the <MailboxStoreProfile> section in the configuration file, as follows:
<MailboxStoreProfile>
<SortField>2</SortField>
<TaskConfigList>
<TaskConfig d6p1:type="InitializeMailboxTask" xmlns:d6p1="http://www.w3.org/2001/XMLSchema-instance">
<TaskCount>1</TaskCount>
<TaskParameters d6p1:type="InitializeMailboxTaskParameters">
<InboxUnreadPercentage>0</InboxUnreadPercentage>
<NewFolderUnreadPercentage>0</NewFolderUnreadPercentage>
31
<BuildInboxRules>true</BuildInboxRules>
<FixUpInboxRules>false</FixUpInboxRules>
<InboxMessageCount>42</InboxMessageCount>
<DeletedMessageCount>6</DeletedMessageCount>
<NewFolderCount>5</NewFolderCount>
<DeepFolderCount>0</DeepFolderCount>
<DeepFolderDepth>0</DeepFolderDepth>
<NewFolderMessageCount>4</NewFolderMessageCount>
<ConversationCount>0</ConversationCount>
<MinConversationSize>2</MinConversationSize>
<MaxConversationSize>2</MaxConversationSize>
<AvgConversationSize>2</AvgConversationSize>
<MinConversationFolderSpan>1</MinConversationFolderSpan>
<MaxConversationFolderSpan>1</MaxConversationFolderSpan>
<AvgConversationFolderSpan>1</AvgConversationFolderSpan>
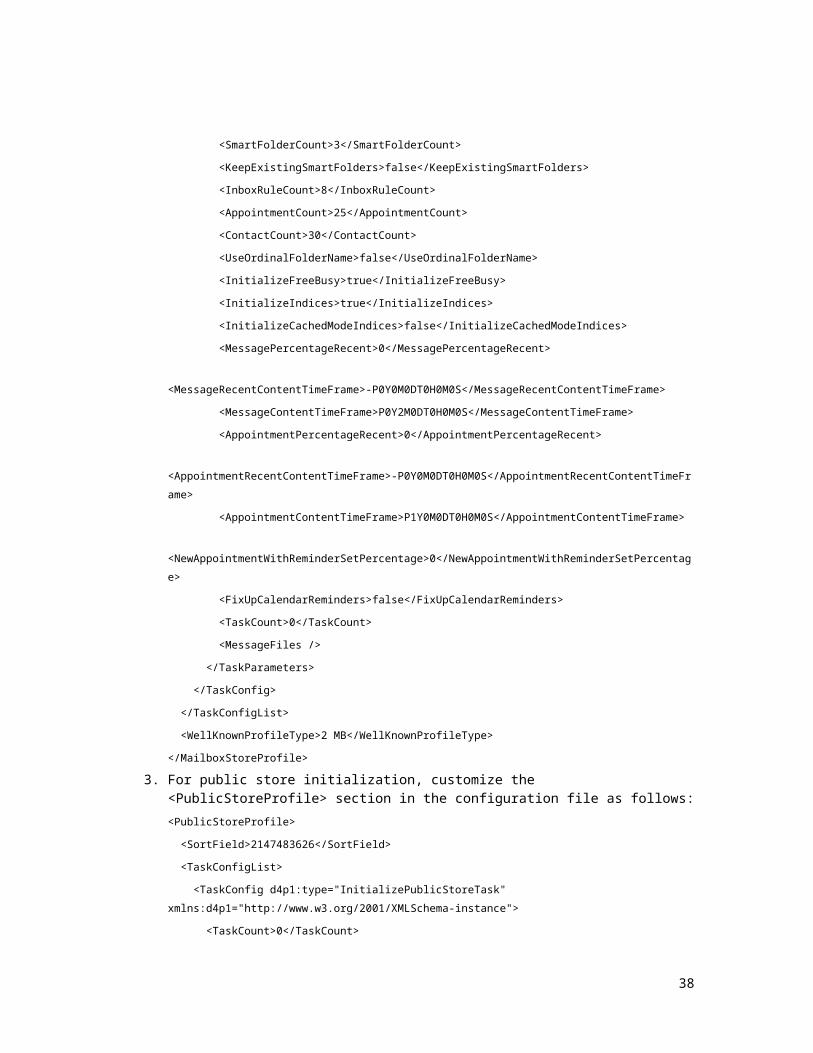
<SmartFolderCount>3</SmartFolderCount>
<KeepExistingSmartFolders>false</KeepExistingSmartFolders>
<InboxRuleCount>8</InboxRuleCount>
<AppointmentCount>25</AppointmentCount>
<ContactCount>30</ContactCount>
<UseOrdinalFolderName>false</UseOrdinalFolderName>
<InitializeFreeBusy>true</InitializeFreeBusy>
<InitializeIndices>true</InitializeIndices>
<InitializeCachedModeIndices>false</InitializeCachedModeIndices>
<MessagePercentageRecent>0</MessagePercentageRecent>
<MessageRecentContentTimeFrame>-P0Y0M0DT0H0M0S</MessageRecentContentTimeFrame>
<MessageContentTimeFrame>P0Y2M0DT0H0M0S</MessageContentTimeFrame>
<AppointmentPercentageRecent>0</AppointmentPercentageRecent>
<AppointmentRecentContentTimeFrame>-P0Y0M0DT0H0M0S</AppointmentRecentContentTimeFrame>
<AppointmentContentTimeFrame>P1Y0M0DT0H0M0S</AppointmentContentTimeFrame>
<NewAppointmentWithReminderSetPercentage>0</NewAppointmentWithReminderSetPercentage>
<FixUpCalendarReminders>false</FixUpCalendarReminders>
32
<TaskCount>0</TaskCount>
<MessageFiles />
</TaskParameters>
</TaskConfig>
</TaskConfigList>
<WellKnownProfileType>2 MB</WellKnownProfileType>
</MailboxStoreProfile>
3. For public store initialization, customize the <PublicStoreProfile> section in the configuration file as follows:
<PublicStoreProfile>
<SortField>2147483626</SortField>
<TaskConfigList>
<TaskConfig d4p1:type="InitializePublicStoreTask" xmlns:d4p1="http://www.w3.org/2001/XMLSchema-instance">
<TaskCount>0</TaskCount>
<TaskParameters d4p1:type="InitializePublicStoreParameters">
<MessageFiles/>
<TopLevelFolderCount>1</TopLevelFolderCount>
<NonTopLevelFolderCount>1</NonTopLevelFolderCount>
<MinimumFolderDepth>1</MinimumFolderDepth>
<AverageFolderDepth>2</AverageFolderDepth>
<MaximumFolderDepth>3</MaximumFolderDepth>
<MinimumMessageCount>5</MinimumMessageCount>
<AverageMessageCount>10</AverageMessageCount>
<MaximumMessageCount>15</MaximumMessageCount>
<UseOrdinalFolderName>false</UseOrdinalFolderName>
</TaskParameters>
</TaskConfig>
</TaskConfigList>
<WellKnownProfileType>Default</WellKnownProfileType>
</PublicStoreProfile>
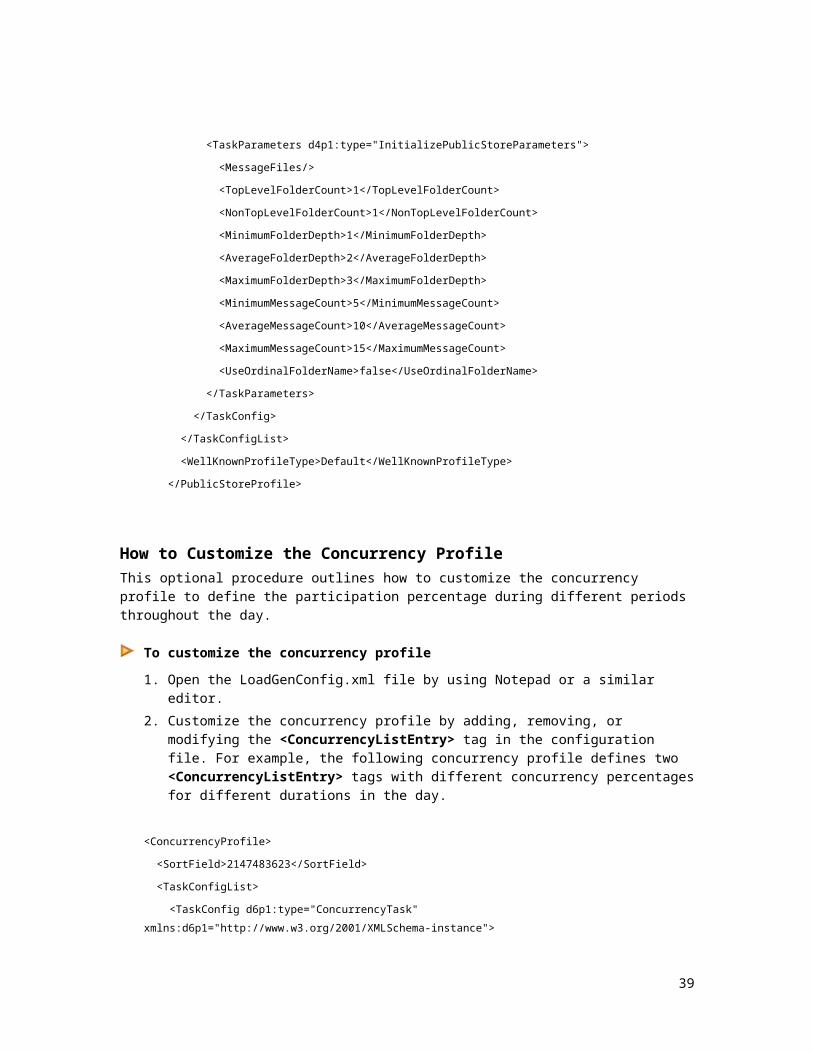
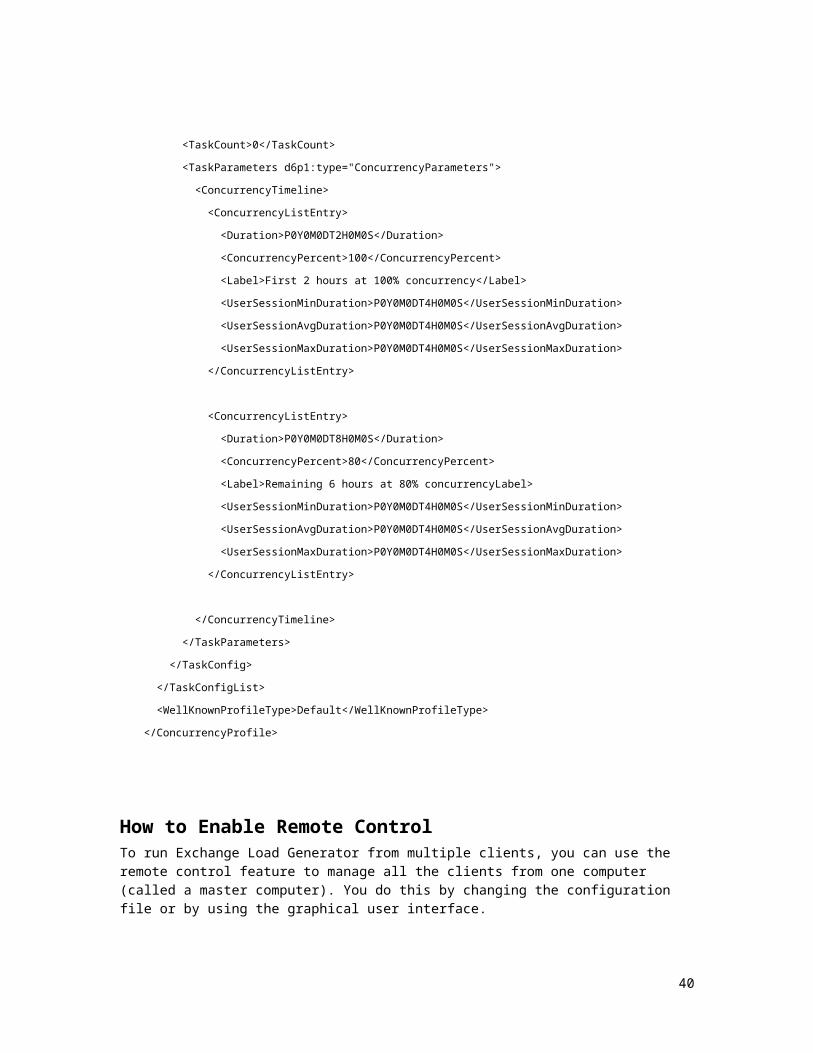
How to Customize the Concurrency ProfileThis optional procedure outlines how to customize the concurrency profile to define the participation percentage during different periods throughout the day.
33

To customize the concurrency profile
1. Open the LoadGenConfig.xml file by using Notepad or a similar editor.
2. Customize the concurrency profile by adding, removing, or modifying the <ConcurrencyListEntry> tag in the configuration file. For example, the following concurrency profile defines two <ConcurrencyListEntry> tags with different concurrency percentages for different durations in the day.
<ConcurrencyProfile>
<SortField>2147483623</SortField>
<TaskConfigList>
<TaskConfig d6p1:type="ConcurrencyTask" xmlns:d6p1="http://www.w3.org/2001/XMLSchema-instance">
<TaskCount>0</TaskCount>
<TaskParameters d6p1:type="ConcurrencyParameters">
<ConcurrencyTimeline>
<ConcurrencyListEntry>
<Duration>P0Y0M0DT2H0M0S</Duration>
<ConcurrencyPercent>100</ConcurrencyPercent>
<Label>First 2 hours at 100% concurrency</Label>
<UserSessionMinDuration>P0Y0M0DT4H0M0S</UserSessionMinDuration>
<UserSessionAvgDuration>P0Y0M0DT4H0M0S</UserSessionAvgDuration>
<UserSessionMaxDuration>P0Y0M0DT4H0M0S</UserSessionMaxDuration>
</ConcurrencyListEntry>
<ConcurrencyListEntry>
<Duration>P0Y0M0DT8H0M0S</Duration>
<ConcurrencyPercent>80</ConcurrencyPercent>
<Label>Remaining 6 hours at 80% concurrencyLabel>
<UserSessionMinDuration>P0Y0M0DT4H0M0S</UserSessionMinDuration>
<UserSessionAvgDuration>P0Y0M0DT4H0M0S</UserSessionAvgDuration>
<UserSessionMaxDuration>P0Y0M0DT4H0M0S</UserSessionMaxDuration>
</ConcurrencyListEntry>
</ConcurrencyTimeline>
</TaskParameters>
</TaskConfig>
</TaskConfigList>
34
<WellKnownProfileType>Default</WellKnownProfileType>
</ConcurrencyProfile>
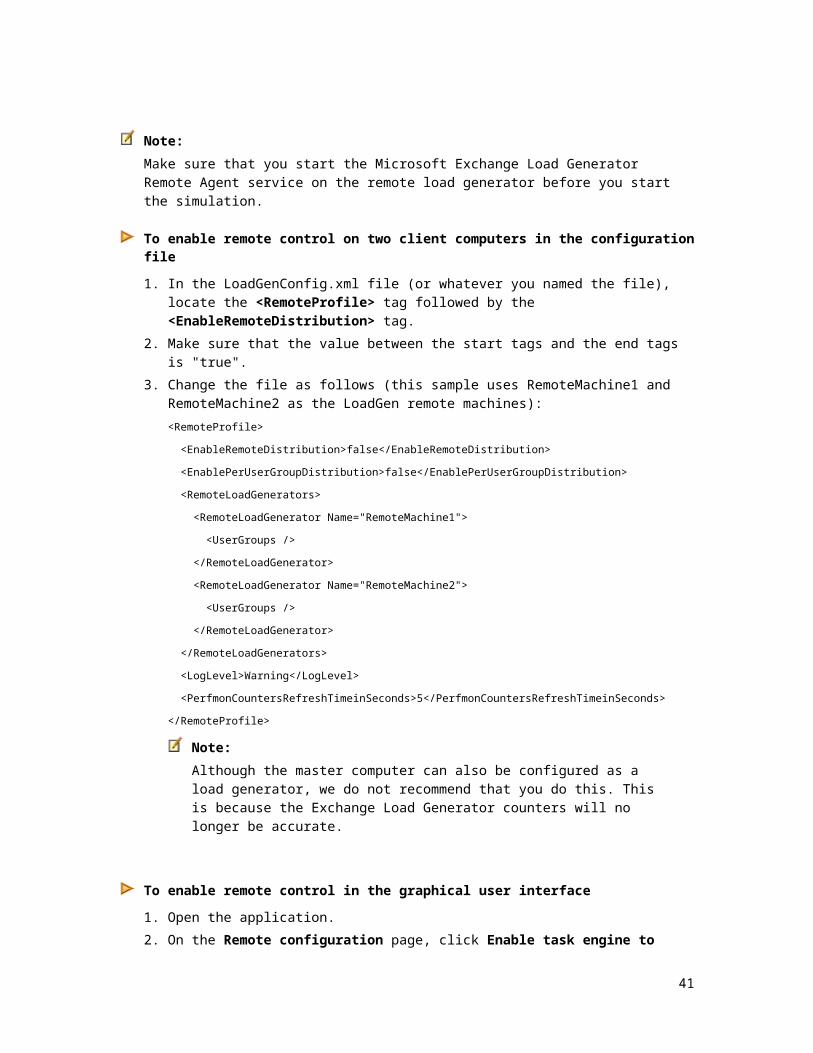
How to Enable Remote ControlTo run Exchange Load Generator from multiple clients, you can use the remote control feature to manage all the clients from one computer (called a master computer). You do this by changing the configuration file or by using the graphical user interface.
Note: Make sure that you start the Microsoft Exchange Load Generator Remote Agent service on the remote load generator before you start the simulation.
To enable remote control on two client computers in the configuration file
1. In the LoadGenConfig.xml file (or whatever you named the file), locate the <RemoteProfile> tag followed by the <EnableRemoteDistribution> tag.
2. Make sure that the value between the start tags and the end tags is "true".
3. Change the file as follows (this sample uses RemoteMachine1 and RemoteMachine2 as the LoadGen remote machines):
<RemoteProfile>
<EnableRemoteDistribution>false</EnableRemoteDistribution>
<EnablePerUserGroupDistribution>false</EnablePerUserGroupDistribution>
<RemoteLoadGenerators>
<RemoteLoadGenerator Name="RemoteMachine1">
<UserGroups />
</RemoteLoadGenerator>
<RemoteLoadGenerator Name="RemoteMachine2">
<UserGroups />
</RemoteLoadGenerator>
</RemoteLoadGenerators>
<LogLevel>Warning</LogLevel>
<PerfmonCountersRefreshTimeinSeconds>5</PerfmonCountersRefreshTimeinSeconds>
</RemoteProfile>
Note: Although the master computer can also be configured as a load generator, we do not recommend that you do this. This is because the Exchange Load Generator counters will no longer be accurate.
35

To enable remote control in the graphical user interface
1. Open the application.
2. On the Remote configuration page, click Enable task engine to distribute the load to remote load generators.
3. On the Remote configuration page, click Enable load balancing on remote load generators to enable or disable load balancing.
4. From the drop-down list in Remote logging level, select the log level that you want.
5. Add or delete load generators using the Remote Load Generators selection box.
To enable logging on the remote load generator
1. In the LoadGenConfig.xml file (or whatever you named the file), locate the <RemoteProfile> tag, and then the <LogLevel> tag that follows it.
2. The default value of LogLevel is Off. This means no log file will be generated on the remote load generator. To enable the log file, type any of the following values depending on the log levels that you want: Information, Error, Warning, Verbose.
Information refers to informational messages, warnings, and error-handling messages.
Error refers to output error-handling messages.
Warning refers to output warnings and error-handling messages.
Verbose refers to output all debugging and tracing messages.
How to Enable Stress ModeThis optional procedure explains how to enable stress mode.
To enable stress mode
1. Open the LoadGenConfig.xml file by using Notepad or a similar editor.
2. Enable stress mode by setting the <StressMode> tag to true.
How to Initialize the Exchange Load Generator TestBefore you run a Microsoft® Exchange Server Load Generator test, you must initialize the mailboxes that will be used for the test. The initialization process stores much data in each mailbox based on the <MailboxStoreProfile> tag in the configuration file. You should only run initialization from one computer at a time or use remoting.
However, if search indexing is running on the server, it competes with Exchange Load Generator for CPU resources. Depending on whether your goal is to run a highly accurate test or not, you
36
can either disable the search service if you are not concerned about accuracy. Or if you do, you have two choices for running the Exchange Load Generator initialization.
Run Exchange Load Generator initialization on the server with search service disabled during initialization. As soon as the initialization has finished, enable the search service and let it complete the indexing process all at one time. Be aware that this activity could take a very long time.
When you initialize the test, Exchange Load Generator adds or deletes messages in the Inbox and folders of each user in the test so that each mailbox has the number of messages specified in the <MailboxStoreProfile> tag. Calendar items and Contacts are handled similarly. Therefore you can re-run initialization to set the mailboxes back to how they were before you ran the test.
Note: Initialization can take several hours, or even a full day(s), to finish.
The procedure in this topic describes how to initialize the test using the command line and the configuration file. When you use this method, you must run a separate command for the mailbox store and for the public store.
If you use the graphical user interface, the mailbox store and public store initialization is automatically done together. You can step through the user interface until you are at the Configuration summary page, where you are given two choices:
Start the initialization phase. We recommend that you do this before you run the test.
Skip the initialization phase and run the simulation immediately
To initialize the test
1. Log on to the client computer by using domain credentials. If you have not joined the client computer to a domain, log on with a local administrator account. We recommend that you use a domain account because the user experience will be enhanced.
2. Open a command shell and locate the Exchange Load Generator installation directory.
Run the command LoadGenCmd.exe /r /c <configurationfile>, where configurationfile is the name of your configuration file. By default, this is LoadGenConfig.xml in the current directory if you have run LoadGenCmd.exe /g. Therefore, if you have not renamed your configuration file, the command is LoadGenCmd.exe /i.
ImportantTo view detailed trace information about the actions that the tool is doing, you can add a trace listener as a command-line option. Trace listeners can be files. Alternatively, they can be the console if you want to view the output on screen. To view the output on screen, add the option /add console. To output the trace.log, add the /add trace.log option at the command line. For example:
C: \Program Files\Exchange Server Load Generator>LoadGenCmd.exe /i /add trace.log
Microsoft Exchange Load Generator
Configuring LoadGen task engine…
37
Load settings…
NOTE: There are no trace listeners found. You can add/remove shared trace listeners.
Starting mailbox initialization…
3. Monitor the progress of initialization tasks by using performance counters. Click Start, click Run, type perfmon, and then click OK.
4. Add the following performance counters to your view:
Exchange Load Generator(_Total)\Task Queue Length
Exchange Load Generator(_Total)\Tasks Completed
Exchange Load Generator(_Total)\Tasks Dispatched
The Tasks Dispatched counter equals the number of users whom you have configured for the test. One initialization task is dispatched for each user during the initialization process. The Tasks Completed counter shows the number of initialization tasks that have been completed. This value slowly increases to equal the value of the Tasks Dispatched counter until the initialization process is complete. The Tasks Queue Length counter displays the number of tasks that remain to be run. This value goes to zero when the initialization process is finished.
5. To cancel the initialization process, see How to Stop the Simulation Process.
Note: During initialization, Exchange Load Generator will stop if it encounters errors such as network errors or errors connecting to the Exchange server or Active Directory. If you restart the initialization after you resolve the errors, Exchange Load Generator restarts with the first user. It does not delete and re-create the messages already in the Inbox and folders. This applies also to Calendar items and Contacts.
6. If you decide to initialize public folders, run the command LoadGenCmd.exe /p /c <configuration file>, where configuration file is the name of your configuration file. Exchange Load Generator randomly determines the number of subfolders and messages in each folder, based on the minimum, maximum, and average parameters that are set in <PublicStoreProfile>.
When Exchange Load Generator determines the number of subfolders and messages to create, it will create them if the number of existing folders is less. Alternatively, Exchange Load Generator will delete some existing public folders if the number of existing folders is more. If Exchange Load Generator stops the initialization, when you run it again and decide to initialize public folders again, the number of subfolders and messages Exchange Load Generator creates will not necessarily match the numbers from the previous initialization. We recommend that you delete all existing public folders before you run initialization again.
38
How to Run the Exchange Load Generator TestA typical test that has an average number of users is set to take ten hours as the duration of the simulation. Allow for at least two hours for a sufficient warm-up. After this warm-up period, the clients and the server operate at a sustained baseline because the intensive startup processes have completed. After the server starts and code is paged into memory, the server operates in a consistent pattern. If the mailbox store database is new, more database activity can occur as index pages split. The server does not reach a sustained baseline for adequate benchmarking until this activity level decreases.
You should collect test information when the server is in this consistent state. After the server has reached a sustained baseline, it must run long enough to collect statistically significant data. The time this takes depends on the complexity of the user model and the cumulative rate at which user actions are being generated. Perform a long calibration test run before you run your actual tests. For example, if you perform an eight-hour test run and find variation from hour to hour, but not between two-hour segments, the results are consistent. This indicates that your test runs should include at least two hours where the server has reached a sustained baseline of consistent behavior.
For information about performance counters and running Performance Monitor (Perfmon) so that you can monitor the progress of the simulation, see Performance Counters Reference.
To run the Exchange Load Generator test
1. Start Exchange Load Generator. For the three methods to start the test, see How to Start Exchange Load Generator.
2. Log on to the client computer that has domain credentials. If you have not joined the client computer to a domain, log on with a local administrator account. We recommend that you use a domain account because the user experience will be enhanced.
3. Open a command shell and locate the Exchange Load Generator installation directory.
4. Run the command LoadGenCmd.exe /r /c <configurationfile>, where configurationfile is the name of your configuration file. By default, this is LoadGenConfig.xml in the current directory. If you have not renamed your configuration file, you only need to run LoadGenCmd.exe /r.
Important: To view detailed trace information about the actions that the tool is performing, you can add a "trace listener" as a command-line option. Trace listeners can be either files or the console, if you want to view the output on screen. To view the output on screen, add this option to the command line: /add console. To output to a file that is named trace log, add this option to the command line: /add trace.log.
5. For running a test using the graphical user interface, after you have opened the tool, follow the instructions on the Welcome page to Start a new test.
39
How to Stop the Simulation ProcessFrom the graphical user interface, on the Simulation in Progress screen, click Stop Simulation.
From the command line, to cancel the process from the keyboard, press the keyboard shortcut Ctrl+C. The task engine will be stopped as soon as possible. To force the task engine to stop immediately, press Ctrl+C repeatedly until you are returned to a command prompt.
How to Repeat the TestThis is an optional step. It is common to run subsequent tests using different client numbers and characteristics. Running subsequent tests gives you a better idea of the capabilities of the Microsoft Exchange server. Be prepared to rerun your test to validate the test results. Also, be sure to allocate enough time in your test cycles to do this.
Running Exchange Load Generator as a Command-Line ProgramThere are several tasks or actions that you can run for Exchange Load Generator by using the command-line program LoadGenCmd.exe. One of the key tasks is to generate the generic configuration file. You must do this in order to set up the adjustable parameters for the test.
When you start Exchange Load Generator at a command prompt, you must indicate if you want to initialize users or run a simulation. You cannot do these tasks from the same command. You must run Exchange Load Generator separately for each task. Additionally, you must create user accounts before generating a configuration file.
To run Exchange Load Generator at a command prompt, locate the LoadGenCmd.exe program, which is in the directory where Exchange Load Generator was installed. Click Start, click Run, and type cmd. If it is required, change the directory path to the path of the LoadGenCmd.exe program, and continue with running the applicable tasks.
The syntax for running Exchange Load Generator as a command-line program is as follows:
LoadGenCmd [Action Argument] [Configuration Argument]
The configuration argument is Config [filename] = Config file (default is /c) LoadGenConfig.xml. The following table presents action arguments with their examples of use.
Action Argument Example of use Description
Help /h or /? The help for the command-line program
LoadCtr /l counter.xml Load performance counters
UnloadCtr /u counter.xml Unload performance counters
AddTrace /add trace log Add trace listeners
SupTrace /sup console Suppress trace listeners
40
Action Argument Example of use Description
EnsMessage /ens *.msg Make sure that message files are formatted correctly and can be opened successfully
GenConfig /g Generate a generic configuration file
InitPrivStore /i Initialize mailbox stores
PrepPublicStore /p Prepare the public store
RunLoadSim /r Run load simulation
Running Exchange Load Generator TasksThe default task parameters for Microsoft® Exchange Load Generator are set up in the LoadGenConfig.xml file. This can be generated by using the command LoadGenCmd.exe /g. To customize the test tasks, you have to edit the configuration file and save it to a directory of your choice. You can also rename it if you choose.
Access the configuration file in either of the following two ways.
From the command-line tool: LoadGenCmd.exe /r /c <path>\<config.xml> From the graphical user interface: After you have started the tool by clicking
LoadGenWin.exe in the installation directory, select the file from the Start a new test screen.
This topic includes information about how to set up the task information from the command line (LoadGenCmd.exe) and from the graphical user interface (LoadGenWin.exe).
Setting Parameters using LoadGenCmd and the Configuration FileAfter you run LoadGenCmd to generate a new configuration file, you then make any required changes in this generated file for the test simulation run.
Note: You can edit the XML file by using an editor of your choice. To download XML Notepad 2007, go to the XML Downloads page at http://go.microsoft.com/fwlink/?linkid=8078.
A typical scenario for setting parameters is as follows:
Generate a new configuration file by using LoadGenCmd.exe /g.
Open the configuration file and change parameters as required. Important XML tags include <ActionProfile> and <ActionCount>.
There is an <ActionProfile> tag for each defined user group. This tag indicates the start of the XML that is related to tasks and their parameters, for a particular user group.
41
In the XML script, a task is of the format <tasknameActionCount>. Therefore, for the logon task, this would be <LogonActionCount>.
Additionally, <ActionProfile> has the WellKnownProfileType attribute, which will contain a value like Outlook_200 or Custom (same as the UI drop down). If you select the Custom profile, the task parameters can be changed according to the user requirements of the simulation.
Caution: We encourage you to use the well-known profiles that are provided by Exchange Load Generator. Avoid creating a custom profile unless you are very familiar with Exchange Load Generator parameters, and you understand what type of difference your customization will make in terms of the load that is generated on the server.
Running the Simulation Using LoadGenCmd.exeWhen the action profile has been set, run LoadGenCmd.exe /r /c config.xml. This runs the simulation based on the configuration.
Selecting the Action Profile Using LoadGenWin.exeWhen you run LoadGenWin.exe, you are provided with the user interface with which to select the Action Profile type. As you step through the user interface, in the Specify test user groups page, under Action Profile, select Custom.
However, there is no user interface for editing task parameters so if you want a custom profile, do the following:
1. On the Configuration summary page, save the configuration file.
2. Close the Microsoft Exchange Load Generator tool.
3. Open the saved configuration file in Notepad or a similar application, manually change the required task parameters, and then save the file when you are completed.
4. Open the Microsoft Exchange Load Generator tool. (Locate LoadGenWin.exe and double-click it.)
5. On the Welcome to Exchange Load Generator landing page, click Start a new test, provide the saved configuration file name on the next page, and then click Continue.
6. Continue paging through until you reach the Configuration summary page, and then click Start the initialization phase (recommended before running the test).
Changing the XMLThe following are the tasks that can be run during simulation. To change the XML, search for the task and change the parameters to customize the file. See Customizing the Exchange Load Generator Test for information about the parameters.
BrowseCalendar
42
BrowseContacts
BrowsePublicFolder
BrowseTasks
CreateContact
CreateFolder
CreateTask
DeleteFolder
DeleteMail
DownloadOab
EditRules
EditSmartFolders
ExportMail
Logoff
Logon
MailboxStoreProfile
MakeAppointment
MoveMail
PostFreeBusy
PublicFolderPost
PublicStoreProfile
ReadAndProcessMessages
RequestMeeting
SendMail
Search
Using System Monitor and Exchange Load Generator DataExchange Load Generator performance counters represent only a partial view of the operation of a system. To fully understand how the system works, analyze the information in the Windows and Exchange counters by running Windows® System Monitor during the Exchange Load Generator test.
Use System Monitor data to do the following:
Track how closely various resources are to saturation, and adjust subsequent Exchange Load Generator tests accordingly.
Use the server performance data to identify bottlenecks and resources that are in high demand, and consider re-tuning the system and then running the same test again.
43
You should log the System Monitor data from both the Exchange server and the Exchange Load Generator client on a single, separate computer. For more information about consolidating your log files on a single computer, see How to Consolidate System Monitor Data.
Questions to Consider when Looking at Test ResultsConsider the following questions when looking at Exchange Load Generator test results and the performance data from System Monitor. To additionally help you answer these questions, view the log files in Exchange Load Generator and System Monitor.
Were there any errors in the test? Did they significantly affect the load?
You can use both the LoadGen.log file and Windows Event Viewer to locate any test errors. To determine the validity of the test, examine the type and quantity of errors.
Did the client computers create the expected load?
If too many users are simulated per client computer, Exchange Load Generator generates less than the expected load. To determine whether too many users are causing Exchange Load Generator to generate a lighter load, you can designate a control client that has one-fourth or one-eighth the number of users as the other client computers as a control for your test. If the per-user rate of events that Exchange Load Generator generates is different for the control client and the other clients, your experiment is invalid because the workload that is generated is incorrect. If your other client computers are bottlenecked, they will generate less than the expected requests. Additionally, if you compare the response times between the regular clients and the control client, you can help determine whether the number of users per client computer is affecting the results.
What was the actual load on the server with regard to transactions per user per day? Does this match the expected value?
Make sure that you answer these two questions. To better understand the accuracy of the test and the performance characteristics of a server, consider the actual work that the server performed. If the server performed a different amount of work than expected, your test represents a different workload than intended.
Were there any server resources that were saturated? Were there any software queues growing unbounded?
To verify this we suggest you use the performance counters and thresholds that are specified in the following locations.
Exchange 2010
http://technet.microsoft.com/en-us/library/dd335215.aspx
How to Consolidate System Monitor DataYou can consolidate System Monitor (perfmon) data by logging all Exchange Load Generator client counters and Exchange server System Monitor counters to one data log instead of having one log per computer.
44
To log all Exchange Load Generator counters and Exchange server counters to one data log
1. Log on to the computer on the domain where you want to log all System Monitor data.
2. Open Services: Click Start, point to Programs, point to Administrative Tools, click Computer Management, and then click Services.
3. In Services, in the results pane, under Name, right-click Performance Logs and Alerts, and then click Properties.
4. In Performance Logs and Alerts Properties (Local Computer), click the Log On tab, and then click This account.
5. Click Browse.
6. In Select User, select the domain administrator account, and then click OK.
7. On the Log On tab, in the Password box, type the password for the domain administrator account.
8. In the Confirm password box, retype the password for the domain administrator account.
9. Click OK.
10. Close Services.
11. Click Start, click Run, and then type perfmon.msc to access the Performance dialog box.
12. In Performance, click System Monitor, and then click the Add (+) icon on the toolbar to open the Add Counters dialog box.
13. In the Add Counters dialog box, click Select counters from computer, and then type the server or client name in the corresponding list.
14. In the Performance object list, select the performance object to add. Minimally, you should add Exchange Load Generator Engine and Exchange Load Generator User Groups for each client.
15. Click All counters to add all counters for the object, or click Select counters from list to individually select the counters to be added for the object.
16. Repeat Steps 14 and 15 for each performance object to be monitored for this computer.
17. Repeat Steps 12 to 16 for each additional client or server for which you want to consolidate the logs.
Operational Recommendations for Using Exchange Load GeneratorThe following operational recommendations will help you achieve solid results from the Exchange Load Generator tests.
45
Simulating Cached ModeExchange Load Generator simulates the cached mode of Microsoft Office Outlook 2003 and later versions, through a combination of tasks that are common to online mode. To simulate cached mode, use the Cached Mode client type as a starting point to increasing and decreasing task frequencies to match your user profiles.
Using Stress ModeBy using stress mode, you can run a test with the Exchange Load Generator users performing their tasks as fast as they can. When in this mode, Exchange Load Generator does not spread out the tasks throughout the defined length of a simulation day, but runs them as fast as the server or client can and will finish probably faster and unpredictably.
You should only use this mode when the objective is to stress the server at its mode and ignore the deterministic way (spreading a fixed load for a fixed number of hours) that Exchange Load Generator runs. Make sure while running in stress mode that you are not bound by the performance of your Loadgen clients but of the server.
RPC over HTTPTo use RPC over HTTP, your topology has to be configured to use one or more RPC proxy servers. Instructions for doing this using the configuration file are in the topic, Customizing the Exchange Load Generator Test. The following are two recommendations for user loads when you use RPC over HTTP.
Does the Connector Behavior Accurately Simulate Outlook?With a reasonable number of users who are running on an Exchange Load Generator computer, inactive RPC/HTTP connections will be disconnected automatically by the Windows RPC runtime component at 90-second intervals. This means that with such a small level of load running through RPC/HTTP, you may find that the number of active connections is very low.
How Many Users does the Client Support?The number of users who are supported by the client depends on the actions and frequencies specified in the configuration file. Generally, the number of users is limited by the connections and ports configured on the server. If you are running Outlook 2003 online simulation, there are two RPC connections to the mailbox store and one to the public folder for each user. Each connection generates two HTTP connections (data in and data out). Make sure that the server is configured correctly and there are no other applications on either side that consume more TCP port numbers than you expected. For a client computer that has a single processor (2 GHz) and 1 gigabyte of RAM, no major issues are presented in supporting 1200 to 1500 RPC over HTTP users driven by Exchange Load Generator. The command-generated LoadGenConfig.xml file would be used for setting up the configuration.
Make sure that you monitor the value of \Exchange Load Generator Engine\Task Queue Length to make sure that it is not increasing. The value of \Exchange Load Generator Engine\Task
46
Completed/sec and \Exchange Load Generator Engine\Task Dispatched/sec should also match. This means that the client is catching up. Usually the out-of-memory problem or MAPI connection errors occur you hit the CPU bottleneck.
Distribution Groups, Query-Based Distribution Groups, and Global CatalogsIn the Read and Process Message task, you can configure a percentage of the messages to be sent to distribution groups (also known as DLs) or query-based distribution groups. Although you can configure the average size of a distribution group in Exchange Load Generator, query-based distribution groups are generally larger than the distribution groups. This is because they can include all per database, per server, or for a whole topology.
Sending mail to query-based distribution groups can severely stress the server and global catalogs’ domain controller when the query-based distribution groups are being expanded. We recommend that you set up a dedicated expansion server for the distribution groups. You should also modify Exchange Load Generator’s distribution groups and query-based distribution groups accordingly. Additionally, consider using the “one per MDB” query-based distribution group that is typically smaller.
Deployment Verification Using Exchange Load GeneratorExchange Load Generator can be an effective tool for deployment verification. For example, you can use it to verify that you will be able to support the number of users who have been planned for your deployment. You can also examine how the system might react to stress loads that are heavier than what you would typically expect.
Important: Although Exchange Load Generator can be used to verify your deployment in various ways, it should not be used in production environments.
We recommend that Exchange Load Generator be run for verification in separate topologies and then rolled out on production environments. Also, it is a good idea to run each Exchange Load Generator test multiple times. This will help make sure of the validity of your results.
Capacity Planning Using Exchange Load GeneratorExchange Load Generator has profiles that enable you to verify deployments and that help in capacity planning. To model your deployment’s users, enable or disable tasks and change the settings and task frequencies of the 200 profile. The 200 profile has many features to better simulate real-life users.
Caution: We encourage you to use the well-known profiles such as "200" that are provided by Exchange Load Generator. Avoid creating a custom profile unless you are very familiar with Exchange Load Generator parameters, and you understand what type of difference your customization will make in terms of the load that is generated on the server.
47
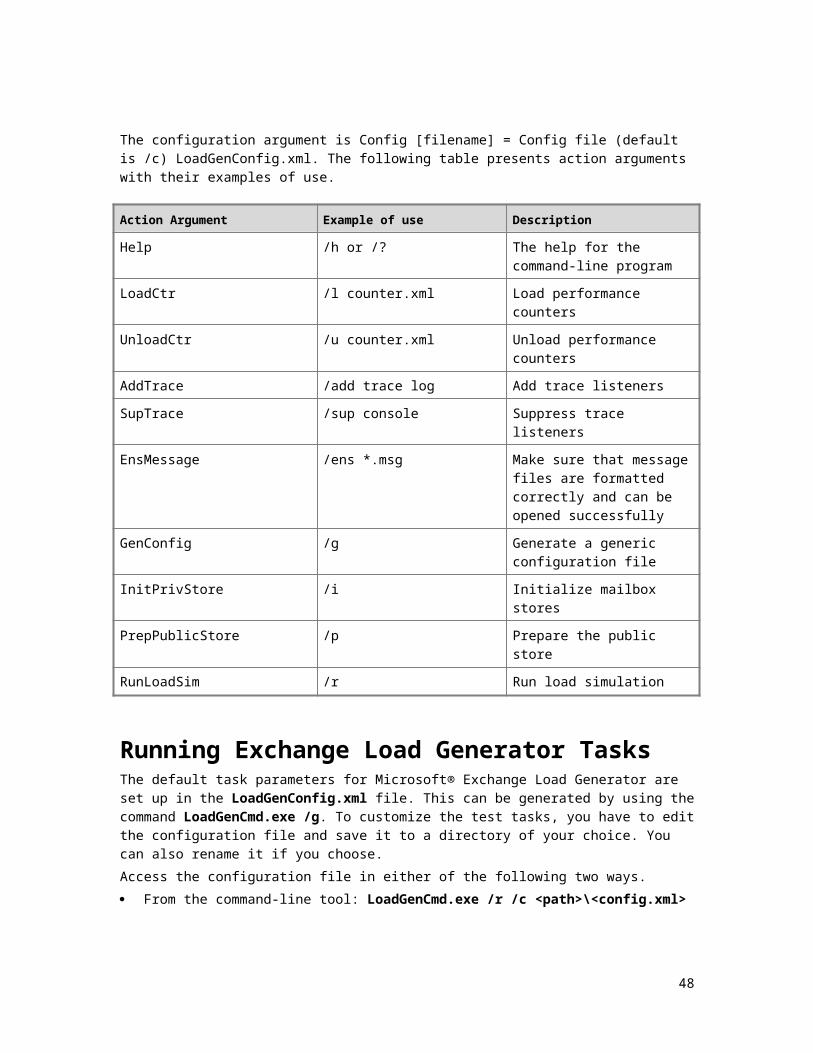
To control the stress load that Exchange Load Generator puts on the Exchange server, you can change the duration settings of the simulation in the Specify test settings page of the graphical user interface, and enable or disable tasks. Exchange Load Generator calculates the stress from the frequencies of the tasks, and then spreads the load homogeneously across the configured length of the simulation day. For example, if Exchange Load Generator must run a task four times in an eight-hour daytime period, it will run a task every two hours. By increasing the task frequency to eight times a day and keeping the length of the simulation day setting the same, a task will be run every hour, thereby doubling the stress load. Therefore, if the length of the simulation day increased, the stress is actually diminished, because the same load is spread over a longer time. To increase the stress load, increase the task frequencies and/or reduce the simulation day length.
Re-create the Topology Every Time a Topology Setting ChangesAfter you change the topology settings, you should re-create the topology to make sure that the physical topology matches your settings.
Back up and Restore Databases to Skip Repeating the Initialization PhaseAfter you initialize users for a test run that will be changed and repeated over time, it is a good idea to back up the databases so that the initialization process does not have to be repeated. After each test run, restore the databases and re-start your tests without having to reinitialize all users.
Note: Backing up and restoring databases to skip repeating the initialization phase makes sense only if the initialization and topology settings are unchanged between test runs for the server in question.
Monitor for SaturationThe typical goal of Exchange Load Generator tests is to analyze the load that the server can support and still provide sufficient response times. However, sometimes the goal of Exchange Load Generator tests is to determine what load the network can support while still providing sufficient response times. You should saturate the resource you are focusing on with the test, but not saturate other resources in the test. For example, you cannot effectively study the server behavior if the client computers or the network are saturated.
The following two methods can be used to monitor for saturation:
Monitor the demands on the clients, network, and server.
Do not let the clients become the bottleneck in an experiment.
Monitor Mail QueuesUse System Monitor to make sure that mail delivery is working correctly.
48

If there are several messages in the queue, this indicates a server bottleneck. Because the server must operate at a consistent baseline for sufficient benchmarking, a server bottleneck invalidates your test results. For example, if the queue is continually growing for the whole duration of the test, the server is probably overloaded. This indicates a bottleneck.
Specific Features and Behaviors of Exchange Load GeneratorThis topic contains in-depth observations about some specific features and behaviors of Exchange Load Generator.
Public FoldersExchange Load Generator has two public folder tasks: Public Folder Post and Browse Public Folder. Both tasks will choose any public folder in the MAPI TLH (the default public folder root), except for one named Internet Newsgroups.
Exchange Load Generator can choose other folders to browse or post, even if it did not create them. Therefore, in such an attempt, Exchange Load Generator may not always run some tasks and indicate it had access denied. We recommend that you have only the public folders that were created by Exchange Load Generator.
When Exchange Load Generator creates its public folders, it changes the permissions to give owner rights as default. This means that any user can edit, delete, or add new posts. This is required for Exchange Load Generator to simulate multiple users when logging on to users using their respective accounts. If the permissions are changed in any way, Exchange Load Generator might not always create posts or browse the public folders.
Mail Flow and RecipientsA core functionality of Exchange Load Generator is that it can send mail to users, distribution groups, and query-based distribution groups. When you set up a complex topology, you must understand how Exchange Load Generator will decide who it will send mail to.
There are two distinct scenarios that cause Exchange Load Generator to send mail. The first is when Exchange Load Generator is processing the Inbox or browsing old mail and tries to Reply or Reply all to one or more messages. In this scenario, Exchange Load Generator sends the reply to the sender and recipients (if Reply all), regardless of whether the users are in the topology. This means that when a topology is initialized, all the mail that is populated in the mailbox is consistent with the topology settings of the client that initialized all mailboxes. As test runs occur, e-mail is added from clients that have their own topology configuration, which can be the same as the one that initialized the mail. If at any point there is a change in the topology (for example, a server is removed or users are added or removed), the mail that is already in the user’s mailboxes is not affected. If Exchange Load Generator tries to reply to a sender that no longer exists, a non-delivery report (NDR) occurs.
49

The other scenario is with regard to sending a new mail. When sending a new mail, Exchange Load Generator uses the information in the send mail task for selecting the number of recipients and whether distribution groups and query-based distribution groups should be added. After this step, Exchange Load Generator chooses the recipients based on the test group configuration. For example, if the topology settings are configured so that a server has 1,000 users and the test targets only 10 users, Exchange Load Generator will only consider 10 users as possible recipients. Additionally, the distribution groups and query-based distribution groups will be configured to the 1,000 users. Therefore any mail going to them will end up in users other than the 10 users.
Task Rate, Concurrency Settings, and Stress ModeTo fine-tune stress, it helps to understand how Exchange Load Generator calculates how much load will occur against servers. This calculation process occurs in two steps.
In the first step, Exchange Load Generator calculates the number of tasks that need to run per user group. This is the sum of all task frequencies multiplied by the number of users.
In the second step, Exchange Load Generator sums the number of tasks of all the user groups that the client computer that the test is running on is configured to do. In other words, this is the result of the calculation from the first step. The summed task is spread across the total duration of the simulation. The duration values are set in the Specify test settings page in the graphical user interface as follows:
The length of a 'simulation day' defined in hours, minutes, and seconds
The total length of the simulation defined as forever, or as a specified duration (in hours, minutes, and seconds)
For example, if there is one group that has 100 users and will run the Send Mail task 10 times in an eight-hour configuration, Exchange Load Generator will spread 1,000 tasks across eight hours, running each task every 347 milliseconds (1,000 divided by 8 hours).
Independently of the concurrency settings, the duration of the simulation will stop the test after a designated elapsed time is started. For the previous example, if the duration of the simulation was two or eight hours, the tasks would still run every 347 milliseconds. The difference is that the test would stop in two and eight hours, respectively.
Finally, there is an additional option: stress mode. In stress mode, Exchange Load Generator ignores the concurrency settings and task frequencies. It runs the tasks back-to-back and without a wait for the duration of the simulation. For example, if the duration of the simulation was set to eight hours, the tasks would run for eight hours without the 347 millisecond wait between them. Because only the client, server, and network configurations limit this mode, results will vary extensively from setup to setup. Therefore, we do not recommend this mode for comparing computers or for sizing.
50

Dynamic Mail GeneratorMail messages are now created dynamically as they are needed. This ensures a more unique message mix that is closer to a real environment. The word frequency it based on the language of choice.
The dynamic mail generator has a number of settings that you can specify.o Min/Max/Avg message sizeo Default language (English, French, Spanish, Korean, Turkish)o Language Variation %o Default Body Type (html, rtf, text)o Body Type Variation %o Attachments (just drop the attachments that you want to use into the folder where
the Dynamic Mail Generator is looking.
The dynamic mail generator is setup by default for initialization as well as sending mail.We currently do not have a UI for this feature. You will have to customize your Loadgen XML to change the default settings.
The default settings are:
<GeneratedMailProfile> <SortField>323423</SortField> <TaskConfigList> <TaskConfig d6p1:type="GeneratedMailProfileTask" xmlns:d6p1="http://www.w3.org/2001/XMLSchema-instance"> <TaskCount>0</TaskCount> <TaskParameters d6p1:type="GeneratedMailParameters"> <MessageSizeParameters> <MinimumSize>100</MinimumSize> <MaximumSize>100000</MaximumSize> <AverageSize>30000</AverageSize> <IndexableTextPercentage>100</IndexableTextPercentage> </MessageSizeParameters> <LanguageParameters> <EnglishLanguageWeight>100</EnglishLanguageWeight> <FrenchLanguageWeight>0</FrenchLanguageWeight> <KoreanLanguageWeight>0</KoreanLanguageWeight> <SpanishLanguageWeight>0</SpanishLanguageWeight> <TurkishLanguageWeight>0</TurkishLanguageWeight> </LanguageParameters> <BodyTypeParameters> <HtmlBodyWeight>70</HtmlBodyWeight> <PlainTextBodyWeight>5</PlainTextBodyWeight> <RtfBodyWeight>15</RtfBodyWeight> </BodyTypeParameters> <AttachmentParameters> <AttachFrequency>0.05</AttachFrequency> <AttachmentCount> <MinimumCount>1</MinimumCount> <MaximumCount>5</MaximumCount> <AverageCount>1</AverageCount> </AttachmentCount> <PercentInfected>0</PercentInfected> <MessageFiles> <MessageFile> <Weight>840</Weight> <Pathname>messages\msg00001.msg</Pathname> </MessageFile> </MessageFiles> </AttachmentParameters>
51
</TaskParameters> </TaskConfig> </TaskConfigList> <WellKnownProfileType>Default</WellKnownProfileType></GeneratedMailProfile>In order to use attachments, specify them in the MessageFiles section of the GeneratedMailProfile.
Using Custom MessagesExchange Load Generator has two areas where a custom message mix can be used. One set is for sending new messages and another set is for posting in public folders. The former is defined in the Send Mail task and it is also used by individual mailbox initialization. The latter is defined in the Public Folder Post task.
Exchange Load Generator has one message set for public store initialization. It is also configured in the LoadGenConfig.xml file.
You can use any MSG MAPI message that is formatted correctly with Exchange Load Generator. The following table lists the message mix of the files that are downloaded to the installation directory. The attachments can be documents, clip art, spreadsheets, or any type recognized by the client mail application.
Exchange Load Generator loads in memory all messages used from both message sets, per user group. This means that if you have multiple user groups, even if with the same list of messages to be used, they will be loaded separately and occupy more space in memory. Additionally, the overall memory consumption of Exchange Load Generator increases if many custom messages are used.
The following table lists the message mix of the files that are downloaded to the installation directory. Use these files as is, or customize for your test simulation.
File name Content type Size (in bytes) in DAV
msg00001 HTML 2187
msg00002 HTML 3858
msg00003 HTML 5174
msg00004 HTML 6716
msg00005 HTML 11639
msg00006 HTML 16720
msg00007 HTML 32518
msg00008 HTML 47781
msg00009 HTML 105244
msg00010 HTML 211710
52
File name Content type Size (in bytes) in DAV
msg00011 HTML 313025
msg00012 HTML 530583
msg00013 HTML 106890
msg00014 HTML 2651291
msg00015 HTML w/attachment 6831
msg00016 HTML w/attachment 7869
msg00017 HTML w/attachment 11965
msg00018 HTML w/attachment 18178
msg00019 HTML w/attachment 48299
msg00020 HTML w/attachment 416410
msg00021 HTML w/attachment 1053029
msg00022 RTF 6404
msg00023 RTF 8280
msg00024 RTF 10174
msg00025 RTF 20850
msg00026 RTF 30254
msg00027 RTF 61812
msg00028 RTF 92586
msg00029 RTF 205005
msg00030 RTF 409874
msg00031 RTF 614404
msg00032 RTF 1048846
msg00033 RTF w/attachment 12217
msg00034 RTF w/attachment 15326
msg00035 RTF w/attachment 20881
msg00036 RTF w/attachment 31032
msg00037 RTF w/attachment 61383
msg00038 RTF w/attachment 614192
msg00039 RTF w/attachment 1057303
53
File name Content type Size (in bytes) in DAV
msg00040 Text 1472
msg00041 Text 2287
msg00042 Text 2681
msg00043 Text 3190
msg00044 Text 4900
msg00045 Text 6624
msg00046 Text 11679
msg00047 Text 16607
msg00048 Text 35177
msg00049 Text 68834
msg00050 Text 102574
msg00051 Text 346338
msg00052 Text w/attachment 5661
msg00053 Text w/attachment 6849
msg00054 Text w/attachment 10779
msg00055 Text w/attachment 16521
msg00056 Text w/attachment 38678
msg00057 Text w/attachment 277239
msg00058 Text w/attachment 1051835
Performance Counters ReferenceYou can monitor the progress of the simulation when the test is being run by observing performance counters. To reach the Performance screen, click Start, click Run, type perfmon, and then click OK.
The following two tables list the counters and purposes for the Exchange Load Generator Engine Counter object and the Exchange Load Generator User Groups Counter object.
Note: Do not use the Exchange Load Generator latency counters as a measure of acceptable performance with regard to latency. Instead, use the RPC averaged latency counter on the server.
54

Counter Object for Exchange Load Generator Engine
Counter Purpose
ContentCacheTrims Number of times that the task engine was required to allocate additional space for cached data, where there were no more than 8 regions of 64 MBs available and in-memory contents were removed from the cache. Indicates that task engine does not have sufficient virtual memory to perform an accurate simulation.
ContentCacheTrims/sec. Rate of content cache trims. As the rate increases, overall accuracy of the simulation decreases.
Task Exceptions Count of task executions that resulted in a fatal exception
Task Exceptions/sec. Number of fatal exceptions encountered when running a task per second
Task Interval Number of milliseconds that the engine will wait between dispatching tasks
Task Queue Length Number of items currently in task queue that have not yet been executed
Tasks Skipped Number of tasks that were skipped
Tasks Completed Total number of tasks completed
Tasks Completed/sec. Number of tasks completed per second
Tasks Dispatched Total number of tasks dispatched
Tasks Dispatched/sec. Number of tasks dispatched per second
Counter Object for Exchange Load Generator User GroupsThe counters are listed alphabetically, and within task or action type.
Counter Purpose
Browse Calendar Action Latency Average time (in milliseconds) taken to complete a Browse Calendar action
Browse Calendar Actions Total Browse Calendar actions executed
Browse Calendar Actions/sec. Count of Browse Calendar actions executed
55
Counter Purpose
per second
Browse Calendar Action Latency (95th Percentile)
The 95th percentile value of the time (in milliseconds) taken to complete a Browse Calendar action
Browse Contacts Action Latency Average time (in milliseconds) taken to complete a Browse Contacts action
Browse Contacts Actions Total Browse Contacts actions executed
Browse Contacts Actions/sec. Count of Browse Contacts actions executed per second
Browse Contacts Action Latency (95th Percentile)
The 95th percentile value of the time (in milliseconds) taken to complete a Browse Contacts action
Browse Public Folder Action Latency Average time (in milliseconds) taken to complete a Browse Public Folder action
Browse Public Folder Actions Total Browse Public Folder actions executed
Browse Public Folder Actions/sec. Count of Browse Public Folder actions executed per second
Browse Public Folder Action Latency (95th Percentile)
The 95th percentile value of the time (in milliseconds) taken to complete a Browse Public Folder action
Browse Tasks Action Latency Average time (in milliseconds) taken to complete a Browse Tasks action
Browse Tasks Actions Total Browse Tasks actions executed
Browse Tasks Actions/sec. Count of Browse Tasks actions executed per second
Browse Tasks Action Latency (95th Percentile) The 95th percentile value of the time (in milliseconds) taken to complete a Browse Tasks action
Create Contact Action Latency Average time (in milliseconds) taken to complete a Create Contact action
Create Contact Actions Total Create Contact actions executed
Create Contact Actions/sec. Count of Create Contact actions executed per second
Create Contact Action Latency (95th Percentile) The 95th percentile value of the time (in
56

Counter Purpose
milliseconds) taken to complete a Create Content action
Create Folder Action Latency Average time (in milliseconds) taken to complete a Create Folder action
Create Folder Actions Total Create Folder actions executed
Create Folder Actions/sec. Count of Create Folder actions executed per second
Create Folder Action Latency (95th Percentile) The 95th percentile value of the time (in milliseconds) taken to complete a Create Folder action
Create Task Action Latency Average time (in milliseconds) taken to complete a Create Task action
Create Task Actions Total Create Task actions executed
Create Task Actions/sec. Count of Create Task actions executed per second
Create Task Action Latency (95th Percentile) The 95th percentile value of the time (in milliseconds) taken to complete a Create Task action
Delete Mail Action Latency Average time (in milliseconds) taken to complete a Delete Mail action
Delete Mail Actions Total Delete Mail actions executed
Delete Mail Actions/sec. Count of Delete Mail actions executed per second
Delete Mail Action Latency (95th Percentile) The 95th percentile value of the time (in milliseconds) taken to complete a Delete Mail action
Download OAB Action Latency Average time (in milliseconds) taken to complete a Download OAB action
Download OAB Actions Total Download OAB actions executed
Download OAB Actions/sec. Count of Download OAB actions executed per second
Download OAB Action Latency (95th Percentile)
The 95th percentile value of the time (in milliseconds) taken to complete a Download OAB action
57
Counter Purpose
Edit Rules Action Latency Average time (in milliseconds) taken to complete an Edit Rules action
Edit Rules Actions Total Edit Rules actions executed
Edit Rules Actions/sec. Count of Edit Rules actions executed per second
Edit Rules Action Latency (95th Percentile) The 95th percentile value of the time (in milliseconds) taken to complete an Edit Rules action
Edit Smart Folders Action Latency Average time (in milliseconds) taken to complete an Edit Smart Folders action
Edit Smart Folders Actions Total Edit Smart Folders actions executed
Edit Smart Folders Actions/sec. Count of Edit Smart Folders actions executed per second
Edit Smart Folders Action Latency (95th Percentile)
The 95th percentile value of the time (in milliseconds) taken to complete an Edit Smart Folders action
Export Mail Action Latency Average time (in milliseconds) taken to complete a Export Mail action
Export Mail Actions Total Export Mail actions executed
Export Mail Actions/sec. Count of Export Mail actions executed per second
Export Mail Action Latency (95th Percentile) The 95th percentile value of the time (in milliseconds) taken to complete an Export Mail action
Initialize Mailbox Action Latency Average time (in milliseconds) taken to complete an Initialize Mailbox action
Initialize Mailbox Actions Total Initialize Mailbox actions executed
Initialize Mailbox Actions/sec. Count of Initialize Mailbox actions executed per second
Initialize Mailbox Action Latency (95th Percentile)
The 95th percentile value of the time (in milliseconds) taken to complete an Initialize Mailbox action
Logoff Action Latency Average time (in milliseconds) taken to complete a Logoff action
58

Counter Purpose
Logoff Actions Total Logoff actions executed
Logoff Actions/sec. Count of Logoff actions executed per second
Logoff Action Latency (95th Percentile) The 95th percentile value of the time (in milliseconds) taken to complete a Logoff action
Logon Action Latency Average time (in milliseconds) taken to complete a Logon action
Logon Actions Total Logon actions executed
Logon Actions/sec. Count of Logon actions executed per second
Logon Action Latency (95th Percentile) The 95th percentile value of the time (in milliseconds) taken to complete a Logon action
Make Appointment Action Latency Average time (in milliseconds) taken to complete a Make Appointment action
Make Appointment Actions Total Make Appointment actions executed
Make Appointment Actions/sec. Count of Make Appointment actions executed per second
Make Appointment Action Latency (95th Percentile)
The 95th percentile value of the time (in milliseconds) taken to complete a Make Appointment action
Move Mail Action Latency Average time (in milliseconds) taken to complete a Move Mail action
Move Mail Actions Total Move Mail actions executed
Move Mail Actions/sec. Count of Move Mail actions executed per second
Move Mail Action Latency (95th Percentile) The 95th percentile value of the time (in milliseconds) taken to complete a Move Mail action
Not Implemented Action Latency Average time (in milliseconds) taken to complete a Not Implemented action
Not Implemented Actions Total Not Implemented actions executed
Not Implemented Actions/sec. Count of Not Implemented actions executed per second
Not Implemented Action Latency (95th Percentile)
The 95th percentile value of the time (in milliseconds) taken to complete a Not
59
Counter Purpose
Implemented action
Post Free Busy Action Latency Average time (in milliseconds) taken to complete a Post Free Busy action
Post Free Busy Actions Total Post Free Busy actions executed
Post Free Busy Actions/sec. Count of Post Free Busy actions executed per second
Post Free Busy Action Latency (95th Percentile)
The 95th percentile value of the time (in milliseconds) taken to complete a Post Free Busy action
Public Folder Post Action Latency Average time (in milliseconds) taken to complete a Public Folder Post action
Public Folder Post Actions Total Public Folder Post actions executed
Public Folder Post Actions/sec. Count of Public Folder Post actions executed per second
Public Folder Post Action Latency (95th Percentile)
The 95th percentile value of the time (in milliseconds) taken to complete a Public Folder Post action
Read And Process Messages Action Latency Average time (in milliseconds) taken to complete a Read And Process Messages action
Read And Process Messages Actions Total Read And Process Messages actions executed
Read And Process Messages Actions/sec. Count of Read And Process Messages actions executed per second
Read and Process Action Latency (95th Percentile)
The 95th percentile value of the time (in milliseconds) taken to complete a Read and Process action
Request Meeting Action Latency Average time (in milliseconds) taken to complete a Request Meeting action
Request Meeting Actions Total Request Meeting actions executed
Request Meeting Actions/sec. Count of Request Meeting actions executed per second
Request Meeting Action Latency (95th Percentile)
The 95th percentile value of the time (in milliseconds) taken to complete a Request
60

Counter Purpose
Meeting action
Search Action Latency Average time (in milliseconds) taken to complete a Search action
Search Actions Total Search actions executed
Search Actions/sec. Count of Search actions executed per second
Search Action Latency (95th Percentile) The 95th percentile value of the time (in milliseconds) taken to complete a Search action
Send Mail Action Latency Average time (in milliseconds) taken to complete a Send Mail action
Send Mail Actions Total Send Mail actions executed
Send Mail Actions/sec. Count of Send Mail actions executed per second
Send Mail Action Latency (95th Percentile) The 95th percentile value of the time (in milliseconds) taken to complete a Send Mail action
Synchronize Folders Action Latency Average time (in milliseconds) taken to complete a Synchronize Folders action
Synchronize Folders Actions Total Synchronize Folders actions executed
Synchronize Folders Actions/sec. Count of Synchronize Folders actions executed per second
Synchronize Folders Action Latency (95th Percentile)
The 95th percentile value of the time (in milliseconds) taken to complete a Synchronize Folders action
Task Exceptions Count of task executions that resulted in a fatal exception within the current user group
Task Exceptions/sec. Count of task executions that resulted in a fatal exception per second within the current user group
User Init Action Latency Average time (in milliseconds) taken to complete a User Initiation action
User Init Actions Total User Initiated actions executed
User Init Actions/sec. Count of User Initiated actions executed per second
61
Counter Purpose
User Init Action Latency (95th Percentile) The 95th percentile value of the time (in milliseconds) taken to complete a User Init action
User Term Action Latency Average time (in milliseconds) taken to complete a User Term action
User Term Actions Total User Term actions executed
User Term Actions/sec. Count of User Term actions executed per second
User Term Action Latency The 95th percentile value of the time (in milliseconds) taken to complete a User Term action
Users Active Number of active users in the current configuration
Users Configured Number of users defined in the current configuration
Users Standby Number of inactive users in the current configuration
Scripted Load Modules in the Exchange Load Generator FrameworkThe following topics describe the scripted load modules in the Exchange Load Generator framework.
Description and example of the Exchange Load Generator configuration XML at Exchange Load Generator Configuration XML.
Description of the base set of verbs that all the modules can use at Base Script Verbs.
Information about the POP3 module at The POP3 Module.
Information about the SMTP module at The SMTP Module.
Information about the IMAP4 module at The IMAP4 Module.
Information about the Outlook Web Access module at The Outlook Web Access Module.
Exchange Load Generator Configuration XMLThe Exchange Load Generator configuration XML is used to supply arguments to the script modules. In particular, <ScriptProfile> defines the scripted module-specific parameters.
The following table explains the tags that are used in the <ScriptProfile>.
62
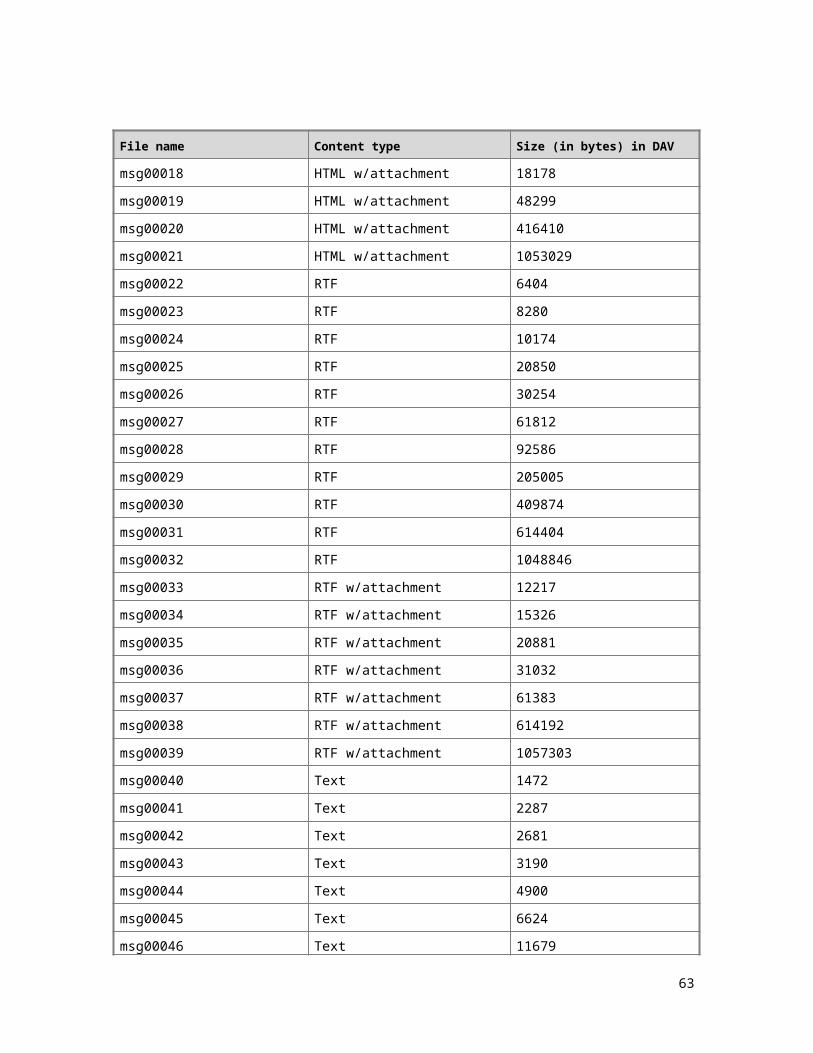
Tag Description
Logging True or false.
LogPath String. The default is the executing directory and module name.
LogLevel Integer. 0-2 increasing amount of detail in the log.
ScriptPath String. Path to the script file.
EncryptedPort True or false. By default, the target port is encrypted.
Server String. The target or destination server.
Port Integer. Port to which requests will be directed.
ProtocolName String. The name of the protocol.
StartDelay Integer. The interval (in) milliseconds to wait between the start of each user instance.
UserCount Integer. Number of script instances. (-1 will run entire UserGroup.)
NearBy Integer. Distance from the current user to search for other users.
Sample Configuration XMLThe XML script is as follows:
<UserGroup>
<ExtendedProperties />
<ScriptProfile>
<ExtendedProperties />
<Logging>true</Logging>
<LogPath>\myModuleLog.txt</LogPath>
<ScriptPath>myModuleScript.txt</ScriptPath>
<EncryptedPort>false</EncryptedPort>
<Server>targetServer</Server>
<Port>25</Port>
<StartDelay>4</StartDelay>
<UserCount>30</UserCount>
63

<NearBy>1</NearBy>
</ScriptProfile>
<ClientType>SmtpModule</ClientType>
<Name>UserGroup2</Name>
<LdapBaseDn>OU=FewUsers,DC=XZPVCB,DC=com</LdapBaseDn>
<StartWaitDuration>P0Y0M0DT0H0M0S</StartWaitDuration>
<RunLengthDuration>P0Y0M0DT14H0M00S</RunLengthDuration>
</UserGroup>
<ClientType/>under<UserGroup/> is used to define which scripted module to simulate. Following is a list of client types supported by Exchange Load Generator.
<ClientType>SmtpModule</ClientType>
<ClientType>PopModule</ClientType>
<ClientType>ImapModule</ClientType>
<ClientType>Owa2013Module</ClientType>
Base Script VerbsThe base class provides a set of verbs that can be used by all the modules. The script can also contain variables that are described in this topic.
Note: Instances of variables and verbs are not related. That is, SEQULIST will be sequential for each script instance.
Table of VerbsThe following table lists the verbs and their functions.
Verb Function
RANDLIST Returns a string from the list of strings inside a file.
Matches "randlist\\(([-_:\\\\.#a-z0-9A-Z]+)\\)"
Example: RANDLIST(c:\temp\myfilelist.txt) returns “hello14”
SEQULIST Returns the next string from a list of strings. Wraps after the ultimate line.
Matches "sequlist\\(([-_:\\\\.#a-z0-9A-Z]+)\\)"
Example: SEQULIST(c:\temp\myfilelist.txt) returns “hello0”
64
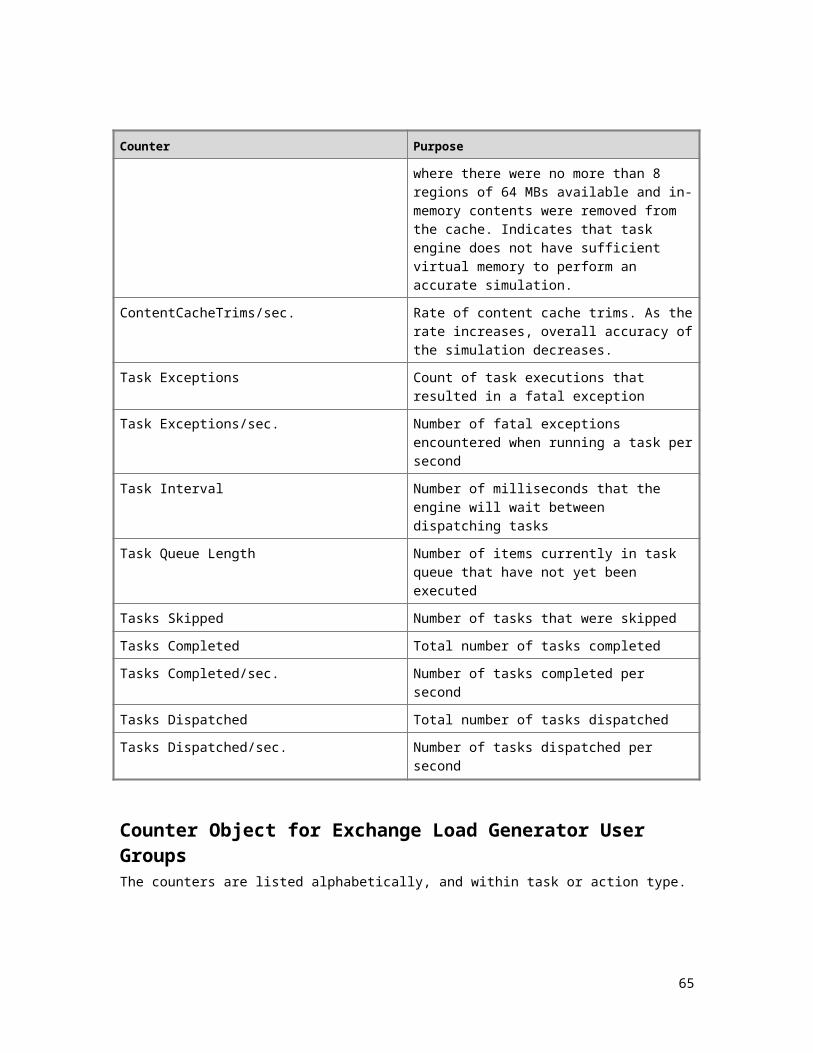
Verb Function
SAMESEQULIST Returns the same string as the previous call to SEQULIST.
Matches "samesequlist\\(([-_:\\\\.#a-z0-9A-Z]+)\\)"
Example: SEQULIST(C:\temp\myfilelist.txt) returns “hello0”
Example: SAMESEQULIST(C:\temp\myfilelist.txt) returns “hello0”
SEQUNUMBER Returns the next number between n1 and n2.
Matches "sequnumber\\(([0-9,]+\\))"
Example: SEQUNUMBER(0,10) returns 1
SAMESEQUNUMBER Returns the same number as the previous call to SEQUNUMBER.
Matches "samesequnumber\\(([0-9,]+\\))"
Example: SAMESEQUNUMBER(0,10) returns 1
RANDNUMBER Returns a random number between n1 and n2.
Matches "randnumber\\(([0-9,]+\\))"
Example: RANDNUMBER(0,100) returns 32
LOOP Starts a loop block.
Matches "loop ([0-9]+)"
Example: LOOP (10)
ENDLOOP Ends a loop block.
Matches "endloop"
Example: ENDLOOP
RANDNUMERIC Returns a random number of n digits.
Matches "randnumeric\\(([0-9]+)\\)"
Example: RANDNUMERIC(4) returns 3456
RANDALPHA Returns a random string of length n.
Matches "randalpha\\(([0-9]+)\\)"
Example: RANDALPHA(3) returns sdk
SKIP Skips the next n lines, wraps, not including lines that have been removed or blanks.
Matches "skip\\(([0-9]+)\\)"
65
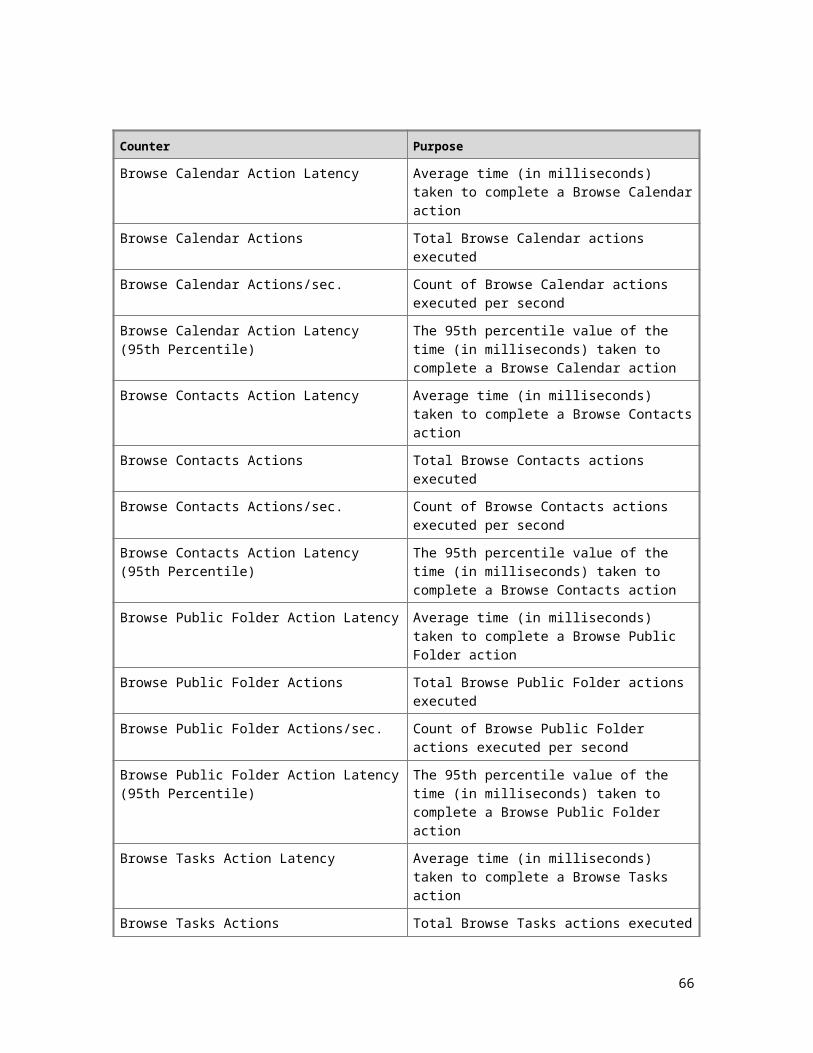
Verb Function
Example: SKIP(10)
PERCENT Executes the remainder of the line n% of the time.
Matches "%([0-9]+)"
Example: %40 RCPT TO: [email protected]
SLEEP Pauses execution of the instance in milliseconds.
Matches "sleep"
Example: SLEEP 1000
RANDUSER Selects a random user from the list of users in the UserGroup.
Information available: username, password, e-mail, domain.
Matches "RANDUSER.[a-zA-Z]+"
Example: RANDUSER.emailaddress returns [email protected]
SEQUUSER Selects the next user from the list of users in the UserGroup.
Information available: username, password, e-mail, domain
Matches "SEQUUSER.[a-zA-Z]+"
Example: SEQUUSER.username returns user21
NEARBY Randomly picks a user from the list of users in the UserGroup within n of the current user.
ScriptProfile xml parameter NearBy default value = 5
Information available: username, password, e-mail, domain
Matches "NEARBY.[a-zA-Z]+"
Example: NEARBY.emailaddress returns [email protected]
USER Replaced with the current users information. This is a one-time replacement, not a variable.
Information available: username, password, e-mail, domain
66
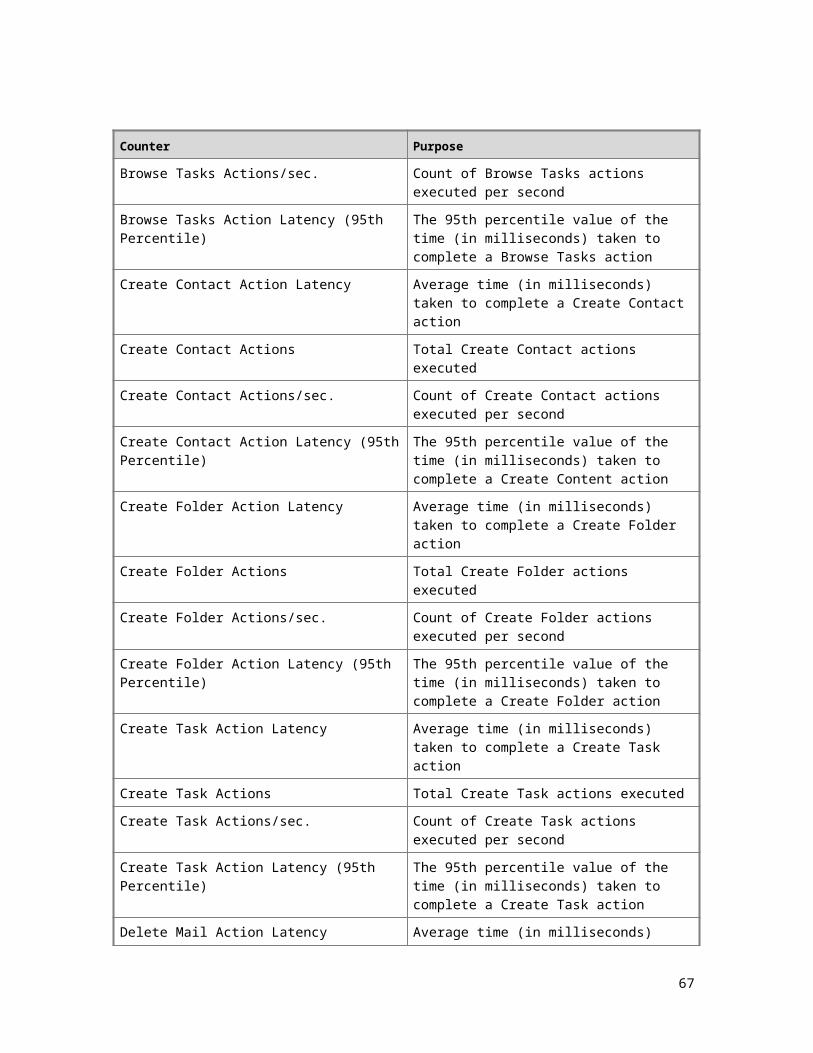
Verb Function
Matches “USER.[a-zA-Z]”
USER.emailAddress
USER.username
USER.userPassword
USER.domain
Variable BehaviorAll script-based modules support simple variables which enable you to store values and do simple operations. Declaration and initial value is:
The default value is string.empty.
There are 2 types: string and integer.
There are no operators in the SET command.
The reserved patterns are "\$[^\$^ ]+\$" and "~userVar".
SET <$var$> [initial value]
SET $myvar$
SET $myvar1$ 1
SET $myVAR2$ the world
SET $MyVar3$ RANDNUMBER(0,1)
NO SET $MyVar4$ $Myvar3$
NO RANDNUMBER(0,$myVar$)
Integer OperatorsAll operations return a string: += and -=. Change the value of the left operand. Operations other than SET on a string variable return the unchanged value of the variable. Precedence is right to left replacement with the universal variables being replaced first.
+
$myvar$ + 4
$myVar$ + $myvar2$
$myVar$ + RANDNUMBER(0,100)
++
$myvar$++
+=
$myvar$ += 5
$myvar$+=$myvar2$
-
67
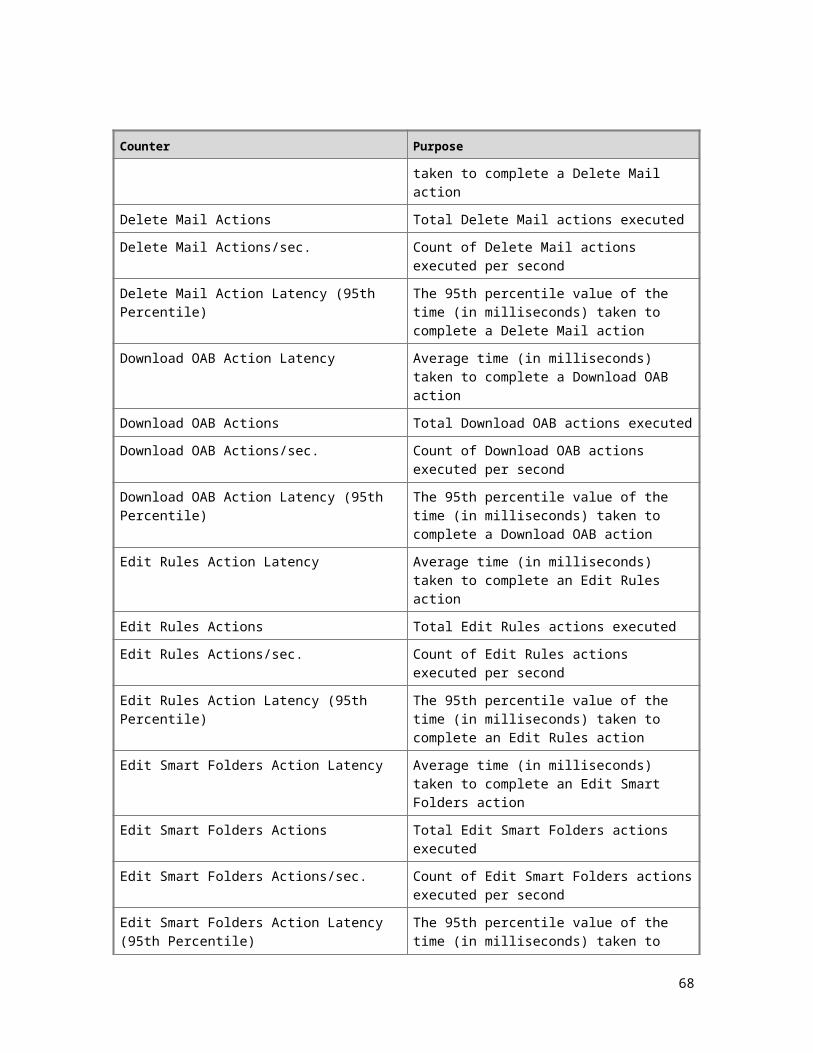
$myvar$ - 4
$myVar$ - $myvar2$
$myVar$ - RANDNUMBER(0,100)
--
$myvar$--
-=
$myvar$ -= 5
$myvar$ -= $myvar2$
The POP3 ModuleThe Post Office Protocol version 3 (POP3) module simulates multiple clients using the POP3 protocol. The module supports parameters to configure options for the following:
Different protocol-specific options
How the test executes
Security options
Examples are the server that this client is targeting or the port number. Client actions are simulated by running a script that contains scripted module keywords and POP3 verbs.
This module also implements performance counters for protocol statistics. Additionally, you can log client actions and server responses during a test run. You cannot configure the events that are logged.
Script Verbs Specific to the POP3 ModuleThe following table lists script verbs and their functions.
Script verb Function
AUTH Authenticates the current user.
CAPA Executes the CAPA request.
CONNECT Connects to the specified server on the specified port.
DELE <msgnum> Marks the specified message for deletion.
LIST Returns a listing of messages by using the current message number and size.
LOGON Creates a logon request using the current user.
NOOP Sends a NOOP (no operation) request.
QUIT Ends the conversation.
RETR <msgnum> Retrieves the specified message.
68
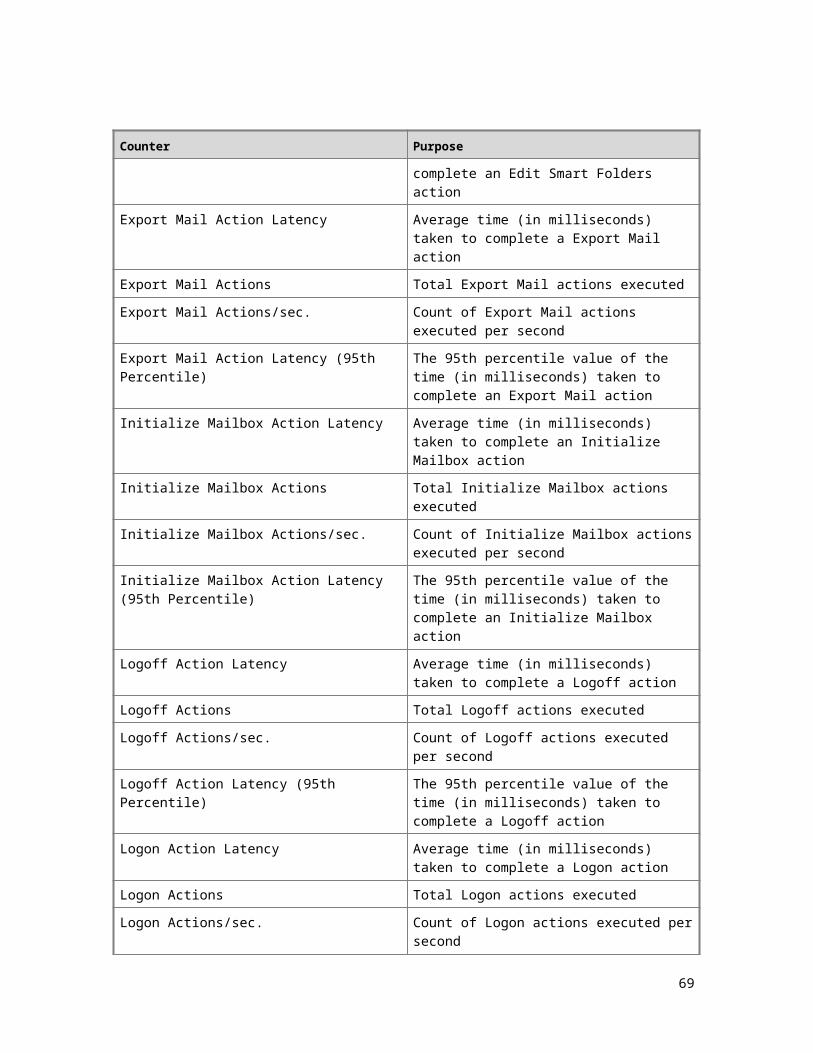
Script verb Function
RSET Resets the status on the mailbox. All messages that are marked for deletion will be unmarked.
STAT Returns the number of items in the mailbox and the total size of the mailbox.
STLS Starts a TLS session.
TOP <msgnum> Retrieves the requested number of lines from the specified message.
UIDL <msgnum> Returns a Unique ID Listing for a particular message or all the messages.
ALL A macro that can be used in place of <msgnum>. Assumes the verb LIST has been previously run.
Sample ScriptThe following is sample script for running the POP3 module.
REM. Assumes that there are at least 10 items in the Inbox.
CONNECT
STLS
LOGON
STAT
LIST
UIDL RANDNUMBER(1,10)
RETR RANDNUMBER(1,9)
TOP 1 10
DELE 4
SLEEP RANDNUMBER(0,20)
RSET
SLEEP RANDNUMBER(0,20)
NOOP
QUIT
SLEEP RANDNUMBER(1800,2400)
69
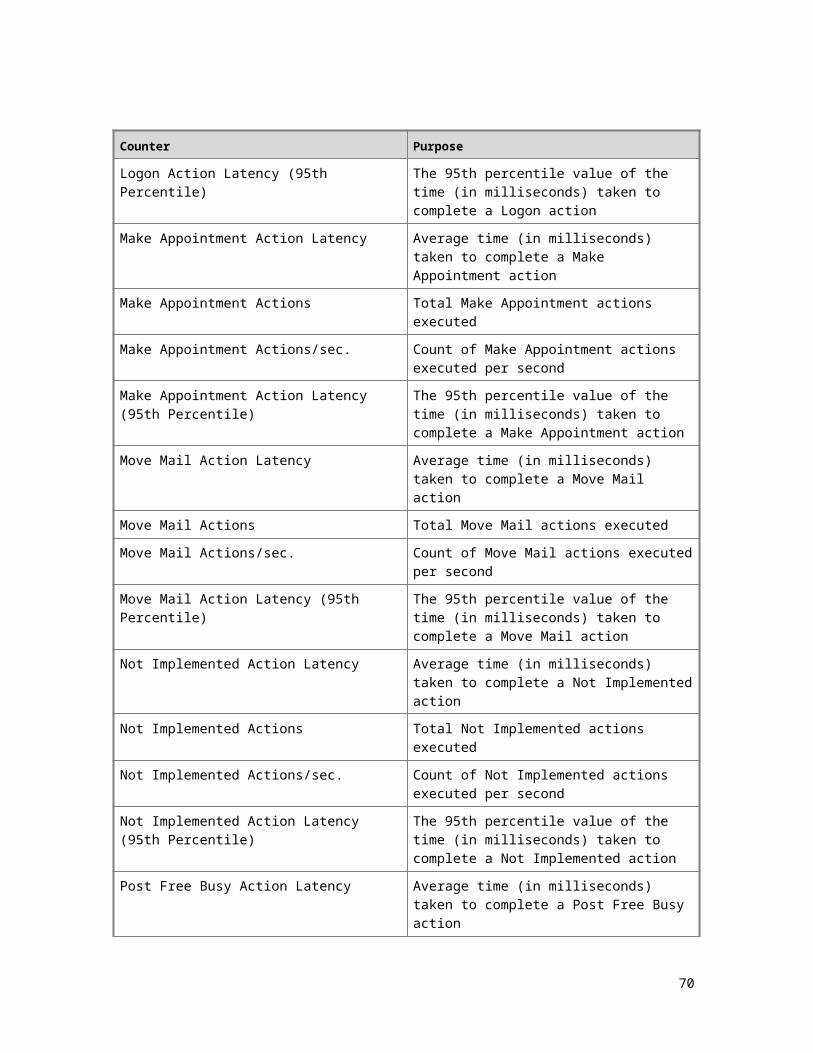
The SMTP ModuleThe Simple Mail Transfer Protocol (SMTP) module simulates multiple clients using the SMTP protocol. The module supports parameters for configuring the following:
Different protocol-specific options
Options for how the test executes
Security options
Examples of options are the server that this client is targeting or the port number. Client actions are simulated by running a script that contains scripted module keywords and SMTP verbs.
This module also implements performance counters for protocol statistics. Additionally, you can log client actions and server responses during a test run. You cannot configure the events that are logged.
Script Verbs Specific to the SMTP ModuleThe following table lists script verbs and their functions.
Script verb Function
AUTH [LOGIN] Authenticates the current user by using the prescribed method.
BDAT <file path> Sends the specified file.
CONNECT Connects to the specified server on the specified port.
DATA <file path> Sends the specified data.
EHLO <string> Sends the EHLO command.
HELO <string> Sends the HELO command.
HELP Sends the Help command.
MAIL FROM <smtp address> Sends the MAIL FROM command. Defaults to current user.
NOOP Do nothing.
RCPT TO <smtp address> Sends the RCPT TO command. Defaults to a random user in the user group.
RSET Resets the session.
QUIT Ends the session.
STARTTLS Begins a TLS session.
VRFY <smtp address> Verifies the SMTP address.
70
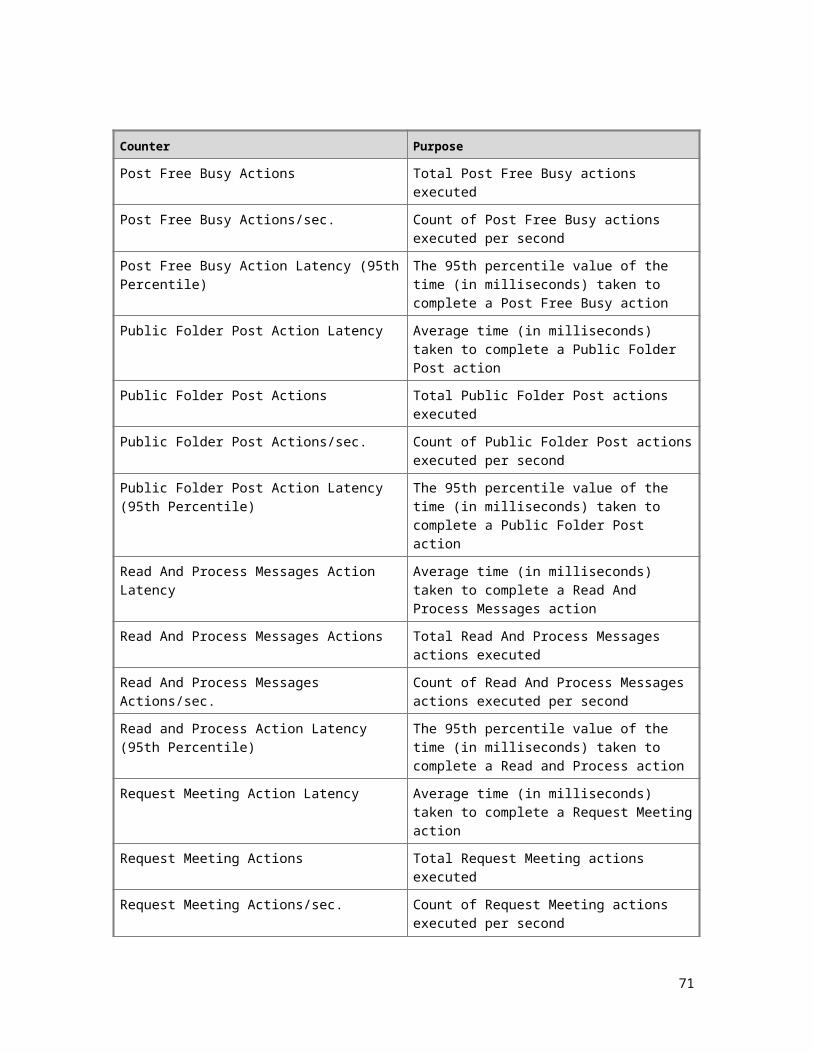
Sample ScriptThe following is sample script for running the SMTP module.
CONNECT
EHLO ADMIN
STARTTLS
EHLO
AUTH NTLM
MAIL FROM: user.emailaddress
RCPT TO: SEQUUSER.emailaddress
RCPT TO: RANDUSER.emailaddress
RCPT TO: NEARBY.emailaddress
RCPT TO:
%40 RCPT TO:
%30 RCPT TO:
BDAT RANDLIST(d:\loadgen\perfbh\Exiser-Perf-BH-Inbound-messages.txt)
NOOP
QUIT
Sleep RANDNUMBER(500,1000)
The IMAP4 ModuleThe Internet Message Access Protocol version 4 (IMAP4) module simulates multiple clients using the IMAP4 protocol. The module supports parameters for configuring the following:
Different protocol-specific options
Options for how the test executes
Security options
Examples of options are the server that this client is targeting or the port number. Client actions are simulated by running a script that contains scripted module keywords and IMAP4 verbs.
This module also implements performance counters for protocol statistics. Additionally, you can log client actions and server responses during a test run. You cannot configure the events that are logged.
Script Verbs Specific to the IMAP4 ModuleThe following table lists the script verbs and their functions.
Script verb Function
APPEND <mailbox name> <file name> Appends the contents of <filename> to the
71
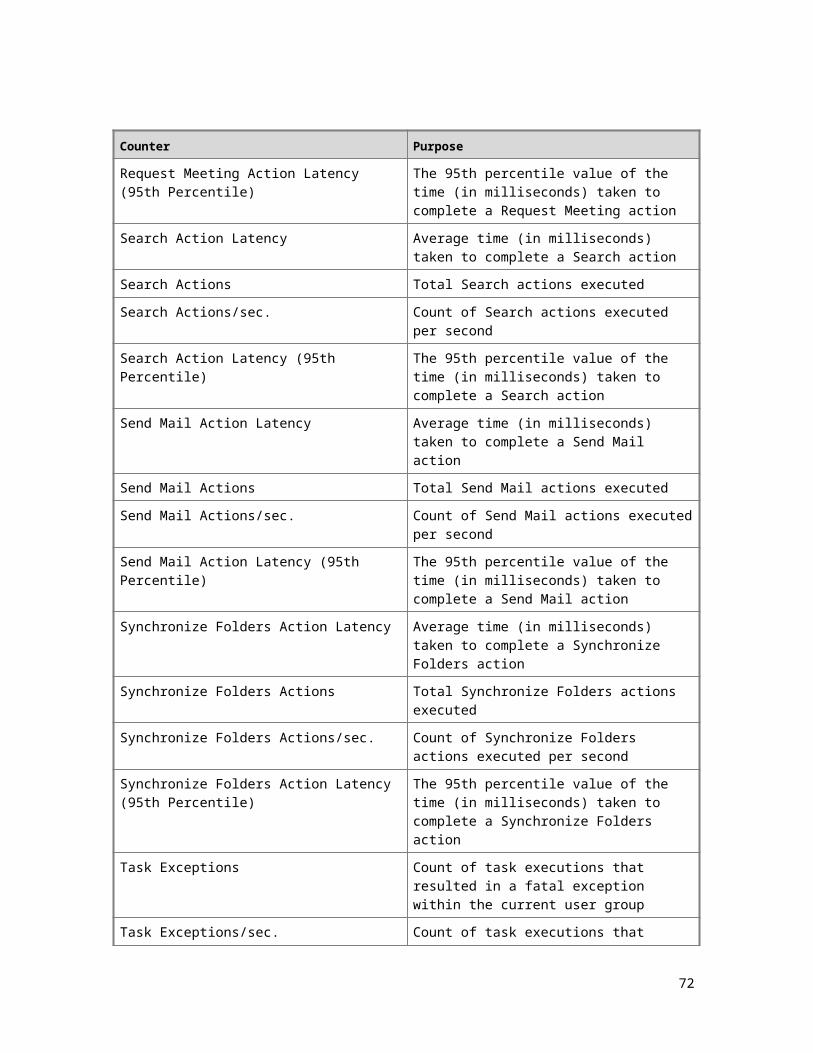
Script verb Function
mailbox.
AUTHENTICATE <package name> Authenticates the connection as the current user.
CAPABILITY Requests the capability string from the server.
CHECK Performs a Check command against the server (equivalent to a NOOP in Exchange).
CLOSE Closes the selected folder. This deletes any items that are flagged for deletion in the folder.
CONNECT Connects to the specified server on the specified port.
COPY <num><dest> Copies an item or set of items from the selected mailbox to a destination mailbox.
CREATE <mailbox name> Creates a specified mailbox.
DELETE <mailbox name> Deletes a specified mailbox.
DONE Executes the Done command.
EXAMINE <mailbox name> Examines a specified mailbox.
EXPUNGE <mailbox name> Calls the Expunge command on the selected folder.
FETCH <num><msg data item string> Returns the item or set of items.
FETCHUID Translates to a “FETCH 1:* UID”.
IDLE Executes the Idle command.
LIST <reference name><wildcard> Lists folders.
LOGIN Authenticates the current user with the login command.
LOGOUT Logs out the current user.
LSUB <reference name><wildcard> Lists subscribed folders.
NOOP Do nothing.
RENAME <mailbox name><new name> Renames the object.
SEARCH Executes the Search command.
SELECT <mailbox name> Specifies the selected mailbox.
STARTTLS Begins a TLS session.
72
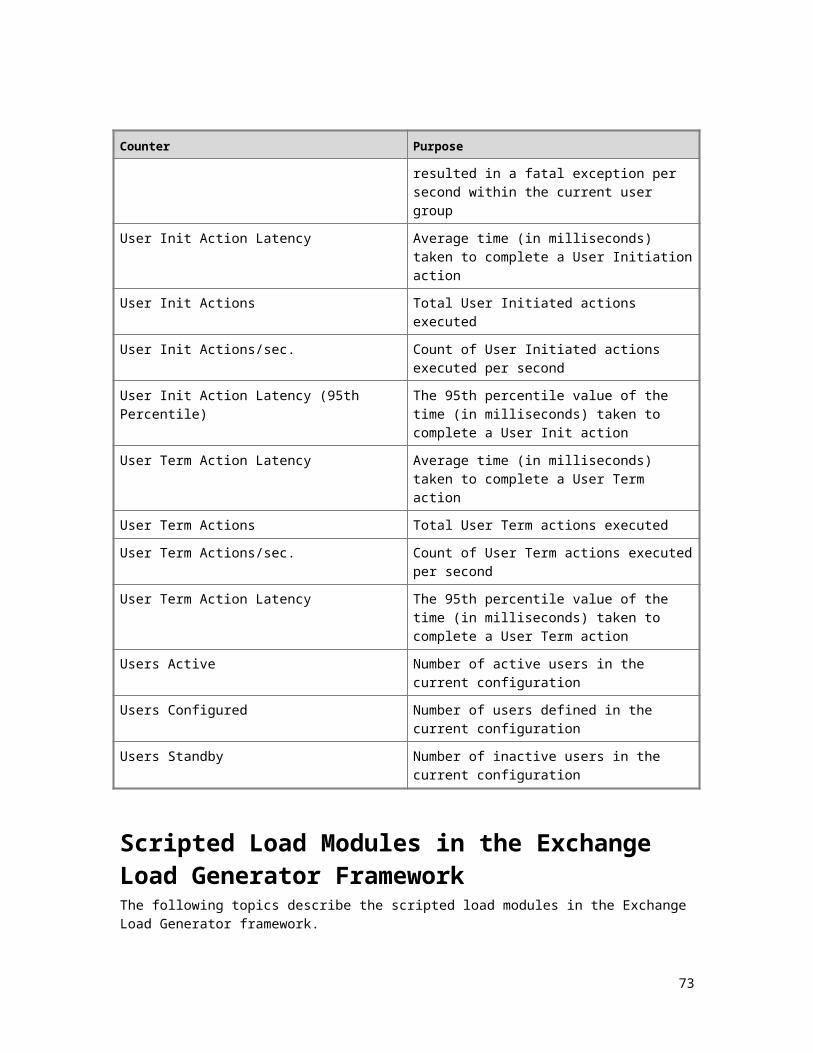
Script verb Function
STATUS <mailbox name> Returns the status of a specified mailbox and its attributes.
STORE <num><msg data item name><item value>
Stores the specified item.
SUBSCRIBE <mailbox name> Stores the specified item.
UIDCOPY <num><dest mailbox> Copies the specified object to a destination.
UIDFETCH <num><msg data item set> Uses the UID to fetch an object.
UIDSTORE <num><msg data item set> Stores a specified object.
UNSUBSCRIBE <mailbox name> Unsubscribes to a specified mailbox.
Sample ScriptThe following is sample script for running the IMAP4 module.
REM # This script assumes the presence of at least 10 message currently in the users INBOX
REM # And will create said structure
REM # This script will leave the INBOX with the first 10 messages of the INBOX remaining... all others will be purged.
CONNECT
STARTTLS
REM LOGIN
AUTHENTICATE NTLM
SLEEP RANDNUMBER(0,100)
CAPABILITY
SELECT "INBOX"
LOOP 10
APPEND "INBOX" .\scripts\file1.txt
SLEEP RANDNUMBER(0,100)
ENDLOOP
LOGOUT
CONNECT
STARTTLS
LOGIN
73
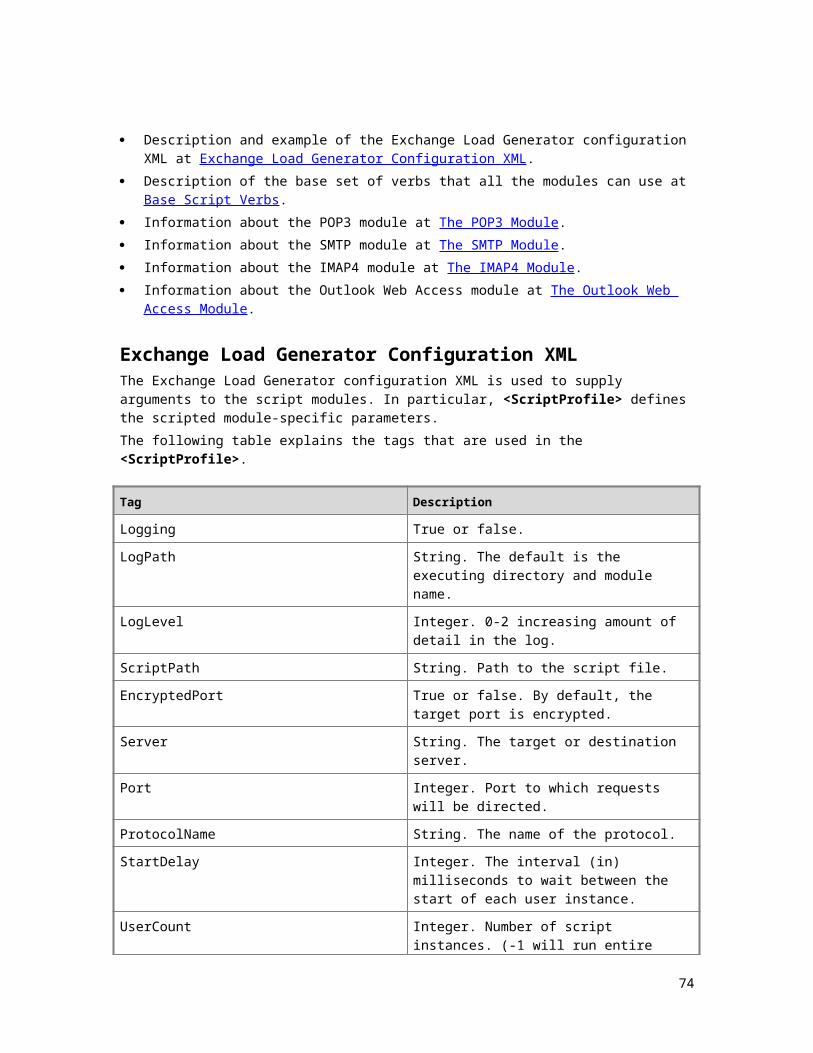
SELECT "INBOX"
CREATE "BackMeUp"
COPY 1:10 "BackMeUp"
CREATE "Other Mail"
CREATE "Trash"
IDLE
DONE
LIST "" "*"
SELECT "INBOX"
FETCHUID
UIDFETCH UIDALL (UID RFC822.SIZE rfc822.header)
NOOP
UIDFETCH FIRST 1 (UID RFC822.SIZE RFC822)
SLEEP RANDNUMBER(100,120)
UIDCOPY 1 "Trash"
UIDSTORE 1 +FLAGS (\Deleted)
UIDFETCH NEXT (UID RFC822.SIZE RFC822)
SLEEP RANDNUMBER(100,120)
UIDFETCH NEXT (UID RFC822.SIZE RFC822)
SLEEP RANDNUMBER(100,120)
UIDCOPY 2 "Other Mail"
UIDFETCH NEXT (UID RFC822.SIZE RFC822)
SLEEP RANDNUMBER(100,120)
UIDFETCH NEXT (UID RFC822.SIZE RFC822)
SLEEP RANDNUMBER(100,120)
UIDCOPY 1 "Trash"
UIDSTORE 1 +FLAGS (\Deleted)
UIDFETCH NEXT (UID RFC822.SIZE RFC822)
SLEEP RANDNUMBER(100,120)
UIDCOPY 2 "Other Mail"
UIDFETCH NEXT (UID RFC822.SIZE RFC822)
SLEEP RANDNUMBER(100,120)
UIDCOPY 1 "Trash"
UIDSTORE 1 +FLAGS (\Deleted)
74
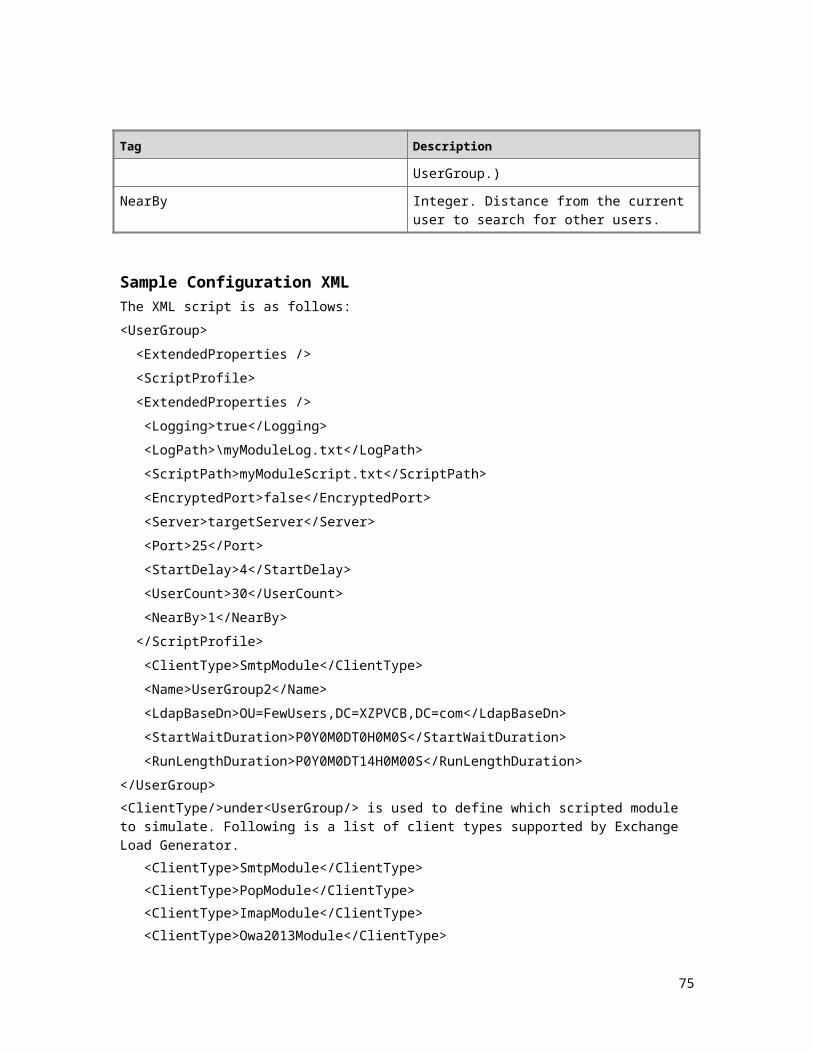
CHECK
SLEEP RANDNUMBER(1000,2000)
NOOP
FETCH LAST 1 (UID)
UIDCOPY LAST 2 "Other Mail"
UIDSTORE LAST 2 +FLAGS (\Deleted)
CLOSE
SELECT "Other Mail"
FETCHUID
UIDFETCH 1:* (FLAGS)
UIDFETCH UIDALL (UID RFC822.SIZE rfc822.header)
NOOP
UIDFETCH FIRST 1 (UID RFC822.SIZE RFC822)
SLEEP RANDNUMBER(1000,2000)
UIDFETCH NEXT (UID RFC822.SIZE RFC822)
SLEEP RANDNUMBER(1000,2000)
UIDFETCH NEXT (UID RFC822.SIZE RFC822)
SLEEP RANDNUMBER(1000,2000)
UIDFETCH NEXT (UID RFC822.SIZE RFC822)
SLEEP RANDNUMBER(1000,2000)
FETCHUID
UIDCOPY LAST 4 "Trash"
UIDSTORE LAST 4 +FLAGS (\Deleted)
SLEEP RANDNUMBER(1000,2000)
CLOSE
SELECT "INBOX"
FETCHUID
UIDFETCH 1:10 (FLAGS)
UIDFETCH UIDALL (UID RFC822.SIZE rfc822.header)
NOOP
SLEEP RANDNUMBER(1000,2000)
UIDCOPY LAST 5 "Trash"
UIDSTORE UIDALL +FLAGS (\Deleted)
EXPUNGE
75
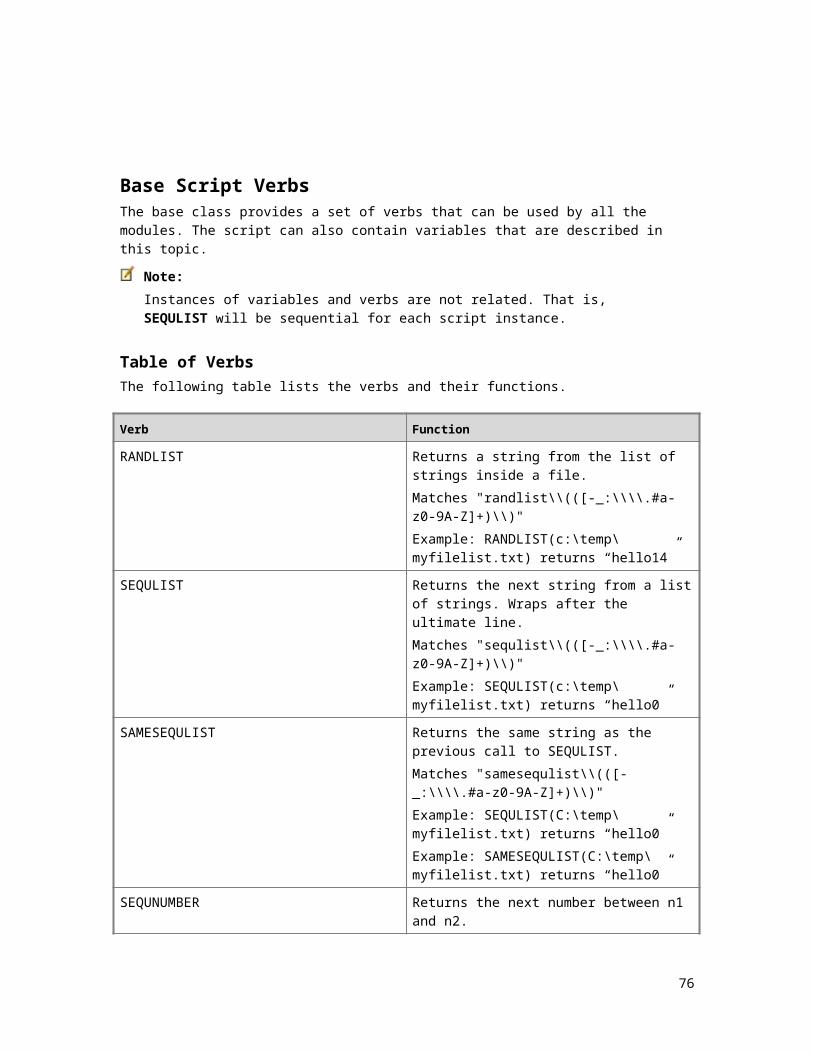
CLOSE
SELECT "TRASH"
STORE ALL +FLAGS (\DELETED)
EXPUNGE
LIST "TRASH" "*"
DELETE "Other Mail"
DELETE "TRASH"
CLOSE
SELECT "BackMeUp"
COPY 1:10 "INBOX"
DELETE "BackMeUp"
LOGOUT
SKIP(12)
The Outlook Web Access ModuleFor the Outlook Web Access module, test cases are written in script files that specify the actions to be done for each stress test user. The test module parses and reads this script file and executes each command by building and sending the appropriate HTTP requests. Each command consists of the name of the action to be performed and a series of parameters for the action (if applicable).
This section describes the Outlook Web Access module commands.
AssignPolicyToItem CommandThe AssignPolicyToItem command simulates assigning a policy to the active item by adjusting the appropriate policy property tag on the item. A random simulated policy is assigned to the item as a result of this command. The command syntax is as follows:
AssignPolicyToItem
Auth CommandThe Auth command sends authentication tokens to the server as part of the logon process. The command syntax is as follows:
Auth
CreateAppointment CommandThe CreateAppointment command creates an appointment on the user’s calendar. The command syntax is as follows:
CreateAppointment
76
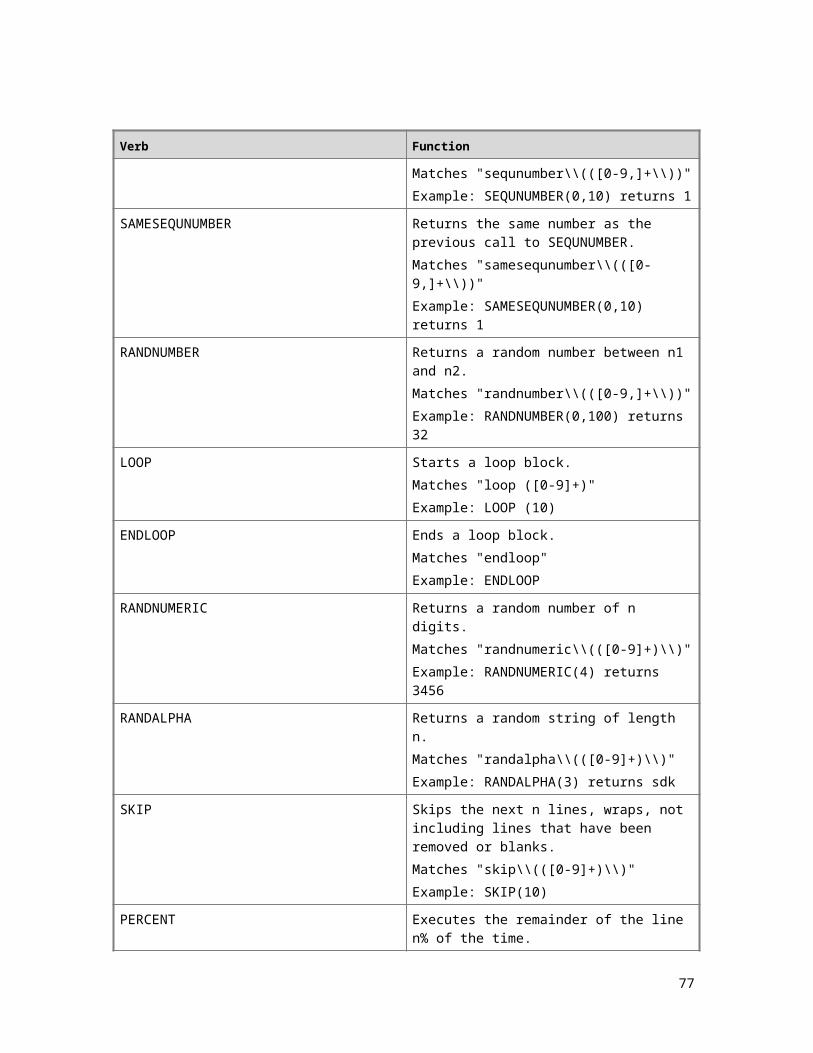
CreateAttachmentFromForm CommandThe CreateAttachmentFromForm command uploads a simulated attachment to the in scope item. The command syntax is as follows:
CreateAttachmentFromForm
CreateFolder CommandThe CreateFolder command creates a subfolder beneath a specified folder. The name of the created folder is generated by the module and cannot be manipulated. The command syntax is as follows:
CreateFolder <parent folder path>
An example of command usage is as follows:
CreateFolder Inbox
CreateSaveItem CommandThe CreateSaveItem command creates a new item to be persisted in the mailbox. The command syntax is as follows:
CreateSaveItem
CreateSendItem CommandThe CreateSendItem command creates a new item to be persisted in the mailbox and sent to configured recipients. The command syntax is as follows:
CreateSendItem
DeleteConversation CommandThe DeleteConversation command deletes items associated with a conversation. The default behavior of the command with no arguments will delete the active conversation. Alternatively, the additional parameter “random” will cause the command to delete a random conversation. The command syntax is as follows:
DeleteConversation
DeleteConversation random
DeleteItem CommandThe DeleteItem command deletes an item from the active conversation. The command syntax is as follows:
DeleteItem
FindAllCachedPeople Command
77

The FindAllCachedPeople command queries all people in the user’s recipient cache. The command syntax is as follows:
FindAllCachedPeople
FindCalendarItem CommandThe FindCalendarItem command finds calendar items within a given view of the calendar relative to the current date. Acceptable parameters include “day”, “workweek”, “week”, and “month”. The command syntax is as follows:
FindCalendarItem <calendar view>
An example of command usage is as follows:
FindCalendarItem workweek
FindConversation CommandThe FindConversation command finds a conversation. The command syntax is as follows:
FindConversation
FindFolder CommandThe FindFolder command finds folders. The command syntax is as follows:
FindFolder
FindItem CommandThe FindItem command finds items contained in the specified folder. The command syntax is as follows:
FindItem <folder path>
An example of command usage is as follows:
FindItem Inbox
FindPeople CommandThe FindPeople command finds people using the specified search string. The command syntax is as follows:
FindPeople <search string>
An example of command usage is as follows:
FindPeople SomeString
FindSenderItself CommandThe FindSenderItself command finds the user associated with the OWA session. The command syntax is as follows:
78
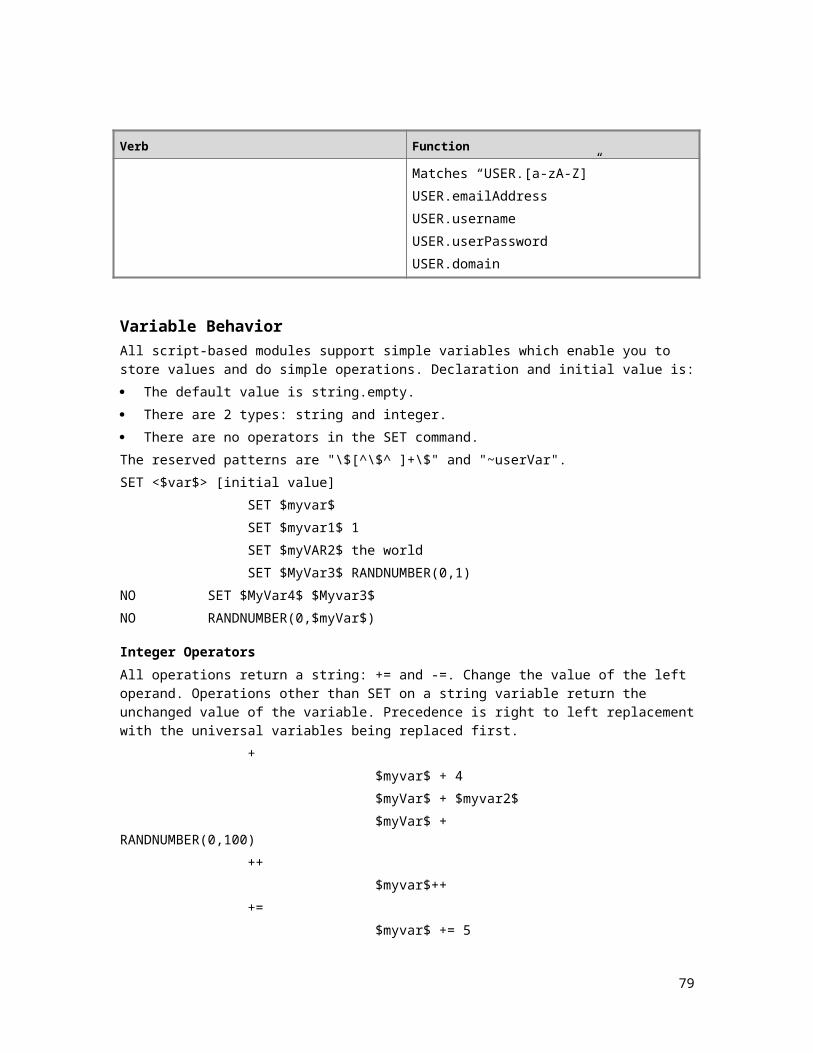
FindSenderItself
GetAuthenticationPage CommandThe GetAuthenticationPage command requests the OWA logon page as part of the logon sequence. The command syntax is as follows:
GetAuthenticationPage
GetCalendarFolders CommandThe GetCalendarFolders command retrieves all calendar folders for a user. The command syntax is as follows:
GetCalendarFolders
GetCalendarItem CommandThe GetCalendarItem command retrieves details for a random calendar item in the mailbox. The command syntax is as follows:
GetCalendarItem
GetConversationItems CommandThe GetConversationItems command retrieves details on the items associated with a conversation. The default behavior of the command with no arguments will use the active conversation. Alternatively, the additional parameter “random” will cause the command to use a random conversation. The command syntax is as follows:
GetConversationItems
GetConversationItems random
GetFavorites CommandThe GetFavorites command retrives the favorite folder list. The command syntax is as follows:
GetFavorites
GetFolder CommandThe GetFolder command simulates opening the folder specified by the folder name and sets this folder as the active folder.
The command syntax is as follows:
OpenFolder <folder name>
An example of command usage is as follows:
OpenFolder Inbox
79
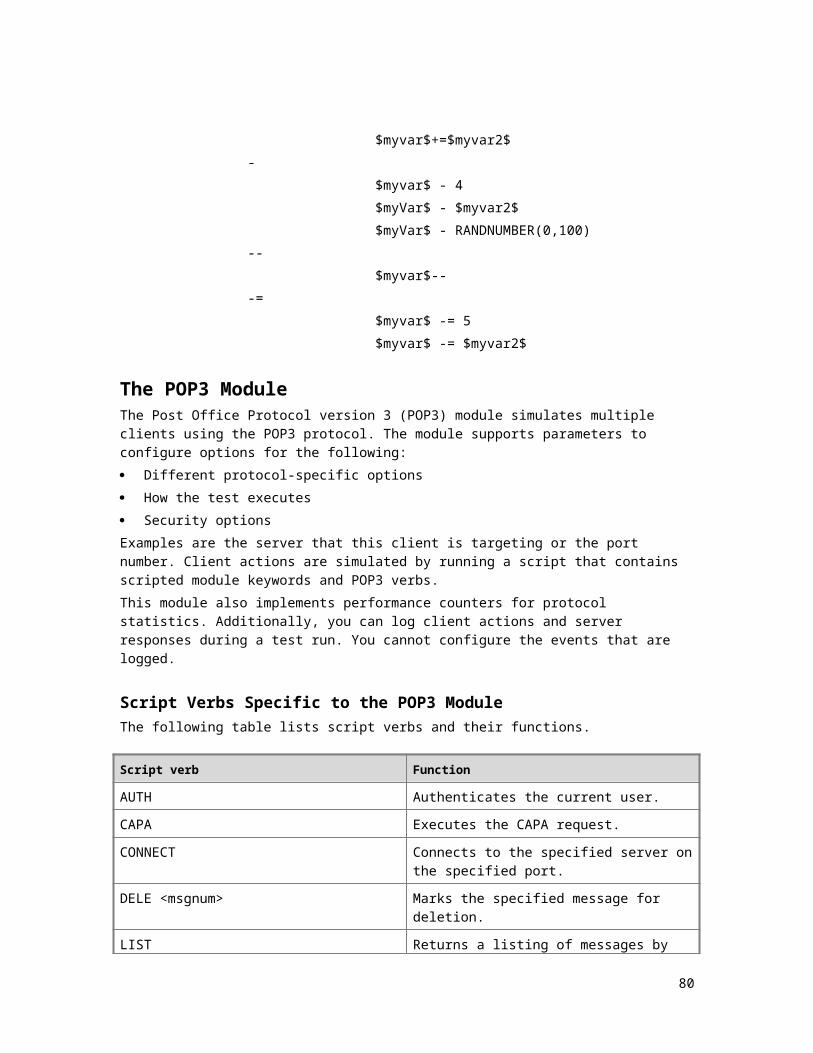
GetItem CommandThe GetItem command retrieves details associated with the active item. The command syntax is as follows:
GetItem
GetMailTips CommandThe GetMailTips command retrieves MailTips for the currently active person. The command syntax is as follows:
GetMailTips
GetOwaUserConfiguration CommandThe GetOwaUserConfiguration command retrieves OWA configuration information for the current user. The command syntax is as follows:
GetOwaUserConfiguration
GetOwaUserOofSettings CommandThe GetOwaUserOofSettings command retrieves OOF settings for the current user. The command syntax is as follows:
GetOwaUserOofSettings
GetPersonaPhoto CommandThe GetPersonaPhoto command retrieves a photo of the currently active person. The command syntax is as follows:
GetPersonaPhoto
GetReminders CommandThe GetReminders command retrieves reminders. The command syntax is as follows:
GetReminders
GetSessionData CommandThe GetSessionData command retrieves data from the server to initialize an OWA session. The command syntax is as follows:
GetSessionData
GetUserAvailability Command
80

The GetUserAvailability command retrieves availability information for the current user in the specified timeframe relative to the current time. Acceptable parameters include “day”, “workweek”, “week”, and “month”. The command syntax is as follows:
GetUserAvailability <timeframe>
An example of command usage is as follows:
GetUserAvailability week
Logoff CommandThe Logoff command ends the OWA session for the user. The command syntax is as follows:
Logoff
Logon CommandThe Logon command completes the logon sequence and typically follows the GetAuthenticationPage and Auth commands. The command syntax is as follows:
Logon
MarkConversationAsRead CommandThe MarkConversationAsRead command marks the currently active conversation as read. The command syntax is as follows:
MarkConversationAsRead
MoveConversation CommandThe MoveConversation command moves the active conversation to a subfolder under the current folder. The command syntax is as follows:
MoveConversation
Search CommandThe Search command searches for a specified sring. The command syntax is as follows:
Search <search string>
An example of command usage is as follows:
Search SomeString
UpdateAppointment CommandThe UpdateAppointment command updates the current appointment. The command syntax is as follows:
UpdateAppointment
81
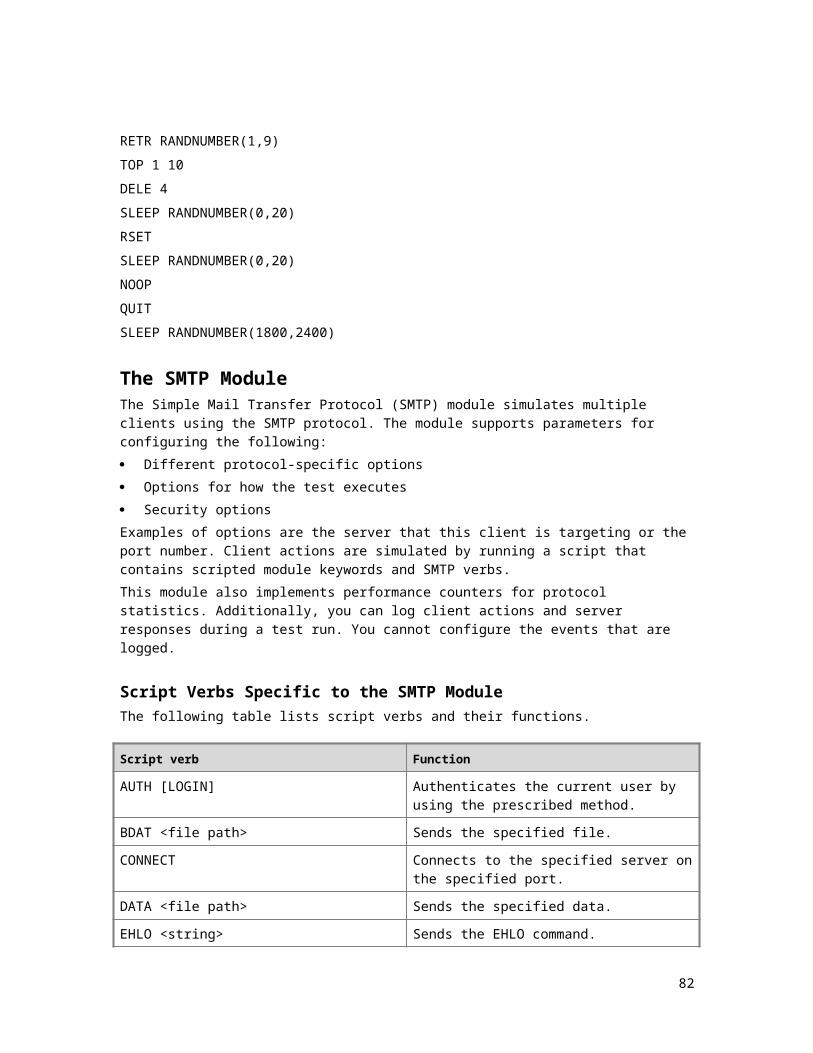
UpdateItem CommandThe UpdateItem command updates the current item. The command syntax is as follows:
UpdateItem
UserSpecificResourceInjector CommandThe UserSpecificResourceInjector command submits a request to retrieve appropriate resources for the OWA session. This is part of the typical process of establishing a new OWA session. The command syntax is as follows:
UserSpecificResourceInjector
82

CopyrightThe information contained in this document represents the current view of Microsoft Corporation on the issues discussed as of the date of publication. Because Microsoft must respond to changing market conditions, it should not be interpreted to be a commitment on the part of Microsoft, and Microsoft cannot guarantee the accuracy of any information presented after the date of publication.
This White Paper is for informational purposes only. MICROSOFT MAKES NO WARRANTIES, EXPRESS, IMPLIED OR STATUTORY, AS TO THE INFORMATION IN THIS DOCUMENT.
Complying with all applicable copyright laws is the responsibility of the user. Without limiting the rights under copyright, no part of this document may be reproduced, stored in or introduced into a retrieval system, or transmitted in any form or by any means (electronic, mechanical, photocopying, recording, or otherwise), or for any purpose, without the express written permission of Microsoft Corporation.
Microsoft may have patents, patent applications, trademarks, copyrights, or other intellectual property rights covering subject matter in this document. Except as expressly provided in any written license agreement from Microsoft, the furnishing of this document does not give you any license to these patents, trademarks, copyrights, or other intellectual property.
Unless otherwise noted, the companies, organizations, products, domain names, e-mail addresses, logos, people, places, and events depicted in examples herein are fictitious. No association with any real company, organization, product, domain name, e-mail address, logo, person, place, or event is intended or should be inferred.
© 2013 Microsoft Corporation. All rights reserved.
Microsoft, MS-DOS, Windows, Windows Server, Windows Vista, Active Directory, ActiveSync, ActiveX, Entourage, Excel, FrontPage, Hotmail, JScript, Microsoft Press, MSDN, MSN, Outlook, SharePoint, Visual Basic, Visual C++, Visual Studio, Win32, Windows Mobile, Windows NT, and Windows Server System are either registered trademarks or trademarks of Microsoft Corporation in the United States and/or other countries.
All other trademarks are property of their respective owners.
83