journgrad.files.wordpress.com file · web view03.09.2009 · define a site “dwcs3_css”...
TRANSCRIPT
1
Adapted from a tutorial at http://www.vineyardesigns.com/resources/dreamweaver/div_css_site.shtml
Dreamweaver CS3 Tutorial: DIV/ CSS/ Tableless Layout-Based Website
View Demo
1. Download the project files . (DWCS3_css.zip, 32 KB) from http://www.vineyardesigns.com/resources/dreamweaver/div_css_site.shtml
2. Make a copy of the “images” folder in a folder titled “dwcs3_css”
Define site, create template and external CSS file: 1. Define a site “dwcs3_css” specifying the new folder you made as the root directory.2. File > New (or if a box of choices is already on the screen: Create New… More…)3. In the window that opens: Select Blank Template > HTML Template > None4. Save the template. Name it template_css. It will get saved as a .dwt file in a new
“Templates” folder. (When it asks you if you want to save it with uneditable regions, you do. Okay it and keep going.)
5. In the CSS Panel > click the ‘New CSS Rule’ icon (look on the lower right of the panel for a box with a plus sign in it; if the panel is not showing, go to the WINDOWS menu to STYLES; if the icon isn’t showing, make sure “All” is selected, not “Current”).
Leslie-Jean Thornton Multimedia Boot Camp 2009

2
6. Selector Type=Tag, Tag=body, Define in = New style sheet file. Click OK. In next form, the file name = styles (you may have to enter it as part of the url – you’ll see where). Click “save” button.
(In your “Where” entry, it will say dwcs3_css)
7. In the CSS rule definition window:a. Select “Box.” For margin and padding enter “0”b. Select “Block.” For Text Align enter = center. Click OK.c. Click the styles.css tab at the top of the document window and save the styles.css
file
8. Click the “template_css.dwt” tab at the top of the document window to get back into the template file. You will have to save the stylesheet and template files every time you make
Leslie-Jean Thornton Multimedia Boot Camp 2009

3
a change (when the * symbol appears). And, yes, you really do want to save the template even without uneditable regions.
The header: 1. Insert > Layout Object > Div Tag (if you’re using the pull-down menu. If you’re using
the Insert/Layout bar, click on the Insert Div icon.)2. In the “Insert Div Tag” window that opens:
a. ID = headerb. Click “New CSS style”
3. In the “New CSS Rule” window that opens Selector = #header will already be inserted and define in = styles.css will already be selected. Click the OK button.
(If “styles.css” does not show up in the “Define in” area, you’ve missed a step in the naming and saving process. Go back to where you went wrong or start over.)
4. In the “CSS rule definition” window that opens
a. Click “Box.” Enter Width = 780 pixels. b. Padding = 0, Margin = Auto.
5. Click OK. Click next OK button, too.6. You will see [Content for id "header" Goes Here] in a dotted box in the document
window. This is the header div. You can check how it will look in the browser by clicking File > Preview in Browser > select browser name. You should do this regularly throughout the process of building the layout so that you know as soon as something is not looking OK. You should check in IE, Safari and Firefox.
Leslie-Jean Thornton Multimedia Boot Camp 2009

4
7. In the CSS panel you will see two styles – body and #header.
8. Let’s specify the default font in the body tag. Right click “body” in the CSS panel. Select the “Edit” option. The CSS rule definition window will open.
a. Select “Type”. b. Specify Font = ‘Arial, Helvetica, sans-serif’. c. Size = 12 pixelsd. Click “OK.”e. SAVE template and CSS sheet.
[If the last steps don’t match what you’re seeing (versions vary), you may have to go to “Add Property,” and find font-family and font-size to enter those values.]
Logo and Search Div: 1. Delete ‘Content for id "header" Goes Here,’ keep your cursor inside the div.
a. Insert > Layout objects > div tag. b. ID = logoc. Click “New CSS Style” button, selector=#logo, click OK.d. Block > Text Align = lefte. Box > Width = 50%f. Box > Float = Left
Leslie-Jean Thornton Multimedia Boot Camp 2009

5
g. Box > Padding/ Margin = 0h. Click OK . Click OK again.
2. “Content for id "logo" Goes Here” will appear in the document window. And a new style, #logo, will appear in the CSS panel.
3. Go into the code view (click the “Code” button at the top of the document window or select View > Code)
4. Place your cursor after the div id="logo" closing tag, i.e. after “<div id="logo">Content for id "logo" Goes Here</div>”
5. Go back to design or split view (click the “Design” button or View > Design, same for Split)
a. Insert > Layout objects > div tag. b. ID = searchc. Click “New CSS Style” button, selector= #search, click OK.d. Block > Text Align = righte. Box > Width = 50%f. Box > Float = rightg. Box > Padding/ Margin = 0h. Click OK. Click OK again in the next prompt.
6. Delete “Content for id "logo" Goes Here” and insert the logo image. Insert > Image > browse and select logo.gif from the images folder.
Leslie-Jean Thornton Multimedia Boot Camp 2009

6
7. Delete “Content for id "search" Goes Here” and insert the search code here (keep reading). For now you can simply enter a form tag, a text field and a button. Please note that the search will not actually work until it is programmed to do so. You can use one of the free search options.
a. Insert > Form> Formb. Click inside the red dashed outline that appearsc. Insert Form > Text Field. OK.d. Insert Form > Button. OK.e. Click on the button that appears and rename it in the Properties panel (bottom of
workspace, usually). Value = Search. f. SAVE everything.
Menu Bar Div: 1. Go into the code view. Click after the closing header div tag. To do so you can click
anywhere within the header div tag (eg. select the logo image in the design view before going into the code view) and then click the <div#header> that appears at the bottom of the code view window. The entire header div code will be highlighted. Then you can easily click after the closing </div> tag. REMEMBER THIS PROCESS FOR WHEN YOU DO THIS STEP IN OTHER PLACES.
Leslie-Jean Thornton Multimedia Boot Camp 2009

7
2. Now let's add the yellow menu bar. (Go into design or split view for this so you can see what the logo looks like.)
a. Insert > layout objects > div tag. Name the div ID= menu. New CSS Styles. OK.b. Create the #menu CSS style with the following properties:c. Box > Width = 780 pixels, Clear = both, Padding = 5 pixels, Margin = Top = 0,
Left = auto, Right = auto, Bottom = 1
d. Background > Background color > Click the triangle on the gray box to get the color palette and the ink dropper. Move the cursor to the flower in the logo and pick the yellow color.
e. Block > Text align = leftf. Click OK. OK again.g. Delete the default text that appears in the menu and type in the menu text “Home |
Services | About Us | Contact Us”
Leslie-Jean Thornton Multimedia Boot Camp 2009

8
h. SAVE both template and CSS sheet.
(I’ve noticed that in some cases, the left alignment is off. In that case, make the left margin = 0 instead of “auto.”)
Content Div: 1. Similarly create another div (check where your cursor is in the code view – it needs to be
after the previous div, as you learned above, not in it) and CSS style titled “content” below this div.
a. Insert > layout objects > div tag. Name the div ID= content. b. Create the #content CSS style with the following properties:c. Box > Width = 780 pixels, Height = 300 pixels, Clear = both, Padding = 5 pixels,
Margin > Top = 0, Left = auto, Right = auto, Bottom = 0d. Block > Text align = lefte. Border > top/ bottom> solid> 1 pixel > pick green color from the leaf in the logo.f. SAVE both template and CSS sheet.
Footer Div: 1. Similarly (meaning: follow the same process), create a “footer” div tag and CSS style
with:a. Type > Size= 10 pixels
Leslie-Jean Thornton Multimedia Boot Camp 2009

9
b. Click OK and OK again.
c. Replace the default text that appears with “Copyright 2007 site name.com” (or whatever).
d. SAVE both template and CSS sheet. [From now on, just save a lot. No need to have it in the directions all the time.]
H1 and Menu Link Styles: 1. Click the “New CSS rule” icon in the CSS panel. Redefine the h1 tag by doing the
following: Select “Tag.” Tag= h1 (check the pull-down options); make font size = 20 pixels, and pick the green color from the leaf for the font color.
2. Similarly, let’s create a style for the menu links. Create a new CSS style (tag, as above) called “#menua.”
Leslie-Jean Thornton Multimedia Boot Camp 2009

10
Type >
a. Font color = black (pick from the color picker)b. Decoration = nonec. Weight = boldd. OK.
Content/Editable Region: 1. Delete [Content for id "content" Goes Here] and Insert > Template Objects > editable
Region. Name the editable region “content”2. Your template is almost ready. We will use it to make the pages and then come back to
link the menu items.
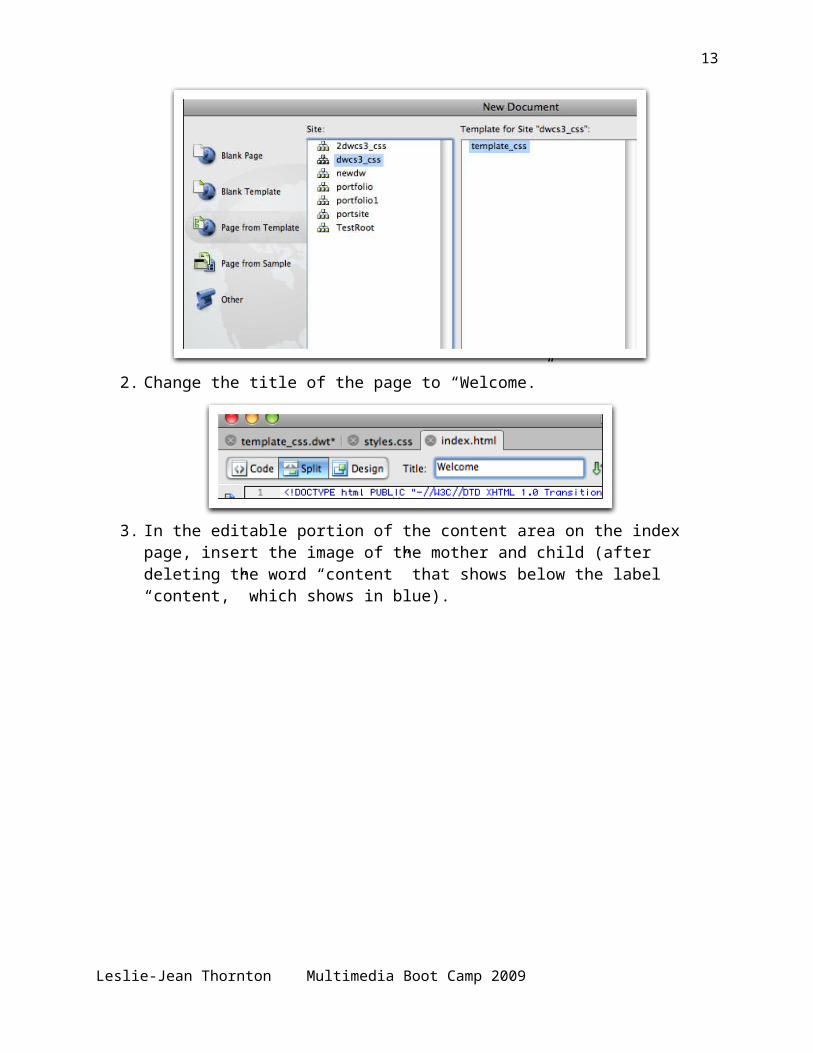
Create the Web pages: 1. File > New > Page from Template > dwcs3_css > template_css> click create > Save as
“index.html”
Leslie-Jean Thornton Multimedia Boot Camp 2009

11
2. Change the title of the page to “Welcome.”
3. In the editable portion of the content area on the index page, insert the image of the mother and child (after deleting the word “content” that shows below the label “content,” which shows in blue).
4. Type the heading text and the remaining content. Right-align the picture.
Leslie-Jean Thornton Multimedia Boot Camp 2009

12
5. Apply the Heading 1 tag (format dropdown in Properties panel) to the heading.
6. Make three copies of the index.html file in the “Files” Panel (use the save-as feature). Change the page title, heading and content to reflect “services,” “about us,” and “contact us.” Save them with similar names.
Leslie-Jean Thornton Multimedia Boot Camp 2009
13
Link the menu items: 1. Go into the template file and link the menu items to the appropriate pages. 2. Check your pages in the browsers to make sure everything looks OK and that the links
are working. If they’re not, check to see that all the pages were saved.
[At this point, you would be ready to upload your site and make it live. Congratulations!]
Leslie-Jean Thornton Multimedia Boot Camp 2009