webelos craftsman activity badge technology group
TRANSCRIPT

Santa Clara County Council -- 1 -- 2008 Pow Wow & University of Scouting
Webelos Craftsman Activity Badge
Technology Group A craftsman can be talented in many areas of work. Webelos Scouts will learn more about
working with wood and other materials such as leather and tin. A craftsman also knows how to
safely work with the tools needed for each type of material. Working with wood and leather
is fun, but only if we are safe first. These Webelos craftsmen can develop confidence in
their abilities, and these talents and skills they develop may be a hobby for them someday.
IDEAS FOR DEN ACTIVITIES
-Discuss finishing methods for wood projects – sanding, filling holes and scratches, finishing, etc.
-Have a nail driving contest.
-Make a tool chest or bench horse for sawing.
-Build mid-way games for your pack.
-Visit a building supply store. While there, look at the tools and materials required for different
projects.
-Visit a furniture factory, lumber mill, saw mill or cabinetry shop.
-Visit a tanner or leather goods manufacturer.
-Invite someone to give a demonstration on the proper care and use of tools.
-Have a demonstration of leather craft and leather tools.
GAMES
HOW BIG?
Equipment: Two sets of objects or boards of the same length, two tape measures
Object: For each boy to measure an object and add these figures to the one before him so as to come up
with a total team length
-Divide into two teams.
-On the word “Go” the first Webelos Scout runs up, picks up an object, measures it, lays the object
down in a different location, and then returns to tag the next boy.
-This second boy also runs up, measures an object, lays it beside the first, but then he must add his
length to the first boy’s length, before the third team member can come up.
-This continues until each boy has measured and added their objects together for a team total.
-The leader should know what the total of the objects added together will be – as the winning team will
be the one that is the nearest to the correct total.
NAIL DRIVING CONTEST
Have Webelos Scouts drive nails into a 4x4. Individual or relay races can be held. The fewest number of
strokes wins, not the fastest, as this is much safer.
TOOL BOX SORT
Using an egg carton for the toolbox, have an assortment of nuts, bolts, screws, etc to be sorted into the
toolbox. The first Webelos Scout to sort by size in the proper place in the “toolbox” wins. To make the game
more challenging, blindfold the Webelos Scouts and let them sort the items by touch.

Webelos Craftsman Activity Badge
Santa Clara County Council -- 2 -- 2008 Pow Wow & University of Scouting
PROJECTS
TIN CAN LANTERNS
Materials: A tin can with frozen water in it (this makes the holes easier to punch), hammer, nails, paper,
pencil or pen, scissors, masking tape, and old towel and a small candle and candleholder.
In Mexico, people often light their houses at Christmas with simple tin lanterns. They are decorated with
lacy patterns of punched holes. Candlelight glowing through the holes creates dozens of flickering “stars”.
Make a paper pattern that will fit around the can. Draw designs on that paper that you can follow as you
punch the holes in the can. Cut your pattern out. Wrap the pattern around the can and tape the pattern down
with masking tape. Lay the can of frozen water on the towel. Hammer evenly spaced holes through the lines of
your pattern.
When the holes are all made, place a small candle holder and candle into each can. Votive candles work well.
An aluminum funnel can be placed over the top.
WOODEN WIND CHIMES
Create your own open-air concert with an orchestra of lattice, screen, rounds, half rounds, quarter rounds,
dowels, squares, base caps, coves and stops, all clustered together to form a melodious wind chime. The tones
will vary according to the weight, length and patterns of wood molding you choose.
After you’ve made your selection, attach small eye hooks at the end and suspend them from a frame of
squares with dowel cross pieces. The distance between them should be far enough apart to swing freely, but
close enough to touch in a gentle breeze.
Stain or oil as you desire, then hang it from your porch or a nearby tree and await the first musical
selection.

Webelos Craftsman Activity Badge
Santa Clara County Council -- 3 -- 2008 Pow Wow & University of Scouting
LEATHER EYEGLASS CASE
Measure eyeglasses and cut leather (a piece approximately 6” x 6”) so glasses fit easily when case is folded.
Use leather stamps to decorate the case. Fold leather and punch holes for lacing using the running stitch or a
whipping stitch.
Webelos Craftsman Activity Badge
Santa Clara County Council -- 4 -- 2008 Pow Wow & University of Scouting
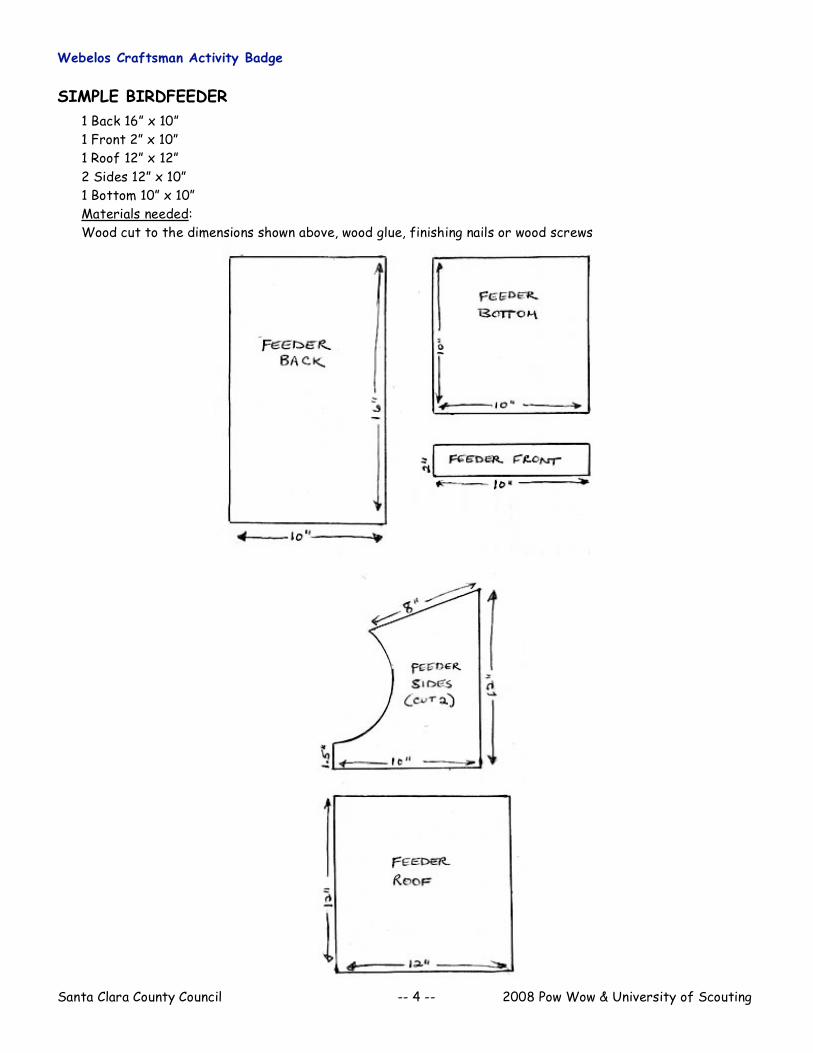
SIMPLE BIRDFEEDER
1 Back 16” x 10”
1 Front 2” x 10”
1 Roof 12” x 12”
2 Sides 12” x 10”
1 Bottom 10” x 10”
Materials needed:
Wood cut to the dimensions shown above, wood glue, finishing nails or wood screws

Webelos Craftsman Activity Badge
Santa Clara County Council -- 5 -- 2008 Pow Wow & University of Scouting
Directions:
Cut the wood to the dimensions in the drawings. You can have the lumber yard cut the pieces if you want.
For the feeder sides, just make sure the back height is 12” and the bottom length is 10”. Measure up 1.5”
for the bottom front. From the top back corner, measure down 8” with about a 70 degree angle. This is NOT an
exact angle, just get it approximately 70 degrees. This will slope the roof. Find something round and use it to
trace around from the end of the 8” to the top of the 1.5” at the front.
Attach the back to the bottom of the feeder, using wood
glue and either wood screws or nails.
Attach the sides to the bottom and back pieces, using wood
glue and either wood screws or nails.
Attach the front to the sides and bottom pieces, using
wood glue and either wood screws or nails.
Attach the roof to the back and side pieces, using wood
glue and either wood screws or nails. You may miter the back of
the roof piece to make it fit flush against the back. If you do
not miter the back of the roof piece, use silicone caulk to keep
the rain from dripping into the feeder.
Drill a hole in the center of the back, near the top.
Stain, paint or put a finish on the outside of the feeder if
desired
Hang your feeder and fill it with food.
WOODPECKER SUET FEEDER
Materials: Thick branch or thin log about 18” long, 3” - 8” thick, 1 large eye bolt, leather
strip, chain, or rope for hanging
Cut a thick branch or a piece of a log that is around 18” in length. The thickness of the
branch or log can be from 3” - 8”. Try to use one that is fairly straight.
Drill holes 1” - 11/2” in diameter all the way through the log. Suet will be packed in
these holes.
Perches are not necessary. If you wish to have perches, drill small holes just below the
larger suet holes and insert small dowels into these holes, using wood glue to secure them.
Screw a large eye bolt into one end of the log.
Hang using sturdy rope or chain. Stuff the holes with meat suet or peanut butter suet.

Webelos Craftsman Activity Badge
Santa Clara County Council -- 6 -- 2008 Pow Wow & University of Scouting
More about the Craftsman Activity Badge Purpose: Learn how to work with tools
Challenges: Wide range of abilities, obtaining adequate supervision, making a mess, inexpensive materials,
Solutions: This badge will be a favorite, but requires a lot of preparation. Some projects, like leather work
and cardboard, can be held at your regular meeting place. Others, like woodworking, should be held in a shop or
garage where the sawdust can be contained easier. Because every Cub wants to do something, you'll need a large
supply of hammers or set up cutting, sanding, nailing, and gluing stations. Have small groups rotate around as
the work progresses. If everybody is starting fresh, you may need a second project to keep all boys busy. An
adult helper or guide with each group or an adult supervisor at each station are both good methods. Remember,
everyone is included in the clean-up.
Resources: Collection of materials will be a challenge. Check with local companies for wood scraps. Plywood
is usable for most projects, but solid lumber such as pine is better for some cutouts. Hardwoods like oak, ash,
and walnut are too hard for most Cubs to cut and shape; they may get frustrated. When hardwoods are needed,
precut and rough sand them in advance, leaving the finishing work to the Cub.
For leather crafts, check with companies for scraps that the boys can cut and tool. 6" square or round
pieces of Masonite make good work surfaces for cutting and stamping operations.
First projects should be simple. Key chains are easy and make good gifts.
Clay projects are good for gifts and puppet heads that can be used for work in the Showman badge.
Try a ceramic shop for advice and possible help with glazing and firing.
Planning: The Craftsman is a multi-meeting project, and the Cubs may also do a lot of work at home. The
Cubs require a lot of supervision and help on most projects. Plan one adult for every two or three Cubs.
Remember that tools used correctly are safe, but the incorrect use of tools can have serious consequences!
Activities:
The activities included in the Craftsman section of the Webelos book help the boys grasp a basic
understanding of using hand tools while building something from scratch. As a Webelos den leader this leaves
you with a lot of flexibility in helping the kids come up with ideas for FUN projects to build.
The key word here is FUN. If the project is not fun the kids will not participate and you will likely never
finish. and remember these kids are 4th and 5th graders and do not yet have the skill level or attention span
necessary to build a work of art.
They will require a lot of one on one attention during these activities. The best advise for you is to BE
PREPARED for each den meeting and have a lot of help. If you decide to build these projects during the den
meeting I suggest that you have everything set up and ready before the boys show up. Most project will take a
minimum of 1 hour to complete.
The Webelos Scout Helps set a side both November and December for the Craftsman activity badge. Your
best friends during this time are the boys’ parents. Who can resist a trip down to the local hardware store to
get just the right tool for the job. Remember also that these projects are just in time for Christmas.
There are a lot of suggestions in the Webelos book for easy to medium hard projects. Experience has shown
that boys this age are very eager to start cutting, hammering and gluing but don't know how to use the tools
properly. Most of these young men have never used a coping saw or hammer before. Begin by explaining how to
safely use the tools that you will need to do the project. Next demonstrate on a scrap piece of wood or plastic
how to properly use each one. You will be very surprised to see how hard it really is to use a coping saw, if not
properly done. This demonstration will save you a lot of time later on when the boys begin cutting on their
projects. Let each boy try it on the scrap wood.

Webelos Craftsman Activity Badge
Santa Clara County Council -- 7 -- 2008 Pow Wow & University of Scouting
Building Tools -- An Opening or Closing Ceremony
1. We are the future builders of America. This is how we will shape tomorrow.
2. We will hammer out justice. (Hammer)
3. We will help cut out crime. (Saw)
4. We will pinch out poverty. (Pliers)
5. We will wrench out discrimination. (Wrench)
6. We will live by the Golden Rule. (Ruler)
7. We will plunge out hatred. (Plunger)
8. We will drill love deep into our hearts. (Drill)
Den Activities
• Visit a furniture factory, lumber yard, saw mill or cabinetmaker.
• Visit a tannery or leather goods manufacturer.
• Invite an expert to give a demonstration on the proper care and use of tools.
• Have someone give a demonstration of leather craft and explain how to use leather tools.
• Discuss finishing methods for wood projects: The importance of sanding, filling holes and scratches, the
various types of finishes, such as shellac, stain, lacquer, varnish and enamel.
• Have a nail-driving contest. Give each boy a scrap of wood, nails and a hammer. Let them practice driving
nails straight.
• Make a tool chest or a bench horse for sawing.
• Have a birdhouse building contest.
• Build midway games for your Pack.
Working With Leather
Leather crafting is a hobby that many boys may carry into adulthood. It is best to start with simple
projects like key chains and coasters and let the boys work their way up to more difficult items such as wallets
or belts.
Look in the yellow pages for leather crafting supply stores near you. Here are some tips to help you get
started:
Dampen leather with a sponge for ease of tooling, but don't have it dripping wet.
Have the boys draw a design on paper before starting. Then trace the design onto their leather piece with
an awl.
Let the boys practice with their tools on scrap leather first.
Leather stains or acrylic paints will give projects added dimension. Put a wood board under each boy's
leather piece while he is working.

Webelos Craftsman Activity Badge
Santa Clara County Council -- 8 -- 2008 Pow Wow & University of Scouting
Bow Drill
This drill may be used to start a fire or to drill holes.
Materials:
A green twig for the bow
Stone or block of wood for palm piece
(needs indentation, to hold shaft)
A 4" x 3/4" straight branch or dowel for shaft
Thong or gut string long enough to hold bow bent
Bit of flint or sharpened steel rod
Instructions for Shaft:
Indent at center so thong loop won't slip. Drill hole for drill bit
To Operate:
1. Tie thong to bend bow.
2. Loop thong around shaft indentation.
3. Bear down on palm piece with left hand (if you're right handed).
This may require some adult assistance.
4. Saw the bow back and forth to rotate drill shaft.
5. Keep tension in the thong to prevent it from slipping on the
shaft.
Wooden Trivet
Materials:
1 dowel - 4' x 1"
Table saw
Sandpaper
Waxed paper
Carpenter's glue
Felt, 6"X6"
Cut the dowel into slices about l 1/2" thick using table saw. Sand any rough edges. Lay a piece of waxed
paper on the working surface. It can be easily removed from the trivet after the glue has dried. Begin gluing
the slices together as shown in the picture. When glue has dried, pull away waxed paper. Cut the felt piece to
fit the back of the trivet. Glue in place.

Webelos Craftsman Activity Badge
Santa Clara County Council -- 9 -- 2008 Pow Wow & University of Scouting
Weather Vane
Supplies:
20" Curtain Rod,
Wire coat hanger,
Glue
Tin or Aluminum
Broomstick or dowel
Bolts, washers, screws Enamel Paint
Construction:
1. Using patterns enlarged from above illustration, cut arrowhead, Webelos insignia and compass point initials
from tin.
2. Roll edges so they will not be sharp and dangerous.
3. Paint with enamel.
4. Bolt arrowhead and Webelos insignia to ends to curtain rod.
5. Drill small holes in 4 sides of broomstick.
6. Solder initials to wire. Glue ends of wire in holes of broomstick.
7. Punch hole in middle of curtain rod.
8. Screw curtain rod to top of broomstick, using washers, so arrow will swing freely when the wind blows.
9. When installing vane, be sure that the stationary compass directional initials point correctly, i.e., N, due
North, etc.
More Activities
• Visit furniture factory, lumber mill or lumberyard.
• Some local home centers offer special weekend classes for Webelos age children.
• Invite someone to give a demonstration on the safe use of tools.
• Visit a construction site or find out about helping with a Habitat for Humanity project.
• Visit a tannery or leather goods manufacturer.
• Invite someone to give a demonstration of leather craft and explain how to use leather tools.
• Invite someone to give a demonstration of metal work, using tin snips and a vise.
• Have a nail driving contest.
• Build a bridge for pack crossover ceremonies; tie it into the Engineering pin.
• Tie in with the Scholar pin and discuss how education helps when doing crafts and working in the
technology field.
Pedro Doorstop
Use grid method to enlarge Pedro pattern to about 7-by-6 inches.
Trace on 1/2 inch plywood or scrap and
Cut with coping saw.
Paint as desired.

Webelos Craftsman Activity Badge
Santa Clara County Council -- 10 -- 2008 Pow Wow & University of Scouting
Potholder Hanger
Use scrap wood about 1-by-4-by-12 inches, L-shaped cup hooks, and picture hooks.
Webelos Craftsman Activity Badge
Santa Clara County Council -- 11 -- 2008 Pow Wow & University of Scouting
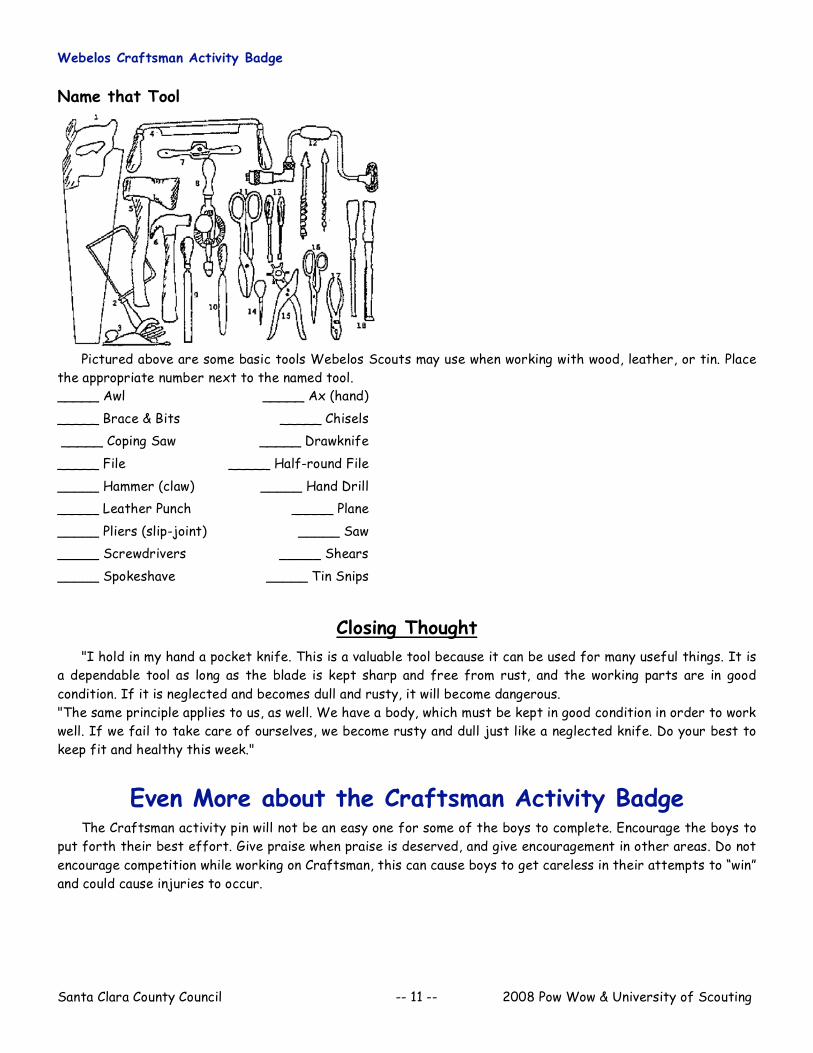
Name that Tool
Pictured above are some basic tools Webelos Scouts may use when working with wood, leather, or tin. Place
the appropriate number next to the named tool.
_____ Awl _____ Ax (hand)
_____ Brace & Bits _____ Chisels
_____ Coping Saw _____ Drawknife
_____ File _____ Half-round File
_____ Hammer (claw) _____ Hand Drill
_____ Leather Punch _____ Plane
_____ Pliers (slip-joint) _____ Saw
_____ Screwdrivers _____ Shears
_____ Spokeshave _____ Tin Snips
Closing Thought
"I hold in my hand a pocket knife. This is a valuable tool because it can be used for many useful things. It is
a dependable tool as long as the blade is kept sharp and free from rust, and the working parts are in good
condition. If it is neglected and becomes dull and rusty, it will become dangerous.
"The same principle applies to us, as well. We have a body, which must be kept in good condition in order to work
well. If we fail to take care of ourselves, we become rusty and dull just like a neglected knife. Do your best to
keep fit and healthy this week."
Even More about the Craftsman Activity Badge The Craftsman activity pin will not be an easy one for some of the boys to complete. Encourage the boys to
put forth their best effort. Give praise when praise is deserved, and give encouragement in other areas. Do not
encourage competition while working on Craftsman, this can cause boys to get careless in their attempts to “win”
and could cause injuries to occur.

Webelos Craftsman Activity Badge
Santa Clara County Council -- 12 -- 2008 Pow Wow & University of Scouting
Handsaws
Handsaws have come a long way since the earliest Stone Age man made his by chipping notches in a piece of
stone or flint. Today’s saws are made of steel, with handles designed for a firm grip and with tow different
types of teeth. These two very important saws in a wood worker’s tool kit are a rip and a crosscut saw. While
both saws look alike in size and shape, a close examination of the teeth will disclose several differences - the
shape and spacing of the teeth, and the way the teeth are filed. Rip-saw teeth are designed to cut with the
grain of the wood and so are straight-filed, each tooth cutting as a small chisel. Crosscut saw teeth are
designed to cut across the grain and so are bevel-filed, each tooth cutting the wood fibers like a sharp knife.
Both saws have a “set” in the teeth ... that is, alternate teeth are bent outward slightly, so the saw serf will be
slightly wider than the thickness of the blade to provide clearance and make cutting easier.
High quality saws are taper-ground for the same reason. The most popular size of rip and crosscut saws is
26 inches, with five or five and one-half teeth (point to the inch for rip saws and eight or ten teeth to the inch
for crosscut saws.)
To rip a board, hold at 45 to 60-degree angle. Take long, easy strokes. Don’t force saw To start a cut, use
thumb as a guide for blade. Extending your forefinger on handle, helps to steer saw in straight line. For
crosscutting, hold the saw at an angle of 45 degrees. Steady the board so it does not vibrate.
Working with Plastics
Acrylic sheets are used for plastic projects. Almost any plastic supplier has scrap acrylics which you can
purchase from them for a minimal price. (They may offer to donate the pieces.) You can also find sheets of
acrylic in many home improvement stores. You will need fairly thin acrylic (1/8” thickness is plenty) for these
projects. You can use clear or colored sheets, depending on the project you choose.
It is important that you plan ahead. You will have to do some of the work yourself. For example, an adult
should oversee the use of ovens or appliances. For simple thermoforming, a kitchen oven, electric hot plate, heat
gun, hair dryer or strip heater can be used. There are many variables involved in heating and forming plastics, so
experiment in advance with scrap pieces so you’ll know what to expect at the meeting.
As a general rule, the plastic should be heated as quickly and uniformly as possible. The plastic should be
very pliable or rubbery for good forming, when heated. When heating in an oven, set the temperature at 350
degrees.
General Procedures:
1. Before you heat any plastic, be sure to remove all masking paper and foreign matter from it.
2. For simple bends, first cut to shape the pieces to be formed.
3. Finish the edges the way you want them to appear in the final project.
4. Wear soft cotton flannel gloves when handling the heated plastic.
5. Form all pieces a quickly as possible, as the plastic cools quickly.

Webelos Craftsman Activity Badge
Santa Clara County Council -- 13 -- 2008 Pow Wow & University of Scouting
Working with Leather
Leather crafting is a fun hobby that many boys may carry into adulthood with them. It is best to start with
simple projects like key chains and coasters. Then let the boys work their way up to more difficult items such as
wallets or belts.
Leather Tooling Tips
• Dampen leather for ease of tooling, but don’t leave it dripping wet.
• Hve the boys draw a design on paper before starting. Then they can trace the design onto their piece of
leather with an awl.
• Let the boys practice with their tools on scarp leather first.
• Lather stains or acrylic paints can give your projects an added dimension.
• Put a scrap of wood under each boy’s project.
Projects
Book Rack:
Keeping your Scouting books, and other books that you are reading, in this rack will help you find just the
book you want quickly.
It also helps to keep your room in order. Making this book rack is not difficult and is a good woodworking
project. The end boards of the rack are cut out in the shape of a huge Indian arrowhead. See template for
pattern. These are cut from one-half inch hardwood.
Sandpaper the edges off smooth and “chip” the edges with a hall-round file. The chip grooves are made on
the outside of the end boards only. The inside surface is left smooth. Three, one-half inch dowels are used for
the spreaders. They are 12 inches long, and the ends are glued into holes made in the end boards. These holes
must stop short of going through. The proper location of these holes can be determined from the pattern.
When boring the holes, be sure to make the ends right hand and left hand. Otherwise, you will be in trouble.
A thin piece of plywood about 1/8 inch thick is used for the Scout emblem. Make one for each end and glue
them in place as indicated in the illustration. The rack can be finished any way you desire. It can be stained and
lacquered, or finished natural. If you like bright colors, it can be painted with enamel The emblem should be a
contrasting color.

Webelos Craftsman Activity Badge
Santa Clara County Council -- 14 -- 2008 Pow Wow & University of Scouting
Weather Vane
Materials:
20” Curtain Rod
Coathanger Wire
Tin or Aluminum
Broomstick or dowel
Bolts, washers, screws
Glue
Enamel Paint
Construction:
1. Using patterns enlarged from the above illustrations, cut
arrowhead, Webelos insignia and compass point initials
from tin. Roll edges so they will not be sharp and
dangerous.
2. Paint with enamel.
3. Bolt arrowhead and Webelos insignia ends to curtain rod.
4. Drill small holes in 4 sides of broomstick.
5. Solder initials to wire. Glue ends of wire in holes of broomstick.
6. Punch hole in middle of curtain rod.
7. Screw curtain rod to top of broomstick, using washers, so arrow will swing freely when the wind blows.
8. When installing vane, be sure that the stationery compass directional initials point correctly, i.e. N is due
North, etc.
Drafting Word Search:
Accuracy Acetate Arcs
Artist Bars Beam
Blade Block Board
Brush Caliper Case
Chalk Clip Copy
Curve Desk Draft
Easel Edge File
Graphics Inks Linear
Matte Paper Pencil
Plan Render rule
Sheet Stand Stylus
Tools Trace