websecurityservice connectivity: explicitproxyandsepclient
TRANSCRIPT

Connectivity:Explicit Proxy and SEP ClientRevision: NOV.07.2020
Web Security Service

Symantec Web Security Service/Page 2

Copyrights
Broadcom, the pulse logo, Connecting everything, and Symantec are among the trademarks of Broadcom. The term “Broadcom”refers to Broadcom Inc. and/or its subsidiaries.
Copyright © 2020 Broadcom. All Rights Reserved.
The term “Broadcom” refers to Broadcom Inc. and/or its subsidiaries. For more information, please visit www.broadcom.com.
Broadcom reserves the right to make changes without further notice to any products or data herein to improve reliability, function,or design. Information furnished by Broadcom is believed to be accurate and reliable. However, Broadcom does not assume anyliability arising out of the application or use of this information, nor the application or use of any product or circuit described herein,neither does it convey any license under its patent rights nor the rights of others.
Page 3


WSS Access Method: Explicit Proxy/Page 5
WSS Access Method: Explicit ProxyThe Symantec Web Security Service solutions provide real-time protection against web-borne threats. As a cloud-basedproduct, theWeb Security Service leverages Symantec's proven security technology, including theWebPulse™ cloudcommunity.
With extensive web application controls and detailed reporting features, IT administrators can use theWeb Security Service tocreate and enforce granular policies that are applied to all covered users, including fixed locations and roaming users.
This document describes how to use the PAC File Management Service (PFMS) to set up explicit proxy connections to theWSS for security scanning and policy checks on web-bound traffic. It includes how to implement theWSS and SymantecEndpoint Protection (SEP) solution.

Symantec Web Security Service/Page 6
Table Of Contents
WSS Access Method: Explicit Proxy 5Table Of Contents 6
Connectivity: About Explicit Proxy 8Why Select This Method? 10
Connectivity: PAC File Management Service (EP) 12Technical Requirements 12Technical Limitations 12Example Procedure—New PAC File 13Edit 17Duplicate 17Import 17
Connectivity: Set Browsers to Explicit Proxy 19Technical Requirements 19
Connectivity: Publish PAC File With WPAD 22Technical Requirements 22Procedure 22DHCP Method 22DNS Method 22
Connectivity: About Symantec Endpoint Protection 24Why Select This Method? 25Why Select This Method? 27ConnectionMethods 28Authentication Support 28Why Select This Method? 28
Connectivity: WSS-SEP with Captive Portal 30Technical Requirements 30Technical Limitation 31Best Practice 31Procedure—Enable Web Traffic Redirection on SEP 31PAC File Management in SEP 33
Connectivity: WSS-SEP-WTR With Seamless Identification 36Technical Requirements 36Technical Limitations 37Best Practice 37
WSS Access Method: Explicit Proxy/Page 7
Procedure—Enable Web Traffic Redirection and Seamless Identification on SEP 37Additional Support 42
Connectivity: WSS-SEP-NTR With Seamless Identification 43Technical Requirements 43Technical Limitation 43Best Practice 43Procedure—Enable Web Traffic Redirection and Seamless Identification on SEP 43Additional Support 46
Connectivity: WSS-SEP Roaming SAML 47Technical Requirements 47Technical Limitations 48Best Practice 48Procedure—Enable Web Traffic Redirection and Seamless Identification on SEP 48Additional Support 54
Prevent IP/Subnet From Routing to the Web Security Service 55Notes 55Procedure—Manually Add IP Addresses 55Import IP Address Entries From a Saved List 56
Add an Explicit Proxy Location 57
Reference: Required Locations, Ports, and Protocols 59Symantec Resource 59Connectivity Methods 59Authentication 61
Reference: Sample PAC File for Explicit Proxy 63

Symantec Web Security Service/Page 8
Connectivity: About Explicit ProxyThe Explicit Proxy Access Method refers to using proxy auto-config (PAC) files to direct internet-bound traffic to theWebSecurity Service or to specific proxy servers based on the destinations. It might also refer to themethod of using the browsersettings in client browsers to direct traffic to proxy servers that host PAC files.
A PAC file is a JavaScript that automates which proxies web browsers communicate through to reach the internet.
n Requests for external websites or requests made by company-owned computers using an external IP address are routedthrough the service.
n Computers inside the firewall are given access to sites on the corporate intranet without routing throughWSS.
The Explicit Proxy connectivity method protects endpoints at a fixed location (clients reside behind a single-IP egress device) orroaming clients.

Connectivity: About Explicit Proxy/Page 9
About the PAC File Management Service
TheWSS PAC File Management Service (PFMS) enables deployment flexibility as youmanage PACfiles and PAC file location association through the cloud service. Furthermore, you can create andupdate bypass lists and other configurations directly in theWSS portal. With the PFMS, you cancreate up to 100 PAC files and assign them to different locations. For example, you want on-premiseswork stations in one location to use one PAC file that bypasses specific servers andOffice 365requests. But connections from other remote locations always connect throughWSS.
1—For various locations, the Admin generates a PAC file in theWSS portal, possibly providing custombypassing of specific servers. The PAC files are installed on client browsers, either through your ITinfrastructure or to Symantec Endpoint Protection (SEP) agents.
2—The PFMS manages the created PAC files, which are available for updating. AmazonWeb Services(AWS) stores the PAC files; AWS provides the automatic health checks and failover infrastructure.
Note: PAC file edits might experience up to a oneminute delay for world-wide propagation.
3—By default, the PAC file script identifies the internal IP address based on the RFC 1918 standard.Direct access to the internal URL is granted.
4—Location 1's PAC file instructs the browser to bypass WSS for Office 365 requests.
5—For other locations, the PAC files proxies all internet-bound traffic through the nearest WSSdatacenter.

Symantec Web Security Service/Page 10
Why Select This Method?
Benefits—
n Valid if your environment has a PAC-managed proxy.
n Your environment has infrastructure and IP address space.
n You do not want to install an agent.
Select another method if—
n Your network egress is not a static IP address or it requires traversing a NAT devices.
n You require Client IP-based policy, as addresses are not visible toWSS.
Is this the method you require?
n "Connectivity: PAC File Management Service (EP)" on page 12.
Connectivity: About Explicit Proxy/Page 11
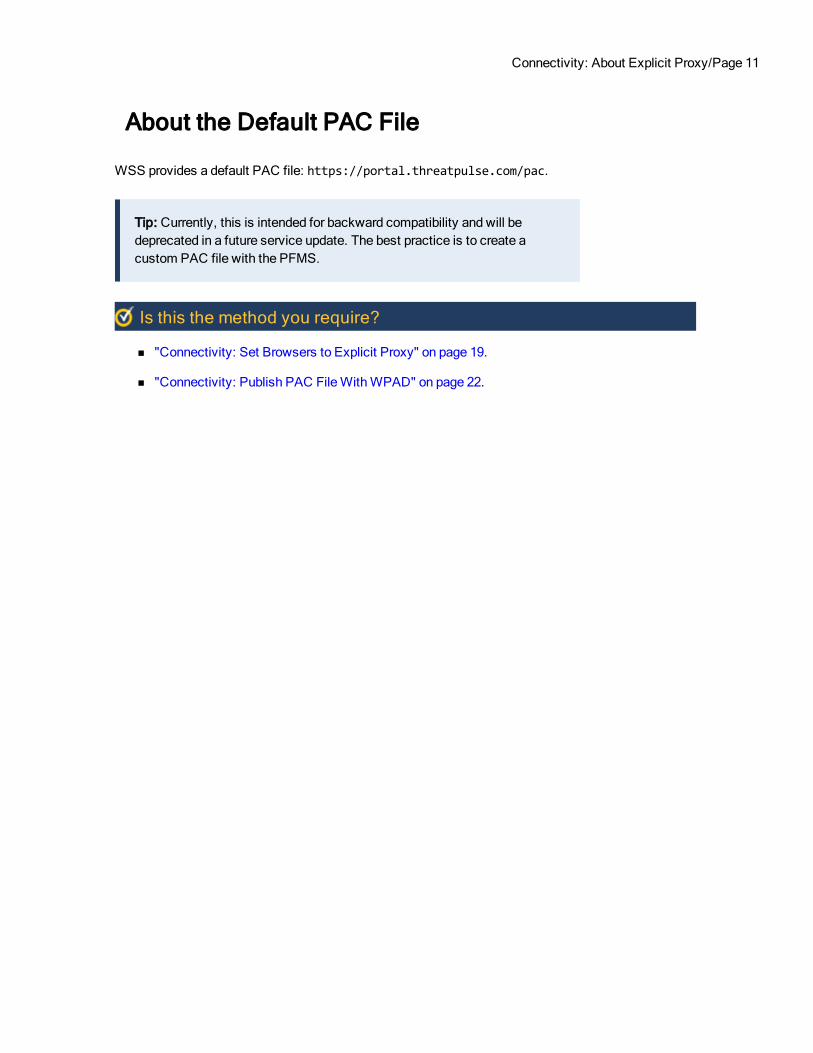
About the Default PAC File
WSS provides a default PAC file: https://portal.threatpulse.com/pac.
Tip: Currently, this is intended for backward compatibility and will bedeprecated in a future service update. The best practice is to create acustom PAC file with the PFMS.
Is this the method you require?
n "Connectivity: Set Browsers to Explicit Proxy" on page 19.
n "Connectivity: Publish PAC FileWithWPAD" on page 22.
Symantec Web Security Service/Page 12
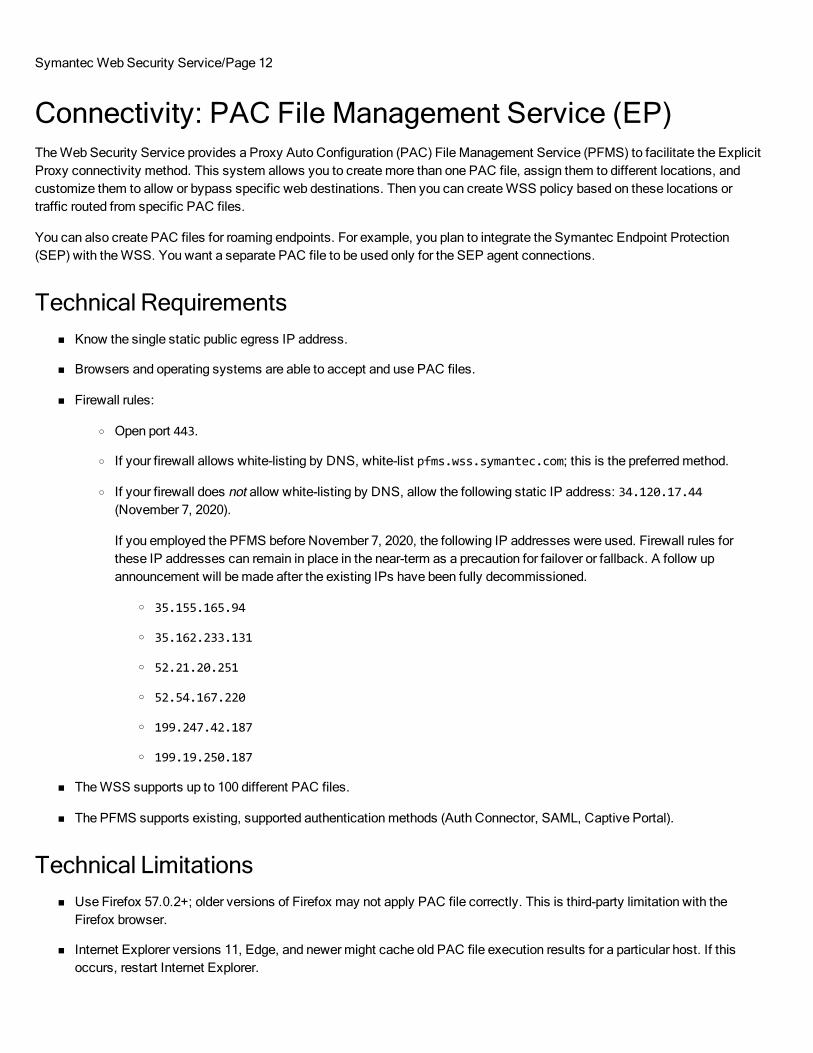
Connectivity: PAC File Management Service (EP)TheWeb Security Service provides a Proxy Auto Configuration (PAC) File Management Service (PFMS) to facilitate the ExplicitProxy connectivity method. This system allows you to createmore than one PAC file, assign them to different locations, andcustomize them to allow or bypass specific web destinations. Then you can createWSS policy based on these locations ortraffic routed from specific PAC files.
You can also create PAC files for roaming endpoints. For example, you plan to integrate the Symantec Endpoint Protection(SEP) with theWSS. You want a separate PAC file to be used only for the SEP agent connections.
Technical Requirementsn Know the single static public egress IP address.
n Browsers and operating systems are able to accept and use PAC files.
n Firewall rules:
o Open port 443.
o If your firewall allows white-listing by DNS, white-list pfms.wss.symantec.com; this is the preferredmethod.
o If your firewall does not allow white-listing by DNS, allow the following static IP address: 34.120.17.44(November 7, 2020).
If you employed the PFMS before November 7, 2020, the following IP addresses were used. Firewall rules forthese IP addresses can remain in place in the near-term as a precaution for failover or fallback. A follow upannouncement will bemade after the existing IPs have been fully decommissioned.
o 35.155.165.94
o 35.162.233.131
o 52.21.20.251
o 52.54.167.220
o 199.247.42.187
o 199.19.250.187
n TheWSS supports up to 100 different PAC files.
n The PFMS supports existing, supported authenticationmethods (Auth Connector, SAML, Captive Portal).
Technical Limitationsn Use Firefox 57.0.2+; older versions of Firefox may not apply PAC file correctly. This is third-party limitation with the
Firefox browser.
n Internet Explorer versions 11, Edge, and newermight cache old PAC file execution results for a particular host. If thisoccurs, restart Internet Explorer.

Connectivity: About Explicit Proxy/Page 13
n If the browser does not accept cookies or PAC files, supportability becomes difficult.
n If the user agent is unable to process the PAC file, there will be no protection or exceptions.
Example Procedure—New PAC FileOne option is to duplicate the default PAC file andmodify it.
To demonstrate the PAC File Management feature, the following steps create a new PAC file and designate its use for the SEPtest Explicit Proxy location (previously entered on the Connectivity > Locations page).
1. In theWSS portal, navigate to Connectivity > PAC Files.
2. Click New File. The portal switches to the PAC File Editor.
a. Name the PAC file.
b. (Optional) Describe the purpose of this PAC file.
c. Include WSS Bypass adds any IP addresses or domains that were previously added to the portal bypass lists(Connectivity > Bypassed Traffic). You can click the expander to view those entries; however, you cannot editthose entries here.

Symantec Web Security Service/Page 14
Tip: Bypass lists cannot exceed 256 KB in size.
d. Include Office 365 Bypass adds all of the currently knownMicrosoft Office web application domains.
3. Click Save.
The portal generates an explicit PAC File URL. You can copy this URL and use it for an explicit proxy configuration toguarantee that this PAC is used. For example, you can send this to the Admin who is configuring the SEP clients to directtraffic toWSS.
4. Continuing with the example, click the Locations tab.

Connectivity: About Explicit Proxy/Page 15
a. Click Edit Locations.
b. Select a Location that is to connect through this PAC file. This example selects a previously added ExplicitProxy Location created to test SEP integration.
Tip: You can havemore than one location that uses the same PAC file. For moreinformation about the Roaming Endpoints, see "About the Roaming Location" onpage 17.
c. Click Add and Save.
5. Click the PAC Files link (or the Up arrow icon next to the PAC file name). The portal now displays the newly-createdPAC file.

Symantec Web Security Service/Page 16
About PAC File Hierarchy
With the possibility of multiple PAC files, theWSS evaluates and connects according to the following hierarchy.
n Full custom PAC File URL—The connection always uses the parameters in this PAC file.
n Locations—TheWSS checks to see if the Location has an assigned PAC file. If yes, the connection proceeds with thoseparameters.
n Default PAC File—If no Location is assigned to the connection, WSS uses the default PAC file(http://portal.threatpulse.com:8080/pac).
Note: The default PAC file behavior is fail open. If for some reason the client cannotconnect toWSS, it falls back and goes DIRECT.
n If you configure a connection to use the PAC File URL only up to the customer ID portion (see screenshot), thenWSSfollows the Locations/Default hierarchy described in the previous two bullets.

Connectivity: About Explicit Proxy/Page 17
About the Roaming Location
The PFMS provides a Location called Roaming Endpoints. You can create a PAC file that applies toWSS Agents andmobiledevices that access the internet when outside of the corporate network. This is available on the Locations tab of the PAC Filedialog.
After the traffic reaches theWSS, your configured Authenticationmethod is triggered (Identity > Auth Connector > RoamingCaptive Portal option or Identity > SAML).
PAC File Management
EditDuring the creation phase or any time after, you can Edit a PAC file to change the parameters. Be advised that this requires amoderate knowledge of network connections.
Note: PAC file edits might experience up to a oneminute delay for world-wide propagation.
DuplicateYou can Duplicate an existing PAC file andmodify it for another purpose. For example, you want to test a configuration updatebefore implementing it.
ImportIf you have created PAC files in text files, you can Import them for use inWSS.

Symantec Web Security Service/Page 18
Troubleshooting
n Verify the browser can download the PAC file.
n Confirm provided PAC file is the correct one for the situation (Location, Roaming).
n Verify issue applies to all browsers.
n Confirm if the issue is related to one webserver or several.
n Create three troubleshooting test policies.
o Public URLwith no auth required.
o URL requiring Auth no policy.
o URLwith Auth policy.

Connectivity: Set Browsers to Explicit Proxy/Page 19
Connectivity: Set Browsers to Explicit ProxyManually configure web browsers on client systems or a demonstration client to point to the location of the Symantec ProxyAutomatic Configuration (PAC), which provides the route to theWeb Security Service. See "Connectivity: About ExplicitProxy" on page 8.
Tip: Currently, this is intended for backward compatibility and will be deprecated in a futureservice update. The best practice is to create a custom PAC file with the PFMS.
Technical Requirementsn Verify that firewall port 8080 is open.
Warning: If you continue to use the default PAC file and for some reasonWSS is notaccessible—for example, firewall issue on 8080, mis-configured URL, deleted PAC file),fail open occurs and the connection goes direct.
Apple Safari
1. Select Apple menu > System Preferences.
2. Select the Internet and Network tab.
3. Select an option:
n If you are connected by cable to the network, select Ethernet.
n If you are connected usingWiFi, select the AirPort option.
4. Click Advanced. Enter the address of your PAC file in the Address field. For example,https://portal.threatpulse.com/pac.
5. Click the Proxies tab.
a. Select Using a PAC file.
b. Enter theWeb Security Service PAC file location in the Addressfield: https://portal.threatpulse.com/pac.
6. Select Quit to exit System Preferences.

Symantec Web Security Service/Page 20
Google Chrome
1. In the top-right corner of the browser, select the wrench .
2. From the drop-down list, select Options. The browser displays the Google ChromeOptions dialog.
3. In the Network section, click Change proxy settings. The browser displays the Internet Properties dialog.
4. Click the Connections tab.
5. In the Local Area Network (LAN) Settings section, click LAN settings. The Local Area Network (LAN) Settings dialogdisplays.
a. In the Automatic configuration area, select Use automatic configuration script.
b. Enter theWeb Security Service PAC file location in the Address field: https://portal.threatpulse.com/pac.
6. Click OK and exit out of all open dialogs.
Microsoft Internet Explorer
1. Select Tools > Internet Options.
2. Select the Connections tab.
3. If you are using a VPN connection, click Add to set up the connection wizard. If you are using a LAN connection, clickLAN settings
4. LAN settings dialog:
a. Select Automatically detect settings and Use automatic configuration script.
b. Enter theWeb Security Service PAC file location in the Address field: https://portal.threatpulse.com/pac.
5. Click OK and exit out of all open dialogs.
Mozilla Firefox
1. Select Tools > Options. The browser displays the Options dialog.
2. Select the Advanced > Network tab.
3. In the Connections area, click Settings.
4. Configure Connection Settings:
a. Select Automatic proxy configuration URL.
b. Enter theWSS PAC file location in the Address field: https://portal.threatpulse.com/pac.
5. Click OK and exit out of all open dialogs.

Connectivity: Set Browsers to Explicit Proxy/Page 21
Next Step
n Proceed to "Prevent IP/Subnet From Routing to theWeb Security Service" on page 55.

Symantec Web Security Service/Page 22
Connectivity: Publish PAC File With WPADEnforce the use of a Proxy Automatic Configuration (PAC) file without manual web browser configuration by using theWebProxy Auto-Discovery (WPAD) protocol. WPAD offers two options to publish the location of the PAC file: Dynamic HostConfiguration Protocol (DHCP) and Domain Name System (DNS). See "Connectivity: About Explicit Proxy" on page 8.
Tip: Currently, this is intended for backward compatibility and will be deprecated in a futureservice update. Symantec strongly encourages you to create a custom PAC file with the PFMS.
Technical Requirementsn Verify that firewall port 8080 is open.
Warning: If you continue to use the default PAC file and for some reason theWSS is notaccessible—for example, firewall issue on 8080, mis-configured URL, deleted PAC file),fail open occurs and the connection goes direct.
n Example PAC File.
"Reference: Sample PAC File for Explicit Proxy" on page 63
Procedure
Step 1—Select and perform a publishmethod.
DHCPMethod1. Before retrieving the first page, the web browser sends the local DHCP server a DHCPINFORM query.
2. The web browser uses the URL returned from the server to locate the PAC file.
3. If the DHCP server does not return the location of the PAC file, the DNS method is used.
DNSMethod1. Change the name of the PAC file located on the web server from proxy.pac to wpad.dat.
2. The web browser searches the web server for the PAC file using URLs until the proxy configuration file is found in thedomain of the client. The URL format is http://wpad.x.x.com/wpad.dat. WPAD.dat is the name for the PAC file and xis a part of the domain name.

Connectivity: Publish PAC FileWithWPAD/Page 23
Step 2—Bypass IP Addresses/Subnets
Some IP addresses or subnets do not requireWSS processing. For example, you want to exclude test networks. Configure theservice to ignore these connections.
See "Prevent IP/Subnet From Routing to theWeb Security Service" on page 55.
Step 3—Add an Explicit Proxy Location in the portal.
See Add an Explicit Proxy Location.
Next Step
n Proceed to "Prevent IP/Subnet From Routing to theWeb Security Service" on page 55.

Symantec Web Security Service/Page 24
Connectivity: About Symantec Endpoint ProtectionThe Symantec Endpoint Protection (SEP) solution provides security to endpoint devices, such as laptops. SEP is an agent-based approach that uses PAC file based re-direction to protect traditional endpoints. Integrating SEP with theWeb SecurityService extends the security profile to the network level.
WSS provides four SEP methods. This topic provides conceptual information to help you determine which is themostappropriate for your network, then provides links to topics that provide best practices and recommended values for configuring aVPN tunnel.
n If you need to understand themethods before deciding, continue reading the following concept sections.
n If you know what deployment you require, select a link to the configuration topic.
o "Connectivity: WSS-SEP with Captive Portal" on page 30
o "Connectivity: WSS-SEP-WTR With Seamless Identification" on page 36
o "Connectivity: WSS-SEP-NTR With Seamless Identification" on page 43
o "Connectivity: WSS-SEP Roaming SAML" on page 47
Connectivity: About Symantec Endpoint Protection/Page 25
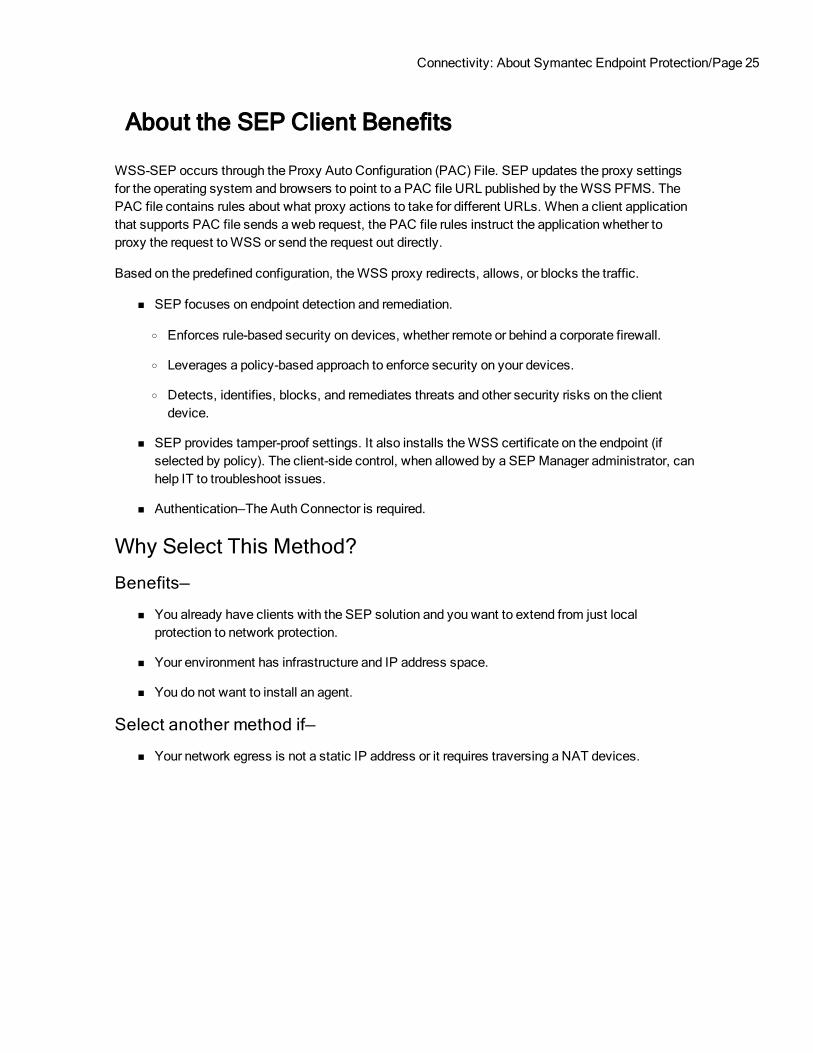
About the SEP Client Benefits
WSS-SEP occurs through the Proxy Auto Configuration (PAC) File. SEP updates the proxy settingsfor the operating system and browsers to point to a PAC file URL published by theWSS PFMS. ThePAC file contains rules about what proxy actions to take for different URLs. When a client applicationthat supports PAC file sends a web request, the PAC file rules instruct the application whether toproxy the request toWSS or send the request out directly.
Based on the predefined configuration, theWSS proxy redirects, allows, or blocks the traffic.
n SEP focuses on endpoint detection and remediation.
o Enforces rule-based security on devices, whether remote or behind a corporate firewall.
o Leverages a policy-based approach to enforce security on your devices.
o Detects, identifies, blocks, and remediates threats and other security risks on the clientdevice.
n SEP provides tamper-proof settings. It also installs theWSS certificate on the endpoint (ifselected by policy). The client-side control, when allowed by a SEP Manager administrator, canhelp IT to troubleshoot issues.
n Authentication—The Auth Connector is required.
Why Select This Method?
Benefits—
n You already have clients with the SEP solution and you want to extend from just localprotection to network protection.
n Your environment has infrastructure and IP address space.
n You do not want to install an agent.
Select another method if—
n Your network egress is not a static IP address or it requires traversing a NAT devices.

Symantec Web Security Service/Page 26
Sample WSS-SEP with Captive Portal Topography
1—The Admin uses the WSS portal to create custom a PAC file —possibly providing custom bypassingof specific servers—and associates it with an Explicit Proxy Location.
2—The Admin accesses the SEP Manager and configures Web Traffic Redirection (WTR), whichincludes adding the generated PAC file.
3—SEP Manager distributes the security policy, including the PAC file URL, to the SEP endpoints. TheSEP agent receives the security policy and configures the proxy settings for system and browsers.
4—The PAC file proxies all internet-bound traffic to the nearest WSS for web use and security policyprocessing.

Connectivity: About Symantec Endpoint Protection/Page 27
Why Select This Method?
Benefits—
n Used in conjunction with PFMS, the SEP client can dynamically update the PAC file on theendpoint’s browser. This feature also allows you tomaintain more than one PAC file; forexample, for various locations, groups, and so on.
n Your network egress is not a static IP address or it requires traversing NAT devices.
Select another method if—
n Your network egress is not a static IP address or it requires traversing a NAT devices.
Used in conjunction with the PFMS, the SEP client can dynamically update the PAC file on theendpoint’s browser. This feature also allows you tomaintain more than one PAC file; for example, forvarious locations, groups, and so on.
Is this the method you require?
n "Connectivity: WSS-SEP with Captive Portal" on page 30.

Symantec Web Security Service/Page 28
About WSS-SEP-WTR/NTR—Web or NetworkRedirection with Seamless Identification
This method requires an integration token that you generate in yourWSS portal. The token is enteredinto the SEP Manager, which then pushes the integration out to the SEP clients. When the employeelogs in to their system, the SEP client initiates a secure connection (with a session key and a pre-shared key (PSK)) toWSS. The SEP client then provides an assertion toWSS. The assertion containsthe user identity and other information about the endpoint, such as the OS version. This seamlessidentificationmeans employees do not have to re-login again when accessing the internet throughCaptive/Roaming Captive Portal. This allows for per-user policy to be applied to traffic and alsoprovides risky client context toWSS for logging and reporting. Seamless Identification also preventsissues related to Cross-Origin-Resource-Sharing (CORS).
If the seamless identification is disabled or fails for any reason, user identity is not automaticallyprovided. Authentication reverts to a backupmethod configured for that location (Captive Portal ifenabled or Roaming Captive Portal).
Connection Methodsn WSS-SEP-WTR—Leverage theWSS PFMS with the SEP Web Traffic Redirection (WTR)
option in SEP Manager.
n WSS-SEP-NTR—Embeds and deploys selectiveWSS Agent technology into SEP. This yieldsthe benefits of the full Network Traffic Redirection (NTR) and captures non-proxy applications.You can select what is captured by the agent. This method is beneficial if SEP clients frequentlychange from one network to another. The tunnel method provides heightened security byencrypting traffic between the endpoint and the data center.
Authentication Supportn Auth Connector—It is possible that client systems can belong to different Active Directory
domains or even different forests, whichmeans WSS cannot discern the proper group.Therefore, the Auth Connector is required for group-based policies.
n SAML—SEP with Seamless Identification supports Roaming SAML (WSS-SEP-WTR only atthis time). Adding aWSS-generated token to the SEP Manager establishes tenancy, which isrequired for the SAML IdP.
Why Select This Method?
Benefits—
n Securely transfers the logged-in user ID and device information toWSS or SAML IdP, thusCaptive Portal is not required.

Connectivity: About Symantec Endpoint Protection/Page 29
Is this the method you require?
n "Connectivity: WSS-SEP-WTR With Seamless Identification" on page 36.
n "Connectivity: WSS-SEP-NTR With Seamless Identification" on page 43
n "Connectivity: WSS-SEP Roaming SAML" on page 47.

Symantec Web Security Service/Page 30
Connectivity: WSS-SEP with Captive PortalRedirect traffic from Symantec Endpoint Protection (SEP) clients to theWeb Security Service to extend from local to network-level protection.
n See "Connectivity: About Symantec Endpoint Protection" on page 24 for more information about the solution.
Technical Requirementsn Admin access to anWSS account.
n Admin access to SEP Manager.
n SEP client 14.2+ Windows andMAC clients.
n Captive Portal—Employees must log in to the Captive or Roaming Captive Portal. This method requires the on-premisesAuth Connector integration.
n Youmust backup the client proxy settings because the new SEP install erases them (Symantec is investigating thisissue). Restore the settings after installing SEP.
n Before installing, verify no listener on TCP 2968.
n Firewall rule: Open port 8080.
n Supported browsers:
o Apple Safari
o Google Chrome
o Microsoft Edge
o Microsoft Internet Explorer 9 through 11
o Mozilla Firefox
n If you plan to use the PAC File Management Service (PFMS) in conjunction with SEP clients, youmust runNorton LiveUpdate on the client to obtain the required certificate.
https://support.norton.com/sp/en/us/home/current/solutions/kb20080520094501EN_EndUserProfile_en_us
ISSUE: If you encounter issues with Live Update, download the SSL Intercept cert from theWSS portal andmanuallyinstall it on the test machine(s).
n https://portal.threatpulse.com/docs/am/Solutions/ManagePolicy/SSL/ssl_chrome_cert_ta.htm
n https://portal.threatpulse.com/docs/am/Solutions/ManagePolicy/SSL/ssl_ie_cert_ta.htm

Connectivity: WSS-SEP with Captive Portal/Page 31
Technical Limitationn Some browsers do not support proxy settings change in already running sessions. Changing a policy state
(enabled/disabled) requires browser restarts.
Best Practicen Keep SEP clients updated to the latest versions; the updates provide critical fixes and performance enhancements.
Procedure—EnableWeb Traffic Redirection on SEPThis procedure is for high-level reference. For greater detail, consult the documentation for your SEP/SEP Manager versions.
Prerequisite Step—Obtain a PAC File URL
WSS-SEP requires a PAC File URL, which instructs the browsers onmachines where to download the PAC File. Use thePAC File Management Service to create one for use with SEP connections. See "Connectivity: PAC File Management Service(EP)" on page 12.
Step 1—Obtain and Distribute the SEP Client
n If you already have a supported SEP client, proceed toStep 2.
n Consult the welcome letter you receive from Symantec regarding how to access the SEP Manager.
n SEP Client Downloads—https://knowledge.broadcom.com/external/article?legacyId=TECH103088.
Step 2—EnableWSS Traffic Redirection in the SEPManager
1. Log in to the Symantec Endpoint ProtectionManager.
2. Select Policies > Integrations.
3. Click Add an Integrations Policy. The SEP Manager displays the Integrations Policy dialog.
4. Select WSS Traffic Redirection.

Symantec Web Security Service/Page 32
a. Select Enable WSS Traffic Redirection.
b. Select Install the...root certificate....
c. In the PAC Auto Configuration (PAC) File URL field, enter the URL obtained from theWSS.
Example format: https://pfms.wss.symantec.com/v1/pac?tenant=f6104d245&pac=6027c20d1.
d. Click OK.
Tip: If you click Mixed Control under Client User Interface Control Settings and then clickCustomize, no option exists in the client user interface settings to configureWSS TrafficRedirection.
Verify WTR on the SEP Client
1. Access the SEP client on a system that is receiving this configuration.
2. Select theWTR tab.
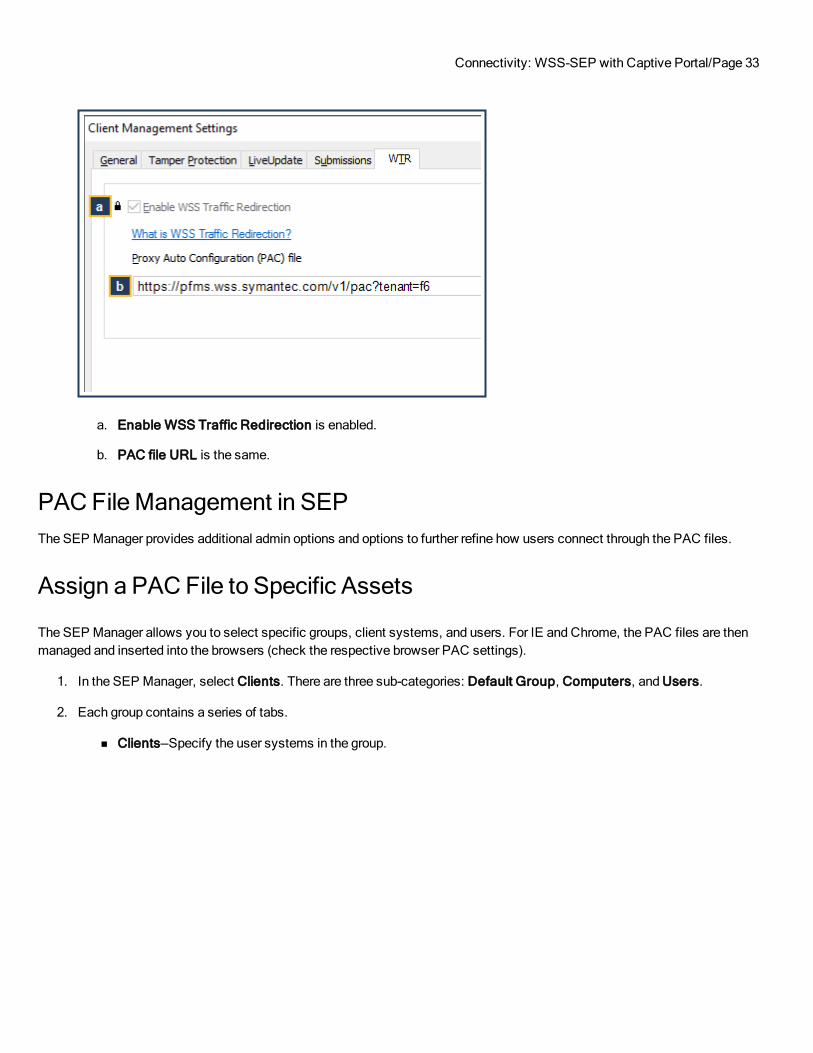
Connectivity: WSS-SEP with Captive Portal/Page 33
a. Enable WSS Traffic Redirection is enabled.
b. PAC file URL is the same.
PAC File Management in SEPThe SEP Manager provides additional admin options and options to further refine how users connect through the PAC files.
Assign a PAC File to Specific Assets
The SEP Manager allows you to select specific groups, client systems, and users. For IE and Chrome, the PAC files are thenmanaged and inserted into the browsers (check the respective browser PAC settings).
1. In the SEP Manager, select Clients. There are three sub-categories: Default Group, Computers, and Users.
2. Each group contains a series of tabs.
n Clients—Specify the user systems in the group.

Symantec Web Security Service/Page 34
n Policies—Assign or remove theWSS PAC file.
Give Users the Ability to Turn the Service On or Off
Allow specific users and SEP groups the ability to turn the service on and off. For example, a specific consulting group requiresthe ability to turn off these settings; however, a help desk employee cannot turn off these settings.
On the integration policy created inStep 3 (Policy > Integrations), the interface displays a gold padlock icon.

Connectivity: WSS-SEP with Captive Portal/Page 35
The gold padlock icon enables or disables the end user ability to turn on or off theWSS redirection settings. By default, thepolicy is locked, whichmeans users cannot disable the service. Click the padlock (which switches to an unlocked icon) toallow users to disable connection to the service on their systems.
You can review all enable/disable activities on theMonitors > Logs SEP Manager page.
Take Policy Offline
You can disable the policy for all clients assigned Integrations Policy. Perhaps you have a need to troubleshoot some policyand don't want employee productivity to be impacted.
1. On the integration policy screen, click Overview.
2. Clear the Enable this policy option.
The next time SEP connects to themanagement server, it receives the instruction. If you change policy and re-enable it, thesame occurs. Upon the next management server connection, the client receives the policy.
Symantec Web Security Service/Page 36
Connectivity: WSS-SEP-WTRWith SeamlessIdentificationRedirect traffic from Symantec Endpoint Protection (SEP) clients to theWeb Security Service to extend from local to network-level protection. This topic provides the information for a fixed-location that uses SEPWeb Traffic Redirection (WTR), whichrequires a PAC File.
n See "Connectivity: About Symantec Endpoint Protection" on page 24 for more information about the solution.
Technical Requirementsn SEP 14.2+ is required for this feature.
n Requires an Explicit Proxy Location defined in Connectivity > PAC Files. The examples in this procedure use a locationnamed PAC-SA.
n Authenticationmethod—
The Seamless Identification feature securely transfers the logged-in user ID and device information toWSS, thusCaptive Portal is not required. However, you can enable Captive Portal or Roaming Captive Portal for backupauthenticationmethod should it become disabled or fail for any reason. This method supplies only the individual userinformation. To perform group-based policy, the Auth Connector is still required.
n Verify that yourWSS portal is not configured to bypass client-id.wss.symantec.com or any domains that couldcontain client-id.wss.symantec.com.
n If you plan to use the PAC File Management Service (PFMS) in conjunction with SEP clients, youmust runNorton LiveUpdate on the client to obtain the required certificate.
https://support.norton.com/sp/en/us/home/current/solutions/kb20080520094501EN_EndUserProfile_en_us
ISSUE: If you encounter issues with Live Update, download the SSL Intercept cert from theWSS portal andmanuallyinstall it on the test machine(s).
n https://portal.threatpulse.com/docs/am/Solutions/ManagePolicy/SSL/ssl_chrome_cert_ta.htm
n https://portal.threatpulse.com/docs/am/Solutions/ManagePolicy/SSL/ssl_ie_cert_ta.htm
n Supported browsers:
o Apple Safari
o Google Chrome
o Microsoft Edge
o Microsoft Internet Explorer 9 through 11
o Mozilla Firefox

Connectivity: WSS-SEP-WTR With Seamless Identification/Page 37
Technical Limitationsn WSS-SEP does not support remote logins if:
o The client is not in the domain tied with the Auth Connector;
o And policies based on groups exist in the policy editor.
Best Practicen Keep SEP clients updated to the latest versions, which provide critical fixes and performance enhancements.
Procedure—EnableWeb Traffic Redirection and SeamlessIdentification on SEP
Step 1—Obtain and Distribute the SEP Client (SEP 14.2+)
n If you already have a supported SEP Client, proceed toStep 2.
n Consult the welcome letter you receive from Symantec regarding how to access the SEP Manager.
n SEP Client Downloads—https://knowledge.broadcom.com/external/article?legacyId=TECH103088.
Step 2—Obtain an Integration Token
For SEP clients to securely forward user ID and client-context information to theWSS, youmust generate an integration tokento be entered in SEP Manager.
1. In theWSS portal, navigate to Connectivity > Symantec Endpoint Protection.
2. Click New Token.

Symantec Web Security Service/Page 38
a. Verify that Local Device Authentication is selected.
b. (Optional) Enter a Comment to reference the purpose of this token.
c. Click Generate Token. WSS generates the randomized token.
d. Copy or record the token.
e. Click Save.
Step 3—Obtain a PAC URL
1. In theWSS portal, navigate to Connectivity > PAC Files.
2. Click New File. The portal switches to the PAC File Editor.

Connectivity: WSS-SEP-WTR With Seamless Identification/Page 39
a. Name the PAC file.
b. (Optional) Describe the purpose of this PAC file.
c. Include WSS Bypass adds any IP addresses or domains that were previously added to the portal bypass lists.You can click the expander to view those entries; however, you cannot edit those entries here.
d. Include Office 365 Bypass adds all of the currently knownMicrosoft Office web application domains.
3. Click Save.
The portal generates an explicit PAC File URL. Copy this URL (click the Copy icon at the right-side of the field), as it isrequired during the SEP integration step.
4. Continuing with the example, click the Locations tab.

Symantec Web Security Service/Page 40
Tip: You can havemore than one location that uses the same PAC file.
a. Select a Location that is to connect through this PAC file. This example selects a previously added Explicit ProxyLocation (named PAC-SA) created to test SEP integration.
Tip: The Roaming Endpoints option applies the PAC file to all remote client (non-corporate network) connections.
b. Click Add and Save.
5. Click the PAC Files link (or the Up arrow icon next to the PAC file name). The portal now displays the newly-createdPAC file.
Step 4—ConfigureWTR in the SEPManager
In the Symantec Endpoint ProtectionManager, configureWSS Traffic Redirection (WTR).
1. Log in to the Symantec Endpoint ProtectionManager.
2. Select Policies > Network Traffic Redirection.
3. Double-click Network Traffic Redirection policy. The SEP Manager displays the Network Traffic Redirection dialog.
4. On theOverview tab, verify that Enable This Policy is selected.
5. Select Network Traffic Redirection.
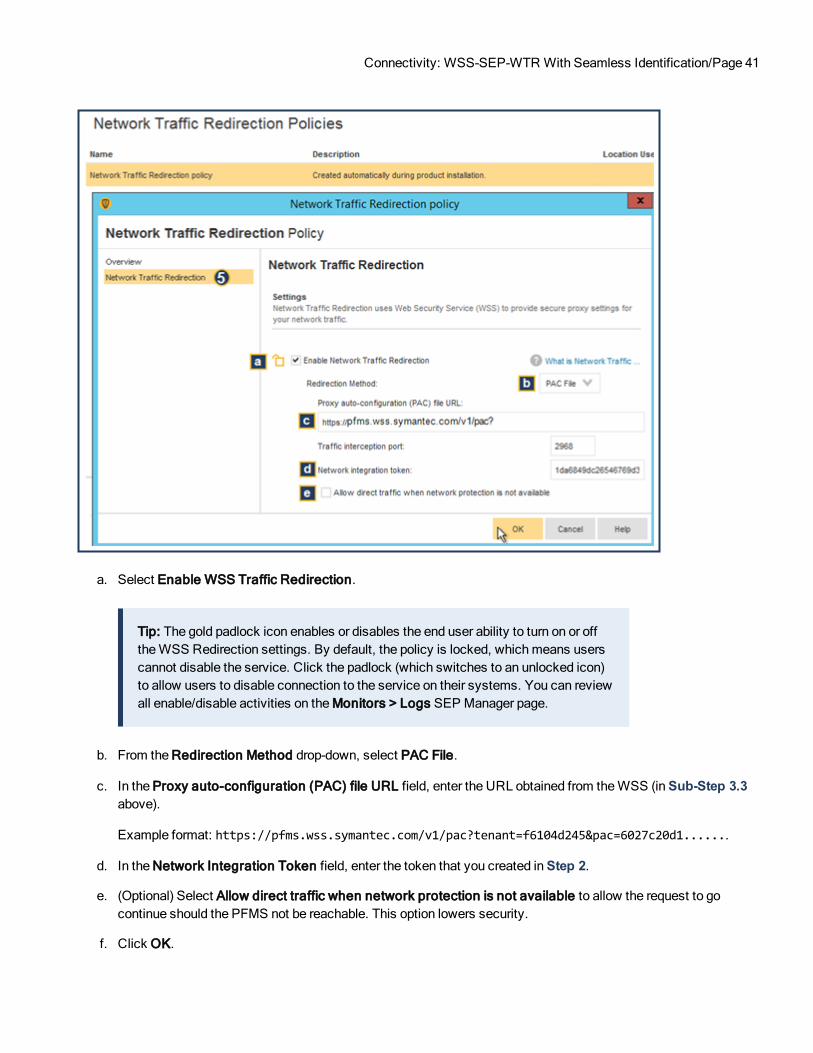
Connectivity: WSS-SEP-WTR With Seamless Identification/Page 41
a. Select Enable WSS Traffic Redirection.
Tip: The gold padlock icon enables or disables the end user ability to turn on or offtheWSS Redirection settings. By default, the policy is locked, whichmeans userscannot disable the service. Click the padlock (which switches to an unlocked icon)to allow users to disable connection to the service on their systems. You can reviewall enable/disable activities on theMonitors > Logs SEP Manager page.
b. From the Redirection Method drop-down, select PAC File.
c. In the Proxy auto-configuration (PAC) file URL field, enter the URL obtained from theWSS (inSub-Step 3.3above).
Example format: https://pfms.wss.symantec.com/v1/pac?tenant=f6104d245&pac=6027c20d1.......
d. In the Network Integration Token field, enter the token that you created inStep 2.
e. (Optional) Select Allow direct traffic when network protection is not available to allow the request to gocontinue should the PFMS not be reachable. This option lowers security.
f. Click OK.

Symantec Web Security Service/Page 42
Step 5—(Optional) Verify the SEP Client Settings
On a test system with SEP client installed with Admin rights, you can review the settings.
1. Access the SEP client application.
2. On the Status page, click Options for Network Traffic Redirection.
n Enable WSS Traffic Redirection—This client has the feature enabled.
n Redirection Method is PAC File.
Additional Support
n Refer to the Symantec SEP documentation.

Connectivity: WSS-SEP-NTR With Seamless Identification/Page 43
Connectivity: WSS-SEP-NTRWith SeamlessIdentificationRedirect traffic from Symantec Endpoint Protection (SEP) clients to theWeb Security Service to extend from local to network-level protection. This topic provides the information required for enabling Network Traffic Redirection (NTR) in SEP Manager.
n See "Connectivity: About Symantec Endpoint Protection" on page 24 for more information about the solution.
Technical Requirementsn SEP 14.3-RU1 is required for this feature.
n Authenticationmethod—
The Seamless Identification feature securely transfers the logged-in user ID and device information toWSS, thusCaptive Portal is not required. However, you can enable Captive Portal or Roaming Captive Portal for backupauthenticationmethod should Seamless Identification become disabled or fail for any reason. This method supplies onlythe individual user information. To perform group-based policy, the Auth Connector is still required.
n Verify that yourWSS portal is not configured to bypass client-id.wss.symantec.com or any domains that couldcontain client-id.wss.symantec.com.
Technical Limitationn WSS-SEP does not support remote logins if:
o The client is not in the domain tied with the Auth Connector;
o And policies based on groups exist in the policy editor.
Best Practicen Keep SEP clients updated to the latest versions, which provide critical fixes and performance enhancements.
Procedure—EnableWeb Traffic Redirection and SeamlessIdentification on SEP
Step 1—Obtain and distribute the SEP client (SEP 14.3-RU1).
n If you already have a supported SEP Client, proceed toStep 2.
n Consult the welcome letter you received from Symantec regarding how to access the SEP Manager.
n SEP Client Downloads—https://knowledge.broadcom.com/external/article?legacyId=TECH103088.

Symantec Web Security Service/Page 44
Step 2—Obtain an Integration Token.
For SEP clients to securely forward user ID and client-context information toWSS, youmust generate an integration token to beentered in SEP Manager.
1. In theWSS portal, navigate to Connectivity > Symantec Endpoint Protection.
2. Click New Token.
a. Verify that Local Device Authentication is selected.
b. (Optional) Enter a Comment to reference the purpose of this token.
c. Click Generate Token. TheWSS generates the randomized token.
d. Copy or record the token.
e. Click Save.
Step 3—Configure NTR in the SEPManager.
In the Symantec Endpoint ProtectionManager, configureWSS Network Traffic Redirection (NTR).

Connectivity: WSS-SEP-NTR With Seamless Identification/Page 45
1. Log in to the Symantec Endpoint ProtectionManager.
2. Select Policies > Network Traffic Redirection.
3. Double-click Network Traffic Redirection policy. The SEP Manager displays the Network Traffic Redirection dialog.
4. On theOverview tab, verify that Enable This Policy is selected.
5. Select Network Traffic Redirection.
a. Select Enable Network Traffic Redirection.
Tip: The gold padlock icon enables or disables the end user ability to turn theWSSRedirection settings on or off. By default, the policy is locked, whichmeans userscannot disable the service. Click the padlock (which switches to an unlocked icon)to allow users to disable the connection to the service on their systems. You canreview all enable/disable activities on theMonitors > Logs SEP Manager page.
b. From the Redirection Method drop-down, select Tunnel.
c. In the Network Integration Token field, enter the token that you created inStep 2.
d. Click OK.

Symantec Web Security Service/Page 46
Step 4—(Optional) Verify the SEP client Settings.
On a test system with a SEP client installed with Admin rights, you can review the settings.
1. Access the SEP client application.
2. On the Status page, click Options for Network Traffic Redirection.
n Enable WSS Traffic Redirection—This client has the feature enabled.
n Redirection Method is Tunnel.
Additional Support
n Refer to the Symantec SEP documentation.

Connectivity: WSS-SEP-NTR With Seamless Identification/Page 47
Connectivity: WSS-SEP Roaming SAMLRedirect traffic from Symantec Endpoint Protection (SEP) clients to theWeb Security Service to extend from protection toSAML-authenticated clients when not connecting through a corporate network. The Seamless Identification feature securelytransfers the logged-in user ID and device information to the cloud-based or on-premises SAML Identity Provider (IdP). Thismethod is a solution for roaming SEP clients because the SAML realm must receive the tenancy before authentication occurs;that is, client-to-IdP traffic cannot route throughWSS.
n See "Connectivity: About Symantec Endpoint Protection" on page 24 for more information about the solution.
Technical Requirementsn SEP 14.2+ is required for this feature.
n Authenticationmethod.
o Your environment has a functioning SAML/IdP solution.
o Allow saml.threatpulse.net:8443.
o IdP NOTE—As the client to SAML IdP traffic cannot route throughWSS because, youmust add an entry to thePAC file to make the IdP traffic go direct.
o The default SAMLmethod is Cookie. CORS-issues aremitigated because the procedure includesgenerating and providing an integration token, which is included in the HTTP header.
n The IdP must have an internet-facing IP address.
n For traffic bypass best practices, consult the following KB article.
n https://knowledge.broadcom.com/external/article?legacyId=TECH252765
n If you plan to use the PAC File Management Service (PFMS) in conjunction with SEP clients, youmust runNorton LiveUpdate on the client to obtain the required certificate.
https://support.norton.com/sp/en/us/home/current/solutions/kb20080520094501EN_EndUserProfile_en_us
ISSUE: If you encounter issues with Live Update, download the SSL Intercept cert from theWSS portal andmanuallyinstall it on the test machine(s).
n http://portal.threatpulse.com/docs/sol/Solutions/ManagePolicy/SSL/ssl_chrome_cert_ta.htm
n http://portal.threatpulse.com/docs/sol/Solutions/ManagePolicy/SSL/ssl_ie_cert_ta.htm
n Supported browsers:
o Apple Safari
o Google Chrome
o Microsoft Edge

Symantec Web Security Service/Page 48
o Microsoft Internet Explorer 9 through 11
o Mozilla Firefox
Technical Limitationsn Some browsers do not support proxy settings change in already running sessions. Changing a policy state
(enabled/disabled) requires browser restarts.
Best Practicen Keep SEP clients updated to the latest versions, which provide critical fixes and performance enhancements.
Procedure—EnableWeb Traffic Redirection and SeamlessIdentification on SEP
Step 1—Obtain and Distribute the SEP Client (SEP 14.2+)
n If you already have a supported SEP Client, proceed toStep 2.
n Consult the welcome letter you receive from Symantec regarding how to access the SEP Manager.
n SEP Client Downloads— https://knowledge.broadcom.com/external/article?legacyId=TECH103088.
Step 2—Obtain an Integration Token
For SEP clients to securely forward user ID and client-context information to theWSS, youmust generate an integration tokento be entered in SEP Manager.
1. In theWSS portal, navigate to Connectivity > Symantec Endpoint Protection.
2. Click New Token.

Connectivity: WSS-SEP-NTR With Seamless Identification/Page 49
a. For Authentication, select SAML (SEP only).
b. Click Generate Token. WSS generates the randomized token.
c. Copy the token to a local text file or email if another admin is to configure SEP Manager. (Click the copy icon atthe end of the field.)
Tip: Enter Comments to help future admins understand the token's role whenviewed in the portal.
d. Click Save.
Step 3—Obtain a PAC URL
1. In theWSS portal, navigate to Connectivity > PAC Files.
2. Click New File. The portal switches to the PAC File Editor.

Symantec Web Security Service/Page 50
a. Name the PAC file.
b. (Optional) Describe the purpose of this PAC file.
c. Include WSS Bypass adds any IP addresses or domains that were previously added to the portal bypass lists.You can click the expander to view those entries; however, you cannot edit those entries here.
d. Include Office 365 Bypass adds all of the currently knownMicrosoft Office web application domains.
e. Add an entry to bypass the SAML IdP server.
3. Click Save.
The portal generates an explicit PAC File URL. Copy this URL (click the Copy icon at the right-side of the field), as it isrequired during the SEP Manager integration step.
4. Continuing with the example, click the Locations tab.

Connectivity: WSS-SEP-NTR With Seamless Identification/Page 51
a. Select Roaming Endpoints and click Add.
b. Click Save.
5. Click the PAC Files link (or the Up arrow icon next to the PAC file name). The portal now displays the newly-createdPAC file.
Step 4—ConfigureWTR in the SEPManager
In the Symantec Endpoint ProtectionManager, configureWSS Traffic Redirection (WTR).
1. Log in to the Symantec Endpoint ProtectionManager.
2. Select Policies > Integrations.
3. Click Add an Integrations Policy. The SEP Manager displays the Integrations Policy dialog.
4. On theOverview tab, verify that Enable This Policy is selected.
5. Select WSS Traffic Redirection.

Symantec Web Security Service/Page 52
a. Select Enable WSS Traffic Redirection.
b. In the PAC Auto Configuration (PAC) File URL field, enter the URL obtained from theWSS (inSub-Step 3.3above; screenshot example format is not valid).
Example format: https://pfms.wss.symantec.com/v1/pac?tenant=f6104d245&pac=6027c20d1.......
c. In theWSS Integration Token field, enter the token that you created inStep 2.
d. Select Install the...root certificate....
e. Click OK.
Tip: The gold padlock icon enables or disables the end user ability to turn on or off theWSSRedirection settings. By default, the policy is locked, whichmeans users cannot disablethe service. Click the padlock (which switches to an unlocked icon) to allow users todisable connection to the service on their systems. You can review all enable/disableactivities on theMonitors > Logs SEP Manager page.
Step 5—(Optional) Verify the SEP Client Settings
On a test system with SEP client installed with Admin rights, you can review the settings.
1. Access the SEP client application.
2. In the Client Management row, click Configure Settings.
3. Select theWSS Traffic Redirection tab.
Connectivity: WSS-SEP-NTR With Seamless Identification/Page 53
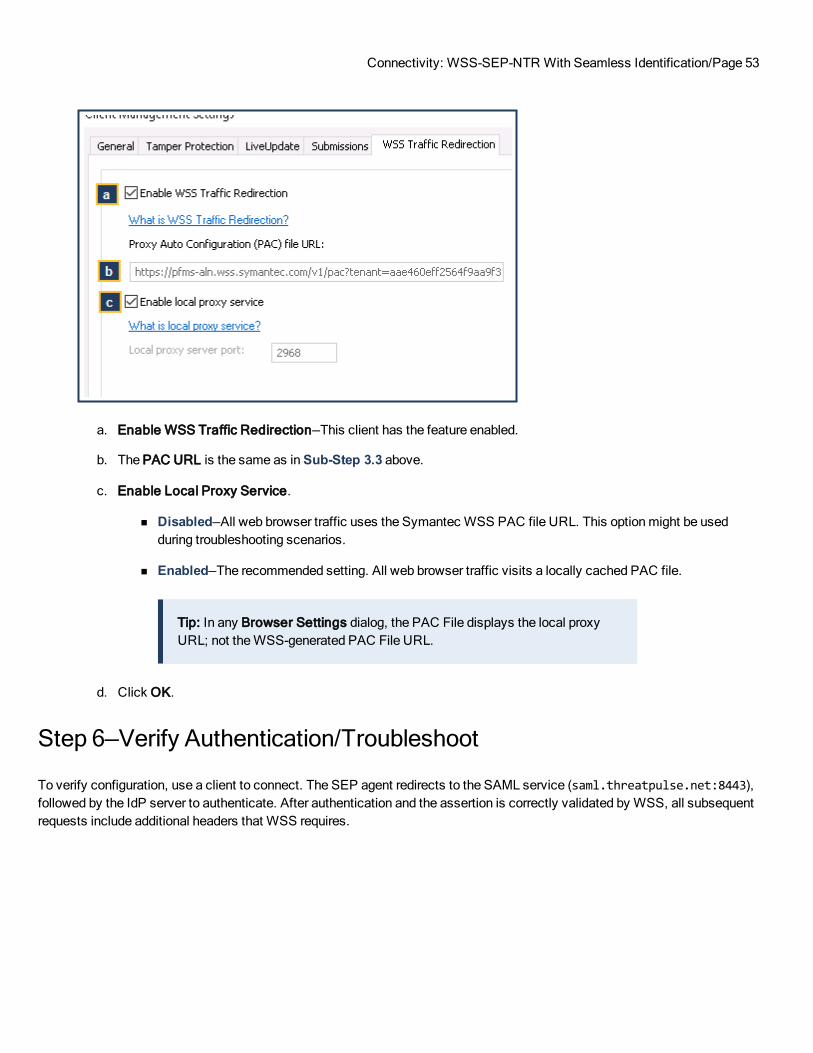
a. Enable WSS Traffic Redirection—This client has the feature enabled.
b. The PAC URL is the same as inSub-Step 3.3 above.
c. Enable Local Proxy Service.
n Disabled—All web browser traffic uses the Symantec WSS PAC file URL. This optionmight be usedduring troubleshooting scenarios.
n Enabled—The recommended setting. All web browser traffic visits a locally cached PAC file.
Tip: In any Browser Settings dialog, the PAC File displays the local proxyURL; not theWSS-generated PAC File URL.
d. Click OK.
Step 6—Verify Authentication/Troubleshoot
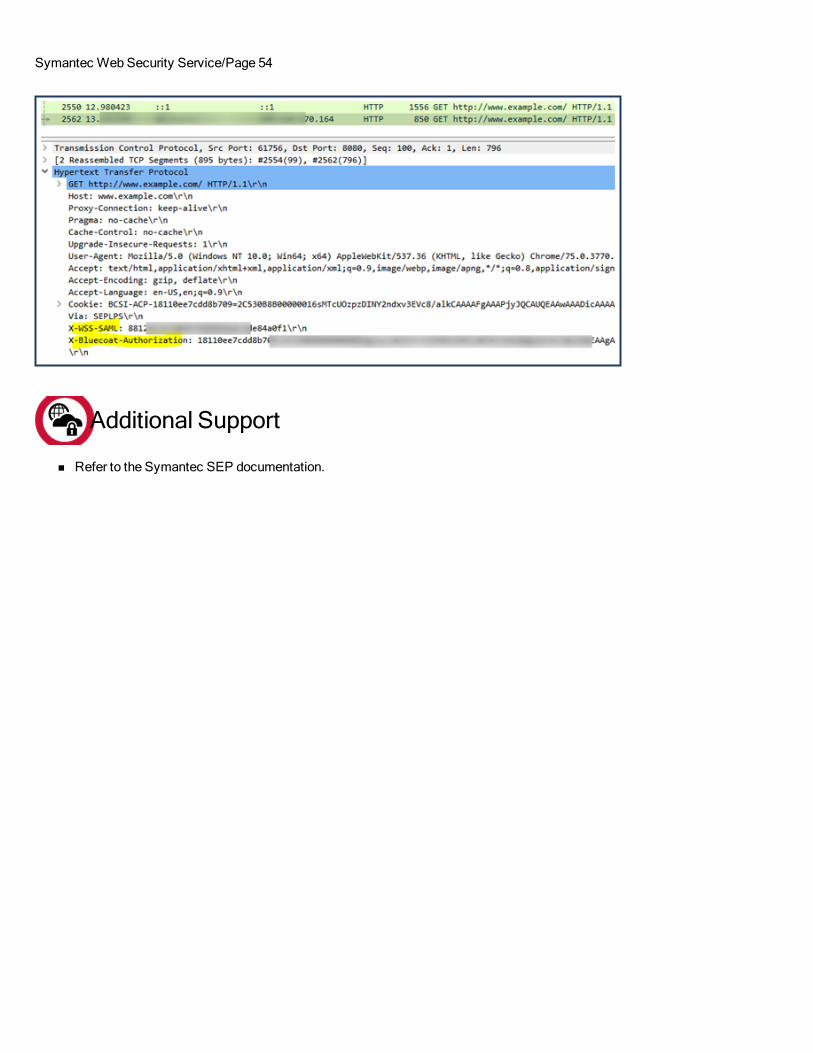
To verify configuration, use a client to connect. The SEP agent redirects to the SAML service (saml.threatpulse.net:8443),followed by the IdP server to authenticate. After authentication and the assertion is correctly validated by WSS, all subsequentrequests include additional headers that WSS requires.
Symantec Web Security Service/Page 54
Additional Support
n Refer to the Symantec SEP documentation.

Prevent IP/Subnet From Routing to theWeb Security Service/Page 55
Prevent IP/Subnet From Routing to the Web SecurityServiceIMPORTANT—This topic only applies to locations that use the Explicit Proxy andWSS Agent Web SecurityServiceconnectivity methods. All other access methods ignore any bypass domain configurations.
Some IP addresses or subnets do not requireWSS processing. For example, you want to exclude test networks. Configure theservice to ignore these connections.
Notesn WSS allows an unlimited number of bypassed IP addresses/subnets.
n Each time that aWSS Agent reconnects toWSS (for example, a user who takes a laptop off campus and connectsthrough a non-corporate network), the client checks against any updates to the list.
Procedure—Manually Add IP Addresses1. Navigate to the Policy > Bypassed Traffic > Bypassed IPs/Subnets tab.
2. Click Add. The service displays a dialog.
a. Enter an IP/Subnet.
b. (Optional) Enter a Comment.

Symantec Web Security Service/Page 56
c. (Optional) Click the + icon to add another row for another entry.
d. Click Add IPs/Subnets.
The new entries display in the tab view. You can edit or delete any entry from here.
Import IP Address Entries From a Saved ListThis procedure assumes that you have already created an accessible list (text file) of IP addresses to be bypassed. Each entryin the file must be on its own line.
1. Navigate to the Policy > Bypassed Traffic > Bypassed IPs/Subnets tab.
2. Click Add. The service displays the Add Bypass IP Address/Subnet dialog.
3. Click Import IPs/Subnets.
a. Click Browse. The service displays the File Upload dialog. Navigate to the file location andOpen it.
b. Click Import.
All of the new entries display in the tab view. You can edit or delete any entry from here.

Add an Explicit Proxy Location/Page 57
Add an Explicit Proxy LocationWhen configuring Explicit Proxy as the connectivity method, each gateway IP address defined in a PAC file requires anequivalent Symantec WSS location configuration.
1. Navigate to Connectivity > Locations.
2. Click Add Location.
3. Complete the Location dialog.
a. Name the location. For example, use the fixed geographical location or organization name.
b. Select Explicit Proxy as the Access Method.
c. Enter the IP/Subnet that forwards web traffic to theWSS.
4. Enter resource and location information.

Symantec Web Security Service/Page 58
a. Select the Estimated User range that will be sending web requests through this gateway interface. Symantecuses this information to ensure proper resources.
b. Select a Country and Time Zone.
c. Fill out location information and enter comments (optional).
5. Click Save.
n The Firewall/VPN connectivity method supports Captive Portal.

Reference: Required Locations, Ports, and Protocols/Page 59
Reference: Required Locations, Ports, and ProtocolsMost Symantec Web Security Service connectivity and authenticationmethods require communication through specific ports,protocols, and locations. If you have firewall rules in place, use this reference to verify the ports and services that must beopened to allow connectivity.
Symantec Resourcesupport.broadcom.com Provides knowledge base articles and support information.
Connectivity MethodsMethod Port(s) Protocol Resolves To
WSS portal access URL.
IP addresses for administration of yourWSS policy and configuration.
443 portal.threatpulse.com
35.245.151.22434.82.146.64
Partner Portal Functionality
35.245.151.23134.82.146.71
Firewall/VPN (IPsec) UDP 500(ISAKMP)
UDP4500 iffirewall isbehind a NAT.
IPsec/ESP
Proxy Forwarding TCP 8080/8443
TCP 8084*
HTTP/HTTPS proxy.threatpulse.net
* Use when the forwarding host is configured for localSSL interception.
Symantec Web Security Service/Page 60
Method Port(s) Protocol Resolves To
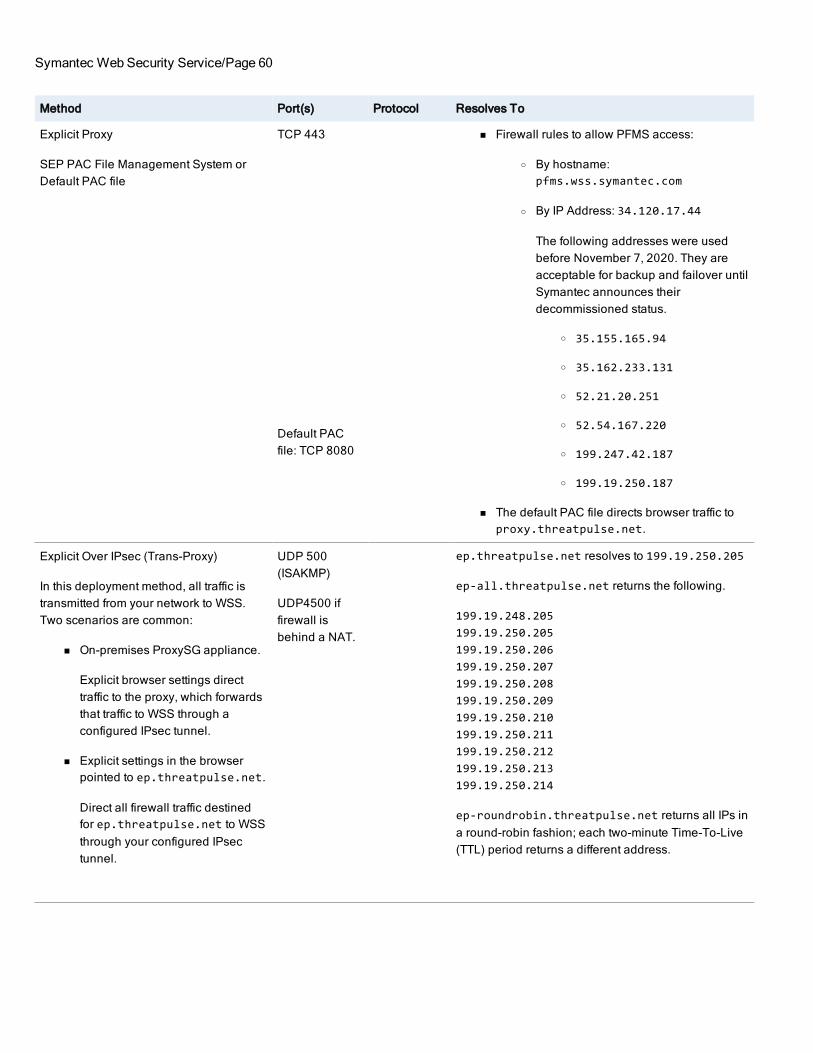
Explicit Proxy
SEP PAC File Management System orDefault PAC file
TCP 443
Default PACfile: TCP 8080
n Firewall rules to allow PFMS access:
o By hostname:pfms.wss.symantec.com
o By IP Address: 34.120.17.44
The following addresses were usedbefore November 7, 2020. They areacceptable for backup and failover untilSymantec announces theirdecommissioned status.
o 35.155.165.94
o 35.162.233.131
o 52.21.20.251
o 52.54.167.220
o 199.247.42.187
o 199.19.250.187
n The default PAC file directs browser traffic toproxy.threatpulse.net.
Explicit Over IPsec (Trans-Proxy)
In this deployment method, all traffic istransmitted from your network to WSS.Two scenarios are common:
n On-premises ProxySG appliance.
Explicit browser settings directtraffic to the proxy, which forwardsthat traffic to WSS through aconfigured IPsec tunnel.
n Explicit settings in the browserpointed to ep.threatpulse.net.
Direct all firewall traffic destinedfor ep.threatpulse.net to WSSthrough your configured IPsectunnel.
UDP 500(ISAKMP)
UDP4500 iffirewall isbehind a NAT.
ep.threatpulse.net resolves to 199.19.250.205
ep-all.threatpulse.net returns the following.
199.19.248.205199.19.250.205199.19.250.206199.19.250.207199.19.250.208199.19.250.209199.19.250.210199.19.250.211199.19.250.212199.19.250.213199.19.250.214
ep-roundrobin.threatpulse.net returns all IPs ina round-robin fashion; each two-minute Time-To-Live(TTL) period returns a different address.

Reference: Required Locations, Ports, and Protocols/Page 61
Method Port(s) Protocol Resolves To
WSS Agent TCP/UDP 443 SSL ctc.threatpulse.com130.211.30.2TCP port 443 for CTC requests and configuration.
portal.threatpulse.com
TCP port 443 for downloading updates.
Unified Agent TCP/UDP 443
Port 80
TCP, SSL ctc.threatpulse.com130.211.30.2TCP port 443 for CTC requests and configuration.
portal.threatpulse.com
TCP port 443 for downloading updates.
TCP/UDP port 443 to client.threatpulse.net(DNS fallback)
Port 80 for captive network information and updates.
Mobile (SEP-Mobile iOS/Android app) UDP 500(ISAKMP)
UDP 4500(NAT-T)
IPSec/ESP mobility.threatpulse.com
35.245.151.22834.82.146.68
Universal Policy Enforcement(UPE)/Hybrid Policy
On-Premises Policy Management(sgapi.threatpulse.com andsgapi.es.bluecoat.com)
35.245.151.229
34.82.146.69
If connectivity to WSS is behind stringent firewall rules,adjust the rules to allow traffic to pass to these IPaddresses on port 443.
Authentication
Auth Method Port(s) Protocol Resolves To
Auth Connector TCP 443 SSL auth.threatpulse.com:
35.245.151.22634.82.146.65
portal.threatpulse.com:
Tip: Additional Required Information: Reference:Authentication IP Addresses.

Symantec Web Security Service/Page 62
Auth Method Port(s) Protocol Resolves To
Auth Connector toActive Directory
TCP 139, 445 SMB
TCP 389 LDAP
TCP 3268 ADSI LDAP
TCP 135 Location Services
TCP 88 Kerberos
49152-65535 TCP Open when Auth Connector is installed on a new Windows Server2012 Member rather than a Domain Controller.
AC-Logon App TCP 80 Port 80 from all clients to the server.
SAML TCP 8443(over VPN)
Explicit andIPSec
saml.threatpulse.net
Roaming CaptivePortal
TCP 8080

Reference: Sample PAC File for Explicit Proxy/Page 63
Reference: Sample PAC File for Explicit ProxyThe following is sample text that makes up a Proxy Automatic Configuration (PAC) file from whichWeb browsers receiverouting instructions. The PAC file redirects all non-internal traffic to the Symantec Web Security Service.
function FindProxyForURL(url, host) { // If URL has no dots in host name, send traffic direct.
if (isPlainHostName(host)) return "DIRECT";// If specific URL needs to bypass proxy, send traffic direct.
if (shExpMatch(url,"*bluecoat.com*") || shExpMatch(url,"*cacheflow.com*")) return "DIRECT";// If IP address is internal send direct. if (isInNet(host, "10.0.0.0", "255.0.0.0") || isInNet(host, "172.16.0.0", "255.240.0.0") || isInNet(host, "192.168.0.0", "255.255.0.0") || isInNet(host, "216.52.23.0", "255.255.255.0") || isInNet(host, "127.0.0.0", "255.255.255.0") || isInNet(host, "192.41.79.240", "255.255.255.255")) return "DIRECT";// All other traffic uses below proxies, in fail-over order.
return "PROXY proxy.threatpulse.net:8080; DIRECT"; return "PROXY 199.19.250.164:8080; DIRECT"; }