week 9 - nasirunnisabtech.files.wordpress.com€¦ · web viewstep by step procedure for creating...
TRANSCRIPT

Week 9AimInstall a database(Mysql or Oracle).Create a table which should contain at least the following fields: name, password, email-id, phone number(these should hold the data from the registration form).
Write a PHP program to connect to that database and extract data from the tables and display them. Experiment with various SQL queries.Insert the details of the users who register with the web site, whenever a new user clicks the submit button in the registration page (week2).
DescriptionCreate a Connection to a MySQL DatabaseBefore you can access data in a database, you must create a connection to the database.In PHP, this is done with the mysql_connect() function.Syntaxmysql_connect(servername,username,password);
Parameter DescriptionServername Optional. Specifies the server to connect to. Default value is "localhost:3306"Username Optional. Specifies the username to log in with. Default value is the name of the
user that owns the server processPassword Optional. Specifies the password to log in with. Default is ""
ExampleIn the following example we store the connection in a variable ($con) for later use in the script. The "die" part will be executed if the connection fails:<?php$con = mysql_connect("localhost","peter","abc123");if (!$con) { die('Could not connect: ' . mysql_error()); }
// some code?>
Closing a ConnectionThe connection will be closed automatically when the script ends. To close the connection before, use the mysql_close() function:<?php$con = mysql_connect("localhost","peter","abc123");if (!$con) { die('Could not connect: ' . mysql_error()); }
// some code

mysql_close($con);?>
Source code
Step by step procedure for creating table in php my admin
MySQL is automatically installed along with WAMP server installation.User environment for MySQL in WAMP is “phpMyAdmin”.
Step1: Start WAMP server
Step2: Click WAMP server icon on taskbar and select “phpMyAdmin” option.
It automatically opens “phpMyAdmin” screen.

Step3: create New Database.Provide database name on “create new database” field and click “create” button. The
following screen displays in your computer
Step 4: Click database “ivcse” i.e appeared left panel of phpMyAdmin Screen. It displays following screen

Step5: Creating a table.The Aim indicates that you can create which should contain at least the following fields:
name, password, email-id, phone number. So here 4 fields are there. Provide table name “login” and “number of fields:” 4Click “Go” button. It displays following screen
Step 6: Provide fields name and its datatype, size like the following screen

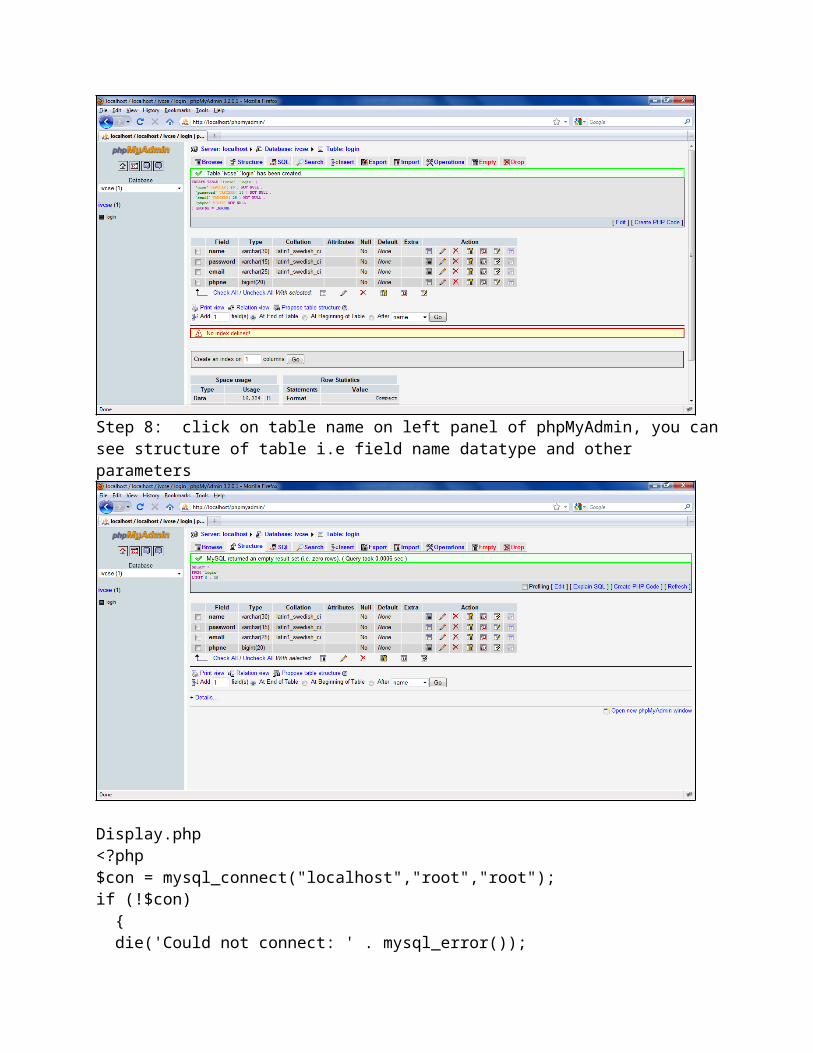
Step 7: click “Save”. It create login table and displays “Table ‘ivcse’,’login’ has been created.”
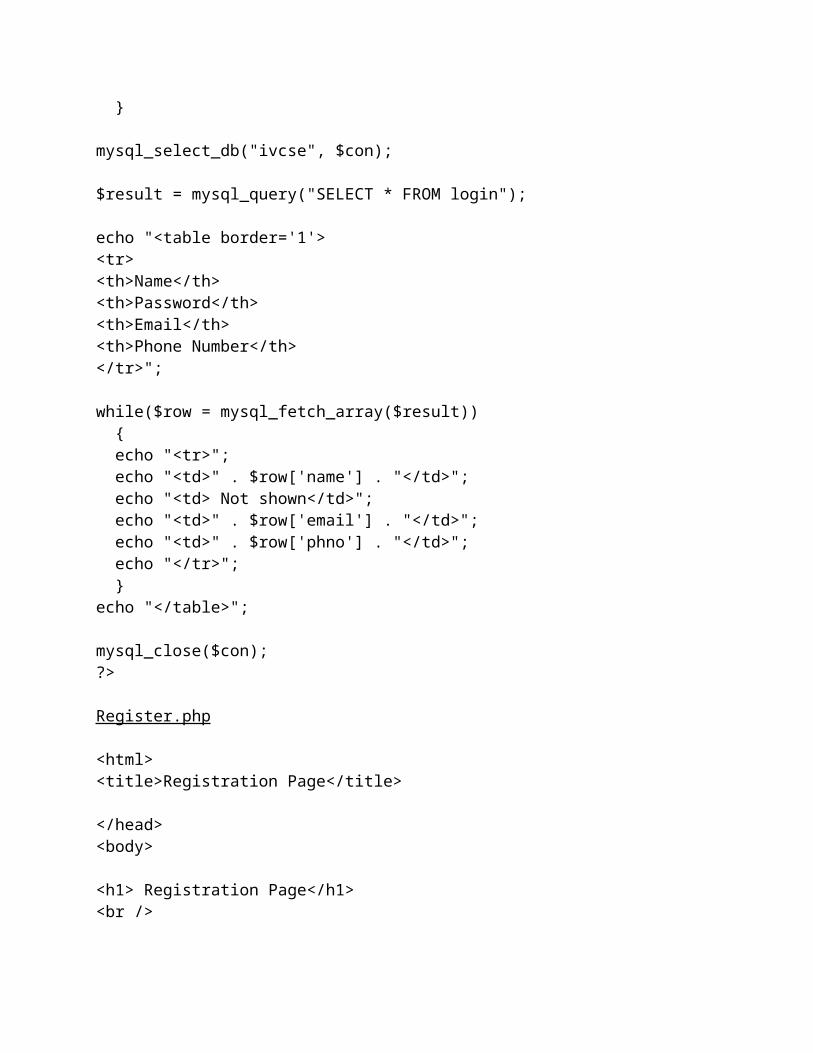
Step 8: click on table name on left panel of phpMyAdmin, you can see structure of table i.e field name datatype and other parameters
Display.php<?php$con = mysql_connect("localhost","root","root");if (!$con) { die('Could not connect: ' . mysql_error()); }
mysql_select_db("ivcse", $con);
$result = mysql_query("SELECT * FROM login");
echo "<table border='1'><tr><th>Name</th><th>Password</th><th>Email</th><th>Phone Number</th></tr>";
while($row = mysql_fetch_array($result)) { echo "<tr>"; echo "<td>" . $row['name'] . "</td>"; echo "<td> Not shown</td>"; echo "<td>" . $row['email'] . "</td>"; echo "<td>" . $row['phno'] . "</td>"; echo "</tr>";
}echo "</table>";
mysql_close($con);?>
Register.php
<html><title>Registration Page</title>
</head><body>
<h1> Registration Page</h1><br />
<form action="insert.php" method="post">Name <input type="text" name="fname" id="fname" value="name" /><br />Password <input type="password" name="pwd" id="pwd" value="password" /> <br />Email <input type="text" name="email" id="email" value="[email protected]"/><br />Phone Number <input type="text" name="ph" id="ph" value="9999999999" maxlength="10"/><br /><input type="submit" value="Submit" /></form></body></html>
Insert .php
<?php$con = mysql_connect("localhost","root","root");if (!$con) { die('Could not connect: ' . mysql_error()); }
mysql_select_db("ivcse", $con);
$sql="INSERT INTO login (name, password, email, phno)

VALUES('$_POST[fname]','$_POST[pwd]','$_POST[email]','$_POST[ph]')";
if (!mysql_query($sql,$con)) { die('Error: ' . mysql_error()); }echo "1 record added";echo "<br> <br>";echo "You want to register another user, Click <a href='register.html'>here</a>";
mysql_close($con);?>
Execution procedureStep1: Type all programs and save with .php extension in c:\WAMP\WWW directory.Step2: Run WAMP Server.Step3: Through localhost execute your programs. url’s are: http://localhost/display.php && http://localhost/insert.php
Output
Figure 1: Displaying data from Database

Figure 2:Registering New User
After providing all fields of data and Click on Submit button
Figure 3: After successfully added 1 user