welch allyn retinavue™ 100 imager pro - directions … · controls and connectors ... use the...
TRANSCRIPT

Welch Allyn RetinaVue™ 100Imager Pro
Directions for useSoftware version 6.XX

© 2018 Welch Allyn. All rights are reserved. To support the intended use of the product described in this publication,the purchaser of the product is permitted to copy this publication, for internal distribution only, from the mediaprovided by Welch Allyn. No other use, reproduction, or distribution of this publication, or any part of it, is permittedwithout written permission from Welch Allyn. Welch Allyn assumes no responsibility for any injury to anyone, or forany illegal or improper use of the product, that may result from failure to use this product in accordance with theinstructions, cautions, warnings, or statement of intended use published in this manual.
Software in this product is Copyright 2018 Welch Allyn or its vendors. All rights are reserved. The software isprotected by United States of America copyright laws and international treaty provisions applicable worldwide. Undersuch laws, the licensee is entitled to use the copy of the software incorporated with this instrument as intended inthe operation of the product in which it is embedded. The software may not be copied, decompiled, reverse-engineered, disassembled, or otherwise reduced to human-perceivable form. This is not a sale of the software orany copy of the software; all right, title, and ownership of the software remain with Welch Allyn or its vendors.
For information about any Welch Allyn product, contact Welch Allyn Technical Support: http://www.welchallyn.com/support.
727803, (printed copy)DIR 80022009 Ver. B
Revision date: 2018-07
This manual applies to the 901103 Fundus Camera
Distributed by Welch Allyn, Inc.
Medimaging Integrated Solution Inc. (MiiS)
1F, No. 7, R&D Rd II, Hsinchu Science Park,
Hsinchu, TAIWAN 30076, R.O.C.
Regulatory Affairs RepresentativeMedNet GmbH
Borkstrasse 10
48163 Muenster
Germany
Made in Taiwan

Contents
Symbols ................................................................................................... 1
Introduction ............................................................................................. 5Intended use ........................................................................................................ 5About warnings and cautions ............................................................................... 5General warnings, cautions, and notes ................................................................ 6Controls and connectors ...................................................................................... 8
Using the RetinaVue 100 Imager Pro ................................................... 11Unpack the system ............................................................................................ 11Docking station .................................................................................................. 17First time set up of the RetinaVue 100 Imager Pro .......................................... 18RetinaVue 100 Imager Pro Home screen .......................................................... 20Create a new patient on the RetinaVue 100 Imager Pro camera ....................... 22About the Auto and Manual Exam modes ......................................................... 25Adaptive software in the Auto exam mode for software 6.10.02 and higher .... 27Perform an eye exam using the Auto exam mode ............................................ 28Perform a manual image capture while in Auto exam mode ............................. 34Skip an image capture while in Auto exam mode .............................................. 35Perform a manual image capture while in Manual exam mode ......................... 36Review patient exams on the RetinaVue 100 Imager Pro ................................. 37Transfer patient exams from the RetinaVue 100 Imager Pro to a computer ..... 39Use the RetinaVue 100 Imager Pro SD Card to transfer patient exams to acomputer ............................................................................................................ 40
Troubleshooting .................................................................................... 41
Maintenance .......................................................................................... 47Clean and disinfect ............................................................................................. 47
RetinaVue 100 Imager Pro Specifications ........................................... 49
Enable the RetinaVue Network ........................................................... 51To change the camera configuration from the RV100 Pro to the RV100 (USB orWireless): .......................................................................................................... 51To change the camera configuration from the RV100 (USB or Wireless) to theRV100 Pro: ........................................................................................................ 52
Viewing or changing the RetinaVue 100 Imager Pro settings ........... 53Power down the RetinaVue 100 Imager ............................................................ 54Sleep mode ........................................................................................................ 55Set the date and time ........................................................................................ 57
iii

Set the Device Access Code ............................................................................ 58
General compliance and standards ..................................................... 63EMC compliance ................................................................................................ 63Emissions and immunity information ................................................................. 64
Navigation controls ............................................................................... 67Navigation controls in the Training mode ........................................................... 67Navigation controls in the Exam mode .............................................................. 68Navigation controls in the Settings mode .......................................................... 69Navigation controls in the Review mode ........................................................... 69Image Pre-acquisition controls (Auto mode) ..................................................... 71Controls (Post-acquisition) ................................................................................ 71Exam summary controls (Post-acquisition and Review modes) ....................... 73
Update the RetinaVue 100 Imager Pro software to version 6.XX andabove ...................................................................................................... 75
RetinaVue 100 and 100 Imager Pro Accessories ............................... 77
iv Contents Welch Allyn RetinaVue™ 100 Imager Pro

Symbols
Documentation symbolsFor information on the origin of these symbols, visit http://www.welchallyn.com/symbolsglossary for the Welch Allyn symbols glossary.
WARNING The warning statements inthis manual identify conditions orpractices that could lead to illness, injury,or death. Warning symbols will appearwith a grey background in a black andwhite document.
Caution The caution statements in thismanual identify conditions or practicesthat could result in damage to theequipment or other property, or loss ofdata.
Consult directions for use (DFU). A copyof the DFU is available on this website. Aprinted copy of the DFU can be orderedfrom Welch Allyn for delivery within 7calendar days.
Meets essential requirements of theEuropean Medical Device Directive 93/42/EC.
Power symbolsPower button Direct current (DC)
Rated power input, DC Rated power output, DC
Fuse Rechargeable battery
Battery Charging - Non-AC powered
1

Connectivity symbolsUSB
Wireless radio symbolsNon-ionizing electromagnetic radiation Australian Communications and Media
Authority (ACMA) Radio ComplianceMark (RCM)
FCC ID The identification number assigned bythe Federal Communication Commission2AFB3WA-WEC100
IC ID Industry Canada identification number.The equivalent governing body to the FCCin the United States21375-WAWEC100
CAN ICES-3 (B)/NMB-3(B)
Shipping, storing, and environment symbolsTemperature limit Keep Dry
Separate collection of Electrical andElectronic Equipment. Do not dispose asunsorted municipal waste.
Fragile
Humidity limitation Atmospheric pressure limitation
This way up Stacking limit by number
Recyclable
Miscellaneous symbolsProduct Identifier Reorder Number
2 Symbols Welch Allyn RetinaVue™ 100 Imager Pro

Global Trade Item Number For indoor use only
Type BF applied part Prescription only or "For Use by or on theorder of a licensed medical professional"
Clock; time switch; timer Serial Number
Authorized Representative in theEuropean Community
Battery charge level indicatorsDevice is running on battery and chargeis between 75 and 100 percent.
Device is running on battery and chargeis below 75 percent.
Device is running on battery and chargeis below 50 percent.
Device is running on battery and chargeis below 25 percent.
Device is running on battery and chargeis below 10 percent. Device blinks withalternating icons.
Device is connected to a power supplyand is docked.
Directions for use Symbols 3

4 Symbols Welch Allyn RetinaVue™ 100 Imager Pro

Introduction
Intended useThe Welch Allyn RetinaVue 100 Imager is a digital hand-held eye-fundus camera used torecord digital photographs of the fundus (including retina, macula and optic disc) of thehuman eye and surrounding area.
Prescription only or "For Use by or on the order of a licensed medical professional".
Note It is the responsibility of the health care provider to protect patient healthinformation and to meet regulatory and HIPAA compliance. The images onthe RetinaVue 100 Imager Pro may contain identifiable patient informationand it is the responsibility of the health care provider to ensure that datasafeguards are implemented to protect patient health information.
For information on configuring the RetinaVue 100 Imager Pro device to connect to theRetinaVue Network system, contact Welch Allyn support to discuss setting up aRetinaVue Network account.
About warnings and cautionsWarning and caution statements can appear on the RetinaVue 100 Imager device, thepackaging, the shipping container, or in this Directions for use.
The RetinaVue 100 Imager is safe for patients and clinicians when used in accordancewith the instructions and the warning and caution statements presented in thisDirections for use.
Before using the device, you must familiarize yourself with all warnings and cautions,with the steps to power up the device, and with the sections of this Directions for usethat pertain to your use of the device. Specific warnings and cautions are also foundthroughout this manual.
• Failure to understand and observe any warning statement in this manual could leadto patient injury or illness.
• Failure to understand and observe any caution statement in this manual could lead todamage to the equipment or other property, or loss of patient data.
5

General warnings, cautions, and notesWARNING Exposure to the RetinaVue 100 Imager flash, in rare cases,may contribute to migraines or temporary visual disturbances, particularly inpatients with a history of light sensitivity or migraines. Multiple flashes pereye in a single exam may increase the likelihood of occurrence.
WARNING Clean and disinfect the eye cup after each patient to avoid therisk of cross-contamination.
WARNING Operating the device in the presence of a flammableanesthetic mixture with air, oxygen, or nitrous oxide; in oxygen-enrichedenvironments; or in any other potentially explosive environment may causea fire and explosion hazard.
WARNING Do not use batteries from other sources. This may result inexcessive temperatures, fire, or explosion.
WARNING To prevent fire or electrical shock, do not expose the device torain or moisture.
CAUTION When manually entering patient information, do not use thesame patient identifier for multiple patients. This may result in inaccuratedata association.
CAUTION Avoid subjecting the device to vibration or shock.
CAUTION Avoid using the device in a dusty environment.
CAUTION Keep the power cord away from any heat source.
CAUTION Do not sterilize the device.
CAUTION All servicing of this equipment is to be performed by WelchAllyn, Inc. or by a center approved by Welch Allyn, Inc.
CAUTION This device needs to be installed and put into service accordingto the EMC information provided herein.
CAUTION Portable and mobile RF communications equipment can affectthe RetinaVue 100 Imager performance.
CAUTION Input overload can occur in proximity to defibrillator orelectrocautery devices.
CAUTION This device is not protected against the ingress of water andshould not be used in the presence of liquids which may enter the device.
CAUTION Results deleted on the device cannot be recovered.
CAUTION Do not modify this equipment without authorization of themanufacturer.
CAUTION Do not use the device in direct sunlight. Strong ambient lightmay affect results.
6 Introduction Welch Allyn RetinaVue™ 100 Imager Pro

CAUTION Within the patient environment, only connect the equipment(the RetinaVue 100 Imager) to computers or laptops that have passed thesafety standard for information technology equipment IEC 60601-1, EN60601-1, ANSI/AAMI ES 60601-1 to ensure the safety of the USB electricalconnection. Outside the patient environment, only connect the equipment(the RetinaVue 100 Imager) to computers or laptops that have passed thesafety standard for information technology equipment IEC 60950-1, EN60950-1, UL 60950-1 to ensure the safety of the USB electrical connection.
CAUTION Do not turn off the device while saving data from a patient test.Turning off the device while saving patient data may delete the data.
CAUTION Do not use the device adjacent to or stacked with otherequipment. If the device is used adjacent or stacked with other equipment,the device should be observed to verify normal operation in theconfiguration in which it will be used.
CAUTION Do not submerge the device in liquid or allow liquid to enter theinterior of the device.
CAUTION Do not use automatic cleansing machines or sterilization.
CAUTION Consult the cleaning agent and germicidal cleaner agentmanufacturer instructions for their proper use and germicidal efficacy priorto their use.
CAUTION Only use the cleaning or germicidal cleaner agent types listed ordamage may occur.
Note The RetinaVue 100 Imager can be used on patients with eye implants andintraocular lenses. While the RetinaVue 100 Imager can be used onpatients with cataracts and other eye opacities, the use of the RetinaVue100 Imager may result in a lower quality image due to the increasedreflection of the flash off the patient's intraocular lens.
Directions for use Introduction 7
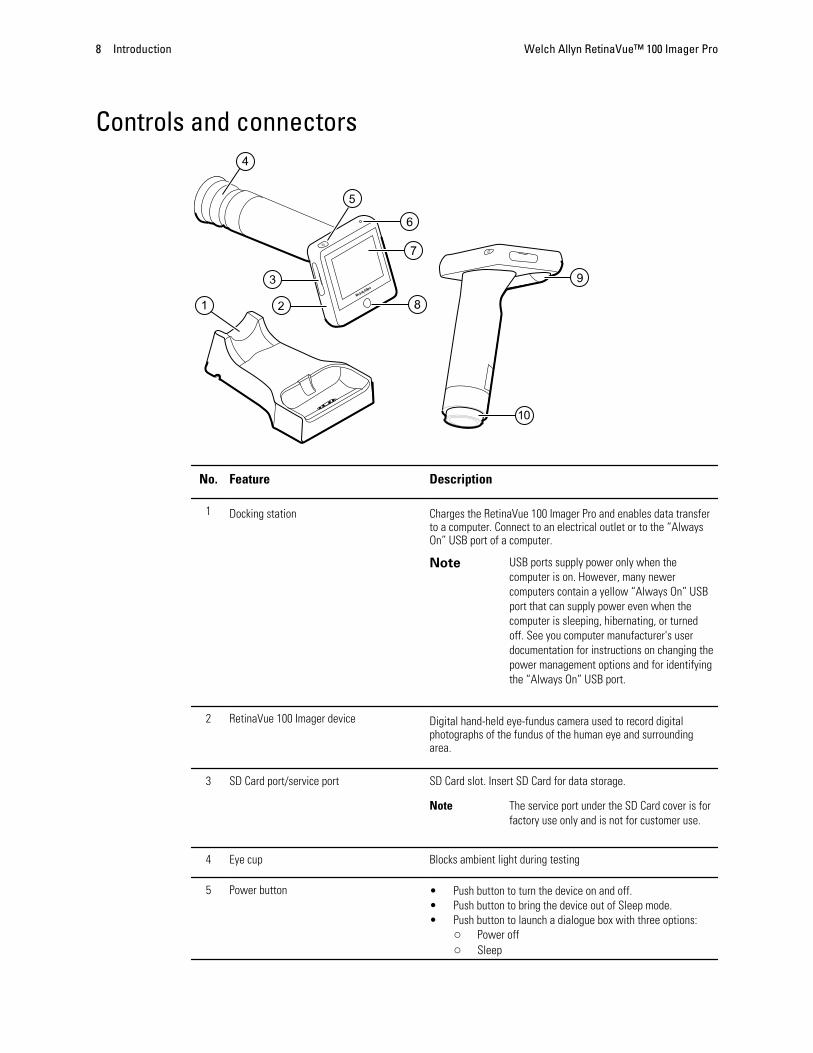
Controls and connectors
No. Feature Description
1 Docking station Charges the RetinaVue 100 Imager Pro and enables data transferto a computer. Connect to an electrical outlet or to the “AlwaysOn” USB port of a computer.
Note USB ports supply power only when thecomputer is on. However, many newercomputers contain a yellow “Always On” USBport that can supply power even when thecomputer is sleeping, hibernating, or turnedoff. See you computer manufacturer's userdocumentation for instructions on changing thepower management options and for identifyingthe “Always On” USB port.
2 RetinaVue 100 Imager device Digital hand-held eye-fundus camera used to record digitalphotographs of the fundus of the human eye and surroundingarea.
3 SD Card port/service port SD Card slot. Insert SD Card for data storage.
Note The service port under the SD Card cover is forfactory use only and is not for customer use.
4 Eye cup Blocks ambient light during testing
5 Power button • Push button to turn the device on and off.• Push button to bring the device out of Sleep mode.• Push button to launch a dialogue box with three options:
○ Power off○ Sleep
8 Introduction Welch Allyn RetinaVue™ 100 Imager Pro

No. Feature Description
○ Cancel
6 Power indicator • When the LED light is green, it indicates that the device isdocked and is fully powered.
• When the LED light is amber, it indicates that the device isdocked and is in the process of charging.
• When the device is not docked the LED is off.
7 LCD touchscreen 3.5” color HD LCD touchscreen. Displays information for charging,testing, and adjustments to the device.
8 Home button Press the Home button to navigate to the Home screen (workflowselection) from any screen on the device.
9 Battery cover Covers the battery compartment
10 Bezel Area to which the eye cup attaches
Directions for use Introduction 9

10 Introduction Welch Allyn RetinaVue™ 100 Imager Pro

Using the RetinaVue 100 Imager Pro
View images saved to the RetinaVue 100 Imager Pro on the LCD touchscreen. Theimages saved on the SD card are in unencrypted (.jpg) format and a DICOM (.dcm)format. To view images on a computer, use photo viewer software.
Unpack the systemThe RetinaVue 100 Imager Pro device is packaged with the following items. Confirm thatall items are included.
Number Item Description
1 RetinaVue 100 Imager Pro deviceDigital hand-held eye-fundus camera used to record digitalphotographs of the fundus of the human eye and surroundingarea.
2 Docking stationCharges the RetinaVue 100 Imager Pro device and enables USBdata transfer to a computer or laptop. Connect to region-specificAC wall outlet.
3 USB cableConnects the docking station to a computer or laptop to transferresults. Connects the docking station to the wall adapter plug forAC charging.
4 Wall adapter plug Connects to USB cable. Match to region-specific AC wall outlet.
11

Number Item Description
5 Eye cup Blocks ambient light during testing
6 Battery Rechargeable lithium ion battery
7 Screwdriver Phillips screwdriver to remove battery cover screws
Not shown RetinaVue 100 Imager Pro Directionsfor use
This document. The Directions for use (DFU) is also available onthe Welch Allyn web site.
Not shown SD Card SD Card installed in the SD Card slot for data storage
Not shown Lens spray RetinaVue 100 Imager lens cleaner
Not shown Lens cloth RetinaVue 100 Imager lens cleaning cloth
If any item is missing, contact Welch Allyn Technical Support: www.welchallyn.com/service. We recommend that you save the shipping box and packing materials in caseyou need to store or ship the system.
Battery installation and replacementUse the device on battery power once the battery is installed and charged. The battery ischarged through contact pins on the device and the docking station.
Install the battery/replace the batterySet the RetinaVue 100 Imager on a flat, clean surface with the LED display facing down.
WARNING Personal injury risk. Improper handling of the battery can leadto heat generation, smoke, explosion, or fire. Do not short-circuit, crush,incinerate, or disassemble the battery. Never dispose of batteries in refusecontainers. Always recycle batteries according to national or localregulations.
WARNING Use only Welch Allyn approved accessories, and use themaccording to the manufacturer’s directions for use. Using unapprovedaccessories with the camera can affect patient and operator safety and cancompromise product performance and accuracy, and void the productwarranty.
1. Loosen the screw at the left side of the battery cover.
2. Loosen the screw at the right side of the battery cover.
3. Push in the battery cover tab and then lift up the battery cover. Slide open thebattery cover by tilting the cover upward.
12 Using the RetinaVue 100 Imager Pro Welch Allyn RetinaVue™ 100 Imager Pro

4. For first-time setup of the RetinaVue 100 Imager, insert the battery into the batterycompartment. For battery replacement, remove the existing battery and then insertthe new replacement battery into the battery compartment.
a. This procedure applies to first-time setup of the RetinaVue 100 Imager. Insertthe battery into the battery compartment. Match the polarity of the battery to the+ and - markings on the RetinaVue 100 Imager.
b. This procedure only applies to battery replacement. Remove the existing batteryfrom the battery compartment and insert the new replacement battery into thebattery compartment. Match the polarity of the battery to the + and - markingson the RetinaVue 100 Imager.
5. Rotate the raised flat edge of the battery until it sets in the back notch of the batterycompartment.
6. Insert the two battery cover tabs into the slot, then push in the tab to close thebattery compartment.
7. Tighten the screw at the left side of the battery cover.
8. Tighten the screw at the right side of the battery cover.
Directions for use Using the RetinaVue 100 Imager Pro 13

Note Do not over-tighten the screws.
Eye cupThe eye cup blocks ambient light during testing and covers the patient's eye socket toallow them to best focus on the green fixation lights. The eye cup works on the patient'sleft and right eye.
Set up the eye cup for a patient exam1. Remove the lens cap from the RetinaVue 100 Imager.
2. Slide the eye cup over the bezel on the RetinaVue 100 Imager.
3. Use the eye cup to cover the patient's examined eye and allow them to focus on thegreen fixation lights.
14 Using the RetinaVue 100 Imager Pro Welch Allyn RetinaVue™ 100 Imager Pro

Hold the RetinaVue 100 Imager for a patient examThe RetinaVue 100 Imager must be held level and in line with your patient’s eye.
There are two recommended techniques to properly hold the RetinaVue 100 Imager for aquick and successful retinal exam:
Telescope Grip
Directions for use Using the RetinaVue 100 Imager Pro 15

Smart phone Grip
Make micro adjustments with your guide hand to fine tune the focus of the RetinaVue100 Imager.
Guide (Patient End) Hand
Hold the patient end of the RetinaVue 100 Imager with just the thumb and forefinger.Use the small and ring finger to steady the RetinaVue 100 Imager by anchoring themgently on the patient’s forehead.
16 Using the RetinaVue 100 Imager Pro Welch Allyn RetinaVue™ 100 Imager Pro
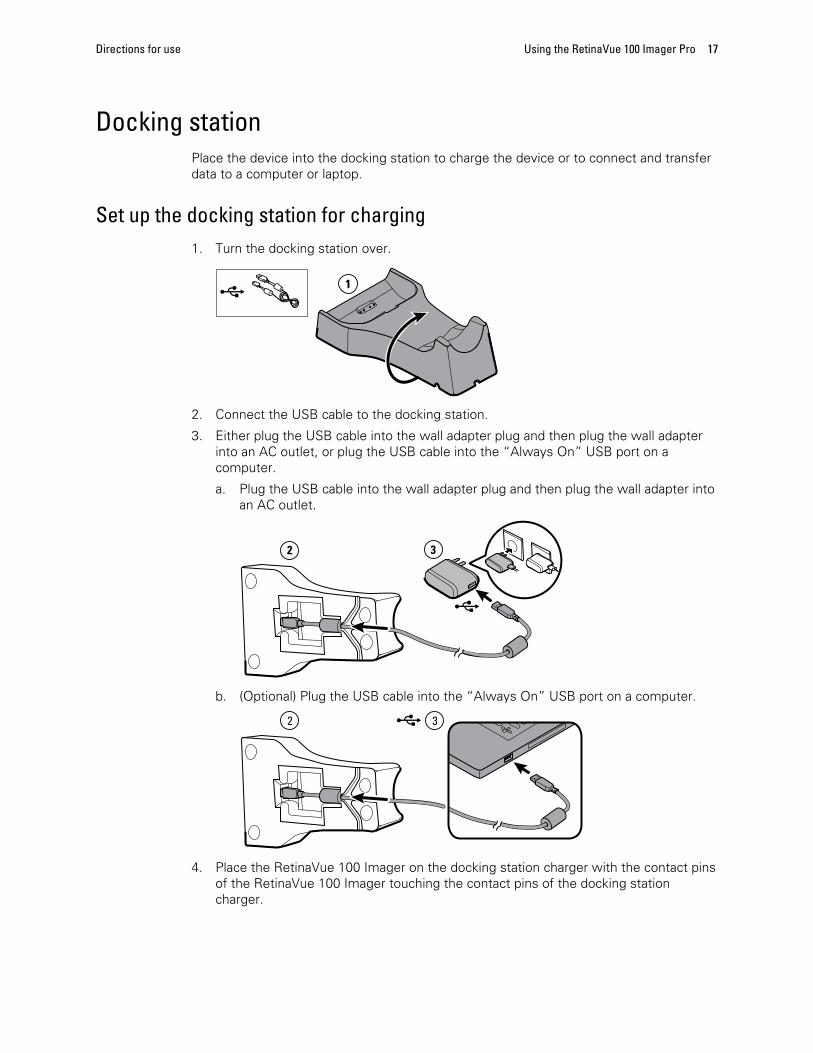
Docking stationPlace the device into the docking station to charge the device or to connect and transferdata to a computer or laptop.
Set up the docking station for charging1. Turn the docking station over.
2. Connect the USB cable to the docking station.
3. Either plug the USB cable into the wall adapter plug and then plug the wall adapterinto an AC outlet, or plug the USB cable into the “Always On” USB port on acomputer.
a. Plug the USB cable into the wall adapter plug and then plug the wall adapter intoan AC outlet.
b. (Optional) Plug the USB cable into the “Always On” USB port on a computer.
2 3
4. Place the RetinaVue 100 Imager on the docking station charger with the contact pinsof the RetinaVue 100 Imager touching the contact pins of the docking stationcharger.
Directions for use Using the RetinaVue 100 Imager Pro 17
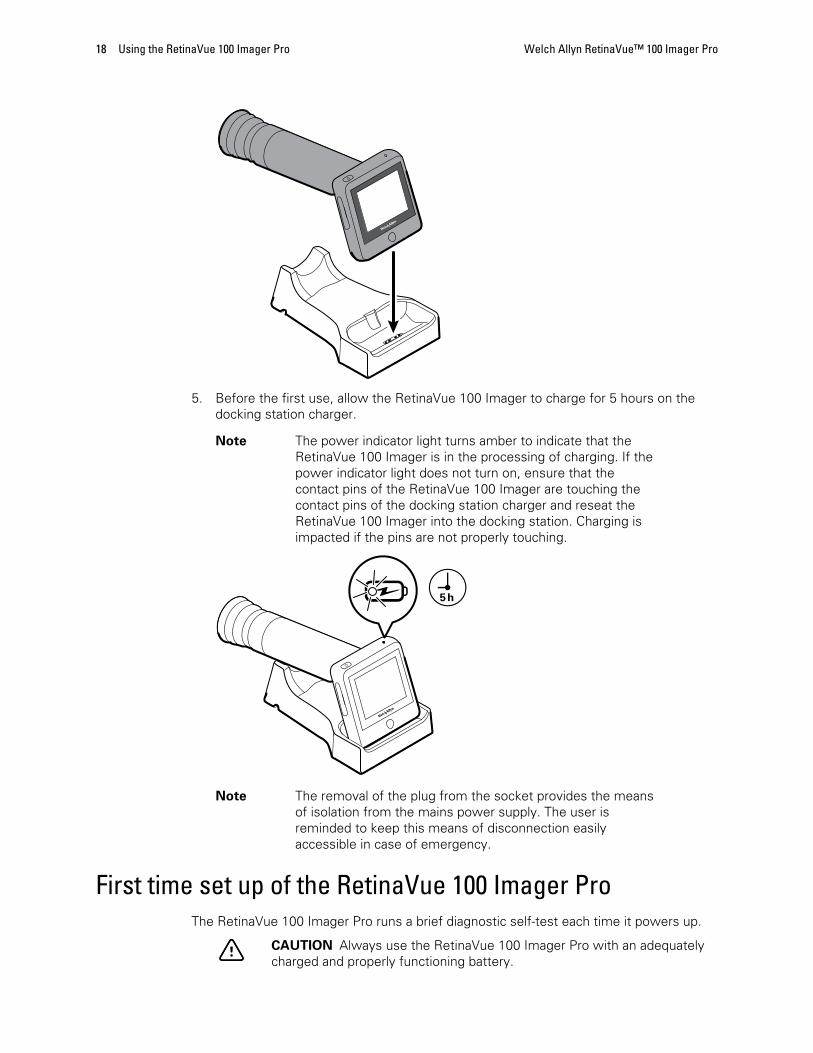
5. Before the first use, allow the RetinaVue 100 Imager to charge for 5 hours on thedocking station charger.
Note The power indicator light turns amber to indicate that theRetinaVue 100 Imager is in the processing of charging. If thepower indicator light does not turn on, ensure that thecontact pins of the RetinaVue 100 Imager are touching thecontact pins of the docking station charger and reseat theRetinaVue 100 Imager into the docking station. Charging isimpacted if the pins are not properly touching.
Note The removal of the plug from the socket provides the meansof isolation from the mains power supply. The user isreminded to keep this means of disconnection easilyaccessible in case of emergency.
First time set up of the RetinaVue 100 Imager ProThe RetinaVue 100 Imager Pro runs a brief diagnostic self-test each time it powers up.
CAUTION Always use the RetinaVue 100 Imager Pro with an adequatelycharged and properly functioning battery.
18 Using the RetinaVue 100 Imager Pro Welch Allyn RetinaVue™ 100 Imager Pro
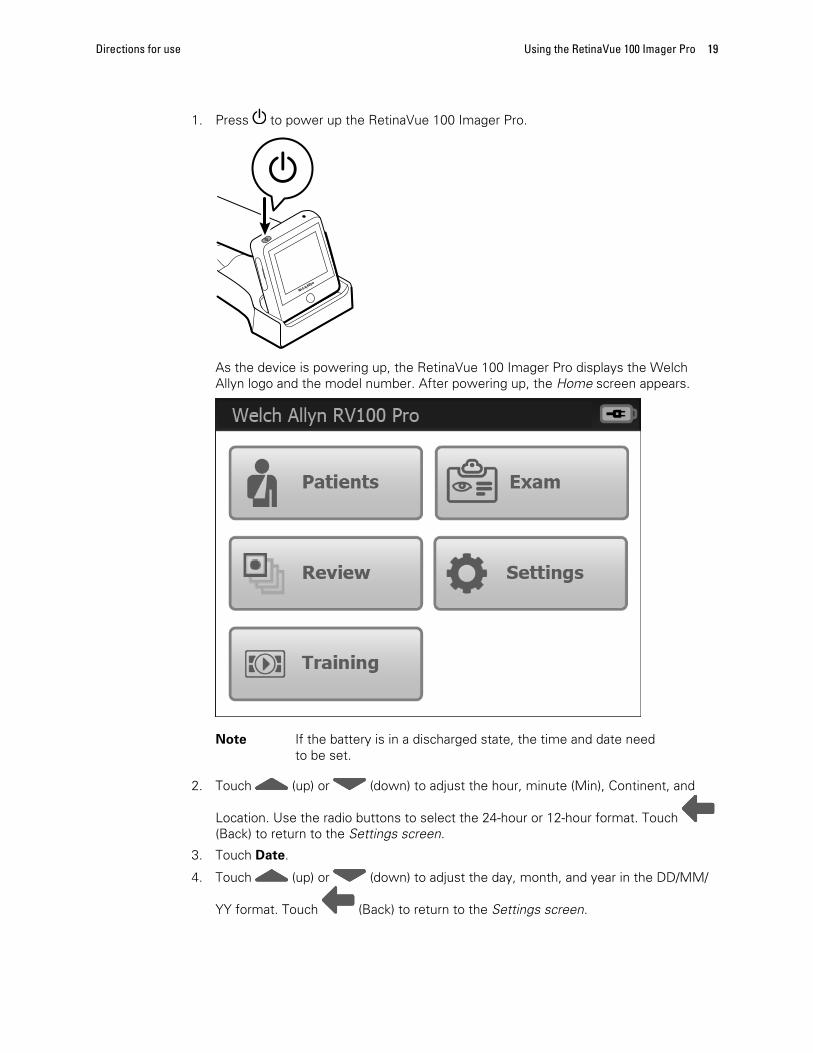
1. Press to power up the RetinaVue 100 Imager Pro.
As the device is powering up, the RetinaVue 100 Imager Pro displays the WelchAllyn logo and the model number. After powering up, the Home screen appears.
Note If the battery is in a discharged state, the time and date needto be set.
2. Touch (up) or (down) to adjust the hour, minute (Min), Continent, and
Location. Use the radio buttons to select the 24-hour or 12-hour format. Touch (Back) to return to the Settings screen.
3. Touch Date.
4. Touch (up) or (down) to adjust the day, month, and year in the DD/MM/
YY format. Touch (Back) to return to the Settings screen.
Directions for use Using the RetinaVue 100 Imager Pro 19

RetinaVue 100 Imager Pro Home screenThe RetinaVue 100 Imager Pro Home screen includes the following areas:
Item Area
1 Device status
2 Content
Device Status Area
The Device Status Area, located at the top of the Home screen, displays the Batterycondition and the device model number. Estimated battery capacity is displayed in acharged or discharged status format.
In the Exam Summary and Review screens, the Device Status Area displays:
• the device model number
• the battery condition
Content Area
The Content Area includes four workflow selection buttons and a Training button.Touching one of the five buttons navigates to the next screen associated with thatworkflow or training.
• Patients: Presents a list of patients created on the RetinaVue 100 Imager Pro untilthe exams are completed.
• Exam: The Exam workflow provides a guided approach to image capture. Tomaintain consistent and complete exam submissions, a prescribed image acquisition
20 Using the RetinaVue 100 Imager Pro Welch Allyn RetinaVue™ 100 Imager Pro

sequence is used to complete an exam. The Exam workflow also presents controls,status, and previews of images.
• Review: Presents images and exams from a list of patient IDs contained on theRetinaVue 100 Imager Pro .
• Settings. Provides controls to view or change the following:○ Volume○ Time○ Date○ Advanced settings:
– Device access code
– Advanced settings code
– Format SD
– Restore factory defaults○ Exam setup
– 1-image (Macula-centered)
– 2-image (Macula and Optic Disc-centered)○ Camera configuration
Switch between RV100/RV100 Pro
– RV100 ProUnencrypted images only (no RetinaVue Network compatibility)
– RV100RetinaVue Network required (USB or Wireless)
– Export log○ About
– Software version○ Regulatory Information
• Training: Provides demonstrations and interactive training exercises on theRetinaVue 100 Imager Pro. Short video clips and interactive training help you practicethe three key steps necessary to master the RetinaVue 100 Imager Pro.
Directions for use Using the RetinaVue 100 Imager Pro 21

Create a new patient on the RetinaVue 100 Imager Procamera
1. From the Home screen, touch Patients.
2. After the Patients screen appears, touch (New patient).
The New Patient screen appears.
22 Using the RetinaVue 100 Imager Pro Welch Allyn RetinaVue™ 100 Imager Pro

The Patient ID field is the only Required field and is noted with a red asterisk. Onceadded, the required Patient ID will appear in the top left of the Pre-acquisition screenas the camera enters the Pre-acquisition mode.
CAUTION When manually entering patient information, donot use the same patient identifier for multiple patients. Thismay result in inaccurate data association.
3. Touch within the Patient ID field to launch the on-screen keyboard. Enter the PatientID and touch OK.
4. (Optional) Touch within the Patient's Last name, First name, or Middle initial to enterthe patient's last name, first name and middle initial. Touch OK.
5. (Optional) Enter the patient's Date of Birth. Touch within the DOB/Gender field tolaunch the on-screen keyboard and to enter the patient's Date of Birth. Touch OK.
6. (Optional) Enter the patient's gender using the radio button to select male (M) orfemale (F).
7. Once all the required fields are complete, touch OK to open a new exam. The Pre-acquisition screen appears.
Directions for use Using the RetinaVue 100 Imager Pro 23

Note The Patient ID appears in the top left of the Pre-acquisitionscreen.
8. Refer to the topic Perform an eye exam using the Auto exam mode for instructionson performing exams and acquiring images.
24 Using the RetinaVue 100 Imager Pro Welch Allyn RetinaVue™ 100 Imager Pro

About the Auto and Manual Exam modesAuto Mode
Auto Mode is the default image capture mode. Available automatic features include:• Image capture• Focus• Flash brightness• Sequential image capture order of the right and left eye• Navigation to the image Inspection screen
In addition to the automatic features, manual capture, manual focus adjustment, and manual flashbrightness adjustment are also available. (Manual focus adjustment and flash brightness areaccessed from the Capture settings screen.)
Manual Mode
Directions for use Using the RetinaVue 100 Imager Pro 25

Manual mode contains advanced image capture options.
Note A manual touch of the capture button is required to obtain an image.
Available manual features include:• Focus adjustment (values range from -1 to +1)• Flash brightness adjustment (values range from -2 to +2)• Sequential image capture order of the right and left eye• Image capture
26 Using the RetinaVue 100 Imager Pro Welch Allyn RetinaVue™ 100 Imager Pro

Adaptive software in the Auto exam mode for software6.10.02 and higher
Auto exam modefirst stage
Once the view is in-fundus, the adaptive software will enlarge the on-screen diamond at specifictime intervals.
Note The best image quality is obtained while the diamond is at the beginning smallestsize.
Note The diamond will reset to its smallest size each time the view moves out of thefundus.
Auto exam modesecond stage
As the image capture sequence continues, the diamond on the LCD touchscreen increases in size.
Directions for use Using the RetinaVue 100 Imager Pro 27

Perform an eye exam using the Auto exam modeAuto exam mode is the default image capture mode.
Available automatic features include:
• Image capture
• Focus adjustment
• Flash brightness adjustment
• Sequential image capture order of the right and left eye
• Navigation to the image Inspection screen○ In addition to automatic image capture, manual capture is also available.
Note To ensure that the patient's pupils sufficiently dilate to at least 3.5 mmdiameter, adjust the room lighting to the lowest possible level. Ifnecessary, have the patient sit in a dark room for 5 minutes to dilate theirpupils.
Note While the RetinaVue 100 Imager Pro can be used on patients withcataracts and other eye opacities, the use of the RetinaVue 100 Imager Promay result in a lower quality image due to the increased reflection of theflash off the patient's intraocular lens.
• Ensure that the SD card is installed into the RetinaVue 100 Imager Pro.
• Ask your patient to remove their glasses, contacts can remain in place.
• Ensure that the patient sits on the edge of an exam table and stand in front of thepatient to take the image.
Alternatively, ask the patient to sit in a chair and sit directly across from the patientwith your legs together on the same side as the examined eye.
• Ask the patient to sit up straight and hold their head in a stationary position duringthe entire procedure.
28 Using the RetinaVue 100 Imager Pro Welch Allyn RetinaVue™ 100 Imager Pro

• Ensure that the patient is sitting in a position that allows for a straight and levelapproach of the RetinaVue 100 Imager Pro into the patient's eyes. A stable approachminimizes the loss of the view of the eye and repeated image capture attempts.
• Keep the RetinaVue 100 Imager Pro lens the same height as the patient's examinedeye.
• Approach the patient from directly in front of the examined eye.
• Make slight, micro adjustments with your guide hand to fine tune the position of theRetinaVue 100 Imager Pro. Do not use your hand on the LCD side to make minoradjustments.
Note For additional information about techniques to capture the highest qualityimage, see the Technique guide and the Training video that came with theRetinaVue 100 Imager Pro.
1. Press the power button .
Note To conserve power, the RetinaVue 100 Imager Pro entersSleep mode if it remains idle for approximately 2 minutes.Touch the LCD screen, press the power button, or press theHome button to wake up the RetinaVue 100 Imager Pro fromSleep mode.
Note After 10 minutes of inactivity in Sleep mode, the RetinaVue100 Imager Pro powers down. Press the power button toactivate the RetinaVue 100 Imager Pro.
2. From the Home screen, touch Exam.
The Preacquisition screen appears.
3. (Optional), If necessary, touch (Settings) to adjust the illumination, or thefocus. Touch the up or down arrows in the Advanced image capture settings andtouch OK.
Directions for use Using the RetinaVue 100 Imager Pro 29

4. Touch Start to enter the Image acquisition mode and begin the first exam of thepatient's right eye (R1).
The Exam acquisition screen appears.
5. Hold the patient end of the RetinaVue 100 Imager Pro two to three inches directly infront of the patient's examined eye. Continue forward to compress the eye cupagainst the examined eye.
WARNING Clean and disinfect the eye cup after eachpatient to avoid the risk of cross-contamination.
6. Direct the patient to focus on the green fixation lights inside the barrel of theRetinaVue 100 Imager Pro.
Note Instruct the patient to cover, but not close, their unexaminedeye. This will help the patient to focus on the green fixationlights.
30 Using the RetinaVue 100 Imager Pro Welch Allyn RetinaVue™ 100 Imager Pro

7. Look for a white circular reflection at the top of the eye's image on the LCDtouchscreen. This is your initial target.
8. Guide the green circle on the RetinaVue 100 Imager Pro LCD touchscreen towardsthe initial target by slowly moving the RetinaVue 100 Imager Pro towards the eye.
Directions for use Using the RetinaVue 100 Imager Pro 31

9. Once the reflection has filled the screen, push slightly forward until a “bubble”appears.
10. Keep the RetinaVue 100 Imager Pro in line. Slightly adjust the RetinaVue 100 ImagerPro away from any shadows that appear.
11. Move the patient end of the RetinaVue 100 Imager Pro toward the bubble.
12. Align the bubble inside the diamond icon.
32 Using the RetinaVue 100 Imager Pro Welch Allyn RetinaVue™ 100 Imager Pro

13. An audible tone alerts you that the image has been captured.
The acquired image appears on the LCD touchscreen for review in about fiveseconds.
14. Touch (Accept) to begin the second exam of the patient's left eye (L1) and waitat least 1 minute before repeating the steps until the second image is automaticallycaptured.
• (Optional) If the 2-image, Macula +Optic Disc-center exam setup is selected inAdvanced settings, wait at least 1 minute before repeating the steps until all theimages are automatically captured (R1, L1, R2, L2 and up to 4 additional images).
Directions for use Using the RetinaVue 100 Imager Pro 33
Note Touch to review the current image. Images with a red
X ( ) denote low quality images. Touch (navigates
to the Acquisition screen) or touch (navigates to thePre-acquisition screen) to dispose of an image and then
touch (Add image) to begin a capture of anotherimage.
15. When the sequential image capture is complete and the images contain a green oryellow quality acceptance check mark, proceed to the Exam summary screen.
Note To add missing patient context information touch and
then touch to create a new patient, or touch on anexisting patient's name from within the Patients screen toselect that patient. Touch Save to save the exam images.
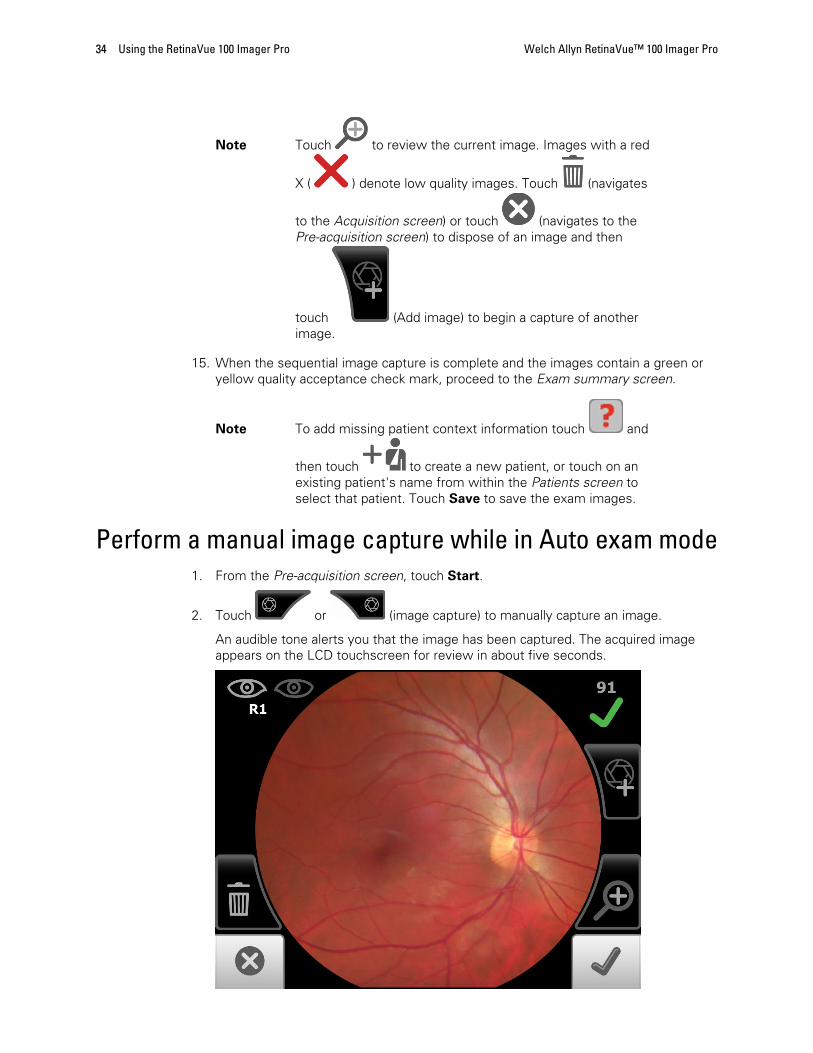
Perform a manual image capture while in Auto exam mode1. From the Pre-acquisition screen, touch Start.
2. Touch or (image capture) to manually capture an image.
An audible tone alerts you that the image has been captured. The acquired imageappears on the LCD touchscreen for review in about five seconds.
34 Using the RetinaVue 100 Imager Pro Welch Allyn RetinaVue™ 100 Imager Pro

Skip an image capture while in Auto exam mode1. From the Home screen, touch Exam.
The Pre-acquisition screen appears.
2. Touch (Next) or touch , or , or (Image Order) to skip tothe next image in the sequence.
3. Touch Start to enter Image acquisition mode and begin the exam of the patient'seye using the next image in the sequence. The Exam acquisition screen appears.
4. If this is the last image in the sequence, touch (Accept) on the Image inspectionscreen and navigate to the Exam summary screen. If an image is missing in the 1-image, Macula-centered Exam setup, touch Override to access the Save button andto save the image. Or, touch Override to access the Save button and to savemultiple images in the 2-image, Macula + Optic Disc-centered Exam setup.
Directions for use Using the RetinaVue 100 Imager Pro 35

Perform a manual image capture while in Manual exammode
1. From the Home screen, touch Exam.
The Pre-acquisition screen appears.
2. Touch MANUAL to enter Image acquisition mode and begin the exam of thepatient's eye.
The Exam acquisition screen appears.
36 Using the RetinaVue 100 Imager Pro Welch Allyn RetinaVue™ 100 Imager Pro

3. (Optional), If necessary, touch to adjust illumination, or touch to adjust thefocus.
4. Hold the patient end of the RetinaVue 100 Imager two to three inches directly infront of the patient's examined eye. Continue forward to compress the eye cupagainst the examined eye.
5. Direct the patient to focus on the green fixation lights inside the barrel of theRetinaVue 100 Imager.
6. Look for a white circular reflection at the top of the eye's image on the LCDtouchscreen. This is your initial target.
7. Guide the green circle on the RetinaVue 100 Imager LCD touchscreen towards theinitial target by slowly moving the RetinaVue 100 Imager towards the eye.
8. Once the reflection has filled the screen, push slightly forward until a “bubble”appears.
9. Move the patient end of the RetinaVue 100 Imager toward the bubble.
10. Align the bubble inside the diamond icon.
11. Touch or (image capture) to manually capture an image.
An audible tone alerts you that the image has been captured. The acquired imageappears on the LCD touchscreen for review in about five seconds.
Review patient exams on the RetinaVue 100 Imager Pro1. From the Home screen, touch Review. The Review screen appears.
Directions for use Using the RetinaVue 100 Imager Pro 37

2. Touch on a patient's ID to review the patient demographics (Patient summaryscreen) and to view images associated with a patient.
3. Any saved images appear on the Exam summary screen.
4. After the review is complete, touch (Back) to return to the Review screen and
then touch (Home) to return to the Home screen.
38 Using the RetinaVue 100 Imager Pro Welch Allyn RetinaVue™ 100 Imager Pro

Transfer patient exams from the RetinaVue 100 Imager Proto a computer
1. Place the RetinaVue 100 Imager Pro into the cradle and ensure that the cradle isconnected to a computer by the USB cable.
2. Power on the computer and the RetinaVue 100 Imager Pro.3. If using a computer on a network, enter your credentials.
Note It is the responsibility of the health care provider to protectpatient health information and to meet regulatory and HIPAAcompliance. The images on the RetinaVue 100 Imager Promay contain identifiable patient information and it is theresponsibility of the health care provider to ensure that datasafeguards are implemented to protect patient healthinformation.
4. Within a few seconds, an Autoplay pop-up window appears on the computer screen,indicating that a new storage volume (the RetinaVue 100 Imager Pro camera's SDcard) was detected.
5. Click on the storage volume. Click on the folder with the Patient ID that you createdpreviously on the RetinaVue 100 Imager Pro camera.
6. Double-click on the .jpg image to open an exam image in your installed photo viewerprogram.
7. Select the image and copy the image and paste it into the desired location.
Directions for use Using the RetinaVue 100 Imager Pro 39

Use the RetinaVue 100 Imager Pro SD Card to transferpatient exams to a computer
1. Power down the RetinaVue 100 Imager Pro and remove the SD Card.
2. Insert the SD Card into an open SD Card reader port on the computer.3. Within a few seconds, an Autoplay pop-up window appears on the compter screen,
indicating that a new storage volume (the RetinaVue 100 Imager Pro camera's SDcard) was detected.
Note It is the responsibility of the health care provider to protectpatient health information and to meet regulatory and HIPAAcompliance. The images on the RetinaVue 100 Imager Promay contain identifiable patient information and it is theresponsibility of the health care provider to ensure that datasafeguards are implemented to protect patient healthinformation.
4. Click on the storage volume. Click on the folder with the Patient ID that you createdpreviously on the RetinaVue 100 Imager Pro camera.
5. Transfer the exam images from the SD Card to the computer.
6. Select the image and copy the file from the SD Card and paste it into the desiredlocation.
40 Using the RetinaVue 100 Imager Pro Welch Allyn RetinaVue™ 100 Imager Pro

Troubleshooting
CAUTION A defective device should not be used. A device with partswhich may be broken or missing, visibly worn, distorted, or contaminatedshould be replaced immediately.
To correct an error, follow these instructions or contact Welch Allyn Technical Support:www.welchallyn.com/service.
Troubleshooting image qualityGood quality image
Problem Solution
Partial blink Ask the patient to keep his or her eye open.
41

Problem Solution
Dark semi-circle on top Move the patient side of the RetinaVue 100 Imagerdown and away from dark semi-circle.
Dirty lens Clean the lens with an appropriate cleaning cloth.
Error messagesError message/problem Solution
There is no SD card inserted. Please insert an SD card to continue. Insert SD card.
SD card access error Check the write-protection switch on the SD cardand ensure that it is in the forward position.Reinsert SD card to ensure the card is seatedcorrectly.
The space left in the SD card is not enough. Please replace the SDcard.
Replace the SD card with a formatted SD card.
Update file extraction failed. Power off device and restart. Check the write-protection switch on the SD cardand ensure that it is in the forward position.Reinsert SD card to ensure the card is seatedcorrectly.If the SD card does not have sufficient space,remove all files (except the update image) from theSD card. Perform the update again.
Failed saving files to the SD card. Check the write-protection switch on the SD cardand ensure that it is in the forward position.Reinsert or replace the SD card and click Retry.
42 Troubleshooting Welch Allyn RetinaVue™ 100 Imager Pro

Error message/problem Solution
Camera is docked. Remove camera from docking station to accesscamera functions.
Remove the camera from the docking station.
The battery is running low. Please recharge. When the battery charge level is below 25 percent,the low battery error message appears. Place thecamera into the docking station to charge thebattery.To reduce the likelihood of a low battery chargingstate, ensure that the USB cable is plugged into a"Always On" USB port on the computer.
If the low battery message continues to display afterthe camera is docked in the docking station forseveral hours and while it is plugged into a USB portof your computer, plug the USB cable into an"Always On" USB port on the computer. (Only"Always On" USB ports continue to charge thecamera when the computer enters sleep mode orpower-saving mode.)
Note See you computer manufacturer'suser documentation forinstructions on changing thepower management options andfor identifying the "Always On"USB port.
The battery level is too low to acquire any image. Please rechargenow.
When the battery charge level is below ten percentand the battery icon blinks, the low battery errormessage appears. Place the camera into the dockingstation to charge the battery.
Problem Solution
Battery is not installed. Camera will not charge. The powerindicator LED light on the camera blinks between green and amberwhen placed in the docking station.
Install the battery and check to ensure that thepolarity on the battery matches the + and - polarityon the device.
Battery is installed with the polarity reversed. Camera will notcharge. The power indicator LED light on the camera blinksbetween green and amber when placed in the docking station.
Re-install the battery and check to ensure that thepolarity on the battery matches the + and - polarityon the device. Set the camera into the dockingstation and wait for the power indicator LED light toturn amber indicating that the device is charging.
The power indicator light does not turn on when the camera is setinto the docking station. Charging is impacted if the pins are notproperly touching.
Ensure that the contact pins of the camera aretouching the contact pins of the docking stationcharger. If necessary, reseat the camera into thedocking station.
The Windows® operating system may display the Scan and fix orContinue without scanning message once the camera is set in thecradle or when the USB cable is removed from the laptop or PC.
Select Scan and fix if this Windows messageappears in situations when the camera is connectedto a laptop or PC by the USB cable.
Directions for use Troubleshooting 43

Problem Solution
The Windows® operating system may display the Autoplaynotification popup dialogue box each time the camera is placedinto the docking station when the USB cable is connected to thelaptop or PC.
By default, the AutoPlay notification is displayedwhen a USB storage device is connected to thelaptop or PC. To disable this notification, select Control Panel > AutoPlay from the Windows®
Start menu. Uncheck the Use AutoPlay for all mediaand devices checkbox. Click Save.
Reset the codes and dataProblem Solution
Locked out of the RetinaVue 100 Imager Pro.Cannot recall the Device access code or the Advanced settingscode.
CAUTION Resetting the codeswill result in a loss of any imagesand patient data stored on theRetinaVue 100 Imager Pro.
When the Please enter access code screen appears,press and hold the Home button for approximately 10seconds. Touch Confirm at the dialogue screenprompt Reset all the settings to defaults?
44 Troubleshooting Welch Allyn RetinaVue™ 100 Imager Pro

Problem Solution
Note The reset process typically takes afew minutes to cycle through thecomplete reset. During the resetprocess, it is normal for theConfirm button to remain activebefore the reset confirmationdialogue screen appears. Do notremove the SD card or power offthe device.
Touch OK at the All settings were restored tofactory defaults confirmation dialogue screen.
Directions for use Troubleshooting 45

46 Troubleshooting Welch Allyn RetinaVue™ 100 Imager Pro

Maintenance
Clean and disinfectCAUTION Never submerge the RetinaVue 100 Imager in water or anyother liquid.
CAUTION Never use abrasive cleaning agents, thinners or benzene forcleaning and never immerse the instrument in water or other cleaningliquids.
CAUTION Never insert a sharp object into the device or any open surfaceon the RetinaVue 100 Imager.
CAUTION Do not use unapproved cleaning or disinfection agents. Use ofthese agents may cause damage to components.
CAUTION When cleaning the device and the docking station charger,avoid using cloths or solutions that include quaternary ammoniumcompounds (ammonium chlorides) or glutaraldehyde-based disinfectants.
CAUTION Do not use bleach solutions of any kind when cleaning metalelectrical contacts. They will damage the docking station charger and thedevice.
Note Clean on a routine basis according to your facility's protocols and standardsor local regulations.
The RetinaVue 100 Imager has been tested to verify that it is compatible with theapproved cleaning agents.
Cleaning the RetinaVue 100 Imager lensWipe the surface of the lens with a cleaning cloth or a lens cleaning tissue such asThorlabs Inc.. Avoid touching the lens except when cleaning is required.
Cleaning the RetinaVue 100 Imager and eye cupPower off the RetinaVue 100 Imager before cleaning it.
Use a pre-moistened wipe or soft cloth slightly moistened with an approved cleaner togently clean the RetinaVue 100 Imager and eye cup.
47

Cleaning the docking station chargerUse a pre-moistened wipe or soft cloth slightly moistened with an approved cleaner togently clean the docking station charger.
Disinfecting the RetinaVue 100 Imager, eye cup, and docking stationcharger
Note Disinfect according to your facility's protocols and standards or localregulations.
Use a pre-moistened wipe or soft cloth slightly moistened with an approved disinfectantto disinfect the RetinaVue 100 Imager, eye cup, and docking station charger. Follow themanufacturers recommendations.
Approved cleaning agentsUse only the following approved cleaning agents on the RetinaVue 100 Imager, eye cup,and docking station charger:
• 70 percent isopropyl alcohol
• CaviWipes
• Sani-Cloth® Plus
• Super Sani-Cloth®
The RetinaVue 100 Imager has been tested to verify these instructions as being capableof preparing the RetinaVue 100 Imager for re-use. You must ensure that cleaning anddisinfection as actually performed by your personnel, with your equipment and materials,achieves the desired result. This may require validation and routine monitoring of youractual process.
48 Maintenance Welch Allyn RetinaVue™ 100 Imager Pro

RetinaVue 100 Imager Pro Specifications
SpecificationsView Angle 45 Degree (Typical)
Diopter -20 ~ +20D (Typical)
Dimensions L 8.8 inches (224.2 mm) × W 4.2 inches (106.7 mm) × H 4.1 inches (105.2 mm)
Weight 565 Grams ±5%
Search FundusLighting
Infrared LED
Camera flash light Natural White Light Emitting Diode (LED)
Captures Auto capture and Manual capture
Camera Resolution 2048 x 1536 pixels
LCD Monitor 3.5 inch Full Color TFT-LCD
Image Format Unencrypted JPEG/DICOM (standalone use)
Interface Micro USB
RetinaVue 100Imager Pro FileTransfer
Docking station, micro USB cable to a computerSD Card transfer to a computer SD Card Reader
File Storage SD Card, default 8GB. Supports 8GB to 32GB by FAT32 format.Supports 1,200 exams
Supports up to 200 patients
Power Source Rechargeable Lithium Battery 3.6V / 3350mAh
External Power Source: 100~240 VAC, 50/60 Hz
Power AdapterSpec.
Input Spec. : 100~240 VAC, 50/60 Hz, 0.2A - 0.1A; Output Spec. : 5V DC, 2A
Charger StationInput Spec.
5V DC, 1.2A
49

Operating Time 3 hours at 5 minutes working mode.
The device enters Sleep mode if idle for 2 minutes.
Once the device is idle for 2 minutes it enters Sleep mode and if it remains idle in Sleep mode foranother 10 minutes the device powers down.
Charging Time 5 hours (through the docking station using a Welch Allyn approved battery)
All specifications are subject to change.
Operating environmentCriterion Environmental conditions
Temperature + 10 °C to + 35 °C
Relative humidity 30 % to 90 %
Atmospheric pressure 800 hPa to 1060 hPa
Storage environmentCriterion Environmental conditions
Temperature − 10 °C to + 55 °C
Relative humidity 10 % to 95 %
Atmospheric pressure 700 hPa to 1060 hPa
Transportation environmentCriterion Environmental conditions
Temperature − 40 °C to + 70 °C
Relative humidity 10 % to 95 %
Atmospheric pressure 500 hPa to 1060 hPa
Device lifetimeThe lifetime of the device is five (5) years. The manufacture date of the device can befound on the device labels.
Welch Allyn will service RetinaVue 100 Imager Pro devices that are within their lifetime.Firmware updates and support may require an annual subscription service after the initialone (1) year warranty period. The expected battery life is at least one (1) year. If theRetinaVue 100 Imager Pro device fails to hold a charge, a new battery can be ordered.
50 RetinaVue 100 Imager Pro Specifications Welch Allyn RetinaVue™ 100 Imager Pro

Enable the RetinaVue Network
Note The RetinaVue 100 Imager Pro model is a stand alone camera withunencrypted images and is designed for use independent of the WelchAllyn RetinaVue Network.
Note Account registration with the Welch Allyn RetinaVue Network is required touse the RetinaVue 100 Imager camera with wireless or USB connectivity.To change to a RetinaVue 100 Imager camera configuration with encryptedimages and a USB or wireless connection to the Welch Allyn RetinaVueNetwork:
• In North America, please call the following number: 865.622.8380 from 8:00AM – 5 PM EST to create an account with the Welch Allyn RetinaVueNetwork. For additional inquires use the following link:www.welchallyn.com/support.
• In the Australian region, contact Australia Technical Support at the followingnumber: 1800 650 083 from 08:30 – 17:00 Monday – Friday AEDT. Foradditional inquires use the following link: [email protected].
To change the camera configuration from the RV100 Pro tothe RV100 (USB or Wireless):
1. Touch Settings.
2. Touch Advanced settings.
3. Touch Camera configuration.
4. To convert the RV100 Pro to a RV100, touch RV100 to use the RetinaVue Imagercamera with encrypted images and with the RetinaVue Network:
a. Touch Yes at the prompt: I already have an account.
b. Touch OK at the prompt: Saved exams stored on this camera will bediscarded.Note: This prompt only appears if saved exams have not beentransferred.
c. At the RetinaVue 100 Imager camera set up screen, select whether your camerawill be used with Wi-Fi or USB connectivity.
• For Wi-Fi set up, touch the RetinaVue Network - Wi-Fi radio button and see theRetinaVue 100 Imager Directions for use topic First time selection of Wi-Ficonnectivity workflow for instructions on setting up the camera for a wirelessconnection to the RetinaVue Network Customer Portal.
51

• For USB set up, touch the RetinaVue Network - USB radio button and see themanual Software installation instructions for instructions on downloading theRetinaVue Network software application onto your PC.
To change the camera configuration from the RV100 (USBor Wireless) to the RV100 Pro:
1. Touch Settings.
2. Touch Advanced settings.
3. Touch Camera configuration.
Note The RetinaVue 100 Imager Pro camera provide a means torevert back to the RetinaVue 100 Imager Pro model at thispoint in the configuration.
4. Touch RV100 Pro to convert the RV100 to the RV100 Pro and to use the RetinaVue100 Imager Pro camera with unencrypted images without using the RetinaVueNetwork:
a. Touch OK at the prompt: Saved exams stored on this camera will bediscarded.Note: This prompt only appears if saved exams have not beentransferred.
b. At the RetinaVue 100 Imager camera set up screen, touch the RV100 Pro radiobutton to revert back the RetinaVue 100 Imager Pro model.
52 Enable the RetinaVue Network Welch Allyn RetinaVue™ 100 Imager Pro

Viewing or changing the RetinaVue 100Imager Pro settings
To view or change the settingsTouch Settings. Modify the settings as desired.
• Touch Volume.
Touch (up) or (down) to adjust the device sound volume. Touch (Back)to return to the Settings screen.
• Touch Time.
Touch (up) or (down) to adjust the hour, minute (Min), Continent, and
Location. Use the radio buttons to select the 24-hour or 12-hour format. Touch (Back) to return to the Settings screen.
• Touch Date.
Touch (up) or (down) to adjust the day, month, and year in the DD/MM/YY
format. Touch (Back) to return to the Settings screen.
Touch Advanced settings.
Modify the settings as desired
• Device access code. Set the Device access numeric code, retype the code toconfirm, and touch OK to return to the Advanced Settings screen.
• Advanced settings code. Set the Advanced settings numeric code, retype the codeto confirm, and touch OK to return to the Advanced Settings screen.
• Format SD. Touch OK to format the SD card to the default settings and touch OKagain to return to the Advanced Settings screen.
• Restore factory defaults. Touch Confirm to reset the device to the default settingsand touch OK to return to the Advanced Settings screen.
• Exam setup. Touch Exam setup. Touch 1-image (Macula-centered) to use the oneimage per eye exam workflow or touch 2-image (Macula and Optic Disc-centered) to
use the two images per eye exam workflow . Touch (Back) to return to theSettings screen.
53

• Camera configuration. Touch Camera configuration. Touch RV100 Pro to use theRetinaVue 100 Pro Imager with unencrypted images only without the RetinaVueNetwork. See the topic Enable the device with the RetinaVue Network for furtherinstructions on configuring the device.
• Export log. The log files are exported to the SD card. Touch OK to return to the
Advanced Settings screen. Touch (Back) to return to the Settings screen.
• Touch About to view the software version. Touch OK.
• Regulatory Information. Touch Regulatory Information to view Regulatory
Information. Touch (Back) to return to the Settings screen.
Touch (Home) to return to the Home screen.
Power down the RetinaVue 100 Imager1. Press .
2. A dialogue box appears with three options:
• Power Off
• Sleep
• Cancel
54 Viewing or changing the RetinaVue 100 Imager Pro settings Welch Allyn RetinaVue™ 100 Imager Pro

3. Touch one of the options.
The RetinaVue 100 Imager will power off, go into Sleep mode, or return to the priorscreen, depending on the option you choose.
Sleep modeTo conserve power, the RetinaVue 100 Imager enters Sleep mode if approximately 2minutes have passed since the last screen press.
To bring the RetinaVue 100 Imager out of Sleep mode, use any of these methods:
1. Touch the power button.
2. Touch the LCD touchscreen.
3. Press the Home button.
Note Lifting or moving the RetinaVue 100 Imager also brings the RetinaVue 100Imager out of Sleep mode.
Enter Sleep mode
1. Press .
Directions for use Viewing or changing the RetinaVue 100 Imager Pro settings 55

2. A dialogue box appears with three options:
• Power Off
• Sleep
• Cancel
3. Touch Sleep.
The RetinaVue 100 Imager enters Sleep mode.
Exit sleep mode
1. Perform one of these options: (1) Press , (2) touch the LCD touchscreen, or (3)press the Home button.
56 Viewing or changing the RetinaVue 100 Imager Pro settings Welch Allyn RetinaVue™ 100 Imager Pro

Note Lifting or moving the RetinaVue 100 Imager also brings theRetinaVue 100 Imager out of Sleep mode.
2. After performing one of the options, the RetinaVue 100 Imager will awaken from Sleep mode, or return to the prior screen.
Set the date and timeBefore first use, set the date and time:
1. Follow the steps in the Battery installation and replacement section to install thebattery and then press and hold the power button to turn the device on.
2. Touch Settings on the RetinaVue 100 Imager Home screen.
3. Touch Time. Touch (up) or (down) to adjust the hour, minute, Continent,and location.
Note The default time appears in the 24-hour format. Use theradio buttons to select the 24-hour or 12-hour format.
Directions for use Viewing or changing the RetinaVue 100 Imager Pro settings 57

4. Touch (Back) to return to the Settings screen.
5. Touch Date. Touch (up) or (down) to adjust the day, month, and year inthe DD/MM/YY format.
6. Touch (Back) to return to the Settings screen.
7. Touch (Home) to return to the RetinaVue 100 Imager Home screen.
Set the Device Access CodeNote Setting the Device Access Code before first use provides additional
security features in the RetinaVue 100 Imager Pro to prevent unintendedaccess to patient information by unauthorized individuals.
1. Follow the steps in the Battery installation and replacement section to install thebattery and then press and hold the power button to turn the device on.
2. Remove the RetinaVue 100 Imager Pro from the docking station charger.
3. Touch Settings on the RetinaVue 100 Imager Pro Home screen.
58 Viewing or changing the RetinaVue 100 Imager Pro settings Welch Allyn RetinaVue™ 100 Imager Pro

4. Touch Advanced Settings.
5. Touch Device Access Code to enter an access code for the RetinaVue 100 ImagerPro.
6. Use the touchscreen numeric keypad to enter an access code into the Access codefield and then retype the same code into Access code (retype) field.
Note The access code password can contain a minimum of 1-digitand a maximum of 18-digits. Characters are only numericfrom 0 through 9.
7. Touch OK to accept the code and touch OK again at the confirmation screen toreturn to the Advanced Settings screen.
8. Touch (Back) to return to the Settings screen.
9. Touch (Home) to return to the RetinaVue 100 Imager Pro Home screen.
Reset the Device access code
Note See the Troubleshooting section if you cannot recall your RetinaVue 100Imager Pro access code and need to erase the access code.
1. Remove the RetinaVue 100 Imager Pro from the docking station charger.
2. If you are not already logged in, enter the existing access code for the RetinaVue 100Imager Pro.
3. Touch Settings on the RetinaVue 100 Imager Pro Home screen.
4. Touch Advanced Settings.
5. Touch Device access code.
6. Touch Reset to clear the existing access codes.
Directions for use Viewing or changing the RetinaVue 100 Imager Pro settings 59

7. Use the touchscreen numeric keypad to enter an access code into the Access codefield and then retype the same code into the Access code (retype) field.
Note The access code password can contain a minimum of 1-digitand a maximum of 18-digits. Characters are only numericfrom 0 through 9.
Note Alternatively, after the code reset, touch (Back),
(Back), and (Home) to return to the RetinaVue 100Imager Pro Home screen without using a Device accesscode.
8. Touch OK to accept the code and touch OK again at the confirmation screen toreturn to the Advanced Settings screen.
9. Touch (Back) to return to the Settings screen.
10. Touch (Home) to return to the RetinaVue 100 Imager Pro Home screen.
Reset the Advanced settings code
Note See the Troubleshooting section if you cannot recall your RetinaVue 100Imager Pro Advanced settings code or the Device access code and need toerase the code.
1. Remove the RetinaVue 100 Imager Pro from the docking station charger.
2. If the RetinaVue 100 Imager Pro is set with a Device access code (in addition to theAdvanced settings code) and you are not already logged in, enter the existing Deviceaccess code.
3. Touch Settings on the RetinaVue 100 Imager Pro Home screen.
4. Touch Advanced Settings.
5. Enter the existing Advanced settings code for the RetinaVue 100 Imager Pro.
6. Touch Advanced settings code.
7. Touch Reset to clear the existing Advanced settings codes.
8. Use the touchscreen numeric keypad to enter a code into the Advanced settingscode field and then retype the same code into the Advanced settings code (retype)field.
60 Viewing or changing the RetinaVue 100 Imager Pro settings Welch Allyn RetinaVue™ 100 Imager Pro

Note The Advanced settings code password can contain aminimum of 1-digit and a maximum of 18-digits. Charactersare only numeric from 0 through 9.
Note Alternatively, after the code reset, touch (Back),
(Back), and (Home) to return to the RetinaVue 100Imager Pro Home screen without using an Advanced settingcode.
9. Touch OK to accept the code and touch OK again at the confirmation screen.
10. Touch (Back) to return to the Settings screen.
11. Touch (Home) to return to the RetinaVue 100 Imager Pro Home screen.
Directions for use Viewing or changing the RetinaVue 100 Imager Pro settings 61

62 Viewing or changing the RetinaVue 100 Imager Pro settings Welch Allyn RetinaVue™ 100 Imager Pro

General compliance and standards
The RetinaVue 100 Imager complies with the following standards:
IEC 60601-1:2005/A1:2012 (EN 60601-1:2006/A1:2013)
IEC 60601-1-2 : 2014 (EN 60601-1-2 : 2015)
ISO 15004-1:2006
ISO 15004-2:2007
ISO 10940:2009
ISO 10993-1 : 2009
Directive 2002/96/EC-WEEE:Disposal of noncontaminated electrical and electronic equipment
This product and its accessories must be disposed of according to local laws andregulations. Do not dispose of this product as unsorted municipal waste. Prepare thisproduct for reuse or separate collection as specified by Directive 2002/96/EC of theEuropean Parliament and the Council of the European Union on Waste Electronic andElectrical Equipment (WEEE). If this product is contaminated, this directive does notapply.
For more specific disposal or compliance information, see www.welchallyn.com/weee,or contact Welch Allyn Customer Service at +44 207 365 6780.
EMC complianceSpecial precautions concerning electromagnetic compatibility (EMC) must be taken for allmedical electrical equipment. This device complies with IEC 60601-1-2 : 2014 (EN60601-1-2 : 2015).
• All medical electrical equipment must be installed and put into service in accordancewith the EMC information provided in this Directions for use.
• Portable and mobile RF communications equipment can affect the behavior ofmedical electrical equipment.
The 901103 Imager complies with all applicable and required standards forelectromagnetic interference.
• It does not normally affect nearby equipment and devices.
• It is not normally affected by nearby equipment and devices.
63

• However, it is good practice to avoid using the 901103 Imager in extremely closeproximity to other equipment.
• It is not safe to operate the 901103 Imager in the presence of high-frequencysurgical equipment.
Emissions and immunity informationElectromagnetic emissions
The 901103 is intended for use in the electromagnetic environment specified below. The customer or user of the 901103should assure that it is used in such an environment.
Emissions test Compliance Electromagnetic environment - guidance
RF emissionsCISPR 11
Group 1 The 901103 uses RF energy only for its internal function. Therefore, itsRF emissions are very low and are not likely to cause any interferencein nearby electronic equipment.
RF emissionsCISPR 11
Class B The 901103 is suitable for use in all establishments, including domesticestablishments and those directly connected to the public low voltagepower supply network that supplies buildings used for domesticpurposes.
WARNING This equipment/system is intended foruse by healthcare professionals only. Thisequipment/ system may cause radio interference ormay disrupt the operation of nearby equipment a. Itmay be necessary to take mitigation measures, suchas re-orienting or relocating the 901103 or shieldingthe location.
Harmonic emissionsIEC 61000-3-2
Class A
Voltage fluctuations/flicker emissionsIEC 61000-3-3
Complies
a The 901103 contains a 5-GHz orthogonal frequency-division multiplexing transmitter or a 2.4-GHz frequency hoppingspread-spectrum transmitter for the purpose of wireless communication. The radio is operated according to therequirements of various agencies, including FCC 47 CFR 15.247 and R&TTE Directive (1995/5/EC). The transmitter isexcluded from the EMC requirements of 60601-1-2, but should be considered when addressing possible interferenceissues between this and other devices.
Electromagnetic immunity
The 901103 is intended for use in the electromagnetic environment specified below. The customer or the user of the901103 should assure that it is used in such an environment.
Immunity test IEC 60601 test level Compliance level Electromagnetic environment - guidance
Electrostatic discharge(ESD)IEC 61000-4-2
±8 kV contact
±15 kV air
±8 kV contact
±15 kV air
Floors should be wood, concrete or ceramictile. If floors are covered with syntheticmaterial, the relative humidity should be atleast 30%.
Electrical fasttransient/burstIEC 61000-4-4
±2 kV for power supplylines±1 kV for input/outputlines
±2 kV for power supplylines±1 kV for input/outputlines
Mains power quality should be that of a typicalcommercial or hospital environment.
Surge ± 1 kV differentialmode
± 1 kV differentialmode
Mains power quality should be that of a typicalcommercial or hospital environment.
64 General compliance and standards Welch Allyn RetinaVue™ 100 Imager Pro

Electromagnetic immunity
IEC 61000-4-5 ± 2 kV common mode ± 2 kV common mode
Voltage dips, shortinterruptions andvoltage variations onpower supply inputlinesIEC 61000-4-11
100% dip in 0.5 cycle
100% dip in 1 cycles
30% dip in 25 cycles
100% interruption in250 cycles
100% dip in 0.5 cycle
100% dip in 1 cycles
30% dip in 25 cycles
100% interruption in250 cycles
Mains power quality should be that of a typicalcommercial or hospital environment. If the userof the 901103 requires continued operationduring power mains interruptions, it isrecommended that the 901103 be poweredfrom an uninterruptible power supply or abattery.
Electromagnetic immunity
The 901103 is intended for use in the electromagnetic environment specified below. The customer or the user of the901103 should assure that it is used in such an environment.
Immunity test IEC 60601 test level Compliance level Electromagnetic environment - guidance
Portable and mobile RF communicationsequipment should be used no closer to any partof the 901103, including cables, than therecommended separation distance calculatedfrom the equation applicable to the frequencyof the transmitter.
Recommended separation distance
Conducted RFIEC 61000-4-6
3 Vrms150 kHz to 80 MHz
3 Vrms d= (1.17)
Radiated RFIEC 61000-4-3
3 V/m 80 MHz to 1 GHz 3 V/m d= (1.17) 80 to 800 MHz
d= (2.33) 800 MHz to 2,7 GHz
whereP is the maximum output power rating ofthe transmitter in watts (W) andd is therecommended separation distance in meters(m). Field strengths from fixed RF transmitters,as determined by an electromagnetic sitesurveya, should be less than the compliancelevel in each frequency rangeb. Interferencemay occur in the vicinity of equipment markedwith the following symbol:
Note1: At 80 MHz and 800 MHz, the higher frequency range applies.Note 2: These guidelines may not apply in all situations. Electromagnetic propagation is affected by absorption andreflection from structures, objects, and people.aField strengths from fixed transmitters, such as base stations for radio (cellular/cordless) telephones and land mobileradios, amateur radio, AM and FM radio broadcast, and TV broadcast cannot be predicted theoretically with accuracy. Toassess the electromagnetic environment due to fixed RF transmitters, an electromagnetic site survey should beconsidered. If the measured field strength in the location in which the 901103 is used exceeds the applicable RF
Directions for use General compliance and standards 65

Electromagnetic immunity
compliance level above, the 901103 should be observed to verify normal operation. If abnormal performance is observed,additional measures may be necessary, such as reorienting or relocating the 901103.bOver the frequency range 150 kHz to 80 MHz, field strengths should be less than 3 V/m.
Recommended separation distances between portable and mobile RF communicationsequipment and the 901103
The 901103 is intended for use in an electromagnetic environment in which radiated RF disturbances are controlled. Thecustomer or user of the 901103 can help prevent electromagnetic interference by maintaining a minimum distancebetween portable and mobile RF communications equipment (transmitters) and the 901103 as recommended below,according to the maximum output power of the communications equipment.
Separation distance according to frequency of transmitter (m)
Rated max. outputpower of transmitter(W)
150 kHz to 80 MHz
d= (1.17)
80 MHz to 800 MHz
d= (1.17)
800 MHz to 2.7 GHz
d= (2.23)
0.01 0.11667 0.11667 0.23333
0.1 0.36894 0.36894 0.73785
1 1.1667 1.1667 2.3333
10 3.6894 3.6894 7.3785
100 11.667 11.667 23.3333
For transmitters rated at a maximum output power not listed above, the recommended separation distanced in meters(m) can be estimated using the equation applicable to the frequency of the transmitter, where P is the maximum outputpower rating of the transmitter in watts (W) according to the transmitter manufacturer.
Note 1: At 80 MHz and 800 MHz, the separation distance for the higher frequency range applies.
Note 2: These guidelines may not apply in all situations. Electromagnetic propagation is affected by absorption andreflection from structures, objects, and people.
66 General compliance and standards Welch Allyn RetinaVue™ 100 Imager Pro

Navigation controls
Navigation controls in the Training modeFrom the Home screen touch Training. The RetinaVue 100 Imager Interactive TrainingVideo screen appears.
Note Navigation controls change with each mode.
Touch anywhere within the RetinaVue 100 Imager touchscreen to display the trainingnavigation controls. The navigation controls appear within the middle of the RetinaVue100 Imager touchscreen.
The navigation controls for the Interactive Training video include:
Step back to beginning: Touch to navigate to the first scene within the trainingsection.
Step back to previous scene: Touch to navigate to the previous scene within thetraining section.
Home: Displays the RetinaVue 100 Imager workflow selection buttons andnavigates to the Home screen.
Play: Touch to resume the training.
Skip forward to next scene: Touch to navigate to the next scene within thetraining section.
Skip forward to last: Touch to navigate to the last scene within the trainingsection.
Note In addition to the control buttons, touch anywhere within the RetinaVue100 Imager touchscreen to pause the training or to display the trainingnavigation controls.
67

Navigation controls in the Exam mode
The Navigation area is located at the bottom of the RetinaVue 100 Imager screen.Navigation controls change with the mode. The navigation controls for Pre-, post-, andacquisition in Exam mode include:
Pre-acquisition1-image
Macula-centered
2-image
Macula + Optic Disc-centered
Home: Displays the RetinaVue 100 Imager workflow selection buttons andnavigates to the Home screen.
Next: Navigates to the next image acquisition within a prescribed imageacquisition sequence or to the next step in a sequence of steps.
Image acquisition navigation: Navigates to the image acquisition position within theprescribed sequence. Provides a visual representation of the prescribed sequential
acquisition, including the right eye ( ) and the left eye ( ).Provides a status of acquired images for acceptance or dismissal.
Acquisition
Exit: Navigates to the Pre-acquisition screen.
Post-acquisition
Discard image: Navigates to the Pre-acquisition screen. Or Navigates to theAcquisition screen.
68 Navigation controls Welch Allyn RetinaVue™ 100 Imager Pro

Accept image: Navigates to the Exam summary screen when the last exam in thesequence has been accepted. Also navigates to Pre-acquisition screen if there are moreimages to be captured.
Image inspection: Navigates to the Image inspection screen.
Add image: Navigates to the Acquisition screen
Navigation controls in the Settings modeThe navigation controls for the Settings mode include the back, home, and advance tonext buttons. The primary navigation area is located at the bottom of the RetinaVue 100Imager screen. While on the Settings screen, the > (Advance to next screen) buttonnavigates to the next dialogue. The button is located on the same line as the setting.
Back: Navigates to a previous dialogue or step.
Home: Displays the RetinaVue 100 Imager workflow selection buttons andnavigates to the Home screen.
>: (Advance to next screen) Navigates to a next dialogue while on the Settings screen.
Navigation controls in the Review modeThe navigation controls for the Review mode include the back, home, advance to nextscreen, and image quality buttons. The primary navigation area is located at the bottomof the RetinaVue 100 Imager screen. In addition, the > (Advance to next screen) buttonnavigates to an image. The button is located on the same line as the patient's name onthe Review screen. The image quality button also navigates to an image. The button islocated below the patient's name on the Exam summary screen.
Back: Navigates to a previous dialogue or step.
Home: Displays the RetinaVue 100 Imager workflow selection buttons andnavigates to the Home screen.
>: (Advance to next screen) Navigates to an image while on the Review screen.
Good quality green: From the Exam summary screen, touch the good quality iconto navigate to the image on the Post-acquisition screen.
Acceptable quality yellow: From the Exam summary screen, touch theacceptable quality icon to navigate to the image on the Post-acquisition screen.
Directions for use Navigation controls 69

Unacceptable quality red: From the Exam summary screen, touch theunacceptable quality icon to navigate to the image on the Post-acquisition screen.
70 Navigation controls Welch Allyn RetinaVue™ 100 Imager Pro

Image Pre-acquisition controls (Auto mode)From the Home screen touch Exam. The Exam Pre-acquisition screen appears.
No. Feature No. Feature
1. START enters automatic image acquisitionmode.
4. Navigates to the Home screen.
2. (Image Acquisition Settings) navigates to
the Capture settings screen. Adjust the flashbrightness (-2 to +2) or the focus settings (-1 to+1).
5. MANUAL switches to advanced image captureoptions.
3. (Image Order) skips to thenext image in the sequence.
6. (Next) skips to the next image acquisition within
a prescribed image acquisition sequence or navigates tothe Exam summary screen if the last image has beenacquired.
Controls (Post-acquisition)
On the Post-acquisition screen, images with a green check ( ) are of good quality
(scores of 40 +), images with a yellow check ( ) are of acceptable quality (scores of
20 — 39), and those with a red x ( ) are of unacceptable quality (scores of 0 — 19).
Directions for use Navigation controls 71

Use the RetinaVue 100 Imager touchscreen inspection control to navigate to the
Inspection screen, then zoom in or out with a pinch or pull. Touch (Back) to
navigate to the Post-acquisition screen. Or, touch (Trash) and then touch Delete atthe dialogue screen: Do you wish to discard this image and acquire again? to confirm the
discard and to return to the Acquisition screen to acquire again. Touch (Addimage) to navigate to the Acquisition screen and take an additional image.
Note The initial captured image is saved.
Touch (Discard) then touch Yes at the dialogue: Do you wish to discard thisimage? to discard the image. Alternatively, touch No at the dialogue screen to return tothe Post-acquisition screen to save the initial captured image.
On the Post-acquisition screen, touch (Trash) and then touch Delete at the dialoguescreen: Do you wish to discard this image and acquire again? to confirm the discard andto return to the Acquisition screen to acquire again.
Touch (Accept) to accept the image and to navigate to the next image. Or touch
(Accept) to navigate to the Exam summary screen once the last image of the examis acquired.
72 Navigation controls Welch Allyn RetinaVue™ 100 Imager Pro

Exam summary controls (Post-acquisition and Reviewmodes)
Exam summary from the Post-acquisition screen
From the Post-acquisition screen, touch (Accept) to navigate to the Exam summaryscreen. Each image on the Exam summary screen contains a quality score and status.
Touch (Good quality green) to view that image. Image accepted, good quality.Quality scores of 40+.
Touch (Acceptable quality yellow) to view that image. Image accepted, quality OK.Quality scores ranging from 20 – 39.
Touch (Unacceptable quality red) to view that image. Image rejected. Qualityscores ranging from 0 – 19.
CAUTION Captured images require patient context before the images canbe saved.
Note To add missing patient context information touch .
Touch to create a new patient, or touch on an existing patient's ID from withinthe Patients screen.
Touch SAVE to accept all images and to return to the Home screen.
Directions for use Navigation controls 73

If an image is missing touch Override to access the Save button and to save a singleimage in the 1-image, Macula-centered Exam setup, or touch Override to save multipleimages in the 2-image, Macula + Optic Disc-centered Exam setup.
Exam summary from the Review screenTouch Review.
Touch on a patient's ID. The Exam summary screen appears for that patient.
Touch (Good quality green), (Acceptable quality yellow), or
(Unacceptable quality red) to view the image. Touch (Patient) to review patient
demographics on the Patient summary screen. Touch (Back) to return to the
Review screen. Touch (Home) to return to the Home screen.
74 Navigation controls Welch Allyn RetinaVue™ 100 Imager Pro

Update the RetinaVue 100 Imager Prosoftware to version 6.XX and above
CAUTION Do NOT remove the SD Card or the power source from thedevice during boot up.
Take note of the current software version:
1. Touch Settings.2. Touch About to view the software version.
Before you begin, you will need the following :
• A computer with an Internet connection.
• The docking station charger with a USB cable connected to the power source.
• The RetinaVue 100 Imager Pro containing the SD card that you plan to update.(Alternatively, you can use a blank, formatted, 8GB to 32GB SD Card to transfer thedownloaded software update to the RetinaVue 100 Imager Pro).
1. Ensure that any patient data that you want to save is transferred by docking theRetinaVue 100 Imager Pro into the docking station charger with a USB cableconnected to a laptop or PC.
2. Remove the RetinaVue 100 Imager Pro from the docking station charger, touch Settings then touch Advanced settings.
3. Touch Format SD.
4. Touch OK.
5. Power down the RetinaVue 100 Imager Pro and remove the SD Card.
6. Insert the SD Card into an open SD Card reader port on the computer.
7. Download the software update and transfer the software update to a computer.
8. Transfer the software update from the computer to the SD Card.
75

Note Use a safe eject method when ejecting the SD card toensure a complete software transfer to the SD card.(Options include right-clicking on the Start Menu > OpenWindows Explorer> right-click on SD card> click Eject. Or,click on the Taskbar> Show hidden icons > clickSafelyRemove Hardware and Eject Media> click Eject SDHC).If an eject menu is not available with your system settings,wait until the files have completely copied before manuallyejecting the SD Card.
9. Remove the SD Card from the computer.
10. Insert the SD Card into the RetinaVue 100 Imager Pro.
11. Place the RetinaVue 100 Imager Pro on the docking station charger, connect thedocking station charger via a USB cable to the power source, and then power up theRetinaVue 100 Imager Pro.
Note The update process typically takes a few minutes to cyclethrough the complete update. During the update process, itis normal to see both a blank screen and an update screenthat appear several times before the RetinaVue 100 ImagerPro automatically reboots.
12. After the RetinaVue 100 Imager Pro boots up to the Home screen, confirm thesoftware update.
a. Touch Settings.
b. Touch About to view the software version.
13. Touch OK.
You are ready to use the updated software.
Troubleshooting software updates
Note The RetinaVue 100 Imager Pro boots up normally after a successfulsoftware update, however if a software update fails, the RetinaVue 100Imager Pro displays a failed update error message.
Power loss during software update:
• If a power loss occurs during the software update or if there are hardware issues,the RetinaVue 100 Imager Pro posts a blank screen. Remove the battery, reinstall it,and restart RetinaVue 100 Imager Pro. By performing this power cycle, theRetinaVue 100 Imager Pro reverts to a previous version of software. Repeat thesteps to perform the update again.
Corrupted software files:
• If the software update on the SD Card is corrupted, the RetinaVue 100 Imager Prodisplays a failed update error message indicating that the RetinaVue 100 Imager Prois unable to load the software from the SD Card. Remove the SD Card, reformat it ona PC. Repeat the steps to perform the update again.
Update extraction file error
If the RetinaVue 100 Imager Pro displays the failed update error message, Update fileextraction failed. Power off device and restart, the SD Card does not have sufficientspace. Remove all files (except the update image) from the SD Card. Perform the updateagain.
76 Update the RetinaVue 100 Imager Pro software to version 6.XX and above Welch Allyn RetinaVue™ 100 Imager Pro

RetinaVue 100 and 100 Imager ProAccessories
Miscellaneous itemsPart number Description
RV100PRO-B RetinaVue 100 Imager Pro with lithium-ion battery
RV100-B RetinaVue 100 Imager with lithium-ion battery
RV100-6 RetinaVue 100 Imager with lithium-ion battery and Australian plug
RV100PRO-6 RetinaVue 100 Imager Pro with lithium-ion battery and Australian plug
106401 Charging Dock for Welch Allyn RetinaVue 100 Imager; 100-240 V,50-60 Hz
106405 Battery for Welch Allyn RetinaVue 100 Imager; Lithium-Ion 3.6V /3350mAh
106406 Replacement USB Cable for Welch Allyn RetinaVue 100 Imager
106507 Power supply wall adapter for Welch Allyn RetinaVue 100 Imager.100-240 V, 50-60 Hz; IEC Plug Type B (US)
106508 Power supply wall adapter for Welch AllynRetinaVue 100 Imager.100-240 V, 50-60 Hz; IEC Plug Type C (EU)
106509 Power supply wall adapter for Welch Allyn RetinaVue 100 Imager.100-240 V, 50-60 Hz; IEC Plug Type G (UK)
106530 Power supply wall adapter for Welch Allyn RetinaVue 100 Imager.100-240 V, 50-60 Hz; IEC Plug Type I (AU)
106710 RetinaVue 100 Imager Lens cap
106711 RetinaVue 100 Imager Battery cover
77

Part number Description
236200-2 Welch Allyn RetinaVue 100 Imager replacement screwdriver forbattery cover. #1 Phillips Screwdriver w/ Logo
723481 Laptop for RetinaVue Network
724224 RetinaVue 100 Imager camera case
723484 Lens spray
723671 Lens cloth
Applied partsPart number Description
106404 Reusable Eye Cups for Welch Allyn RetinaVue 100 Imager: Qty. 5
ServicePart number Description
S1-RV100-1 Welch Allyn Partners in Care Comprehensive Partnership ProgramService for RetinaVue 100 Imager; 1 year
SV-RV100-2 Welch Allyn Partners in Care Comprehensive Partnership ProgramService for RetinaVue 100 Imager; 2 years
SV-RV100-3 Welch Allyn Partners in Care Comprehensive Partnership ProgramService for RetinaVue 100 Imager; 3 years
S1-RV100-1P Welch Allyn Partners in Care Comprehensive Partnership ProgramPremium Service for RetinaVue 100 Imager; 1 year
S1-RV100-2P Welch Allyn Partners in Care Comprehensive Partnership ProgramPremium Service for RetinaVue 100 Imager; 2 years
S1-RV100-3P Welch Allyn Partners in Care Comprehensive Partnership ProgramPremium Service for RetinaVue 100 Imager; 3 years
Literature/DocumentationPart number Description
411492 RetinaVue 100 Imager Directions for use
727803 RetinaVue 100 Imager Pro Directions for use
78 RetinaVue 100 and 100 Imager Pro Accessories Welch Allyn RetinaVue™ 100 Imager Pro

Part number Description
724146 RetinaVue 100 Imager Technique guide
Directions for use RetinaVue 100 and 100 Imager Pro Accessories 79

Material No. 727803