welcome to game components · welcome to britannia britain in the centuries from the roman...
TRANSCRIPT

Welcome to Britannia Welcome to a land of sweeping history. Welcome to a land that the Romans, the Angles, the Saxons, and a dozen other peoples warred over for a thousand years. Welcome to the land of King Arthur, Alfred the Great, Harald the Ruthless, and William the Conqueror. Welcome to BRitAnniA.
BRitAnniA is a historical board game that broadly depicts the millennium-long struggle for control of England, Scotland, and Wales. the game begins with the Roman invasion of 43 A.D., continues through the many struggles between Angles, Saxons, Picts, norsemen, Scots, irish, and other nations, and ends with the norman invasion of 1066.
BRitAnniA allows players to re-create this epic history, re-enacting important battles in some cases, altering the course of history in others. the game rules discourage players from making historically unrealistic moves, but also give players the freedom to alter Great Britain’s history in important ways, creating countless interesting “what if?” scenarios. What if Boudicca’s Revolt against the Romans had been more successful? What if the Romans and the Romano-British had repelled the Saxon invasions of the 5th and 6th centuries? What if William the Conqueror had died during the norman invasion of 1066? in BRitAnniA, the players will determine the destiny of a kingdom.
Game Overview
BRitAnniA is a board game for three to five play-ers that broadly depicts the wars in, and migrations to, Britain in the centuries from the Roman invasions to the norman Conquest.
Each player controls several nations. Seventeen nations are included in the game, each representing a people that lived in or invaded Britain between 43 A.D. and 1085 A.D. not all 17 nations are in play at the same time. instead, only six nations are in play at the beginning of the game; others enter, and in some cases leave, the game at specific times, reflecting known historic events. For example, the Romans begin the game prepared to invade from Gaul across the English Channel, simulating the Roman invasion of 43 A.D., and later leave the game after the fifth round of play, reflecting the Roman with-drawal from Britain in the 4th century. Similarly, many nations have leaders – such as Arthur or Cnut – who enter the game at historically appropriate times. At dif-ferent points in the game, players will control different nations, which will each have different leaders and dif-ferent objectives.
the players’ goal is to win the game by claiming the most victory points. Players gain victory points mainly by using their nations to occupy specified areas on the map at specified times, as instructed by each player’s nation Cards. nations may have to engage in battle against other nations to secure territory and gain victory. Some nations can also gain victory points in other ways: For example, the Romans and the Angles gain points if other nations submit to their rule, while other nations can gain points if their ruler becomes Bretwalda (overlord) or King.
Game Objective
BRitAnniA is played over 16 game rounds, with each round representing about 75 years of history. At the end of Round 16 the game ends, and the player whose nations have accumulated the most victory points wins the game.
Number of Players
BRitAnniA plays best with four players, since this number provides the best combination of player interest, interaction, and overall game balance. However, the game can easily be played with three or five players. Rules for the three- and five-player versions of BRitAnniA can be found on page 19. Rules for two-player “learning” sce-narios can also be found on pages 19-20.
the standard four-player game takes three to five hours, the five-player game takes slightly longer, and the shorter variant of the three-player game takes about two hours.
Game Components in this copy of BRitAnniA you will find the following components:
•ThisRulebook •TheGameBoard •251UnitMarkersinfourcolors:red,blue,yellow, and green, representing infantry, Cavalry, Leaders, Roman Forts, and Saxon Burhs. See page 20 for a detailed list of these markers. •17NationCards •175VictoryPointTokensindenominationsof1, 5, and 25 •16PopulationMarkers •1RoundMarker •5Dice
The Game Board
the board represents the island of Britain, divided into 37 land areas. Six sea areas surround the island. Some land areas, shaded more deeply, represent difficult terrain – rough, hilly, or swampy areas that impede movement.
Britain itself is divided into three regions by heavy red lines, as follows:
Wales: Clwyd, Cornwall, Devon, Dyfed, Gwent, Gwynedd, Powys (7 areas).
Scotland: Alban, Caithness, Dalriada, Dunedin, Hebrides, Mar,Moray,Orkneys,Skye,Strathclyde(10areas).
England: the remaining 20 areas.
Otherkeypartsofthegameboardareexplainedin“TheGame Board” diagram.
Islands and Coastal areas
the Scottish areas of Hebrides and Orkneyseachconsistofaclus-ter of islands. the area of Skye includes both the island and the portion of the mainland that formed the ancient kingdom of Skye; it borders both the icelandic and the irish Seas. Dalriada borders only the irish Sea. Hwicce is a coastal area,borderingtheAtlanticOcean.
Parts of ireland and normandy are shown in the left and lower-right areas of the map, although they are not involved in the game.
Page 2
Page 3
The unit markers
Each nation’s units – infantry and cavalry, as well as leaders, Roman forts, and Saxon burhs – are represented by cardboard markers.
Note: in this rulebook, the term units refers to all of a nation’s markers: infantry, cavalry, leaders, Roman forts, and Saxon burhs. the term armies refers to both infantry units and cavalry units, but not forts, burhs, or leaders.
Each nation’s playing pieces in BRitAnniA are dif-ferentiated not only by unique art, but also by a unique combination of a color (red, green, yellow, or blue) and a symbol (spear, shield, axe, ship, or eagle). For example, the Belgae have blue playing pieces with a shield sym-bol, while the Scots have yellow playing pieces with a spear symbol. the color-symbol combination on the playing pieces match that on each nation’s nation Card and on the game board’s nation List, to make it easier to identify each nation’s pieces during play.
note that while the nations are color-coded for the four-player game (each player takes all the nations of one color), the symbols are used for identification purposes only and have no other effect on game play. So, for example, although the Belgae have blue pieces with a shield symbol and the Welsh have green pieces with a shield symbol, there is no special relationship between the Belgae and Welsh nations.
Infantry
infantry armies are the most common unit in the game. Roman infantry units rep-resent more highly trained troops, and in game terms they move and fight like cavalry units. All other nations’ infantry units are “normal” infantry units.
Cavalry
Cavalry can move farther than normal infantry units and are better in com-bat.OnlytheRomano-Britishandthenormans have cavalry units.
Note: Each nation is limited by the markers included with the game in regard to how many armies they may have in play at once. For a complete list of how many infantry and cavalry markers are included with each nation, see page 20.
leaders
Leaders represent individuals of extraordinary ability. they enter the game during certain game rounds as indicated on both the timeline and the markers themselves. Leaders have no combat value in themselves (and must always be accompanied by army units), but they give a movement
and combat bonus to the armies accompanying them. the Danish leader marker “ivar and Halfdan” represents two individuals (the “Danish brothers”) but acts as a single leader for game purposes. Leaders are discussed in detail on page 13.
roman forts
Whenever the Romans are the only nation occupying an area, they immediately build a fort in the area. these forts act as “normal” (not Roman) infantry units in battle (see page 11), but they cannot move.
Areas with Roman forts are considered to also have “Roman roads,” which Roman armies can use for extra mobility.
Roman forts represent not only military fortifica-tions, but also the Romans’ “civilizing” influence in an area. Roman fort markers have both an “intact” and a “destroyed” side. if a Roman fort is eliminated in battle, it is flipped to its destroyed side, as a reminder that the area has rejected Roman influence and that a new fort may not be built in the area. See “the Romans and the Romano-British,” on pages 14-17, for further discussion of the significance of Roman forts.
Note: the Romans are not limited by the components in the number of forts they may have.
saxon Burhs
the Saxons have a special unit called a burh, which represents a type of fortification. Sax-on burhs fight as normal infantry units in battle, and cannot move. However, Saxon burhs do not provide the additional benefits that Roman forts do. For a full discussion of Saxon burhs, see page 17.
Other components
natIon Cards
there are 17 nation Cards, one for each nation. Each card has the same background color as the cardboard markers of its nation. Each nation’s card states what it must do to earn victory points, when its units appear in the game, and additional important information. See “OverviewoftheNationCard”onpage5foracompleteoverview of the nation Card and how to use it.
vICtory PoInt markers
175 victory point markers are pro-vided with the game, in denomi-nations of 1, 5, and 25. nations receive victory points throughout the game for complet-ing the objectives listed on their nation Card. the player with the most victory points among the nations he con-trols at the end of the game is the winner.
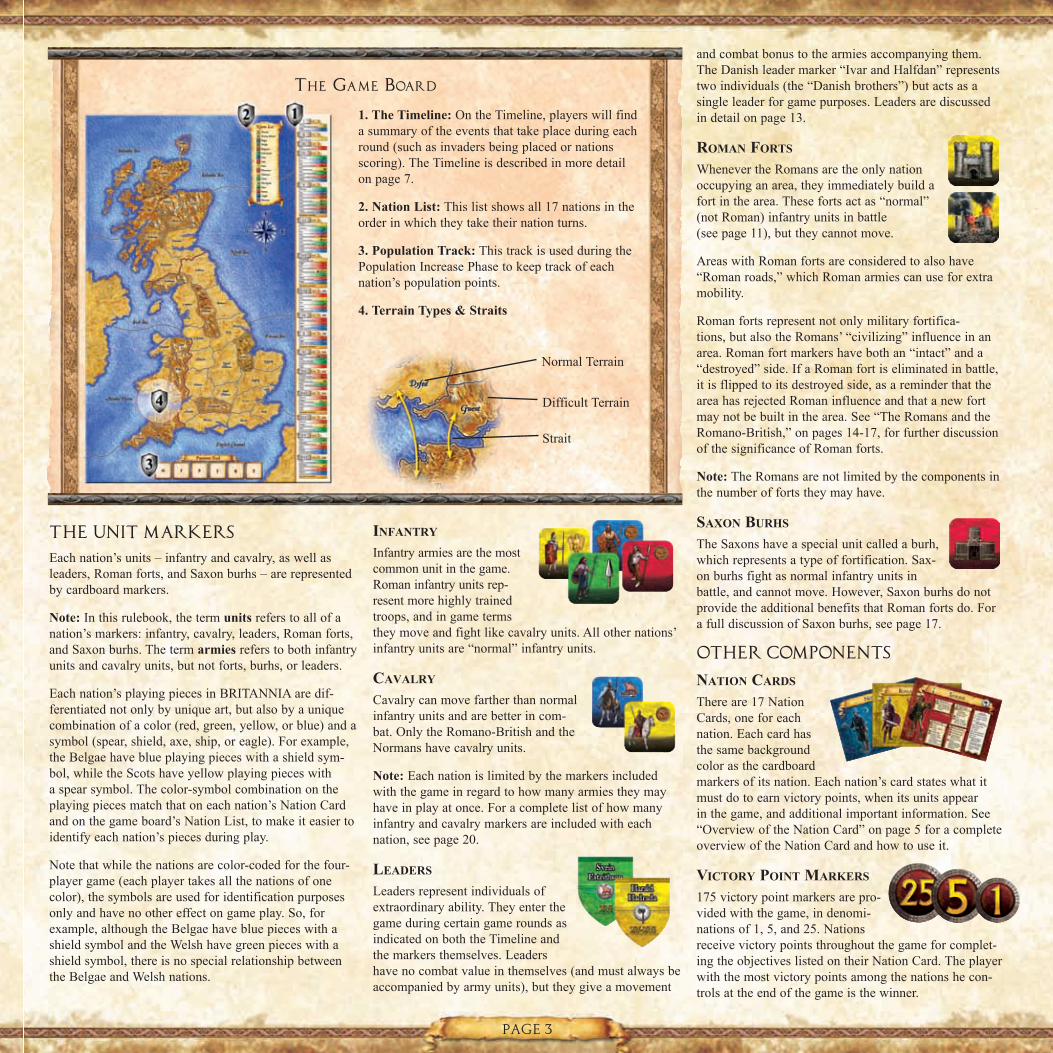
the Game Board
1. The Timeline:OntheTimeline,playerswillfinda summary of the events that take place during each round (such as invaders being placed or nations scoring). the timeline is described in more detail on page 7.
2. Nation List: this list shows all 17 nations in the order in which they take their nation turns.
3. Population Track: this track is used during the Population increase Phase to keep track of each nation’s population points.
4. Terrain Types & Straits
normal terrain
Difficult terrain
Strait

Page 4
PoPulatIon markers
Each nation except the Romans has aPopulationIncreaseMarker.Thismarker is used to track the nation’s progress on the Population track.
Designer’s Note: Markers have been included for the Norwegians and Normans, even though they are not used in standard game because the game ends after Round 16. There are two reasons: Lack of these markers caused misinterpreta-tion of the rules in the past, and if people devise variants that go beyond Turn 16, the markers will then be needed.
round marker
TheRoundMarkerisplacedon the timeline to keep track of the current game round.
Game Setupthe following setup instructions are for the four-player game. See page 19 for instructions on playing the game with three or five players.
1. Place the round marker in the Round 1 space on the timeline on the board.
2. Randomly determine which player will control the red, green, blue, or yellow nations. Each player should take the pieces for the nations he or she controls:
Player 1 controls the Dubliners, the norwegians, the Romans, the Romano-British, and the Scots (the yellow pieces).Player 2 controls the Caledonians, the Danes, the Jutes, and the Welsh (the green pieces). Player 3 controls the Brigantes, the irish, the norsemen, and the Saxons (the red pieces).Player 4 controls the Belgae, the Picts, the Angles, and the normans (the blue pieces).
3. Each player should take the nation Card that corre-sponds to each nation he or she controls.
now the starting units are placed on the map. Sixteen Roman infantry are placed in the English Channel, and one infantry is placed in each of the starting areas as listed in the “Game Setup” diagram.
When all pieces have been placed, the first game round begins.
Victory Points and the Nation Card
there are four main ways for nations to score victory points. these are described in detail below, and sum-marized for each nation on its nation Card. An astute player will refer to his nation Cards and his opponents’ nation Cards frequently. if another player asks to see any nation Card, the owner must comply.
When a nation receives victory points, the player con-trolling that nation should immediately take the appro-priate number of victory point tokens and place them on or near that nation’s Nation Card. it is important that each nation’s victory points be kept separate, so that all players know how well each nation, rather than just each player, is doing in the game. if any player asks how many victory points a nation currently has, the player controlling that nation must comply.
holdIng areas
the first and most common way for a nation to score points is by holding areas at the end of a scoring round. this is indicated on the nation Card by the Hold symbol (a fist) followed by the appropriate round and points granted for each area. Holding an area is defined as being the sole nation with units in an area at the end of an entire scoring round (not just the end of the nation turn; see “A Game Round,” on pages 6-7). the scoring rounds are Rounds 5, 7, 10, 13, and 16, and are high-lighted on the timeline.
Each nation has different areas that it must hold dur-ing specific rounds in order to score victory points. For example, at the end of Round 5, the Caledonians score fourpointseachforholdingOrkneys,Caithness,andHebrides,andtwopointseachforholdingMoray,Skye,andDalriada.Ofcourse,manynationsareafterthesameareas, and this is a major source of conflict in the game.
Game setup
When setting up the game, the nations listed below place infantry units in the following areas: The Caledonians (3 starting armies): Caithness, Hebrides, Orkneys.
The Picts (6 starting armies): Alban,Dalriada,Dunedin,Mar,Moray,Skye.
The Brigantes (9 starting armies): Bernicia, Cheshire, Cumbria, Galloway,Lothian,March,Pennines,Strathclyde, York.
The Belgae (10 starting armies): Downlands, Essex, Kent, Lindsey, n. Mercia,S.Mercia,Norfolk,Suffolk,Sussex, Wessex.
The Welsh (9 starting armies): Avalon, Clwyd, Cornwall, Devon, Dyfed, Gwent, Gwynedd, Hwicce, Powys.
The Romans place 16 invading armies in the English Channel.

Page 5
At the end of each scoring round, the players should consulttheNationListonthegameboard.Onebyone,they should go through the nations in order, checking each nation’s nation Card to see how many victory points each nation should receive for holding areas.
A nation may score points for holding an area even if it has already scored for holding the area in a previous round, and even if it has scored for occupying the area (see below) in the current round or a previous round.
oCCuPyIng areas A nation may score points for occupying certain areas during certain game rounds (even non-scoring rounds). this is indicated on the nation Cards by the occupy symbol (a flag) followed by the appropriate round and points granted for each region. For example, the Welsh score 12 points for occupying York during Round 8 or Round 9. Occupying an area is defined as being the sole nation with units in an area at any time during the game round. A nation may even score occupy points for retreating into an area or just moving through the area
during the appropriate game round (assuming no other nation’s units are present). As soon as a nation is the sole occupant of the listed area, the controlling player should take the appropriate number of victory point tokens.
Example: In Round 15, the Norwegians begin their nation turn with 10 armies in the North Sea. They move 3 armies into Bernicia, which is empty. The player controlling the Norwegians immediately takes 4 vic-tory points for occupying Bernicia, since the Norwegian Nation Card shows that that is how many points the Norwegians receive for occupying Bernicia in Round 15.
1. nation name.
2. Generic Scoring Scroll. A Scoring Scroll with no symbol is used for special scoring situations. For example, the Romans get 6 points if the Belgae sub-mit to them.
3. “Hold” Scoring Scroll. this scroll is marked with the Hold symbol (a closed fist). it shows that if the nation holds the listed areas at the end of the specified round(s), it will score the listed number of points.
4. “Eliminate” Scoring Scroll. this scroll is marked with the Eliminate symbol (a skull). it shows that the nation will score the listed number of points for each of the named unit(s) that it eliminates during the specified round(s).
5. “Occupy”ScoringScroll.ThisscrollismarkedwiththeOccupysymbol(aflag).Itshowsthatifthenation occupies the listed areas at any time during the specified round(s), it will score the listed number of points.
6. nation Reference. this area lists important infor-mation about the nation and special rules that apply on specific rounds.
7. nation Symbol: Each nation has a color (red, green, yellow, or blue) and symbol (spear, shield, axe, ship, or eagle). together, these color-symbol combinations serve as a unique identifiers used to differentiate the various nations. For example, the Romans’ symbol is the yellow eagle, while the Picts have a blue spear. Each nation’s color and symbol are also used on its playing pieces.
overvIew of the natIon Card

Page 6
He then moves the armies in Bernicia to York, which is occupied by three Danish armies. He does not take any victory points for occupying York yet, since the Norwegians are currently not the sole nation with units in the area. In the Battles/Retreats Phase, if the Norwegian armies in York eliminate all the Danish armies in York, and at least one Norwegian army in York survives the battle, then the player controlling the Norwegians would immediately take 10 victory points, since the Norwegians would then be the sole nation with units in York.
A single nation may only score points for occupying a specific area once. (So if the Welsh score for occupying York in Round 8, they may not do so again on Round 9.) However, a nation may score for occupying an area even if the nation has already scored for holding the area (see above), and vice versa. the rule to remember is that a nation may score for holding an area multiple times, but may only score for occupying each area once. Keeping track of which areas a nation has scored for occupying is discussed in more detail on page 17.
Exception: the Danes may score for occupying the same areas in Rounds 11 and 12 (see page 18 for details).
elImInatIng unIts A nation may receive points for eliminating enemy units in battle (even during non-scoring rounds). this is indicated on the nation Cards by the eliminate symbol (a skull) followed by the appropriate round and points granted for each unit type. For example, the Picts receive two points for each Roman army they eliminate, and six points for each Roman fort they eliminate, in any game round. the Romans, on the other hand, receive six points for eliminating the Belgae leader Boudicca in Rounds 1 or 2.
nations that score points in this manner may do so at any time during the listed rounds. As soon as a nation eliminates a relevant unit (as listed on its nation Card), the controlling player receives the appropriate number of points. it is possible for a nation to score victory points for eliminating units and then go on to lose the battle.
Exception: Certain nations may only score points for eliminating units on their nation turn (listed as such on their nation Cards). this signifies that they cannot receive these points during an opponent’s nation turn, and must therefore be the attacker to gain these points (see “Phase iii: Battle/Retreats,” page 11). this applies only to the specific unit listed. For example, the Saxons may only score for eliminating Romano-British cavalry on the Saxon nation turn, but they may score for elimi-nating Roman armies and forts at any time.
the Bretwalda and the kIng
the fourth way that a nation may score victory points is by claiming Bretwalda or King. there may be a Bretwalda in Rounds 8, 9, and 10, and a King in Rounds 11, 12, 13, 14, and 16, as indicated on the timeline by a crown symbol. the Bretwalda and the King are described in more detail on page 18.
roman vICtory PoInts
the Romans may score victory points in three additional ways. First, at the end of Round 5, they score points for limes (submitted nations and intact Roman forts). Second, the Belgae may submit to the Romans in Round 1, and if they do, the Romans receive six victory points. third, the Welsh, the Brigantes, and the Picts may also submit to the Romans. the Romans receive points for the areas occupied or held by any submitted nations (including the Belgae) as if the Romans occupied or held the areas themselves. these three types of Roman scor-ing are described in more detail on pages 14-16.
A Game Round BRitAnniA is played over 16 game rounds. A game round consists of all the 17 nations taking their nation turns. Each nation turn consists of five phases, described below.
At the beginning of each game round, players should consult the timeline to see what events will occur in that round.
The Nation Turn
in BRitAnniA, the order of play depends on nations, not players. During each game round, each nation takes its nation turn in the order stated in the nation List print-ed on the board. thus, the Romans play first, completing all of the phases of their nation turn, then the Romano-British take their turn, then the Belgae, then the Welsh, and so on.
in many rounds some nations will have no units on the board. For example, the Romano-British and all nations listed after the Picts are not yet on the board in Round 1. if a nation has not yet entered the game – or has already left the game – simply skip its nation turn.
Each nation’s turn consists of the following five phases, which are explained in greater detail throughout this rulebook.
three nations – the Welsh, the Saxons, and the Angles – have special restrictions, called point limits, on the areas they may score points for holding.
welsh PoInt lImIt
in a scoring round, the total points that the Welsh score for holding areas outside Wales may not be more than half the total points that the Welsh score for holding areas in Wales. Any excess points from holding areas outside Wales are lost.
Example: In Round 7, the Welsh hold eight areas outside Wales: Cheshire, March, Hwicce, North Mercia, South Mercia, Lindsey, Suffolk, and Essex, which are worth one point each to the Welsh. However, the Welsh only hold Powys and Gwynedd in Wales, which are each worth four points to the Welsh. Since the Welsh only scored eight points for areas in Wales, they may only score four points for areas outside Wales. The extra four points for the areas outside Wales are lost.
this Welsh point limit is summarized on its nation Card as follows: “Point limit outside Wales (half Wales points).”
saxon PoInt lImIt
in a scoring round, the total points that the Saxons score for holding areas in Wales may not be more than half the total points that the Saxons score for holding areas in England. Any excess points from holding areas in Wales are lost.
the Saxon point limit is summarized on its nation Card as follows: “Point limit in Wales (half England points).”
angle PoInt lImIt
in a scoring round, the total points that the Angles score for holding areas in Scotland may not be more than half the total points that the Angles score for holding areas in England. Any excess points from holding areas in Scotland are lost.
the Angle point limit is summarized on its nation Card as follows: “Point limit in Scotland (half England points).”
vICtory poInt lImIts
Page 7
Phase 1: PoPulatIon InCrease
in this phase, new armies may be placed on the board, depending on the number of areas that the nation con-trols. See pages 7-8 for more information on this phase.
Phase 2: movement
in this phase, the controlling player moves the current nation’s armies, possibly initiating battles. See pages 8-10 for the rules governing movement.
Phase 3: Battles/retreats
in this phase, battles and retreats are resolved. See pages 11-13 for the rules governing battles and retreats.
Phase 4: raIder wIthdrawal in this phase, Raiding armies may choose to withdraw back to the sea. See pages 9-10 for more details on Raiding and page 13 for information on Raider Withdrawal.
Phase 5: overPoPulatIon
in this phase, if the number of armies a nation has in land areas is more than twice the number of land areas it occupies, it must remove the excess armies. this proce-dure is explained on page 13.
End of the Game Round
AftertheOverpopulationPhase,thenationturnisoverand the next nation will then take its nation turn. After every nation has taken its nation turn, players perform the following two steps, in order:
Step 1: Scoring for Holding Areas
Players check the timeline to see whether the round was a scoring round (Rounds 5, 7, 10, 13, and 16, marked on the timeline). At the end of scoring rounds, each nation gains victory points for holding the areas indicated on its nation Card (as described under “Holding Areas,” pages 4-5). these points scored at the end of a game round are in addition to any points scored during a nation’s nation turn.
Step 2: Scoring for Bretwalda or the King
At the end of some rounds – indicated on the timeline by a crown – players determine whether any nation has claimed Bretwalda or a King. A Bretwalda may be elect-ed in Rounds 8, 9, and 10, and a King may be crowned in Rounds 11, 12, 13, 14, and 16. the procedure for determining whether there is a Bretwalda or a King, and
how many points the nation receives, is discussed in detail on page 18.
After these two steps are complete, the game round is over. the round marker is moved to the next round on the timeline and the next game round begins.
Phase I: Population Increase A major way that nations gain more armies is by increas-ing their population, which is done by occupying areas.
Exception: the Romans receive reinforcements instead of increasing their population. See “Roman Reinforce-ments” on page 14.
During a nation’s Population increase Phase, the con-trolling player counts the number of areas currently occupied by that nation’s armies. normal areas provide two population points, while difficult terrain areas pro-vide only one. to this total, add any population points left over from the previous game round, as indicated on the Population track. For each count of six, the nation receives one new infantry unit from among its eliminated and unused units. Any points left over are saved until the next turn. to track this, place the nation’s popula-tion increase marker on the appropriate space on the Population track.
Example: During the Welsh nation’s Population Increase Phase, the Welsh population marker shows 3 population points left from last turn, and Welsh armies occupy land areas worth 11 population points, for a total of 14. The Welsh receive two new armies (if available) and their population marker is moved to the “2” space of the Population Track.
A player may not refuse to increase his population. this may result in more armies on the board than his nation cansupport(see“PhaseV:Overpopulation,”page13);inthat case he’ll have to move and perhaps attack in order toavoidlosingarmiesintheOverpopulationPhase(orhe might let the extra armies starve).
Each nation is limited to the number of armies it may have in play by the number of components included with the game. (See page 20 for a complete list of how many units of each type each nation has.) if no infantry units are available, the nation cannot receive any new armies. it may save up to five population points, but any extra points are lost.
Note: the Romano-British and the normans both have cavalry units. these units only enter the game in Rounds 7, 15, and 16, as specified by the timeline. they may not be brought into play via the spending of population points.
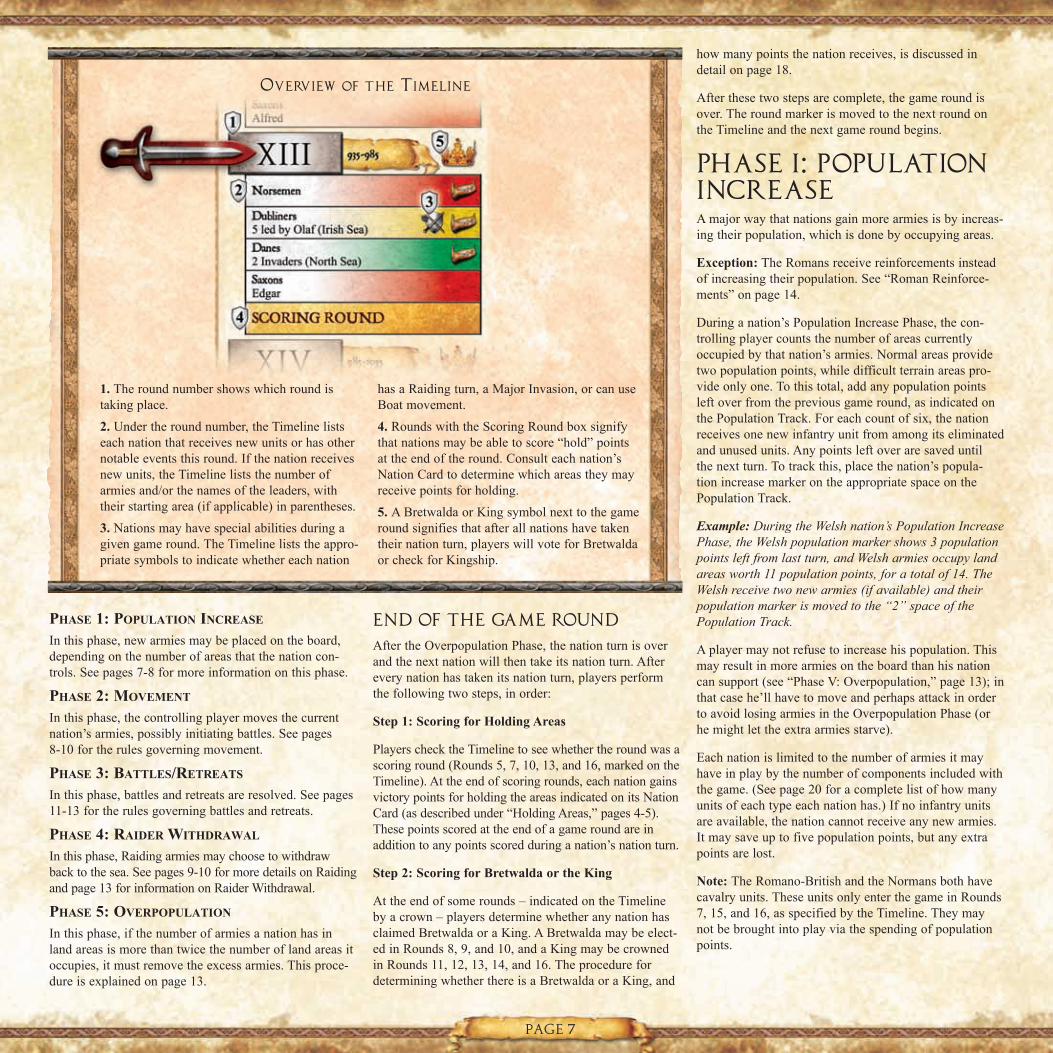
overvIew of the tImelIne
1. the round number shows which round is taking place.2.Undertheroundnumber,theTimelinelistseach nation that receives new units or has other notable events this round. if the nation receives new units, the timeline lists the number of armies and/or the names of the leaders, with their starting area (if applicable) in parentheses. 3. nations may have special abilities during a given game round. the timeline lists the appro-priate symbols to indicate whether each nation
hasaRaidingturn,aMajorInvasion,orcanuseBoat movement.4. Rounds with the Scoring Round box signify that nations may be able to score “hold” points at the end of the round. Consult each nation’s nation Card to determine which areas they may receive points for holding.5. A Bretwalda or King symbol next to the game round signifies that after all nations have taken their nation turn, players will vote for Bretwalda or check for Kingship.

Page 8
Placing New Armies
new infantry armies gained in the Population increase Phase are placed on areas occupied by the nation’s armies. no more than one army may be placed in a given area, unless there is no alternative (for example, because some areas are occupied by the maximum num-ber of armies allowed by the stacking limits, see page 9). if there is nowhere to place an army received in the Population increase Phase, owing to stacking limits, the army is lost, but the nation’s population marker remains at “5” on the Population track. Note: the norwegians, normans, and Saxons each receive special reinforcements at the beginning of Round 16. these are described in detail on page 18.
Placing invaders and raiders
Finally place any invaders or raiders, including leaders (see “Leaders”, page 13), as listed for the nation in the timeline. if there are not enough armies available because all armies are already on board, the player may select which invader or raider units do not appear. in that case, move population marker to “5” on Population track.
Phase II: Movement Duringanation’sMovementPhase,thecontrollingplayer may move any, all, or none of the nation’s armies. Armies may not normally move into a sea area, except during Boat movement (page 9) or during a Raiding turn (page 10).
normal armies (all those except cavalry and Roman infantry) may move up to two land areas per turn. For example, one may start in Essex, move to Suffolk, and then to norfolk. However, an infantry army must end its move when it enters a difficult terrain area (those with darker shading).
Cavalry units and Roman infantry may move three land areas per turn, but must end their move if they move into adifficultterrainarea.(OnlytheRomano-Britishandthenormans have cavalry units.)
there are two major exceptions to these basic movement rules. First, armies with leaders may move three areas per turn, and need not stop in difficult terrain. Leaders are discussed in more detail on pages 13-14. Second,
normal movement
the three Welsh armies in Avalon have several possible destinations to choosefromduringtheirMovementPhase:
1.OneormoreWelsharmiesmaychoosetomoveintotheDownlands.
2. the Welsh armies cannot move into the Downlands and then continue on to Sussex, because the Downlands is a difficult terrain area.
3.OneormoreWelsharmiesmaychoosetomoveintoWessex.Ifoneortwo armies move into Wessex, they must stop there because of the opposing army in that territory.
4. if all three Welsh armies move into Wessex, the Welsh will outnumber their opponent by more than two to one. two Welsh armies must still stop, but the third may overrun through Wessex, continuing on to Sussex.
straIt and Boat movement
in Round 9, the Saxons have Boat movement. the Saxon army in Devon has several movement possibilities:
5. the Saxon army may use the strait to move into Gwent. note that this takes their entire movement. to use a strait, an army must start its MovementPhaseatoneendofthestrait,andstopitsmovementattheotherend of the strait.
6. the Saxon army could move from Devon to Dyfed, but may not then continue on to Powys, because using the strait would take up its entire movement.
7. the Saxon army may use its Boat capability to first move into a sea area and then move into a bordering coastal area. in this example, the arrow showshowtheSaxonarmymaymovefromDevonintotheAtlanticOcean,and then land in Hwicce. though not pictured here, the Saxon army could also use Boat movement to move into the Atlantic and then to Powys, Gwynedd, Clwyd, or Cheshire, or it could move into the English Channel and then into a bordering coastal area.

Page 9
Roman armies may also use Roman roads to move sev-eral spaces in a single turn. Roman roads are described in detail on pages 14-15.
All units must stop when moving into an area containing an opposing nation’s units unless they are able to “over-run” through the area (see below).
straIts
there are four strait symbols marked on the board, repre-sented by yellow arrows. these straits link the Hebrides andSkye,theOrkneysandCaithness,DyfedandDevon,and Gwent and Devon. Armies may move across a strait as though the destination area were adjacent, traveling from one of the connected areas to the other despite the intervening water. However, this move takes all of an army’s movement. So the army must begin the move-ment in one of the two areas and end the movement in the other. (Exception: Roman roads, see pages 14-15.)
staCkIng lImIts
the number of armies of one nation allowed in a single land area is strictly limited in most cases. Each nation (except the Romans) may normally have no more than three armies in a non-difficult terrain area, or two in a difficult terrain area. As an exception to this restric-tion, each nation may have a single overstack. this overstack consists of one group of an unlimited number in a non-difficult terrain area or one group of up to four armies in a difficult terrain area (but not both).
Exception: the Romans can have any number of armies in each non-difficult terrain area and up to four in each difficult terrain area. Forts do not count toward stacking limits. Since the Romans do not have to adhere to nor-mal stacking limits, they do not have a single overstack capability.
these stacking limits are effective at the end of every nation’sMovementPhase,butnot during movement. the stacking limits apply separately to each nation with armiesinanareaafteraMovementPhase.
Stacking limits may not be exceeded during the Population increase Phase, nor may they be exceeded as a result of retreats.
Exceptions: Stacking limits may be exceeded when placing Round 1 Belgae reinforcements, Round 6 Romano-British armies, and Round 7 Romano-British reinforcements (see page 15).
overruns
When a player moves one or more armies into an area occupiedbyanothernation,abattleisinitiated.Usually,all the armies moving into the area must stop and fight in the battle. However, in some cases some of the moving armies may be able to continue moving: this is called an overrun.
if the number of armies moving into an area is less than or equal to twice the number of opposing forces (count armies and forts/burhs, but not leaders), then all the attacking armies must stop and fight the battle. However, if the moving armies outnumber the opposing forces by more than two to one, the excess armies may move through the area (overrun) without stopping (provided they would be able to legally move that far if the areas in question were empty – difficult terrain still stops move-ment, etc.).
note that since some armies can move three areas, they can sometimes overrun through two areas.
Regardless of whether any overruns occur or not, all movement must be completed before any battles are resolved.
Boat movement During some rounds, certain nations will have the ability to move units via Boat movement. the turns in which a nation has Boat movement are listed on its nation Card. OntheTimeline,ifanationhasBoatmovementinagiven round it is indicated by the Boat symbol, pictured above.
With Boat movement, units may move through (but may not end their turn in) one sea area. this movement is a part of, rather than in addition to, their normal move-ment. note that the sea area may be different for each unit, but no one unit may move through more than one sea area.
Example: During a Boat movement turn, an army in Kent might move to York or Cornwall (or to a coastal area between those two); one in Mar may move to York or Skye (or to a coastal area between those two).
Designer’s Note: At times the “Dubliners” probably portaged their boats across Scotland and then sailed down the eastern coast to York. This is certainly legal in the game, when other movement rules are satisfied.
WhenthereisaMajorInvasion,BoatmovementmaybeusedduringeitherorbothhalvesoftheMajorInvasionaslongasotherrulesarefollowed(see“Majorinvasions,” page 10).
Invasions and Raiding
throughout the game, new armies are brought into play in the sea areas indicated on the timeline. these armies represent, in broad terms, the peoples who landed on the shores of Britain at a particular time in history. invasions are indicated on the timeline under the names of the relevant nations. the number of armies each nation receives that round is listed, along with the sea area in which those armies are placed in parentheses. Players should place invading armies in the appropriate sea areas, as instructed by the timeline, at the beginning of the game round.
the romans
the Roman occupation of Britain from 43 A.D. through the 4th century shaped Britain’s history in countless ways. As a conquering empire, the Romans were very different – particularly in terms of military might – from the other peoples that occupied Britain in this time period. these differences are reflected in BRitAnniA in a variety of ways. First, the Romans begin the game with more armies than any other nation, as described in “Game Setup.” Second, Roman armies can move farther than normal armies (three areas rather than two, see page 8). third, Roman armies are more effective in combat than normal armies, as described on page 11.
there are other differences between the Romans and other nations. the Romans can build forts, which act as normal armies that cannot move. intact forts also score victory points for the Romans at the end of Round 5. Roman armies can also use “Roman roads” to move across many areas in a single turn. the Romans do not have a normal Population increase Phase – instead they receive a variable number of reinforcements from Rome – and the Romans skip theOverpopulationPhase.Somenations (the Belgae, the Welsh, the Brigantes, and the Picts) may submit to the Romans, for which the Romans receive victory points. Finally, the Romans leave the game after Round 5 and are replaced by the Romano-British, representing the Romans’ withdrawal from Britain in the 4th century.
the Roman nation and the special rules governing it are explained in detail on pages 14-17. the player controlling the Romans should review these rules prior to the start of the game.
Page 10
Example: On the Round 8 space of the Timeline, under-neath the word “Irish” the Timeline reads “1 Invader (Atlantic Ocean),” under “Scots” it reads “1 Invader (Irish Sea),” and under the “Angles” it reads “2 Invaders (North Sea).” This indicates that players must place one Irish army in the Atlantic Ocean area, one Scots army in the Irish Sea area, and two Angle armies in the North Sea area at the start of the game round.
Armies in a sea area must do one of the following:
1.Movedirectlyfromseatoaborderinglandarea.Then,following normal movement rules, they may choose to move one additional land area.
2.Movetoanadjacentseaareaandthenlandinanadja-cent land area. Some nations have additional restrictions regarding this option (see below).
3.DuringaRaidingturnorduringthefirsthalfofaMajorinvasion, armies may remain in the sea area they started in.(See“MajorInvasions”and“RaidingTurns,”below).
thIngs to note aBout Invaders
invading cavalry, armies with a leader, and Roman infan-try may move three areas (following normal movement rules).
Normally,allarmiesmustendtheirMovementPhaseina land area. (Important Exceptions:MajorInvasionsand Raiding turns, see below.)
ArmiesbeginningtheirMovementPhaseinaseaareamay never move two sea areas before landing in a land area.
When units at sea land, they are not required to all land in the same area.
Any number of armies from any number of nations may be in the same sea area. Stacking limits are ignored, and no battles occur at sea.
InvasIon restrICtIons on the natIon Card
Several nations have additional restrictions regarding where their invaders may land. Such restrictions are listed in the nation Reference area of the nation Cards. For example, in the nation Reference section of the irish nation Card it says “invaders must land south of Galloway.” When the nation Card says that invaders must land “north of” or “south of” a certain area, land-ing in the listed area is not allowed. therefore, irish invaders may not land in Galloway. However, irish invaders may land in Cumbria and move into Galloway via normal movement.
in addition, invader restrictions apply only to units that begin their nation turn at sea, not to units that begin their turn on land and use Boat movement. Jute invaders may not move into the Atlantic, but Jute units that begin
their nation turn on land in Round 6 may move into the Atlantic via Boat movement.
major InvasIons
OncertainroundssomenationsinitiateMajorInvasions.MajorInvasionsareindicatedontheTimelinebyacrossed axes symbol, pictured above.
DuringaMajorInvasionturn,allofanation’sunits,onland and at sea, may move and attack twice. in a round inwhichanationhasaMajorInvasion,thecontrollingplayertakestwoMovementandBattles/RetreatsPhasesinthisorder:FirstMovementPhase,FirstBattles/RetreatsPhase,SecondMovementPhase,SecondBattles/Retreats Phase. no other phases of the nation’s turn are duplicated.
Inaddition,duringaMajorInvasion,anarmymaystayatsea(notmove)duringthefirstMovementPhase.However, all the nation’s armies must end their Second MovementPhaseinlandareas(unlesstheyareonaRaiding turn; see below).
Designer’s Note: A Major Invasion reflects the additional shock and impetus of a great effort that sometimes takes place over a long period of time.
raIdIng turns During some rounds, certain nations are considered to be Raiding. this is listed on the nation Cards as well as the timeline with the Raiding symbol, pictured above.
Example: In Round 6 the Irish and the Scots are both listed as Raiding on the Timeline and on their Nation Cards, meaning that both of their nation turns are con-sidered Raiding turns.
if a nation is listed as having a Raiding turn in a certain round, then all the armies of that nation that are in a sea area at the beginning of the nation turn (not just those that were placed at the beginning of the current round) are considered to be Raiding armies for that turn. in historical terms Raiding armies represent invaders that returned to their homeland after invading Britain. in game terms, Raiding armies are permitted to end their nation turn in a sea area (again, in reality these armies returned to their homelands). Raiding armies may end their nation turn in a sea area in three ways.
1. Remain at Sea Raiding armies may choose not to move out of the sea area they start in (whereas all non-Raiding armies are required to end their nation turn in a land area).
2. Retreat Back to Sea Raiding armies may, after landing and engaging in battle, retreat from battle back to the sea area they started in. For detailed rules on how Raiding armies may retreat back to sea, see “Where the Attacker Retreats,” page 12.
3. Withdraw Back to Sea Raiding armies may withdraw back to sea during the Raider Withdrawal Phase, as described under “Phase 4: Raider Withdrawal,” on page 13. During the Raider Withdrawal Phase, the controlling player may simply pick up any Raiding armies and place them back in the sea area they started in. it does not matter if there are areas with opposing units between the Raiding army and the sea area. the Raider Withdrawal Phase occurs after the Battles/Retreats Phase. thus, Raiding armies may land, fight battles, and then withdraw to the sea so that they may not be attacked later that game round.
thIngs to note aBout raIdIng
Armies that begin the nation turn on land are not consid-ered to be Raiding armies, even though the nation may be on a Raiding turn. therefore, units that start on land may not withdraw during the Raider Withdrawal Phase. (Exception: Pict Raiding, see sidebar.)
TheScotsMajorInvasioninRound7andtheNorseMajorInvasioninRound11arealsoRaidingturns.this entails the movement of the Raider Withdrawal Phase to just after the second Battles/Retreats Phase. So these nations’ turns have the following phases: First MovementPhase,FirstBattles/RetreatsPhase,SecondMovementPhase,SecondBattles/RetreatsPhase,RaiderWithdrawal Phase. As with other Raiding turns, armies
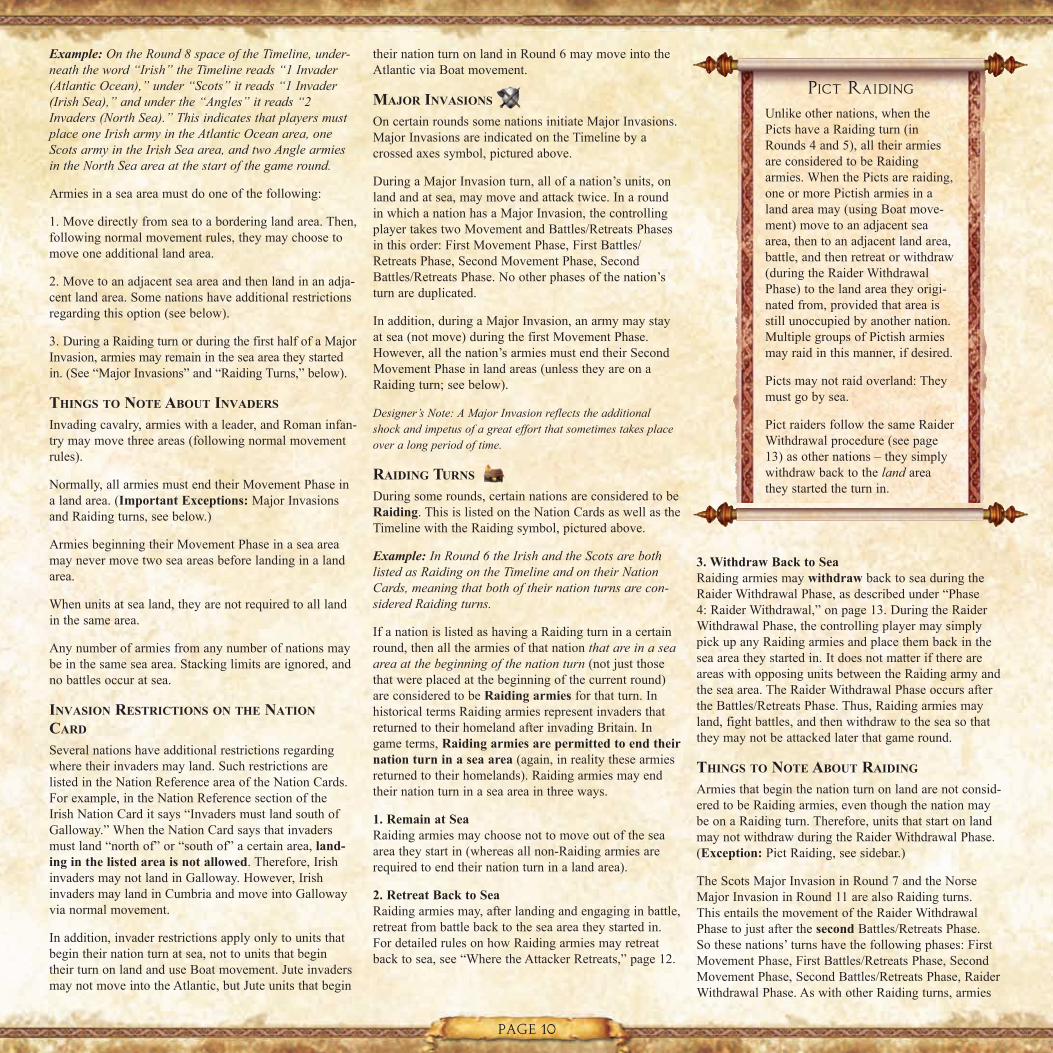
pICt raIdInG
Unlikeothernations,whenthePicts have a Raiding turn (in Rounds 4 and 5), all their armies are considered to be Raiding armies. When the Picts are raiding, one or more Pictish armies in a land area may (using Boat move-ment) move to an adjacent sea area, then to an adjacent land area, battle, and then retreat or withdraw (during the Raider Withdrawal Phase) to the land area they origi-nated from, provided that area is still unoccupied by another nation. MultiplegroupsofPictisharmiesmay raid in this manner, if desired.
Picts may not raid overland: they must go by sea.
Pict raiders follow the same Raider Withdrawal procedure (see page 13) as other nations – they simply withdraw back to the land area they started the turn in.

Page 11
must have begun the nation turn at sea in order to be considered Raiding armies.
As indicated on the timeline and their nation Card, in Round 11, the Danes’ Raiding armies must return to sea by the end of the Danes’ nation turn. they may return to sea via any of three ways listed above.
the invader restrictions on some nation’s nation Cards also apply to Raiding armies.
Phase III:Battles/RetreatsWhen units belonging to two nations occupy the same landareaattheendofaMovementPhase,abattlemust take place (even if the same player controls both nations). Combat at sea is not possible. the nation that moved into the area is considered the attacker, and the nation that was already there is considered the defender. if multiple battles need to be fought, the attacker chooses the order in which they are resolved.
Start of a Battle
the controlling player for each nation rolls one die for each army and fort/burh they have in the area. A player
controlling different types of units in a battle rolls sepa-rately for the different types of units. For example, a player controlling the Romans would have to roll dice for his armies separately from the dice he rolls for his forts, rather than rolling them all at once and assigning the dice afterwards.
the dice rolls determine how many opposing armies are eliminated. Eliminated armies are removed from the board.
Armies are eliminated according to the following rules:
1. A normal army eliminates a normal enemy army on a roll of 5 or higher.
2. A Roman or cavalry army eliminates a normal enemy army on a roll of 4 or higher.
3. Roman and cavalry armies are eliminated on a roll of 6 or higher, no matter what type of unit is attacking.
4. Any defending army in a difficult terrain area is elimi-nated on a roll of 6 or higher. this rule takes precedence over rules 1 and 2.
thIngs to note aBout Battles: in battle, Roman forts and Saxon burhs act as normal armies.
Die rolls are considered to be simultaneous, regardless of which player rolls the dice first.
A player may find that nations he controls are compet-ing for the same objectives. it is legal for two nations controlled by the same player to attack each other. the controlling player makes all decisions regarding retreats, but may have another player roll for one of the nations.
Eliminating Roman Forts
Any Roman armies in an area with a Roman fort must be eliminated by an attacker before the fort may be eliminated. thus a die roll of 5 will not eliminate the fort unless any Roman armies present in that round are elimi-nated by rolls of 6.
Example: Four armies are attacking a Roman fort and one Roman infantry. Four dice are rolled at once. If the attacker rolls at least one 6, then the Roman infantry is eliminated, and another 5 or 6 eliminates the fort. But if the attacker rolls four 5s, then no Roman units are elimi-nated, because there is no 6 to kill the infantry.
examples of Battle
1.OneWelsharmymovesintoAvalontobattleoneBelgaearmy.TheBelgaeplayerrolls a 6 while the Welsh player rolls a 4.
Result: the Welsh army is eliminated.
2. two Welsh armies move into the Downlands to battle one Belgae army. the Belgae player rolls a 5, and the Welsh player rolls a 2 and a 5.
Result: the Belgae army survives, since it is defending in difficult terrain and therefore only eliminated on a roll of 6. the Welsh however, lose one army from the Belgae’s “5” result. the Belgae player then gets to decide if he wants to retreat. if he does not, the Welsh player may then decide to retreat back to Wessex or continue fighting.
3.OneBelgaearmymovesintoSussextoattacktheRomanarmyandfort.TheRomanplayer rolls a 5 for the army and a 4 for the fort, while the Belgae player rolls a 5.
Result: the Belgae player loses one army from the Roman army’s 5 result, since a Roman army eliminates an opponent on a 4 or higher. (if the Belgae player had brought two armies, the second one would not be eliminated by the other “4” result, because the fort fights like a normal army.)
no Roman units are eliminated because of the Belgae player’s roll of 5. Roman forts are eliminated by a 5 or higher, but only if Roman armies have been eliminated first – and it takes a roll of 6 to eliminate a Roman army.

Page 12
Note: the above rule does not apply to Saxon burhs: they are eliminated just like normal armies, and are removed before normal Saxon armies are removed (see “Saxon Burhs,” page 17).
Deciding Which Unit Is Eliminated
in battles where cavalry and infantry are on the same side, 5s kill normal armies, while 6s kill cavalry or nor-mal armies as the opposing player desires. Players do not have to specify which die attacks which type of unit before rolling.
However, aside from the cavalry/infantry situation above, the controlling player chooses which armies are to be eliminated. if all armies are of the same type, choosing which ones have been eliminated can be done when the battle is finished. (this is sometimes an issue during Raiding turns, where some armies may have begun the turn at sea and can therefore retreat to the sea, while others began on land and cannot go back to sea. it may also be an issue if units attacked from different areas, and are therefore limited to retreating to those areas.)
Ending a Battle
Battle continues until all the armies and forts/burhs of one or both nations are eliminated, or until one player retreats all of their units.
After both players have rolled dice and eliminated units according to the results, if both sides have at least one surviving unit in the area, the defender may choose to retreat. if the defender still has at least one unit in the area, the attacker may then choose to retreat. note that when retreating, a player may choose to retreat some or all of his units involved in the battle.
if both sides have armies in the area after the opportunity to retreat, another round of battle is fought.
this procedure is repeated until only one nation occupies the area (or they are both eliminated at the same time).
Where the Defender Retreats
When the defending nation retreats, its units may have a choice of areas to retreat to, and some may retreat to one area while others retreat to another. Legal areas include:
1. Adjacent areas which are solely occupied by the retreating nation’s units.
2. Adjacent areas which are vacant and are not adjacent to a land area occupied solely by the attacking nation’s units (other than the battle area itself).
Adjacent areas also include areas connected to the battle area by a strait. However, a unit at one end of a strait does not prevent retreat to an area at the other end of the strait (for example, an army in Devon does not prevent an army from retreating from Dyfed to Gwent).
the defender may never retreat to:
1. A sea area. 2. Any area containing enemy units. 3. Any area from which the opposing armies entered the battle area. this case includes armies that went through the battle area as part of an overrun, but did not actually participate in the battle in question.
the defender must observe stacking limits when retreating.
if no legal retreat area is available, the defender must remain in the battle area and continue the battle.
Where the Attacker Retreats
When the attacking nation retreats, its units must retreat to the area(s) from which they entered the battle area. the attacker must observe stacking limits when retreating.
examples of retreats
The Saxons have attacked a Welsh army in North Mercia from Suffolk. There are also Saxons in Powys and South Mercia. There is a Welsh army in Hwicce. The Welsh army decides to retreat from North Mercia. It can retreat to Lindsey or York because they are vacant and not adjacent to areas with Saxon units (aside from North Mercia, where the battle is being fought). The Welsh army may not retreat to Suffolk, because that is where the attackers came from. It also may not retreat to March, because of the Saxon army in Powys. The Welsh army may retreat to Hwicce, even though it is adjacent to Powys, because of the Welsh army there.
One Angle army is in Sussex and one is in Kent. Three Saxon armies move from Wessex to Sussex. Two of the Saxon armies must stop in Sussex, but the one remaining Saxon army continues on via the overrun ability to Kent. In the Battles/Retreats Phase, the player controlling the Saxons chooses to fight the battle in Kent first.
Attacking armies may only retreat to the area from which they entered the battle. In this case, the army in Kent will not be able to retreat because the region from which it entered the battle – Sussex – contains armies of another nation.
Page 13
Example: Three Saxon armies attack Essex, two com-ing from Kent and one from Sussex; one is eliminated following battle, and the player decides to retreat. Both surviving armies may go to Kent, or one to Kent and one to Sussex, depending on which army the owning player chooses to remove.
if the area the attacker came from contains an army of another nation, the attacker cannot retreat to that area. it must remain in the battle area and fight again. this can occur when a group of attacking armies has moved through an area containing opposing units via an overrun.
if an army attacks from a sea area, it must retreat to the(landorsea)areainwhichitstarteditsMovementPhase.
Example: Five Norsemen armies are placed in the Icelandic Sea during the start of round 11 (a Norsemen Raiding turn). During the Norsemen Movement Phase, the armies move to the North Sea, then land in York, which is occupied by opposing units. During the ensuing battle, if the Norsemen armies retreat, they must retreat back to the Icelandic Sea.
Armies may only retreat back to sea on a Raiding turn orduringthefirsthalfofaMajorInvasion.Atanyothertime, a retreat that would make the army end its nation turn at sea is not allowed.
thIngs to note aBout retreatIng
Armies attacking an area via a Boat move may retreat via a Boat move to the area they started the Boat move in, provided that area is still unoccupied by another nation.
the Raider Withdrawal Phase (which takes place after all battles have been completed), is entirely different and separate from retreats (which occur during the Battles/Retreats Phase).
Phase IV: Raider WithdrawalDuring this phase Raiding armies may withdraw back to the sea area they started the turn in – even if they have already used up all their normal movement and engaged in a battle, and even if there is not a clear path for them to return to the appropriate sea area. the controlling player simply picks up any Raiding armies that he wants to withdraw off the board and places them in the sea area they started in. Raiding armies are thus able to invade from the sea, fight battles, and withdraw back to the sea in the same turn.
Phase V: OverpopulationThelastphaseofeachnationturnistheOverpopulationPhase. (Exception: the Romans are not subject to over-population.) During this phase, the controlling player counts 1) the number of land areas it occupies and 2) the number of armies occupying these land areas. Armies at sea do not count towards overpopulation (these armies are considered to have temporarily returned to their homelands). if the number of armies occupying land areas is greater than two times the number of land areas occupied, the excess armies must be removed.
For example, if a nation occupies four land areas, it can have no more than eight armies in those areas at the end ofitsOverpopulationPhase.Thecontrollingplayermustremove excess armies until the state of overpopulation no longer exists. However, no area can be emptied dur-ing removal, nor can a player remove more armies than are required to end overpopulation.
Leaders At various points in the game, as indicated on the timeline and the nation Cards, some nations will receive leaders. A leader represents a single individual of extraordinary ability and authority.
Some leaders start in a sea zone with invading armies, and these leaders may be placed in the sea areas listed on the timeline at the start of the game round.
Otherleadersdonothaveastartingarealistedonthetimeline. A leader whose location is not specified is placed on the board at the end of the relevant nation’s Population increase Phase. Such a leader may be placed in any area occupied by the nation’s units. if the start-ing location of a leader is not specified, and the leader’s nation has no armies in any land areas, then that leader may not enter play. (Exception: Arthur, see page 15.)
in some cases, special conditions (noted on the timeline) must be met before a leader can be brought into play.
Note: in two cases the Angles receive leaders only if theyoccupyaparticulararea(Bernicia,NorthMercia).the Angles also receive the leader when a submitted Brigante nation occupies the area (see page 17). the cor-responding leader is not required to appear in that par-ticular area, in any case.
A leader is removed from the board at the beginning of its nation’s next turn before any Population increase is calculated. thus a leader is on the board from the start of its nation turn in one round until the start of its nation turn in the following round – unless it is eliminated in battle.
Exceptions: Harold the Saxon, Harald Hardrada of the norwegians, and William the Conqueror of the normans
all enter play in Round 15 and remain in play (unless killed) until the end of Round 16.
Leaders and Movement
A leader is not an army and does not count for purposes ofoverruns,Overpopulation,orstackinglimits.
A leader may never be in an area without armies of his nation accompanying him. A leader may move three areas, but may never enter an area that is not occu-pied by armies of his nation unless one or more armies accompany him. if an area is emptied of friendly armies (by retreat or movement), the leader must move out with these armies.
Any armies accompanying leaders may move three areas and need not stop when entering a difficult ter-rain area. this is an exception to the normal movement rule.Movingacrossastraitstillstopstheleaderandthose with him. the armies must accompany the leader for their entire move in order for them to gain these movement advantages.
Example: A leader starting in Bernicia with two armies may move to York and pick up two more armies and then continue with a total of four armies through (empty) Lindsey to Norfolk. The armies in York may not have moved prior to being picked up by the leader, nor may they continue moving after entering Norfolk.
An army using Boat movement and accompanied by a leader may still only move through one sea area, but may move an additional land area before or after land-ing. For example, an army and leader in Lothian using
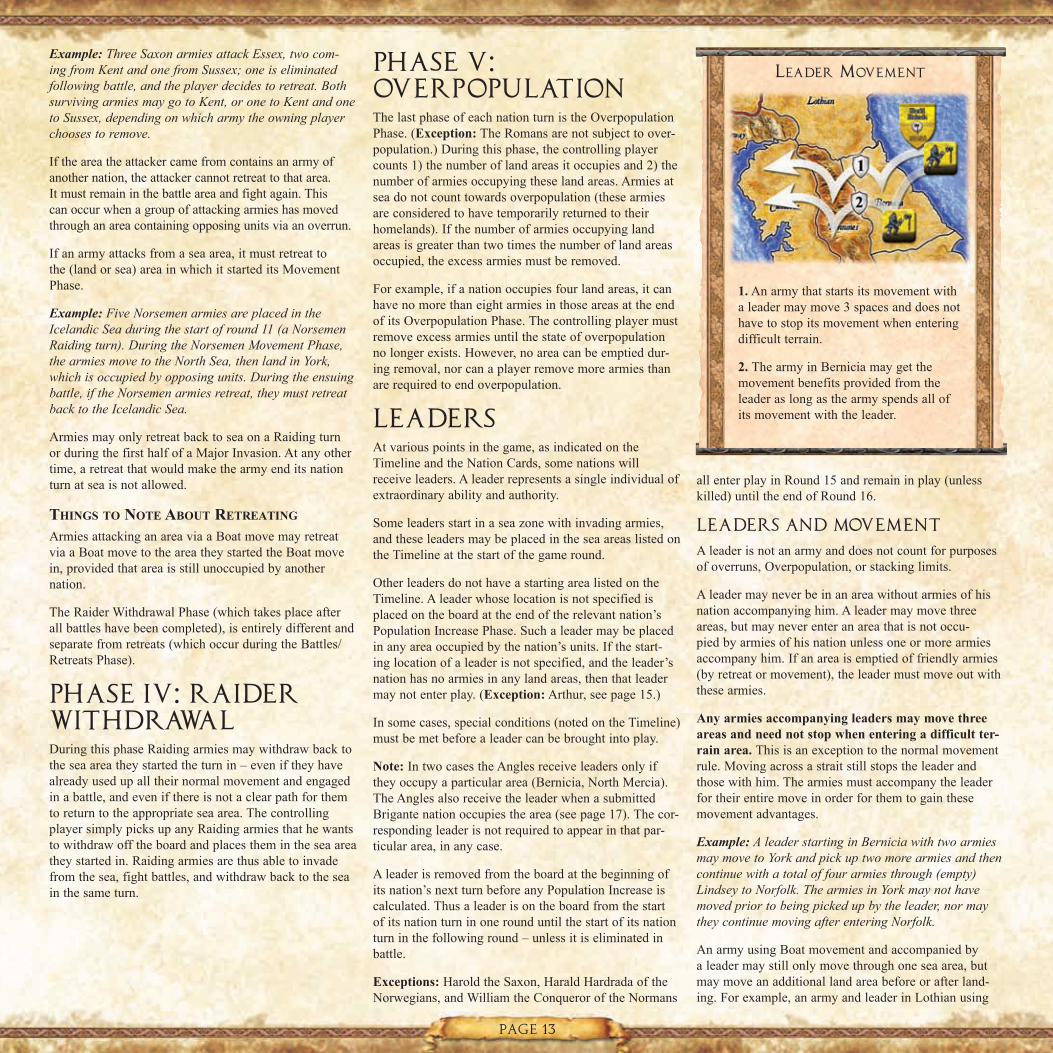
leader movement
1. An army that starts its movement with a leader may move 3 spaces and does not have to stop its movement when entering difficult terrain.
2. the army in Bernicia may get the movement benefits provided from the leader as long as the army spends all of its movement with the leader.

Page 14
Boat movement could move to the north Sea, then to York,thentoNorthMercia.
Leaders and Battle
When a leader is present during a battle, add one to the die roll of each army and burh of the leader’s nation in the battle. Leaders are not armies, so no die is rolled for them. A leader is immediately eliminated in battle if combat losses leave the leader without other units of his nation in the area, even if there are no opposing armies remaining. no dice roll is required.
A leader can retreat alone before the last army of his nation is eliminated in battle, but only to an adjacent area that is occupied solely by units of his nation.
The Romans and the Romano-Britishthe Romans are different from other nations in many ways. As noted previously, Roman armies can move three areas per turn, and are more powerful in battle. As discussed under “Stacking Limits” on page 9, Romans can have any number of armies in each non-difficult ter-rain area and up to four in each difficult terrain area. in addition, the Romans are not subject to overpopulation, andskiptheOverpopulationPhaseontheirnationturn.
the Romans are different from other nations in a few other ways, discussed below.
Roman Reinforcements
As a professional army based on the continent, the Romans do not increase Population as other nations do, but they do receive reinforcements during the Population increase Phase.
the number of Roman reinforcements depends on how many Roman armies remain in play, as follows:
Example: In Round 2, there are 12 Roman armies in play. They receive no reinforcements. Later, in Round 4, there are 9 Roman armies in play during the Population
Increase Phase of the Roman nation turn. They receive one reinforcement. In Round 5 they have 9 armies (one was eliminated), so they receive no reinforcements.
Designer’s Note: This table not only reflects the decreasing size of the Roman army, but the decrease in the fighting capability of that army following the Empire’s crisis of the third century.
Roman reinforcements are placed in the English Channel during the Population increase Phase of the Roman nationturn,andduringtheMovementPhasetheymust move to a land area adjacent to the English Channel (and may continue to move from there).
Roman Legion Withdrawal in Round II
in Round 2, at the end of the Roman nation turn, if there are more than 12 Roman armies in play, the controlling player must remove armies to reduce the number to 12.
Designer’s Note: This represents the withdrawal of one legion in AD 84/85, leaving three.
Roman Forts
the Romans build forts, which provide three advantages: 1) they act as normal (not Roman) armies in battle, 2) they represent networks of Roman roads, and 3) they score points for the player controlling the Romans at the end of Round 5. Several nations also receive points for destroying Roman forts.
When a Roman army becomes the sole occupant of any area for the first time, even if only moving through, and even if the Romans cannot score points for the area, a Roman fort is immediately built there. this fort acts as a normal army (not Roman army) that cannot move. Any Roman armies in an area must be eliminated by an attacker before the fort may be eliminated. thus a die roll of 5 will not eliminate the fort unless any Roman armies present are eliminated by rolls of 6. (See “Phase iii: Battles/Retreats” on pages 11-13.)
A fort is built only the first time the area is occupied by the Romans. if a Roman fort is eliminated in battle, do not remove it from the board, but instead flip it over to its “destroyed” side as a reminder that a Roman fort has already been built in that area.
Roman forts do no count toward stacking limits.
Designer’s Note: The Roman forts partially represent the abil-ity of the Romans to protect “civilization” in Britain. If an area is ravaged by enemies, then the Romans have failed, and the destroyed fort represents that failure. This is why forts cannot be rebuilt, and why destroyed forts do not score Limes points.
Roman Roads
Roman forts also signify the appearance and mainte-nance of Roman roads. if a Roman army moves from a fort area to an adjacent fort area, it doesn’t count against
that army’s capability to move three areas. if it moves from a non-fort area to an adjacent fort, or from a fort area to an adjacent non-fort area, it does count as one of the army’s three moves.
Example: There are Roman forts in Essex, Suffolk, Lindsey, York, and Pennines. A Roman army in Cheshire moves to York, using up one of its three movements. It then uses the roads to move down to Essex, and then moves to Kent, using its second movement. It chooses not to move a third area.
A Roman fort does not provide the Roman roads capa-bility in the phase during which it is built. However, fortsbuiltduringthefirsthalfoftheRomanMajorinvasion in Round 1 do provide road movement during the second half of the invasion.
if a Roman fort is destroyed, the Roads capability in that area is lost forever.
Difficult terrain areas with Roman forts are considered to have Roman roads. However, if a Roman army moves into a difficult terrain area containing a fort, from an area that does not contain a fort, it may move farther via the forts/roads but may not move on to a non-fort area (thus reflecting its move into the difficult terrain earlier).
Example: A Roman army in Cumbria moves to Pennines (difficult terrain). It can then move via the chain of forts to one of the areas occupied by a fort, but cannot move
roman movement
1. A Roman army may move up to 3 spaces instead of the normal 2.
2. the Roman army first moves one space, fromWessextoSussex.UsingRomanroads, the Roman army does not have to spend any movement to go from Sussex to Essex. it uses its two remaining moves to movetoSuffolkandthentoNorthMercia.
3. the Roman army does not get road movement benefits from the destroyed fort.
Page 15
farther because its move into the difficult terrain was not via the Roman roads.
if a player wishes to move a Roman army across both Roman roads and a strait, the following rule applies: A Roman army that crosses a strait may use road move-ment on either one end of the strait, but not both. no other movement can be combined with strait crossing. So a Roman can use road movement (only) before cross-ing, but must then stop, or it can cross the strait as the first step of its movement and then use road movement (only) after crossing.
See “Welsh, Brigante, and Pict Submission to Roman Rule,” for details regarding Roman roads in submitted areas.
Roman Scoring in Rounds I-IIIthe Romans score points for occupying areas during their nation turn in Rounds 1-3. Like other nations, the
Romans are considered to occupy an area if at any time during their nation turn they are the sole nation with units in an area. Like other nations, the Romans may only score for occupying each area once. it is easy to keep track of which areas the Romans have occupied, since there will be either an intact fort or a destroyed fort in each such area.
the Romans may also score points for occupying areas in Rounds 1-3 if another nation submits to the Romans (see below) during these rounds. When the submission is declared, the Romans immediately score points for the areas occupied by the now-subject nation. if the nation later occupies a new area while still in submission to the Romans, the Romans score points as if they occupied the area at that time.
Limes at the End of Round V
Limes is the name given by the Romans to their defen-sive lines/walls such as Hadrian’s Wall and the “Saxon Shore” forts, which were built as defenses against bar-barian raids. Instead of scoring normal holding points at the end of Round 5, the Romans score points at the end of Round 5 for each area listed on their nation Card that is either (a) occupied by an intact Roman fort, or (b) occupied by a subject nation (see below).
Welsh, brigante, and Pict Submission to Roman Rule
When the Welsh, Brigantes, or Picts occupy five, three, or three areas or fewer, respectively, they may submit to Roman rule, but only during a Roman turn. this submis-sion can only occur while Roman armies are still on the board.
During the Roman nation turn, these nations may declare submission after any battle finishes, or after any round of battle (the effects of the dice rolls are still applied), or afteranyRomanMovementPhase.AnyRomanarmiesstationed in an area held by a subject nation when submis-sion is declared must move immediately to any adjacent Roman-occupied or vacant area(s). if they are then in an area with a fort, they can take advantage of Roman road movement to move farther.
if there is no Roman-occupied or vacant area adjacent, the armies can be moved to any Roman-occupied area(s) adjacent to any area occupied by the submitting nation. if there is still none, they can be moved to any vacant area(s) adjacent to any area occupied by the submitting nation. if none of these apply, then the armies are elimi-nated owing to the incompetent leadership!
Submitting has the following effects:
1. in Rounds 1-3, the Romans may immediately gain vic-tory points for the areas occupied by the subject nation, as if the Romans occupied the area themselves. the Romans may not then later receive points for occupying those areas (since a nation can only score for occupying an area
once). However, they may receive victory points for the areas held by the subject nation at the end of Round 5 (see “Limes at the End of Round 5,” above).
2. the Romans can no longer attack the subject nation, and the subjects cannot attack the Romans or other Roman subjects. Subject armies can attack other nations not sub-jected to the Romans, and can occupy vacant areas (even ones that contain a destroyed Roman fort).
3. Subject nations receive only half the usual population points (round halves up). However, each turn the Roman player may allow subjects to increase Population fully (so that the subjects can fight off mutual enemies).
4. Subject nations receive only half the victory points for holding areas that they would normally earn at the end of Round 5 (round halves up).
5. Subject nations cannot abandon (leave vacant at the end of their movement) any area they occupy at the beginning of movement unless permitted to do so by the Romans. (this prevents a subject nation from depriving the Romans of Limes points merely by abandoning an area.)
6. Roman armies can move freely through, but not end a turn in, subject areas, and subject areas where there is no destroyed Roman fort count as having Roman roads.
Subjection ends when the Romans leave, at the start of Round 6 (see below).
Belgae Submission And Boudicca's Revolt
the Belgae may submit to the Romans only on the Roman nation turn of Round 1, if the Belgae are reduced to four or fewer areas. the Belgae must “unsubmit” on their own turn in Round 1 before their Population increase Phase (this represents Boudicca’s revolt). Whether they submit or not, they place the leader Boudicca and one army at the end of the Population increase Phase, without regard to stacking limits.
Roman Withdrawal in Round vi and Placement of Romano-British Armies
At the beginning of Round 6, the Romans do not take a nation turn. instead, the Romans leave Britain (in order to help defend italy and the Rhine frontier) and the Romano-British nation enters play. Romano-British armies are normal armies, and the Romano-British nation has different victory point objectives from the Romans.
the Romano-British do not perform the Population increase Phase in Round 6. instead, the player control-ling the Romano-British must replace eight surviv-ing Roman forts in or south of York and Cheshire with Romano-British armies. Any other Roman forts (destroyed or intact) are removed from the board. if there
arthur
in Round 7, the Romano-British receive a leader, Arthur, and two cavalry units, which may be placed at the end of the Population increase Phase.
Arthur and his cavalry must be placed together. they may be placed in any area containing Roman-British armies, or any vacant land area south of Cumbria, Pennines, and Bernicia. Arthur and his cavalry are the only units in the game that can enter the game in a vacant land area. if there are no Romano-British armies on the board and no eligible vacant areas, Arthur and his cavalry may not be placed. Arthur and his cavalry may be placed without regard to stack-ing limits, and may be placed even if there are no Romano-British armies on the board.
At the beginning of Round 8, Arthur is removed from the board and his cavalry are replaced with infantry armies. if there are already eight Romano-British infantry armies on the board, the cavalry pieces may be used to represent infantry, thus circumventing the usual Romano-British maximum number of infantry armies.

Page 16
the first time you play BRitAnniA, the concept of controlling multiple nations, and keeping track of their different victory point objectives, can seem a little overwhelming. However, there are only six nations on the board during the first several game rounds, so each player is only controlling one or two nations at first. We suggest that new players focus on just these nations’ objectives during the first few rounds.
Please keep in mind that the strategies in BRitAnniA are deep and varied, and that the “tips” on this page are only very general sug-gestions for players new to the game.
The Romans
the player controlling the Romans has the most decisions to make during the early rounds. the Romans begin the game with 16 armies in the English Channel, and the Romans take their nation turn first. Further-more,theRomanshaveaMajorInvasion(seepage 10) on Round 1, meaning that all their armies will move and attack twice. Before moving any armies, the Roman player should consult the Roman nation Card to see what the Romans’ victory point objectives are.
the nation Card shows that the Romans receive 6 victory points if the Belgae submit to them on Round 1 (see page 15). the Belgae may only submit if they are reduced to 4 or fewer areas during the Round 1 Roman nation turn, so the player controlling the Romans could choose to attack the Belgae. However, the player controlling the Belgae decides whether they submit or not; the Romans can-not force submission.
Looking a little further ahead, the nation Card indicates that the Romans receive victory points for occupying certain areas in Rounds 1-3 (see page 15). Looking at the map, the player controlling the Romans should note that they receive more points for occupying northern areas than for southern areas. For example, the Romans score four victory points foroccupyingMar,comparedtoonlyoneforGwynedd and other more southern areas. So the player controlling the Romans may want to push north, hoping to occupy high-scoring
territories by the end of the Roman nation turn on Round 3.
Ontheotherhand,theplayercontrollingthe Romans may also try to get the Welsh, the Brigantes, or the Picts to submit to the Romans (see page 15), so that he can receive points for the areas these nations occupy.
Finally, the Romans score points for limes (see page 15) at the end of Round 5. the play-er controlling the Romans may want to try to build forts in as many areas and possible, and keep them from being destroyed, to maximize the Romans’ scoring opportunity in Round 5.
the player controlling the Romans should also remember the advantages the Romans have in battle (see page 11) and the extra mobility they have from being able to move three areas and from Roman roads (see pages 14-15).
The Brigantes
the player controlling the Brigantes begins with relatively few units on the board, at least compared to the Romans. Still, he should try to get the maximum number of victory points from them.
the Brigante nation Card shows that the Brigantes receive points for eliminating Roman armies and forts, so the player con-trolling the Brigantes may want to focus on attacking the Romans.
However, the player controlling the Brigantes should also be aware of which territories the Brigantes score the most for holding at the end of Round 5: Strathclyde and Galloway. the controlling player may want to focus on getting armies into these areas, and holding them, rather than throwing all the Brigantes’ strength at the Romans.
The Welsh and the Caledonians
Like the Brigantes, the Welsh score points for eliminating Roman armies and forts. they also receive 2 victory points for eliminat-ing the Saxon leader Aelle, but the timeline shows that Aelle does not enter the game until Round 6.
the Welsh score points in Round 5 for hold-ing areas in Wales, so they may want to focus on defending them.
the Caledonians do not score points for elimi-nating Roman units. in fact, they only score for holding certain areas during the scoring rounds highlighted on the timeline. the Caledonians face a unique challenge in that all their units are in areas with difficult ter-rain. the player controlling the Caledonians should think about the best way to keep hold ofthemorenorthernareas,suchasOrkneysand Hebrides, that score the most points for the Caledonians.
The Belgae and the Picts
As mentioned above, the Belgae may submit to the Romans if it appears that the Romans may eliminate too many Belgae units. Even if the Belgae do submit during the Roman nation turn in Round 1, they unsubmit during their own nation turn (see page 15).
Furthermore, the Belgae leader Boudicca and one Belgae army enter the game during the Population increase Phase of their Round 1 nation turn, which will help them in battle against the Romans. this Belgae army may be placed in any area with Belgae units, without regard to stacking limits (page 15). Keep in mind that the Belgae score 6 points for elimi-nating Roman armies and forts in Round 1, but fewer points thereafter.
the Picts receive points for eliminating Roman armies and forts, and for holding cer-tain areas at the end of the scoring rounds.
the player controlling the Picts should also note that the Picts have Raiding turns in Rounds 4 and 5. the Picts follow special rules for Raiding, as described on page 10.
Looking Ahead
As players become familiar with the game, they should look ahead on the timeline and nation Cards to see when their other nations appear, and what those nations’ objectives are.
Please visit www.fantasyflightgames.com for more strategy tips.
tIps for your fIrst Game

Page 17
are fewer than eight forts left, then Roman armies in or south of York and Cheshire are replaced by Romano-British armies, without regard to stacking limits, until there are eight Romano-British armies on the board. Any remaining Roman armies are then removed from the board. no Romano-British army can be placed north of York and Cheshire, regardless of the location of forts and Roman armies. if there are not enough Roman forts and armies in the permitted areas, then the Romano-British will have fewer than eight armies.
the Romano-British perform the Population increase Phase as normal after Round 6. the Romano-British also receive a leader, Arthur, in Round 7. See the sidebar on page 15.
The Romano-British and Submitted Nations
UntilthebeginningofRound8,theRomano-Britishcannot attack any nation that submitted to the Romans unless that nation has already attacked the Romano-British. if such an attack happens in Rounds 6 or 7, the Romano-British may attack the formerly submitted nation who attacked, and score points for eliminating armies of that nation (as they do for Angles, Saxons, and Jutes) until the beginning of Round 8.
Because the Belgae rebel against the Romans even if they originally submitted, the Romano-British may freely attack the Belgae.
Other Rulesthis section covers finer rules points as well as rules that apply to certain nations at particular points in the game.
Negotiations
Players are likely to wish to discuss cooperation with otherplayers.Unfortunately,discussionsofthiskind tend to lengthen the game, and many BRitAnniA play-ers prefer to have no negotiations at all. Consequently, players may discuss strategy and negotiate agreements only while another player is taking his turn, and only over the board (no secret negotiations). no deal can be binding, that is, “backstabbing” is perfectly legal (and encouraged – to discourage deal-making!).
Tracking Occupied Areas
Each nation except the Danes may only score points for occupying a given area once, as described on page 6. Keeping track of which areas a nation has already occupied isn’t a problem for the norwegians and the normans, since they may only score occupy points in Round 15.
However, the Welsh are able to score points for occupy-ing York in both Rounds 8 and 9, and the norsemen are able to score points for occupying several areas from the time they enter the game in Round 11 through to the end of the game. to keep track of whether these nations have occupied a given area, players may want to place the victory point tokens that the Welsh or norsemen receive for occupying these areas in the area itself, and then later remove them to the nation Card at the end of Round 9 for the Welsh and the end of Round 16 for the norsemen.
Remember, however, that the norsemen may score points for holding areas in Rounds 13 and 16 even if they have already scored for occupying the areas.
Saxon Burhs
in Rounds 12 and 13, the Saxons may choose to build burhs, fortified dwellings, during their Population increase Phase. Each burh costs just two population points–onethirdthecostofanormalarmy.Onlyoneburh may be in an area (if one is destroyed, another may be built there), and no burh may be in difficult terrain.
the number of burhs that can be built on a turn is lim-ited, and a Saxon that is doing well may be unable to build any at all. the maximum number of burhs that the Saxon may build is equal to eight minus the number of areas held by Saxons. So if, at the Population increase Phase, the Saxon occupies six areas, he can build no more than two burhs (eight minus six).
Burhs cannot move. A burh fights as a normal army and counts as a normal army for purposes of Population Increase,Overpopulation,stackinglimits,overrunsand the maximum total number of armies (20) that the Saxons may have in play at any time.
Burhs can remain on the board until the end of the game. However, in Rounds 14 through 16, if there is a battle involving a burh in which Saxons take a loss, the burh must be lost first.
Designer’s Note: At this period the Vikings did not have the siege equipment or experience to take fortified places. The Saxons regularly manned the burhs, helping provide quick-reaction forces. While the burhs did not cause the defeat of the Danes, they did assure that the Saxons would survive, as finally the “Great Army” gave up and settled down to farming. As the Saxons retook parts of England, they built additional burhs to hold areas.
The scale of the game makes it impossible to show the intrica-cies of this warfare. By the time of renewed serious Danish invasions, the Danes were able to take such fortified places (only London could hold out), so no new burhs can be built then and they will gradually disappear from the game.
The limit on the number of burhs can be interpreted two ways: 1) If the Saxons are doing very well, why would they develop a
the Angles are the only other nation besides the Romans that may have another nation – the Brigantes – submit to them. Brigante submission to the Angles is also unique in that the effects of submission are different in some areas compared to others.
the Brigantes may only submit to the Angles once the Romans have left. they may only submit to the Angles if in Scotland, but also including the area of Galloway, the Brigantes only occupy one or two areas. it does not matter if the Brigantes occupy other areas outside Scotland (except for Galloway).
Designer’s Note: There were actually several British nations in the area for a time (Rheged and Gododdin were some others). This rule allows the Angles to, in effect, eliminate the non-Strathclyde nations, leaving the British nation of Strathclyde.
the effects of submission are as described for the Romans with one exception. the Angles can score victory points at the end of Round 7 and Round 10 for all Brigante-occupied areas, and the Brigantes will score half victory points for their areas. they will gain half or full population points (depending on the Angle choice) for all their areas. However, unlike the Romans and their subject nations, the Angles are not allowed to move through Brigante-occupied spaces.
OncetheBrigantessubmit,noneoftheirarmies may attack the Angles; but Angles can attack Brigante-occupied areas in Wales and England (except Galloway), and Brigantes there will fight back. Also, the Brigantes may freely vacate those areas without permission.
Submission ends at the end of Round 12, or when all Angle armies have been eliminated.
BrIGante suBmIssIon to the anGles

Page 18
new type of fortification? 2) The rule is intended to help prop up weak Saxons for the end game, not help strong ones!
The Bretwalda
At the end of Rounds 8, 9, and 10, nations vote for a “Bretwalda” (overlord) of England.
Designer’s Note: The Bretwalda is not the king of the entire country, but is a king of a region within the country who is acknowledged lord of the kings of the other regions. The “sub-ordinate” kings might pay tribute (or, more likely, give pres-ents), but the Bretwaldaship is more prestige than substance. A single battle could result in a change of Bretwalda. Battles and wars commonly took place despite recognition of a Bretwalda. When the Bretwalda died, a struggle among several kings for the succession often followed. Nevertheless, the Bretwalda often came from the same nation for several generations. At other times there was no Bretwalda at all. The Bretwalda was largely an Anglo-Saxon institution, and hence ceased to exist once the Danes started overrunning large parts of England.
Each nation has one “vote” for each English area it occupies. At the end of the round nations cast their votes for which nation they choose as Bretwalda. Players may only vote for a nation that controls an area in England. A nation’s vote cannot be divided, nor can it abstain. if one nation gains a majority (that is, more than half) of the votes cast, then that nation claims the Bretwalda. The nation gains four victory points, even if this is not stated on their nation Card.
Note: if the Brigantes have submitted to the Angles (see the sidebar on page 17), Brigante-occupied Galloway must vote with the Angles. Any other Brigante-occupied English areas can vote as the player controlling the Brigantes sees fit.
in most cases it will not be necessary to have a secret ballot, but any player may call for a secret ballot, and then each player writes down (secretly, of course) his votes, to be revealed simultaneously.
The King
AboutthetimetheVikingraidsbegan,politicalinte-gration and social development progressed to the point that one man could call himself King of England. in the game, at the end of Rounds 11, 12, 13, and 14, if any nation occupies twice as many areas in England as any other nation (minimum of 4), that nation claims Kingship of England. if no nation meets these criteria, there is no King. there is no determination of King at the end of Round 15, owing to the succession crisis depicted in the last two rounds.
The King’s nation gains eight victory points and an extra infantry unit, which is immediately placed on the board according to the placement rules for the Population increase Phase.
the danIsh turn In round 11the Danes enter the game in Round 11, with Raiding armies in both the north Sea and the Frisian Sea. these armies represent the series of raids that the Danes made on Britain in the thirty years prior to the more organized invasion of the “Great Army” of Danes in 865. the Great Army’s invasion is represented in the game by the Danes’MajorInvasioninRound12.
in Round 11, two special rules apply to the Danes. First, their armies must return to sea, as stated on the timeline and the Danes’ nation Card. the armies may return to the sea area they started their nation turn in via any of the three ways discussed under “Raiding turns” (page 10).
Second, the Danes may score points in Round 11 for the areas they occupy. normally, when a nation is eligible to score points for occupying areas, as indicated on its nation Card, the nation may score points whenever it is the sole nation with units in the area, as discussed on pages 5-6. However, in Round 11, the Danes only score for areas they occupy at the start of their Raider Withdrawal Phase: they cannot score points for merely moving through empty areas. (in Round 12, however, the Danes score points for occupying certain areas accord-ing to the normal rules, and they can score again for the areas they earned occupy points for in Round 11.)
the danIsh turn In round 14 and kIng Cnut
During the Raider Withdrawal Phase of the Danish nation turn in Round 14, any four Danish armies plus the leader Cnut must be removed from the board (they return to Denmark). no route is needed – they simply disappear. if, when placing the six invading Danish armies at the beginning of Round 14, there are not enough armies to place all six, the difference is sub-tracted from the four armies that the Danes must remove at the end of the Danish nation turn. For example, if only three armies can invade (shortfall of three), only one army needs to be withdrawn at the end of the Danish nation turn instead of four.
immediately prior to the Raider Withdrawal Phase of the Danish turn in Round 14 (just before the withdrawal of Cnut and his armies), if the Danes hold twice as many areas in England as any other nation, and Cnut is alive, Cnut becomes King and the Danes gain eight victory points. the Danes do not receive an army for Cnut being King. normal kingship is still decided normally at the end of the round. thus, there can be two Kings in Round 14.
the kIng In round 16there is no kingship in Round 15. in Round 16 the king-ship is determined at the end of the turn by the usual rules, but only Harold, William, Harald Hardrada, and Svein Estrithson are eligible (if alive). if all but one of these leaders are dead, however, the surviving one auto-
matically becomes King. Ten victory points are given for this endgame kingship.
Important: if some nation other than the ones men-tioned above holds twice as many areas as the prospec-tive King’s nation, there is no king in Round 16.
Round XVI Special Reinforcements
in Round 16, the norwegians, the normans, and the Saxons each receive special reinforcements. these armies are placed on the board at the beginning of Round 16, not during the nation turns, and these armies are in addi-tion to any armies these three nations receive during the Population increase Phases of their nation turns.
norwegIans the norwegians receive one additional reinforcing army, in the north Sea, for each area that they occupy. The Norwegians receive no special reinforcements if Harald Hardrada is not in play.
normans
the normans receive reinforcing armies in the English Channel according to the areas occupied by them at the end of Round 15: one for Essex, one for Wessex, one for Hwicce,andoneforSouthMercia.TheygainthreeifHarold the Saxon is not in play at the end of the norman nation turn in Round 15. All of these are infantry armies, but the normans can choose to take cavalry armies at the rate of one cavalry army in place of two infantry armies. For example, if the normans were due to receive three infantry armies, the controlling player could elect to take one cavalry army and one infantry army (assuming that these armies were available from the supply). The Normans receive no special reinforcements if William is not in play.
saxons
the Saxons receive reinforcing armies according to the areas occupied by them at the end of Round 15: one for every two areas in England (round down) provided that Harold the Saxon is in an English area. these armies must be placed in English areas. The Saxons receive no special rein-forcements if Harold is not in an English area.
Reinforcements are placed in order of normal play. if there are not enough unused armies for all of these reinforcements,
Page 19
the excess are lost, even if more armies become avail-able later in the turn.
Regardless of whether these nations receive special reinforcements or not (because their leader is alive or dead), they still perform their Population increase Phase normally.
Winning the GameAt the end of the game each player adds together the number of victory points that each of his nations has scored. the player with the most victory points wins the game.
Strategy NotesBRitAnniA is different from many other games insofar as it is never immediately obvious which player is winning. At any time, any player may ask for, and must be given, the current point total for any nation or player. Each player accumulates points at a different rate, some scoring many points early (such as the player controlling the Romans), some scoring many later in the game (such as the player controlling the Danes). Experienced players will learn to recognize who is doing better or worse than the average. if one player is clearly doing better than anyone else, the others may try to gang up on the leader.
in a game of this scope it is impossible to force play-ers to do exactly as their nations did historically, but the game is arranged so that a player who indulges in bizarre moves, from a historical viewpoint, will fail to score manypoints.Moreover,becausethereareseveralplay-ers, each player is, in effect, outnumbered. if a player makes an ill-considered move in order to hurt another player, he will hurt himself as well, and the remaining player(s) will benefit. in the process of following his his-torical objectives each player will have ample chances to hinder his opponents.
BRITANNIA with Three or Five PlayersWhen playing BRitAnniA with three or five players, all the rules of play remain the same. However, the way the nations are divided among the players is different than in the four-player game. Since the game compo-nents are color-coded for the four-player game, in the three- and five-player games players will control pieces of more than one color, and players must use the nation Cards to remember which player controls which nation.
Three-Player Game
in a three-player game, the nations are divided as follows:
Player 1: the Romans, the Romano-British, the Scots, the Dubliners, the Danes, and the Jutes. Player 2: the Belgae, the Welsh, the Picts, the Angles, and the normans.Player 3: the Brigantes, the Caledonians, the irish, the norsemen, the norwegians, and the Saxons.
Five-Player Game
in a five-player game, the nations are divided as follows:
Player 1: the Romans, the Romano-British, the Scots, and the norwegians.Player 2: the Welsh, the Danes, and the Jutes.Player 3: the Brigantes, the irish, the norsemen, and the normans.Player 4: the Belgae, the Picts, and the Angles.Player 5: the Caledonians, the Dubliners, and the Saxons.
Game Variants and Optional RulesShorter game variants and optional rules are discussed below.
Shorter Three-Player Variant
this version for three players begins after the Romans have left Britain, and ends with the attacks of the Vikings.Ittakesabouthalfaslongtoplayasthestan-dard four-player game.
the nations are divided as follows:
Player 1: the Romano-British, the Welsh, the Brigantes, the Caledonians, and the Danes.Player 2: the Picts, the irish, the norsemen, the Saxons. Player 3: the Scots, the Jutes, Angles, and the Dubliners. the Romans, the Belgae, the norwegians, and the normans are not used in this variant.
Each nation places one infantry in each the following areas:
The Romano-British (6 armies): Avalon, Downlands, Hwicce,NorthMercia,SouthMercia,York.The Welsh (7 armies): Cheshire, Clwyd, Devon, Gwent, Gwynedd,March,Powys.The Brigantes (6 armies): Bernicia, Cumbria, Galloway, Lothian, Pennines, StrathclydeThe Caledonians (2 armies):Caithness,Orkneys.The Picts (5 armies):Alban,Dunedin,Mar,Moray,Skye.The Irish (2 armies): Cornwall, Dyfed.The Scots (2 armies): Dalriada, Hebrides.
The Jutes (2 armies): Kent, Essex.The Saxons (2 armies): Sussex, Wessex.The Angles (3 armies): Lindsey, norfolk, Suffolk.the game begins in Round 6, using the normal invaders on that round per the timeline, and continues until the end of Round 13. the setup is not exactly representative of 430, as far as we know it, but does depict some of the settlements already made by the new invaders around the coasts of Britain.
Remember, there is no Romano-British Population increase Phase in Round 6. the Brigantes and the Welsh are treated as having been submitted to the Romans. Since the Romano-British player also controls these two nations, no points may be scored by the Romano-British for eliminating their armies. Furthermore, to show their tolerance of Anglo-Saxon federates, on Round 6 the Romano-British may not attack the Jutes, Saxons, or Angles (but the Romano-British defend normally against attacks from these nations).
Two-Player Scenarios
the two-player scenarios are provided as a way to become familiar with the game, or to allow players to practice, when only two people are available. inevitably, chance can play a large part in the outcome of a two-playerversion.Owingtostylisticdifferencesinhowpeople play BRitAnniA, it is virtually impossible to find an exact balance between two sides. Consequently, these should be viewed as practice scenarios rather than complete games.
early Invaders vs. InhaBItants of BrItaIn
Player 1: the Romans, the Caledonians, and the Scots.Player 2: all other nations.this scenario lasts only to the end of Round 5.
Setup: As at the start of the four-player game.
Special rules: the Belgae, the Welsh, the Brigantes, and the Picts must submit to the Romans if they meet the submission criteria. (this is because, in a short two-player game, these nations would prefer to fight to the death if they could.)
germanIC Invaders vs. InhaBItants of BrItaIn
Player 1: the Angles, the irish, the Jutes, the Saxons, and the ScotsPlayer 2: all other nations.this scenario lasts from the start of Round 6 to the end of Round 10.
Belgae pieces are used to represent additional Romano-British inhabitants, played separately from the Romano-British but under the same rules (no Population increase
Page 20
Phase in turn 6, for example) and with the same victory point objectives. Setup is as follows:
The Romano-British (7 infantry): Avalon, Bernicia, Cheshire,Hwicce,March,Wessex,YorkThe “Belgae” (7 armies):Essex,Kent,NorthMercia,Norfolk,SouthMercia,Suffolk,SussexThe Welsh (6 armies): All areas of Wales except the one occupied by the irish.The Brigantes (4 armies): Cumbria, Galloway, Lothian, StrathclydeThe Caledonians (3 armies): Caithness, Hebrides, OrkneysThe Picts (5 armies):Alban,Dunedin,Mar,Moray,SkyeThe Irish (1 army): CornwallThe Scots (1 army): DalriadaEmpty areas: Downlands, Lindsey, Pennines
vIkIngs vs. the InhaBItants of BrItaIn
Player 1: the Danes, the Dubliners, and the norsemenPlayer 2: all other nations.this scenario lasts from start of Round 11 to the end of Round 14.
Setup: Each nation places one infantry unit each in the following areas:
The Welsh (4 armies): Cheshire, Clwyd, Gwent, PowysThe Brigantes (2 armies): Galloway, StrathclydeThe Caledonians (2 armies):Hebrides,OrkneysThe Picts (4 armies):Alban,Caithness,Mar,MorayThe Irish (1 army): CornwallThe Scots (3 armies): Dalriada, Dunedin, SkyeThe Saxons (5 armies): Avalon, Devon, Hwicce, Sussex, WessexThe Jutes (1 army): KentThe Angles (8 armies): Bernicia, Essex, Lothian, Norfolk,NorthMercia,SouthMercia,Suffolk,YorkEmpty areas: Cumbria, Downlands, Dyfed, Gwynedd, Lindsey,March,Pennines
Bidding for Sides
Some gaming groups or individual players believe that one combination of nations has a better chance of win-ning than others. to accommodate that point of view, players may wish to allocate nations by the bidding method described below. note that players are still restricted to using the combination of nations described for the three-, four-, and five-player games as listed in these rules. the players are bidding for which group of nations they will control, not auctioning off each nation
one at a time. Players may bid victory points in order to get the group of nations they prefer.
Randomly determine which player bids first, with bid-dingpassingaroundthetabletotheleft.UsetheNationCard from one nation from each group of nations being bid on (for example, for the four-player game, use one nation Card of each color).
the first bidder selects the nation Card representing the group of nations he wants to play. He places it in front him and announces the bid he wishes to make on that group of nations. A bid may be zero, one, or more points. Place victory point tokens on the card to indicate the bid.
the second player may either select an unselected nation Card (placing a bid of zero or more on it) or raise the bidding on the already-selected nation Card. if he chooses the latter, he must raise the bid by at least one. the third player may choose an unselected card or raise the bidding on an already-selected card, and so on.
When the bidding comes around to a player who has acardinfrontofhim,thatplayermustpass.Onceallplayers have passed, the bidding ends.
Each bid represents the number of victory points the player is willing to lose at the end of the game if he is able to play the group in question. So when bidding is over, if a player’s bid for his selected group of nations is two, he will subtract two victory points from his total at the end of the game. Write these numbers down, and put the victory point tokens used for bidding in the main pile with the rest of the victory point tokens.
Example (standard four-player game): Steve, Torben, Jim, and Roseanna sit around a table in that order. Steve is going to bid first. He takes the Nation Card for group 4 and places it in front of him (this is a bid of zero points). Torben takes the card for group 2, but thinking others might want it, he places one victory point token on it in hopes of discouraging further bidding for that group. Jim takes the card for group 4 from Steve and puts one token on it. Roseanna takes the card for group 3 and places no tokens on it. Steve could then take the card for group 1, ending the bidding, but he takes the card for group 3 from Roseanne and places a bid of one on it. Torben and Jim pass, since they have a card in front of them. Roseanna, however, takes the group 3 card from Torben and puts another token on it, making it a bid of two. Steve passes. Torben then decides to take the card for group 1.
The result: Steve plays group 3 at the cost of one victory point, Torben plays group 1 at no cost, Jim plays group 4 at the cost of one victory point, and Roseanna plays group 2 at the cost of two victory points.
if all the players agree, they can speed up the bidding procedure by requiring a minimum amount by which players must outbid one another, for example, 5 points. initial bids may still be any value, including zero.
Complete Unit ListEach nation is limited in how many infantry and cavalry units it may have on board by the number of components supplied in the game. the Romans are not limited by the number of forts provided (although it is unlikely they will need more than 24). the rules governing Saxon burhs (see page 17) limit the number of burhs that may be built to 6. Below is a full list of each nation’s playing pieces.
Romans: 16 infantry, 24 fortsRomano-British: 8 infantry, 2 cavalry, ArthurBelgae: 10 infantry, BoudiccaWelsh: 13 infantryBrigantes:11infantry,UrienCaledonians: 7 infantryPicts: 10 infantryirish: 8 infantryScots:11infantry,FergusMorMacErcnorsemen: 10 infantry, Ketil FlatnoseDubliners:9infantry,OlafGuthfrithssonDanes: 18 infantry, ivar and Halfdan, Cnut, Svein Estrithsonnorwegians: 12 infantry, Harald HardradaSaxons: 20 infantry, 8 burhs, Aelle, Egbert, Alfred, Edgar, HaroldJutes: 6 infantryAngles:17infantry,Ida,Oswiu,Offanormans: 8 infantry, 4 cavalry, William
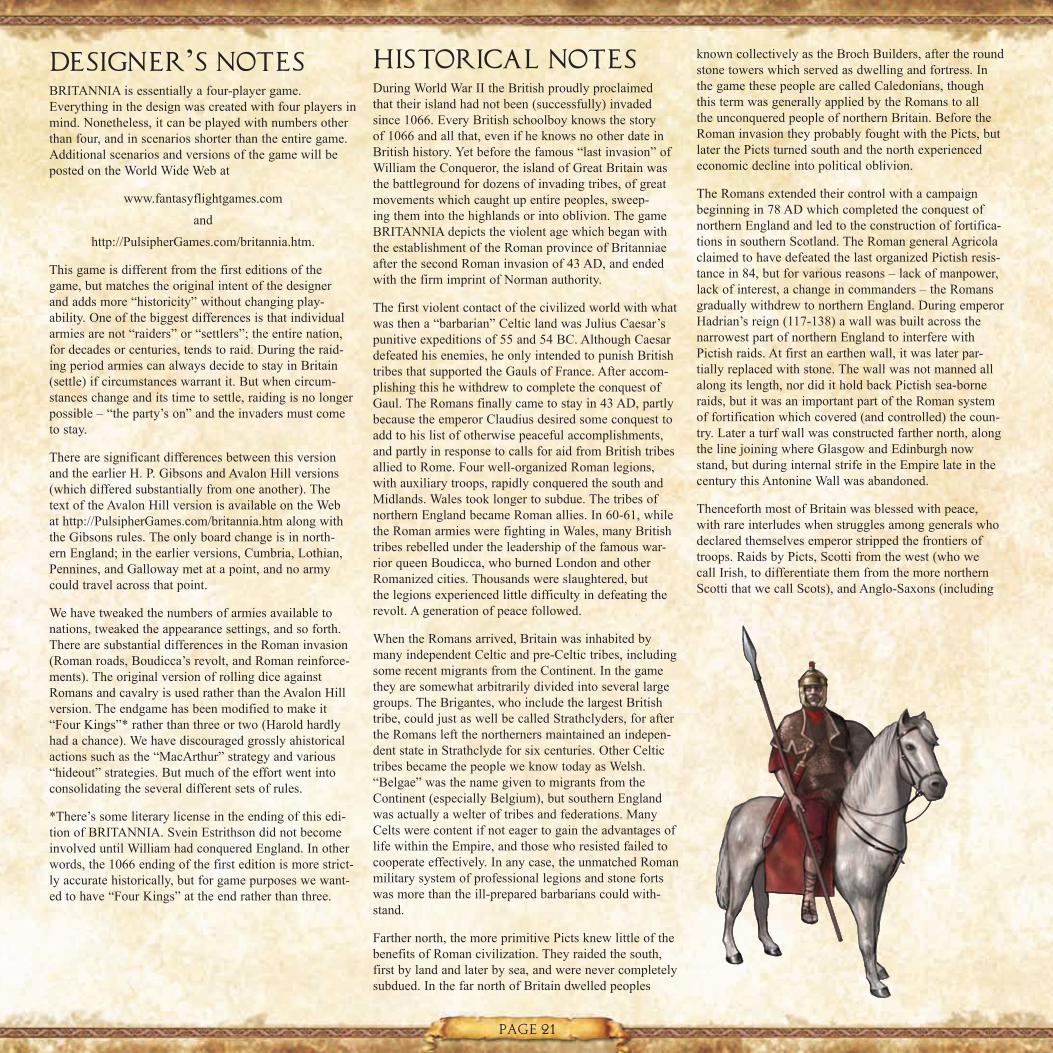
Page 21
Designer’s NotesBRitAnniA is essentially a four-player game. Everything in the design was created with four players in mind. nonetheless, it can be played with numbers other than four, and in scenarios shorter than the entire game. Additional scenarios and versions of the game will be posted on the World Wide Web at
www.fantasyflightgames.com and
http://PulsipherGames.com/britannia.htm.
this game is different from the first editions of the game, but matches the original intent of the designer and adds more “historicity” without changing play-ability.Oneofthebiggestdifferencesisthatindividualarmies are not “raiders” or “settlers”; the entire nation, for decades or centuries, tends to raid. During the raid-ing period armies can always decide to stay in Britain (settle) if circumstances warrant it. But when circum-stances change and its time to settle, raiding is no longer possible – “the party’s on” and the invaders must come to stay.
there are significant differences between this version and the earlier H. P. Gibsons and Avalon Hill versions (which differed substantially from one another). the text of the Avalon Hill version is available on the Web at http://PulsipherGames.com/britannia.htm along with the Gibsons rules. the only board change is in north-ern England; in the earlier versions, Cumbria, Lothian, Pennines, and Galloway met at a point, and no army could travel across that point.
We have tweaked the numbers of armies available to nations, tweaked the appearance settings, and so forth. there are substantial differences in the Roman invasion (Roman roads, Boudicca’s revolt, and Roman reinforce-ments). the original version of rolling dice against Romans and cavalry is used rather than the Avalon Hill version. the endgame has been modified to make it “Four Kings”* rather than three or two (Harold hardly had a chance). We have discouraged grossly ahistorical actionssuchasthe“MacArthur”strategyandvarious“hideout” strategies. But much of the effort went into consolidating the several different sets of rules.
*there’s some literary license in the ending of this edi-tion of BRitAnniA. Svein Estrithson did not become involved until William had conquered England. in other words, the 1066 ending of the first edition is more strict-ly accurate historically, but for game purposes we want-ed to have “Four Kings” at the end rather than three.
Historical notesDuring World War ii the British proudly proclaimed that their island had not been (successfully) invaded since 1066. Every British schoolboy knows the story of 1066 and all that, even if he knows no other date in British history. Yet before the famous “last invasion” of William the Conqueror, the island of Great Britain was the battleground for dozens of invading tribes, of great movements which caught up entire peoples, sweep-ing them into the highlands or into oblivion. the game BRitAnniA depicts the violent age which began with the establishment of the Roman province of Britanniae after the second Roman invasion of 43 AD, and ended with the firm imprint of norman authority.
the first violent contact of the civilized world with what was then a “barbarian” Celtic land was Julius Caesar’s punitive expeditions of 55 and 54 BC. Although Caesar defeated his enemies, he only intended to punish British tribes that supported the Gauls of France. After accom-plishing this he withdrew to complete the conquest of Gaul. the Romans finally came to stay in 43 AD, partly because the emperor Claudius desired some conquest to add to his list of otherwise peaceful accomplishments, and partly in response to calls for aid from British tribes allied to Rome. Four well-organized Roman legions, with auxiliary troops, rapidly conquered the south and Midlands.Walestooklongertosubdue.Thetribesofnorthern England became Roman allies. in 60-61, while the Roman armies were fighting in Wales, many British tribes rebelled under the leadership of the famous war-rior queen Boudicca, who burned London and other Romanized cities. thousands were slaughtered, but the legions experienced little difficulty in defeating the revolt. A generation of peace followed.
When the Romans arrived, Britain was inhabited by many independent Celtic and pre-Celtic tribes, including some recent migrants from the Continent. in the game they are somewhat arbitrarily divided into several large groups. the Brigantes, who include the largest British tribe, could just as well be called Strathclyders, for after the Romans left the northerners maintained an indepen-dentstateinStrathclydeforsixcenturies.OtherCeltictribes became the people we know today as Welsh. “Belgae” was the name given to migrants from the Continent (especially Belgium), but southern England wasactuallyawelteroftribesandfederations.ManyCelts were content if not eager to gain the advantages of life within the Empire, and those who resisted failed to cooperate effectively. in any case, the unmatched Roman military system of professional legions and stone forts was more than the ill-prepared barbarians could with-stand.
Farther north, the more primitive Picts knew little of the benefits of Roman civilization. they raided the south, first by land and later by sea, and were never completely subdued. in the far north of Britain dwelled peoples
known collectively as the Broch Builders, after the round stone towers which served as dwelling and fortress. in the game these people are called Caledonians, though this term was generally applied by the Romans to all the unconquered people of northern Britain. Before the Roman invasion they probably fought with the Picts, but later the Picts turned south and the north experienced economic decline into political oblivion.
the Romans extended their control with a campaign beginning in 78 AD which completed the conquest of northern England and led to the construction of fortifica-tions in southern Scotland. the Roman general Agricola claimed to have defeated the last organized Pictish resis-tance in 84, but for various reasons – lack of manpower, lack of interest, a change in commanders – the Romans gradually withdrew to northern England. During emperor Hadrian’s reign (117-138) a wall was built across the narrowest part of northern England to interfere with Pictish raids. At first an earthen wall, it was later par-tially replaced with stone. the wall was not manned all along its length, nor did it hold back Pictish sea-borne raids, but it was an important part of the Roman system of fortification which covered (and controlled) the coun-try. Later a turf wall was constructed farther north, along the line joining where Glasgow and Edinburgh now stand, but during internal strife in the Empire late in the century this Antonine Wall was abandoned.
thenceforth most of Britain was blessed with peace, with rare interludes when struggles among generals who declared themselves emperor stripped the frontiers of troops. Raids by Picts, Scotti from the west (who we call irish, to differentiate them from the more northern Scotti that we call Scots), and Anglo-Saxons (including
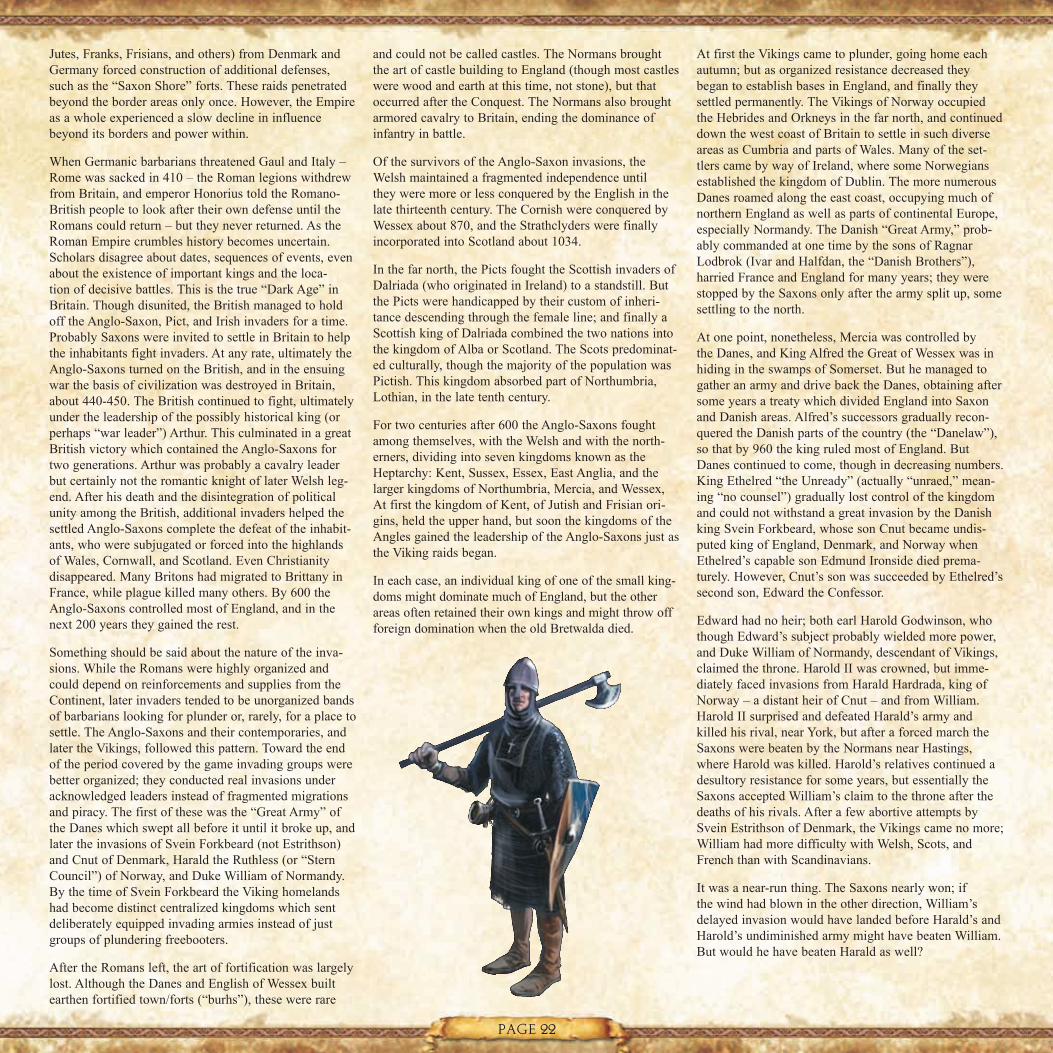
Page 22
Jutes, Franks, Frisians, and others) from Denmark and Germany forced construction of additional defenses, such as the “Saxon Shore” forts. these raids penetrated beyond the border areas only once. However, the Empire as a whole experienced a slow decline in influence beyond its borders and power within.
When Germanic barbarians threatened Gaul and italy – Rome was sacked in 410 – the Roman legions withdrew from Britain, and emperor Honorius told the Romano-British people to look after their own defense until the Romans could return – but they never returned. As the Roman Empire crumbles history becomes uncertain. Scholars disagree about dates, sequences of events, even about the existence of important kings and the loca-tion of decisive battles. this is the true “Dark Age” in Britain. though disunited, the British managed to hold off the Anglo-Saxon, Pict, and irish invaders for a time. Probably Saxons were invited to settle in Britain to help the inhabitants fight invaders. At any rate, ultimately the Anglo-Saxons turned on the British, and in the ensuing war the basis of civilization was destroyed in Britain, about 440-450. the British continued to fight, ultimately under the leadership of the possibly historical king (or perhaps “war leader”) Arthur. this culminated in a great British victory which contained the Anglo-Saxons for two generations. Arthur was probably a cavalry leader but certainly not the romantic knight of later Welsh leg-end. After his death and the disintegration of political unity among the British, additional invaders helped the settled Anglo-Saxons complete the defeat of the inhabit-ants, who were subjugated or forced into the highlands of Wales, Cornwall, and Scotland. Even Christianity disappeared.ManyBritonshadmigratedtoBrittanyinFrance, while plague killed many others. By 600 the Anglo-Saxons controlled most of England, and in the next 200 years they gained the rest.
Something should be said about the nature of the inva-sions. While the Romans were highly organized and could depend on reinforcements and supplies from the Continent, later invaders tended to be unorganized bands of barbarians looking for plunder or, rarely, for a place to settle. the Anglo-Saxons and their contemporaries, and latertheVikings,followedthispattern.Towardtheendof the period covered by the game invading groups were better organized; they conducted real invasions under acknowledged leaders instead of fragmented migrations and piracy. the first of these was the “Great Army” of the Danes which swept all before it until it broke up, and later the invasions of Svein Forkbeard (not Estrithson) and Cnut of Denmark, Harald the Ruthless (or “Stern Council”) of norway, and Duke William of normandy. BythetimeofSveinForkbeardtheVikinghomelandshad become distinct centralized kingdoms which sent deliberately equipped invading armies instead of just groups of plundering freebooters.
After the Romans left, the art of fortification was largely lost. Although the Danes and English of Wessex built earthen fortified town/forts (“burhs”), these were rare
and could not be called castles. the normans brought the art of castle building to England (though most castles were wood and earth at this time, not stone), but that occurred after the Conquest. the normans also brought armored cavalry to Britain, ending the dominance of infantry in battle.
OfthesurvivorsoftheAnglo-Saxoninvasions,theWelsh maintained a fragmented independence until they were more or less conquered by the English in the late thirteenth century. the Cornish were conquered by Wessex about 870, and the Strathclyders were finally incorporated into Scotland about 1034.
in the far north, the Picts fought the Scottish invaders of Dalriada (who originated in ireland) to a standstill. But the Picts were handicapped by their custom of inheri-tance descending through the female line; and finally a Scottish king of Dalriada combined the two nations into the kingdom of Alba or Scotland. the Scots predominat-ed culturally, though the majority of the population was Pictish. this kingdom absorbed part of northumbria, Lothian, in the late tenth century.
For two centuries after 600 the Anglo-Saxons fought among themselves, with the Welsh and with the north-erners, dividing into seven kingdoms known as the Heptarchy: Kent, Sussex, Essex, East Anglia, and the largerkingdomsofNorthumbria,Mercia,andWessex,At first the kingdom of Kent, of Jutish and Frisian ori-gins, held the upper hand, but soon the kingdoms of the Angles gained the leadership of the Anglo-Saxons just as theVikingraidsbegan.
in each case, an individual king of one of the small king-doms might dominate much of England, but the other areas often retained their own kings and might throw off foreign domination when the old Bretwalda died.
AtfirsttheVikingscametoplunder,goinghomeeachautumn; but as organized resistance decreased they began to establish bases in England, and finally they settledpermanently.TheVikingsofNorwayoccupiedtheHebridesandOrkneysinthefarnorth,andcontinueddown the west coast of Britain to settle in such diverse areasasCumbriaandpartsofWales.Manyoftheset-tlers came by way of ireland, where some norwegians established the kingdom of Dublin. the more numerous Danes roamed along the east coast, occupying much of northern England as well as parts of continental Europe, especially normandy. the Danish “Great Army,” prob-ably commanded at one time by the sons of Ragnar Lodbrok (ivar and Halfdan, the “Danish Brothers”), harried France and England for many years; they were stopped by the Saxons only after the army split up, some settling to the north.
Atonepoint,nonetheless,Merciawascontrolledbythe Danes, and King Alfred the Great of Wessex was in hiding in the swamps of Somerset. But he managed to gather an army and drive back the Danes, obtaining after some years a treaty which divided England into Saxon and Danish areas. Alfred’s successors gradually recon-quered the Danish parts of the country (the “Danelaw”), so that by 960 the king ruled most of England. But Danes continued to come, though in decreasing numbers. KingEthelred“theUnready”(actually“unraed,”mean-ing “no counsel”) gradually lost control of the kingdom and could not withstand a great invasion by the Danish king Svein Forkbeard, whose son Cnut became undis-puted king of England, Denmark, and norway when Ethelred’s capable son Edmund ironside died prema-turely. However, Cnut’s son was succeeded by Ethelred’s second son, Edward the Confessor.
Edward had no heir; both earl Harold Godwinson, who though Edward’s subject probably wielded more power, andDukeWilliamofNormandy,descendantofVikings,claimed the throne. Harold ii was crowned, but imme-diately faced invasions from Harald Hardrada, king of norway – a distant heir of Cnut – and from William. Harold ii surprised and defeated Harald’s army and killed his rival, near York, but after a forced march the Saxons were beaten by the normans near Hastings, where Harold was killed. Harold’s relatives continued a desultory resistance for some years, but essentially the Saxons accepted William’s claim to the throne after the deaths of his rivals. After a few abortive attempts by SveinEstrithsonofDenmark,theVikingscamenomore;William had more difficulty with Welsh, Scots, and French than with Scandinavians.
it was a near-run thing. the Saxons nearly won; if the wind had blown in the other direction, William’s delayed invasion would have landed before Harald’s and Harold’s undiminished army might have beaten William. But would he have beaten Harald as well?
Page 23
CHRONOLOGY55, 54 BC Julius Caesar raids southern Britain.43–47 AD Romans conquer southern England and Midlands.49–61 Romans subdue Wales.60–61 Boudicca’s revolt.84 Romans take north, establish themselves in Scotland.c. 85 Roman garrison reduced to three legions.122–130 Hadrian’s Wall built on Solway-tyne isthmus142 Antonine Wall built on Glasgow-Edinburgh isthmus. 3rd century Anglo-Saxon raids begin.367–369 Picts and irish break through defenses to ravage fron tiers. 407 Remainder of Roman garrison goes to Gaul to fight German invaders.c.425 VortigernisrulerofalargepartofsouthernBritain.c.430 VortigerninvitesSaxonstosettle.c. 442 Saxons attack British. Breakdown of Roman civiliza tioninBritain.MigrationstoBrittany.500 British (Arthur’s cavalry) defeat Anglo- Saxons at BattleofMonsBadonicus(siteunknown).542 Plague devastates Britain.c. 550–600 Anglo-Saxons attack again, drive British into Wales, Cornwall, and the north.597 Kingdom of Kent converted to Christianity. Remainder of English kingdoms converted by 650.c.610–678 NorthumbriankingisusuallyBretwalda(Oswiu 645–670). 731–799 MerciankingisusuallyBretwalda(Offa757–796).793 MonasteryofLindisfarnesackedbyfirstVikingraid.838,851 WessexvictoriesoverVikings.843 KennethMcAlpinofDalriadaunitesScotsandPicts.865 Danish “Great Army” invades East Anglia, destroys northern English kingdoms.871 Great Army divides: Danes attack Wessex; Alfred the Great becomes king of Wessex (d. 899).871–876 MerciaruledbyDanishprotégé.876–878 Renewed war, Wessex nearly conquered.878 Battle of Edington saves English.886 Peace treaty divides England into English and Danish halves (Danelaw).892–896 FurtherVikingattacks.899–924 Edward reconquers most of Danelaw.919 Dubliners control kingdom of York.924–939 Athelstan of Wessex controls most of England.937 Athelstan defeats Scots-Dubliners-Strathclyde coalition at Brunanburh (site unknown).945 Edmund of Wessex conquers Strathclyde, gives/leases it to his Scottish ally/subordinate; Lothian similarly treated late in tenth century. 1013 Ethelred deposed; King Svein Forkbeard of Denmark conquers England, dies next year.1016 Ethelred dies, and his son Edmund ironside soon after; Svein’s son Cnut elected king of England. 1042 Cnut’s son Hardecnut dies without heir; Edward the Confessor becomes king.1066 Edward dies without heir; Harold Godwinson succeeds him. Harald the Hardrada of norway and William of normandy invade England. Harold defeats and kills Harald but is defeated and killed by William. William becomes king.1086 AgreatVikinginvasionfleetisdispersedordestroyed bystorm–thelastVikingeffort.Pronunciation: Brigantes (Bri-gan'-tase, “gan” sounds close to “gone”); Belgae (Bel'-ji).
CreditsDedicatedtoTorbenMogensen,JimJordan,StephenBraund,andalltheplayersandGMswhohavemadeBRitAnniA live over the years.
Game Design and Development: Lewis E. Pulsipher, Ph.D.Additional Development: Corey Konieczka and John GoodenoughRules: Lewis E. Pulsipher, Ph.D.Editing: James D. torrGraphic Design: Brian SchomburgGame Board Art: KurtMillerNation Art: PatrickMcEvoy,GuyGentry, tomas Jedruszek, ted Pendergraft Art Direction: John GoodenoughProduction Manager: Darrell HardyExecutive Developer: Greg BenagePublisher: Christian t. Petersen
Playtestingthis edition owes whatever improvements have been made to the many BRitAnniA players around the world, especially the members of the Eurobrit Yahoo Group and authors of the World E-mail BRitAnniA Championships, and the 2004 World Board Gaming Championships BRitAnniA tournament. Without their enthusiasm, the designer would never have attempted this edition.
Contributors:StephenBraund,TorbenMogensen.
Playtesters for this edition: Llew Bardecki, nicholas Benedict, Simon Bullock, tim Coburn, thayne Conrad, Bill Crew, Caleb Diffell, Paul Doherty, Padraig Francis, John David Galt, Jaakko Kankaanpaa, takuya Kato, Richard Jones, Jim Jordan, Duane Kristensen, Pekka Marjola,EwanMcNay,ChristopherMorgan,KarstenOckenfels,ScottPfeiffer,RaffaelePorrini,JimPulsipher,David Rayner, Peter Riedlberger, Luke taper, Andrew tjader. Bob tjader, Stephen tjader, William tjader, Scott Weber, D. Charles Williams, David Yoon, and many others at the World Boardgaming Championships and Eurobrit listserv. i apologize to anyone i have acci-dentally left out.
Playtesting of Gibsons and Avalon Hill editions: Jim Adams,EricBracey,MartinCrim,ChrisHughes,KeithIvey,BobLansdell,FredParham,MundyPeale,SteveRaymond, Sue Pulsipher, Roger Heyworth (uncredited Developer, Gibsons), Adrienne Heyworth, David Abbott, tony Gordon, Claire Grant, Richard Bairstow, Alan R. Moon,MikeSchloth,RexMartin,andCraigTaylor,BruceShelley(AHeditor),MickUhl(AHeditor).
Index2-player scenarios: 19-203-player game: 195-player game: 19Angles, Brigante submission to: 17armies: definition of, 3; placing, 8Arthur: 15Battles/Retreats Phase: 11-13Boat movement: 8, 9Bretwalda: 6, 18Brigante submission to the Angles: 17burhs: see Saxon burhscavalry: 3chronology: 23Cnut, as king: 18Danish armies: removal in Round 14: 18eliminating: 6England: 2-3forts: see Roman fortsgame round: 6-7historical notes: 21-22holding: 4-5King: 6, 18; Cnut as, 18; in Round 16, 18infantry: 3invaders: 9-10invasion restrictions: 10leaders: 13-14limes: 15MajorInvasion:10MovementPhase:8-10nation Cards: 3, 4-5nation List: 3nation turn: 6negotiations: 17occupying: 5-6, keeping track of occupied areas, 17OverpopulationPhase:13overrun: 9Pict raiding: 10point limits: 6population points: 7-8Population track: 3, 7-8Raider Withdrawal Phase: 13Raiding: 10reinforcements: Roman, 14; in Round 16, 18retreats: 12-13Roman legion withdrawal: 14Roman roads: 14Roman forts: 3, 14; in battle, 11; limes, 14; movement, 14-15Romano-British: 15Saxon burhs: 3, 17scoring round: 4, 7Scotland: 2stacking limits: 9straits: 8, 9submission: 14-15, 17timeline: 7units: definition of, 3; complete list of, 20Wales: 2
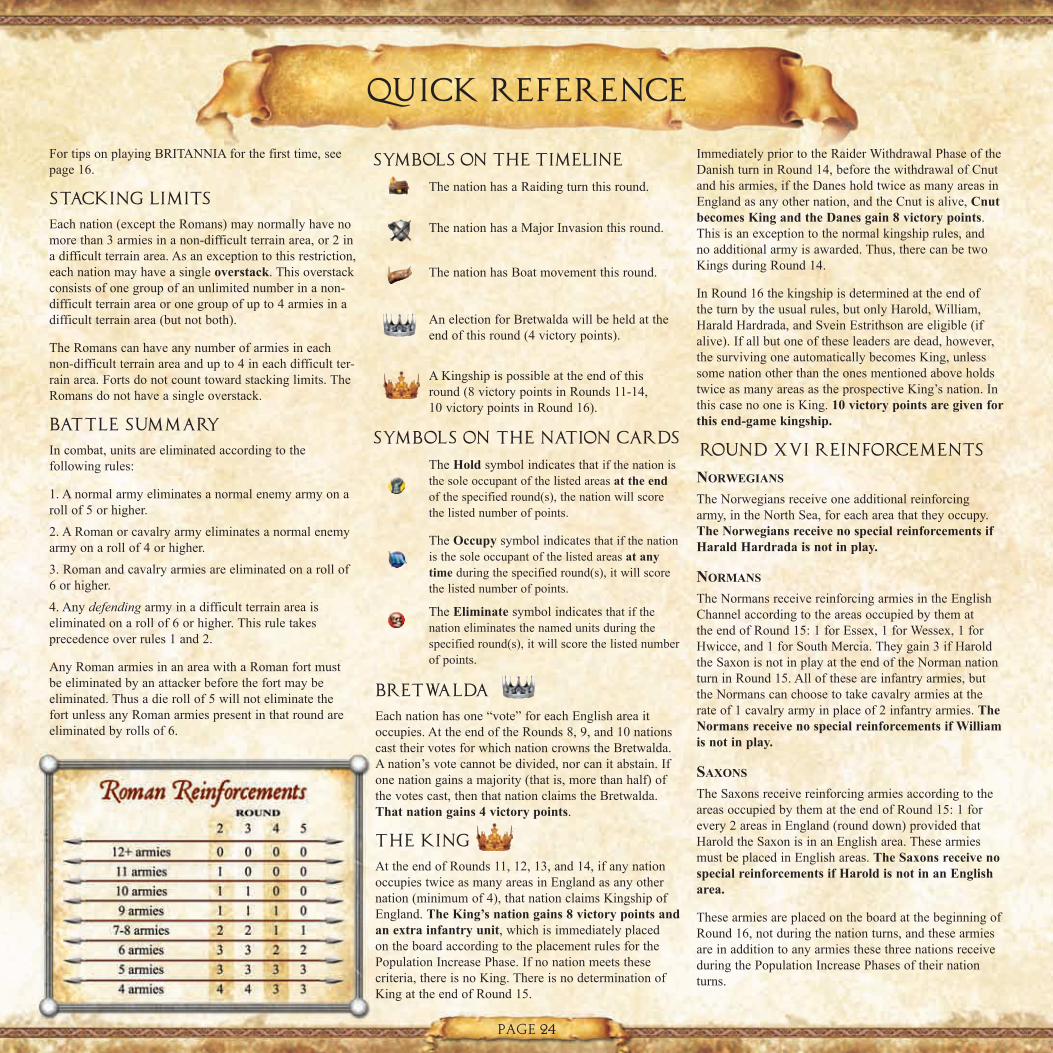
Page 24
For tips on playing BRitAnniA for the first time, see page 16.
Stacking limits
Each nation (except the Romans) may normally have no more than 3 armies in a non-difficult terrain area, or 2 in a difficult terrain area. As an exception to this restriction, each nation may have a single overstack. this overstack consists of one group of an unlimited number in a non-difficult terrain area or one group of up to 4 armies in a difficult terrain area (but not both).
the Romans can have any number of armies in each non-difficult terrain area and up to 4 in each difficult ter-rain area. Forts do not count toward stacking limits. the Romans do not have a single overstack.
Battle Summary
in combat, units are eliminated according to the following rules:
1. A normal army eliminates a normal enemy army on a roll of 5 or higher. 2. A Roman or cavalry army eliminates a normal enemy army on a roll of 4 or higher.3. Roman and cavalry armies are eliminated on a roll of 6 or higher. 4. Any defending army in a difficult terrain area is eliminated on a roll of 6 or higher. this rule takes precedence over rules 1 and 2.
Any Roman armies in an area with a Roman fort must be eliminated by an attacker before the fort may be eliminated. thus a die roll of 5 will not eliminate the fort unless any Roman armies present in that round are eliminated by rolls of 6.
Bretwalda
Each nation has one “vote” for each English area it occupies. At the end of the Rounds 8, 9, and 10 nations cast their votes for which nation crowns the Bretwalda. A nation’s vote cannot be divided, nor can it abstain. if one nation gains a majority (that is, more than half) of the votes cast, then that nation claims the Bretwalda. That nation gains 4 victory points.
The King
At the end of Rounds 11, 12, 13, and 14, if any nation occupies twice as many areas in England as any other nation (minimum of 4), that nation claims Kingship of England. The King’s nation gains 8 victory points and an extra infantry unit, which is immediately placed on the board according to the placement rules for the Population increase Phase. if no nation meets these criteria, there is no King. there is no determination of King at the end of Round 15.
immediately prior to the Raider Withdrawal Phase of the Danish turn in Round 14, before the withdrawal of Cnut and his armies, if the Danes hold twice as many areas in England as any other nation, and the Cnut is alive, Cnut becomes King and the Danes gain 8 victory points. this is an exception to the normal kingship rules, and no additional army is awarded. thus, there can be two Kings during Round 14.
in Round 16 the kingship is determined at the end of the turn by the usual rules, but only Harold, William, Harald Hardrada, and Svein Estrithson are eligible (if alive). if all but one of these leaders are dead, however, the surviving one automatically becomes King, unless some nation other than the ones mentioned above holds twice as many areas as the prospective King’s nation. in this case no one is King. 10 victory points are given for this end-game kingship.
Round XVI Reinforcements
norwegIans the norwegians receive one additional reinforcing army, in the north Sea, for each area that they occupy. The Norwegians receive no special reinforcements if Harald Hardrada is not in play.
normans
the normans receive reinforcing armies in the English Channel according to the areas occupied by them at the end of Round 15: 1 for Essex, 1 for Wessex, 1 for Hwicce,and1forSouthMercia.Theygain3ifHaroldthe Saxon is not in play at the end of the norman nation turn in Round 15. All of these are infantry armies, but the normans can choose to take cavalry armies at the rate of 1 cavalry army in place of 2 infantry armies. The Normans receive no special reinforcements if William is not in play.
saxons
the Saxons receive reinforcing armies according to the areas occupied by them at the end of Round 15: 1 for every 2 areas in England (round down) provided that Harold the Saxon is in an English area. these armies must be placed in English areas. The Saxons receive no special reinforcements if Harold is not in an English area.
these armies are placed on the board at the beginning of Round 16, not during the nation turns, and these armies are in addition to any armies these three nations receive during the Population increase Phases of their nation turns.
QUICK REFERENCE
the nation has a Raiding turn this round.
ThenationhasaMajorInvasionthisround.
the nation has Boat movement this round.
An election for Bretwalda will be held at the end of this round (4 victory points).
A Kingship is possible at the end of this round (8 victory points in Rounds 11-14, 10 victory points in Round 16).
the Hold symbol indicates that if the nation is the sole occupant of the listed areas at the end of the specified round(s), the nation will score the listed number of points.
the Occupy symbol indicates that if the nation is the sole occupant of the listed areas at any time during the specified round(s), it will score the listed number of points.
the Eliminate symbol indicates that if the nation eliminates the named units during the specified round(s), it will score the listed number of points.
Symbols on the Timeline
Symbols on the Nation CARDS