welcome to labeltac let’s start labeling
TRANSCRIPT

LabelTac® Pro X | REFERENCE GUIDE
WELCOME TO LABELTAC®- LET’S START LABELING
1 | UNBOX & CHECK CONTENTS
2 | CONNECT
3 | INSTALL SOFTWARE
USER MANUAL LabelTac® Pro X Thermal Transfer Printer
Included Accessories
Option 1: Install from CD
Option 2: Digital download
Insert the USB cable to the back of your printer and plug the other end into a USB port on your computer.
Put the included CD in your computer’s CD drive and follow the prompts on your screen to install the software.
Head to the LabelTac® support page, select your printer model, and download the driver for your printer.
labeltac.com/support
Connect the the two halves of the power cable and plug into the power jack socket. Plug the other end into an electrical outlet.
Power on your printer.
Note: It is important that your LabelTac® printer is powered on before installing software.
Cleaning Swabs (2)USB Cable Power CableSoftware CD
1 2 3
SUPPORTYour LabelTac® printer includes a free, full lifetime warranty on all parts and labor and unlimited support by phone, email or live chat.
Online Support labeltac.com/support
Support by phone 1-877-356-6584
Support by email [email protected]
Label Squeegee
LabelTac® Pro X | REFERENCE GUIDE
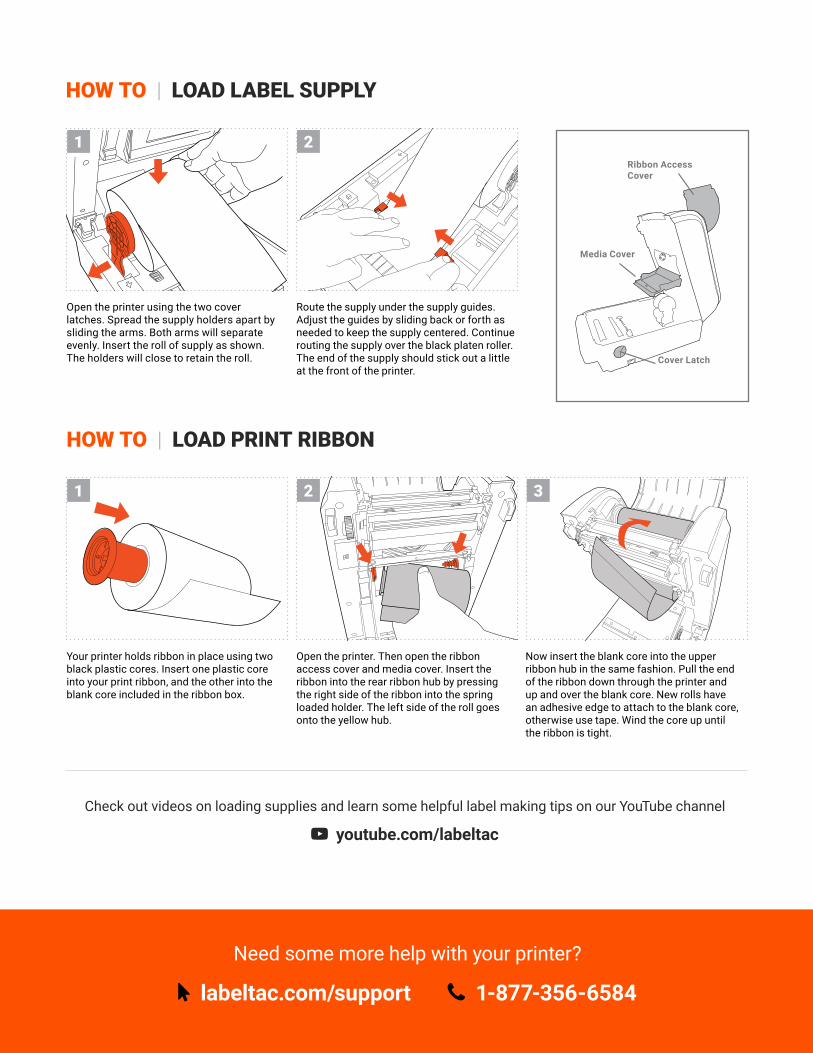
HOW TO | LOAD LABEL SUPPLY
HOW TO | LOAD PRINT RIBBON
Open the printer using the two cover latches. Spread the supply holders apart by sliding the arms. Both arms will separate evenly. Insert the roll of supply as shown. The holders will close to retain the roll.
Your printer holds ribbon in place using two black plastic cores. Insert one plastic core into your print ribbon, and the other into the blank core included in the ribbon box.
Route the supply under the supply guides. Adjust the guides by sliding back or forth as needed to keep the supply centered. Continue routing the supply over the black platen roller. The end of the supply should stick out a little at the front of the printer.
Open the printer. Then open the ribbon access cover and media cover. Insert the ribbon into the rear ribbon hub by pressing the right side of the ribbon into the spring loaded holder. The left side of the roll goes onto the yellow hub.
Now insert the blank core into the upper ribbon hub in the same fashion. Pull the end of the ribbon down through the printer and up and over the blank core. New rolls have an adhesive edge to attach to the blank core, otherwise use tape. Wind the core up until the ribbon is tight.
1
1
Check out videos on loading supplies and learn some helpful label making tips on our YouTube channel
youtube.com/labeltac
2
2 3
labeltac.com/support 1-877-356-6584
Need some more help with your printer?
Cover Latch
Ribbon Access Cover
Media Cover

LabelTac® Pro X | REFERENCE GUIDE
LCD Menu Function
Press the “Menu” button to enter the main menu. Use the “Cross” button to select the item on main menu. The selected item will turn red. Press the “Feed” button to enter the setting list.
LCD Menus

LabelTac® Pro X | REFERENCE GUIDE
Menu
TSPL ZPL2 Sensor Interface Diagnostics AdvancedFile Manager
Speed Darkness Auto Calibration
Serial Comm. Print Config. Display
BrightnessDEAM
Density Print Speed Manual Setup Ethernet Dump Mode
Service
Date & TimeFLASH
Direction Tear Off Threshold Detect
Bluetooth (option) Print head
Initialization
LanguageCARD
Print Mode Print Mode Maximum Length
Wi-Fi (option) Display
Printer Information
Sensor
Contact us
Offset Print Width Advanced
Shift X List Fonts
Shift Y List Images
Reference X List Formats
Reference Y List Setup
Code Page Control Prefix
Country Format Prefix
Delimiter Char
Media Power Up
Media Power Up
Label Top
Left Position
Reprint Mode
Format Convert
Main Menu Overview
There are 8 categories for the main menu. You can easy to set the settings of printer without connecting the computer. Please refer to following sections for more details.

LabelTac® Pro X | REFERENCE GUIDE
Menu TSPL
Speed
None
Offset
Cutter Batch
Reference Y
Direction
Peeler Mode
Shift Y
Country
Density
Batch Mode
Shift X
Code Page
Print Mode
Cutter Mode
Reference X
TSPL2
This “TSPL2” category can set up the printer settings for TSPL2.
LabelTac® Pro X | REFERENCE GUIDE
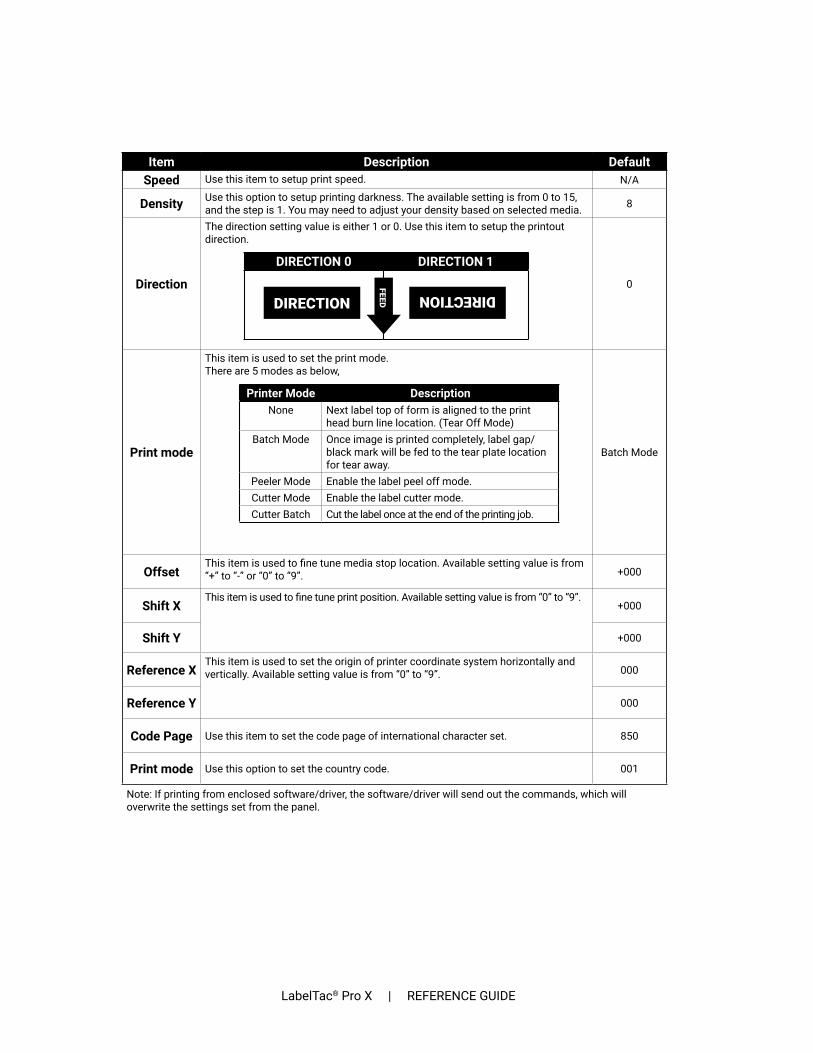
Item Description DefaultSpeed Use this item to setup print speed. N/A
Density Use this option to setup printing darkness. The available setting is from 0 to 15, and the step is 1. You may need to adjust your density based on selected media. 8
Direction
The direction setting value is either 1 or 0. Use this item to setup the printout direction.
0
Print mode
This item is used to set the print mode. There are 5 modes as below,
Batch Mode
OffsetThis item is used to fine tune media stop location. Available setting value is from “+” to “-” or “0” to “9”. +000
Shift XThis item is used to fine tune print position. Available setting value is from “0” to “9”.
+000
Shift Y +000
Reference XThis item is used to set the origin of printer coordinate system horizontally and vertically. Available setting value is from “0” to “9”. 000
Reference Y 000
Code Page Use this item to set the code page of international character set. 850
Print mode Use this option to set the country code. 001
Note: If printing from enclosed software/driver, the software/driver will send out the commands, which will overwrite the settings set from the panel.
DIRECTION 0 DIRECTION 1
DIRECTION
DIRECTIONFEED
Printer Mode DescriptionNone Next label top of form is aligned to the print
head burn line location. (Tear Off Mode)Batch Mode Once image is printed completely, label gap/
black mark will be fed to the tear plate location for tear away.
Peeler Mode Enable the label peel off mode.Cutter Mode Enable the label cutter mode.Cutter Batch Cut the label once at the end of the printing job.

LabelTac® Pro X | REFERENCE GUIDE
Menu ZPL2
Darkness
Tear Off
Head Close
150 ->300
No Motion
No Motion
Calibration
Calibration
Length
Length
Feed
Feed
Print Width
List Setup
Tear Off
Cutter
Left Position
200 -> 600
Disabled
Reprint Mode
300 -> 600
None
Format Convert
List Images
Format Prodix
Print Speed
Peeler Off
Label Top
150 -> 600
Enabled
List Fonts
Control Prefix
Print Mode
List Formats
Delimiter Char
Media Power Up
ZPL2
This “ZPL2” category can set up the printer settings for ZPL2.

LabelTac® Pro X | REFERENCE GUIDE
Item Description Default
DarknessUse this item to setup printing darkness. The available setting is from 0 to 30, and the step is 1. You may need to adjust your density based on selected media.
16
Print SpeedUse this item to setup print speed. The each increase or decrease is 1 ips. Available setting is from 2 to 6.
6 (203dpi) 4 (300dpi) 3 (600dpi)
Tear Off This item is used to fine tune media stop location. Available setting value is from “+” to “-” or “0” to “9”.
+000
Print mode
This item is used to set the print mode. There are 3 modes as below, Tear Off
Print Width This item is used to set print width. The available value is from “0” to “9”. N/A
List Fonts This feature is used to print current printer available fonts list to the label. The fonts stored in the printer’s DRAM, Flash or optional memory card.
N/A
List ImagesThis feature is used to print current printer available images list to the label. The images stored in the printer’s DRAM, Flash or optional memory card.
N/A
List FormatsThis feature is used to print current printer available formats list to the label. The formats stored in the printer’s DRAM, Flash or optional memory card.
N/A
List Setup This feature is used to print current printer configuration to the label. N/A
Control Prefix This feature is used to set control prefix character. N/A
Format Prefix This feature is used to set control prefix character. N/A
Delimiter Char This feature is used to set delimiter character. N/A
Media Power Up
This option is used to set the action of the media when you turn on the printer. No Motion
Head Close
This option is used to set the action of the media when you close the print head.
No Motion
Label Top This option is used to adjust print position vertically on the label. 0 The range is -120 to +120 dots.
0
Left Position This option is used to adjust print position horizontally on the label. The range is -9999 to +9999 dots.
+0000
Reprint Mode When reprint mode is enabled, you can reprint the last label printer by pressing “UP” button on printer’s control panel.
Disabled
Format Convert Selects the bitmap scaling factor. The first number is the original dots per inch (dpi) value; the second, the dpi to which you would like to scale.
None
Note: If printing from enclosed software/driver, the software/driver will send out the commands, which will overwrite the settings set from the panel.
Printer Mode Description
Tear Off Next label top of form is aligned to the print head burn line location.
Peeler Off Enable the label peel off mode.Cutter Enable the label cutter mode
Selections Description Feed Printer will advance one label
Calibration Printer will calibration the sensor levels, determine length and feed label
Length Printer determine length and feed labelNo Motion Printer will not move media
Selections DescriptionFeed Printer will advance one label
Calibration Printer will calibration the sensor levels, determine length and feed label
Length Printer determine length and feed labelNo Motion Printer will not move media
LabelTac® Pro X | REFERENCE GUIDE
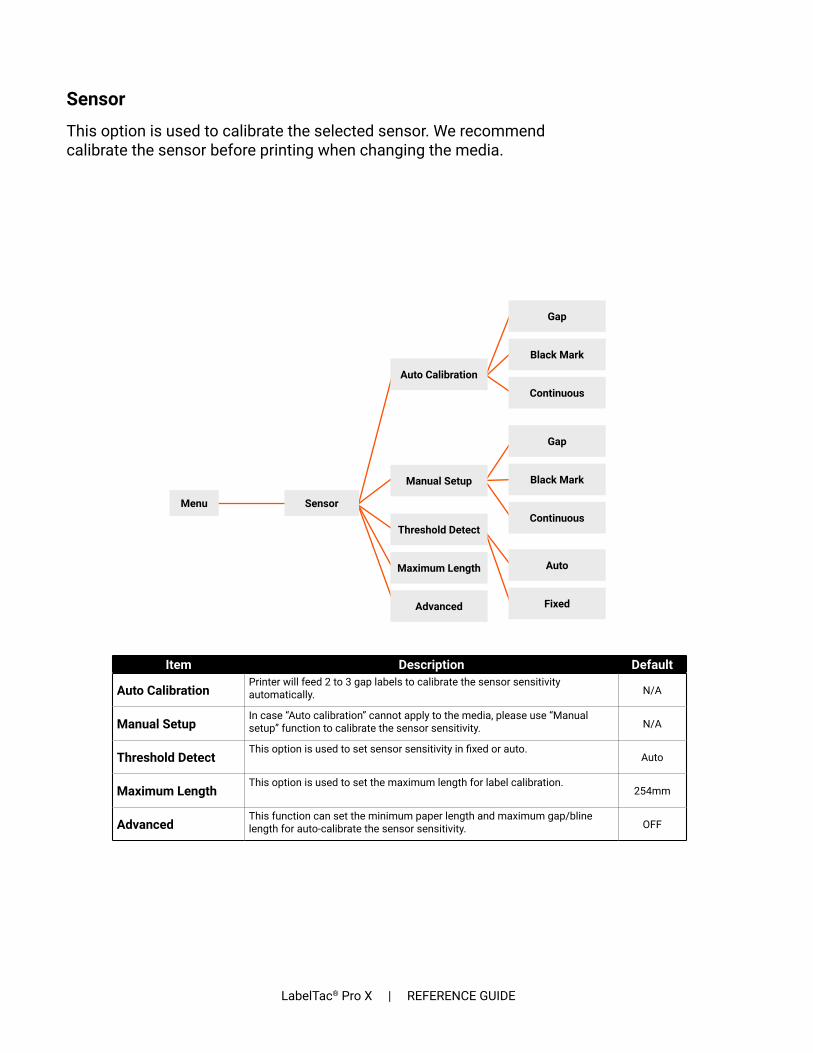
Menu Sensor
Auto Calibration
Manual Setup
Threshold Detect
Gap
Gap
Maximum Length
Black Mark
Black Mark
Auto
Advanced
Continuous
Continuous
Fixed
Sensor
This option is used to calibrate the selected sensor. We recommend calibrate the sensor before printing when changing the media.
Item Description Default
Auto CalibrationPrinter will feed 2 to 3 gap labels to calibrate the sensor sensitivity automatically. N/A
Manual SetupIn case “Auto calibration” cannot apply to the media, please use “Manual setup” function to calibrate the sensor sensitivity. N/A
Threshold DetectThis option is used to set sensor sensitivity in fixed or auto.
Auto
Maximum LengthThis option is used to set the maximum length for label calibration.
254mm
AdvancedThis function can set the minimum paper length and maximum gap/bline length for auto-calibrate the sensor sensitivity. OFF

LabelTac® Pro X | REFERENCE GUIDE
Menu Interface
Serial
Ethernet
Bluetooth
Wi-Fi
Interface
This option is used to set the printer interface settings.
Menu Interface Serial
Baud Rate
1200 bps
2400 bps
4800 bps
9600 bps
19200 bps
38400 bps
57600 bps
115200 bps
None
Odd
Even
7
8
1
2
Parity
Data Bits
Stop Bit(s)
Serial Comm.
This option is used to set the printer RS-232 settings.
Item Description Default
Baud RateThis item is used to set the RS-232 baud rate.
9600
ParityThis item is used to set the RS-232 parity.
None
Data BitsThis item is used to set the RS-232 Data Bits.
8
Stop Bit(s)This item is used to set the RS-232 Stop Bits.
1

LabelTac® Pro X | REFERENCE GUIDE
Menu Interface Ethernet DHCPStatus
Static IPConfigure
Ethernet
Use this menu to configure internal Ethernet configuration check the printer’s Ethernet module status, and reset the Ethernet module.
Item Description Default
StatusUse this menu to check the Ethernet IP address and MAC setting status.
N/A
DHCPThis item is used to ON or OFF the DHCP (Dynamic Host Configuration Protocol) network protocol. N/A
Static IPUse this menu to set the printer’s IP address, subnet mask and gateway.
ON
Menu Interface BluetoothBluetooth Name
Bluetooth PIN Code
Bluetooth
This option is used to set the printer blustooth settings.
Item Description Default
Bluetooth NameThis item is used to set the local name for Bluetooth.
BT-SPP
Bluetooth PIN CodeThis item is used to set the local PIN code for Bluetooth.
0000

LabelTac® Pro X | REFERENCE GUIDE
Menu Interface Scan AP
Operation Mode
Wi-Fi
DHCP
Wi-Fi
Item Description Default
Operating
This item is used to set the operating mode of wireless local area networks to connect devices to the networks.Note:Infrastructure mode requires the use of an access point for this communication to take place.Ad hoc mode involves connecting a computer directly to another computer.
Infrastructure
Scan APThis item is used to scan the access point devise
N/A
DHCPThis item is used to ON or OFF the DHCP (Dynamic Host Configuration Protocol) network protocol. ON
Menu FLASH
DRAM
File Manager
CARD
File Manager
This feature is used to check the printer available memory and file list.
Item Description
DRAMUse this menu to show, delete and run (.BAS) the files saved in the printer DRAM memory.
FLASHUse this menu to show, delete and run (.BAS) the files saved in the printer Flash memory.
CARDUse this menu to show, delete and run (.BAS) the files saved in the printer Card memory.

LabelTac® Pro X | REFERENCE GUIDE
Menu
Dump Mode
Display
Print Config.
Diagnostics Print Head
Sensor
Diagnostics
Menu Diagnostics Print Config.
Print Configuration
This feature is used to print current printer configuration to the la-bel. On the configuration printout, there is a print head test pattern, which is useful for checking if there is any dot damage on the print head heater element.
Self-test printout
Model nameF/W versionFirmware checksumPrinter S/NConfiguration fileSystem dateSystem timePrinted mileage (meter)Cutting counter
Print speed (inch/sec)Print darknessLabel size (inch)Gap diestance (inch)Gap/black mark sensor intentionCode pageCountry code

LabelTac® Pro X | REFERENCE GUIDE
ZPL Setting InformationPrint darknessPrint speed (inch/sec) Label sizeControl prefixFormat prefixDelimiter prefixPrinter power up motion Printer head close motionNote:ZPL is emulating for Zebra® language.
RS232 serial port configuration
Numbers of download files Total & available memory space
Print head check pattern
Note: Checking dot damage requires 4” wide paper width.

LabelTac® Pro X | REFERENCE GUIDE
Menu Diagnostics Dump Mode
Dump Mode
Captures the data from the communications port and prints out the data received by printer. In the dump mode, all characters will be printed in 2 columns. The left side characters are received from your system and right side data are the corresponding hexadecimal value of the characters. It allows users or engineers to verify and debug the program.
Note: Dump mode requires 4” wide paper width.