wetland bmp manual - home- rhode island …€¦ · rhode island department ... many project...
TRANSCRIPT

Wetland BMP Manual:Techniques for Avoidance and Minimization
Rhode Island Department of Environmental ManagementOffice of Water Resources
Freshwater Wetlands Program
April 2010
ii
Dedication
The Wetland BMP Manual:Techniques for Avoidance and Minimization
is dedicated to the memory of
Carl A. Ruggieri (1963 - 2006)
in honor of his fifteen years of dedicated service to the
Rhode Island Department of Environmental Management Freshwater Wetlands Program.

iii
Table of ContentsDedication ii
List of Examples iv
Introduction vi
1.The Importance of Protecting Wetlands 1-1
2. Single-Family Lots 2-1
3. Subdivisions 3-1
4. Commercial and Industrial Projects 4-1
5. Golf Courses 5-1
6. Bike Paths, Foot Paths,Trails and Boardwalks 6-1
7. Roads and Bridges 7-1
8. Utilities 8-1
9.Wetland Crossings 9-1
10. Plantings 10-1
11. Construction and Maintenance Tips 11-1
12. References & Resources 12-1
Acknowledgements

iv
List of ExamplesChapter Page
2. Single-Family Lots1a Original Plan for a Single-Family Home 2-21b Revised Plan for a Single-Family Home with Avoidance. and Minimization 2-32a House Placement Original Design 2-42b House Placement Revised Design 2-53a Lot Layout Original Design 2-63b Lot Layout Revised Design 2-74 Marking the Buffer Zone 2-8
3. Subdivisions5a Original Subdivision Plan 3-25b Revised Subdivision Plan with Avoidance and Minimization (Option 1) 3-35c Revised Subdivision Plan with Avoidance and Minimization (Option 2) 3-46a Subdivision Layout Original Design 3-56b Subdivision Layout Revised Design 3-6
4. Commercial and Industrial Projects 7a Storage Facility Original Design 4-37b Storage Facility Revised Design 4-48 Lighting 4-59 Retaining Wall 4-6
5. Golf Courses10 Avoiding a Large Wetland Complex 5-311a Original Design for Emergent Plant Community Crossing 5-411b Revised Design for Emergent Plant Community Crossing 5-512a Original Design with Multiple Wetlands 5-612b Revised Design with Multiple Wetlands 5-713 Crossings 5-814 Cart Paths 5-915 Preserved Areas 5-10
6. Bike Paths, Foot Paths,Trails and Boardwalks16 Path Layout and Design 6-417 Path Width and Buffers 6-518 Vegetative Clearing 6-519 Wetland Crossings 6-620a View Corridor and Access Areas 6-720b Revised Design A 6-720c Revised Design B 6-8
v
List of Examples, Continued
Chapter Page
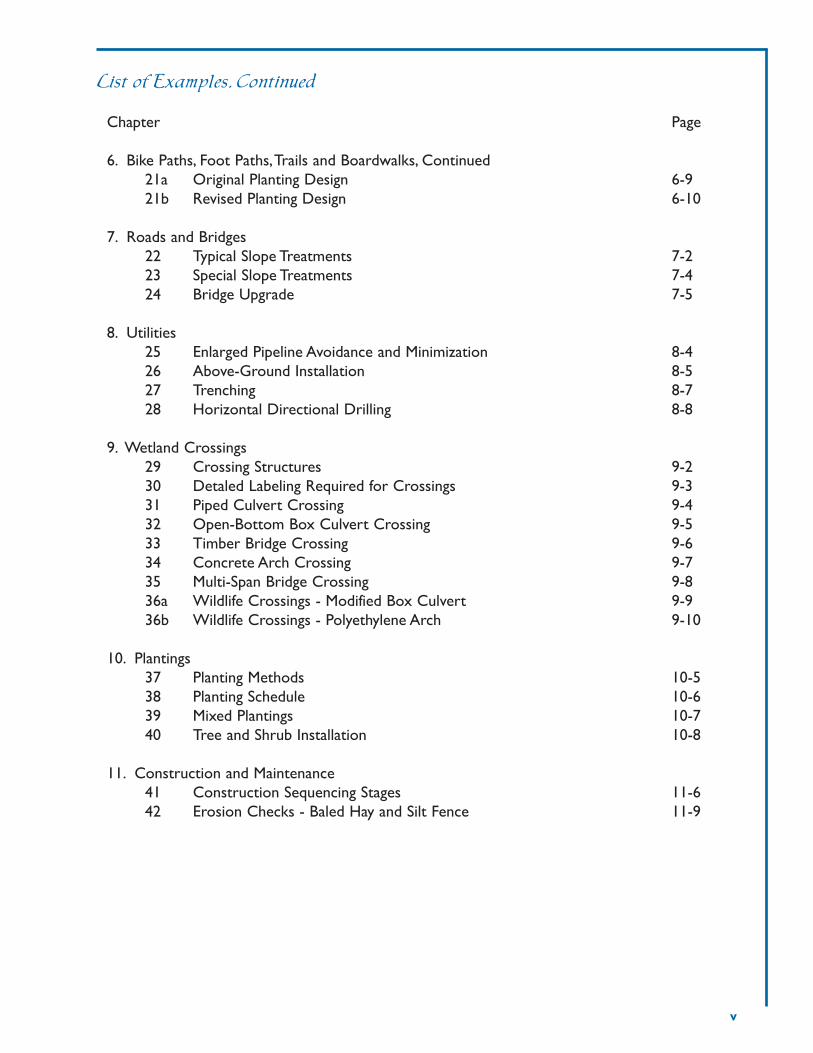
6. Bike Paths, Foot Paths,Trails and Boardwalks, Continued 21a Original Planting Design 6-921b Revised Planting Design 6-10
7. Roads and Bridges22 Typical Slope Treatments 7-223 Special Slope Treatments 7-424 Bridge Upgrade 7-5
8. Utilities25 Enlarged Pipeline Avoidance and Minimization 8-426 Above-Ground Installation 8-527 Trenching 8-728 Horizontal Directional Drilling 8-8
9. Wetland Crossings29 Crossing Structures 9-230 Detaled Labeling Required for Crossings 9-331 Piped Culvert Crossing 9-432 Open-Bottom Box Culvert Crossing 9-533 Timber Bridge Crossing 9-634 Concrete Arch Crossing 9-735 Multi-Span Bridge Crossing 9-836a Wildlife Crossings - Modified Box Culvert 9-936b Wildlife Crossings - Polyethylene Arch 9-10
10. Plantings37 Planting Methods 10-538 Planting Schedule 10-639 Mixed Plantings 10-740 Tree and Shrub Installation 10-8
11. Construction and Maintenance41 Construction Sequencing Stages 11-642 Erosion Checks - Baled Hay and Silt Fence 11-9

vi
IntroductionBackground and Purpose
The Wetland BMP Manual:Techniques for Avoidance and Minimization is a final product of a multi-year effort to improve the Department of Environmental Management's Groundwater andFreshwater Protection Program, prompted by recommendations of the Wetlands Task Force (2001)and by Program staff.The Program has completed many other projects based on thoserecommendations, including: restructuring the Rules and Regulations and the applicationinstructions, developing outreach materials, and providing numerous training workshops forconsultants and municipal officials.This Manual is intended to be used in conjunction with otheravailable materials.The target audience for this Manual is applicants and professional consultantswho prepare applications for submittal to the Rhode Island Wetlands Program, as well as buildersand contractors.
The Wetland BMP Manual is a compilation of Best Management Practices (BMPs), including text,tips, and examples that were researched and compiled from staff input and from the DEM wetlandfiles.The Manual is intended to help answer questions posed by Task Force members andapplicants, namely "How does an applicant know what DEM wants?" and "How does an applicantknow whether he or she is going to get a permit?" To help answer these questions and to helpapplicants "get it right the first time," this Manual provides examples of acceptable and permittedwetland-friendly designs and practices that could be used by applicants when designing projects.The Wetland BMP Manual is another tool to help applicants and consultants to prepare morecomplete applications, in order to adequately avoid and minimize impacts to wetlands and tofacilitate applicants receiving speedier decisions from the Department.The Manual includes project-specific examples and details that are applicable to many project types that have been successfullypermitted in Rhode Island or in nearby states.
Guide to Using the Wetland BMP Manual
The Wetland BMP Manual can be approached in various ways.The authors recommend that theintroductory pages and Chapter 1 be read first, before delving into the project-specific chapters.
A review of the Table of Contents reveals that, after the introductory pages, the Manual is largelyorganized around project types that are the subject of wetlands applications commonly submittedto the Wetlands Program. Each chapter begins with an introduction to the project type, followedby numerous bulleted tips on avoidance and minimization techniques and practices; and in manychapters the tips are followed by "before" and "after" example illustrations.The examples are notintended to be complete site plans, but rather they are simplified illustrations the readers will findhelpful.The "before" examples depict proposed projects without consideration of wetlandavoidance and minimization practices, and the "after" examples depict projects which weremodified to include the consideration of avoidance and minimization. Bulleted lists accompany the"after" illustrations and describe how the initial proposal was improved with respect to wetlandprotection.Throughout the Manual the reader will also find helpful details that would be applicableto various project types.

vii
Some of the "after" examples in Chapters 2 through 8 illustrate some remaining encroachmentinto regulated wetland areas, including Perimeter Wetland and Riverbank Wetland. Suchencroachments have been permitted by the Program in the past, but only after the applicants havedemonstrated to the Program that the alterations were truly unavoidable and that remainingimpacts were not detrimental.These examples are included because they are based on real-worldprojects; however, applicants should keep in mind that decisions to permit encroachments are verysite specific.
Chapter-by-Chapter Guide
Chapter 1 is a primer on the importance of protecting Rhode Island's wetlands, whose functionsand values the Department is charged with protecting according to Rhode Island General Law.Thischapter lists various activities or alterations that may be posed in or near wetlands and that mayadversely impact these functions and values both hydrologically and ecologically, especially overtime.This builds the case for the critical need for (1) the avoidance of wetlands altogether and (2)the minimization of truly unavoidable impacts.
Chapters 2 through 8 focus on specific project types, beginning with Single-Family Lots andprogressing to Utility Projects. Each chapter can stand alone, however, the reader will note somerepetition in the text and in the bullets from chapter to chapter, since some common techniquesand practices are pertinent to more than one project type.The reader may also find relevantexamples and tips within specific chapters that may also apply to another project type (ex. lighting).A review of the list of examples will help the reader identify which examples may be of use tothem and where to find them.
The authors recommend that all Manual users read the final three Chapters entirely, namelyChapter 9 - Wetland Crossings, Chapter 10 - Plantings, and Chapter 11 - Construction andMaintenance Tips, since these Chapters address activities that are common to many project types.
Chapter 9 describes wetland crossings.A crossing is rarely a stand-alone project type, but rather acommon component of other projects and one of the more frequent alteration types resulting indirect wetland alteration and loss.Applicants will propose crossing wetlands, including rivers andstreams, to gain access to upland portions of properties on which to build their projects. Chapter9, largely through illustrations of culverts and bridges, emphasizes the importance of maximizingspan width and maintaining the existing hydrology and substrates of the wetland proposed to becrossed. During the development of the Wetland “BMP” Manual, other New England states, underthe direction of the U.S.Army Corps of Engineers New England Division, have developed wetland-crossing standards, including requirements for span width, opening size, etc. However, the WetlandProgram prefers to maximize flexibility for applicants through case-by-case design and review.
Other DEM Resources
This Wetland BMP Manual should be used by applicants and consultants in conjunction with theRules and Regulations Governing the Administration and Enforcement of the Freshwater WetlandsAct and other guidance materials developed by the Program and the Department, including.
• What's the Scoop on Wetland's? Frequently Asked Questions about DEM's FreshwaterWetlands Program (revised 2008);
• The DEM Wetland Fact Sheet Series;

viii
• Guidance for Preparation of Subwatershed Maps (2007);• Hydrologic and Hydraulic Modeling Guidance (2007);• Guidance for the Preparation of Stormwater Best Management Practices (BMP's) (2007); and• Floodplain Impacts: Regulatory Provisions Pertaining to Floodplains and Floodways (2007).
Concurrent with the internal development of the Wetland BMP Manual, the DEM Office ofStrategic Planning and Policy has developed the following colorful and informative landdevelopment guidance manuals, which when implemented should also result in improved wetlandprotection:
• The Rhode Island Conservation Development Manual:A Ten-Step Process for Planning andDesign of Creative Development Projects (2003);
• Rhode Island Rural Design Manual (2000, rev. 2004); and• Urban Environmental Design Manual (2005).
Currently, the Department and the Coastal Resources Management Council are updating theRhode Island Stormwater Design and Installation Standards Manual, including Low ImpactDevelopment (LID) requirements.That Manual will become the over-arching development guide formany project types, and it is possible that some updates to this Wetland BMP Manual may becomenecessary once the Rhode Island Stormwater Manual is finalized.The Rhode Island Soil Erosion andSediment Control Handbook (1989) which, while dated, is also a very relevant source ofinformation for wetland applicants and consultants.
Finally, the Department would like to receive your feedback about the usefulness of this Manual.Do you find it helpful? What additional information would you like to see? Please send yourcomments to Wetland BMP Manual @ DEM Office of Water Resources, 235 Promenade Street,Providence, RI 02908 or via email to [email protected].

1-1
1. The Importance ofProtecting WetlandsAvoidance and minimization of impacts to wetlands should be an integral part of designing andbuilding any project that is located in or near a wetland. Before designing a permittable project, it isimportant for an applicant to understand the functions and values of wetlands that need to beprotected.These functions and values are described in the Rules.The list includes: protection fromflooding, groundwater protection, valuable wildlife habitat, recreation value, and water qualitymaintenance. Once an applicant understands how valuable and important wetlands are in thelandscape, it will be easier to understand why they must be protected.The following textelaborates on the five functions and values that are listed in the Rules.
1. Protection from Flooding
One of the most important functions of freshwater wetlands is their capacity to control flooding,thereby protecting people and property.Wetlands help control floodwaters by storing excesswater during heavy periods of rain and snowmelt. During storm events and spring thaws, vegetatedwetlands receive runoff from upland areas and water that overflows from rivers and streams, andlakes and ponds. Freshwater wetland trees, shrubs, roots, soil, and other vegetation temporarilyhold and store excess water, sometimes for long periods, until it can be slowly released intonearby rivers and streams.While this water is being stored in wetlands, it reduces the risk offlooding nearby houses, roads, parking lots, etc., and it also lessens the threat of downstreamflooding.
When heavy rain occurs in a watershed where vegetated wetlands have been altered or destroyed,the rainwater flows more quickly over the land and causes quick rises and falls in river and streamlevels, which in turn can cause flash flooding in the vicinity or downstream. In a watershed withhealthy, functioning wetlands, rainwater may be temporarily stored in wetlands, thus moderatingthe river and stream levels and both delaying and reducing the flood peak of the storm.
Without question, it is easier and less expensive to protect existing wetlands and their naturalflood control function, than to pay for flood damages or to build storm water and flood controlstructures to manage the water. If wetlands are filled, their ability to store floodwater isdiminished, thus putting lives and properties at risk.
2. Groundwater Protection
The connection between wetlands and the groundwater system is especially important in RhodeIsland where many people rely on groundwater for their source of drinking water, for agriculture,and for other uses. Depending upon their position in the watershed and the underlying geology,some wetlands may feed or recharge the groundwater system, while other wetlands may be areaswhere groundwater discharges to the surface. Both wetland-groundwater relationships areimportant.
In the first situation, wetlands convey some of the runoff and floodwaters that they havetemporarily stored into the ground, thereby contributing water to the aquifer system below.
1-2
The aquifer may be a public or private water supply source.The second more common situation iswhere groundwater discharges to the surface of wetlands, which may help to cool surface waters,maintain habitat, and maintain river and stream levels.
As groundwater aquifers are developed for water supplies, their impacts to wetlands must becarefully considered. If an aquifer is located beneath a wetland, then pumping it may result ininduced groundwater recharge from the wetland, thus resulting in potential long-term changes tothe wetland’s natural hydrology. If the wetland becomes polluted, then the groundwater that ispumped from the aquifer for drinking water may also become polluted.Therefore, protectingwetlands will in turn help protect our groundwater and our drinking water.
3.Valuable Wildlife Habitat
One of the best-known functions of wetlands is the habitat they provide for a wide variety ofwildlife. Many mammals, birds, reptiles, and amphibians depend on wetlands for feeding, nesting,escape cover, migration stopovers, and wintering habitat; while other wildlife do not requirewetlands to meet their life needs, they do utilize them. Certain specially adapted plants also growand flourish in wetlands. Even small wetlands that appear dry much of the year are crucial to thesurvival of certain species, and in urban areas they may be the only remaining habitat for wildlife.
More than one-third of all threatened and endangered wildlife species in the United States live onlyin wetlands, and nearly 50% of all threatened or endangered species use wetlands at some point intheir lives. Many rare plants and animals of Rhode Island also depend on wetlands for survival.
4. Recreational Value
Wetlands support a wide range of active and passive recreational activities, including hunting,hiking, photography, bird watching, research, and nature study. Other open water activities includeswimming, fishing, and boating. Some of these activities may not be entirely dependent on thepresence of water, but they are often enhanced by and focused around wetlands.
The quality of a recreational activity depends, to a great extent, on the health of the wetlandsystem. For example, the fish in a pond will only be healthy if the streams and groundwater thatfeed the pond are healthy. Fish from ponds and streams that are contaminated with urban orindustrial runoff may no longer be safe to eat.Therefore, protecting wetlands helps to provide theconsumer with safe and healthy fish.
Wetlands are also important because they provide attractive open space in increasingly urbanizedareas. In addition, many wetlands contain unusual physical features or have a particular historicalsignificance.
5.Water Quality Maintenance
Wetland soils and plants have the capacity to naturally treat surface water and groundwater byfiltering nutrients, absorbing pollutants, removing sediment, up taking pollutants and by othernatural chemical and physical processes.This natural treatment capacity is limited, but it does helpto protect and improve groundwater quality and the water quality in our rivers and streams. It islimited because if wetlands are used solely for this treatment purpose (and therefore becomeoverburdened), they can become degraded themselves, thus eliminating or impacting their otherbenefits to people and to wildlife.
In addition to the functions and values described above, wetlands provide other importantcontributions, such as the production of commercially viable products.They also serve as sites for
1-3
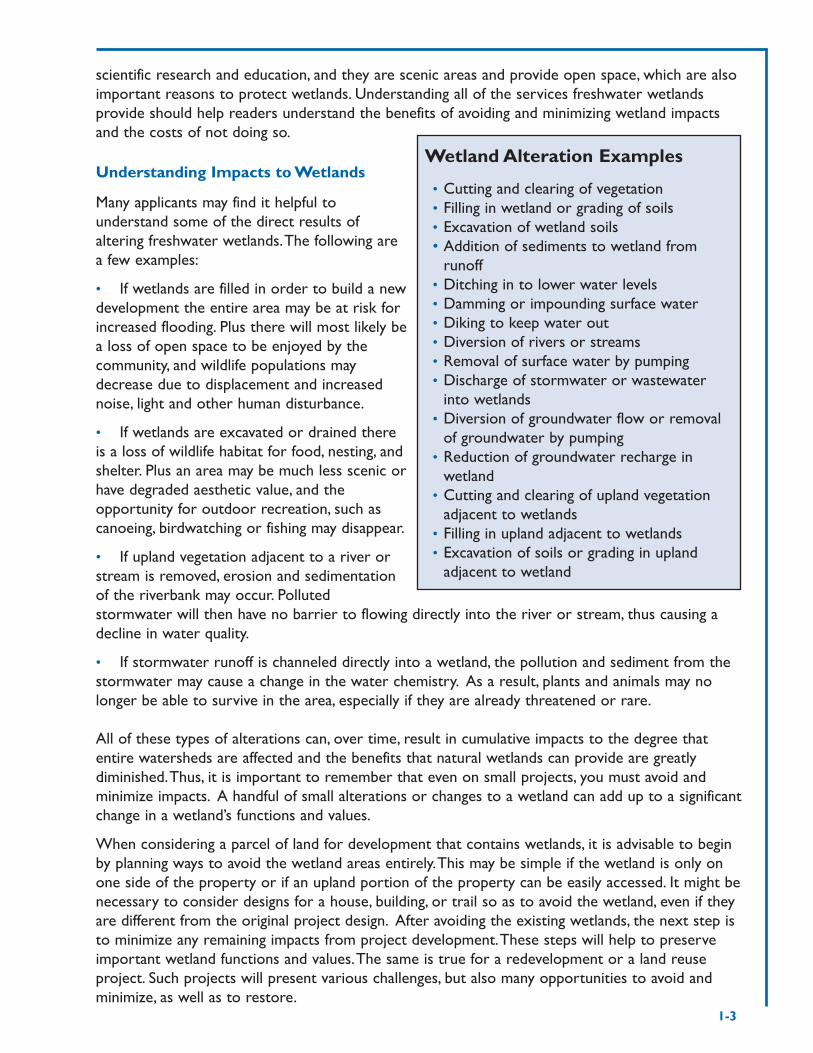
scientific research and education, and they are scenic areas and provide open space, which are alsoimportant reasons to protect wetlands. Understanding all of the services freshwater wetlandsprovide should help readers understand the benefits of avoiding and minimizing wetland impactsand the costs of not doing so.
Understanding Impacts to Wetlands
Many applicants may find it helpful tounderstand some of the direct results ofaltering freshwater wetlands.The following area few examples:
• If wetlands are filled in order to build a newdevelopment the entire area may be at risk forincreased flooding. Plus there will most likely bea loss of open space to be enjoyed by thecommunity, and wildlife populations maydecrease due to displacement and increasednoise, light and other human disturbance.
• If wetlands are excavated or drained thereis a loss of wildlife habitat for food, nesting, andshelter. Plus an area may be much less scenic orhave degraded aesthetic value, and theopportunity for outdoor recreation, such ascanoeing, birdwatching or fishing may disappear.
• If upland vegetation adjacent to a river orstream is removed, erosion and sedimentationof the riverbank may occur. Pollutedstormwater will then have no barrier to flowing directly into the river or stream, thus causing adecline in water quality.
• If stormwater runoff is channeled directly into a wetland, the pollution and sediment from thestormwater may cause a change in the water chemistry. As a result, plants and animals may nolonger be able to survive in the area, especially if they are already threatened or rare.
All of these types of alterations can, over time, result in cumulative impacts to the degree thatentire watersheds are affected and the benefits that natural wetlands can provide are greatlydiminished.Thus, it is important to remember that even on small projects, you must avoid andminimize impacts. A handful of small alterations or changes to a wetland can add up to a significantchange in a wetland’s functions and values.
When considering a parcel of land for development that contains wetlands, it is advisable to beginby planning ways to avoid the wetland areas entirely.This may be simple if the wetland is only onone side of the property or if an upland portion of the property can be easily accessed. It might benecessary to consider designs for a house, building, or trail so as to avoid the wetland, even if theyare different from the original project design. After avoiding the existing wetlands, the next step isto minimize any remaining impacts from project development.These steps will help to preserveimportant wetland functions and values.The same is true for a redevelopment or a land reuseproject. Such projects will present various challenges, but also many opportunities to avoid andminimize, as well as to restore.
Wetland Alteration Examples
• Cutting and clearing of vegetation• Filling in wetland or grading of soils• Excavation of wetland soils• Addition of sediments to wetland from
runoff• Ditching in to lower water levels• Damming or impounding surface water• Diking to keep water out• Diversion of rivers or streams • Removal of surface water by pumping• Discharge of stormwater or wastewater
into wetlands• Diversion of groundwater flow or removal
of groundwater by pumping • Reduction of groundwater recharge in
wetland• Cutting and clearing of upland vegetation
adjacent to wetlands • Filling in upland adjacent to wetlands• Excavation of soils or grading in upland
adjacent to wetland

1-4
Project Development:Avoidance and Minimization
Every project submitted by a property owner is evaluated by DEM to see whether all steps havebeen taken to avoid alterations in or near wetlands.The following questions may help determinewhether or not wetland impacts have been sufficiently avoided and minimized:
? Are there other properties available on which to build that do not contain wetlands? (This isa good first question to ask before buying property with wetlands)
? Does the project have to be located where it is, or could it be located elsewhere on theproperty farther away from the wetlands?
? Are there alternative layouts, designs or technologies that would avoid detrimental wetlandimpacts and still meet the project purpose by building up instead of out?
? Are there any other project alternatives that would not adversely impact health, safety orthe environment?
? Could an easement be obtained from a neighbor for a driveway or to access upland thatwould allow the project to be built further away from the wetlands?
? Could one obtain a zoning variance?
The following are key avoidance and minimization techniques common to manyproject types. These techniques are elaborated on and expanded in each of thesubsequent sections:
• Avoid filling wetlands or removing trees or other vegetation from within wetlands.
• Keep disturbed areas to a minimum, and preserve natural areas around wetlands as much aspossible.
• Design with the grade of the land to avoid earthwork as much as possible and to maintainexisting drainage characteristics.
• For large projects consider a design that limits road and utility crossings.
• Locate unavoidable crossings at the narrowest section of the wetland, or utilize existingcrossings, such as from a farm road or cart path, for access to upland.
• Consider designing a shared driveway to limit the number of wetland crossings in asubdivision or neighborhood.
• Minimize surface area of roads, parking, paving or other artificial surfaces.
• Utilize boulders, gabions, or retaining walls where appropriate to reduce the amount of fillingneeded for slopes.
• Use pervious materials, such as crushed stone or gravel, for driveways and roadways.
• Use light shields to direct artificial lighting away from wetlands.
• Avoid water withdrawal from wetlands.
• Install dense plantings of trees and shrubs within the limits of work to help buffer thewetland from noise, lighting and other disturbances post construction.

2-1
2. Single-Family LotsSingle-Family House lots are by far the most common project type that DEMreviews. One of the first things for an applicant to consider is whether or not the size of homeyou desire will fit on the lot you have chosen, particularly if there are wetlands you need to avoid.Prior to purchasing the property it is advisable to have the current owner complete aDetermination or Verification Application with the DEM. In response, DEM willl determine thepresence of wetlands on a property or verify thedelineated edge of a wetland when one is alreadyknown to exist.The following recommendations areprovided for the applicant:
Site Design
• Avoid building in or near wetlands if at allpossible.
• Locate the house or building closer to theroad.To avoid a wetland it may be necessary toapply for a variance from the town on therequired setback from the road.
• If you cannot avoid a wetland, consider obtaining an easement from a neighbor to share adriveway and reduce wetland encroachment.
• Remember to provide realistic Limits of Clearing and Disturbance that will encompass allproposed work and land uses on the site. Consider room for construction vehicles andspace for future maintenance (e.g. a backhoe for grading around the house) and use.
• Consider installing a retaining wall, gabions or terracing at the Limits of Clearing andDisturbance to reduce filling.
• The site design should allow for adequate yard space for future uses, such as decks, sheds,gardens, or swing sets outside wetland areas.
• To avoid flooding, determine the boundaries of the 100 Year Flood Plain as well as lesserintensity flood event levels and place the house, driveway, and parking areas outside the floodzone.
House Design
• Reduce the size of the house to be built, or consider building “up” instead of “out.”
• Design the garage to be incorporated as part of the first story of the house instead of as aseparate structure.
• Decks and other property accessories may need to be reduced in in size or eliminated toinimize wetland impacts.
Driveways
• Use retaining walls, terracing, or gabions to reduce the area of fill needed.
Limits of Clearing andDisturbance (LOD)
Realistic Limits of Clearing andDisturbance will vary from project toproject. For some it may be 10-15 feetfrom a structure, for others it may be 20-25 feet. DEM encourages the applicant tothoroughly consider the location of theLOD before submitting the application toavoid future enforcement problems if theLOD is not adhered to.

2-2
Example 1a: Original Plan for a Single-Family Home
In this example, the proposed house and driveway encroach into the Perimeter and ForestedWetland.The project calls for clear-cutting of the wetland vegetation adjacent to the house anddriveway, as well as some filling along the Swamp edge for the garage construction.
• Maintain existing grading as much as possible.
• Preserve as many large trees and as much of the tree canopy as possible.
• Avoid crossings by locating the driveway outside of wetland areas.
• Minimize the driveway width as much as possible.
Screens and Plantings
• Create a thick buffer by increasing plantings at the Limits of Clearing and Disturbanceadjacent to wetlands to reduce noise and disturbance to wildlife. Use 2-3 rows of plantings,instead of just one. If additional rows involve an increase in clearing or soil disturbance inwetland areas, a single row is preferable.Typically, evergreens are preferred because theyretain their leaves or needles all year.
• Avoid the use of fertilizers, pesticides, herbicides, or pollutants - chemical or organic - withinwetlands.
Example 1a

2-3
Example 1b: Revised Plan for a Single-Family Home with Avoidance andMinimization
Example 1b
How wetland impacts were minimized:
The driveway was moved between the two wetland areas to reduce wetland impacts.
The house and driveway were moved out of the Swamp and Perimeter Wetlands, therebymaintaining the original tree canopy in those areas.
The garage was incorporated as part of the first story of the house, instead of as a separatestructure.
Additional plantings were voluntarily proposed adjacent to the driveway to filter noise andlight from the wetlands.

2-4
Example 2a: House Placement Original Design
In this example, the house is located more than 160 feet back from the road and only 10 feet fromthe edge of the Perimeter Wetland.
Example 2a

2-5
Example 2b: House Placement Revised Design
Example 2b
How wetland impacts were minimized:
By moving the house closer to the road (still well within the town setback requirements),the dwelling remained the same size and a deck was added, given the extra space.
Adequate backyard space does not encroach into the Perimeter Wetland.
In this case, the dwelling and limits of disturbance were far enough away from the wetlandthat the owner did not even need to apply to DEM for a wetland determination or permit.
On a large lot with plenty of room to build, it is possible to avoid wetlands altogether. Projectplans that demonstrate provisions to avoid & minimize impacts to wetlands may eliminate the needfor a permit.

2-6
Example 3a: Lot Layout Original Design
This lot is primarily wetland, making it difficult to locate a house and septic system. In the originaldesign, the proposed dwelling, driveway and deck are within the Swamp and Perimeter Wetlandareas.The proposed Individual Sewage Disposal System (ISDS) is located far away from the housethus causing a larger area to be disturbed.
Example 3a

2-7
Example 3b: Lot Layout Revised Design
The revised design, while not ideal, proposes significantly less encroachment into wetland areas byrelocating the house.
Example 3b
How wetland impacts were minimized:
The house and driveway were relocated to the front of the lot resulting in far less wetlandencroachment, while still adhering to town setback requirements.
The deck was omitted to allow for a larger backyard.
The driveway retaining wall reduced the need for grading in the perimeter wetland.
Proposed plantings shield the wetland from noise and light disturbance.
A grading easement was obtained from the owners of the neighboring lot to allow for morepractical Limits of Clearing and Disturbance (LOD).

2-8
Example 4: Marking the Buffer Zone
This example illustrates Buffer Zone Markers. Often on lots that contain a large amount ofwetland, and where proposals have narrow backyards and limited building space, DEM requires as apermit condition that permanent buffer zone markers be installed along the Limits of Clearing andDisturbance.The markers serve as a reminder to homeowners that no disturbance can occur pastthe line without a permit or specific exemption.Also, if the property is sold, the markers serve aspermanent visual reminders that a wetland permit exists for the property.
Acceptable permanent type markers include 4" x 4" pressure treated timber posts, galvanizedfence posts with cap, or granite or concrete bounds. Markers should extend a minimum 24" abovegrade.A permanent-type tag or sign labeled "RIDEM Buffer Zone" must be placed on each marker.A permanent-type fence at least 24 " tall and similarly labeled may be used instead if preferred.
Example 4a
Example 4b

3-1
3. SubdivisionsWhole subdivisions cover large parcels of land that often contain wetlands.Theremay be a need to include a crossing or some other type of encroachment into these areas.Veryseldom is a subdivision planned, designed and constructed without in some way affecting nearbywetlands. Large projects may include a number of small encroachments, which may accumulate tocreate larger overall impacts to wetlands that could be avoided. Following are many ways to avoidand minimize impacts to wetlands through alternative designs by considering the following items:
Lot Design
• Configure the lots to completely avoid wetland encroachment.
• Reduce the number of lots to avoid wetland disturbance.
• Provide adequate yard space for future homeowners to add a deck, shed, or pool to theirproperty without impacts to adjacent wetlands.
• Avoid subdividing lots such that they create a self-imposed hardship.
Driveways and Roads
• Design roads and driveways to be as narrow as possible.
• Avoid or limit the number of wetland crossings. If a crossing is unavoidable, design it so thatthe narrowest section of wetland is traversed or so that it crosses in a previously destroyedor degraded area. (See Chapter 9 for Crossing BMPs).
• Consider shared driveways for entrance and exit to small subdivisions.
• Avoid illumination, or use lamps that deflect light away from the wetland.
Screens and Plantings
• Increase plantings along roadsides within the Limits of Clearing and Disturbance to reducenoise and disturbance, especially along wetland crossings, and to provide replacement habitatfor wildlife.
Engineering Considerations
• Work with the grade of the land to avoid or minimize earthwork and to maintain the naturaltopography and hydrology.
• Decrease impervious surfaces and maintain existing drainage patterns.
• Reduce stormwater runoff from impervious surfaces, and infiltrate to compensate for loss ofgroundwater recharge.
• Place detention basins and other stormwater controls completely outside of all regulatedwetland areas.
• Avoid filling in the 100-year floodplain of any nearby streams or rivers.

3-2
Example 5a: Original Subdivision Plan
This subdivision was purchased as one large lot and subdivided as illustrated.The original plan wasdesigned with four separate wetland and stream crossings. The proposed driveways in all four lotsdisturb the Stream, Swamp, Perimeter and Riverbank Wetlands.
Example 5a
• Avoid concentrating flow where possible.
• Consider the use of stone riprap channels to guide stormwater flow over steep or erosiveslopes.
• Mitigate peak runoff rates and volumes of stormwater that will reach wetlands.This will helpprevent erosion and negative water quality impacts to wetlands.
• Consider flood elevations from the100-year and lesser flood events when deciding on roadlocation and placement of other structures. (See the overtopping paragraph in Chapter 9).

3-3
Example 5b: Revised Subdivision Plan with Avoidance & Minimization(Option 1)
Example 5b
How wetland impacts were minimized:
The developer designed a shared easement, reducing the number of crossings from four toone.
The house on Lot 1 is no longer sandwiched between areas of wetland thus eliminating allencroachment into Swamp and Perimeter Wetlands and allowing for a more realistic anduseful yard.
The house on Lot 2 was moved back farther from the Swamp and Perimeter Wetlands.

3-4
Example 5c: Revised Subdivision Plan with Avoidance and Minimization(Option 2)
Example 5c
How wetland impacts were further minimized:
This is a better, and more realistic, example of impact avoidance and minimization because itincorporates techniques of cluster development and open space preservation, therebydisturbing less land.
The lots are now rearranged to limit encroachment into vegetated wetlands with onenarrow crossing instead of several crossings.
The amount of land disturbed was also partly reduced by using shorter driveways.

3-5
Example 6a: Subdivision Layout Original Design
A comparison of examples 6a and 6b illustrates simple ways to avoid and minimize direct impactsto wetlands. In the original example, the main road to the subdivision fragments a ForestedWetland. It is also designed for 11 separate dwellings, many of which have very limited yard space,especially the ones located near the Stream. In addition, one of the drainage easements is directlyadjacent to the Forested Wetland.
Example 6a

3-6
Example 6b: Subdivision Layout Revised Design
Example 6b

3-7
How wetland impacts were minimized:
The developer received a variance from the town to allow for only one entrance and exit tothe subdivision which initially avoided wetland impacts.
Fragmentation of the Forested Wetland was completely avoided by curving the mainentrance road.
The drainage easement closest to the Forested Wetland was eliminated by making the othertwo easements slightly larger.
The developer opted to reduce the Limits of Clearing and Disturbance on lots 3. 4. and 5 toleave a larger natural buffer between the backyard and the wetland.
The lot shapes were reconfigured to propose only 9 dwellings, thereby maintaining avegetated buffer to the left of the Stream and helping to protect wetland functions andvalues.
Open space was dedicated via a municipal land trust on both sides of the Stream, thushelping to protect valuable wetland functions and values.
Conservation Development
Wetland impacts may be further minimized by adhering to the ten-step ConservationDevelopment Process and associated techniques, as described in The Rhode Island ConservationDevelopment Manual (Flinker 2003). The Conservation Development process begins with siteanalysis and concludes with open space management.

4-1
4. Commercial andIndustrial Projects Applicants proposing commercial projects, like all others, must first address the avoidance andminimization requirements. Choosing a parcel that has plenty of upland surface area is important.If upland area is not readily available, developers should explore local zoning variances in order toavoid impacting freshwater wetlands.
By the nature of their use, commercial projects may require more mitigation for noise and lightthan other projects. Due to the amount of impervious surface that is often required, includingdriveways, large parking areas, and buildings, it is especially important to utilize effectivestormwater management practices.The following practices can help reduce the impacts that theseimpervious surfaces may have on nearby wetlands.
Site Layout and Design
• Minimize wetland encroachment as much as possible by reducing the size or scope of theproject.
• Avoid fragmenting wetland habitat and corridors.
• Locate projects in previously disturbed areas of upland.
• Be aware of how the project may affect ground or surface waters that drain to wetlands as aresult of impervious surfaces.
• Incorporate appropriate soil erosion and sediment controls into the design followingguidelines in the Rhode Island Soil Erosion and Sediment Control Handbook.
Paved Surfaces: Parking, Roads and Driveways
• Reduce the amount of impervious surface as much as possible.
• Design roads and entrances to be as narrow as possible through or adjacent to wetlands.
• Avoid or limit the number of wetland crossings. If a crossing is unavoidable, designing it sothat the narrowest section of wetland is traversed usually results in reduced impacts. (SeeChapter 9 for Crossing BMPs and Chapter 7 for Road BMPs).
• Consider a multi-level parking garage to minimize impervious surfaces (and runoff) andprotect naturally vegetated zones.
• When designing a commercial or industrial subdivision, include details on the amount ofimpervious surface on each lot.
• Provide sufficient stormwater controls and treatments. Utilize Stormwater best managementpractices specified in the Rhode Island Stormwater Manual (pending revision 2010).

4-2
Lighting
• Avoid outdoor illumination, or use lamps or shields that deflect light away from the wetland.
• Install lamps at a greater height with a narrowbeam to focus the lighting away from wetlands,or place the light next to the wetland and aim itin the opposite direction.
• Utilize motion-sensor lighting to limit theamount of time the area is illuminated.
Screens and Plantings
• Increase plantings along road sides within theLimits of Clearing and Disturbance, especiallyalong wetland crossings, to reduce noise anddisturbance and to provide replacement habitatfor wildlife.
• Utilize retaining walls, berms or barriers to avoid filling into wetlands. Be sure to incorporateplantings into the design.
• Consider adding a roof garden, especially in redeveloped or urbanized areas, to help managestormwater.
Construction and Maintenance
Development of commercial projects often involves the disturbance (clearing, grading, filling) oflarge tracts of land.As a result, it is vital that sediment and erosion controls are properly installedand maintained throughout the life of the project to prevent construction-related wetland impacts.
• To properly install controls on site, make sure silt fences are toed into the soil and bales ofhay are securely staked into the ground and trenched into the soil.
• Install sediment and erosion controls as illustrated on design plans. Supplement thesecontrols, within the approved Limits of Clearing and Disturbance, as the need arises (e.g.,around soil, stockpile areas, matting/jute mesh on steep slopes, etc.).
• Schedule regular inspection of sediment and erosion controls (daily to weekly after stormevents), and replace or repair them as conditions dictate.
• Specify inspection and maintenance requirements on all stormwater control elements, bothduring and post construction.
• Catch basin cleanup, regular parking lot sweeping, and litter cleanup should be specifiedwhere needed.
• Consider snow removal procedures, and designate a location for snow to ensure properprotection of wetlands.
• Place construction access roads and locate soil stockpiles as far away from wetlands aspossible.
• Perform work near wetlands outside the breeding and migratory season of sensitive wetlandspecies as much as possible.
Pervious Surfaces
Use of pervious surfaces are a goodway to reduce impacts fromdevelopment by reducing the amountof runoff.This alternative enablesgroundwater recharge and facilitatestreatment of pollutants via theunderlying soil. Common pervioussurfaces include porous pavement,gravel, and geotextile grids.
4-3
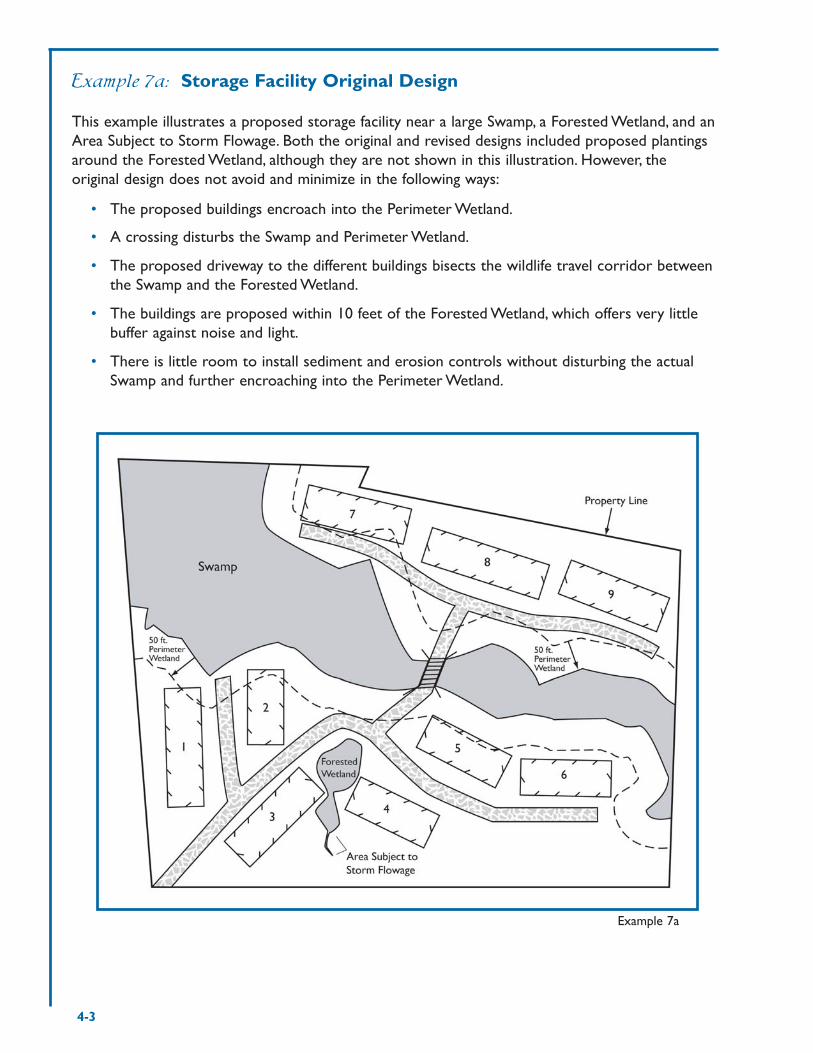
Example 7a: Storage Facility Original Design
This example illustrates a proposed storage facility near a large Swamp, a Forested Wetland, and anArea Subject to Storm Flowage. Both the original and revised designs included proposed plantingsaround the Forested Wetland, although they are not shown in this illustration. However, theoriginal design does not avoid and minimize in the following ways:
• The proposed buildings encroach into the Perimeter Wetland.
• A crossing disturbs the Swamp and Perimeter Wetland.
• The proposed driveway to the different buildings bisects the wildlife travel corridor betweenthe Swamp and the Forested Wetland.
• The buildings are proposed within 10 feet of the Forested Wetland, which offers very littlebuffer against noise and light.
• There is little room to install sediment and erosion controls without disturbing the actualSwamp and further encroaching into the Perimeter Wetland.
Example 7a

4-4
Example 7b: Storage Facility Revised Design
Sometimes it is necessary to scale back on a design in order to minimize impacts to wetlands andto have a permittable project.This design improved upon the original design and still met theproject purpose.
Example 7b
How wetland impacts were minimized:
The buildings were moved farther away from all the wetland areas.
The crossing and buildings above the Swamp (7, 8, & 9) were removed to minimize impactsand to avoid isolating the Forested Wetland from the Swamp.
The footprint of the storage building to the left of the Forested Wetland was reduced,thereby increasing its distance from the Forested Wetland.
The roadway was moved to avoid bisecting the travel corridor between the Swamp and theForested Wetland.

4-5
Example 8: Lighting
This example illustrates a problem that can occur when directing lighting on commercial projects.If the correct lighting techniques had been used in this example, light would not have spilled fromthe parking areas into the Wetland. It is important to keep the light focused away from wetlandareas so that wildlife is not adversely impacted by the project.The extent of the area to be lit is afunction of the location of the lamppost, the height of the lamp, and where the light is directed to.
How wetland impacts could be minimized:
The light could be mounted at a greater height and with a narrower beam to focus the lightaway from the wetlands, thus eliminating the spill and glare into the Wetland area.
The light could be placed next to the wetland and aimed in the opposite direction to directthe light away from the Wetland area completely.
If it is not possible to direct light away from the vegetated wetland areas, the use ofdeflectors to concentrate lighting away from vegetated wetlands must be employed.
Example 8

4-6
Example 9: Retaining Wall
This drawing illustrates a commercial building project located very close to a Swamp and withinthe Perimeter Wetland. In this case, there were no alternatives available.
Example 9a
Example 9b
How wetland impacts were minimized:
The retaining wall reduced the amount of fill needed to construct the parking/driving areaaround the building, thereby reducing encroachment into the wetlands.
Plantings were installed on the upland side of the retaining wall to help provide additionalscreening against noise, light, and other disturbances.

THIS PAGE INTENTIONALLY LEFT BLANK

5-1
5. Golf CoursesIt is very difficult to plan, design and construct a golf course without affectingwetlands in some way. Courses encompass such large areas of land that they often includenumerous wetland crossings and encroachments. It is DEM’s responsibility to ensure that applicantsavoid wetland alterations and minimize impacts for every golf course design.
Site Selection and Planning
When choosing a site, it is important for the planner to consider whether there is sufficientbuildable area for a course, whether there is access to adequate amounts of water, and whetherthe topography is appropriate.A site that includes large areas of wetland may not be a good choiceif construction will result in many impacts to wetlands. Sometimes a beautiful site may not befeasible due to wetland constraints or the finances needed to develop the golf course in anenvironmentally sound way.The planner should therefore:
• Evaluate alternative sites before making a final selection.
• Attempt to locate the course on previously used or abandoned properties, such as landfills,sand and gravel operations, or farms.
• Evaluate if the proposed site will be able to supply the amount of water necessary for thecourse through the development of a water budget and a drought contingency plan thatestablishes alternate water sources.The water budget should not deplete nearby wetlandsor streams.
Course Design
Once a site is chosen, the course designer must give careful consideration to all wetland areas.Protecting these areas can and should be considered together with course playability andaesthetics.The designer should therefore:
• Design fairways, tees, greens, and golf cart paths to avoid wetlands and filling of floodplains.
• Complete a Floodplain Evaluation if filling a floodplain is unavoidable.
• Be sure to consider alternative sizes if upland space is limited. Consider a 9-hole courseinstead of an 18-hole course.
• Protect existing wetlands, and improve or restore previously degraded areas if possible.
• Create and maintain buffer zones around wetlands to protect their functions and values.
• Design a course that will naturally “hold” water, maintain wetland hydrology, and requireminimal topographic changes.
• Ensure that irrigation, drainage, and retention systems encourage efficient use of water andprotect wetland water quality.
• Maintain interconnected, naturally vegetated wildlife corridors and passages in the golf coursedesign.
5-2
• Include plantings that serve as noise and lighting shields for wetland wildlife.
• Avoid the use of lighting in or around wetlands, especially near bodies of water.
• Design signs and barriers to keep golfers out of sensitive areas. Designate sensitive wetlandareas as “no play” zones.
• For unavoidable wetland crossings, design bridges that can be installed as a complete unitfrom overhead or can be built one section at a time to limit work in wetlands.
• Incorporate low-impact pervious surfaces for roads and paths which help infiltrate surfacewater.
• Utilize geographically native and drought-resistant grasses for the turf.These types of grassesbenefit wetland wildlife habitat by requiring less water and less pesticide and fertilizerapplication, which maintain good wetland water quality. (URI’s Department of Plant Sciencesand Entomology) is a good resource for turfgrass management information:http://www.uri.edu/cels/pls)
• Develop a stormwater management and pollution prevention plan that takes intoconsideration runoff, infiltration rates, topography, and pollutants. See the Rhode IslandStormwater Manual (pending revision 2010).
• Develop a practical and long-term maintenance plan for stormwater controls that can befollowed effectively.
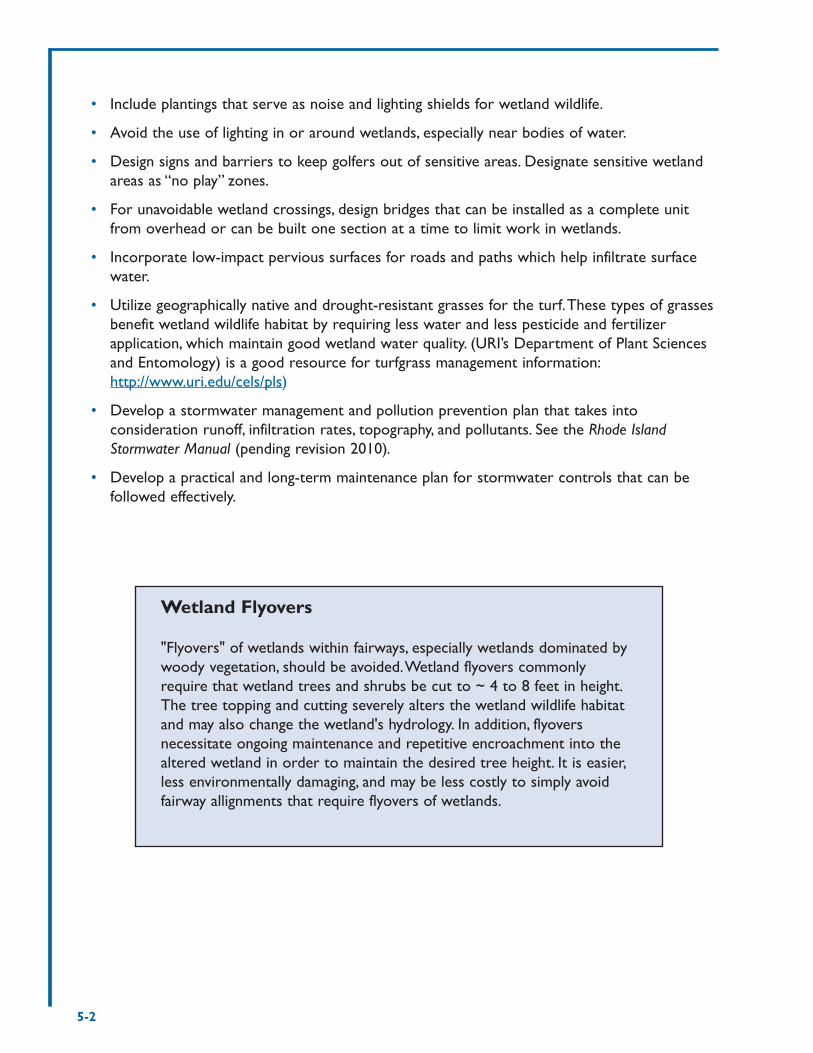
Wetland Flyovers
"Flyovers" of wetlands within fairways, especially wetlands dominated bywoody vegetation, should be avoided.Wetland flyovers commonlyrequire that wetland trees and shrubs be cut to ~ 4 to 8 feet in height.The tree topping and cutting severely alters the wetland wildlife habitatand may also change the wetland's hydrology. In addition, flyoversnecessitate ongoing maintenance and repetitive encroachment into thealtered wetland in order to maintain the desired tree height. It is easier,less environmentally damaging, and may be less costly to simply avoidfairway allignments that require flyovers of wetlands.

5-3
Example 10: Avoiding a Large Wetland Complex
This example is an aerial view of one-half of an existing golf course. The challenge with upgradingthis site was to avoid the large Swamp.
Example 10
How wetland impacts were minimized:
The fairways were located outside the wetlands near the edges of the property.
A wetland corridor was maintained within the interior of the property, thus preservingwildlife habitat.
A crossing was located at a narrow spot while spanning the entire Stream and Swamp tominimize disturbance of another wetland corridor
Whenever possible, additional vegetated corridors beyond the Perimeter or RiverbankWetlands were maintained around the wetland areas.

5-4
Example 11a
Example 11a: Original Design for Emergent Plant Community Crossing
This example illustrates a golf course section that encroaches on an Emergent Plant Community.This particular course is proposed to be built on old farmland.The plant community illustratedonly has low ground vegetation, without any large trees that would need to be trimmed forflyovers.This original design bisects the Emergent Plant Community wetland with a crossing for acart path from Fairway A to Fairway B.

5-5
Example 11b: Revised Design at Emergent Plant Community
Example 11b
How wetland impacts were minimized :
The cart path was moved around the wetland thus avoiding the Emergent Plant Communityand eliminating the crossing.
Narrow but reasonable Limits of Clearing and Disturbance were maintained.
The existing tree line was maintained where possible.
Existing vegetation surrounding the Emergent Plant Community was maintained to buffer thewetland from noise and light.

5-6
Example 12a: Original Design with Multiple Wetlands
In this second example, it was much more difficult to design a course that avoided impactingwetlands. In the middle of this property lies a series of wetlands – a Pond, a Perimeter Wetland andan Emergent Plant Community.This original design for Fairways A and B greatly impacts thesewetland areas.
Example 12a

5-7
Example 12b: Revised Design with Multiple Wetlands
Example 12b
How wetland impacts were minimized:
Fairway B and its tee boxes were moved to avoid the Emergent Plant Community.
Fairway A and its tee boxes were adjusted to avoid bisecting corners of the Pond and topreserve the Perimeter wetland.
Narrow but reasonable Limits of Clearing and Disturbance were maintained.
Open space for wildlife habitat corridors was maintained adjacent to the Pond.
The existing vegetation was maintained, and plantings were installed, as appropriate, along theLimits of Clearing and Disturbance line within and adjacent to wetland areas to bufferimpacts from loss of wildlife habitat and to reduce the effects of disturbance to wildlife.

5-8
Example 13: Crossings
Roads and cart path crossings are other common elements proposed in golf course applications.The designer should first try to avoid any crossings. If crossings are unavoidable, their impactsshould be minimized. In this particular golf course, a cart path crossing was proposed to accessupland for another part of the course.The path and crossing were laid out within an alreadycleared area, which minimized further wetland encroachment and preserved the wetland corridor.
Example 13
How wetland impacts were minimized:
The cart path and Limits of Clearing and Disturbance are narrow and utilize an alreadydisturbed area to maintain habitat.
The bridge crosses the Swamp at its narrowest point and spans a small portion of PerimeterWetland on either side to allow a clear passage for water and wildlife.
The timber bridge structure was installed in sections which limited impacts to the Swampand Perimeter Wetland.
Proposed plantings were installed along the Limits of Clearing and Disturbance line withinand adjacent to wetland areas to buffer impacts from loss of wildlife habitat and reduce theeffects of disturbance to wildlife.

5-9
Example 14: Cart paths
Quite often cart paths are proposed in or near wetlands, including Forested, Perimeter andRiverbank Wetlands. It is always best to try to avoid these areas; however, if it is not possible, thenimpacts should be minimized.The following example illustrates a conscientious design.
How wetland impacts were minimized:
Only a minimum width of forest was disturbed, including a narrow path and area of influence.
The overhead tree canopy was preserved.
The surface of the proposed path was covered with crushed stone,shells, or other porousmaterial that helps recharge groundwater and prevent the incorporation of pollutants intosurface runoff.
Minimum grading was required.
Other porous materials include wood chips, and leaf litter. Cart paths should be installed as closeto existing grades as possible. This will prevent future erosion and sedimentation impacts tonearby wetlands.
Example 14

5-10
Example 15: Preserved Areas
Commonly, golf course designs include fairways and flyovers around sensitive wetland and wildlifeareas. Golf balls are often shot over and around these areas thus creating a need to keep peoplefrom trampling through preserved areas for lost golf balls.A rail fence, with native non-invasiverose plantings, is one way to keep people out of sensitive areas. In addition, signs are often postedthat read: Conservation Area: Do Not Enter.
Example 15a
How wetland impacts were minimized:
The fence is nearly four feet tall, thus making itvery difficult for anyone to climb over toretrieve a ball and thus preventing regular footor cart traffic through the wetland.
Native rose bushes or other thorny shrubs areplanted to further discourage entrance to theprotected areas.
Example 15b

5-11
Construction
DEM often finds that projects are not constructed as shown on the approved plans, nor are all thepermit conditions met. It is especially important on large projects, such as golf courses, for plansand conditions to be strictly followed. It is helpful to utilize design consultants who areexperienced with golf course construction, as well.
• Install proper soil erosion and sediment controls prior to the initial phase of construction(phased or overall project).
• At a pre-construction meeting with all contractors and subcontractors, take note of sensitivewetland/habitat areas that must be avoided per DEM approved permit plans and conditions.
• Establish and stabilize material storage and staging areas prior to construction. Install andmaintain proper soil erosion and sediment controls around such areas during the life of theproject. Stockpile erosion controls for ready replacement of those that deteriorate.
• Phase any clearing that is necessary, instead of cutting and clearing all vegetation at the sametime. This will help to control erosion and protect the wetland and wildlife.
• Keep heavy equipment use to a minimum, especially near wetlands or other sensitive areasto reduce soil compaction.
• Recycle any trees and stumps that are removed into mulch or woodchips to be used on site.Woodchips and mulch are not to be placed in a wetland.
Course Use and Maintenance
Water: A water budget and a drought and dry weather contingency plan that establishesalternate water sources and a method for scaling back irrigation should be developed. A completeapplication package should include information on irrigation rates or other ways the waterwithdrawal may affect wetlands.
Pesticides and Fertilizers: DEM is responsible for protecting wetland areas that could becomedegraded from runoff carrying pesticides or fertilizers.All pesticides used in Rhode Island must beregistered with the EPA and RIDEM/Division of Agriculture & Resource Marketing. Pesticides mustbe applied in accordance with label instructions and any state Pesticide Management Plan for thatpesticide. Pesticide Applicators must be licensed or certified by RIDEM/Division of Agriculture &Resource Marketing and file the appropriate Pesticide Use report with the Division annually.
References
This list provides additonal sources for information on golf courses. (Also see Chapter 12.)
• Environmental Guidelines for the Design and Maintenance of Golf Courses by R. O. Powell and J. B. Jollie (1990)
• Environmental Principles for Golf Courses in the U.S. by The Center for Resource Management(1996)
• Golf Courses and the Environment by the Massachusetts Audubon Society (1999)
• Manual of Environmental Best Management Practices for Construction and Maintenance of GolfCourses by Mason & Associates, Inc. (Unpublished, 2002)

6-1
66.. Bike Paths, Foot Paths,Trails and BoardwalksBike paths, foot paths, trails and boardwalks are excellent means of showcasing wetlands and thenatural environment, especially for people who may not otherwise enjoy natural areas. It is theDepartment’s responsibility to protect wetland areas from unnecessary and undesirable impactsand intrusions into wildlife habitat. Good project planning and design simultaneously protectwetlands and provide opportunities for recreational use of the environment.
Planning and Site Selection
Bike paths are unique in that they require long, undivided stretches of land.These are mostcommonly in the form of former railroad beds or utility easements. It is not a surprise that thesestretches of land may include many wetlands and may even follow a larger river or stream. Othersmaller trails and paths may specifically be proposed to enhance an area that is set aside forconservation or recreation, which is also likely to have wetland habitat. For all projects, in order toprotect wetlands and their functions and values, it’s important for the planner to do the following:
Research and evaluate the area to decide if the trail will be able to accommodate all projected users without degrading the natural resources. Not all wetland areas can supportall types of paths while maintaining wildlife values. If this can’t be accomplished, it may be necessary to downsize the project or look for an alternative route for the path or trail. Be sure to take safety standards into consideration when choosing a site.
Create a design that works with the natural environment. Look for existing disturbedcorridors and popular routes, and research the area to find out what types of wildlife are the most sensitive and will need the most protection.
Avoid areas with steep slopes and rough terrain, as they will be more expensive to convert to a suitable surface and to maintain. If these areas cannot be avoided, it may be necessary to limit the scope of the project or the possible uses of the path. Fewer grade changes willhelp limit wetland impacts.
Evaluate the site for engineering constraints such as poor drainage and the presence of floodplains. If floodplain wetlands cannot be avoided, strive to balance cuts and fills within the project limits.

6-2
Design
Good trail design is critical to help prevent unnecessary and detrimental impacts to wetlands,whether the trail is constructed on a previously disturbed railroad bed or on an undisturbednatural area.The following are general tips to protect wetlands and minimize impacts:
Grading
• Utilize natural land contours to avoid excessive fill.
• Design retaining walls in areas of steep or irregular topography to minimize amount of cut and fill needed alongside a path.
Maintain habitat values
• Preserve the natural character of the area, while making it available for recreational use.
• Skirt sensitive wetland areas, and provide for views from the periphery instead of bisecting wetlands.
• Preserve natural buffers within and around wetlands.
• Use lookouts and overlooks to enjoy wetlands instead of crossing sensitive areas.
• Be sensitive to the wildlife that use the area.
• Propose limited access to sensitive areas for bird-watching, nature study and non-motorized boating.
• Build outside of areas used by sensitive species and critical wetland areas, such as special aquatic sites.
• Avoid disturbing all rare plants and wildlife.
Wetland Crossings (see Chapter 9 for more details)
• Utilize existing structures and pathways, wherever possible.
• If crossing a sensitive habitat or creating a new trail, keep the crossing as narrow as possible.
• Timber bridges and elevated boardwalks are good options.
• Utilize wildlife passage structures.
• Elevate boardwalks, observation decks, and bridges to minimize disturbance to wetland vegetation, as well as to protect wetlands underneath.
• Allow spacing between slats in boardwalks to allow light penetration underneath.
View corridors and recreational access areas
• Utilize existing disturbed or thinned areas for rest areas, or for canoeing or fishing access.
• If necessary, thin trees and shrubs sparingly for a view of the wetland area.
• Keep recreational corridors narrow.
• Create a minimum number of well-chosen corridors.

6-3
Path dimensions
• Paved multi-use paths in the vicinity of wetlands should not be any wider than 10 feet with 2-4 feet of clearance on either side for a safety and work zone, unless specific circumstances dictate otherwise. In Rhode Island they have been permitted up to 14 feet to allow for emergency vehicle passage.
• Foot paths in the vicinity of wetlands should not be wider than 3-5 feet.
• Height clearance is recommended at 7 feet for pedestrians/bicycling and 10 feet for horseback riding.
• Selective thinning of trees and shrubs may be necessary adjacent to the primary path in order to provide the necessary height clearance for multiple path uses.
Signage - Place informational signs at the entrance to sensitive habitat areas.
Pervious surfaces
• Examples include: shells, stone dust, bark mulch, wood chips, leaf litter, or plastic grates filled with stone.
• These alternative surfaces are more natural and often encourage water infiltration.
• Many surfaces are safe and sturdy enough for bikes and wheelchairs.
• Alternative surfaces require smaller equipment to construct, thus allowing for a narrower area of disturbance.
Plantings and buffers
• Plantings should screen sensitive wetland areas from human disturbance: 1-3 rows of evergreen shrubs and/or trees (6 ft minimum height) work well. (Also see Chapter 10.)
• Consider using fences at the limits of work to visually screen human activity.
• Use vegetation, such as native non-invasive thorny plants or a dense evergreen screen,to discourage entry to sensitive areas.
• Propose vegetation on both sides of the path to provide a buffer between the wetland and developed areas.
• Propose planting schemes that are both aesthetic and attractive to wildlife, such as berry producing trees and shrubs.
• Preserve and enhance existing tree cover and shrubs.Where possible, consider weaving paths around existing trees to help maintain canopy cover and to preserve large diameter trees.
• Avoid using invasive species such as Honeysuckle, and try to control existing non-nativeand invasive species such as Bittersweet.

6-4
How wetland impacts were minimized:
The trails avoid almost all of the wetland areas and are narrow so that less vegetation wascut.
The primary trails were centered on old farm roads and previously disturbed areas.
The secondary trails were built by trimming woody vegetation, but no trees were removed.
Trails are composed of soil, leaf litter or wood chips, depending on the existing groundconditions. All materials are permeable and allow natural stormwater flow and absorption.
No grade changes were needed for path construction.
Trails are maintained by mowing or hand removal of larger vegetation.
The path crossed an Area Subject to Storm Flowage wetland but avoided a more sensitiveForested Wetland.
Instead of installing a simple culvert, the footbridge was built with timber decking, whichrequired less fill material and caused less disturbance during construction.
View corridors are not numerous and were kept narrow with proposed signage to explainthe sensitive habitat.
Example 16
Example 16: Path Layout and Design
The following example is a portion of a forested conservation area with a proposed trail system.The trails will be used for walking and nature study. The design incorporates many mitigationmeasures that are described below.
6-5
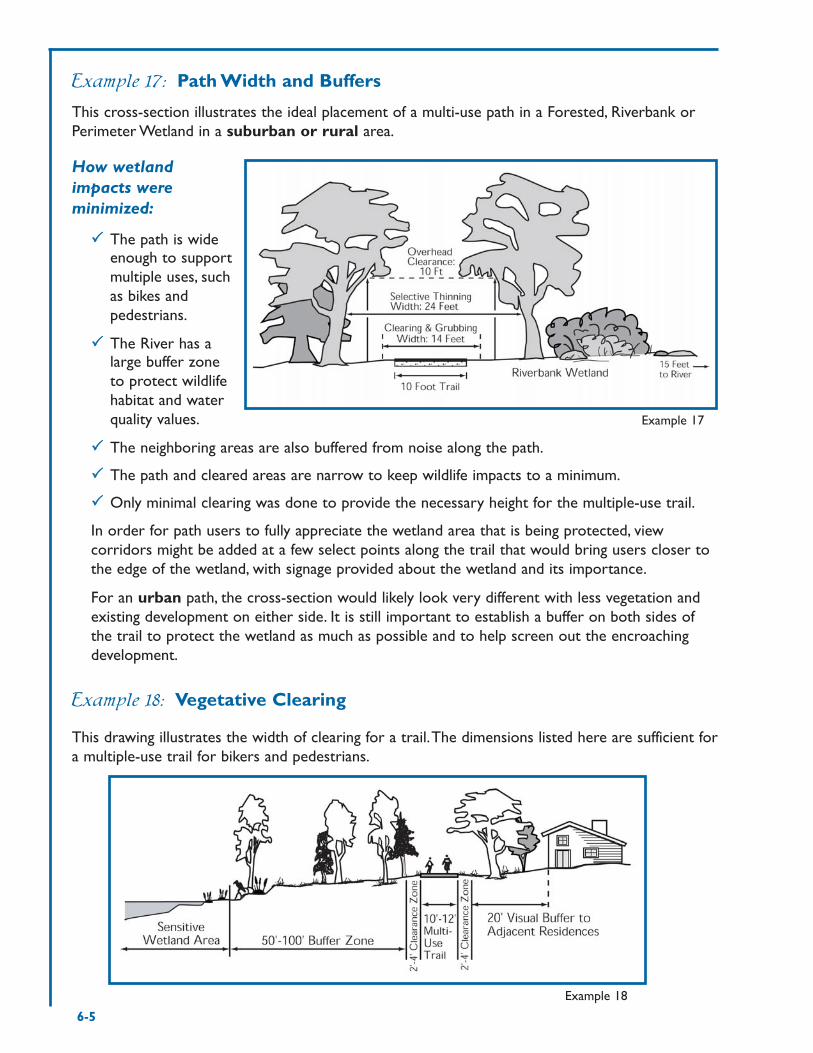
Example 17: Path Width and Buffers
This cross-section illustrates the ideal placement of a multi-use path in a Forested, Riverbank orPerimeter Wetland in a suburban or rural area.
How wetlandimpacts wereminimized:
The path is wideenough to supportmultiple uses, suchas bikes andpedestrians.
The River has alarge buffer zoneto protect wildlifehabitat and waterquality values.
The neighboring areas are also buffered from noise along the path.
The path and cleared areas are narrow to keep wildlife impacts to a minimum.
Only minimal clearing was done to provide the necessary height for the multiple-use trail.
In order for path users to fully appreciate the wetland area that is being protected, viewcorridors might be added at a few select points along the trail that would bring users closer tothe edge of the wetland, with signage provided about the wetland and its importance.
For an urban path, the cross-section would likely look very different with less vegetation andexisting development on either side. It is still important to establish a buffer on both sides ofthe trail to protect the wetland as much as possible and to help screen out the encroachingdevelopment.
Example 17
Example 18: Vegetative Clearing
This drawing illustrates the width of clearing for a trail.The dimensions listed here are sufficient fora multiple-use trail for bikers and pedestrians.
Example 18

6-6
Example 19
Example 19: Wetland Crossings
Wetland crossings are sometimes unavoidable in path and trail applications (please see Chapter 9for more details on crossings).Wooden bridges, platforms, boardwalks and small footbridges areoften the best ways to cross wetland areas, if they must be crossed, or to provide viewingplatforms at the edge of wetlands.The following example is a conservation area with existing dirttrails.The Forested Wetland and Area Subject to Storm Flowage needed to be spanned to allowpassage through these seasonally flooded areas.The trail is primarily used for wildlife viewing andenvironmental education.
How wetland impacts were minimized:
The path and boardwalk crossing are very narrow - only 4 feet across.
The existing tree canopy was maintained, and only a small area of ground cover was clearedfor the path.
The boardwalk was placed on raised timber piles to maintain ground cover and to allow thepassage of small mammals underneath.
The slats were spaced a half inch apart to allow light to penetrate underneath.
The boardwalk was built in sections, starting from one end, while working from above.

6-7
Example 20a
Example 20b
Example 20b: Revised Design A
Example 20a: View Corridors and Access Areas
Viewing and recreational access areas are very popular features to incorporate along bike trailsand foot paths. It’s important to keep in mind that, while these features are acceptable, theirplacement, width and number should be carefully considered and designed.These corridors oftenencroach directly into regulated wetlands and may add to the disturbance and degradation ofwildlife habitat and wetland quality.
This example illustrates a section of bike path along an abandoned railroad bed.There is existingbuffer vegetation on either side of the railroad corridor, although some sections are sparse. Asmall footpath exists in the location where the canoe and fishing access is proposed to be widenedto 40 feet.There is an additional view corridor 140 feet away that overlooks the River and is 60feet wide.The 12-foot bike path was designed to cut through portions of the existing buffer.

6-8
Example 20c
Example 20c: Revised Design B
How wetland impacts were minimized (Design A):
The canoe and fishing access area was narrowed, as these activities do not require morethan 20 feet.
The view corridor was narrowed to 20 feet.
The bike path was relocated and narrowed to 10 feet in the wetland area to maintain thevegetative buffer on either side.
The Limits of Clearing and Disturbance were narrowed on both sides of the path to fivefeet.
How wetland impacts were further minimized (Design B):
The view corridor was incorporated into the canoe and fishing access area, thereby limitinghuman disturbance to one 40-foot area instead of two separate 20-foot areas.
The habitat remains unfragmented and intact.
Buffer plantings were added in areas where the existing vegetation was sparse.

6-9
Example 21a
Example 21a: Original Planting Design
Plantings are an integral part of path and trail design, especially in urban and suburban areas whichmay have less vegetation than in rural areas. It’s important to remember that not only will trailusers and nearby residents and businesses enjoy a path more if development is screened, but thewetland itself will attract more wildlife and may improve water quality if the vegetative buffer isenhanced.This may mean it will be necessary to increase native plantings on both sides of the trail.The users’ clear view to the wetland may be best achieved through properly located and designedview corridors.
This proposed design illustrates a 12-foot bike path through an urban area on a previouslydisturbed railroad bed and utility easement area. Due to development, much of the originalvegetated buffer had been removed from the edge of the Swamp. Plantings were to be installedonly on the side of the path where the tree canopy was thin.

6-10
Example 21b
Example 21b: Revised Planting Design
How wetland impacts were minimized:
Plantings were installed on both sides of the path, which was reduced to 10 feet wide in theregulated area.The plantings are especially thick where there was no tree canopy to providewildlife habitat.
The existing tree canopy was preserved by moving the path farther away from the River andSwamp.
A view corridor was added to allow users to see the wetlands without encroaching upon it.The corridor has sparse vegetation which allows a clear view without severely diminishinghabitat values.

6-11
Construction
Due to the proximity of many paths and trails to wetlands, it is extremely important to useenvironmentally sound construction practices in order to protect the natural resources.Thefollowing are some tips especially important for trail construction. (See also Chapter 11 onConstruction and Maintenance Tips.)
• Properly install and maintain sediment and erosion controls.
• Limit construction activities within watercourses, vegetated wetlands, and flowing andstanding water wetlands to within the low flow period of July - October.
• Restrict construction activities to outside the breeding season/migratory seasons of wildlifethat will utilize the area.
• Preserve the existing tree canopy, and use selective clearing to keep vegetative removal to aminimum.
• Replant disturbed soils, and restore the area to its original topography and hydrology.
Maintenance Tips
• Minimize or eliminate the use of pesticides, fertilizers and other chemical applications nearwetlands.
• Propose limited mowing, especially near wetland areas.
• Utilize native grass species, which will require little or no watering yet will provide adequatesoil stabilization.
References
This list provides additional sources for information on paths and trails. See Chapter 12 forcomplete citations arranged by author.
• Assessing the Cumulative Effcts of Linear Recreation Routes on Wildlife Habitats on the Okanoganand Wenatchee National Forests by W.L. Gaines et al. (2003)
• Designing Sidewalks and Trails for Access: Part I of Best Practices Design Guide by J.B. Kirschbaumet al. (1999)
• Designing Sidewalks and Trails for Access: Part II of Best Practices Design Guide by J.B. Kirschbaumet al. (2001)
• Effects of Non-Consumptive Recreation on Wildlife: A Review by S.A. Boyle and F.B. Samson (1985)
• Managing Degraded Off-Highway Vehicle Trails in Wet, Unstable, and Sensitive Environments by K.G.Meyer (2002)
• Trails for the Twenty-First Century: Planning, Design, and Management Manual for Multi-Use Trails byC.A. Flink and P. Lagewey (1993)

7-1
77.. Roads and BridgesRoads, as linear structures, often traverse nearby wetlands.As road travel increases,it is often necessary to upgrade roads for safety and ease of travel. Improvements might includenew surfaces, lane widening, new drainage structures, bridge reconstruction, or the addition ofsafety features.As with any project, one of the first steps when designing a new or upgraded roadis to avoid wetland areas, and, if this is not possible, then to minimize impacts to wetlands as muchas possible.
Design
During the design stage, it is vital to identify techniques to protect wetland characteristics,functions and values. It is often times a challenge to balance safety and design standards withwetland protection.These mitigation techniques may be implemented before, during or afterconstruction. Although an activity may not be employed until post-construction, it should still beincluded on design plans submitted with the wetland application.
New roads and road upgrades often go hand in hand with subdivisions or new commercialprojects. For a new road, nearby resources and geographical features must be identified in order tofind the most suitable location for the road. It's also important to consider how the road mayaffect nearby wetlands and how to best eliminate or minimize those effects.Adding a thick bufferof varied vegetation between the road and the wetland is one of the best practices.A buffer willhelp to absorb light and sound pollution, in addition to offering food and shelter for wetlandswildlife. It will also act as an additional treatment for water and sediment runoff from the road.The following list gives a few more best management ideas.
• Avoid widening or extending roads into wetlands.
• Consider shifting the geometry or alignment of the road to avoid wetlands.
• Plan new roads to follow the contours of the existing land, which will minimize grading.
• Span as much of a wetland as possible if crossing is necessary in order to maintainconnections between wetland systems.
• Consider alternative designs that will fulfill the same purpose.
• Propose steeper road side-slopes, such as a 2:1 grade instead of a 4:1 grade to avoid excessfill into wetlands.
• Utilize slope alternatives that avoid filling, yet preventerosion and sedimentation into wetlands.
• Consider keeping existing bridge abutments by building newabutments behind the old ones if it will help to reducewetland impacts.
• Plan ahead for temporary crossings that may be needed forconstruction access, travel, or utilities.
Roads & Driveways
Please see Chapters 2 and3 for several examples ofroad and driveway designsthat avoid wetland areas.
7-2
Example 22a
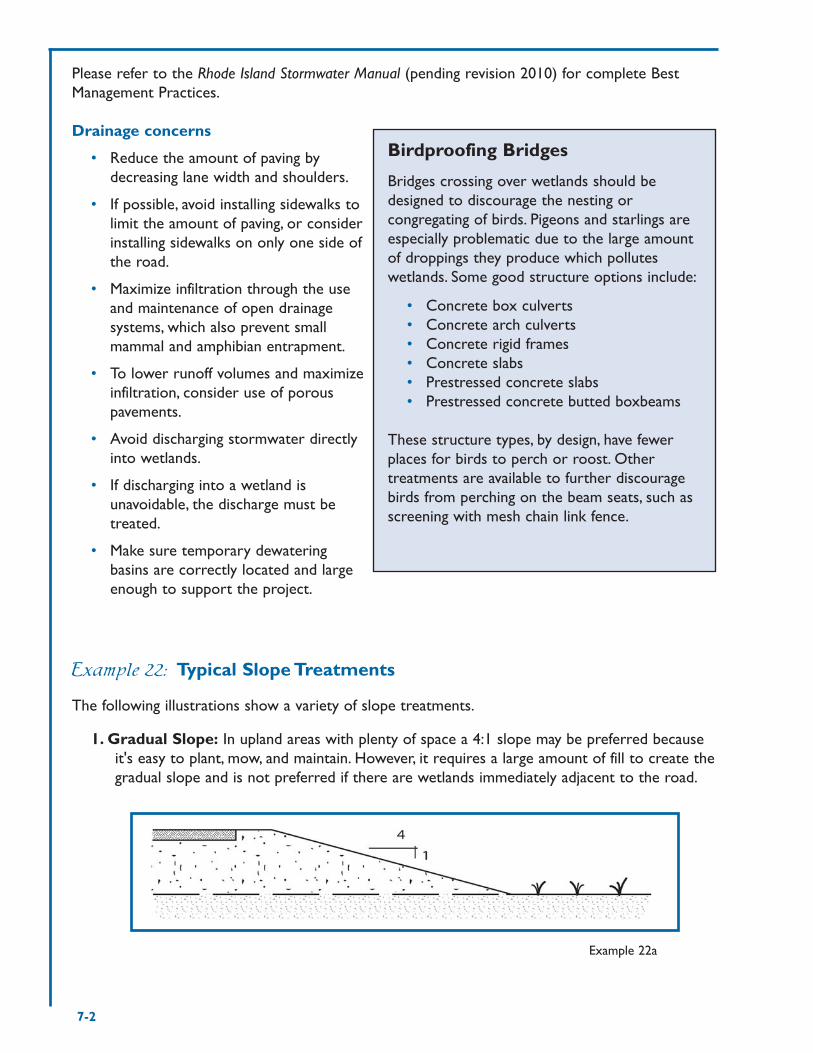
Please refer to the Rhode Island Stormwater Manual (pending revision 2010) for complete BestManagement Practices.
Drainage concerns
• Reduce the amount of paving bydecreasing lane width and shoulders.
• If possible, avoid installing sidewalks tolimit the amount of paving, or considerinstalling sidewalks on only one side ofthe road.
• Maximize infiltration through the useand maintenance of open drainagesystems, which also prevent smallmammal and amphibian entrapment.
• To lower runoff volumes and maximizeinfiltration, consider use of porouspavements.
• Avoid discharging stormwater directlyinto wetlands.
• If discharging into a wetland isunavoidable, the discharge must betreated.
• Make sure temporary dewateringbasins are correctly located and largeenough to support the project.
Birdproofing Bridges
Bridges crossing over wetlands should bedesigned to discourage the nesting orcongregating of birds. Pigeons and starlings areespecially problematic due to the large amountof droppings they produce which polluteswetlands. Some good structure options include:
• Concrete box culverts• Concrete arch culverts• Concrete rigid frames• Concrete slabs• Prestressed concrete slabs• Prestressed concrete butted boxbeams
These structure types, by design, have fewerplaces for birds to perch or roost. Othertreatments are available to further discouragebirds from perching on the beam seats, such asscreening with mesh chain link fence.
Example 22: Typical Slope Treatments
The following illustrations show a variety of slope treatments.
1. Gradual Slope: In upland areas with plenty of space a 4:1 slope may be preferred because it's easy to plant, mow, and maintain. However, it requires a large amount of fill to create the gradual slope and is not preferred if there are wetlands immediately adjacent to the road.

7-3
2. Steeper Slope: Generally, the steepest slope that can be vegetated to reduce erosion is a2:1 slope.At this ratio, a grass cover can still be planted and maintained and less fill is needed, thus reducing the amount of wetland impact.
3. Gabions: To further reduce the amount of wetland fill required to construct a small road, the use of gabions is another option. Gabions are a type of rock-filled wire mesh berm that contains the earthen material.They can be lightly vegetated;often ivy and grasses will grow to cover up thewire. If a wetland is directly adjacent to the road,gabions can cut the amount of fill required nearly in half.
4. Retaining Walls: A final method illustrated below is a retaining wall, which can be stone masonry, boulders, concrete, reinforced earth, or bioengineered materials. Retaining walls can function in place of slopes, thereby eliminating the areas of wetland alteration caused by slopes. However, retaining walls may not be appropriate in many circumstances where their installation will interfere with wildlife travel and dispersal. Fill slopes (2:1) may actually be more beneficial to wetland wildlife.
Example 22b
Gabions and Walls
Gabions and Retaining Walls canalso be used in your backyard atthe Limits of Clearing andDisturbance line to reduce theamount of fill. (See Example 9 inChapter 4.)
Example 22c
Example 22d
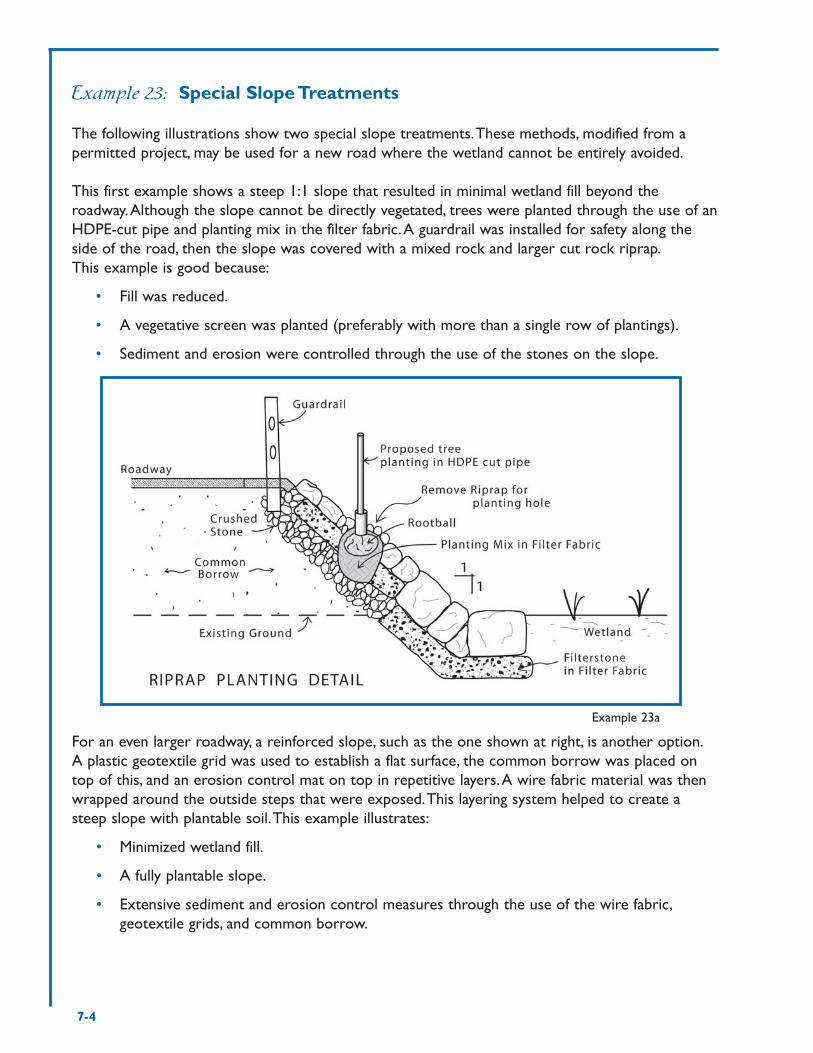
7-4
For an even larger roadway, a reinforced slope, such as the one shown at right, is another option.A plastic geotextile grid was used to establish a flat surface, the common borrow was placed ontop of this, and an erosion control mat on top in repetitive layers.A wire fabric material was thenwrapped around the outside steps that were exposed.This layering system helped to create asteep slope with plantable soil.This example illustrates:
• Minimized wetland fill.
• A fully plantable slope.
• Extensive sediment and erosion control measures through the use of the wire fabric,geotextile grids, and common borrow.
Example 23a
Example 23: Special Slope Treatments
The following illustrations show two special slope treatments.These methods, modified from apermitted project, may be used for a new road where the wetland cannot be entirely avoided.
This first example shows a steep 1:1 slope that resulted in minimal wetland fill beyond theroadway.Although the slope cannot be directly vegetated, trees were planted through the use of anHDPE-cut pipe and planting mix in the filter fabric.A guardrail was installed for safety along theside of the road, then the slope was covered with a mixed rock and larger cut rock riprap.This example is good because:
• Fill was reduced.
• A vegetative screen was planted (preferably with more than a single row of plantings).
• Sediment and erosion were controlled through the use of the stones on the slope.

7-5
Example 24: Bridge UpgradeThis is an example of a multi-lane bridge that was in disrepair and needed to be upgraded fortraffic and safety.While there are many ways to replace or reconstruct bridges, while alsoprotecting wetlands, this example minimizes impacts in specific ways. In some situations it can bebeneficial to carefully remove the old abutments and restore the area adjacent to the watercourse.
Example 23b
Example 24
How wetland impacts were minimized:
The new abutments were built behind the old ones, allowing for less wetland fill anddisturbance.
The old abutments remained in place to avoid disturbance of the watercourse.
The bridge superstructure was dropped into place from overhead to further avoiddisturbance of the watercourse.
The bridge design preserved the hydraulic characteristics of the original opening.
No further obstruction to the floodway was necessary.
The butted prestressed concrete box beams helped prevent bird nesting and roosting.

7-6
Construction
• Before widespread clearing and grubbing occurs, sediment and erosion controls must beproperly installed.
• Place bales of hay a foot out from the toe of the proposed slope to prevent erosion whenthey are removed.
• Do not clear any more land than is absolutely necessary for the project.
• Cofferdams, sandbags, silt curtains, or a combination of the three should be installed ifworking in a watercourse.
• Work in the watercourse should be confined to the low flow season (July - Oct.) if possible.
• Drive sheeting right before beginning work in the area, and remove it immediately afterwardto minimize disturbance to the watercourse as much as possible.
• Take advantage of already cleared areas for staging areas and for material and equipmentstorage that are outside of regulated wetland.
Maintenance
• All drainage structures and the surrounding area must be cleaned and maintained so thatthey do not clog and become ineffective.
• A responsible party should be named in the plan notes to ensure long-term maintenanceand inspection.
References
This list provides additional sources for information on roads and bridges. See Chapter 12 forcomplete citations arranged by author.
• Best Management Practices for Routine Roadway Maintenance Activities in New Hampshire by K.T.Nyhan (2001)
• Ecological Road-Effect Zone of a Massachusetts Suburban Highway by R.T.T. Forman and R.D.Deblinger (2000)
• Estimate of the Area Affected Ecologically by the Road System in the United States by R.T.T.Forman (2000)
• Highway Traffic Noise by Federal Highway Administration (undated)
• Overview of Transportation Impacts on Wildlife Movement and Populations by S.D. Jackson (2000)
• Review of Ecological Effects of Roads on Terrestrial and Aquatic Communities by S.C.Trombulal andC.A. Frissell (2000)
• Rhode Island Standard Details by Rhode Island Department of Transportation (2008)
• Roads and Their Major Ecological Effects by R.T.T. Forman and L.E.Alexander (1998)
• Strategy for Mitigating Highway Impacts on Wildlife by S.D. Jackson and C.R. Griffin (2000)

8-1
88.. UtilitiesProjects may include: gas, water, sewer, electric, telephone, cable, orother fiber optics
Utility installations are similar to other long and linear projects that DEM permits, such as trails orroads. Utility lines can be installed either underground or above ground in pipes or overhead aswires (such as an electric line). After the line is installed, an easement area remains. Although allutility easements need to be accessible for maintenance purposes, they are not subject to continualhuman disturbance like trails or roads. As a result, many easements can be at least partiallyrevegetated. Even overhead utility easements can be restored as long as the vegetation does notinterfere with or compromise the stability of the poles or the utility wires. Utilities are also uniquein that a variety of construction methods are available,which can greatly reduce wetland impacts.
Planning and Design
One of the first steps in the design of an undergroundutility that will cross a wetland area is to consider howto install the piping.The most wetland-friendly methodsare by horizontal directional drilling or another type oftrenchless technology.These methods, while expensive,will avoid or greatly minimize impacts to wetlands. Insome situations it is possible to elevate the utility lineover a wetland.This method might be unsightly and isonly appropriate to reduce impacts in certainsituations. A better solution may be to attach thepiping to a bridge or other structure that spans the wetland.The trench construction method iscommon and often very invasive, but has been used depending on the type and sensitivity of thewetland. For overhead utilities, the installation is fairly standard.The location of the poles is themost important aspect to limiting wetland impacts and excessive clearing.
During the planning and design stages, it is vital to identify techniques to protect wetland functionsand values.These techniques can be implemented before, during, or after construction. Although atechnique may be employed post-construction, it should still be part of the original planning anddesign process. For example, construction sequencing and post-construction maintenancescheduling (including means for emergency repairs) should be considered during the design stageand must be part of a final application submitted to and reviewed by DEM.
It is important to follow these basic Avoidance and Minimization techniques:
• Avoid both above and below-ground wetland crossings unless absolutely necessary.
• If a crossing is unavoidable, take advantage of already disturbed areas such as easements,roads, roadway shoulders, bridges, or old railroad beds.
• Try to avoid disturbing stream beds; if they must be disturbed, utilize a straight and narrowsection with low banks.
Common ConstructionInstallation Methods
• Horizontal directional drilling• Elevation over wetland• Trench method• Overhead poles• Attachment to bridge or
other structure• There may be others or
variations on these commonmethods.

8-2
• Consider spanning a wetland by locating utility poles on either side of the wetland, instead ofdisturbing the interior.
• Zig-zag utility poles across roadways to keep overhead lines within the roadway corridor andto keep the Limits of Clearing and Disturbance out of the wetland (See Example 26).
• If attaching utility lines to a bridge or other structure, be aware of possible floodplainconstraints.
• If underground piping cannot be avoided, consider installing it in a crack-proof casing so thatthe area above the piping can be replanted with larger woody vegetation.
• Keep the size of cleared maintenance areas above and around utility lines to a minimum.
• For electric lines, consider suspending the wires above the wetland tree canopy.
• Avoid diversion of surface water and groundwater sources, which could affect nearbywetlands. Subdraining effects from trench installation must be especially guarded against.
Construction Tips
The following Construction Best Management Practices help limit wetland impacts.A completeapplication package will include details for these practices, which should be considered during theinitial planning and design phases even though they may not be utilized until during or after projectconstruction.
Before Construction
• Ensure that soil erosion and sediment controls are properly installed and maintained.
• Avoid disturbing soils, especially on steep slopes.
• Stabilize exposed soils by seeding and applying a thick mat of spread hay mulch.
• Use erosion control blankets, such as jute or other types of non-plastic matting to preventerosion on steep slopes.
• Have all necessary materials on hand before beginning work.
• Especially for house lots, try to plan for driveway and utility installation to occur within closetime proximity to limit the length of disturbance to nearby wetlands.
During Construction
• Limit construction to outside the breeding and migratory seasons of wetland wildlife.
• Limit construction activities to the low flow period (July - October) or to when the soil isfrozen.
• Preserve existing tree canopies and natural areas in and around wetlands as much aspossible.
• Use structures or devices to prevent subdraining or groundwater movement along pipelinessuch as anti-seepage collars, intermittent clay barriers, trench plugs, or clay saddles.
• If cutting of wetland vegetation cannot be avoided, complete the work by hand (chain orhand saw) instead of using large equipment.
8-3
• For underground utilities through wetlands, install pipe sleeves that wires or smaller pipescan be placed within to allow for easy access for future utility maintenance and repair.
• Use wide-tired vehicles when working in or near wetlands to cause less rutting and soildisturbance.
• Use timber mats when working in or near wetlands.
• If dewatering of trenches is necessary, water must be pumped to an acceptable, properlydesigned dewatering basin - please see the Rhode Island Soil Erosion and Sediment ControlHandbook.
Restoration and Maintenance efforts must also be considered during the initial planning anddesign phases and must be included in the application submittal.
• Plan for restoration to be completed before the end of the growing season and as soon aspossible after laying the pipeline.
• Utilize a wildlife conservation seed mix on all disturbed surfaces within wetlands.
• Stabilize all disturbed areas outside of the cleared maintenance zone with grasses, andrestore them with trees, shrubs or other vegetation.
• Restore wetland soils and hydrology to existing conditions or grades.
• Restore disturbed stream channels to original width and substrate.
• Maintain the area by hand cutting or mowing.
• Avoid the use of fertilizers, pesticides, herbicides, or pollutants - chemical or organic - withinwetlands.
• Include a detailed maintenance schedule and a responsible entity forcutting/trimming/mowing and use of chemicals or prescribed burning.
• Include methods for completing regular and emergency repairs to utility lines.

8-4
Example 25: Enlarged Pipeline Avoidance and Minimization
This overhead view of a proposed enlarged pipeline illustrates several avoidance and minimizationtechniques that were used in the initial project design, as well as additional techniques proposed tofurther minimize wetland impacts.
Example 25
How wetland impacts were further minimized:
Existing utility easements and already disturbed road corridors were used to install newpipe.
A narrow Stream area was crossed to avoid bisecting the large Swamp.
Several other small wetland areas near the Swamp were skirted to reach the narrowcrossing.
The existing utility easement through the large swamp was allowed to revegetate.

8-5
Example 26
Example 26: Above-Ground Installation
This example shows the installation of an overhead utility to a single-family house.The electricalwiring follows an existing gravel driveway that was constructed over 30 years ago.The electricpoles were installed at the same time that the driveway was upgraded, to limit constructiondisturbance.
How wetland impacts were minimized:
The electric wires cross at narrow sections or skirt the edge of the Swamps.
None of the approved poles were located in the Swamps, but several were installed in thePerimeter Wetlands.
The proposed electric lines were located along an existing disturbed area.
The electric lines zigzag back and forth across the driveway, which limits the amount ofwetland and buffer area disturbance.
Most guy wires were installed further outside of the wetland areas.
Wooden mats were used to reduce disturbance to wetland soils in especially sensitive areaswhen needed.
The existing tree canopy was maintained along both sides of the gravel driveway.
The approved tree cutting and brush cutting were completed by hand to limit disturbance tothe wetland.

8-6
Construction Methods
There are a variety of methods that can be utilized to install utility pipes. DEM needs to knowwhat method will be utilized to determine the amount of impact a project will have on wetlands.The majority of utilities, with the possible exception of overhead electrical or phone cable wires,are installed below ground.The below-ground piping is covered by soil, and much of the area(outside of the maintained zone) is replanted.The following examples show various ways to avoidand minimize wetland impacts.
Example 27: Trenching
The diagram on the following page illustrates a proposed natural gas pipeline through a wetlandarea.The applicant has proposed the trenching method* to install the pipeline. Often the trenchingmethod requires a wide construction right-of-way - sometimes over 100 feet for equipment andstaging areas outside of the wetland. In order to minimize impacts in this project, the proposedwidth of the disturbed area was limited to less than 20 feet.This was accomplished by using onesmall machine to dig, lay the pipe and backfill, instead of a larger machine that requires a greaterwidth to operate.
How wetland impacts were minimized:
The primary work and stockpile areas were narrow.
Limited vegetation was cleared for the stockpile area.
Tight Limits of Clearing and Disturbance on either side of the construction right of waywere maintained.
The existing tree canopy was maintained.
The amount of overall disturbance was reduced by the use of small machinery in the wetlandarea.
Tree stumps were left in place to allow for re-growth after the completion of the project.
Separation of excavated topsoil from subsoil allowed for easy and correct replacement afterthe pipe was installed.
The stockpile area was completely replanted upon completion of the project.The primary workarea was lightly revegetated (no large woody vegetation), thereby allowing a narrow corridor to bemaintained for access to the pipeline.
*Variation: A variation of the trench method can be used when installing pipe across large bodiesof water. Often if a trench is dug up to the wetland area, then the pipe can be floated into placeacross the wetland by attaching buoyant devices to the pipe. Once these are removed the pipe willsink into place.
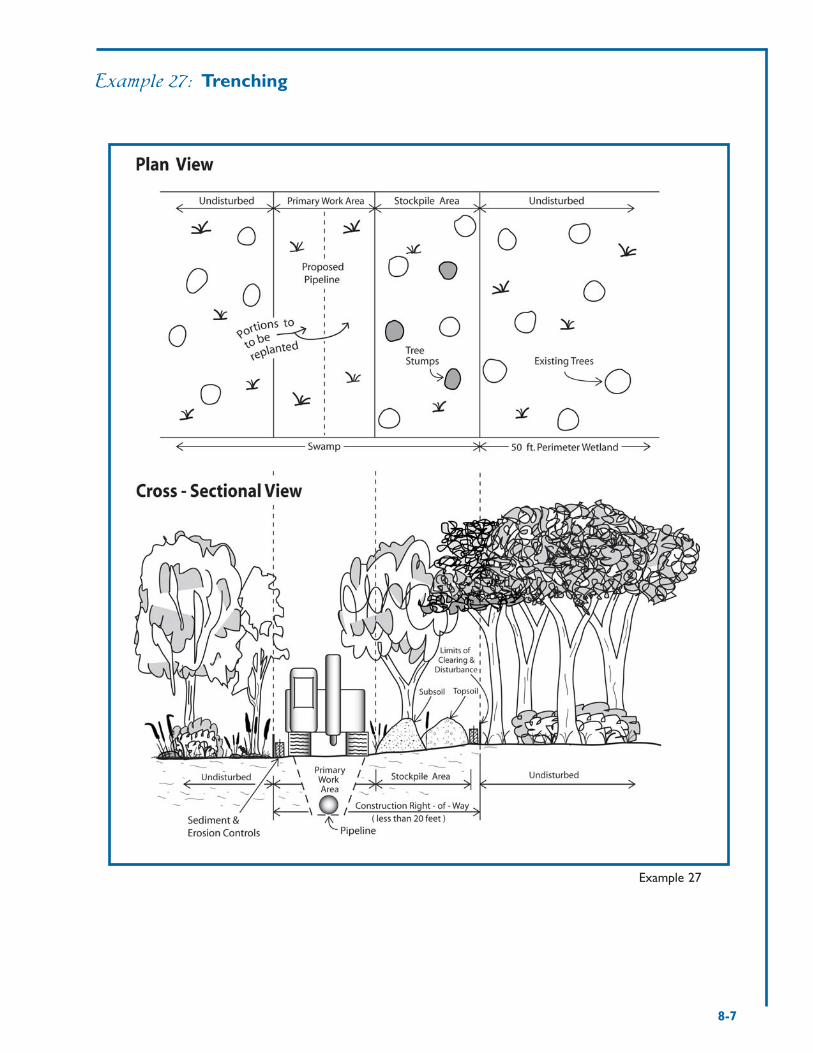
8-7
Example 27
Example 27: Trenching

8-8
Example 28a
Example 28: Horizontal Directional Drilling
This example shows a cross section of land where the horizontal directional drilling method wasused to install piping. Although expensive, this method was completed with the least amount ofwetland impact. A guided drillhead bore down horizontally under roads, wetlands, vegetation andbuildings.This method is most commonly used for short spans under wetlands. Boring machinesare able to drill through nearly any type of soil; however, the pipe installation method depends onthe substrate, as well as the season. Once installed, the pipeline will be maintained in the same wayusing a guided drillhead (often with a camera attached) to find the problem area. A broken pipemay be replaced with a new pipe or sealed with chemical compounds.

8-9
Example 28: Horizontal Directional Drilling Continued
Example 28b
How wetland impacts were minimized:
There was no disturbance to wetland, wildlife, habitat or vegetation because entry and exitpoints were located outside of wetland areas.
The pipe was installed a minimum of 10 feet below the river bottom to avoid impacts to theRiver.
A small work area was required for the initial hole, and limited equipment was used.
The work area was located outside of the 100-year Floodplain Wetland.
There is no cleared corridor to maintain.
Sometimes a pipe-bursting technique is used to destroy an old pipe, then a new (sometimes larger)pipe is installed through a push and pull method.

9-1
9. Wetland CrossingsWell-designed crossings allow wildlife unrestricted access to a watershed,maintain natural conditions without becoming barriers to fish, and help protect roads and propertyfrom the damaging effects of floods. If it is determined that a wetland cannot be avoided and mustbe crossed to access an upland area, it is essential to design an appropriate crossing that minimizesadverse effects.
If not properly designed and constructed, wetland crossings can fragment linear habitat corridors,disturb or block fish and wildlife passage, alter ecosystem processes and aquatic communities, floodroads and property, and compromise water quality. Problems are often encountered whencrossings are undersized, perched, or result in water depths that are too shallow.The followingnegative consequences commonly result from poor design, improper structure selection, orcareless construction:
• Water velocities increase in undersized crossings, thus degrading fish and wildlife habitatwhile also possibly weakening the integrity of a structure
• High water velocities scour and erode natural substrates, thus degrading habitat;
• Water can pond upstream of undersized culverts which can cause changes to the existinghabitat while also leading to property flooding and road and stream erosion;
• Undersized crossings may also become blocked with debris and be time-consuming andcostly to regularly maintain;
• Perching of a crossing outlet leaves the structure above the natural bottom and thereby actsas a barrier; and
• Water depths that are too shallow for fish and wildlife movement may occur, especiallyduring seasonal low flows.
Best Practices for All Types of Crossings
• Avoid crossing open bodies of water, rivers, streams or other wetlands if possible.
• Where crossings are unavoidable, design them to traverse a narrow section of wetland.
• Use or upgrade existing paths, cart paths, roads, or other authorized disturbed areas so as toavoid previously undisturbed locations.
• Design a crossing that keeps disturbance to a minimum and spans as much of the wetlandand perimeter or riverbank, floodplain, and floodway wetland as possible.
• Avoid disturbance to streambeds, wetland soils, and other vegetation.
• Avoid fragmenting wetland wildlife habitat by building away from wildlife travel corridors.
• Avoid crossing through or bisecting a wetland wildlife breeding area.
• Minimize light and noise disturbance on roadways by installing plantings to act as a buffer onthe sides of roadways.

9-2
• Consider using pre-cast bridges, especially for long spans, that allow installation to becompleted with minimal contact with the wetland.
• Design and construct wildlife crossings that attempt to preserve existing light conditions andmaintain soil moisture levels similar to existing natural conditions.
• Maintain existing elevations, or consider installing retaining walls to reduce disturbance andside slope fill.
• Restore stream channels to natural conditions if disturbance of the channel is unavoidable.
• Avoid impounding water up-gradient of the crossing.
• Maintain existing side slope grades, as much as possible, to minimize fill and any wetland loss.
• Minimize the extent of fill needed on top of a crossing structure by limiting the increase ofthe road grade as it approaches the crossing point.
Crossing Structure Selection
A number of different structures can be used to cross wetlands, including rivers and streams. Eachproject and wetland to be crossed is different, and a structure that may be appropriate in onesituation may not be sufficient for another.
Example 29
This illustration was modified from aState of Connecticut manual on sitedesign practices (Callahan et al. 1992).It depicts various crossing options, fromthe most constraining for fish andwildlife to the least constraining.
Arch culverts and bridge spans oropen-bottom culverts are clearlypreferred for maintaining wetlandcontinuity and protecting existinghabitat conditions and quality.

9-3
Example 30: Detailed Labeling Requiredfor Crossings
In addition to the labels required on a full site plan, allplan details included in a wetland application submittalmust be completely labeled, as in the example below.Other views, such as a cross section or profile view, mayneed additional labels for elevations and dimensions.
Example 30
Crossing Labels
Existing and proposed contoursSpot elevationsFloodplain informationCross section locationsSurface courseInvert elevations Structure dimensionsToe of SlopeCheck damsRiprap/Scour protectionLoam, seed, and plantingsLimits of Clearing and Disturbance
Notes1.) Existing floodplain elevation =
x’ (NGVD 1929) as per FEMA
2.) Proposed estimated 100-year
floodplain elevation (upstream) =
x’ (NGVD 1929) and downstream
elevation = y’ (NGVD 1929)
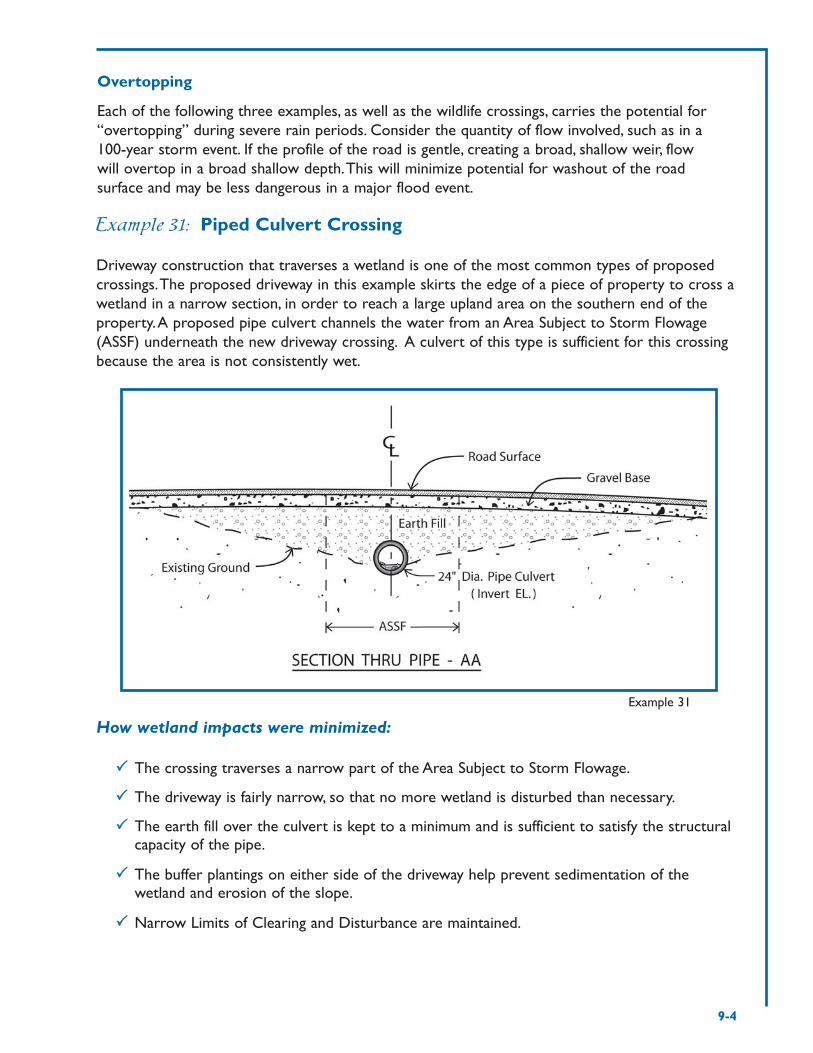
9-4
Example 31: Piped Culvert Crossing
Driveway construction that traverses a wetland is one of the most common types of proposedcrossings.The proposed driveway in this example skirts the edge of a piece of property to cross awetland in a narrow section, in order to reach a large upland area on the southern end of theproperty.A proposed pipe culvert channels the water from an Area Subject to Storm Flowage(ASSF) underneath the new driveway crossing. A culvert of this type is sufficient for this crossingbecause the area is not consistently wet.
How wetland impacts were minimized:
The crossing traverses a narrow part of the Area Subject to Storm Flowage.
The driveway is fairly narrow, so that no more wetland is disturbed than necessary.
The earth fill over the culvert is kept to a minimum and is sufficient to satisfy the structuralcapacity of the pipe.
The buffer plantings on either side of the driveway help prevent sedimentation of thewetland and erosion of the slope.
Narrow Limits of Clearing and Disturbance are maintained.
Example 31
Overtopping
Each of the following three examples, as well as the wildlife crossings, carries the potential for“overtopping” during severe rain periods. Consider the quantity of flow involved, such as in a100-year storm event. If the profile of the road is gentle, creating a broad, shallow weir, flowwill overtop in a broad shallow depth.This will minimize potential for washout of the roadsurface and may be less dangerous in a major flood event.

9-5
Example 32a
Example 32b
Example 32: Open-Bottom Box Culvert Crossing
A subdivision roadway is a common type of wetland crossing.The roadway in this example skirtsseveral properties to reach the upland north of the River and Swamp, thus placing the newsubdivision more than 200 feet from the wetland area to be crossed.This example illustrates anopen-bottom box culvert used to cross the River and Swamp.While acceptable, the best type ofcrossing design would span a greater portion of upland on either side of the River and Swamp andrequire less fill.A different type of structure might be necessary to accomplish such a design.
How wetland impacts were minimized:
The open-bottom culvert allows the Stream to flow freely in the natural streambed.
Plantings along the edge of the road buffer the wetlands from noise and light.
Narrow Limits of Clearing and Disturbance were maintained.
Sediment and erosion controls were used to enclose and isolate the construction zone toprevent sediment from flowing downstream.
Upon completion of the project the adjacent Riverbank Wetland was returned to itsprevious condition.

9-6
Example 33a
Example 33b
Example 33: Timber Bridge Crossing
This is an example of a residential driveway that crosses a River and Swamp to reach an uplandarea.This proposed design uses a timber bridge to cross the wetland complex.This crossing couldbe improved with a wider span that would also breach some of the upland on either side.
How wetland impacts were minimized:
A narrow section of the wetland was utilized for the crossing.
The Limits of Clearing and Disturbance on either side of the driveway were kept narrowconsidering the grade change necessary to cross over the wetland.
The bridge spans the entire Swamp and River to allow for the free flow of water for fishand adequate passage for wildlife.
Plantings along the edge of the road buffer the wetland from noise and light.
The driveway leading up to the bridge was constructed of gravel, a porous material, whichpromotes water infiltration, reduces runoff and provides groundwater recharge.
Sediment and erosion controls were used to enclose and isolate the construction zone toprevent sediment from flowing downstream.
Upon completion of the project the adjacent Riverbank Wetland was returned to itsprevious condition.
Note: DEM prohibits the use of creosote to treat wood used near wetland crossings. However,CCA is acceptable for treatment.
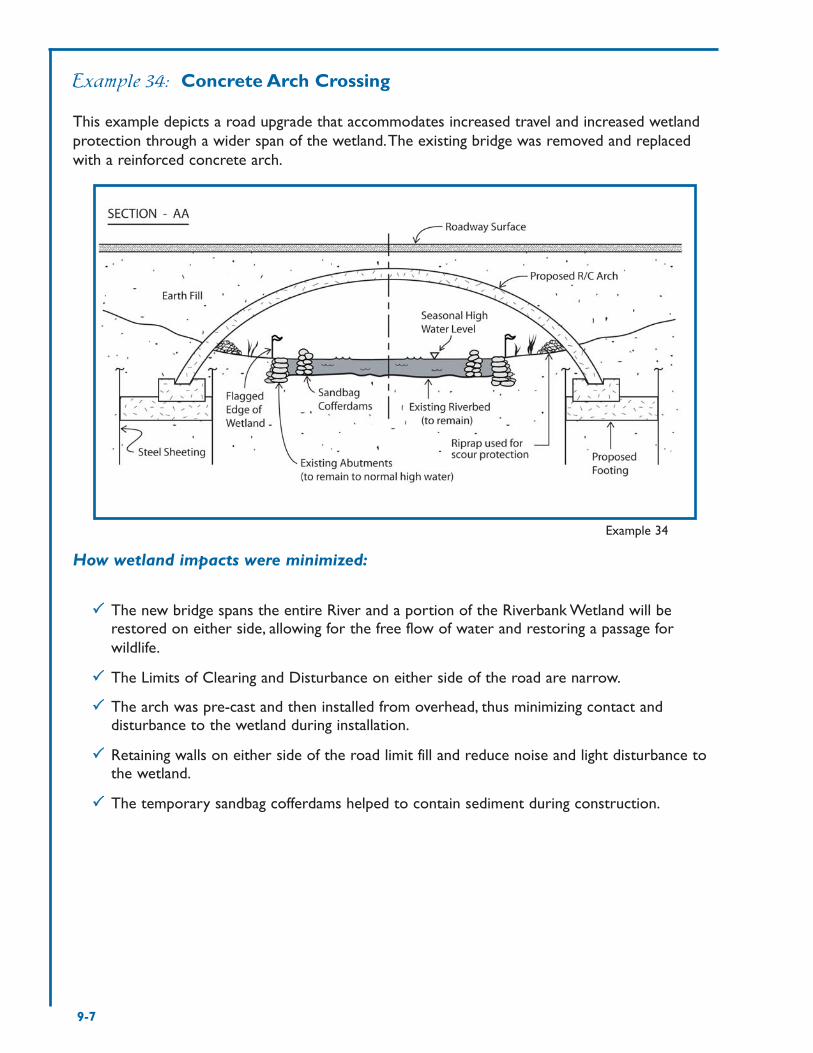
9-7
Example 34: Concrete Arch Crossing
This example depicts a road upgrade that accommodates increased travel and increased wetlandprotection through a wider span of the wetland.The existing bridge was removed and replacedwith a reinforced concrete arch.
How wetland impacts were minimized:
The new bridge spans the entire River and a portion of the Riverbank Wetland will berestored on either side, allowing for the free flow of water and restoring a passage forwildlife.
The Limits of Clearing and Disturbance on either side of the road are narrow.
The arch was pre-cast and then installed from overhead, thus minimizing contact anddisturbance to the wetland during installation.
Retaining walls on either side of the road limit fill and reduce noise and light disturbance tothe wetland.
The temporary sandbag cofferdams helped to contain sediment during construction.
Example 34

9-8
Example 35: Multi-Span Bridge Crossing
This driveway crossing was elevated above the existing grade of an old cartpath which leads to asmall upland area near the rear of the property. By utilizing the existing crossing, the applicantavoided almost all other wetland impacts on a large piece of property.While not always typical fordriveway crossings, this example does a great job of spanning the wetland.
How wetland impacts were minimized:
The driveway was built on an old cartpath where the vegetation had been previouslydisturbed.
The existing crossing culvert remained in place to reduce disturbance to the wetland and tomaintain existing hydrological conditions.
All of the River and Swamp, and some of the Perimeter and Riverbank Wetland werespanned.
The original tree canopy was maintained where possible, and there were a number of bufferplantings added surrounding the disturbed area.
The pre-cast bridge structures were installed from overhead by crane, which limited thelength of time the wetland area was disturbed.
The driveway leading up to the bridge was constructed of gravel, a porous material, whichpromotes water infiltration, reduces runoff and provides groundwater recharge.
Limits of Clearing and Disturbance were confined to within the existing cartpath corridor.
Example 35

9-9
Construction Considerations
• Sequence and duration of project - Work within waterways should be limited to the lowflow period of July 1 - October 31.
• Diversion of flow - In some crossing situations, river or stream flow may need to be divertedduring construction. If unavoidable, plan ahead and include information on the plans aboutflow diversion to minimize impacts while considering the following issues:
• Duration of the proposed construction;
• Dewatering;
• Quantity of flow; and
• Design of the diversion device.
To ensure minimization of wetland impacts, it is important to plan ahead and includeinformation about flow diversion in a wetland application package.
• Phasing of work - Include information in the application if a project will be constructed inphases, and try to limit the amount of time wetlands will be impacted.
• Sediment and erosion controls for dewatering - All controls must be in place prior tobeginning of work and must be maintained for the life of the project.
Wildlife Crossings
The following are two examples of wildlife crossing structures that could be used in conjunctionwith or alongside another wetland crossing.Wildlife crossing structures can be used when awetland is being crossed, or when any wildlife habitat is being bisected. It is important to firstresearch what types of wildlife live in the area and what paths they travel.This information helpsdetermine where to locate a wildlife crossing and what type of structure is most suitable. It hasbeen reported that if wildlife can see through to the other end of a crossing, they are more likelyto use it. Please consider this when designing a wildlife crossing structure. It is also important toconsider design elements, such as the volume of water during various storm events, that thewildlife crossing structure will need to accommodate.
Example 36a: Modified Box Culvert
Example 36a

9-10
How impacts to wetland wildlife were minimized:
This structure allows movement of water.
There is a shelf for small amphibians (frogs, salamanders, etc.) to use for travel inside thestructure.
The shelf is level with the final soil grade, which allows small mammals easy access and use.
The shelf adds little cost to the overall project when incorporated from the beginning.
While a modified box culvert with a shelf may need to be special ordered, they are available or canbe built.The designer may consider adding concrete or stone blocks inside a standard culvert tobuild wildlife passage shelves.
Example 36b: Polyethylene Arch
How impacts to wetland wildlife were minimized:
The arch was built alongside a wetland driveway culvert.
A natural ground bottom allows easy travel for small and medium-sized animals.
A larger tunnel allows more light to filter inside, which creates a more natural environment.
Example 36b

9-11
References
This list provides additional sources for information on wetland crossings. See Chapter 12 forcomplete citations arranged by author.
• Ecological Considerations in the Design of River and Stream Crossings by S.D. Jackson (2003)
• Massachusetts Stream Crossings Handbook by Massachusetts Riverways Program (2005)
• Overview of Transportation Impacts on Wildlife Movement and Populations by S.D. Jackson(2000)
• Proposed Design for an Amphibian and Reptile Tunnel by S.D. Jackson (1997)
• Road Ecology, Science and Solutions by R.T.T. Forman et al. (2003)
• Strategy for Mitigating Highway Impacts on Wildlife by S.D. Jackson and C.R. Griffin (2000)
• Stream Crossing Guidelines by Connecticut Department of Environmental Protection(2008)
• Stream Simulation: An Ecological Approach to Providing Passage for Aquatic Organisms at Road-Stream Crossings by United States Forest Service (2008)
Illustration by Christopher Rowe, adapted from the Massachusetts Stream Crossings Handbook
10-1
1100.. PlantingsPlantings are an extremely important part of any project proposed in or nearwetlands.They help screen and protect wetland wildlife from human presence, light, and otherdisturbances. Several dense rows of plantings can form an effective fence when planted at the edgeof a disturbed area. A planted buffer also helps slow the flow of water, promote infiltration ofrunoff, and allow sediment to settle out before it reaches the wetland. A dense ground cover ofgrasses can also help filter polluted water before it enters the wetland. A careful selection ofplantings provides shelter, food, and breeding sites for wildlife, and a tree canopy helps regulatetemperatures in a wetland by shading the water during summer. For these reasons and others,please consider the following when designing and installing a planting scheme:
Planning and Design
• Take into account the physical conditions of the site, including light levels and soil moisture,to help in plant selection.
• Consider restoring previously disturbed areas with plantings, even if the disturbance is not aresult of the current project.
• If a limit of disturbance borders a thickly wooded area, additional plantings may not benecessary; however, plantings in a previously cleared area can provide added protection tothe wetland.
• Two or more rows of plantings provide a thick buffer; however, sometimes a single row issufficient if the project is next to an already vegetated area that currently buffers thewetland.
• Generally, trees should be planted 6-10 feet on center and shrubs 5-6 on center. Dependingon the purpose of the plantings, recommended spacing will vary.
• Only native plant stock should be used. Invasive or exotic species can overtake and eliminatenative vegetation.
• Consider eliminating any invasive species that are currently growing in areas to be plantedbecause they often overtake native species.Also, be mindful of exposed mineral soils that areespecially susceptible to invasive species.
• Generally the best time to plant is during spring (May 1 - June 15) or fall (September 1-November 15). Plantings can be installed during the dry summer months if they are balledand burlapped and regularly watered.Transplanted trees or shrubs should be planted duringearly spring before leaves appear, in late fall, or in early winter. Be sure to check each speciesfor the recommended planting season.
• To ensure proper plant selection and viability, the use of a landscape professional isrecommended.
• Avoid planting large woody vegetation, such as trees and tall shrubs, on detention orinfiltration basin fill embankments and near basin outlet structures.
• Avoid planting trees within at least ten feet of underground infiltration systems.

10-2
Site Restoration after Planting
• After site construction is complete, final grading and landscaping should be completed assoon as possible to minimize erosion and help ensure that invasive species don't take rootand spread. It is important to plan project completion and planting installation for theappropriate season.
• All sediment and erosion controls should be removed once planting is completed, and alldisturbed surfaces must be adequately stabilized.
• All disturbed surfaces that require stabilization should be covered with a plantable soil orloam, seeded with a native wildlife conservation grass seed mix, or stabilized with a mat ofloose hay mulch after the project is completed.
• If a surface area in or near a wetland does not require stabilization, then it must simply beallowed to revert to a wild condition after plantings are complete.
• Steep surfaces may require extra matting, such as excelsior matting or jute mesh.
• Within jurisdictional areas, no future clearing, mowing, cutting or trimming of restored areasshould occur.
Maintenance
• All plantings should be monitored to ensure that they survive through one growing season(longer for certain projects); if not, they must be replaced with the same species.
• Consider that new plantings will require watering and care to ensure survival.
Information to Include on the Site Plan
• A planting legend should be included if several different varieties of trees and shrubs areproposed; otherwise, the type of tree or shrub should be clearly labeled.
• Proposed planting heights, species (both common and scientific names), spacing, and quantityshould also be included.
• It is also necessary to include detailed notes on when the plantings will be installed, thepurpose of the plantings (either screening or wildlife food and cover), and how the plantingswill be maintained (such as being left unmanicured).
• Planting diagrams should be included to illustrate how plantings will be installed. The RhodeIsland Standard Details from the Department of Transportation is a good information source.
Categories of Plantings
Planting proposals for Wetland application submittals generally fall into two categories: 1) Plantingsused for screening to block noise, light, and other disturbances from the wetlands; and 2) Plantingsthat provide food, cover, and nesting habitat for wildlife.
A good planting scheme should use both categories to adequately mitigate impacts to wetlands.Screen plantings are commonly used to either mark an edge of the Limits of Clearing andDisturbance or to create a thick buffer between the project area of continuous use and a wetland.They are most often evergreen trees because evergreens provide a thick year-round buffer. Otherplantings (deciduous or evergreen) that are intermixed or behind the screen plantings offer avariety of food, cover and nesting options for wetland wildlife. Deer resistant types of evergreenplants are a good choice for plantings, either alone or in combination with berry producing shrubs.

10-3
It is also important to use native, naturalized, and locally grown plantings as often as possible,instead of cultivars plantings, or others that have been genetically modified or imported fromanother region or country. It is important to plan ahead and have plantings ready because it issometimes difficult to find appropriate species.The following is a list of trees, shrubs, vines, andgroundcover for potential use in Wetland Application submittals to DEM.This list is not all-inclusive, but it should be used as a guideline when choosing plantings.
Guidelines for Choosing Appropriate Plantings
Moderate to fast growing
Trees Shrubs• Eastern white pine, Pinus strobus • Southern arrowwood, Viburnum dentatum• Thuja occidentalis nigra • Cornus spp.• Eastern hemlock, Tsuga canadensis• Juniperus spp.• White spruce, Picea glauca
For a flowering, fruiting or evergreen hedge
Trees Shrubs• Eastern white pine, Pinus strobus • Northern bayberry, Myrica pensylvanica• Eastern hemlock, Tsuga canadensis • Southern arrowwood, Viburnum dentatum• Thuja occidentalis nigra • Aronia spp.• Cornus spp.• Juniperus spp.
For a wet location
Trees Shrubs• Red maple, Acer rubrum • Red chokeberry, Aronia arbutifolia• Red ash, Fraxinus pennsylvanica • Swamp-azalea, Rhododendron viscosum• Sweet gum, Liquidambar styraciflua • Fringe-tree, Chionanthus virginicus• Black gum, Nyssa sylvatica • Sweet pepperbush, Clethra alnifolia• Sycamore, Platanus occidentalis • Silky dogwood, Cornus amomum• Swamp white oak, Quercus bicolor • Gray dogwood, Cornus racemosa• Pin oak, Quercus palustris • Red osier dogwood, Cornus sericea• American Elm, Ulmus Americana • Inkberry, Ilex glabra• Thuja occidentalis nigra • Winterberry, Ilex verticillata• Amelanchier spp. • Northern spicebush, Lindera benzoin• Salix spp. • Swamp-rose, Rosa palustris
• Large pussy willow, Salix discolor• Highbush blueberry, Vaccinium corymbosum• Southern arrowwood, Viburnum dentatum• Sweet viburnum, Viburnum lentago• Purple osier (basket) willow, Salix purpurea• Buttonbush, Cephalanthus occidentalis• Highbush cranberry, Viburnum opulus• Alnus spp.
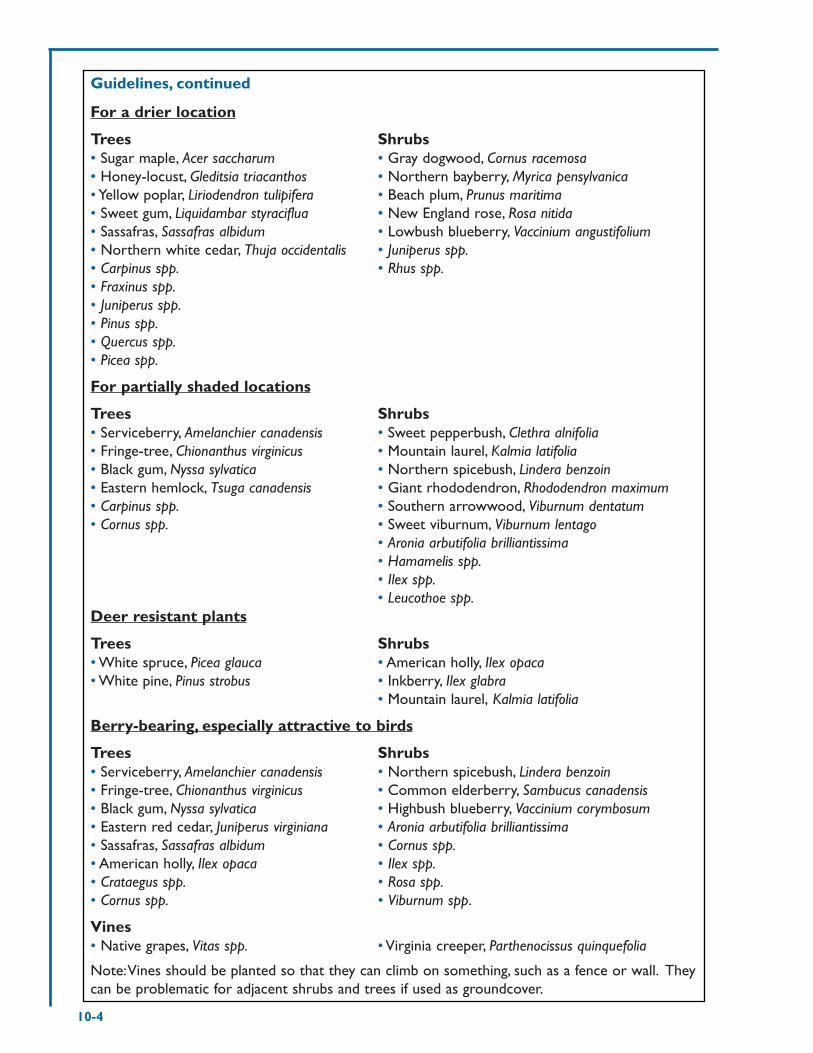
10-4
Guidelines, continued
For a drier location
Trees Shrubs• Sugar maple, Acer saccharum • Gray dogwood, Cornus racemosa• Honey-locust, Gleditsia triacanthos • Northern bayberry, Myrica pensylvanica• Yellow poplar, Liriodendron tulipifera • Beach plum, Prunus maritima• Sweet gum, Liquidambar styraciflua • New England rose, Rosa nitida• Sassafras, Sassafras albidum • Lowbush blueberry, Vaccinium angustifolium• Northern white cedar, Thuja occidentalis • Juniperus spp.• Carpinus spp. • Rhus spp.• Fraxinus spp.• Juniperus spp.• Pinus spp.• Quercus spp.• Picea spp.
For partially shaded locations
Trees Shrubs• Serviceberry, Amelanchier canadensis • Sweet pepperbush, Clethra alnifolia• Fringe-tree, Chionanthus virginicus • Mountain laurel, Kalmia latifolia• Black gum, Nyssa sylvatica • Northern spicebush, Lindera benzoin• Eastern hemlock, Tsuga canadensis • Giant rhododendron, Rhododendron maximum• Carpinus spp. • Southern arrowwood, Viburnum dentatum• Cornus spp. • Sweet viburnum, Viburnum lentago
• Aronia arbutifolia brilliantissima• Hamamelis spp.• Ilex spp.• Leucothoe spp.
Deer resistant plants
Trees Shrubs• White spruce, Picea glauca • American holly, Ilex opaca• White pine, Pinus strobus • Inkberry, Ilex glabra
• Mountain laurel, Kalmia latifolia
Berry-bearing, especially attractive to birds
Trees Shrubs• Serviceberry, Amelanchier canadensis • Northern spicebush, Lindera benzoin• Fringe-tree, Chionanthus virginicus • Common elderberry, Sambucus canadensis• Black gum, Nyssa sylvatica • Highbush blueberry, Vaccinium corymbosum• Eastern red cedar, Juniperus virginiana • Aronia arbutifolia brilliantissima• Sassafras, Sassafras albidum • Cornus spp.• American holly, Ilex opaca • Ilex spp.• Crataegus spp. • Rosa spp.• Cornus spp. • Viburnum spp.
Vines• Native grapes, Vitas spp. • Virginia creeper, Parthenocissus quinquefolia
Note:Vines should be planted so that they can climb on something, such as a fence or wall. Theycan be problematic for adjacent shrubs and trees if used as groundcover.
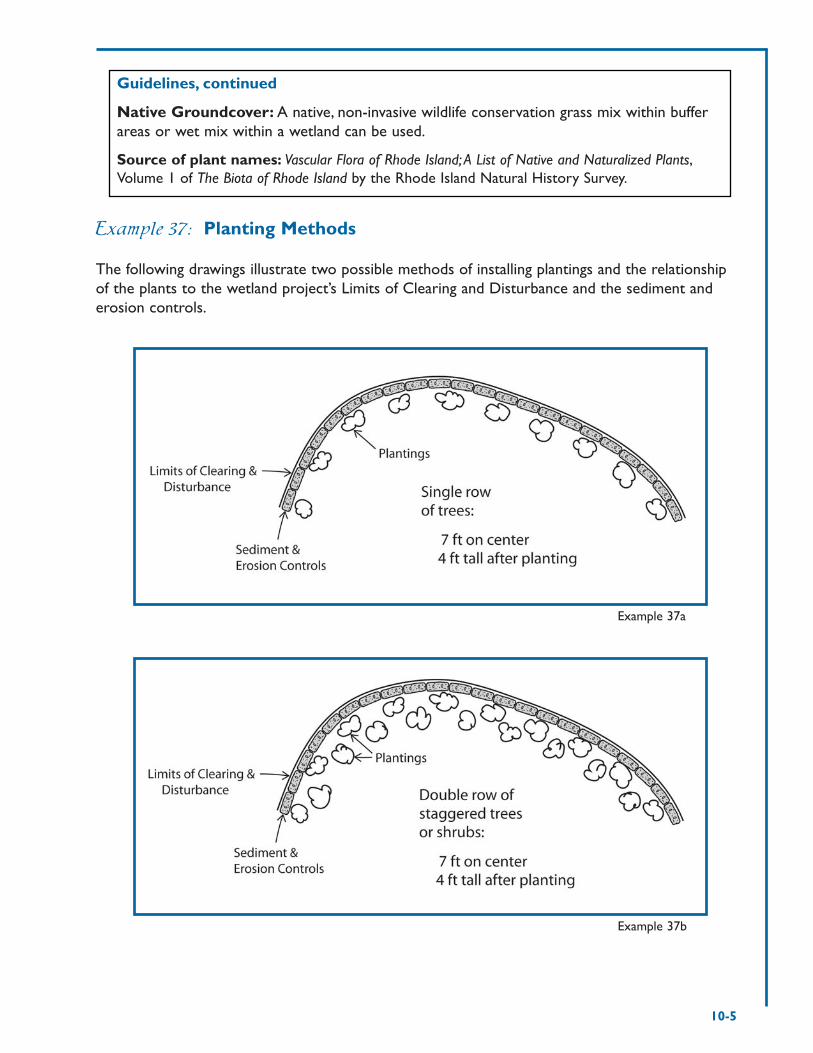
10-5
Example 37: Planting Methods
The following drawings illustrate two possible methods of installing plantings and the relationshipof the plants to the wetland project’s Limits of Clearing and Disturbance and the sediment anderosion controls.
Example 37a
Example 37b
Guidelines, continued
Native Groundcover: A native, non-invasive wildlife conservation grass mix within bufferareas or wet mix within a wetland can be used.
Source of plant names: Vascular Flora of Rhode Island;A List of Native and Naturalized Plants,Volume 1 of The Biota of Rhode Island by the Rhode Island Natural History Survey.
10-6
Example 38: Planting Schedule
The following table is an example of an easy to follow planting legend with much of the requiredplanting information. A detailed drawing and planting notes would also accompany this table aspart of a complete wetlands application package.
Tree & Shrub Species Planting Schedule
Symbol Common/Latin Name EstimatedQuantity
Planting Remarks
Highbush blueberry, Vacciniumcorymbosum
85Balled and burlapped, 5 ft.on center spacing, 3 ft. tallafter planting
Sweet pepperbush, Clethra alnifolia 52Balled and burlapped, 5 ft.on center spacing, 3 ft. tallafter planting
Winterberry, Ilex verticillata 72Balled and burlapped, 5 ft.on center spacing, 3 ft. tallafter planting
Red chokeberry, Aronia arbutifolia 54Balled and burlapped, 5 ft.on center spacing, 3 ft. tallafter planting
Spice bush, Lindera benzoin 54Balled and burlapped, 5 ft.on center spacing, 3 ft. tallafter planting
Red maple, Acer rubrum 32Balled and burlapped, 8 ft.on center spacing, 3 ft. tallafter planting
Weeping willow, Salix babylonica18 Balled and burlapped, 8 ft.
on center spacing, 3 ft. tallafter planting
Northern white cedar,Thuja occidentalis 60Balled and burlapped, 8 ft.on center spacing, 3 ft. tallafter planting
Example 38
Planting Notes
Detailed planting notes must be provided to complete the wetland application package.Theplanting notes should list the species that will be planted and should describe the plantingmethods that will be used.These notes should also describe site preparation, sediment anderosion controls, and planting site maintenance, including mulching, fertilizing, inspections, andreplanting when necessary.

10-7
Example 39: Mixed Plantings
This example illustrates a long row of mixed plantings along the limit of disturbance associatedwith a commercial project in which the applicant could not entirely avoid the Riverbank Wetland.The density of the plantings makes it particularly effective because of the multiple uses andactivities, such as people, lighting, and traffic often associated with most development, especiallycommercial projects.
How wetland impacts were minimized:
The variety of native evergreen trees and shrubs provide a thick year-round buffer to blockout noise, light, and other disturbances created by the project.
The rows of plantings serve as a visual reminder of the Limits of Clearing and Disturbance.
Example 39
10-8
Example 40: Tree and Shrub Installation
The following examples illustrate best management practices for planting a tree and for planting ashrub on a slope taken from the Rhode Island Standard Details by the Department ofTransportation.The Standard Details book includes many other diagrams and illustrations that aregood examples for planting installation. Be sure to verify any specific growth requirements for thespecies proposed to be planted.
Example 40b
Example 40a
10-9
References
This list provides additional sources for information on plantings. (See Chapter 12 for completecitations arranged by author.) Please be aware that not all native or naturalized plants will beappropriate in all circumstances. On certain projects a landscape architect may be required.Otherwise a local nursery may be able to help make recommendations.
• American Wildlife & Plants: A Guide to Wildlife Food Habits by A. C. Martin et al. (1951)
• Conservation Plants for the Northeast by D. G. Lorenz et al. (1989)
• Landscaping for Wildlife by C. L. Henderson, Minnesota Department of Natural ResourcesNongame Wildlife Program (1994)
• Native Plants for Attracting Wildlife by C. M. McDonough (2000)
• Native Shrubs for Landscaping by S. L.Taylor et al. (1987)
• Sustainable Trees and Shrubs, 3rd Edition, by B. Maynard et al. (1999)
• Trees, Shrubs and Vines for Attracting Birds by R. DeGraaf and G.Witman (2002)
• Wetland Planting Guide for the Northeastern United States: Plants for Wetland Creation, Restoration,and Enhancement by G.Thunhorst (1993)
• Vascular Flora of Rhode Island;A List of Native and Naturalized Plants,Volume 1 of The Biota ofRhode Island by the Rhode Island Natural History Survey (1998)

11-1
1111.. Construction and Maintenance Tips
Good construction and maintenance planning are essential to the successful completion of anyproject.Although it may not seem necessary to think about construction or maintenance until theactual work begins on a project site, detailed forethought will prevent problems, save time, andensure a successful project. Construction and maintenance planning are especially crucial withlarger projects due to the larger area of impacted land.The applicant must remember to stay inregular contact with the construction crews as they are implementing the approved permit design.If the plans are not followed as approved, the applicant is responsible for any wetland impacts thatmay occur. Many best management practices to help the applicant limit construction impacts andproperly maintain the project site are discussed on the next few pages.
Prior to Construction the Applicant Should
• Make sure to read all the permit conditionsand ask questions if they are unclear.
• Post a sign with the permit number in a visiblelocation.
• Have a copy of the approved plans and permitat the site.
• Include all contractors in all pre-constructionmeetings. Make sure all contractors are awareof sensitive wetlands/habitat areas that must beavoided per DEM approved permit plans andconditions.
Protection During Construction
• Properly install all sediment and erosioncontrols.
• Consider the use of silt fencing and staked bales of hay if working on land, and considercofferdams and silt curtains if working in a watercourse or pond or lake.
• Use other recommended sediment and erosion controls as described in this manual and theRhode Island Soil Erosion and Sediment Control Handbook.
• Check all sediment and erosion controls and maintain them on a daily to weekly basis andafter any storm event.
• Place baled hay at least a foot out from the proposed (planned) toe of the slope to preventerosion once they are removed.
• Stabilize exposed soils by seeding and applying a thick mat of straw mulch.
• Use erosion control blankets, such as jute or other types of non-plastic matting to prevent
Common Construction &Maintenance Problems
• Soil erosion from clearing andgrading a large area.
• Unauthorized work in areasoutside the Limits of Clearingand Disturbance depicted onthe approved plan.
• Sedimentation of a wetlandfrom poorly installed sedimentand erosion controls, lack oferosion control maintenance,and the failure to stabilizedisturbed soils.
11-2
erosion on steep slopes.
• Divert runoff around excavations by using check dams, ditches, and filter structures made ofstone, gravel, or sandbags. Install gravel trenches along driveways or patios to collect waterand allow it to filter into the soil.
• Use wide-tire vehicles when working in or near wetlands to cause less rutting and soildisturbance.
• Use timber mats when working in or near wetlands, especially where heavy equipmentaccess is required.
• If dewatering of trenches is necessary, pump all water to an acceptable, properly designedfilter fabric basin - please see the Rhode Island Soil Erosion and Sediment Control Handbook.
• No excess cement washwater, excess cement, or other building materials (such as paint)should be flushed into or near a gutter or storm drain or near any wetlands.
• Utilize tree protection devices during construction.
• Please also see the Rhode Island Soil Erosion and Sediment Control Handbook for completeexamples and descriptions of how to protect wetland areas during construction.
Clearing
• Especially on large projects, clear lots in phases so that the land is not stripped of vegetationall at once.
• Once an area has been cleared, try to schedule all work in close time proximity to avoidrepeated disturbance to nearby wetlands and so the area can be stabilized quickly.
• Minimize the amount of exposed soils, especially on steep slopes, and limit the length of timethat any soil is exposed.
• Avoid removing trees or other vegetation from, or in the vicinity of, the wetland.
• Preserve the existing tree canopy, and use selective clearing to minimize clearing ofvegetation.
• Avoid impounding water.
• Limit grading to small areas.
• If cutting of vegetation in the wetland cannot be avoided, complete the work by hand (chainor hand saw) instead of using large equipment.
• When removing trees and brush, use cranes to lift them out of the area, or use chains orcables to drag them upslope to reduce the potential for erosion and sedimentation impactsfrom vehicle tires or treads.
• See the Rhode Island Soil Erosion and Sediment Control Handbook for examples and descriptionsof how to protect cleared areas during construction.

11-3
Timing and Sequence
A good project design can be overshadowed by poor sequencing of construction if theconstruction activities fail to avoid or reduce wetland impacts.While sequence and timing ofconstruction work is often dependent on the contractors schedule, it is always important for themto employ best management practices.
• Limit construction activities withinvegetated wetlands and flowing and standingwater wetlands to the low flow period ofJuly through October, unless there areoverriding breeding or migratory issues.
• Schedule all construction adjacent to orwithin wetlands during dry periods - or atleast not immediately prior to during rainevents.
• Avoid work during the breeding andmigratory seasons of sensitive wildlifespecies that utilize the area.
• Plan utility installations to occur duringother project construction activities to limitthe length of disturbance to nearbywetlands.
Construction Sequence Notes: Allconstruction notes must be detailed enough sothat they can demonstrate to DEM that theapplicant has thought through the constructionactivities and their sequence with respect to theprotection of wetlands.The notes should specifyall construction steps that may affect wetlands andthe order in which the steps will occur, includingthe following: 1. Installation of erosion and sediment controls; 2. Site preparation; 3. Removal anddisposal of items; 4. Dewatering; 5. Grading; 6. Construction and building of structures and drainagesystems; 7.Temporary and permanent site stabilization; 8. Restoration and plantings; and 9. Removalof temporay controls.
Materials
• Have all necessary materials on hand before beginning work.
• Establish a materials storage area and staging area prior to construction. Install and maintainproper soil erosion and sediment controls around areas for the life of the project.
• Place construction access roads and locate soil stockpiles as far from wetlands as possible.
• Keep the construction site clean of loose dirt, litter, toxic chemicals and other debris.
• Cover stockpiles and landscaping materials with tarps.
Recommended ConstructionSequencing
• Acceptable soil erosion and sedimentcontrols and buffer zone markersmust be installed before the start ofall construction activities, includingclearing.
• Wetland restoration or mitigationareas should be completed prior tobuilding of the actual project portionof the construction.
• Stormwater drainage systems andcontrol facilities should be installedand properly functioning prior topaving activities.
• Floodplain compensation areas mustbe constructed and functional priorto, or in concurrence with, anyfloodplain filling/displacement as partof a project design.
• Mitigation plantings must be installedbefore on-site occupancy.

11-4
Site Stabilization, Restoration and Maintenance efforts must be considered during the initialplanning and design phases and should be included in the application submittal.A project site mustbe effectively stabilized, revegetated, and maintainedto prevent soil erosion and to prevent sedimentfrom running into wetlands. Below are some goodtips to follow:
Restoration
• Complete restoration efforts immediatelyafter completing the construction of theproject.
• Replant disturbed soils and restore the areaas close as possible to its original topographyand hydrology if required.
• Replant any and all disturbed vegetation withnative, non-invasive vegetation.
• Restore stream channels to original, naturalconditions if disturbance to the channel isunavoidable.
• Utilize a wildlife conservation seed mix on alldisturbed surfaces within wetlands.
• Stabilize all disturbed areas outside of thecleared maintenance zone with trees, shrubsor other vegetation.
• Consider creating tree cover, nesting sites, orproviding wildlife plantings adjacent towetlands.
• See the Rhode Island Soil Erosion and Sediment Control Handbook for examples and descriptionsof how to protect and restore disturbed areas during construction.
• Completely remove all sediment and erosion controls after a project is completed and thesoil is stabilized.
Maintenance
• Maintain the area within the approved Limits of Clearing and Disturbance by hand-cutting ormowing, if permitted.
• Minimize or eliminate the use of any fertilizers, pesticides, or herbicides near wetlands.
• If the use of chemicals is unavoidable and if they are permitted, use natural pesticides andfertilizers, or use chemicals that tend to be less mobile in the environment and as a resultwill not move off site or degrade before movement can occur. Also ensure that anychemicals used are non-toxic to aquatic organisms.
• Replant any trees, shrubs or other groundcover that does not survive the required length oftime (or at least one full growing season).
Temporary Seeding
If land is cleared and soil is exposedbefore construction will occur, it is agood practice to temporarily stabilizethe soil by seeding.
• Seeding can begin in the spring,but should be completed by earlyfall for seeds to germinate beforethe weather becomes too cold.
• Seeding should be done as soonas an area is exposed if it will notbe built on immediately.
• Areas to be seeded should besmooth and fairly level.
• Steep slopes should be coveredwith erosion control blankets ormulch in addition to seeding.
• Seeding must be kept within theLimits of Clearing andDisturbance.
• Seeded areas should be wateredduring the summer.

11-5
• Include methodology for completing regular maintenance and emergency repairs to any partsof the project that require access in or through wetland.
• Inspect and maintain all stormwater controls on a regular basis.
• Complete regular sweeping and litter clean up in parking lots and other impervious surfaces.
Maintenance Notes: Maintenance notes are a required part of a complete application.Theyoften detail how engineering structures or grass or otherwise vegetated areas will be maintained.The notes will help program staff determine whether a project will impact wetlands, and they willensure that the area will continue to be protected and that the structures will operate effectivelyafter the project is constructed. Sometimes projects may only require a few specific notes onmaintenance, such as a mowing note.
Below is a partial list of what to include in maintenance notes, as applicable to a specific project:
• Long term inspection and maintenance plan.
• Party responsible for long term maintenance.
• Sediment storage and disposal information.
• How hazardous materials will be handled.
• How engineering structures will be cleaned and maintained to prevent clogging.
• Frequency of mowing (i.e. mowing will be done at least once per growing season afterAugust 15 to protect ground nesting birds and other animals), regrading, or revegetation.,
• Treatment for mosquito abatement.
• Provisions for removal of litter and debris.
• Use of herbicides, pesticides or fertilizers.

11-6
Example 41: Construction Sequencing
In addition to site layout and design, the proper sequencing of construction events during a projectwill further help to minimize impacts to wetlands. Information on construction sequencing isalways helpful to the biologist and engineer who review the application. For some projects thisinformation is an absolute requirement; for other projects it may not be as critical but is still veryuseful. Often large projects, or projects that include crossing a wetland, will require theconstruction sequencing information.The following example is an old farm, much of which waspreviously disturbed prior to the Freshwater Wetland Act. Not shown is an existing abandonedhome and barn and some existing vegetation, which is maintaining ground stabilization andproviding a woody habitat.The applicant is proposing to clear the site to build a condominiumcomplex and has utilized a good construction sequence to protect the wetland areas.Although thevast majority of the construction and disturbance will occur outside of the 50 Foot PerimeterWetland, this project will still need a wetland permit due to the change in stormwater runoffpatterns that are created by the development of this lot.
Stages:
1. Sediment and Erosion Controls: These controls should be installed first, before beginningANY type of construction, including clearing of a project site.The controls must encompass allwork, and must be within the Limits of Clearing and Disturbance (most often they are at the limitof clearing and disturbance). Sediment and erosion controls will prevent sediment from passinginto adjacent wetlands and will prevent erosion of exposed ground.This example shows a line ofsediment and erosion controls that encompass the entire project for the construction work.
Example 41a

11-7
Example 41: Construction Sequencing Continued
2. Phased clearing: It is important, especially on a large site to clear in such a way that the entiresite is not exposed all at once. If more ground is cleared and exposed than will be built uponimmediately, it will be necessary to temporarily cover, seed and stabilize the soil.This exampleshows clearing in two phases, as the building will be done in two phases.
Example 41b

11-8
Example 41: Construction Sequencing Continued
3. Grading: When grading a project, gradual slopes are preferable to steep slopes because theyare less susceptible to erosion. However, a site should not be graded so low as to intercept thegroundwater table. In this example the project avoids the steeply sloped Perimeter Wetland andwill maintain the original upland topography as much as possible, with gradual grading in thenecessary areas.The final project contours are not shown.
4. Stabilization and Restoration: Generally all project sites will need some sort of restorationwork after construction to keep soil from eroding, to provide a noise and light buffer to thewetland areas, and to reestablish lost habitat for wetland wildlife species.This example site hasextensive plantings to minimize negative effects that the development will have on the wetlandwater quality and wildlife habitat, as well as to minimize flooding and maintain healthy wetlands.
Example 41c
Example 41d
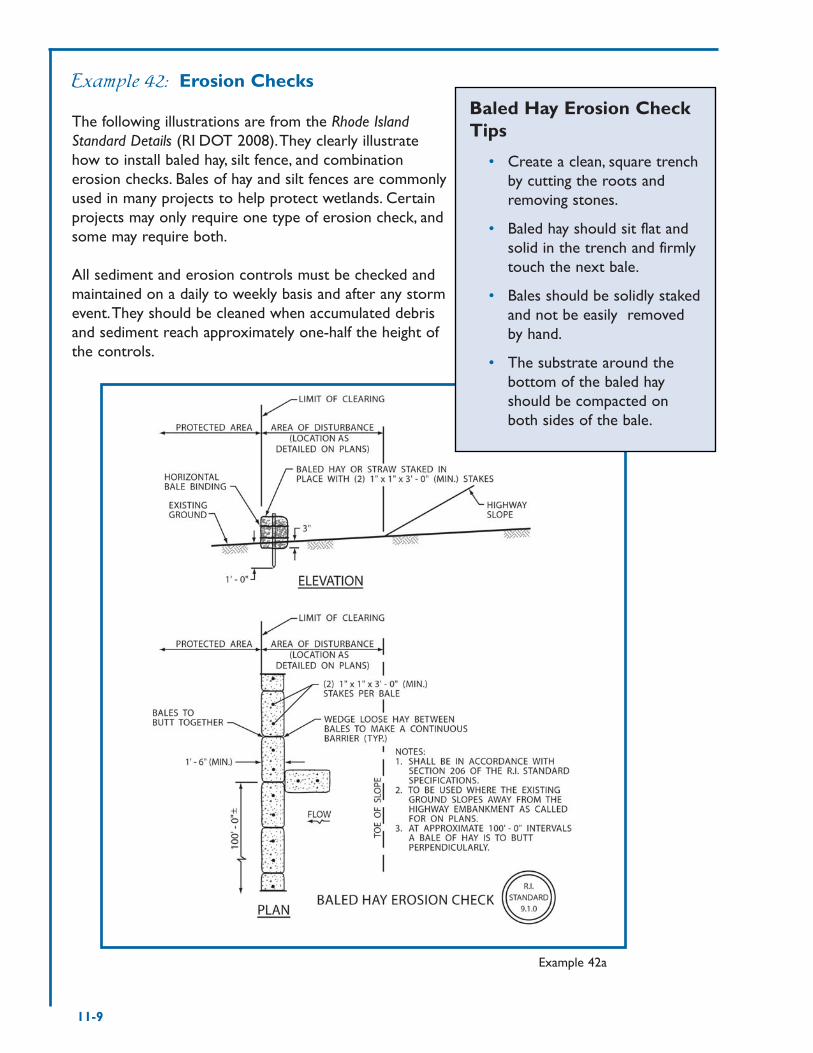
11-9
Example 42: Erosion Checks
The following illustrations are from the Rhode IslandStandard Details (RI DOT 2008).They clearly illustratehow to install baled hay, silt fence, and combinationerosion checks. Bales of hay and silt fences are commonlyused in many projects to help protect wetlands. Certainprojects may only require one type of erosion check, andsome may require both.
All sediment and erosion controls must be checked andmaintained on a daily to weekly basis and after any stormevent.They should be cleaned when accumulated debrisand sediment reach approximately one-half the height ofthe controls.
Baled Hay Erosion CheckTips
• Create a clean, square trenchby cutting the roots andremoving stones.
• Baled hay should sit flat andsolid in the trench and firmlytouch the next bale.
• Bales should be solidly stakedand not be easily removedby hand.
• The substrate around thebottom of the baled hayshould be compacted onboth sides of the bale.
Example 42a
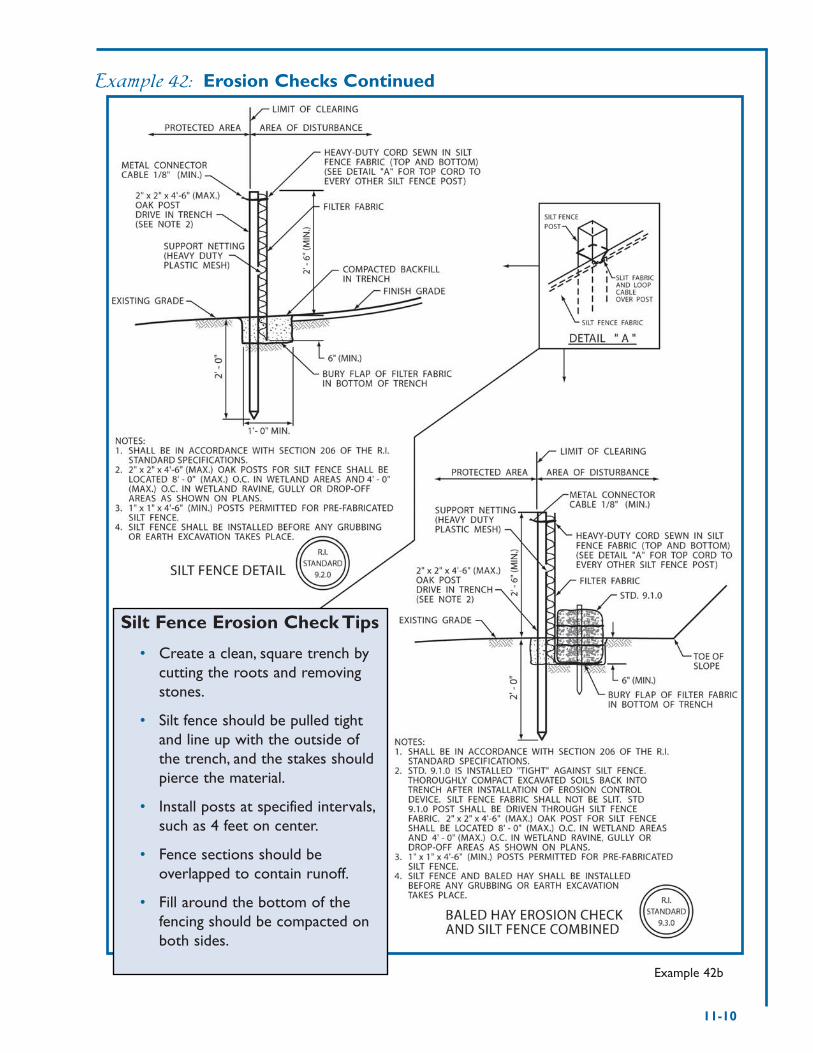
11-10
Example 42: Erosion Checks Continued
Silt Fence Erosion Check Tips
• Create a clean, square trench bycutting the roots and removingstones.
• Silt fence should be pulled tightand line up with the outside ofthe trench, and the stakes shouldpierce the material.
• Install posts at specified intervals,such as 4 feet on center.
• Fence sections should beoverlapped to contain runoff.
• Fill around the bottom of thefencing should be compacted onboth sides.
Example 42b

12-1
1122.. References &ResourcesAxelson, P.W., D.A. Chesney, D.V. Galvan, and J. B. Kirschbaum. 1999. Designing Sidewalks and Trailsfor Access: Part I of Best Practices Design Guide. United States Department of Transportation,Washington, D. C. 109 pp.
Bohlweki Environmental Ltd. and Coastal and Environmental Services. N2 Wild Coast Consortium.2002. N2 Wild Coast Toll Road Between East London and Durban: Environmental ManagementPlan. 164 pp. http://www.nra.co.za/documents/ENntwEMP11.pdf
Boyle, S.A. and F.B. Samson. 1985. Effects of Non-Consumptive Recreation on Wildlife:A Review.Wildlife Society Bulletin 13(2):110-116.
Bureau of Resource Protection Wetlands and Waterways Program. 2002. Massachusetts InlandWetland Replication Guidelines. Massachusetts Department of Environmental Protection. 35pp.
Burger, J. 1981.The Effect of Human Activity on Birds at a Coastal Bay. Biological Conservation 21:231-241.
Calhoun,A. J. K. and M.W. Klemens. 2002. Best Development Practices: Conserving Pool-BreedingAmphibians in Residential and Commercial Developments in the Northeastern United States. MCATechnical Paper No. 5, Metropolitan Conservation Alliance,Wildlife Conservation Society, Bronx,New York. 57 pp.
Callahan, K., G. Hath, M. Hutchinson, J. Gebrian, J. Mills, and H.Withers. 1992.An Inland WetlandCommissioner's Guide To Site Plan Review. Connecticut Department of Environmental Protection,Bureau of Water Management, Inland Water Resources Division/Inland Wetland Program, Hartford,CT. 76 pp.
Cassidy, G. J., J. B.Avan, and M. J.Tremblay. 2003. Forestry Best Management Practices for WaterQuality Protection, Rhode Island, 2nd edition. Rhode Island Department of EnvironmentalManagement, Providence, RI. 36 pp.
The Center for Resource Management. 1996. Environmental Principles for Golf Courses in the U.S.Salt Lake City, UT. 15 pp.
Chase,V.P., L. Deming, and F. Latawiec. 1995. Buffers for Wetlands and Surface Waters:A Guidebookfor New Hampshire Municipalities.Audubon Society of New Hampshire. 80 pp.
Colorado Department of Natural Resources. 1996. Best Management Practices for Wetlands withinColorado State Parks. Colorado State Parks, Natural Areas Program, Denver, CO. 143pp.

12-2
Connecticut Department of Environmental Protection Bureau of Water Management. 1994.Connecticut Erosion and Sediment Control Pocket Guide: Protecting Water Quality ThroughProper Installation and Maintenance of Erosion Control Devices.The Connecticut Department ofEnvironmental Protection, Hartford, Connecticut. 32 pp.
Connecticut Department of Environmental Protection, Inland Fisheries Division, HabitatConservation and Enhancement Program. 2008. Stream Crossing Guidelines.The ConnecticutDepartment of Environmental Protection, Hartford, Connecticut. 14 pp.
Connecticut River Joint Commissions Inc. 2001. Riparian Buffers for the Connecticut River ValleyFact Sheet Series. Connecticut River Joint Commissions, Charlestown, New Hampshire. 10 FactSheets.
DeGraaf, R.M. and G.Whitman. 2002.Trees, Shrubs, and Vines for Attracting Birds. University Pressof New England, Hanover, New Hampshire. 169 pp.
DeLong,A.K. and J.T. Schmidt. Undated. Draft Literature Review: Effects of Human Disturbance onWildlife with Emphasis on Wildlife-Dependent Recreation Relevant to Stillwater National WildlifeRefuge. U.S. Fish and Wildlife Service. Unpublished Draft Report. 52 pp.
Dowd, C. 1992. Effect of Development on Bird Species Composition of Two Urban ForestedWetlands in Staten Island, New York. J. Field Ornithol. 63:455-461.
Environmental Crossing Inc. Horizontal Directional Drilling.Traverse City, MI.http://www.ecihdd.com
Federal Highway Administration. Undated. Highway Traffic Noise. U.S. Department ofTransportation. 8 pp. www.fhwa.dot.gov/environment/htnoise.htm.
Fischer, R.A. and J.C. Fischenich. 2000. Design Recommendations for Riparian Corridors andVegetated Buffer Strips. EMRRP Technical Notes Collection. ERDC TN-EMRRP-SR-24. U.S.ArmyEngineer Research and Development Center,Vicksburg, Mississippi. ww.wes.army.mil/el/emrrp.
Fisher, R.A. 2000.Width of Riparian Zones for Birds. U.S.Army Engineer Research andDevelopment Center. EMRRP Technical Notes Collection.TN EMRRP-SI-09. 7 pp.
Flink, C.A., K. Olka, R. Searns, and D. Burwell.1993.Trails for the Twenty-First Century: Planning,Design, and Management Manual for Multi-Use Trails. Island Press,Washington, D.C. 213 pp.
Flinker, P. and R. Claytor. 2005. Urban Environmental Design Manual. Rhode Island Department ofEnvironmental Management, Providence, RI. 95 pp.
Flinker, P. 2003.The Rhode Island Conservation Development Manual:A Ten-Step Process forPlanning and Design of Creative Development Projects. Rhode Island Department of EnvironmentalManagement, Providence, RI. 96 pp.
Forman, R.T.T. and L.E.Alexander. 1998. Roads and Their Major Ecological Effects.Annual Review ofEcology and Systematics. 29:207-231.

12-3
Forman, R.T.T. 2000. Estimate of the Area Affected Ecologically by the Road System in the UnitedStates. Conservation Biology. 14(1): 31-35.
Forman, R.T.T. and R.D. Deblinger. 2000.The Ecological Road-Effect Zone of a MassachusettsSuburban Highway. Conservation Biology. 14(1): 36-46.
Forman, R.T.T., D. Sperling, J.A. Bissonette,A.P. Clevenger, C. D. Cutshall,V.H. Dale, L. Fahrig, R.France, C. R. Goldman, K. Heanue, J.A. Jones, F.T. Swanson,T.Turrentine, and T. C.Winter. 2003.Road Ecology, Science and Solutions. Island Press,Washington, D.C. 481 pp.
Gaines,W. L., P.H. Singleton, and R. C. Ross. 2003.Assessing the Cumulative Effects of LinearRecreation Routes on Wildlife Habitats on the Okanogan and Wenatchee National Forests.General Technical Report. PNW-GTR-586. 79 pp.
Garbisch, E.W. 2002.The Dos and Don'ts of Wetland Construction: Creation, Restoration andEnhancement. Environmental Concern Inc., St. Michaels, Maryland. 180 pp.
Geist, K., S. Pick, and M. Brittingham. 2001. Pennsylvania Wildlife No. 10: Neighborly NaturalLandscaping: Creating Natural Environments in Residential Areas. Pennsylvania State College ofAgricultural Sciences, University Park, Pennsylvania. 8 pp.
Gibbs, J.P. 1998.Amphibian Movements in Response to Forest Edges, Roads, and Streambeds inSouthern New England. Journal of Wildlife Management. 62(2): 584-589.
Golet, F.C. 2005. NRS 424 Wetland Project Review Checklist. University of Rhode Island, Collegeof the Environment and Life Sciences, Department of Natural Resource Sciences, Kingston, RI. 1p.
Gould, L. L., R.W. Enser, R. E. Champlin, and I. H. Stuckey. 1998.Vascular Flora of Rhode Island:A Listof Native and Naturalized Plants.The Rhode Island Natural History Survey, Kingston, RI. 268 pp.
Groffman, P.M.,A. J. Gold,T. Husband, R. Simmons, and W. Eddleman. 1991.An Investigation IntoMultiple Uses of Vegetated Buffer Strips. Narragansett Bay Project Report. NBP-91-63. University ofRhode Island, Department of Natural Resources Science. 166 pp
Henderson, C. L. 1981. Landscaping for Wildlife. Minnesota Department of Natural ResourcesNongame Wildlife Program, St. Paul, Minnesota. 145 pp.
Hockin, D., M. Ounsted, M. Gorman, D. Hill,V. Keller, and M.A. Barker. 1992. Examination of theEffects of Disturbance on Birds with Reference to its Importance in Ecological Assessments. Journalof Environmental Management. 36: 253-286.
Jackson, S.D. 1997. Proposed Design for an Amphibian and Reptile Tunnel. Unpaginated.
Jackson, S.D. 2000. Overview of Transportation Impacts on Wildlife Movement and Populations.Pages 7-20 in Messmer,T.A. and B.West.Wildlife and Highways: Seeking Solutions to an Ecologicaland Socio-Economic Dilemma.The Wildlife Society.
12-4
Jackson, S.D. 2003. Ecological Considerations in the Design of River and Stream Crossings. Pages20-29 in Irwin, C.L., P. Garrett, and K. P. McDermott, eds. 2003. Proceedings of the InternationalConference on Ecology and Transportation. Center for Transportation and the Environment, NorthCarolina State University, Raleigh, NC.
Jackson, S.D. and C.R. Griffin. 2000.A Strategy for Mitigating Highway Impacts on Wildlife. Pp. 143-159. In Messmer,T.A. and B.West.Wildlife and Highways: Seeking Solutions to an Ecological andSocio-Economic Dilemma.The Wildlife Society.
Kaiser, M.S. and E.K. Fritzell. 1984. Effects of River Recreationists on Green-Backed Heron Behavior.Journal of Wildlife Management 48(2): 561-567.
Kirschbaum, J. B., P.W.Axelson, P. E. Longmuor. 2001. Designing Sidewalks and Trails for Access: PartII of Best Practices Design Guide. United States Department of Transportation,Washington, D. C.484 pp.
Knight, R.L. and K.J. Gutzwiller. 1995.Wildlife and Recreationists: Coexistence Through Managementand Research. Island Press,Washington, D.C. 372 pp.
Korschgen, C.E. and R.B. Dahlgren. 1992. Human Disturbances of Waterfowl: Causes, Effects, andManagement. U.S. Fish and Wildlife Leaflet 13.2.15. 8 pp.
Leung,Y. and J. L. Marion. 2000. Recreation Impacts and Management in Wilderness:A State-of-Knowledge Review. Pages 23-48 in Cole, D.N., S. F. McCool,W.T. Borrie, J. O'Loughlin, comps. 2000.Wilderness Science in a Time of Change Conference - Volume 5:Wilderness Ecosystems,Threats,and Management; 1999 May 23-27; Missoula, MT, Proceedings RMRS-P-15-VOL-5. U.S. Departmentof Agriculture Forest Service, Rocky Mountain Research Station, Ogden, Utah.
Lorenz, D. G.,W. C. Sharp, J. D. Ruffner. 1989. Conservation Plants for the Northeast. United StatesDepartment of Agriculture, Soil Conservation Service. 43 pp.
Martin,A. C., H. S. Zim,A. L. Nelson 1951.American Wildlife & Plants A Guide to Wildlife FoodHabits:The Use of Trees, Shrubs,Weeds and Herbs by Birds and Mammals of the United States.Dover Publication, Inc., New York. 500 pp.
Mason & Associates, Inc. 2002.A Manual of Environmental Best Management Practices forConstruction & Maintenance of Golf Courses. Unpublished. 70 pp.
Massachusetts Audubon Society. 1999. Golf Courses and the Environment. Massachusetts AudubonSociety, Lincoln, Massachusetts. 8 pp.
Massachusetts Executive Office of Environmental Affairs, Department of Fish and Game,Massachusetts Riverways Program. 2005. Massachusetts Stream Crossings Handbook.Commonwealth of Massachusetts, Boston, Massachusetts. 14 pp.
Maynard, B.K., R.A. Casagrande, M. Gold, S. Livingston, and S. H. Gordon. 1999. Sustainable Treesand Shrubs, third edition. University of Rhode Island, Cooperative Extension LandscapeHorticulture Program. University of Rhode Island Cooperative Extension Education Center,Kingston, Rhode Island. 48 pp.

12-5
McDonough, C. M. 2000. Native Plants for Attracting Wildlife. New England Wild Flower Society,Framingham, Massachusetts. 11 pp.
Meyer, K. G. 2002. Managing Degraded Off-Highway Vehicle Trails in Wet, Unstable, and SensitiveEnvironments. USDA Forest Service Technology and Development Program, Missoula, Montana. 48pp.
Narrow River Preservation Association. 1997.The Narrow River Handbook:A Guide to Living inthe Watershed. Narrow River Preservation Association, Saunderstown, RI. 28 pp.
Nyhan, K.T. 2001. Best Management Practices for Routine Roadway Maintenance Activities in NewHampshire. New Hampshire Department of Transportation, Concord, NH. 54 pp.
Paton, P. and S. Egan. 2001. Effects of roads on amphibian community structure at breeding ponds inRhode Island. Final Report to Federal Highway Administration. University of Rhode Island, Kingston,Rhode Island. 44 pp.
Picone, P. M. 1995. Enhancing Your Backyard Habitat for Wildlife. Connecticut Department ofEnvironmental Protection Bureau of Natural Resources Wildlife Division. 26 pp.
Pomerantz, G.A., D. J. Decker, G. R. Goff, and K. G. Purdy. 1988.Assessing Impact of Recreation onWildlife:A Classification Scheme.Wildlife Society Bulletin. 16(1): 58-62.
Powell, R. O. and J. B. Jollie. 1990. Environmental Guidelines for the Design and Maintenance of GolfCourses. Department of Environmental Protection and Resource Management, Baltimore County,Maryland. 26 pp.
Prince George's County, Maryland Department of Environmental Resource Programs and PlanningDivision. 2000. Low-Impact Development:An Integrated Design Approach. Prince George's CountyDepartment of Environmental Resources, Largo, Maryland. 148 pp.
Purdy, K.G. and G. R. Goff. 1987.A Guide to Managing Human Activity on National Wildlife Refuges.SDI Fish and Wildlife Service Technical Information Package. U.S. Government Printing Office 1987-776-853,Washington, D.C. 57 pp.
Rhode Island Department of Environmental Management. 1989. Soil Erosion and Sediment ControlHandbook. Rhode Island Department of Environmental Management, Providence, Rhode Island.218 pp.
Rhode Island Department of Environmental Management. 2008.What's the Scoop on Wetlands?Frequently Asked Questions about DEM's Freshwater Wetlands Program. Rhode IslandDepartment of Environmental Management, Providence, Rhode Island. 48 pp.
Rhode Island Department of Transportation. 2008. Rhode Island Standard Details. State of RhodeIsland and Providence Plantations, Providence, RI.
Rodgers, Jr., J.A. and H.T. Smith. 1997. Buffer Zone Distances to Protect Foraging and LoafingWaterbirds from Human Disturbance in Florida.Wildlife Society Bulletin. 25(1): 139-145.
12-6
Shellman, M.,A. McCann,A. J. Gold, and A. Simeoni. 1994. RI Home*A*SYST Home LandscapeImprovements for Water Quality Protection. University of Rhode Island Cooperative ExtensionDepartment of Natural Resources Science, Kingston, RI. 14 pp.
Simicevic, J. and R. L. Sterling. 2001. Guidelines for Pipe Bursting. U.S.Army Corps of EngineersEngineering Research and Development Center,Vicksburg, Mississippi. 55 pp.
Taylor, S. L.,W.A. Niering, and G. D. Dreyer. 1987. Native Shrubs for Landscaping.The ConnecticutCollege Arboretum, New London, Connecticut. 40 pp.
Thunhorst, G.A. 1993.Wetland Planting Guide for the Northeastern United States: Plants forWetland Creation, Restoration, and Enhancement. Environmental Concern, Inc., St. Michael's,Maryland. 179 pp.
Trombulal, S.C. and C.A. Frissell. 2000. Review of Ecological Effects of Roads on Terrestrial andAquatic Communities. Conservation Biology. 14:18-30.
U. S. Department of Agriculture (USDA) Forest Service. 2008. Stream Simulation:An EcologicalApproach to Providing Passage for Aquatic Organisms at Road-Stream Crossings. Forest ServiceStream-Simulation Working Group. National Technology and Development Program, San Dimas,CA.
Welsch, D.J. 1991. Riparian Forest Buffers: Function and Design for Protection and Enhancement ofWater Resources. U.S. Department of Agriculture Forest Service Publication. No. NA-PR-07-91. 24pp.
Whitlock,A.L., N. M. Jarman, and J. S. Larson. 1994.WEThings:Wetland Habitat Indicators forNongame Species:Wetland-Dependent Amphibians, Reptiles, and Mammals of New England VolumeII.The Environmental Institute, University of Massachusetts,Amherst, Massachusetts.TEI PublicationNo. 94-2. 627 pp.

AcknowledgementsThis Wetland BMP Manual:Techniques for Avoidance and Minimization is in partialfulfillment of contract agreements between the State of Rhode Island and Providence PlantationsDepartment of Environmental Management (DEM), the New England Interstate Water PollutionControl Commission (NEIWPCC), and the Environmental Protection Agency (EPA), Region 1.Theagreements were funded in part by the EPA Region 1, Clean Water Act Section 104 (b)3 WetlandProgram Development Grants and by the State of Rhode Island.The project was managed,coordinated and editted at DEM by Sue Kiernan and Carol Murphy. NEIWPCC contracts wereoverseen by Beth Card, Rebekah Lacey, and Kerry Strout.
Susan Ely, formerly of NEIWPCC, is the principal author of and researcher for the Wetland BMPManual and she skillfully facilitated the work of the DEM technical team.Anne Jett Owens, alsoformerly of NEIWPCC, and Christopher Rowe, formerly of DEM, were the Manual designers andillustrators. Chris also honed the text and examples to provide consistency in later drafts.Christine Caron of NEIWPCC assisted DEM with final editting and production.
The DEM technical team members were Dan Kowal, Claire Swift, Joe Casey, Nancy Freeman, JaneKelly, Jay Osenkowski, Nick Pisani, PE, Ray Larson, PE, Greg Swift, Jennifer Stout, Bruce Ahern,Howard Cooke, Hank Ellis, Steve Tyrrell, and former DEM staff Dean Albro, Michael Dahlquist,Heather Hamilton, and Leland Mello. Each of these team members contributed expertise andassistance, without which the manual could not have been drafted.
Many others assisted with the development and shaping of the manual and acknowledgements aretherefore made to the following individuals:
§ Within DEM:Terry Walsh, Elizabeth Scott, Lisa Lawless, PE, Scott Millar, Ron Gagnon, PE, KenAyars, PE,Terri Bisson, Melinda Hopkins, Charlie VanPatten and prior staff Jim Riordan, Fred Presley,and Eugene Pepper.
§ Outside DEM: Karen Beck, RLA, (Commonwealth Engineers and Consultants, Inc.) regardingChapter 10 Plantings, Steve Cabral, PE, (Crossman Engineering, Inc.), Christopher Duhamel, PE(DiPrete Engineering Associates), Frank Golet, PhD, (University of Rhode Island and Wetland TaskForce), Emilie Holland (RI DOT and Wetland Task Force), Briscoe Lang (Pare Associates),Christopher Mason (Mason and Associates, Inc. and Wetland Task Force) regarding Chapter 5 GolfCourses, and Kelly Presley (former RIDOT).
§ From NEIWPCC: Deb Pelton (former staff).
Special acknowledgements to Peter Holmes, EPA Region 1, Rhode Island Wetland ProgramCoordinator and DEM wetland managers and supervisors,Alicia Good, PE, Russ Chateauneuf, PE,Chuck Horbert, Marty Wencek, and Hank Ellis all of whom provided longstanding assistance andsupport during the development and completion of this Manual.
A document of this scope would not have been possible without the contributions of all of thesepeople.