what is azure relay and why use it overview | microsoft docs
TRANSCRIPT

Table of ContentsTable of Contents
Service Bus Relay Documentation Overview
What is Relay? FAQ
Quickstarts Create a namespace Create a hybrid on-premises/cloud application Hybrid Connections
.NET Node
WCF Relay WCF Relay tutorial WCF Relay REST tutorial
How To Plan and design
Authentication and security Hybrid Connections protocol
Develop Available APIs
Manage Monitor Azure Relay with Azure Monitoring
Reference .NET
Microsoft.Azure.Relay Microsoft.ServiceBus
Exceptions Port settings
Resources Azure Roadmap
Blog Pricing Pricing calculator Samples Stack Overflow

Service Bus Relay Documentation
Reference
Learn how Azure Relay service facilitates hybrid applications between on-premises and cloud environments within a corporateenterprise network and the public cloud, without having to open a firewall connection or require intrusive changes to a corporatenetwork infrastructure.
Learn about Service Bus RelayLearn about Service Bus Relay
Azure Service Bus Relay Video LibraryAzure Service Bus Relay Video Library
Create a namespaceCreate a namespace
Get started with Hybrid ConnectionsGet started with Hybrid Connections
Get started with Shared Access SignaturesGet started with Shared Access Signatures
Command-LineCommand-Line
LanguagesLanguages
RESTREST
PowerShell
.NET
REST API Reference

What is Azure Relay?12/20/2017 • 3 min to read • Edit Online
WCF RELAY HYBRID CONNECTIONS
WCF x
.NET Core x
.NET Framework x x
JavaScript/NodeJS x
Standards-Based Open Protocol x
Multiple RPC Programming Models x
Hybrid Connections
The Azure Relay service facilitates hybrid applications by enabling you to securely expose services that residewithin a corporate enterprise network to the public cloud, without having to open a firewall connection, or requireintrusive changes to a corporate network infrastructure. Relay supports a variety of different transport protocolsand web services standards.
The relay service supports traditional one-way, request/response, and peer-to-peer traffic. It also supports eventdistribution at internet-scope to enable publish/subscribe scenarios and bi-directional socket communication forincreased point-to-point efficiency.
In the relayed data transfer pattern, an on-premises service connects to the relay service through an outboundport and creates a bi-directional socket for communication tied to a particular rendezvous address. The client canthen communicate with the on-premises service by sending traffic to the relay service targeting the rendezvousaddress. The relay service then "relays" data to the on-premises service through a bi-directional socket dedicatedto each client. The client does not need a direct connection to the on-premises service, it is not required to knowwhere the service resides, and the on-premises service does not need any inbound ports open on the firewall.
The key capability elements provided by Relay are bi-directional, unbuffered communication across networkboundaries with TCP-like throttling, endpoint discovery, connectivity status, and overlaid endpoint security. Therelay capabilities differ from network-level integration technologies such as VPN, in that relay can be scoped to asingle application endpoint on a single machine, while VPN technology is far more intrusive as it relies on alteringthe network environment.
Azure Relay has two features:
1. Hybrid Connections - Uses the open standard web sockets enabling multi-platform scenarios.2. WCF Relays - Uses Windows Communication Foundation (WCF) to enable remote procedure calls. WCF
Relay is the legacy relay offering that many customers already use with their WCF programming models.
Hybrid Connections and WCF Relays both enable secure connection to assets that exist within a corporateenterprise network. Use of one over the other is dependent on your particular needs, as described in thefollowing table:

Service historyService history
WCF Relay
Architecture: Processing of incoming relay requests
Next steps
The Azure Relay Hybrid Connections capability is a secure, open-protocol evolution of the existing Relay featuresthat can be implemented on any platform and in any language that has a basic WebSocket capability, whichexplicitly includes the WebSocket API in common web browsers. Hybrid Connections is based on HTTP andWebSockets.
Hybrid Connections supplants the former, similarly named "BizTalk Services" feature that was built on the AzureService Bus WCF Relay. The new Hybrid Connections capability complements the existing WCF Relay featureand these two service capabilities exist side-by-side in the Azure Relay service. They share a common gateway,but are otherwise different implementations.
WCF Relay works for the full .NET Framework (NETFX) and for WCF. You initiate the connection between youron-premises service and the relay service using a suite of WCF "relay" bindings. Behind the scenes, the relaybindings map to new transport binding elements designed to create WCF channel components that integratewith Service Bus in the cloud. For more information, see getting started with WCF Relay.
When a client sends a request to the Azure Relay service, the Azure load balancer routes it to any of the gatewaynodes. If the request is a listening request, the gateway node creates a new relay. If the request is a connectionrequest to a specific relay, the gateway node forwards the connection request to the gateway node that owns therelay. The gateway node that owns the relay sends a rendezvous request to the listening client, asking the listenerto create a temporary channel to the gateway node that received the connection request.
When the relay connection is established, the clients can exchange messages via the gateway node that is used forthe rendezvous.
Relay FAQCreate a namespaceGet started with .NETGet started with Node

Azure Relay FAQs3/23/2018 • 7 min to read • Edit Online
General questionsWhat is Azure Relay?What is Azure Relay?
What is a Relay namespace?What is a Relay namespace?
What happened to Service Bus Relay service?What happened to Service Bus Relay service?
Pricing
How do you charge for Hybrid Connections and WCF Relay?How do you charge for Hybrid Connections and WCF Relay?
How am I billed for Hybrid Connections?How am I billed for Hybrid Connections?
This article answers some frequently asked questions (FAQs) about Azure Relay. For general Azure pricing andsupport information, see Azure Support FAQs.
The Azure Relay service facilitates your hybrid applications by helping you more securely expose services thatreside within a corporate enterprise network to the public cloud. You can expose the services without opening afirewall connection, and without requiring intrusive changes to a corporate network infrastructure.
A namespace is a scoping container that you can use to address Relay resources within your application. You mustcreate a namespace to use Relay. This is one of the first steps in getting started.
The previously named Service Bus Relay service is now called WCF Relay. You can continue to use this service asusual. The Hybrid Connections feature is an updated version of a service that's been transplanted from AzureBizTalk Services. WCF Relay and Hybrid Connections both continue to be supported.
This section answers some frequently asked questions about the Relay pricing structure. You also can see AzureSupport FAQs for general Azure pricing information. For complete information about Relay pricing, see ServiceBus pricing details.
For complete information about Relay pricing, see the Hybrid Connections and WCF Relays table on the ServiceBus pricing details page. In addition to the prices noted on that page, you are charged for associated data transfersfor egress outside of the datacenter in which your application is provisioned.
Here are three example billing scenarios for Hybrid Connections:
Scenario 1:
Scenario 2:
Scenario 3:
You have a single listener, such as an instance of the Hybrid Connections Manager installed andcontinuously running for the entire month.You send 3 GB of data across the connection during the month.Your total charge is $5.
You have a single listener, such as an instance of the Hybrid Connections Manager installed andcontinuously running for the entire month.You send 10 GB of data across the connection during the month.Your total charge is $7.50. That's $5 for the connection and first 5 GB + $2.50 for the additional 5 GB ofdata.
You have two instances, A and B, of the Hybrid Connections Manager installed and continuously

How are hours calculated for Relay?How are hours calculated for Relay?
What if I have more than one listener connected to a specific relay?What if I have more than one listener connected to a specific relay?
How is the messages meter calculated for WCF Relays?How is the messages meter calculated for WCF Relays?
QuotasQUOTA NAME SCOPE NOTES VALUE
running for the entire month.You send 3 GB of data across connection A during the month.You send 6 GB of data across connection B during the month.Your total charge is $10.50. That's $5 for connection A + $5 for connection B + $0.50 (for the sixthgigabyte on connection B).
Note that the prices used in the examples are applicable only during the Hybrid Connections preview period.Prices are subject to change upon general availability of Hybrid Connections.
WCF Relay is available only in Standard tier namespaces. Pricing and connection quotas for relays otherwise havenot changed. This means that relays continue to be charged based on the number of messages (not operations)and relay hours. For more information, see the "Hybrid Connections and WCF Relays" table on the pricing detailspage.
In some cases, a single relay might have multiple connected listeners. A relay is considered open when at leastone relay listener is connected to it. Adding listeners to an open relay results in additional relay hours. Thenumber of relay senders (clients that invoke or send messages to relays) that are connected to a relay does notaffect the calculation of relay hours.
(This applies only to WCF relays. Messages are not a cost for Hybrid Connections.)
In general, billable messages for relays are calculated by using the same method that is used for brokered entities(queues, topics, and subscriptions), described previously. However, there are some notable differences.
Sending a message to a Service Bus relay is treated as a "full through" send to the relay listener that receives themessage. It is not treated as a send operation to the Service Bus relay, followed by a delivery to the relay listener.A request-reply style service invocation (of up to 64 KB) against a relay listener results in two billable messages:one billable message for the request and one billable message for the response (assuming the response is also 64KB or smaller). This is different than using a queue to mediate between a client and a service. If you use a queueto mediate between a client and a service, the same request-reply pattern requires a request send to the queue,followed by a dequeue/delivery from the queue to the service. This is followed by a response send to anotherqueue, and a dequeue/delivery from that queue to the client. Using the same size assumptions throughout (up to64 KB), the mediated queue pattern results in 4 billable messages. You'd be billed for twice the number ofmessages to implement the same pattern that you accomplish by using relay. Of course, there are benefits tousing queues to achieve this pattern, such as durability and load leveling. These benefits might justify theadditional expense.
Relays that are opened by using the netTCPRelay WCF binding treat messages not as individual messages, butas a stream of data flowing through the system. When you use this binding, only the sender and listener havevisibility into the framing of the individual messages sent and received. For relays that use the netTCPRelaybinding, all data is treated as a stream for calculating billable messages. In this case, Service Bus calculates thetotal amount of data sent or received via each individual relay on a 5-minute basis. Then, it divides that totalamount of data by 64 KB to determine the number of billable messages for that relay during that time period.
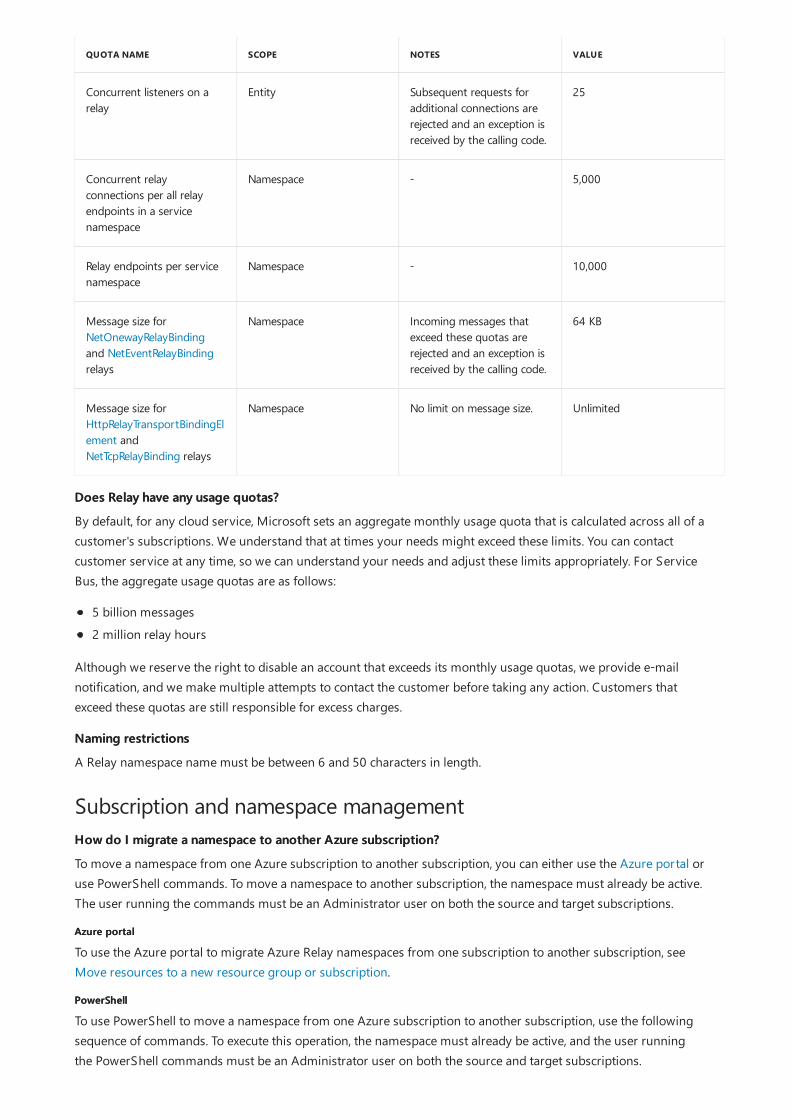
Concurrent listeners on arelay
Entity Subsequent requests foradditional connections arerejected and an exception isreceived by the calling code.
25
Concurrent relayconnections per all relayendpoints in a servicenamespace
Namespace - 5,000
Relay endpoints per servicenamespace
Namespace - 10,000
Message size forNetOnewayRelayBindingand NetEventRelayBindingrelays
Namespace Incoming messages thatexceed these quotas arerejected and an exception isreceived by the calling code.
64 KB
Message size forHttpRelayTransportBindingElement andNetTcpRelayBinding relays
Namespace No limit on message size. Unlimited
QUOTA NAME SCOPE NOTES VALUE
Does Relay have any usage quotas?Does Relay have any usage quotas?
Naming restrictionsNaming restrictions
Subscription and namespace managementHow do I migrate a namespace to another Azure subscription?How do I migrate a namespace to another Azure subscription?
Azure portalAzure portal
PowerShellPowerShell
By default, for any cloud service, Microsoft sets an aggregate monthly usage quota that is calculated across all of acustomer's subscriptions. We understand that at times your needs might exceed these limits. You can contactcustomer service at any time, so we can understand your needs and adjust these limits appropriately. For ServiceBus, the aggregate usage quotas are as follows:
5 billion messages2 million relay hours
Although we reserve the right to disable an account that exceeds its monthly usage quotas, we provide e-mailnotification, and we make multiple attempts to contact the customer before taking any action. Customers thatexceed these quotas are still responsible for excess charges.
A Relay namespace name must be between 6 and 50 characters in length.
To move a namespace from one Azure subscription to another subscription, you can either use the Azure portal oruse PowerShell commands. To move a namespace to another subscription, the namespace must already be active.The user running the commands must be an Administrator user on both the source and target subscriptions.
To use the Azure portal to migrate Azure Relay namespaces from one subscription to another subscription, seeMove resources to a new resource group or subscription.
To use PowerShell to move a namespace from one Azure subscription to another subscription, use the followingsequence of commands. To execute this operation, the namespace must already be active, and the user runningthe PowerShell commands must be an Administrator user on both the source and target subscriptions.

# Create a new resource group in the target subscription.Select-AzureRmSubscription -SubscriptionId 'ffffffff-ffff-ffff-ffff-ffffffffffff'New-AzureRmResourceGroup -Name 'targetRG' -Location 'East US'
# Move the namespace from the source subscription to the target subscription.Select-AzureRmSubscription -SubscriptionId 'aaaaaaaa-aaaa-aaaa-aaaa-aaaaaaaaaaaa'$res = Find-AzureRmResource -ResourceNameContains mynamespace -ResourceType 'Microsoft.ServiceBus/namespaces'Move-AzureRmResource -DestinationResourceGroupName 'targetRG' -DestinationSubscriptionId 'ffffffff-ffff-ffff-ffff-ffffffffffff' -ResourceId $res.ResourceId
TroubleshootingWhat are some of the exceptions generated by Azure Relay APIs, and suggested actions you can take?What are some of the exceptions generated by Azure Relay APIs, and suggested actions you can take?
What is a shared access signature, and which languages can I use to generate a signature?What is a shared access signature, and which languages can I use to generate a signature?
Is it possible to whitelist relay endpoints?Is it possible to whitelist relay endpoints?
Next steps
For a description of common exceptions and suggested actions you can take, see Relay exceptions.
Shared Access Signatures (SAS) are an authentication mechanism based on SHA-256 secure hashes or URIs. Forinformation about how to generate your own signatures in Node, PHP, Java, C, and C#, see Service Busauthentication with shared access signatures.
Yes. The relay client makes connections to the Azure Relay service by using fully qualified domain names.Customers can add an entry for *.servicebus.windows.net on firewalls that support DNS whitelisting.
Create a namespaceGet started with .NETGet started with Node

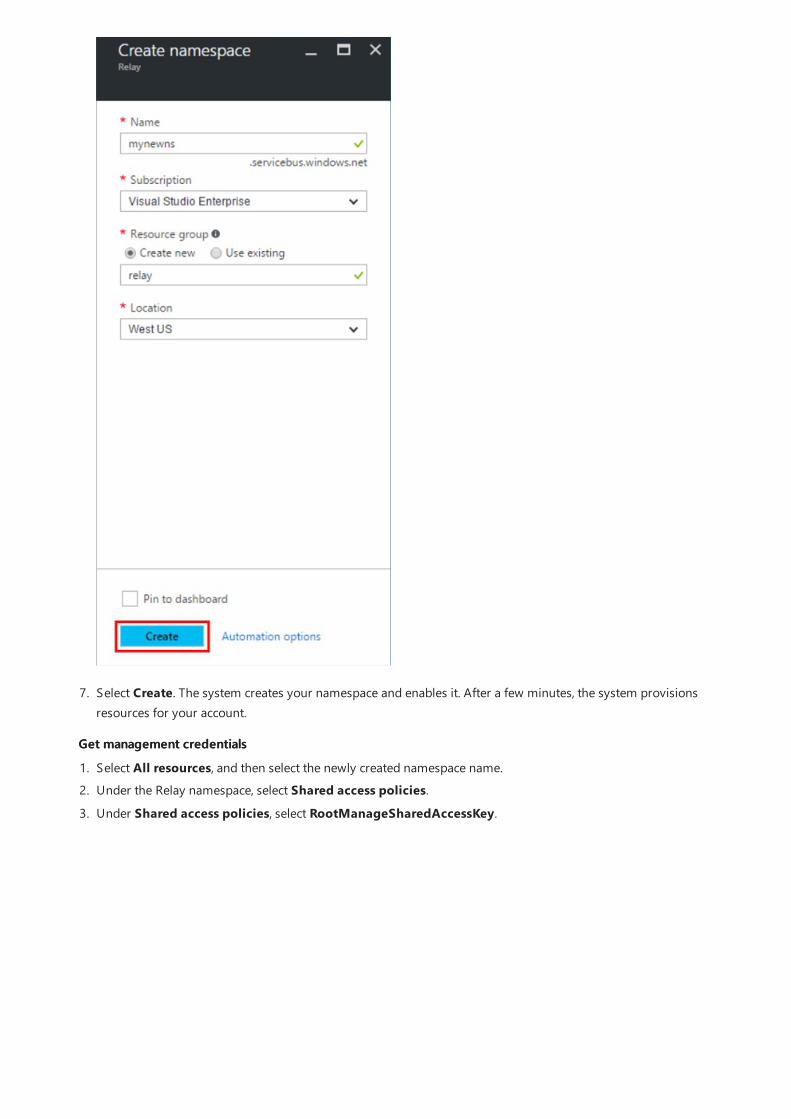
Create a Relay namespace using the Azure portal12/21/2017 • 1 min to read • Edit Online
Create a namespace in the Azure portal
A namespace is a scoping container for all your Azure Relay components. Multiple relays can reside in a singlenamespace, and namespaces often serve as application containers. There are currently two different ways tocreate a relay namespace:
1. Azure portal (this article).2. Azure Resource Manager templates.
1. Sign in to the Azure portal.2. In the left menu, select + Create a resource. Then, select Enterprise Integration > Relay.3. Under Create namespace, enter a namespace name. The system immediately checks to see if the name is
available.4. In the Subscription box, select an Azure subscription in which to create the namespace.5. In the Resource group box, select an existing resource group in which to place the namespace, or create a new
one.6. In Location, select the country or region in which your namespace should be hosted.

Get management credentialsGet management credentials
7. Select Create. The system creates your namespace and enables it. After a few minutes, the system provisionsresources for your account.
1. Select All resources, and then select the newly created namespace name.2. Under the Relay namespace, select Shared access policies.3. Under Shared access policies, select RootManageSharedAccessKey.
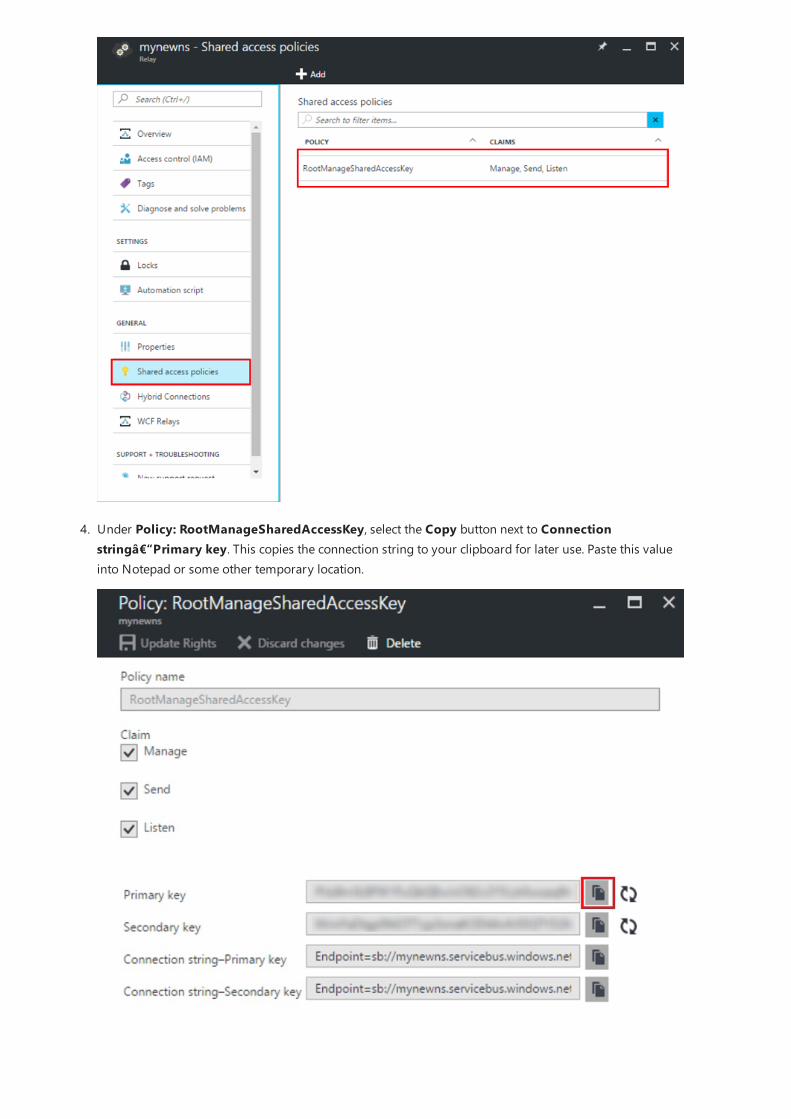
4. Under Policy: RootManageSharedAccessKey, select the Copy button next to Connectionstring–Primary key. This copies the connection string to your clipboard for later use. Paste this valueinto Notepad or some other temporary location.

Next steps
5. Repeat the preceding step to copy and paste the value of Primary key to a temporary location for lateruse.
Congratulations! You have now created a relay namespace.
Relay FAQGet started with .NETGet started with Node

.NET on-premises/cloud hybrid application usingAzure WCF Relay2/13/2018 • 13 min to read • Edit Online
NOTENOTE
How Azure Relay helps with hybrid solutions
Solution scenario
This article shows how to build a hybrid cloud application with Microsoft Azure and Visual Studio. The tutorialassumes you have no prior experience using Azure. In less than 30 minutes, you will have an application that usesmultiple Azure resources up and running in the cloud.
You will learn:
How to create or adapt an existing web service for consumption by a web solution.How to use the Azure WCF Relay service to share data between an Azure application and a web service hostedelsewhere.
To complete this tutorial, you need an Azure account. You can activate your MSDN subscriber benefits or sign up for a freeaccount.
Business solutions are typically composed of a combination of custom code written to tackle new and uniquebusiness requirements and existing functionality provided by solutions and systems that are already in place.
Solution architects are starting to use the cloud for easier handling of scale requirements and lower operationalcosts. In doing so, they find that existing service assets they'd like to leverage as building blocks for their solutionsare inside the corporate firewall and out of easy reach for access by the cloud solution. Many internal services arenot built or hosted in a way that they can be easily exposed at the corporate network edge.
Azure Relay is designed for the use-case of taking existing Windows Communication Foundation (WCF) webservices and making those services securely accessible to solutions that reside outside the corporate perimeterwithout requiring intrusive changes to the corporate network infrastructure. Such relay services are still hostedinside their existing environment, but they delegate listening for incoming sessions and requests to the cloud-hosted relay service. Azure Relay also protects those services from unauthorized access by using Shared AccessSignature (SAS) authentication.
In this tutorial, you will create an ASP.NET website that enables you to see a list of products on the productinventory page.

Set up the development environment
Create a namespace
Create an on-premises server
Create the projectCreate the project
The tutorial assumes that you have product information in an existing on-premises system, and uses Azure Relayto reach into that system. This is simulated by a web service that runs in a simple console application and is backedby an in-memory set of products. You will be able to run this console application on your own computer anddeploy the web role into Azure. By doing so, you will see how the web role running in the Azure datacenter willindeed call into your computer, even though your computer will almost certainly reside behind at least one firewalland a network address translation (NAT) layer.
Before you can begin developing Azure applications, download the tools and set up your developmentenvironment:
1. Install the Azure SDK for .NET from the SDK downloads page.2. In the .NET column, click the version of Visual Studio you are using. The steps in this tutorial use Visual Studio
2017.3. When prompted to run or save the installer, click Run.4. In the Web Platform Installer, click Install and proceed with the installation.5. Once the installation is complete, you will have everything necessary to start to develop the app. The SDK
includes tools that let you easily develop Azure applications in Visual Studio.
To begin using the relay features in Azure, you must first create a service namespace. A namespace provides ascoping container for addressing Azure resources within your application. Follow the instructions here to create aRelay namespace.
First, you will build a (mock) on-premises product catalog system. It will be fairly simple; you can see this asrepresenting an actual on-premises product catalog system with a complete service surface that we're trying tointegrate.
This project is a Visual Studio console application, and uses the Azure Service Bus NuGet package to include theService Bus libraries and configuration settings.
1. Using administrator privileges, start Microsoft Visual Studio. To do so, right-click the Visual Studio programicon, and then click Run as administrator.
2. In Visual Studio, on the File menu, click New, and then click Project.3. From Installed Templates, under Visual C#, click Console App (.NET Framework). In the Name box,

4. Click OK to create the ProductsServer project.5. If you have already installed the NuGet package manager for Visual Studio, skip to the next step. Otherwise,
visit NuGet and click Install NuGet. Follow the prompts to install the NuGet package manager, then re-startVisual Studio.
6. In Solution Explorer, right-click the ProductsServer project, then click Manage NuGet Packages.7. Click the Browse tab, then search for WindowsAzure.ServiceBus. Select the WindowsAzure.ServiceBus
package.
9. Add a new class for your product contract. In Solution Explorer, right-click the ProductsServer project and clickAdd, and then click Class.
10. In the Name box, type the name ProductsContract.cs. Then click Add.
type the name ProductsServer:
8. Click Install, and accept the terms of use.
Note that the required client assemblies are now referenced.
11. In ProductsContract.cs, replace the namespace definition with the following code, which defines thecontract for the service.
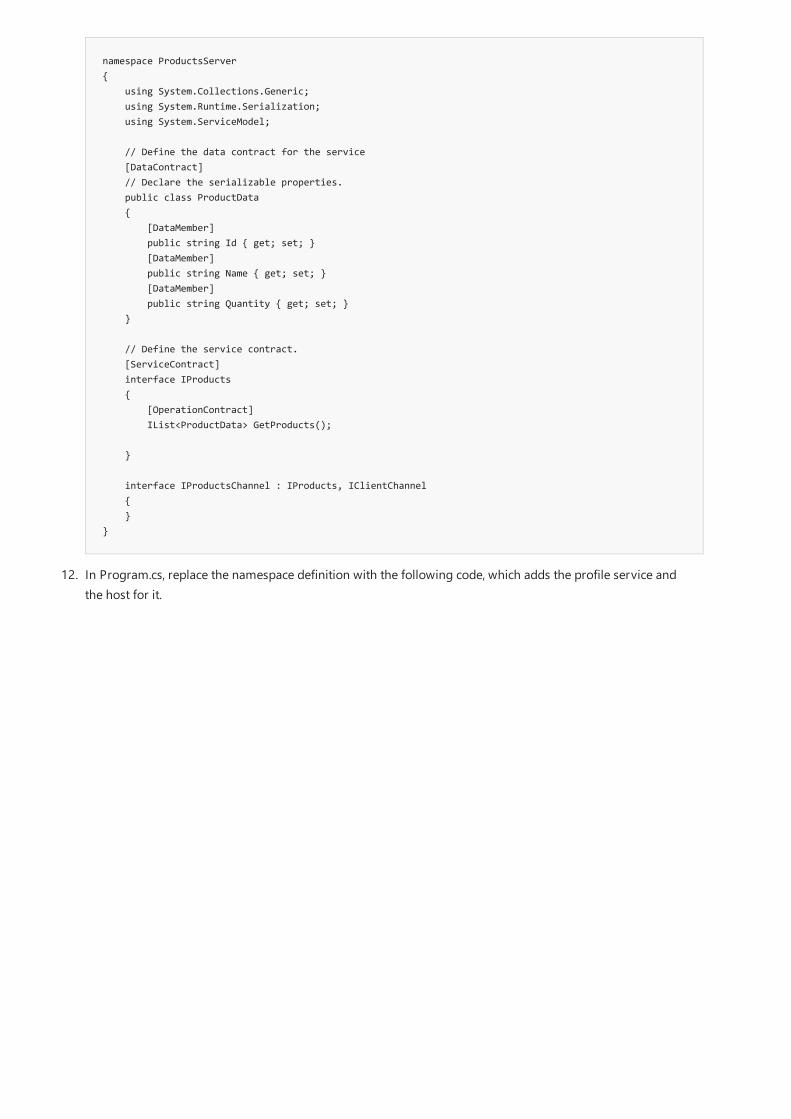
namespace ProductsServer{ using System.Collections.Generic; using System.Runtime.Serialization; using System.ServiceModel;
// Define the data contract for the service [DataContract] // Declare the serializable properties. public class ProductData { [DataMember] public string Id { get; set; } [DataMember] public string Name { get; set; } [DataMember] public string Quantity { get; set; } }
// Define the service contract. [ServiceContract] interface IProducts { [OperationContract] IList<ProductData> GetProducts();
}
interface IProductsChannel : IProducts, IClientChannel { }}
12. In Program.cs, replace the namespace definition with the following code, which adds the profile service andthe host for it.

namespace ProductsServer{ using System; using System.Linq; using System.Collections.Generic; using System.ServiceModel;
// Implement the IProducts interface. class ProductsService : IProducts {
// Populate array of products for display on website ProductData[] products = new [] { new ProductData{ Id = "1", Name = "Rock", Quantity = "1"}, new ProductData{ Id = "2", Name = "Paper", Quantity = "3"}, new ProductData{ Id = "3", Name = "Scissors", Quantity = "5"}, new ProductData{ Id = "4", Name = "Well", Quantity = "2500"}, };
// Display a message in the service console application // when the list of products is retrieved. public IList<ProductData> GetProducts() { Console.WriteLine("GetProducts called."); return products; }
}
class Program { // Define the Main() function in the service application. static void Main(string[] args) { var sh = new ServiceHost(typeof(ProductsService)); sh.Open();
Console.WriteLine("Press ENTER to close"); Console.ReadLine();
sh.Close(); } }}
13. In Solution Explorer, double-click the App.config file to open it in the Visual Studio editor. At the bottom ofthe <system.ServiceModel> element (but still within <system.ServiceModel> ), add the following XML code. Besure to replace yourServiceNamespace with the name of your namespace, and yourKey with the SAS keyyou retrieved earlier from the portal:

Create an ASP.NET application
Create the projectCreate the project
<system.serviceModel>... <services> <service name="ProductsServer.ProductsService"> <endpoint address="sb://yourServiceNamespace.servicebus.windows.net/products" binding="netTcpRelayBinding" contract="ProductsServer.IProducts" behaviorConfiguration="products"/> </service> </services> <behaviors> <endpointBehaviors> <behavior name="products"> <transportClientEndpointBehavior> <tokenProvider> <sharedAccessSignature keyName="RootManageSharedAccessKey" key="yourKey" /> </tokenProvider> </transportClientEndpointBehavior> </behavior> </endpointBehaviors> </behaviors></system.serviceModel>
<appSettings> <!-- Service Bus specific app settings for messaging connections --> <add key="Microsoft.ServiceBus.ConnectionString" value="Endpoint=sb://yourNamespace.servicebus.windows.net/;SharedAccessKeyName=RootManageSharedAccessKey;SharedAccessKey=yourKey"/></appSettings>
15. Press Ctrl+Shift+B or from the Build menu, click Build Solution to build the application and verify theaccuracy of your work so far.
The error caused by "transportClientEndpointBehavior" is just a warning and is not a blocking issue for thissample.
14. Still in App.config, in the <appSettings> element, replace the connection string value with the connectionstring you previously obtained from the portal.
In this section you will build a simple ASP.NET application that displays data retrieved from your product service.
1. Ensure that Visual Studio is running with administrator privileges.2. In Visual Studio, on the File menu, click New, and then click Project.3. From Installed Templates, under Visual C#, click ASP.NET Web Application (.NET Framework).
Name the project ProductsPortal. Then click OK.

4. From the ASP.NET Templates list in the New ASP.NET Web Application dialog, click MVC.
5. Click the Change Authentication button. In the Change Authentication dialog box, ensure that NoAuthentication is selected, and then click OK. For this tutorial, you're deploying an app that does not needa user login.

Modify the web applicationModify the web application
7. Now you must configure Azure resources for a new web app. Follow the steps in the Publish to Azure section ofthis article. Then, return to this tutorial and proceed to the next step.
6. Back in the New ASP.NET Web Application dialog, click OK to create the MVC app.
8. In Solution Explorer, right-click Models and then click Add, then click Class. In the Name box, type thename Product.cs. Then click Add.
// Declare properties for the products inventory. namespace ProductsWeb.Models { public class Product { public string Id { get; set; } public string Name { get; set; } public string Quantity { get; set; } } }
1. In the Product.cs file in Visual Studio, replace the existing namespace definition with the following code.

2. In Solution Explorer, expand the Controllers folder, then double-click the HomeController.cs file to open it inVisual Studio.
namespace ProductsWeb.Controllers{ using System.Collections.Generic; using System.Web.Mvc; using Models;
public class HomeController : Controller { // Return a view of the products inventory. public ActionResult Index(string Identifier, string ProductName) { var products = new List<Product> {new Product {Id = Identifier, Name = ProductName}}; return View(products); } }}
4. In Solution Explorer, expand the Views\Shared folder, then double-click _Layout.cshtml to open it in the VisualStudio editor.
5. Change all occurrences of My ASP.NET Application to Northwind Traders Products.
3. In HomeController.cs, replace the existing namespace definition with the following code.
6. Remove the Home, About, and Contact links. In the following example, delete the highlighted code.
7. In Solution Explorer, expand the Views\Home folder, then double-click Index.cshtml to open it in the VisualStudio editor. Replace the entire contents of the file with the following code.

Run the app locallyRun the app locally
@model IEnumerable<ProductsWeb.Models.Product>
@{ ViewBag.Title = "Index";}
<h2>Prod Inventory</h2>
<table> <tr> <th> @Html.DisplayNameFor(model => model.Name) </th> <th></th> <th> @Html.DisplayNameFor(model => model.Quantity) </th> </tr>
@foreach (var item in Model) { <tr> <td> @Html.DisplayFor(modelItem => item.Name) </td> <td> @Html.DisplayFor(modelItem => item.Quantity) </td> </tr>}
</table>
8. To verify the accuracy of your work so far, you can press Ctrl+Shift+B to build the project.
Run the application to verify that it works.
1. Ensure that ProductsPortal is the active project. Right-click the project name in Solution Explorer and selectSet As Startup Project.
2. In Visual Studio, press F5.3. Your application should appear, running in a browser.

Put the pieces togetherThe next step is to hook up the on-premises products server with the ASP.NET application.
1. If it is not already open, in Visual Studio re-open the ProductsPortal project you created in the Create anASP.NET application section.
2. Similar to the step in the "Create an On-Premises Server" section, add the NuGet package to the projectreferences. In Solution Explorer, right-click the ProductsPortal project, then click Manage NuGet Packages.
3. Search for WindowsAzure.ServiceBus and select the WindowsAzure.ServiceBus item. Then complete theinstallation and close this dialog box.
4. In Solution Explorer, right-click the ProductsPortal project, then click Add, then Existing Item.5. Navigate to the ProductsContract.cs file from the ProductsServer console project. Click to highlight
ProductsContract.cs. Click the down arrow next to Add, then click Add as Link.
6. Now open the HomeController.cs file in the Visual Studio editor and replace the namespace definitionwith the following code. Be sure to replace yourServiceNamespace with the name of your servicenamespace, and yourKey with your SAS key. This will enable the client to call the on-premises service,returning the result of the call.

namespace ProductsWeb.Controllers{ using System.Linq; using System.ServiceModel; using System.Web.Mvc; using Microsoft.ServiceBus; using Models; using ProductsServer;
public class HomeController : Controller { // Declare the channel factory. static ChannelFactory<IProductsChannel> channelFactory;
static HomeController() { // Create shared access signature token credentials for authentication. channelFactory = new ChannelFactory<IProductsChannel>(new NetTcpRelayBinding(), "sb://yourServiceNamespace.servicebus.windows.net/products"); channelFactory.Endpoint.Behaviors.Add(new TransportClientEndpointBehavior { TokenProvider = TokenProvider.CreateSharedAccessSignatureTokenProvider( "RootManageSharedAccessKey", "yourKey") }); }
public ActionResult Index() { using (IProductsChannel channel = channelFactory.CreateChannel()) { // Return a view of the products inventory. return this.View(from prod in channel.GetProducts() select new Product { Id = prod.Id, Name = prod.Name, Quantity = prod.Quantity }); } } }}
7. In Solution Explorer, right-click the ProductsPortal solution (make sure to right-click the solution, not theproject). Click Add, then click Existing Project.
8. Navigate to the ProductsServer project, then double-click the ProductsServer.csproj solution file to add it.9. ProductsServer must be running in order to display the data on ProductsPortal. In Solution Explorer, right-
click the ProductsPortal solution and click Properties. The Property Pages dialog box is displayed.10. On the left side, click Startup Project. On the right side, click Multiple startup projects. Ensure that
ProductsServer and ProductsPortal appear, in that order, with Start set as the action for both.

Run the project locally
12. In the Projects list, click ProductsServer. Ensure that ProductsPortal is not selected.
11. Still in the Properties dialog box, click Project Dependencies on the left side.
13. In the Projects list, click ProductsPortal. Ensure that ProductsServer is selected.
14. Click OK in the Property Pages dialog box.
To test the application locally, in Visual Studio press F5. The on-premises server (ProductsServer) should startfirst, then the ProductsPortal application should start in a browser window. This time, you will see that theproduct inventory lists data retrieved from the product service on-premises system.

Deploy the ProductsPortal project to an Azure web app
Set ProductsPortal as web appSet ProductsPortal as web app
Press Refresh on the ProductsPortal page. Each time you refresh the page, you'll see the server app display amessage when GetProducts() from ProductsServer is called.
Close both applications before proceeding to the next step.
The next step is to republish the Azure Web app ProductsPortal frontend. Do the following:
NOTENOTE
1. In Solution Explorer, right-click the ProductsPortal project, and click Publish. Then, click Publish on thePublish page.
You may see an error message in the browser window when the ProductsPortal web project is automaticallylaunched after the deployment. This is expected, and occurs because the ProductsServer application isn't runningyet.
2. Copy the URL of the deployed web app, as you will need the URL in the next step. You can also obtain thisURL from the Azure App Service Activity window in Visual Studio:
3. Close the browser window to stop the running application.
Before running the application in the cloud, you must ensure that ProductsPortal is launched from within Visual

Run the application
Studio as a web app.
1. In Visual Studio, right-click the ProductsPortal project and then click Properties.2. In the left-hand column, click Web.
5. From the Build menu in Visual Studio, click Rebuild Solution.
3. In the Start Action section, click the Start URL button, and in the text box enter the URL for your previouslydeployed web app; for example, http://productsportal1234567890.azurewebsites.net/ .
4. From the File menu in Visual Studio, click Save All.
1. Press F5 to build and run the application. The on-premises server (the ProductsServer console application)should start first, then the ProductsPortal application should start in a browser window, as shown in thefollowing screen shot. Notice again that the product inventory lists data retrieved from the product serviceon-premises system, and displays that data in the web app. Check the URL to make sure thatProductsPortal is running in the cloud, as an Azure web app.

IMPORTANTIMPORTANTThe ProductsServer console application must be running and able to serve the data to the ProductsPortalapplication. If the browser displays an error, wait a few more seconds for ProductsServer to load and display thefollowing message. Then press Refresh in the browser.
2. Back in the browser, press Refresh on the ProductsPortal page. Each time you refresh the page, you'll seethe server app display a message when GetProducts() from ProductsServer is called.

Next stepsTo learn more about Azure Relay, see the following resources:
What is Azure Relay?How to use Azure Relay

Get started with Relay Hybrid Connections1/3/2018 • 11 min to read • Edit Online
What will be accomplished
Prerequisites
NOTENOTE
1. Create a namespace by using the Azure portal
This tutorial provides an introduction to Azure Relay Hybrid Connections. Learn how to use Microsoft .NET tocreate a client application that sends messages to a corresponding listener application.
Hybrid Connections requires both a client component and a server component. In this tutorial, you completethese steps to create two console applications:
1. Create a Relay namespace by using the Azure portal.2. Create a hybrid connection in that namespace by using the Azure portal.3. Write a server (listener) console application to receive messages.4. Write a client (sender) console application to send messages.
To complete this tutorial, you need the following prerequisites:
Visual Studio 2015 or later. The examples in this tutorial use Visual Studio 2017.An Azure subscription.
To complete this tutorial, you need an Azure account. You can activate your MSDN subscriber benefits or sign up for a freeaccount.
If you have already created a Relay namespace, go to Create a hybrid connection by using the Azure portal.
1. Sign in to the Azure portal.2. In the left menu, select + Create a resource. Then, select Enterprise Integration > Relay.3. Under Create namespace, enter a namespace name. The system immediately checks to see if the name is
available.4. In the Subscription box, select an Azure subscription in which to create the namespace.5. In the Resource group box, select an existing resource group in which to place the namespace, or create a new
one.6. In Location, select the country or region in which your namespace should be hosted.

Get management credentialsGet management credentials
7. Select Create. The system creates your namespace and enables it. After a few minutes, the system provisionsresources for your account.
1. Select All resources, and then select the newly created namespace name.2. Under the Relay namespace, select Shared access policies.3. Under Shared access policies, select RootManageSharedAccessKey.

4. Under Policy: RootManageSharedAccessKey, select the Copy button next to Connectionstring–Primary key. This copies the connection string to your clipboard for later use. Paste this valueinto Notepad or some other temporary location.

2. Create a hybrid connection by using the Azure portal
5. Repeat the preceding step to copy and paste the value of Primary key to a temporary location for lateruse.
If you have already created a hybrid connection, go to Create a server application.
Ensure that you have already created a Relay namespace.
1. Sign in to the Azure portal.2. In the left menu, select All resources.3. Select the namespace where you want to create the hybrid connection. In this case, it is mynewns.4. Under Relay namespace, select Hybrid Connections.
5. In the namespace overview window, select + Hybrid Connection

3. Create a server application (listener)
Create a console applicationCreate a console application
Add the Relay NuGet packageAdd the Relay NuGet package
Write code to receive messagesWrite code to receive messages
7. Select Create.
6. Under Create Hybrid Connection, enter a value for the hybrid connection name. Leave the other defaultvalues.
In Visual Studio, write a C# console application to listen for and receive messages from the relay.
In Visual Studio, create a new Console App (.NET Framework) project.
1. Right-click the newly created project, and then select Manage NuGet Packages.2. Select Browse, and then search for Microsoft.Azure.Relay. In the search results, select Microsoft Azure
Relay.3. Select Install to complete the installation. Close the dialog box.
1. At the top of the Program.cs file, replace the existing using statements with the following using

using System;using System.IO;using System.Threading;using System.Threading.Tasks;using Microsoft.Azure.Relay;
private const string RelayNamespace = "{RelayNamespace}.servicebus.windows.net";private const string ConnectionName = "{HybridConnectionName}";private const string KeyName = "{SASKeyName}";private const string Key = "{SASKey}";
statements:
2. Add constants to the Program class for the hybrid connection details. Replace the placeholders in bracketswith the values that you obtained when you created the hybrid connection. Be sure to use the fullyqualified namespace name.
3. Add the ProcessMessagesOnConnection method to the Program class:

// The method initiates the connection.private static async void ProcessMessagesOnConnection(HybridConnectionStream relayConnection, CancellationTokenSource cts){ Console.WriteLine("New session");
// The connection is a fully bidrectional stream. // Put a stream reader and a stream writer over it. // This allows you to read UTF-8 text that comes from // the sender, and to write text replies back. var reader = new StreamReader(relayConnection); var writer = new StreamWriter(relayConnection) { AutoFlush = true }; while (!cts.IsCancellationRequested) { try { // Read a line of input until a newline is encountered. var line = await reader.ReadLineAsync();
if (string.IsNullOrEmpty(line)) { // If there's no input data, signal that // you will no longer send data on this connection, // and then break out of the processing loop. await relayConnection.ShutdownAsync(cts.Token); break; }
// Write the line on the console. Console.WriteLine(line);
// Write the line back to the client, prepended with "Echo:" await writer.WriteLineAsync($"Echo: {line}"); } catch (IOException) { // Catch an I/O exception. This likely occurred when // the client disconnected. Console.WriteLine("Client closed connection"); break; } }
Console.WriteLine("End session");
// Close the connection. await relayConnection.CloseAsync(cts.Token);}
4. Add the RunAsync method to the Program class:

private static async Task RunAsync(){ var cts = new CancellationTokenSource();
var tokenProvider = TokenProvider.CreateSharedAccessSignatureTokenProvider(KeyName, Key); var listener = new HybridConnectionListener(new Uri(string.Format("sb://{0}/{1}", RelayNamespace, ConnectionName)), tokenProvider);
// Subscribe to the status events. listener.Connecting += (o, e) => { Console.WriteLine("Connecting"); }; listener.Offline += (o, e) => { Console.WriteLine("Offline"); }; listener.Online += (o, e) => { Console.WriteLine("Online"); };
// Opening the listener establishes the control channel to // the Azure Relay service. The control channel is continuously // maintained, and is reestablished when connectivity is disrupted. await listener.OpenAsync(cts.Token); Console.WriteLine("Server listening");
// Provide callback for the cancellation token that will close the listener. cts.Token.Register(() => listener.CloseAsync(CancellationToken.None));
// Start a new thread that will continuously read the console. new Task(() => Console.In.ReadLineAsync().ContinueWith((s) => { cts.Cancel(); })).Start();
// Accept the next available, pending connection request. // Shutting down the listener allows a clean exit. // This method returns null. while (true) { var relayConnection = await listener.AcceptConnectionAsync(); if (relayConnection == null) { break; }
ProcessMessagesOnConnection(relayConnection, cts); }
// Close the listener after you exit the processing loop. await listener.CloseAsync(cts.Token);}
RunAsync().GetAwaiter().GetResult();
namespace Server{ using System; using System.IO; using System.Threading; using System.Threading.Tasks; using Microsoft.Azure.Relay;
public class Program { private const string RelayNamespace = "{RelayNamespace}.servicebus.windows.net"; private const string ConnectionName = "{HybridConnectionName}"; private const string KeyName = "{SASKeyName}"; private const string Key = "{SASKey}";
public static void Main(string[] args)
5. Add the following line of code to the Main method in the Program class:
The completed Program.cs file should look like this:

public static void Main(string[] args) { RunAsync().GetAwaiter().GetResult(); }
private static async Task RunAsync() { var cts = new CancellationTokenSource();
var tokenProvider = TokenProvider.CreateSharedAccessSignatureTokenProvider(KeyName, Key); var listener = new HybridConnectionListener(new Uri(string.Format("sb://{0}/{1}", RelayNamespace, ConnectionName)), tokenProvider);
// Subscribe to the status events. listener.Connecting += (o, e) => { Console.WriteLine("Connecting"); }; listener.Offline += (o, e) => { Console.WriteLine("Offline"); }; listener.Online += (o, e) => { Console.WriteLine("Online"); };
// Opening the listener establishes the control channel to // the Azure Relay service. The control channel is continuously // maintained, and is reestablished when connectivity is disrupted. await listener.OpenAsync(cts.Token); Console.WriteLine("Server listening");
// Provide callback for a cancellation token that will close the listener. cts.Token.Register(() => listener.CloseAsync(CancellationToken.None));
// Start a new thread that will continuously read the console. new Task(() => Console.In.ReadLineAsync().ContinueWith((s) => { cts.Cancel(); })).Start();
// Accept the next available, pending connection request. // Shutting down the listener allows a clean exit. // This method returns null. while (true) { var relayConnection = await listener.AcceptConnectionAsync(); if (relayConnection == null) { break; }
ProcessMessagesOnConnection(relayConnection, cts); }
// Close the listener after you exit the processing loop. await listener.CloseAsync(cts.Token); }
private static async void ProcessMessagesOnConnection(HybridConnectionStream relayConnection, CancellationTokenSource cts) { Console.WriteLine("New session");
// The connection is a fully bidrectional stream. // Put a stream reader and a stream writer over it. // This allows you to read UTF-8 text that comes from // the sender, and to write text replies back. var reader = new StreamReader(relayConnection); var writer = new StreamWriter(relayConnection) { AutoFlush = true }; while (!cts.IsCancellationRequested) { try { // Read a line of input until a newline is encountered. var line = await reader.ReadLineAsync();
if (string.IsNullOrEmpty(line)) { // If there's no input data, signal that

4. Create a client application (sender)
Create a console applicationCreate a console application
Add the Relay NuGet packageAdd the Relay NuGet package
Write code to send messagesWrite code to send messages
// you will no longer send data on this connection. // Then, break out of the processing loop. await relayConnection.ShutdownAsync(cts.Token); break; }
// Write the line on the console. Console.WriteLine(line);
// Write the line back to the client, prepended with "Echo:" await writer.WriteLineAsync($"Echo: {line}"); } catch (IOException) { // Catch an I/O exception. This likely occurred when // the client disconnected. Console.WriteLine("Client closed connection"); break; } }
Console.WriteLine("End session");
// Close the connection. await relayConnection.CloseAsync(cts.Token); } }}
In Visual Studio, write a C# console application to send messages to the relay.
In Visual Studio, create a new Console App (.NET Framework) project.
1. Right-click the newly created project, and then select Manage NuGet Packages.2. Select Browse, and then search for Microsoft.Azure.Relay. In the search results, select Microsoft Azure
Relay.3. Select Install to complete the installation. Close the dialog box.
using System;using System.IO;using System.Threading;using System.Threading.Tasks;using Microsoft.Azure.Relay;
1. At the top of the Program.cs file, replace the existing using statements with the following using
statements:
2. Add constants to the Program class for the hybrid connection details. Replace the placeholders in bracketswith the values that you obtained when you created the hybrid connection. Be sure to use the fullyqualified namespace name.

private const string RelayNamespace = "{RelayNamespace}.servicebus.windows.net";private const string ConnectionName = "{HybridConnectionName}";private const string KeyName = "{SASKeyName}";private const string Key = "{SASKey}";
3. Add the following method to the Program class:

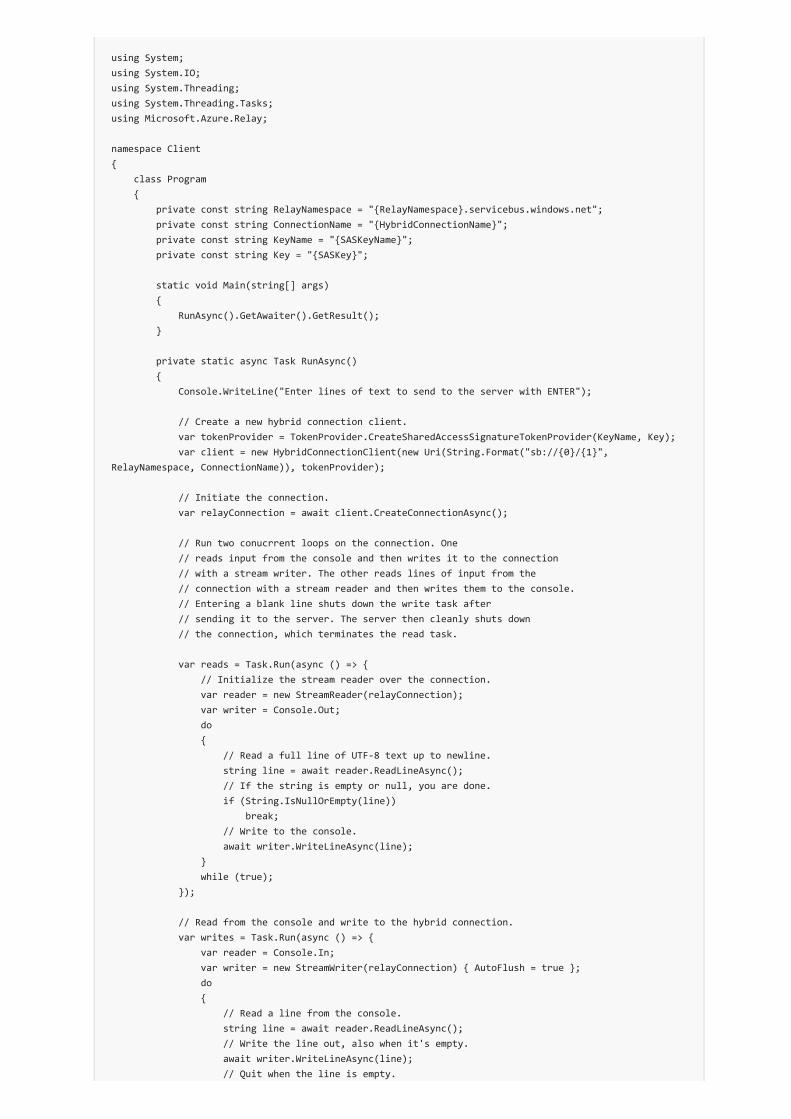
private static async Task RunAsync(){ Console.WriteLine("Enter lines of text to send to the server with ENTER");
// Create a new hybrid connection client. var tokenProvider = TokenProvider.CreateSharedAccessSignatureTokenProvider(KeyName, Key); var client = new HybridConnectionClient(new Uri(String.Format("sb://{0}/{1}", RelayNamespace, ConnectionName)), tokenProvider);
// Initiate the connection. var relayConnection = await client.CreateConnectionAsync();
// Run two concurrent loops on the connection. One // reads input from the console and writes it to the connection // with a stream writer. The other reads lines of input from the // connection with a stream reader and writes them to the console. // Entering a blank line shuts down the write task after // sending it to the server. The server then cleanly shuts down // the connection, which terminates the read task.
var reads = Task.Run(async () => { // Initialize the stream reader over the connection. var reader = new StreamReader(relayConnection); var writer = Console.Out; do { // Read a full line of UTF-8 text up to newline. string line = await reader.ReadLineAsync(); // If the string is empty or null, you are done. if (String.IsNullOrEmpty(line)) break; // Write to the console. await writer.WriteLineAsync(line); } while (true); });
// Read from the console and write to the hybrid connection. var writes = Task.Run(async () => { var reader = Console.In; var writer = new StreamWriter(relayConnection) { AutoFlush = true }; do { // Read a line from the console. string line = await reader.ReadLineAsync(); // Write the line out, also when it's empty. await writer.WriteLineAsync(line); // Quit when the line is empty, if (String.IsNullOrEmpty(line)) break; } while (true); });
// Wait for both tasks to finish. await Task.WhenAll(reads, writes); await relayConnection.CloseAsync(CancellationToken.None);}
RunAsync().GetAwaiter().GetResult();
4. Add the following line of code to the Main method in the Program class.
The Program.cs should look like this:
using System;using System.IO;using System.Threading;using System.Threading.Tasks;using Microsoft.Azure.Relay;
namespace Client{ class Program { private const string RelayNamespace = "{RelayNamespace}.servicebus.windows.net"; private const string ConnectionName = "{HybridConnectionName}"; private const string KeyName = "{SASKeyName}"; private const string Key = "{SASKey}";
static void Main(string[] args) { RunAsync().GetAwaiter().GetResult(); }
private static async Task RunAsync() { Console.WriteLine("Enter lines of text to send to the server with ENTER");
// Create a new hybrid connection client. var tokenProvider = TokenProvider.CreateSharedAccessSignatureTokenProvider(KeyName, Key); var client = new HybridConnectionClient(new Uri(String.Format("sb://{0}/{1}", RelayNamespace, ConnectionName)), tokenProvider);
// Initiate the connection. var relayConnection = await client.CreateConnectionAsync();
// Run two conucrrent loops on the connection. One // reads input from the console and then writes it to the connection // with a stream writer. The other reads lines of input from the // connection with a stream reader and then writes them to the console. // Entering a blank line shuts down the write task after // sending it to the server. The server then cleanly shuts down // the connection, which terminates the read task.
var reads = Task.Run(async () => { // Initialize the stream reader over the connection. var reader = new StreamReader(relayConnection); var writer = Console.Out; do { // Read a full line of UTF-8 text up to newline. string line = await reader.ReadLineAsync(); // If the string is empty or null, you are done. if (String.IsNullOrEmpty(line)) break; // Write to the console. await writer.WriteLineAsync(line); } while (true); });
// Read from the console and write to the hybrid connection. var writes = Task.Run(async () => { var reader = Console.In; var writer = new StreamWriter(relayConnection) { AutoFlush = true }; do { // Read a line from the console. string line = await reader.ReadLineAsync(); // Write the line out, also when it's empty. await writer.WriteLineAsync(line); // Quit when the line is empty.

5. Run the applications
Next steps
if (String.IsNullOrEmpty(line)) break; } while (true); });
// Wait for both tasks to finish. await Task.WhenAll(reads, writes); await relayConnection.CloseAsync(CancellationToken.None); } }}
1. Run the server application.2. Run the client application and enter some text.3. Ensure that the server application console displays the text that was entered in the client application.
Congratulations, you have created an end-to-end Hybrid Connections application!

Relay FAQCreate a namespaceGet started with Node

Get started with Relay Hybrid Connections12/21/2017 • 5 min to read • Edit Online
What will be accomplished
Prerequisites
NOTENOTE
1. Create a namespace using the Azure portal
This tutorial provides an introduction to Azure Relay Hybrid Connections, and shows how to use Node.js tocreate a client application that sends messages to a corresponding listener application.
Because Hybrid Connections requires both a client and a server component, create two console applications inthis tutorial. Here are the steps:
1. Create a Relay namespace, using the Azure portal.2. Create a hybrid connection, using the Azure portal.3. Write a server console application to receive messages.4. Write a client console application to send messages.
1. Node.js.2. An Azure subscription.
To complete this tutorial, you need an Azure account. You can activate your MSDN subscriber benefits or sign up for a freeaccount.
If you already have a Relay namespace created, jump to the Create a hybrid connection using the Azure portalsection.
1. Sign in to the Azure portal.2. In the left menu, select + Create a resource. Then, select Enterprise Integration > Relay.3. Under Create namespace, enter a namespace name. The system immediately checks to see if the name is
available.4. In the Subscription box, select an Azure subscription in which to create the namespace.5. In the Resource group box, select an existing resource group in which to place the namespace, or create a new
one.6. In Location, select the country or region in which your namespace should be hosted.
Get management credentialsGet management credentials
7. Select Create. The system creates your namespace and enables it. After a few minutes, the system provisionsresources for your account.
1. Select All resources, and then select the newly created namespace name.2. Under the Relay namespace, select Shared access policies.3. Under Shared access policies, select RootManageSharedAccessKey.

4. Under Policy: RootManageSharedAccessKey, select the Copy button next to Connectionstring–Primary key. This copies the connection string to your clipboard for later use. Paste this valueinto Notepad or some other temporary location.

2. Create a hybrid connection using the Azure portal
5. Repeat the preceding step to copy and paste the value of Primary key to a temporary location for lateruse.
If you already have a hybrid connection created, jump to the Create a server application section.
Ensure that you have already created a Relay namespace.
1. Sign in to the Azure portal.2. In the left menu, select All resources.3. Select the namespace where you want to create the hybrid connection. In this case, it is mynewns.4. Under Relay namespace, select Hybrid Connections.
5. In the namespace overview window, select + Hybrid Connection

3. Create a server application (listener)
Create a Node.js applicationCreate a Node.js application
Add the Relay NPM packageAdd the Relay NPM package
Write some code to receive messagesWrite some code to receive messages
7. Select Create.
6. Under Create Hybrid Connection, enter a value for the hybrid connection name. Leave the other defaultvalues.
To listen and receive messages from the Relay, write a Node.js console application.
Create a new JavaScript file called listener.js .
Run npm install hyco-ws from a Node command prompt in your project folder.
const WebSocket = require('hyco-ws');
1. Add the following constant to the top of the listener.js file.

var wss = WebSocket.createRelayedServer({ server : WebSocket.createRelayListenUri(ns, path), token: WebSocket.createRelayToken('http://' + ns, keyrule, key)}, function (ws) { console.log('connection accepted'); ws.onmessage = function (event) { console.log(event.data); }; ws.on('close', function () { console.log('connection closed'); }); });
console.log('listening');
wss.on('error', function(err) { console.log('error' + err);});
const WebSocket = require('hyco-ws');
const ns = "{RelayNamespace}";const path = "{HybridConnectionName}";const keyrule = "{SASKeyName}";const key = "{SASKeyValue}";
var wss = WebSocket.createRelayedServer( { server : WebSocket.createRelayListenUri(ns, path), token: WebSocket.createRelayToken('http://' + ns, keyrule, key) }, function (ws) { console.log('connection accepted'); ws.onmessage = function (event) { console.log(event.data); }; ws.on('close', function () { console.log('connection closed'); }); });
console.log('listening');
wss.on('error', function(err) { console.log('error' + err);});
2. Add the following constants to the listener.js file for the hybrid connection details. Replace theplaceholders in brackets with the values you obtained when you created the hybrid connection.
a. const ns - The Relay namespace. Be sure to use the fully qualified namespace name; for example, {namespace}.servicebus.windows.net .
b. const path - The name of the hybrid connection.c. const keyrule - The name of the SAS key.d. const key - The SAS key value.
3. Add the following code to the listener.js file:
Here is what your listener.js file should look like:

4. Create a client application (sender)
Create a Node.js applicationCreate a Node.js application
Add the Relay NPM packageAdd the Relay NPM package
Write some code to send messagesWrite some code to send messages
To send messages to the Relay, write a Node.js console application.
Create a new JavaScript file called sender.js .
Run npm install hyco-ws from a Node command prompt in your project folder.
const WebSocket = require('hyco-ws');const readline = require('readline') .createInterface({ input: process.stdin, output: process.stdout });;
WebSocket.relayedConnect( WebSocket.createRelaySendUri(ns, path), WebSocket.createRelayToken('http://'+ns, keyrule, key), function (wss) { readline.on('line', (input) => { wss.send(input, null); });
console.log('Started client interval.'); wss.on('close', function () { console.log('stopping client interval'); process.exit(); }); });
1. Add the following constants to the top of the sender.js file.
2. Add the following constants to the sender.js file for the hybrid connection details. Replace theplaceholders in brackets with the values you obtained when you created the hybrid connection.
a. const ns - The Relay namespace. Be sure to use the fully qualified namespace name; for example, {namespace}.servicebus.windows.net .
b. const path - The name of the hybrid connection.c. const keyrule - The name of the SAS key.d. const key - The SAS key value.
3. Add the following code to the sender.js file:
Here is what your sender.js file should look like:

5. Run the applications
const WebSocket = require('hyco-ws');const readline = require('readline') .createInterface({ input: process.stdin, output: process.stdout });;
const ns = "{RelayNamespace}";const path = "{HybridConnectionName}";const keyrule = "{SASKeyName}";const key = "{SASKeyValue}";
WebSocket.relayedConnect( WebSocket.createRelaySendUri(ns, path), WebSocket.createRelayToken('http://'+ns, keyrule, key), function (wss) { readline.on('line', (input) => { wss.send(input, null); });
console.log('Started client interval.'); wss.on('close', function () { console.log('stopping client interval'); process.exit(); }); });
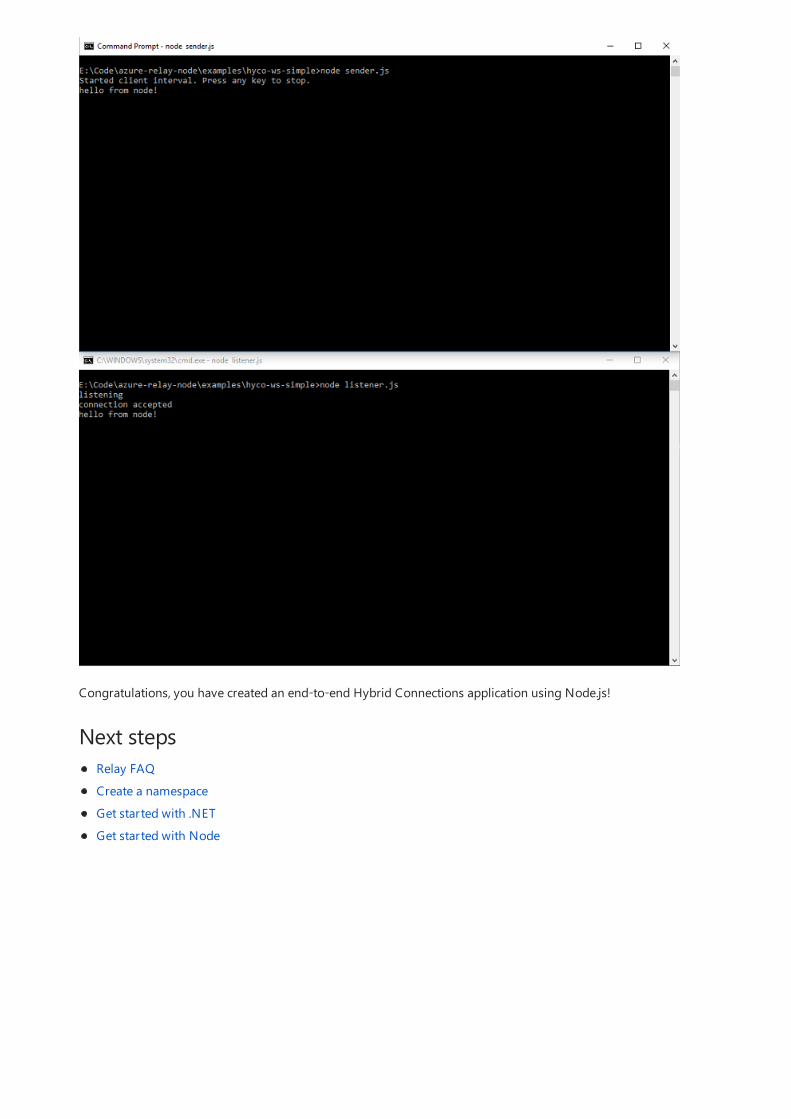
1. Run the server application: from a Node.js command prompt type node listener.js .2. Run the client application: from a Node.js command prompt type node sender.js , and enter some text.3. Ensure that the server application console outputs the text that was entered in the client application.
Next steps
Congratulations, you have created an end-to-end Hybrid Connections application using Node.js!
Relay FAQCreate a namespaceGet started with .NETGet started with Node

How to use Azure Relay WCF relays with .NET12/20/2017 • 9 min to read • Edit Online
NOTENOTE
What is WCF Relay?
This article describes how to use the Azure Relay service. The samples are written in C# and use the WindowsCommunication Foundation (WCF) API with extensions contained in the Service Bus assembly. For moreinformation about Azure relay, see the Azure Relay overview.
To complete this tutorial, you need an Azure account. You can activate your MSDN subscriber benefits or sign up for a freeaccount.
The Azure WCF Relay service enables you to build hybrid applications that run in both an Azure datacenter andyour own on-premises enterprise environment. The relay service facilitates this by enabling you to securelyexpose Windows Communication Foundation (WCF) services that reside within a corporate enterprise network tothe public cloud, without having to open a firewall connection, or requiring intrusive changes to a corporatenetwork infrastructure.
Azure Relay enables you to host WCF services within your existing enterprise environment. You can then delegatelistening for incoming sessions and requests to these WCF services to the relay service running within Azure. Thisenables you to expose these services to application code running in Azure, or to mobile workers or extranetpartner environments. Relay enables you to securely control who can access these services at a fine-grained level.It provides a powerful and secure way to expose application functionality and data from your existing enterprisesolutions and take advantage of it from the cloud.
This article discusses how to use Azure Relay to create a WCF web service, exposed using a TCP channel binding,that implements a secure conversation between two parties.
To begin using Service Bus messaging entities in Azure, you must first create a namespace with a name that isunique across Azure. A namespace provides a scoping container for addressing Service Bus resources within yourapplication.
To create a namespace:
1. Log on to the Azure portal.

Obtain the management credentialsObtain the management credentials
2. In the left navigation pane of the portal, click + Create a resource, then click Enterprise Integration, andthen click Service Bus.
3. In the Create namespace dialog, enter a namespace name. The system immediately checks to see if the nameis available.
4. After making sure the namespace name is available, choose the pricing tier (Basic, Standard, or Premium).5. In the Subscription field, choose an Azure subscription in which to create the namespace.6. In the Resource group field, choose an existing resource group in which the namespace will live, or create a
new one.
8. Click Create. The system now creates your namespace and enables it. You might have to wait several minutesas the system provisions resources for your account.
7. In Location, choose the country or region in which your namespace should be hosted.
Creating a new namespace automatically generates an initial Shared Access Signature (SAS) rule with anassociated pair of primary and secondary keys that each grant full control over all aspects of the namespace. SeeService Bus authentication and authorization for information about how to create further rules with moreconstrained rights for regular senders and receivers. To copy the initial rule, follow these steps:
1. Click All resources, then click the newly created namespace name.

2. In the namespace window, click Shared access policies.3. In the Shared access policies screen, click RootManageSharedAccessKey.
4. In the Policy: RootManageSharedAccessKey window, click the copy button next to Connectionstring–primary key, to copy the connection string to your clipboard for later use. Paste this value intoNotepad or some other temporary location.
5. Repeat the previous step, copying and pasting the value of Primary key to a temporary location for lateruse.

Get the Service Bus NuGet package
Expose and consume a SOAP web service with TCP
How to create the serviceHow to create the service
The Service Bus NuGet package is the easiest way to get the Service Bus API and to configure your applicationwith all of the Service Bus dependencies. To install the NuGet package in your project, do the following:
1. In Solution Explorer, right-click References, then click Manage NuGet Packages.2. Search for "Service Bus" and select the Microsoft Azure Service Bus item. Click Install to complete the
installation, then close the following dialog box:
To expose an existing WCF SOAP web service for external consumption, you must make changes to the servicebindings and addresses. This may require changes to your configuration file or it could require code changes,depending on how you have set up and configured your WCF services. Note that WCF allows you to havemultiple network endpoints over the same service, so you can retain the existing internal endpoints while addingrelay endpoints for external access at the same time.
In this task, you build a simple WCF service and add a relay listener to it. This exercise assumes some familiaritywith Visual Studio, and therefore does not walk through all the details of creating a project. Instead, it focuses onthe code.
Before starting these steps, complete the following procedure to set up your environment:
1. Within Visual Studio, create a console application that contains two projects, "Client" and "Service", within thesolution.
2. Add the Service Bus NuGet package to both projects. This package adds all the necessary assembly referencesto your projects.
First, create the service itself. Any WCF service consists of at least three distinct parts:
Definition of a contract that describes what messages are exchanged and what operations are to be invoked.Implementation of that contract.Host that hosts the WCF service and exposes several endpoints.
The code examples in this section address each of these components.
The contract defines a single operation, AddNumbers , that adds two numbers and returns the result. The IProblemSolverChannel interface enables the client to more easily manage the proxy lifetime. Creating such an
interface is considered a best practice. It's a good idea to put this contract definition into a separate file so that you

using System.ServiceModel;
[ServiceContract(Namespace = "urn:ps")]interface IProblemSolver{ [OperationContract] int AddNumbers(int a, int b);}
interface IProblemSolverChannel : IProblemSolver, IClientChannel {}
class ProblemSolver : IProblemSolver{ public int AddNumbers(int a, int b) { return a + b; }}
Configure a service host programmaticallyConfigure a service host programmatically
ServiceHost sh = new ServiceHost(typeof(ProblemSolver));
sh.AddServiceEndpoint( typeof (IProblemSolver), new NetTcpBinding(), "net.tcp://localhost:9358/solver");
sh.AddServiceEndpoint( typeof(IProblemSolver), new NetTcpRelayBinding(), ServiceBusEnvironment.CreateServiceUri("sb", "namespace", "solver")) .Behaviors.Add(new TransportClientEndpointBehavior { TokenProvider = TokenProvider.CreateSharedAccessSignatureTokenProvider("RootManageSharedAccessKey", "<yourKey>")});
sh.Open();
Console.WriteLine("Press ENTER to close");Console.ReadLine();
sh.Close();
can reference that file from both your "Client" and "Service" projects, but you can also copy the code into bothprojects.
With the contract in place, the implementation is as follows:
With the contract and implementation in place, you can now host the service. Hosting occurs inside aSystem.ServiceModel.ServiceHost object, which takes care of managing instances of the service and hosts theendpoints that listen for messages. The following code configures the service with both a regular local endpointand a relay endpoint to illustrate the appearance, side by side, of internal and external endpoints. Replace thestring namespace with your namespace name and yourKey with the SAS key that you obtained in the previoussetup step.
In the example, you create two endpoints that are on the same contract implementation. One is local and one isprojected through Azure Relay. The key differences between them are the bindings; NetTcpBinding for the localone and NetTcpRelayBinding for the relay endpoint and the addresses. The local endpoint has a local networkaddress with a distinct port. The relay endpoint has an endpoint address composed of the string sb , yournamespace name, and the path "solver." This results in the URI sb://[serviceNamespace].servicebus.windows.net/solver , identifying the service endpoint as a Service Bus (relay)

Configure a service host in the App.config fileConfigure a service host in the App.config file
ServiceHost sh = new ServiceHost(typeof(ProblemSolver));sh.Open();Console.WriteLine("Press ENTER to close");Console.ReadLine();sh.Close();
<services> <service name="Service.ProblemSolver"> <endpoint contract="Service.IProblemSolver" binding="netTcpBinding" address="net.tcp://localhost:9358/solver"/> <endpoint contract="Service.IProblemSolver" binding="netTcpRelayBinding" address="sb://<namespaceName>.servicebus.windows.net/solver" behaviorConfiguration="sbTokenProvider"/> </service></services><behaviors> <endpointBehaviors> <behavior name="sbTokenProvider"> <transportClientEndpointBehavior> <tokenProvider> <sharedAccessSignature keyName="RootManageSharedAccessKey" key="<yourKey>" /> </tokenProvider> </transportClientEndpointBehavior> </behavior> </endpointBehaviors></behaviors>
Create the clientCreate the clientConfigure a client programmaticallyConfigure a client programmatically
TCP endpoint with a fully qualified external DNS name. If you place the code replacing the placeholders into the Main function of the Service application, you will have a functional service. If you want your service to listen
exclusively on the relay, remove the local endpoint declaration.
You can also configure the host using the App.config file. The service hosting code in this case appears in the nextexample.
The endpoint definitions move into the App.config file. The NuGet package has already added a range ofdefinitions to the App.config file, which are the required configuration extensions for Azure Relay. The followingexample, which is the exact equivalent of the previous code, should appear directly beneath thesystem.serviceModel element. This code example assumes that your project C# namespace is named Service.Replace the placeholders with your relay namespace name and SAS key.
After you make these changes, the service starts as it did before, but with two live endpoints: one local and onelistening in the cloud.
To consume the service, you can construct a WCF client using a ChannelFactory object. Service Bus uses a token-based security model implemented using SAS. The TokenProvider class represents a security token provider withbuilt-in factory methods that return some well-known token providers. The following example uses theCreateSharedAccessSignatureTokenProvider method to handle the acquisition of the appropriate SAS token. Thename and key are those obtained from the portal as described in the previous section.
First, reference or copy the IProblemSolver contract code from the service into your client project.
Then, replace the code in the Main method of the client, again replacing the placeholder text with your relaynamespace and SAS key.

var cf = new ChannelFactory<IProblemSolverChannel>( new NetTcpRelayBinding(), new EndpointAddress(ServiceBusEnvironment.CreateServiceUri("sb", "<namespaceName>", "solver")));
cf.Endpoint.Behaviors.Add(new TransportClientEndpointBehavior { TokenProvider = TokenProvider.CreateSharedAccessSignatureTokenProvider("RootManageSharedAccessKey","<yourKey>") });
using (var ch = cf.CreateChannel()){ Console.WriteLine(ch.AddNumbers(4, 5));}
Configure a client in the App.config fileConfigure a client in the App.config file
var cf = new ChannelFactory<IProblemSolverChannel>("solver");using (var ch = cf.CreateChannel()){ Console.WriteLine(ch.AddNumbers(4, 5));}
<client> <endpoint name="solver" contract="Service.IProblemSolver" binding="netTcpRelayBinding" address="sb://<namespaceName>.servicebus.windows.net/solver" behaviorConfiguration="sbTokenProvider"/></client><behaviors> <endpointBehaviors> <behavior name="sbTokenProvider"> <transportClientEndpointBehavior> <tokenProvider> <sharedAccessSignature keyName="RootManageSharedAccessKey" key="<yourKey>" /> </tokenProvider> </transportClientEndpointBehavior> </behavior> </endpointBehaviors></behaviors>
Next steps
You can now build the client and the service, run them (run the service first), and the client calls the service andprints 9. You can run the client and server on different machines, even across networks, and the communicationwill still work. The client code can also run in the cloud or locally.
The following code shows how to configure the client using the App.config file.
The endpoint definitions move into the App.config file. The following example, which is the same as the code listedpreviously, should appear directly beneath the <system.serviceModel> element. Here, as before, you must replacethe placeholders with your relay namespace and SAS key.
Now that you've learned the basics of Azure Relay, follow these links to learn more.
What is Azure Relay?Azure Service Bus architectural overviewDownload Service Bus samples from Azure samples or see the overview of Service Bus samples.

Azure WCF Relay tutorial11/3/2017 • 20 min to read • Edit Online
Prerequisites
Create a service namespace
Define a WCF service contract
Create a relay contract with an interfaceCreate a relay contract with an interface
This tutorial describes how to build a simple WCF Relay client application and service using Azure Relay. For asimilar tutorial that uses Service Bus messaging, see Get started with Service Bus queues.
Working through this tutorial gives you an understanding of the steps that are required to create a WCF Relayclient and service application. Like their original WCF counterparts, a service is a construct that exposes one ormore endpoints, each of which exposes one or more service operations. The endpoint of a service specifies anaddress where the service can be found, a binding that contains the information that a client must communicatewith the service, and a contract that defines the functionality provided by the service to its clients. The maindifference between WCF and WCF Relay is that the endpoint is exposed in the cloud instead of locally on yourcomputer.
After you work through the sequence of topics in this tutorial, you will have a running service, and a client that caninvoke the operations of the service. The first topic describes how to set up an account. The next steps describe howto define a service that uses a contract, how to implement the service, and how to configure the service in code.They also describe how to host and run the service. The service that is created is self-hosted and the client andservice run on the same computer. You can configure the service by using either code or a configuration file.
The final three steps describe how to create a client application, configure the client application, and create and usea client that can access the functionality of the host.
To complete this tutorial, you'll need the following:
Microsoft Visual Studio 2015 or higher. This tutorial uses Visual Studio 2017.An active Azure account. If you don't have one, you can create a free account in just a couple of minutes. Fordetails, see Azure Free Trial.
The first step is to create a namespace, and to obtain a Shared Access Signature (SAS) key. A namespace providesan application boundary for each application exposed through the relay service. A SAS key is automaticallygenerated by the system when a service namespace is created. The combination of service namespace and SASkey provides the credentials for Azure to authenticate access to an application. Follow the instructions here tocreate a Relay namespace.
The service contract specifies what operations (the web service terminology for methods or functions) the servicesupports. Contracts are created by defining a C++, C#, or Visual Basic interface. Each method in the interfacecorresponds to a specific service operation. Each interface must have the ServiceContractAttribute attribute appliedto it, and each operation must have the OperationContractAttribute attribute applied to it. If a method in aninterface that has the ServiceContractAttribute attribute does not have the OperationContractAttribute attribute,that method is not exposed. The code for these tasks is provided in the example following the procedure. For alarger discussion of contracts and services, see Designing and Implementing Services in the WCF documentation.
1. Open Visual Studio as an administrator by right-clicking the program in the Start menu and selecting Run as

administrator.
4. In Solution Explorer, double-click the Program.cs file to open it in the editor, if it is not already open.
2. Create a new console application project. Click the File menu and select New, then click Project. In theNew Project dialog, click Visual C# (if Visual C# does not appear, look under Other Languages). Clickthe Console App (.NET Framework) template, and name it EchoService. Click OK to create the project.
3. Install the Service Bus NuGet package. This package automatically adds references to the Service Buslibraries, as well as the WCF System.ServiceModel. System.ServiceModel is the namespace that enablesyou to programmatically access the basic features of WCF. Service Bus uses many of the objects andattributes of WCF to define service contracts.
In Solution Explorer, right-click the project, and then click Manage NuGet Packages.... Click the Browsetab, then search for WindowsAzure.ServiceBus. Ensure that the project name is selected in the Version(s)box. Click Install, and accept the terms of use.
5. Add the following using statements at the top of the file:

using System.ServiceModel;using Microsoft.ServiceBus;
IMPORTANTIMPORTANT
[ServiceContract(Name = "IEchoContract", Namespace = "http://samples.microsoft.com/ServiceModel/Relay/")]public interface IEchoContract{}
NOTENOTE
[OperationContract]string Echo(string text);
public interface IEchoChannel : IEchoContract, IClientChannel { }
10. From the Build menu, click Build Solution or press Ctrl+Shift+B to confirm the accuracy of your work so far.
6. Change the namespace name from its default name of EchoService to Microsoft.ServiceBus.Samples.
This tutorial uses the C# namespace Microsoft.ServiceBus.Samples, which is the namespace of the contract-basedmanaged type that is used in the configuration file in the Configure the WCF client step. You can specify anynamespace you want when you build this sample; however, the tutorial will not work unless you then modify thenamespaces of the contract and service accordingly, in the application configuration file. The namespace specified inthe App.config file must be the same as the namespace specified in your C# files.
7. Directly after the Microsoft.ServiceBus.Samples namespace declaration, but within the namespace, define anew interface named IEchoContract and apply the ServiceContractAttribute attribute to the interface witha namespace value of http://samples.microsoft.com/ServiceModel/Relay/ . The namespace value differs fromthe namespace that you use throughout the scope of your code. Instead, the namespace value is used as aunique identifier for this contract. Specifying the namespace explicitly prevents the default namespace valuefrom being added to the contract name. Paste the following code after the namespace declaration:
Typically, the service contract namespace contains a naming scheme that includes version information. Includingversion information in the service contract namespace enables services to isolate major changes by defining a newservice contract with a new namespace and exposing it on a new endpoint. In this manner, clients can continue to usethe old service contract without having to be updated. Version information can consist of a date or a build number.For more information, see Service Versioning. For the purposes of this tutorial, the naming scheme of the servicecontract namespace does not contain version information.
8. Within the IEchoContract interface, declare a method for the single operation the IEchoContract contractexposes in the interface and apply the OperationContractAttribute attribute to the method that you want toexpose as part of the public WCF Relay contract, as follows:
9. Directly after the IEchoContract interface definition, declare a channel that inherits from both IEchoContract and also to the IClientChannel interface, as shown here:
A channel is the WCF object through which the host and client pass information to each other. Later, you willwrite code against the channel to echo information between the two applications.

ExampleExample
using System;using System.ServiceModel;
namespace Microsoft.ServiceBus.Samples{ [ServiceContract(Name = "IEchoContract", Namespace = "http://samples.microsoft.com/ServiceModel/Relay/")] public interface IEchoContract { [OperationContract] String Echo(string text); }
public interface IEchoChannel : IEchoContract, IClientChannel { }
class Program { static void Main(string[] args) { } }}
Implement the WCF contract
The following code shows a basic interface that defines a WCF Relay contract.
Now that the interface is created, you can implement the interface.
Creating an Azure relay requires that you first create the contract, which is defined by using an interface. For moreinformation about creating the interface, see the previous step. The next step is to implement the interface. Thisinvolves creating a class named EchoService that implements the user-defined IEchoContract interface. After youimplement the interface, you then configure the interface using an App.config configuration file. The configurationfile contains necessary information for the application, such as the name of the service, the name of the contract,and the type of protocol that is used to communicate with the relay service. The code used for these tasks isprovided in the example following the procedure. For a more general discussion about how to implement a servicecontract, see Implementing Service Contracts in the WCF documentation.
class EchoService : IEchoContract{}
[ServiceBehavior(Name = "EchoService", Namespace = "http://samples.microsoft.com/ServiceModel/Relay/")]class EchoService : IEchoContract{}
1. Create a new class named EchoService directly after the definition of the IEchoContract interface. The EchoService class implements the IEchoContract interface.
Similar to other interface implementations, you can implement the definition in a different file. However, forthis tutorial, the implementation is located in the same file as the interface definition and the Main method.
2. Apply the ServiceBehaviorAttribute attribute to the IEchoContract interface. The attribute specifies theservice name and namespace. After doing so, the EchoService class appears as follows:
3. Implement the Echo method defined in the IEchoContract interface in the EchoService class.

Define the configuration for the service hostDefine the configuration for the service host
ExampleExample
public string Echo(string text){ Console.WriteLine("Echoing: {0}", text); return text;}
4. Click Build, then click Build Solution to confirm the accuracy of your work.
1. The configuration file is very similar to a WCF configuration file. It includes the service name, endpoint (that is,the location that Azure Relay exposes for clients and hosts to communicate with each other), and the binding(the type of protocol that is used to communicate). The main difference is that this configured service endpointrefers to a NetTcpRelayBinding binding, which is not part of the .NET Framework. NetTcpRelayBinding is one ofthe bindings defined by the service.
2. In Solution Explorer, double-click the App.config file to open it in the Visual Studio editor.3. In the <appSettings> element, replace the placeholders with the name of your service namespace, and the SAS
key that you copied in an earlier step.
<?xmlversion="1.0"encoding="utf-8"?><configuration> <system.serviceModel> <services>
</services> </system.serviceModel></configuration>
<service name="Microsoft.ServiceBus.Samples.EchoService"></service>
<endpoint contract="Microsoft.ServiceBus.Samples.IEchoContract" binding="netTcpRelayBinding"/>
7. From the Build menu, click Build Solution to confirm the accuracy of your work.
4. Within the <system.serviceModel> tags, add a <services> element. You can define multiple relayapplications in a single configuration file. However, this tutorial defines only one.
5. Within the <services> element, add a <service> element to define the name of the service.
6. Within the <service> element, define the location of the endpoint contract, and also the type of binding forthe endpoint.
The endpoint defines where the client will look for the host application. Later, the tutorial uses this step tocreate a URI that fully exposes the host through Azure Relay. The binding declares that we are using TCP asthe protocol to communicate with the relay service.
The following code shows the implementation of the service contract.

[ServiceBehavior(Name = "EchoService", Namespace = "http://samples.microsoft.com/ServiceModel/Relay/")]
class EchoService : IEchoContract { public string Echo(string text) { Console.WriteLine("Echoing: {0}", text); return text; } }
<?xml version="1.0" encoding="utf-8" ?><configuration> <system.serviceModel> <services> <service name="Microsoft.ServiceBus.Samples.EchoService"> <endpoint contract="Microsoft.ServiceBus.Samples.IEchoContract" binding="netTcpRelayBinding" /> </service> </services> <extensions> <bindingExtensions> <add name="netTcpRelayBinding" type="Microsoft.ServiceBus.Configuration.NetTcpRelayBindingCollectionElement, Microsoft.ServiceBus, Culture=neutral, PublicKeyToken=31bf3856ad364e35"/> </bindingExtensions> </extensions> </system.serviceModel></configuration>
Host and run a basic web service to register with the relay service
Create the relay credentialsCreate the relay credentials
Create a base address for the serviceCreate a base address for the service
The following code shows the basic format of the App.config file associated with the service host.
This step describes how to run an Azure Relay service.
Console.Write("Your Service Namespace: ");string serviceNamespace = Console.ReadLine();Console.Write("Your SAS key: ");string sasKey = Console.ReadLine();
TransportClientEndpointBehavior sasCredential = new TransportClientEndpointBehavior();sasCredential.TokenProvider = TokenProvider.CreateSharedAccessSignatureTokenProvider("RootManageSharedAccessKey", sasKey);
1. In Main() , create two variables in which to store the namespace and the SAS key that are read from theconsole window.
The SAS key will be used later to access your project. The namespace is passed as a parameter to CreateServiceUri to create a service URI.
2. Using a TransportClientEndpointBehavior object, declare that you will be using a SAS key as the credentialtype. Add the following code directly after the code added in the last step.
After the code you added in the last step, create a Uri instance for the base address of the service. This URIspecifies the Service Bus scheme, the namespace, and the path of the service interface.

Uri address = ServiceBusEnvironment.CreateServiceUri("sb", serviceNamespace, "EchoService");
Create and configure the service hostCreate and configure the service host
"sb" is an abbreviation for the Service Bus scheme, and indicates that we are using TCP as the protocol. This wasalso previously indicated in the configuration file, when NetTcpRelayBinding was specified as the binding.
For this tutorial, the URI is sb://putServiceNamespaceHere.windows.net/EchoService .
ServiceBusEnvironment.SystemConnectivity.Mode = ConnectivityMode.AutoDetect;
ServiceHost host = new ServiceHost(typeof(EchoService), address);
using System.ServiceModel.Description;using Microsoft.ServiceBus.Description;
IEndpointBehavior serviceRegistrySettings = new ServiceRegistrySettings(DiscoveryType.Public);
foreach (ServiceEndpoint endpoint in host.Description.Endpoints){ endpoint.Behaviors.Add(serviceRegistrySettings); endpoint.Behaviors.Add(sasCredential);}
1. Set the connectivity mode to AutoDetect .
The connectivity mode describes the protocol the service uses to communicate with the relay service; eitherHTTP or TCP. Using the default setting AutoDetect , the service attempts to connect to Azure Relay over TCPif it is available, and HTTP if TCP is not available. Note that this differs from the protocol the service specifiesfor client communication. That protocol is determined by the binding used. For example, a service can usethe BasicHttpRelayBinding binding, which specifies that its endpoint communicates with clients over HTTP.That same service could specify ConnectivityMode.AutoDetect so that the service communicates withAzure Relay over TCP.
2. Create the service host, using the URI created earlier in this section.
The service host is the WCF object that instantiates the service. Here, you pass it the type of service youwant to create (an EchoService type), and also to the address at which you want to expose the service.
3. At the top of the Program.cs file, add references to System.ServiceModel.Description andMicrosoft.ServiceBus.Description.
4. Back in Main() , configure the endpoint to enable public access.
This step informs the relay service that your application can be found publicly by examining the ATOM feedfor your project. If you set DiscoveryType to private, a client would still be able to access the service.However, the service would not appear when it searches the Relay namespace. Instead, the client would haveto know the endpoint path beforehand.
5. Apply the service credentials to the service endpoints defined in the App.config file:
As stated in the previous step, you could have declared multiple services and endpoints in the configurationfile. If you had, this code would traverse the configuration file and search for every endpoint to which it
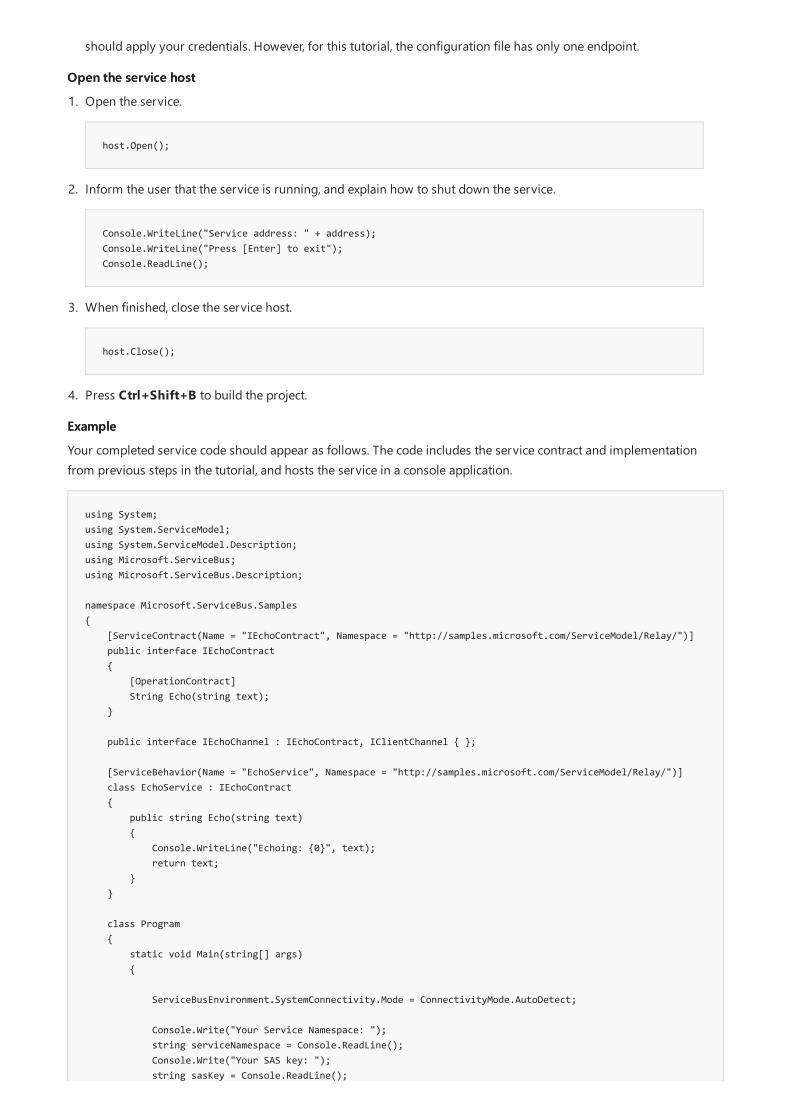
Open the service hostOpen the service host
ExampleExample
using System;using System.ServiceModel;using System.ServiceModel.Description;using Microsoft.ServiceBus;using Microsoft.ServiceBus.Description;
namespace Microsoft.ServiceBus.Samples{ [ServiceContract(Name = "IEchoContract", Namespace = "http://samples.microsoft.com/ServiceModel/Relay/")] public interface IEchoContract { [OperationContract] String Echo(string text); }
public interface IEchoChannel : IEchoContract, IClientChannel { };
[ServiceBehavior(Name = "EchoService", Namespace = "http://samples.microsoft.com/ServiceModel/Relay/")] class EchoService : IEchoContract { public string Echo(string text) { Console.WriteLine("Echoing: {0}", text); return text; } }
class Program { static void Main(string[] args) {
ServiceBusEnvironment.SystemConnectivity.Mode = ConnectivityMode.AutoDetect;
Console.Write("Your Service Namespace: "); string serviceNamespace = Console.ReadLine(); Console.Write("Your SAS key: "); string sasKey = Console.ReadLine();
should apply your credentials. However, for this tutorial, the configuration file has only one endpoint.
host.Open();
Console.WriteLine("Service address: " + address);Console.WriteLine("Press [Enter] to exit");Console.ReadLine();
host.Close();
4. Press Ctrl+Shift+B to build the project.
1. Open the service.
2. Inform the user that the service is running, and explain how to shut down the service.
3. When finished, close the service host.
Your completed service code should appear as follows. The code includes the service contract and implementationfrom previous steps in the tutorial, and hosts the service in a console application.
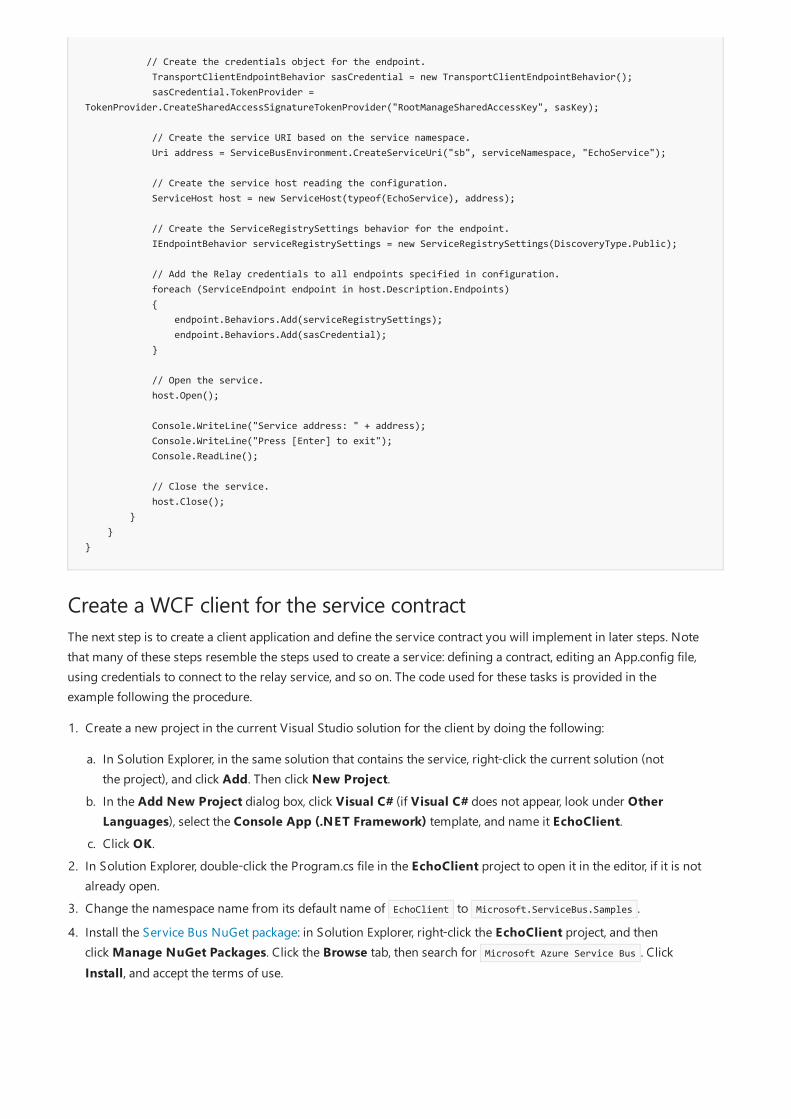
// Create the credentials object for the endpoint. TransportClientEndpointBehavior sasCredential = new TransportClientEndpointBehavior(); sasCredential.TokenProvider = TokenProvider.CreateSharedAccessSignatureTokenProvider("RootManageSharedAccessKey", sasKey);
// Create the service URI based on the service namespace. Uri address = ServiceBusEnvironment.CreateServiceUri("sb", serviceNamespace, "EchoService");
// Create the service host reading the configuration. ServiceHost host = new ServiceHost(typeof(EchoService), address);
// Create the ServiceRegistrySettings behavior for the endpoint. IEndpointBehavior serviceRegistrySettings = new ServiceRegistrySettings(DiscoveryType.Public);
// Add the Relay credentials to all endpoints specified in configuration. foreach (ServiceEndpoint endpoint in host.Description.Endpoints) { endpoint.Behaviors.Add(serviceRegistrySettings); endpoint.Behaviors.Add(sasCredential); }
// Open the service. host.Open();
Console.WriteLine("Service address: " + address); Console.WriteLine("Press [Enter] to exit"); Console.ReadLine();
// Close the service. host.Close(); } }}
Create a WCF client for the service contractThe next step is to create a client application and define the service contract you will implement in later steps. Notethat many of these steps resemble the steps used to create a service: defining a contract, editing an App.config file,using credentials to connect to the relay service, and so on. The code used for these tasks is provided in theexample following the procedure.
2. In Solution Explorer, double-click the Program.cs file in the EchoClient project to open it in the editor, if it is notalready open.
3. Change the namespace name from its default name of EchoClient to Microsoft.ServiceBus.Samples .
1. Create a new project in the current Visual Studio solution for the client by doing the following:
a. In Solution Explorer, in the same solution that contains the service, right-click the current solution (notthe project), and click Add. Then click New Project.
b. In the Add New Project dialog box, click Visual C# (if Visual C# does not appear, look under OtherLanguages), select the Console App (.NET Framework) template, and name it EchoClient.
c. Click OK.
4. Install the Service Bus NuGet package: in Solution Explorer, right-click the EchoClient project, and thenclick Manage NuGet Packages. Click the Browse tab, then search for Microsoft Azure Service Bus . ClickInstall, and accept the terms of use.

ExampleExample
using System.ServiceModel;
[ServiceContract(Name = "IEchoContract", Namespace = "http://samples.microsoft.com/ServiceModel/Relay/")]public interface IEchoContract{ [OperationContract] string Echo(string text);}
public interface IEchoChannel : IEchoContract, IClientChannel { }
7. Press Ctrl+Shift+B to build the client.
5. Add a using statement for the System.ServiceModel namespace in the Program.cs file.
6. Add the service contract definition to the namespace, as shown in the following example. Note that thisdefinition is identical to the definition used in the Service project. You should add this code at the top of the Microsoft.ServiceBus.Samples namespace.
The following code shows the current status of the Program.cs file in the EchoClient project.

using System;using Microsoft.ServiceBus;using System.ServiceModel;
namespace Microsoft.ServiceBus.Samples{
[ServiceContract(Name = "IEchoContract", Namespace = "http://samples.microsoft.com/ServiceModel/Relay/")] public interface IEchoContract { [OperationContract] string Echo(string text); }
public interface IEchoChannel : IEchoContract, IClientChannel { }
class Program { static void Main(string[] args) { } }}
Configure the WCF clientIn this step, you create an App.config file for a basic client application that accesses the service created previously inthis tutorial. This App.config file defines the contract, binding, and name of the endpoint. The code used for thesetasks is provided in the example following the procedure.
1. In Solution Explorer, in the EchoClient project, double-click App.config to open the file in the Visual Studioeditor.
2. In the <appSettings> element, replace the placeholders with the name of your service namespace, and the SASkey that you copied in an earlier step.
<?xmlversion="1.0"encoding="utf-8"?><configuration> <system.serviceModel> <client> </client> </system.serviceModel></configuration>
<endpoint name="RelayEndpoint" contract="Microsoft.ServiceBus.Samples.IEchoContract" binding="netTcpRelayBinding"/>
5. Click File, then click Save All.
3. Within the system.serviceModel element, add a <client> element.
This step declares that you are defining a WCF-style client application.
4. Within the client element, define the name, contract, and binding type for the endpoint.
This step defines the name of the endpoint, the contract defined in the service, and the fact that the clientapplication uses TCP to communicate with Azure Relay. The endpoint name is used in the next step to linkthis endpoint configuration with the service URI.
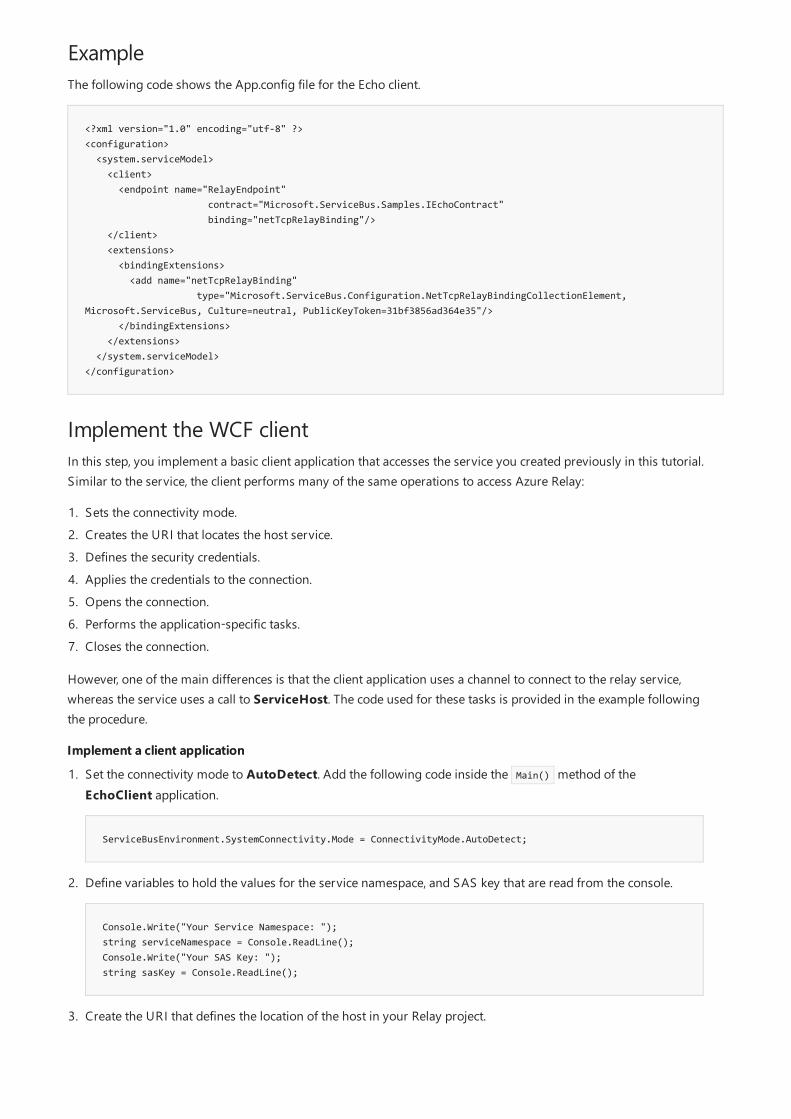
Example
<?xml version="1.0" encoding="utf-8" ?><configuration> <system.serviceModel> <client> <endpoint name="RelayEndpoint" contract="Microsoft.ServiceBus.Samples.IEchoContract" binding="netTcpRelayBinding"/> </client> <extensions> <bindingExtensions> <add name="netTcpRelayBinding" type="Microsoft.ServiceBus.Configuration.NetTcpRelayBindingCollectionElement, Microsoft.ServiceBus, Culture=neutral, PublicKeyToken=31bf3856ad364e35"/> </bindingExtensions> </extensions> </system.serviceModel></configuration>
Implement the WCF client
Implement a client applicationImplement a client application
The following code shows the App.config file for the Echo client.
In this step, you implement a basic client application that accesses the service you created previously in this tutorial.Similar to the service, the client performs many of the same operations to access Azure Relay:
1. Sets the connectivity mode.2. Creates the URI that locates the host service.3. Defines the security credentials.4. Applies the credentials to the connection.5. Opens the connection.6. Performs the application-specific tasks.7. Closes the connection.
However, one of the main differences is that the client application uses a channel to connect to the relay service,whereas the service uses a call to ServiceHost. The code used for these tasks is provided in the example followingthe procedure.
ServiceBusEnvironment.SystemConnectivity.Mode = ConnectivityMode.AutoDetect;
Console.Write("Your Service Namespace: ");string serviceNamespace = Console.ReadLine();Console.Write("Your SAS Key: ");string sasKey = Console.ReadLine();
1. Set the connectivity mode to AutoDetect. Add the following code inside the Main() method of theEchoClient application.
2. Define variables to hold the values for the service namespace, and SAS key that are read from the console.
3. Create the URI that defines the location of the host in your Relay project.

Example
Uri serviceUri = ServiceBusEnvironment.CreateServiceUri("sb", serviceNamespace, "EchoService");
TransportClientEndpointBehavior sasCredential = new TransportClientEndpointBehavior();sasCredential.TokenProvider = TokenProvider.CreateSharedAccessSignatureTokenProvider("RootManageSharedAccessKey", sasKey);
ChannelFactory<IEchoChannel> channelFactory = new ChannelFactory<IEchoChannel>("RelayEndpoint", new EndpointAddress(serviceUri));
channelFactory.Endpoint.Behaviors.Add(sasCredential);
IEchoChannel channel = channelFactory.CreateChannel();channel.Open();
Console.WriteLine("Enter text to echo (or [Enter] to exit):");string input = Console.ReadLine();while (input != String.Empty){ try { Console.WriteLine("Server echoed: {0}", channel.Echo(input)); } catch (Exception e) { Console.WriteLine("Error: " + e.Message); } input = Console.ReadLine();}
channel.Close();channelFactory.Close();
4. Create the credential object for your service namespace endpoint.
5. Create the channel factory that loads the configuration described in the App.config file.
A channel factory is a WCF object that creates a channel through which the service and client applicationscommunicate.
6. Apply the credentials.
7. Create and open the channel to the service.
8. Write the basic user interface and functionality for the echo.
Note that the code uses the instance of the channel object as a proxy for the service.
9. Close the channel, and close the factory.
Your completed code should appear as follows, showing how to create a client application, how to call theoperations of the service, and how to close the client after the operation call is finished.
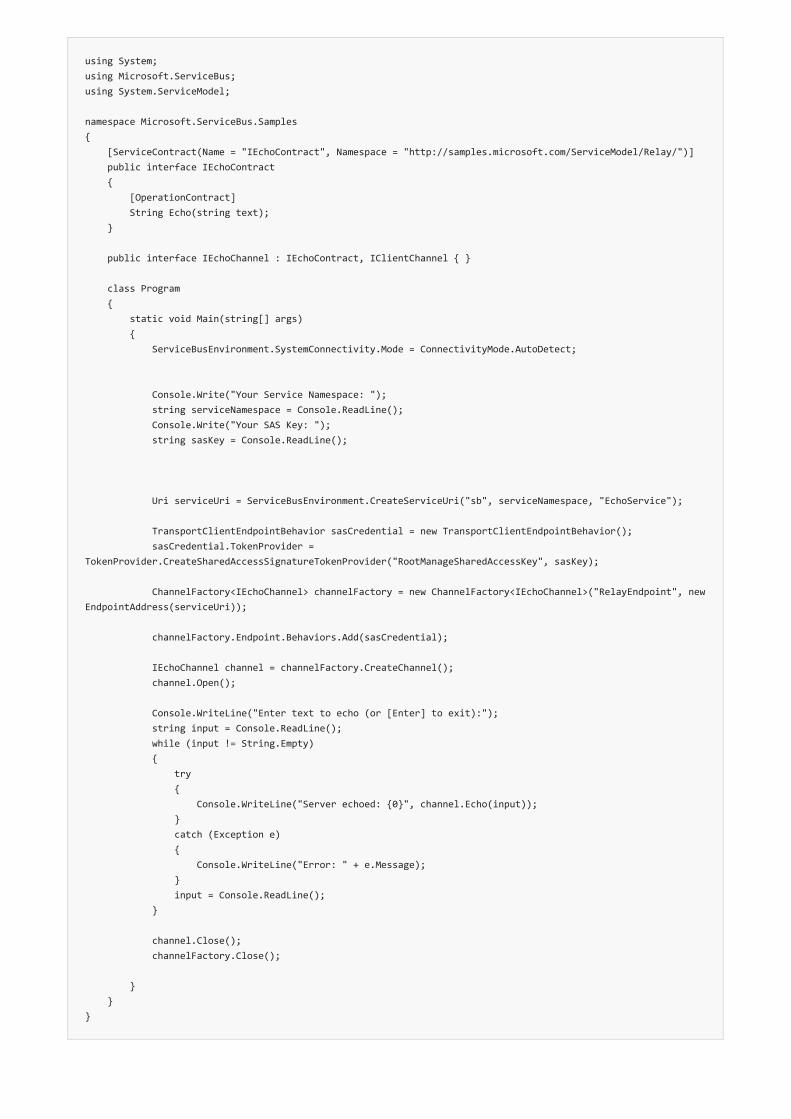
using System;using Microsoft.ServiceBus;using System.ServiceModel;
namespace Microsoft.ServiceBus.Samples{ [ServiceContract(Name = "IEchoContract", Namespace = "http://samples.microsoft.com/ServiceModel/Relay/")] public interface IEchoContract { [OperationContract] String Echo(string text); }
public interface IEchoChannel : IEchoContract, IClientChannel { }
class Program { static void Main(string[] args) { ServiceBusEnvironment.SystemConnectivity.Mode = ConnectivityMode.AutoDetect;
Console.Write("Your Service Namespace: "); string serviceNamespace = Console.ReadLine(); Console.Write("Your SAS Key: "); string sasKey = Console.ReadLine();
Uri serviceUri = ServiceBusEnvironment.CreateServiceUri("sb", serviceNamespace, "EchoService");
TransportClientEndpointBehavior sasCredential = new TransportClientEndpointBehavior(); sasCredential.TokenProvider = TokenProvider.CreateSharedAccessSignatureTokenProvider("RootManageSharedAccessKey", sasKey);
ChannelFactory<IEchoChannel> channelFactory = new ChannelFactory<IEchoChannel>("RelayEndpoint", new EndpointAddress(serviceUri));
channelFactory.Endpoint.Behaviors.Add(sasCredential);
IEchoChannel channel = channelFactory.CreateChannel(); channel.Open();
Console.WriteLine("Enter text to echo (or [Enter] to exit):"); string input = Console.ReadLine(); while (input != String.Empty) { try { Console.WriteLine("Server echoed: {0}", channel.Echo(input)); } catch (Exception e) { Console.WriteLine("Error: " + e.Message); } input = Console.ReadLine(); }
channel.Close(); channelFactory.Close();
} }}

Run the applications1. Press Ctrl+Shift+B to build the solution. This builds both the client project and the service project that you
created in the previous steps.2. Before running the client application, you must make sure that the service application is running. In Solution
Explorer in Visual Studio, right-click the EchoService solution, then click Properties.3. In the solution properties dialog box, click Startup Project, then click the Multiple startup projects button.
Make sure EchoService appears first in the list.4. Set the Action box for both the EchoService and EchoClient projects to Start.
5. Click Project Dependencies. In the Projects box, select EchoClient. In the Depends on box, make sureEchoService is checked.

Next steps
6. Click OK to dismiss the Properties dialog.7. Press F5 to run both projects.8. Both console windows open and prompt you for the namespace name. The service must run first, so in the
EchoService console window, enter the namespace and then press Enter.
10. In the EchoClient console window, enter the same information that you entered previously for the serviceapplication. Follow the previous steps to enter the same service namespace and SAS key values for the clientapplication.
12. You can continue sending text messages from the client to the service in this manner. When you are finished,press Enter in the client and service console windows to end both applications.
9. Next, you are prompted for your SAS key. Enter the SAS key and press ENTER.
Here is example output from the console window. Note that the values provided here are for examplepurposes only.
Your Service Namespace: myNamespace Your SAS Key: <SAS key value>
The service application prints to the console window the address on which it's listening, as seen in thefollowing example.
Service address: sb://mynamespace.servicebus.windows.net/EchoService/ Press [Enter] to exit
11. After entering these values, the client opens a channel to the service and prompts you to enter some text asseen in the following console output example.
Enter text to echo (or [Enter] to exit):
Enter some text to send to the service application and press Enter. This text is sent to the service through theEcho service operation and appears in the service console window as in the following example output.
Echoing: My sample text
The client application receives the return value of the Echo operation, which is the original text, and prints itto its console window. The following is example output from the client console window.
Server echoed: My sample text
This tutorial showed how to build an Azure Relay client application and service using the WCF Relay capabilities ofService Bus. For a similar tutorial that uses Service Bus Messaging, see Get started with Service Bus queues.
To learn more about Azure Relay, see the following topics.
Azure Service Bus architectural overviewAzure Relay overviewHow to use the WCF relay service with .NET

Azure WCF Relay REST tutorial11/6/2017 • 13 min to read • Edit Online
Step 1: Create a namespace
Step 2: Define a REST-based WCF service contract to use with AzureRelay
To create a contract with an interfaceTo create a contract with an interface
This tutorial describes how to build a simple Azure Relay host application that exposes a REST-based interface.REST enables a web client, such as a web browser, to access the Service Bus APIs through HTTP requests.
The tutorial uses the Windows Communication Foundation (WCF) REST programming model to construct a RESTservice on Azure Relay. For more information, see WCF REST Programming Model and Designing andImplementing Services in the WCF documentation.
To begin using the relay features in Azure, you must first create a service namespace. A namespace provides ascoping container for addressing Azure resources within your application. Follow the instructions here to create aRelay namespace.
When you create a WCF REST-style service, you must define the contract. The contract specifies what operationsthe host supports. A service operation can be thought of as a web service method. Contracts are created bydefining a C++, C#, or Visual Basic interface. Each method in the interface corresponds to a specific serviceoperation. The ServiceContractAttribute attribute must be applied to each interface, and theOperationContractAttribute attribute must be applied to each operation. If a method in an interface that has theServiceContractAttribute does not have the OperationContractAttribute, that method is not exposed. The codeused for these tasks is shown in the example following the procedure.
The primary difference between a WCF contract and a REST-style contract is the addition of a property to theOperationContractAttribute: WebGetAttribute. This property enables you to map a method in your interface to amethod on the other side of the interface. This example uses the WebGetAttribute attribute to link a method toHTTP GET. This enables Service Bus to accurately retrieve and interpret commands sent to the interface.
1. Open Visual Studio as an administrator : right-click the program in the Start menu, and then click Run asadministrator.
2. Create a new console application project. Click the File menu and select New, then select Project. In the NewProject dialog box, click Visual C#, select the Console Application template, and name it ImageListener.Use the default Location. Click OK to create the project.
3. For a C# project, Visual Studio creates a Program.cs file. This class contains an empty Main() method, requiredfor a console application project to build correctly.
4. Add references to Service Bus and System.ServiceModel.dll to the project by installing the Service BusNuGet package. This package automatically adds references to the Service Bus libraries, as well as the WCFSystem.ServiceModel. In Solution Explorer, right-click the ImageListener project, and then click ManageNuGet Packages. Click the Browse tab, then search for Microsoft Azure Service Bus . Click Install, and acceptthe terms of use.
5. You must explicitly add a reference to System.ServiceModel.Web.dll to the project:
a. In Solution Explorer, right-click the References folder under the project folder and then click AddReference.

using System.ServiceModel;using System.ServiceModel.Channels;using System.ServiceModel.Web;using System.IO;
namespace Microsoft.ServiceBus.Samples{ ...
[ServiceContract(Name = "ImageContract", Namespace = "http://samples.microsoft.com/ServiceModel/Relay/RESTTutorial1")]public interface IImageContract{}
public interface IImageContract{ [OperationContract] Stream GetImage();}
public interface IImageContract{ [OperationContract, WebGet] Stream GetImage();}
b. In the Add Reference dialog box, click the Framework tab on the left-hand side and in the Search box,type System.ServiceModel.Web. Select the System.ServiceModel.Web check box, then click OK.
6. Add the following using statements at the top of the Program.cs file.
System.ServiceModel is the namespace that enables programmatic access to basic features of WCF. WCFRelay uses many of the objects and attributes of WCF to define service contracts. You use this namespace inmost of your relay applications. Similarly, System.ServiceModel.Channels helps define the channel, which isthe object through which you communicate with Azure Relay and the client web browser. Finally,System.ServiceModel.Web contains the types that enable you to create web-based applications.
7. Rename the ImageListener namespace to Microsoft.ServiceBus.Samples.
8. Directly after the opening curly brace of the namespace declaration, define a new interface namedIImageContract and apply the ServiceContractAttribute attribute to the interface with a value of http://samples.microsoft.com/ServiceModel/Relay/ . The namespace value differs from the namespace that
you use throughout the scope of your code. The namespace value is used as a unique identifier for thiscontract, and should have version information. For more information, see Service Versioning. Specifying thenamespace explicitly prevents the default namespace value from being added to the contract name.
9. Within the IImageContract interface, declare a method for the single operation the IImageContract contractexposes in the interface and apply the OperationContractAttribute attribute to the method that you want toexpose as part of the public Service Bus contract.
10. In the OperationContract attribute, add the WebGet value.
Doing so enables the relay service to route HTTP GET requests to GetImage , and to translate the returnvalues of GetImage into an HTTP GETRESPONSE reply. Later in the tutorial, you will use a web browser to

ExampleExample
using System;using System.Collections.Generic;using System.Linq;using System.Text;using System.ServiceModel;using System.ServiceModel.Channels;using System.ServiceModel.Web;using System.IO;
namespace Microsoft.ServiceBus.Samples{
[ServiceContract(Name = "IImageContract", Namespace = "http://samples.microsoft.com/ServiceModel/Relay/")] public interface IImageContract { [OperationContract, WebGet] Stream GetImage(); }
public interface IImageChannel : IImageContract, IClientChannel { }
class Program { static void Main(string[] args) { } }}
Step 3: Implement a REST-based WCF service contract to use ServiceBus
public interface IImageChannel : IImageContract, IClientChannel { }
12. From the Build menu, click Build Solution to confirm the accuracy of your work so far.
access this method, and to display the image in the browser.
11. Directly after the IImageContract definition, declare a channel that inherits from both the IImageContract
and IClientChannel interfaces.
A channel is the WCF object through which the service and client pass information to each other. Later, youcreate the channel in your host application. Azure Relay then uses this channel to pass the HTTP GETrequests from the browser to your GetImage implementation. The relay also uses the channel to take theGetImage return value and translate it into an HTTP GETRESPONSE for the client browser.
The following code shows a basic interface that defines a WCF Relay contract.
Creating a REST-style WCF Relay service requires that you first create the contract, which is defined by using aninterface. The next step is to implement the interface. This involves creating a class named ImageService thatimplements the user-defined IImageContract interface. After you implement the contract, you then configure theinterface using an App.config file. The configuration file contains necessary information for the application, such asthe name of the service, the name of the contract, and the type of protocol that is used to communicate with therelay service. The code used for these tasks is provided in the example following the procedure.
As with the previous steps, there is very little difference between implementing a REST-style contract and a WCFRelay contract.

To implement a REST-style Service Bus contractTo implement a REST-style Service Bus contract
class ImageService : IImageContract{}
[ServiceBehavior(Name = "ImageService", Namespace = "http://samples.microsoft.com/ServiceModel/Relay/")]class ImageService : IImageContract{}
4. To make sure that the running service can find the image file, in Solution Explorer right-click the image file,then click Properties. In the Properties pane, set Copy to Output Directory to Copy if newer.
using System.Drawing;using System.Drawing.Imaging;using Microsoft.ServiceBus;using Microsoft.ServiceBus.Web;
1. Create a new class named ImageService directly after the definition of the IImageContract interface. TheImageService class implements the IImageContract interface.
Similar to other interface implementations, you can implement the definition in a different file. However, forthis tutorial, the implementation appears in the same file as the interface definition and Main() method.
2. Apply the ServiceBehaviorAttribute attribute to the IImageService class to indicate that the class is animplementation of a WCF contract.
As mentioned previously, this namespace is not a traditional namespace. Instead, it is part of the WCFarchitecture that identifies the contract. For more information, see the Data Contract Names article in theWCF documentation.
3. Add a .jpg image to your project.
This is a picture that the service displays in the receiving browser. Right-click your project, then click Add.Then click Existing Item. Use the Add Existing Item dialog box to browse to an appropriate .jpg, and thenclick Add.
When adding the file, make sure that All Files is selected in the drop-down list next to the File name: field.The rest of this tutorial assumes that the name of the image is "image.jpg". If you have a different file, youmust rename the image, or change your code to compensate.
5. Add a reference to the System.Drawing.dll assembly to the project, and also add the following associated using statements.
6. In the ImageService class, add the following constructor that loads the bitmap and prepares to send it tothe client browser.

To define the configuration for running the web service on Service BusTo define the configuration for running the web service on Service Bus
class ImageService : IImageContract{ const string imageFileName = "image.jpg";
Image bitmap;
public ImageService() { this.bitmap = Image.FromFile(imageFileName); }}
public Stream GetImage(){ MemoryStream stream = new MemoryStream(); this.bitmap.Save(stream, ImageFormat.Jpeg);
stream.Position = 0; WebOperationContext.Current.OutgoingResponse.ContentType = "image/jpeg";
return stream;}
8. From the Build menu, click Build Solution.
7. Directly after the previous code, add the following GetImage method in the ImageService class to returnan HTTP message that contains the image.
This implementation uses MemoryStream to retrieve the image and prepare it for streaming to thebrowser. It starts the stream position at zero, declares the stream content as a jpeg, and streams theinformation.
<bindings> <!-- Application Binding --> <webHttpRelayBinding> <binding name="default"> <security relayClientAuthenticationType="None" /> </binding> </webHttpRelayBinding></bindings>
1. In Solution Explorer, double-click App.config to open it in the Visual Studio editor.
The App.config file includes the service name, endpoint (that is, the location Azure Relay exposes for clientsand hosts to communicate with each other), and binding (the type of protocol that is used to communicate).The main difference here is that the configured service endpoint refers to a WebHttpRelayBinding binding.
2. The <system.serviceModel> XML element is a WCF element that defines one or more services. Here, it isused to define the service name and endpoint. At the bottom of the <system.serviceModel> element (but stillwithin <system.serviceModel> ), add a <bindings> element that has the following content. This defines thebindings used in the application. You can define multiple bindings, but for this tutorial you are defining onlyone.
The previous code defines a WCF Relay WebHttpRelayBinding binding withrelayClientAuthenticationType set to None. This setting indicates that an endpoint using this bindingdoes not require a client credential.
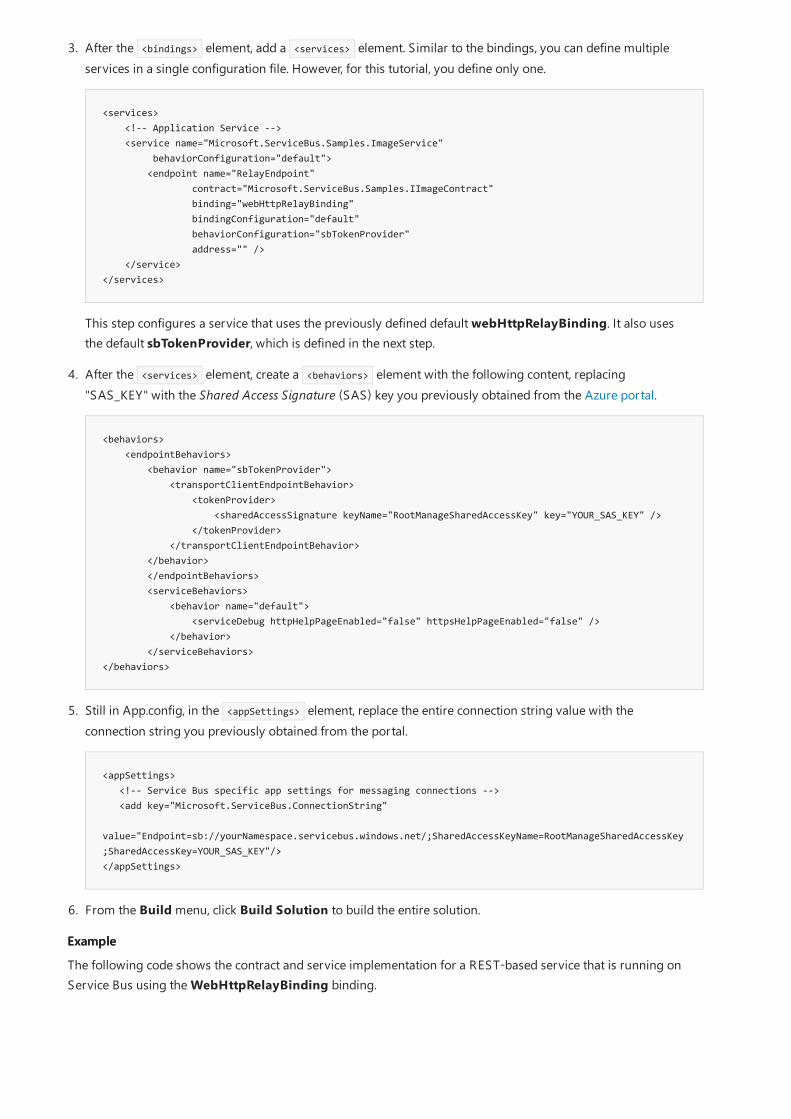
ExampleExample
<services> <!-- Application Service --> <service name="Microsoft.ServiceBus.Samples.ImageService" behaviorConfiguration="default"> <endpoint name="RelayEndpoint" contract="Microsoft.ServiceBus.Samples.IImageContract" binding="webHttpRelayBinding" bindingConfiguration="default" behaviorConfiguration="sbTokenProvider" address="" /> </service></services>
<behaviors> <endpointBehaviors> <behavior name="sbTokenProvider"> <transportClientEndpointBehavior> <tokenProvider> <sharedAccessSignature keyName="RootManageSharedAccessKey" key="YOUR_SAS_KEY" /> </tokenProvider> </transportClientEndpointBehavior> </behavior> </endpointBehaviors> <serviceBehaviors> <behavior name="default"> <serviceDebug httpHelpPageEnabled="false" httpsHelpPageEnabled="false" /> </behavior> </serviceBehaviors></behaviors>
<appSettings> <!-- Service Bus specific app settings for messaging connections --> <add key="Microsoft.ServiceBus.ConnectionString" value="Endpoint=sb://yourNamespace.servicebus.windows.net/;SharedAccessKeyName=RootManageSharedAccessKey;SharedAccessKey=YOUR_SAS_KEY"/></appSettings>
6. From the Build menu, click Build Solution to build the entire solution.
3. After the <bindings> element, add a <services> element. Similar to the bindings, you can define multipleservices in a single configuration file. However, for this tutorial, you define only one.
This step configures a service that uses the previously defined default webHttpRelayBinding. It also usesthe default sbTokenProvider, which is defined in the next step.
4. After the <services> element, create a <behaviors> element with the following content, replacing"SAS_KEY" with the Shared Access Signature (SAS) key you previously obtained from the Azure portal.
5. Still in App.config, in the <appSettings> element, replace the entire connection string value with theconnection string you previously obtained from the portal.
The following code shows the contract and service implementation for a REST-based service that is running onService Bus using the WebHttpRelayBinding binding.
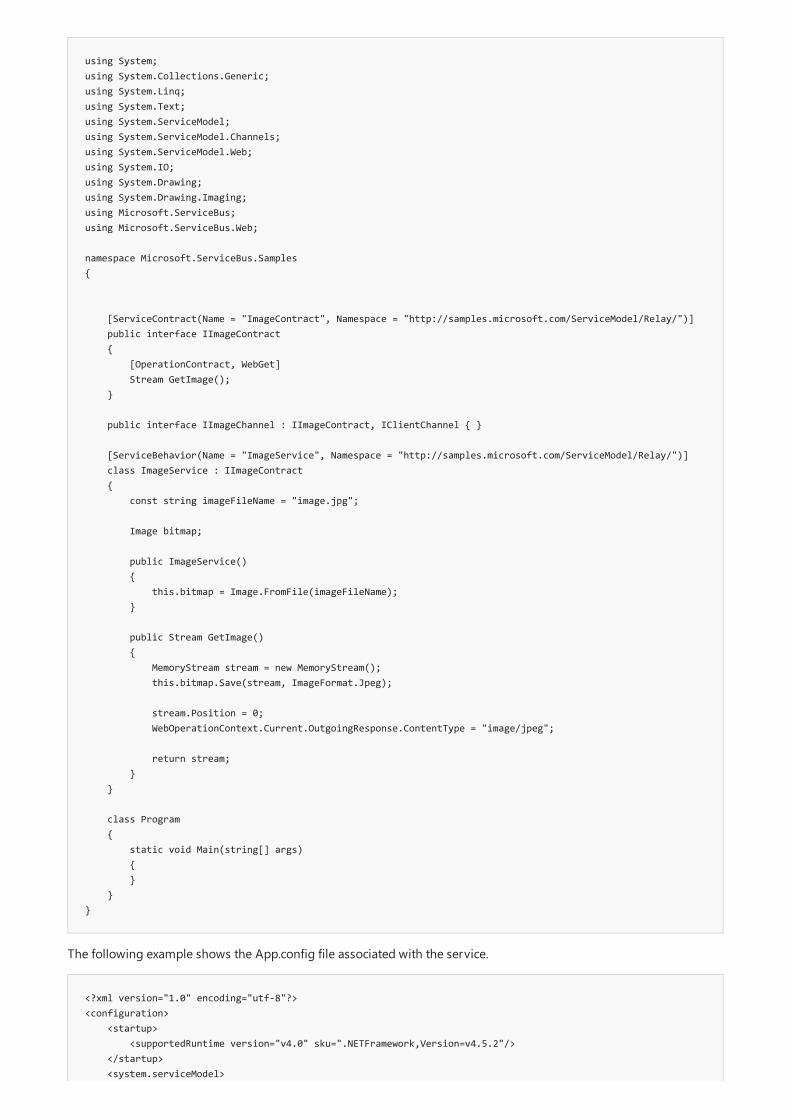
using System;using System.Collections.Generic;using System.Linq;using System.Text;using System.ServiceModel;using System.ServiceModel.Channels;using System.ServiceModel.Web;using System.IO;using System.Drawing;using System.Drawing.Imaging;using Microsoft.ServiceBus;using Microsoft.ServiceBus.Web;
namespace Microsoft.ServiceBus.Samples{
[ServiceContract(Name = "ImageContract", Namespace = "http://samples.microsoft.com/ServiceModel/Relay/")] public interface IImageContract { [OperationContract, WebGet] Stream GetImage(); }
public interface IImageChannel : IImageContract, IClientChannel { }
[ServiceBehavior(Name = "ImageService", Namespace = "http://samples.microsoft.com/ServiceModel/Relay/")] class ImageService : IImageContract { const string imageFileName = "image.jpg";
Image bitmap;
public ImageService() { this.bitmap = Image.FromFile(imageFileName); }
public Stream GetImage() { MemoryStream stream = new MemoryStream(); this.bitmap.Save(stream, ImageFormat.Jpeg);
stream.Position = 0; WebOperationContext.Current.OutgoingResponse.ContentType = "image/jpeg";
return stream; } }
class Program { static void Main(string[] args) { } }}
<?xml version="1.0" encoding="utf-8"?><configuration> <startup> <supportedRuntime version="v4.0" sku=".NETFramework,Version=v4.5.2"/> </startup> <system.serviceModel>
The following example shows the App.config file associated with the service.
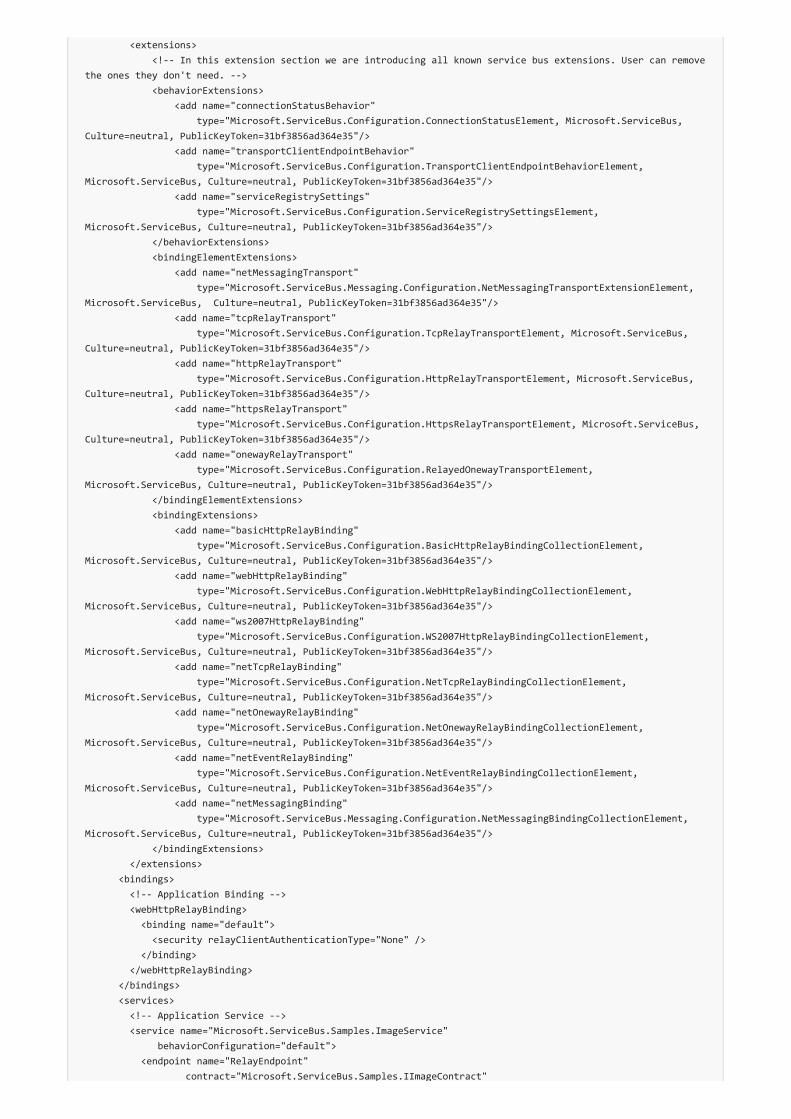
<extensions> <!-- In this extension section we are introducing all known service bus extensions. User can remove the ones they don't need. --> <behaviorExtensions> <add name="connectionStatusBehavior" type="Microsoft.ServiceBus.Configuration.ConnectionStatusElement, Microsoft.ServiceBus, Culture=neutral, PublicKeyToken=31bf3856ad364e35"/> <add name="transportClientEndpointBehavior" type="Microsoft.ServiceBus.Configuration.TransportClientEndpointBehaviorElement, Microsoft.ServiceBus, Culture=neutral, PublicKeyToken=31bf3856ad364e35"/> <add name="serviceRegistrySettings" type="Microsoft.ServiceBus.Configuration.ServiceRegistrySettingsElement, Microsoft.ServiceBus, Culture=neutral, PublicKeyToken=31bf3856ad364e35"/> </behaviorExtensions> <bindingElementExtensions> <add name="netMessagingTransport" type="Microsoft.ServiceBus.Messaging.Configuration.NetMessagingTransportExtensionElement, Microsoft.ServiceBus, Culture=neutral, PublicKeyToken=31bf3856ad364e35"/> <add name="tcpRelayTransport" type="Microsoft.ServiceBus.Configuration.TcpRelayTransportElement, Microsoft.ServiceBus, Culture=neutral, PublicKeyToken=31bf3856ad364e35"/> <add name="httpRelayTransport" type="Microsoft.ServiceBus.Configuration.HttpRelayTransportElement, Microsoft.ServiceBus, Culture=neutral, PublicKeyToken=31bf3856ad364e35"/> <add name="httpsRelayTransport" type="Microsoft.ServiceBus.Configuration.HttpsRelayTransportElement, Microsoft.ServiceBus, Culture=neutral, PublicKeyToken=31bf3856ad364e35"/> <add name="onewayRelayTransport" type="Microsoft.ServiceBus.Configuration.RelayedOnewayTransportElement, Microsoft.ServiceBus, Culture=neutral, PublicKeyToken=31bf3856ad364e35"/> </bindingElementExtensions> <bindingExtensions> <add name="basicHttpRelayBinding" type="Microsoft.ServiceBus.Configuration.BasicHttpRelayBindingCollectionElement, Microsoft.ServiceBus, Culture=neutral, PublicKeyToken=31bf3856ad364e35"/> <add name="webHttpRelayBinding" type="Microsoft.ServiceBus.Configuration.WebHttpRelayBindingCollectionElement, Microsoft.ServiceBus, Culture=neutral, PublicKeyToken=31bf3856ad364e35"/> <add name="ws2007HttpRelayBinding" type="Microsoft.ServiceBus.Configuration.WS2007HttpRelayBindingCollectionElement, Microsoft.ServiceBus, Culture=neutral, PublicKeyToken=31bf3856ad364e35"/> <add name="netTcpRelayBinding" type="Microsoft.ServiceBus.Configuration.NetTcpRelayBindingCollectionElement, Microsoft.ServiceBus, Culture=neutral, PublicKeyToken=31bf3856ad364e35"/> <add name="netOnewayRelayBinding" type="Microsoft.ServiceBus.Configuration.NetOnewayRelayBindingCollectionElement, Microsoft.ServiceBus, Culture=neutral, PublicKeyToken=31bf3856ad364e35"/> <add name="netEventRelayBinding" type="Microsoft.ServiceBus.Configuration.NetEventRelayBindingCollectionElement, Microsoft.ServiceBus, Culture=neutral, PublicKeyToken=31bf3856ad364e35"/> <add name="netMessagingBinding" type="Microsoft.ServiceBus.Messaging.Configuration.NetMessagingBindingCollectionElement, Microsoft.ServiceBus, Culture=neutral, PublicKeyToken=31bf3856ad364e35"/> </bindingExtensions> </extensions> <bindings> <!-- Application Binding --> <webHttpRelayBinding> <binding name="default"> <security relayClientAuthenticationType="None" /> </binding> </webHttpRelayBinding> </bindings> <services> <!-- Application Service --> <service name="Microsoft.ServiceBus.Samples.ImageService" behaviorConfiguration="default"> <endpoint name="RelayEndpoint" contract="Microsoft.ServiceBus.Samples.IImageContract"
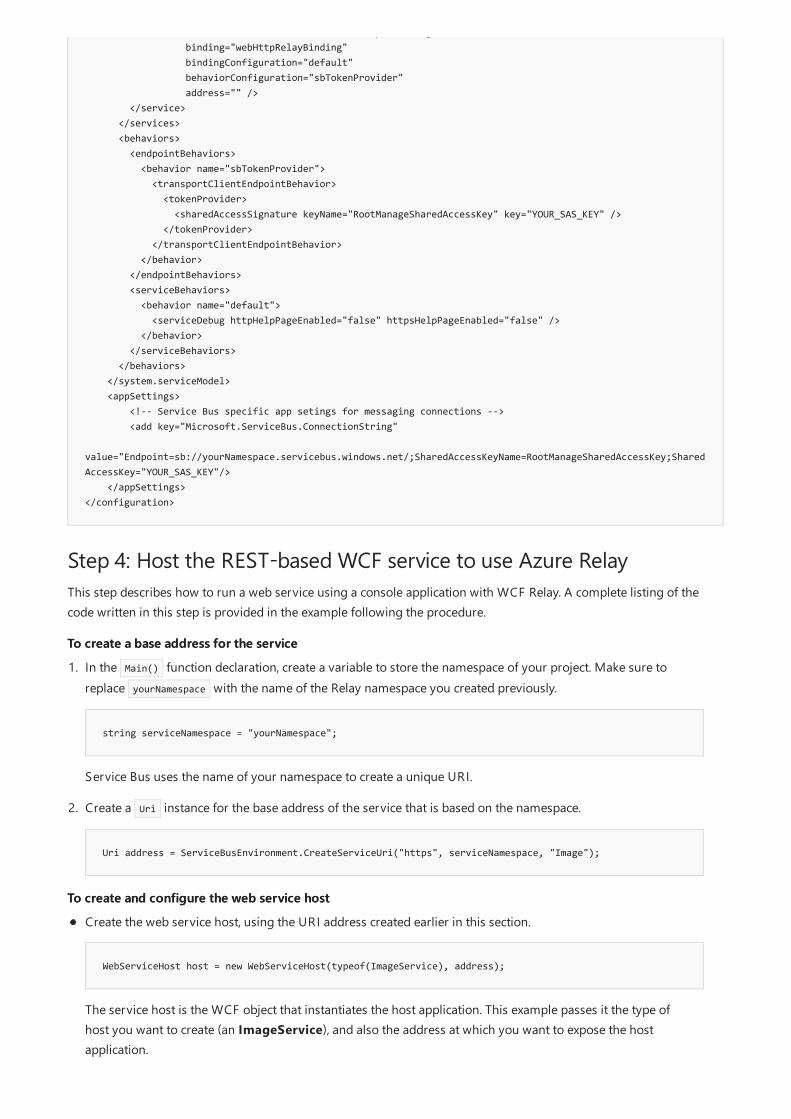
contract="Microsoft.ServiceBus.Samples.IImageContract" binding="webHttpRelayBinding" bindingConfiguration="default" behaviorConfiguration="sbTokenProvider" address="" /> </service> </services> <behaviors> <endpointBehaviors> <behavior name="sbTokenProvider"> <transportClientEndpointBehavior> <tokenProvider> <sharedAccessSignature keyName="RootManageSharedAccessKey" key="YOUR_SAS_KEY" /> </tokenProvider> </transportClientEndpointBehavior> </behavior> </endpointBehaviors> <serviceBehaviors> <behavior name="default"> <serviceDebug httpHelpPageEnabled="false" httpsHelpPageEnabled="false" /> </behavior> </serviceBehaviors> </behaviors> </system.serviceModel> <appSettings> <!-- Service Bus specific app setings for messaging connections --> <add key="Microsoft.ServiceBus.ConnectionString" value="Endpoint=sb://yourNamespace.servicebus.windows.net/;SharedAccessKeyName=RootManageSharedAccessKey;SharedAccessKey="YOUR_SAS_KEY"/> </appSettings></configuration>
Step 4: Host the REST-based WCF service to use Azure Relay
To create a base address for the serviceTo create a base address for the service
To create and configure the web service hostTo create and configure the web service host
This step describes how to run a web service using a console application with WCF Relay. A complete listing of thecode written in this step is provided in the example following the procedure.
string serviceNamespace = "yourNamespace";
Uri address = ServiceBusEnvironment.CreateServiceUri("https", serviceNamespace, "Image");
1. In the Main() function declaration, create a variable to store the namespace of your project. Make sure toreplace yourNamespace with the name of the Relay namespace you created previously.
Service Bus uses the name of your namespace to create a unique URI.
2. Create a Uri instance for the base address of the service that is based on the namespace.
WebServiceHost host = new WebServiceHost(typeof(ImageService), address);
Create the web service host, using the URI address created earlier in this section.
The service host is the WCF object that instantiates the host application. This example passes it the type ofhost you want to create (an ImageService), and also the address at which you want to expose the hostapplication.

To run the web service hostTo run the web service host
Example
using System;using System.Collections.Generic;using System.Linq;using System.Text;using System.ServiceModel;using System.ServiceModel.Channels;using System.ServiceModel.Web;using System.IO;using System.Drawing;using System.Drawing.Imaging;using Microsoft.ServiceBus;using Microsoft.ServiceBus.Web;
namespace Microsoft.ServiceBus.Samples{
[ServiceContract(Name = "ImageContract", Namespace = "http://samples.microsoft.com/ServiceModel/Relay/")] public interface IImageContract { [OperationContract, WebGet] Stream GetImage(); }
public interface IImageChannel : IImageContract, IClientChannel { }
[ServiceBehavior(Name = "ImageService", Namespace = "http://samples.microsoft.com/ServiceModel/Relay/")] class ImageService : IImageContract { const string imageFileName = "image.jpg";
Image bitmap;
public ImageService() { this.bitmap = Image.FromFile(imageFileName); }
host.Open();
Console.WriteLine("Copy the following address into a browser to see the image: ");Console.WriteLine(address + "GetImage");Console.WriteLine();Console.WriteLine("Press [Enter] to exit");Console.ReadLine();
host.Close();
1. Open the service.
The service is now running.
2. Display a message indicating that the service is running, and how to stop the service.
3. When finished, close the service host.
The following example includes the service contract and implementation from previous steps in the tutorial andhosts the service in a console application. Compile the following code into an executable named ImageListener.exe.

public Stream GetImage() { MemoryStream stream = new MemoryStream(); this.bitmap.Save(stream, ImageFormat.Jpeg);
stream.Position = 0; WebOperationContext.Current.OutgoingResponse.ContentType = "image/jpeg";
return stream; } }
class Program { static void Main(string[] args) { string serviceNamespace = "InsertServiceNamespaceHere"; Uri address = ServiceBusEnvironment.CreateServiceUri("https", serviceNamespace, "Image");
WebServiceHost host = new WebServiceHost(typeof(ImageService), address); host.Open();
Console.WriteLine("Copy the following address into a browser to see the image: "); Console.WriteLine(address + "GetImage"); Console.WriteLine(); Console.WriteLine("Press [Enter] to exit"); Console.ReadLine();
host.Close(); } }}
Compiling the codeCompiling the code
Next steps
After building the solution, do the following to run the application:
1. Press F5, or browse to the executable file location (ImageListener\bin\Debug\ImageListener.exe), to run theservice. Keep the app running, as it's required to perform the next step.
2. Copy and paste the address from the command prompt into a browser to see the image.3. When you are finished, press Enter in the command prompt window to close the app.
Now that you've built an application that uses the Azure Relay service, see the following articles to learn more:
Azure Service Bus architectural overviewAzure Relay overviewHow to use the WCF relay service with .NET

Azure Relay authentication and authorization1/24/2018 • 2 min to read • Edit Online
Shared Access Signature authentication
Next steps
Applications can authenticate to Azure Relay using Shared Access Signature (SAS) authentication. SASauthentication enables applications to authenticate to the Azure Relay service using an access key configured onthe Relay namespace. You can then use this key to generate a Shared Access Signature token that clients can use toauthenticate to the relay service.
SAS authentication enables you to grant a user access to Azure Relay resources with specific rights. SASauthentication involves the configuration of a cryptographic key with associated rights on a resource. Clients canthen gain access to that resource by presenting a SAS token, which consists of the resource URI being accessedand an expiry signed with the configured key.
You can configure keys for SAS on a Relay namespace. Unlike Service Bus messaging, Relay Hybrid Connectionssupports unauthorized or anonymous senders. You can enable anonymous access for the entity when you create it,as shown in the following screen shot from the portal:
To use SAS, you can configure a SharedAccessAuthorizationRule object on a Relay namespace that consists of thefollowing:
KeyName that identifies the rule.PrimaryKey is a cryptographic key used to sign/validate SAS tokens.SecondaryKey is a cryptographic key used to sign/validate SAS tokens.Rights representing the collection of Listen, Send, or Manage rights granted.
Authorization rules configured at the namespace level can grant access to all relay connections in a namespace forclients with tokens signed using the corresponding key. Up to 12 such authorization rules can be configured on aRelay namespace. By default, a SharedAccessAuthorizationRule with all rights is configured for every namespacewhen it is first provisioned.
To access an entity, the client requires a SAS token generated using a specific SharedAccessAuthorizationRule. TheSAS token is generated using the HMAC-SHA256 of a resource string that consists of the resource URI to whichaccess is claimed, and an expiry with a cryptographic key associated with the authorization rule.
SAS authentication support for Azure Relay is included in the Azure .NET SDK versions 2.0 and later. SAS includessupport for a SharedAccessAuthorizationRule. All APIs that accept a connection string as a parameter includesupport for SAS connection strings.
Continue reading Service Bus authentication with Shared Access Signatures for more details about SAS.See the Azure Relay Hybrid Connections protocol guide for detailed information about the Hybrid Connections

capability.For corresponding information about Service Bus Messaging authentication and authorization, see Service Busauthentication and authorization.

Migrate from Azure Active Directory Access ControlService to Shared Access Signature authorization12/20/2017 • 4 min to read • Edit Online
Migration scenarios
Unchanged defaultsUnchanged defaults
Azure Relay applications historically had a choice of using two different authorization models: the Shared AccessSignature (SAS) token model provided directly by the Relay service, and a federated model where the managementof authorization rules is managed inside by the Azure Active Directory Access Control Service (ACS), and tokensobtained from ACS are passed to Relay for authorizing access to the desired features.
The ACS authorization model has long been superseded by SAS authorization as the preferred model, and alldocumentation, guidance, and samples exclusively use SAS today. Moreover, it is no longer possible to create newRelay namespaces that are paired with ACS.
SAS has the advantage in that it is not immediately dependent on another service, but can be used directly from aclient without any intermediaries by giving the client access to the SAS rule name and rule key. SAS can also beeasily integrated with an approach in which a client has to first pass an authorization check with another serviceand then is issued a token. The latter approach is similar to the ACS usage pattern, but enables issuing accesstokens based on application-specific conditions that are difficult to express in ACS.
For all existing applications that are dependent on ACS, we urge customers to migrate their applications to rely onSAS instead.
ACS and Relay are integrated through the shared knowledge of a signing key. The signing key is used by an ACSnamespace to sign authorization tokens, and it's used by Azure Relay to verify that the token has been issued by thepaired ACS namespace. The ACS namespace holds service identities and authorization rules. The authorizationrules define which service identity or which token issued by an external identity provider gets which type of accessto a part of the Relay namespace graph, in the form of a longest-prefix match.
For example, an ACS rule might grant the Send claim on the path prefix / to a service identity, which means thata token issued by ACS based on that rule grants the client rights to send to all entities in the namespace. If the pathprefix is /abc , the identity is restricted to sending to entities named abc or organized beneath that prefix. It isassumed that readers of this migration guidance are already familiar with these concepts.
The migration scenarios fall into three broad categories:
1. Unchanged defaults. Some customers use a SharedSecretTokenProvider object, passing the automaticallygenerated owner service identity and its secret key for the ACS namespace, paired with the Relaynamespace, and do not add new rules.
2. Custom service identities with simple rules. Some customers add new service identities and grant eachnew service identity Send, Listen, and Manage permissions for one specific entity.
3. Custom service identities with complex rules. Very few customers have complex rule sets in whichexternally issued tokens are mapped to rights on Relay, or where a single service identity is assigneddifferentiated rights on several namespace paths through multiple rules.
For assistance with the migration of complex rule sets, you can contact Azure support. The other two scenariosenable straightforward migration.

Simple rulesSimple rules
Complex rulesComplex rules
Next steps
If your application has not changed ACS defaults, you can replace all SharedSecretTokenProvider usage with aSharedAccessSignatureTokenProvider object, and use the namespace preconfiguredRootManageSharedAccessKey instead of the ACS owner account. Note that even with the ACS owner account,this configuration was (and still is) not generally recommended, because this account/rule provides fullmanagement authority over the namespace, including permission to delete any entities.
If the application uses custom service identities with simple rules, the migration is straightforward in the casewhere an ACS service identity was created to provide access control on a specific relay. This scenario is often thecase in SaaS-style solutions where each relay is used as a bridge to a tenant site or branch office, and the serviceidentity is created for that particular site. In this case, the respective service identity can be migrated to a SharedAccess Signature rule, directly on the relay. The service identity name can become the SAS rule name and theservice identity key can become the SAS rule key. The rights of the SAS rule are then configured equivalent to therespectively applicable ACS rule for the entity.
You can make this new and additional configuration of SAS in-place on any existing namespace that is federatedwith ACS, and the migration away from ACS is subsequently performed by usingSharedAccessSignatureTokenProvider instead of SharedSecretTokenProvider. The namespace does not need to beunlinked from ACS.
SAS rules are not meant to be accounts, but are named signing keys associated with rights. As such, scenarios inwhich the application creates many service identities and grants them access rights for several entities or the wholenamespace still require a token-issuing intermediary. You can obtain guidance for such an intermediary bycontacting support.
To learn more about Azure Relay authentication, see the following topics:
Azure Relay authentication and authorizationService Bus authentication with Shared Access Signatures

Azure Relay Hybrid Connections protocol1/24/2018 • 13 min to read • Edit Online
Interaction model
Listener interactionsListener interactions
ListenListen
AcceptAccept
Azure Relay is one of the key capability pillars of the Azure Service Bus platform. The new Hybrid Connectionscapability of Relay is a secure, open-protocol evolution based on HTTP and WebSockets. It supersedes the former,equally named BizTalk Services feature that was built on a proprietary protocol foundation. The integration ofHybrid Connections into Azure App Services will continue to function as-is.
Hybrid Connections enables bi-directional, binary stream communication between two networked applications,during which either or both parties can reside behind NATs or firewalls. This article describes the client-sideinteractions with the Hybrid Connections relay for connecting clients in listener and sender roles, and howlisteners accept new connections.
The Hybrid Connections relay connects two parties by providing a rendezvous point in the Azure cloud that bothparties can discover and connect to from their own network’s perspective. That rendezvous point is called "HybridConnection" in this and other documentation, in the APIs, and also in the Azure portal. The Hybrid Connectionsservice endpoint is referred to as the "service" for the rest of this article. The interaction model leans on thenomenclature established by many other networking APIs.
There is a listener that first indicates readiness to handle incoming connections, and subsequently accepts them asthey arrive. On the other side, there is a connecting client that connects towards the listener, expecting thatconnection to be accepted for establishing a bi-directional communication path. "Connect," "Listen," and "Accept"are the same terms you find in most socket APIs.
Any relayed communication model has either party making outbound connections towards a service endpoint,which makes the "listener" also a "client" in colloquial use, and may also cause other terminology overloads. Theprecise terminology we therefore use for Hybrid Connections is as follows:
The programs on both sides of a connection are called "clients," since they are clients to the service. The client thatwaits for and accepts connections is the "listener," or is said to be in the "listener role." The client that initiates anew connection towards a listener via the service is called the "sender," or is in the "sender role."
The listener has four interactions with the service; all wire details are described later in this article in the referencesection.
To indicate readiness to the service that a listener is ready to accept connections, it creates an outboundWebSocket connection. The connection handshake carries the name of a Hybrid Connection configured on theRelay namespace, and a security token that confers the "Listen" right on that name. When the WebSocket isaccepted by the service, the registration is complete and the established web WebSocket is kept alive as the"control channel" for enabling all subsequent interactions. The service allows up to 25 concurrent listeners on aHybrid Connection. If there are two or more active listeners, incoming connections are balanced across them inrandom order ; fair distribution is not guaranteed.
When a sender opens a new connection on the service, the service chooses and notifies one of the active listenerson the Hybrid Connection. This notification is sent to the listener over the open control channel as a JSONmessage containing the URL of the WebSocket endpoint that the listener must connect to for accepting theconnection.

RenewRenew
PingPing
Sender interactionSender interaction
ConnectConnect
Interaction summaryInteraction summary
Protocol reference
Listener protocolListener protocol
Listener control channel connectionListener control channel connection
The URL can and must be used directly by the listener without any extra work. The encoded information is onlyvalid for a short period of time, essentially for as long as the sender is willing to wait for the connection to beestablished end-to-end, but up to a maximum of 30 seconds. The URL can only be used for one successfulconnection attempt. As soon as the WebSocket connection with the rendezvous URL is established, all furtheractivity on this WebSocket is relayed from and to the sender, without any intervention or interpretation by theservice.
The security token that must be used to register the listener and maintain the control channel may expire while thelistener is active. The token expiry does not affect ongoing connections, but it does cause the control channel to bedropped by the service at or soon after the moment of expiry. The "renew" operation is a JSON message that thelistener can send to replace the token associated with the control channel, so that the control channel can bemaintained for extended periods.
If the control channel stays idle for a long time, intermediaries on the way, such as load balancers or NATs maydrop the TCP connection. The "ping" operation avoids that by sending a small amount of data on the channel thatreminds everyone on the network route that the connection is meant to be alive, and it also serves as a "live" testfor the listener. If the ping fails, the control channel should be considered unusable and the listener shouldreconnect.
The sender only has a single interaction with the service: it connects.
The "connect" operation opens a WebSocket on the service, providing the name of the Hybrid Connection and(optionally, but required by default) a security token conferring "Send" permission in the query string. The servicethen interacts with the listener in the way described previously, and the listener creates a rendezvous connectionthat is joined with this WebSocket. After the WebSocket has been accepted, all further interactions on thatWebSocket are with a connected listener.
The result of this interaction model is that the sender client comes out of the handshake with a "clean" WebSocket,which is connected to a listener and that needs no further preambles or preparation. This model enablespractically any existing WebSocket client implementation to readily take advantage of the Hybrid Connectionsservice by supplying a correctly-constructed URL into their WebSocket client layer.
The rendezvous connection WebSocket that the listener obtains through the accept interaction is also clean andcan be handed to any existing WebSocket server implementation with some minimal extra abstraction thatdistinguishes between "accept" operations on their framework's local network listeners and Hybrid Connectionsremote "accept" operations.
This section describes the details of the protocol interactions described previously.
All WebSocket connections are made on port 443 as an upgrade from HTTPS 1.1, which is commonly abstractedby some WebSocket framework or API. The description here is kept implementation neutral, without suggesting aspecific framework.
The listener protocol consists of two connection gestures and three message operations.
The control channel is opened with creating a WebSocket connection to:
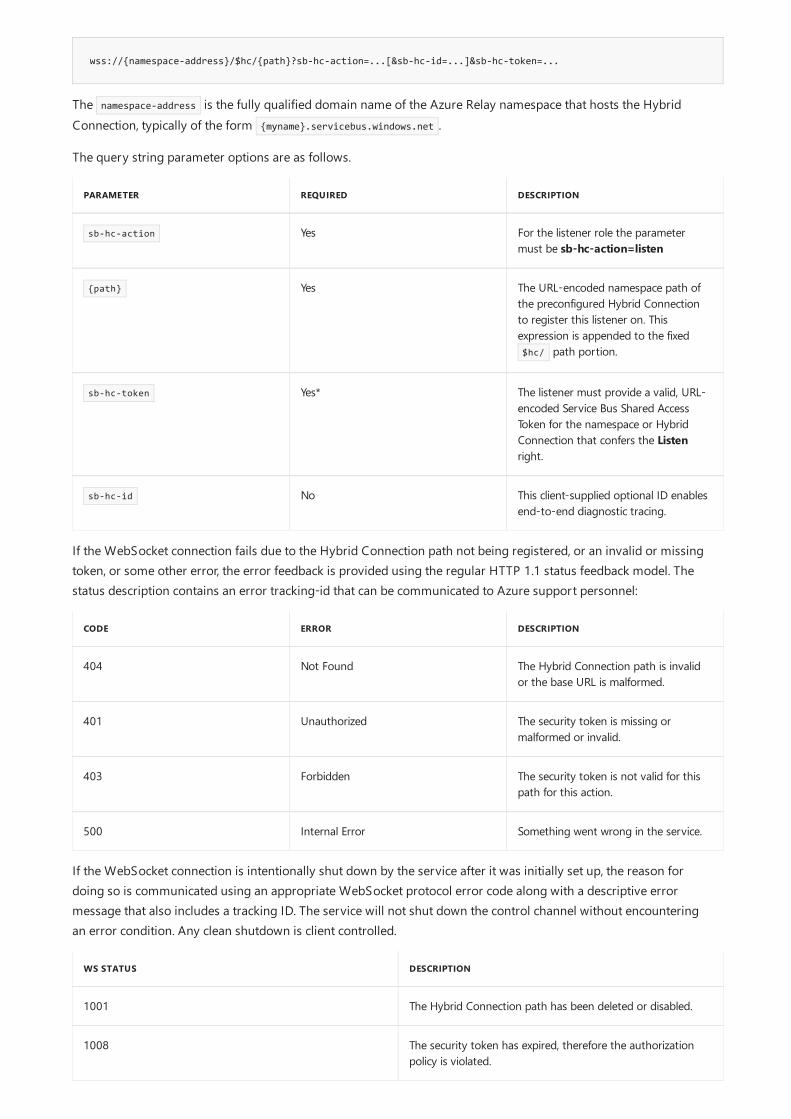
wss://{namespace-address}/$hc/{path}?sb-hc-action=...[&sb-hc-id=...]&sb-hc-token=...
PARAMETER REQUIRED DESCRIPTION
sb-hc-action Yes For the listener role the parametermust be sb-hc-action=listen
{path} Yes The URL-encoded namespace path ofthe preconfigured Hybrid Connectionto register this listener on. Thisexpression is appended to the fixed $hc/ path portion.
sb-hc-token Yes* The listener must provide a valid, URL-encoded Service Bus Shared AccessToken for the namespace or HybridConnection that confers the Listenright.
sb-hc-id No This client-supplied optional ID enablesend-to-end diagnostic tracing.
CODE ERROR DESCRIPTION
404 Not Found The Hybrid Connection path is invalidor the base URL is malformed.
401 Unauthorized The security token is missing ormalformed or invalid.
403 Forbidden The security token is not valid for thispath for this action.
500 Internal Error Something went wrong in the service.
WS STATUS DESCRIPTION
1001 The Hybrid Connection path has been deleted or disabled.
1008 The security token has expired, therefore the authorizationpolicy is violated.
The namespace-address is the fully qualified domain name of the Azure Relay namespace that hosts the HybridConnection, typically of the form {myname}.servicebus.windows.net .
The query string parameter options are as follows.
If the WebSocket connection fails due to the Hybrid Connection path not being registered, or an invalid or missingtoken, or some other error, the error feedback is provided using the regular HTTP 1.1 status feedback model. Thestatus description contains an error tracking-id that can be communicated to Azure support personnel:
If the WebSocket connection is intentionally shut down by the service after it was initially set up, the reason fordoing so is communicated using an appropriate WebSocket protocol error code along with a descriptive errormessage that also includes a tracking ID. The service will not shut down the control channel without encounteringan error condition. Any clean shutdown is client controlled.

1011 Something went wrong in the service.
WS STATUS DESCRIPTION
Accept handshakeAccept handshake
Accept MessageAccept Message
{ "accept" : { "address" : "wss://168.61.148.205:443/$hc/{path}?..." "id" : "4cb542c3-047a-4d40-a19f-bdc66441e736", "connectHeaders" : { "Host" : "...", "Sec-WebSocket-Protocol" : "...", "Sec-WebSocket-Extensions" : "..." } } }
Accepting the socketAccepting the socket
PARAMETER REQUIRED DESCRIPTION
sb-hc-action Yes For accepting a socket, the parametermust be sb-hc-action=accept
{path} Yes (see the following paragraph)
sb-hc-id No See previous description of id.
The "accept" notification is sent by the service to the listener over the previously established control channel as aJSON message in a WebSocket text frame. There is no reply to this message.
The message contains a JSON object named "accept," which defines the following properties at this time:
address – the URL string to be used for establishing the WebSocket to the service to accept an incomingconnection.id – the unique identifier for this connection. If the ID was supplied by the sender client, it is the sendersupplied value, otherwise it is a system generated value.connectHeaders – all HTTP headers that have been supplied to the Relay endpoint by the sender, which alsoincludes the Sec-WebSocket-Protocol and the Sec-WebSocket-Extensions headers.
The address URL provided in the JSON message is used by the listener to establish the WebSocket for acceptingor rejecting the sender socket.
To accept, the listener establishes a WebSocket connection to the provided address.
If the "accept" message carries a Sec-WebSocket-Protocol header, it is expected that the listener only accepts theWebSocket if it supports that protocol. Additionally, it sets the header as the WebSocket is established.
The same applies to the Sec-WebSocket-Extensions header. If the framework supports an extension, it should setthe header to the server-side reply of the required Sec-WebSocket-Extensions handshake for the extension.
The URL must be used as-is for establishing the accept socket, but contains the following parameters:
{path} is the URL-encoded namespace path of the preconfigured Hybrid Connection on which to register thislistener. This expression is appended to the fixed $hc/ path portion.

CODE ERROR DESCRIPTION
403 Forbidden The URL is not valid.
500 Internal Error Something went wrong in the service
WS STATUS DESCRIPTION
1001 The sender client shuts down the connection.
1001 The Hybrid Connection path has been deleted or disabled.
1008 The security token has expired, therefore the authorizationpolicy is violated.
1011 Something went wrong in the service.
Rejecting the socketRejecting the socket
PARAM REQUIRED DESCRIPTION
statusCode Yes Numeric HTTP status code.
statusDescription Yes Human readable reason for therejection.
The path expression may be extended with a suffix and a query string expression that follows the registeredname after a separating forward slash. This enables the sender client to pass dispatch arguments to the acceptinglistener when it is not possible to include HTTP headers. The expectation is that the listener framework parses outthe fixed path portion and the registered name from the path and makes the remainder, possibly without anyquery string arguments prefixed by sb- , available to the application for deciding whether to accept theconnection.
For more information, see the following "Sender Protocol" section.
If there is an error, the service can reply as follows:
After the connection has been established, the server shuts down the WebSocket when the sender WebSocketshuts down, or with the following status:
Rejecting the socket after inspecting the "accept" message requires a similar handshake so that the status codeand status description communicating the reason for the rejection can flow back to the sender.
The protocol design choice here is to use a WebSocket handshake (that is designed to end in a defined error state)so that listener client implementations can continue to rely on a WebSocket client and do not need to employ anextra, bare HTTP client.
To reject the socket, the client takes the address URI from the "accept" message and appends two query stringparameters to it, as follows:
The resulting URI is then used to establish a WebSocket connection.
When completing correctly, this handshake intentionally fails with an HTTP error code 410, since no WebSockethas been established. If something goes wrong, the following codes describe the error :
CODE ERROR DESCRIPTION
403 Forbidden The URL is not valid.
500 Internal Error Something went wrong in the service.
Listener token renewalListener token renewal
renewToken messagerenewToken message
{ "renewToken" : { "token" : "SharedAccessSignature sr=http%3a%2f%2fcontoso.servicebus.windows.net%2fhyco%2f&sig=XXXXXXXXXX%3d&se=1471633754&skn=SasKeyName" } }
WS STATUS DESCRIPTION
1008 The security token has expired, therefore the authorizationpolicy is violated.
Sender protocol
wss://{namespace-address}/$hc/{path}?sb-hc-action=...&sb-hc-id=...&sbc-hc-token=...
PARAM REQUIRED? DESCRIPTION
sb-hc-action Yes For the sender role, the parametermust be action=connect .
When the listener token is about to expire, it can replace it by sending a text frame message to the service via theestablished control channel. The message contains a JSON object called renewToken , which defines the followingproperty at this time:
token – a valid, URL-encoded Service Bus Shared Access token for the namespace or Hybrid Connection thatconfers the Listen right.
If the token validation fails, access is denied, and the cloud service closes the control channel WebSocket with anerror. Otherwise there is no reply.
The sender protocol is effectively identical to the way a listener is established. The goal is maximum transparencyfor the end-to-end WebSocket. The address to connect to is the same as for the listener, but the "action" differsand the token needs a different permission:
The namespace-address is the fully qualified domain name of the Azure Relay namespace that hosts the HybridConnection, typically of the form {myname}.servicebus.windows.net .
The request can contain arbitrary extra HTTP headers, including application-defined ones. All supplied headersflow to the listener and can be found on the connectHeader object of the accept control message.
The query string parameter options are as follows:

{path} Yes (see the following paragraph)
sb-hc-token Yes* The listener must provide a valid, URL-encoded Service Bus Shared AccessToken for the namespace or HybridConnection that confers the Send right.
sb-hc-id No An optional ID that enables end-to-enddiagnostic tracing and is made availableto the listener during the accepthandshake.
PARAM REQUIRED? DESCRIPTION
wss://{namespace-address}/$hc/hyco/suffix?param=value&sb-hc-action=...[&sb-hc-id=...&]sbc-hc-token=...
CODE ERROR DESCRIPTION
404 Not Found The Hybrid Connection path is invalidor the base URL is malformed.
401 Unauthorized The security token is missing ormalformed or invalid.
403 Forbidden The security token is not valid for thispath and for this action.
500 Internal Error Something went wrong in the service.
WS STATUS DESCRIPTION
1000 The listener shut down the socket.
1001 The Hybrid Connection path has been deleted or disabled.
1008 The security token has expired, therefore the authorizationpolicy is violated.
The {path} is the URL-encoded namespace path of the preconfigured Hybrid Connection on which to registerthis listener. The path expression can be extended with a suffix and a query string expression to communicatefurther. If the Hybrid Connection is registered under the path hyco , the path expression can be hyco/suffix?param=value&... followed by the query string parameters defined here. A complete expression may
then be as follows:
The path expression is passed through to the listener in the address URI contained in the "accept" controlmessage.
If the WebSocket connection fails due to the Hybrid Connection path not being registered, an invalid or missingtoken, or some other error, the error feedback is provided using the regular HTTP 1.1 status feedback model. Thestatus description contains an error tracking ID that can be communicated to Azure support personnel:
If the WebSocket connection is intentionally shut down by the service after it has been initially set up, the reasonfor doing so is communicated using an appropriate WebSocket protocol error code along with a descriptive errormessage that also includes a tracking ID.

1011 Something went wrong in the service.
WS STATUS DESCRIPTION
Next stepsRelay FAQCreate a namespaceGet started with .NETGet started with Node

Available Relay APIs1/24/2018 • 1 min to read • Edit Online
Runtime APIs
LANGUAGE/PLATFORM AVAILABLE FEATURE CLIENT PACKAGE REPOSITORY
.NET Standard Hybrid Connections Microsoft.Azure.Relay GitHub
.NET Framework WCF Relay WindowsAzure.ServiceBus N/A
Node Hybrid Connections hyco-ws
hyco-websocket
GitHub
Additional informationAdditional information.NET.NET
Next steps
The following table lists all currently available Relay runtime clients.
The additional information section contains more information about the status of each runtime library.
The .NET ecosystem has multiple runtimes, hence there are multiple .NET libraries for Event Hubs. The .NETStandard library can be run using either .NET Core or the .NET Framework, while the .NET Framework library canonly be run in a .NET Framework environment. For more information on .NET Frameworks, see frameworkversions.
To learn more about Azure Relay, visit these links:
What is Azure Relay?Relay FAQ

Azure Relay Hybrid Connections .NET Standard APIoverview1/24/2018 • 2 min to read • Edit Online
Relay Connection String Builder class
var endpoint = "[Relay namespace]";var entityPath = "[Name of the Hybrid Connection]";var sharedAccessKeyName = "[SAS key name]";var sharedAccessKey = "[SAS key value]";
var connectionStringBuilder = new RelayConnectionStringBuilder(){ Endpoint = endpoint, EntityPath = entityPath, SharedAccessKeyName = sasKeyName, SharedAccessKey = sasKeyValue};
var myConnectionString = "[RelayConnectionString]";// Declare the connectionStringBuilder so that it can be used outside of the loop if neededRelayConnectionStringBuilder connectionStringBuilder;try{ // Create the connectionStringBuilder using the supplied connection string connectionStringBuilder = new RelayConnectionStringBuilder(myConnectionString);}catch (ArgumentException ae){ // Perform some error handling}
Hybrid connection stream
Getting a Hybrid connection streamGetting a Hybrid connection streamListenerListener
This article summarizes some of the key Azure Relay Hybrid Connections .NET Standard client APIs.
The RelayConnectionStringBuilder class formats connection strings that are specific to Relay Hybrid Connections.You can use it to verify the format of a connection string, or to build a connection string from scratch. See thefollowing code for an example:
You can also pass a connection string directly to the RelayConnectionStringBuilder method. This operation enablesyou to verify that the connection string is in a valid format. If any of the parameters are invalid, the constructorgenerates an ArgumentException .
The HybridConnectionStream class is the primary object used to send and receive data from an Azure Relayendpoint, whether you are working with a HybridConnectionClient, or a HybridConnectionListener.
Using a HybridConnectionListener object, you can obtain a HybridConnectionStream object as follows:
// Use the RelayConnectionStringBuilder to get a valid connection stringvar listener = new HybridConnectionListener(csb.ToString());// Open a connection to the Relay endpointawait listener.OpenAsync();// Get a `HybridConnectionStream`var hybridConnectionStream = await listener.AcceptConnectionAsync();
ClientClient
// Use the RelayConnectionStringBuilder to get a valid connection stringvar client = new HybridConnectionClient(csb.ToString());// Open a connection to the Relay endpoint and get a `HybridConnectionStream`var hybridConnectionStream = await client.CreateConnectionAsync();
Receiving dataReceiving data
// Create a CancellationToken, so that we can cancel the while loopvar cancellationToken = new CancellationToken();// Create a StreamReader from the 'hybridConnectionStream`var streamReader = new StreamReader(hybridConnectionStream);
while (!cancellationToken.IsCancellationRequested){ // Read a line of input until a newline is encountered var line = await streamReader.ReadLineAsync(); if (string.IsNullOrEmpty(line)) { // If there's no input data, we will signal that // we will no longer send data on this connection // and then break out of the processing loop. await hybridConnectionStream.ShutdownAsync(cancellationToken); break; }}
Sending dataSending data
var data = Encoding.UTF8.GetBytes("hello");await clientConnection.WriteAsync(data, 0, data.Length);
// The StreamWriter object only needs to be created oncevar textWriter = new StreamWriter(hybridConnectionStream);await textWriter.WriteLineAsync("hello");
Using a HybridConnectionClient object, you can obtain a HybridConnectionStream object as follows:
The HybridConnectionStream class enables two-way communication. In most cases, you continuously receive fromthe stream. If you are reading text from the stream, you might also want to use a StreamReader object, whichenables easier parsing of the data. For example, you can read data as text, rather than as byte[] .
The following code reads individual lines of text from the stream until a cancellation is requested:
Once you have a connection established, you can send a message to the Relay endpoint. Because the connectionobject inherits Stream, send your data as a byte[] . The following example shows how to do this:
However, if you want to send text directly, without needing to encode the string each time, you can wrap the hybridConnectionStream object with a StreamWriter object.

Next stepsTo learn more about Azure Relay, visit these links:
Microsoft.Azure.Relay referenceWhat is Azure Relay?Available Relay APIs

Relay Hybrid Connections Node API overview1/24/2018 • 5 min to read • Edit Online
Overview
Documentation
Package helper methodsPackage helper methods
const WebSocket = require('hyco-ws');
var listenUri = WebSocket.createRelayListenUri('namespace.servicebus.windows.net', 'path');listenUri = WebSocket.appendRelayToken(listenUri, 'ruleName', '...key...')...
createRelayListenUricreateRelayListenUri
var uri = createRelayListenUri([namespaceName], [path], [[token]], [[id]])
The hyco-ws Node package for Azure Relay Hybrid Connections is built on and extends the 'ws' NPM package.This package re-exports all exports of that base package and adds new exports that enable integration with theAzure Relay service Hybrid Connections feature.
Existing applications that require('ws') can use this package with require('hyco-ws') instead, which also enableshybrid scenarios in which an application can listen for WebSocket connections locally from "inside the firewall" andvia Hybrid Connections, all at the same time.
The APIs are documented in the main 'ws' package. This article describes how this package differs from thatbaseline.
The key differences between the base package and this 'hyco-ws' is that it adds a new server class, exported via require('hyco-ws').RelayedServer , and a few helper methods.
There are several utility methods available on the package export that you can reference as follows:
The helper methods are for use with this package, but can also be used by a Node server for enabling web ordevice clients to create listeners or senders. The server uses these methods by passing them URIs that embedshort-lived tokens. These URIs can also be used with common WebSocket stacks that do not support setting HTTPheaders for the WebSocket handshake. Embedding authorization tokens into the URI is supported primarily forthose library-external usage scenarios.
Creates a valid Azure Relay Hybrid Connection listener URI for the given namespace and path. This URI can thenbe used with the relay version of the WebSocketServer class.
namespaceName (required) - the domain-qualified name of the Azure Relay namespace to use.path (required) - the name of an existing Azure Relay Hybrid Connection in that namespace.token (optional) - a previously issued Relay access token that is embedded in the listener URI (see the
following example).id (optional) - a tracking identifier that enables end-to-end diagnostics tracking of requests.
The token value is optional and should only be used when it is not possible to send HTTP headers along with theWebSocket handshake, as is the case with the W3C WebSocket stack.

createRelaySendUricreateRelaySendUri
var uri = createRelaySendUri([namespaceName], [path], [[token]], [[id]])
createRelayTokencreateRelayToken
var token = createRelayToken([uri], [ruleName], [key], [[expirationSeconds]])
appendRelayTokenappendRelayToken
var uri = appendRelayToken([uri], [ruleName], [key], [[expirationSeconds]])
Class ws.RelayedServerClass ws.RelayedServer
ConstructorConstructor
Creates a valid Azure Relay Hybrid Connection send URI for the given namespace and path. This URI can be usedwith any WebSocket client.
namespaceName (required) - the domain-qualified name of the Azure Relay namespace to use.path (required) - the name of an existing Azure Relay Hybrid Connection in that namespace.token (optional) - a previously issued Relay access token that is embedded in the send URI (see the following
example).id (optional) - a tracking identifier that enables end-to-end diagnostics tracking of requests.
The token value is optional and should only be used when it is not possible to send HTTP headers along with theWebSocket handshake, as is the case with the W3C WebSocket stack.
Creates an Azure Relay Shared Access Signature (SAS) token for the given target URI, SAS rule, and SAS rule keythat is valid for the given number of seconds or for an hour from the current instant if the expiry argument isomitted.
uri (required) - the URI for which the token is to be issued. The URI is normalized to use the HTTP scheme,and query string information is stripped.ruleName (required) - SAS rule name for either the entity represented by the given URI, or for the namespace
represented by the URI host portion.key (required) - valid key for the SAS rule.expirationSeconds (optional) - the number of seconds until the generated token should expire. If not specified,
the default is 1 hour (3600).
The issued token confers the rights associated with the specified SAS rule for the given duration.
This method is functionally equivalent to the createRelayToken method documented previously, but returns thetoken correctly appended to the input URI.
The hycows.RelayedServer class is an alternative to the ws.Server class that does not listen on the local network,but delegates listening to the Azure Relay service.
The two classes are mostly contract compatible, meaning that an existing application using the ws.Server class caneasily be changed to use the relayed version. The main differences are in the constructor and in the availableoptions.

var ws = require('hyco-ws');var server = ws.RelayedServer;
var wss = new server( { server: ws.createRelayListenUri(ns, path), token: function() { return ws.createRelayToken('http://' + ns, keyrule, key); } });
EventsEvents
h e a d e r sh e a d e r s
function(headers)
c o n n e c t i o nc o n n e c t i o n
function(socket)
e r r o re r r o r
function(error)
HelpersHelpers
c r e a t e R e l a y e d L i s t e n e rc r e a t e R e l a y e d L i s t e n e r
The RelayedServer constructor supports a different set of arguments than the Server , because it is not astandalone listener, or able to be embedded into an existing HTTP listener framework. There are also fewer optionsavailable since the WebSocket management is largely delegated to the Relay service.
Constructor arguments:
server (required) - the fully qualified URI for a Hybrid Connection name on which to listen, usually constructedwith the WebSocket.createRelayListenUri() helper method.token (required) - this argument holds either a previously issued token string or a callback function that can be
called to obtain such a token string. The callback option is preferred, as it enables token renewal.
RelayedServer instances emit three events that enable you to handle incoming requests, establish connections, anddetect error conditions. You must subscribe to the connect event to handle messages.
The headers event is raised just before an incoming connection is accepted, enabling modification of the headersto send to the client.
Emitted when a new WebSocket connection is accepted. The object is of type ws.WebSocket , same as with the basepackage.
If the underlying server emits an error, it is forwarded here.
To simplify starting a relayed server and immediately subscribing to incoming connections, the package exposes asimple helper function, which is also used in the examples, as follows:

var WebSocket = require('hyco-ws');
var wss = WebSocket.createRelayedServer( { server: WebSocket.createRelayListenUri(ns, path), token: function() { return WebSocket.createRelayToken('http://' + ns, keyrule, key); } }, function (ws) { console.log('connection accepted'); ws.onmessage = function (event) { console.log(JSON.parse(event.data)); }; ws.on('close', function () { console.log('connection closed'); }); });
c r e a t e R e l a y e d Se r v e rc r e a t e R e l a y e d Se r v e r
var server = createRelayedServer([options], [connectCallback] )
r e l a y e d C o n n e c tr e l a y e d C o n n e c t
var uri = WebSocket.createRelaySendUri(ns, path);WebSocket.relayedConnect( uri, WebSocket.createRelayToken(uri, keyrule, key), function (socket) { ... });
Next steps
This method calls the constructor to create a new instance of the RelayedServer and then subscribes the providedcallback to the 'connection' event.
Simply mirroring the createRelayedServer helper in function, relayedConnect creates a client connection andsubscribes to the 'open' event on the resulting socket.
To learn more about Azure Relay, visit these links:
What is Azure Relay?Available Relay APIs
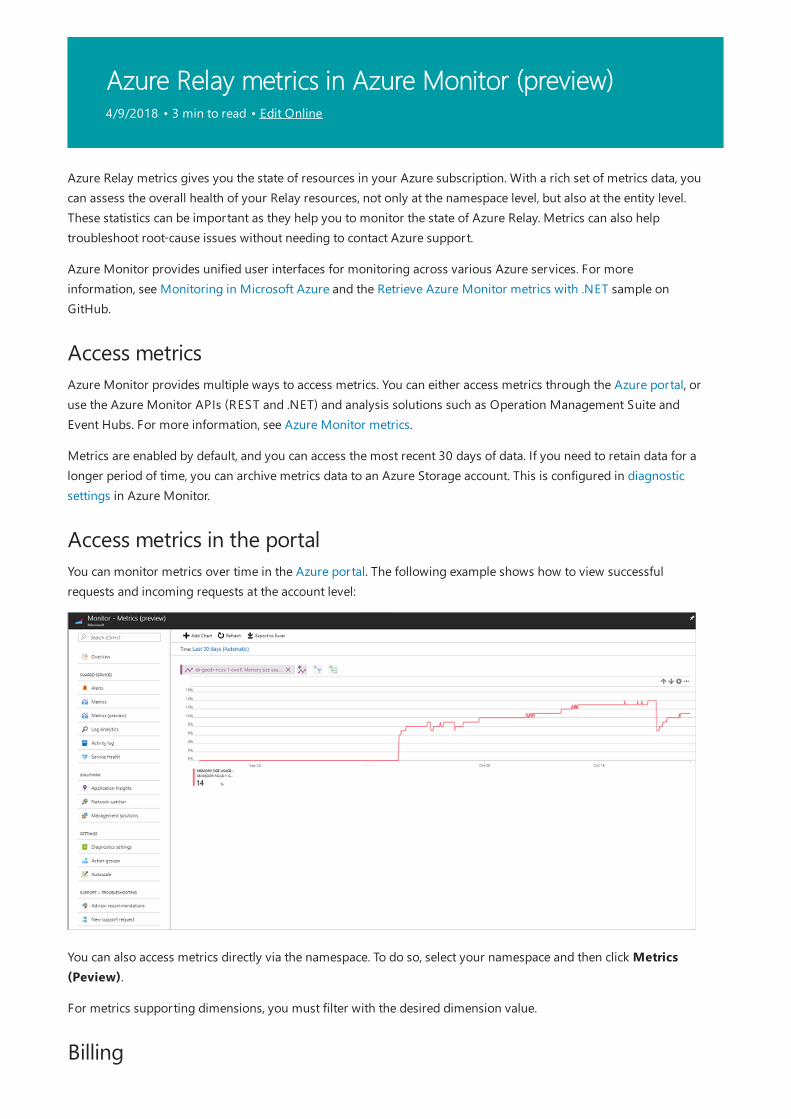
Azure Relay metrics in Azure Monitor (preview)4/9/2018 • 3 min to read • Edit Online
Access metrics
Access metrics in the portal
Billing
Azure Relay metrics gives you the state of resources in your Azure subscription. With a rich set of metrics data, youcan assess the overall health of your Relay resources, not only at the namespace level, but also at the entity level.These statistics can be important as they help you to monitor the state of Azure Relay. Metrics can also helptroubleshoot root-cause issues without needing to contact Azure support.
Azure Monitor provides unified user interfaces for monitoring across various Azure services. For moreinformation, see Monitoring in Microsoft Azure and the Retrieve Azure Monitor metrics with .NET sample onGitHub.
Azure Monitor provides multiple ways to access metrics. You can either access metrics through the Azure portal, oruse the Azure Monitor APIs (REST and .NET) and analysis solutions such as Operation Management Suite andEvent Hubs. For more information, see Azure Monitor metrics.
Metrics are enabled by default, and you can access the most recent 30 days of data. If you need to retain data for alonger period of time, you can archive metrics data to an Azure Storage account. This is configured in diagnosticsettings in Azure Monitor.
You can monitor metrics over time in the Azure portal. The following example shows how to view successfulrequests and incoming requests at the account level:
You can also access metrics directly via the namespace. To do so, select your namespace and then click Metrics(Peview).
For metrics supporting dimensions, you must filter with the desired dimension value.

NOTENOTE
Connection metricsMETRIC NAME DESCRIPTION
ListenerConnections-Success (preview) The number of successful listener connections made to AzureRelay over a specified period.
Unit: Count Aggregation Type: Total Dimension: EntityName
ListenerConnections-ClientError (preview) The number of client errors on listener connections over aspecified period.
Unit: Count Aggregation Type: Total Dimension: EntityName
ListenerConnections-ServerError (preview) The number of server errors on the listener connections over aspecified period.
Unit: Count Aggregation Type: Total Dimension: EntityName
SenderConnections-Success (preview) The number of successful sender connections made over aspecified period.
Unit: Count Aggregation Type: Total Dimension: EntityName
SenderConnections-ClientError (preview) The number of client errors on sender connections over aspecified period.
Unit: Count Aggregation Type: Total Dimension: EntityName
Using metrics in Azure Monitor is currently free while in preview. However, if you use additional solutions thatingest metrics data, you may be billed by these solutions. For example, you are billed by Azure Storage if youarchive metrics data to an Azure Storage account. You are also billed by Log Analytics if you stream metrics data toLog Analytics for advanced analysis.
The following metrics give you an overview of the health of your service.
We are deprecating several metrics as they are moved under a different name. This might require you to update yourreferences. Metrics marked with the "deprecated" keyword will not be supported going forward.
All metrics values are sent to Azure Monitor every minute. The time granularity defines the time interval for whichmetrics values are presented. The supported time interval for all Azure Relay metrics is 1 minute.

SenderConnections-ServerError (preview) The number of server errors on sender connections over aspecified period.
Unit: Count Aggregation Type: Total Dimension: EntityName
ListenerConnections-TotalRequests (preview) The total number of listener connections over a specifiedperiod.
Unit: Count Aggregation Type: Total Dimension: EntityName
SenderConnections-TotalRequests (preview) The connection requests made by the senders over a specifiedperiod.
Unit: Count Aggregation Type: Total Dimension: EntityName
ActiveConnections (preview) The number of active connections over a specified period.
Unit: Count Aggregation Type: Total Dimension: EntityName
ActiveListeners (preview) The number of active listeners over a specified period.
Unit: Count Aggregation Type: Total Dimension: EntityName
ListenerDisconnects (preview) The number of disconnected listeners over a specified period.
Unit: Bytes Aggregation Type: Total Dimension: EntityName
SenderDisconnects (preview) The number of disconnected senders over a specified period.
Unit: Bytes Aggregation Type: Total Dimension: EntityName
METRIC NAME DESCRIPTION
Memory usage metricsMETRIC NAME DESCRIPTION
BytesTransferred (preview) The number of bytes transferred over a specified period.
Unit: Bytes Aggregation Type: Total Dimension: EntityName

Metrics dimensions
DIMENSION NAME DESCRIPTION
EntityName Azure Relay supports messaging entities under thenamespace.
Next steps
Azure Relay supports the following dimensions for metrics in Azure Monitor. Adding dimensions to your metrics isoptional. If you do not add dimensions, metrics are specified at the namespace level.
See the Azure Monitoring overview.

Azure Relay exceptions12/20/2017 • 4 min to read • Edit Online
Exception categories
Exception types
EXCEPTION TYPE DESCRIPTION SUGGESTED ACTIONNOTE ON AUTOMATIC ORIMMEDIATE RETRY
Timeout The server did not respondto the requested operationwithin the specified time,which is controlled byOperationTimeout. Theserver might havecompleted the requestedoperation. This can happendue to network or otherinfrastructure delays.
Check the system state forconsistency, and then retry,if necessary. SeeTimeoutException.
Retry might help in somecases; add retry logic tocode.
Invalid Operation The requested useroperation is not allowedwithin the server or service.See the exception messagefor details.
Check the code and thedocumentation. Make surethat the requested operationis valid.
Retry will not help.
This article lists some exceptions that might be generated by the Azure Relay APIs. This reference is subject tochange, so check back for updates.
The Relay APIs generate exceptions that might fall into the following categories. Also listed are suggested actionsthat you can take to help resolve the exceptions.
User coding error: System.ArgumentException, System.InvalidOperationException,System.OperationCanceledException, System.Runtime.Serialization.SerializationException.
General action: Try to fix the code before you proceed.
Setup/configuration error: System.UnauthorizedAccessException.
General action: Review your configuration. If necessary, change the configuration.
Transient exceptions: Microsoft.ServiceBus.Messaging.MessagingException,Microsoft.ServiceBus.Messaging.ServerBusyException,Microsoft.ServiceBus.Messaging.MessagingCommunicationException.
General action: Retry the operation or notify users.
Other exceptions: System.Transactions.TransactionException, System.TimeoutException.
General action: Specific to the exception type. See the table in the following section.
The following table lists messaging exception types and their causes. It also notes suggested actions you can taketo help resolve the exceptions.

Operation Canceled An attempt is made toinvoke an operation on anobject that has already beenclosed, aborted, or disposed.In rare cases, the ambienttransaction is alreadydisposed.
Check the code and makesure it does not invokeoperations on a disposedobject.
Retry will not help.
Unauthorized Access The TokenProvider objectcould not acquire a token,the token is invalid, or thetoken does not contain theclaims required to performthe operation.
Make sure that the tokenprovider is created with thecorrect values. Check theconfiguration of the AccessControl service.
Retry might help in somecases; add retry logic tocode.
Argument Exception,Argument Null,Argument Out Of Range
One or more of thefollowing has occurred:One or more argumentssupplied to the method areinvalid.The URI supplied toNamespaceManager orCreate contains one or morepath segments.The URI scheme supplied toNamespaceManager orCreate is invalid. The property value is largerthan 32 KB.
Check the calling code andmake sure the argumentsare correct.
Retry will not help.
Server Busy Service is not able to processthe request at this time.
The client can wait for aperiod of time, then retrythe operation.
The client might retry after aspecific interval. If a retryresults in a differentexception, check the retrybehavior of that exception.
Quota Exceeded The messaging entity hasreached its maximumallowable size.
Create space in the entity byreceiving messages from theentity or its subqueues. SeeQuotaExceededException.
Retry might help if messageshave been removed in themeantime.
Message Size Exceeded A message payload exceedsthe 256-KB limit. Note thatthe 256-KB limit is the totalmessage size. The totalmessage size can includesystem properties and anyMicrosoft .NET overhead.
Reduce the size of themessage payload, then retrythe operation.
Retry will not help.
EXCEPTION TYPE DESCRIPTION SUGGESTED ACTIONNOTE ON AUTOMATIC ORIMMEDIATE RETRY
QuotaExceededExceptionQuotaExceededException indicates that a quota for a specific entity has been exceeded.
For Relay, this exception wraps the System.ServiceModel.QuotaExceededException, which indicates that themaximum number of listeners has been exceeded for this endpoint. This is indicated in theMaximumListenersPerEndpoint value of the exception message.
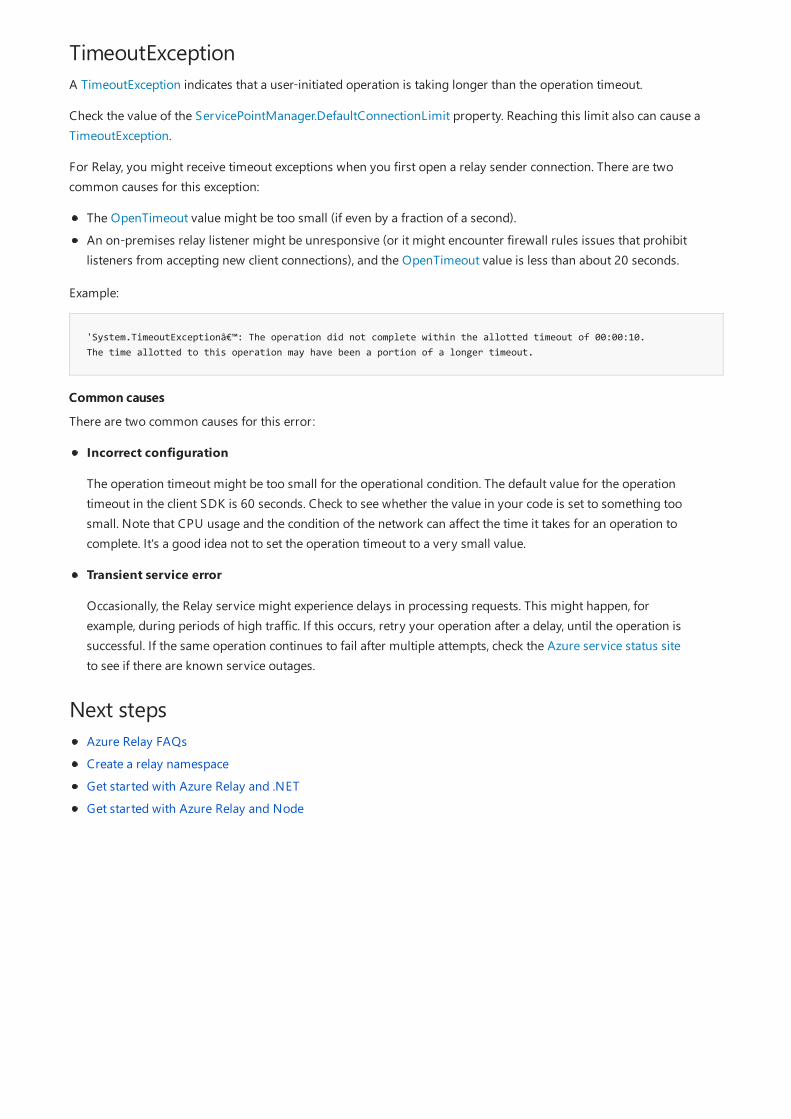
TimeoutException
'System.TimeoutException’: The operation did not complete within the allotted timeout of 00:00:10.The time allotted to this operation may have been a portion of a longer timeout.
Common causesCommon causes
Next steps
A TimeoutException indicates that a user-initiated operation is taking longer than the operation timeout.
Check the value of the ServicePointManager.DefaultConnectionLimit property. Reaching this limit also can cause aTimeoutException.
For Relay, you might receive timeout exceptions when you first open a relay sender connection. There are twocommon causes for this exception:
The OpenTimeout value might be too small (if even by a fraction of a second).An on-premises relay listener might be unresponsive (or it might encounter firewall rules issues that prohibitlisteners from accepting new client connections), and the OpenTimeout value is less than about 20 seconds.
Example:
There are two common causes for this error :
Incorrect configuration
The operation timeout might be too small for the operational condition. The default value for the operationtimeout in the client SDK is 60 seconds. Check to see whether the value in your code is set to something toosmall. Note that CPU usage and the condition of the network can affect the time it takes for an operation tocomplete. It's a good idea not to set the operation timeout to a very small value.
Transient service error
Occasionally, the Relay service might experience delays in processing requests. This might happen, forexample, during periods of high traffic. If this occurs, retry your operation after a delay, until the operation issuccessful. If the same operation continues to fail after multiple attempts, check the Azure service status siteto see if there are known service outages.
Azure Relay FAQsCreate a relay namespaceGet started with Azure Relay and .NETGet started with Azure Relay and Node

Azure Relay port settings1/24/2018 • 1 min to read • Edit Online
Hybrid Connections
WCF RelaysBINDING TRANSPORT SECURITY PORT
BasicHttpRelayBinding Class (client) Yes HTTPS
" No
BasicHttpRelayBinding Class (service) Either 9351/HTTP
NetEventRelayBinding Class (client) Yes 9351/HTTPS
" No
NetEventRelayBinding Class (service) Either 9351/HTTP
NetTcpRelayBinding Class (client/service) Either 5671/9352/HTTP (9352/9353 if usinghybrid)
NetOnewayRelayBinding Class (client) Yes 9351/HTTPS
" No
NetOnewayRelayBinding Class (service) Either 9351/HTTP
WebHttpRelayBinding Class (client) Yes HTTPS
" No
WebHttpRelayBinding Class (service) Either 9351/HTTP
WS2007HttpRelayBinding Class (client) Yes HTTPS
" No
WS2007HttpRelayBinding Class (service) Either 9351/HTTP
Next steps
The following table describes the required configuration for port values for Azure Relay.
Hybrid Connections uses WebSockets as the underlying transport mechanism, which uses HTTPS only.
To learn more about Azure Relay, visit these links:

What is Azure Relay?Relay FAQ