what’s new in powerscribe 360 | reporting version 2 · by default these new columns are not...
TRANSCRIPT

© 2013 Nuance Communications, Inc. All rights reserved.Nuance®, the Nuance logo, Dragon®, and PowerScribe® are registered trademarks of Nuance Communications, Inc. or its affiliates in the United States and/or other countries. All other trademarks referenced herein are trademarks or registered trademarks of their respective owners.L-3625-001 10/2013
What’s New in PowerScribe® 360 | Reporting, Version 2.0
PowerScribe® 360 | Reporting, version 2.0, is the latest version of Nuance’s leading speech-recognition reporting solution for radiologists. This latest version gives you more control of your reports with the goal of making the dictation process faster and more accurate. PowerScribe 360 | Reporting helps you achieve faster report turnaround time, reduce transcription costs, provide higher levels of satisfaction to referring providers, and enhance patient care.
ContentsNew features...................................................................... page 2
For providers ................................................................. page 2For administrators .......................................................... page 9
Step-by-step instructions ..................................................... page 28For administrators .......................................................... page 28
Purchasable features ........................................................... page 37For providers ................................................................. page 37For administrators .......................................................... page 40

2
What’s New in PowerScribe® 360 | Reporting, Version 2.0
G Overview New Features Step-by-StepF For Providers G For ProvidersG For Administrators
New Features
New Features For ProvidersThe following new features for providers are explained in greater detail in the remainder of this section.
New Columns Available in the Explorer Results WindowSeveral new columns have been added to the Explorer results window, allowing you to see even more information about your orders/reports.
Deadline: Shows reports that are close to or have exceeded their TAT target (see Hot Worklist in Explorer Window, beginning on page 3 for more information).
TAT Clock: Same as above, only in an icon format.
Location: Shows where the patient was seen (if your institution’s HIS is sending location information).
Patient Class: Shows the type of patient: Inpatient, Outpatient, Emergency, and so on.
Ordering: Shows the name of the provider who ordered the study.
By default these new columns are not displayed. As with all the Explorer columns, you can choose to either show or hide them (right-click any column heading and select Columns to manage all of your results columns).
• New columns available in the Explorer results window• Hot worklist added to Explorer window• Browse by priority• Browse by gender• My Productivity dashboard• Assign STAT to a microphone button• Warn on logoff preference• Merge field display list • Assign a Patient Class in AutoText Editor

3
What’s New in PowerScribe® 360 | Reporting, Version 2.0
G Overview New Features Step-by-StepF For Providers G For ProvidersG For Administrators
Hot Worklist in Explorer WindowA new link called Hot Worklist is now available in the Worklists section of the Explorer window.
Use this worklist to see orders and reports (of either regular or STAT priority) that are approaching, or have exceeded, their standard turnaround time frame. The time frames for these settings are configured by your site administrator based on your organization’s specific needs.
You can display your Hot Worklist results by using the voice command “Hot Worklist” or by clicking the Hot Worklist link (see illustration below).
The results window contains new columns that you can display when you select Hot Worklist:
• Deadline: Displays a red block for orders/reports that are approaching or have exceeded their turnaround time deadline. Shows the time remaining until the order/report exceeds its scheduled TAT time (or the amount of time by which the order/report has exceeded its scheduled TAT time).
• TAT Clock icon: Same function as the Deadline column described above, but requires you to hover your mouse cursor over the clock to see the time data.
STAT Indicator
TAT Clock Deadline
4
What’s New in PowerScribe® 360 | Reporting, Version 2.0
G Overview New Features Step-by-StepF For Providers G For ProvidersG For Administrators
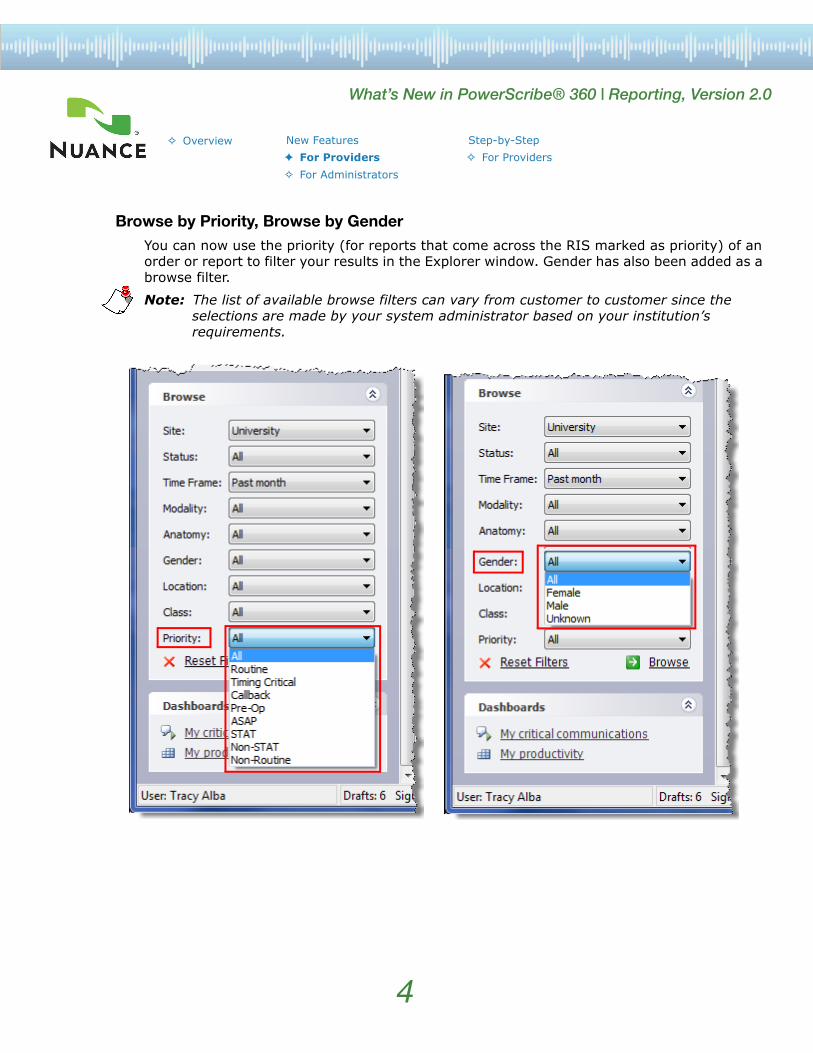
Browse by Priority, Browse by GenderYou can now use the priority (for reports that come across the RIS marked as priority) of an order or report to filter your results in the Explorer window. Gender has also been added as a browse filter.
Note: The list of available browse filters can vary from customer to customer since the selections are made by your system administrator based on your institution’s requirements.

5
What’s New in PowerScribe® 360 | Reporting, Version 2.0
G Overview New Features Step-by-StepF For Providers G For ProvidersG For Administrators
My Productivity DashboardA new dashboard called My Productivity shows providers information about their orders/reports to help them manage and evaluate their workload.
Use any of the following methods to access the My Productivity dashboard:
• Use the My Productivity voice command• Click View > My Productivity• Click the My Productivity link in the Dashboards section of the Explorer window
(located below your Browse filters).
Filter your information by site or time frame. The results area shows the following fields:
• Site: Name of site (only displayed if you have access to more than one site)• Reports Dictated: Number of reports dictated during the selected time frame• Reports Signed: Number of reports signed during the selected time frame• Average TAT: Time shown in days, hours, and minutes• RVU Count: Relative value unit count (for information on RVUs, see Editing Procedure
Codes, beginning on page 19 of this document)• Daily RVU Quota: Daily quota of RVUs
Click the Display by count link to show the information for each site in a column instead of a row. The link changes to Display by site, which you can click to return to the original format.
6
What’s New in PowerScribe® 360 | Reporting, Version 2.0
G Overview New Features Step-by-StepF For Providers G For ProvidersG For Administrators
Assign STAT to a Microphone ButtonYou can now assign the STAT function to your microphone, allowing you to mark a report as STAT by pressing a microphone button. To assign STAT to one of your microphone buttons, click Tools > Preferences, then click your microphone (either Dictaphone PowerMic or Philips Speech Mike) and select STAT from one of the microphone button drop-down lists.
For Dictaphone PowerMic: Assign STAT to any of the following buttons: Tab Backward; Tab Forward; Transcribe; Enter/Select; Custom Left; Custom Right; or Scan (on back of microphone)
For Philips SpeechMike: Assign STAT to any of the following buttons: EOL; Ins/Ovr; F1; F2; F3; F4; or Command (on back of microphone)
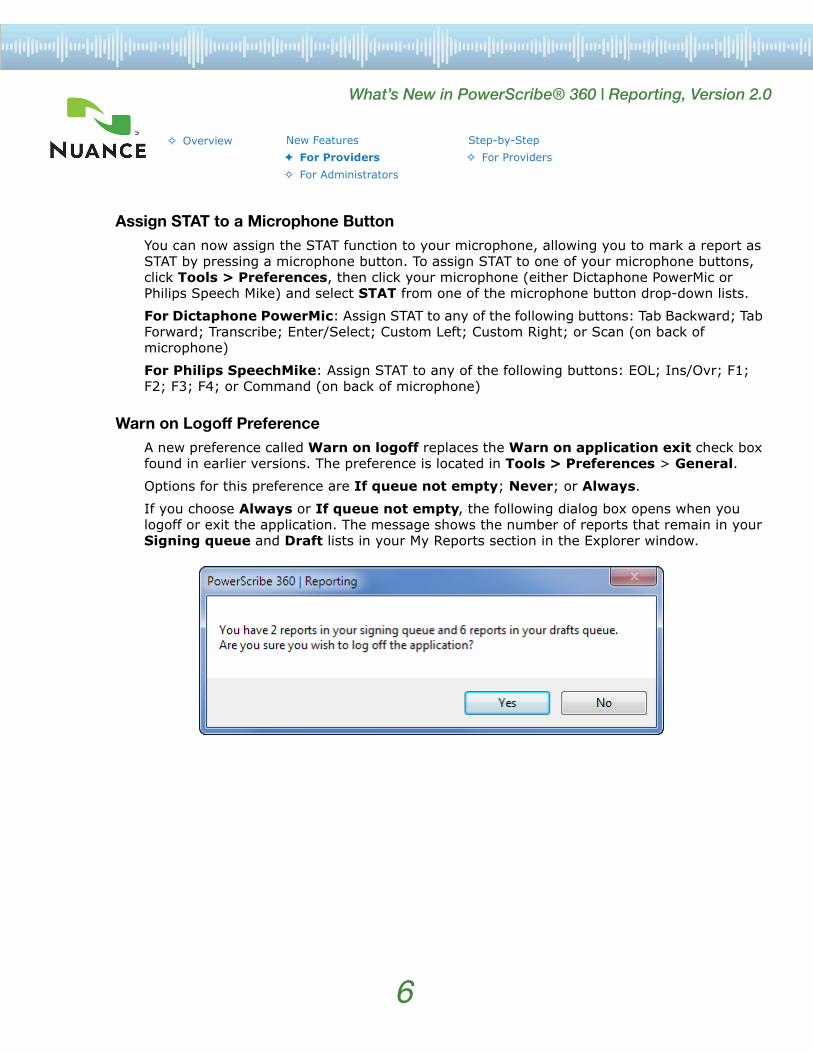
Warn on Logoff PreferenceA new preference called Warn on logoff replaces the Warn on application exit check box found in earlier versions. The preference is located in Tools > Preferences > General. Options for this preference are If queue not empty; Never; or Always.
If you choose Always or If queue not empty, the following dialog box opens when you logoff or exit the application. The message shows the number of reports that remain in your Signing queue and Draft lists in your My Reports section in the Explorer window.
7
What’s New in PowerScribe® 360 | Reporting, Version 2.0
G Overview New Features Step-by-StepF For Providers G For ProvidersG For Administrators
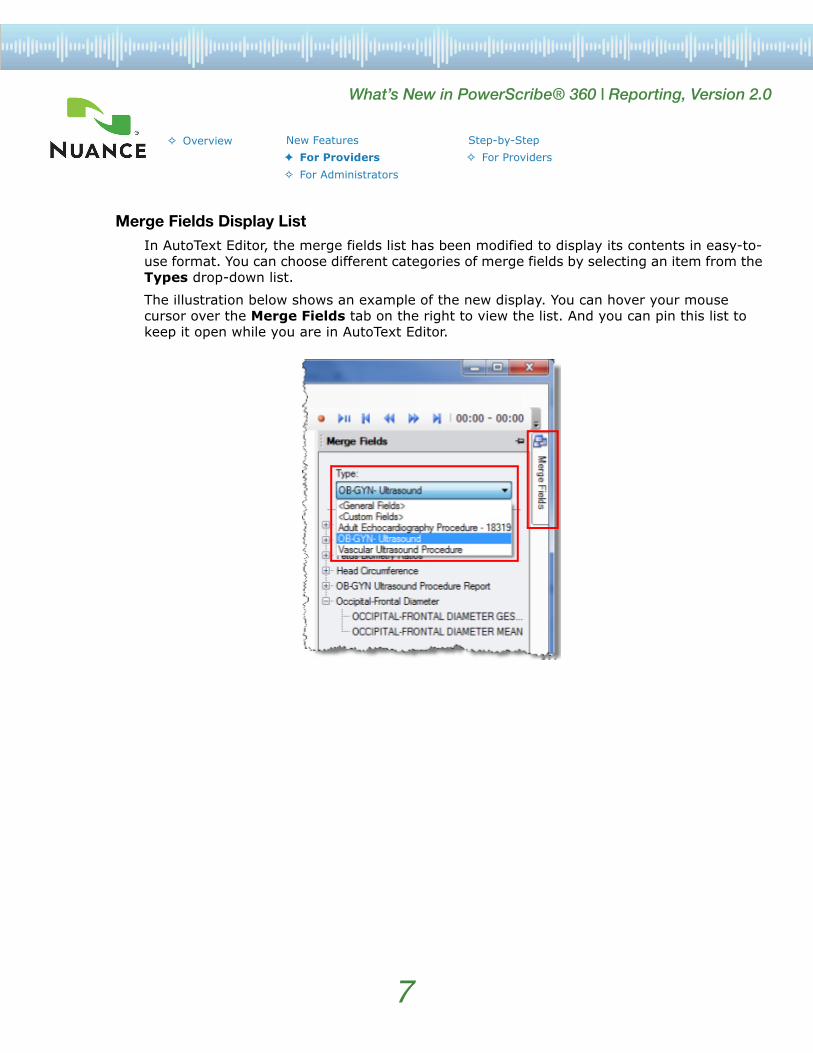
Merge Fields Display List In AutoText Editor, the merge fields list has been modified to display its contents in easy-to-use format. You can choose different categories of merge fields by selecting an item from the Types drop-down list.
The illustration below shows an example of the new display. You can hover your mouse cursor over the Merge Fields tab on the right to view the list. And you can pin this list to keep it open while you are in AutoText Editor.

8
What’s New in PowerScribe® 360 | Reporting, Version 2.0
G Overview New Features Step-by-StepF For Providers G For ProvidersG For Administrators
Assign a Patient Class in the AutoText EditorThe AutoText Editor window now allows you to assign a patient class to your AutoText.
The Patient Class attribute appears in a drop-down list in the AutoText Editor window.

9
What’s New in PowerScribe® 360 | Reporting, Version 2.0
G Overview New Features Step-by-StepG For Providers G For ProvidersF For Administrators
New Features for Administrators
Control Administrator Portal Access by SiteYou can now create an administrator who has access only to specific sites in the administrator portal. This new type of administrator is called a site administrator. Previous versions of PowerScribe 360 | Reporting had only one type of administrator (now referred to as a system administrator) who had full control of all sites at all times.
• Site administrators have access to site-level settings and preferences only for the sites that have been assigned to them by a system-level administrator.
• System administrators can access all areas of the administrator portal, which includes all site- and system-level settings and preferences.
Note: Only system-level administrators can manage site-level administrator accounts.
For more information, see Creating a Site Administrator, beginning on page 28.
• Control Administrator Portal access by site • Turnaround Time settings• New preferences: Require impression for addendum; require
comments for all levels of peer review, and others• Hot Worklist for administrators• Report and administrative auditing updates • Map procedure codes directly to anatomy/modality • Manage procedure codes • Manage ICD-9 codes • Manage individual user AutoCorrect rules from the Admin Portal • Primary accession number now supported • Patient Class AutoText attribute • Added Ordering Clinician column to Exam search results grid • Speech tab changes• Speech formatting options• Upload RTF-formatted document via HL7• Bridge time zone enhancements• Bridge Service configuration

10
What’s New in PowerScribe® 360 | Reporting, Version 2.0
G Overview New Features Step-by-StepG For Providers G For ProvidersF For Administrators
Turnaround Time (TAT) Settings for Each SiteYou can now configure standard and STAT turnaround time (TAT) preferences at the site or system level (under Preferences > Explorer Screen tab)
The standard TAT specifies the time frame in which a report should be finalized. Standard TAT helps site administrators and providers to manage their workloads. The official TAT definition begins at the time that the exam is completed and ends at the time that the report is finalized.
For example, if a site has a one-hour TAT for all standard reports, you would set the TAT Deadline Standard preference to sixty minutes. You can also set the timeframe for when the indicator color should change to yellow and red. In the illustration below, the deadline for TAT on a standard report is 60 minutes (TAT Deadline Standard); orders will appear with a yellow indicator 45 minutes before the TAT Deadline Standard time; and orders will appear with a red indicator 30 minutes before the TAT Deadline Standard time.
Similarly for STAT reports, set the three levels (Deadline, Red Alert, Yellow Alert) to meet your organization’s requirements. The example below shows the TAT Deadline STAT set for 30 minutes; orders will appear with a yellow indicator 15 minutes before the TAT Deadline STAT time; and orders will appear with a red indicator 10 minutes before the TAT Deadline STAT time.
Note: Stat alerts are visible only on orders/reports sent across the RIS marked as STAT.
Note: When the yellow time is nearly completed, the indicator will turn orange as it approaches the red alert time. This orange indicator is not configurable.

11
What’s New in PowerScribe® 360 | Reporting, Version 2.0
G Overview New Features Step-by-StepG For Providers G For ProvidersF For Administrators
New PreferencesSeveral new preferences have been added to the Admin Portal. To access preferences, click Setup > System > Preferences. The following table shows the changes.
Note: Preferences that have a Type of Site can be configured at the site level. To configure site-level preferences, click Setup > Sites, select a site from the drop-down list in the upper-right section of the window, and click the Preferences link.
Tab Name Preference Description Type
Workflow
Require BI-RADS for mammography exams
True or False check box, Default is False. Site
Require impression for addendum True or False check box, Default is True. Site
Daily RVU quotaSee Editing Procedure Codes, beginning on page 19 of this document for more information.
Site
Permissions Allow physicians to access preliminary reports
True or False check box, Default is False. Site
Dictation (See description)
Moved Capitalize beginning of dictated sentences check box to the new AutoCorrect preference tab
N/A
AutoCorrect
Capitalize beginning of dictated sentences
Previously appeared on the Dictation tab Account
Replace text during dictation Account
Devices STAT assignmentYou can now assign STAT to one of your microphone buttons
Account
Explorer Screen
TAT Deadline StandardTAT Red Alert StandardTAT Yellow Alert StandardTAT Deadline STATTAT Red Alert STATTAT Yellow Alert STAT
See Turnaround Time (TAT) Settings for Each Site, beginning on page 10 of this document for information on these preferences.
Site
12
What’s New in PowerScribe® 360 | Reporting, Version 2.0
G Overview New Features Step-by-StepG For Providers G For ProvidersF For Administrators
Security (See description)
Warn on logoff drop-down list (Never; Always; If queue not empty) replaces the Warn on application exit check box. If queue not empty presents a message box that the provider must okay before logging off. Looks for both Unsigned and Draft reports.
Account
ACO/LMO (See description) No changes to this tab N/A
Tab Name Preference Description Type

13
What’s New in PowerScribe® 360 | Reporting, Version 2.0
G Overview New Features Step-by-StepG For Providers G For ProvidersF For Administrators
Report and Administrative Auditing UpdatesAdministrators can now audit several types of events at both the system and site levels.
• To view the audit log at the system level, click Setup > System > Audit• To view the audit log at the site level, click Setup > Sites > Audit
System
Sites

14
What’s New in PowerScribe® 360 | Reporting, Version 2.0
G Overview New Features Step-by-StepG For Providers G For ProvidersF For Administrators
The types of events available are the same for both the system and site audits.
Filter your audit event list by:
• Site: Select one or all sites (the Site-level audit list shows only the current site) • Account: Select an administrator account or select all administrators• Type: Select a specific type of event or select all events:– Create/Delete/Update Entity: Shows create, delete, and update events for entities
such as systems and sites– Change preference: Shows changes in system- or site-level preferences performed
by the selected administrators– Change configuration: Shows changes made to any of the tabs in the Setup >
System > Configuration window– Change bridge option: Shows changes made in the Setup > Bridge tab– Change worklist: Shows changes made to any worklists in the system (Setup >
System > Worklists)

15
What’s New in PowerScribe® 360 | Reporting, Version 2.0
G Overview New Features Step-by-StepG For Providers G For ProvidersF For Administrators
• Time Frame: Select a time from the drop-down list, or click Custom and create your own filter
•
•
In addition, several new account-level items have been added to the existing account audit log (to view an account-level audit log, click Setup > Accounts, select the account you want to view, and click the Audit link):
• Change Username• Change Personal Info• Change Admin Rights• Change Sections• Change Supervisor• Change Specialties

16
What’s New in PowerScribe® 360 | Reporting, Version 2.0
G Overview New Features Step-by-StepG For Providers G For ProvidersF For Administrators
Ordering Clinician Column Added to Exam Results A column displaying the ordering clinician’s name and identifier has been added to the Exam results window.
Primary Accession Number SupportSome RIS systems (for example, GE RIS-IC and Meditech) rely on accession numbers always being in the same order. PowerScribe 360 | Reporting now supports the concept of primary and secondary accession numbers.
For example, a radiologist accesses the PowerScribe 360 | Reporting client and enters accession numbers CCC3, BBB2, and AAA1, in that order. The radiologist then creates a report using orders with accession numbers CCC3, BBB2, and AAA1. PowerScribe 360 | Reporting associates the multiple accession numbers with the report, and tags CCC3 as the primary accession number.

17
What’s New in PowerScribe® 360 | Reporting, Version 2.0
G Overview New Features Step-by-StepG For Providers G For ProvidersF For Administrators
In the above example, the system will recognize the first accession number in the list, CCC3, as the primary accession number, and recognizes BBB2 and AAA1 as secondary accession numbers.
Note the following guidelines for primary/secondary accession numbers:
• A cancelled order cannot be a primary accession number.• In the PowerScribe 360 | Reporting client, the primary accession number cannot be
demoted.• The first accession number that the radiologist searches for to associate with a report (or
the first accession number provided to PowerScribe 360 | Reporting by the RIS) becomes the primary accession number.
• If an accession number is dissociated from a report containing multiple orders, the remainder of the accession numbers will be re-sequenced so that there is no gap in the numbering sequence.

18
What’s New in PowerScribe® 360 | Reporting, Version 2.0
G Overview New Features Step-by-StepG For Providers G For ProvidersF For Administrators
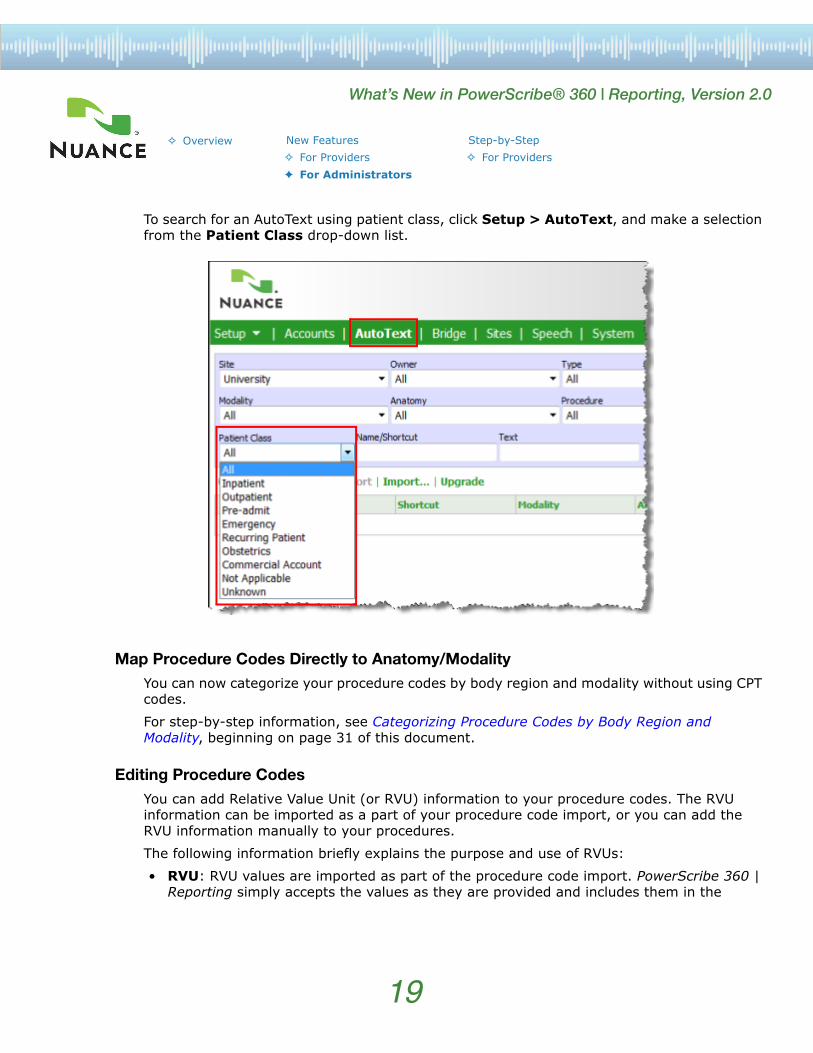
Manage AutoText Patient Class AttributeAdministrators can now modify the new Patient Class attribute for an AutoText. In addition, Patient Class is now available as a filter when searching for a specific AutoText.
To modify an AutoText patient class, click Setup > AutoText, select for the AutoText you want to modify, and make a selection from the Patient Class drop-down list.
19
What’s New in PowerScribe® 360 | Reporting, Version 2.0
G Overview New Features Step-by-StepG For Providers G For ProvidersF For Administrators
To search for an AutoText using patient class, click Setup > AutoText, and make a selection from the Patient Class drop-down list.
Map Procedure Codes Directly to Anatomy/ModalityYou can now categorize your procedure codes by body region and modality without using CPT codes.
For step-by-step information, see Categorizing Procedure Codes by Body Region and Modality, beginning on page 31 of this document.
Editing Procedure CodesYou can add Relative Value Unit (or RVU) information to your procedure codes. The RVU information can be imported as a part of your procedure code import, or you can add the RVU information manually to your procedures.
The following information briefly explains the purpose and use of RVUs:
• RVU: RVU values are imported as part of the procedure code import. PowerScribe 360 | Reporting simply accepts the values as they are provided and includes them in the

20
What’s New in PowerScribe® 360 | Reporting, Version 2.0
G Overview New Features Step-by-StepG For Providers G For ProvidersF For Administrators
reports (and in the My Productivity dashboard); no calculations are performed on RVUs. As a measure of productivity, the higher the RVU, the more complicated the read, and so the practice (and radiologist) get paid more for higher RVU studies.
• Professional RVU component: A factor indicating the professional aspects of a health service in a global RVU, such as the physician's work and other expenses (including practice overhead, insurance, and so on).
• Technical RVU component: A factor indicating the technical aspects of a health service in a global RVU. such as the facility (e.g. CT scanner operation) and so on.
• Global RVU: Generally, but not always, the sum of the professional RVU component and the technical RVU component; however, PowerScribe 360 | Reporting does not enforce this. Customers can enter any value in this field.
To edit your procedure codes, click Setup > Sites > Procedures > Edit.
21
What’s New in PowerScribe® 360 | Reporting, Version 2.0
G Overview New Features Step-by-StepG For Providers G For ProvidersF For Administrators
Manage ICD-9 CodesYou can update the ICD-9 codes in your system by importing them into PowerScribe 360 | Reporting. You can perform this import on a site-by-site basis if necessary.
Import the codes from an Excel spreadsheet. The import supports mappings of ICD-9 codes to custom exam codes.
Manage Individual User AutoCorrect RulesAdministrators can now manage an individual user’s AutoCorrect rules from the Administrator Portal.
For more information, see Manage Individual User AutoCorrect Rules, beginning on page 34 of this document.
22
What’s New in PowerScribe® 360 | Reporting, Version 2.0
G Overview New Features Step-by-StepG For Providers G For ProvidersF For Administrators
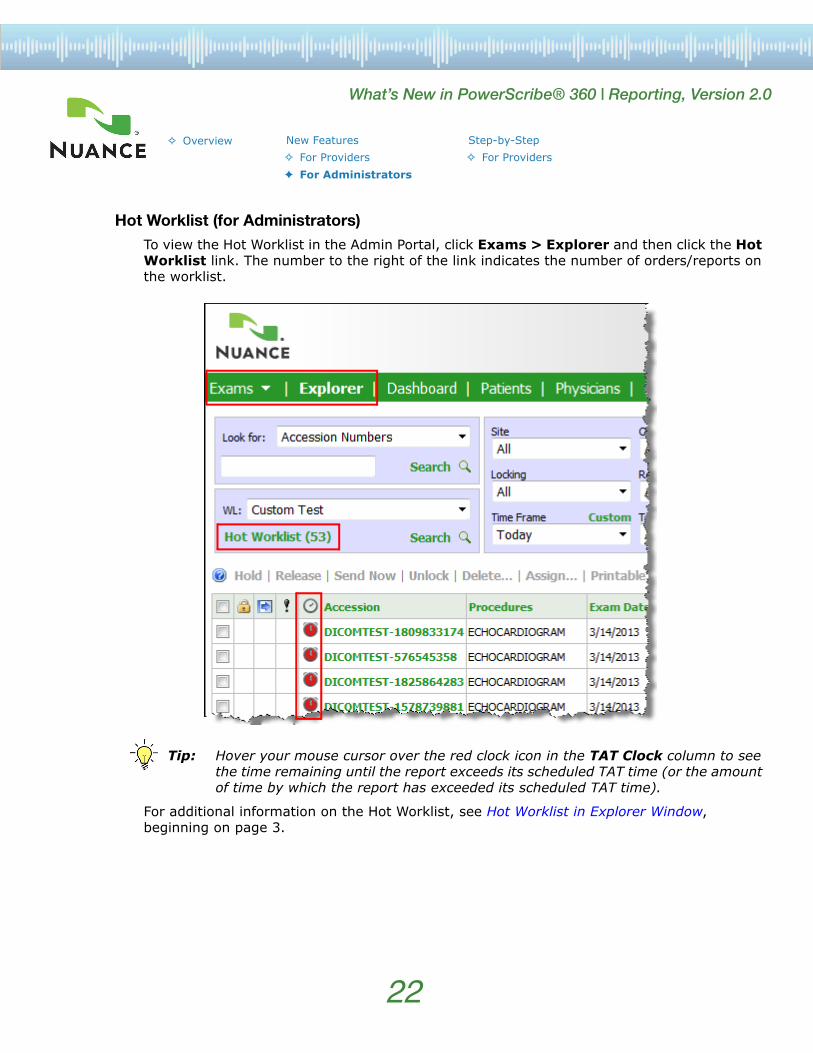
Hot Worklist (for Administrators)To view the Hot Worklist in the Admin Portal, click Exams > Explorer and then click the Hot Worklist link. The number to the right of the link indicates the number of orders/reports on the worklist.
Tip: Hover your mouse cursor over the red clock icon in the TAT Clock column to see the time remaining until the report exceeds its scheduled TAT time (or the amount of time by which the report has exceeded its scheduled TAT time).
For additional information on the Hot Worklist, see Hot Worklist in Explorer Window, beginning on page 3.
23
What’s New in PowerScribe® 360 | Reporting, Version 2.0
G Overview New Features Step-by-StepG For Providers G For ProvidersF For Administrators
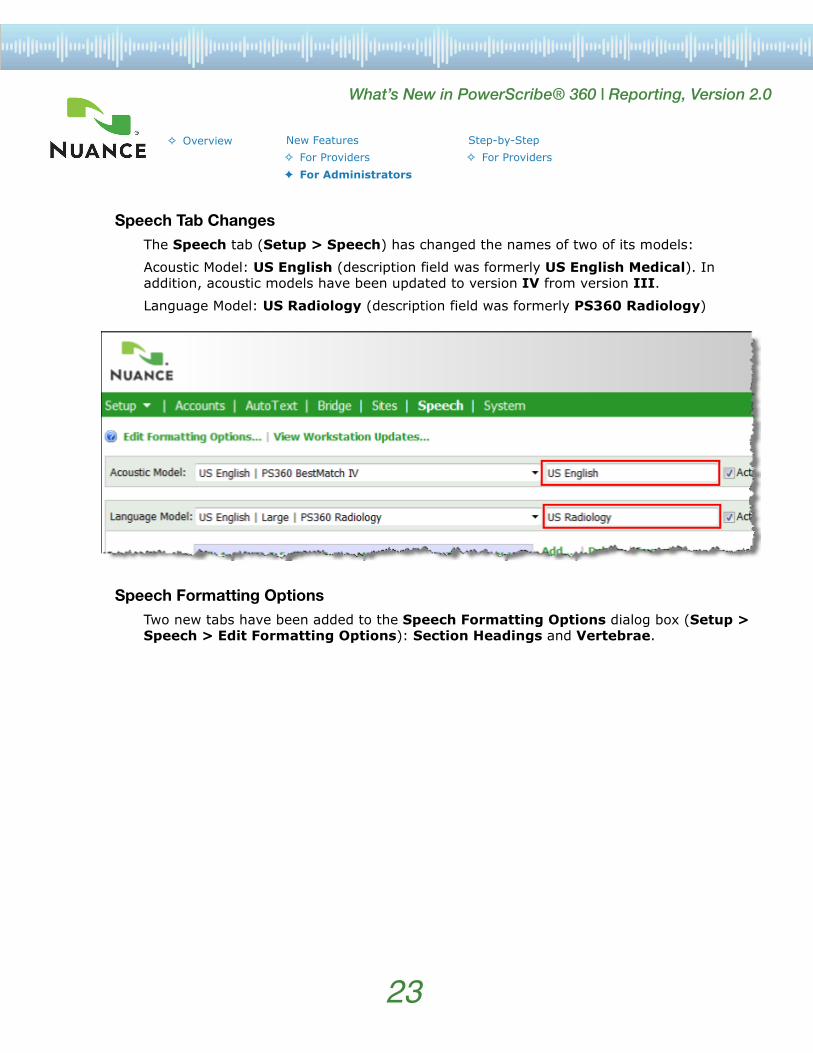
Speech Tab Changes The Speech tab (Setup > Speech) has changed the names of two of its models:
Acoustic Model: US English (description field was formerly US English Medical). In addition, acoustic models have been updated to version IV from version III.
Language Model: US Radiology (description field was formerly PS360 Radiology)
Speech Formatting OptionsTwo new tabs have been added to the Speech Formatting Options dialog box (Setup > Speech > Edit Formatting Options): Section Headings and Vertebrae.

24
What’s New in PowerScribe® 360 | Reporting, Version 2.0
G Overview New Features Step-by-StepG For Providers G For ProvidersF For Administrators
Section Headings Tab
Use the Section Headings tab to determine how your section headings and subheadings appear.
Vertebrae Tab
Use the Vertebrae tab to determine how your vertebrae range dictations will appear.
For more information on speech formatting, see the PowerScribe 360 | Reporting Administrator Guide, L-3624-001, AutoFormatting chapter.

25
What’s New in PowerScribe® 360 | Reporting, Version 2.0
G Overview New Features Step-by-StepG For Providers G For ProvidersF For Administrators
Bridge/Interface Services Information
Upload RTF-Formatted Document via HL7You can select rich text format (RTF) as a message output type from PowerScribe 360 | Reporting to your RIS. Note that this is outgoing messages only and does not affect messages from your RIS to PowerScribe 360 | Reporting.
To manage this setting, go to Setup > Bridge, and select RTF from the Send formatted report as embedded document drop-down box.
Note: To use the RTF content, the receiving application must be able to interpret the ED Value type in OBX 2 (Encapsulated Data) to know that there is an embedded document in the result. The receiving application then must interpret the data subtype from OBX 5^3 indicating the format is RTF, and then decode the result data in OBX 5^5 based on the OBX 5^4 Encoding value of Base64.

26
What’s New in PowerScribe® 360 | Reporting, Version 2.0
G Overview New Features Step-by-StepG For Providers G For ProvidersF For Administrators
Bridge Time Zone QualifierThe PowerScribe 360 | Reporting Bridge component now has a parameter that indicates whether the time stamps will include time zone information on outbound reports (results sent to the RIS from PowerScribe 360 | Reporting).
To manage this setting, go to Setup > Bridge, and make a selection from the Send time zone qualifier drop-down box. Choices are All Timestamps; Header Only (MSH-7); or None.

27
What’s New in PowerScribe® 360 | Reporting, Version 2.0
G Overview New Features Step-by-StepG For Providers G For ProvidersF For Administrators
Bridge Service ConfigurationSeveral new preferences have been added to the Bridge Service configuration section (Setup > System > Configuration link > Bridge Service tab). The default values for each preference are shown in green text to the right of each item in the illustrations below.
• Enable mobile notifications: Choose from For Radiologists; For Physicians; For Radiologists and Physicians; or Disabled.
• Days to keep administrative audit events: Ranging from 1 month to Infinitely• Days to keep AutoText usage: Ranging from 1 month to Infinitely• Days to keep DICOM SR: Ranging from 1 month to Infinitely

28
What’s New in PowerScribe® 360 | Reporting, Version 2.0
G Overview New Features Step-by-StepG For Providers G For ProvidersG For Administrators F For Administrators
Step-by-Step Instructions for Administrators
Creating a Site AdministratorTo create a site administrator:
1. Log in to the administrator portal as a system administrator.2. Click Setup > Accounts and either select an existing user or create a new user for whom
you want to create site administrator rights.3. Make sure the Administrator check box is selected and click the Edit Rights link.
29
What’s New in PowerScribe® 360 | Reporting, Version 2.0
G Overview New Features Step-by-StepG For Providers G For ProvidersG For Administrators F For Administrators
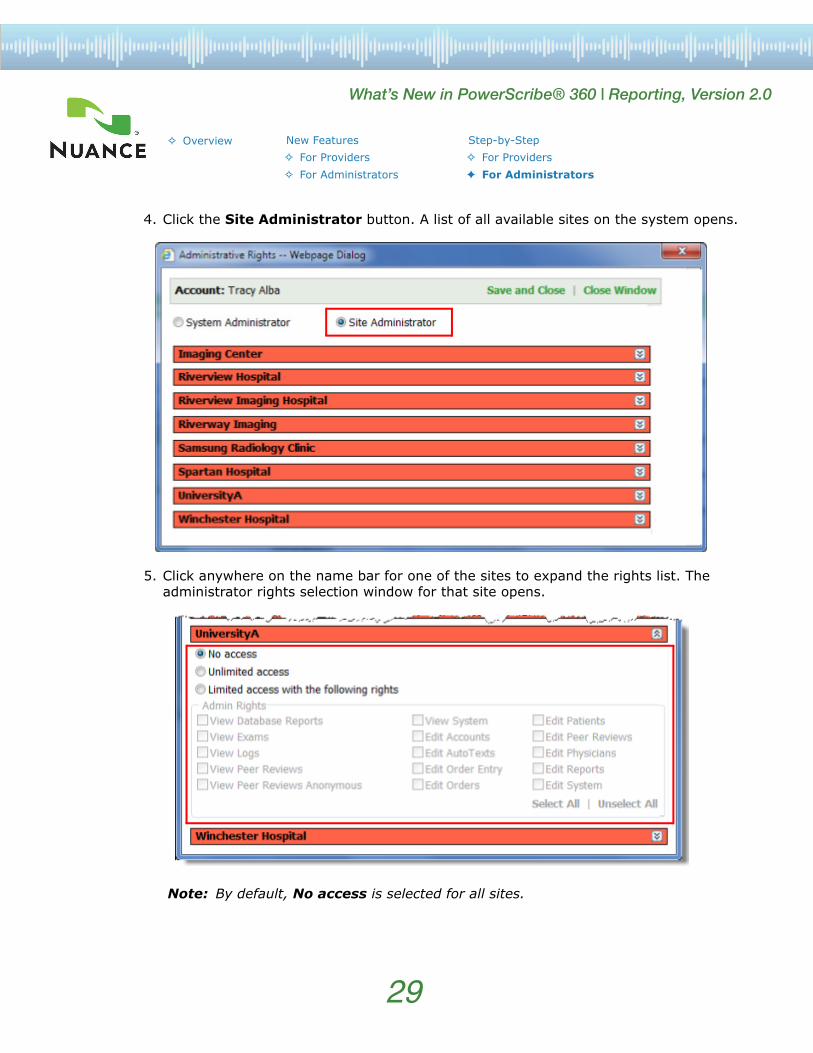
4. Click the Site Administrator button. A list of all available sites on the system opens.
5. Click anywhere on the name bar for one of the sites to expand the rights list. The administrator rights selection window for that site opens.
Note: By default, No access is selected for all sites.

30
What’s New in PowerScribe® 360 | Reporting, Version 2.0
G Overview New Features Step-by-StepG For Providers G For ProvidersG For Administrators F For Administrators
6. Select one of the three access type buttons:• No access: The user has no administrative rights for the site.• Unlimited access: The user has complete access to this site as an administrator. • Limited access with the following rights: Allows you to assign specific rights to the
administrator, limiting the administrative tasks this person can perform for this site.7. Repeat step 5 and step 6 to configure additional sites for this administrator.8. When finished, click Save and Close.
Tip: If you need to edit a site administrator’s rights, sites that have been assigned to the user appear with a green bar and are automatically expanded (see illustration below). Also, you can collapse a site’s rights list by clicking anywhere on the site name bar.

31
What’s New in PowerScribe® 360 | Reporting, Version 2.0
G Overview New Features Step-by-StepG For Providers G For ProvidersG For Administrators F For Administrators
Categorizing Procedure Codes by Body Region and Modality
1. From the Admin Portal, click Setup > Sites > Procedures > Categorize.
2. Search for the procedure code by using the Categorization drop-down list, or by using the Modality and Anatomy filters on the left side of the window.

32
What’s New in PowerScribe® 360 | Reporting, Version 2.0
G Overview New Features Step-by-StepG For Providers G For ProvidersG For Administrators F For Administrators
3. Select a code to categorize.
Note: Select more than one code to assign the same modality and anatomy to multiple codes.
4. Click the Categorize link. The Anatomy/Modality Assignment to Procedure dialog box opens.
33
What’s New in PowerScribe® 360 | Reporting, Version 2.0
G Overview New Features Step-by-StepG For Providers G For ProvidersG For Administrators F For Administrators
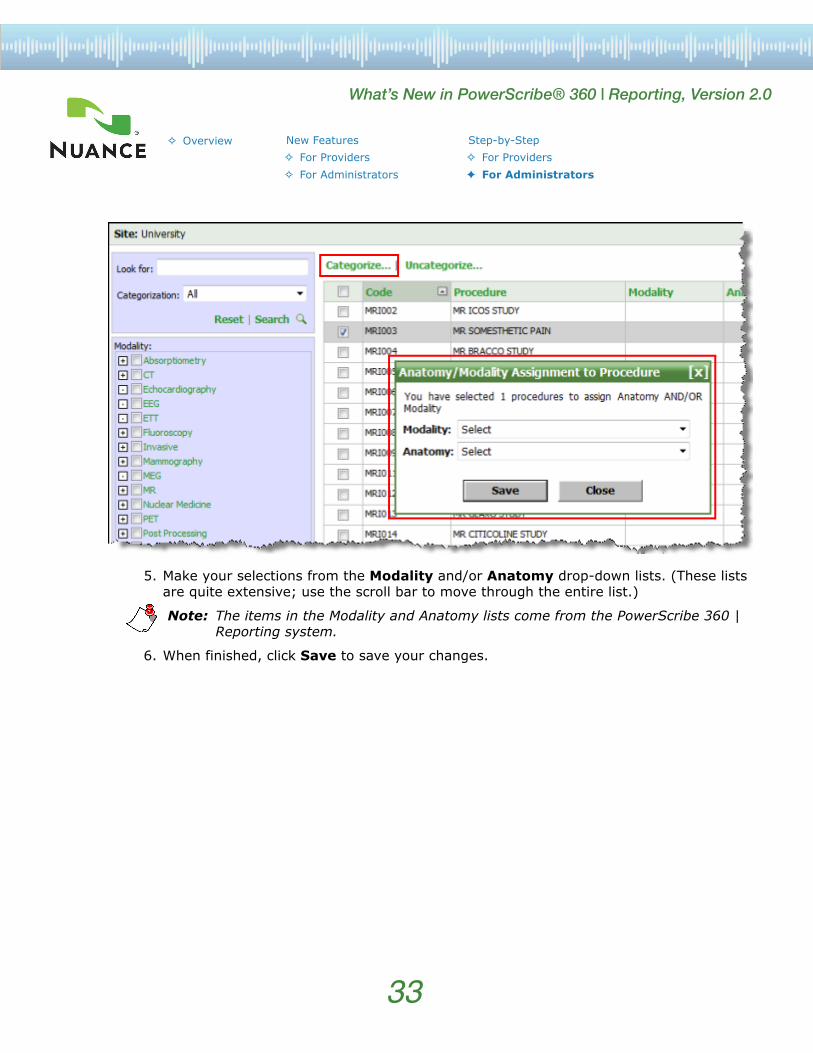
5. Make your selections from the Modality and/or Anatomy drop-down lists. (These lists are quite extensive; use the scroll bar to move through the entire list.)
Note: The items in the Modality and Anatomy lists come from the PowerScribe 360 | Reporting system.
6. When finished, click Save to save your changes.

34
What’s New in PowerScribe® 360 | Reporting, Version 2.0
G Overview New Features Step-by-StepG For Providers G For ProvidersG For Administrators F For Administrators
Manage Individual User AutoCorrect Rules
1. From the Admin Portal, click Setup > Accounts and select the user whose AutoCorrect rules you want to manage.
2. On the right side of the user account window, click the Preferences link, then select the AutoCorrect tab.
3. Perform any of the following tasks for this user’s AutoCorrect section:• Edit an existing AutoCorrect entry by clicking the Edit icon. You can change both the
Text and Replacement fields. And you can select or clear the Ignore Case check box.• Delete an existing AutoCorrect entry by clicking the Delete icon.• Add a new AutoCorrect entry by clicking the Create New icon
35
What’s New in PowerScribe® 360 | Reporting, Version 2.0
G Overview New Features Step-by-StepG For Providers G For ProvidersG For Administrators F For Administrators
• Select or clear the two available check boxes: Capitalize beginning of dictated sentences and Replace text during dictation.
4. When finished, click Save and Close to save your changes.

36
What’s New in PowerScribe® 360 | Reporting, Version 2.0
G Overview New Features Step-by-StepG For Providers G For ProvidersG For Administrators F For Administrators
New Features For Providers: Purchasable
DICOM Structured Reporting for PowerScribe 360 | ReportingDICOM (Digital Imaging and Communications in Medicine) is a global IT standard for handling, storing, printing, and transmitting information in medical imaging. The DICOM Bridge allows the PowerScribe 360 | Reporting system to communicate more easily with external systems and share data, in an industry standard format. It allows external vendors to send DICOM SR (Structured Report) objects to PowerScribe 360 | Reporting, and allows PowerScribe 360 | Reporting to query external systems for DICOM SR objects.
For more information on DICOM, refer to Nuance document P36A018, DICOM for PowerScribe 360 | Reporting 2.0.
Inserting DICOM Objects into a Report
You can insert DICOM objects by double-clicking an item in the DICOM list to insert it at your cursor’s current location.
Enable and Disable Individual Assure Consistency ChecksCustomers who purchased the Assure Consistency Checker option can now select which types of consistency checks they want to use.
If your administrator has configured your system for this feature, you can select any or all of the consistency check options.
For information on how to set these preferences, see Configuring the Assure Consistency Checks, beginning on page 37 of this document.
• DICOM SR for PowerScribe 360 | Reporting (4.3)• Enable and disable individual Assure consistency checks.

37
What’s New in PowerScribe® 360 | Reporting, Version 2.0
G Overview New Features Step-by-StepG For Providers G For ProvidersG For Administrators F For Administrators
Step-by-Step Instructions for Providers: Purchasable
Assure Consistency Checks
Configuring the Assure Consistency Checks
1. From the PowerScribe 360 | Reporting application, click Tools > Preferences. By default the Reporting > General section opens.
2. Click the arrow to the right of the Enable Assure consistency check types item and click the check box next to each item you want to select. To remove the check mark (which excludes the item), click the check box again.
3. When finished making your changes, click OK.
38
What’s New in PowerScribe® 360 | Reporting, Version 2.0
G Overview New Features Step-by-StepG For Providers G For ProvidersG For Administrators F For Administrators
Step-by-Step Instructions for Administrators: PurchasableRunning the Assure Consistency Check Report
To run this report:
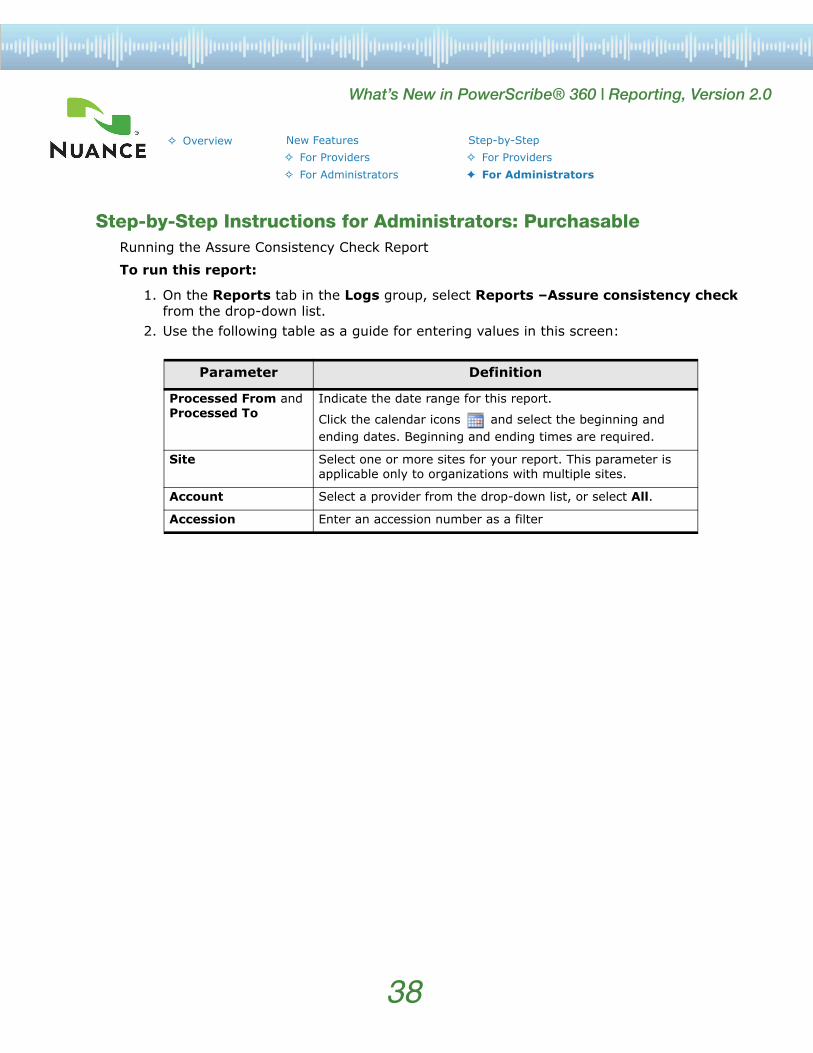
1. On the Reports tab in the Logs group, select Reports –Assure consistency check from the drop-down list.
2. Use the following table as a guide for entering values in this screen:
Parameter Definition
Processed From and Processed To
Indicate the date range for this report.
Click the calendar icons and select the beginning and ending dates. Beginning and ending times are required.
Site Select one or more sites for your report. This parameter is applicable only to organizations with multiple sites.
Account Select a provider from the drop-down list, or select All.
Accession Enter an accession number as a filter

39
What’s New in PowerScribe® 360 | Reporting, Version 2.0
G Overview New Features Step-by-StepG For Providers G For ProvidersG For Administrators F For Administrators
3. Click View Report.
The Reports—Assure consistency check report shows the following information:
• NUS Doc ID: A number automatically generated by the system. An additional NUS Doc ID is created each time Assure is run (in the client). For example, in the above illustration, the attending ran the consistency checker at two different times for the report with accession number 4438295.
• Accession: The identifying number assigned in the RIS• A: The addendum’s sequence number. For an original report, this column is blank.• Resident: Name of the resident who ran the Assure consistency checker• Attending: Name of the attending who dictated the report• Report Created: Date and time the report was created• Assure Check: Date and time the Assure consistency checker was run

40
What’s New in PowerScribe® 360 | Reporting, Version 2.0
G Overview New Features Step-by-StepG For Providers G For ProvidersF For Administrators
New Features for System Administrators: Purchasable
New PreferencesSeveral new preferences have been added to the Admin Portal. To access preferences, click Setup > System > Preferences. The following table shows the changes.
Note: Preferences that have a Type of Site can be configured at the site level. To configure site-level preferences, click Setup > Sites, select a site from the drop-down list in the upper-right section of the window, and click the Preferences link.
DICOM Structured Reporting for PowerScribe 360 | ReportingDICOM (Digital Imaging and Communications in Medicine) is a global IT standard for handling, storing, printing, and transmitting information in medical imaging. The DICOM Bridge allows the PowerScribe 360 | Reporting system to communicate more easily with external system and share data, in an industry standard format. It allows external vendors to send DICOM SR (Structured Report) objects to PowerScribe 360 | Reporting.
Tab Name Preference Description Type
Permissions Allow Assure consistency check Replaces Allow report consistency check Site
Peer Review Require comment for all peer review
See Require Comments for Peer Review Ratings 1 and 2, beginning on page 41 of this document for more information on this preference.
Site
Report Editing Enable Assure consistency check types
Choose any or all of the consistency checks. Account
• New preferences (relating to purchasable features)• DICOM SR for PowerScribe 360 | Reporting • Assure Consistency Check report • Peer Review enhancements
41
What’s New in PowerScribe® 360 | Reporting, Version 2.0
G Overview New Features Step-by-StepG For Providers G For ProvidersF For Administrators
Assure Consistency Check ReportThis report confirms whether the Assure consistency checker was run for a specific study. You can use this report in conjunction with Nuance Technical Support or Nuance Professional Services groups to research further details on a specific run of the Assure consistency checker for a particular study.
Note that the Service URL and License ID (that appear in each report heading) are unique for each customer.
For information on running this report, see Step-by-Step Instructions for Administrators: Purchasable, beginning on page 38 of this document.
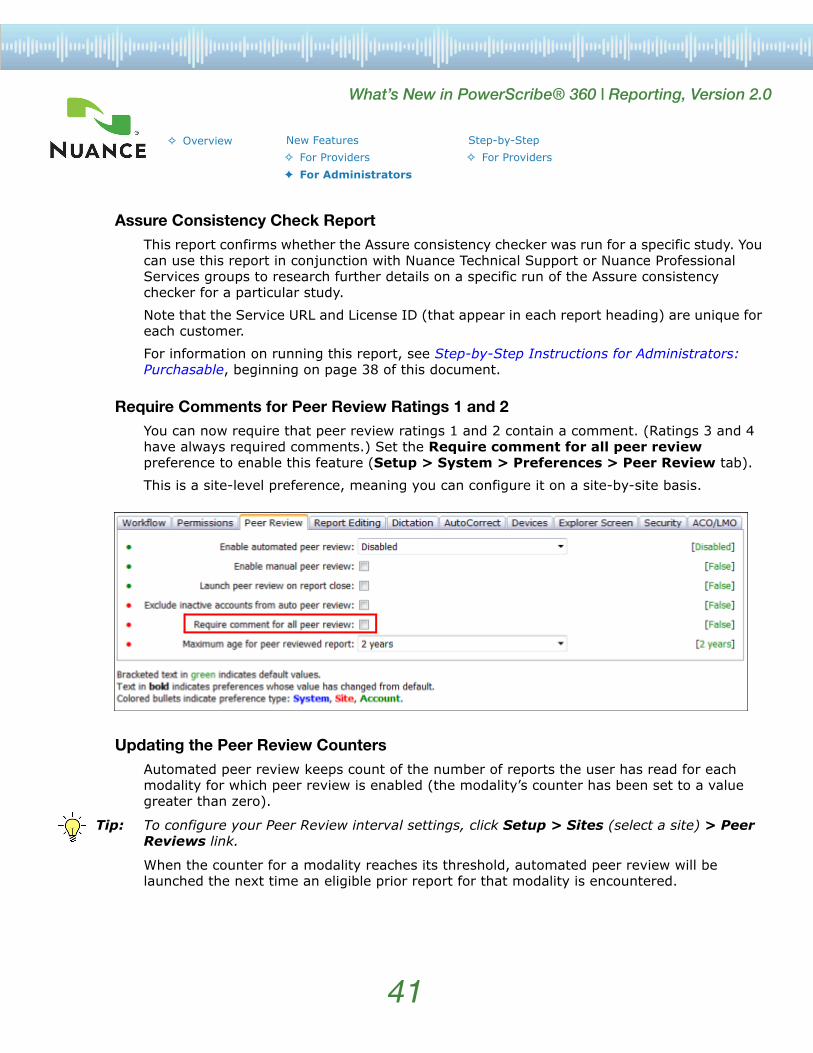
Require Comments for Peer Review Ratings 1 and 2You can now require that peer review ratings 1 and 2 contain a comment. (Ratings 3 and 4 have always required comments.) Set the Require comment for all peer review preference to enable this feature (Setup > System > Preferences > Peer Review tab).
This is a site-level preference, meaning you can configure it on a site-by-site basis.
Updating the Peer Review CountersAutomated peer review keeps count of the number of reports the user has read for each modality for which peer review is enabled (the modality’s counter has been set to a value greater than zero).
Tip: To configure your Peer Review interval settings, click Setup > Sites (select a site) > Peer Reviews link.
When the counter for a modality reaches its threshold, automated peer review will be launched the next time an eligible prior report for that modality is encountered.
42
What’s New in PowerScribe® 360 | Reporting, Version 2.0
G Overview New Features Step-by-StepG For Providers G For ProvidersF For Administrators
A prior report is considered eligible for peer review if it meets all of the following criteria:
• Comes from the same site• Created for the same patient• Same anatomy and modality• Does not have any non-Final addendums• Does not include the logged in radiologist as dictator, signer, or contributor• Is not dictated or signed by inactive users (if the Exclude inactive accounts from auto
peer review Site preference is enabled)• Is not older than the Maximum age for peer reviewed report Site preference setting• Has not already been peer reviewed
Incrementing peer review counters is now deferred to ensure that all radiologists will be eligible for automated peer reviews regardless of their workflow. A peer review counter increments at the earliest point in the workflow where the report is considered read by the radiologist.
Since incrementing the counter is now deferred, and is not related to the check to see whether it is time to launch an automated peer review, in some cases this might lead to the radiologist performing fewer automated peer reviews than desired. Therefore, some additional changes have been made to ensure that the radiologist does not get prompted too infrequently.
For example, in a new PowerScribe 360 | Reporting installation, there might not be enough prior reports in the system to trigger automated peer reviews on a regular basis. To prevent the scenario where the radiologist is repeatedly prompted to perform peer reviews when the counter reaches a very large value, an additional safety mechanism has been implemented: the counter will be capped at three times the interval. This will ensure that the radiologist is never prompted for more than three automated peer reviews in a row for a given modality.