what's new in d-show 2.8 - avid...
TRANSCRIPT

What’s New in VENUE D-Show®
2.8.1 SoftwareFor All VENUE Systems
Digidesign2001 Junipero Serra BoulevardDaly City, CA 94014-3886 USA
Technical Support (USA)
Visit the Digidesign Online Support Center atwww.digidesign.com/support
Product Information
For company and product information,visit us on the web at www.digidesign.com
Guide Part Number: 9321-61359-00 REV A 05/09

Legal Notices
This guide is copyrighted ©2009 by Digidesign, a division of Avid Technology, Inc. (hereafter “Digidesign”), with all rights reserved. Under copyright laws, this guide may not be duplicated in whole or in part without the written consent of Digidesign.
003, 003 Rack, 96 I/O, 96i I/O, 192 Digital I/O, 192 I/O, 888|24 I/O, 882|20 I/O, 1622 I/O, 24-Bit ADAT Bridge I/O, AudioSuite, Avid, Avid DNA, Avid Mojo, Avid Unity, Avid Unity ISIS, Avid Unity MediaNetwork, Avid Xpress, AVoption, AVoption|V10, Beat Detective, Bruno, Command|8, Control|24, D-Command, D-Control, D-Fi, D-fx, D-Show, DAE, Digi 002, Digi 002 Rack, DigiBase, DigiDelivery, Digidesign, Digidesign Audio Engine, Digidesign Intelligent Noise Reduction, Digidesign TDM Bus, DigiDrive, DigiRack, DigiTest, DigiTranslator, DINR, DV Toolkit, EditPack, Eleven, Impact, Interplay, M-Audio, MachineControl, Maxim, Mbox, MediaComposer, MIDI I/O, MIX, MultiShell, OMF, OMF Interchange, PRE, ProControl, Pro Tools M-Powered, Pro Tools, Pro Tools|HD, Pro Tools LE, QuickPunch, Reel Tape, Reso, Reverb One, ReVibe, RTAS, Smack!, SoundReplacer, Sound Designer II, Strike, Structure, SYNC HD, SYNC I/O, Synchronic, TL Space, Velvet, and X-Form are trademarks or registered trademarks of Digidesign and/or Avid Technology, Inc. All other trademarks are the property of their respective owners.
Product features, specifications, system requirements, and availability are subject to change without notice.
Guide Part Number 9321-61359-00 REV A 05/09
Comments or suggestions regarding our documentation?email: [email protected]

Contents
Chapter 1. Introduction . . . . . . . . . . . . . . . . . . . . . . . . . . . . . . . . . . . . . . . . . . . . . . . . . . . . . . . . . . . . . . . . . . . . . . . . . . . 1
New Features in D-Show 2.8.1 . . . . . . . . . . . . . . . . . . . . . . . . . . . . . . . . . . . . . . . . . . . . . . . . . . . . . . . . . . . . . . . . . . . . 1
About www.digidesign.com . . . . . . . . . . . . . . . . . . . . . . . . . . . . . . . . . . . . . . . . . . . . . . . . . . . . . . . . . . . . . . . . . . . . . . 1
Chapter 2. Installing D-Show 2.8.1 Software . . . . . . . . . . . . . . . . . . . . . . . . . . . . . . . . . . . . . . . . . . . . . . . . . . . . . . . . 3
Installing D-Show Software. . . . . . . . . . . . . . . . . . . . . . . . . . . . . . . . . . . . . . . . . . . . . . . . . . . . . . . . . . . . . . . . . . . . . . . 3
Loading and Converting Show Files . . . . . . . . . . . . . . . . . . . . . . . . . . . . . . . . . . . . . . . . . . . . . . . . . . . . . . . . . . . . . . . . . 6
Chapter 3. New Features . . . . . . . . . . . . . . . . . . . . . . . . . . . . . . . . . . . . . . . . . . . . . . . . . . . . . . . . . . . . . . . . . . . . . . . . . . 7
Solo and Monitor Mixing . . . . . . . . . . . . . . . . . . . . . . . . . . . . . . . . . . . . . . . . . . . . . . . . . . . . . . . . . . . . . . . . . . . . . . . . 7
Snapshots and Events . . . . . . . . . . . . . . . . . . . . . . . . . . . . . . . . . . . . . . . . . . . . . . . . . . . . . . . . . . . . . . . . . . . . . . . . . . 8
Miscellaneous New Features . . . . . . . . . . . . . . . . . . . . . . . . . . . . . . . . . . . . . . . . . . . . . . . . . . . . . . . . . . . . . . . . . . . . 10
Other Recently Added Features . . . . . . . . . . . . . . . . . . . . . . . . . . . . . . . . . . . . . . . . . . . . . . . . . . . . . . . . . . . . . . . . . . 11
Contents iii

HDx TDM Record/Playback Option Guideiv

Chapter 1: Introduction
Welcome to VENUE D-Show® software version 2.8.1 for VENUE D-Show, VENUE Profile™, VENUE Mix Rack, and VENUE SC48™ systems.
This guide explains the new features in D-Show 2.8.1, and pro-vides installation instructions for upgrading your current ver-sion of D-Show software to version 2.8.1.
New Features in D-Show 2.8.1
Solo and Monitor Mixing• Cue on Mains Fader
• Cue on Output Encoder (VENUE SC48 only)
Snapshots and Events• Snapshot Crossfade Pan
• New Event Action for Cue on Mains
Mix Rack
The following is available on systems that include a VENUE Mix Rack:
• Expanded Input Channel Configurations
About www.digidesign.comThe Digidesign website (www.digidesign.com) is your best on-line source for information to help you get the most out of your Pro Tools system. The following are just a few of the ser-vices and features available.
Product Registration Register your purchase online.
Support and Downloads Contact Digidesign Technical Support or Customer Service; download software updates and the lat-est online manuals; browse the Compatibility documents for system requirements; search the online Answerbase or join the worldwide Pro Tools community on the Digidesign User Conference.
Training and Education Study on your own using courses avail-able online or find out how you can learn in a classroom set-ting at a certified Pro Tools training center.
Products and Developers Learn about Digidesign products; download demo software or learn about our Development Partners and their plug-ins, applications, and hardware.
News and Events Get the latest news from Digidesign or sign up for a Pro Tools demo.
Pro Tools Accelerated Videos Watch the series of free tutorial videos. Accelerated Videos are designed to help you get up and running with Pro Tools and its plug-ins quickly.
Live Sound Webinars Watch free tutorial videos and VENUE-specific webinars to learn from the experts.
To learn more about these and other resources available from Digidesign, visit the Digidesign website (www.digide-sign.com).
Chapter 1: Introduction 1

What’s New in D-Show 2.8.12

Chapter 2: Installing D-Show 2.8.1 Software
This chapter shows you how to install VENUE D-Show 2.8.1 to update or restore your VENUE system.
Installing D-Show SoftwareThe VENUE D-Show 2.8.1 installer lets you choose either of the following methods for installing the new software:
Update Upgrades the D-Show software and leaves User Set-tings, Shows and Presets intact.
Restore Completely erases the system drive and places a new install of D-Show software on the drive. It is recommended to perform a full system restore at least once per year in order to ensure optimal system drive performance.
Backing Up Current Settings
Whether you are performing an update or a full system re-store, you should back up any Console Settings, Show files and Presets on your system before installing D-Show software.
To back up the current D-Show settings:
1 Go to the Filing page and click the Transfer tab.
2 Connect a portable storage device (such as a USB key disk) to the system. The device appears above the right column of the Transfer page.
Plug-ins and software for the ECx option (if present) must be re-installed after performing either an Update or Restore.
The USB ports on the Mix Rack, FOH Rack, and SC48 are USB 2.0 ports. Use these ports to reduce the time needed for large transfers.
3 Do one of the following to select the type of data to transfer:
• To transfer all data, click the Console icon.
• To transfer Console Settings only, click the Settings icon.
• To transfer Show Folders, click the Show Folders icon.
• To transfer individual Shows, click the Shows icon.
• To transfer all Preset Folders, click the Preset Folders icon.
• To transfer Presets for individual items, click the Built-In icon or the Plug-In icon and choose a processor or plug-in from the pop-up menu. Or, choose D-Show Input Channel to transfer Input Channel Presets.
• To transfer Scope Sets for Recall Safe, click the Scope Sets icon.
4 In the left column, select the items you want to transfer from the VENUE system to your portable storage device.
5 Click the Transfer button.
Large transfers may take time. Transfer status is shown by a progress bar. A transfer may be cancelled by clicking Cancel.
6 Remove the portable storage device from the system.
Show files selected for transfer from D-Show to USB key disk
Cancelled transfers may result in partial folder contents on the storage device, which will have to be deleted manually.
Chapter 2: Installing D-Show 2.8.1 Software 3

Installing VENUE D-Show Software
To install D-Show 2.8.1 software:
1 Make sure all sound systems are shut down or muted.
2 Insert the D-Show 2.8.1 System Restore CD into the system CD-ROM drive.
3 Press the two Reset switches (on the front of the Mix Rack or FOH Rack, or on the back of the SC48) simultaneously to re-boot the system, then press and hold F10 on the keyboard un-til either of the following occur:
• If the system begins to boot off the System Restore CD, proceed to step 4.
• If the Restore CD text screen appears, release F10 and use the Up and Down Arrow keys to select the CD drive, then press Enter. This launches using the software on the in-serted System Restore CD. Continue to step 4.
4 Do one of the following to update or restore system soft-ware:
Update To update the system software while keeping any Show files and Preset files on the system, press “u” (lower-case). When the Update confirmation dialog appears, press Shift+U (upper-case) to proceed. Follow the on-screen in-structions to begin installation.
– or –
Restore To fully restore the system (completely removing all files on the system), press “r” (lower-case). (Or press “P” (up-per-case) to return to the previous screen.) When the Restore confirmation dialog appears, press Shift+R to proceed. Follow on-screen instructions to complete the system restore opera-tion.
When finished updating or restoring, the system restarts.
5 Update and install plug-ins as necessary. See “Reinstalling Plug-ins” on page 4.
Updating Firmware
During an update or system restore, the installer checks all connected hardware devices and automatically updates their firmware if necessary.
Some models of USB keyboards require repeated pressing of F10 (holding it down in between pressings) to register.
It is recommended to perform a full system restore at least once per year in order to ensure optimal system drive perfor-mance.
When you perform an Update from a previous version of D-Show software, a backup of the previous Console Set-tings file is automatically saved in the Preserved Shows folder, accessible from the History tab.
What’s New in D-Show 2.8.14
Reinstalling Plug-ins
The System Restore CD includes installers for factory-installed plug-ins only. Plug-ins must be re-installed after an Update or a System Restore, as follows:
• Factory-installed plug-ins can be re-installed immedi-ately after an Update or a System Restore using the in-stallers on the Console drive.
• Any previously installed plug-ins can be re-installed im-mediately after an Update (but not after a System Re-store).
• Any additional plug-ins from Digidesign or its Develop-ment Partners must be re-installed after an Update or a System Restore from their original installer disc.
To reinstall plug-ins:
1 Put the system into Config mode by pressing the Config switch.
2 If installing from a USB disk, insert the USB device into an available USB port. If installing from a CD-ROM, insert the in-staller disc into the CD-ROM drive.
3 Go to the Options page and click the Plug-Ins tab. The follow-ing two lists are shown:
Plug-Ins to Install This list shows available plug-in installers.
Installed Plug-Ins This list shows all plug-ins already installed on the system.
4 Click the Device Selector pop-up menu and do one of the following:
• Choose Previous Installs to access any plug-in installers af-ter a system update.
• Choose Console to access all factory-installed plug-in in-stallers after a system update or a full system restore.
• Choose an external storage device, as available, to access plug-in installers on any inserted USB media, or loaded in the system CD-ROM drive.
5 Select a plug-in from the Plug-Ins to Install list on the left by doing any of the following:
• Click to select a single installer.
• Shift-click to select multiple contiguous installers.
• Control-click to select or deselect installers one at a time.
6 Click Install to install the selected plug-ins. Once installed, plug-ins appear in the Installed Plug-Ins list on the right.
7 Repeat as necessary to re-install all plug-ins needed on the system.
Choosing a Device in the Options > Plug-Ins page
Device selector

Plug-In Version Checker
If you choose to install a plug-in for which there is a critical or recommended update, the system will ask you to confirm the installation procedure.
A similar dialog appears when attempting to replace an in-stalled plug-in with an older version of the same plug-in. Fol-low the instructions on-screen to install anyway, or cancel.
Installing Plug-ins Manually
If a plug-in does not appear in the Plug-Ins to Install list, it may not have a fully compatible VENUE installer and must be manually installed. This is required the first time you install the plug-in, and after using the System Restore CD to update or restore the system.
To install a plug-in manually:
1 Make sure all sound systems are shut down or muted.
2 Insert the plug-in installer disc into the system CD-ROM drive on the rack.
3 Go to the Options page and click the System tab.
4 Hold the Control key and click Shutdown Console on-screen. Follow on-screen directions to exit to the Desktop.
5 Copy the plug-in installer to the partition named User Data.
6 Launch the plug-in installer application and follow any on-screen directions. If prompted, do not restart the system from a plug-in installer. (Doing so will not harm the system, but will take longer, especially if you have multiple plug-ins to install manually.)
7 Quit the installer application and eject the installer disc.
8 Click the Return to D-Show shortcut on the desktop to re-launch the VENUE D-Show software. If prompted to restart the system, click Yes and wait for the system to restart.
Dialog shown when attempting to install a plug-in that has a known newer version.
For more information, see the Plug-Ins chapter of your VENUE Profile, D-Show, or SC48 Guide.
A plug-in without a VENUE installer may still be com-patible with your VENUE system. Consult the plug-in manufacturer for compatibility information.
9 Go to the Options page and click the Plug-Ins tab. Verify that the manually installed plug-in appears in the Console list of available plug-ins.
Installing the ECx Ethernet Option Software
The steps for installing ECx Ethernet Control software vary de-pending on whether you update or restore your system.
After Updating Your System
(D-Show 2.5 or Later with ECx Ethernet Control Only)
If you've previously installed ECx Ethernet Control on your system, and you are updating from D-Show 2.5 software or later, ECx can be re-installed immediately after you update your system.
To update ECx:
1 Update your VENUE D-Show software (do not perform a System Restore) and restart the system.
2 Put the system in Config mode by pressing the Config switch.
3 Go to the Options > System page, and click Update.
4 Follow the instructions on-screen to complete the Update.
After Restoring Your System
(All Systems)
If you performed a System Restore, or are updating from D-Show version 2.0 software or earlier, you may have to re-in-stall ECx manually from its installer disc.
To re-install ECx host software on D-Show:
1 Insert the ECx installer CD-ROM in the system CD-ROM drive.
2 Put the system in Config mode by pressing the Config switch.
3 Go to the Options > System page and click Update.
4 Click Yes to exit D-Show software and begin the installa-tion.
5 After the ECx software installation is complete, the system restarts.
Chapter 2: Installing D-Show 2.8.1 Software 5

Loading and Converting Show FilesVENUE systems can load Show files created with prior ver-sions of VENUE D-Show software.
D-Show software loads and automatically converts Show files created with earlier versions of D-Show software. It does not automatically convert the Show file saved on disk. The saved version 1.x or 2.x Show file can still be opened on a VENUE system running that earlier version, if needed.
To load and convert a Show file:
1 Transfer the Show file to the system if it is not already present.
2 Go to the Filing page and click the Load tab.
3 In the Show Folders column, click the name of the Show Folder containing the show file you want to load.
4 In the Shows column, click the name of the Show file you want to load. The Show file version appears in the Info win-dow.
5 Click the Load button.
D-Show software loads the file without affecting the saved Show file. Until you save the Show as a new file (or overwrite the original), the Show file will not be saved to disk in the newer VENUE D-Show format.
While the file is loading, D-Show software checks whether any saved data will have to be modified for the new file format.
Show File Compatibility
D-Show 2.8.1 Show files can be opened on VENUE Profile, VENUE D-Show or VENUE SC48 systems.
What’s New in D-Show 2.8.16
Data Conversion
Show files created with 2.0.x versions of D-Show software will be converted to 2.8.1 format when loaded into a system run-ning version 2.8.1. Conversion is necessary to support the new and changed features added in each release of D-Show software.
If you load a Show file saved in version 1.x on a system run-ning version 2.0 or higher, the following snapshot attributes may also be affected.
• Beginning with D-Show software 2.0 , Snapshots “store all” parameters. Previously, snapshots only stored data that was explicitly scoped for storage.
• Channel Delay is now stored separately, and has a dedi-cated Data Type Scope button in the Snapshots main page. Previously, channel Delay was stored as part of the larger Pre data type.
• VCA membership is now stored as part of the VCA chan-nel itself. Previously, VCA membership was stored with the channels assigned to each VCA.
Backwards CompatibilityOpening D-Show 2.8.1 Show Files on Previous D-Show 2.x Versions
Show files saved in software version 2.8.1 can be opened on any previous 2.x system. However, some attributes or features not present in the earlier version may not transfer.
Version 2.x Files are Not Compatible with D-Show 1.x
D-Show 2.x format Show files cannot be opened on VENUE systems running D-Show software 1.x.

Chapter 3: New Features
This chapter describes the following new or changed features:
Solo and Monitor Mixing
• “Cue on Mains” on page 7
• “Cue on Output Encoder” on page 8 (VENUE SC48 only)
Snapshots and Events
• “Adding Tempo Data to Snapshots” on page 8
• “Snapshot Crossfade Pan” on page 9
• “New Action to Toggle Cue on Mains” on page 10
Miscellaneous New Features
• “Miscellaneous New Features” on page 10 (VENUE SC48 only)
• “Expanded Input Channel Configurations for Mix Rack” on page 11 (Mix Rack only)
• “Cancelling VCA/Mute Group Show Members” on page 11
Solo and Monitor Mixing
Cue on Mains
The Mains fader can be assigned to control cue (Monitoring bus) output level. Enabling the Cue to Mains option lets you adjust solo PFL/AFL level without having to take your hands off the faders.
Control of the Mains busses are still available on the Output encoders and on-screen in the Outputs page.
The Cue on Mains setting is stored with the Show file.
To enable Cue on Mains:
1 On VENUE Profile and D-Show consoles, turn the Monitor-ing encoder fully counter-clockwise (off). This step is not nec-essary on VENUE SC48 consoles.
2 Go to the Options > Busses page.
3 Under Solo and Monitor Operations, select the Cue on Mains option.
The Mains fader now controls Monitoring level. The Mains Se-lect switch flashes quickly.
To exit Cue on Mains (return to normal):
Go to the Options > Busses page, then click to deselect the Cue on Mains option.
If the system has to enable Backup Personality mode while Cue on Mains is enabled, the Mains fader and Mute switch im-mediately revert to controlling Mains; Cue level can be con-trolled from the Monitoring control (Profile and D-Show) or on-screen (all systems). When normal operation is resumed, Cue on Mains assignment is restored.
Adjusting Mains
When Cue on Mains is enabled, the Mains output level re-mains at its last setting and remains accessible from the con-sole and on-screen, as follows:
Cue on Mains
The Monitoring encoder normally ranges from –127 dB to 0 dB. When using the Mains fader this range is extended to cover the standard fader range of –144 dB to +12 dB.
You can set up an Event to toggle Cue on Mains on or off. See “New Action to Toggle Cue on Mains” on page 10.
Cue on Mains Fader
Chapter 3: New Features 7

Adjusting Mains with the Output Encoders
On VENUE Profile and SC48 consoles, enabling Cue on Mains maps the Mains to Output encoders 1—3.
While Cue on Mains is active:
• Enabling Insert mode replaces the current Output en-coder assignments with insert controls.
• Banking to Matrix or PQ replaces the current Output en-coder assignments with the sources for the selected Ma-trix or PQ.
Adjusting Mains On-Screen
You can use the controls in the Outputs page on-screen to se-lect, mute, or adjust the level of any of the Mains busses (L, R and C/Mono).
You can select a Mains bus on-screen to target it in the ACS. Use the selected channel controls in the ACS to select, mute, or adjust the level of the Mains busses.
Using the Flex Channel (VENUE SC48 Only)
On VENUE SC48, the Flex Channel can be used to control the Mains bus.
To assign the VENUE SC48 Flex Channel to Mains while Cue on Mains is enabled:
1 Select the desired Mains bus by clicking it on-screen.
2 Press the Flex Channel Latch switch. The selected Mains bus is now at the Flex Channel.
Bus control while Cue on Mains is enabled (VENUE Profile shown)
On VENUE D-Show systems, Mains bus linking/unlinking and Safe controls are only available on-screen while Cue on Mains is enabled.
MainsL R C/M (or L C R)
Cue(Monitoring)
What’s New in D-Show 2.8.18
Cue on Output Encoder(VENUE SC48 Only)
On VENUE SC48, you can control Cue (Monitoring) level from the Output encoder section. Cue on Output Encoder is always enabled, but is available only when no other function is assigned to the Output encoders. Specifically, banking the Output section to Matrixes, Groups (if stereo), or enabling In-sert Mode replaces Cue on the encoders with Matrix input level, Group pan, or plug-in parameters, respectively.
Snapshots and Events
Adding Tempo Data to Snapshots
The Snapshots List can be toggled to display Tempo, along with a Tempo On/Off indicator for each snapshot entry.
Storing a tempo with snapshots lets your system tempo change per song or scene. This lets you take full advantage of Tempo Sync (aka Tap Tempo) to synchronize delay and echo plug-ins.
Displaying Tempo in the Snapshots List
To show Tempo in the Snapshots List:
Right-click anywhere in the Snapshots List and choose Show Tempo.
Tempo is displayed in BPM (beats per minute) or milliseconds, as set in the Options > Misc page.
To change the units for Tempo display:
1 Go to the Options > Misc page.
2 In the Tap Tempo section, click to select BPM or ms.
Assigning and Enabling a Tempo
Each snapshot can store a custom tempo value. You can man-ually enter a custom tempo, or use a shortcut to assign the cur-rent System Tempo. Use the Tempo Enable icon to enable or disable tempo recall when the associated snapshot is recalled.
To assign a Tempo value to a snapshot manually:
1 In the Snapshots List, double-click the Tempo value you want to change, then do one of the following:
• From the keyboard, type a new tempo value.
– or –
Snapshots List showing tempo

• Press the Up and Down Arrow keys to increase and de-crease the selected value.
2 Press Enter or click another snapshot Tempo value to con-firm the entry.
To assign the current System Tempo to a snapshot:
1 Make sure Tempo is shown in the Snapshots List.
2 Right-click and choose the Set Tempo to option, which will display the current System Tempo.
The System Tempo is set in the Options > Misc page. For de-tails on configuring the system tempo and using it to synchro-nize plug-ins, see the main guide that came with your system.
To toggle tempo on/off for each snapshot:
1 Make sure Tempo is shown in the Snapshots List (if not, right-click any item in the list and choose Show Tempo).
2 Click the Tempo icon so that it is lit (enabled) or unlit (dis-abled).
Snapshot Crossfade Pan
All snapshots provide a Croosfade setting that determines how long scoped faders will crossfade to the stored values in that snapshot when it is recalled. The Options > Snapshots page provides Snapshot General Preference settings for opti-mizing crossfades between snapshots.
Snapshots List showing tempo
Pan, Balance and Width Crossfade Parameter Reference
Default Time Defines a Crossfade time to apply to all new snapshots.
Pan, Balance & Width Enables pan, balance and width on scoped channels to crossfade.
Faders can be crossfaded on all channel types. Pan, balance, and width can crossfade on input channels, FX Returns, Groups, and PQ outputs. In order to crossfade, the desired channels must be scoped, and both Fader and Pan data types must also be scoped.
To configure snapshot crossfade:
1 Go to the Options page and click the Snapshots tab.
2 In the Snapshot General Preferences section, enter a non-zero value for Default Crossfade Time. Maximum cross-fade time is 99.9 seconds.
3 To have pan parameters follow the snapshot crossfade time, click to enable the Pan, Balance & Width setting. (See “Pan, Bal-ance and Width Crossfade Reference” on page 9.)
4 Go to the Snapshots page and make sure to scope the desired channels by clicking to select them in the fader display.
5 Click to scope Fader and/or Pan as needed in the appropriate snapshots.
Pan, Balance and Width Crossfade Reference
Snapshot preferences in the Options > Snapshots screen
Pan Balance Width
Inputs† Input Channel
Mono •
Stereo • •
FX Return Stereo • •
Output Mas-ters††
Aux Mono/Stereo-linked
PQ •
Matrix Mono/Stereo-linked
Groups Mono •
Stereo • •
Variable Groups Mono/Stereo-linked •
† Crossfade does not apply to Pan for channel Aux sends.
†† Crossfade does not apply to Pan for input sources within the Matrix or PQ mixer.Chapter 3: New Features 9
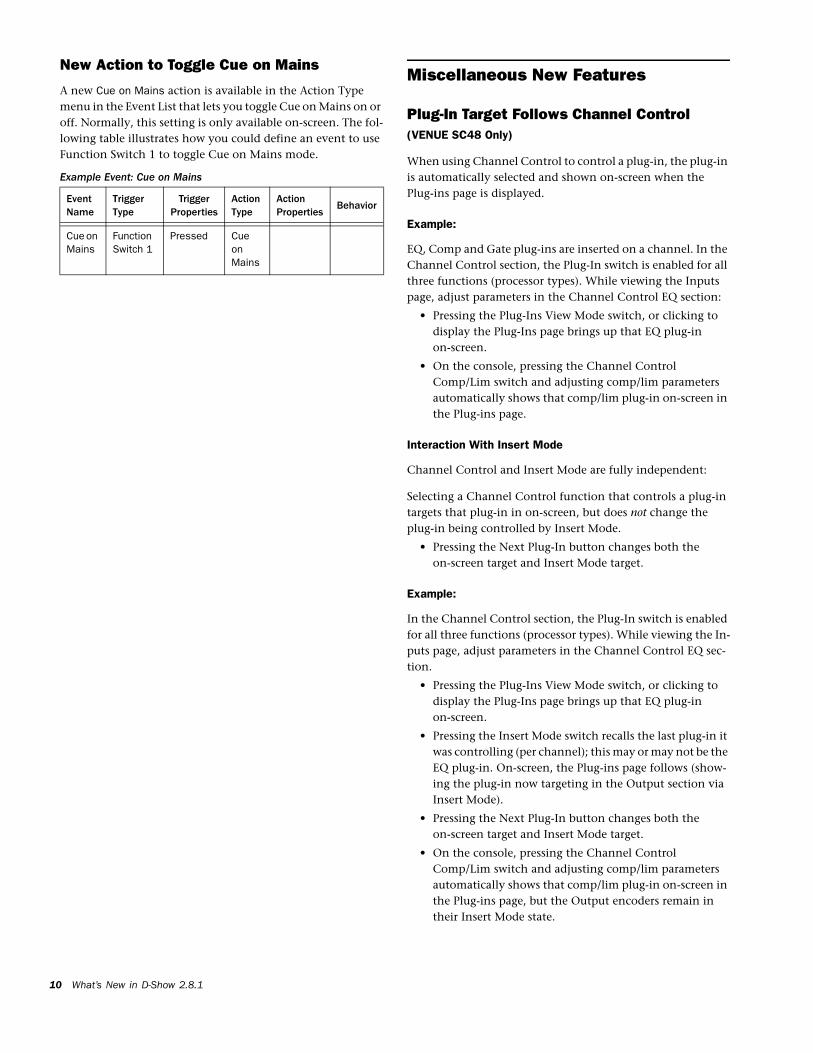
New Action to Toggle Cue on Mains
A new Cue on Mains action is available in the Action Type menu in the Event List that lets you toggle Cue on Mains on or off. Normally, this setting is only available on-screen. The fol-lowing table illustrates how you could define an event to use Function Switch 1 to toggle Cue on Mains mode.
Example Event: Cue on Mains
Event Name
Trigger Type
Trigger Properties
Action Type
Action Properties
Behavior
Cue on Mains
Function Switch 1
Pressed Cue on Mains
What’s New in D-Show 2.8.110
Miscellaneous New Features
Plug-In Target Follows Channel Control (VENUE SC48 Only)
When using Channel Control to control a plug-in, the plug-in is automatically selected and shown on-screen when the Plug-ins page is displayed.
Example:
EQ, Comp and Gate plug-ins are inserted on a channel. In the Channel Control section, the Plug-In switch is enabled for all three functions (processor types). While viewing the Inputs page, adjust parameters in the Channel Control EQ section:
• Pressing the Plug-Ins View Mode switch, or clicking to display the Plug-Ins page brings up that EQ plug-in on-screen.
• On the console, pressing the Channel Control Comp/Lim switch and adjusting comp/lim parameters automatically shows that comp/lim plug-in on-screen in the Plug-ins page.
Interaction With Insert Mode
Channel Control and Insert Mode are fully independent:
Selecting a Channel Control function that controls a plug-in targets that plug-in in on-screen, but does not change the plug-in being controlled by Insert Mode.
• Pressing the Next Plug-In button changes both the on-screen target and Insert Mode target.
Example:
In the Channel Control section, the Plug-In switch is enabled for all three functions (processor types). While viewing the In-puts page, adjust parameters in the Channel Control EQ sec-tion.
• Pressing the Plug-Ins View Mode switch, or clicking to display the Plug-Ins page brings up that EQ plug-in on-screen.
• Pressing the Insert Mode switch recalls the last plug-in it was controlling (per channel); this may or may not be the EQ plug-in. On-screen, the Plug-ins page follows (show-ing the plug-in now targeting in the Output section via Insert Mode).
• Pressing the Next Plug-In button changes both the on-screen target and Insert Mode target.
• On the console, pressing the Channel Control Comp/Lim switch and adjusting comp/lim parameters automatically shows that comp/lim plug-in on-screen in the Plug-ins page, but the Output encoders remain in their Insert Mode state.

Expanded Input Channel Configurations for Mix Rack(VENUE Systems with Mix Rack Only)
Systems that include a Mix Rack can configure the system for up to 64 input channels.
To change the Input Channel configuration:
1 Put the system into Config Mode.
2 Go to the Options page and click the System tab.
3 Click Edit.
4 Click the Input Channels selector and choose the desired number of Input Channels.
• Click Apply.
Cancelling VCA/Mute Group Show Members
VCA and Mute Group Show Members modes can be cancelled by pressing the flashing Cancel button.
Other Recently Added FeaturesFor information on these and other recently added features, refer to the most recent version of the guide for your VENUE console (VENUE D-Show, Profile, or SC48):
• VCA and Group Spill
• Stereo Linked Matrix Mixers
• Talkback, Osc, and 2-Track Routing
• Tap Tempo for Plug-ins
PDF copies of guides are available on your Standalone Soft-ware Installer disc, and from our website:
(www.digidesign.com)
Chapter 3: New Features 11

What’s New in D-Show 2.8.112


DIGIDESIGN2001 Junipero Serra BoulevardDaly City, CA 94014-3886 USA
TECHNICAL SUPPORT (USA)Visit the Digidesign Online Support Centerat www.digidesign.com/support
PRODUCT INFORMATIONFor company and product information,
www.digidesign.com
visit us on the web at www.digidesign.com