what's new - structural and civil engineering software · a new category in the powerpack for...
TRANSCRIPT

What's New 2018


What's New in GRAITEC Advance PowerPack 2018
3
Table of Contents
WELCOME TO GRAITEC ADVANCE POWERPACK FOR REVIT® 2018 ........................................................ 4
NEWS ..................................................................................................................................................... 5
1: Compliancy with Revit® 2017 and Revit® 2018 .............................................................................................. 5
2: Prepare Background Model ............................................................................................................................ 5
3: Link Background Model .................................................................................................................................. 7
4: Create Views .................................................................................................................................................. 8
5: Join & Unjoin Geometry .................................................................................................................................. 9
6: Pipe Insulation .............................................................................................................................................. 11
7: Structural Modelling ...................................................................................................................................... 13
8: New interface language: Russian ................................................................................................................. 14
IMPROVEMENTS ..................................................................................................................................... 15
1: Custom installation package ......................................................................................................................... 15
2: Quick dimension ........................................................................................................................................... 15
3: BIM Connect ................................................................................................................................................. 16

What's New in GRAITEC Advance PowerPack 2018
4
Welcome to GRAITEC Advance PowerPack for Revit® 2018 Improvements to the GRAITEC Advance PowerPack for Revit® 2018 cover requests of multiple categories of users and as a result, the new tools included in this version are applicable to a large variety of projects. These include, besides Structural and Architectural functionalities, a new set of tools dedicated to MEP models in particular.
As a consequence, it was necessary for the ribbon to be re-organized in order to include the new functionalities, for a user-friendly program interface. Since the new tools are embedded amongst the old ones, users are already familiar with the panels and the layout of the icons, and will still have the possibility to customize the ribbon depending on their own needs.
The version does, however, come with major change in the ribbon: the migration of the “Reinforcement” panel from PowerPack for Revit to the Reinforced Concrete BIM Designers application, as a result of users desire for a more compact reinforcement package, to include calculation, cage generation, drawings, reports and detailing, all in one place.

What's New in GRAITEC Advance PowerPack 2018
5
News
1: Compliancy with Revit® 2017 and Revit® 2018 The 2018 version of GRAITEC PowerPack for Revit® is compatible with both 2017 and 2018 versions of Autodesk Revit®. This also includes the BIM Connect plug-in, which can be installed separately from the PowerPack. All commands are available and fully functional on both versions of Revit®, as is the content provided at installation.
This version of PowerPack adds the possibility to install only certain elements, such as Family Manager, Link to excel and Watermark Manager.
2: Prepare Background Model It is a common practice for MEP and structural engineers to clean up the files they receive from the architects before linking them in their models. The new Prepare Background Model command in the PowerPack for Revit® was designed to clean up the architectural background file before linking it in the structural or MEP models.
Selecting the command brings up a pop-up menu with several options:
Source file: shows the path to the selected Revit project. Clicking the browsing button opens a dialog allowing the user to browse to a specific project path.
Step 1 - worksharing
Detach the file from the Central file: if checked, a separate independent file is created, preventing it to synchronize with the central file.

What's New in GRAITEC Advance PowerPack 2018
6
Step 2 - audit
Audit the file: if checked, PowerPack will instruct Revit to perform an audit on the file. The Audit function scans, detects, and fixes corrupt elements in the model. It does not provide feedback on which elements are fixed.
Step 3 - unnecessary views
Delete all views and sheets in the file except for active view: performs the described action.
Delete all views and sheets except for the floor plans and ceiling plans and active view: performs the described action.
Step 4 - unused elements
Purge all unused elements: if checked, unused views, families, and other objects from the project are removed to improve performance and reduce file size.
Step 5 - linked files
Remove all links: if checked, PowerPack will remove all the active links of the file.
Set all links to Overlay: if checked, the nested links will display according to the overlay reference type, which will not load nested models into the host model, so they will not display in the project.

What's New in GRAITEC Advance PowerPack 2018
7
3: Link Background Model Link Background Model is a new tool that links the architectural background file in the MEP or Structural model. Users can choose between different options, such as transferring project standards from the linked file, copying scope boxes from the background file and making the link room bounding.
Step 1 - link the background model
Background file: shows the path to the background Revit project file. Clicking the browsing button opens a dialog allowing the user to browse to a specific project path.
Step 2 - project standards
Transfer project standards: offers the possibility to transfer project standards, including: family types, line weights, materials, view templates and object styles, mechanical settings, piping and electrical settings, annotation styles, color fill schemes and fill patterns.
Step 3 - scope boxes
Copy scope boxes from the link to the current model: allows the user to either copy the scope boxes from the linked model in the main model, or ignore them.

What's New in GRAITEC Advance PowerPack 2018
8
Step 4 - room bounding
Make the link room bounding: allows to make the imported elements room bounding. To indicate that an element should be used to define the boundaries of a room for room area and volume computations, you must specify that the element is room-bounding.
Step 5 - levels
Align existing levels: performs the described action.
4: Create Views The new Create views feature allows users to rapidly and efficiently create views based on view templates. The selection of multiple levels and multiple view templates, including floor plans, ceiling plans and structural plans is possible. All views will be named based on the level and view template.
The Create plan views for levels dialog is divided in two sections:
The options in the Create section are related to the creation method and allow to choose between singular or multiple plan types to create. Every plan type has a related drop down menu from which the user can choose what view template to use for the specific view.

What's New in GRAITEC Advance PowerPack 2018
9
The drop-down menu lists all the templates loaded in the Revit file, allowing the user to easily generate views based on specific templates, which increases efficiency when dealing with specific company standards.
The options in the Create views for selected levels section show all the views that exist in the project, offering the Revit user the opportunity to choose what view to create, from all the views created in the file.
5: Join & Unjoin Geometry Join & Unjoin Geometry is a new feature designed to improve the laborious workflow of Revit when it comes to joining geometry and switching the join order of elements.
This is an automated function, allowing users to choose the type of element to join to another, and easily switch the order of the join condition.
The associated dialog features a number of options that the user can chose from to obtain the desired result:
What's New in GRAITEC Advance PowerPack 2018
10
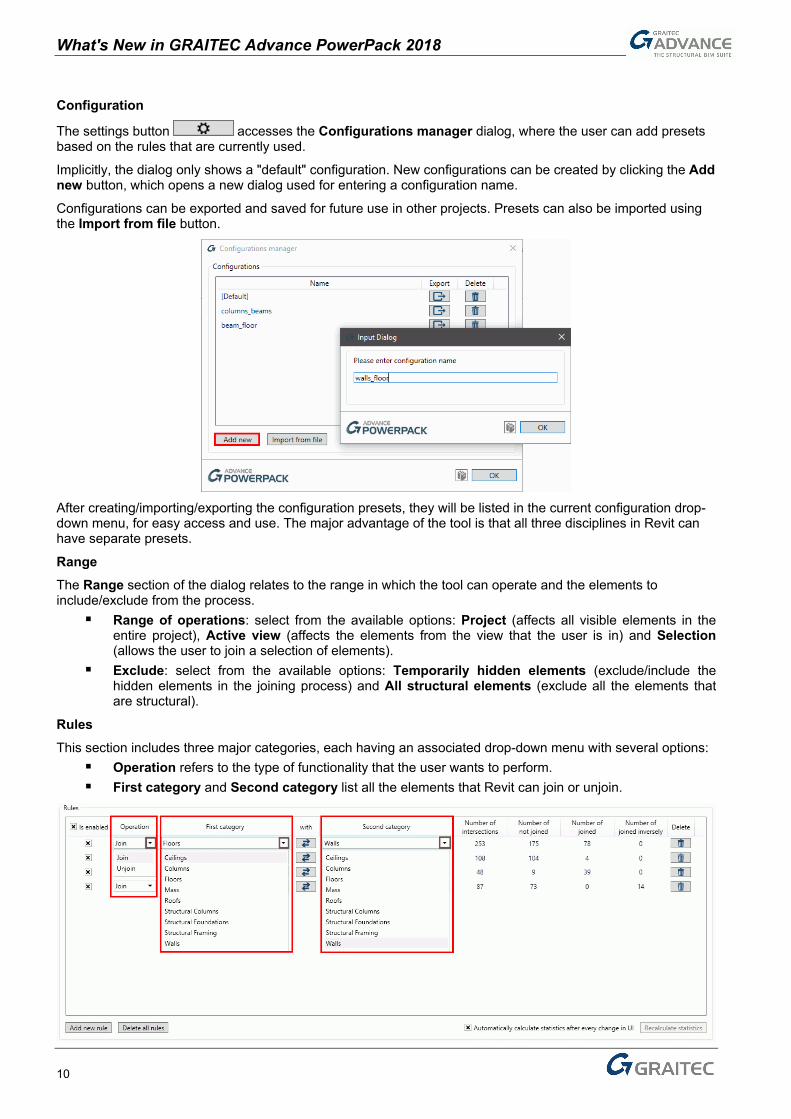
Configuration
The settings button accesses the Configurations manager dialog, where the user can add presets based on the rules that are currently used.
Implicitly, the dialog only shows a "default" configuration. New configurations can be created by clicking the Add new button, which opens a new dialog used for entering a configuration name.
Configurations can be exported and saved for future use in other projects. Presets can also be imported using the Import from file button.
After creating/importing/exporting the configuration presets, they will be listed in the current configuration drop-down menu, for easy access and use. The major advantage of the tool is that all three disciplines in Revit can have separate presets.
Range The Range section of the dialog relates to the range in which the tool can operate and the elements to include/exclude from the process. Range of operations: select from the available options: Project (affects all visible elements in the
entire project), Active view (affects the elements from the view that the user is in) and Selection (allows the user to join a selection of elements).
Exclude: select from the available options: Temporarily hidden elements (exclude/include the hidden elements in the joining process) and All structural elements (exclude all the elements that are structural).
Rules This section includes three major categories, each having an associated drop-down menu with several options: Operation refers to the type of functionality that the user wants to perform. First category and Second category list all the elements that Revit can join or unjoin.
What's New in GRAITEC Advance PowerPack 2018
11
To enable or disable a certain rule, select or deselect the corresponding check box under Is enabled. To swap the first category with the second category, click the button from the with column.
The last 4 columns in the Rules section display statistic information: Number of intersections, Number of not joined, Number of joined and Number of joined inversely.
Note: By default, this statistic information is automatically calculated after every modification of the information in the user interface. The function can be turned off by deselecting Automatically calculate statistics after every change in the UI. If this functionality is disabled, the user will be able to run the command whenever necessary, by clicking the Recalculate statistics button.
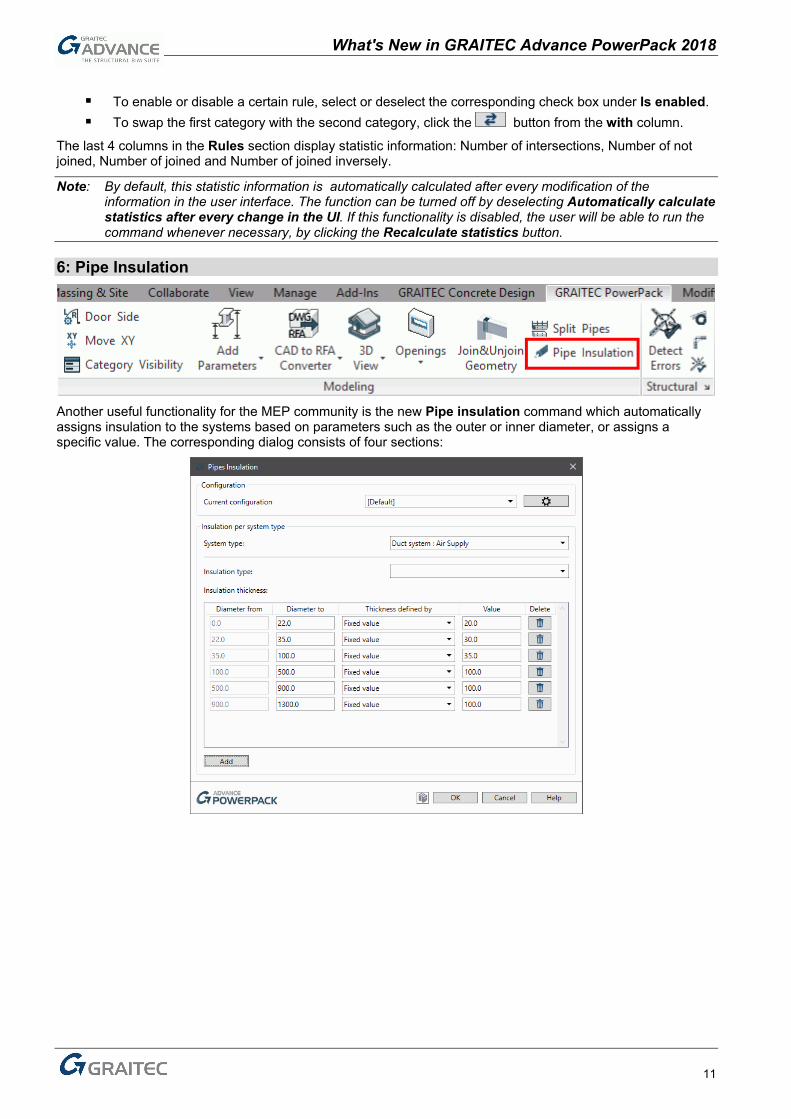
6: Pipe Insulation
Another useful functionality for the MEP community is the new Pipe insulation command which automatically assigns insulation to the systems based on parameters such as the outer or inner diameter, or assigns a specific value. The corresponding dialog consists of four sections:

What's New in GRAITEC Advance PowerPack 2018
12
Configuration
This section is used for saving configurations. The settings button accesses the Configurations manager dialog, where the user can add presets based on the rules that are currently used.
Implicitly, the dialog only shows a "default" configuration. New configurations can be created by clicking the Add new button, which opens a new dialog used for entering a configuration name. Configurations can be exported and saved for future use in other projects. Presets can also be imported using the Import from file button.
After creating/importing/exporting the configuration presets, they will be listed in the current configuration drop-down menu, for easy access and use. The major advantage of the tool is that all three disciplines in Revit can have separate presets.
Insulation per system type System type: the drop-down contains all Revit system types that can be insulated, allowing the user
to select a system type on which to apply the insulation. This function speeds up the long process of applying insulation to a large number of pipes.
Insulation type: the drop-down lists all pipe insulation materials present in the project.
Insulation thickness: lists a collection of parameters that can be added or deleted. The list of
parameters defines a set of functions in which the task can perform. For example, pipes with a diameter between 3.50 cm and 10 cm will be insulated based on a fixed value of 3.50 cm. The Diameter from parameter is locked and the user can not define a value for it. The Diameter to parameter is editable and allows users to input of a maximum diameter to define a specific range of pipe dimensions in which the command should perform.

What's New in GRAITEC Advance PowerPack 2018
13
7: Structural Modelling A new category in the PowerPack for Revit, named Structural, includes several tools used for verifying and correcting the analytical model of Revit projects and obtaining correct FEM results after exporting them into Advance Design.
The Detect Errors command points out elements that seem to be connected though, from a calculation point of view, they are not. It also points out nodes that are abnormally close to each other (i.e. the distance between the nodes is smaller than the tolerance). After applying the command, a dialog opens, listing all problematic nodes within the established tolerance.
Reset Analytical Models resets the manual adjustments of the analytical model (for all models or a selection).
Trim or Extend automatically trims or extends the extremities of close objects. However, it does not modify their axes, and does not affect elements that are not in the same plane).
Stretch to Node automatically stretches the closest extremities of selected elements to a reference point. To apply the function, click the Stretch to Node button, select the elements to be stretched, then select the reference node (pressing Enter after each selection). As a result, the elements will be properly connected.
An option menu for the structural tools can be accessed by clicking the arrow in the right corner of the Structural panel. The Structural Configuration dialog contains a set of parameters that define the range of operation of the tools.
What's New in GRAITEC Advance PowerPack 2018
14
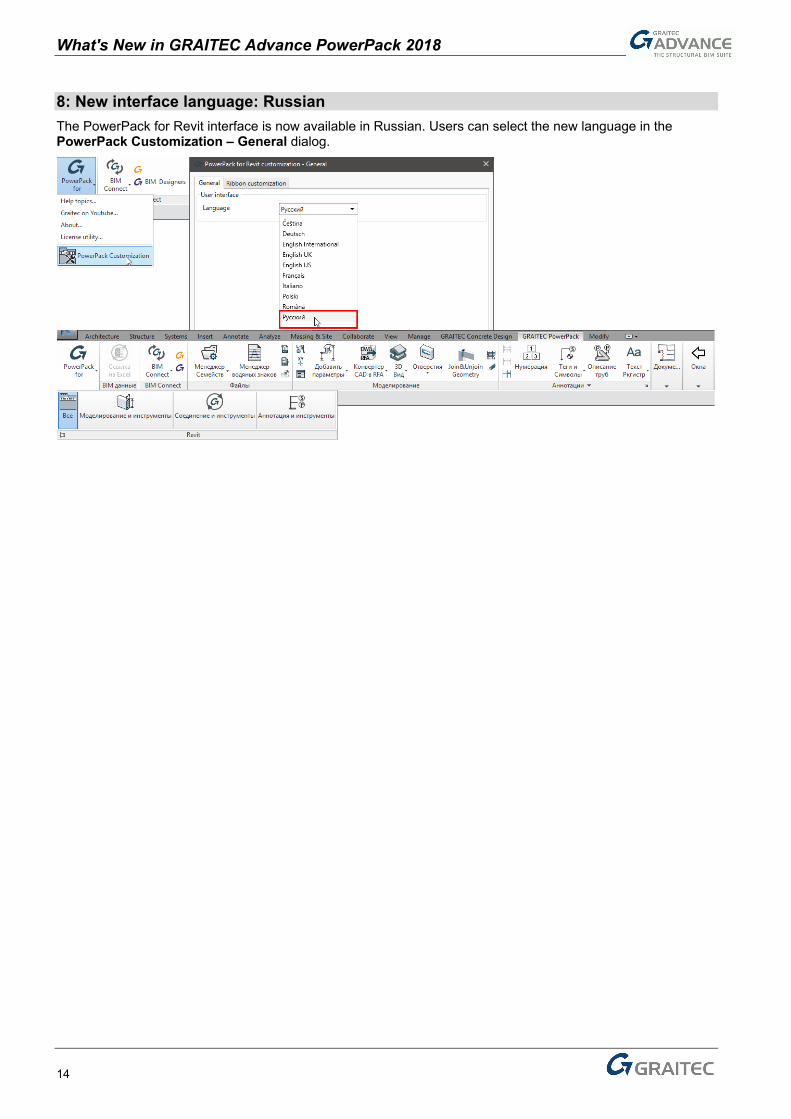
8: New interface language: Russian The PowerPack for Revit interface is now available in Russian. Users can select the new language in the PowerPack Customization – General dialog.
What's New in GRAITEC Advance PowerPack 2018
15
Improvements The 2018 version of the PowerPack for Revit comes with a series of improvements applied to the already existing commands, in order to optimize the behavior of the tools and fulfill the expectations of the users.
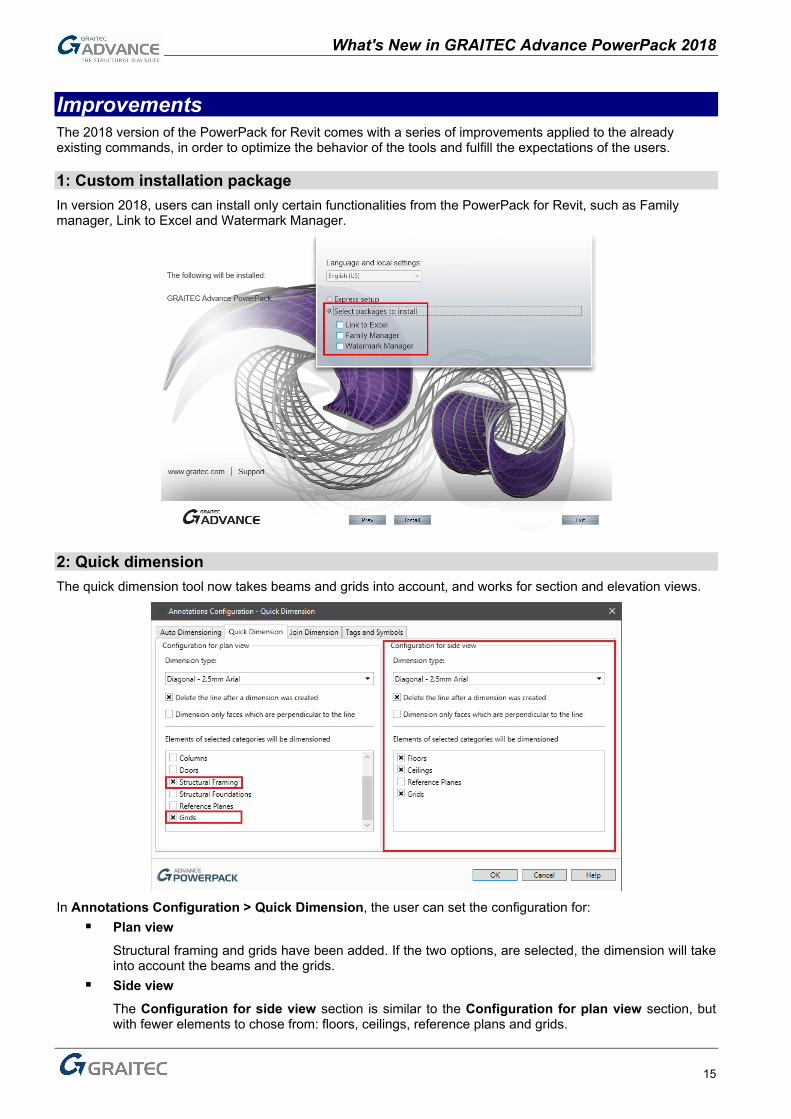
1: Custom installation package In version 2018, users can install only certain functionalities from the PowerPack for Revit, such as Family manager, Link to Excel and Watermark Manager.
2: Quick dimension The quick dimension tool now takes beams and grids into account, and works for section and elevation views.
In Annotations Configuration > Quick Dimension, the user can set the configuration for: Plan view
Structural framing and grids have been added. If the two options, are selected, the dimension will take into account the beams and the grids.
Side view The Configuration for side view section is similar to the Configuration for plan view section, but with fewer elements to chose from: floors, ceilings, reference plans and grids.

What's New in GRAITEC Advance PowerPack 2018
16
3: BIM Connect The 2018 version of the plug-in comes with improvements to the existing functionalities of BIM Connect.
GTC ID in the synchronization dialog One of the most useful changes is the possibility to display the GTC ID of each element in the synchronization dialog. As a new attribute available in the specific customization dialog, the GTC ID can be added to the synchronization table, offering precious information about elements that suffered any kind of change, for an easier and faster identification process.
Export improvements to Arche Building: Load Nature Starting with this version of BIM Connect, the nature of loads coming from Revit is kept regardless of the load names. As a result, a Live Load will be recognized and imported correctly into Arche Building regardless of the language:

What's New in GRAITEC Advance PowerPack 2018
17
Uniform Default settings for all languages The 2018 version of BIM Connect is installed with proper default options for Synchronization and Import of FEM results. Both corresponding options in the Settings dialog are now checked by default, allowing the user to automatically obtain results when importing or synchronizing projects from Advance Design:
These default values are kept in the computer’s registries, therefore, once set, they remain available until the a change is performed by the user.
