wheelchair seating & positioning guide...seating & positioning guide purpose of this guide...
TRANSCRIPT

WHEELCHAIR SEATING & POSITIONING GUIDEFOR LONG TERM CARE

Seating & Positioning Guide
www.comfortcompany.com
HELLO! I'M ANA ENDSJO
ABOUT ANAAna Endsjo has worked for over fourteen years as an occupational therapist in a variety of treatment settings, mainly with the geriatric population. Over the last eight years, she has been dedicated to the betterment of the treatment of the elderly in LTC centers. Her time was focused on seating and positioning and contracture management of the nursing home residents. With this experience, her hope is to guide other therapists, rehab directors, nurses, and administrators through blogs, webinars, and live courses in her role as Comfort Company's Clinical Education Manager for the long term care division.
Master of Occupational Therapy Nova Southeastern University
Bachelor of Nutrition and Dietetics University of Delaware

www.comfortcompany.com
Seating & Positioning Guide
PURPOSE OF THIS GUIDE
This guide is intended to shed some light on the mystery of seating and positioning in the LTC setting. The aim is to assist the LTC therapist obtain customized, optimal posture for each resident by:
• Understanding universal wheelchair terminology
• Identifying the abnormal postures created by poor wheelchair positioning
• Understanding how ill-fitting components lead to abnormal postures
• Identifying keys to a successful wheelchair evaluation in the LTC setting
Look for these blue boxes in the rest of the guide. They're Ana's quick tips or takeaways for that specific section.

Seating & Positioning Guide
1 www.comfortcompany.com
CHALLENGES OF WHEELCHAIR
POSITIONING IN LTC:
Getting approval for appropriate
chairs
Overused, worn out stock equipment
Time constraints
Cognitive issues
Varying experience levels among therapists
Resistant family members/residents
Lack of samples
to trial
Poor carryover upon discharge
Communication among departments
Lack of dealer
support
Multiple caregivers
Comorbidities
Lack of knowledge
about available equipment
resources
Despite knowing what is BEST for the resident, the above factors may prevent us from doing it!

2www.comfortcompany.com
Seating & Positioning Guide
TABLE OF CONTENTSGENERAL INFORMATION
Wheelchair Parts: Knowing the Universal Terminology
Wheelchair Options: Features & Limitations
PROBLEMSAbnormal Postures
Fixed vs Flexible Postural Abnormalities
Issues with the Current Wheelchair System can Cause Abnormal Posture
GOALS Seating Evaluation Goals
SOLUTIONS How to Measure for Properly Fitting Wheelchair Components
What Type of Cushion Should I Choose?
When Do I Choose a Specialized Back Support?
The Great Elevating Legrest Myth!
Accessories
Conclusion
Glossary
3
4
9
18
19
31
33
44
47
52
55
59
60

Seating & Positioning Guide
3 www.comfortcompany.com
WHEELCHAIR PARTS: KNOWING THE UNIVERSAL TERMINOLOGY
Handgrip
Armrest
Foot Plate
Front Rigging
Side Panel
Seat Upholstery
Caster Wheel Fork
Wheel Lock
Handrim
Rear Wheel
Back Upholstery
Canes

4www.comfortcompany.com
Seating & Positioning Guide
WHEELCHAIR OPTIONS: FEATURES & LIMITATIONS
WHAT CHAIR SHOULD I BUY FOR AN LTC RESIDENT?
The cheapest option is often NOT the best option.
Look for that ONE chair with MAXIMUM ADJUSTABILITY to fit multiple body types.
STANDARD WHEELCHAIR OPTIONSVery Minimal Adjustability Minimal Adjustability Most Adjustability
K0001/K0002 K0003 K0004
NON-STANDARD WHEELCHAIR OPTIONS
Minimal Adjustability Minimal Adjustability Most Adjustability
Gerichair Recline/High Back Chair Tilt-in-Space
WHEELCHAIR KEYK0001: Standard Wheelchair
K0002: Standard Hemi Wheelchair
K0003: Lightweight Wheelchair
K0004: High Strength, Lightweight Wheelchair

Seating & Positioning Guide
5 www.comfortcompany.com
STANDARD WHEELCHAIR COMPARISON CHART
*Features vary according to model.
K0001: Standard
K0002: Standard Hemi
Height
K0003: Lightweight
K0004: High Strength, Lightweight
Chair Weight without Legrests >35 lbs >35 lbs 33 - 35 lbs 30 - 34 lbsSeat Width: Standard 16", 18", 20" 16", 18", 20" 16", 18", 20" 16", 18", 20", 22"Seat Depth: Standard 16" 16" 16", 18" 16", 18", 20"Weight Capacity 300 lbs 300 lbs 300 lbs 300 lbsBack Height 18" 18" 18" 16" to 20"Lowest Achievable Seat-to-Floor Height 21" 19" 17" 14.5"Adjustability to accommodate for postural abnormality:
Armrest Height No No No YesBack Height No No No YesSeat-to-Back Angle No No No YesAbility to create a Fixed Tilt No No No YesSeat-to-Floor Height (STFH) No Hemi Height Only Yes Yes
Armrest Options
Desk Length Yes Yes Yes YesFull Length Yes Yes Yes Yes
Legrest Options
Standard Yes Yes Yes YesElevated (ELR) Yes Yes Yes YesSwing-Away Yes Yes Yes Yes
Meant for Long Term Sitting No No No Yes

6www.comfortcompany.com
Seating & Positioning Guide
K0001: Standard
K0002: Standard Hemi
Height
K0003: Lightweight
K0004: High Strength, Lightweight
Chair Weight without Legrests >35 lbs >35 lbs 33 - 35 lbs 30 - 34 lbsSeat Width: Standard 16", 18", 20" 16", 18", 20" 16", 18", 20" 16", 18", 20", 22"Seat Depth: Standard 16" 16" 16", 18" 16", 18", 20"Weight Capacity 300 lbs 300 lbs 300 lbs 300 lbsBack Height 18" 18" 18" 16" to 20"Lowest Achievable Seat-to-Floor Height 21" 19" 17" 14.5"Adjustability to accommodate for postural abnormality:
Armrest Height No No No YesBack Height No No No YesSeat-to-Back Angle No No No YesAbility to create a Fixed Tilt No No No YesSeat-to-Floor Height (STFH) No Hemi Height Only Yes Yes
Armrest Options
Desk Length Yes Yes Yes YesFull Length Yes Yes Yes Yes
Legrest Options
Standard Yes Yes Yes YesElevated (ELR) Yes Yes Yes YesSwing-Away Yes Yes Yes Yes
Meant for Long Term Sitting No No No Yes

Seating & Positioning Guide
7 www.comfortcompany.com
SPECIALIZED WHEELCHAIR COMPARISON CHART
Recline/High Back Chair Tilt-in-SpaceChair Weight without Legrests 35 - 50 lbs >45 lbsSeat Width: Standard 16", 18", 20" 16", 18", 20"Seat Depth: Standard 16", 18", 20" 16", 18", 20"Weight Capacity 300 lbs 300 lbsBack Height 22" - 53" 24"Lowest Achievable Seat-to-Floor Height (STFH) 21" 17"Adjustability to accommodate for postural abnormality:
Armrest Height No YesBack Height No YesSeat Depth No YesSeat-to-Back Angle Yes YesAbility to create a Fixed Tilt No YesAngle Adjustable Foot Plates No YesSeat-to-Floor Height (STFH) Standard or Hemi Height 17" - 21"
Armrest OptionsDesk Length Yes YesFull Length Yes Yes
Legrest OptionsStandard Yes YesElevated (ELR) Yes YesSwing-Away Yes Yes
Meant for Long Term Sitting Yes YesAble to replace sling back with a specialty back support No YesFrame has built-in growth capability No YesAble to add a head support No YesTilt Angle Unable to Tilt 45°
Recline Range 90° - 180° Fixed recline using chair canes: 80° - 120°
*Features vary according to model.

8www.comfortcompany.com
Seating & Positioning Guide
A NOTE ON GERICHAIRS Gerichairs have evolved over the years. Older models, found in a number of facilities, have little to no adjustability while newer models have more built-in adjustability. Keep in mind that seat width and the back support still cannot be changed to fit the resident’s individual shape, limiting the therapist's ability to contour the seating system to the resident’s curvature.
Recline/High Back Chair Tilt-in-SpaceChair Weight without Legrests 35 - 50 lbs >45 lbsSeat Width: Standard 16", 18", 20" 16", 18", 20"Seat Depth: Standard 16", 18", 20" 16", 18", 20"Weight Capacity 300 lbs 300 lbsBack Height 22" - 53" 24"Lowest Achievable Seat-to-Floor Height (STFH) 21" 17"Adjustability to accommodate for postural abnormality:
Armrest Height No YesBack Height No YesSeat Depth No YesSeat-to-Back Angle Yes YesAbility to create a Fixed Tilt No YesAngle Adjustable Foot Plates No YesSeat-to-Floor Height (STFH) Standard or Hemi Height 17" - 21"
Armrest OptionsDesk Length Yes YesFull Length Yes Yes
Legrest OptionsStandard Yes YesElevated (ELR) Yes YesSwing-Away Yes Yes
Meant for Long Term Sitting Yes YesAble to replace sling back with a specialty back support No YesFrame has built-in growth capability No YesAble to add a head support No YesTilt Angle Unable to Tilt 45°
Recline Range 90° - 180° Fixed recline using chair canes: 80° - 120°

Seating & Positioning Guide
9 www.comfortcompany.com
ABNORMAL POSTURE
WHAT AM I LOOKING AT? WHAT IS THE BODY DOING THAT IT SHOULDN’T BE DOING?
With prolonged sitting, residents begin to shift their bodies into what is known as abnormal postures to seek stability and/or alleviate pain and pressure.
Abnormal Postures are grouped into 5 categories and are as follows:
• Anterior Pelvic Tilt (page 12) with lumbar lordosis; with or without neck hyperextension.
• Posterior Pelvic Tilt (page 13) with thoracic kyphosis; with or without forward neck flexion. Referred to as SACRAL SITTING.
• Pelvic Obliquity (page 15) with scoliosis; with or without lateral neck flexion.
• Pelvic Rotation (page 16) with rotation of the spine; with or without lateral neck flexion.
• Windswept Posture (page 17)
Understand what you are looking at and decide whether your goal is to correct or accommodate for the abnormal posture. (pg 18)

10www.comfortcompany.com
Seating & Positioning Guide
ASIS
ANATOMY REFRESHER
Sacrum
CervicalCurvature
ThoracicCurvature
LumbarCurvature
SacralCurvatureCoccyx
RIGHT LATERAL VIEW OF SPINE
RIGHT LATERAL VIEW OF PELVIC BONE
POSTERIOR VIEW OF PELVIS
Iliac Crest
SacrumIliac Crest
Anterior Superior Iliac Spine(ASIS)
Posterior Superior Iliac Spine(PSIS)
PSIS
Coccyx

Seating & Positioning Guide
11 www.comfortcompany.com
OPTIMAL POSTURE
What is the pelvis doing?
Pelvis in midline. ASIS & PSIS at equal height: no pelvic tiltL ASIS & R ASIS at equal height: no obliquityL ASIS & R ASIS at equal depth: no rotation
What is the spine doing?
Balanced and upright, no rotation, no lateral curvature. Normal lordosis in cervical and lumbar spine and normal kyphosis in thoracic spine creating the desired “S” shape.
What is the head doing?
Head is functionally upright with only mild forward/lateral flexion or rotation.
Goals Maintain proper alignment with a STANDARD cushion (pg 45) and back support.
OPTIMAL POSTURE
Neutral Pelvic Position

12www.comfortcompany.com
Seating & Positioning Guide
ANTERIOR PELVIC TILT
ANTERIOR PELVIC TILTWhat is the pelvis doing?
Pelvis sits with PSIS higher than the ASIS resulting in the anterior pelvic tilt.
What is the spine doing?
Excessive lordosis of the lumbar and cervical spine: the resident hyperextends his or her back over the sling back of the chair, placing him or her at risk to tip the chair backwards.
What is the head doing?
Excessive lordosis of cervical spine causes hyperextension of the neck and upward eye gaze.
Goals
Utilize a cushion and back support that maximizes contact with the seat surface for optimal pelvic and spinal stability and pressure redistribution.
Stability is the goal so provide a back support that is tall enough for the resident. Measure from seat surface to the top of shoulder.
Look for a moldable back support to conform to the curvature of the spine.
Anterior Pelvic Tilt

Seating & Positioning Guide
13 www.comfortcompany.com
POSTERIOR PELVIC TILT
Posterior Pelvic Tilt

14www.comfortcompany.com
Seating & Positioning Guide
POSTERIOR PELVIC TILT
What is the pelvis doing?
Pelvis sits with ASIS higher than the PSIS resulting in the posterior pelvic tilt which produces the sacral sitting posture.
What is the spine doing?
Excessive thoracic kyphosis, producing “C” shape spine
“Flattening out” of the lordosis of the cervical spine
“Flattening out” of the lordosis of the lumbar spine
What is the head doing?
Decreased lordosis in cervical spine, causingforward neck flexion & downward eye gaze to floor/lap
Goals
Use a cushion with medial and lateral contour to promote LE alignment and pelvic stability.
Ensure appropriate cushion depth to prevent resident from sliding forward seeking reduced pressure behind the knees.Add a rigid insert to prevent hammocking of the seat and cushion and keep the pelvis from collapsing into a posterior pelvic tilt.If FLEXIBLE: Try a cushion with tapered adductors to load the trochanters, stabilizing the pelvis in the resident's most neutral alignment. If FLEXIBLE: Use a cushion with an anti-thrust component to reduce forward sliding of the pelvis into posterior pelvic tilt.
If FIXED: Use and immersion style cushion that contours to the shape of the resident to promote maximum pressure redistribution, minimizing peak pressures.
If FIXED: Consider opening seat-to-back angle in conjunction with a fixed tilt in the wheelchair, to match the resident's ROM limitations and minimize forward sliding.
Refer to Page 18 for more information on Fixed and Flexible postures

Seating & Positioning Guide
15 www.comfortcompany.com
PELVIC OBLIQUITYWhat is the pelvis doing?
Pelvis sits with the L or R ASIS higher than the other, causing the raising up of one hip.
What is the spine doing?
When one side of the pelvis is raised higher than the other, the thoracic spine curves away from the higher side creating a scoliosis over time.
What is the head doing?
The neck will go into lateral flexion as if the person is dropping the ear to his or her shoulder. The lateral flexion will usually be towards the side where the hip is higher.
Goals
Pressure redistribution is the goal whether the deformity is FIXED or FLEXIBLE.
If FLEXIBLE: level the pelvis by building up the lower side.
If FIXED: accommodate for the deformity. Protect the bony prominences from pressure by "filling in" the higher side and immersing the lower side IT.
PELVIC OBLIQUITY

16www.comfortcompany.com
Seating & Positioning Guide
PELVIC ROTATION
PELVIC ROTATIONWhat is the pelvis doing?
Pelvis sits with L or R ASIS more forward than the other producing the rotation in the hips.
What is the spine doing?
The thoracic spine follows and rotates in the same direction as the pelvis. Therefore, if the right side of the pelvis is rotated more forward, the right side of the spine is rotated more forward as well.
What is the head doing?
The neck will go into lateral flexion as if the person is dropping the ear to his or her shoulder.
Goals
Stabilize the pelvis in the resident’s most neutral position—adjusting for flexible or fixed postures— to prevent further pelvic rotation.Consider an anti-thrust to reduce forward migration of the pelvis. If FLEXIBLE: use tapered adductors and a medial abductor to create leg troughs for midline LE alignment and to maintain a pelvic neutral position.If FIXED: look for a cushion with less aggressive contouring. Protect the bony prominences with an immersion-style cushion.

Seating & Positioning Guide
17 www.comfortcompany.com
WINDSWEPT POSTURE
WINDSWEPT POSTUREWhat are the pelvis and LEs doing?
Usually goes hand in hand with a rotation or an obliquity and causes one leg to adduct and the other leg to abduct, presenting as if the legs were “swept” away together to one side of the chair.
What is the spine doing?
Will present usually with a rotation or scoliosis depending on the position of the pelvis.
What is the head doing?
The neck will go into lateral flexion and may be accompanied by forward flexion.
Goals
Look for a cushion that can be adjusted (built-up or minimized) to accommodate for internal rotation and adduction of one LE and external rotation and abduction of the opposite LE.
Avoid use of ELRs that decrease femoral contact with seat surface and promote windswept posture.
Windswept posture often accompanies either a rotation or an obliquity, so follow the goals for those underlying causes of this posture.

18www.comfortcompany.com
Seating & Positioning Guide
FIXED VS FLEXIBLE POSTURAL ABNORMALITIES
HOW DO I KNOW WHEN TO CORRECT THE POSTURAL ABNORMALITY AND WHEN TO ACCOMMODATE FOR IT?
Each abnormality is either FIXED or FLEXIBLE. Understanding whether the postural abnormality is fixed or flexible helps
decide if we need to ACCOMMODATE for or to CORRECT the postural abnormality.
FIXED = ACCOMMODATEWhen a posture is FIXED, the skeleton does not move out of that posture. The resident needs equipment that will ACCOMMODATE for the fixed posture, providing optimal support and pressure redistribution.
GOAL = Prevention of further progression
FLEXIBLE = CORRECT When a posture is FLEXIBLE, the skeleton still moves and equipment should be chosen with the goal to CORRECT the abnormal posture.
GOAL = Prevention from becoming a fixed posture

Seating & Positioning Guide
19 www.comfortcompany.com
ISSUES WITH THE CURRENT WHEELCHAIR SYSTEM CAN CAUSE ABNORMAL POSTURE
HOW DOES AN IMPROPERLY FITTING WHEELCHAIR IMPACT MY RESIDENT’S POSTURE?
The wheelchair can definitely be at fault when the resident is sitting in one of the five abnormal postures. Here is a closer
look into seating dimensions and how an ill-fitting wheelchair component can be the culprit behind the body moving into unwanted, harmful postures.
• Seat Dimension Issues: Pages 20 - 22
• Seat-to-Floor Height Issues: Pages 23 - 24
• Back Support Issues : Pages 25 - 26
• Legrest Issues: Pages 27 - 28
• Armrest Issues: Page 29
• Head Support Issues: Page 30
What is going on? What can you do?
Use this column as your problem list in your evals.
This column gives you ways to address the issues present. Letters referenced correspond to measuring guide pages 35 - 43. Use those measurements to find the appropriate wheelchair dimension to fit your resident's body size.

20www.comfortcompany.com
Seating & Positioning Guide
SEAT DIMENSIONWheelchair seat width and depth are crucial
to proper pelvic and LE alignment
HAMMOCKING SEAT SLINGWhat is going on? Negative Result What can you do?
Pelvis collapses Posterior pelvic tilt aka sacral sitting Add Rigid Insert
Resident seeks out one side of wheelchair for stability Pelvic obliquity Add Rigid Insert
Resident compensates by rotating pelvis for stability Pelvic rotation Add Rigid Insert
LEs “sweep” to one side Windswept posture of LEs Add Rigid Insert
WIDTH: TOO NARROW
What is going on? Negative Result What can you do?
Excess pressure at trochanter from contact with the chair
Wound risk at the trochanter
Measure hip width (C)
Look for a skin protection cushion that immerses the trochanters
Resident rotates hips to “fit” into the chair Pelvic rotation Measure hip width (C)
Resident ”sweeps” LEs to one side trying to avoid a buildup of pressure on the trochanters
Windswept posture of LEs
Measure hip width (C)
Find a cushion with medial abduction and lateral adduction contours to maintain LE alignment

Seating & Positioning Guide
21 www.comfortcompany.com
DEPTH: TOO DEEP
What is going on? Negative Result What can you do?
Seat sling digs into the back of legs causing pain
Resident will slide forward to alleviate the pain
Posterior pelvic tilt aka sacral sitting
Measure upper leg length (K) minus 2”
Seat sling digs into the back of legs decreasing circulation, increasing LE edema
Resident slides forward to alleviate numbness
Posterior pelvic tilt aka sacral sitting
Measure upper leg length (K) minus 2”
Foot propulsion more difficult, resident slides forward for better heel strike
Posterior pelvic tilt aka sacral sitting
Measure upper leg length (K) minus 2”
Resident will slide forward immediately after repositioning
Posterior pelvic tilt aka sacral sitting
Measure upper leg length (K) minus 2”
SEAT DIMENSIONWIDTH: TOO WIDE
What is going on? Negative Result What can you do?
Resident leans to one side to increase stability. Pelvis will be lower on that side
Pelvic obliquity Measure hip width (C)
Pelvis collapses Posterior pelvic tilt aka sacral sitting Measure hip width (C)
Pelvic collapse causes hips to internally rotate and LEs to excessively adduct
Strain & contracture risk at hip joints
Wound risk at medial knees where knees rub together
Find a cushion with medial abduction and lateral adduction contours to maintain LE alignment
LEs ”sweep” to one side when LE weakness is present
Windswept positioning of LEs
Measure hip width (C)
Find a cushion with medial abduction and lateral adduction contours to maintain LE alignment
Use a MWC that has seat depth adjustability: K0004

22www.comfortcompany.com
Seating & Positioning Guide
DEPTH: TOO SHALLOW
What is going on? Negative Result What can you do?
Decreased femoral contact and LE support
Windswept posture, abduction, or adduction of LEs
Measure upper leg length (K) minus 2”
Find a cushion with medial abduction and lateral adduction contours to maintain LE alignment
Reduced area for pressure redistribution results in increased pressure at the ITs, sacrum and coccyx
Wound risk at ITs, sacrum, and coccyx
Measure upper leg length (K) minus 2”
Look for a skin protection cushion that immerses and/or offloads the bony prominences
Pelvis collapses inward due to lack of LE support to ensure pelvic alignment
Hips internally rotate and LEs excessively adduct
Strain & contracture risk at hip joints
Wound risk at medial knees where knees rub together
Measure upper leg length (K) minus 2”
Find a cushion with medial abduction and lateral adduction contours to maintain LE alignment
When any given seat dimension is incorrect, the ideal solution is to change out the wheelchair for one that's dimensions meet your resident's specific measurements. It may seem too easy but it really is true!
When LE alignment is an issue: think CONTOURS when choosing a cushion!

Seating & Positioning Guide
23 www.comfortcompany.com
SEAT-TO-FLOOR HEIGHT (STFH) STFH is crucial for proper pelvic alignment, LE alignment, and heel strike for self-propulsion
Wheelchair Model Achievable STFH Lower Leg Length Required to Fit MWC
K0001 21” 23” or longer
K0002 19” 21” or longer
K0003 17” - 19” 19” or longer
K0004 As low as 14.5” 16.5” or longer
STFH: TOO LOW
What is going on? Negative Result What can you do?
Legrests are shortened to compensate for lack of threshold clearance
Knees are then higher than the hips causing decreased femoral contact with the seat surface and LEs “sweep” to one side
Windswept positioning of LEs
Measure lower leg length (L)
Use a higher profile cushion
Find a cushion with medial abduction and lateral adduction contours to maintain LE alignment
Knees higher than hips increase peak pressure at ITs, sacrum, and coccyx
Wound risk at ITs, sacrum, and coccyx
Measure lower leg length (L)
Use a higher profile cushion
Look for a skin protection cushion that immerses and/or offloads the bony prominences
On a chair without legrests, feet can drag and get caught under chair during propulsion or transport
Resident can be thrown out of chair or injury to LEs can occur
Measure lower leg length (L)
Use a higher profile cushion
Use a MWC with STFH adjustability: K0004
The below is a quick reference to match lower leg length to wheelchair model for proper STFH

24www.comfortcompany.com
Seating & Positioning Guide
STFH: TOO HIGHWhat is going on? Negative Result What can you do?
Foot propulsion is more difficult so resident slides forward for better heel strike
Posterior pelvic tilt aka sacral sitting
Measure lower leg length (L)
Use a lower profile cushion
Increased pressure at distal thigh, increasing risk of LE edema, resident slides forward to reduce numbness and pain
Posterior pelvic tilt aka sacral sitting
Measure lower leg length (L)
Use a lower profile cushion
Resident rotates forward on one side for better heel strike of one foot
Pelvic rotationMeasure lower leg length (L)
Use a lower profile cushion
Feet “dangle”Increased internal rotation and adduction of hip
Measure lower leg length (L)
Use a lower profile cushion
Find a cushion with medial abduction and lateral adduction contours to maintain LE alignment
Resident slides forward to alleviate strain on pelvis and knees
Posterior pelvic tilt aka sacral sitting
Measure lower leg length (L)
Use a lower profile cushion
Choose a higher or lower profile cushion to compensate for incorrect STFH when switching out the MWC just isn’t an option!
TOO HIGH TOO LOW GOOD STFH
Refer to Page 39 for more information on measuring for proper STFH

Seating & Positioning Guide
25 www.comfortcompany.com
HEIGHT: TOO LOW This causes insufficient stability for a
resident with poor trunk strength and balanceWhat is
going on? Negative Result What can you do?
Resident slides down in the chair seeking more surface area for increased stability
Posterior pelvic tilt with kyphosis of the thoracic spine
Measure seat to top of shoulder (G) or Seat to inferior angle of scapula (H)
Provide an appropriately sized contoured back support for added stability that allows for immersion and envelopment of resident's curvature
Resident seeks out one armrest to gain more stability
Pelvic obliquity with scoliosis of the spine
Measure seat to top of shoulder (G) or Seat to inferior angle of scapula (H)
Provide an appropriately sized contoured back support for added stability that allows for immersion and envelopment of resident's curvature
Resident rotates spine and pelvis to seek out more stability on one side of the body
Pelvic rotation with rotation of the spine
Measure seat to top of shoulder (G) or Seat to inferior angle of scapula (H)
Provide an appropriately sized contoured back support for added stability that allows for immersion and envelopment of resident's curvature
BACK SUPPORT An appropriate back support can: align the spine,
provide pelvic stability, decrease risk of wound development and pain, and improve function
When choosing appropriate back support height, define your GOAL for the resident:
• IF positioning is the objective, then measure seat to top of shoulder height (G) to choose a back support that can provide optimal trunk stabilization.
• IF self-propulsion for a resident with good trunk strength is the goal, measure seat to inferior angle of scapula (H) for increased freedom of movement and access to the wheels.
Refer to the back support measuring guide on page 40 to address the following issues.

26www.comfortcompany.com
Seating & Positioning Guide
HEIGHT: TOO HIGH/TOO UPRIGHTWhat is
going on? Negative Result What can you do?
Resident with poor core strength will slide down to alleviate fatigue
Posterior pelvic tilt with kyphosis of the thoracic spine
Measure seat to top of shoulder (G) or Seat to inferior angle of scapula (H)
Open seat-to-back angle either through back support hardware or by adjusting the back canes in a MWC with that option
Provide an appropriately sized contoured back support for added stability that allows for immersion and envelopment of resident's curvature
Sitting too upright pushes the trunk forward resulting in instability
Anterior pelvic tilt with lumbar lordosis
Measure seat to top of shoulder (G) or Seat to inferior angle of scapula (H)
Open seat-to-back angle either through back support hardware or by adjusting the back canes in a MWC with that option
Provide an appropriately sized contoured back support for added stability that allows for immersion and envelopment of resident's curvature
Another reason to choose a K0004 MWC is the ability to adjust seat-to-back angle. This helps to alleviate fatigue of the trunk muscles and reduce the sensation of being pushed out of the chair.
G H
Refer to Page 40 for more on measuring for proper back support height

Seating & Positioning Guide
27 www.comfortcompany.com
USE OF ONLY ONE LEGREST
What is going on? Negative Result What can you do?
Pelvis on the side with the legrest is higher Pelvic obliquity Add second legrest if
positioning is your goal
One-legged heel strike for propulsion Pelvic rotation Add second legrest if
positioning is your goal
LEs will “sweep” toward the slide with the legrest
Windswept positioning of LEs
Add second legrest if positioning is your goal
LEGRESTProperly fitting legrests not only provide a place to rest the feet, they: • Stabilize the LEs for optimal pelvic and spine
alignment• Promote femoral contact for pressure redistribution
away from the bony prominences to reduce risk of wounds
Sometimes only one legrest is necessary but having only one can cause the above issues. We can’t have our cake and eat it too. When considering the addition of a second legrest, decide what is more important: one-legged propulsion OR the prevention of a postural abnormality.
UNEQUAL FOOT PLATE HEIGHTS
What is going on? Negative Result What can you do?
Unequal foot plate heights cause one side of the pelvis to be higher
Pelvic obliquity Adjust foot plate heights to be even
28www.comfortcompany.com
Seating & Positioning Guide
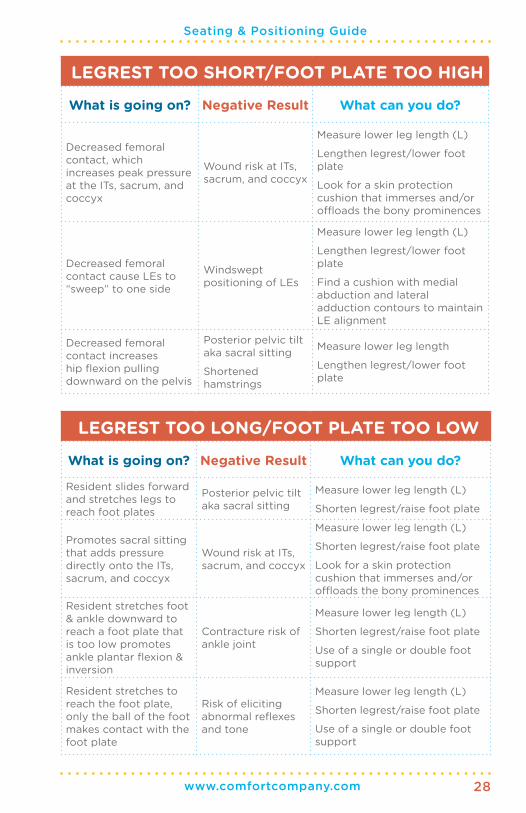
LEGREST TOO LONG/FOOT PLATE TOO LOW
What is going on? Negative Result What can you do?
Resident slides forward and stretches legs to reach foot plates
Posterior pelvic tilt aka sacral sitting
Measure lower leg length (L)
Shorten legrest/raise foot plate
Promotes sacral sitting that adds pressure directly onto the ITs, sacrum, and coccyx
Wound risk at ITs, sacrum, and coccyx
Measure lower leg length (L)
Shorten legrest/raise foot plate
Look for a skin protection cushion that immerses and/or offloads the bony prominences
Resident stretches foot & ankle downward to reach a foot plate that is too low promotes ankle plantar flexion & inversion
Contracture risk of ankle joint
Measure lower leg length (L)
Shorten legrest/raise foot plate
Use of a single or double foot support
Resident stretches to reach the foot plate, only the ball of the foot makes contact with the foot plate
Risk of eliciting abnormal reflexes and tone
Measure lower leg length (L)
Shorten legrest/raise foot plate
Use of a single or double foot support
LEGREST TOO SHORT/FOOT PLATE TOO HIGH
What is going on? Negative Result What can you do?
Decreased femoral contact, which increases peak pressure at the ITs, sacrum, and coccyx
Wound risk at ITs, sacrum, and coccyx
Measure lower leg length (L)
Lengthen legrest/lower foot plate
Look for a skin protection cushion that immerses and/or offloads the bony prominences
Decreased femoral contact cause LEs to “sweep” to one side
Windswept positioning of LEs
Measure lower leg length (L)
Lengthen legrest/lower foot plate
Find a cushion with medial abduction and lateral adduction contours to maintain LE alignment
Decreased femoral contact increases hip flexion pulling downward on the pelvis
Posterior pelvic tilt aka sacral sitting
Shortened hamstrings
Measure lower leg length
Lengthen legrest/lower foot plate

Seating & Positioning Guide
29 www.comfortcompany.com
ARMRESTProperly adjusted armrests serve many functions:
• A place to rest UEs
• Contribute to overall trunk stability and upright posture when muscle weakness is present
• Facilitates ease of transfers
HEIGHT: TOO LOW
What is going on? Negative Result What can you do?
Resident slides down in chair to make contact with armrests
Posterior pelvic tilt with kyphosis of the thoracic spine
Measure seat to elbow (I) and adjust armrest height accordingly
Resident leans to one side seeking more support Pelvis on that side will be lower
Pelvic obliquity with scoliosis of the spine
Measure seat to elbow (I) and adjust armrest height accordingly
Excessive shoulder depression to make contact with armrest allows gravity to pull at shoulder joint
Shoulder subluxation and dislocation in a resident with weak shoulder musculature
Measure seat to elbow (I) and adjust armrest height accordingly
HEIGHT: TOO HIGH
What is going on? Negative Result What can you do?
Excessive elevation of shoulder to place arms on armrests
Constant contraction of musculature causes fatigue, pain, numbness, and contracture risk
Measure seat to elbow (I) and adjust armrest height accordingly
Resident leans against armrest versus placing arm on armrest seeking stability
Lateral leaning of trunk Measure seat to elbow (I) and adjust armrest height accordingly
Resident leans to one side causing the pelvis on that side to be lower
Pelvic obliquity with scoliosis of the spine
Measure seat to elbow (I) and adjust armrest height accordingly
Use a MWC with armrest adjustability: K0004

30www.comfortcompany.com
Seating & Positioning Guide
TOO HIGH
What is going on? Negative Result What can you do?
The pad will rest on the occipital area or above, causing strain on the neck
Resident will try to adjust by moving the head away from the pad
Place pad in suboccipital area
TOO LOW
What is going on? Negative Result What can you do?
The pad will rest on the cervical spine, resulting in poor posterior support
Head extension Place pad in suboccipital area
Look for a head support that has maximum adjustability to support the head posteriorly and laterally simultaneously and is angle adjustable.
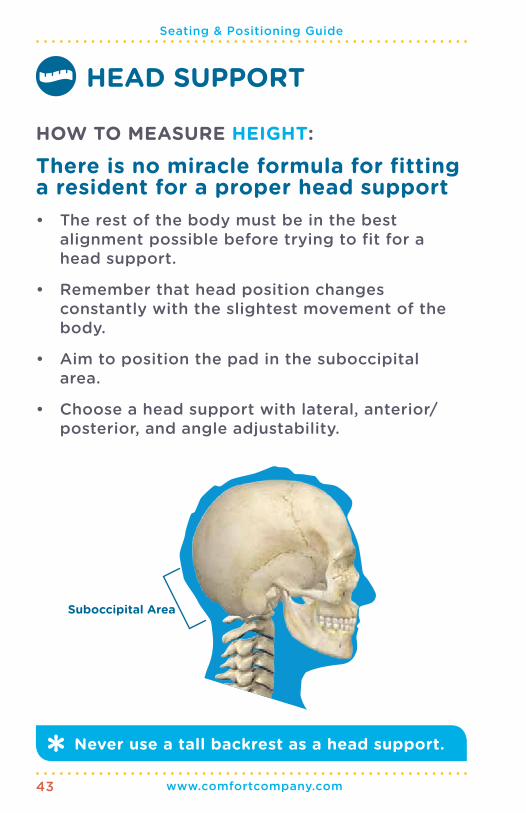
HEAD SUPPORTProper head support is important for: • Socialization and Communication• Safe Swallowing• Respiration• Attention to Task• MobilityA standard posterior head support pad should be positioned in the suboccipital area with the goal to prevent excessive extension, rotation, or lateral flexion.
Suboccipital Area

Seating & Positioning Guide
31 www.comfortcompany.com
Goals of a therapist when fitting a resident for a wheelchair
• Provide pelvic and trunk stability
• Maximum function for ADLs
• Protect skin and prevent wounds or heal existing wounds
• Maximum comfort for resident
• Minimize unwanted movement
• Correct or accommodate for postural abnormalities
• Prevent progression of postural abnormalities
WHAT SHOULD MY GOALS BE IN A SEATING EVALUATION?
SEATING EVALUATION GOALS

32www.comfortcompany.com
Seating & Positioning Guide
BE A 5 STAR Facility through achieving your seating and positioning goals
• Pass state inspections
• Reduce the incidence and cost of wound care
• Reduce the incident of injury due to falls from wheelchair level
• Maintain skin, skeletal, and muscular integrity and function
• Reduce the number of residents with a “decline in function” on quarterly screens
• Eliminate the temptation of using restraints
• Maximize the ability to participate in ADLs from wheelchair level
• Reduce the percentage of residents that report pain while sitting at wheelchair level
• Maximize quality of life

Seating & Positioning Guide
33 www.comfortcompany.com
HOW TO MEASURE FOR PROPERLY FITTING WHEELCHAIR COMPONENTS:
HOW IS A SEATING EVALUATION DIFFERENT THAN A TYPICAL OT/PT EVAL?
Don’t let the term “Seating Evaluation” scare you!!
• Conduct your evaluation as you would any other OT/PT eval in the nursing home to determine functional needs of the resident.
• Assess limitations in ROM, strength, balance and endurance and how they negatively affect posture in the wheelchair.
• Is there a postural abnormality? Decide if that postural abnormality is flexible or fixed: should your goal be to correct or accommodate for it?
• Choose an appropriate wheelchair model that allows for adjustability, seat cushion, back support, head support, and accessories to address the resident’s physical limitations.
• Use the measurement form provided to take key measurements.
• Match the wheelchair to the resident’s dimensions to ensure a proper fit.

34www.comfortcompany.com
Seating & Positioning Guide
Don’t forget to look for hip contractures and tight hamstrings during the evaluation. They are often the culprits of poor pelvic positioning!
Measuring Tips • All measurements should be taken while sitting on a
firm, flat surface in the posture the therapist is trying to accomplish for the resident.
• Measure using a hard measuring tape not one that can bend and wrap around the patient’s body. That will lead to measurement errors, adding circumference or length.
• All measurements should be taken straight across the body.
• Use a measurement form to remind you of the measurements needed to be taken and to record them properly.
Seating & Positioning Guide
35 www.comfortcompany.com
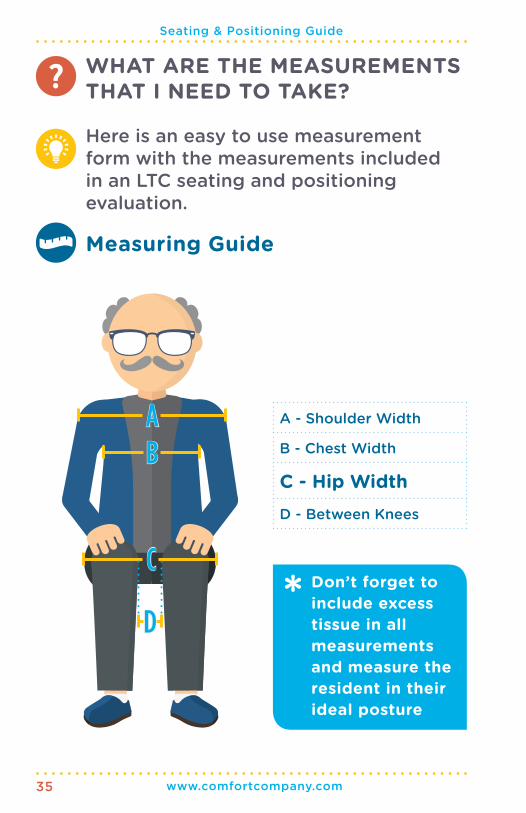
A - Shoulder Width
B - Chest Width
C - Hip WidthD - Between Knees
WHAT ARE THE MEASUREMENTS THAT I NEED TO TAKE?
Here is an easy to use measurement form with the measurements included in an LTC seating and positioning evaluation.
Measuring Guide
AB
D
CDon’t forget to include excess tissue in all measurements and measure the resident in their ideal posture

36www.comfortcompany.com
Seating & Positioning Guide
E - Top of Head
F - Occiput
G - Seat to Top of ShoulderH - Inferior Angle of Scapula
I - Seat to Elbow
J - Lower Arm Length
K - Upper Leg Length
L - Lower Leg LengthM - Foot Length
EFGHI
J
M
L
K
Seating & Positioning Guide
37 www.comfortcompany.com
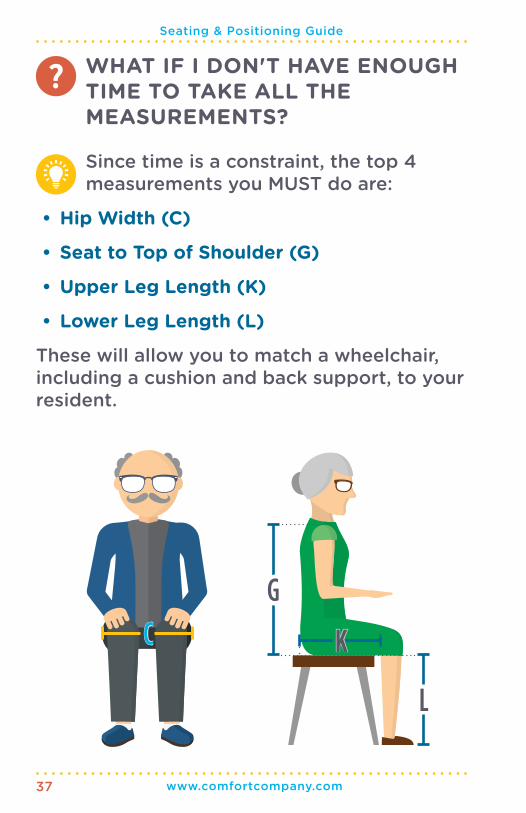
WHAT IF I DON'T HAVE ENOUGH TIME TO TAKE ALL THE MEASUREMENTS?
Since time is a constraint, the top 4 measurements you MUST do are:
• Hip Width (C)
• Seat to Top of Shoulder (G)
• Upper Leg Length (K)
• Lower Leg Length (L)
These will allow you to match a wheelchair, including a cushion and back support, to your resident.
C
G
L
K

38www.comfortcompany.com
Seating & Positioning Guide
SEAT DIMENSION
HOW TO MEASURE WIDTH: • Measure from widest point to widest point of
hips including all residual tissue
HOW TO MEASURE DEPTH: • Measure from the buttocks, including any excess
tissue, across the femur to the popliteal fossa • Then subtract 2”
WIDTH
REMEMBER TO HAVE RESIDENT SITTING ON A FLAT, FIRM SURFACE FOR ACCURATE MEASUREMENTS
C K
DEPTH: K - 2"

Seating & Positioning Guide
39 www.comfortcompany.com
If providing the resident with a new cushion, remember to consider the thickness of the desired cushion and adjust STFH accordingly
SEAT-TO-FLOOR HEIGHT (STFH, AKA LOWER LEG LENGTH)
HOW TO MEASURE: • Measure from the top of the resident's seat to
the floor (top of cushion if applicable)
• Measure with feet on floor with shoes that they normally wear or barefoot if they do not normally wear shoes, and measure bottom of foot/shoe to popliteal fossa
L
40www.comfortcompany.com
Seating & Positioning Guide
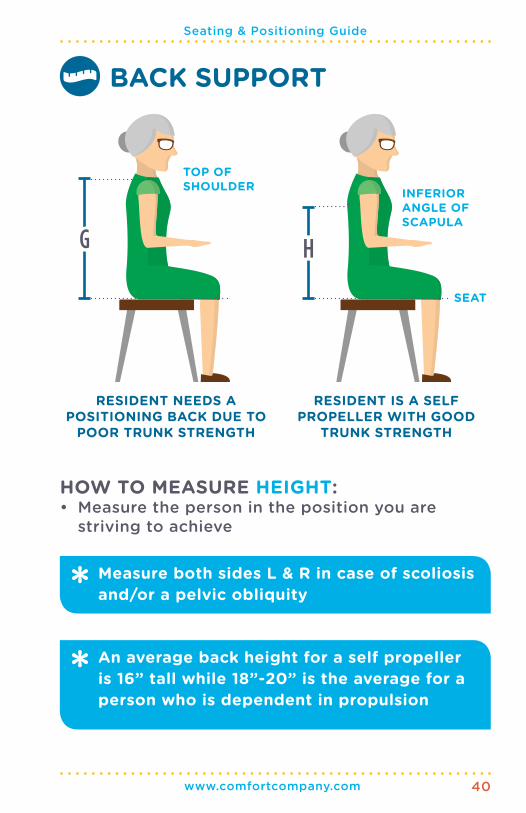
BACK SUPPORT
RESIDENT NEEDS A POSITIONING BACK DUE TO
POOR TRUNK STRENGTH
G
TOP OF SHOULDER INFERIOR
ANGLE OF SCAPULA
SEAT
RESIDENT IS A SELF PROPELLER WITH GOOD
TRUNK STRENGTH
An average back height for a self propeller is 16” tall while 18”-20” is the average for a person who is dependent in propulsion
Measure both sides L & R in case of scoliosis and/or a pelvic obliquity
HOW TO MEASURE HEIGHT: • Measure the person in the position you are
striving to achieve
H

Seating & Positioning Guide
41 www.comfortcompany.com
LEGREST
LENGTH: L - 2"
There must be a 2” clearance from foot plate and floor to clear thresholds
HOW TO MEASURE LENGTH: • Measure from bottom of foot/shoe to popliteal
fossa, including shoes that resident normally wears
• Then subtract 2”
L

42www.comfortcompany.com
Seating & Positioning Guide
HEIGHT
K0001, K0002, K0003 chairs DO NOT come with height adjustable armrests. This is just one more reason they are not the most cost-effective option when thinking long term.
ARMREST
HOW TO MEASURE HEIGHT (I): • Seat your resident with shoulder in neutral and
elbow bent at his or her side to 90°
• Measure from top of seat to under forearm/elbow
• If resident is needing a specialized arm length (J): measure from end of elbow to where the therapist wants the desired replacement arm support to end
IJ
Seating & Positioning Guide
43 www.comfortcompany.com
Never use a tall backrest as a head support.
HEAD SUPPORT
HOW TO MEASURE HEIGHT:
There is no miracle formula for fitting a resident for a proper head support
• The rest of the body must be in the best alignment possible before trying to fit for a head support.
• Remember that head position changes constantly with the slightest movement of the body.
• Aim to position the pad in the suboccipital area.
• Choose a head support with lateral, anterior/posterior, and angle adjustability.
Suboccipital Area

44www.comfortcompany.com
Seating & Positioning Guide
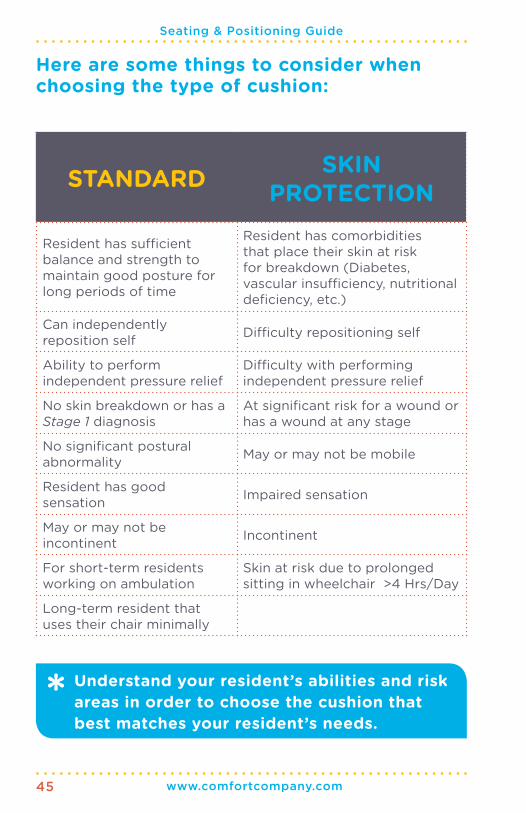
Typically there is a fourth category for positioning only cushions. We believe that all residents that sit with a postural abnormality are at risk for wound development due to peak pressures on the bony prominences. Therefore, all positioning cushions SHOULD have skin protection properties.
WHAT TYPE OF CUSHION SHOULD I CHOOSE?
HOW DO I KNOW WHAT CUSHION TO CHOOSE OUT OF THE HUNDREDS OUT THERE?There are two key questions to ask yourself:
• Does the resident sit in an abnormal posture that places them at risk to fall from the chair and/or develop a contracture?
• Is the resident at risk for, have an existing, or have a history of wound development?
The answers to these questions will guide you to the correct cushion category. Cushions are broken up into three categories depending on the resident's particular needs.
• Standard
• Skin Protection
• Skin Protection & Positioning
Seating & Positioning Guide
45 www.comfortcompany.com
STANDARD SKIN PROTECTION
Resident has sufficient balance and strength to maintain good posture for long periods of time
Resident has comorbidities that place their skin at risk for breakdown (Diabetes, vascular insufficiency, nutritional deficiency, etc.)
Can independently reposition self Difficulty repositioning self
Ability to perform independent pressure relief
Difficulty with performing independent pressure relief
No skin breakdown or has a Stage 1 diagnosis
At significant risk for a wound or has a wound at any stage
No significant postural abnormality May or may not be mobile
Resident has good sensation Impaired sensation
May or may not be incontinent Incontinent
For short-term residents working on ambulation
Skin at risk due to prolonged sitting in wheelchair >4 Hrs/Day
Long-term resident that uses their chair minimally
Here are some things to consider when choosing the type of cushion:
Understand your resident’s abilities and risk areas in order to choose the cushion that best matches your resident’s needs.

46www.comfortcompany.com
Seating & Positioning Guide
SKIN PROTECTION & POSITIONING
Resident has comorbidities that place their skin at risk for breakdown (Diabetes, vascular insufficiency, nutritional deficiency, etc.)
Poor balance and weak core, pelvic, and LE musculature
Minimal to no ability to reposition self
Minimal to no ability to perform independent pressure relief
Sits in one of the 5 postural abnormalities (Pages 12 - 17)
At significant risk for a wound or has a wound at any stage
Limited mobility or immobile
Impaired sensation
Incontinent
CONTRACTURE RISK from prolonged sitting in a postural abnormality
FALL RISK from chair
Progressive disorders
Dementia
Neurological impairment
Want help finding a cushion that meets your resident's needs? Refer to the decision tree and cushion comparison chart in our LTC Wheelchair Seating and Positioning Product Selection Guide for our top picks in each category.
Seating & Positioning Guide
47 www.comfortcompany.com
WHEN DO I CHOOSE A SPECIALIZED BACK SUPPORT?
HOW DO I KNOW IF MY RESIDENT NEEDS IT? There are key questions to ask yourself when deciding if the sling back should be replaced
with a specialized back support: • Is your resident immobile?
• Does your resident have a postural abnormality that affects pelvic and trunk stability and alignment?
• Does your resident require assistance to sit unsupported?
• Does your resident complain of pain while sitting in the wheelchair?
If you answered yes to any of these questions, then without a doubt, replace the sling back with a specialized back support.
Back supports are broken into the following categories:
• Standard
• Moderate Support
• Maximum SupportMuch like cushion categories, there are certain criteria that assist a therapist in choosing the appropriate back support category that will meet the

48www.comfortcompany.com
Seating & Positioning Guide
The typical sling back that comes on all models of chairs easily hammock and lose their shape, no longer stabilizing the trunk. Be familiar with back supports on the market and how they can help to achieve your resident's goals.
resident’s needs. This criteria includes the amount of assistance needed for repositioning, ability to maintain an optimal midline posture, and the amount of pressure the back support must withstand. Please refer to pages 49-50 for a more detailed algorithm to help you choose what back support category fits your resident’s needs.
No matter what category you choose, the right back support is an essential part of an optimal
seating system. Here are some of the important advantages of a specialized back support:• Increases seat depth
• Captures curvature whether normal or abnormal and increases contact with both the back support and seat surface for maximum stabilization
• Envelops the spine to maximize pressure redistribution and minimize peak pressure on the spinous process
• Decreases pain
• Works hand in hand with the cushion to lock in the pelvis for maximum stabilization
• Helps reduce the progression of an abnormal spinal posture

Seating & Positioning Guide
49 www.comfortcompany.com
STANDARD MODERATEIndependently maintains trunk in midline while sitting unsupported
Min to mod assist to maintain trunk in midline while sitting unsupported
Active resident; with or without a fixed or flexible abnormal curvature of the spine
Resident with activity limitations; with or without a fixed or flexible abnormal curvature of the spine
Can independently reposition and perform pressure relief
Requires min to mod assist to reposition and perform pressure relief
Intact skin and/or occasional redness along the spinous process
Persistent redness or an open area along the spinous process
Light leaner that may use a foam lateral trunk support to promote upright, midline posture
Moderate leaner that would benefit from a mounted lateral trunk support to promote upright, midline posture
Complaint of back pain while sitting in the wheelchair
Complaint of back pain while sitting in the wheelchair
Awake and alert Decreased alertness, sleeps occasionally in chair
Good head control, head position does not affect trunk posture or vice versa
May or may not require a head support to maintain optimal head, neck, and trunk alignment
Captures some abnormal curvatures of the spine with a less aggressive system to increase stability and pressure redistribution
More stable and durable back support that allows for better surface contact through adjustability of seat-to-back angle and contours to most postural abnormalities, leading to stability and pressure redistribution
Here are some things to consider when choosing a type of back support:

50www.comfortcompany.com
Seating & Positioning Guide
MAXIMUM
Max to dep assist to maintain trunk in midline while sitting unsupported
Inactive resident; with or without a fixed or flexible abnormal curvature of the spine
Requires max to dep assist to reposition and perform pressure relief
Persistent redness or an open area along the spinous process
Heavy leaner that requires a mounted lateral trunk support to promote upright, midline posture
Complaint of back pain while sitting in the wheelchair
Decreased alertness, sleeps often in chair
Requires a head support to maintain optimal head, neck, and trunk alignment
Neurological disorders
Progressive disorders
Most stable and durable back support that allows for the most aggressive envelopment to capture any abnormal curvature, leading to optimal stability and pressure redistribution
Want help finding a product that meets your resident's needs? Refer to the back support decision tree and comparison chart in our LTC Wheelchair Seating and Positioning Product Selection Guide.

Seating & Positioning Guide
51 www.comfortcompany.com
Specialized back supports can be molded to an abnormal curvature of the spine seen with all pelvic deformities. Here is a closer look at
the abnormal curvatures of the spine that you will be able to envelop for increased stability and alignment, pressure distribution, and comfort:
Kyphosis Scoliosis
Lumbar Lordosis Spinal Rotation

52www.comfortcompany.com
Seating & Positioning Guide
See page 54 for visual
1 ELRs keep hips back in chair: Wrong!• ELRs do just the opposite!
• When we elevate the legs, we pull on the already tightened hamstrings of the resident.
• The shortened hamstrings cause a greater pull on the pelvis, bringing the pelvis into a posterior pelvic tilt.
• The posterior pelvic tilt makes the pelvis slide forward, resulting in sacral sitting.
• The resident begins to slide forward out of the chair, the exact opposite of keeping the hips back in the chair!
THE GREAT ELEVATING LEGREST MYTH!
ELEVATING LEGRESTS (ELRs) ARE A GOOD OPTION RIGHT?
NO!Here are some common myths about ELRs that you NEED ABSOLUTE CLARIFICATION on to help you understand why standard legrests are usually the better option:

Seating & Positioning Guide
53 www.comfortcompany.com
2 ELRs decrease edema: Wrong! • Contrary to popular belief ELRs on K0001-K0004
MWCs—the type typically seen in a nursing home—unfortunately CANNOT reduce edema.
• In order to decrease edema, the legs must be 30 cm above heart level. The only way to achieve that degree of elevation with an ELR is when used in combination with tilt and recline, often seen in power chairs.
• ELRs on a manual chair can actually decrease optimal circulation by cutting off blood flow at the groin area and inhibiting flow to the lower extremities.
3 ELRs decrease pressure on the pelvis: Wrong!
• ELRs actually position the pelvis in a posterior pelvic tilt.
• The forced posterior pelvic tilt increases pressure on the bony prominences of the ITs, sacrum, and coccyx.
• Wound development risk is increased in those areas.
• Elevating the legrest promotes knee flexion, leading to decreased femoral contact, shifting the pressure back onto the ITs and sacrum/coccyx.
4 ELRs help with LE alignment: Wrong! • ELRs prevent full femoral contact with the seat surface.
• Since less of the leg is making contact with the seat surface, it is easier for the leg to internally/externally rotate or abduct/adduct.
• Legs then fall off legrests more easily.
• Windswept posture is more prevalent.
• ELRs promote flexion of knees, hips, and ankles, increasing risk of contractures at those joints.

54www.comfortcompany.com
Seating & Positioning Guide
AVOID the use of ELRs as much as possible for optimal positioning in a wheelchair.
Elevated Leg Rest
RIGHT LATERAL VIEW - WHAT IS REALLY HAPPENING WHEN USING AN ELR
4
2
1
3

Seating & Positioning Guide
55 www.comfortcompany.com
UPPER EXTREMITY SUPPORTS CAN BE ADDED ONTO THE EXISTING ARMREST TO: • Add length
• Add additional postural support
• Decrease contracture risk
• Decrease dependent edema in UE
• Increase comfort while sitting in wheelchair
Most of us don’t sit with our elbows bent to 90˚ with the forearm straight out. So why do we position our residents this way, especially when dealing with abnormal tone or decreased range of motion? Choose an upper extremity support that has angle adjustability!!
ACCESSORIES
WHEN WOULD I NEED TO ADD ACCESSORIES?As in most things, LESS is MORE and this is certainly true in wheelchair positioning. If you take your time in selecting the right model
and size wheelchair and then select an appropriate cushion and back support, accessories may not be needed. Too often accessories are used as “band-aids” to a less than optimal wheelchair and seating system. When used the proper way, they can be the finishing touch to achieve the best posture possible for your resident!

56www.comfortcompany.com
Seating & Positioning Guide
TYPES OF UPPER EXTREMITY SUPPORTS:You can choose a basic non-adjustable support or you can choose a pad style and hardware style to suit the needs of your resident.
HARDWARE TYPES• Slide On: Pad will be aligned with existing armrest
• Bolt On: Pad will be aligned with existing armrest
• Swing-Away: Pad can move towards or away from body as needed
• Articulating: Pad can be positioned in any plane, most adjustable option
PAD TYPES• Standard trough that keeps arm from sliding off the
pad in any direction
• Minimal contour for low profile support
• Moldable option at the wrist for extension of wrist and finger abduction

Seating & Positioning Guide
57 www.comfortcompany.com
Don’t forget that quality leg supports have a range of sizes or can be customized. Consider where you want the support and measure to ensure you get the right fit.
An external fixator support provides great stability and support for a LE post hip/knee surgery, or when a LE immobilizer is in use!
LOWER EXTREMITY SUPPORTSAdded to a chair: • Support the lower leg, foot, and ankle in optimal
position
• Decrease risk of contracture
• Accommodate for contractures and protect from injury
• Manage abnormal tone and reflexes
• Support an amputated limb
• Support a limb post surgery on legrest
TYPES OF LE SUPPORTS:• Single Foot Support
• Double Foot Support
• Double Foot Support with Separator
• Calf Pads
• External Fixator Support
• Amputee Support

58www.comfortcompany.com
Seating & Positioning Guide
If your resident has tone and/or is a heavy leaner, choose mounted lateral trunk supports. Traditional foam supports cannot withstand the sustained pressure and the foam will collapse.
LATERAL TRUNK SUPPORTS• Prevent lateral leaning due to decreased trunk
strength and balance
• Correct or accommodate for a scoliosis or trunk rotation and prevent further progression of the postural abnormality
• Decrease pressure points on the apex of the curvature that could possibly lead to skin breakdown and cause pain to the resident
TYPES OF LATERAL SUPPORTS:• Mounted swing-away or fixed lateral supports
• Traditional foam lateral supports

Seating & Positioning Guide
59 www.comfortcompany.com
Remember there is NO cookbook solution to wheelchair seating and positioning. Use your clinical reasoning skills to figure out what's best within the parameters you are given.
CONCLUSION
REFERENCES
Keep the following goals in mind and do the best you can!
• Maximize resident comfort
• Minimize pain
• Correct deformity when possible
• Prevent further deformity
• Prevent Wounds
Please refer to Comfort Company’s LTC Product Selection Guide to see our top picks for seating and positioning products!
Rader, J., Jones, D., & Miller, L.L. (1997). Individualized wheelchair seating: Part I A guide for caregivers. Mt. Angel, OR: Benedictine Institute for Long Term Care.
Jones, D., Rader, J., & Miller, L.L. (1997). Individualized wheelchair seating for older adults: Part II A guide for professionals. Mt. Angel, OR: Benedictine Institute for Long Term Care.
Rader, J., Jones, D., & Miller, L. (2000). The importance of individualized wheelchair seat-ing for frail older adults. Journal of Gerontological Nursing 26(11), 24-32.
"Adult Wheelchairs Categorized and Explained - Northwest Pompano." Active Mobility Center, 10 May 2015. Web. 19 July 2016. http://nearsay.com/c/44448/33117/adult-wheel-chairs-categorized-and-explained
Dicianno, Brad E., Juliana Arva, Jenny M. Lieberman, Mark R. Schmeler, Ana Souza, Kevin Phillips, Michelle Lange, Rosemarie Cooper, Kim Davis, and Kendra L. Betz. "RESNA Posi-tion on the Application of Tilt, Recline, and Elevating Legrests for Wheelchairs." Assistive Technology 21.1 (2009): 13-22. RESNA.org. RESNA, 25 Feb. 2015. Web. 21 July 2016. http://www.resna.org/sites/default/files/legacy/resources/position-papers/RESNA%20PP%20on%20Tilt%20Recline_2015.pdf

60www.comfortcompany.com
Seating & Positioning Guide
ELR: Elevating Legrest
STFH: Seat-to-Floor Height
MWC: Manual Wheelchair
IT: Ischial Tuberosity
PSIS: Posterior Superior Iliac Spine
ASIS: Anterior Superior Iliac Spine
LE: Lower Extremity
UE: Upper Extremity
ROM: Range of Motion
ADLs: Activities of Daily Living
PPT: Posterior Pelvic Tilt
GLOSSARY
REFERENCES CONT.Cole, Elizabeth. "Causes and Prevention Skin Breakdown." US Rehab Seating and Mobility Master Program. 2016 Lecture.
Cole, Elizabeth. “The Biomechanics of Seating.” US Rehab Seating and Mobility Master Program. 2016 Lecture.
Cole, Elizabeth. “Matching the Evaluation Results to Seating Interventions Part 1, 2, 3 .” US Rehab Seating and Mobility Master Program. 2016 Lecture.
Cole, Elizabeth. “How to Measure for Seating and Positioning Products.” US Rehab Seating and Mobility Master Program. 2016 Lecture.
Mounic, Gerard, OTD,OTR/L,C/NDT,COS-C. “Evaluation and Seating Strategies with Regulatory Guidelines, Wheelchair Seating and Positioning Improving Functional Mobility and Patient ADLs." Summit Professional Education Continuing Education Course. North Carolina, Asheville. 2014 Lecture.
VGM Course Anatomy and Physiology. US Rehab Seating and Mobility Master Program. 2016 Lecture. https://univ.vgmu.com/opcv/pages/course/run_course.jsp?id=282740
