whirligig - media.rainpos.com · whirligig vintage 30s – ruby’s treasures collection by...
TRANSCRIPT

Whirligig Vintage 30s – Ruby’s Treasures Collection by Paintbrush Studio
Designed by Barbara J. Eikmeier
50” x 60”
901 E 14th Ave North Kansas City, MO 64116
816-421-2000 • 816-471-2853 Fax www.fabri-quilt.com

Quilt designed by Barbara J. Eikmeier Quilt Size: 50” x 60”
Yardages and Cutting
Note: WOF = Width of fabric, selvage to selvage.
Piecing the Blocks
Note: Use a 1/4” seam allowance for all stitching. Press seams in direction of arrows. Draw a diagonal line on the wrong side of the background 2½” and 2 ⅞” squares.
Select one set of matching print pieces. Draw a diagonal line on the wrong side of the 2 ½” print squares. Place a marked 2 ½” background square on 1 end of the 2 ½” x 4 ½” print rectangles. Stitch on the drawn lines. Trim ¼” away from the stitching. Press seam away from the background. Repeat on the remaining end of the rectangle
to make 2 print flying geese units. Repeat with the marked 2 ½” print squares and (2) 2 ½” x 4 ½” background rectangles to make 2 cream flying geese units. Place the 2 ⅞” background squares right sides together with 2 ⅞” x 2 ⅞” print squares. Stitch ¼” on each side of the drawn line. Cut on the line. Press the seams away from the background fabric to make 4 half square triangle units. Sew 2 half square triangles into a triangle unit. Press the seam away from the background fabric. Make a second triangle unit.
BLOCKS: From each 1/8 yard print fabric, cut one set of the following
pieces (a total of 18 sets): ● (2) 2 ⅞” x 2 ⅞” squares ● (8) 2 ½” x 2 ½” squares ● (2) 2 ½” x 4 ½”
1/3 yard – Violet/Yellow Dots (120-12662) ● (1) 2 ⅞” x WOF strip; sub-cut
● (2)2 ⅞” x 2 ⅞ squares ● (8) 2 ½” x 2 ½” squares ● (2) 2 ½” x 4 ½”
● (2) 2 ½” x WOF strips; sub-cut: ● (30) 2 ½” x 2 ½” cornerstones 1 1/2 yard – Violet/Pink/Yellow flowers (120-12581)
● (1) 2 ⅞” x WOF strip; sub-cut ● (2) 2 ⅞” x 2 ⅞” squares ● (8) 2 ½” x 2 ½” squares ● (2) 2 ½” x 4 ½”
● (6) 4 ½” x WOF strips for borders ● (6) 2 ¼” x WOF strips for binding
BACKGROUND: 1 1/2 yards – Painter’s Palette Rice Paper (121-099)
● (3) 4½” x WOF strips; sub-cut: ● (20) 4 ½” x 4 ½” squares
● (3) 2 ⅞” x WOF strips; sub-cut ● (40) 2 ⅞” x 2 ⅞” squares ● (10) 2 ½” x WOF strips; sub-cut ● (40) 2 ½” x 4 ½” rectangles ● (80) 2 ½” x 2 ½” squares
SASHINGS: 1 1/8 yards – Yellow Geometric (120-12622) ● (4) 8 ½” x WOF strips; sub-cut:
● (49) 2 ½” x 8 ½” sashings
BACKING: 3 1/3 yards – Backing of choice ● 2 strips 58” x WOF
Assembling the Rows
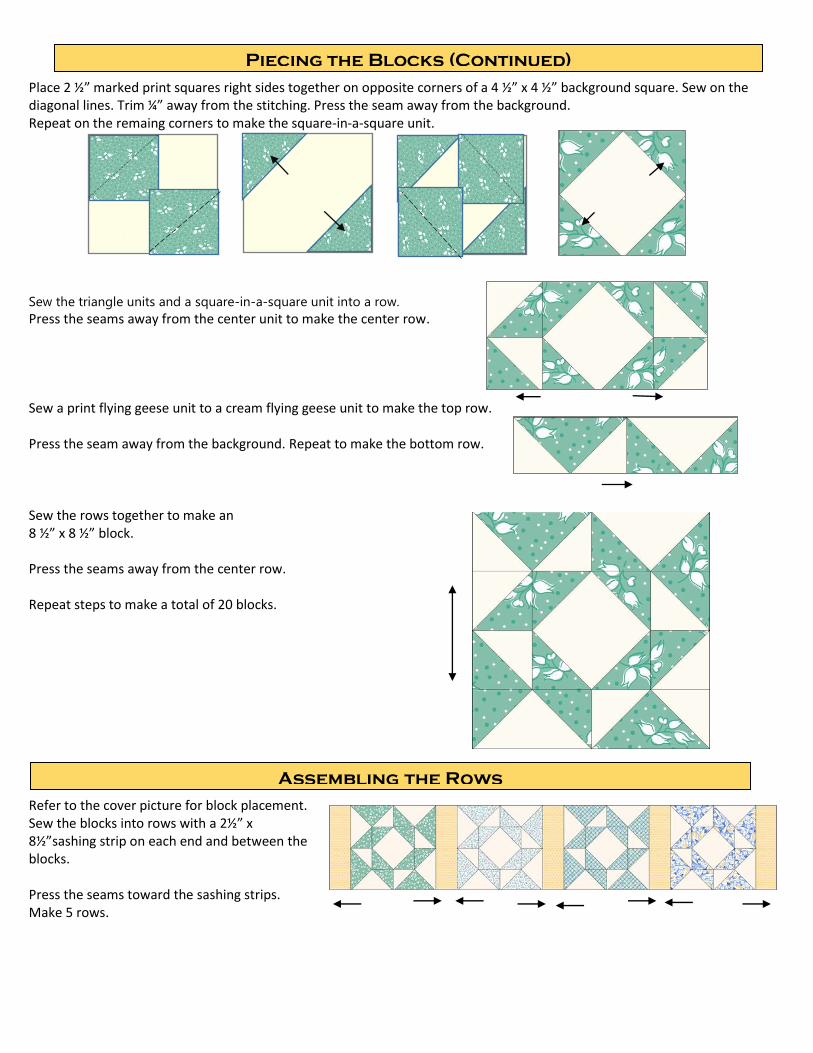
Place 2 ½” marked print squares right sides together on opposite corners of a 4 ½” x 4 ½” background square. Sew on the diagonal lines. Trim ¼” away from the stitching. Press the seam away from the background. Repeat on the remaing corners to make the square-in-a-square unit.
Sew the triangle units and a square-in-a-square unit into a row.
Press the seams away from the center unit to make the center row. Sew a print flying geese unit to a cream flying geese unit to make the top row. Press the seam away from the background. Repeat to make the bottom row. Sew the rows together to make an 8 ½” x 8 ½” block. Press the seams away from the center row. Repeat steps to make a total of 20 blocks.
Refer to the cover picture for block placement. Sew the blocks into rows with a 2½” x 8½”sashing strip on each end and between the blocks. Press the seams toward the sashing strips. Make 5 rows.
Piecing the Blocks (Continued)

Completing the quilt
Sew (5) 2½” x 2½” violet/yellow cornerstones and (4) 2½” x 8½”yellow sashing strips together as shown. Press the seams toward the sashing strips. Make (6) sashing units.
Sew a sashing unit to the bottom of each row. Sew the rows together. Sew a sashing unit to the top. Press the seams toward the sashing units. Borders Sew the (6) 4 ½” x WOF outer border strips end to end. Cut (2) 4½” x 52 ½” strips and sew to the sides of the quilt. Press the seams toward the border strips. Cut (2) 4 ½” x 50 ½” strips and sew to the top and bottom of the quilt. Press the seams toward the border strips.
Sew the backing fabric together with a crosswise seam. Press the seam open. Trim to 58” x 68” to make the backing. Layer and quilt. Use the (6) 2 ¼” x WOF violet/pink/yellow flowers binding strips to bind the completed quilt.

1 Kit 6 Kits 12 kits 1 Kit 6 Kits 12 kits
1 1/2 yards 9 yards 18 yards 1/8 yard 3/4 yard 1 1/2 yards
121-099
1 1/2 yards 9 yards 18 yards
120-12602
1/8 yard 3/4 yard 1 1/2 yards
120-12622
1 1/8 yards 6 3/4 yards 13 yards 120-12601
1/8 yard 3/4 yard 1 1/2 yards
120-12662
1/3 yard 2 yards 4 yards 120-12621
1/8 yard 3/4 yard 1 1/2 yards
120-12571
1/8 yard 3/4 yard 1 1/2 yards120-12631
1/8 yard 3/4 yard 1 1/2 yards
120-12572
1/8 yard 3/4 yard 1 1/2 yards 120-12632
1/8 yard 3/4 yard 1 1/2 yards
120-12591
1/8 yard 3/4 yard 1 1/2 yards 120-12561
1/8 yard 3/4 yard 1 1/2 yards
120-12592
1/8 yard 3/4 yard 1 1/2 yards 120-12562
1/8 yard 3/4 yard 1 1/2 yards
120-12551
1/8 yard 3/4 yard 1 1/2 yards120-12652
1/8 yard 3/4 yard 1 1/2 yards
120-12642
1/8 yard 3/4 yard 2 1/2 yards120-12661
1/8 yard 3/4 yard 1 1/2 yards
120-12651
1/8 yard 3/4 yard 1 1/2 yards Backing of
choice 3 1/3 yards 20 yards 40 yards
120-12611
1/8 yard 3/4 yard 1 1/2 yards
120-12581 120-12641
For kits:Whirligig