why do i need a pen test lab? requirements - rochester ny · why do i need a pen test lab? hacking...
TRANSCRIPT

Why do I need a pen test lab?
Hacking and or scanning machines without consent is against the law in most countries
To become an effective penetration tester or ethical hacker you need to practice to
enhance your skills
Freedom to install, run, and configure any tool you like
Requirements
Hard Disk - 50GB of disk space or more depending on the number of guest operating
systems you plan on installing.
CPU - I recommend the latest technology but any of the I3/I5/I7 families are ok. The
more processing power you have the better
Memory - I recommend 8GB or 16GB. Memory is critical. The more memory you have
the more virtual systems you will be able to have running at one time
Virtualization software – I recommend using open source software to start using either
VirtualBox or VMPlayer. Eventually you might want to pay for the commercial software
such as VMworkstation of if you have a Mac VMfusion
Virtual Machine Downloads
Kali Linux 2 -Pentesting Environment
o Osboxes.org
o https://www.offensive-security.com/kali-linux-vmware-arm-image-download/
Metasploitable 2 – Vulnerable Machine
o http://sourceforge.net/projects/metasploitable/files/Metasploitable2/
Bee-Box – Vulnerable Machine
o http://sourceforge.net/projects/bwapp/files/bee-box/bee-
box_v1.6.7z/download
OWASP Brocken Web Applications Project – Vulnerable Machine
o http://sourceforge.net/projects/owaspbwa/files/

Virtualization Software
For this class I will be using VirtualBox
o https://www.virtualbox.org/wiki/Downloads
o Install the software based on your host operating system
Windows, OSX, Linux, or Solaris
Folder Structure
I recommend creating 2 folders for this work
o A folder for the compressed files so that if need be you can recreate the vms in
case you end up with a corrupted VM
o A folder for the uncompressed Virtual Machines
Extracting Files I recommend downloading 7-zip if you don’t already have winzip. 7-zip is open source
software which can decompress a large number of compressed file types.
o http://www.7-zip.org/
Creating Virtual Machines Open Virtual Box
Click New
Enter the Name and Operating System and Click Next

Change the memory size to 512
Use and existing virtual hard disk
Click on the folder icon above cancel and select the folder and file that you want to use.
Click Open. Then click Create. Select the first file cl1.vmdk…

Now you will see your virtual machine on the vm list’
Click on Settings
Click on Network. Change Attached to to Nat Network. Name NatNetwork and click OK
Click on Start
o Wait for the machine to run. You will then be at the login screen. Enter the
password of root and the password of owaspbwa

You will now be logged in as root and be at the # prompt. This is all you need to do with
this VM. Write down the ip address as in this case it is 10.0.2.12 so you can use it later.
Create the other VMS just as you did with this one. When you are done you should have a
virtual machine list that looks like this:
Kali Linux Video 1 https://www.youtube.com/watch?v=HQYcgvISi9Y
Video 2 https://www.offensive-security.com/kali-linux-vmware-arm-image-download/
Start Kali Linux VM
Login with the username of root
Enter the password of toor if you downloaded the Vm from offensive security
Enter the password of osboxes.org if you downloaded the VM from osboxes.org
Open up a terminal session

Create a new user called user1
o Type useradd –m user1
Create a password for user1
o Type passwd user1
o Type root
o Retype root
Add user1 to the sudo group
o Type usermod –a –G sudo user1
Update Kali Distribution
Now let’s update our Kali Distribution
o Type apt-get update
o Once complete and you are back at the # prompt
o Type apt-get dist-upgrade
o Type y and hit enter
o When done type exit

Power Settings
Now let’s turn off power saving
Click on the down arrow in the top right of screen then click on settings
Click on Power
Change Blank screen to Never
Close out of Power Settings
Privacy Settings
Change Privacy Settings
Click on Show Applications
Type settings in the search bar and hit enter
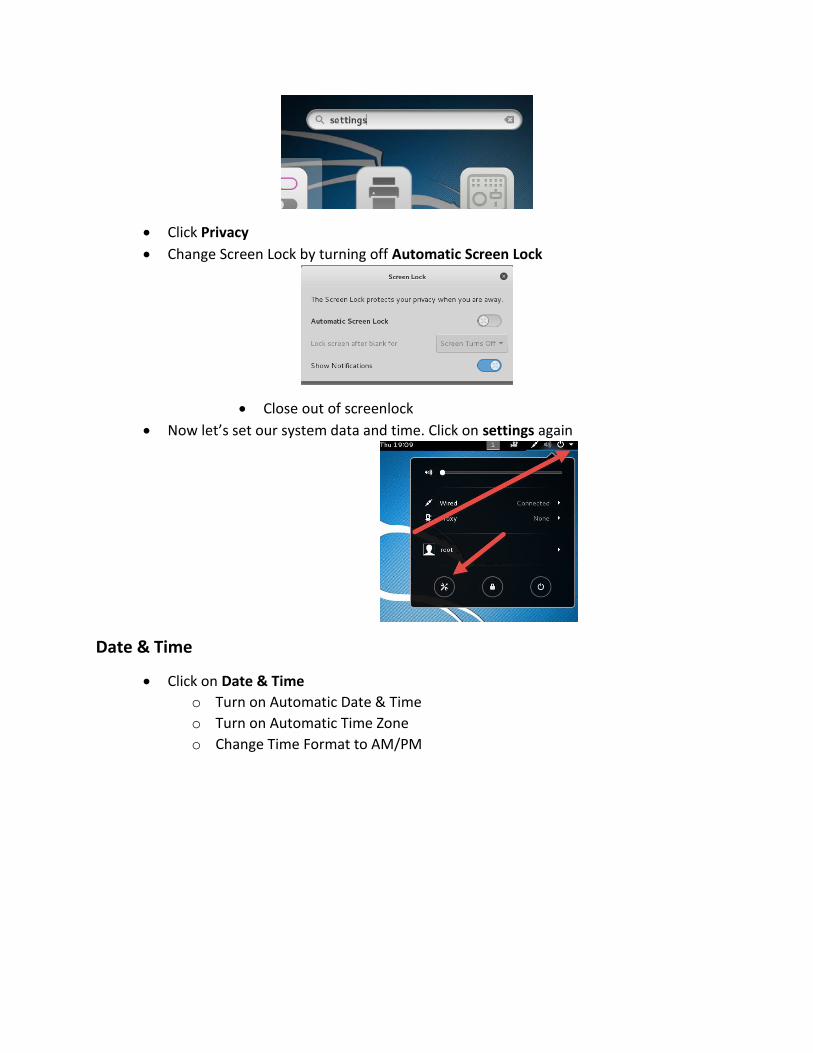
Click Privacy
Change Screen Lock by turning off Automatic Screen Lock
Close out of screenlock
Now let’s set our system data and time. Click on settings again
Date & Time
Click on Date & Time
o Turn on Automatic Date & Time
o Turn on Automatic Time Zone
o Change Time Format to AM/PM

Close out of Date & Time
Nmap
Open a terminal session
Test your network connectivity and make sure nmap is working
Type nmap scanme.nmap.org
Review the results to see the open ports and services found
Zenmap
At the command line type Zenmap
Enter scanme.nmap.org as the target
Select the profile of Regular scan and hit the scan button

Nmap Scans Run the following scans against scanme.nmap.org
Nmap –sn scanme.nmap.org (just a ping)
Nmap –Pn scanme.nmap.org (without a ping stealthy)
Nmap –A scanme.nmap.org (aggressive scan)
Nmap –p 80 scanme.nmap.org – Nmap can select what ports to scan by simply adding –p port,port2,port 3… In this case we will only scan port 80.
Nmap –p- scanme.nmap.org – Scans all ports from port 1-65535. It can also be accomplished by nmap –p 1-65535 scanme.nmap.org.

Zenmap Scans Enter the target of scanme.nmap.org and select the following profiles and hit the scan button. Look at the commands.
Regular Scan
Quick traceroute
Quick scan
Intense scan, all TCP ports
Switch user to user1
Login with the username of user1
Enter the password of root
Open up a terminal session and notice that now you have a $ prompt as opposed to a #
prompt. You are no longer logged in as root so the # is replaced with a $.
Now when you run your nmap commands you are going to have to enter sudo before
the nmap command

Scanning Vulnerable Virtual Machines
Bee-Box
Start Bee-Box
Open up a terminal session
Type ifconfig and hit enter
You should get an IP address

Write down the ip address as you are going to use it throughout the nmap and Zenmap
exercises. Mine is 192.168.1.126. Yours will be different
Go back to Kali Linux and open up a terminal session
Type sudo nmap –sn x.x.x.x (ip address from bee-box)
Enter the password of user1 - root
Type sudo Nmap ip address
Type sudo nmap –Pn IP address
Type sudo nmap –F IP Address This scan will scan the top 100 ports.
Type sudo Nmap --top-ports 10 ip address This will only scan the top 10 ports.
Type sudo nmap –open ip address This scan will only display the open ports
Type sudo nmap –p 80 ip address This will only scan port 80.
Type sudo nmap –p 80,445 IP Address This will only scan ports 80 and 445.
Type sudo nmap –p 20-500 This will scan ports 20 through 600.
Type sudo nmap –p- ip address This will scan all the TCP ports 1-65535. You can also achieve the
same thing by typing sudo nmap –p 1-65535 ip address
Type sudo nmap –sV ip address This will scan the top 1000 ports and provide details about the
services.
Type sudo nmap – O ip address in order to scan the top 1000 ports but also scan for the
operating system. Nmap has a database of operating systems it uses to compare to the system…
Type sudo nmap – A ip address in order to perform an aggressive scan which includes, open
ports, OS, Services, traceroute, and mac address. This is not a stealthy scan by any means… It
will take much longer than any of the other scans.
Type sudo nmap –T5 ip address to run an insane fast scan. The other options are -T4
(aggressive), -T3 (normal), -T2 (polite), -T1 (Sneaky), -T0 (paranoid)
Zenmap
Enter the target IP address, Profile select regular scan, and hit the scan button
Now let’s perform a Quick scan by changing the profile to quick scan and hitting the scan
button
Metasploitable
Metasploitable
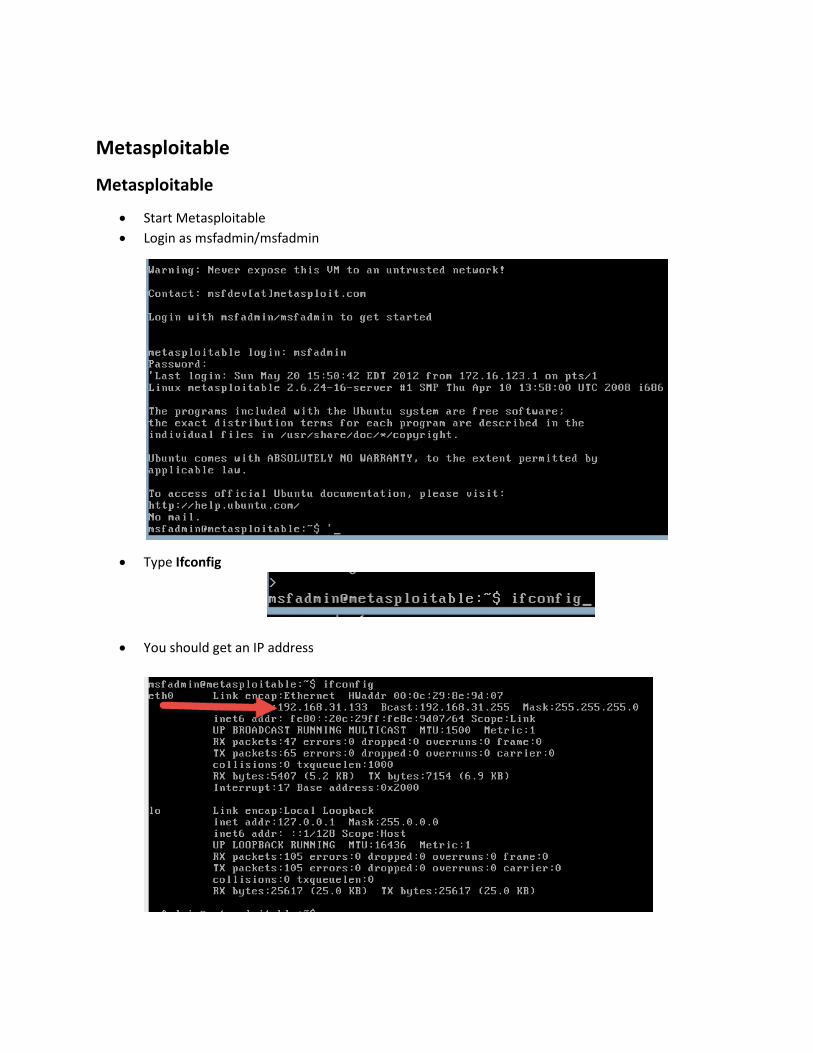
Start Metasploitable
Login as msfadmin/msfadmin
Type Ifconfig
You should get an IP address

Write down the ip address as you are going to use it throughout the nmap and Zenmap
exercises. Mine is 192.168.31.133. Yours will be different
Go back to Kali Linux and open up a terminal session
Type sudo nmap –sn x.x.x.x (ip address from metasploitable)
Type sudo Nmap ip address
Type sudo nmap –Pn IP address
Type sudo nmap –F IP Address This scan will scan the top 100 ports.
Type sudo Nmap --top-ports 10 ip address This will only scan the top 10 ports.
Type sudo nmap –open ip address This scan will only display the open ports
Type sudo nmap –p 80 ip address This will only scan port 80.
Type sudo nmap –p 80,445 IP Address This will only scan ports 80 and 445.
Type sudo nmap –p 20-500 This will scan ports 20 through 600.
Type sudo nmap –p- ip address This will scan all the TCP ports 1-65535. You can also achieve the
same thing by typing sudo nmap –p 1-65535 ip address
Type sudo nmap –sV ip address This will scan the top 1000 ports and provide details about the
services.
Type sudo nmap – O ip address in order to scan the top 1000 ports but also scan for the
operating system. Nmap has a database of operating systems it uses to compare to the system…
Type sudo nmap – A ip address in order to perform an aggressive scan which includes, open
ports, OS, Services, traceroute, and mac address. This is not a stealthy scan by any means… It
will take much longer than any of the other scans.
Type sudo nmap –T5 ip address to run an insane fast scan. The other options are -T4
(aggressive), -T3 (normal), -T2 (polite), -T1 (Sneaky), -T0 (paranoid)
Zenmap
Enter the tar
Enter the target IP address, Profile select regular scan, and hit the scan button
Now let’s perform a Quick scan by changing the profile to quick scan and hitting the scan
button

OWASP
Your OWASP machine should already be running. You logged in s root with a password of
owaspbwa. You should have already written down the ipaddress from earlier
Go back to Kali Linux and open up a terminal session
Type sudo nmap –sn x.x.x.x (ip address from Owasp)
Type sudo Nmap ip address
Type sudo nmap –Pn IP address
Type sudo nmap –F IP Address This scan will scan the top 100 ports.
Type sudo Nmap --top-ports 10 ip address This will only scan the top 10 ports.
Type sudo nmap –open ip address This scan will only display the open ports
Type sudo nmap –p 80 ip address This will only scan port 80.
Type sudo nmap –p 80,445 IP Address This will only scan ports 80 and 445.
Type sudo nmap –p 20-500 This will scan ports 20 through 600.
Type sudo nmap –p- ip address This will scan all the TCP ports 1-65535. You can also achieve the
same thing by typing sudo nmap –p 1-65535 ip address
Type sudo nmap –sV ip address This will scan the top 1000 ports and provide details about the
services.
Type sudo nmap – O ip address in order to scan the top 1000 ports but also scan for the
operating system. Nmap has a database of operating systems it uses to compare to the system…
Type sudo nmap – A ip address in order to perform an aggressive scan which includes, open
ports, OS, Services, traceroute, and mac address. This is not a stealthy scan by any means… It
will take much longer than any of the other scans.
Type sudo nmap –T5 ip address to run an insane fast scan. The other options are -T4
(aggressive), -T3 (normal), -T2 (polite), -T1 (Sneaky), -T0 (paranoid)
Zenmap
Enter the tar
Enter the target IP address, Profile select regular scan, and hit the scan button
Now let’s perform a Quick scan by changing the profile to quick scan and hitting the scan
button

Scanning all Vulnerable VMs at once
Type sudo nmap –sn ip 192.168.31.133 192.168.1.126, 192.168.1.135 ( use your ip addresses
not mine)
Type sudo nmap ip 192.168.31.133 192.168.1.126, 192.168.1.135 ( use your ip addresses not
mine)
Type sudo nmap –F 192.168.31.133 192.168.1.126 192.168.1.135 ( use your ip addresses not
mine)
Type sudo nmap --top-ports 10 192.168.31.133 192.168.1.126 ( use your ip addresses not
mine)
Zenmap Scanning of Vulnerable VMs
Type sudo zenmap at the command line
Enter the ip address of bee-box as the target. Select regular scan and hit the scan button
Enter the ip address of metasploitable as the target. Select regular scan and hit the scan
button
Enter the ip address of OWASP as the target. Select regular scan and hit the scan button
Exit Zenmap
Nessus
Activation Code
Open google and search for nessus obtain an activation code
Click on Obtain an Activation Code | Tenable Network Security
Under Nessus Home Click Register Now
Enter your information and hit Register

Wait a few minutes and check your email
Nessus Download
Open up the Iceweasel web browser
Search for download nessus and hit search
Click Download Nessus
Scroll down and Download Nessus Home
Select your Operation System – Linux

Select the file for your operating system 32 or 64 bit.
Agree to the Subscription Agreement
Click on Save File
When the file has downloaded you should see the following:
Nessus Installation
Close your browser and open a terminal session
Type ls
Change the directory to Downloads. Type cd Downloads (remember Linux is case
sensitive so be sure to type the capital D)
Type ls again and you should see the file you just downloaded (Nessus-6.4.3-
debian6_amd64.deb. If you have a 32 bit operating system the file will be Nessus-6.4.3-
debian6_i386.deb.
Type sudo dpkg –i Nessus-6.4.3-debian6_amd64.deb (64 bit) (will be a different file if
you have a 32 bit OS. In that case type sudo dpkg –i Nessus-6.4.3-debian6_i386.deb
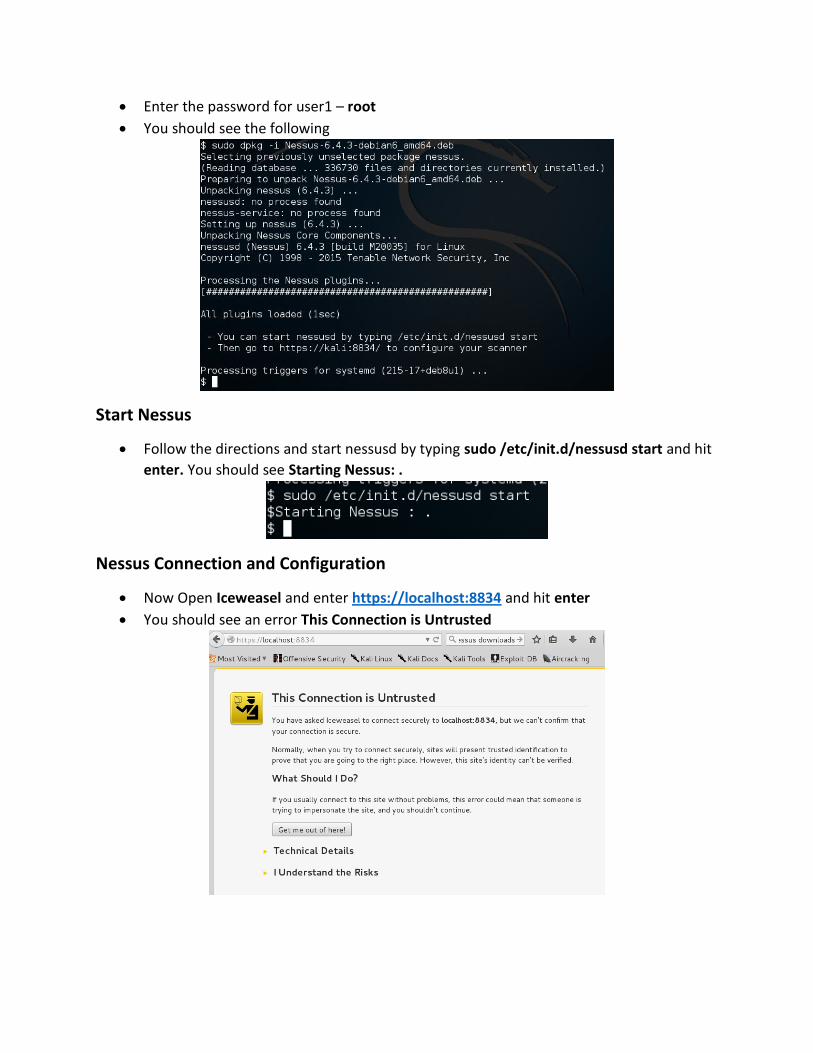
Enter the password for user1 – root
You should see the following
Start Nessus
Follow the directions and start nessusd by typing sudo /etc/init.d/nessusd start and hit
enter. You should see Starting Nessus: .
Nessus Connection and Configuration
Now Open Iceweasel and enter https://localhost:8834 and hit enter
You should see an error This Connection is Untrusted

Click I Understand the Risks
Click Add Exception
Click Get Certificate and Confirm Security Exception
You will be presented with the Nessus welcome screen, Click Continue
Initial Account Setup
o Username – user1
o Password – root
o Confirm Password – root
If you are asked if you want to save your password select Never…

Activation and Plugins Download
Enter you activation code from your nessus.txt file and Click Continue
Wait for the plugins to download
When the update is complete you will be at the logon screen
Enter the username of user1 and a password of root then Click Sign In
You will now be at the Nessus Main Screen

Let’s create a new folder for our scans called user1.
Click on New Folder, enter user1, and Click on Create
You will now see the user1 folder under My scans
Now we are ready for scanning
Nessus Scan
Click on New Scan
Select Basic Network Scan
Enter the following Information
o Name – Basic Scan Bee-box
o Description Basic Scan bee-box
o Folder – user1
o Scanner – Local Scanner
o Targets enter the ip addresses from Bee-Box that you wrote down earlier.
Click on Save and Nessus will conduct a scan of the most common ports
Wait for the scan to finish and the green circle will be replaced with a gray checkmark.
Click on the completed scan and review the results
Click on New Scan
Select Basic Network Scan
Enter the following Information
o Name – Basic Scan OWASP
o Description Basic Scan OWASP
o Folder – user1
o Scanner – Local Scanner
o Targets enter the ip addresses from OWASP that you wrote down earlier.
Click on Save and Nessus will conduct a scan of the most common ports

Wait for the scan to finish and the green circle will be replaced with a gray checkmark.
Click on the completed scan and review the results
Nessus Scan Two Hosts
Click on New Scan
Select Basic Network Scan
Enter the following Information
o Name – Basic Scan 2hosts
o Description Basic Scan 2hosts
o Folder – user1
o Scanner – Local Scanner
o Targets enter the ip addresses from OWASP and Bee-Box that you wrote down earlier.
Click on Save and Nessus will conduct a scan of the most common ports
Wait for the scan to finish and the green circle will be replaced with a gray checkmark. This will
take a while as it is scanning 2 hosts.
Click on the completed scan and review the results
Report Executive Summary
Click on Export
Select PDF
Accept Executive Summary and Click on Export

You will now be asked if you want to save the file. Click Save File
Now click on the down arrow and you will see the pdf file. Click on the pdf file to open it
The Nessus Report will now display on your screen
The executive summary provides the vulnerability information for each host in order of
severity.
Change the view to be 100% and then click on the first ip address

At the top of the screen you will notice the summary of each severity by number
Go through the report and look at all the detail it provides. This is an executive summary
you can provide to show vulnerabilities by severity so that the client knows what issues
they need to address in order of importance.
Select the next IP address and look at the detail for that host
When you are done looking at the report Close it
Thanks for your attention I hope this course has helped you on your way to become an ethical
hacker…
