wifi pstn - banggood
TRANSCRIPT

WiFi + PSTNSmart Home Alarm System

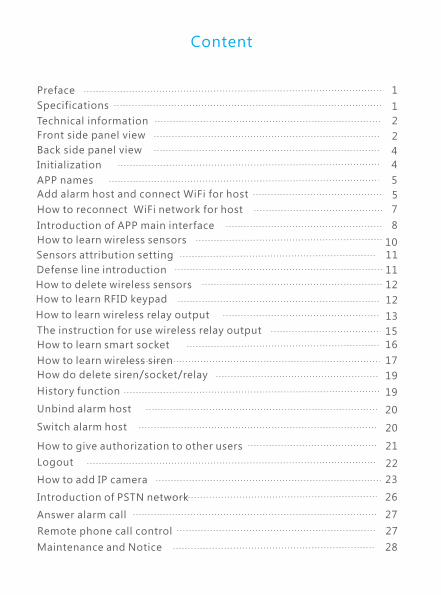
Preface
Specifications
Technical information
Front side panel view
Back side panel view
Initialization
APP names
Add alarm host and connect WiFi for host
How to reconnect WiFi network for host
Introduction of APP main interface
How to learn wireless sensors
1
1
2
2
4
4
5
5
7
8
10
11
12
12
13
15
16
17
19
19
23
20
20
How to learn RFID keypad
Defense line introduction
How to delete wireless sensors
How to learn wireless relay output
The instruction for use wireless relay output
How to learn smart socket
How to learn wireless siren
How do delete siren/socket/relay
History function
How to add IP camera
Unbind alarm host
Switch alarm host
How to give authorization to other users 21
Logout 22
26Introduction of PSTN network
Answer alarm call 27
Maintenance and Notice 28
Content
Sensors attribution setting 11
Remote phone call control 27

Preface
Thanks for choosing our WiFi PSTN home alarm system. This home
alarm system has implanted the most advanced and popular Wi-Fi
technology into traditional PSTN alarm system technology, with very
simple wireless set up. It’s very convenient for users to set up the alarm
system via APP. Also Wi-Fi APP is much more simple for quicker
operation.
Caution: To ensure that you can enjoy the impeccable warranty service,
do not open the host-housing to repair and renovate by yourself or we
will not provide free warranty service. All the losses and the adverse
consequences it causes will be assumed by users.
Specifications:
1. Fashion design WIFI+PSTN home alarm system with voice.
2. 24 hours free of charge alarm pushes through WiFi network.
3. Support remote online upgrade.
4.Android + IOS APP application easily control, easy to give
authorization.
5. Work with IP camera, the IP camera APP embeds in the host APP.
Users can monitor what happen at home wherever and whenever.
6. Work with 5pcs smart sockets and 2pcs wireless relay outputs to
control simple home appliances.
7. Work with RFID wireless keypad.
8. Information push promptly when host connected with WiFi network.
9. Smart zone function: self-check doors/windows status when user
arm host.
10. Support maximum 99pcs wireless sensors,
user can edit each sensor ’s name .
11.Can store 3 alarm call phone numbers.
12.Support three types of defense line: 24H line, 1st line, 2nd line.
13.Support arm delay, alarm delay,timed arm/disarm function.
14. Built-in rechargeable battery .
1

Power supply: AC=100 ~ 240V
Working voltage: DC12V 1A
Static current: < 50mA
Alarm current: < 250mA
Backup Battery: 3.7V 1000mah
Standby time: 10 hours
Charging time: 8 hours
WiFi frequency:2.4G
Wifi transmission Power: 0.2W
Receiving and emitting frequency: 433MHz (868MHz optional)
Wireless transmission distance: ≥100 m (Open space)
Working condition: temperature: -10ºC ~ 50ºC, humidity:5% ~ 80%
Front side panel view:
Technical information:
2
LED light
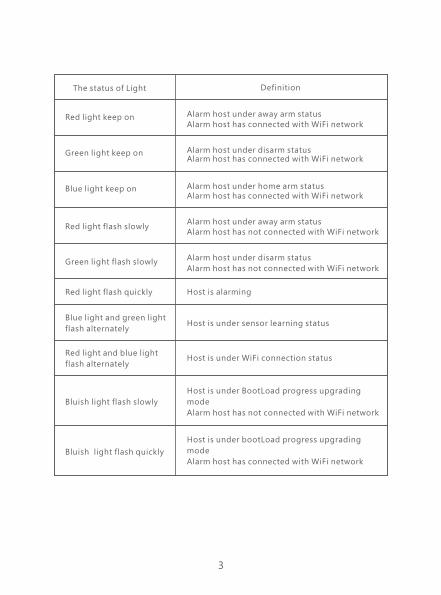
The status of Light Definition
Red light keep on Alarm host under away arm status
Alarm host has connected with WiFi network
Green light keep on Alarm host under disarm statusAlarm host has connected with WiFi network
Blue light keep on Alarm host under home arm statusAlarm host has connected with WiFi network
Red light flash slowlyAlarm host under away arm statusAlarm host has not connected with WiFi network
Green light flash slowlyAlarm host under disarm status
Alarm host has not connected with WiFi network
Red light flash quickly Host is alarming
Blue light and green light
flash alternatelyHost is under sensor learning status
Red light and blue light
flash alternatelyHost is under WiFi connection status
Bluish light flash slowly
Host is under BootLoad progress upgrading
mode
Alarm host has not connected with WiFi network
Bluish light flash quickly
Host is under bootLoad progress upgrading
mode
Alarm host has connected with WiFi network
3

Back side panel view:
WiFi connect button
Reset button
: long press the “WiFi connect button” , then the
host will enter WiFi connection status.
: user can press the reset button with pin. Long press the
reset button until the APP tips “Are you sure to reset alarm host? “,
press the “reset” icon to reset alarm host .
Initialization:
First connect telephone lines for host(take page 26 for reference),
power on the alarm host with adapter,then switch on the alarm host.
About 3 seconds later, the panel will make a long beep, then
initialization succeeds.
Reset
Power Jack
Power Switch
Telephone Line
Reset button WiFi Connect Button
4

After download the APP in smartphone, users need to .
Click the “Register” button to go to register interface, enter email
address , password and user name, then click the “Register” button to
save. Now users need to . Then user can input
email address and password to log in the APP.
register in APP
activate account in email
Add alarm host and connect WiFi for host:
Firstly,add alarm host.
Secondly,connect WiFi for host.
①
②
Log in APP, click the “ Add equipment” button, and
code of alarm panel to add equipment.
After scan the QR code, APP will turn to WiFi connection
interface.
Input the WiFi password.
(note:do not click the “connect” button now)
then scan the QR
5
APP names:
Apple users search: “ ”Carener S
Android users search: “ ”Carener S

③
④
⑤
Keep press the WIFI connection button on host about 2 seconds.
When host says “start to connect network, please enter WiFi
password on APP and then click "Connect" button”, turn to APP click
“Connect”.
Click “Confirm” when the APP tips “Network configuration
successful”.
Note:
1.
2.
If user failed to connect WiFi network for host, then he needs to scan
the QR code again and connect WiFi network again until he successfully
connect WiFi network for alarm host and become host’s administrator.
3.
Before users add alarm host, please confirm the smartphone has
connected with workable WIFI network and the alarm host has been
powered on with adapter.
The first person, who scans the host’s QR code and successfully
connect WiFi network for host, will become the host administrator.
Users can find host QR code on host’s rear cover .
The host QR code is formed by host serial number which is stuck on host
mainboard.
6
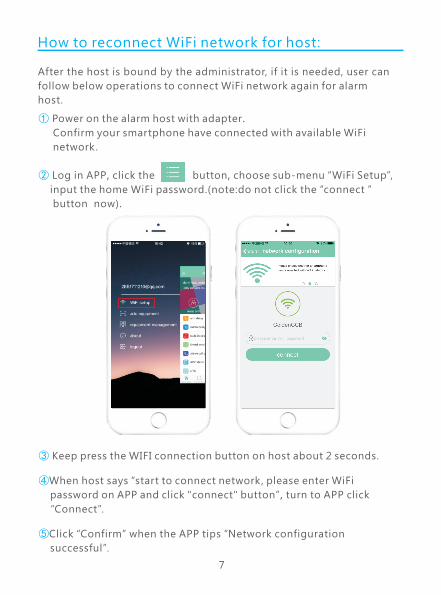
How to reconnect WiFi network for host:
①
②
Power on the alarm host with adapter.
Confirm your smartphone have connected with available WiFi
network.
Log in APP, click the button, choose sub-menu “WiFi Setup”,
input the home WiFi password.(note:do not click the “connect ”
button now).
③
④
⑤
Keep press the WIFI connection button on host about 2 seconds.
When host says “start to connect network, please enter WiFi
password on APP and click "connect" button”, turn to APP click
“Connect”.
Click “Confirm” when the APP tips “Network configuration
successful”.
7
After the host is bound by the administrator, if it is needed, user can
follow below operations to connect WiFi network again for alarm
host.

Introduction of APP main interface
Away Arm: press button to away arm the host, it will say “Away
Arm”. All sensors will under arm status.
Disarm: press button to disarm the host, it will say “ Disarm”.
Then the 1st defense line sensors and 2nd defense line sensors will
under disarm status, only 24 hours defense line sensors under arm
status.
(For defense line introduction, please take page 11 for reference)
Home Arm: press button to home arm the host, it will say “
Home Arm”.Then 1st defense line sensors and 24 hours defense line
sensors will under arm status, 2nd defense line sensors will under
disarm status.
Arm Delay: Arm time delay setting is that the host will not be armed
until delayed time arrives. Therefore, when press “ away arm” button
on alarm host, users will have time to deviate from house.
Alarm Delay: First user should active “alarm delay” function under the
sub-menu of “ sensor attribution” which is mentioned on page 11.
Then set time for delayed alarm. This function is usually applied to
leave time for users to disarm alarm host.
Timed arm/disarm: In total user can set 3 groups of auto arm/disarm
time .
For each group, user can set the arm time and disarm time, choose the
date from Monday to Sunday, click [Save] button. Then click the
“activate” button to activate that group time setting.
Alarm call numbers: User can set maximum 3 groups of alarm call
phone numbers.
8

Note: if the time zone begin with “0”, then the “0” will be deleted
automatically.
For example: the international time zone of Beijing is East 8 hour. So, it
can be set as 800.
Pushes setting : this function is for receive push alerts of AC fail and
recover,Arm/Disarm, Sensor low battery ,host online, PSTN off
alarming.
Call in setting: users can set it from 1 to 10 times. When users make call
to alarm host, after the call in time, the host will pick up call and users
can remote control the host.
Host password(default 123456): user can set host user password.
User will need input host user password when users make call to
remote control the host.
APP alarm ring time: when the host alarm, the APP will make alarm
ring. And users can set the APP alarm ring time from 0 to 90 seconds.
UTC time difference: after connect WiFi network for host, users need
to set time zone for host according to local international time zone.
User can set time zone like XXYY or -XXYY .
XXYY : is for East time zone.
-XXYY:is for West time Zone.
XX : means hour
YY : means minute
Note: the host password should be 6 digitals.
9

10
How to learn wireless sensors
Users can learn maximum 99pcs wireless sensors. Learning procedure
as below:
Login APP, click “Zone attribution”;
Choose the right sensor type;
Click “ Add equipment”,
the host will say “ start learning, please trigger sensor”;
Trigger the sensor;
The host will say “ learning success”,
click the “confirm”button when APP tips” success”.
①
②
③
④
⑤
Press [add] button
to add more sensors.

11
Defense line introduction
24H defense line: it means 24 hours protection, the alarm sensors in
this defense line will trigger the alarm system whenever in arm status or
disarm status, usually panic button, smoke detector, gas leakage sensor,
etc. should earn to 24H defense line.
1st defense line: it means perimeter protection, the alarm sensors in
this defense line will trigger host alarm when host under away arm and
home arm modes.
2nd defense line: it means interior protection, the alarm sensors in this
defense line will trigger alarm host only when host under away arm
mode, but will be deactivated when host under home/stay arm mode.
Alarm delay: Alarm delay setting is that the host will not alarm until
delayed time arrives.
: For alarm delay time setting part, users should take page 8 for
reference.
Detect Door: If the door/window sensors choose “detect door” ,then
those sensors will have smart zone function. That is, when users away
arm the alarm host, the system will automatically check whether doors
and windows are closed; alarm host will remind users which door or
window is open.
: This function is only available for smart door/window sensor.
Note
Note
Sensors attribution setting
Login APP, click “ Zone attribution”,find the sensor which you need
edit. Click that sensor to go to sensors attribution setting interface.
Then users can edit sensor ’s attribution, such as sensor ’ name, defense
line and so on.

12
Login APP, click “Zone attribution”, find the sensor which you need to
delete. Click that sensor to go to sensors attribution setting interface.
Then click “Delete sensor” button to delete that sensor.
How to delete wireless sensors
How to learn RFID keypad
①
②
③
④
⑤
Log in APP application, choose “zone attribution”;
Choose “RFID keyapd”;
Click “Add equipment”. The host will say “ start learning, please
trigger sensor”;
Press the tamper switch of keypad;
(the tamper switch is at the back side of keypad)
The host will say “ learning success”, click the “confirm” button when
APP tips” success”.
Join link: If alarm sensor choose “join link”, then means this alarm
sensor will active to work, if not chosen means it will not work anytime
in any status.

How to learn wireless relay output
①
②
③
④
⑤
⑥
Power the wireless relay output with adapter. To reset the relay
output, user can long press its learning button about 6 seconds until
the LED indicator lamp lights on again;
Log in APP application, click the "Automation” button;
Choose “Wireless control devices”;
Click “Add Equipment” button or “Add”button;
Choose “Wireless relay output” .The host will say “ start learning,
please wait”;
Press the learning button of relay, its indicator light will flash
and the relay will make switch sounds;
13

⑦
⑧
The host will say “ learning success”, click the “confirm”button when
APP tips” success”;
Disconnect power adapter from relay. And then reconnect power
adapter for delay. Then user can control relay outputs on APP.
14

The instruction for use wireless relay output
15

How to learn smart socket
①
②
③
④
⑤
⑥
Log in APP application, click the "Automation” button;
Choose “Wireless control devices”;
Click “Add Equipment” button or “Add”button;
Choose “Smart socket” ,The host will say “ start learning, please
wait”;
Long press the smart socket learning button until its LED light turn
on. When the socket is coding with alarm host, its LED light will flash
slowly. If the LED light quickly flash two times, it means coding
succeed.
The host will say “ learning success”, click the “confirm” button when
APP tips ” success”.
16

How to learn wireless siren
①
②
Log in APP application, click "Automation" and choose “Siren
setting”;
Set the siren ring time and choose the siren type(see below picture);
③
④
⑤
Back to "Automation”, choose “Wireless control devices”;
Click “Add Equipment” button or “Add”button;
Choose “Wireless siren”. The host will say “start learning, please
wait”;
17

⑥
⑦
Long press type [B] siren learning button for 3 seconds or short
press type [A] siren learning button, then the siren will start
coding with alarm host;
The host will say “ learning success”, click the “confirm” button
when APP tips” success”.
18

How to delete siren/socket/relay output:
①
②
③
④
Log in APP application, click the "Automation" button;
Choose “Wireless control devices”;
Find the device you want to delete, and then left slide that device.
The APP will appear “delete” button;
Click that “delete” button.
When the host connect with WiFi network. Click the [History] button,
the latest 50 alarm and operation records can be traced.
History function
19

Unbind alarm host
Log in APP application , click button. Choose “equipment / host
management” , left slide the device which you want to unbind, then
click “Unbind” to unbind the current alarm host.
20
Switch alarm host
Log in APP application, click button. Choose “
management”, click the “switch” button at top right corner. Then
choose the alarm host and click “Confirm”.
equipment / host

How to give authorization to other users
The APP administrator can give authorization to other users. The other
users need to download APP and sign up firstly and get the right to be
authorized, then the administrator can give authorization successfully.
Operations as below:
Log in APP application, and click button.
Choose “equipment/host management”
Click “current equipment”,
Click ,then choose “Authorization”
①
②
③
④
21

⑤
⑥
Input the email address of other user who need to be authorized,
and click “Authorization now”.
Click “confirm ” when the app tips “Invitation has been sent,
waiting for members of treated” . The authorized users will receive
a notice “Administrator give you permission to share equipment ” ,
the authorized users can click “accept”. Then authorization succeeds .
After authorization, the authorized users can control the host and
receive pushes. The authorized users can not authorize other users.
Only the administrator can authorize other users, and administrator
can also unbind the authorized users.
22
Logout
User can click “Logout” button to return to log in page.

How to add IP camera
Firstly, install IP camera APP:
Apple users search: “ ”yoosee
Android users search: “ ”yoosee
Or users can visit the website ( to download APP.www.yoosee.co)
Secondly, register in IP camera APP.
Then add IP camera.
Smart connection
Note
: users need to power on IP camera with adapter.
Choose “Smart connection” to enter next interface, click “Next” to
enter next interface ,then fill in the WiFi password and click “Next”.
he APP will automatically shows IP camera ID, input the
device password(default:123) and click “save” button, then adding
succeed.
.
: after adding succeed, if there is exclamatory mark beside
the device, users should change more complex password for IP
camera.
Click “Next”.Wait for some time, click “OK” when APP tips “setting
success”.T
23
“Smart connection”and
“Add manually”.

24
:Firstly, choose “ ” to enter “Add online device”
interface.
Add manuallyAdd manually

25

Introduction of PSTN network
This product can work with PSTN network, users need to connect
telephone lines with the alarm host .
PSTN off push alert setting : When the host under away arm status, if
anyone pull out the telephone line from host. The host will alarm, and
users will receive PSTN off notification on smartphone application.(take
page 9 for reference)
26
This PSTN cable need connect withtelecom host.
The cable in package need connect with telephone

27
User can use smartphone to make a call to remote control panel. After the
ring time, user will hear the voice “ please enter password”. Then users can
input user password(Default user password is 123456) and then press “ #” to
confirm.
Press [1]: Away Arm the host
Press [2]: Home Arm the host
Press [3]: Disarm the host
:
.Please be careful and slow when user input the password. After user
press each digital, he will hear the indicator sound like ”di” .
. For wrong password, users will hear ”wrong password”, user can try
to input the correct password and press”#” again. For correct password,
users will hear “correct password”, and then users can set the host via
smartphone keypad.
Note
1
2
Remote phone call control
Alarm call introduction:
When the host make alarm, it will send alarm push to smartphone APP
and it will make alarm call to the preset phone numbers.
After user pick up the alarm call, he will hear the alarm sounds. User can
control the host via APP.
: users can set maximum 3 groups of alarm phone call numbers.
The host will
The host will dial each number every 45s.
And the host will make maximum 3 circles alarm calls.
Note
make alarm call to users until users pick up alarm phone call.

Maintenance
Alarm system need regular care and maintenance and detection to
ensure they work stable, reliable and safe. Normally the host needs a
thorough inspection every 3 months and the detectors need to be
checked once a month.
Whether the host normally dials up the telephone numbers.
Whether the host can receive detector signal and whether its backup
battery works.
Manually trigger detectors to check whether they trigger panel alarm.
Check batteries of all detectors to see whether they are under voltage.
!
!
!
!
Alarm equipment, for explosion-proof design, shall not directly be used
in hazardous location. Do not dismantle, repair and modify products
privately.
Without permit and consent from relevant department, do not directly
set "110", "119" or alarm phone number of police station as alarm
phone number of the host.
Notice
28
