wilkinson - irrigation renovation and troubleshooting
TRANSCRIPT

1/21/2019
1
Irrigation Renovation and Troubleshooting Strategies
STMA 2019
Discussion Outline
• HDPE‐Simplified
• “Spin‐off Spin‐on” Renovation
• Two‐Wire Communication
• Ground Penetrating Radar
• Pipe Bursting
• Pneumatic Boring
HDPE‐Why and How
• High Density Polyethylene
• Primary alternative to PVC
– Why?
– Environmental Impact
– Durability
HDPE versus PVC
HDPE is chlorine free and chemically inert
PVC manufacturing creates Dioxine
Potent Carcinogen
PVC manufacturing also creates ethylene dichloride and vinyl chloride
Known for myriad health issues including:
cancer, neurological and immune system damage
Product Comparison
HDPE
• Chlorine Free
• No Dioxin
• High abrasion resistance
• Chemical resistance
• Less susceptible to surge
• Seamless joint connections
• Flexible
• Built in UV protection
PVC
• Contains chlorine• Dioxine produced during
manufacturing process• Moderate abrasion and chemical
resistance• More susceptible to surge shock• Expected joint leakage • Very rigid
• No UV protection
HDPE Fusion
HDPE requires no solvents or gaskets
All pipe becomes a monolithic seamless unit through various heating processes
The result is a system without fail points and requires no thrust blocking
1 2
3 4
5 6

1/21/2019
2
Choosing the Material
• It is recommended to only transition one size in HDPE systems
• Most consultants recommend DR 13.5 and DR 11
• DR 13.5 is rated a 160 PSI
• DR 11 at 200 PSI
Nipples, Reducers, and other size transitions are resin 4710 with DR 11 for greater wall thickness
Large HDPE Pipe
Pipes come in 40’ or 50’ lengths
40 foot length is shown in the photo
• Laterals are commonly DR 13.5
• HDPE does not come in 2.5” size
• 2” pipe can come in sticks or 500 foot rolls
Notice the pipe is marked just as PVC would be
Pipe brand, size, pressure rating, and resin type are all clearly visible
Examples of Pipe in transit and storage
7 8
9 10
11 12

1/21/2019
3
Types of Fusion
• Primary Fusion Types Include:
• Butt Fusion
• Sidewall Fusion
• Socket Fusion
• Electrofusion
• All fusion is about heating and Pressure
HDPE Expandability
• Hybrid systems are also a popular option.
• HDPE can be used in conjunction with PVC to expand current systems.
• Some designs marry PVC mainline to HDPE laterals.
• The ability for HDPE to be cut and refused means future upgrades will offer seamless expandability.
Butt Fusion
Can be done either manually or hydraulically
Must be aligned so that no gaps are apparent…both vertically and horizontally
All fusion requires the pipe to be cleaned with
minimum 96% isopropyl alcohol
ANY dirt/sand/debris/moisture will compromise fusion
Hydraulic Butt FusionMcElroy 412 Tracstar McElroy Manual 28
Butt Fusion
• Manual butt fusion requires the use of a pitbull as seen to the left
• The pipe is shaved (faced) flat
• The hot plate is then placed between HDPE pieces at 450 degrees Fahrenheit
13 14
15 16
17 18

1/21/2019
4
Saddle Fusion
Sometimes called Branch Saddle or Sidewall Fusion
Used in the replacement of
‘Tees’
Primary objective is to transition sizes and direction
Requires same basic setup principles as
Butt Fusion
Sidewinder Setup
Saddle Fusion
Socket Fusion
Socket Fusion
• Male to female adapters may be needed when changing direction
• Generally socket fusion is done when connecting smaller pipe 3” or less
• Typically no change in DR equivalency
• Used for couplers, tees or 90’s
• Predetermined heating times vary depending on pipe size
Socket Fusion
19 20
21 22
23 24

1/21/2019
5
Socket Fusion
Electro Fusion
• Costly during new construction.
• Operates by electricity heating filamentous wire embedded in the coupling.
• After predetermined heating time, the fuse is complete
• Would be my choice for R&M and would recommend all HDPE mainline clubs have one.
Electro Fusion
Philmac Fittings
• Compression repair coupling for 2” HDPE
• Some limited supply of 3” fittings
• Can be useful for repair needed immediately on 2” pipe.
Hybrid System
• A PVC mainline provides a comfort level with those concerned with leaks/breaks.
• Utilizing HDPE laterals allows a system the flexibility to have the option of couplers for all pipe.
Additional options may be to use Philmac fittings on swing joints rather than saddle fusion.
25 26
27 28
29 30
1/21/2019
6
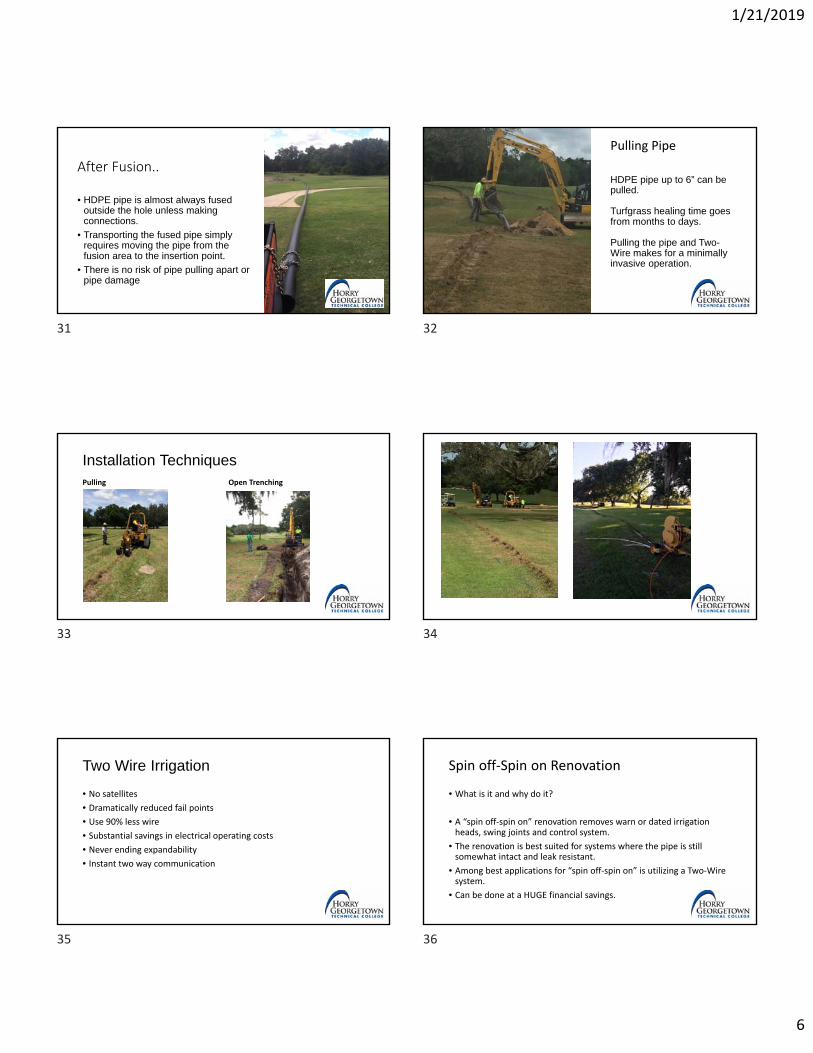
After Fusion..
• HDPE pipe is almost always fused outside the hole unless making connections.
• Transporting the fused pipe simply requires moving the pipe from the fusion area to the insertion point.
• There is no risk of pipe pulling apart or pipe damage
HDPE pipe up to 6” can be pulled.
Turfgrass healing time goes from months to days.
Pulling the pipe and Two-Wire makes for a minimally invasive operation.
Pulling Pipe
Installation TechniquesPulling Open Trenching
Two Wire Irrigation
• No satellites
• Dramatically reduced fail points
• Use 90% less wire
• Substantial savings in electrical operating costs
• Never ending expandability
• Instant two way communication
Spin off‐Spin on Renovation
• What is it and why do it?
• A “spin off‐spin on” renovation removes warn or dated irrigation heads, swing joints and control system.
• The renovation is best suited for systems where the pipe is still somewhat intact and leak resistant.
• Among best applications for “spin off‐spin on” is utilizing a Two‐Wire system.
• Can be done at a HUGE financial savings.
31 32
33 34
35 36

1/21/2019
7
Where to start
• Isolating a single hole will allow all heads in that area to be changed.
• The photo shows a single head that has been switched with several other heads that have also been switched in the foreground.
• Without knowing what is underground surprises are common
• Be well stocked for potential surprises or be prepared to make numerous trips to your nearest supply store.
Following installation the heads should be set to ensure the area is clean and operational by flag key until wire can be pulled.
In this photo, inboard/outboard heads were added.
Spin off‐Spin on with Two‐Wire
Plowing the single wire reduces visible
impact to the course.
No communication wire, common
wire, or field wires are necessary.
Single head control can be achieved and with minimal
disturbance.
37 38
39 40
41 42

1/21/2019
8
Equipment
• Only a small plow should be needed.
• Minimal visual disruption to the turfgrass will be noticed
• Typical healing time for the plow line will be less than two weeks and we opened for play the same day as installation.
• Mapping the wire route can be a simple as painting a path to the next sprinkler.
• Each sprinkler will operate independently so wire mistakes are greatly reduced.
If done properly, few boxes for wire splices should be needed.
Splices can be made at the head to minimize fail points.
Splice boxes will serve as good grounding points as ground rods should be placed within 500 feet of each other.
• Rolling the plow lines should take place as fast as possible to ensure the turfgrass heals properly and doesn’t dry out.
• The longer the area stays open, the more likely the line will not settle properly.
Inboard/Outboard updates
• Create dual head control on greens where full circle operation existed.
• Marries seamlessly with two-wire updates.
43 44
45 46
47 48

1/21/2019
9
Parts Breakdown
• Few parts will be needed
• Determining the type of service tee will speed material ordering
• Remember all fittings will now be ACME so adapters may be needed.
Adding Quick Couplers to greens, tees and fairways is also an easy project.
Adding electric valves to water isolated areas like tees and bunkers can also be achieved this way.
Plowing Drawbacks
• Shallow or mislocatedpipe can create the need for additional repairs.
• However, the minimal disturbance will more than make up for the possibility of periodic cuts in pipe.
Ground Penetrating Radar
49 50
51 52
53 54

1/21/2019
10
Ground Penetrating Radar
What is it?
• GPR is a nondestructive method for detecting subsurface structures, voids, discontinuities, and changes in material.
• GPR can be used in a variety of soils but works best in dry sandy or hard materials such as concrete, granite, and dry sandstone.
• GPR will locate size, width and depth of drainage pipes, irrigation lines, conduit and other objects.
How it works
• GPR uses radar pulses transmitted into the ground to image the subsurface by recording electromagnetic signals reflected back to the GPR system.
Basic Operation
• The buttons allow the user to quickly set up the GPR to relay back data.
Basic Operation
• Several color options are available to best suit your desire and the atmospheric conditions.
• The Depth button allows you to search more deep or shallow to better locate the objects.
Understanding the Screen
• As you walk behind the GPR, the screen will widen to show the path.
• It is suggested to walk beyond the object, then walk backwards to place the arch directly over the object that was located.
• Once you locate the object, adjust the arch width and depth to determine location and size.
55 56
57 58
59 60

1/21/2019
11
Basic Operation
• As the arch looked prior to setting it over the object.
Basic Operation
• Once the location arch is set, we can focus on the amount of vacant color in the middle of the arch.
• The thickness of the arch becomes more pronounced as the object thickness increases.
Object Located
• The Depth shown in the bottom right corner indicates the depth of the object after adjustments were made.
Pneumatic Boring
Where is boring applicable?
• Crossing cartpaths and roads.
• Installing irrigation or drainage without costly cutting or curb damage.
• Adding sleeves/conduit for communication cable, subsurface venting units, fans, satellites, etc.
61 62
63 64
65 66

1/21/2019
12
How It Works
• Compressed air propels the “missile” through the soil.
• The missile has threading on the rear where the hose attaches.
• Altering the direction the threading will alter a forward or reverse motion.
• The missile must be placed parallel to its desired endpoint.
Lubrication
• The only maintenance issue will be keeping the oil reservoir at proper levels.
• The ball valve allows the boring speed to increase or decrease depending upon the volume of air allowed to pass.
Be Cost Effective
• Determine locations prior to renting equipment.
• Excavating a hole large enough to fit the “missile” will also save rental time.
67 68
69 70
71 72

1/21/2019
13
Air Compressor
• The “missile” needs adequate air compression to work properly.
• The compressor comes with the needed hose, oil reservoir, and missile.
Pipe Bursting
Why Pipe Bursting?
• Aging systems with deteriorating pipe
• Areas where Transite pipe is still in use.
• Mainline under right of ways or near narrow easements.
73 74
75 76
77 78

1/21/2019
14
Pipe Bursting
• Speed of installation with 300 to 600 feet replaced per day
• Ability to replace size on size or upsize
• Follows existing utility path using as‐builts for design
• Reduction in social impact as traffic flows freely
• Reduction in environmental impact with 86% less excavation
• Installs new HDPE pipe with 100 plus year design life
Swagelining Overview
Pipe Bursting
• The Swagelining process uses HDPE which has an outside diameter slightly larger than the inside diameter of the host pipe to be renewed. After sections of HDPE are fused together, it is pulled through a reduction die immediately before entering the host pipe.
Pipe Bursting
• This temporary reduction enables the HDPE to be pulled through the original pipeline. After the PE pipe has been pulled completely through the host pipe, the pulling load is removed. This allows the HDPE to naturally return to its original diameter until it forms a compressive tight fit within the host pipe.
Benefits of Pipe Bursting
• Reduce costs
• Reduce social impact
• Reduce environmental impact
• Reduce project duration
79 80
81 82
83 84

1/21/2019
15
Day of Pipe BurstingPipe Bursting/Swagelining
• The method utilizes HDPE pipe and entails the pre‐assembly and testing of approximately 300 to 600 foot lengths of pipe above grade at a nearby staging location.
• This work is completed in advance of pipe bursting operations. Once the pipe string is proven to be sound by the testing and disinfection procedures, bursting operations can begin.
• In the area of water main being replaced, a series of small excavations are made and the new pipe is pulled into place by pipe bursting the existing main. A post‐chlorination and flushing of the main is then performed and the new line is connected into the distribution system.
• Ultimately, all services are connected to the new main and the surface area is backfilled to preconstruction grade.
• The entire process is completed within a single day, 6 to 8 hours, thereby minimizing the disruption to area residents.
85 86
87 88
89 90

1/21/2019
16
Bursting Versus Splitting
• In some applications, the original pipe is cut as the pull head brings the new pipe through.
Schematic
• Ideal for 2" through 16" water main replacement
• 86% less restoration ‐Environmentally Friendly
• Crews visible to homeowners for 1 day
• No new easement required
• Projects completed 42% faster
Pipe Re‐Lining
• Cured in Place pipe (CIPP) can be used to rehabilitate sanitary sewers, storm drains and pressure pipelines for water, gas and process effluents.
• Prior to lining, the pipe must be cleaned by jetting to remove corrosion debris and detritus.
Special thanks to Mike Roach
91 92
93 94
95