windows 8 installation instructions for the pr3 install-win8.… · windows 8 installation...
TRANSCRIPT

Windows 8 Installation Instructions for the PR3
Required equipment:• PR3• Installation CD or downloaded and extracted PR3 files from
www.digitrax.com/downloads (PR3 Windows XP and Vista Drivers)• USB Cable• PS14 (or equivalent) 14 volt power supply
STOP!Read these instructions before connecting the PR-3 to your Computer
• NOTE - The Windows Vista drivers are compatible with Windows 8.• These instructions are for a new installation of the PR3 Drivers. • The key to a successful installation is NOT to allow Windows 8 to install the
drivers automatically.
PART ONE
Changes to Windows 8 need to be made before you can proceed! Please do the following:
1. Mouse over to the top-right to bring up the search window or press the Windows Key + I on your keyboard.

2. Click on the “Search” button.
3. Click on Settings4. Type in “advanced startup” without the quotes5. Click on “Advanced startup options”

6. The PC Settings > General menu will appear, scroll all the way down.
7. When you see “Advanced startup” click on the “Restart now” button below.
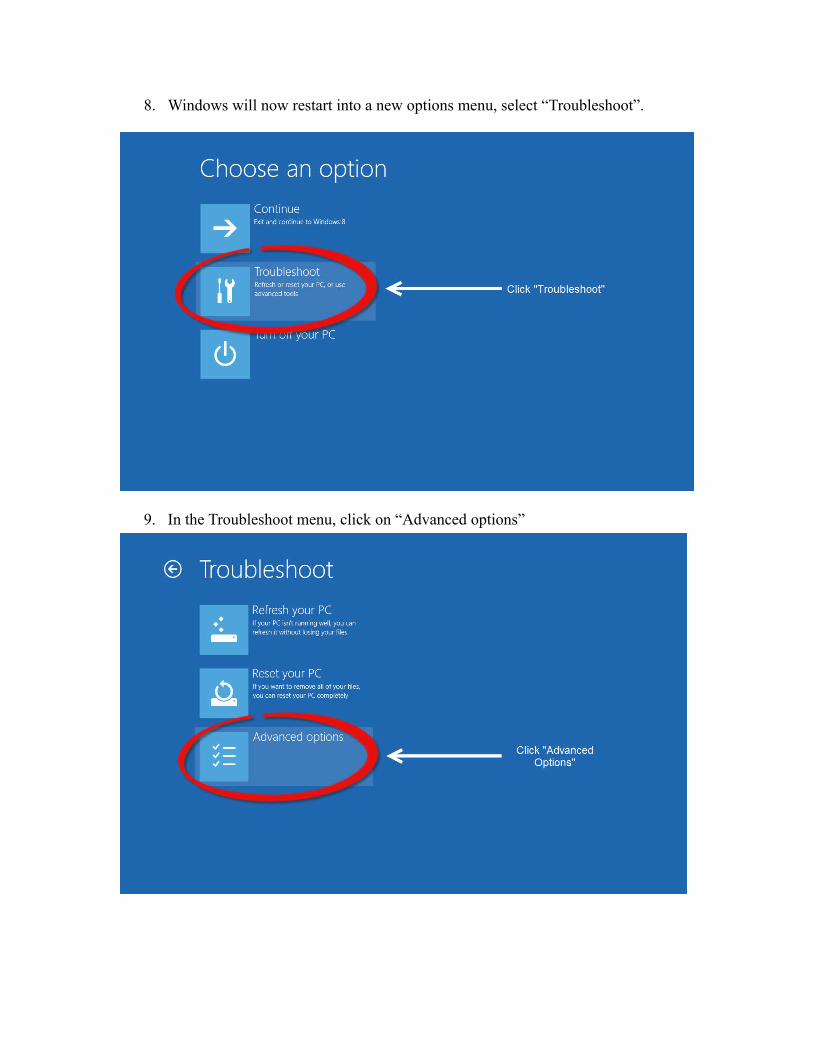
8. Windows will now restart into a new options menu, select “Troubleshoot”.
9. In the Troubleshoot menu, click on “Advanced options”

10. In the “Advanced Options” menu click on “Startup Settings”
11. You will now want to click on “Restart” to boot into the Startup Settings boot screen.
12. Once your computer has rebooted, the “Startup Settings” screen appears, Press “7” or F7” on your keyboard to “Disable driver signature enforcement”. Your

computer will reboot and you will now be able to install the PR3 Driver.
PART TWOIf you downloaded the drivers from the Digitrax website, extract the zipped files and note where you stored them prior to beginning installation:
1. Right click on the file folder. 2. Then click on Extract All... 3. Select a location, such as the desktop, where you will save the extracted files. 4. Click on Extract. 5. The files will decompress into a new folder. 6. Note the location where you saved the extracted files. You'll need it later in the
install process.
Installation13. Plug PS14 into a wall outlet.14. Plug the 2.1mm jack of the PS14 into the PR3’s Power Connector located on the
back of the PR3. a. The red LED (next to "ERR") should light solid and b. The Green LED (next to "USB") should blink on and off.
15. Press and Hold both buttons until the bi-color “STAT” LED flashes red and green. Release both buttons, the PR3 is now reset to its default settings (MS-100 Mode, No Termination).

16. Plug the USB cable into an open USB port on the computer. Select a port that is convenient and can be dedicated to the PR3. Using the same USB port will allow the PR3 to use the same Virtual Com Port number and ease future software configuration.
17. Plug the other end of the USB cable into the USB plug on the PR3.18. An Error message will briefly display at the bottom right of the screen stating
Device driver software was not installed correctly.19. If using the supplied CD-ROM Device Driver disk, insert the disk now.
NOTE - The following steps and screen captures may vary depending on your computer, software version and settings.
20. Press the Windows Key + R on your keyboard this will open the run dialog box.
21. The Run dialog box will open, type in devmgmt.msc and press OK.
22. The Device Manager will open. Right Click on the VCOM Port with the Yellow Exclamation Point.

23. Click on Update Driver Software...
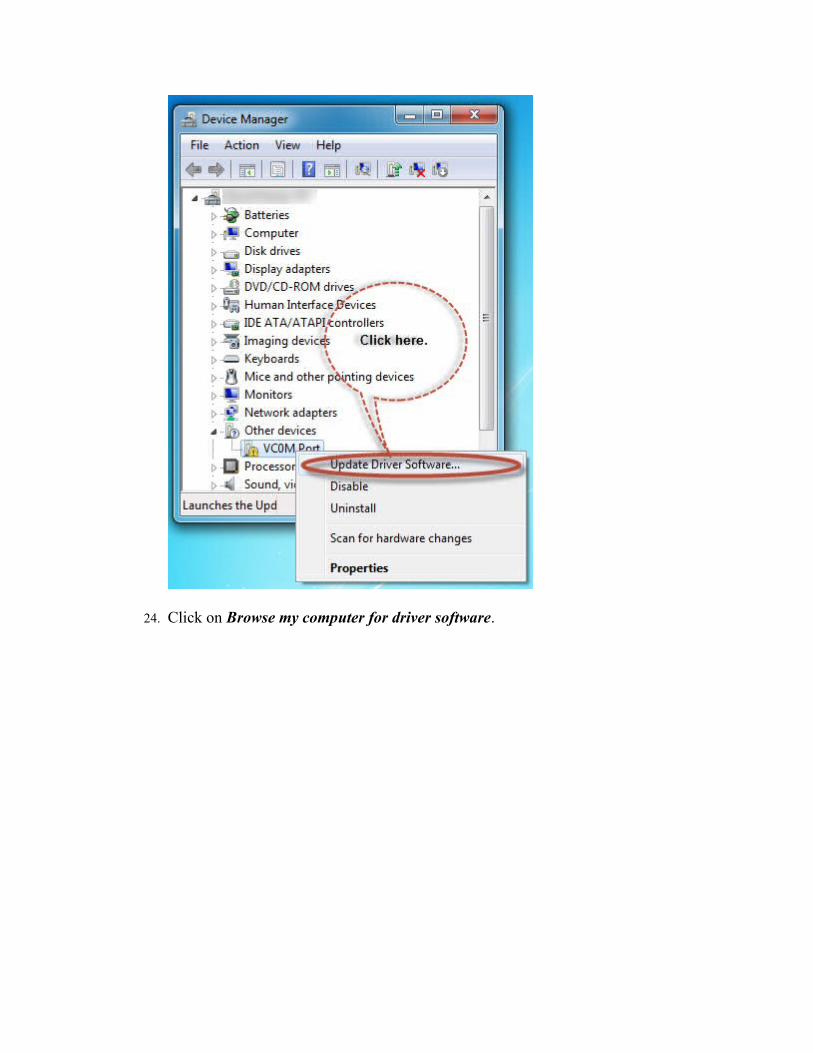
24. Click on Browse my computer for driver software.

25. Click the Browse my computer for driver software button
26. Browse for driver software on your computer dialog box updates, click on the Browse button.

27. Click on Computer.

28. If using the Installation CD, click on the CD-Rom or DVD Drive. Typically (D:). OR, if you downloaded the drivers from the Digitrax website, browse to the location on your computer where you saved the drivers. Skip to Step 19.
29. If using the Installation CD, click on the subdirectory win_xp_vista32_64.

30. Click the OK button.
31. Click the Next button.

32. A Red Windows Security box will pop up.

33. Click Install this driver software anyway.
34. A Installing driver software box will pop up.
35. A Windows has successfully updated your driver software box will pop up.
36. Note the COM Port that windows assigned the PR3. You will need this COM Port information for various Digitrax Utilities or 3rd party software programs. If you plug your PR3 into the same physical USB Port each and every time, Windows will always assign the same COM Port to your PR3.
37. Device Manager will show your newly installed COM port under Ports (Com & LPT).
38. Click the Close Button
39. Reboot your computer – this is important to complete the install process!
You have successfully installed your PR3 Driver Software!