windows iot core application development: … iot core application development: headless blinky...
TRANSCRIPT
Windows IoT Core Application Development: Headless BlinkyCreated by Rick Lesniak
Last updated on 2016-08-18 05:22:16 PM UTC
2333
557
101011
1213
14161618
2021
22
Guide Contents
Guide ContentsOverview
Headed and HeadlessC-Sharp (C#)
Headless BlinkyStep 1: Create SolutionStep 2: Add IoT framework
Program ArchitectureTimer threadTask deferral
Pin I/OPi Setup
BlinkyHeadless CodeRunning BlinkyHeadless
Remote MachineRun
DebuggingNext steps
FAQ
© Adafruit Industries https://learn.adafruit.com/windows-iot-application-development-headless-application
Page 2 of 22

Overview
Headed and Headless
There are two basic types of Windows IoT Core applications: “headed” and “headless”.
“Headless” apps have no graphical user interface (GUI), and are said to run “in thebackground”. That is, they continue to run even when you start up a “headed” application. Also,they don’t depend on having a monitor attached to the system.
“Headed” applications have a GUI, so you need a display attached to your system in order touse them.
C-Sharp (C#)
Using Visual Studio, you can program your Raspberry Pi in C# or Visual Basic (or even C++).Microsoft has unified the API (Application Programmability Interface) between C# and VisualBasic, so it’s easy to switch between them. We’ll be using C# for this tutorial (just because we
© Adafruit Industries https://learn.adafruit.com/windows-iot-application-development-headless-application
Page 3 of 22

like it better, and hey, it’s our tutorial anyway!).
Instructions on the C# and Visual Basic programming languages are wayyy beyond the scopeof this tutorial, so we’ll assume you already know the basics.
© Adafruit Industries https://learn.adafruit.com/windows-iot-application-development-headless-application
Page 4 of 22
Headless BlinkyMicrosoft provides the headless Blinky app as a preconfigured solution (Visual Studio is basedon solutions. Each solution may contain multiple projects. You can compile and run eachproject separately). The Blinky solution contains a single Blinky project.
Rather than simply downloading Blinky and running it, we thought it would be more useful to gothrough the entire process of creating the Blinky solution.
Note: We'll be changing the wiring of the LED from the Microsoft version of Blinky, but otherwiseit's all the same.
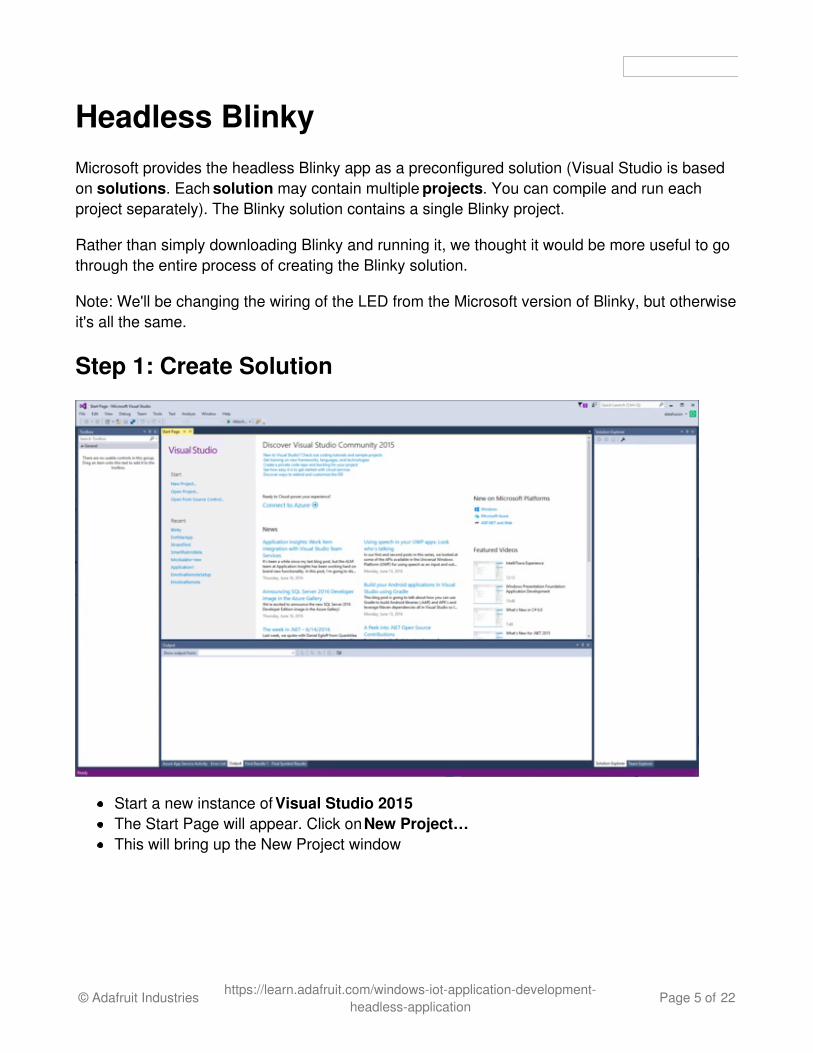
Step 1: Create Solution
Start a new instance of Visual Studio 2015The Start Page will appear. Click on New Project…This will bring up the New Project window
© Adafruit Industries https://learn.adafruit.com/windows-iot-application-development-headless-application
Page 5 of 22
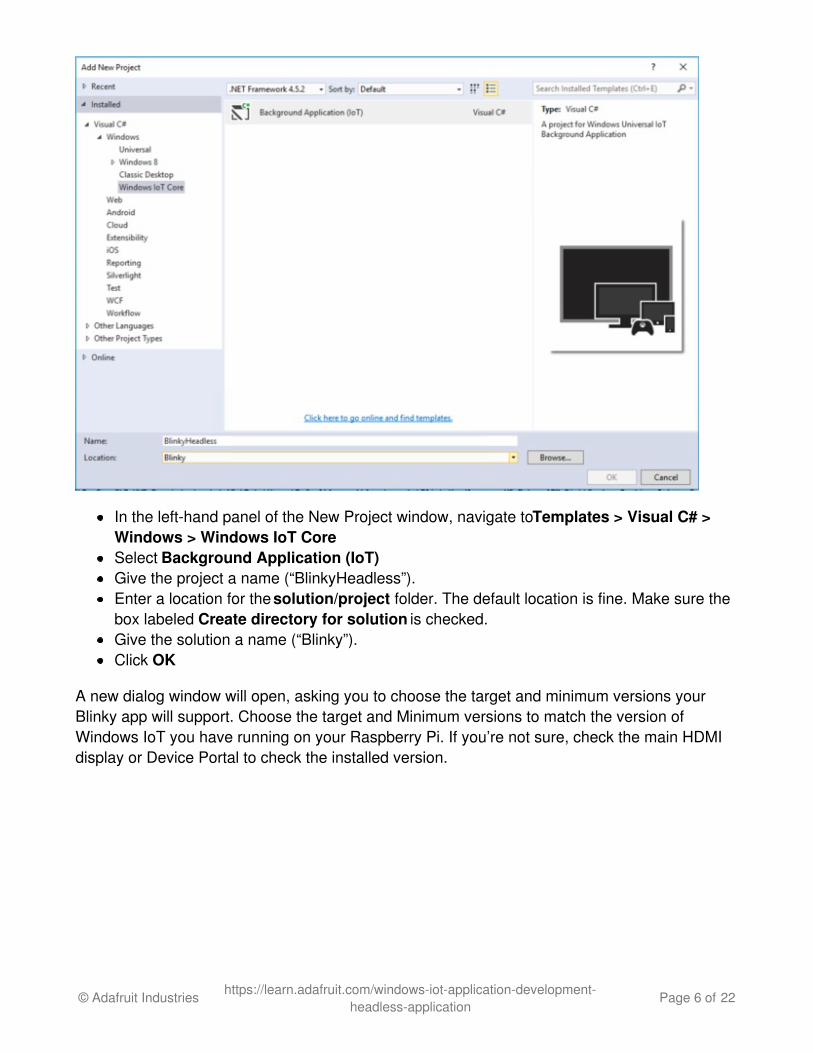
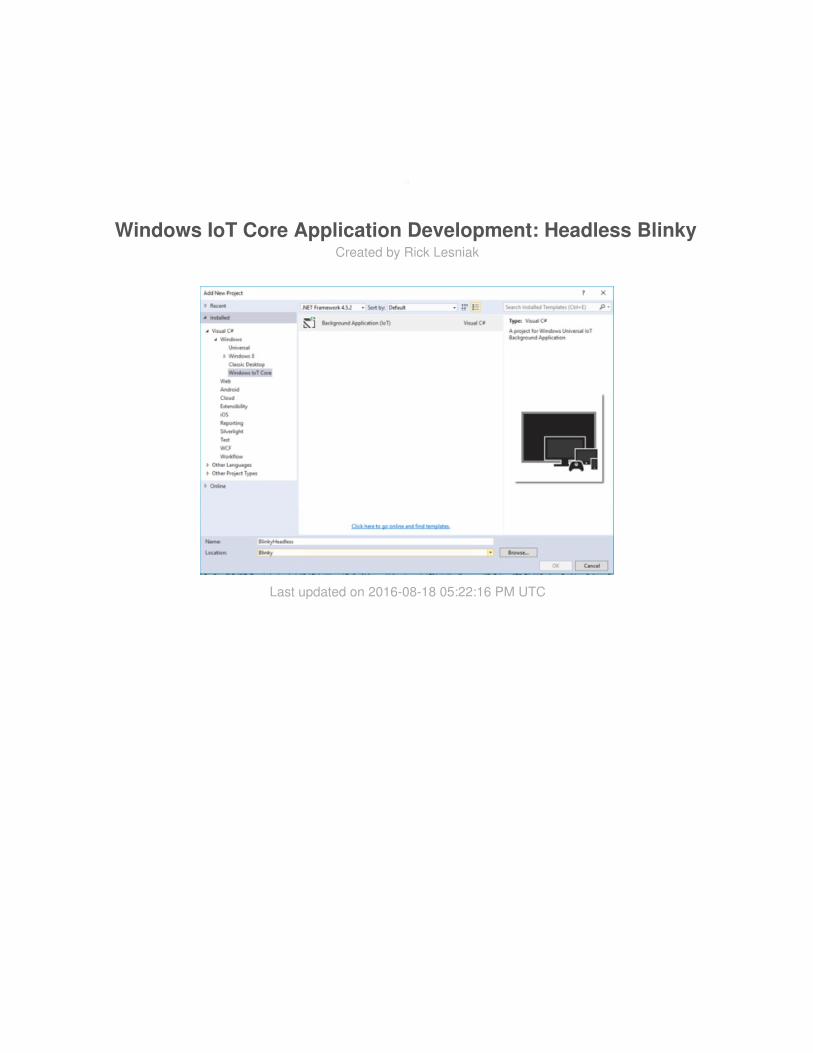
In the left-hand panel of the New Project window, navigate to Templates > Visual C# >Windows > Windows IoT CoreSelect Background Application (IoT)Give the project a name (“BlinkyHeadless”).Enter a location for the solution/project folder. The default location is fine. Make sure thebox labeled Create directory for solution is checked.Give the solution a name (“Blinky”).Click OK
A new dialog window will open, asking you to choose the target and minimum versions yourBlinky app will support. Choose the target and Minimum versions to match the version ofWindows IoT you have running on your Raspberry Pi. If you’re not sure, check the main HDMIdisplay or Device Portal to check the installed version.
© Adafruit Industries https://learn.adafruit.com/windows-iot-application-development-headless-application
Page 6 of 22
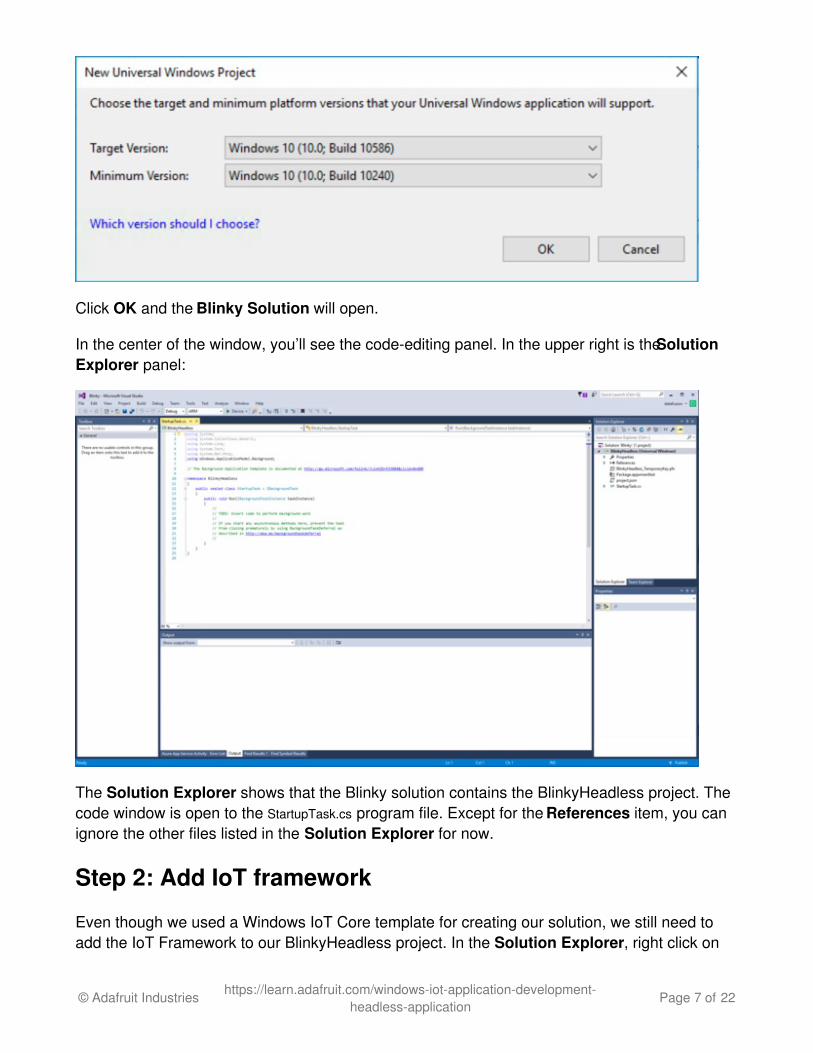
Click OK and the Blinky Solution will open.
In the center of the window, you’ll see the code-editing panel. In the upper right is the SolutionExplorer panel:
The Solution Explorer shows that the Blinky solution contains the BlinkyHeadless project. Thecode window is open to the StartupTask.cs program file. Except for the References item, you canignore the other files listed in the Solution Explorer for now.
Step 2: Add IoT framework
Even though we used a Windows IoT Core template for creating our solution, we still need toadd the IoT Framework to our BlinkyHeadless project. In the Solution Explorer, right click on
© Adafruit Industries https://learn.adafruit.com/windows-iot-application-development-headless-application
Page 7 of 22
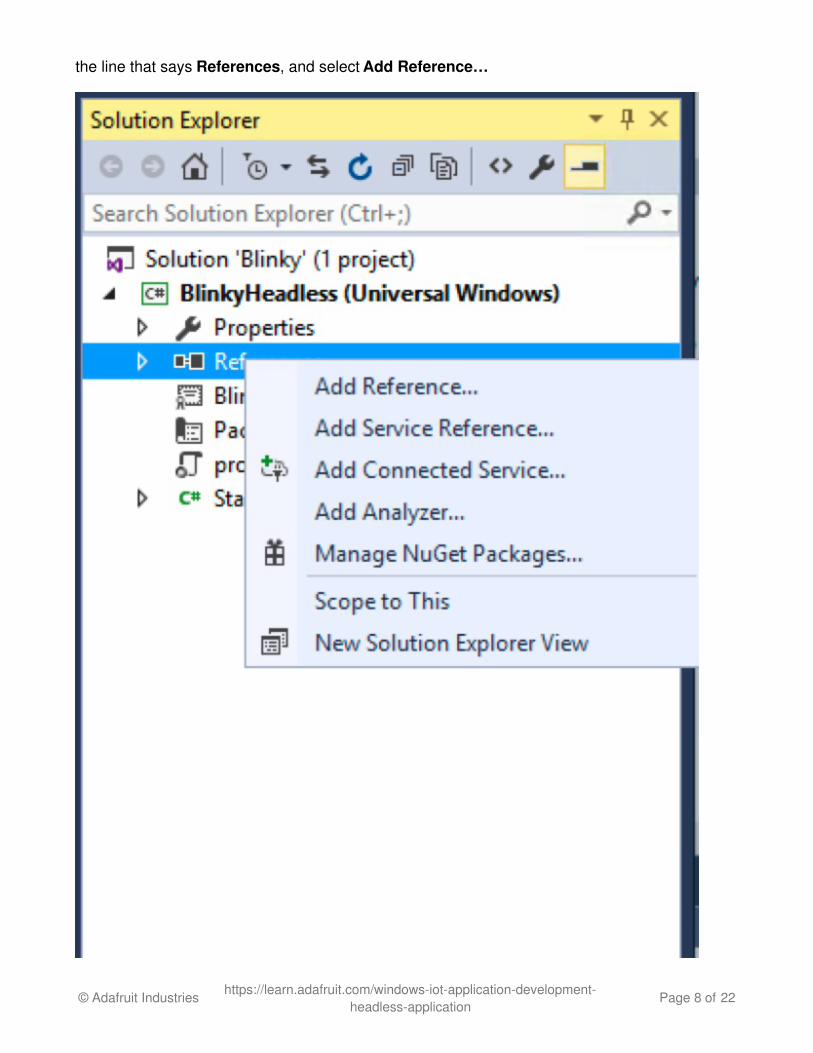
the line that says References, and select Add Reference…
© Adafruit Industries https://learn.adafruit.com/windows-iot-application-development-headless-application
Page 8 of 22
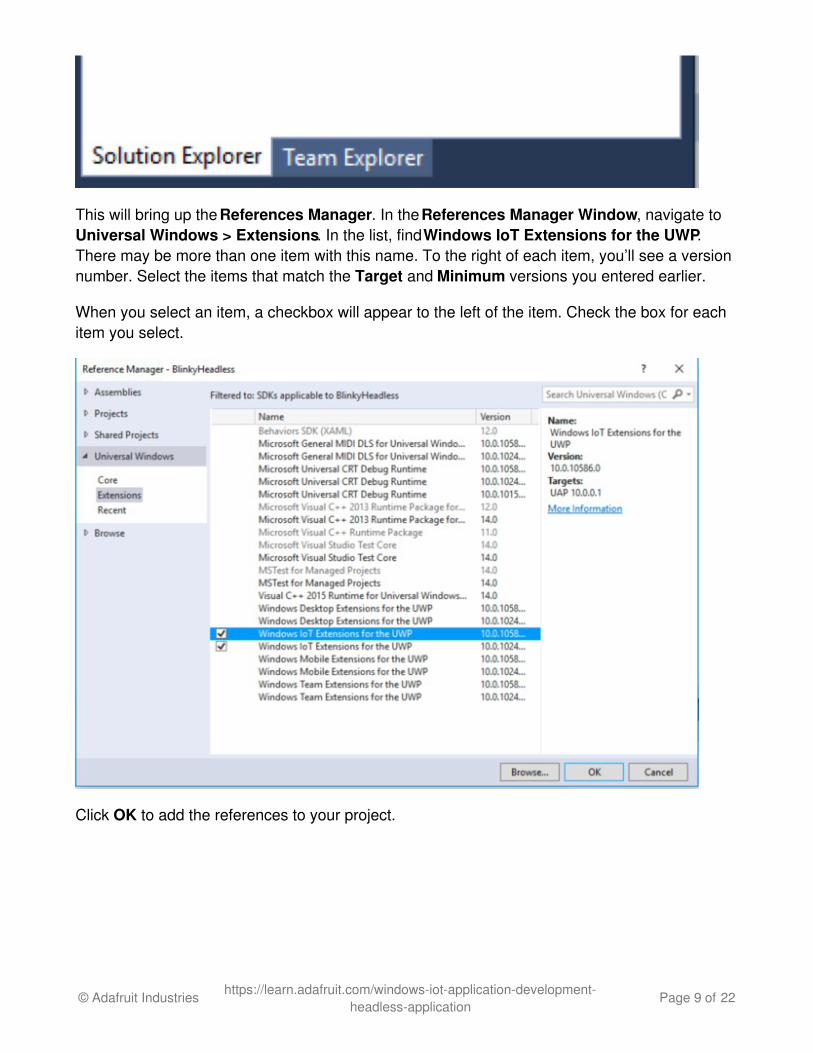
This will bring up the References Manager. In the References Manager Window, navigate toUniversal Windows > Extensions. In the list, find Windows IoT Extensions for the UWP.There may be more than one item with this name. To the right of each item, you’ll see a versionnumber. Select the items that match the Target and Minimum versions you entered earlier.
When you select an item, a checkbox will appear to the left of the item. Check the box for eachitem you select.
Click OK to add the references to your project.
© Adafruit Industries https://learn.adafruit.com/windows-iot-application-development-headless-application
Page 9 of 22
Program ArchitectureWe said we weren’t going to turn this into a C# tutorial, but a few words about the programarchitecture are appropriate.
Windows IoT Core applications are oriented around tasks. If you’re mostly familiar with Arduinoor python programming, you probably aren’t too familiar with tasks. Basically, a task is aprogram than can run at the same time as other programs on the same computer. Arduino onlyallows one program at a time. Linux supports tasks, but you may not have done any task-oriented programming.
We’re not going to go into the intricacies of tasks here, but it’s worth noting that the fundamentalstructure of our BlinkyHeadless application is a task. You can see this from the type of theStartupTask class – it inherits from the IBackgroundTask interface class. To executeBlinkyHeadless, Windows IoT creates a new task object and uses it to call the Run function.
The Run function is where we’ll put our code.
If you’re curious, you can read more about background tasks here:
Background Tasks: More Infohttp://adafru.it/psAFor the purposes of this tutorial, we're going to use screen captures to illustrate the codecomponents of the application. The full code will be available at the end of the tutorial.
Timer thread
We’re not quite done with tasks. Tasks may also be referred to as threads, particularly whenthey exist within a task. One of the standard thread objects in Windows is the Timer. We will beusing a timer to control the blinking of our LED.
If you are familiar with Arduino, you will be accustomed to using delay() statements to controlthings like blinking LEDs. The drawback of this approach is that the Arduino can’t do anythingelse while it is waiting for the delay to expire.
In Windows, instead of using a delay, we can start a timer thread. Once the thread is started,we can go about doing other useful things, and the timer will alert us when the period hasexpired. The timer does this through a Timer Tick event. All we need to do is to create an eventfunction and associate it with the timer. When it’s time to turn the LED on or off, windows willautomatically call our tick event function.
© Adafruit Industries https://learn.adafruit.com/windows-iot-application-development-headless-application
Page 10 of 22

There’s one other thing we need to do. You may have noticed a series of using statements atthe top of StartupTask.cs. These are similar to the C #include or python import statements.They identify libraries we want to refer to in our program. We need to add the threading libraryto the list:
Don’t worry about the using statements that are grayed out – it just means that there are noreferences to those libraries in the code yet.
Task deferral
There is one other thing about tasking in BlinkyHeadless, and this is subtle. When the Runfunction exits, so does our main task. That is, our BlinkyHeadless application terminates. Wedon’t want this to happen.
In BlinkyHeadless, we really don’t have anything else to do while we’re waiting for the timer tickevent. We could add an infinite loop, but that will consume processor resources. Windowsprovides a better way to do the same thing, and that is a Task Deferral.
When we set up a deferral on a background task, such as our main task, the task won’t exit untilwe explicitly tell it that we’re done, even if it runs out of other things to do.
You can read more about background task deferral here:
Task Deferral: more infohttp://adafru.it/psB
© Adafruit Industries https://learn.adafruit.com/windows-iot-application-development-headless-application
Page 11 of 22
Pin I/ODigital I/O pin operations are quite simple in Windows 10 IoT Core. Windows provides a GPIOcontroller object. With this object, we can select a pin, set it for input or output, and read or writethe logic state of the pin.
To access a pin, we first need an instance of the GpioController object. As the name suggests,the GpioController is where we go to set up GPIO pins. Once we have a reference to theGpioController, we can get a reference to a pin.
The pin reference allows us to set the pin mode to input or output, and to read or write the stateof the pin.
Before we can do this, we need to add another using statement, to say that we’ll be using theWindows.Devices.Gpio library.
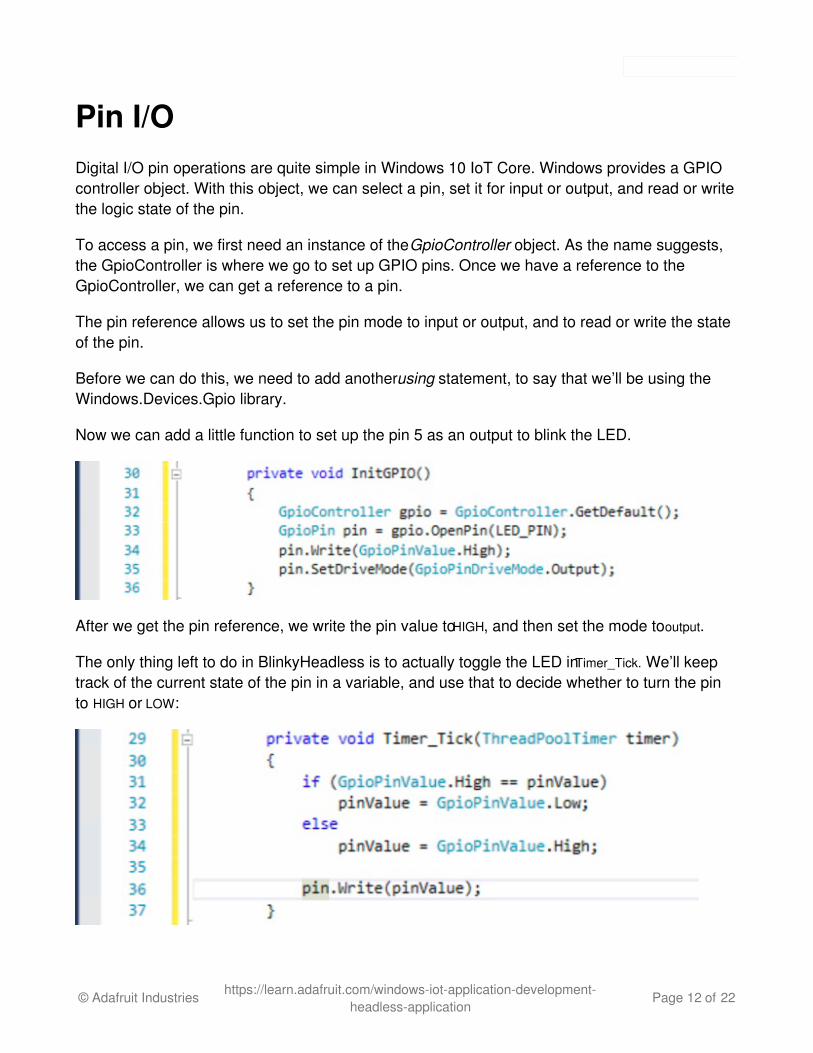
Now we can add a little function to set up the pin 5 as an output to blink the LED.
After we get the pin reference, we write the pin value to HIGH, and then set the mode to output.
The only thing left to do in BlinkyHeadless is to actually toggle the LED in Timer_Tick. We’ll keeptrack of the current state of the pin in a variable, and use that to decide whether to turn the pinto HIGH or LOW:
© Adafruit Industries https://learn.adafruit.com/windows-iot-application-development-headless-application
Page 12 of 22

Pi Setup
Of course, if we want to blink a LED, we need to attach a LED to the Pi. Use something like ared LED. Connect the long leg of the LED to GPIO 5 on the Pi. Connect a 180 Ohm resistor tothe short leg of the LED, and then connect the other end of the resistor to Ground on the Pi.
Connected this way, the LED will light when we set the GPIO pin HIGH, and it will turn off whenwe set the GPIO pin LOW.
(Note: This is different from the way Microsoft has the LED arranged in their version of Blinky. Microsoft Blinky asks you to wire the LED between 3.3V and the GPIO pin. Wired that way, toturn the LED on, you have to set the GPIO pin to low. To turn the LED off, you have to set theGPIO pin to high. There are reasons for doing it this way, but it's kind of logically backwards).
© Adafruit Industries https://learn.adafruit.com/windows-iot-application-development-headless-application
Page 13 of 22
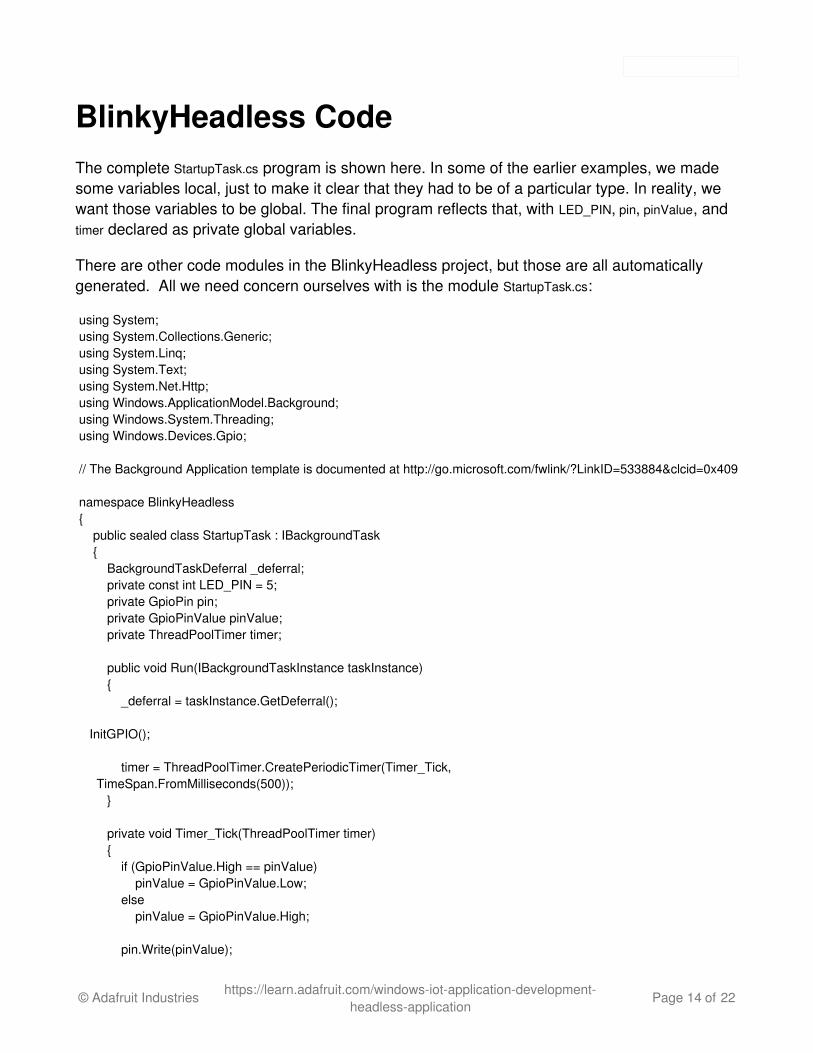
BlinkyHeadless CodeThe complete StartupTask.cs program is shown here. In some of the earlier examples, we madesome variables local, just to make it clear that they had to be of a particular type. In reality, wewant those variables to be global. The final program reflects that, with LED_PIN, pin, pinValue, andtimer declared as private global variables.
There are other code modules in the BlinkyHeadless project, but those are all automaticallygenerated. All we need concern ourselves with is the module StartupTask.cs:
using System; using System.Collections.Generic; using System.Linq; using System.Text; using System.Net.Http; using Windows.ApplicationModel.Background; using Windows.System.Threading; using Windows.Devices.Gpio; // The Background Application template is documented at http://go.microsoft.com/fwlink/?LinkID=533884&clcid=0x409 namespace BlinkyHeadless { public sealed class StartupTask : IBackgroundTask { BackgroundTaskDeferral _deferral; private const int LED_PIN = 5; private GpioPin pin; private GpioPinValue pinValue; private ThreadPoolTimer timer; public void Run(IBackgroundTaskInstance taskInstance) { _deferral = taskInstance.GetDeferral();
InitGPIO();
timer = ThreadPoolTimer.CreatePeriodicTimer(Timer_Tick, TimeSpan.FromMilliseconds(500)); } private void Timer_Tick(ThreadPoolTimer timer) { if (GpioPinValue.High == pinValue) pinValue = GpioPinValue.Low; else pinValue = GpioPinValue.High; pin.Write(pinValue);
© Adafruit Industries https://learn.adafruit.com/windows-iot-application-development-headless-application
Page 14 of 22
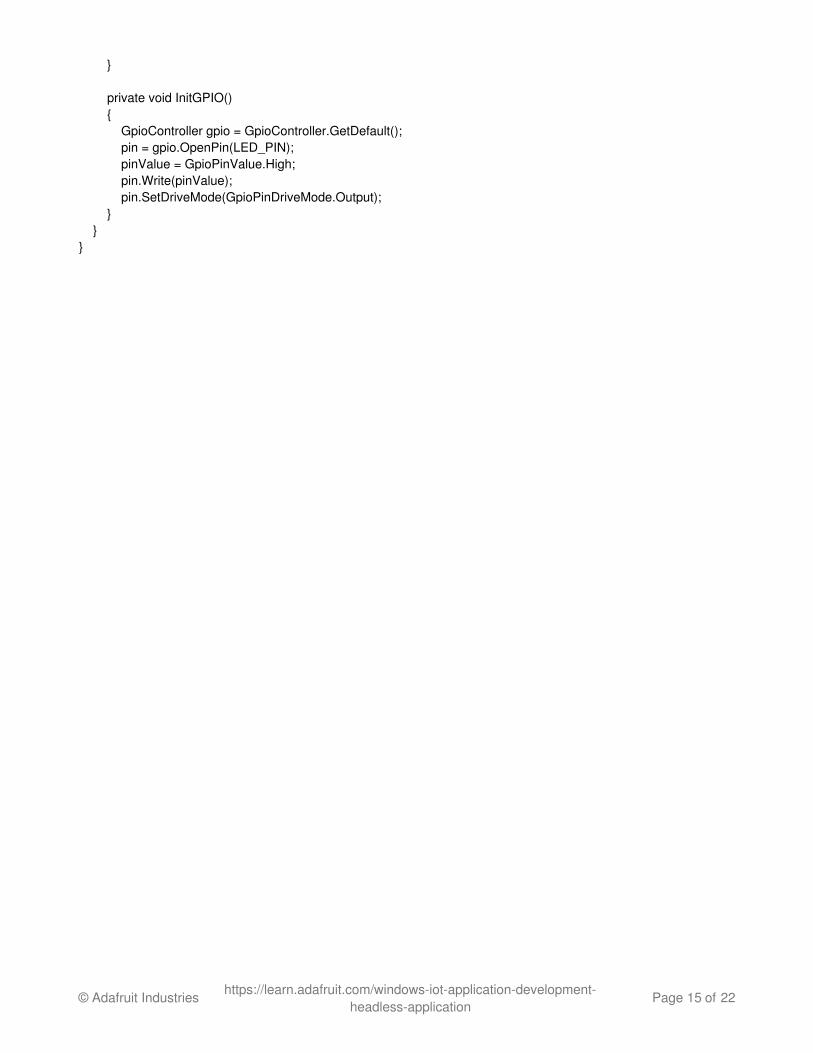
} private void InitGPIO() { GpioController gpio = GpioController.GetDefault(); pin = gpio.OpenPin(LED_PIN); pinValue = GpioPinValue.High; pin.Write(pinValue); pin.SetDriveMode(GpioPinDriveMode.Output); } } }
© Adafruit Industries https://learn.adafruit.com/windows-iot-application-development-headless-application
Page 15 of 22
Running BlinkyHeadless
Remote Machine
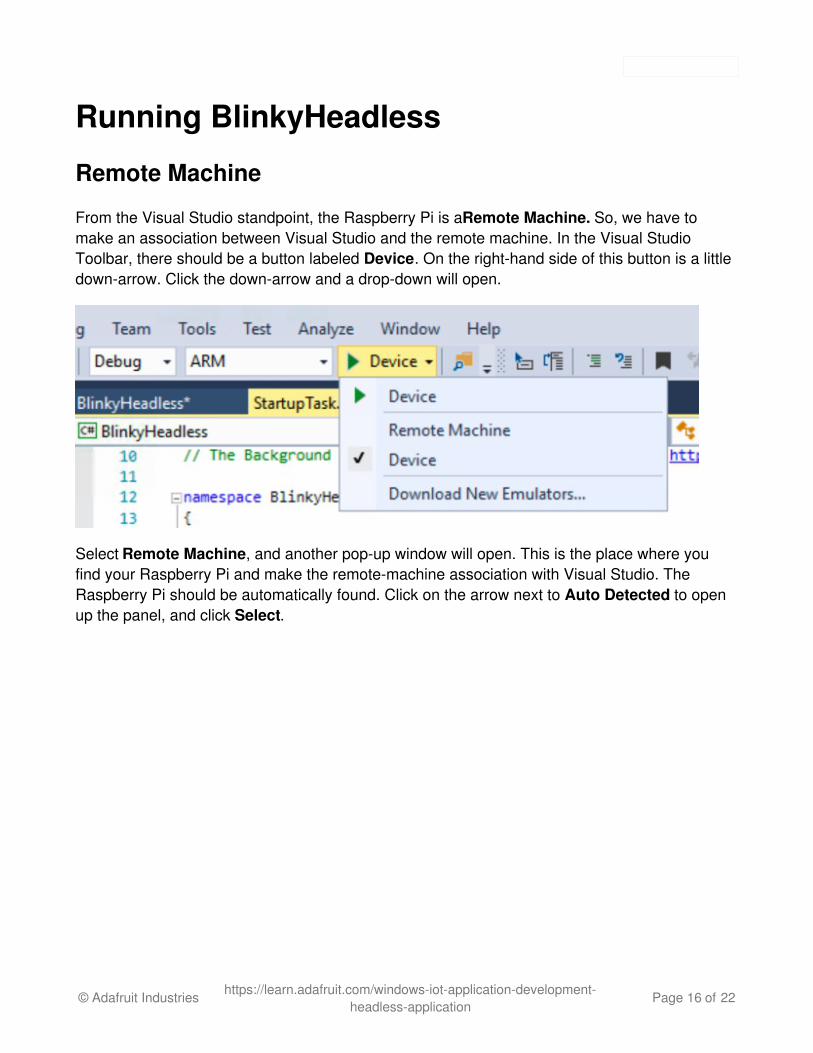
From the Visual Studio standpoint, the Raspberry Pi is a Remote Machine. So, we have tomake an association between Visual Studio and the remote machine. In the Visual StudioToolbar, there should be a button labeled Device. On the right-hand side of this button is a littledown-arrow. Click the down-arrow and a drop-down will open.
Select Remote Machine, and another pop-up window will open. This is the place where youfind your Raspberry Pi and make the remote-machine association with Visual Studio. TheRaspberry Pi should be automatically found. Click on the arrow next to Auto Detected to openup the panel, and click Select.
© Adafruit Industries https://learn.adafruit.com/windows-iot-application-development-headless-application
Page 16 of 22
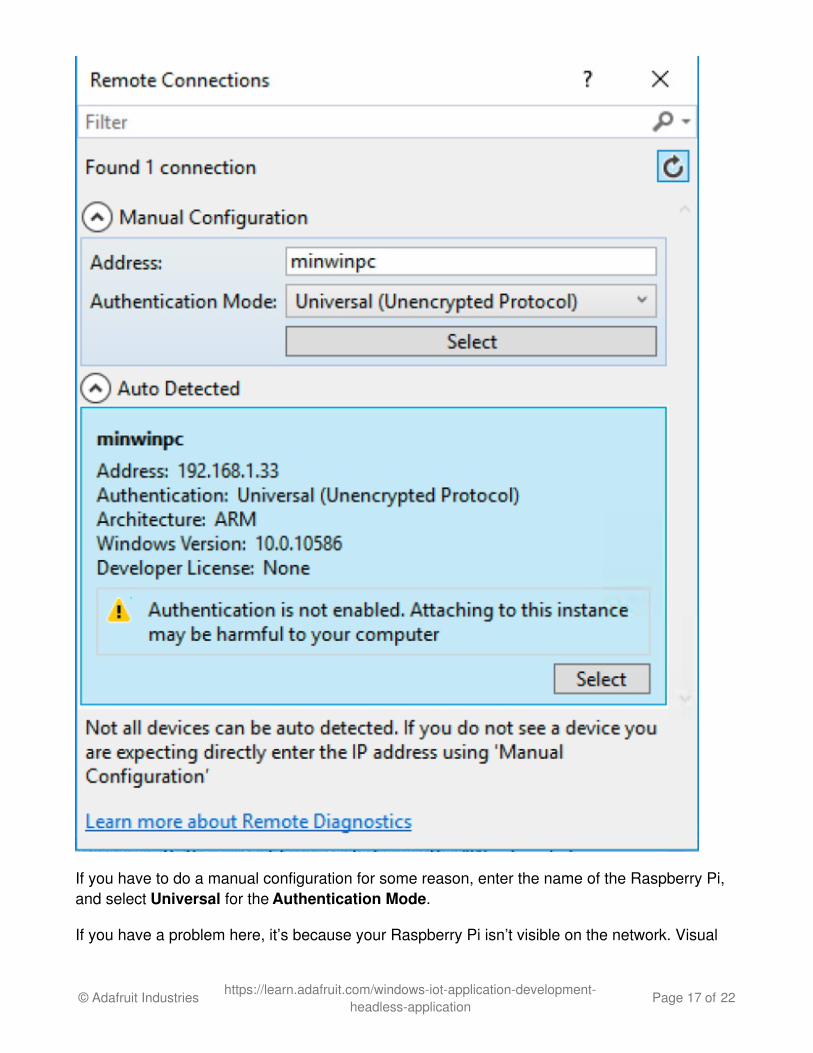
If you have to do a manual configuration for some reason, enter the name of the Raspberry Pi,and select Universal for the Authentication Mode.
If you have a problem here, it’s because your Raspberry Pi isn’t visible on the network. Visual
© Adafruit Industries https://learn.adafruit.com/windows-iot-application-development-headless-application
Page 17 of 22
Studio can’t see it. Go back and make sure your Pi is configured correctly and is visible toDevice Portal.
You can also get to this window by going through the Solution Explorer. Find the Propertiesentry in your project and double click on it. The Project Properties window will open. On theleft of the panel, select Debug. In Start Options, select Remote Machine, and then click theFind… button.
Run
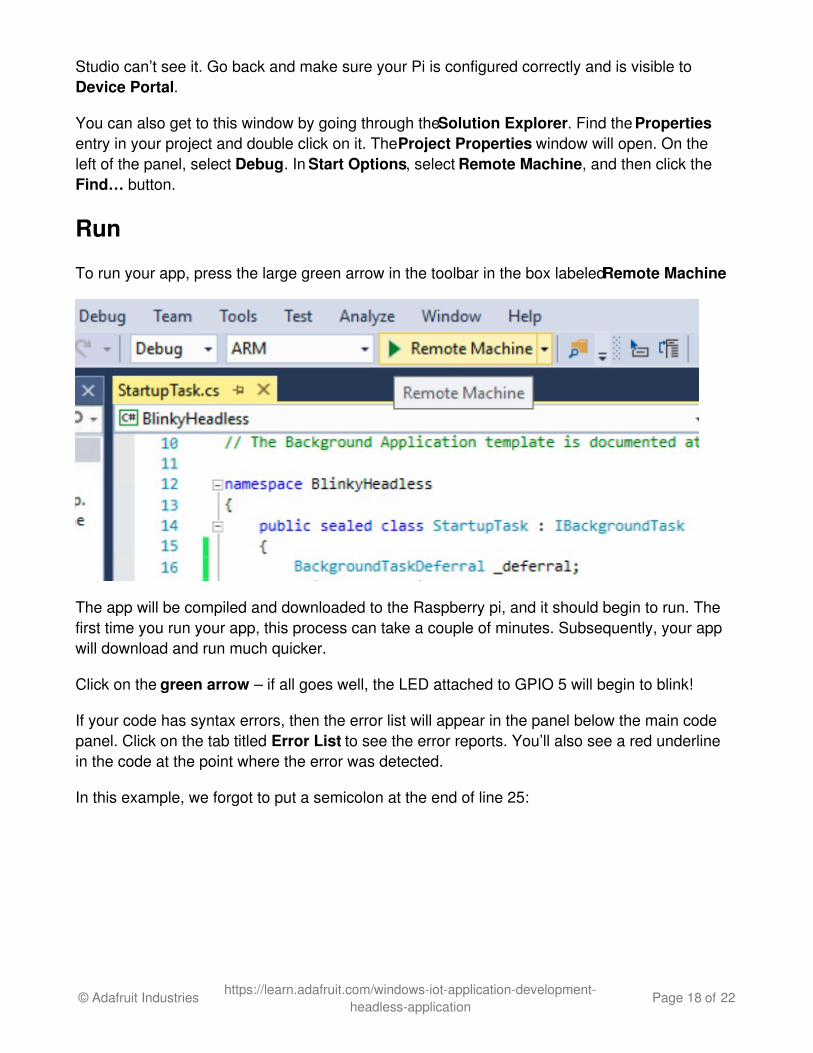
To run your app, press the large green arrow in the toolbar in the box labeled Remote Machine
The app will be compiled and downloaded to the Raspberry pi, and it should begin to run. Thefirst time you run your app, this process can take a couple of minutes. Subsequently, your appwill download and run much quicker.
Click on the green arrow – if all goes well, the LED attached to GPIO 5 will begin to blink!
If your code has syntax errors, then the error list will appear in the panel below the main codepanel. Click on the tab titled Error List to see the error reports. You’ll also see a red underlinein the code at the point where the error was detected.
In this example, we forgot to put a semicolon at the end of line 25:
© Adafruit Industries https://learn.adafruit.com/windows-iot-application-development-headless-application
Page 18 of 22

if you reboot your Raspberry Pi, Visual Studio may have trouble re-connecting to the Pi. Youmay see strange "deployment" errors. If this happens, exit and restart Visual Studio after the Pihas finished rebooting.
© Adafruit Industries https://learn.adafruit.com/windows-iot-application-development-headless-application
Page 19 of 22
DebuggingDebugging is a large topic. We won’t go into in much detail here.
If you are accustomed to Arduino programming, then you have likely used Serial.printstatements to add a debugging trace to your sketches. Visual Studio and IoT Core applicationsdo things differently. Instead of print statements, you set breakpoints in your code.
With breakpoints, you tell Visual Studio where to pause in executing your code. Once the codepauses, you can use Visual Studio to look at the values of variables. You can also single-stepthrough your code line-byline, so that you can see the order of operations.
This form of debugging is much quicker and much more effective than using print statements.
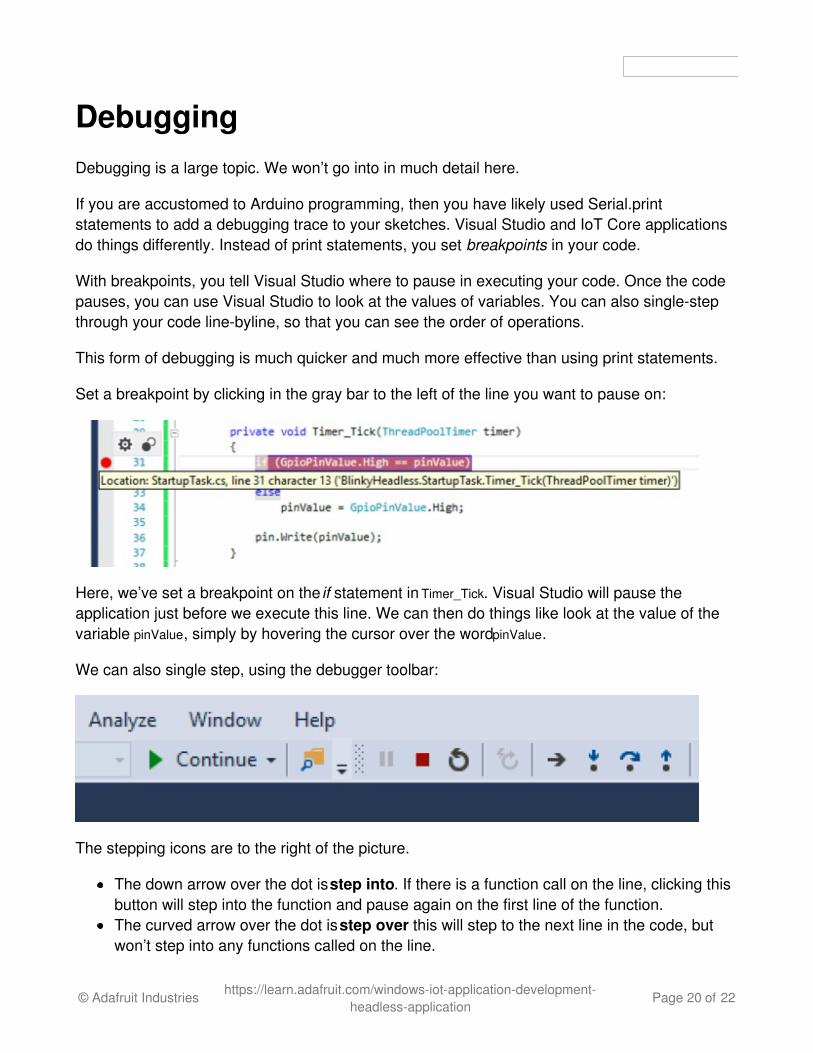
Set a breakpoint by clicking in the gray bar to the left of the line you want to pause on:
Here, we’ve set a breakpoint on the if statement in Timer_Tick. Visual Studio will pause theapplication just before we execute this line. We can then do things like look at the value of thevariable pinValue, simply by hovering the cursor over the word pinValue.
We can also single step, using the debugger toolbar:
The stepping icons are to the right of the picture.
The down arrow over the dot is step into. If there is a function call on the line, clicking thisbutton will step into the function and pause again on the first line of the function.The curved arrow over the dot is step over this will step to the next line in the code, butwon’t step into any functions called on the line.
© Adafruit Industries https://learn.adafruit.com/windows-iot-application-development-headless-application
Page 20 of 22

The up arrow over the dot is step out. It causes the code to proceed until the currentfunction is exited. It will then pause again on the first line after the function call.Other buttons to note are the green Continue button, which resumes normal executionfrom the breakpoint . The red square will immediately terminate your app. The circulararrow will restart your app from the beginning.
Next steps
That's pretty much it for our headless application. If all went well, your LED should be merrilyblnking away. If not, help is always available in the forums!
Next, we'll go through the Headed version of Blinky
Headed Blinkyhttp://adafru.it/psC
© Adafruit Industries https://learn.adafruit.com/windows-iot-application-development-headless-application
Page 21 of 22
FAQI get a deployment error from Visual Studio: DEP0001 : Unexpected Error: -2145615869
This error typically happens after you reboot your Pi. For whatever reason, Visual Studio is notlonger able to communicate with it. The solution is to simply close and restart Visual Studio. Dothis every time you reboot your Pi.
© Adafruit Industries Last Updated: 2016-08-18 05:22:14 PM UTC Page 22 of 22