windows presentation foundation tutorial 1networksims.com/wpf_1.pdf · w.buchanan 1 windows...
TRANSCRIPT
W.Buchanan 1
Windows Presentation Foundation Tutorial 1 PDF: http://billdotnet.com/wpf_1.pdf
Tutorial: http://billdotnet.com/dotnet_lecture/dotnet_lecture.htm
A Introduction 1. Start Visual Studio 2008, and select a WPF Application. Next add the
following highlighted XAML code:
<Window x:Class="WpfApplication1.Window1"
xmlns="http://schemas.microsoft.com/winfx/2006/xaml/presentation"
xmlns:x="http://schemas.microsoft.com/winfx/2006/xaml"
Title="Window1" Height="304" Width="466">
<Grid>
<Border BorderBrush="Black" BorderThickness="5" Margin="10" Padding="5">
<Button>First button</Button>
</Border>
</Grid>
</Window>
2. Next try the following colours for the Border: AliceBlue, CornflowerBlue and
MediumBlue.
3. Next try to change the colour of the text on the button to AliceBlue.
4. Change the name of the form to “Napier”.
B Exporting and importing XAML
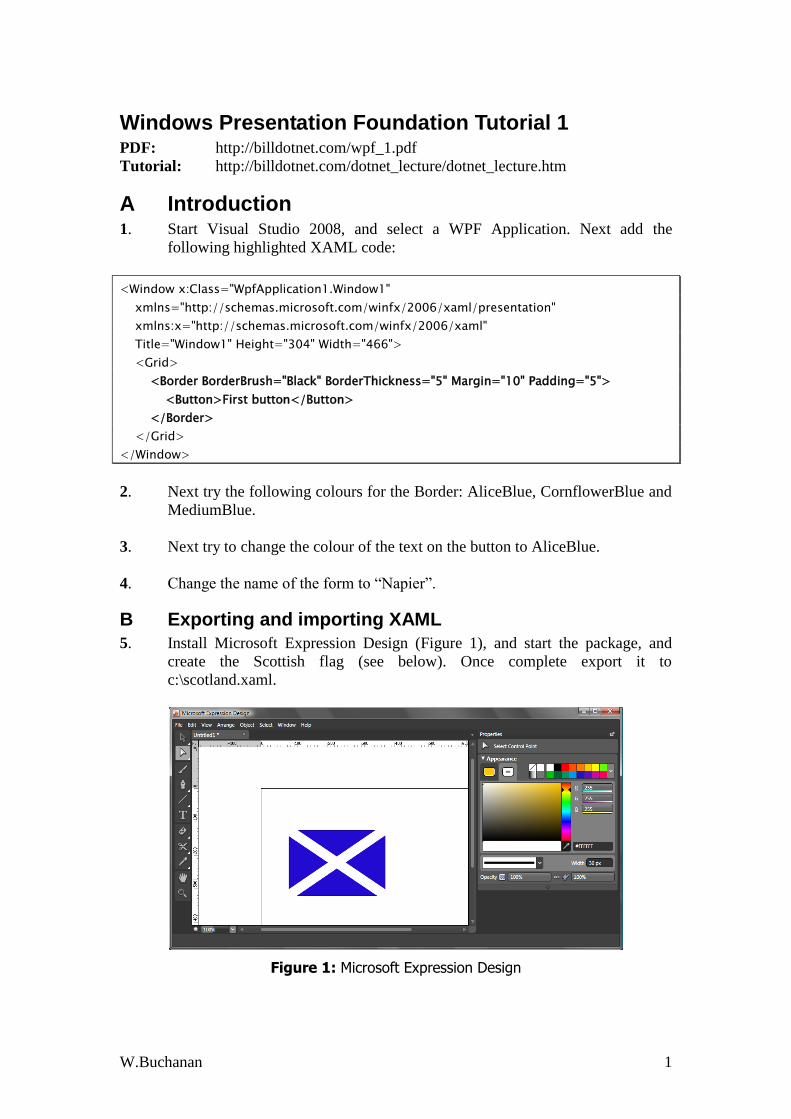
5. Install Microsoft Expression Design (Figure 1), and start the package, and
create the Scottish flag (see below). Once complete export it to
c:\scotland.xaml.
Figure 1: Microsoft Expression Design

W.Buchanan 2
Note: if you cannot install with package on your computer, you can download
the exported XML from:
http://billdotnet.com/scotland.zip
6. Next import the XAML into the form (such as in the highlighted text). Figure
2 shows the result of a sample run.
<Window x:Class="WpfApplication1.Window1"
xmlns="http://schemas.microsoft.com/winfx/2006/xaml/presentation"
xmlns:x="http://schemas.microsoft.com/winfx/2006/xaml"
Title="Napier" Height="304" Width="466">
<Grid>
<Button>
<Canvas xmlns="http://schemas.microsoft.com/winfx/2006/xaml/presentation"
xmlns:x="http://schemas.microsoft.com/winfx/2006/xaml"
xmlns:c="http://schemas.openxmlformats.org/markup-compatibility/2006"
xmlns:d="http://schemas.microsoft.com/expression/blend/2006" c:Ignorable="d"
x:Name="Untitled1" Width="800" Height="600">
<Canvas x:Name="Layer_1" d:IsLayer="True" Width="800" Height="600"
Canvas.Left="0" Canvas.Top="0">
<Rectangle x:Name="Rectangle" Width="288" Height="197" Canvas.Left="74"
Canvas.Top="27" Stretch="Fill" StrokeLineJoin="Round" Stroke="#FF000000"
Fill="#FF230FD2"/>
<Path x:Name="Line" Width="309" Height="216" Canvas.Left="64"
Canvas.Top="17" Stretch="Fill" StrokeThickness="30" StrokeLineJoin="Round"
Stroke="#FFFFFFFF" Data="F1 M 70,116L 391.333,333.333"/>
<Path x:Name="Line_0" Width="288" Height="197" Canvas.Left="74"
Canvas.Top="27" Stretch="Fill" StrokeThickness="30" StrokeLineJoin="Round"
Stroke="#FFFFFFFF" Data="F1 M 390,110.667L 70,329.333"/>
</Canvas>
</Canvas>
</Button>
</Grid>
</Window>
Figure 2: Example button

W.Buchanan 3
Try: http://billdotnet.com/dotnet3_2.xbap
C Assigning an event to a button
7. Next modify the button code so that it now has an event, such as with:
<Button Click="ButtonOkClicked">
and go to the Window1.xaml.cs file, and add:
private void ButtonOkClicked(object sender, RoutedEventArgs e)
{
MessageBox.Show("Hello");
}
8. Run the project, and show that you can click on the button and that it displays
a message box.
9. Add another button from the toolbox, and define that this is an exit button with
the code:
private void button1_Click(object sender, RoutedEventArgs e)
{
Close();
}
Try: http://billdotnet.com/dotnet3_3.xbap
D UI Layout
9. Next create a ListBox with the following highlighted text
[http://buchananweb.co.uk/dotnet3_4.zip]:
<Window x:Class="WpfApplication1.Window1"
xmlns="http://schemas.microsoft.com/winfx/2006/xaml/presentation"
xmlns:x="http://schemas.microsoft.com/winfx/2006/xaml"
Title="Napier" Height="304" Width="466">
<Grid>
<StackPanel>
<TextBlock>My Menu</TextBlock>
<ListBox>
<ListBoxItem>Napier University</ListBoxItem>
<ListBoxItem>Centre for Distributed Computing and Security</ListBoxItem>
</ListBox>
<RichTextBox/>
</StackPanel>
</Grid>
</Window>
10. Update the ListBox tags with the events:

W.Buchanan 4
<ListBoxItem Selected="Web1">Napier University</ListBoxItem>
<ListBoxItem Selected="Web2">Centre for Distributed Computing and Security
</ListBoxItem>
11. Next add the events to the CS file:
private void Web1(object sender, RoutedEventArgs e)
{
Process.Start("IExplore.exe", "http://www.napier.ac.uk");
}
private void Web2(object sender, RoutedEventArgs e)
{
Process.Start("IExplore.exe", "http://www.cdcs.soc.napier.ac.uk/");
}
Note: make sure you add: using System.Diagnostics;
12. Run the program and make sure it works (see Figure 3).
Figure 3: Example button
13. Now add a ListBoxItem to exit the program.
D Dockpanel Layout
14. Now we can create a text box on the left hand side, and the menu on the left
with:
<Window x:Class="WpfApplication1.Window1"
xmlns="http://schemas.microsoft.com/winfx/2006/xaml/presentation"
xmlns:x="http://schemas.microsoft.com/winfx/2006/xaml"
Title="Napier" Height="304" Width="466">
<Grid>
<DockPanel>
<TextBlock DockPanel.Dock="Top">Napier</TextBlock>

W.Buchanan 5
<ListBox DockPanel.Dock="Right">
<ListBoxItem>Main Site</ListBoxItem>
<ListBoxItem>CDCS</ListBoxItem>
</ListBox>
<RichTextBox/>
</DockPanel>
</Grid>
</Window>
15. Modify this so that it contains the links from the previous example.
16. The menu can be on the other side with:
<Window x:Class="WpfApplication2.Window1"
xmlns="http://schemas.microsoft.com/winfx/2006/xaml/presentation"
xmlns:x="http://schemas.microsoft.com/winfx/2006/xaml"
Title="Window1" Height="300" Width="300">
<Grid>
<Grid.RowDefinitions>
<RowDefinition Height="*"/>
<RowDefinition Height="3*"/>
</Grid.RowDefinitions>
<Grid.ColumnDefinitions>
<ColumnDefinition/>
<ColumnDefinition/>
</Grid.ColumnDefinitions>
<TextBlock Grid.ColumnSpan="2">My UI</TextBlock>
<ListBox Background="Aqua" Grid.Row="1" Grid.Column="0">
<ListBoxItem>Napier University</ListBoxItem>
<ListBoxItem>Centre for Distributed Computing and Security</ListBoxItem>
</ListBox>
<RichTextBox Grid.Row="1" Grid.Column="1"/>
</Grid>
</Window>
E Data binding
17. Create a new project with a Windows-based WPF application, and copy the
code from the following. In this case it has the name of two of the text boxes
(txtF and txtS) [http://buchananweb.co.uk/dotnet3_5.zip]::
<Window x:Class="WpfApplication2.Window1"
xmlns="http://schemas.microsoft.com/winfx/2006/xaml/presentation"
xmlns:x="http://schemas.microsoft.com/winfx/2006/xaml"
Title="Window1" Height="304" Width="373">
<Grid>
<Grid.RowDefinitions>
<RowDefinition/>
<RowDefinition/>
<RowDefinition/>

W.Buchanan 6
<RowDefinition/>
<RowDefinition/>
</Grid.RowDefinitions>
<Grid.ColumnDefinitions>
<ColumnDefinition Width="75"/>
<ColumnDefinition/>
</Grid.ColumnDefinitions>
<Label>First Name:</Label>
<TextBox Grid.Column="1" x:Name="txtF" />
<Label Grid.Row="1">Last Name:</Label>
<TextBox Grid.Row="1" x:Name="txtL" Grid.Column="1" />
<Label Grid.Row="2">Street:</Label>
<TextBox Grid.Row="2" Grid.Column="1" />
<Label Grid.Row="3">City:</Label>
<TextBox Grid.Row="3" Grid.Column="1" />
<Label Grid.Row="4">State:</Label>
<TextBox Grid.Row="4" Grid.Column="1" />
<Label Grid.Row="5">State:</Label>
<TextBox Grid.Row="5" Grid.Column="1" />
<Button HorizontalAlignment="Right" Grid.Row="4" Width="75" Grid.Column="1"
Click="Button_Click">Save</Button>
</Grid>
</Window>
18. Next update the code for the event on the button with:
private void Button_Click(object sender, RoutedEventArgs e)
{
string firstName = this.txtF.Text;
string surname = this.txtL.Text;
MessageBox.Show("Your name is " + firstName + " " + surname);
}
19. Figure 4 shows a sample run. Modify the XAML and C# code so that it shows
the three other values in the message box.

W.Buchanan 7
Figure 4: Getting values
F Template standards
20. In XAML it is possible to define new style tags. Add the highlighted code in
the following example, and prove that it defines a new style. Update it so that
it uses “Times New Roman” with non-bold text
[http://buchananweb.co.uk/dotnet3_6.zip]:
<Window x:Class="WpfApplication2.Window1"
xmlns="http://schemas.microsoft.com/winfx/2006/xaml/presentation"
xmlns:x="http://schemas.microsoft.com/winfx/2006/xaml"
Title="Napier" Height="304" Width="373">
<Grid>
<StackPanel>
<StackPanel.Resources>
<Style TargetType="{x:Type Label}">
<Setter Property="FontFamily" Value="Arial" />
<Setter Property="FontSize" Value="12" />
<Setter Property="FontWeight" Value="Bold" />
</Style>
</StackPanel.Resources>
<Label>Napier University.</Label>
<Label>Is based in Edinburgh</Label>
</StackPanel>
</Grid>
</Window>
G StoryBoards 21. In XAML it is possible to design a storyboard for animation. Enter the
following highlighted code, and prove that when the button is pressed that the
opacity goes from 100% to 0% in 5 seconds.
<Window x:Class="WpfApplication2.Window1"

W.Buchanan 8
xmlns="http://schemas.microsoft.com/winfx/2006/xaml/presentation"
xmlns:x="http://schemas.microsoft.com/winfx/2006/xaml"
Title="Napier" Height="304" Width="373">
<Grid>
<Button Height="40" Width="125">
<Button.Triggers>
<EventTrigger RoutedEvent="Button.Click">
<BeginStoryboard>
<Storyboard TargetProperty="Opacity">
<DoubleAnimation From="1" To="0" Duration="0:0:05" />
</Storyboard>
</BeginStoryboard>
</EventTrigger>
</Button.Triggers>
</Button>
</Grid>
</Window>
22. Next update the code so that the button increases from 125 pixels to 300 pixels
in 5 seconds (as shown next). Modify the code so that the height increases
from 40 pixels to 80 pixels [http://buchananweb.co.uk/dotnet3_7.zip].
<Storyboard TargetProperty="Width">
<DoubleAnimation From="125" To="300" Duration="0:0:05" />
</Storyboard>
23. The following allows for a colour change of a rectangle from Red to Blue, and
back again (the source is at http://billdotnet.com/anim.zip). Run the program,
and prove its operation. Change the colour from Black to White, over a period
of 5 seconds.
<Window x:Class="WpfApplication6.Window1"
xmlns="http://schemas.microsoft.com/winfx/2006/xaml/presentation"
xmlns:x="http://schemas.microsoft.com/winfx/2006/xaml"
Title="Window1" Height="300" Width="300">
<Grid>
<StackPanel Margin="20">
<Rectangle Width="94" Height="94">
<Rectangle.Fill>
<SolidColorBrush x:Name="AnimationFill" Color="Red" />
</Rectangle.Fill>
<Rectangle.Triggers>
<EventTrigger RoutedEvent="Rectangle.MouseEnter">
<BeginStoryboard>
<Storyboard>
<ColorAnimation Storyboard.TargetName="AnimationFill"
Storyboard.TargetProperty="Color" To="Blue" Duration="0:0:2" />
</Storyboard>
</BeginStoryboard>

W.Buchanan 9
</EventTrigger>
<EventTrigger RoutedEvent="Rectangle.MouseLeave">
<BeginStoryboard>
<Storyboard>
<ColorAnimation Storyboard.TargetName="AnimationFill"
Storyboard.TargetProperty="Color" To="Red" Duration="0:0:2" />
</Storyboard>
</BeginStoryboard>
</EventTrigger>
</Rectangle.Triggers>
</Rectangle>
</StackPanel>
</Grid>
</Window>
24. Other events can be added, such as for the left hand mouse button click. Add
the following code to the previous example (Ex 23), and prove its operation.
Remeber to add it before the end Rectangle.Triggers tags.
<EventTrigger RoutedEvent="Rectangle.MouseLeftButtonDown">
<BeginStoryboard>
<Storyboard>
<DoubleAnimation
Storyboard.TargetName="AnimationFill"
Storyboard.TargetProperty="Opacity"
From="1" To="0" Duration="0:0:0.5" AutoReverse="True" />
</Storyboard>
</BeginStoryboard>
</EventTrigger>
25. The following XAML code allows a red rectangle to be moved across the
window (http://billdotnet.com/rect.zip). Check the program, and make sure
that it left click mouse event on the rectangle causes it to animate, and a left
click at the end will move it back to the start.
<Window x:Class="WpfApplication6.Window1"
xmlns="http://schemas.microsoft.com/winfx/2006/xaml/presentation"
xmlns:x="http://schemas.microsoft.com/winfx/2006/xaml"
Title="Window1" Height="300" Width="300">
<Grid>
<Rectangle Name="MovingRect" Fill="Red" Width="50"
HorizontalAlignment="Left" Margin="6,100,0,112">
<Rectangle.Style>
<Style TargetType="{x:Type Rectangle}">
<Style.Triggers>
<EventTrigger RoutedEvent="Rectangle.MouseLeftButtonDown">
<EventTrigger.Actions>
<BeginStoryboard>
<Storyboard>

W.Buchanan 10
<DoubleAnimation
Storyboard.TargetProperty="RenderTransform.(TranslateTransform.X)"
From="0" To="200" />
</Storyboard>
</BeginStoryboard>
</EventTrigger.Actions>
</EventTrigger>
</Style.Triggers>
</Style>
</Rectangle.Style>
<Rectangle.RenderTransform>
<TranslateTransform X="0" Y="0" />
</Rectangle.RenderTransform>
</Rectangle>
</Grid>
</Window>
26. XAML can contain key frames, where there are breakpoints in the animation.
The following move a rectangle from 0 to 350 (for seven seconds), 350 to 50
(for five seconds) and 50 to 200 (in seconds seconds). Check the operation
(http://billdotnet/rect2.zip), and then modify to that the same movement occurs
in the x-direction (instead of the x-direction).
<Window x:Class="WpfApplication6.Window1"
xmlns="http://schemas.microsoft.com/winfx/2006/xaml/presentation"
xmlns:x="http://schemas.microsoft.com/winfx/2006/xaml"
Title="Window1" Height="300" Width="500">
<Grid>
<Rectangle Name="MovingRect" Fill="Red" Width="50"
HorizontalAlignment="Left" Margin="6,100,0,112">
<Rectangle.Triggers>
<EventTrigger RoutedEvent="Rectangle.MouseLeftButtonDown">
<EventTrigger.Actions>
<BeginStoryboard>
<Storyboard>
<DoubleAnimationUsingKeyFrames
Storyboard.TargetName="Trans" Storyboard.TargetProperty="X"
Duration="0:0:15">
<LinearDoubleKeyFrame Value="350" KeyTime="0:0:7" />
<LinearDoubleKeyFrame Value="50" KeyTime="0:0:5" />
<LinearDoubleKeyFrame Value="200" KeyTime="0:0:3" />
</DoubleAnimationUsingKeyFrames>
</Storyboard>
</BeginStoryboard>
</EventTrigger.Actions>
</EventTrigger>
</Rectangle.Triggers>
<Rectangle.RenderTransform>
<TranslateTransform x:Name="Trans" X="0" Y="0" />
</Rectangle.RenderTransform>

W.Buchanan 11
</Rectangle>
</Grid>
</Window>
H Additional 27. Show that the following code makes a button disappear when the user keeps
the left-button pressed down [http://buchananweb.co.uk/dotnet3_6.zip]:
<Page x:Class="dotnet3_6.Page1"
xmlns="http://schemas.microsoft.com/winfx/2006/xaml/presentation"
xmlns:x="http://schemas.microsoft.com/winfx/2006/xaml"
Title="Page1">
<Grid>
<StackPanel>
<StackPanel.Resources>
<Style TargetType="{x:Type Label}">
<Setter Property="FontFamily" Value="Arial" />
<Setter Property="FontSize" Value="12" />
<Setter Property="FontWeight" Value="Bold" />
</Style>
</StackPanel.Resources>
<Label>Napier University.</Label>
<Label>Is based in Edinburgh</Label>
</StackPanel>
</Grid>
</Page>
28. Show that the following code makes a button disappear when the user keeps
the left-button pressed down [http://buchananweb.co.uk/dotnet3_7.zip]:
<Page x:Class="dotnet3_7.Page1"
xmlns="http://schemas.microsoft.com/winfx/2006/xaml/presentation"
xmlns:x="http://schemas.microsoft.com/winfx/2006/xaml"
Title="Page1" Height="334" Width="547">
<Grid>
<Button Height="40" Margin="203,72,219,0" VerticalAlignment="Top">
<Button.Triggers>
<EventTrigger RoutedEvent="Button.Click">
<BeginStoryboard>
<Storyboard TargetProperty="Opacity">
<DoubleAnimation From="1" To="0"
Duration="0:0:05" />
</Storyboard>
</BeginStoryboard>
</EventTrigger>
</Button.Triggers>
</Button>
<Label Height="28" HorizontalAlignment="Left" Margin="88,0,0,132"
Name="label1" VerticalAlignment="Bottom" Width="120">Label</Label>
</Grid>
</Page>
29. Show that the following code contains a button which grows in size, when the
button is clicked [http://buchananweb.co.uk/dotnet3_8.zip]:
<Page x:Class="dotnet3_8.Page1"
xmlns="http://schemas.microsoft.com/winfx/2006/xaml/presentation"
xmlns:x="http://schemas.microsoft.com/winfx/2006/xaml"
Title="Page1">
<Grid>

W.Buchanan 12
<Grid>
<Button Height="40" Width="125">
<Button.Triggers>
<EventTrigger RoutedEvent="Button.Click">
<BeginStoryboard>
<Storyboard TargetProperty="Width">
<DoubleAnimation From="125" To="300"
Duration="0:0:05" />
</Storyboard>
</BeginStoryboard>
</EventTrigger>
</Button.Triggers>
</Button>
</Grid>
</Grid>
</Page>
30. Show that the following code provides a mouseover which changes colour
[http://buchananweb.co.uk/dotnet3_9.zip]:
<Page x:Class="dotnet3_9.Page1"
xmlns="http://schemas.microsoft.com/winfx/2006/xaml/presentation"
xmlns:x="http://schemas.microsoft.com/winfx/2006/xaml"
Title="Page1">
<Grid>
<StackPanel Margin="20">
<Rectangle Width="94" Height="94">
<Rectangle.Fill>
<SolidColorBrush x:Name="AnimationFill" Color="Red" />
</Rectangle.Fill>
<Rectangle.Triggers>
<EventTrigger RoutedEvent="Rectangle.MouseEnter">
<BeginStoryboard>
<Storyboard>
<ColorAnimation
Storyboard.TargetName="AnimationFill"
Storyboard.TargetProperty="Color" To="Blue" Duration="0:0:2" />
</Storyboard>
</BeginStoryboard>
</EventTrigger>
<EventTrigger RoutedEvent="Rectangle.MouseLeave">
<BeginStoryboard>
<Storyboard>
<ColorAnimation
Storyboard.TargetName="AnimationFill"
Storyboard.TargetProperty="Color" To="Red" Duration="0:0:2" />
</Storyboard>
</BeginStoryboard>
</EventTrigger>
</Rectangle.Triggers>
</Rectangle>
</StackPanel>
</Grid>
</Page>
31. Show that the following code contains a red rectangle. Determine the event
and the motion created [http://buchananweb.co.uk/dotnet3_11.zip]:
<Page x:Class="dotnet3_11.Page1"
xmlns="http://schemas.microsoft.com/winfx/2006/xaml/presentation"
xmlns:x="http://schemas.microsoft.com/winfx/2006/xaml"
Title="Page1">
<Grid Height="295" Width="711">
<Rectangle Name="MovingRect" Fill="Red" Width="50"

W.Buchanan 13
HorizontalAlignment="Left" Margin="6,100,0,112">
<Rectangle.Triggers>
<EventTrigger RoutedEvent="Rectangle.MouseLeftButtonDown">
<EventTrigger.Actions>
<BeginStoryboard>
<Storyboard>
<DoubleAnimationUsingKeyFrames
Storyboard.TargetName="Trans" Storyboard.TargetProperty="X"
Duration="0:0:15">
<LinearDoubleKeyFrame Value="350"
KeyTime="0:0:7" />
<LinearDoubleKeyFrame Value="50"
KeyTime="0:0:5" />
<LinearDoubleKeyFrame Value="200"
KeyTime="0:0:3" />
</DoubleAnimationUsingKeyFrames>
</Storyboard>
</BeginStoryboard>
</EventTrigger.Actions>
</EventTrigger>
</Rectangle.Triggers>
<Rectangle.RenderTransform>
<TranslateTransform x:Name="Trans" X="0" Y="0" />
</Rectangle.RenderTransform>
</Rectangle>
</Grid>
</Page>
32. Show that the following code contains a red rectangle. Determine the event
and the motion created [http://buchananweb.co.uk/dotnet3_13.zip]:
<Page xmlns="http://schemas.microsoft.com/winfx/2006/xaml/presentation"
xmlns:x="http://schemas.microsoft.com/winfx/2006/xaml"
x:Class="dotnet3_13.Page1" x:Name="Page"
Title="Page1" Width="640" Height="480">
<Page.Resources>
<Storyboard x:Key="Timeline1">
<ColorAnimationUsingKeyFrames BeginTime="00:00:00"
Storyboard.TargetName="rectangle"
Storyboard.TargetProperty="(Shape.Fill).(SolidColorBrush.Color)">
<SplineColorKeyFrame KeyTime="00:00:02" Value="#FFD31818"/>
<SplineColorKeyFrame KeyTime="00:00:04" Value="#FFD31818"/>
</ColorAnimationUsingKeyFrames>
<DoubleAnimationUsingKeyFrames BeginTime="00:00:00"
Storyboard.TargetName="rectangle"
Storyboard.TargetProperty="(UIElement.RenderTransform).(TransformGroup.Child
ren)[3].(TranslateTransform.X)">
<SplineDoubleKeyFrame KeyTime="00:00:00" Value="218"/>
<SplineDoubleKeyFrame KeyTime="00:00:02" Value="0"/>
<SplineDoubleKeyFrame KeyTime="00:00:04" Value="367"/>
</DoubleAnimationUsingKeyFrames>
<DoubleAnimationUsingKeyFrames BeginTime="00:00:00"
Storyboard.TargetName="rectangle"
Storyboard.TargetProperty="(UIElement.RenderTransform).(TransformGroup.Child
ren)[3].(TranslateTransform.Y)">
<SplineDoubleKeyFrame KeyTime="00:00:00" Value="91"/>
<SplineDoubleKeyFrame KeyTime="00:00:02" Value="0"/>
<SplineDoubleKeyFrame KeyTime="00:00:04" Value="-4"/>
</DoubleAnimationUsingKeyFrames>
</Storyboard>
</Page.Resources>
<Page.Triggers>
<EventTrigger RoutedEvent="FrameworkElement.Loaded">
W.Buchanan 14
<BeginStoryboard Storyboard="{StaticResource Timeline1}"/>
</EventTrigger>
</Page.Triggers>
<Grid x:Name="LayoutRoot">
<Rectangle RenderTransformOrigin="0.5,0.5" Fill="#FFFFFFFF"
Stroke="#FF000000" HorizontalAlignment="Left" Margin="51,45,0,0"
x:Name="rectangle" VerticalAlignment="Top" Width="186" Height="141">
<Rectangle.RenderTransform>
<TransformGroup>
<ScaleTransform ScaleX="1" ScaleY="1"/>
<SkewTransform AngleX="0" AngleY="0"/>
<RotateTransform Angle="0"/>
<TranslateTransform X="0" Y="0"/>
</TransformGroup>
</Rectangle.RenderTransform>
</Rectangle>
<MediaElement HorizontalAlignment="Left" Margin="154,212,0,148"
Name="mediaElement1" Width="160" />
<Button Height="23" Margin="269,71,296,0" Name="button1"
VerticalAlignment="Top" Click="button1_Click">Button</Button>
</Grid>
</Page>
Next, on the Click event on the button, and some code to play an MP3 file, such as:
mediaElement1.Source = new Uri("file://C:/rem.mp3");
mediaElement1.Play();
33. The following code provides an animation for a rocket, which explodes when
it reaches the group [http://buchananweb.co.uk/dotnet3_14.zip]:
<Page
xmlns="http://schemas.microsoft.com/winfx/2006/xaml/presentation"
xmlns:x="http://schemas.microsoft.com/winfx/2006/xaml"
x:Class="dotnet3_14.Page1"
x:Name="Page"
Title="Page1"
Width="640" Height="480"
xmlns:d="http://schemas.microsoft.com/expression/blend/2006"
xmlns:mc="http://schemas.openxmlformats.org/markup-compatibility/2006"
mc:Ignorable="d">
<Page.Resources>
<Storyboard x:Key="Timeline1">
<DoubleAnimationUsingKeyFrames BeginTime="00:00:00"
Storyboard.TargetName="grid"
Storyboard.TargetProperty="(UIElement.RenderTransform).(TransformGroup.Child
ren)[3].(TranslateTransform.Y)">
<SplineDoubleKeyFrame KeyTime="00:00:01" Value="-114"/>
<SplineDoubleKeyFrame KeyTime="00:00:02" Value="-153"/>
<SplineDoubleKeyFrame KeyTime="00:00:03" Value="-177"/>
<SplineDoubleKeyFrame KeyTime="00:00:04" Value="-156"/>
<SplineDoubleKeyFrame KeyTime="00:00:05" Value="6"/>
</DoubleAnimationUsingKeyFrames>
<DoubleAnimationUsingKeyFrames BeginTime="00:00:00"
Storyboard.TargetName="grid"
Storyboard.TargetProperty="(UIElement.RenderTransform).(TransformGroup.Child
ren)[3].(TranslateTransform.X)">
<SplineDoubleKeyFrame KeyTime="00:00:01" Value="-2"/>
<SplineDoubleKeyFrame KeyTime="00:00:02" Value="122"/>
<SplineDoubleKeyFrame KeyTime="00:00:03" Value="207"/>
<SplineDoubleKeyFrame KeyTime="00:00:04" Value="341"/>
<SplineDoubleKeyFrame KeyTime="00:00:05" Value="368"/>
</DoubleAnimationUsingKeyFrames>
<DoubleAnimationUsingKeyFrames BeginTime="00:00:00"
Storyboard.TargetName="grid"

W.Buchanan 15
Storyboard.TargetProperty="(UIElement.RenderTransform).(TransformGroup.Child
ren)[2].(RotateTransform.Angle)">
<SplineDoubleKeyFrame KeyTime="00:00:01" Value="0"/>
<SplineDoubleKeyFrame KeyTime="00:00:02" Value="44.307"/>
<SplineDoubleKeyFrame KeyTime="00:00:03" Value="82.416"/>
<SplineDoubleKeyFrame KeyTime="00:00:04" Value="138.953"/>
<SplineDoubleKeyFrame KeyTime="00:00:05" Value="177.618"/>
</DoubleAnimationUsingKeyFrames>
<DoubleAnimationUsingKeyFrames BeginTime="00:00:00"
Storyboard.TargetName="grid"
Storyboard.TargetProperty="(UIElement.Opacity)">
<SplineDoubleKeyFrame KeyTime="00:00:05" Value="1"/>
<SplineDoubleKeyFrame KeyTime="00:00:06" Value="0"/>
</DoubleAnimationUsingKeyFrames>
<ColorAnimationUsingKeyFrames BeginTime="00:00:00"
Storyboard.TargetName="path"
Storyboard.TargetProperty="(Shape.Fill).(SolidColorBrush.Color)">
<SplineColorKeyFrame KeyTime="00:00:06" Value="#FF641500"/>
</ColorAnimationUsingKeyFrames>
<DoubleAnimationUsingKeyFrames BeginTime="00:00:00"
Storyboard.TargetName="path"
Storyboard.TargetProperty="(UIElement.Opacity)">
<SplineDoubleKeyFrame KeyTime="00:00:00" Value="0"/>
<SplineDoubleKeyFrame KeyTime="00:00:05" Value="0"/>
<SplineDoubleKeyFrame KeyTime="00:00:06" Value="1"/>
<SplineDoubleKeyFrame KeyTime="00:00:07" Value="0"/>
</DoubleAnimationUsingKeyFrames>
<DoubleAnimationUsingKeyFrames BeginTime="00:00:00"
Storyboard.TargetName="path"
Storyboard.TargetProperty="(UIElement.RenderTransform).(TransformGroup.Child
ren)[0].(ScaleTransform.ScaleY)">
<SplineDoubleKeyFrame KeyTime="00:00:00" Value="1"/>
<SplineDoubleKeyFrame KeyTime="00:00:05" Value="0.403"/>
<SplineDoubleKeyFrame KeyTime="00:00:06" Value="1"/>
<SplineDoubleKeyFrame KeyTime="00:00:07" Value="0.303"/>
</DoubleAnimationUsingKeyFrames>
<DoubleAnimationUsingKeyFrames BeginTime="00:00:00"
Storyboard.TargetName="path"
Storyboard.TargetProperty="(UIElement.RenderTransform).(TransformGroup.Child
ren)[3].(TranslateTransform.Y)">
<SplineDoubleKeyFrame KeyTime="00:00:00" Value="0"/>
<SplineDoubleKeyFrame KeyTime="00:00:05" Value="36"/>
<SplineDoubleKeyFrame KeyTime="00:00:06" Value="0"/>
<SplineDoubleKeyFrame KeyTime="00:00:07" Value="42"/>
</DoubleAnimationUsingKeyFrames>
</Storyboard>
</Page.Resources>
<Page.Triggers>
<EventTrigger RoutedEvent="FrameworkElement.Loaded">
<BeginStoryboard Storyboard="{StaticResource Timeline1}"/>
</EventTrigger>
</Page.Triggers>
<Grid x:Name="LayoutRoot">
<Canvas
xmlns="http://schemas.microsoft.com/winfx/2006/xaml/presentation"
xmlns:x="http://schemas.microsoft.com/winfx/2006/xaml"
xmlns:c="http://schemas.openxmlformats.org/markup-compatibility/2006"
xmlns:d="http://schemas.microsoft.com/expression/blend/2006" c:Ignorable="d"
x:Name="Untitled1" Width="800" Height="600">
<Canvas x:Name="Layer_1" d:IsLayer="True" Width="800"
Height="600" Canvas.Left="0" Canvas.Top="0">
<Grid RenderTransformOrigin="0.5,0.5" x:Name="grid"
Width="38.866" Height="161.367" Canvas.Left="105.152" Canvas.Top="269.518">
<Grid.RenderTransform>
<TransformGroup>
<ScaleTransform ScaleX="1" ScaleY="1"/>
<SkewTransform AngleX="0" AngleY="0"/>

W.Buchanan 16
<RotateTransform Angle="0"/>
<TranslateTransform X="0" Y="0"/>
</TransformGroup>
</Grid.RenderTransform>
<Rectangle x:Name="Rectangle" Stretch="Fill"
StrokeLineJoin="Round" Stroke="#FF000000" Fill="#FFFF0000"
Margin="1.869,32.375,1,0"/>
<Path x:Name="Path" Height="36.375" Stretch="Fill"
StrokeLineJoin="Round" Stroke="#FF000000" Fill="#FFFF7D00" Data="F1 M
146.585,337.018L 120.652,401.393L 178.518,398.638L 146.585,337.018 Z "
VerticalAlignment="Top"/>
</Grid>
<Path RenderTransformOrigin="0.5,0.5" Fill="#FF006432"
Stretch="Fill" Stroke="#FF000000" StrokeLineJoin="Round" x:Name="path"
Width="140.816" Height="120.54" Canvas.Left="428.684" Canvas.Top="330.495"
Data="M569,438 C558,384 574,341 558,384 542,427 557,483.00012 542,426.99997
527,370.99982 543,323.99967 527,370.99982 511,417.99996 529,475.00023
511,418.99985 493,362.99948 514,286.99897 493,362.99948 472,438.99999
374,441.00003 472,439.00003">
<Path.RenderTransform>
<TransformGroup>
<ScaleTransform ScaleX="1" ScaleY="1"/>
<SkewTransform AngleX="0" AngleY="0"/>
<RotateTransform Angle="0"/>
<TranslateTransform X="0" Y="0"/>
</TransformGroup>
</Path.RenderTransform>
</Path>
</Canvas>
</Canvas>
<Grid d:IsLayer="True" x:Name="Layer" Grid.ColumnSpan="1"
Grid.RowSpan="1"/>
</Grid>
</Page>
Modify the code in Expression (or manually) so that the rocket is coloured blue, and
the explosion is orange.
I Using Microsoft Expression Blend 34. If you have Microsoft Expression Blend, create a new project. Next add a red
rectangle on the screen, and then add a new timeline from the + button on the
Object and Timeline (Figure 5). From the record line move on the 0 second
mark, move the rectangle into the centre of the design area, then move to one
second. Press the + button on the timeline (Record Keyframe). Then move to 1
second on the timeline, and move the rectangle to the left top-hand side, and
press Record Keyframe. Finally move to the 2 second mark, and move the
retangle, and press Record Keyframe. Finally go back to the 0 second
keyframe, and change the fill colour to White. There should now be a blue
dotted line for the path of the rectangle.

W.Buchanan 17
Figure 5: Adding a timeline in Blend
Figure 6: Showing timeline
35. View the XAML (otherwise load it from http://billdotnet.com/rect3.zip), and
integrate it with Visual Studio, and prove its operation.
<Window xmlns="http://schemas.microsoft.com/winfx/2006/xaml/presentation"
xmlns:x="http://schemas.microsoft.com/winfx/2006/xaml"
x:Class="UntitledProject2.Window1" x:Name="Window"
Title="Window1" Width="640" Height="480">
<Window.Resources>
<Storyboard x:Key="Timeline1">

W.Buchanan 18
<ColorAnimationUsingKeyFrames BeginTime="00:00:00"
Storyboard.TargetName="rectangle" Storyboard.TargetProperty="(Shape.Fill).(SolidColorBrush.Color)">
<SplineColorKeyFrame KeyTime="00:00:02" Value="#FFD31818"/>
<SplineColorKeyFrame KeyTime="00:00:04" Value="#FFD31818"/>
</ColorAnimationUsingKeyFrames>
<DoubleAnimationUsingKeyFrames BeginTime="00:00:00"
Storyboard.TargetName="rectangle"
Storyboard.TargetProperty="(UIElement.RenderTransform).(TransformGroup.Children)[3].(TranslateTransfor
m.X)">
<SplineDoubleKeyFrame KeyTime="00:00:00" Value="218"/>
<SplineDoubleKeyFrame KeyTime="00:00:02" Value="0"/>
<SplineDoubleKeyFrame KeyTime="00:00:04" Value="367"/>
</DoubleAnimationUsingKeyFrames>
<DoubleAnimationUsingKeyFrames BeginTime="00:00:00"
Storyboard.TargetName="rectangle"
Storyboard.TargetProperty="(UIElement.RenderTransform).(TransformGroup.Children)[3].(TranslateTransfor
m.Y)">
<SplineDoubleKeyFrame KeyTime="00:00:00" Value="91"/>
<SplineDoubleKeyFrame KeyTime="00:00:02" Value="0"/>
<SplineDoubleKeyFrame KeyTime="00:00:04" Value="-4"/>
</DoubleAnimationUsingKeyFrames>
</Storyboard>
</Window.Resources>
<Window.Triggers>
<EventTrigger RoutedEvent="FrameworkElement.Loaded">
<BeginStoryboard Storyboard="{StaticResource Timeline1}"/>
</EventTrigger>
</Window.Triggers>
<Grid x:Name="LayoutRoot">
<Rectangle RenderTransformOrigin="0.5,0.5" Fill="#FFFFFFFF" Stroke="#FF000000"
HorizontalAlignment="Left" Margin="51,45,0,0" x:Name="rectangle" VerticalAlignment="Top" Width="186"
Height="141">
<Rectangle.RenderTransform>
<TransformGroup>
<ScaleTransform ScaleX="1" ScaleY="1"/>
<SkewTransform AngleX="0" AngleY="0"/>
<RotateTransform Angle="0"/>
<TranslateTransform X="0" Y="0"/>
</TransformGroup>
</Rectangle.RenderTransform>
</Rectangle>
</Grid>
</Window>
36. Finally, using Microsoft Expression Blend, draw the Union Jack Flag, and
animate it so that it starts at the top-left hand side, moves to the top-right hand,
then moves to the bottom right-hand side, and finally moves back to the
original place. The flag should fade out when it reaches the top right-hand
side.