windows server® 2008 r2 hyper-v™ live migration · windows server 2008 r2 hyper‐v™...
TRANSCRIPT
Windows Server® 2008 R2 Hyper-V™ Live Migration

Windows Server 2008 R2 HyperV™ Live MigrationPage #2
Table of Contents
Overview of Windows Server 2008 R2 HyperV™ Features.......................................................................... 3
Dynamic VM storage............................................................................................................................. 3
Enhanced Processor Support ................................................................................................................ 3
Enhanced Networking Support............................................................................................................. 4
Cluster Shared Volumes (CSV) .............................................................................................................. 4
Live Migration ....................................................................................................................................... 4
Live Migration Overview........................................................................................................................... 4
Live Migration Compared to Quick Migration ...................................................................................... 5
Live Migration Architecture ...................................................................................................................... 5
Requirements........................................................................................................................................ 5
Processor Compatibility Mode.............................................................................................................. 6
Live Migration Scenarios......................................................................................................................... 13
Physical Computer Maintenance ........................................................................................................13
Dynamic Data center........................................................................................................................... 15
Green IT............................................................................................................................................... 16
Deploying Live Migration ........................................................................................................................ 16
Managing Live Migration ........................................................................................................................ 17
Summary ..................................................................................................................................................... 18

Windows Server 2008 R2 Hyper‐V™ Live MigrationPage #3
Overview of Windows Server 2008 R2 HyperV™
FeaturesMicrosoft® Windows Server® 2008 R2 Hyper‐V™ builds on the architecture and functions of Windows
Server® 2008 Hyper‐V™ by adding multiple new features that enhance product flexibility. The adoption
of virtualization in the enterprise has increased flexibility in deployment and life cycle management of
applications. IT professionals deploy and use virtualization to consolidate workloads, reducing server
sprawl. Additionally, they deploy virtualization with clustering technologies to provide a robust IT
infrastructure with high availability and quick disaster recovery. Even so, customers are looking for more
flexibility. Windows Server 2008 R2 Hyper‐V provides greater flexibility with live migration. Live
migration is integrated with Windows Server 2008 R2 Hyper‐V and Microsoft Hyper‐V Server 2008 R2.
With Hyper‐V live migration, you can move running VMs from one Hyper‐V physical host to another,
without any disruption or perceived loss of service. IT professionals increasingly look to live migration to
create a dynamic and flexible IT environment that responds to emerging business needs. Live migration
provides the core technology required for dynamic load balancing, virtual machine (VM) placement, high
availability for virtualized workloads during physical computer maintenance and reduced data center
power consumption.
Windows Server 2008 R2 Hyper‐V adds new features to the first version of Hyper‐V. For example, by
using live migration in Windows Server 2008 R2 Hyper‐V, you can migrate running VMs from one
physical computer to another and add or remove storage from a VM while it is running. In addition,
Windows Server 2008 R2 Hyper‐V takes better advantage of physical computer hardware with greater
processor support and deeper support for physical computer hardware. This paper provides an overview
of the new features in Windows Server 2008 R2 Hyper‐V and information on live migration.
Dynamic VM storage
Windows Server 2008 R2 Hyper‐V supports hot plug‐in and hot removal of storage. By supporting the
addition or removal of Virtual Hard Drive (VHD) files and pass‐through disks while a VM is running,
Windows Server 2008 R2 Hyper‐V makes it possible to reconfigure VMs quickly to meet changing
workload requirements. This feature allows the addition and removal of both VHD files and pass‐
through disks to existing SCSI controllers for VMs.
Note: Hot add and removal of storage requires the Hyper‐V Integration Services supplied with
Windows Server 2008 R2 to be installed in the guest operating system.
Enhanced Processor Support
Windows Server 2008 R2 Hyper‐V supports up to 32 logical processor cores. The increased processor
support makes it possible to run even more demanding workloads on a single physical computer, or
consolidate more workloads on a single physical computer.
Windows Server 2008 R2 Hyper‐V also supports Second‐Level Address Translation (SLAT) and CPU Core
Parking. SLAT uses special CPU functions available in Intel processors that support Extended Page tables

Windows Server 2008 R2 Hyper‐V™ Live MigrationPage #4
and AMD processors that support Rapid Virtualization Indexing to carry out some VM memory
management functions that reduce the overhead of translating guest physical addresses to real physical
addresses. This significantly reduces Hypervisor CPU time and saves memory for each VM, allowing the
physical computer to do more work while utilizing fewer system resources. CPU Core Parking enables
power savings by scheduling VM execution on only some of a server’s CPU cores and placing the rest in a
sleep state.
Enhanced Networking Support
In Windows Server 2008 R2 there are three new networking features that improve the performance of
virtual networks. Support for Jumbo frames, previously available in non‐virtual environments, has been
extended to work with VMs. This feature enables VMs to use Jumbo Frames up to 9014 bytes if the
underlying physical network supports it. Supporting Jumbo frames reduces the network stack overhead
incurred per byte and increases throughput. In addition, there is a significant reduction of CPU
utilization due to the fewer number of calls from the network stack to the network driver.
TCP Chimney, which allows the offloading of TCP/IP processing to the network hardware, has been
extended to the virtual environment. It improves VM performance by allowing the VM to offload
network processing to hardware, especially on networks with bandwidth over 1 Gigabit. This feature is
especially beneficial for roles involving large amounts of data transfer, such as the file server role.
The Virtual Machine Queue (VMQ) feature allows physical computer Network Interface Cards (NICs) to
use direct memory access (DMA) to place the contents of packets directly into VM memory, increasing
I/O performance.
Cluster Shared Volumes (CSV)
With Windows Server 2008 R2, Hyper‐V uses CSV storage to simplify and enhance shared storage usage.
CSV enables multiple Windows Servers to access SAN storage using a single consistent namespace for all
volumes on all hosts. Multiple hosts can access the same Logical Unit Number (LUN) on SAN storage.
CSV enables faster live migration and easier storage management for Hyper‐V when used in a cluster
configuration. Cluster Shared Volumes is available as part of the Windows Failover Clustering feature of
Windows Server® 2008 R2.
Live Migration
One of the new features in Windows Server 2008 R2 Hyper‐V is live migration. The remainder of this
document describes this feature of Windows Server 2008 R2 Hyper‐V, several scenarios where live
migration is particularly useful, and the requirements for implementing live migration.
Live Migration Overview
Hyper‐V live migration is integrated with Windows Server 2008 R2 Hyper‐V and Microsoft Hyper‐V
Server 2008 R2. With it you can move running VMs from one Hyper‐V physical host to another without
any disruption of service or perceived downtime.
Moving running VMs without downtime using Hyper‐V live migration:

Windows Server 2008 R2 Hyper‐V™ Live MigrationPage #5
� Provides better agility: Data centers with multiple Hyper‐V physical hosts can move running
VMs to the best physical computer for performance, scaling, or optimal consolidation without
affecting users.
� Reduces costs and increase productivity: Data centers with multiple Hyper‐V physical hosts can
service those systems in a controlled fashion, scheduling maintenance during regular business
hours. Live migration makes it possible to keep VMs online, even during maintenance, increasing
productivity for users and server administrators. Data centers can now also reduce power
consumption by dynamically increasing consolidation ratios and powering off un‐used physical
hosts during lower demand times.
Live Migration Compared to Quick Migration
Quick Migration is a feature of both Windows Server 2008 Hyper‐V and Windows Server 2008 R2 Hyper‐
V. Live migration and Quick Migration both move running VMs from one Hyper‐V physical computer to
another. The difference is Quick Migration saves, moves and restores VMs, which results in some
downtime. The live migration process uses a different mechanism for moving the running VM to the
new physical computer. The Live Migration Architecture section of this document below explains this
process in greater detail. Here is a summary of the live migration process:
1. All VM memory pages are transferred from the source Hyper‐V physical host to the destination
Hyper‐V physical host. As this is occurs, any VM modifications to the VMs memory pages are
tracked.
2. Pages modified during step 1 are transferred to the destination physical computer.
3. Hyper‐V moves the storage handle for the VMs VHD files to the destination physical computer.
4. The destination VM is brought online on the destination Hyper‐V server.
Live migration produces significantly less downtime for the VM being migrated. This makes live
migrations preferable when users need uninterrupted access to the migrating VM. Because a live
migration completes in less time than the TCP timeout for the migrating VM, users experience no outage
for the migrating VM during steps 3 and 4 of the migration.
Note: Windows Server 2008 Hyper‐V supports Quick Migration. Windows Server 2008 R2 Hyper‐
V supports both Quick Migration and live migration.
Live Migration Architecture
Hyper‐V live migration moves running VMs with no impact on VM availability to users. By pre‐copying
the memory of the migrating VM to the destination physical host, live migration minimizes the transfer
time of the VM. A live migration is deterministic, meaning that the administrator, or script, that initiates
the live migration can control which computer that is the destination for the live migration. The guest
operating system of the migrating VM is unaware the migration is happening, so no special
configuration for the guest operating system is needed.
Requirements
Hyper‐V live migration has similar requirements to Hyper‐V Quick Migration. For organizations already
using Quick Migration, the shift to live migration is simple. The physical hosts that participate in live

Windows Server 2008 R2 Hyper‐V™ Live MigrationPage #6
migration must be configured with Microsoft Failover Clustering Services as a Failover Cluster and must
use shared storage. To move a VM from one Hyper‐V physical host to another using live migration, both
physical hosts must use processor(s) from the same manufacturer. There are no differences in storage
requirements between Quick Migration and live migration. A complete list of the requirements for
Hyper‐V live migration follows:
� Use any of the following Windows Server 2008 R2 products for Hyper‐V live migration:
o Windows Server 2008 R2 x64 Enterprise
o Windows Server 2008 R2 x64 Datacenter
o Microsoft Hyper‐V Server 2008 R2
� Configure all physical hosts that will use live migration with Microsoft Failover Clustering, which
supports up to 16 nodes per cluster
� Configure the cluster with a dedicated network for live migration traffic
� Use the same processor or processors from the same manufacturer on both physical host
servers
� Configure physical hosts on the same TCP/IP subnet
� Provide shared storage access to all physical hosts
Recommendations and Notes:
� Set up a clustered shared volume for VM storage in a cluster where live migration will be used.
� A cluster will support number_of_nodes/2 simultaneous live migrations. For example, a 16‐node
cluster will support eight simultaneous live migrations with no more than one live migration
session active from every node of the cluster.
� Dedicate a 1 Gigabit Ethernet connection for the live migration network between cluster nodes
to transfer the large number of memory pages typical for a virtual machine.
� Find the cluster configurations that have been validated by vendors through the listings in the
FCCP program under the heading of The Microsoft Support Policy for Windows Server 2008
Failover Clusters at this URL: http://support.microsoft.com/default.aspx?scid=kb;EN‐US;943984
Processor Compatibility Mode
Processor Compatibility Mode brings the benefits of live migration, Quick Migration, and Failover
Clustering to scenarios where cluster hardware cannot be completely standardized by using identical
processor types on all cluster members. VM migrations on versions of Hyper‐V prior to the Windows
Server 2008 R2 RC release required the source and destination Hyper‐V hosts use the same processor
type. This requirement existed so that applications running in the VM environment could have access to
a completely consistent set of processor features regardless of the cluster node the VM was hosted on.
Previous versions of Hyper‐V required cluster hosts to use the same processor type, because an
application started when the VM is hosted on Host A needs all the processor features of Host A to
remain available for as long as that application runs. If the VM is migrated to Host B that has a different
processor type, then the application may fail when it attempts to use a processor feature that Host A
supports but Host B does not.
Processor Compatibility Mode works by hiding a fixed set of processor features that differ among
members of the same processor architecture. For example, not all Hyper‐V‐capable Intel processors
Windows Server 2008 R2 Hyper‐V™ Live MigrationPage #7
support the Intel SSE4 instruction set that improves the performance of media, imaging and 3D
workloads. On Intel processors, Processor Compatibility Mode disables a set of processor features that
includes the SSE4 instruction set.
Applications use the x86 CPUID processor instruction to determine processor type and processor
features. The Hyper‐V hypervisor hides processor features by intercepting a VMs CPUID instruction and
clearing the returned bits corresponding to the hidden features.
Use the Processor Compatibility Mode only in cases where VMs will migrate from one Hyper‐V‐enabled
processor type to another within the same vendor processor family. Processor Compatibility Mode does
not enable migrations between AMD and Intel‐based hosts. Processor Compatibility Mode is not needed
for VM moves that involve a stop and restart of the VM. This includes unplanned failovers and manual
VM moves between hosts.
Before enabling Processor Compatibility Mode, consider that:
� Applications depending on specific acceleration‐related processor features may have reduced
performance. Processor features for multimedia, high‐performance computer (HPC) and
encryption are most likely to be affected. In general, do not run these applications within a
compatibility mode VM.
� Applications using non‐standard methods for processor feature detection may fail after
migration even when Processor Compatibility Mode is enabled. In general, it is very rare for
applications to use non‐standard methods for processor feature detection. Nevertheless, test
applications for compatibility first.
� Some applications may rely on features hidden by Processor Compatibility Mode. These
applications may fail to start when a VM has Processor Compatibility Mode enabled. Again,
testing applications for compatibility is important.
Processor Compatibility Mode can only be enabled or disabled when a VM is turned off. (It is disabled by
default and it can be enabled through the Hyper‐V Management Console interface, in the VM CPU
properties interface, through SCVMM, and through the PowerShell Windows Management Interface
API.)
How Live Migration Works
The live migration process moves a running VM from the source physical host to a destination physical
host as quickly as possible. A live migration is initiated by an administrator through one of the methods
listed below. The speed of the process is partially dependent on the hardware used for the source and
destination physical computers, as well as the network capacity.
Three methods can initiate a live migration:
� Using the Failover Cluster Management console, an administrator can initiate a live migration.
� If Virtual Machine Manager is managing physical hosts that are configured to support live
migration, the Virtual Machine Manager administration‐console can be used to initiate a live
migration.
� A WMI or PowerShell script can be used to initiate a live migration.

Windows Server 2008 R2 Hyper‐V™ Live MigrationPage #8
Any guest operating system supported by Hyper‐V will work with the live migration process.
After initiating a live migration, the following process occurs:
1. Live migration setup
During the live migration setup stage (Figure 1), the source physical host creates a TCP
connection with the destination physical host. This connection transfers the VM configuration
data to the destination physical host. A skeleton VM is set up on the destination physical host
and memory is allocated to the destination VM.
Figure 1. Live Migration Setup

Windows Server 2008 R2 Hyper‐V™ Live MigrationPage #9
2. Memory pages are transferred from the source node to the destination node
Figure 2 shows the second stage of a live migration, where the memory assigned to the
migrating VM is copied over the network to the destination physical host. This memory is
referred to as the working set of the migrating VM. A page of memory is 4 kilobytes.
For example, suppose that a VM named NYC‐SVR2 configured with 1024MB of RAM is migrating
to another Hyper‐V physical host. The entire 1024MB of RAM assigned to this VM is the working
set of NYC‐SVR2. The utilized pages within the NYC‐SVR2 working set are copied to the
destination Hyper‐V physical computer.
In addition to copying the working set of NYC‐SVR2 to the destination physical host, Hyper‐V on
the source physical host monitors the pages in the working set for NYC‐SVR2. As memory pages
are modified by NYC‐SVR2, they are tracked and marked as being modified. The list of modified
pages is simply the list of memory pages NYC‐SVR2 has modified after the copy of its working set
has begun.
During this phase of the migration, the migrating VM continues to run. Hyper‐V iterates the
memory copy process several times, each time a smaller number of modified pages will need to
be copied to the destination physical computer.
After the working set is copied to the destination physical host, the next stage of the live
migration begins.
Figure 2. Memory Pages Transferred
Windows Server 2008 R2 Hyper‐V™ Live MigrationPage #10
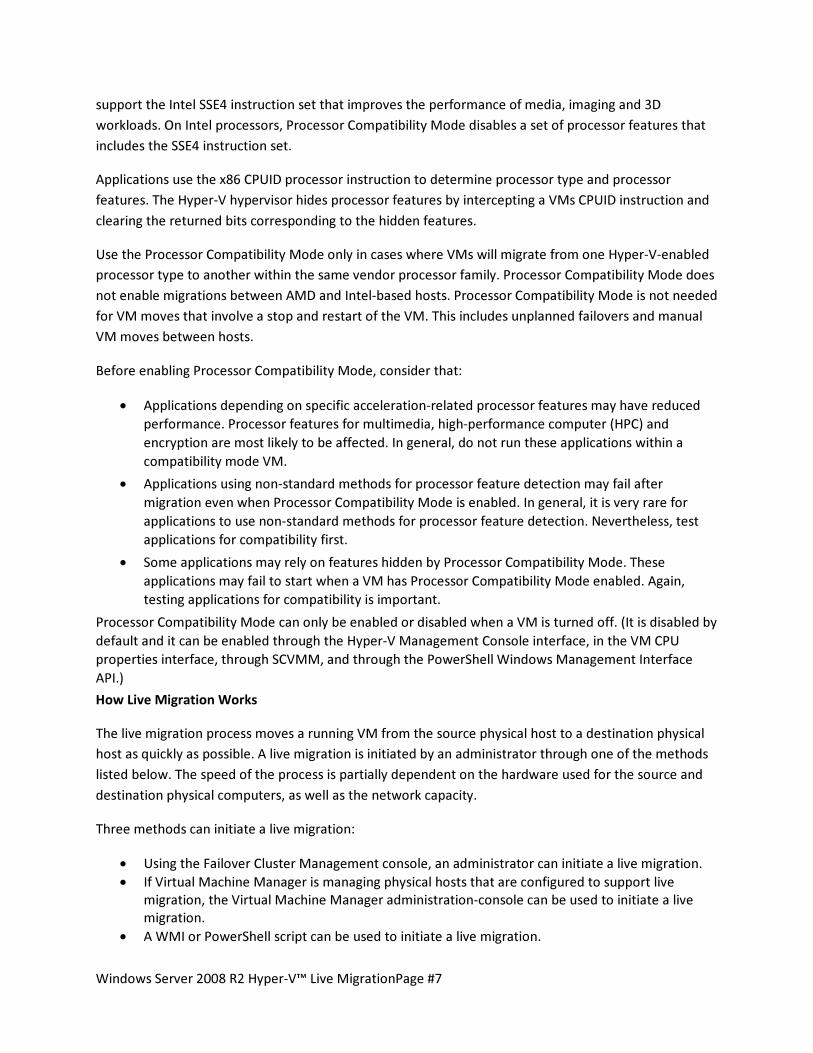
3. Memory pages transferred
Stage three is a memory copy process that duplicates the remaining modified memory pages for
NYC‐SVR2 to the destination physical host. The source physical host transfers the register and
device state of the VM to the destination physical host.
During this stage, the network bandwidth available between the source and destination physical
hosts is critical to the speed of the live migration and using a 1 Gigabit Ethernet or faster is
important. The faster the source physical host transfers the modified pages from the migrating
VMs working set, the more quickly the live migration will complete.
The number of pages transferred in this stage is dictated by how actively the VM is accessing
and modifying memory pages. The more modified pages, the longer the VM migration process
takes for all pages to be transferred to the destination physical host.
After the modified memory pages are copied completely to the destination physical host, the
destination physical host has an up‐to‐date working set for NYC‐SVR2. The working set for NYC‐
SVR2 is present on the destination physical host in the exact state it was in when NYC‐SVR2
began the migration process.
Note: You can cancel the live migration process at any point before this stage of the migration.
Figure 3. Modified Pages Transferred
Windows Server 2008 R2 Hyper‐V™ Live MigrationPage #11
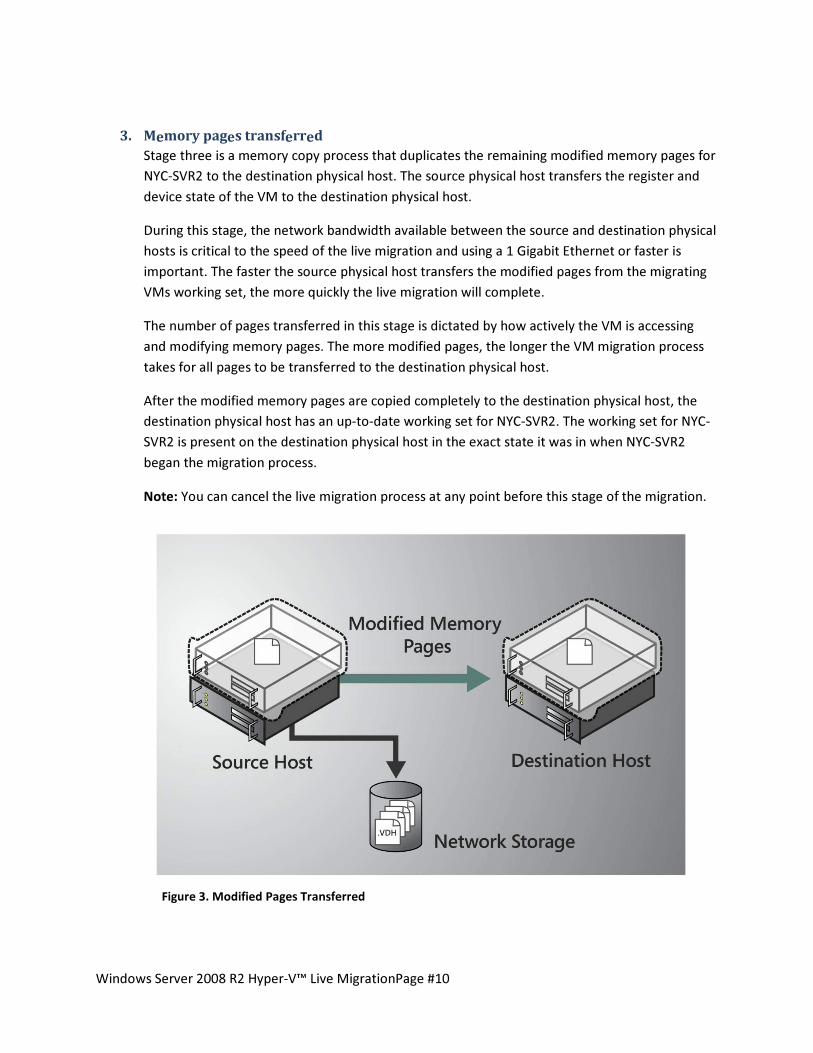
4. Move the storage handle from source to destination
During the fourth stage of a live migration (Figure 4), control of the storage associated with NYC‐
SVR2, such as any VHD files or pass‐through disks, is transferred to the destination physical host.
Figure 4. Storage Handle Moved
Windows Server 2008 R2 Hyper‐V™ Live MigrationPage #12
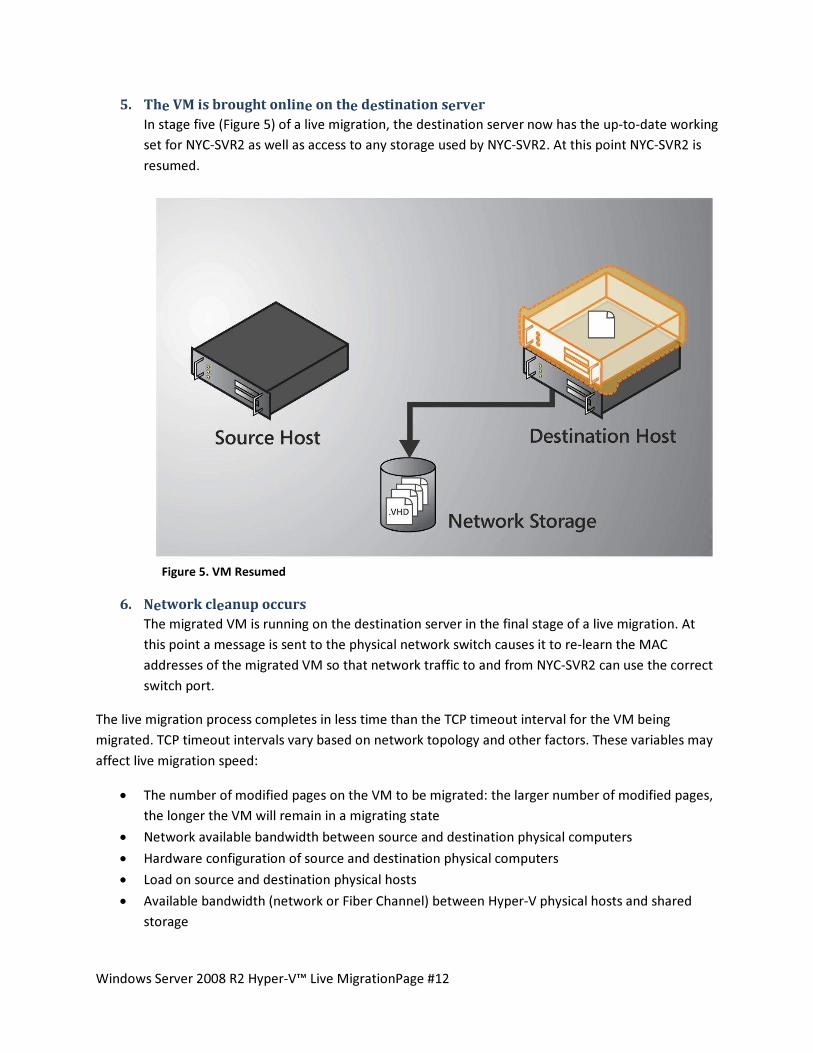
5. The VM is brought online on the destination server
In stage five (Figure 5) of a live migration, the destination server now has the up‐to‐date working
set for NYC‐SVR2 as well as access to any storage used by NYC‐SVR2. At this point NYC‐SVR2 is
resumed.
Figure 5. VM Resumed
6. Network cleanup occurs
The migrated VM is running on the destination server in the final stage of a live migration. At
this point a message is sent to the physical network switch causes it to re‐learn the MAC
addresses of the migrated VM so that network traffic to and from NYC‐SVR2 can use the correct
switch port.
The live migration process completes in less time than the TCP timeout interval for the VM being
migrated. TCP timeout intervals vary based on network topology and other factors. These variables may
affect live migration speed:
� The number of modified pages on the VM to be migrated: the larger number of modified pages,
the longer the VM will remain in a migrating state
� Network available bandwidth between source and destination physical computers
� Hardware configuration of source and destination physical computers
� Load on source and destination physical hosts
� Available bandwidth (network or Fiber Channel) between Hyper‐V physical hosts and shared
storage
Windows Server 2008 R2 Hyper‐V™ Live MigrationPage #13
Live Migration Scenarios
Hyper‐V live migration increases flexibility for many applications and uses of Hyper‐V, but the following
scenarios are examples of how live migration provides real‐world benefits.
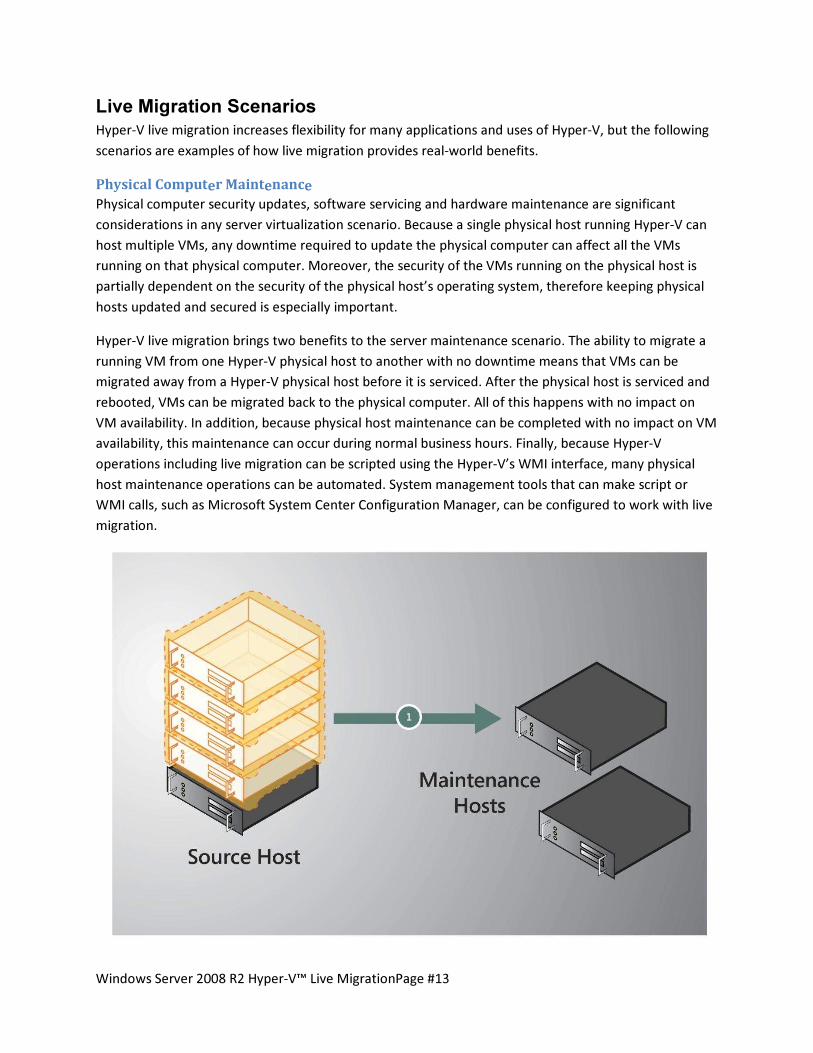
Physical Computer Maintenance
Physical computer security updates, software servicing and hardware maintenance are significant
considerations in any server virtualization scenario. Because a single physical host running Hyper‐V can
host multiple VMs, any downtime required to update the physical computer can affect all the VMs
running on that physical computer. Moreover, the security of the VMs running on the physical host is
partially dependent on the security of the physical host’s operating system, therefore keeping physical
hosts updated and secured is especially important.
Hyper‐V live migration brings two benefits to the server maintenance scenario. The ability to migrate a
running VM from one Hyper‐V physical host to another with no downtime means that VMs can be
migrated away from a Hyper‐V physical host before it is serviced. After the physical host is serviced and
rebooted, VMs can be migrated back to the physical computer. All of this happens with no impact on
VM availability. In addition, because physical host maintenance can be completed with no impact on VM
availability, this maintenance can occur during normal business hours. Finally, because Hyper‐V
operations including live migration can be scripted using the Hyper‐V’s WMI interface, many physical
host maintenance operations can be automated. System management tools that can make script or
WMI calls, such as Microsoft System Center Configuration Manager, can be configured to work with live
migration.
Windows Server 2008 R2 Hyper‐V™ Live MigrationPage #14
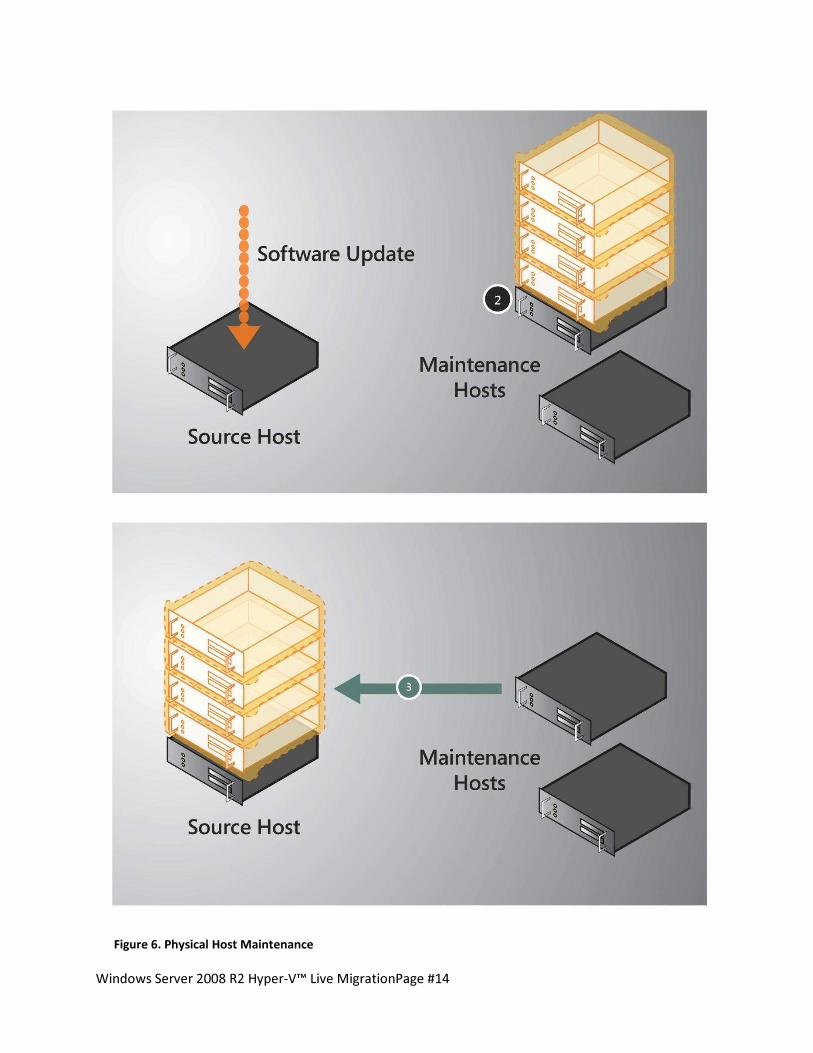
Figure 6. Physical Host Maintenance

Windows Server 2008 R2 Hyper‐V™ Live MigrationPage #15
Dynamic Data center
With Hyper‐V live migration, organizations can implement dynamic IT environments. Dynamic IT
environments facilitate server provisioning based on actual utilization and service demand rather than
on less flexible criteria, such as expected demand. The management logic of the dynamic IT environment
assigns virtual machines to Hyper‐V physical hosts according to actual utilization and demand.
For example, if the IT environment hosts a Web‐based application and the number of simultaneous
requests to the Web site increases, Microsoft System Center Virtual Machine Manager (VMM) can
automatically provision one or more additional Web servers. When provisioning these Web servers,
Virtual Machine Manager takes into account the workload on the current physical hardware. If the IT
environment load continues to increase, Virtual Machine Manager can switch on additional physical
hosts and start up more virtual machines to meet the load.
As the load fluctuates, virtual machines can be transferred between physical hosts to keep hardware
utilization rates high. Unused physical hosts can then be turned off, reducing both power consumption
and cooling requirements and therefore minimizing running costs. Mismatches between physical host
capacity and VM demands can be addressed more easily, because no downtime is required to move a
VM to a physical host with more available processing capacity. If the physical host performance or usage
changes after a VM is placed on that server, the VM can easily be migrated to a server with more free
capacity. Virtual Machine Manager can be used to easily report on current physical host utilization and
to help select ideal candidates for the VM in question.
Figure 7.Workload Moved to a More Powerful Server
Windows Server 2008 R2 Hyper‐V™ Live MigrationPage #16
Green IT
As much as 33 percent of the power consumed by many data centers goes towards cooling and other
infrastructure requirements. The agile load balancing approach enabled by Hyper‐V live migration can
be extended to reduce power consumption in the data center. Data centers with fluctuating loads can
use script automation and live migration to increase the virtual machine consolidation ratio during low
demand times. With fewer physical host servers each running more VMs, the un‐used physical host can
be powered off to reduce the electricity and cooling demand. In anticipation of periods of greater
demand (such as daily peak usage, quarter end, or yearend processing), the offline physical host can be
powered back on and the VM load can be redistributed using live migration.
The Hyper‐V live migration feature is integrated with Windows Server 2008 R2 Hyper‐V and no separate
licensing or product installation is involved. In fact, any configuration that works with Quick Migration
and also includes processors of the same type will support live migration.
Figure 8. Increasing Consolidation Ratio
Deploying Live Migration
Because Windows Server 2008 has eased the configuration process for Failover Clustering, deploying
live migration is easy. First, complete the planning necessary to determine how many cluster nodes you
will implement. Next, ensure that the physical host and shared storage meet Microsoft’s requirements
for usage in a Failover Cluster. See the Microsoft Failover Cluster Configuration Program for more
information. The process involves the following high‐level steps:
1. Configure Windows Server 2008 R2 Failover Clustering

Windows Server 2008 R2 Hyper‐V™ Live MigrationPage #17
2. Connect both physical hosts to networks and storage
3. Install Hyper‐V and Failover Clustering on both physical hosts
4. Enable Cluster Shared Volumes
5. Make the Virtual Machines highly available
6. Test a Live Migration
For detailed, step‐by‐step instructions see the deploying live migration whitepaper at this URL:
http://go.microsoft.com/fwlink/?LinkId=139667
Managing Live Migration
Microsoft System Center Virtual Machine Manager 2008 R2 adds significant value to organizations that
use Hyper‐V live migration. The virtual machine management and reporting functions of Virtual Machine
Manager can be used with live migration to reduce the effort needed to manage a virtualized data
center. In addition, the Virtual Machine Manager used with live migration can increase an organizations’
ability to respond to changing usage levels and requirements. Virtual Machine Manager is also useful
when managing disparate Hyper‐V physical hosts in an organization, such as Hyper‐V physical hosts
located in remote sites.
When Virtual Machine Manager manages a Hyper‐V host that is configured for high availability, Virtual
Machine Manager is able to initiate Quick Migrations or live migrations from within the Virtual Machine
Manager management console. This provides a single management tool for all VM management tasks,
including live migrations.
Because the Virtual Machine Manager administration console can optionally output PowerShell scripts
for every task an administrator uses the console for, future iterations of common tasks can easily be
automated with minimal programming skill required. Of course, this extends to live migrations as well.
Using Virtual Machine Manager to initiate a live migration moves a running VM to another physical host
with no downtime and also produces the PowerShell script that can initiate that same task in the future
or be easily modified to initiate live migration on a different VM or different source and destination
physical host pair.
Virtual Machine Manager offers comprehensive reporting on virtualization physical host utilization and
VM placement. These reports can be used to decide placement of new VMs or migrations of existing
VMs. Especially in a very dense environment like many data centers or very dispersed environment like
remote sites, good information about virtualization performance can be vital in meeting uptime and
availability requirements. Virtual Machine Manager easily provides the information required to manage
multiple Hyper‐V physical hosts or VMs effectively. Because Hyper‐V live migration makes it so easy to
move VMs from one physical host to another, obtaining good information about Hyper‐V physical hosts
in the environment is important.
Windows Server 2008 R2 Hyper‐V™ Live MigrationPage #18
SummaryThe live migration feature of Windows Server 2008 R2 Hyper‐V greatly increases the flexibility of Hyper‐
V. The ability to move running VMs between Hyper‐V physical hosts with no downtime for users makes
it easier to maintain physical host, and opens up new possibilities for dynamically scaling server
resources to efficiently meet changing demands. Live migration makes it possible to perform
maintenance on Hyper‐V servers without scheduling a maintenance times for running VMs. When
demand on a VM changes, you can migrate it to a more powerful server with no downtime, or if
demand has decreased you can migrate it to a server where the consolidation ratio is higher to conserve
electricity usage. Hyper‐V live migration makes it possible to use VMs with less effort and greater
flexibility than before. These benefits translate to time and money savings in almost any Hyper‐V server
virtualization usage.