windows ulv - frontier precision · postgis bundle 2.3.0 for postgresql 9.6; file name:...
TRANSCRIPT

Windows ULV User Guide
Frontier Precision, Inc.
154 1st Avenue West, Jerome, ID 83338 - (208) 324-8006 - [email protected]
Revision 3 - 5/25/2018

Frontier Precision Software License This is a legal agreement between you (either an individual or an entity); and Frontier Precision. By installing the Sentinel GIS software, you agree to be bound by the terms of this Agreement. The Sentinel GIS applications consist of customized ESRI ArcPad toolbars and interface for mobile data collection, customized ESRI ArcGIS Desktop toolbars for configuration and administration, and DataLink GIS software for automated data management. These customized toolbars and DataLink GIS are licensed to you (as an individual, district, field office, or similar ‘entity’) and may be used on an unlimited number of computers and handheld devices within a single district or entity office. “Use” means loaded in temporary memory or permanent storage on a computer or handheld. ESRI’s ArcPad and ArcGIS Desktop software are governed by their respective license agreements. The software is protected by United States copyright laws and international treaties. You may make one copy of the software solely for backup or archival purposes or transfer it to a single hard disk provided you keep the original solely for backup or archival purposes. You may not rent, lease, or transfer the software or copy the written materials accompanying the software. You may not reverse engineer, decompile, or disassemble the software.
Limited Warranty Frontier Precision warrants that the software media are free from defects in materials and workmanship under normal use for ninety (90) days from the date you receive them. This warranty is limited to you and is not transferable. Any implied warranties are limited to 90 days. Some jurisdictions do not allow limits on the duration of an implied warranty, so this limitation may not apply to you. The entire liability of Frontier Precision and its suppliers, and your exclusive remedy, shall be (a) return of the price paid for the software or (b) replacement of any software media that does not meet this warranty. Any replacement software media is warranted for the remaining original warranty period or 30 days whichever is longer. Frontier Precision does not warrant that the functions of the software will meet your requirements or that operation of the software will be uninterrupted or error free. You assume responsibility for selecting the software to achieve your intended results, and for the use and results obtained from the software. Frontier Precision disclaims all other warranties, expressed or implied, including but not limited to implied warranties of merchantability and fitness for a particular purpose, for the software and all accompanying written materials. This limited warranty gives you specific legal rights. You many have others, which vary from jurisdiction to jurisdiction. In no event shall Frontier Precision or its suppliers be liable for any damages whatsoever (including, without limitation, damages for loss of business profits, business interruption, loss of business information, or other pecuniary loss) arising out of use or inability to use the software, even if advised of the possibility of such damages. Because some jurisdictions do not allow an exclusion or limitation of liability for consequential or incidental damages, the above limitation may not apply to you.

U. S. Government Restricted Rights The software and documentation are provided with Restricted Rights. Use duplication, or disclosure by the Government is subject to restrictions as set forth in subparagraph (c)(1)(ii) of the Rights in Technical Data and Computer Software clause at DFARS 252.227-7013 or subparagraphs (c)(1) and (2) of the Commercial Computer Software-Restricted Rights at 48 CFR 52.227-19. Manufacturer is Frontier Precision, 154 1st Ave W., Jerome, ID 83338. This license is effective until terminated. It will terminate upon your breach of any term of this license. Upon termination, you agree that the software and accompanying materials, and all copies thereof, will be destroyed. This agreement is governed by the laws of the State of North Dakota. You acknowledge that you have read this agreement, you understand it, you agree to be bound by its terms, and that this is the complete and exclusive statement of the agreement between you and Frontier Precision regarding the software.
Questions? Should you have any questions concerning this Agreement, please call Frontier Precision at (208) 324-8006.

Contents Frontier Precision Software License ............................................................................................................. 2
Limited Warranty ....................................................................................................................................... 2
U. S. Government Restricted Rights ......................................................................................................... 3
Questions? ................................................................................................................................................ 3
About Windows ULV ..................................................................................................................................... 1
FieldSeeker GIS for Mosquito Control ...................................................................................................... 1
Core ....................................................................................................................................................... 1
ULV/Adulticiding .................................................................................................................................... 1
System Components, Hardware and Software Requirements ................................................................. 1
Installation Instructions .............................................................................................................................. 2
Sentinel GIS Adulticiding (ArcMap toolbar) Users ................................................................................ 2
Standalone ULV Office Users ............................................................................................................... 2
Multi-PC Install ...................................................................................................................................... 2
Finding Additional Information ...................................................................................................................... 3
Help and User Guides ............................................................................................................................... 3
Training ..................................................................................................................................................... 3
Technical Assistance .................................................................................................................................... 4
Technical Support ..................................................................................................................................... 4
Mobile and GPS Support .......................................................................................................................... 4
Esri Software Support ............................................................................................................................... 4
Standalone ULV Office .................................................................................................................................. 5
Sentinel Adulticiding (ArcMap Toolbar) ......................................................................................................... 6
FieldSeeker GIS (Web Application, Feature Services) ................................................................................. 7
Office Software User Interface ...................................................................................................................... 8
Log In ............................................................................................................................................................ 8
Configuration ................................................................................................................................................. 8
Directories ................................................................................................................................................. 9
General .................................................................................................................................................... 10
Picklists ................................................................................................................................................... 11
Products .................................................................................................................................................. 12
Sprayer .................................................................................................................................................... 13
Technicians ............................................................................................................................................. 13
Storage Service ....................................................................................................................................... 14
Dropbox ............................................................................................................................................... 14
Google Drive ....................................................................................................................................... 16
Configure Storage Service ...................................................................................................................... 20
Make Mobile Software Aware of Configuration ................................................................................... 21
Managing Restricted Areas ......................................................................................................................... 21
Add New Areas ....................................................................................................................................... 21
Update or Delete Existing Areas ............................................................................................................. 22
Managing Zones ......................................................................................................................................... 23
Add New Areas ....................................................................................................................................... 23
Update or Delete Existing Areas ............................................................................................................. 23
Preparing Data ............................................................................................................................................ 23
Transferring to Field Devices ...................................................................................................................... 24
Data Utilities ................................................................................................................................................ 25
Import Map Areas or Restricted Areas ................................................................................................ 25
Processing Field Data ................................................................................................................................. 26
Working With Field Data ............................................................................................................................. 28
Setting a Date Range .............................................................................................................................. 28
Set Additional Filters ............................................................................................................................... 29
Export ...................................................................................................................................................... 30
Get Feature Information .......................................................................................................................... 31
Update Spray Session ............................................................................................................................ 32
Reports ........................................................................................................................................................ 32
Spray Session Detail Report (with or without map) ................................................................................ 34
Spray Session Detail / Columnar (with or without map) ......................................................................... 35
Spray Session Summary Report ............................................................................................................. 36
Field Software User Interface ..................................................................................................................... 37
Log In .......................................................................................................................................................... 40
Sync ........................................................................................................................................................ 40
Options ........................................................................................................................................................ 41
GPS ......................................................................................................................................................... 41
Sprayer .................................................................................................................................................... 43
Map ......................................................................................................................................................... 45
Sync ........................................................................................................................................................ 46
Check for Updates .................................................................................................................................. 47
About ....................................................................................................................................................... 48
Collecting Spray Session Data ................................................................................................................... 48

Start Spray Session ................................................................................................................................ 48
Restricted Area Warnings ....................................................................................................................... 51
Sketching Treatment Area .......................................................................................................................... 52
Collecting Events ........................................................................................................................................ 54
Syncing Data ............................................................................................................................................... 55
1
Introduction
About Windows ULV Windows ULV is an end-to-end system for managing Adulticiding data collection. It consists of an Office application and a mobile data collection application. Windows ULV operates standalone, or it can be used with Sentinel GIS & ArcGIS Desktop, or FieldSeeker GIS.
Windows ULV is licensed on a per-mobile device basis for field users, and on a per-concurrent-user basis for office users.
FieldSeeker GIS for Mosquito Control Core The “core” FieldSeeker GIS application contains tools for Larviciding, Surveillance, and Service Request (everything except ULV truck spraying). This includes software configuration; service requests; larval inspections, samples, and treatments; adult landing count, trapping, and lab data entry tools; sample collection and lab data entry tools (e.g. dead birds, specimen samples); work review tools; search and query tools; and mapping tools including address geocoding, GPS mapping, online basemaps (imagery, topographic, StreetMap, and others), map navigation, and map printing or export.
ULV/Adulticiding The ULV extension contains tools for recording ULV truck spraying, including configuration tools, tools for managing restricted areas, map filtering tools, reporting tools, and a mobile application for collecting data from truck sprayers. Supported sprayer types include Clarke SmartFlow, Curtis Dyna-Fog, London Fogger, and Target/B&G Phoenix, as well as backpack, ATV, and truck sprayers that don’t output sprayer data for software collection.
System Components, Hardware and Software Requirements Windows ULV is built on open GIS technology. No GIS software needs to be installed for Windows ULV software to work.
The mobile software requires Windows 8.1 or Windows 10 devices that have a built-in GPS (Location Sensor or NMEA 0183 COM port) and RS-232 serial port.
The office software requires Windows 7, 8.1, or 10. The software installation requires a connection to PostgreSQL, which is installed separately.
Windows ULV field software can be used in conjunction with Sentinel GIS Adulticiding. The ArcMap Adulticiding toolbar can extract a GeoPackage for use in the mobile software, and DataLink Merge can process field data into an Esri file geodatabase.
Windows ULV can also be used in conjunction with FieldSeeker GIS. Processed data can be synced to a FieldSeeker feature service / SDE database.

2
Installation Instructions Sentinel GIS Adulticiding (ArcMap toolbar) Users
1. Install Adulticiding 3.6 or latest Sentinel patch installer
Standalone ULV Office Users 1. Install all prerequisites
a. Crystal Reports for Visual Studio, v13.0.19, 32-bit, file name: CRRuntime_32bit_13_0_19.msi
b. Microsoft Visual C++ 2015 Redistributable – choose 32-bit or 64-bit version depending on your operating system; file name: vc_redist.x64.exe or vc_redist.x86.exe; this file can also be downloaded from Microsoft’s Website
c. .NET 4.6.2, file name: dot net 4.6.2 - NDP462-KB3151800-x86-x64-AllOS-ENU; this file can also be downloaded from Microsoft’s Website
d. PostgreSQL 9.6.1 32-bit, file name: postgresql-9.6.1-1-windows x86.exe; this file can also be downloaded from https://www.enterprisedb.com/downloads/postgres-postgresql-downloads
i. Accept the default installation directory ii. For the data directory, enter C:\PostgreSQL Data iii. Enter 12345 for the password of the postgres user (the code currently has this
password hard-wired) iv. Accept the default port of 5432 v. Accept the default locale vi. At the “finish” dialog, uncheck the option to run Stack Builder and click Finish
e. PostGIS Bundle 2.3.0 for PostgreSQL 9.6; file name: postgis-bundle-pg96x32-setup-2.3.0-1.exe this file is also downloadable as a final step of the PostgreSQL installer
i. You will be prompted to register the GDAL_DATA environment variable; click Yes.
ii. You will be prompted about Raster drivers. Click Yes. iii. You will be prompted about Raster out of db. Click Yes. iv. Click Close, then click Finish.
2. Install ULV Office
The installer will create the database and schema needed for the program.
Multi-PC Install Postgres needs to be configured to allow remote connections to the database.
Find the pg_hba.conf file in the PostgreSQL data directory (such as C:\PostgreSQLData), edit in a text editor, and at the bottom, add this line:
host FieldSeeker all 0.0.0.0/0 trust
What that does is allow all machines for all IP addresses access to the database on the server machine if the password is supplied correctly.
3
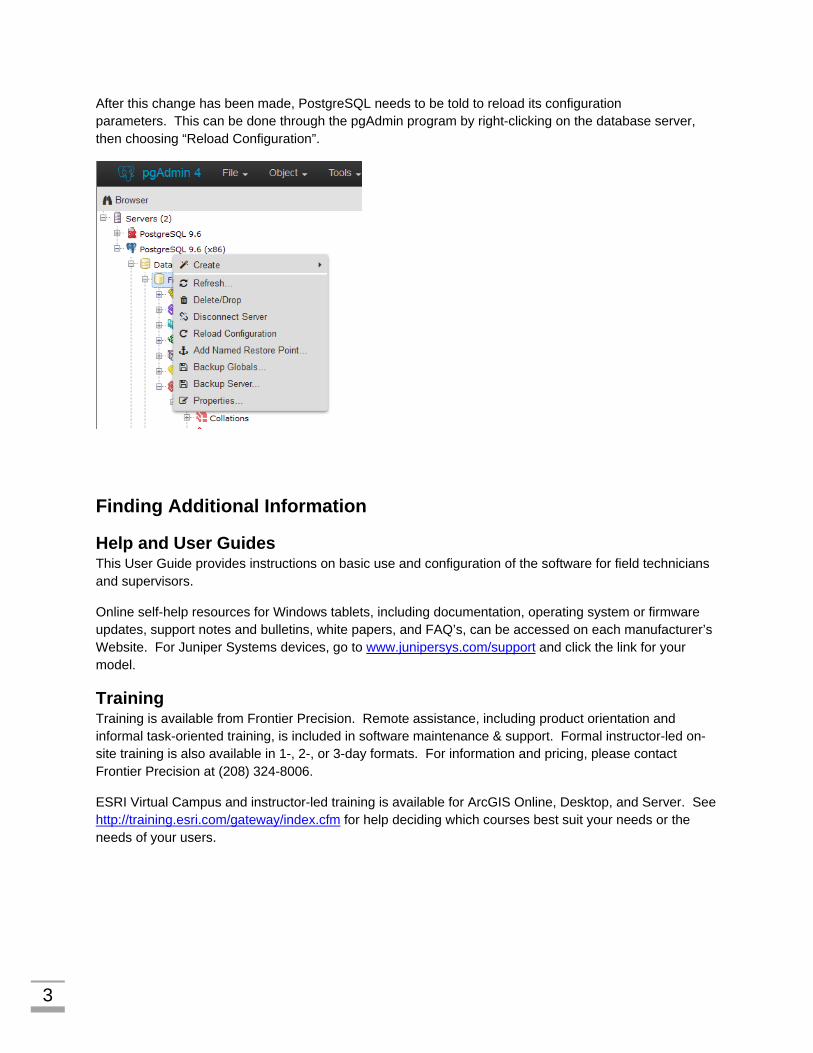
After this change has been made, PostgreSQL needs to be told to reload its configuration parameters. This can be done through the pgAdmin program by right-clicking on the database server, then choosing “Reload Configuration”.
Finding Additional Information
Help and User Guides This User Guide provides instructions on basic use and configuration of the software for field technicians and supervisors.
Online self-help resources for Windows tablets, including documentation, operating system or firmware updates, support notes and bulletins, white papers, and FAQ’s, can be accessed on each manufacturer’s Website. For Juniper Systems devices, go to www.junipersys.com/support and click the link for your model.
Training Training is available from Frontier Precision. Remote assistance, including product orientation and informal task-oriented training, is included in software maintenance & support. Formal instructor-led on-site training is also available in 1-, 2-, or 3-day formats. For information and pricing, please contact Frontier Precision at (208) 324-8006.
ESRI Virtual Campus and instructor-led training is available for ArcGIS Online, Desktop, and Server. See http://training.esri.com/gateway/index.cfm for help deciding which courses best suit your needs or the needs of your users.

4
Technical Assistance
Technical Support High-priority unlimited toll-free phone and email support is available from Frontier Precision. If Windows ULV software maintenance is current, please use the contact information below to contact support. This technical support covers the mobile devices, mobile software, and office software configuration and use. To contact Technical Support: Frontier Precision (208) 324-8006, 8 AM – 5 PM MTN [email protected] www.frontierprecision.com/mosquito When contacting support, please supply your contact details (name, company, email, phone) and the nature of your inquiry. This helps support to locate your information and history more quickly Please note that high-priority technical support does not include software maintenance for Esri software, or hardware warranty for Trimble GPS equipment or Juniper Systems hardware. Esri ArcGIS software has Support and Maintenance extensions available separately from Esri; see www.esri.com/support for more details. Trimble GPS equipment comes with 1 year hardware warranty standard, which can be extended two additional years. Please contact Frontier Precision for Windows ULV software maintenance renewal or hardware warranty extension, and Esri for ArcGIS software maintenance. If you have not purchased software maintenance, product updates and technical support will not be available.
Mobile and GPS Support Technical support for your mobile device is available from the retail outlet where it was purchased, the equipment manufacturer, the warranty service company (e.g. SquareTrade, Asurion), or Frontier Precision, depending on where you purchased it.
Esri Software Support ArcGIS software support as it relates to the use of Windows ULV obtained through Frontier Precision. Technical assistance for issues, bugs, or defects with standard ArcGIS software is obtained through Esri Support. Technical assistance is included in annual software maintenance. Even if maintenance is not current, self-help resources are also available from Esri’s Website.
Live Support from Esri:
(888)377-4575 toll-free Online request: http://support.esri.com/index.cfm?fa=homepage.policies.gateway Self-help resources, including patches and service packs, user discussion forums, documentation, support notes and white papers: http://resources.arcgis.com

5
Windows ULV Workflow
Standalone ULV Office
Windows ULV Data Flow
GeoPackage
PostgreSQLDatabase
Office ULVStandalone
DataExtract
Interactive
ULVProcessor
Windows ULV
Automatic
Desktop Sync Directory
MobileDesktop
DirectSync
From MobileOr
Memory Device
GeoPackage
MBTilesBasemap
TileMill(Free)Shapefiles
DirectSync
From MobileOr
Memory Device
Standalone
The standalone ULV Office software runs on Windows desktops. It stores data in a PostGIS (PostgreSQL) database, which is an Open GIS data format. The Office software is used to:
• Configure • Manage Restricted Areas and Zones • Extract data for the mobile software (this creates a GeoPackage containing all the data) • Filter, View, and Find data • Run Reports
The mobile software runs on Windows tablets. It collects data into the GeoPackage and syncs data to a folder (network path, shared desktop folder, or memory device). It uses online basemaps if there is an Internet connection in the field, or it uses offline basemaps in MBTiles format. These are created using TileMill, a free program.
The ULV Processor agent runs in the system tray, monitors a folder for new data, and processes the data into the database.

6
Sentinel Adulticiding (ArcMap Toolbar)
The Adulticiding toolbar runs inside of ArcMap. Data is stored in an Esri file geodatabase. ArcMap and the Adulticiding toolbar is used to:
• Configure • Manage Restricted Areas and Zones • Extract data for the mobile software (this creates a GeoPackage containing all the data) • Filter, View, and Find data • Run Reports
The mobile software runs on Windows tablets. It collects data into the GeoPackage and syncs data to a folder (network path, shared desktop folder, or memory device). It uses online basemaps if there is an Internet connection in the field, or it uses offline basemaps in MBTiles format. These are created using TileMill, a free program. Note: Only Zones and No Sprays are included in the GeoPackage; other data layers that are in ArcMap are not included in the GeoPackage.
DataLink Merge processes the GeoPackage data into the Esri file geodatabase. Note: GeoPackage data cannot be processed directly into an SDE geodatabase.

7
FieldSeeker GIS (Web Application, Feature Services)
This scenario is basically Standalone Windows ULV + synchronization of selected data to FieldSeeker feature services, so that selected data can be viewed in FieldSeeker Web and Mobile software. Note: this is not supported in the first release of the application.

8
ULV Office Software Operation
Office Software User Interface
Log In
Select your name from the picklist and press OK. This will be used to keep track of Created By or Edited By when creating or editing spray sessions or map features.
Configuration You can easily configure picklists and other settings. Tap the Configuration button.
Then select the configuration type.

9
Directories
After selecting Directories, tap the buttons to set the path options.
• Data Path – this is the folder that the ULV Processing Agent will monitor for new incoming field data to process.
o If you will sync data from the mobile tablets using a memory device, set this path to the memory device path when it’s plugged in to the computer, e.g.
E:\ULV Field Data o If you will sync data from the mobile tablets via Wi-Fi, set this path to the shared folder,
e.g. If the shared folder is on your local computer, enter the path to the shared folder.
• C:\ULV Field Data If the shared folder is on your network, enter the path. This can be the UNC
path, or it can be a mapped network drive. • \\SharedNetworkFolder\ULV Field Data • Z:\ULV Field Data
• Extract Path – this is the folder where the program will extract the map package for syncing with the mobile devices.
o If you will sync data to the mobile tablets using a memory device, set this path to the memory device path when it’s plugged in to the computer, e.g.
E:\ULV GeoPackage Data o If you will sync data from the mobile tablets via Wi-Fi, set this path to the shared folder,
e.g. If the shared folder is on your local computer, enter the path to the shared folder.
• C:\ULV GeoPackage Data If the shared folder is on your network, enter the path. This can be the UNC
path, or it can be a mapped network drive. • \\SharedNetworkFolder\ULV GeoPackage Data • Z:\ULV GeoPackage Data

10
General
After selecting General, tap Update.
• No Spray Distance – this is the warning distance for Restricted Areas (the value is in feet) • Split Session at Zone – select this option to split spray sessions at zone boundaries (not
implemented yet) • Tracklog Interval – how often to collect tracklog points, if that is enabled on the mobile software
(the value is in seconds)

11
Picklists
• Category – select the category on the left, then Add, Update, or Delete picklist values o Name: what shows up for the user in the picklist o Value: what gets stored in the database o Active: if unchecked, does not display for the user

12
Products
Add, Update, and Delete products. Items in bold are required.
• Name: what shows up for the user in the picklist • Value: what gets stored in the database • Chemical Reg No: the EPA registration number from the label; this shows up on reports • Diluent: None, Water, Oil • Mix Rate: 0 for ready-to-use (RTU) products, otherwise enter the mix rate, e.g. for 1:4
formulation, enter “4” • AI 1: enter the lbs/gal for the primary active ingredient from the label • AI2: optionally enter the lbs/gal for the 2nd active ingredient from the label • Active: if unchecked, does not display for the user

13
Sprayer
Add, Update, or Delete sprayers.
• Name: what shows up for the user on the picklist • Number: equipment number • Fogger Type: select the fogger type • Calibration Value: N/A for sprayers that output a flow rate
o Clarke SmartFlow: N/A because the sprayer outputs a flow rate o Curtis Dyna-Fog: N/A because the sprayer outputs a flow rate o Curtis Dyna-Fog Set Flow: enter a valid calibration value o BG Phoenix: enter a valid calibration value o London Fog: enter a valid calibration value
• Active: if unchecked, does not display for the user
Note: for sprayer types that require a calibration value, it is critical that you calibrate the equipment according to manufacturer instructions, then enter the calibration value into the software. These sprayer types output a “motor count” value which has to be calculated to a flow rate using the calibration value, so if the value entered is wrong, or if you change the calibration on the sprayer but don’t update it here, the spray totals will be wrong.
Technicians

14
Add, Update, and Delete technicians.
• Name: what shows up for the user on the picklist • Description: only shows up here in the Office software; optional • Truck: configure the truck assignment; optional • Active: if unchecked, does not display for the user
Storage Service
Configure sync using Dropbox or Google Drive. When this option is configured, data is synced in both directions using the cloud storage service you select.
• ULV Office > Data Operations > Extract GeoPackage > the GPKG file is created in the “Extract” path that is configured, then copied to Dropbox or Drive
• ULV Office > Data Operations > Utilities > Upload Basemap to Google Drive > the MBtiles basemap that is selected is copied to Dropbox or Drive
• ULV Processing Agent > checks for new data to process on Dropbox or Drive every 10 minutes o This setting can be changed in the Data Processor.ini file o StorageServiceCheckTimeSeconds = 600
• ULV Mobile > Sync o Field data on the tablet is archived locally, then copied to Dropbox or Drive o Updated GeoPackage is copied from Dropbox or Drive to the mobile device, bringing in
updates to Restricted Areas, picklists, products, etc.
Storage service configuration requires you to log into a Drive or Dropbox account and grant developer API / application access to the account so that ULV Office & Mobile can communicate with the account automatically. This is a one-time setup process that has to be done in Drive or Dropbox, after which account credentials are remembered by FieldSeeker and used throughout. It is not necessary to sign in on every device or require users to remember a Drive or Dropbox login.
Note: you will configure Dropbox or Drive, not both. Which one of these free storage services you use is completely up to you. Select one or the other and follow the instructions below to configure developer API / application access.
Dropbox Create an account on Dropbox or log in to an existing account. Browse to https://www.dropbox.com/developers/apps/create to configure program access.
Click My apps.
1) Choose the Dropbox API

15
2) Choose “App folder” for the type of access needed 3) Enter a name for the application, for example “FieldSeekerULV”
Click on the Create app button.
In the application settings tab, click on the Enable Additional Users button.

16
The App folder name can be left as-is.
For the Allow implicit grant option, choose Disallow.
Under Generated access token, click on the Generate button.
This action will generate a long sequence of numbers and letters. Click on the sequence and it will appear as highlighted. Right-click and choose Copy. This value will be pasted into the ULV Office configuration screen for storage service.
Google Drive Operation with Google Drive has two stages. Stage one is to enable the drive API. Stage two is to permit access to the API by creating a service account.
Enable Drive API 1. Bring up a web browser and navigate to https://console.developers.google.com/project. Log in
with your Google credentials. 2. Click on CREATE PROJECT.

17
3. Enter the project name FieldSeekerULV and click Create.
4. Under Google APIs, choose APIs & Services > Dashboard.
5. Click on Google Drive API.

18
6. Click ENABLE.
Service Account The authorization for Google Drive involves creating what is known as a “service account,” which is a method to permit access to an application, not specific users. This permits the access of data on Google Drive from the ULV Office and mobile applications without user consent each and every time.
Following are the steps involved in creating a service account.
1. Click on the project name to go to the project’s permissions, and in the left-hand menu, choose Service Accounts.
2. Click on CREATE SERVICE ACCOUNT.

19
3. For the service account name, enter FieldSeekerULV. For the role, choose Project > Owner.
4. Check the “Furnish a new private key” checkbox. Leave the key type as JSON.
5. Click Save. You may get a “Service accounts error” as such:
6. In the Service Accounts list, click on the 3 vertical dots to the very right-hand side of the
fieldseekerulv entry, and choose Create key.
7. Leave the key type as JSON and click CREATE. This action will download a key file to the
computer, which will be used by the ULV Office software to use the storage service. It may be more convenient to choose to save this file in a more readily-accessible location, such as the

20
desktop.
Configure Storage Service
Select Dropbox or Google Drive.
For Dropbox, paste in the access token obtained earlier (page 16).
For Google Drive, click Choose key file… and browse to the file saved earlier (above).
Click Test to verify communication with the storage service.

21
Press OK. The Configuration page now shows which storage service is configured.
Make Mobile Software Aware of Configuration In ULV Office, go to Data Operations > Extract GeoPackage. When this completes, a new file called sscredentials is created in the same folder as the GKPG file. Next time the mobile software syncs it will become aware of this configuration and attempt to use it. Note: Mobile v1.4 or greater is required.
For details on the mobile Sync functionality, see the Sync heading in the mobile section of this guide.
Managing Restricted Areas Restricted Areas can be created, edited, and deleted in the office software. Restricted Areas are usually no spray areas, but this layer can also be used to provide informational warnings to drivers about special instructions, gate codes, call ahead information and so on.
Add New Areas Turn on the Restricted Areas layer by clicking it, then press the green + to add.

22
Click to add points around the perimeter of the area, then double-click to finish.
Fill in the required information for the restricted area. The Warning is what the driver will see in the field.
Update or Delete Existing Areas To update an existing area, tap the feature to get the popup. Tap the red X to delete (you will be prompted first), or tap the Attributes button to edit the attributes, then press Save.

23
Managing Zones Map Areas can be created, edited, and deleted in the office software. Zones (or Map Areas) are usually geographic divisions of an overall area of responsibility, but they can be town boundaries, special spray areas, or temporary spray areas.
Add New Areas Turn on the Map Areas layer by clicking it, then press the green + to add.
Click to add points around the perimeter of the area, then double-click to finish.
Fill in the Name, then press Save.
Update or Delete Existing Areas To update an existing area, tap the feature to get the popup. Tap the red X to delete (you will be prompted first), or tap the Attributes button to edit the name, then press Save.
Preparing Data If you’re setting things up for the first time, or if you’ve made any changes to configurations, Zones, or Restricted Areas, you’ll need to Extract Data. This prepares a FieldSeekerULV.gpkg file for use in the mobile software.

24
Tap the Data Operations button.
In Extract, tap Extract to GPKG. This will output a file to the configured file path. If a storage service is configured, the file will also be copied to Dropbox or Google Drive.
Transferring to Field Devices Data is synced from the mobile software. The Office software doesn’t send or receive data, it just outputs the GPKG to a configured directory and monitors a data directory for incoming field data. Ideally, the Office software should be configured to extract the GPKG to the same shared folder that the mobile software is configured to Pull from, or configured to use a storage service such as Google Drive or Dropbox.
For details on the mobile Sync functionality, see the Sync heading in the mobile section of this guide.

25
Data Utilities
Map Areas (Zones) and Restricted Areas can be imported from an existing shapefile. An MBtiles basemap (created by Frontier Precision using TileMill) can be uploaded to the configured storage service.
Import Map Areas or Restricted Areas Browse to the shapefile to import. As long as the shapefile has an associated .prj file, ULV Office will detect the projection information and handle it properly on the import.
You will be prompted whether you would like to remove the existing features, or not. If not, the features will be appended.
For Map Areas, the only attribute that will be imported is NAME, if it exists.
For Restricted Areas, the import will look for the following attributes and if they exist, they will be imported.

26
Processing Field Data The ULV Processing Agent monitors a data folder (default is C:\ULV Data) for incoming data from the mobile software. It also monitors a cloud storage service if that is configured. This program runs in the system tray at startup.
You can right-click the program to see Status.
The data processor will run when one of the following things happens:

27
• When data is received from a mobile sync to the monitored data folder (signaled by a FieldSeekerULV.gpkg.COMPLETE file)
• If the monitored data folder is an external USB drive location (e.g. D:\ULV Field Data), the processor will run
o When the user manually presses Process Data (see below) o Every 12 hours (ULV Data Processor.ini FileCheckTimeSeconds setting)
# In addition to monitoring the data path for the creation of ".complete" files, it also checks # periodically in order to catch situations where files may have appeared when the agent was not # running. # 43200 = 12 hrs FileCheckTimeSeconds =43200
• If storage service is configured (Dropbox or Google Drive), the processor will check for new files every 10 minutes (ULV Data Processor.ini StorageServiceCheckTimeSeconds setting)
# If a storage service is configured, check for new files at this interval. StorageServiceCheckTimeSeconds = 600
The ULV Processor will push new data nto the database and provide information about success or any issues that were encountered.

28
The Status window only shows recent messages. If you want to look at older logging messages, go to Data Operation > Log.
Working With Field Data After field data is processed into the main database, you can browse and filter the data based on date, Zone, Technician, Vehicle, Product, or Equipment.
First, turn on the layers you wish to see on the map. Spray session data includes Treatment Areas (buffered spray area), Treatment Lines, and Treatment Log (points).
Setting a Date Range Use the calendar controls to set a date range, or click Today, This Week, or This Month.

29
Available spray sessions are listed. Check the boxes to display the sessions on the map, or slick Select All. Clear selections by unchecking or clicking Select None. The map will update immediately based on your selections.
The list of spray sessions is sorted (ascending) by date. You can sort the list by Start, Stop, Zone, Technician, Truck, or Chemical by clicking on the column header. Click once to sort Ascending.
Click again to sort Descending.
Set Additional Filters Set additional filters for Zone, Technicians, Vehicles or Products by checking the boxes. Spray session results are updated immediately.

30
Export
Selected spray session data can be exported to KML or shapefile format.

31
Select options including whether to output sessions to separate files (one per spray session), the output path, and what data to include.
Get Feature Information To view information about any spray session feature, activate the Information tool, then click on the feature.

32
Update Spray Session To update spray session details, right-click a listed session and select Update Spray Session.
Make changes as needed and press Save. Only some fields are editable.
Reports Tap Reports, then select the report to run.

33
• You can optionally filter the report by date range, driver, vehicle, sprayer, chemical, or Zone (Spray Area)
• Map options o Use map from main window: uses the map extent from the main map window o Generate map that encompasses sessions: uses the map extent encompassing all of the
selected data • Use sessions selected in main window, or set filter option • Picklist options
o All historical picklist values: shows all values found in the database for the filter selections

34
o Current picklist values: shows only current picklist values (for example, old driver or vehicle values may have been deleted)
• Report Subtitle: type in a subtitle for the printed report
When the report is generated, it can be printed, saved, or exported to a variety of formats, including Word, Excel, or PDF.
Spray Session Detail Report (with or without map)
The spray session report (with or without a map) shows all the details of the included spray sessions, grouped by Date, Zone, and Driver. Spray Session totals are included for each zone, day, and grand total.

35
Spray Session Detail / Columnar (with or without map)
The spray sessions columnar report (with or without a map) shows all the details of spray sessions in an easy to read format with some key statistics highlighted. Average and max speed are displayed (not available on other reports).
36
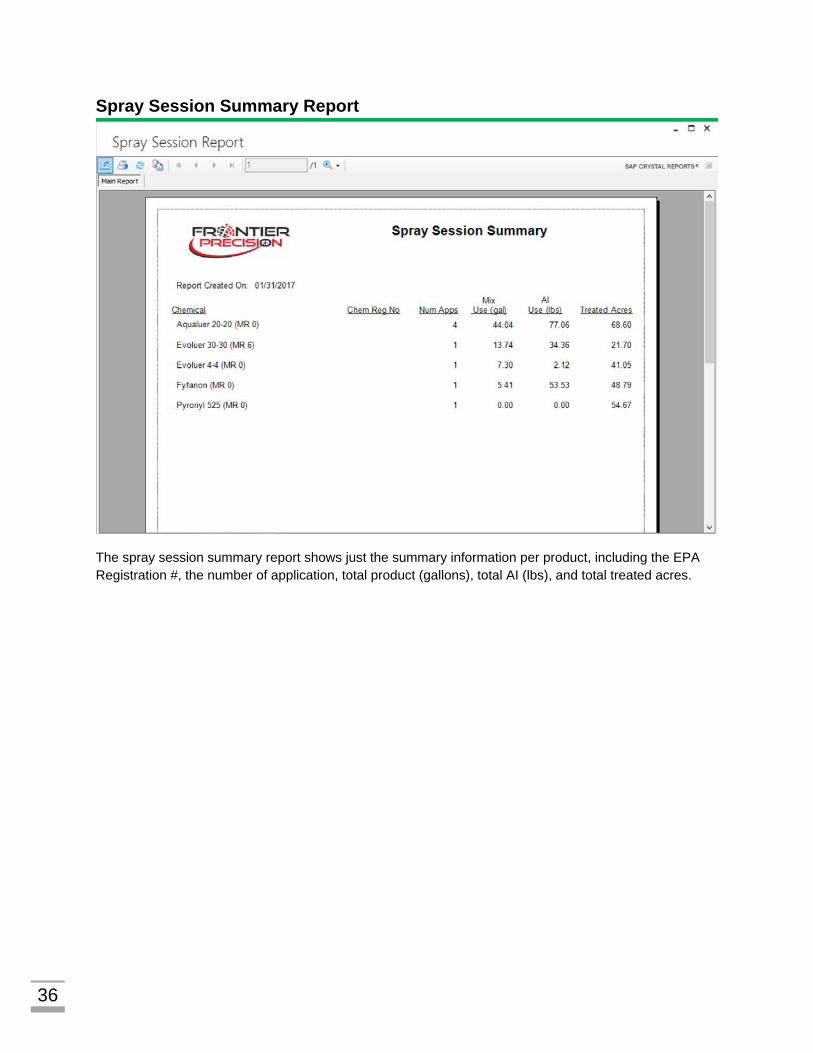
Spray Session Summary Report
The spray session summary report shows just the summary information per product, including the EPA Registration #, the number of application, total product (gallons), total AI (lbs), and total treated acres.

37
Windows ULV Field Software Operation
Field Software User Interface
After logging in, the main user interface is a map with status information displayed. It’s easy to see what’s going on with your sprayer, GPS, and nearby restricted areas.
1. Create Menu – choices to Create Spray Session, Sketch Treatment Area, or create Event.

38
a. Spray Session – prompts for session details then starts recording data from a connected
sprayer b. Sketch Treatment Area – provides a choice of Line or Polygon, then after drawing the
treatment area on the map, prompts for treatment details c. Event – prompts for GPS or Sketch; records an event at a point on the map
2. Options Menu – choices for GPS, Sprayer, Map, Sync, Import, and About
a. GPS – display, recording, and connection settings b. Sprayer – enable Sketch tools and configure sprayer connection settings c. Map – turn layers on and off, set default scale, enable offline basemap d. Sync – set sync folders e. Import – select a shapefile to import on the map f. About – get software version details
3. Map Tools a. Zoom In b. Zoom Out c. Center on GPS – toggle on (green) or off (red) d. Auto-rotate map with GPS – toggle on (green) or off (red)

39
e. Info – click this tool then click a feature on the map to get info
4. Exit 5. Basemap selection – hidden if using offline basemap 6. North arrow – rotates if auto-rotate is turned on

40
7. GPS location – centered on map if Options > GPS is set that way 8. Warnings – no-spray and other relevant warnings are displayed in Red over a portion of the map 9. GPS status – shows current location and indicates if there is a problem with GPS 10. Sprayer status – shows whether sprayer is on or off (if connected and in a spray session) 11. Direction – shows direction of travel (0 – 360 degree Heading) 12. Speed – shows current speed while moving 13. Flow Rate – shows current flow rate (if sprayer is connected and a spray session is running)
Log In When the field tech starts the software, they’ll be prompted to select their name and the truck they’re in. These values default to what was entered the last time. Pick lists are configured in the Office software.
Sync Prior to starting the software, the user can check for updates to pick lists (Technician, Vehicle, Product, Sprayer, Equipment Type, Activity Type) or map data (Zones, Restricted Areas). When the user presses Sync, the software:

41
1. Checks for field data that has already been collected, and if it finds some, it pushes the data to the configured Sync “Push” folder
2. Retrieves the GeoPackage from the configured Sync “Pull” folder 3. Checks whether there is a new MBTiles offline basemap file and if there is retrieves it from the
configured Sync “Pull” folder 4. Restarts the app to reflect any changes to the picklist
Options It’s easy to change settings on the mobile app. Even if the user doesn’t understand what COM ports and baud rates are, if a connection isn’t working, they can make changes, test the changes, and find settings that work.
The same is true with syncing data. The program is flexible and can sync data to a network path, a shared folder, or a memory device.
GPS

42
• Center on GPS – if checked, the map will stay centered on GPS as the user drives around. This option can also be controlled on the map toolbar
• Record GPS track even when not spraying – if checked, a GPS Tracklog will be recorded at whatever interval is configured in the office application
• Show GPS Track for last XX minutes – if checked, the tracklog map layer is filtered by the time value entered
• Connection Type o Location Sensor – Windows 8 and 10 devices use a Location Sensor. The software can
connect to this location sensor to get GPS location. o COM Port – Select this option to connect to GPS using the old-style COM Port method.
Select a Com Port and Baud Rate, press Save, then press Test to verify whether data is coming through.
Test Failed
Possible reasons for failure include:
- Wrong COM port selected – change COM ports, Save, and Test again; or, go to Device Manager > COM Ports and verify the correct COM Port number
- Wrong baud rate selected – change baud rate, Save, and Test again; or go to Device Manager > COM Ports > Properties and check the baud rate setting matches the sprayer you’re trying to connect
Test Succeeded – Location Sensor
Test Succeeded – COM Port

43
Sprayer

44
• Sprayer Type – select the type of sprayer o Clarke SmartFlow – 9600 baud o Curtis – 9600 baud o London Fog – 4800 baud o B&G Phoenix – 9600 baud
• COM Port and Baud Rate – select the COM port and baud rate, Save, and Test Test Failed
Possible reasons for failure include:
- Wrong sprayer type – every sprayer outputs a different data format; select the correct type and Test to see if you’re getting data
- Wrong COM port selected – change COM ports, Save, and Test again; or, go to Device Manager > COM Ports and verify the correct COM Port number
- Wrong baud rate selected – change baud rate, Save, and Test again; or go to Device Manager > COM Ports > Properties and check the baud rate setting matches the sprayer you’re trying to connect
Test Succeeded
• Sprayer without serial connection – if this is checked, the Sketch Treatment Area tools are enabled

45
Map
• Layer visibility – turn layers on and off for display. Settings are remembered for the next time you log in.
o If Spray Log is not turned on, when you start a spray session, it will get turned on automatically
o Tracklog layer has to be turned on for the Options > GPS settings regarding GPS track to apply
• Load Offline Basemap – if this is turned on, the program will load a file called MapArea.mbtiles from the program’s “Database” folder. This file is created in TileMill and synced to the device using the Sync tools.
• Default Scale – select the default scale to apply when you first log in to the program. Note that after you zoom in or out manually, the program remembers that display scale whenever you return to the map; the default scale is only applied when you first log in.

46
Sync
• Upload path – type or browse to the path where field data will be transferred to. This can be a network path, a shared folder, or a memory device (USB drive, SD card, etc.). Ideally, this should be set to the network path or shared folder that the Desktop ULV Processor is monitoring, or that DataLink GIS Merge will look in to process data.
o UNC Path – for example, \\my-server\shared\mosquito\ULVData o Shared folder – for example, \\chad-pc\DataLink GIS\Data\ULV GeoPackage Data o Memory device – for example, D:\ULVData
Data will be transferred to that location in this folder structure: YYYYMMDD COMPUTER-NAME COMPUTER-NAME-01 COMPUTER2-NAME

47
• Pull path – type or browse to the path where the FieldSeeker.gpkg and MapArea.mbtiles files can be found. This can also be a network path, a shared folder, or a memory device. Ideally, this should be the network path or shared folder that the ULV Office software or Sentinel Adulticiding will extract data to.
o UNC Path – for example, \\my-server\shared\mosquito\ULV GeoPackage Data o Shared folder – for example, \\chad-pc\DataLink GIS\Transmit\ULV GeoPackage Data o Memory device – for example, D:\ULV GeoPackage Data
When the user Syncs, this is the location the software will check to retrieve updated GeoPackage data and .mbtiles data. The GeoPackage contains the picklists for drivers, products, sprayers, trucks, and so on, as well as Zones and Restricted Areas. The .mbtiles file is the offline basemap created in TileMill.
• Archiving settings – if checked, the data that is transferred to the Upload path will also be archived locally for the number of days selected. This is just a backup of data in case it is lost or deleted after being transferred.
Check for Updates
Check for updates (must be connected to the Internet). If updates are available, download and install them.

48
About
• Get info about the version and date of the ULV software
Collecting Spray Session Data Spray session data can be collected from supported sprayer types.
• Clarke SmartFlow • Curtis Dyna-Fog (variable or set flow) • London Fogger • B&G Phoenix
Start Spray Session Tap Create > Create Spray Session to get started.

49
Enter spray session details then Start Spray Session. Required fields are marked with an *. The date and time default to the current date and time. Weather information and Comments are optional.
50
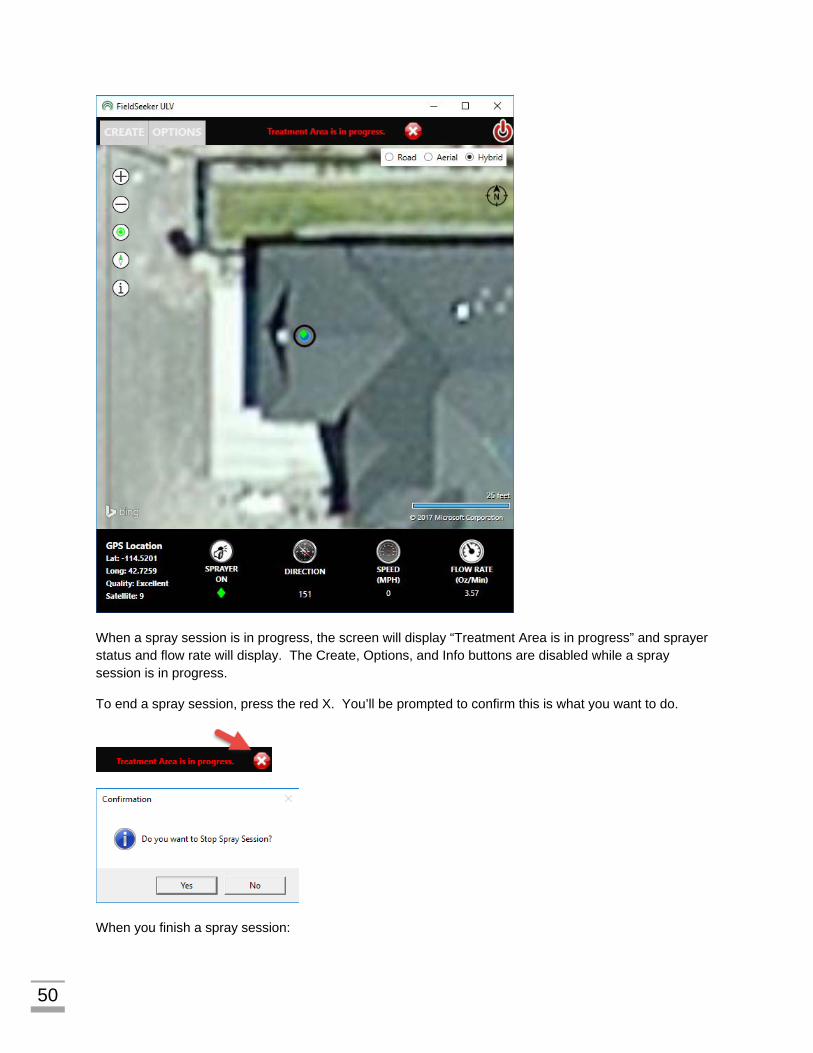
When a spray session is in progress, the screen will display “Treatment Area is in progress” and sprayer status and flow rate will display. The Create, Options, and Info buttons are disabled while a spray session is in progress.
To end a spray session, press the red X. You’ll be prompted to confirm this is what you want to do.
When you finish a spray session:

51
• The End Date and Time are entered automatically • Treatment Area and Treatment Line features are automatically created • Product totals, drive distance, spray distance, and acres treated are all calculated automatically
for the session
Restricted Area Warnings When the user drives near a restricted area, they will receive a warning.
• The visual warning will flash repeatedly o The message will display the text that is entered for Warning or TechnicianWarning field
when the polygon is created in ULV Office or in ArcMap / Adulticiding
o If no text is entered for Warning / TechnicianWarning field, then the message will display
as above • An audible warning will also sound repeatedly • The warning distance is configurable if ULV Office or in ArcMap / Adulticiding

52
Sketching Treatment Area If you do backyard, barrier, ATV or truck spraying using sprayers that don’t output data, you can also sketch in the treatment area as a polygon or line. This works well for backyard sprays, barrier sprays, roadside ditch treatment, and so on.
Tap Create > Sketch Treatment Area > and select line or polygon. Note: this option is disabled if you don’t have Options > Sprayer > Sprayer without serial connection checked.
Tap on the screen to add points around the perimeter of the area treated.

53
Tap the back arrow to remove the last point you added.
Tap the red X to finish the sketch and enter treatment details.
Confirm whether to save the sketch or not. If you press No, the feature will be cancelled. If you press Yes, you’ll be asked for treatment details.
The process with a treatment line is similar, except that when you save it, the line will be buffered 300’ to create a treatment area also.

54
Treatment details are similar to a regular spray session, except you’ll be prompted for a few extra details, including the Sprayer (this is the Treatment Equipment Type picklist, and it can include choices like “Kubota” or “Backpack Sprayer” or “ATV1”), Total Fog Hours, Flow Rate, Product Total, Drive Distance, and Start and End Date and Time.
Collecting Events In addition to spray sessions and treatment areas, you can also record miscellaneous events as point features. These can be created using GPS or by sketching on the map.

55
Enter the Date, Time, Activity category, and optionally Comments, then Save.
Syncing Data After field data is collected, data can be synced wirelessly, by using a memory device, or using a cloud storage service (Google Drive or Dropbox). Data is not synced automatically. But, when you exit the program, you’ll be prompted to sync data before closing. This takes you to the opening screen, where the Sync tool is at.
56
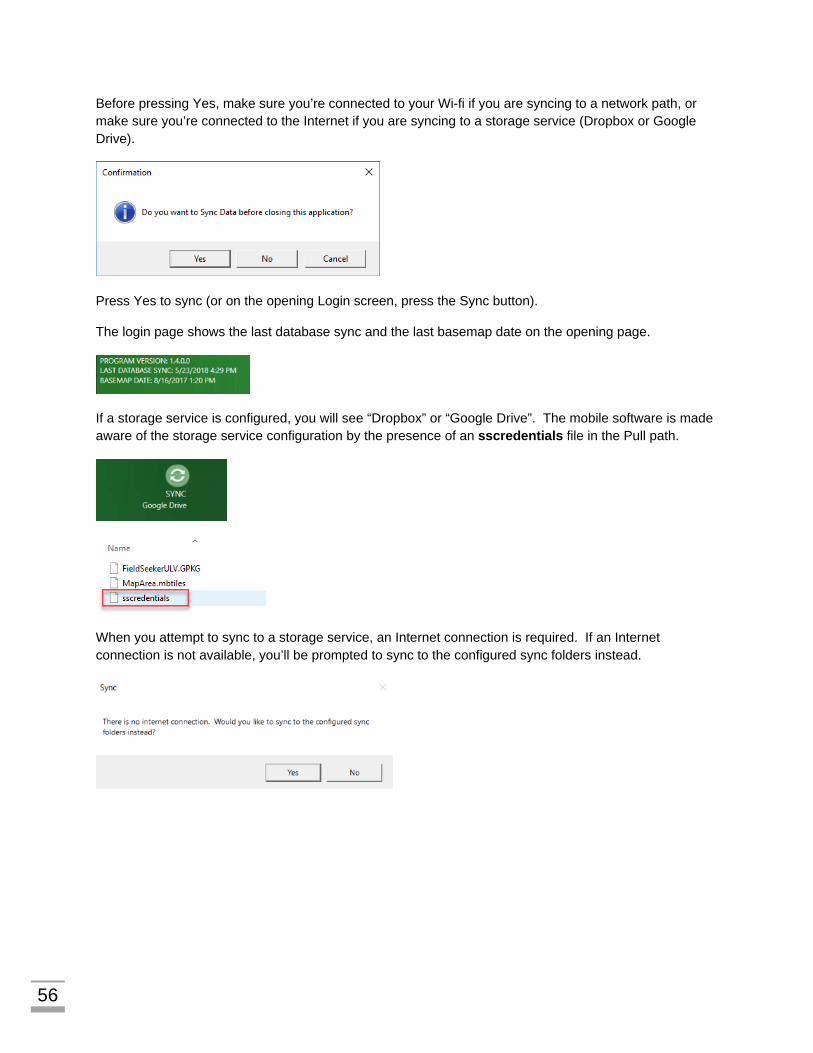
Before pressing Yes, make sure you’re connected to your Wi-fi if you are syncing to a network path, or make sure you’re connected to the Internet if you are syncing to a storage service (Dropbox or Google Drive).
Press Yes to sync (or on the opening Login screen, press the Sync button).
The login page shows the last database sync and the last basemap date on the opening page.
If a storage service is configured, you will see “Dropbox” or “Google Drive”. The mobile software is made aware of the storage service configuration by the presence of an sscredentials file in the Pull path.
When you attempt to sync to a storage service, an Internet connection is required. If an Internet connection is not available, you’ll be prompted to sync to the configured sync folders instead.

57
When sync starts, it will prompt you to sync with Google Drive or Dropbox.
If no storage service is configured, you’ll see the Pull and Push paths.
When you sync, the status is reported, and if data is replaced, you’ll be informed that the program needs to start again.

58
Just a note about syncing. The program attempts to sync to a folder (network path, shared folder, or memory device). Make sure that you can access the folder before attempting sync. If the folder isn’t reachable, you’ll just receive an error message and you can try again later. Any data you’ve collected will remain in place until you can successfully sync.