windwise education - nyserda · windwise education t. ... windmills are the ancient ancestors of...
TRANSCRIPT

WindWise EducationTransforming the Energy of Wind into Powerful Minds
A Curriculum for Grades 6 -12
www.WindWiseEducation.org
Notice: Except for educational use by an individual teacher in a class-room setting this work may not be reproduced or distributed by me-chanical or electronic means without written permission from KidWind or Pandion. For permission to copy portions or all of this material for other purposes, such as for inclusion in other documents please contact Michael Arquin at the KidWind Project at [email protected].

WindWise Education was developed with funding from the New York State Energy Research & Development Authority. V1.0

HOW DOES AWINDMILL WORK?LESSON
6
TIME REQUIRED2 class periods
GRADES6 – 89 – 12
SUBJECTSPhysical ScienceTechnology/Engineering
BACKGROUNDWindmills are the ancient ancestors of modern wind turbines. To understand how wind turbines work, one must first understand a basic windmill. This lesson will help students understand how a windmill captures the energy of the wind and converts it into usable mechanical energy, which is the basis for understanding modern wind turbines. Students will use the engineering design process and the scientific method to design, build, test, and improve their models.
OBJECTIVESAt the end of the lesson, students willn Know the fundamental parts of a windmilln Be able to use the scientific method to isolate and adjust variables in a model
windmilln Understand energy conversions/transfers and how a windmill converts
moving air into usable mechanical energy
METHODStudents will use a limited amount of materials to design and build functioning windmill models. They will use these models to convert wind into usable mechanical energy to lift weights. Using the scientific method, they will conduct trials, change variables, and work to improve the performance of their windmills.
KEY CONCEPTStudents will learn the fundamental parts of a windmill, how different rotor designs affect performance, and how energy is transferred from wind into usable mechanical energy.
MATERIALS Each group needs❑ 1 small electric fan❑ 1 metal rod (16” lo ng)❑ 1 piece PEX tubing (10” long)❑ 4-8 index cards (4” x 6”)❑ 4 wooden shish kebab skewers (10” long)❑ 4 feet of string❑ 1 12-ounce paper deli cup❑ 1 16-ounce plastic cup❑ 1 foam cylinder❑ 1 cork❑ 4 Straight pins or T-pins❑ Clear scotch tape (18”)❑ 1 pair of scissors❑ 15 steel washers❑ Student Worksheets
Classroom materials to share❑ Staplers❑ Various simple tools (pliers, screwdriver, etc.)❑ Hot glue gunswww.WindWiseEducation.org
1
TURBINES

Win
dWis
eEdu
catio
n.or
g
HOW DOES A WINDMILL WORK?
2 Lesson 6
GETTING READYn It is strongly suggested that teachers try to build their own windmills
before the class begins. This is a valuable preview to the challenges and problems that students will face.
n Separate the materials to distribute to each group. Remember that materials for this activity are intentionally limited, as this encourages creativity and discourages waste. Use small, weak fans (8 inch diameter) to encourage the students to build efficient designs.
n Have students do some background reading on windmills and wind power.n The “Additional Resources” section below offers a great deal of
background information. Students should have read the Career Profile before class period 2.
n Make copies of the worksheets for each student group.
ACTIVITYIn the first class period, students should focus on getting their prototypes to spin when placed in front of the fan. In the second class period, students will work to get the windmill to lift a cup of weights (washers) as it rotates.
Class Period 1Step 1: Beginning Questions for Studentsn Who has seen a real windmill (mechanical or electrical)?n What are the parts/features of a windmill?n What are windmills used for?n How does the wind cause the windmill to rotate?
Step 2: What is a Windmill?Ask a couple of students to draw a windmill on the blackboard. Ask the other students to describe how these windmills work and what they are used for.
Step 3: Distribute MaterialsPresent the windmill design activity to the students and organize them into groups of 3-5. Give each group the required materials. (Do not pass out the string, cups, or washers yet, as these will be distributed at the beginning of the second class period when the weight-lifting challenge is presented.) As you distribute the materials, be sure to mention some ground rules for safety.
Step 4: Spin in the WindInstruct the students to assemble something that will rotate when placed in the wind. Tell them not to worry about lifting weight yet. The first challenge is just to get the windmill to spin. (Note: there are not enough materials to build a tower. These windmills should be held by hand or attached to the desktop.)
Step 5: Design and TestingGive the groups plenty of time for initial designing and construction. Each group should have a chance to test their windmill with the fan at least once during this first class period. There is no right answer here and many designs are possible. Students will feel confused. That is okay!
CAUTION!n The spinning rotor blades
and metal rod can be dangerous. Make sure students are working with caution to protect themselves and others.
n Be careful when working with the metal rod. Do not swing or play with the rod! The ends can be protected with tape, foam, cork, or bits of sponge.
n Wear safety glasses when testing windmills with the fan. When the blades are spinning, safety glasses must be worn.
n Use caution when using scissors and hot glue.
n Do not stand in the plane of rotation of the rotor! You could be hit if your blade flies off during testing.

Win
dWis
eEdu
catio
n.or
g
HOW DOES A WINDMILL WORK?
3Lesson 6
Step 6: Wrap UpAt the end of class, show the students different pictures of real windmills and wind turbines. Discuss how windmills work and the fundamental parts of a windmill. How do these real windmills differ from their initial designs? What new ideas do the pictures give them?
Other possible questionsn What windmill designs worked best?n What parts were most difficult to design and make functional?n How did you attach your blades?n Where is there friction in your design?n How did you reduce friction in your windmill?n How did you pitch or angle the blades?n Were your blades changing pitch frequently?n Did the fan work better from the front of the blades or the side?n What energy transfers were taking place as the windmill spun?
Class Period 2Step 1: Weight-lifting ChallengeBy the beginning of this class period, most groups should have gotten their windmills to spin in the wind. Now introduce the weight-lifting challenge. Give each group the string, cups, and washers. Their goal is to lift as many washers as possible using the power of the wind. As students work toward this goal, they will have to isolate and improve certain variables in their designs.
Step 2: Testing Variables and Improving DesignsAs students test their weight-lifting windmills, give them guidance and tips on how to improve their design. Encourage them to focus on one variable at a time; conduct a trial, measure the results, make changes, and repeat the trial. The size, shape, pitch (angle), and number of blades can be explored. The variables of fan setting (speed) and distance from the windmill should be kept constant. Encourage students to use the scientific method as they design and test their prototypes.
Some groups may struggle to get the windmill to lift any weight. Encourage them to look at other groups that have been successful. What techniques work well and what does not seem to work? Remind students that this activity is not a competitive contest, but rather a class effort. Students can learn from and support each other.
BLADE PITCHBlade pitch is the angle of the blades with respect to the plane of rotation. The pitch of the blades dramatically affects the torque of the rotor. Pitch also affects the amount of drag experienced by the blades. Efficient blades will provide maximum torque with minimum drag.
45º
0º
90º

Win
dWis
eEdu
catio
n.or
g
HOW DOES A WINDMILL WORK?
4 Lesson 6
Step 3: Wrap Upn How many blades worked well for lifting weight?n Did more blades mean you could lift more weight?n What blade pitch was best for lifting weight?n Where did you attach the string? Why?n How did your design change after trying to lift weight?n How were you able to get more turning force from your blades?n What energy transfers took place as weight was lifted?n What ideas seemed to work well?n What problems did you encounter?n What skills did you use that Pat Walsh also uses as a wind turbine
technician?n What parts of your windmill broke or failed? Are those the same parts
that Pat Walsh fixes on turbines?
EXTENSIONFor a quantitative analysis of different rotor efficiencies, have students calculate the energy required to lift the mass they have lifted and the power of their windmill as it lifts that mass. Energy is measured in joules (J). Power is measured in watts (W). Power is a measurement of how fast energy is converted. In this case, power is a measurement of how fast the mass is lifted.
To calculate how much energy is required to lift the washers, students will first need to measure the mass (kilograms) of the washers they are lifting and how high they are lifting the washers (meters).
Energy (J) = Mass (kg) x Acceleration of Gravity (9.8 m/s²) x Height (m)
To measure power, they must also measure how long it takes to lift the mass to that height (seconds). Standardize the height so that every group must lift to the same height (0.5 meter or so).
Power (W) = Energy (J)/Time (s)
Have students record their data on the Power and Energy worksheet. Recording these data and calculating power for different prototypes will give the students a quantitative comparison.
Have students hold their windmills or tape them to a desk.

HOW DOES A WINDMILL WORK?
5Lesson 6
Win
dWis
eEdu
catio
n.or
g
VOCABULARYBlade Pitch – Angle of the blades with respect to the plane of rotation. (Blades perpendicular to the oncoming wind would be 0 degrees. Blades parallel to the wind would be 90 degrees.)
Drag – In a wind turbine also called wind resistance. Friction of the blades against air molecules as they rotate. Drag works against the rotation of the blades causing them to slow down.
Drive Shaft – Rod or shaft connected to the hub. Rotates with the rotor.
Energy Transformation – The conversion of energy from one form to another. For example, when coal (chemical energy) is burned, it produces heat (thermal energy) that is then captured and used to turn a generator (mechanical energy), which transforms the energy into electricity (electrical energy).
Force – A push or pull that causes an object with mass to change its velocity.
Friction – A force that resists the relative motion of two bodies in contact.
Hub – Central component connecting the blades to the drive shaft.
Plane of Rotation – The area directly in line with the rotor. This is a dangerous area to stand in case a blade flies out while the windmill is spinning.
Rotor – Rotating section comprised of blades projecting from a hub.
Torque – A force that causes rotation around an axis. In a windmill, each blade acts like a lever rotating around an axis. The more surface area the blade has, the more force the wind applies to the blade.
HOW DOES A WINDMILL WORK?
wind
deflection
blade reaction
HOW DO BLADES MOVE?

Win
dWis
eEdu
catio
n.or
g
HOW DOES A WINDMILL WORK?
6 Lesson 6
RELATED ACTIVITIESn Lesson 7: How Does a Generator Work?n Lesson 8: Which Blades Are Best?n Lesson 9: How Can I Design a Better Blade?
ADDITIONAL RESOURCES KIDWIND PROJECT—http://www.kidwind.org/lessons/BBwindpowerbasics.html —Wind power basics.
WIND WITH MILLER—http://www.windpower.org/en/kids —This is a good introduction to wind energy and wind turbines. Great for grades 6-8.
WHEELS AT WORK—Book by Bernie Zubrowski.
THE WIND AT WORK—Book by Gretchen Woelfe.
DPBS Kids ZOOM!—http://www.youtube.com/watch?v=hL6tpKxcq6Q —Windmills activity.

Win
dWis
eEdu
catio
n.or
g
HOW DOES A WINDMILL WORK?
7Lesson 6
NY STATE STANDARDSIntermediate Level Science–Standard 4: The Physical SettingKey Idea 5:Energy and matter interact through forces that result in changes in motion.
Performance Indicator 5.1:Describe the different patterns of motion of objects.
Major Understandings:5.1b The motion of an object can be described by its position, direction of motion, and speed.
Intermediate Level Science–Standard 1: Analysis, Inquiry, and DesignScientific Inquiry
Key Idea 2:Beyond the use of reasoning and consensus, scientific inquiry involves the testing of proposed explanations involving the use of conventional techniques and procedures and usually requiring considerable ingenuity.
Major Understandings:S2.1c Design and conduct an experiment to test a hypothesis.
Key Idea 3:The observations made while testing proposed explanations, when analyzed using conventional and invented methods, provide new insights into phenomena.
Engineering DesignKey Idea 1:Engineering design is an iterative process involving modeling and optimization; this process is used to develop technological solutions to problems within given constraints.
Major Understandings:T1.4a Design and construct a model of the product or process.
Mathematics–Standard 3:Key Idea 5:Students use measurement in both metric and English measure to provide a major link between the abstractions of mathematics and the real world in order to describe and compare objects and data.

8 WindWiseEducation.org
How Does a Windmill Work?
Lesson 6
Student sheets
CAREER PROFILE: PAT WALSH, WIND TURBINE TECHNICIANA wind turbine technician repairs and maintains wind turbines. That means that every day I get to climb 300-foot towers and fix broken turbines! To be able to repair a wind turbine, I had to become an expert in hydraulics, electricity, wind turbine mechanical systems, and electronics. Technicians must also be physically fit and very safety conscious, as the job can be physically strenuous. Of course, I cannot be afraid of heights, either. While the heights may sound scary, the perks of this job are good. I earn a competitive salary with benefits, not to mention enjoying the spectacular views every day while on the job! In addition, I, like many technicians, got to travel to Europe as part of my training.
Colleges across the United States have begun offering training programs for wind turbine technicians. These 2-year programs teach students everything they need to know to be a certified “wind-smith.” I was trained at Iowa Lakes Community College, but my co-workers came from several different schools. These days, demand for wind technicians is high, and some students are hired by the wind industry while they are still finishing their training.

9WindWiseEducation.org
How Does a Windmill Work?
Lesson 6
Student sheets
Name Date Class Group
HOW DOES A WINDMILL WORK?1. Draw a diagram of your windmill design below. Label the following parts: blades, rotor, hub, drive
shaft. Label these concepts: force, friction, distance (height of string).
2. Which of the following variables did you explore? Number of blades, blade shape, blade size, blade pitch (angle), fan location, wind speed, other (explain).

10 WindWiseEducation.org
How Does a Windmill Work?
Lesson 6
Student sheets
3. Rank the variables in your design from most important to least important.
4. What effect did the number of blades have on how much weight you could lift?
5. How did the pitch (angle) of the blades affect the amount of weight you could lift?

11WindWiseEducation.org
How Does a Windmill Work?
Lesson 6
Student sheets
6. Draw a picture of your wind turbine and label the energy transfers or conversions that took place as you used the wind to lift weight.
7. Explain the windmill design that had the best results. Why do you think this design worked best?
Name Date Class Group
12 WindWiseEducation.org
How Does a Windmill Work?
Lesson 6
Student sheets
Name Date Class Group
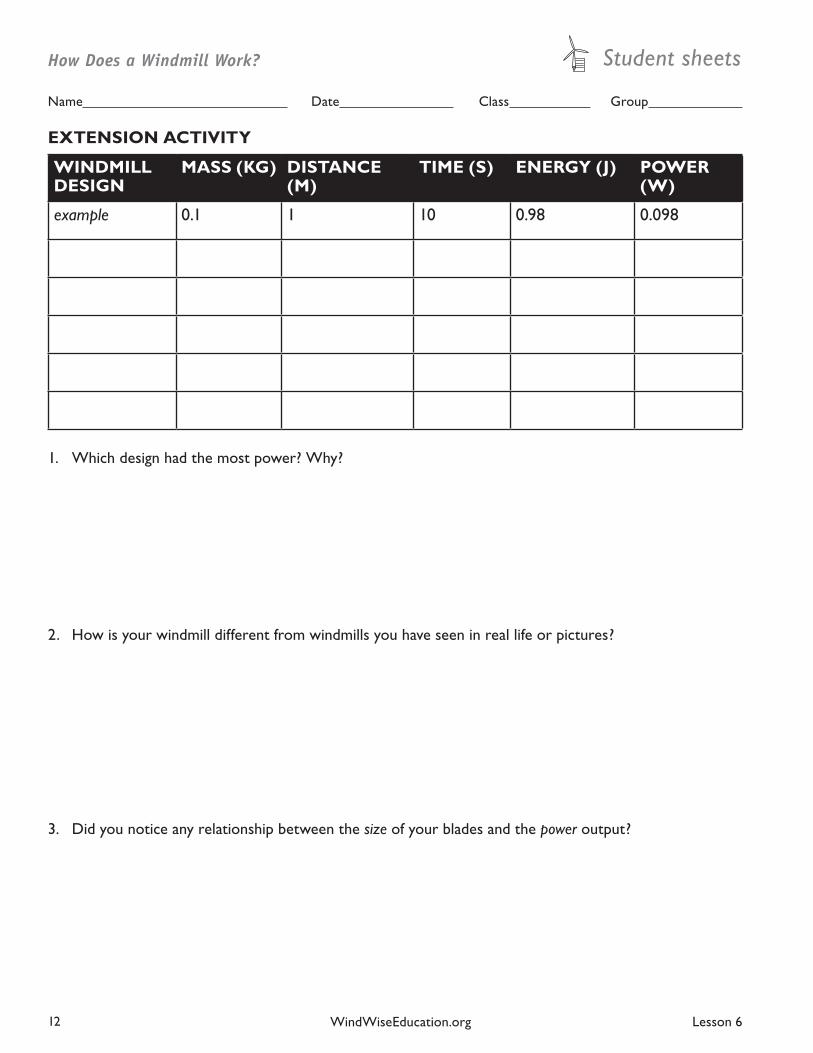
EXTENSION ACTIVITY
WINDMILL MASS (KG) DISTANCE TIME (S) ENERGY (J) POWER DESIGN (M) (W)
example 0.1 1 10 0.98 0.098
1. Which design had the most power? Why?
2. How is your windmill different from windmills you have seen in real life or pictures?
3. Did you notice any relationship between the size of your blades and the power output?
13WindWiseEducation.org
How Does a Windmill Work?
Lesson 6
Answer sheets
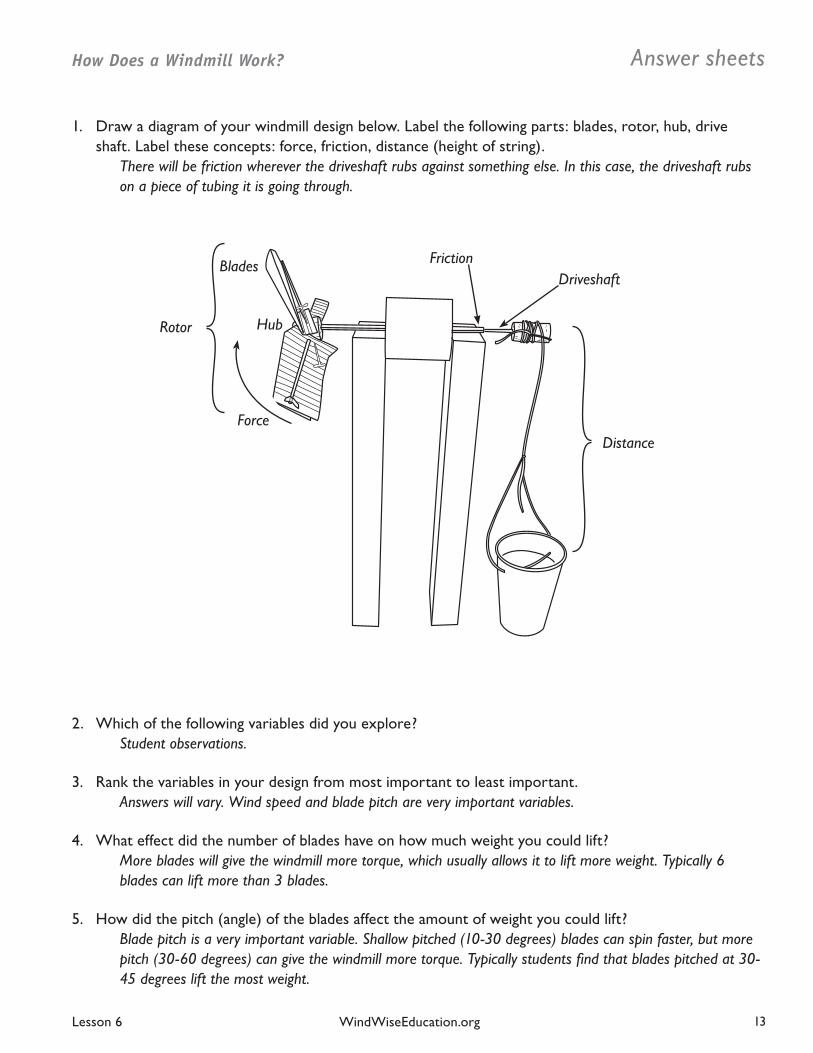
1. Draw a diagram of your windmill design below. Label the following parts: blades, rotor, hub, drive shaft. Label these concepts: force, friction, distance (height of string).
There will be friction wherever the driveshaft rubs against something else. In this case, the driveshaft rubs on a piece of tubing it is going through.
2. Which of the following variables did you explore?Student observations.
3. Rank the variables in your design from most important to least important.Answers will vary. Wind speed and blade pitch are very important variables.
4. What effect did the number of blades have on how much weight you could lift?More blades will give the windmill more torque, which usually allows it to lift more weight. Typically 6 blades can lift more than 3 blades.
5. How did the pitch (angle) of the blades affect the amount of weight you could lift?Blade pitch is a very important variable. Shallow pitched (10-30 degrees) blades can spin faster, but more pitch (30-60 degrees) can give the windmill more torque. Typically students find that blades pitched at 30-45 degrees lift the most weight.
Blades
Distance
DriveshaftFriction
Hub
Force
Rotor
14 WindWiseEducation.org
How Does a Windmill Work?
Lesson 6
Answer sheets
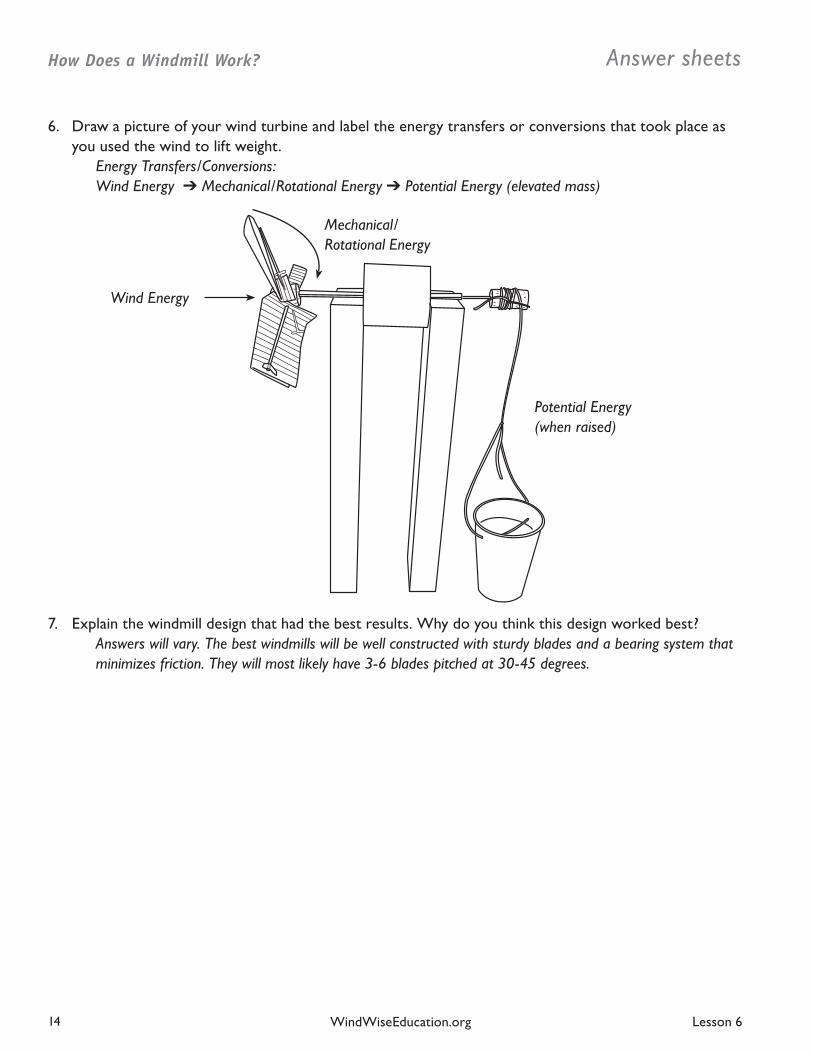
6. Draw a picture of your wind turbine and label the energy transfers or conversions that took place as you used the wind to lift weight.
Energy Transfers/Conversions:Wind Energy ➔ Mechanical/Rotational Energy ➔ Potential Energy (elevated mass)
7. Explain the windmill design that had the best results. Why do you think this design worked best?Answers will vary. The best windmills will be well constructed with sturdy blades and a bearing system that minimizes friction. They will most likely have 3-6 blades pitched at 30-45 degrees.
Wind Energy
Mechanical/Rotational Energy
Potential Energy (when raised)