winthings: an inventory management system
TRANSCRIPT

Portland State University Portland State University
PDXScholar PDXScholar
University Honors Theses University Honors College
2017
WinTHINGS: an Inventory Management System WinTHINGS: an Inventory Management System
Manpreet S. Bahl Portland State University
Follow this and additional works at: https://pdxscholar.library.pdx.edu/honorstheses
Let us know how access to this document benefits you.
Recommended Citation Recommended Citation Bahl, Manpreet S., "WinTHINGS: an Inventory Management System" (2017). University Honors Theses. Paper 426. https://doi.org/10.15760/honors.422
This Thesis is brought to you for free and open access. It has been accepted for inclusion in University Honors Theses by an authorized administrator of PDXScholar. Please contact us if we can make this document more accessible: [email protected].

WinTHINGS: An Inventory Management System by
Manpreet Bahl
An undergraduate honors thesis submitted in partial fulfillment of the
requirements for the degree of
Bachelor of Science in
University Honors
and
Computer Science
Thesis Adviser
Mark Jones
Portland State University
2017

Table of Contents 1.0 Introduction 3
2.0 Problem 3
3.0 Capstone 3
4.0 WinTHINGS 5 4.1 Terminology 6 4.2 Design 6
4.2.1 Architecture 7 4.2.2 Possible Scenario 8 4.2.3 Login 9 4.2.4 Checkout/Checkin 9 4.2.5 Statistics 10 4.2.6 Request 11 4.2.7 Transaction History (Recent) 11 4.2.8 Transaction History (Item Name) 12 4.2.9 Transaction History (Date Range) 13 4.2.10 Shopping List 13
4.3 Testing 14 4.4 Reflection 14
4.4.1 Checkout comparison 16 4.4.1.1 Loading Checkout Window 19 4.4.1.2 Add Item to Cart 21 4.4.1.3 Remove Item from Cart 23 4.4.1.4 Checkout Item(s) 24
5.0 Future Work 26
6.0 Conclusion 27
7.0 References 27
2

1.0 Introduction The purpose of this document is to identify a problem in the Maseeh College of
Engineering and Computer Science; to reflect on a web application, called THINGS, that was developed by a team of seven students (including the current author) to solve this problem; to introduce an alternative application called WinTHINGS developed individually by the current author; to compare WinTHINGS and THINGS; and to describe new skills that I have learned for Windows application development.
2.0 Problem The Computer Action Team (CAT) is a group of staff and students that provide
services to the Maseeh College of Engineering and Computer Science at PSU. One of these services is to provide items (such as cables, projectors, and paper) that the faculty, staff, and students can borrow. However, one problem with the current service is that the management of the items is manual, ad-hoc, and error prone. The CAT decided to address this problem by sponsoring a Computer Science Capstone project to build an inventory management system called THINGS ( Tracking H elper and Interface for N ecessary G eneral S upplies) [4].
3.0 Capstone The Computer Science Capstone is a 20 week course where students form teams
to “work together to solve a problem posed by an outside sponsor.”[3] The goal of the Capstone is to “provide a realistic experience” in a team-oriented environment that is common in industry, and to allow students to learn a “great deal about the normal software development process”. The Capstone begins with introductory lectures on the basics of software engineering, followed by the selection of team leaders. Next, a group of potential sponsors give presentations about their projects and each student ranks the projects they are interested in. The team leaders then pick their teams and project based on the choices and resumes of the entire Capstone class.
Participating in the Capstone in Fall 2016 and Winter 2017 was the first time I had exposure to a team-oriented environment working on an industry-scale project; all of my previous computer science classes have been strictly focused on developing code individually. Our first obstacle during the initial team meetings was to be able to work together. We were all strangers with no idea of each other's knowledge, skills, and experience in regards to software development. Our approach to tackle this was to hold long team meetings in the early weeks to develop a design for THINGS. Beyond our initial steps to develop the project, this allowed us to get to know each other so that we could work more effectively as a team. We also had training sessions for Git (a version control system for code) to make sure everyone understood the basic of Git workflow to
3

prevent mistakes later in the project that might result in code being accidentally overwritten or deleted. This also improved our ability to work as a team and we got to know each other very well.
While we had overcome the hurdle of establishing good teamwork skills, there were still problems during the development process. We decided to structure our system as a collection of components, including a frontend, an API, and a database; we will describe these further in Section 4.1. However, there were still times during team meetings when people didn’t speak their thoughts on the problem at hand. This forced the team leader to make decisions based only on limited feedback. Another problem was that the structure of the frontend kept changing because there was no clear design for the latter. The lack of a clear design was brought up many times during each team meeting and led to more frustration later when the code had to be moved around and restructured to accommodate the newer design. This also impacted the testing of the application considerably as there was little time to ensure that all vital features were working as intended. This experience taught me that working in a team environment is about more than just working on the implementation of the software: it also depends critically on working effectively with people as well.
Being able to work as a team did make it easier to accomplish tasks, but it brought up another obstacle: workload distribution. The distribution of workload was fairly uneven where most of the tasks fell upon the same individuals throughout the Capstone. At times, it felt as if it was a three person team instead of a seven person team, based on how much work was done each week and the amount of communication between all team members. We used Slack (a popular internet messaging platform) as our main form of communication for our team, and while we had channels for different purposes (such as brainstorming and general discussion), they were hardly utilized as compared to the private messages between team members, especially those with higher workloads. Only near the end, when the project had to be submitted, was the workload evenly distributed.
While our communication was lacking and our workload distribution was uneven, our organization in other areas was good. As part of our efforts to get to know each other, we discussed the requirements, design and approach for the development of THINGS. We decided to use the waterfall methodology as our approach to the development process. This is a common software development process consisting of 5 stages: Requirements, which illustrates the needs of the client; Design, which allows for planning of the software; Implementation of the software; Verification, which ensures that the software works as intended; and Maintenance, which allows for easy modifications and improvements to the software. This provided a structure that let us plan when we should have our requirements, design, testing, and implementation done. We scheduled meetings with our sponsor to go over the requirements and design of THINGS for their feedback and confirmation that the proposed software design would meet their needs. I
4

learned from this experience that the reason why discussing the requirements and design with your client before implementation is part of the waterfall methodology is mainly to hold a written agreement with the client; this serves as a future reference should a disagreement ever happen between the developer and client about what the application is supposed to do. Several tools also played an important role in our organization. We used Trello (an assignment manager tool) to maintain the list of assignments, including their overall status and who was working on each one. As mentioned previously, we used Slack as our communication tool with different channels to keep topics of discussions organized for future reference. We used Git as our version control system and had a backup program that made a copy of the repository daily in the event that the original became corrupted.
The tools that I used for my roles in the development consisted of the Atom editor, the Node.js package[9], and the Google Chrome browser. The Atom editor was where all the development was done and, through the use of plugins, it allowed for a group of people to work on the same code. Node.js allowed us to host the API and frontend locally for testing, which allowed Chrome to display the website so that we could interact with it to ensure that it was functioning properly.
Participating in the CS Capstone gave me my first real experience working as part of a team to develop an application for a client. This is valuable because being able to work with people is an important skill when working in industry. I also learned new skills in developing a web application, which is one of the biggest markets in industry. However, there are other types of applications such as Windows apps. With that in mind, I decided to develop a Windows version of THINGS called WinTHINGS to learn new skills and technologies and to provide the CAT with an application that they can use to manage their inventory.
4.0 WinTHINGS
WinTHINGS is a Windows version of THINGS. Specifically, WinTHINGS is an app for Windows Presentation Foundation (WPF), which is a system developed by Microsoft to allow development of user interfaces in Windows applications. The application was developed using the C# programming language in the Visual Studio IDE (Integrated Development Environment) building on the .NET framework. An integrated development environment is a software application that provides tools for programmers; An IDE usually includes a source code editor to write code, a debugger to find and fix bugs, a compiler to generate executable code, and many other features. Specifically, Visual Studio is an IDE developed by Microsoft to develop programs for Windows as well as web sites, web apps, web services, and mobile apps. The .NET framework allows developers to reuse code when applications need to perform some common function and so enables them to focus on code that’s unique to their application.
5

An important question to answer at this point is why did I choose to develop for Windows? The reason is quite simple in that I wanted to learn skills and gain experience with developing a Windows application. It would have been the same reasoning if I had picked something else say an Android app or iOS app. Time was also an influence for picking a Windows application as I only had four weeks to research, learn and develop it; given my background, other choices, such as building an Android app, would likely have required more time to design and implement.
4.1 Terminology Before we get in depth about the design of WinTHINGS, we define some
terminology: 1) Frontend: A user interface that acts as an intermediate between the person and
the system. A common example of a frontend is a website. 2) Application Programming Interface (API): A set of routines exposed by an
application that allow applications to interact with it. 3) Database: A database is a persistent collection of data. Specifically for
WiNTHINGS, the database will contain item information (such as item name, quantity in stock, description) and a transaction history log.
4) Asynchronous Operations: Operations (such as API calls) that are executed in parallel with other tasks without waiting for their final results.
5) Transaction: An interaction between the user and the inventory.
4.2 Design WinTHINGS is an alternative to the browser frontend that was developed during
the Capstone sequence, but the overall purpose is the same: to manage interactions between the user and the inventory (database). The type of users expected to interact with the system are also the same as THINGS: customers and administrators. A customer is a CAT employee who can only checkout or request items. The administrator is a CAT employee in charge of managing the inventory. The administrator has access to all features of WinTHINGS; the specifics of these features are discussed in the next section.
The goals for WinTHINGS can be broken down into two categories: functional and qualitative goals. This is shown in the following table:
6

Functional Qualitative
Allow a customer to checkout item Provide an easy to use frontend
Allow an administrator to manage the inventory Be stable and predictable
Package information from the user and pass it on the API
Display inventory information
Generate a shopping list for the administrator
Generate statistics about the system
4.2.1 Architecture
The application will be a native Windows application, specifically a WPF app. WinTHINGS will take requests from users, pass them along to the API, which will get the information from the database. The application only works on Windows systems that have the latest .NET framework (version 4.7). It will be developed in the C# programming language.
The high level architecture of WinTHINGS follows the structure of the Capstone project. There will be a frontend that will act as an intermediate between the user and the inventory and a backend that will consist of the API and database developed during the Capstone as shown in the diagram below:
The API that will be used for the development of WinTHINGS will be the same one that was created and used in THINGS. The database will be a PostgresSQL database[8], which is the same type that was used during the Capstone sequence. As such, the database design and the setup scripts that were used for THINGS will also be used for WinTHINGS.
7

WinTHINGS will provide the same functionality as THINGS for interacting with the inventory as listed below:
1) Checkout Item: An item is removed from the inventory. 2) Checkin Item: An item is returned to the inventory. 3) Request Item: The ability to place a request to the administrator for an item not
available. 4) View Transaction History: The ability to filter through the transaction history
between the users and the inventory by item name, date range, or recent numbers.
5) View Shopping List: A list of items that are out of stock or running low for the administrator to quickly determine which items to restock.
6) View Statistics: View the statistics about the inventory such as average checkouts per week.
4.2.2 Possible Scenario This following image below illustrates a possible environment in which
WinTHINGS is utilized by the CAT.
The process starts with the customer wanting either to checkout an item, to
checkin an item, or to request an item from the CAT front desk. Checking out items is a simple task for the front desk employee; all he/she needs to do is find the item(s), click on the checkout button, and wait for the results of the transaction. If the transaction is successful, then the task is finished. Otherwise, something else (such as trying again) needs to be done and that is up to the front desk employee.
8

Requesting an item follows a similar process as checking out an item but instead of interacting with the inventory, the front desk employee submits a form which sends an email to the administrator about the requested item. The administrator can then take the appropriate action regarding the request and notify the customer about the status (or request additional details about the item that is requested).
Checking in an item can only be done by the administrator, so when the customer is returning an item, the front desk employee can collect the item and give it to the administrator for check in.
4.2.3 Login When the application is first started, the login page will be displayed. The user
enters his/her credentials and the API is invoked to compare them with the stored credentials on the database. A popup will show if the credentials entered were wrong or if a login error occurred for some other reason (such as a network connectivity issue).
The login window
4.2.4 Checkout/Checkin The checkout window allows the user to select item(s) from the inventory list that
they wish to checkout. When all items have been selected, the user can click on the “Add” button, moving them to the cart table. In the cart table, the user can specify the desired amount to checkout and then click on the “Checkout” button, resulting in multiple API calls, one for each item to checkout, until all items have been checked out
9

successfully. If any errors occur, a popup will be displayed listing any items that the application was unable to checkout.
The checkin window functions in much the same way as the checkout window with the only difference being that it makes different API calls and has slightly different error handling logic. This means that the checkout and checkin window have essentially the same user interface.
The checkout window
4.2.5 Statistics The statistics window, illustrated by the screenshot below, displays two inventory
statistics: weekly average and net per day. The weekly average statistics are the average weekly consumption for each item for the past week. The net per day is the net change in the quantity/day for the past week. The statistics are loaded into the table via API calls.
10

4.2.6 Request The request window allows the user to request items that are not available in the
inventory. The user enters the item name, quantity needed, item description, and any other additional information that would help the administrator get the correct item. This can be seen in the image below. Once the user submits this form, an email is generated and sent to the inventory administrator.
4.2.7 Transaction History (Recent) When this window is first loaded, it displays details about the last 15 transactions.
The user has the option to specify any other number and then those transactions will be
11

displayed in the table. Behind the scenes, the application makes an API call to get the list of transactions based on the number that the user entered (or 15 when first loaded). The following image shows the recent transaction window when it’s first loaded.
4.2.8 Transaction History (Item Name) This transaction history window allows the user to enter an item name and the
number of recent transactions that they want to view. When the user enters in the required information, WinTHINGS will make an API call and display the results into the table. There are no default transactions that are displayed because the item of interest is unknown when the window is first loaded. The following image shows the last 5 transactions of Pop-Tarts (an item in the inventory database used for testing):
12
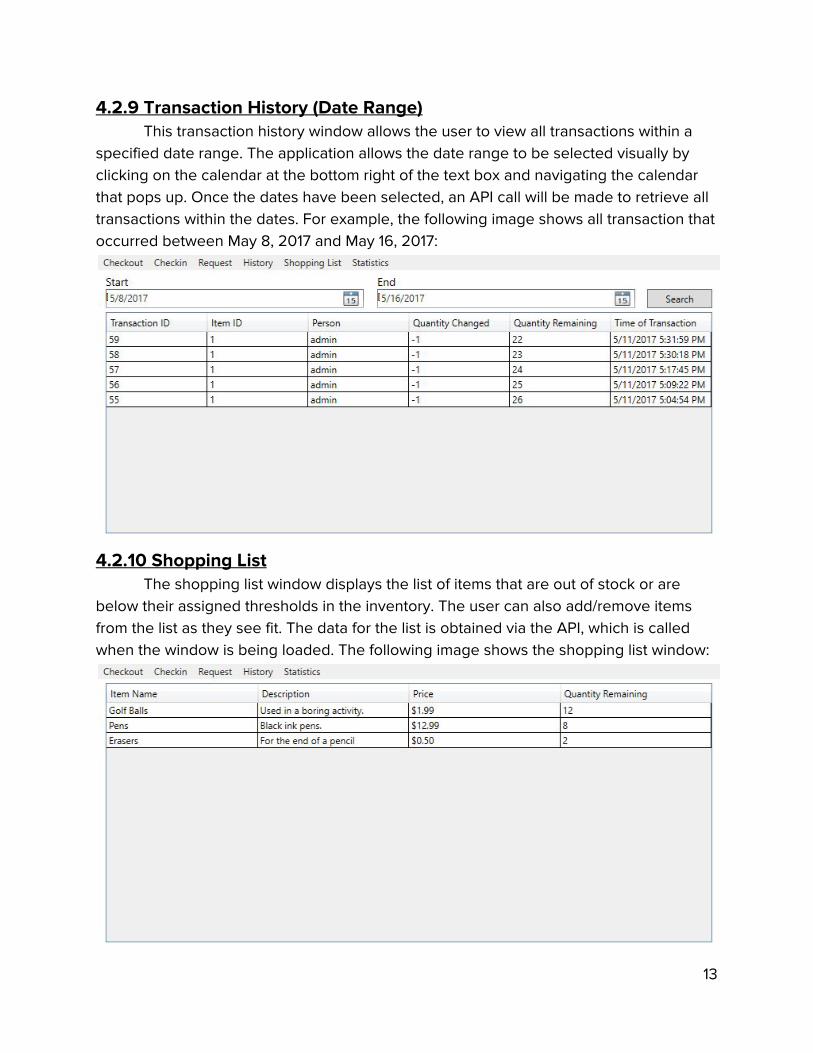
4.2.9 Transaction History (Date Range) This transaction history window allows the user to view all transactions within a
specified date range. The application allows the date range to be selected visually by clicking on the calendar at the bottom right of the text box and navigating the calendar that pops up. Once the dates have been selected, an API call will be made to retrieve all transactions within the dates. For example, the following image shows all transaction that occurred between May 8, 2017 and May 16, 2017:
4.2.10 Shopping List The shopping list window displays the list of items that are out of stock or are
below their assigned thresholds in the inventory. The user can also add/remove items from the list as they see fit. The data for the list is obtained via the API, which is called when the window is being loaded. The following image shows the shopping list window:
13

4.3 Testing Testing of the application consisted mainly of running each window and
interacting with it as it was developed. While the majority of the testing was done by me using the application, I also ran it by a few other people to solicit feedback, and to see if they could break the application in a way that I hadn’t thought of. Any bugs that led to the application crashing were high priority to fix while those that were minor were put on the list for attention if there was time left. Otherwise, those bugs will be fixed after the Honors thesis work is complete. I also used unit tests [7] (a practice of testing certain functions, which is code that is designed to be reused multiple times, and areas (or units)
of the code) when new features, such as checkout items, were implemented.
4.4 Reflection While the development of WinTHINGS helped me to learn valuable skills with
Windows development, it also brought up interesting comparisons with the different tools and techniques that were used in THINGS. In this section, I will examine both applications from a general perspective and then dive in deeper to some technical details and comparisons between the two.
While there are many differences between the two applications, there are obviously some strong similarities. The most obvious one is that both applications are designed to provide similar functionality: to allow the CAT to manage their inventory efficiently and to provide better service and experience to MCECS students, staff, and faculty. Both applications also utilize the same API to get the required information, which ensures that both applications have access to the same data set. In short, the API can be thought of as the control for both THINGS and WinTHINGS for this section.
One of the major differences when developing WinTHINGS was the environment that it was developed in. THINGS was developed in a team environment while WinTHINGS was developed individually. During the development of THINGS, we had to learn to work as a team, to distribute the workload evenly, and to ensure that everyone had a basic understanding of what was being done in the implementation. By contrast, I had complete control of the development of WinTHINGS but at the cost of having to do all the work myself. Another downside of this is that there could have been a better design for WinTHINGS if it was discussed in a group as different ideas and methods could have been proposed and adopted.
While the goal of the two applications is to provide an inventory management system, the tools, techniques and designs used in each are quite different. WinTHINGS is designed to run natively on Windows while THINGS is designed to be a browser solution and thus not dependent on the operating system that the client is using. However, THINGS can only be accessed if the user is connected to the Internet while WinTHINGS
14

potentially has the ability to function offline using a local database (although this feature is yet to be implemented).
Being two different technologies, it’s expected that the tools that were used to develop and test WinTHINGS were different from those used in THINGS. WinTHINGS was developed using the Visual Studio IDE which was designed to develop applications just for Windows. It comes many features to ease the development. One example is IntelliSense, which helps developers finish their current line of code by suggesting possible code components that can go next. Visual Studio also comes with a built-in debugger to help find bugs easily by allowing the user to follow what the application is doing step by step. A designer tool is also included for applications that require a user interface. For example, the image below shows the designer for the login window for WinTHINGS:
The panel on the left-hand side contains a list of controls that can be added to the
window being designed (the login window in the image above). Examples of this can be seen on the login page where the user enters their username (which uses a textbox control) and their password (which uses a PasswordBox to mask the characters that are entered). To add new controls to the window, a developer selects the control of interest and either drags it to the window or clicks on the window where they want to place it. Once placed, the user can resize, move, and edit properties of the control. For example, the Login button has a property enabled when it’s clicked that makes the API call and authenticates the user. The panel below shows XAML code for the design; this provides a textual description of the user interface layout and properties. This allows the
15

developer to design the user interface visually, using code, or by a combination of the two. The panel on the right shows the overall project structure.
Visual Studio is also able to compile and run the application as if it is a released product. This allows the developer to test the current implementation. To do this, the developer just has to click on the Start button shown in the image below:
The first dropdown menu in the image above provides two choices: Debug and
Release. Debug tells the IDE to compile and run the program with the debugger attached so that the developer can inspect the execution and performance of the program. For example, suppose the developer places a breakpoint (a signal that tells the debugger to temporarily pause the program execution) at a certain line in the code and starts the application. When the application reaches that breakpoint, the debugger pauses the program execution and allows the developer to inspect details such as the values of all variables in scope. From here, the developer can run the application line by line or let it run as if there was no breakpoint.
The development of THINGS followed quite a different story, requiring a combination of multiple tools to achieve essentially the same effect. THINGS required a text editor to write the code (I used Notepad++ and the Atom editor); an HTTP server running locally or a remote server hosting the web application; and a browser. The general workflow of the development process was to edit the code in the text editor (which didn’t have any code completion and other nice features that are present in Visual Studio), save the code, restart the HTTP server with the latest code changes and then visit the webpage to see how the website looked and functioned. The only debugger that was available was the one present in the browser and to use any of its functionality, the code for it had to be manually written into the application. This led to the development process being slow and at times frustrating because of a silly mistake in the code that required going through the entire process again.
4.4.1 Checkout comparison There are also comparisons to be made at the technical level of the two
applications. To help with this, I’m going to examine the Checkout pages of THINGS and WinTHINGS. Note that the bold words in this section will indicate keywords in the associated code snippets while italicized words indicate function names for code snippets that call other functions.
An obvious way to begin is to compare the visual appearance of the two pages. Figures 1 and 2 below show the THINGS implementation of the Checkout page while the
16

WinTHINGS version can be found in Section 4.2.4.
Figure 1 (Above): List of inventory from which the user can select the items to checkout which is then added
to the cart as shown in Figure 2 (Below).
The table that displays the inventory in Figure 1 also has more user code behind it
than the WinTHINGS implementation. The following HTML code describes the inventory table. It’s important to note that the HTML just describes the structure of the table and relies on additional JavaScript code to fetch the inventory list from the API.
17
<table datatable="ng" class="table table-bordered" id="inventoryTable"> <thead class="thead-inverse"> <!--First row should be column headers --> <tr> <th><b>Add to Cart</b></th> <th><b>Name</b></th> <th><b>Description</b></th> <th><b>Quantity</b></th> </tr> </thead> <tbody> <!--Rest of the table should contain inventory with one item per row --> <tr ng-repeat="item in inventory | orderBy: 'name'"> <td><button type="button" class="btn btn-outline-primary" ng-click="addToCart(item)" data-ng-disabled="item.quantity < 1">Add</button></td> <td>{{ item.name }}</td> <td>{{ item.description }}</td> <td>{{ item.quantity }}</td> </tr> </tbody> </table>
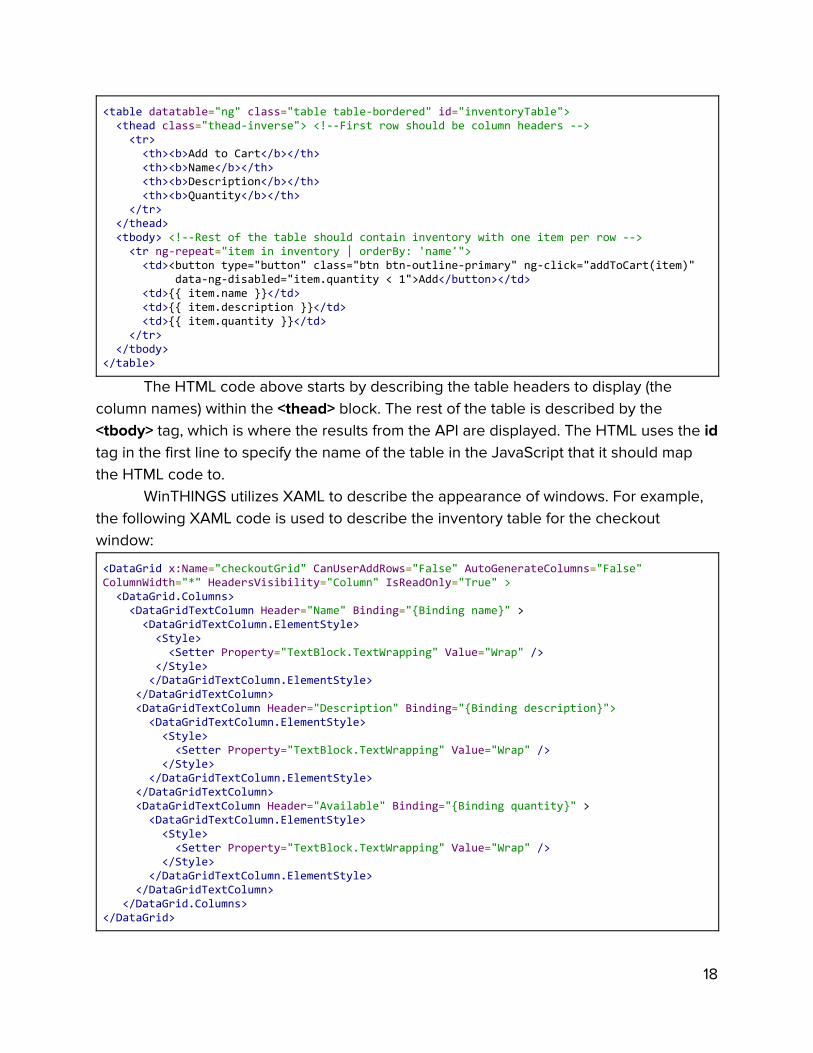
The HTML code above starts by describing the table headers to display (the column names) within the <thead> block. The rest of the table is described by the <tbody> tag, which is where the results from the API are displayed. The HTML uses the id tag in the first line to specify the name of the table in the JavaScript that it should map the HTML code to.
WinTHINGS utilizes XAML to describe the appearance of windows. For example, the following XAML code is used to describe the inventory table for the checkout window:
<DataGrid x:Name="checkoutGrid" CanUserAddRows="False" AutoGenerateColumns="False" ColumnWidth="*" HeadersVisibility="Column" IsReadOnly="True" > <DataGrid.Columns> <DataGridTextColumn Header="Name" Binding="{Binding name}" > <DataGridTextColumn.ElementStyle> <Style> <Setter Property="TextBlock.TextWrapping" Value="Wrap" /> </Style> </DataGridTextColumn.ElementStyle> </DataGridTextColumn> <DataGridTextColumn Header="Description" Binding="{Binding description}"> <DataGridTextColumn.ElementStyle> <Style> <Setter Property="TextBlock.TextWrapping" Value="Wrap" /> </Style> </DataGridTextColumn.ElementStyle> </DataGridTextColumn> <DataGridTextColumn Header="Available" Binding="{Binding quantity}" > <DataGridTextColumn.ElementStyle> <Style> <Setter Property="TextBlock.TextWrapping" Value="Wrap" /> </Style> </DataGridTextColumn.ElementStyle> </DataGridTextColumn> </DataGrid.Columns> </DataGrid>
18

This XAML code above describes each column of the table that will be displayed, using the Binding keyword to map the column name to the column in the datatable. The key aspect of the binding is that there needs to be a column in the source datatable that the column is bound to. So in this case, Binding name means that this column is bound to the name column in the source datatable. If that column doesn’t exist, then the application will crash when executed. The Style and Setter blocks specify that the text should be wrapped if the length of the text is greater than the column width. One important aspect to mention here is that XAML allows table properties to be edited directly. For example, the first line in the code above sets table properties, such as the CanUserAddRows and IsReadOnly properties. These types of properties are also not available in HTML; the closest thing to IsReadOnly is disabling the entire table, which causes problems because that data cannot be sent back to an API/server or any backend implementation that is being used.
Describing the appearance of a web page or a WPF window is important, but if the user cannot interact with it, then it’s meaningless. The next few sections look at the implementation of the checkout window and compare how WinTHINGS uses C# and THINGS use JavaScript to achieve the required functionality. 4.4.1.1 Loading Checkout Window
In WinTHINGS, when the window is first loaded, there is some code that gets run with it called a constructor. A constructor is used to initialize the data and any other components that it needs to before displaying the window. As such, there is quite a bit of data and setup to do for the checkout window, as shown in the following constructor implementation:
public Checkout(string token) { InitializeComponent(); //Position the window to center of the screen WindowStartupLocation = WindowStartupLocation.CenterScreen; this.token = token; //API token to ensure the user can make the API call client.BaseAddress = new Uri("https://localhost:3000/api/"); //API Server Address client.DefaultRequestHeaders.Add("x-access-token", token); ServicePointManager.ServerCertificateValidationCallback += (sender, cert, chain, sslPolicyErrors) => true; //Ignore SSL Cert warning client.DefaultRequestHeaders.Accept.Clear(); client.DefaultRequestHeaders.Accept.Add(new MediaTypeWithQualityHeaderValue("application/json")); //Accept JSON values Task t = loadInventory(); //Load inventory from API }
The code above is executed when the checkout window is being loaded. The window is configured to be displayed at the center of the screen. The constructor also initializes a HTTPClient object, called client in the code above, which allows WinTHINGS to make API calls with the API server and disables SSL certification verification. The last
19

line in the constructor calls the loadInventory() function. This gets the inventory to display to the user so that they may choose what items to checkout. The code for it is displayed below:
private async Task loadInventory() //Notice the async keyword { string response = await client.GetStringAsync("view"); //Make API call to get inventory inventory = JsonConvert.DeserializeObject<DataTable>(response); //Place results into table checkoutGrid.ItemsSource = inventory.AsDataView(); //Display the table on the window }
This is where the first of two asynchronous operations occurs in the checkout window. In C#, in order to run asynchronous operations, the async keyword needs to be in the function declaration (as shown in the code above) to indicate that the function contains asynchronous operations. The function will be executed synchronously until it encounters the keyword await , which tells the program to wait for the results of the asynchronous command to finish before running the next line of code. Essentially this function gets the list of items in the inventory, updates the datatable to hold the information and then displays it to the user. One question that arises is why we did not put this small code fragment inside the constructor? The answer is that it can’t be placed there due to the requirements of the async keyword which is required to be in the function header, and is not permitted in the constructor. The Task keyword just indicates that this is an async operation and so the loadInventory() function returns a Task object back to the constructor.
THINGS does not have the concept of a constructor and so its data initialization occurs as part of the controller code. Below is the code for getting the list of items in the inventory to display to the user:
//Get latest inventory data from database thingsAPI.getView().then(function (response) { inventoryList.setInventory(response.data); $scope.inventory=inventoryList.getInventory(); });
What this code does is to utilize the API controller (that is, the JavaScript code in charge of making API calls and returning the result) to get the inventory list. The .then aspect of the code waits for the asynchronous operation to finish before running the next lines of code just like the await keyword. However, there is one key difference that separates the two which will be discussed in Section 4.4.1.4.
20

4.4.1.2 Add Item to Cart For WinTHINGS, I used the following code to implement this feature:
private void addCart_Click(object sender, RoutedEventArgs e) { //Cart table doesn't exist so create it if (cart == null) { //Table should have same structure as inventory one cart = inventory.Clone(); //Add the desired column and set the default value to 1 cart.Columns.Add("desiredAmount"); cart.Columns["desiredAmount"].DefaultValue = 1; } //Add all selected items in the inventory table to the cart table var selected = checkoutGrid.SelectedItems; foreach (DataRowView item in selected) { cart.ImportRow(item.Row); } //Set the updated Cart datatable as the source for the table grid view on window checkoutCart.ItemsSource = cart.AsDataView(); }
The comments in this code, marked with “//”, document what each section does. For example, the code starts by checking to see if the cart datatable exists, and creating a new table if necessary. This includes steps to make a copy of the inventory table columns, and to add an extra column for the user to specify the amount to checkout. After that, the code will go through all selected items in the inventory table and add each one to the cart.
The implementation of this feature in THINGS spans two JavaScript files. Below is the code that gets executed first when a user clicks on the Add button to add to the cart:
/* This function adds an item from the inventory to the cart by utilizing the cartList factory. */ $scope.addToCart = function(item){ var cartItem = angular.copy(item); cartItem.check = false; cartItem.selectedQuantity = 1; cartList.addToCart(cartItem); }
This code makes a copy of the item that needs to be added to the cart (if a copy is not made, then it updates the item values in the inventory table, which is not what we want). It then adds new properties of check (to allow the user to remove the item from
21

the cart) and selectedQuantity (the number of items that the user wants to check out). The last line of code calls a different function that manages all cart information. The implementation is shown below:
//Adds to the cart addToCart: function(item) { var doesExist = false; //Increase checkout quantity by 1 if already in cart for(var i = 0; i < cart.length; i++){ if (cart[i].item_id === item.item_id){ if(cart[i].selectedQuantity < cart[i].quantity){ cart[i].selectedQuantity = cart[i].selectedQuantity + 1; } doesExist = true; } } if(doesExist == false){ //Otherwise add to cart cart.push(item); $rootScope.$broadcast("CartAdd", cart); } }
This code takes the copied item, checks if it’s already in the cart and, if it is, increments the quantity desired by 1. If the item is not found, then it adds the item to the cart list. It then “broadcasts” that an item has been added/updated in the cart from which all other code that are dependent on the values of the cart can get the updated values.
As you can see, there is a major difference between the two implementations above. The ability to change the datatable dynamically in WinTHINGS made it much easier to work with than the tables in THINGS. The datatable in WinTHINGS functions more as a table instead of an array of JSON key/value pairs and utilizes the tabular properties such as iterating through columns and rows. The THINGS use of datatables is based on an open source implementation [10] and is dependent on how the it was designed by its developers and whether bugs and issues have been fixed. One of things that I took advantage of in WinTHINGS is datatable types such as DataRowView. This allowed me to access the properties of a row in the datatable rather than parsing a string representation of the row, as was the case with the THINGS implementation.
22
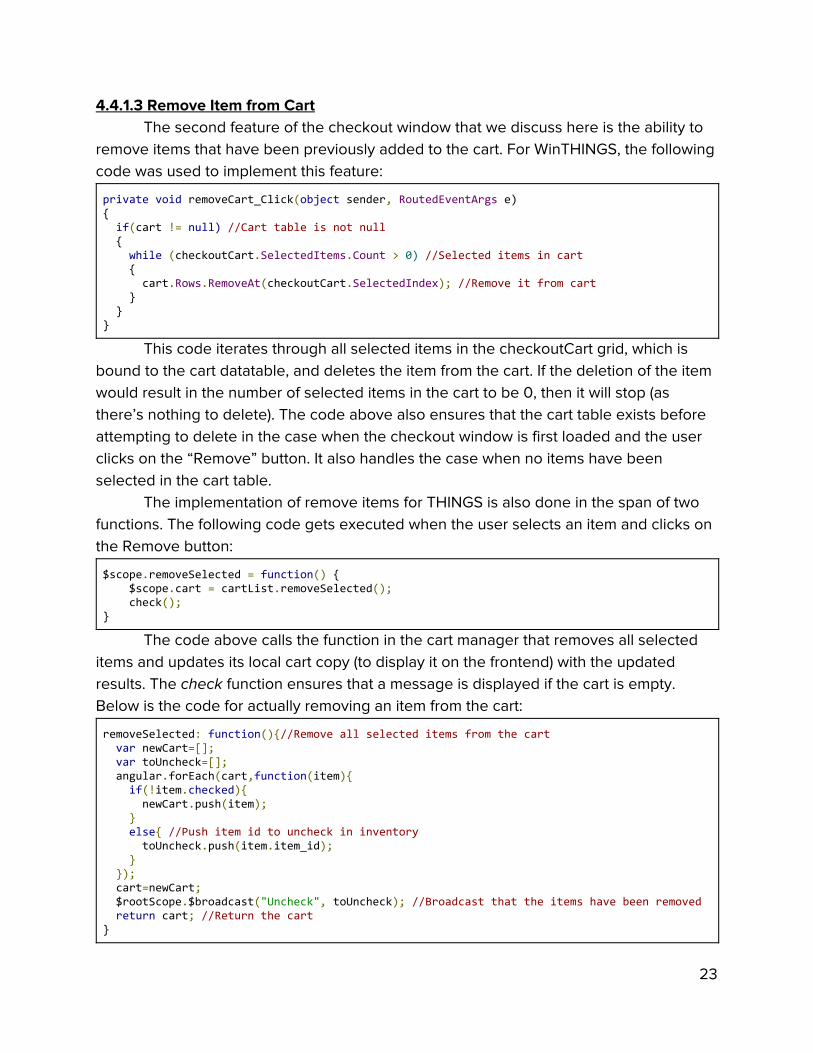
4.4.1.3 Remove Item from Cart The second feature of the checkout window that we discuss here is the ability to
remove items that have been previously added to the cart. For WinTHINGS, the following code was used to implement this feature:
private void removeCart_Click(object sender, RoutedEventArgs e) { if(cart != null) //Cart table is not null { while (checkoutCart.SelectedItems.Count > 0) //Selected items in cart { cart.Rows.RemoveAt(checkoutCart.SelectedIndex); //Remove it from cart } } }
This code iterates through all selected items in the checkoutCart grid, which is bound to the cart datatable, and deletes the item from the cart. If the deletion of the item would result in the number of selected items in the cart to be 0, then it will stop (as there’s nothing to delete). The code above also ensures that the cart table exists before attempting to delete in the case when the checkout window is first loaded and the user clicks on the “Remove” button. It also handles the case when no items have been selected in the cart table.
The implementation of remove items for THINGS is also done in the span of two functions. The following code gets executed when the user selects an item and clicks on the Remove button:
$scope.removeSelected = function() { $scope.cart = cartList.removeSelected(); check(); }
The code above calls the function in the cart manager that removes all selected items and updates its local cart copy (to display it on the frontend) with the updated results. The check function ensures that a message is displayed if the cart is empty. Below is the code for actually removing an item from the cart:
removeSelected: function(){//Remove all selected items from the cart var newCart=[]; var toUncheck=[]; angular.forEach(cart,function(item){ if(!item.checked){ newCart.push(item); } else{ //Push item id to uncheck in inventory toUncheck.push(item.item_id); } }); cart=newCart; $rootScope.$broadcast("Uncheck", toUncheck); //Broadcast that the items have been removed return cart; //Return the cart }
23

In short, this code creates a new cart by making a copy of the old cart but not copying items that have been checked (for deletion). Then, it updates the old cart variable with the new cart and “broadcasts” to all other functions dependent on the data that the cart has been updated. The broadcast also returns a list of items that have been removed for the frontend to display to the user.
The interesting comparison to note here is the number of lines of code that it takes for WinTHINGS to accomplish the same task as it takes for THINGS. All WinTHINGS does is to remove all selected items in the datatable using the available properties whereas the browser implementation requires making a new duplicate of the cart that contains the removed items and then broadcast that the action has been completed so that all other functions can update their code. The reason that the THINGS implementation is more complex is that, in AngularJS, datatables do not have the properties described in Section 4.4.1. Instead, THINGS has to use multiple lists to update the cart and to broadcast changes to other parts of the code that depend on having current cart information. 4.4.1.4 Checkout Item(s)
The last feature on the checkout window is to perform the actual checkout itself once items have been placed in cart with their desired amount to checkout. Async operations are once again used here again but differently than previously discussed. Below is the WinTHINGS implementation of checkout:
private async void checkoutButton_Click(object sender, RoutedEventArgs e) { //Keep track of items that could not be checked out List<string> errors = new List<string>(); for(int i = 0; i < cart.Rows.Count; i++) { var response = await client.PostAsync("a/checkout/" + cart.Rows[i]["item_id"] + "/" + "admin" + "/" + cart.Rows[i]["desiredAmount"], null); if (!response.IsSuccessStatusCode) { errors.Add(cart.Rows[i]["name"].ToString()); } } //Delete all rows from the cart datatable cart.Clear(); //Refresh inventory await loadInventory(); if(errors.Count > 0) { MessageBox.Show("Unable to checkout the following item(s): \n" + string.Join(Environment.NewLine, errors)); } else { MessageBox.Show("All items successfully checked out!"); } }
24

The code starts by declaring a list that will keep track of all items that were not able to checkout due to an error. Then, it starts checking out all items in the cart table one by one utilizing the await keyword. If the checkout is not successful, the item is added to an error list. Once that is done, all items in the cart datatable are deleted. The inventory table is updated with post-checkout data. Finally, a message is displayed to the user indicating that all items were checked out or, in the case of errors, listing the items that were not able to.
Now, the implementation of THINGS’s checkout is displayed below:
$scope.checkOut = function() { var promises = []; //Name is undefined so set to default name if(angular.isUndefined($scope.userName) || $scope.userName.length == 0){ $scope.userName = 'Anonymous'; } for(var i = 0; i < $scope.cart.length; i++){ promises.push(thingsAPI.checkout($scope.cart[i].item_id, $scope.userName, $scope.cart[i].selectedQuantity)); } //Once all promises are completed (i.e. all API calls are done) $q.all(promises).then(function(results){ var failed = []; for(var j = 0; j < results.length; j++){ if(results[j].success == false){ console.log("Unable to check out " + inventoryList.getItemName(results[j].item_id)); failed.push(inventoryList.getItemName(results[j].item_id)); } } //Display any error messages if(failed.length > 0){ $window.alert("Unable to check out the following item(s):\n" + failed); } else{ //Display success message $window.alert("All items successfully checked out!"); } //Update inventory with new quantities thingsAPI.getView().then(function(response) { inventoryList.setInventory(response.data); $scope.inventory=inventoryList.getInventory(); $scope.cart.length = 0; $scope.cartEmpty = true; $scope.cartNotEmpty = false; }); });
This code is more complex than previous snippets, mainly due to the fact that making multiple API calls in a loop is not as straightforward in AngularJS as it is in C#. But the THINGS code works in a similar way to the implementation for WinTHINGS. It goes
25

through the cart data and makes an API call for each item. Once that’s done, a message will be displayed indicating that all items were checked out. If any items failed to checkout, they will be displayed instead. The code will also update the cart data and inventory once all items have been checked out.
The key difference to note here is that the THINGS implementation does not allow waiting inside of a loop, thus rendering the .then useless whereas the await keyword still works as intended whether in a loop or not. The way that the web application gets around this is to take advantage of the “promise” that is returned whenever an async operation takes place. By collecting the promises into a list and utilizing a third-party package ($q package [11]) , AngularJS is able to simulate async operations in a loop. However, the dependency on a third party package, as well as little more complex code, makes implementing async operations less appealing in AngularJS than in a native WPF app written in C#.
5.0 Future Work WinTHINGS is a functional prototype, but there are still many interesting ways in
which the application could be improved or extended: 1) User Interface: The current user interface can be improved to use a single
window and tabs. This would remove a fair amount of code supporting navigation and allow a smoother transition between tabs. The user interfaces for the checkout and checkin window can also be extended to support dragging items from the inventory table to the cart table instead of clicking on the Add button. This same feature can similarly be applied for removing items from the cart by dragging them outside the table. The statistics window can also be extended to support graphs for a visual representation of the tabular data.
2) Error Handling: The current error handling can be greatly improved to prevent unexpected behaviors such as program freezing or crashing due to unexpected user actions. Other error handling should be added to give a user a better experience using the application. One known bug—which doesn’t crash the program but hasn’t been patched up yet—is the ability to add the same items to the cart multiple times and to specify a different desired amount. If the total of the desired amount is less than the available quantity, then the application will run normally but if it results in a total greater than the available quantity, then whichever API request reaches the API server first will be processed. The other request will result in an API error and a failure message to be displayed to the user.
3) Design: The overall design of the application can also be changed for the better. As mentioned earlier, instead of using windows, it may be have been better to use pages within one window or to have utilized the TabControl feature. This
26

combines both the menu bar with the different pages to allow for different forms to be presented. These designs would have been much better since they wouldn’t have to create and reload windows when the user switches between them. A design flaw that is present in the API is the ability to have concurrent operations from multiple instances of the application running. For example, suppose there are two instances of WinTHINGS running. There are 10 pencils available in the inventory. Instance 1 sends a checkout request for 8 pencils and Instance 2 sends a checkout request for 5 pencils but Instance 1’s request reaches the API server first and is processed as normal. When Instance 2’s request reaches the API server, an error occurs because there are fewer pencils available than requested.
I will be working on WinTHINGS and the API well after the thesis has finished to
implement the features that I’ve discussed in this section and any new features that may arise in the process.
6.0 Conclusion Overall, I learned a great deal over the course of both the CS Capstone and the
Honors thesis. I learned how to work with others on developing an application, and how to manage my time. I also learned new skills in different technologies that should help me further my career greatly. I think that the most important thing I learned from this experience is that different technologies have their pros and cons and it’s up to the developers to decide which of the technologies is best suited to their task at hand. I plan to continue to work on WinTHINGS well after my thesis has ended and welcome anyone interested in contributing to the application.
7.0 References 1) Bahl, M., McCann, A., Awasthi, S., McHale, N., Ruzicka, A., Kazmierowicz, L., &
Chen, H. Capstone-Things/THINGS. Retrieved June 14, 2017, from https://github.com/Capstone-Things/THINGS
2) Bahl, M. WindowsTHINGS. Retrieved June 14, 2017, from https://github.com/DarthManpreet/WindowsTHINGS
3) PSU CS Capstone Student Information. Retrieved June 14, 2017, from http://wiki.cs.pdx.edu/capstone/students.html
4) Bahl, M. February 27, 2017. To THINGS And Beyond. Unpublished Honors Prospectus document. Portland State University.
5) Bahl, M. March 15, 2017. Honors Prospectus Addendum. Unpublished document. Portland State University
6) Microsoft. Windows Presentation Foundation. Retrieved June 14, 2017, from https://msdn.microsoft.com/en-us/library/ms754130(v=vs.110).aspx
27

7) McFarlin, T. (2012, June 19). The Beginner’s Guide to Unit Testing: What Is Unit Testing? Retrieved from https://code.tutsplus.com/articles/the-beginners-guide-to-unit-testing-what-is-unit-testing--wp-25728
8) PostgreSQL:About. Retrieved June 14, 2017, from https://www.postgresql.org/about/
9) Node JS. Retrieved June 14, 2017, from https://nodejs.org/en/ 10)Lin, L. L-lin/angular-datatables. Retrieved June 14, 2017, from
https://github.com/l-lin/angular-datatables 11)$q. Retrieved June 14, 2017, from https://docs.angularjs.org/api/ng/service/$q
28