wireless notebook network card wireless desktop network adapter
TRANSCRIPT
F5D6020F5D6000
Wireless Notebook Network Card
Wireless Desktop Network Adapter
User Manual

Table of Contents
Introduction . . . . . . . . . . . . . . . . . . . . . . . . . . . . . . . . . . . . . . . . . . . . . . . . . . 1
Overview . . . . . . . . . . . . . . . . . . . . . . . . . . . . . . . . . . . . . . . . . . . . . . . . . . . 2
Installing the Wireless Notebook Network Adapter using the Optional PCI Adapter . . . . . . . . . . . . . . . . . . . . . . . . . . . . . . . . . . . . . . . . 3–4
Installing the PCI drivers for Windows 95 . . . . . . . . . . . . . . . . . . . . . . . . . 5–6
Installing the PCI drivers for Windows 98/Me . . . . . . . . . . . . . . . . . . . . . . . 7–8
Installing the PCI drivers for Windows 2000 . . . . . . . . . . . . . . . . . . . . . . 9–11
Installing the PCI drivers for Windows NT . . . . . . . . . . . . . . . . . . . . . . . 12–13
Installing the Notebook Network Card in your Notebook PC . . . . . . . . . . . . 14
Installing the Notebook Network Card Drivers for Windows 95 . . . . . . . 15–16
Installing the Notebook Network Card Drivers for Windows 98/Me . . . . 17–18
Installing the Notebook Network Card Drivers for Windows 2000 . . . . . 19–20
Installing the Notebook Network Card Drivers for Windows NT . . . . . . 21–22
Installing Belkin 11Mbps Wireless Setup Utility . . . . . . . . . . . . . . . . . . . . . . 23
Using the Belkin 11Mbps Wireless Setup Utility . . . . . . . . . . . . . . . . . . 24–30
Installing the Belkin SOHO Networking Software for Windows 98/Me . . . . 31
Configuring Your Windows 98/Me Computer Using Belkin NetSetup . . . 32–33
Configuring Additional Computers Using Belkin NetSetup Software . . . 34–35
Sharing Files and Peripherals . . . . . . . . . . . . . . . . . . . . . . . . . . . . . . . . . 36–38
Accessing Resources on Other Computers . . . . . . . . . . . . . . . . . . . . . . . . . . 39
Glossary of Wireless Networking Terms . . . . . . . . . . . . . . . . . . . . . . . . . 40–41
Glossary of Wired Networking Terms . . . . . . . . . . . . . . . . . . . . . . . . . . . 42–43
Information . . . . . . . . . . . . . . . . . . . . . . . . . . . . . . . . . . . . . . . . . . . . . . 44–46

1
Introduction
Thank You for purchasing the Belkin 11Mbps Wireless Desktop NetworkAdapter and/or the Belkin 11Mbps Wireless Notebook Network Card.Now you can take advantage of the wireless world of networking thatfrees you from using cables with your home or office network. TheWireless Network Card Adapter serves as a way for your PCs tocommunicate on a wireless network.
Features• Compatible with PCMCIA and PCI specifications• Provides LED indicators for monitoring network traffic
Contents of Package• One Wireless Notebook Network Card or One Wireless Desktop
Network Adapter• One CD-ROM• User Guide

Overview
2
There are two ways to use your Wireless Notebook Network Adapter.
1. Use in a desktop computer with the optional PCI adapter. If you are usingthe Optional PCI adapter, go to the section on page 3 titled "Installing theWireless Notebook Network Adapter using the Optional PCI Adapter"
2. Use in a laptop with PCMCIA slot. If your are installing your card directlyinto a laptop computer, skip to the section on page 14 titled “Installingthe Notebook Network Card in your Notebook PC”.

Installing the Wireless Notebook Network Adapter using the Optional PCI Adapter
1. Network cards are sensitive to static electricity, which can damage theirdelicate electronic components. To protect your device, always: Touch themetal chassis of your computer before you pick up the card. This groundsthe electrostatic charge. Avoid touching any of the electrical componentswhen handling the card. If possible, wear a grounded wrist strap or anti-static gloves. Note: Dry weather conditions or walking across a carpeted floor maycause you to acquire an electrostatic charge.
2. Turn off the power to the PC and unplug the power cord from theelectrical outlet.
3. Remove the cover to the PC. Please refer to your computer’s Owner’sManual for instructions on how to remove the cover.
4. Find any available PCI expansion bus slot andremove the protector bracket from thecomputer’s case.
5. Carefully insert theWireless DesktopNetwork Card intothe slot until theconnectors at theedge of the cardare firmly in place.
3
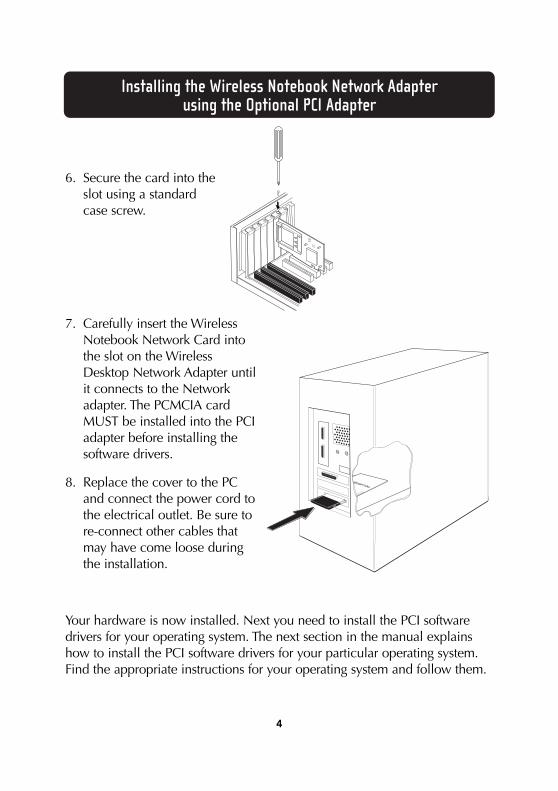
Installing the Wireless Notebook Network Adapter using the Optional PCI Adapter
4
6. Secure the card into theslot using a standardcase screw.
7. Carefully insert the WirelessNotebook Network Card intothe slot on the WirelessDesktop Network Adapter untilit connects to the Networkadapter. The PCMCIA cardMUST be installed into the PCIadapter before installing thesoftware drivers.
8. Replace the cover to the PCand connect the power cord tothe electrical outlet. Be sure tore-connect other cables thatmay have come loose duringthe installation.
Your hardware is now installed. Next you need to install the PCI softwaredrivers for your operating system. The next section in the manual explainshow to install the PCI software drivers for your particular operating system.Find the appropriate instructions for your operating system and follow them.
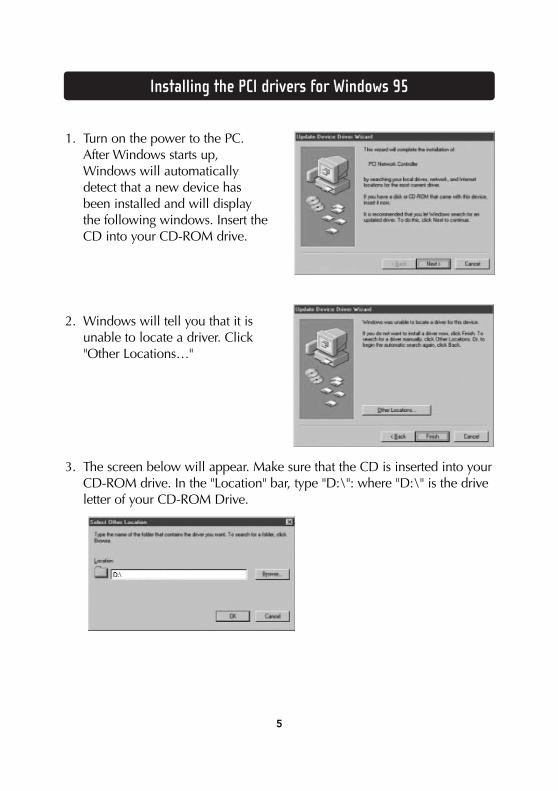
Installing the PCI drivers for Windows 95
5
1. Turn on the power to the PC.After Windows starts up,Windows will automaticallydetect that a new device hasbeen installed and will displaythe following windows. Insert theCD into your CD-ROM drive.
2. Windows will tell you that it isunable to locate a driver. Click"Other Locations…"
3. The screen below will appear. Make sure that the CD is inserted into yourCD-ROM drive. In the "Location" bar, type "D:\": where "D:\" is the driveletter of your CD-ROM Drive.
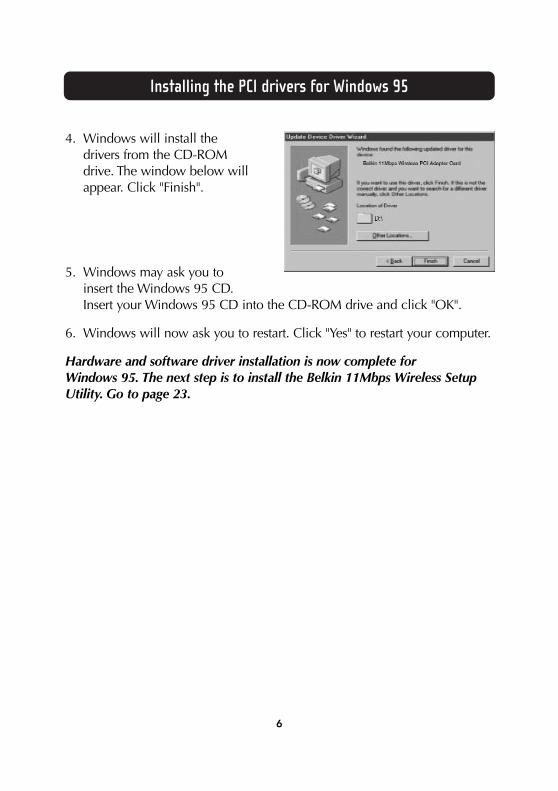
Installing the PCI drivers for Windows 95
6
4. Windows will install thedrivers from the CD-ROMdrive. The window below willappear. Click "Finish".
5. Windows may ask you toinsert the Windows 95 CD.Insert your Windows 95 CD into the CD-ROM drive and click "OK".
6. Windows will now ask you to restart. Click "Yes" to restart your computer.
Hardware and software driver installation is now complete for Windows 95. The next step is to install the Belkin 11Mbps Wireless SetupUtility. Go to page 23.

Installing the PCI drivers for Windows 98/Me
1. Turn on the power to thePC. After Windows startsup, Windows willautomatically detect that anew device has beeninstalled and will displaythe following window:
2. The "Add New Hardware Wizard" will begin. Click "Next".
3. When asked, "What do youwant Windows to do?" select"Search for the best driver foryour device. (Recommended)"and click "Next".
4. Select "CD-ROM". Place theCD-ROM supplied with thecard in your CD-ROM driveand click "Next".
7
Installing the PCI drivers for Windows 98/Me
8
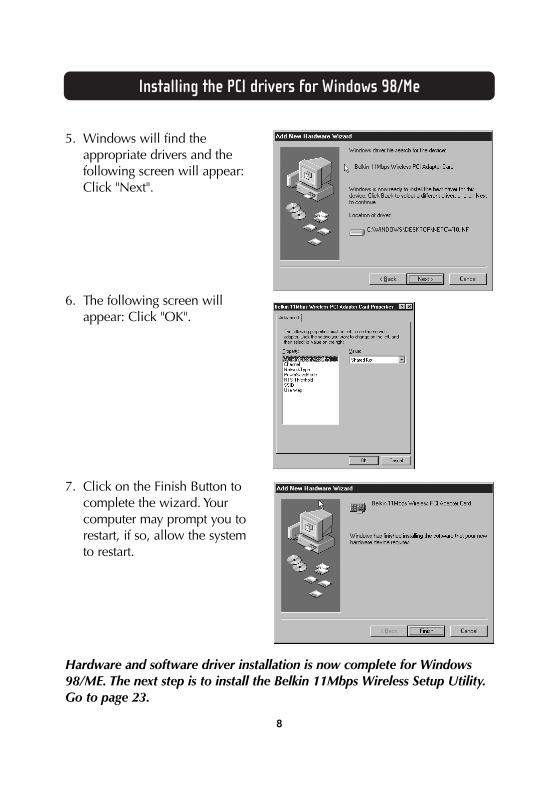
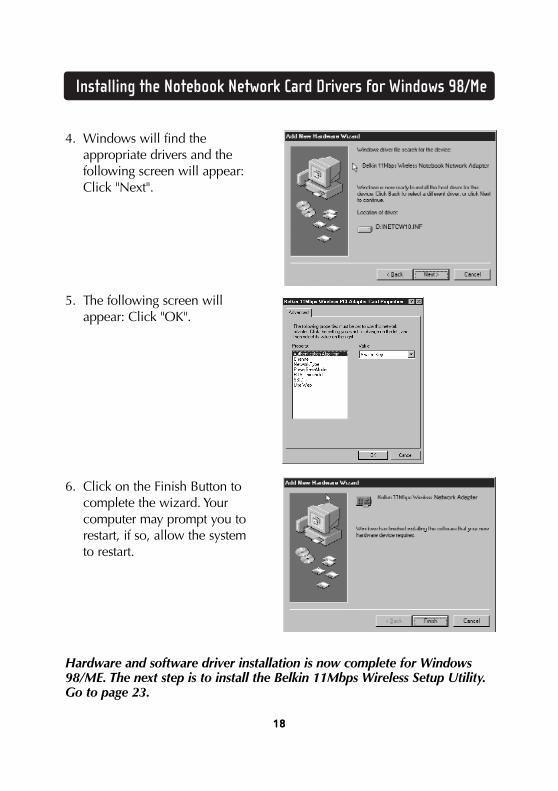
5. Windows will find theappropriate drivers and thefollowing screen will appear:Click "Next".
6. The following screen willappear: Click "OK".
7. Click on the Finish Button tocomplete the wizard. Yourcomputer may prompt you torestart, if so, allow the systemto restart.
Hardware and software driver installation is now complete for Windows98/ME. The next step is to install the Belkin 11Mbps Wireless Setup Utility.Go to page 23.
Installing the PCI drivers for Windows 2000
9
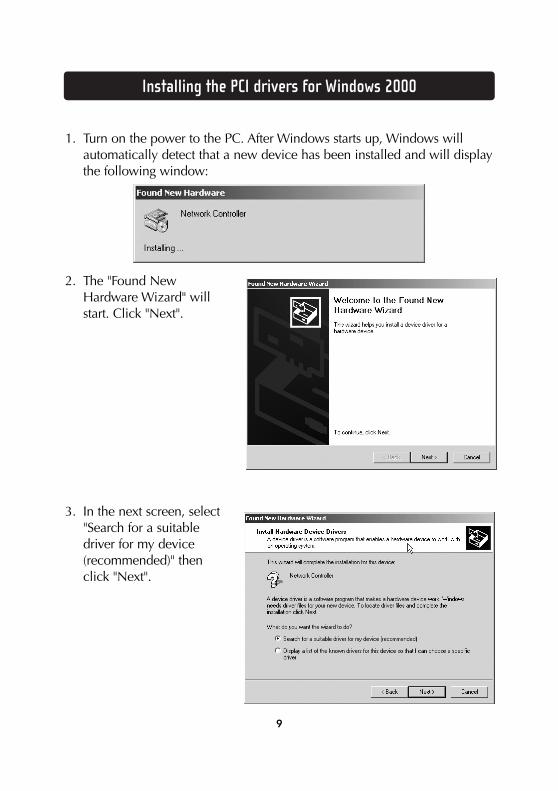
1. Turn on the power to the PC. After Windows starts up, Windows willautomatically detect that a new device has been installed and will displaythe following window:
2. The "Found NewHardware Wizard" willstart. Click "Next".
3. In the next screen, select"Search for a suitabledriver for my device(recommended)" thenclick "Next".

Installing the PCI drivers for Windows 2000
10
4. This screen will appear.Insert the CD (providedwith the card) into yourCD-ROM drive. Select"CD-ROM drive" thenclick "Next".
5. This screen will appear.Click "Next".
6. The "Digital SignatureNot Found" screen willappear. This does notmean there is a problem.Click "Yes" to continue.
11
Installing the PCI drivers for Windows 2000
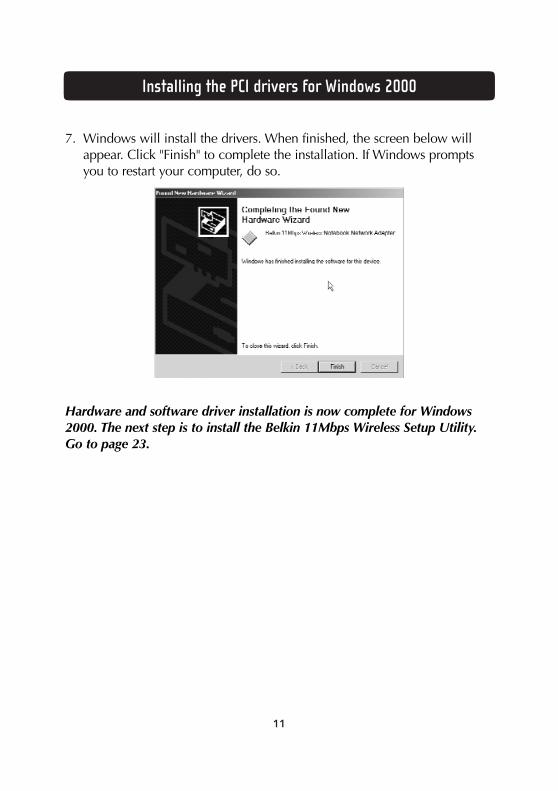
7. Windows will install the drivers. When finished, the screen below willappear. Click "Finish" to complete the installation. If Windows promptsyou to restart your computer, do so.
Hardware and software driver installation is now complete for Windows2000. The next step is to install the Belkin 11Mbps Wireless Setup Utility.Go to page 23.

12
Installing the PCI drivers for Windows NT
Since Windows® NT is not a plug-and-play operating system, it will notautomatically detect the installation of the PCI adapter. To manuallyinstall the PCI Software Drivers, follow the steps below. After WindowsNT starts up,
1. Turn on the power to the PC. After Windows NT starts up, insert the CDinto your CD-ROM drive.
2. Click on "Start", select"Settings" then click on"Control" panel to open the"Control Panel" Window.
3. Double-click on the "NetworkIcon". The screen below willappear. A list of adapter mayappear in the window, howeverthe Belkin PCI adapter will not.Click on "Add".

13
Installing the PCI drivers for Windows NT
4. In the next screen, type"D:\" where D:\ is thedrive letter of your CD-ROM drive. Click "OK".
5. Select "Belkin 11MbpsWireless PCI Adapter Card"then click "OK".
6. This screen will appear. Click "OK".
Hardware and driver installation is now complete for Windows NT. Thenext step is to install the Belkin 11Mbps Wireless Setup Utility. Go to page 23.

14
Installing the Notebook Network Card in your Notebook PC
1. Insert the Wireless Notebook Network Card in the PCMCIA slot of yournotebook with the color label facing up.
2. Install the drivers for your particular operating system. Go to the nextsection that applies to your operating system.

15
Installing the Notebook Network Card Drivers for Windows 95
1. Turn on the power to yourlaptop PC. After Windowsstarts up, Windows willautomatically detect that anew device has beeninstalled and will displaythe windows Below. Insertthe CD into your CD-ROM drive.
2. Windows will tell you thatit is unable to locate adriver. Click "OtherLocations…"
3. The screen below will appear. Make sure that the CD is inserted into yourCD-ROM drive. In the "Location" bar, type "D:\": where "D:\" is the driveletter of your CD-ROM Drive.

16
Installing the Notebook Network Card Drivers for Windows 95
4. Windows will install thedrivers from the CD-ROMdrive. The window belowwill appear. Click "Finish".
5. Windows may ask you toinsert the Windows 95CD. Insert your Windows95 CD into the CD-ROMdrive and click "OK".
6. Windows will now ask you to restart. Click "Yes" to restart your computer.
Hardware and software driver installation is now complete for Windows 95. The next step is to install the Belkin 11Mbps Wireless SetupUtility. Go to page 23.
Installing the Notebook Network Card Drivers for Windows 98/Me
1717
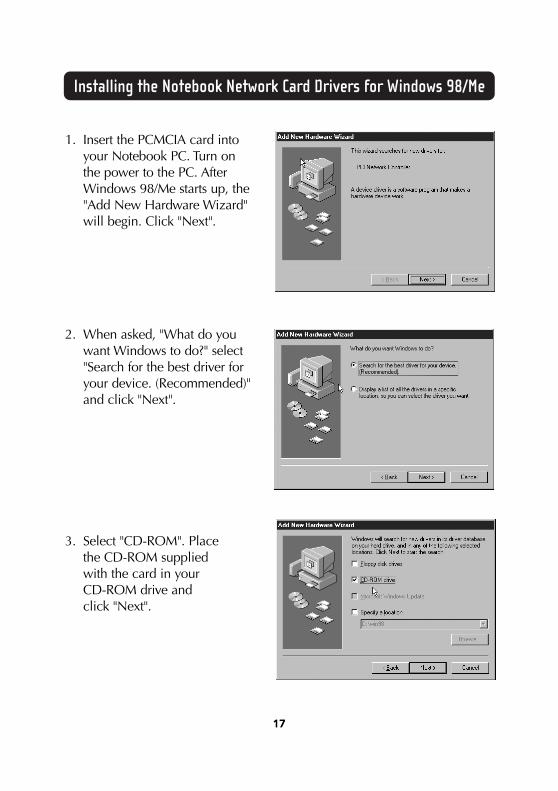
1. Insert the PCMCIA card intoyour Notebook PC. Turn onthe power to the PC. AfterWindows 98/Me starts up, the"Add New Hardware Wizard"will begin. Click "Next".
2. When asked, "What do youwant Windows to do?" select"Search for the best driver foryour device. (Recommended)"and click "Next".
3. Select "CD-ROM". Placethe CD-ROM suppliedwith the card in yourCD-ROM drive andclick "Next".
Installing the Notebook Network Card Drivers for Windows 98/Me
1818
4. Windows will find theappropriate drivers and thefollowing screen will appear:Click "Next".
5. The following screen willappear: Click "OK".
6. Click on the Finish Button tocomplete the wizard. Yourcomputer may prompt you torestart, if so, allow the systemto restart.
Hardware and software driver installation is now complete for Windows98/ME. The next step is to install the Belkin 11Mbps Wireless Setup Utility.Go to page 23.
Installing the Notebook Network Card Drivers for Windows 2000
19
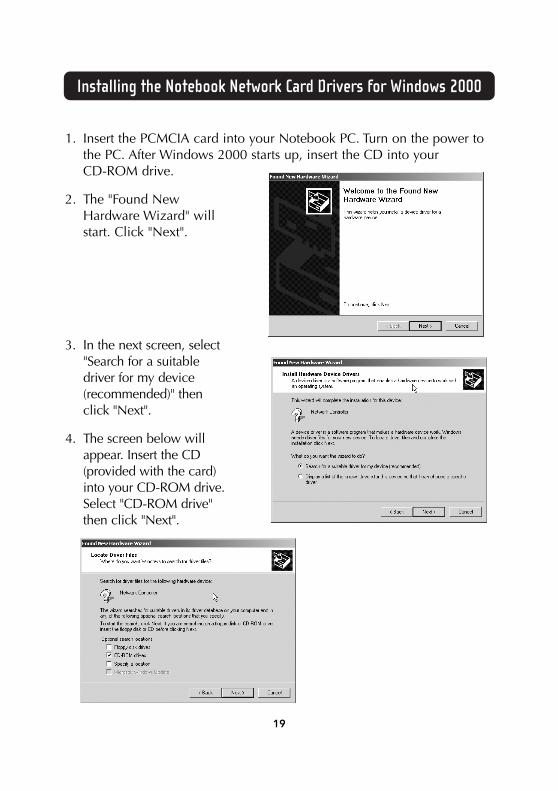
1. Insert the PCMCIA card into your Notebook PC. Turn on the power tothe PC. After Windows 2000 starts up, insert the CD into your CD-ROM drive.
2. The "Found NewHardware Wizard" willstart. Click "Next".
3. In the next screen, select"Search for a suitabledriver for my device(recommended)" thenclick "Next".
4. The screen below willappear. Insert the CD(provided with the card)into your CD-ROM drive.Select "CD-ROM drive"then click "Next".
20
Installing the Notebook Network Card Drivers for Windows 2000
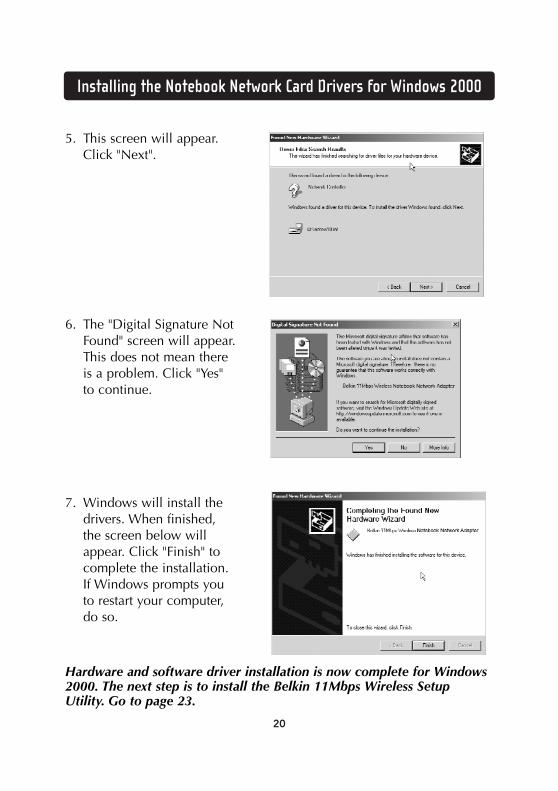
5. This screen will appear.Click "Next".
6. The "Digital Signature NotFound" screen will appear.This does not mean thereis a problem. Click "Yes"to continue.
7. Windows will install thedrivers. When finished,the screen below willappear. Click "Finish" tocomplete the installation.If Windows prompts youto restart your computer,do so.
Hardware and software driver installation is now complete for Windows2000. The next step is to install the Belkin 11Mbps Wireless SetupUtility. Go to page 23.
21
Installing the Notebook Network Card Drivers for Windows NT
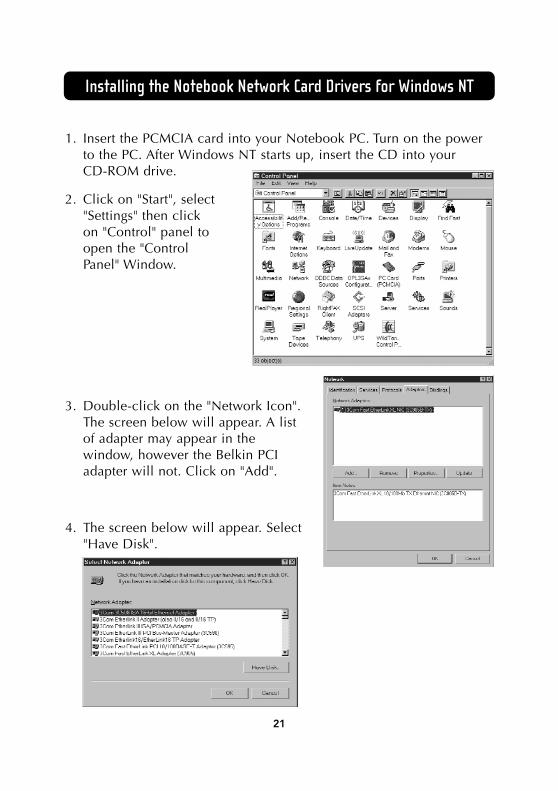
1. Insert the PCMCIA card into your Notebook PC. Turn on the powerto the PC. After Windows NT starts up, insert the CD into your CD-ROM drive.
2. Click on "Start", select"Settings" then clickon "Control" panel toopen the "ControlPanel" Window.
3. Double-click on the "Network Icon".The screen below will appear. A listof adapter may appear in thewindow, however the Belkin PCIadapter will not. Click on "Add".
4. The screen below will appear. Select"Have Disk".

22
Installing the Notebook Network Card Drivers for Windows NT
5. In the next screen, type"D:\" where D:\ is the driveletter of your CD-ROMdrive. Click "OK".
6. Select "Belkin 11MbpsWireless PCI Adapter Card"then click "OK".
7. This screen will appear.Click "OK".
Hardware and driver installation is now complete for Windows NT.The next step is to install the Belkin 11Mbps Wireless Setup Utility.Go to page 23.
23
Installing Belkin 11Mbps Wireless Setup Utility
The Belkin 11Mbps Wireless Setup Utility allows you to setup theWireless Network Card/Adapter’s wireless Ethernet settings.
1. Insert the CD-ROM that came with your Belkin Wireless NotebookNetwork Card or Belkin Wireless Desktop Adapter into your CD-ROM.
2. From your desktop, double-click on "My Computer", then double-clickon your CD-ROM Drive.
3. Double-click on the Setup icon. Windows will automatically install theprogram onto your PC. After the program is installed, Windows mayask you to restart your computer. Please do so.
24
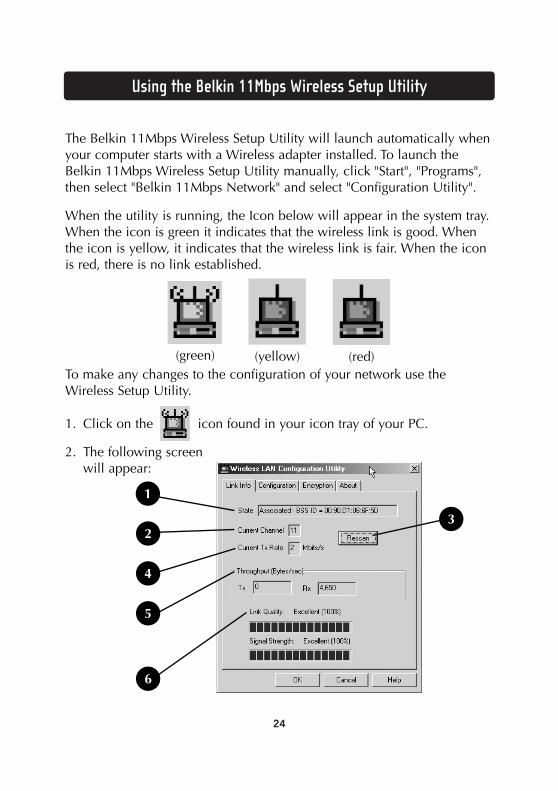
Using the Belkin 11Mbps Wireless Setup Utility
The Belkin 11Mbps Wireless Setup Utility will launch automatically whenyour computer starts with a Wireless adapter installed. To launch theBelkin 11Mbps Wireless Setup Utility manually, click "Start", "Programs",then select "Belkin 11Mbps Network" and select "Configuration Utility".
When the utility is running, the Icon below will appear in the system tray.When the icon is green it indicates that the wireless link is good. Whenthe icon is yellow, it indicates that the wireless link is fair. When the iconis red, there is no link established.
To make any changes to the configuration of your network use theWireless Setup Utility.
1. Click on the icon found in your icon tray of your PC.
2. The following screenwill appear:
(red)(green)
1
2
4
5
6
3
(yellow)
25
Using the Belkin 11Mbps Wireless Setup Utility
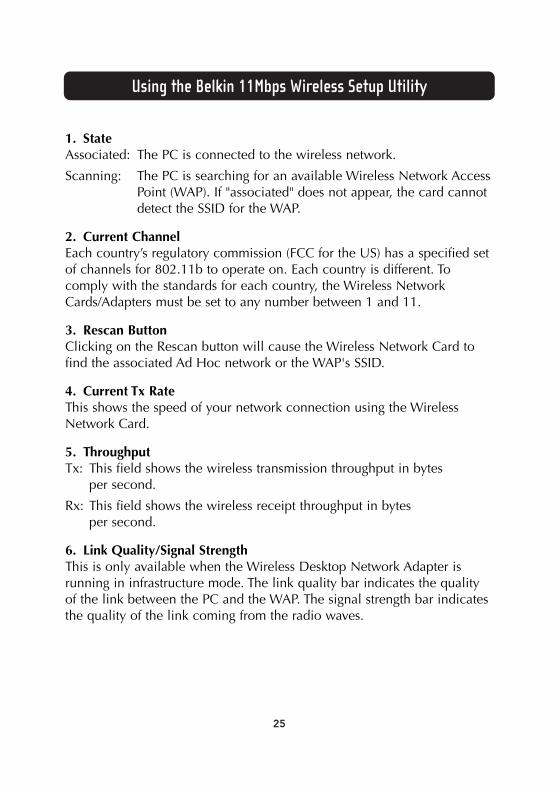
1. StateAssociated: The PC is connected to the wireless network.
Scanning: The PC is searching for an available Wireless Network AccessPoint (WAP). If "associated" does not appear, the card cannotdetect the SSID for the WAP.
2. Current ChannelEach country’s regulatory commission (FCC for the US) has a specified setof channels for 802.11b to operate on. Each country is different. Tocomply with the standards for each country, the Wireless NetworkCards/Adapters must be set to any number between 1 and 11.
3. Rescan ButtonClicking on the Rescan button will cause the Wireless Network Card tofind the associated Ad Hoc network or the WAP's SSID.
4. Current Tx RateThis shows the speed of your network connection using the WirelessNetwork Card.
5. ThroughputTx: This field shows the wireless transmission throughput in bytes
per second.
Rx: This field shows the wireless receipt throughput in bytes per second.
6. Link Quality/Signal StrengthThis is only available when the Wireless Desktop Network Adapter isrunning in infrastructure mode. The link quality bar indicates the qualityof the link between the PC and the WAP. The signal strength bar indicatesthe quality of the link coming from the radio waves.

26
Using the Belkin 11Mbps Wireless Setup Utility
Click-on the Configuration tab and the following screen will appear:
1. Mode
Infrastructure ModeA setup that uses a WAP to connect a wireless LAN to a wired LAN is calledan infrastructure configuration, and the setup is referred to as being inInfrastructure Mode. The WAP serves as a bridge between the wired andwireless network. Connecting the WAP to any port on the wired network willgive wireless access to all wireless equipped computers within its coveragearea. An WAP is configured with a Service Set Identifier. This is a "name" that isgiven to the wireless network and is used by the wireless equipped computersto access the wireless network. The WAP can also be configured to useencryption or grant access to computers with specific MAC addresses. TheWAP also effectively doubles the distance that computers in the wireless LANcan be located from one another. This is because the WAP serves as a centralpoint for routing of all the wireless network traffic between the wirelesscomputers. Wireless equipped computers networked together in infrastructuremode form a group called a Basic Service Set (BSS). Up to 64 individual
1
2
3
4
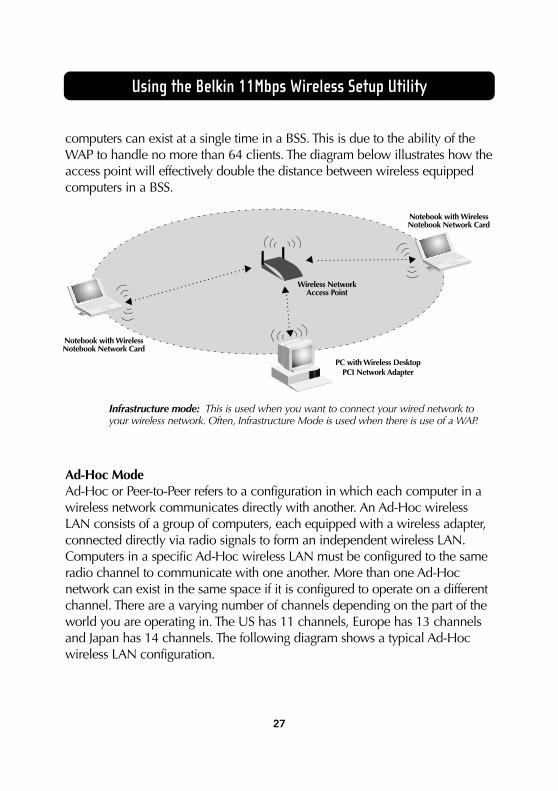
PC with Wireless DesktopPCI Network Adapter
Wireless NetworkAccess Point
Notebook with WirelessNotebook Network Card
Notebook with WirelessNotebook Network Card
27
Using the Belkin 11Mbps Wireless Setup Utility
computers can exist at a single time in a BSS. This is due to the ability of theWAP to handle no more than 64 clients. The diagram below illustrates how theaccess point will effectively double the distance between wireless equippedcomputers in a BSS.
Infrastructure mode: This is used when you want to connect your wired network toyour wireless network. Often, Infrastructure Mode is used when there is use of a WAP.
Ad-Hoc ModeAd-Hoc or Peer-to-Peer refers to a configuration in which each computer in awireless network communicates directly with another. An Ad-Hoc wirelessLAN consists of a group of computers, each equipped with a wireless adapter,connected directly via radio signals to form an independent wireless LAN.Computers in a specific Ad-Hoc wireless LAN must be configured to the sameradio channel to communicate with one another. More than one Ad-Hocnetwork can exist in the same space if it is configured to operate on a differentchannel. There are a varying number of channels depending on the part of theworld you are operating in. The US has 11 channels, Europe has 13 channelsand Japan has 14 channels. The following diagram shows a typical Ad-Hocwireless LAN configuration.
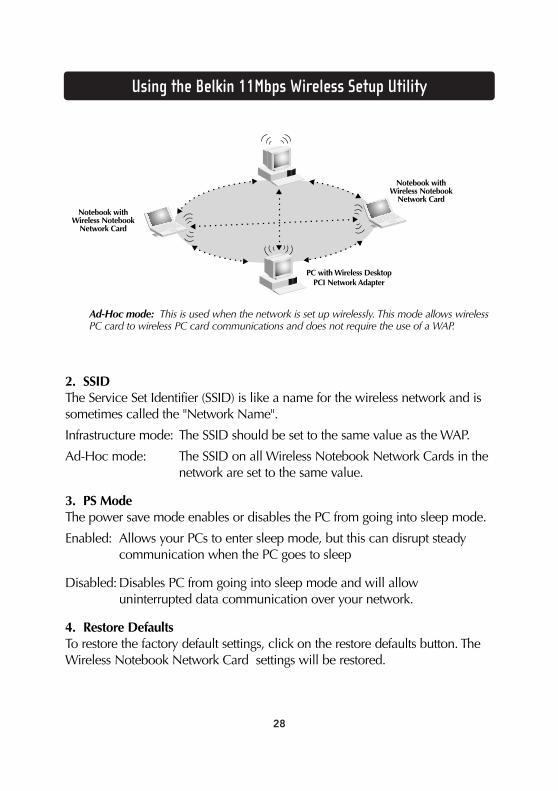
28
Using the Belkin 11Mbps Wireless Setup Utility
Notebook withWireless Notebook
Network Card
Notebook withWireless Notebook
Network Card
PC with Wireless DesktopPCI Network Adapter
Ad-Hoc mode: This is used when the network is set up wirelessly. This mode allows wirelessPC card to wireless PC card communications and does not require the use of a WAP.
2. SSIDThe Service Set Identifier (SSID) is like a name for the wireless network and issometimes called the "Network Name".
Infrastructure mode: The SSID should be set to the same value as the WAP.
Ad-Hoc mode: The SSID on all Wireless Notebook Network Cards in thenetwork are set to the same value.
3. PS ModeThe power save mode enables or disables the PC from going into sleep mode.
Enabled: Allows your PCs to enter sleep mode, but this can disrupt steadycommunication when the PC goes to sleep
Disabled: Disables PC from going into sleep mode and will allowuninterrupted data communication over your network.
4. Restore DefaultsTo restore the factory default settings, click on the restore defaults button. TheWireless Notebook Network Card settings will be restored.

29
Using the Belkin 11Mbps Wireless Setup Utility
Click-on the Encryption tab and the following screen will appear:
EncryptionFor secure data transmissions the Belkin Wireless Desktop NetworkAdapters are capable of encrypting, or "scrambling" the information that issent over the air between your computers. The WAP uses a form ofencryption called WEP (Wired Equivalent Privacy). There are two levels ofWEP encryption, 64-bit and 128-bit. As the numbers imply, 128-bitencryption is more secure than 64-bit encryption. However, using 128-bitencryption uses keys to scramble and unscramble the data that is beingsent between the wireless equipped computers. The wireless networkmust use the same key to be able to communicate using encryption.
Select 64-bit from the drop-down menu. You will notice when using 64-bit encryption there are 4 keys labeled, "Key 1" through "Key 4". Onlyone key can be used at a time. Keys can be entered manually, but for easeof use, the software can generate keys using a "Passphrase" that you enter.This passphrase can be easily distributed to wireless equipped computerusers in your network. For instance, creating a key using the passphrase

30
Using the Belkin 11Mbps Wireless Setup Utility
"Passphrase" generates four keys in 64-bit encryption mode and one keyin 128-bit encryption mode. A user of a laptop needs only to enter thepassphrase and the key number into their computer’s wirelessmanagement software to be able to communicate while using encryption.All computers on the network must use the same encryption rate andpassphrase. The passphrase can be changed as often as desired.
Setting 64-Bit Encryption
1. Select 64-bit from the drop-down menu.
2. Select "Create with Passphrase".
3. Enter a Passphrase and click "Apply".
4. Select the "Default Key ID" from the drop-down menu. These are labeled 1 – 4. Click "Apply".
64-bit encryption is now enabled.
Setting 128-bit Encryption
1. Select 128-bit from the drop-down menu.
2. Select "Create with Passphrase"
3. Enter a Passphrase and click "Apply"
128-bit encryption is now enabled.
Installing the Belkin SOHO Networking Software for Windows 98/Me
31
The Belkin SOHO Networking software provides a simple way to setup yourWindows 98/Me computers for networking, file and printer sharing. If youare familiar with TCP/IP and know how to configure the file and printersharing, it is not necessary to use the Belkin SOHO Networking software.
Now that your wireless network card/adapter drivers have been installed,you can configure the network. For each computer you connect to thenetwork, you must assign a network address to be used by the othercomputers. Belkin has simplified this process by providing you with theBelkin SOHO Networking Software to configure your computers. Make surethat no other network adapters are installed in your computer before runningthe SOHO Networking Software.
1. Insert the SOHO Networking Software that came with your Belkin WirelessNotebook Network Card or Wireless Desktop Network Adapter into yourCD-ROM.
2. Click Start, click Run, and type "D:\NetSetup." ("D" is usually the defaultdrive letter for the CD-ROM drive, if necessary, adjust drive letter to reflectyour designated CD-ROM drive letter.
3. Click OK and Windows will begin to install the program onto your PC.After the program is installed, Windows may ask you to restart yourcomputer. Please do so.
4. Repeat these steps for each computer that you are connecting to your network.
5. Once you have installed the Belkin SOHO Networking Software on all ofyour computers, continue on to the next section.
Configuring Your Windows 98/Me Computer Using Belkin NetSetup
32
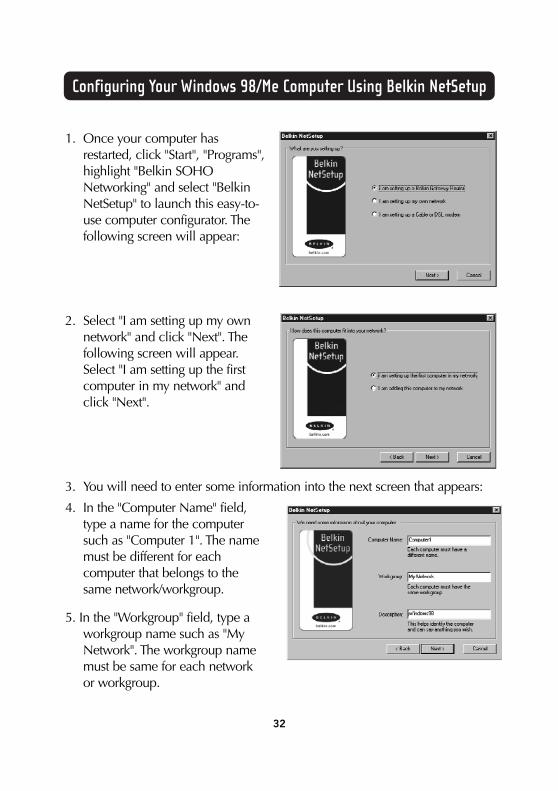
1. Once your computer hasrestarted, click "Start", "Programs",highlight "Belkin SOHONetworking" and select "BelkinNetSetup" to launch this easy-to-use computer configurator. Thefollowing screen will appear:
2. Select "I am setting up my ownnetwork" and click "Next". Thefollowing screen will appear.Select "I am setting up the firstcomputer in my network" andclick "Next".
3. You will need to enter some information into the next screen that appears:
4. In the "Computer Name" field,type a name for the computersuch as "Computer 1". The namemust be different for eachcomputer that belongs to thesame network/workgroup.
5. In the "Workgroup" field, type aworkgroup name such as "MyNetwork". The workgroup namemust be same for each networkor workgroup.
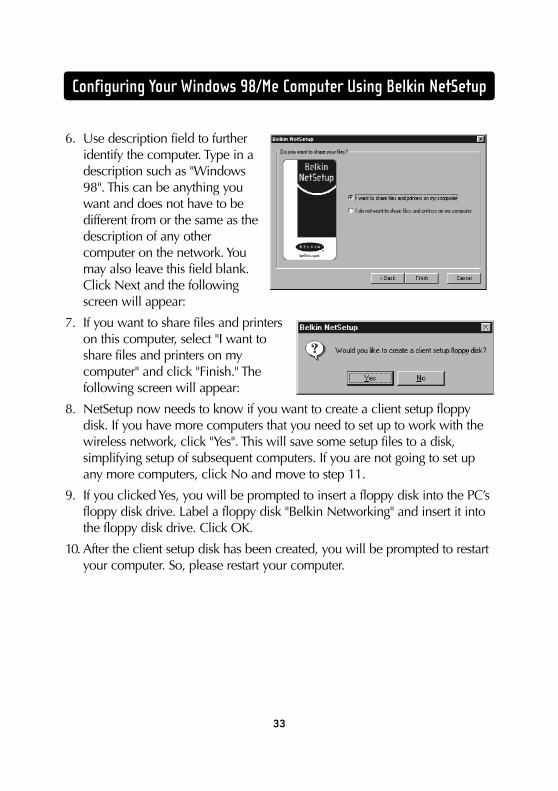
6. Use description field to furtheridentify the computer. Type in adescription such as "Windows98". This can be anything youwant and does not have to bedifferent from or the same as thedescription of any othercomputer on the network. Youmay also leave this field blank.Click Next and the followingscreen will appear:
7. If you want to share files and printerson this computer, select "I want toshare files and printers on mycomputer" and click "Finish." Thefollowing screen will appear:
8. NetSetup now needs to know if you want to create a client setup floppydisk. If you have more computers that you need to set up to work with thewireless network, click "Yes". This will save some setup files to a disk,simplifying setup of subsequent computers. If you are not going to set upany more computers, click No and move to step 11.
9. If you clicked Yes, you will be prompted to insert a floppy disk into the PC’sfloppy disk drive. Label a floppy disk "Belkin Networking" and insert it intothe floppy disk drive. Click OK.
10. After the client setup disk has been created, you will be prompted to restartyour computer. So, please restart your computer.
Configuring Your Windows 98/Me Computer Using Belkin NetSetup
33
34
Configuring Additional Computers Using Belkin NetSetup Software
Now that the first computer has been configured we are ready to configure theother PCs on your network.
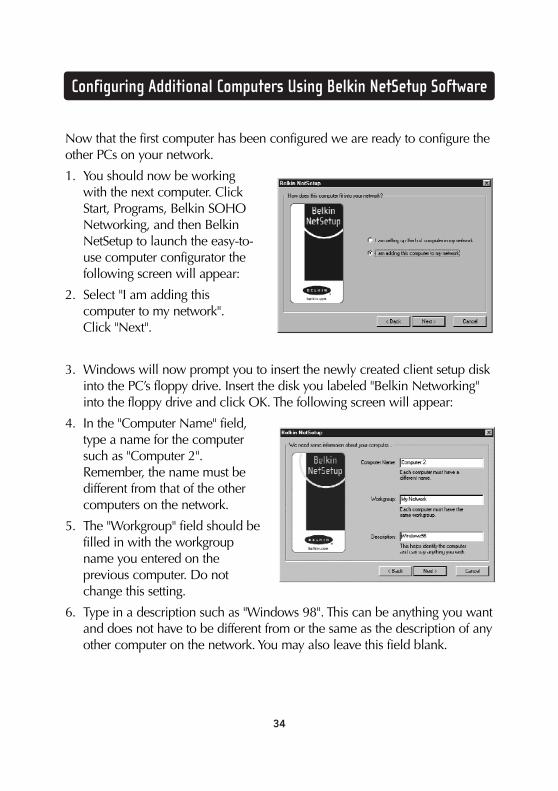
1. You should now be workingwith the next computer. ClickStart, Programs, Belkin SOHONetworking, and then BelkinNetSetup to launch the easy-to-use computer configurator thefollowing screen will appear:
2. Select "I am adding thiscomputer to my network".Click "Next".
3. Windows will now prompt you to insert the newly created client setup diskinto the PC’s floppy drive. Insert the disk you labeled "Belkin Networking"into the floppy drive and click OK. The following screen will appear:
4. In the "Computer Name" field,type a name for the computersuch as "Computer 2".Remember, the name must bedifferent from that of the othercomputers on the network.
5. The "Workgroup" field should befilled in with the workgroupname you entered on theprevious computer. Do notchange this setting.
6. Type in a description such as "Windows 98". This can be anything you wantand does not have to be different from or the same as the description of anyother computer on the network. You may also leave this field blank.
Configuring Additional Computers Using Belkin NetSetup Software
35
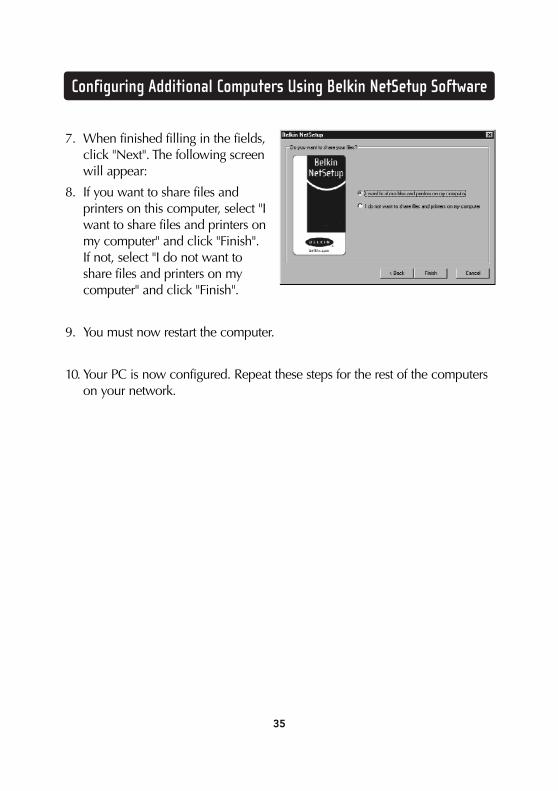
7. When finished filling in the fields,click "Next". The following screenwill appear:
8. If you want to share files andprinters on this computer, select "Iwant to share files and printers onmy computer" and click "Finish".If not, select "I do not want toshare files and printers on mycomputer" and click "Finish".
9. You must now restart the computer.
10. Your PC is now configured. Repeat these steps for the rest of the computerson your network.
Sharing Files and Peripherals
36
To enable file sharing and access between network computers to harddrives, floppy drives, or CD-ROM drives, you must set sharing settings foreach PC in the network.
Belkin has simplified the sharing of files, peripherals, and internetconnections by providing you with the Belkin NetShare Utility to set upyour sharing options.
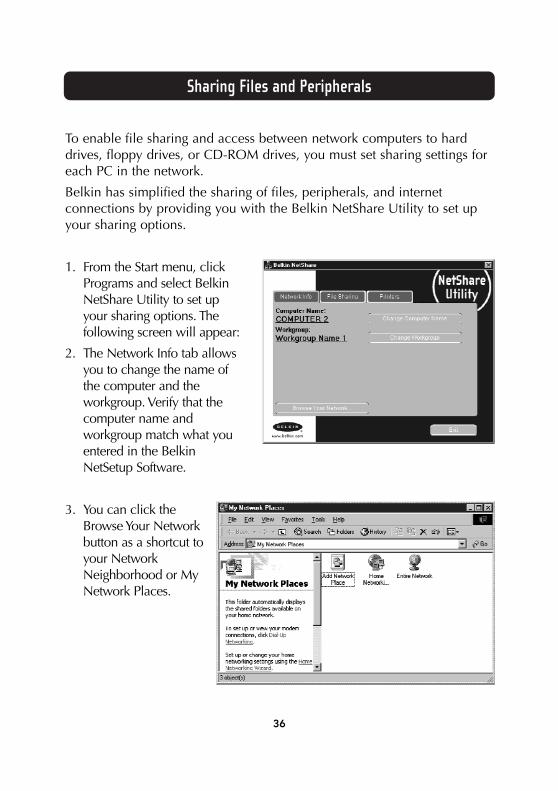
1. From the Start menu, clickPrograms and select BelkinNetShare Utility to set upyour sharing options. Thefollowing screen will appear:
2. The Network Info tab allowsyou to change the name ofthe computer and theworkgroup. Verify that thecomputer name andworkgroup match what youentered in the BelkinNetSetup Software.
3. You can click theBrowse Your Networkbutton as a shortcut toyour NetworkNeighborhood or MyNetwork Places.
Sharing Files and Peripherals
37
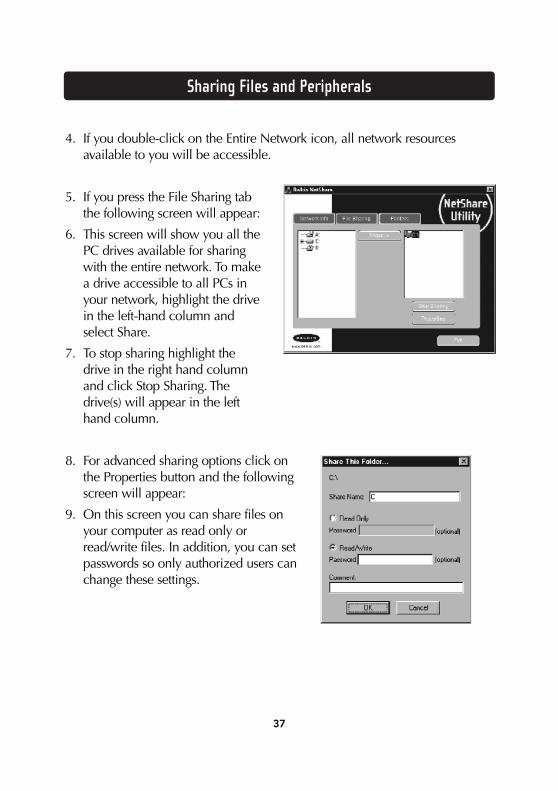
4. If you double-click on the Entire Network icon, all network resourcesavailable to you will be accessible.
5. If you press the File Sharing tabthe following screen will appear:
6. This screen will show you all thePC drives available for sharingwith the entire network. To makea drive accessible to all PCs inyour network, highlight the drivein the left-hand column andselect Share.
7. To stop sharing highlight thedrive in the right hand columnand click Stop Sharing. Thedrive(s) will appear in the lefthand column.
8. For advanced sharing options click onthe Properties button and the followingscreen will appear:
9. On this screen you can share files onyour computer as read only orread/write files. In addition, you can setpasswords so only authorized users canchange these settings.
Sharing Files and Peripherals
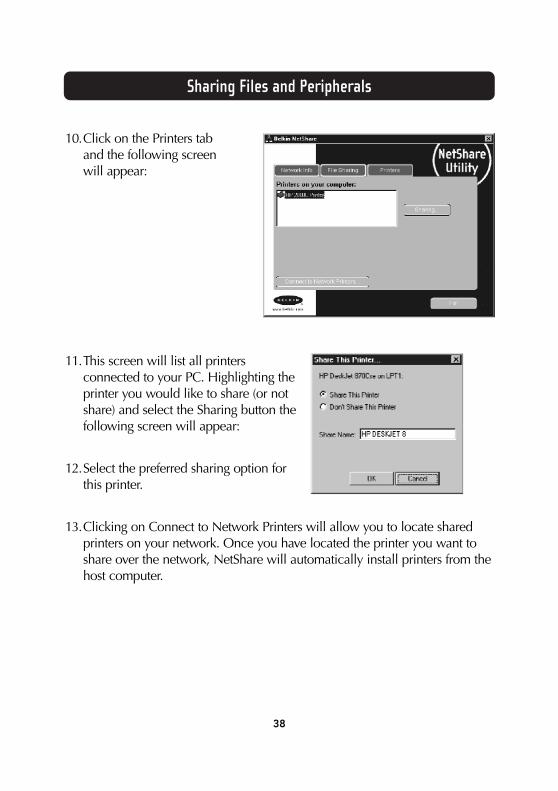
38
10.Click on the Printers taband the following screenwill appear:
11.This screen will list all printersconnected to your PC. Highlighting theprinter you would like to share (or notshare) and select the Sharing button thefollowing screen will appear:
12.Select the preferred sharing option forthis printer.
13.Clicking on Connect to Network Printers will allow you to locate sharedprinters on your network. Once you have located the printer you want toshare over the network, NetShare will automatically install printers from thehost computer.

Accessing Resources on Other Computers
39
1. From the Start menu, go toPrograms and select BelkinNetShare Utility. The followingscreen will appear:
2. Select Browse YourNetwork. The followingscreen will appear:
3. Double-click on the EntireNetwork icon and yourworkgroup will appear.Click on your workgroupand all resources availableto you will be listed.
OR
1. To access resources available on other computers, click on the NetworkNeighborhood or My Network Places icon on your desktop.
2. Double-click on the computer that you wish to access.
3. You can now access all network files that are available to you.
Glossary of Wireless Networking Terms
40
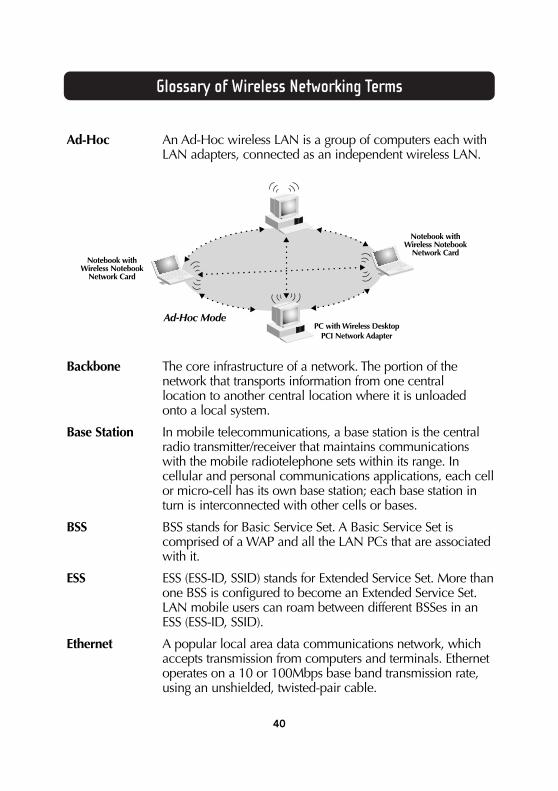
Ad-Hoc An Ad-Hoc wireless LAN is a group of computers each withLAN adapters, connected as an independent wireless LAN.
Backbone The core infrastructure of a network. The portion of thenetwork that transports information from one central location to another central location where it is unloaded onto a local system.
Base Station In mobile telecommunications, a base station is the centralradio transmitter/receiver that maintains communicationswith the mobile radiotelephone sets within its range. Incellular and personal communications applications, each cellor micro-cell has its own base station; each base station inturn is interconnected with other cells or bases.
BSS BSS stands for Basic Service Set. A Basic Service Set iscomprised of a WAP and all the LAN PCs that are associatedwith it.
ESS ESS (ESS-ID, SSID) stands for Extended Service Set. More thanone BSS is configured to become an Extended Service Set.LAN mobile users can roam between different BSSes in anESS (ESS-ID, SSID).
Ethernet A popular local area data communications network, whichaccepts transmission from computers and terminals. Ethernetoperates on a 10 or 100Mbps base band transmission rate,using an unshielded, twisted-pair cable.
Notebook withWireless Notebook
Network CardNotebook with
Wireless NotebookNetwork Card
PC with Wireless DesktopPCI Network Adapter
Ad-Hoc Mode
Glossary of Wireless Networking Terms
41
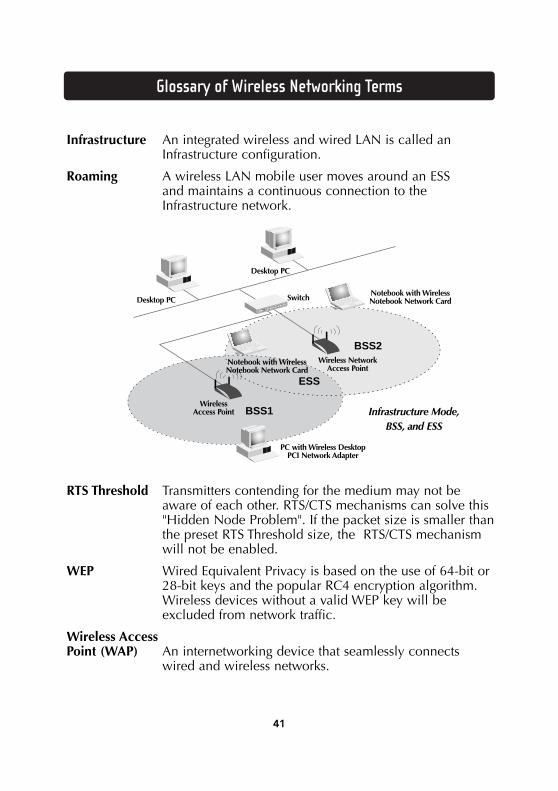
Infrastructure An integrated wireless and wired LAN is called anInfrastructure configuration.
Roaming A wireless LAN mobile user moves around an ESS and maintains a continuous connection to theInfrastructure network.
RTS Threshold Transmitters contending for the medium may not beaware of each other. RTS/CTS mechanisms can solve this"Hidden Node Problem". If the packet size is smaller thanthe preset RTS Threshold size, the RTS/CTS mechanismwill not be enabled.
WEP Wired Equivalent Privacy is based on the use of 64-bit or 28-bit keys and the popular RC4 encryption algorithm.Wireless devices without a valid WEP key will beexcluded from network traffic.
Wireless Access Point (WAP) An internetworking device that seamlessly connects
wired and wireless networks.
ESS
BSS2
BSS1
Desktop PC
Desktop PC Switch
Wireless NetworkAccess Point
Notebook with WirelessNotebook Network Card
WirelessAccess Point
PC with Wireless DesktopPCI Network Adapter
Notebook with WirelessNotebook Network Card
Infrastructure Mode,BSS, and ESS
Glossary of Wired Networking Terms
42
DHCP Dynamic Host Configuration Protocol. This protocolautomatically configures the TCP/IP settings of everycomputer on your home network.
DNS ServerAddress DNS stands for Domain Name System, which allows Internet
host computers to have a domain name (such as belkin.com)and one or more IP addresses (such as 192.34.45.8). A DNSserver keeps a database of host computers and theirrespective domain names and IP addresses, so that when adomain name is requested (as in typing "belkin.com" intoyour Internet browser), the user is sent to the proper IPaddress. The DNS server address used by the computer onyour home network is the location of the DNS server yourISP has assigned.
DSL Modem DSL stands for Digital Subscriber Line. A DSL modem usesyour existing phone lines to transmit data at high speeds.
Ethernet A standard for computer networks. Ethernet networks areconnected by special cables and switches, and move dataaround 100Mbps.
IP Address IP stands for Internet Protocol. An IP address consists of aseries of four numbers, separated by periods, that identify asingle, unique Internet computer host. Example: 192.34.45.8.
ISP Internet Service Provider. An ISP is a business that providesconnectivity to the Internet for individuals and otherbusinesses or organizations.
ISP Gateway Address (see ISP for definition). The ISP Gateway Address is an IP
address for the Internet router located at the ISP's office. Thisaddress is required only when using a cable or DSL modem.
LAN Local Area Network. A LAN is a group of computers anddevices connected together in a relatively small area (such as a house or an office). Your home network is considered a LAN.
MAC Address MAC stands for Media Access Control. A MAC address is the
Glossary of Wired Networking Terms
43
hardware address of a device connected to a network. AMAC address is unique (different) for every device.
NAT Network Address Translation. This process allows all of thecomputers on your home network to use one IP address.Using the NAT capability of the Belkin 4-Port Cable/DSLGateway Router, you can access the Internet from anycomputer on your home network without having to purchasemore IP addresses from your ISP.
PPPoE Point-to-Point Protocol over Ethernet. Point-to-Point Protocolis a method of secure data transmission originally created fordial-up connections; PPPoE is for Ethernet connections.
SPI Stateful Packet Inspection. SPI is the type of corporate-gradeInternet security provided by your Belkin 4-Port Cable/DSLGateway Router. Using SPI, the gateway acts as a "firewall,"protecting your network from computer hackers.
Subnet Mask A subnet mask, which may be a part of the TCP/IPinformation provided by your ISP, is a set of four numbersconfigured like an IP address. It is used to create IP addressnumbers used only within a particular network (as opposedto valid IP address numbers recognized by the Internet,which must be assigned by InterNIC).
TCP/IP Transmission Control Protocol/Internet Protocol. This is thestandard protocol for data transmission over the Internet.
WAN Wide Area Network. A network that connects computerslocated in geographically separate areas (i.e., differentbuildings, cities, countries). The Internet is a wide areanetwork.
44
Information
FCC StatementDECLARATION OF CONFORMITY WITH FCC RULES FOR
ELECTROMAGNETIC COMPATIBILITYWe, Belkin Components, of 501 West Walnut Street, Compton, CA 90220, declare underour sole responsibility that the product,
F5D6020F5D6000
to which this declaration relates,complies with Part 15 of the FCC Rules. Operation is subject to the following two conditions: (1)this device may not cause harmful interference, and (2) this device must accept any interferencereceived, including interference that may cause undesired operation.
Caution: Exposure to Radio Frequency Radiation.The radiated output power of this device is far below the FCC radio frequency exposure lim-its. Nevertheless, the device shall be used in such manner that the potential for human con-tact normal operation is minimized.
When connecting an external antenna to the device, the antenna shall be placed in such amanner to minimize the potential for human contact during normal operation. In order toavoid the possibility of exceeding the FCC radio frequency exposure limits, human proximityto the antenna shall not be less than 20cm (8inches) during normal operation.
Federal Communications Commission NoticeThis equipment has been tested and found to comply with the limits for a Class B digitaldevice, pursuant to Part 15 of the FCC Rules. These limits are designed to provide reason-able protection against harmful interference in a residential installation.
This equipment generates, uses, and can radiate radio frequency energy. If not installed andused in accordance with the instructions, it may cause harmful interference to radio or tele-vision reception, which can be determined by turning the equipment off and on, the user isencouraged to try and correct the interference by one or more of the following measures:
• Reorient or relocate the receiving antenna.
• Increase the distance between the equipment and the receiver.
• Connect the equipment to an outlet on a circuit different from that to which the receiver isconnected.
• Consult the dealer or an experienced radio/TV technician for help.
ModificationsThe FCC requires the user to be notified that any changes or modifications to this device thatare not expressly approved by Belkin Components may void the users authority to operatethe equipment.

Information
45
Canada- Industry Canada (IC)The wireless radio of this device complies with RSS 139 & RSS 210 Industry Canada. ThisClass B digital complies with Canadian ICES-003.
Cet appareil numérique de la classe B conforme á la norme NMB-003 du Canada.
Europe-European Union NoticeRadio products with the CE 0499 or CE alert marking comply with the R&TTE Directive (1995/5/EC) issued by the Commission of the European Community.
Compliance with this directive implies conformity to the followingEuropean Norms (in brackets are the equivalent international standards).
• EN 60950 (IEC60950) – Product Safety
• EN 300 328 Technical requirement for radio equipment
• ETS 300 826 General EMC requirements for radio equipment.
To determine the type of transmitter, check the identification label on your Belkin product.
Products with the CE marking comply with the EMC Directive (89/336/EEC)and the Low Voltage Directive (72/23/EEC) issued by the Commission of theEuropean Community. Compliance with these directives implies conformityto the following European Norms (in brackets are the equivalent internationalstandards).
• EN 55022 (CISPR 22) – Electromagnetic Interference
• EN 55024 (IEC61000-4-2,3,4,5,6,8,11)- Electromagnetic Immunity
• EN 61000-3-2 (IEC610000-3-2) - Power Line Harmonics
• EN 61000-3-3 (IEC610000) – Power Line Flicker
• EN 60950 (IEC60950) – Product Safety
Products that contain the radio transmitter are labeled with CE 0499 or CE alert marking andmay also carry the CE logo.

Information
46
Belkin Components Limited Lifetime Product WarrantyBelkin Components warrants this product against defects in materials and workmanship for its lifetime.If a defect is discovered, Belkin will, at its option, repair or replace the product at no charge provided itis returned during the warranty period, with transportation charges prepaid, to the authorized Belkindealer from whom you purchased the product. Proof of purchase may be required.
This warranty does not apply if the product has been damaged by accident, abuse, misuse, ormisapplication; if the product has been modified without the written permission of Belkin; or if anyBelkin serial number has been removed or defaced.
THE WARRANTY AND REMEDIES SET FORTH ABOVE ARE EXCLUSIVE IN LIEU OF ALL OTHERS,WHETHER ORAL OR WRITTEN, EXPRESSED OR IMPLIED. BELKIN SPECIFICALLY DISCLAIMS ANY ANDALL IMPLIED WARRANTIES, INCLUDING, WITHOUT LIMITATION, WARRANTIES OF MERCHANTABILITYAND FITNESS FOR A PARTICULAR PURPOSE.
No Belkin dealer, agent, or employee is authorized to make any modification, extension, or addition tothis warranty.
BELKIN IS NOT RESPONSIBLE FOR SPECIAL, INCIDENTAL, OR CONSEQUENTIAL DAMAGESRESULTING FROM ANY BREACH OF WARRANTY, OR UNDER ANY OTHER LEGAL THEORY,INCLUDING BUT NOT LIMITED TO, LOST PROFITS, DOWNTIME, GOODWILL, DAMAGE TO ORREPROGRAMMING, OR REPRODUCING ANY PROGRAM OR DATA STORED IN, OR USED WITH,BELKIN PRODUCTS.
Some states do not allow the exclusion or limitation of incidental or consequential damages or exclusionsof implied warranties, so the above limitations of exclusions may not apply to you. This warranty givesyou specific legal rights, and you may also have other rights that vary from state to state.

Belkin Components B.V.Starparc Building • Boeing Avenue 333
1119 PH Schiphol-Rijk • The NetherlandsTel: +31 (0) 20 654 7300Fax: +31 (0) 20 654 7349
Belkin Components, Ltd.Unit 13 • Gatelodge Close • Round Spinney
Northampton • Northants • NN3 8RX • United KingdomTel: +44 (0) 1604678300Fax: +44 (0) 1604678330
Belkin Components501 West Walnut Street
Compton • CA • 90220 • USATel: 310.898.1100Fax: 310.898.1111
© 2002 Belkin Components. All rights reserved. All trade names are registeredtrademarks of respective manufacturers listed.
Belkin Components, Ltd.7 Bowen Cresent • West Gosford
NSW 2250 • AustraliaTel: +61 (2) 4372 8600Fax: +61 (2) 4325 4277
P73851-A
150000005700E R02