with qgis composer · with qgis composer. requierements : ... this tutorial is proudly created with...
TRANSCRIPT

Material Desing MapWith Qgis Composer

Requierements :
I recommand to use Google Fonts that you can find at https://fonts.google.com/?query=roboto
2
Add a gradient background
Change background color with gradient fill and use for example these colors :
#07d39d #0998d2

3
Add Material Design Cards
Create boxs with add rectange, without border but draw effect :
Use drop shadow- Offset 2 Millimeter- Blur radius to 8- Transparency to 50 %

4
Add a map into the map box
Add a map with add new map with the same size of the map box.
Then change map background if needed and set the map position correctly.

5
Add a title box
Add text with add new label , set a white background and check Render as HTML then add this html code :
<body style="padding-left : 20px; padding-top : 10px;"><h1 style="font-family : roboto black; color : #07d39d;">MATERIAL DESIGN MAP</h1><h3 style="font-family:roboto; font-weight:200;">POPULATION DISTRIBUTION</h3>
</body>

6
Set Menu / Legend box
Change the side box color fill and add the legend with Add new legend, remove background color from legend set the font color to white. (Hide layer name for this example)
Center title alignement and legend block

7
Add attribute table
Add attribute table with Add new legend, chose the appropriate layer.
In attributes… button :
- Let only used attributes- In this example align first attribute to Middle left and second to Middle right- Add sorting by attribute
Set maximum rows to correspond with your needs, set Display header to No header, remove background color and grid then set font color to white.
Center attribute table with side box.
Add a description block
Add a description block with Add new label, and add your text based on this code :
<p style="font-family : roboto; color : #07d39d; ">DESCRIPTION</p><p style="font-family:roboto; font-size: 12px; color : white;">Distribution of population in Reunion Island from IGN - GEOFLA 2015</p>

8
Add a Sources / Details block
Add a last block with Add new label, and add your text based for example on this code :
Created on : [% month( now() ) || ' - ' || day( now() ) || ' - ' || year( now() )%]
SOURCES – Your map details Designed by Your Name
9
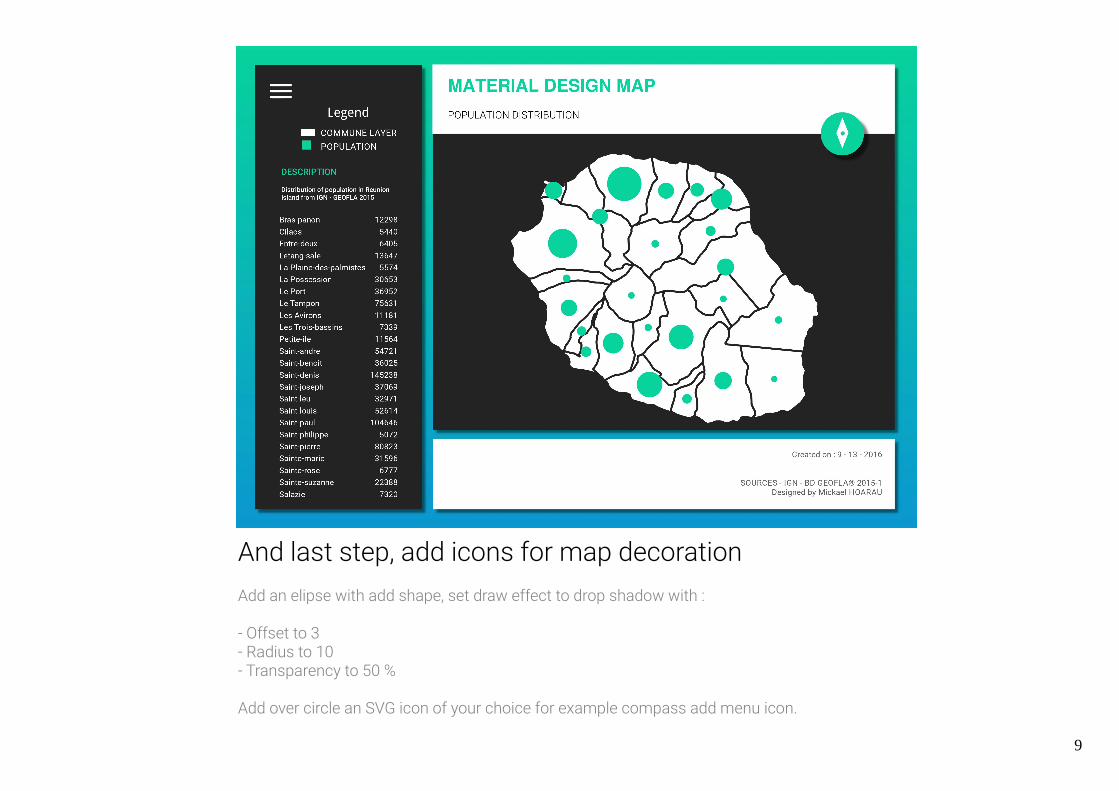
And last step, add icons for map decoration
Add an elipse with add shape, set draw effect to drop shadow with :
- Offset to 3- Radius to 10- Transparency to 50 %
Add over circle an SVG icon of your choice for example compass add menu icon.

10
Well Done !You’ve got a materialized map
This tutorial is proudly created with open source softwares like Qgis, inkscape and LibreOffice.Thanks to Anita Graser for her help and for her amazing book « Qgis Map Design ».
Mickael HOARAUhttps://twitter.com/Oneil974