wkh errn dw wkh )rfdo %rrnvwruh one thing that i’m still finding out – especially with rigging...
TRANSCRIPT

Like what you see?Buy the book at
the Focal Bookstore
An Essential Introduction toMaya Character Rigging
CabreraISBN 978-0-240-52082-7

Creating Your FirstBiped Character:Facial Expressions
➢ Former Student Spotlight: Katie Folsom➢ Workflow➢ Introduction➢ Blend Shapes as an Approach to Creating Facial Expressions➢ Tools Used for Modeling Blend Shapes➢ Deformation Order➢ Summary➢ Assignments: Facial Expressions for a Character
3
The many faces of Tiko, by Josh Burton.
A few facial expressions of Tiko in Much Ado About Breakfast, by Josh Burton (2003).

1 3 0 Chapter Three
Former Student Spotlight: Katie FolsomThe one thing that I’m still finding out – especially with rigging and animation – is thatthere will always be surprises, no matter how much you think you have things plannedout. There is no way to avoid them, especially in the beginning. The good news is theydo become less over time. However, I feel the best way to keep the number of surprisesto a minimum is through consistency, organization, and just understanding. It soundslike a no-brainer, but you would be surprised at how easy it is to get lost in the process.Whether it’s your naming conventions, the order in which you work … you will find thatanything you might have avoided in an earlier stage will not leave you alone unless theproblem is solved right away. In the end it can really affect the quality of your work.
I think I had the most trouble with my blend shapes. I thought that I could just fix themwhen I got to that part of the animation, and I just really wanted to move on. Withoutgoing into too much detail, I ended up doing the second half of my project twice. TimeI could have been spending on fine tuning and making my animation look better. Anotherthing I had to spend a lot of time getting right was rigging the hands. I had 10 fingers anda lot of hand movement in my first short so they had to be right. The orientation of thejoints and the joint placement … it was something I had to keep going back and forthwith. A lot of it is trial and error. With that being said, take the time to really understandwhat it is you’re doing and whether or not it’s the best way. Don’t just go through themotions and think it’s going to work to its full potential. Don’t let the technical part of theprocess affect the artistic part. If you do breeze through it the first time, you got lucky.
From 1999 to 2001, Katie Folsom was a student at the University of Cincinnati in DAAP andgraduated from Savannah College of Art and Design in 2004 with a BFA in computer art.Her professional experience includes the feature film, “Barnyard,” released August 2006.You can see some of her work at: www.katiefolsom.com.
Sticky by Katie Folsom (2003).

Creat ing Your Fi rst B iped Charac ter : Fac ia l Express ions 1 3 1
Workflow
Facial Expression Workflow.

1 3 2 Chapter Three
The concept expressions for Bernie, by David Leonard.
Depending on the amount of time allotted to preparing your character’s facialexpressions, you can create different levels of complexities. For example, you couldcreate a worried face with eyebrows that are pinched together and lowered, and lipsthat are slightly pursed. Instead of creating a single worried expression, you couldseparate the eye and eyebrows as a separate shape from the mouth shape. For evenfurther control, you could create asymmetrical poses for the left and right sides, endingup with four separate shapes, that when combined, create the worried expression.
Now, you might be thinking to yourself, “Why spend time separating these singleexpressions into four or more partial shapes that need to be combined in order toachieve a single expression?” Well, the answer is fairly simple. When you createindependent pieces, you can assemble those pieces with others to create new facialexpressions that were not necessarily planned.
The following facial expressions are the ones that I recommend you create. This is a listthat I feel gives you the most possibilities with a minimum amount of work. I’vedivided them into eye, nose, and mouth areas. The eyebrows should be broken into leftand right, for greater control.
IntroductionFacial expressions are a crucial part of your character’s ability to communicate. Most ofwhat your character feels will be articulated by using facial expressions. Face language isuniversal. For example, we can instantly tell when someone is worried, happy, or sad basedon the position of their eyebrows, cheeks, and mouth, no matter what language is spoken.

Creat ing Your Fi rst B iped Charac ter : Fac ia l Express ions 1 3 3
The top image shows the geometry smoothed. The bottom image shows wireframe on shaded on the
low poly model, prior to smoothing.
Blend Shapes as an Approach to Creating Facial ExpressionsThere are two common approaches primarily used when creating facial expressions:blend shape driven poses and joint driven poses. In this chapter, we will be focusing onthe former, as the joint driven process assumes you already have an understanding ofjoints and skin deformers, which we won’t address until later chapters. The joint drivenprocess is the approach used for animation in the gaming field, because at this time,game engines do not support blend shapes.
A blend shape is a deformer that changes the shape of one piece of geometry to looklike the shape of another. This deformer has also been referred to as a morph, because

1 3 4 Chapter Three
its concept is based on a metamorphosis. Blend shapes can be used for pretty much anytype of morphing. While this chapter will focus on facial expressions, they can also beused in the rest of the body, such as muscle motion and making sure the body geometrybends appropriately in areas such as elbows and knees, a process known as correctiveblend shapes.
A NURBS head with simple geometry can still be used to create a facial expression.
Once you do understand joints and the skinning process, you can actually usejoints to create your blend shapes.
!
Before creating blend shapes, it is extremely important to finalize the geometry. Your finished geometry is considered your base shape. The base shape is duplicated into the target shapes (as many times as necessary), and each target shape is remodeled (with certain limitations) to reflect the desired facial expressions.Blend shapes work by comparing the positions based on the order of individual points in the surface (points such as vertices or CVs). Each point is numbered, so if you alter the geometry by adding or subtracting points, the blend shape will nolonger work and an error message will be given. For this reason, you must finish the face model before creating blend shapes. The more refined and detailed the facial expression, the more geometry is needed in the area (more isoparms or edges are necessary to provide more CVs or vertices that can be pushed and pulled). However, you can get some basic facial expressions from very simplegeometry.
Creat ing Your Fi rst B iped Charac ter : Fac ia l Express ions 1 3 5
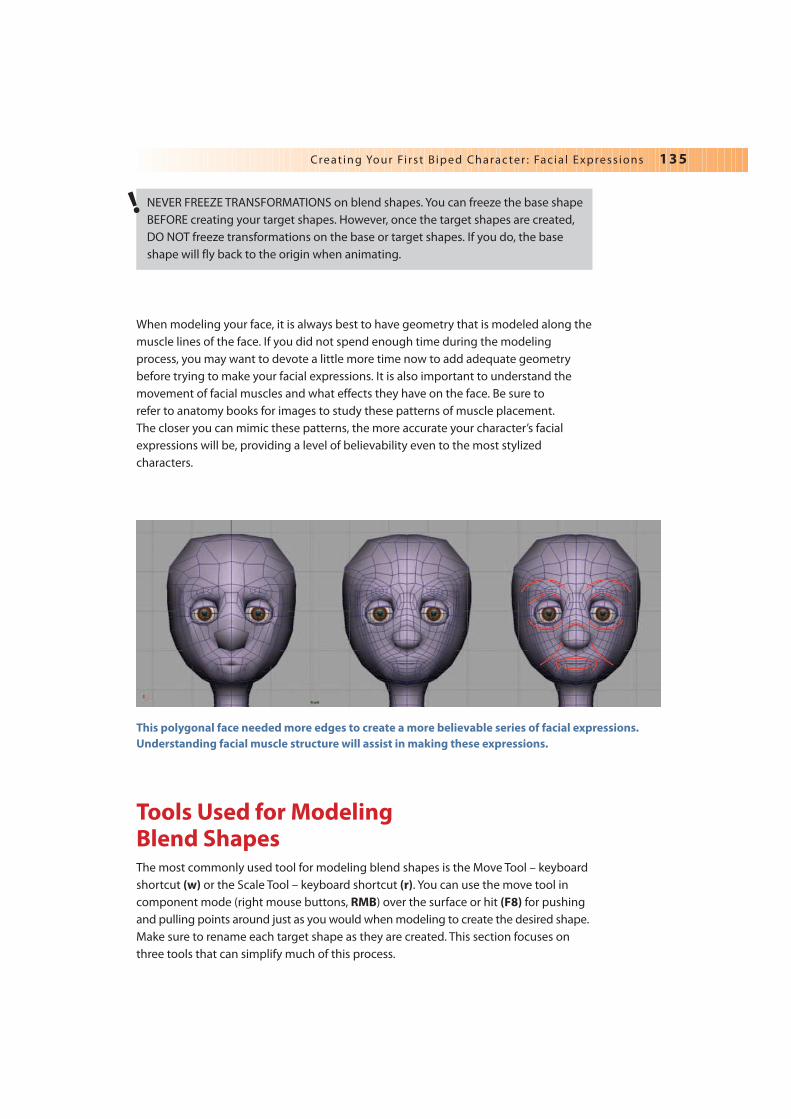
This polygonal face needed more edges to create a more believable series of facial expressions.
Understanding facial muscle structure will assist in making these expressions.
NEVER FREEZE TRANSFORMATIONS on blend shapes. You can freeze the base shapeBEFORE creating your target shapes. However, once the target shapes are created,DO NOT freeze transformations on the base or target shapes. If you do, the baseshape will fly back to the origin when animating.
!
When modeling your face, it is always best to have geometry that is modeled along themuscle lines of the face. If you did not spend enough time during the modelingprocess, you may want to devote a little more time now to add adequate geometrybefore trying to make your facial expressions. It is also important to understand themovement of facial muscles and what effects they have on the face. Be sure to refer to anatomy books for images to study these patterns of muscle placement. The closer you can mimic these patterns, the more accurate your character’s facialexpressions will be, providing a level of believability even to the most stylizedcharacters.
Tools Used for Modeling Blend ShapesThe most commonly used tool for modeling blend shapes is the Move Tool – keyboardshortcut (w) or the Scale Tool – keyboard shortcut (r). You can use the move tool incomponent mode (right mouse buttons, RMB) over the surface or hit (F8) for pushingand pulling points around just as you would when modeling to create the desired shape.Make sure to rename each target shape as they are created. This section focuses onthree tools that can simplify much of this process.

1 3 6 Chapter Three
Soft Modification Tool [Create Deformers � Soft Modification] (It is also found under
the tool manipulators).
The soft modification tool is a deformer that allows you to click on an area and pushand pull points, much like you do with the move tool, but it affects the surroundingpoints as well as the point initially clicked. This tool is more intuitive for artists than the move tool, as it simulates the pushing and pulling of clay. The greatest affect is onthe area clicked, and the gradual drop off can be adjusted for greater control. Colorfeedback is turned on by default, which is visually helpful when adjusting the drop offrate. You can also select an area of points (vertices or CVs) and then apply the soft
Using the move tool to create pursed lips for a target blend shape.
Simply scaling your geometry does not make a deformable object. You must make
changes on the component level by selecting the vertices or CV’s first, then scale
them.
You cannot create a blend shape by scaling or moving on the object level. A change on the object level of the target shape does not affect the base shape.
!

Creat ing Your Fi rst B iped Charac ter : Fac ia l Express ions 1 3 7
The Lattice deformer [Create Deformers � Lattice] and the Sculpt Geometry tool[Edit NURBS � Sculpt Geometry Tool – option box], which were discussed inChapter 2, are also helpful for creating additional facial expressions.
The Soft Modification tool can be found with the Tool Manipulators and in the
Animation menu set (F2) under the Create Deformers menu.
Using the soft modification tool to create an eyebrow raise. Make sure to turn Preserve
History ON in the option box before using the tool so that you can adjust the position
of the Soft Modification deformer later if necessary.
modification, which limits the deformers to only those points. Make sure to open the option box and turn on Preserve history, so that you can modify changes later if necessary.

Add Blend Shapes [Create Deformer � Blend Shape]
Once the target shapes (facial expressions) have been created, you must apply them toyour base shape (neutral pose) using the blend shape deformer. Holding down theshift key, click select on each target shape(s) then select your base shape. (Make surethey have been renamed appropriately, i.e. smile, frown, left_eyebrow_raise, etc.BEFORE applying the deformer.) When defining a blend shape, the base shape MUSTbe selected last. To test your blend shapes, open the blend shape animation editor[Window � Animation Editors � Blend Shapes]. This will open up the blend shapeeditor which has a slider for controlling the movement between the shapes. You canalso access the blend shape by clicking on the input node in the channel box andchanging the value of the field. This attribute is accessible through the Attribute Editor[ctrl�a] as well. It is also a really good idea to set up another control system for yourblend shape sliders, which will be covered later in Chapter 7 of this book, so that theycan be animated more easily.
1 3 8 Chapter Three
After moving vertices in place, the sculpt geometry tool can be used to help shape the
open mouth position.
The blend shape deformer can be found on the Deformation shelf.
Creat ing Your Fi rst B iped Charac ter : Fac ia l Express ions 1 3 9
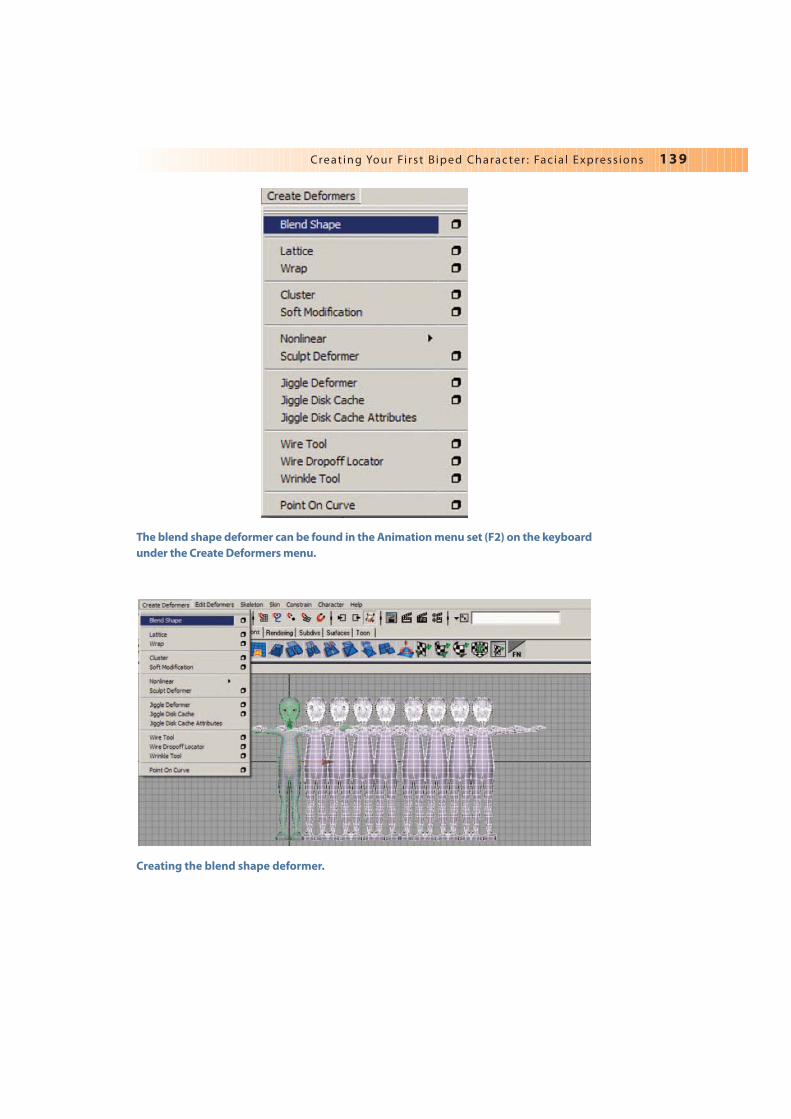
The blend shape deformer can be found in the Animation menu set (F2) on the keyboard
under the Create Deformers menu.
Creating the blend shape deformer.

Update Topology on Blend Shapes
[Edit Deformers � Bake Topology to Targets]
This is a relatively new tool in Maya, as it was introduced to allow for topology
changes to the base shape to be updated on the pre-existing target shapes. Forexample, if more edges needed to be added to create a particular expression, theexisting target shapes would need to be applied to the base shape using [Create
Deformers � Blend Shape]. Once the existing target shapes work, the base modelcan be modified (i.e. more geometry added). This command will pass the modificationson to the target shapes.
1 4 0 Chapter Three
Bake Topology to Targets can be found in the Animation menu set (F2) on the
keyboard under the Edit Deformers menu.
Make sure to rename each target shape BEFORE applying the deformer. If yourelabeled them afterwards, Maya would not recognize them and your target shapeswould not affect the base shape.
!
Do NOT delete history on the geometry after the blend shape deformer has beencreated. Doing so will delete the blend shape deformer. If this happens, you will haveto recreate the deformer again.
!
Have I mentioned? NEVER freeze transformations on Blend shapes!!

Creat ing Your Fi rst B iped Charac ter : Fac ia l Express ions 1 4 1
Adding additional edge loops around the knees adds construction history.
Bake Topology to Targets updates the target shapes and removing the associated
construction history.
Not all changes to the geometry will work reliably. For example, you cannot deletefaces. Therefore, make sure to incrementally save your work, in case of unpredictableresults. Bake topology to targets works best with polygonal geometry.
!

Deformation OrderWhen working with deformers, especially for use with animation, it is important to knowthat history affects how a particular deformer affects the geometry. Multiple deformerscan be applied to the same piece of geometry, and some deformers have to be appliedbefore others, in order to get the desired result. The order in which deformers are createdmakes up the deformation order for that object, and Maya evaluates them in that order.Creating deformers out of order is not a problem, as the deformation order can bechanged.
When creating characters for animation using blend shapes, the blend shape deformershould be the first deformer created, as Maya must evaluate blend shapes before anyother deformer. If not, bizarre things happen, like your character’s geometry will fly offof its skeleton. Remember, if you apply blend shapes after skinning, you must changethe deformation order so that the blend shapes are evaluated first.
To change the deformation order, with the geometry selected, RMB (right mouse button)over the base shape geometry and, from the popup marking menu, select [Inputs �
All Inputs]. This opens up a window name List of Input Operations that shows you a listof the deformers currently affecting this surface. Use the MMB (middle mouse button)button to click and drag the blend shape below any other deformers listed, or to thebottom of the list. This reorders the deformers. Maya evaluates the deformers on the listfrom the bottom up.
1 4 2 Chapter Three
The list of input operations that shows the correct order for the skin deformer and
blend shape inputs.
Just in case you forget, NEVER FREEZE TRANSFORMATIONS on blend shapes! Haveyou figured out how important this is yet?
!

Creat ing Your Fi rst B iped Charac ter : Fac ia l Express ions 1 4 3
Summary3.1 Facial expressions are crucial for your character’s ability to communicate.
3.2 It is best to divide each facial expression into parts that create the expression.Separating each expression into eyes, nose, and mouth areas provides a palette ofoptions that can be combined while animating. The minimum suggested are thefollowing:
eye target shapes:
left_eyebrow_raise
right_eyebrow_raise
left_furrow_up
right_furrow_up
left_furrow_down
right_furrow_down
left_squint
right_squint
nose target shapes:
scrunched_nose
nose_up (optional)
mouth target shapes:
narrow_pucker
wide
smile (which includes raising the cheeks)
open (which includes dropping the jaw)
sad_frown
3.3 There are two basic approaches for creating facial expressions: blend shapes andjoint driven.
3.4 Blend shapes are a deformer that change geometry shapes using a morph process.
3.5 Once you understand joints and skinning, you can use joints to create the blendshapes.
3.6 Before creating blend shapes, it is extremely important to finalize the geometry.
3.7 You can get basic facial expressions from very simple geometry.
3.8 Never freeze transformations on blend shapes!
3.9 Research muscle structure for facial expressions as an aid to creating believablemotion.
3.10 The same tools used for modeling your character can be used to model the blendshapes.
3.11 All geometry changes must be on the component level when modeling blend shapes.

3.12 The most common tools for modeling blend shapes are the following: the movetool (to move components such as points), the soft modification tool, the latticedeformer, and the sculpt geometry tool.
3.13 Be sure to label each target shape as they are created.
3.14 Deleting history on target shapes is unnecessary.
3.15 To create a blend shape, first select all target shapes, then shift select the base shape.
3.16 Do not delete history on that base shape geometry after the blend shape deformerhas been created. Doing so will delete the blend shape deformer.
3.17 If there is a need for more geometry while creating the blend shapes. It is possibleto add more divisions to the base shape and then update the topology to blendshapes that have already been applied. However, this process is not alwaysreliable. Therefore, be sure to finalize your geometry before modeling your blendshapes.
3.18 As always, there is a certain workflow and order of operations that exists. Blendshapes should be applied before the skinning deformer is applied. However thereis a list of input operations that allows the change of deformation order, if necessary.
1 4 4 Chapter Three
Assignments: Facial Expressions for a CharacterAssignment 3.1: Create Facial Expressions
1. Your finished geometry is your base shape. (This is the neutral pose for you face.)This can be one entire piece of geometry (the whole body) or a separate head. Ifyour head is separated, do NOT combine it (if polygonal) after making your blendshapes, as this will make your blend shape targets not work any longer.
2. Duplicate your base shape 15 times and create your target shapes. Move them aboveor below your base shape. Rename the target shapes appropriately.
eyebrow target shapes:
left_eyebrow_raise
right_eyebrow_raise
left_furrow_up
right_furrow_up
left_furrow_down
right_furrow_down
left_squint
right_squint
nose target shapes:
scrunched_nose
nose_up (optional)

Creat ing Your Fi rst B iped Charac ter : Fac ia l Express ions 1 4 5
mouth target shapes:
narrow_pucker
wide
smile (which includes raising the cheeks)
open (which includes dropping the jaw)
sad_frown
1. Use the following tools to reshape these into the facial expressions: Move tool, scaletool, soft modification tool, sculpt geometry tool, lattice deformer.
Using the soft modification tool to create the left_squint eyebrow target shape. It may
take several clicks of this tool to get the desired shape.
Assignment 3.2: Create the Blend Shape Deformer
1. Select your Target shapes then shift select your base shape.
2. Select Create Deformer [Create Deformers � Blend Shape].
3. In the Layer Editor of the Channel Box, create a new layer. Double-click on the new layer (layer1) and rename this layer blend shape_layer, then click save. Shiftselect all of the target shapes you have made, RMB click and hold on top of theblend shape_layer and choose Add Selected Objects. To make the objects invisible,click on the V (visibility) to turn it off.
The soft modification tool can be used effectively to create all of the eyebrow targetshapes, as well as the nose target shapes. To create the mouth shapes, you willprobably need to start with the move and scale tools, then refine the shapes with thesculpt geometry tool.
!
When defining a blend shape, the base shape MUST be selected last.!After creating the blend shape deformer, you should test the blend shape:
1. Select [Windows � Animation Editors � Blend Shape]. This will open up the blendshape editor which has a slider for controlling the movement between the shapes.

1 4 6 Chapter Three
2. You can also access the blend shape by clicking on the input node in the channelbox and changing the value of the field. This attribute is accessible through theAttribute Editor as well.
Opening the blend shape editor.
The blend shape editor.

Creat ing Your Fi rst B iped Charac ter : Fac ia l Express ions 1 4 7
3. Make changes as necessary to the target shapes. You can update them as neededand they will automatically update the deformer. To make it easier to make changes,move the target shape right next to your base shape and make the changes with theslider turned on.
The attribute editor and channel box showing the blend shape attributes.
If you push the slider up, you can make adjustments to the target shape and see the
changes automatically on the base shape.

148 Chapter Three
Assignment 3.3: Create Teeth and Tongue (Optional)
If you plan on opening your character’s mouth for any facial expressions or plan tohave your character speak, you will need to model teeth and a tongue. This can bedone with not much detail.
The teeth and tongue front view and back view.
The tongue is simply a sphere created on the Z-axis and reshaped using a lattice. The teeth can be made by creating a profile curve in the front view, performing arevolve and changing the start sweep of the revolve to 180 in the channel box.
The profile curve of the teeth in the front view and the top view showing the revolve
start sweep beginning at 180.

A lattice deformer can be used to create the narrower shape. The teeth can beduplicated and flipped to create the bottom row. Be sure to also add a shaped plane toact as the throat wall.
Creat ing Your Fi rst B iped Charac ter : Fac ia l Express ions 149
A shaped plane added for the throat wall.