working with financial consolidation and close · exporting journal templates 6-7 deleting journal...
TRANSCRIPT
Oracle® CloudWorking with Financial Consolidation andClose
E93999-15
Oracle Cloud Working with Financial Consolidation and Close,
E93999-15
Copyright © 2016, 2020, Oracle and/or its affiliates.
Primary Author: EPM Information Development Team
This software and related documentation are provided under a license agreement containing restrictions onuse and disclosure and are protected by intellectual property laws. Except as expressly permitted in yourlicense agreement or allowed by law, you may not use, copy, reproduce, translate, broadcast, modify,license, transmit, distribute, exhibit, perform, publish, or display any part, in any form, or by any means.Reverse engineering, disassembly, or decompilation of this software, unless required by law forinteroperability, is prohibited.
The information contained herein is subject to change without notice and is not warranted to be error-free. Ifyou find any errors, please report them to us in writing.
If this is software or related documentation that is delivered to the U.S. Government or anyone licensing it onbehalf of the U.S. Government, then the following notice is applicable:
U.S. GOVERNMENT END USERS: Oracle programs (including any operating system, integrated software,any programs embedded, installed or activated on delivered hardware, and modifications of such programs)and Oracle computer documentation or other Oracle data delivered to or accessed by U.S. Government endusers are "commercial computer software" or “commercial computer software documentation” pursuant to theapplicable Federal Acquisition Regulation and agency-specific supplemental regulations. As such, the use,reproduction, duplication, release, display, disclosure, modification, preparation of derivative works, and/oradaptation of i) Oracle programs (including any operating system, integrated software, any programsembedded, installed or activated on delivered hardware, and modifications of such programs), ii) Oraclecomputer documentation and/or iii) other Oracle data, is subject to the rights and limitations specified in thelicense contained in the applicable contract. The terms governing the U.S. Government’s use of Oracle cloudservices are defined by the applicable contract for such services. No other rights are granted to the U.S.Government.
This software or hardware is developed for general use in a variety of information management applications.It is not developed or intended for use in any inherently dangerous applications, including applications thatmay create a risk of personal injury. If you use this software or hardware in dangerous applications, then youshall be responsible to take all appropriate fail-safe, backup, redundancy, and other measures to ensure itssafe use. Oracle Corporation and its affiliates disclaim any liability for any damages caused by use of thissoftware or hardware in dangerous applications.
Oracle and Java are registered trademarks of Oracle and/or its affiliates. Other names may be trademarks oftheir respective owners.
Intel and Intel Inside are trademarks or registered trademarks of Intel Corporation. All SPARC trademarks areused under license and are trademarks or registered trademarks of SPARC International, Inc. AMD, Epyc,and the AMD logo are trademarks or registered trademarks of Advanced Micro Devices. UNIX is a registeredtrademark of The Open Group.
This software or hardware and documentation may provide access to or information about content, products,and services from third parties. Oracle Corporation and its affiliates are not responsible for and expresslydisclaim all warranties of any kind with respect to third-party content, products, and services unless otherwiseset forth in an applicable agreement between you and Oracle. Oracle Corporation and its affiliates will not beresponsible for any loss, costs, or damages incurred due to your access to or use of third-party content,products, or services, except as set forth in an applicable agreement between you and Oracle.
Contents
Documentation Accessibility
Documentation Feedback
1 Financial Consolidation and Close Overview
Overview of the Home Page 1-1
Settings and Actions Menu 1-3
Searching for Forms, Dashboards, and Infolets 1-5
Navigating Across EPM Cloud Services 1-6
2 Setting Your Preferences
Setting Your Preferences 2-1
Setting General Preferences 2-2
Setting Your Profile Picture 2-3
Setting the Display of Member Names or Aliases 2-3
Setting Approvals Options 2-4
Setting Your Display Preferences 2-4
Setting Up Email for Notifications 2-5
Setting Ad Hoc Options 2-6
Setting User Variables 2-8
Setting Your Financial Reporting Preferences 2-9
Setting Your Printing Preferences 2-10
3 Entering Data in Forms
About Forms 3-1
Opening Forms 3-1
Working with Data in Forms 3-2
Navigating Quickly in a Form 3-2
Entering Data in Forms Using Commands 3-3
iii
Formatting Shortcuts for Forms 3-3
Printing Data 3-4
4 Analyzing Data with Ad Hoc Grids
Creating an Ad Hoc Grid 4-1
Accessing an Ad Hoc Grid 4-1
Manipulating and Annotating Data 4-1
Displaying and Collapsing Lower-Level Members 4-2
Moving Dimensions in Grids 4-3
Pivoting Dimensions in Grids 4-4
Removing Members from Grids 4-4
Ad Hoc Options 4-4
5 Viewing Key Information with Infolets
About Infolet Views 5-2
About the Infolet Dots 5-3
Setting Your Default Infolet 5-3
6 Working with Journals
About Journals 6-2
Viewing Journals 6-2
Journal Security Roles 6-3
Managing Journal Templates 6-3
Creating Journal Templates 6-4
Editing Journal Templates 6-6
Importing Journal Templates 6-6
Exporting Journal Templates 6-7
Deleting Journal Templates 6-8
Creating Journal Files 6-9
Importing Journals 6-13
Exporting Journals 6-15
Creating Journals 6-16
Creating Auto-reversing Journals 6-18
Scanning Journals 6-20
Journal Status 6-20
Editing Journals 6-21
Journal Approval Workflow 6-21
Submitting Journals for Approval 6-22
Approving Journals 6-23
iv
Rejecting Journals 6-24
Processing Journals without an Approval Workflow 6-24
Posting Journals 6-25
Unposting Journals 6-26
Copying Journals 6-26
Viewing Journal History 6-27
Deleting Journals 6-27
7 Working with Reports
Opening Reports 7-1
Managing Journal Reports 7-2
Creating Journal Reports 7-2
Managing Intercompany Matching Reports 7-4
Security for Intercompany Matching Reports 7-4
Setting Up Intercompany Matching Reports 7-5
Creating Intercompany Matching Reports 7-8
Creating Task Manager Reports 7-9
Exporting Formatted Reports to Excel 7-10
8 Reviewing and Approving Data
About Approvals 8-1
Viewing Approval Units 8-2
Approval Unit Actions by Template 8-2
Approval Users and Available Actions 8-3
Approval Unit Status 8-4
Validating Approval Units 8-6
Changing Approval Unit Status 8-6
Approval Unit Ownership 8-8
Adding or Viewing Approval Unit Annotations 8-10
Setting Up Email for Approvals Notification 8-10
Selecting an Alternate Reviewer 8-11
9 Updating Tasks
Working with Tasks from the Home Page 9-1
Viewing Task Worklist 9-2
Viewing Tasks from the Schedule Tasks Page 9-3
Updating Task Information 9-5
Creating Connections to the Task Manager and Supplemental Data Extensions 9-5
Updating Tasks from Smart View 9-6
v
Working with Alerts 9-7
Creating Alerts 9-8
Updating Alerts 9-10
Creating an Alert on a Schedule 9-12
Alert Actions 9-12
Viewing Alerts 9-13
Deleting Alerts 9-15
Viewing Related Tasks 9-15
Viewing Task History 9-15
Reassigning Tasks 9-16
Submitting Tasks 9-16
Approving or Rejecting Tasks 9-17
Canceling Tasks 9-17
Setting Tasks to Force Close Status 9-17
Exporting Tasks from Task Lists 9-18
Workflow for Teams 9-18
10
Viewing Schedules
About Schedules 10-1
Viewing Schedule Properties 10-1
Viewing Schedule Instructions 10-2
Viewing Schedule Viewers 10-2
Viewing Schedule Attributes 10-2
Viewing Day Labels in Schedules 10-2
Viewing Schedule Rules 10-2
Viewing Schedule Alerts 10-3
Viewing Schedule History 10-3
11
Monitoring Dashboards
Dashboard Overview 11-1
Task Overview Dashboard 11-1
Compliance Dashboard 11-3
Financial Dashboard 11-5
12
Working with Supplemental Data
Supplemental Data Process Overview 12-1
Viewing Data in the Supplemental Data Analysis Dashboard 12-2
Adding Dimensions for Supplemental Data 12-3
Importing Dimension Members for Supplemental Data 12-3
vi
Exporting Dimension Members for Supplemental Data 12-4
Creating Supplemental Data Ad-Hoc Forms 12-4
Entering Data into Supplemental Data Forms 12-5
Viewing Form History 12-6
Reassigning Users in Supplemental Data Manager 12-6
Bulk Loading of Data into Collections 12-7
Working with Supplemental Data in Smart View 12-8
vii

Documentation Accessibility
For information about Oracle's commitment to accessibility, visit the OracleAccessibility Program website at http://www.oracle.com/pls/topic/lookup?ctx=acc&id=docacc.
Access to Oracle Support
Oracle customers that have purchased support have access to electronic supportthrough My Oracle Support. For information, visit http://www.oracle.com/pls/topic/lookup?ctx=acc&id=info or visit http://www.oracle.com/pls/topic/lookup?ctx=acc&id=trsif you are hearing impaired.
Documentation Accessibility
viii
Documentation Feedback
To provide feedback on this documentation, send email to [email protected],or, in an Oracle Help Center topic, click the Feedback button located beneath theTable of Contents (you may need to scroll down to see the button).
Follow EPM Information Development on these social media sites:
LinkedIn - http://www.linkedin.com/groups?gid=3127051&goback=.gmp_3127051
Twitter - http://twitter.com/hyperionepminfo
Facebook - http://www.facebook.com/pages/Hyperion-EPM-Info/102682103112642
YouTube - https://www.youtube.com/oracleepminthecloud
ix
1Financial Consolidation and CloseOverview
Financial Consolidation and Close is a subscription-based consolidation and reportingsolution built for and deployed on Oracle Cloud. It provides a simple and quickdeployment for users who want fast implementation with no hardware and minimal ITsupport. It provides a user-friendly and intuitive interface along with built-infunctionality for consolidation and close process tasks.
Financial Consolidation and Close provides these features:
• Simplified tablet user interface
• Native dashboarding and analysis
• Predefined dimensions for detailed analysis
• Flexible application configuration with pre-built forms and reports
• Currency translations and FX adjustment calculations
• Automated cash flow
• Dynamic out-of-box calculations with limited need for customization
• Simplified Consolidation dimension for easy audit
• Business process task management and workflow
• Supplemental schedule data management
Watch the following video for a feature overview:
Getting Started
Overview of the Home PageWhen you first access Financial Consolidation and Close, the Home page provideseasy access to features. Depending on your application features and security roleaccess, you may see all or only some of these features.
1-1
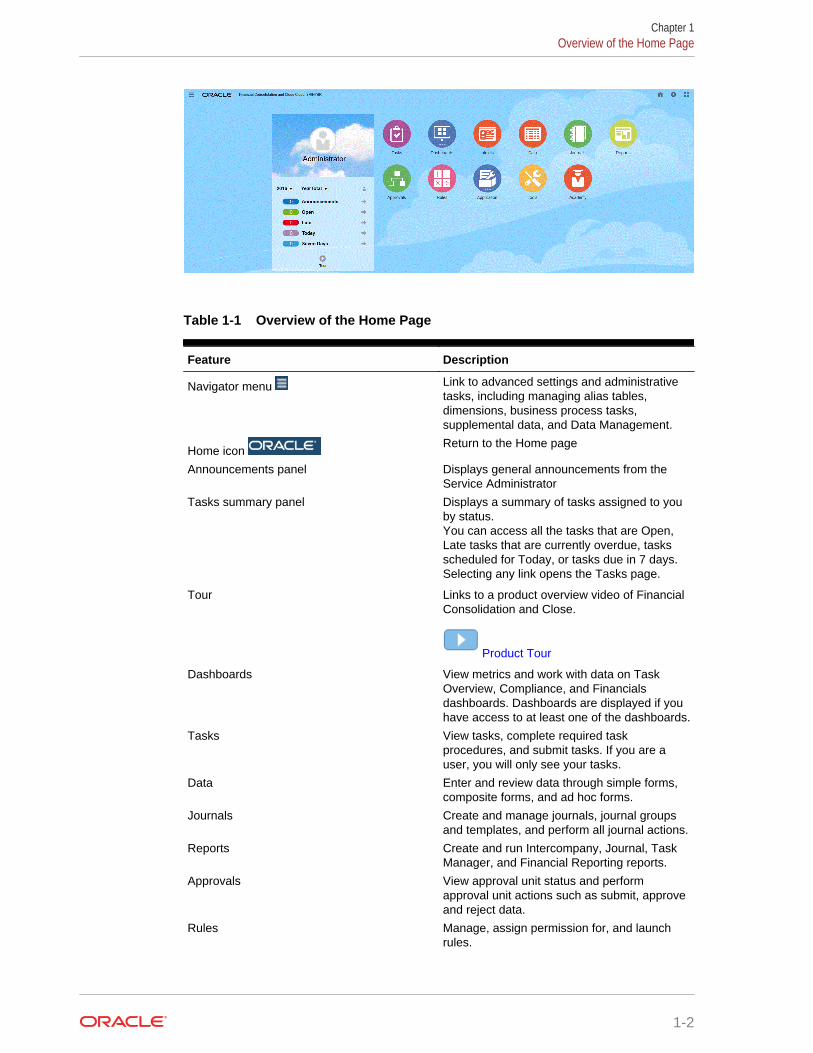
Table 1-1 Overview of the Home Page
Feature Description
Navigator menu Link to advanced settings and administrativetasks, including managing alias tables,dimensions, business process tasks,supplemental data, and Data Management.
Home icon Return to the Home page
Announcements panel Displays general announcements from theService Administrator
Tasks summary panel Displays a summary of tasks assigned to youby status.You can access all the tasks that are Open,Late tasks that are currently overdue, tasksscheduled for Today, or tasks due in 7 days.Selecting any link opens the Tasks page.
Tour Links to a product overview video of FinancialConsolidation and Close.
Product Tour
Dashboards View metrics and work with data on TaskOverview, Compliance, and Financialsdashboards. Dashboards are displayed if youhave access to at least one of the dashboards.
Tasks View tasks, complete required taskprocedures, and submit tasks. If you are auser, you will only see your tasks.
Data Enter and review data through simple forms,composite forms, and ad hoc forms.
Journals Create and manage journals, journal groupsand templates, and perform all journal actions.
Reports Create and run Intercompany, Journal, TaskManager, and Financial Reporting reports.
Approvals View approval unit status and performapproval unit actions such as submit, approveand reject data.
Rules Manage, assign permission for, and launchrules.
Chapter 1Overview of the Home Page
1-2

Table 1-1 (Cont.) Overview of the Home Page
Feature Description
Application • Manage applications• Import and export data• Import and export metadata• Access the consolidation flow• Access Task Manager• Access Supplemental Data• View job status and activity• Schedule jobs• Configure and view audit information• Specify the default translation settings• Manage valid intersections• Run invalid intersection reports• Configure features• Configure service options - manage email
notifications, synchronize users, andprocess supplemental data forms
• Manage periods• Specify application settings• Manage migration tasks
Tools • Set up user variables• Customize your application appearance• Create announcements• Edit navigation flows in application
structure• Edit artifact labels• Set maintenance time• Create notifications• Access additional security options,
including Group Management andProvisioning, and view Provisioning andSecurity Audit reports
Academy Link to videos and documentation
Settings and Actions MenuYou can take actions from the Settings and Actions Menu. Select the caret besideyour user name to display the menu. Options may vary, depending on your assignedrole.
Chapter 1Settings and Actions Menu
1-3
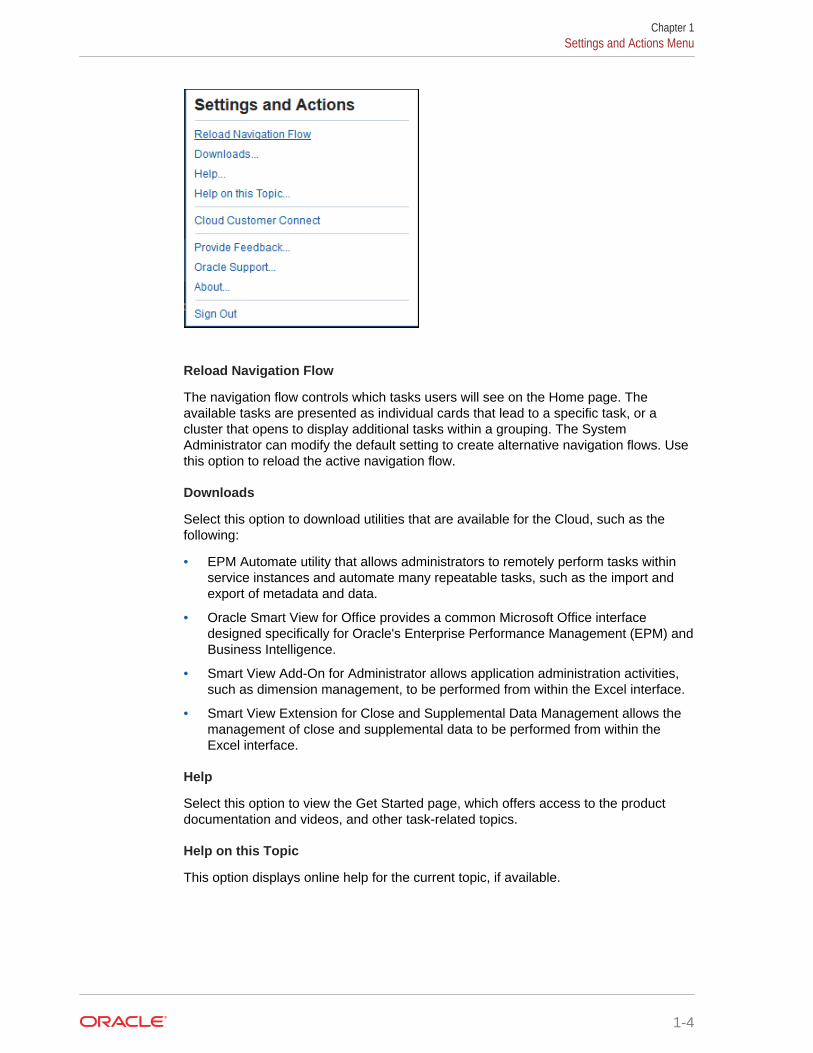
Reload Navigation Flow
The navigation flow controls which tasks users will see on the Home page. Theavailable tasks are presented as individual cards that lead to a specific task, or acluster that opens to display additional tasks within a grouping. The SystemAdministrator can modify the default setting to create alternative navigation flows. Usethis option to reload the active navigation flow.
Downloads
Select this option to download utilities that are available for the Cloud, such as thefollowing:
• EPM Automate utility that allows administrators to remotely perform tasks withinservice instances and automate many repeatable tasks, such as the import andexport of metadata and data.
• Oracle Smart View for Office provides a common Microsoft Office interfacedesigned specifically for Oracle's Enterprise Performance Management (EPM) andBusiness Intelligence.
• Smart View Add-On for Administrator allows application administration activities,such as dimension management, to be performed from within the Excel interface.
• Smart View Extension for Close and Supplemental Data Management allows themanagement of close and supplemental data to be performed from within theExcel interface.
Help
Select this option to view the Get Started page, which offers access to the productdocumentation and videos, and other task-related topics.
Help on this Topic
This option displays online help for the current topic, if available.
Chapter 1Settings and Actions Menu
1-4
Cloud Customer Connect
Cloud Customer Connect is an exclusive community for members to connect withother members and discuss issues or share ideas. Select this option for a direct link toCloud Customer Connect to access:
• Discussion forums to pose questions, explore ideas, and discuss OracleApplications.
• News about upcoming events that showcase new release functionality, industrybest practices, and more.
• Documentation and videos to help you prepare for a successful transition to thelatest release.
• Idea Labs to share your ideas on product enhancements, vote, and comment onyour favorites.
After you sign in, you can select Enterprise Performance Management to navigatedirectly to your Cloud product, to view release information, tips and tricks, and otherposts.
Provide Feedback
If you encounter an issue while using the service, use the Provide Feedback option todescribe the issue and the steps to reproduce it. For help providing feedback, see theGetting Started with Oracle Enterprise Performance Management Cloud for Usersguide.
Oracle Support
Select this option to navigate directly to the My Oracle Support site to search forsolutions, download patches and updates and create a service request.
About
Contains Financial Consolidation and Close notices and version information.
Sign Out
Exits Financial Consolidation and Close.
Searching for Forms, Dashboards, and InfoletsYou can easily search for specific forms, dashboards, and infolets from their listingpage.
Using the Search icon on the listing page, you can toggle between searching forthese artifacts using the following options: a flat view or a tree view:
• Flat View --The Flat View displays only the artifacts that meet the searchcriteria, not the folders that contain them.
• Tree View --The Tree (or Hierarchical) View displays artifacts in the contextof the folders that contain them.
Chapter 1Searching for Forms, Dashboards, and Infolets
1-5
To search on another keyword, click X in the Search box to clear the search criteria.
Navigating Across EPM Cloud ServicesAfter an administrator creates connections to other Oracle Enterprise PerformanceManagement Cloud services, the connections are listed in the My Connections paneon the Navigator.
You can toggle between the services from this location. You must have access to theother services in order to open them. Artifacts are accessible based on your role.
To open another EPM Cloud service:
1. From the Home page, click Navigator .
2. If services are connected and you have access to those services, you'll see a listof connected services in the My Connections pane. Click a service to open it.
Note:
Click the icon to the right of the service name to open the service in a newwindow.
Chapter 1Navigating Across EPM Cloud Services
1-6
2Setting Your Preferences
Related Topics
• Setting Your PreferencesYou can set preferences to control many aspects of the application, such as yourprofile photo and how numbers display in the application.
• Setting General PreferencesOn the General tab, you can set your preferred time zone, language, profilepicture, out-of-office assistant, and so on.
• Setting Your Display PreferencesYou can set how you want numbers formatted, how many members to display onthe Page drop-down list, how the members are indented, how dates are formatted,and whether consolidation operators display.
• Setting Up Email for NotificationsYou can set an email to notify you of application activities when there's a changein task lists, approvals, and the Job Console.
• Setting Ad Hoc OptionsControl the display and behavior of ad hoc grids by setting your preferences.
• Setting User VariablesUser variables act as filters in forms, enabling you to focus only on certainmembers, such as your department. Before you can open a form, you must setyour preferences for the user variables that your administrator has set up.
• Setting Your Financial Reporting PreferencesYou can set preferences for how you want to print and export Financial Reportingreports.
• Setting Your Printing PreferencesYou can set your preferences for how forms and their data are printed as PDFfiles.
Setting Your PreferencesYou can set preferences to control many aspects of the application, such as yourprofile photo and how numbers display in the application.
Note:
The preferences that you set take precedence over the preferences that youradministrator set. You can click Use Administrator's Settings to apply theSystem Settings set by the administrator.
To set your preferences:
2-1
1. On the Home page, click Tools, and then User Preferences.
2. Click the tabs on the left to set your preferences in the application.
• General: Set your profile photo, your preferences for time zone, language,which alias table to use, the display of member names and aliases, andapprovals options, including an out of office message. See Setting GeneralPreferences.
• Display: Set your preferences for how numbers are formatted, how membersare displayed on Page drop-down lists, whether consolidation operators aredisplayed, and the date format. See Setting Your Display Preferences.
• Notifications: Set your email address and select which activities you want tobe notified about—Task Lists, Approvals, and the Job Console. See SettingUp Email for Notifications.
• Ad Hoc Options: Set options for working with ad hoc grids. See Setting AdHoc Options.
• User Variables: Select members for users variables that your administratorset up. See Setting User Variables.
• Financial Reporting: Set preferences for displaying reports. See Setting YourFinancial Reporting Preferences.
• Form Printing: Set your preferences for how to print data in forms as PDFfiles. See Setting Your Printing Preferences.
Setting General PreferencesOn the General tab, you can set your preferred time zone, language, profile picture,out-of-office assistant, and so on.
1. On the Home page, click Tools, and then User Preferences.
2. Click General.
3. Set your preferences for:
• Your time zone. You can type ahead, for example, type "PT" for Pacific Time.The time format that you specify is used throughout the application.
• Your language. When you sign out and sign back in, the user interfacedisplays in the language you selected. If you don’t select a language, thenyour browser’s locale is used.
• Your profile photo. See Setting Your Profile Picture.
• Which alias table to use and how you want members or their aliasesdisplayed. See Setting the Display of Member Names or Aliases.
• Your preferences for Approvals, including whether to display aliases andwhether to show approval units that aren't yet started. You can also set theout-of-office assistant and set Approvals actions to be in effect when you'reaway. See Setting Approvals Options.
4. Click Save.
Chapter 2Setting General Preferences
2-2
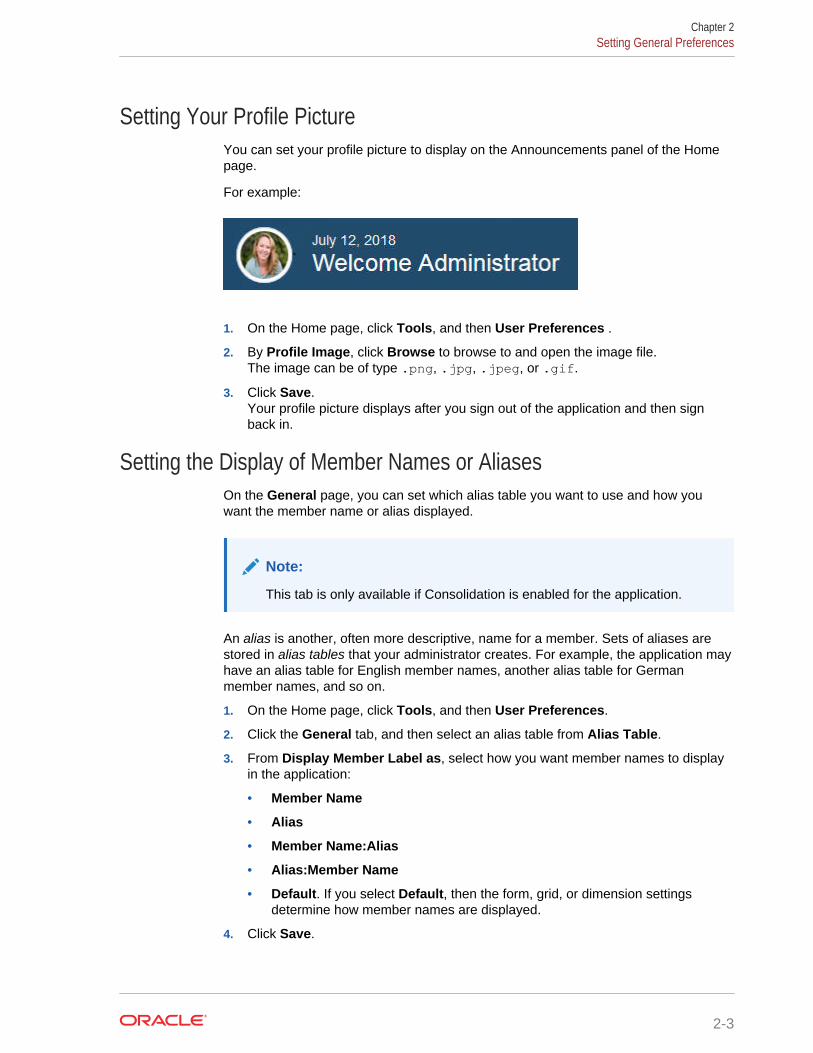
Setting Your Profile PictureYou can set your profile picture to display on the Announcements panel of the Homepage.
For example:
1. On the Home page, click Tools, and then User Preferences .
2. By Profile Image, click Browse to browse to and open the image file.The image can be of type .png, .jpg, .jpeg, or .gif.
3. Click Save.Your profile picture displays after you sign out of the application and then signback in.
Setting the Display of Member Names or AliasesOn the General page, you can set which alias table you want to use and how youwant the member name or alias displayed.
Note:
This tab is only available if Consolidation is enabled for the application.
An alias is another, often more descriptive, name for a member. Sets of aliases arestored in alias tables that your administrator creates. For example, the application mayhave an alias table for English member names, another alias table for Germanmember names, and so on.
1. On the Home page, click Tools, and then User Preferences.
2. Click the General tab, and then select an alias table from Alias Table.
3. From Display Member Label as, select how you want member names to displayin the application:
• Member Name
• Alias
• Member Name:Alias
• Alias:Member Name
• Default. If you select Default, then the form, grid, or dimension settingsdetermine how member names are displayed.
4. Click Save.
Chapter 2Setting General Preferences
2-3
Setting Approvals OptionsSet your preferences for Approvals, for example, what action to take on approval unitswhen you're out of the office. You can also delegate an alternate reviewer.
Note:
This tab is only available if Consolidation is enabled for the application.
To set Approvals options:
1. On the Home page, click Tools, and then User Preferences.
2. On the General tab, under Approvals, select your preferences:
• Display Aliases: Select to display aliases. This option is useful when membernames are cryptic.
• Show Not Started Approval Units: Select to display approval units that aren'tstarted with those that are started.
• Show Approval Units as Aliases in Approvals Notification: Select to showapproval units as aliases if you've enabled Approvals in Notifications.
3. If you'll be out of the office, you can select I am currently out of the office to setwhat action to take on approval units while you're out. Doing so keeps the processmoving when you're away.
Checking or unchecking the Out of Office option affects the primary and backupassignments of open Task Manager tasks and Supplemental Data form entries. Ifa task has both an assignee and a backup assignee, and the assignee selects theOut of Office option, then the task will become the responsibility of the backupassignee. The backup assignee can then perform all the functions normallyreserved for the assignee, including submitting the task.
Set what action to take when you're out:
• Promote: Promote the approval unit.
• Reject: Reject the approval unit.
• Submit: Submit the approval unit.
• Delegate: Select to designate an alternate reviewer to handle your reviewresponsibilities while you're away. You can also include a message for thereviewer in the Message text box.
4. Click Save.
Setting Your Display PreferencesYou can set how you want numbers formatted, how many members to display on thePage drop-down list, how the members are indented, how dates are formatted, andwhether consolidation operators display.
1. On the Home page, click Tools, and then User Preferences.
2. Click Display, and then set your preferences:
Chapter 2Setting Your Display Preferences
2-4
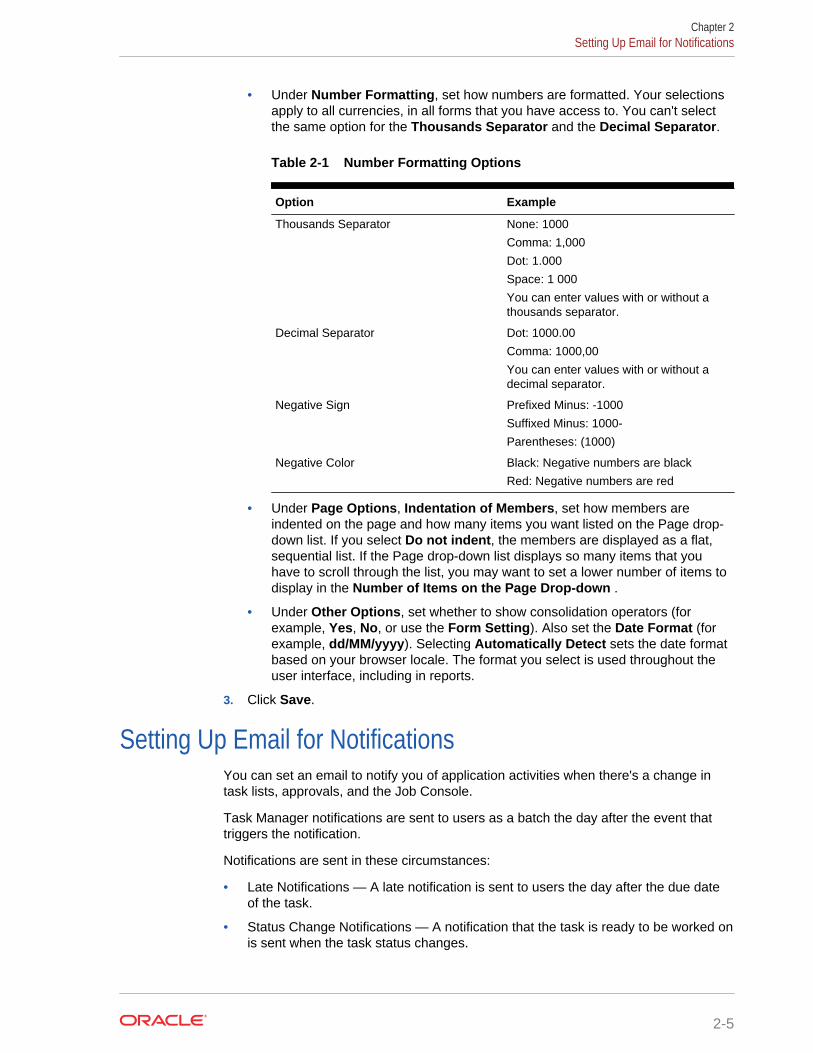
• Under Number Formatting, set how numbers are formatted. Your selectionsapply to all currencies, in all forms that you have access to. You can't selectthe same option for the Thousands Separator and the Decimal Separator.
Table 2-1 Number Formatting Options
Option Example
Thousands Separator None: 1000
Comma: 1,000
Dot: 1.000
Space: 1 000
You can enter values with or without athousands separator.
Decimal Separator Dot: 1000.00
Comma: 1000,00
You can enter values with or without adecimal separator.
Negative Sign Prefixed Minus: -1000
Suffixed Minus: 1000-
Parentheses: (1000)
Negative Color Black: Negative numbers are black
Red: Negative numbers are red
• Under Page Options, Indentation of Members, set how members areindented on the page and how many items you want listed on the Page drop-down list. If you select Do not indent, the members are displayed as a flat,sequential list. If the Page drop-down list displays so many items that youhave to scroll through the list, you may want to set a lower number of items todisplay in the Number of Items on the Page Drop-down .
• Under Other Options, set whether to show consolidation operators (forexample, Yes, No, or use the Form Setting). Also set the Date Format (forexample, dd/MM/yyyy). Selecting Automatically Detect sets the date formatbased on your browser locale. The format you select is used throughout theuser interface, including in reports.
3. Click Save.
Setting Up Email for NotificationsYou can set an email to notify you of application activities when there's a change intask lists, approvals, and the Job Console.
Task Manager notifications are sent to users as a batch the day after the event thattriggers the notification.
Notifications are sent in these circumstances:
• Late Notifications — A late notification is sent to users the day after the due dateof the task.
• Status Change Notifications — A notification that the task is ready to be worked onis sent when the task status changes.
Chapter 2Setting Up Email for Notifications
2-5
• Due Date Reminders — A reminder is sent to users a specified number of daysbefore the due date of the task.
To deactivate a notification, clear the Notifications check boxes, and under NotifyMe, select Never.
To set up and enable email notifications:
1. On the Home page, click Tools, and then User Preferences.
2. Click Notifications.
3. Optional: If you are an Administrator, you can select Use Administrator'sSettings.
4. In Email Address, enter your email address.
5. Under Notifications, select the application updates for which you wantnotifications:
• Task Lists
• Approvals
• Job Console
6. Select an Email Start Time and Email End Time.
7. For a Notification Type, select an option for Notify Me:
• Once a day
• Every 2 hours
• Every 3 hours
• Every 4 hours
• Every 6 hours
• Mixed
• Never - Select this option to deactivate a notification. (Only applicable forStatus Change Notifications and Due Date Reminders)
8. Click Save.
Setting Ad Hoc OptionsControl the display and behavior of ad hoc grids by setting your preferences.
Note:
This tab is only available if Consolidation is enabled for the application.
1. On the Home page, click Tools, and then User Preferences.
2. Click Ad Hoc Options.
3. In the top section, set how members are displayed:
• Member inclusion:
Chapter 2Setting Ad Hoc Options
2-6
– Include selection: Select to display both the selected member and themembers retrieved as a result of the operation. For example, zooming inon the selected member Qtr1 displays data for Qtr1, Jan, Feb, Mar.
– Within selected group: Select to perform an operation such as Zoomonly on the selected group of members, leaving unselected cells as is.This setting is meaningful only when there are two or more dimensionsdown the grid as rows or across the grid as columns. This option pertainsto Zoom, Keep Only, and Remove Only.
• Zoom in: Select the level at which to zoom in:
– Next level: Select to get data for the children of the selected members.
– All levels: Select to get data for all descendants of the selected members.
– Bottom level : Select to get data for the lowest level of members in adimension.
• Ancestor Position: Set how to display ancestors in the hierarchy:
– Top: Select to display member hierarchies in order from highest to lowestlevel.
– Bottom: Select to display member hierarchies in order from lowest tohighest level.
• Display Member Label as: Set whether member names, aliases, or both aredisplayed.
• Alias Table: Select which alias table to use.
• Indentation: Set how member hierarchy levels are indented:
– None: Select for no indentation.
– Subitem: Select to indent descendants. Ancestors are left-justified in thecolumn.
– Totals: Select to indent ancestors. Descendants are left-justified in thecolumn.
• Navigate without refreshing data: Selecting this option improvesperformance as you navigate around the grid. (Data is refreshed by default.)
4. Under Suppression, to simplify your view of the data, select options to suppresselements of the grid. For example, you can hide rows or columns with zeros.
• Zeros:
– Row: Select to hide rows containing only zeros.
– Column: Select to hide columns containing only zeros.
• Suppress:
– Repeat members: Select to hide rows that contain repeated membernames, regardless of the grid orientation.
– Missing blocks on rows: Select to hide blocks of cells in rows that haveno data.
• Missing data: Select to hide rows or columns with zeros or that have no data.
• No Access: Select to hide rows or columns that you don't have access to.
Chapter 2Setting Ad Hoc Options
2-7
Note:
If you get this error when you try to open an ad hoc grid, "Ad hoc gridcannot be opened as there are no valid rows of data", clear the aboveSuppression options.
5. Under Precision, set:
• Use currency member setting: Select to apply the precision setting of theCurrency member.
• Set the minimum and maximum number of decimal positions to display in acell for Currency values, Non-currency values, and Percentage values.For example, if the cell value is 100, and you select the Minimum precision"2", the value displays as "100.00".
6. Under Replacement, set labels to display for cells that are missing data, that youdon't have access permission to view, or that have invalid data:
• No Data: Enter the text that you want displayed for cells that have #Missing or#NoData as their value.
• No Access: Enter the text that you want displayed for cells that you don't haveaccess permission to view.
• Submit Zeros: Select if you specified #NumericZero as the text for the No Data orNo Access replacement option and you want to submit zeros to the application.
Setting User VariablesUser variables act as filters in forms, enabling you to focus only on certain members,such as your department. Before you can open a form, you must set your preferencesfor the user variables that your administrator has set up.
Note:
This tab is only available if Consolidation is enabled for the application.
Administrators can set up user variables to help users focus on those members thatthey're interested in, such as their department's expenses. For example, youradministrator can create a form with entities on the rows and a user variable calledDepartment. You can limit the number of rows displayed on the form by selecting amember for the Department user variable, such as Sales. Later, you can selectanother member for Department, such as Marketing.
To update user variables:
1. On the Home page, click Tools, and then User Preferences.
The User Variables page lists the user variables that the administrator has set upfor each dimension and under Member, the currently selected member for eachvariable.
2. Click the Member Selector next to the variable you want to change.
Chapter 2Setting User Variables
2-8
You can also type a member name directly in the Member column for thedimension.
3. Select members by clicking the member or the checkmark in front of it.
4. Click Save.
Setting Your Financial Reporting PreferencesYou can set preferences for how you want to print and export Financial Reportingreports.
Note:
This tab is only available if Consolidation is enabled for the application.
1. On the Home page, click Tools, and then User Preferences.
2. Click Financial Reporting .
3. On the top of the page, under Financial Reporting, set preferences:
• Annotation Printing Preferences: Define how to print annotations in a report,and then click OK:
– Select Details, and then under Use Footnote Details, select options tocreate a system-defined footnote. Generic formatting is applied andsystem-defined sizes and fonts are used. For example, you can selectTitle, Description, Category, Date, Author, Attachments, and IncludeReplies.
Note:
If you select Include Replies, select whether to include: Allreplies; the Top specified number of replies, starting from theinitial reply; or the Bottom specified number of replies, whichprints the initial annotation and the last number of specifiedreplies. Enter the number of replies to print in the providedspace.
– Select Text Object to select a saved text box in the repository thatcontains the Financial Reporting text function Footnote. In the text box forUse Footnote Text Object, enter text to use in the footnote function in thereport's text object to print annotations. The report designer createsfootnote functions. This option provides more flexibility for formatting andprinting annotations. For example, the footnote function may specify toprint only grid annotations with different size, font, and color to be appliedto the heading and content.
– Select None to print no annotations.
• Merge Equivalent Prompts: Select to respond only once or to respondconsecutively to prompts and variables that are repeated.
• Show Annotations: Select to include annotations in the report.
Chapter 2Setting Your Financial Reporting Preferences
2-9
4. Under Query-Ready Export, set your preferences for how reports are exported toExcel:
• Export Mode:
– Smart View: Exports the report as an Oracle Smart View for Office file.
– Excel Grid: Opens the exported report in Microsoft Excel. Then underExport To, select:
* New Worksheet: To open the exported report as a new sheet in anexisting Excel workbook.
* New Workbook: To open the exported report as sheet1 in a newExcel workbook.
– Disabled: Hides the query-ready link when the report is displayed usingHTML Preview.
• Under Export To, select either:
– New Worksheet: To open the exported report as a new sheet in anexisting Excel workbook.
– New Workbook: To open the exported report as sheet1 in a new Excelworkbook.
5. Click Save.
Setting Your Printing PreferencesYou can set your preferences for how forms and their data are printed as PDF files.
Note:
This preference is only available if Consolidation is enabled for theapplication.
When designing a form, your administrator sets the form's printing options. You canaccept these default settings or set your own preferences for printing PDF files.
Note:
To print to a PDF file, you must have Adobe Acrobat Reader installed.
1. On the Home page, click Tools, and then User Preferences.
2. Click Form Printing.
3. UnderPage Settings, set your preferences for paper size, layout, fit, and flow. Youcan also select whether to print in black and white.
4. Under Options, set whether to apply:
• Formatting
• Comments (text notes associated with cells)
Chapter 2Setting Your Printing Preferences
2-10
• Attribute members, if they're selected in the form
• Currency codes, if the form supports multiple currencies per entity
• The form name
• Repeated row and column headers across pages
• The POV/Page
• Grid lines
• A footer
5. Click Save.
Chapter 2Setting Your Printing Preferences
2-11
3Entering Data in Forms
Related Topics
• About FormsYou enter data into the cells in structured forms that an administrator has created,and each form has a special purpose.
• Opening Forms
• Working with Data in Forms
• Navigating Quickly in a Form
• Entering Data in Forms Using Commands
• Formatting Shortcuts for Forms
• Printing Data
About FormsYou enter data into the cells in structured forms that an administrator has created, andeach form has a special purpose.
You enter data into the cells in structured forms that an administrator has created, andeach form has a special purpose. For example, the administrator may design a formsolely for comparing last year’s actual expenses against this year’s projectedexpenses.
With the form’s objective in mind, the administrator sets up the form with certaindimensions and members. An example of a dimension is Year, and its members mayinclude FY14, FY15, and FY16.
Opening FormsYou enter data into cells in structured forms that an administrator creates.
To open a form:
1. On the Home page, click Data.
2. Depending on the type of form that you want to use, click:
• Simple Forms
• Composite Forms (composed of several simple forms).
• Ad Hoc Grids
3-1

• Smart Forms (created in Smart View using ad hoc grids)
3. Click the Down arrow to select the folder that contains the form.
4. Click the name of the form to open.
Working with Data in FormsYou can enter or change data only in cells for which you have Write access (cells witha white background). Service Administrators set up who can view and change whichdata.
Notes:
• If your Service Administrator set up the simple form to support it, you can undoyour actions by pressing Ctrl+Z (or clicking Undo on the Data tab). Press Ctrl+Zrepeatedly to successively undo actions you’ve taken since you last opened orsaved the form. When you use Undo, dependent cells, such as those that aredynamically calculated, are reevaluated. If the form isn’t set up to support Undo,you can revert to the previous data by clicking Refresh.
• Your Service Administrator can set up a simple form so that when you move out ofa cell, your changes are automatically saved, with no prompt or message. Cellvalues are totaled and the affected cells are displayed with a green background.
• If the structure of the simple form hasn’t changed since you started working in it,when you click Save, your changed or new data is instantly saved.
Navigating Quickly in a FormYou can quickly move around a simple form with these shortcut keys:
Table 3-1 Form Keyboard Shortcuts
Key or Key Combination Result
Tab Moves to the next cell. When focus is on thelast cell of a row, Tab moves to the next row.
Shift+Tab Moves to the previous cell.
Up Arrow, Down Arrow Moves up or down to the previous or next row.
Ctrl+Home Moves to the first cell in the form.
Ctrl+End Moves to the last cell in the form.
Ctrl+Left Arrow Moves to the first cell in the current row.
Ctrl+Right Arrow Moves to the last cell in the current row.
Shift+End Moves to the last cell of the first row.
Ctrl+A Selects all cells.
Shift+Space Selects the row.
Ctrl+Space Selects the column.
Ctrl+Alt+E Moves out of the form to the previouslyselected item. Use Tab to return to the form.
Esc Discards the current changes in the cell,restoring the previous state.
Chapter 3Working with Data in Forms
3-2

Tip:
To print a form, click to the right of the form name at the top (outside thegrid), and then use Ctrl+Alt+P.
Entering Data in Forms Using CommandsYou can use these shortcuts in simple forms. Enter the keys or symbols, and thenpress Enter.
Table 3-2 Quick Data Entry Commands
Keys or Symbol Result Example
K Enters the value in thousands. Enter 5K for 5,000.
M Enters the value in millions. Enter 5M for 5,000,000.
Add or + Adds a number to the cell value. If the cell value is 100, enteringAdd10 after 100 results in 110.
Sub or ~ Subtracts a number from the cellvalue.
If the cell value is 100, enteringSub10 after 100 results in 90.
Percent or per Multiples the cell value by thepercentage that you enter.
If the cell value is 100, enteringper10 after 100 results in 10% of thecurrent cell value, or 10.
Increase or inc Increases the cell value by thepercentage that you enter.
If the cell value is 200, enteringinc10 after 200 increases the cellvalue by 10% of 200 (20), to 220.
Decrease or dec Decreases the cell value by thepercentage that you enter.
If the cell value is 200, enteringdec10 after 200 decreases the cellvalue by 10% of 200 (20), to 180.
Power or pow Changes the cell value to thenumber, added as an exponent.
If the cell value is 100, entering pow2after 100 multiples the cell value byan exponent of 2, to 10,000.
gr Grows a cell by a percentage. If the cell value is 200, entering gr50after 200 increases the cell value by100, to 300.
Formatting Shortcuts for FormsTable 3-3 Formatting Shortcuts
Key Combination Result
Ctrl+Alt+B Bolds the value.
Ctrl+Alt+I Italicizes the value.
Ctrl+Alt+U Underlines the value.
Chapter 3Entering Data in Forms Using Commands
3-3
Printing DataYou can print data in forms as PDF files and customize its format if Adobe AcrobatReader 5.0 is installed on your computer. You can also export formatted reports toOracle Smart View for Office (see Exporting Formatted Reports to Excel
To print a form's data to a PDF file:
1. With a form open, click the Data tab, and then Print.
2. Select the print options that you want.
3. Click Print Preview.
4. Click Open with to open the file in Adobe Acrobat Reader or click Save and namethe file.
To reset the printing options to the settings that were assigned to the form when it wascreated, click Restore Form Settings.
Chapter 3Printing Data
3-4
4Analyzing Data with Ad Hoc Grids
With ad hoc grids, you can personalize focused data slices that you frequently use.For example, you can work with data for a specific set of products.
With ad hoc grids, you can personalize focused data slices that you frequently use.
Examples:
• Work with data for a specific set of products.
• Quickly review profit margins in your regions.
• Use an ad hoc grid in Oracle Smart View for Office that you set up in FinancialConsolidation and Close.
• Save the data in an ad hoc grid as a report and view it in Financial Consolidationand Close and Smart View.
Creating an Ad Hoc GridTo create an ad hoc grid, you must be a Service Administrator, Power User, or a Userthat is provisioned with the Ad Hoc Creator role.
To create an ad hoc grid:
1. On the Home page, click Data.
2. Click on New Ad Hoc Grid, select a cube, and then click Create.
The new ad hoc grid displays. By default, Account is on the row and Year andPeriod are on the column. The other dimensions are on the Point of View (POV) atthe top of the grid.
3. Click Save to save the new grid.
Accessing an Ad Hoc GridTo access an ad hoc grid:
1. On the Home page, click Data.
2. On the left, click Ad Hoc and then click the name of the ad hoc grid.
To access an ad hoc grid from within a form, click Actions, and then Analyze.
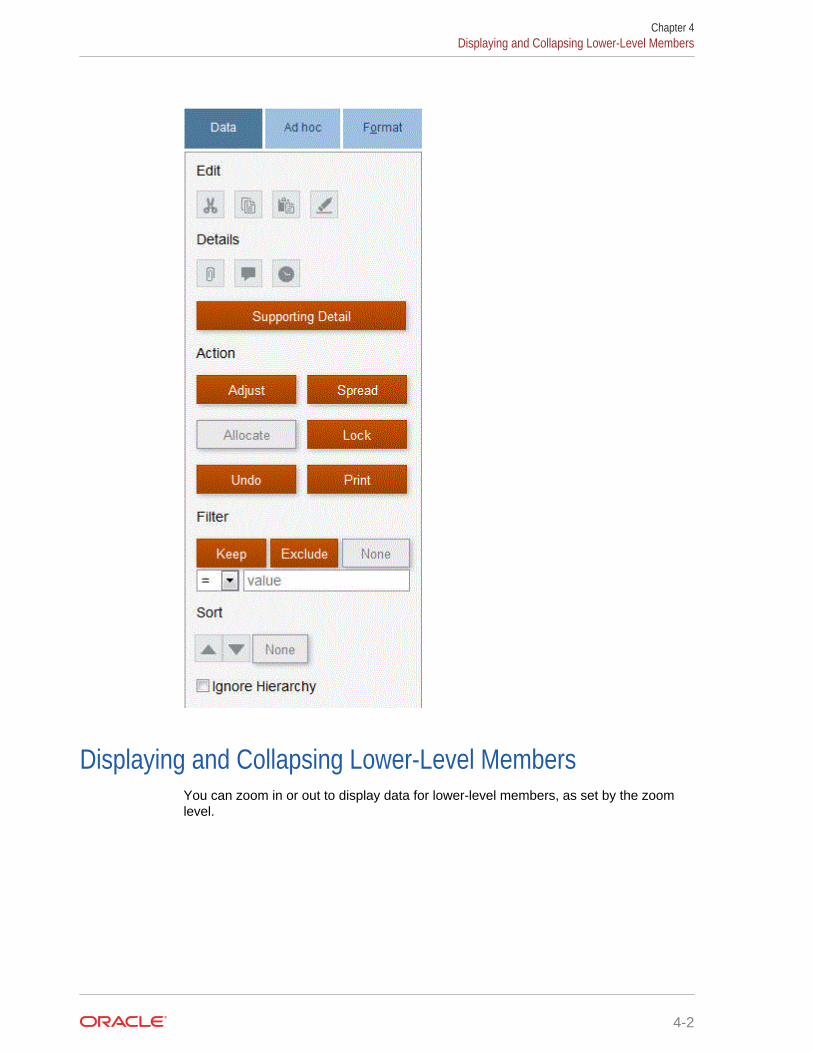
Manipulating and Annotating DataClick the Data tab in an ad hoc grid to manipulate, annotate and filter data:
For example, to filter which data is displayed, select a row or column. Then underFilter, select an operator, enter a value, and then click Keep or Exclude.
4-1
Displaying and Collapsing Lower-Level MembersYou can zoom in or out to display data for lower-level members, as set by the zoomlevel.
Chapter 4Displaying and Collapsing Lower-Level Members
4-2
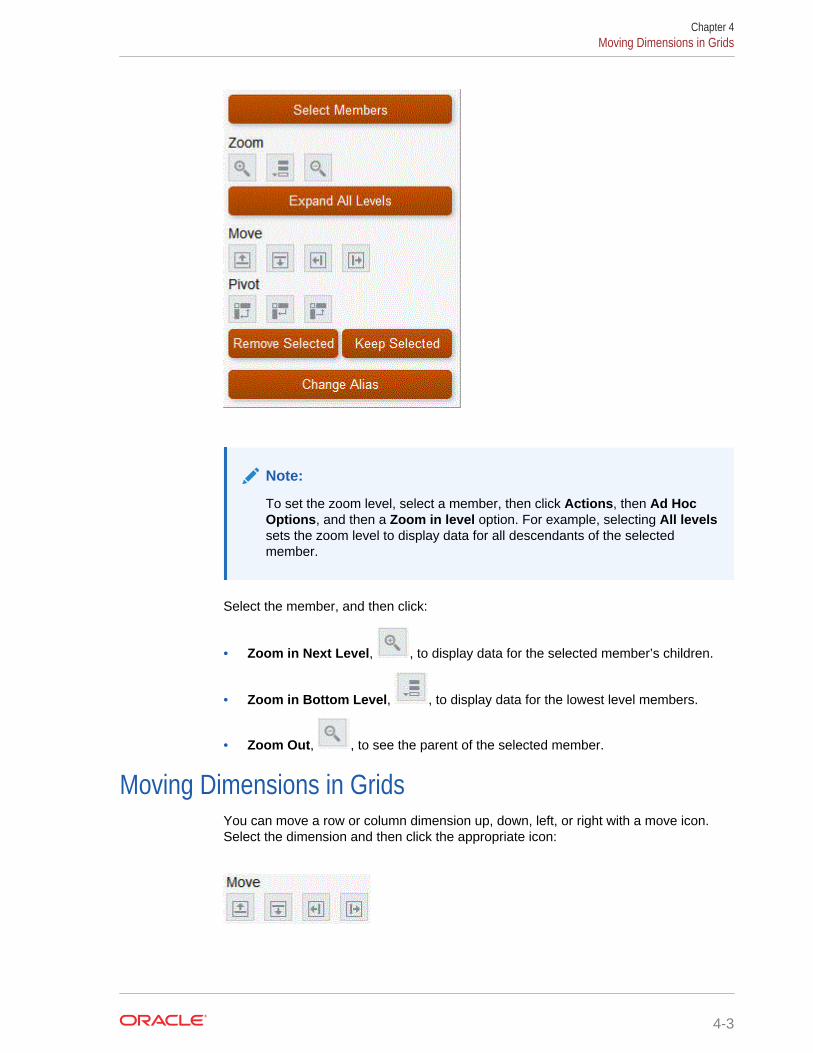
Note:
To set the zoom level, select a member, then click Actions, then Ad HocOptions, and then a Zoom in level option. For example, selecting All levelssets the zoom level to display data for all descendants of the selectedmember.
Select the member, and then click:
• Zoom in Next Level, , to display data for the selected member’s children.
• Zoom in Bottom Level, , to display data for the lowest level members.
• Zoom Out, , to see the parent of the selected member.
Moving Dimensions in GridsYou can move a row or column dimension up, down, left, or right with a move icon.Select the dimension and then click the appropriate icon:
Chapter 4Moving Dimensions in Grids
4-3
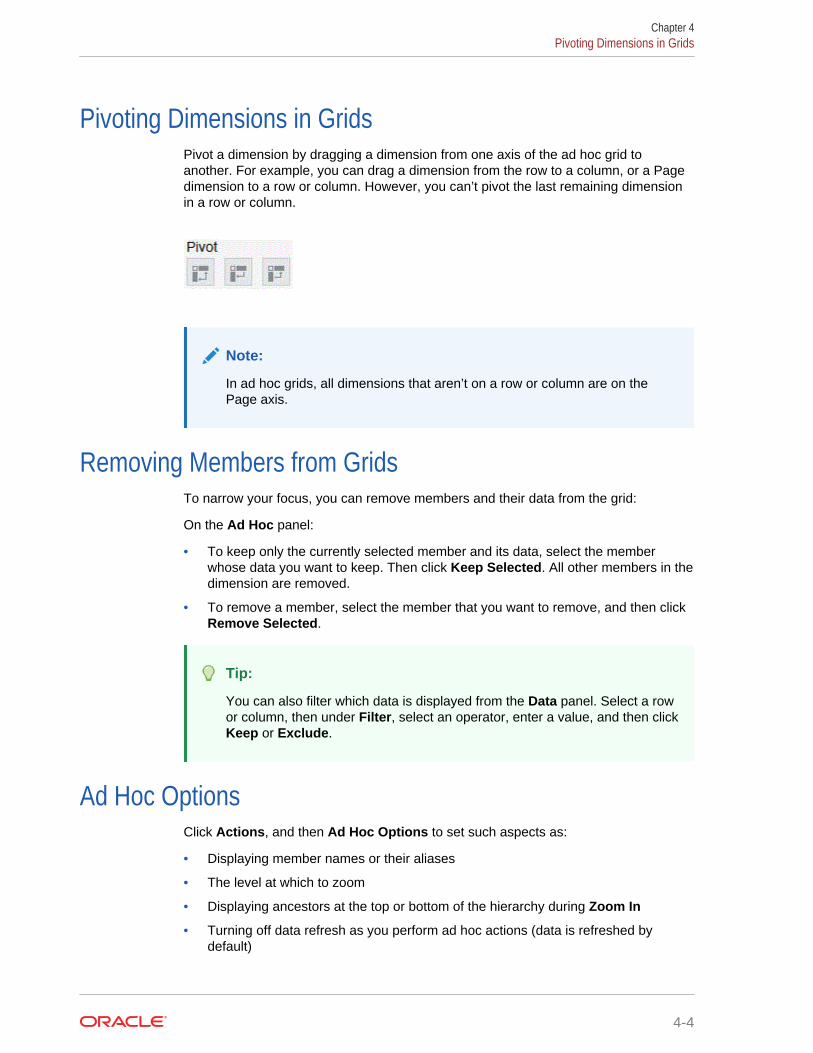
Pivoting Dimensions in GridsPivot a dimension by dragging a dimension from one axis of the ad hoc grid toanother. For example, you can drag a dimension from the row to a column, or a Pagedimension to a row or column. However, you can’t pivot the last remaining dimensionin a row or column.
Note:
In ad hoc grids, all dimensions that aren’t on a row or column are on thePage axis.
Removing Members from GridsTo narrow your focus, you can remove members and their data from the grid:
On the Ad Hoc panel:
• To keep only the currently selected member and its data, select the memberwhose data you want to keep. Then click Keep Selected. All other members in thedimension are removed.
• To remove a member, select the member that you want to remove, and then clickRemove Selected.
Tip:
You can also filter which data is displayed from the Data panel. Select a rowor column, then under Filter, select an operator, enter a value, and then clickKeep or Exclude.
Ad Hoc OptionsClick Actions, and then Ad Hoc Options to set such aspects as:
• Displaying member names or their aliases
• The level at which to zoom
• Displaying ancestors at the top or bottom of the hierarchy during Zoom In
• Turning off data refresh as you perform ad hoc actions (data is refreshed bydefault)
Chapter 4Pivoting Dimensions in Grids
4-4
• Hiding rows or columns with zeros or that have no data
• Using the Currency member’s precision setting or set the number of decimalpositions displayed in a cell. For example, if the cell value is 100, and you selectthe Minimum precision "2", the value displays as "100.00"
Chapter 4Ad Hoc Options
4-5
5Viewing Key Information with Infolets
Infolets provide quick insights into data that guide your decisions and actions. Infoletspresent a visually engaging overview of high-level, aggregated information.
Infolets provide quick insights into data that guide your decisions and actions. Infoletspresent a visually engaging overview of high-level, aggregated information. They canhelp you quickly analyze data and understand key business questions such as:
• Where is it most important to direct my attention?
• What critical information has recently changed?
• How many orders are in jeopardy, listed by status?
Getting an instant overview into key information enables you to react quickly tochanging conditions.
Your administrator can design an infolet to display a chart, a data point in a form, or anentire form. The administrator may design an infolet to progressively display moredetail when you flip or expand it. (Only administrators can design infolets.)
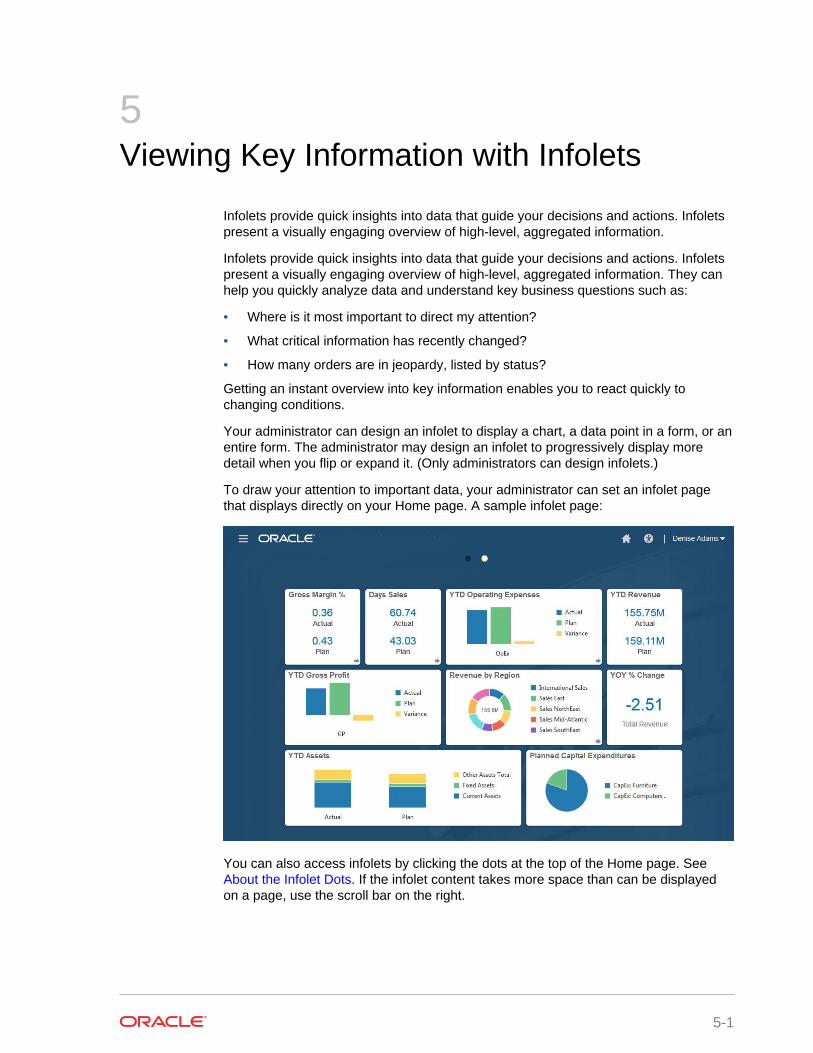
To draw your attention to important data, your administrator can set an infolet pagethat displays directly on your Home page. A sample infolet page:
You can also access infolets by clicking the dots at the top of the Home page. See About the Infolet Dots. If the infolet content takes more space than can be displayedon a page, use the scroll bar on the right.
5-1
Note:
Using the Navigation Flow designer, your administrator can define up toseven infolet dots on the Home page. If your administrator can createconnections to other EPM Cloud subscriptions, infolets can link to infoletpages in other EPM Cloud subscriptions.
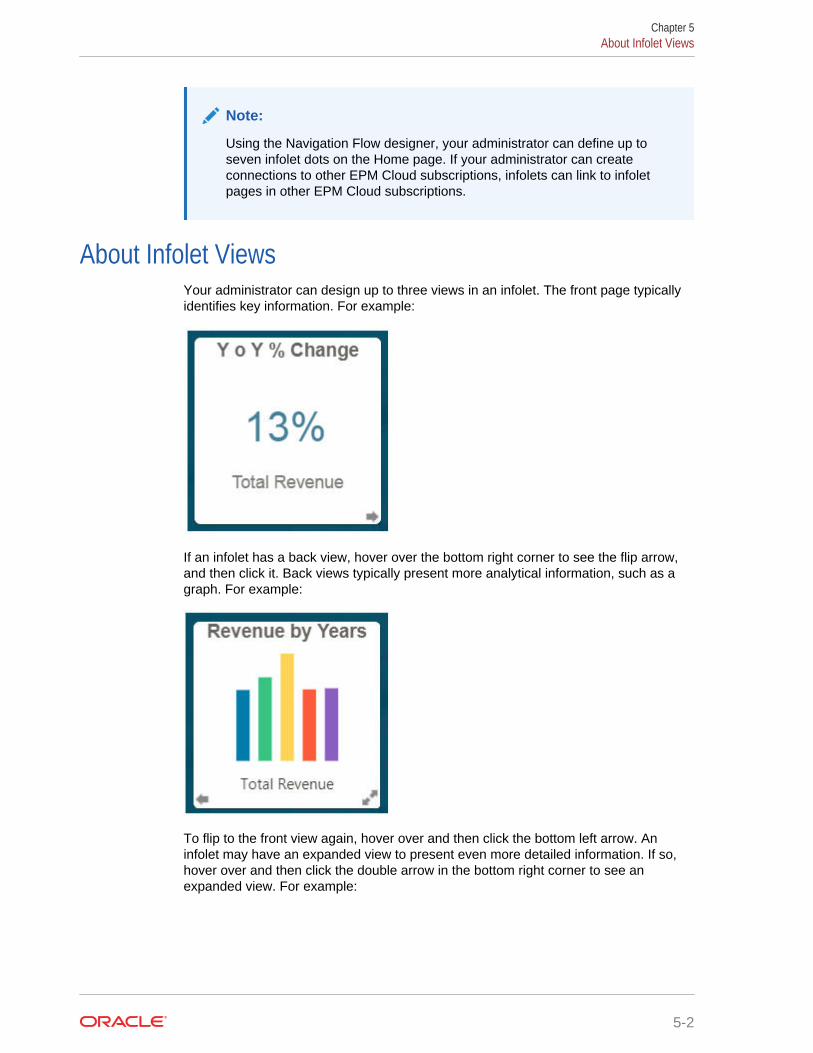
About Infolet ViewsYour administrator can design up to three views in an infolet. The front page typicallyidentifies key information. For example:
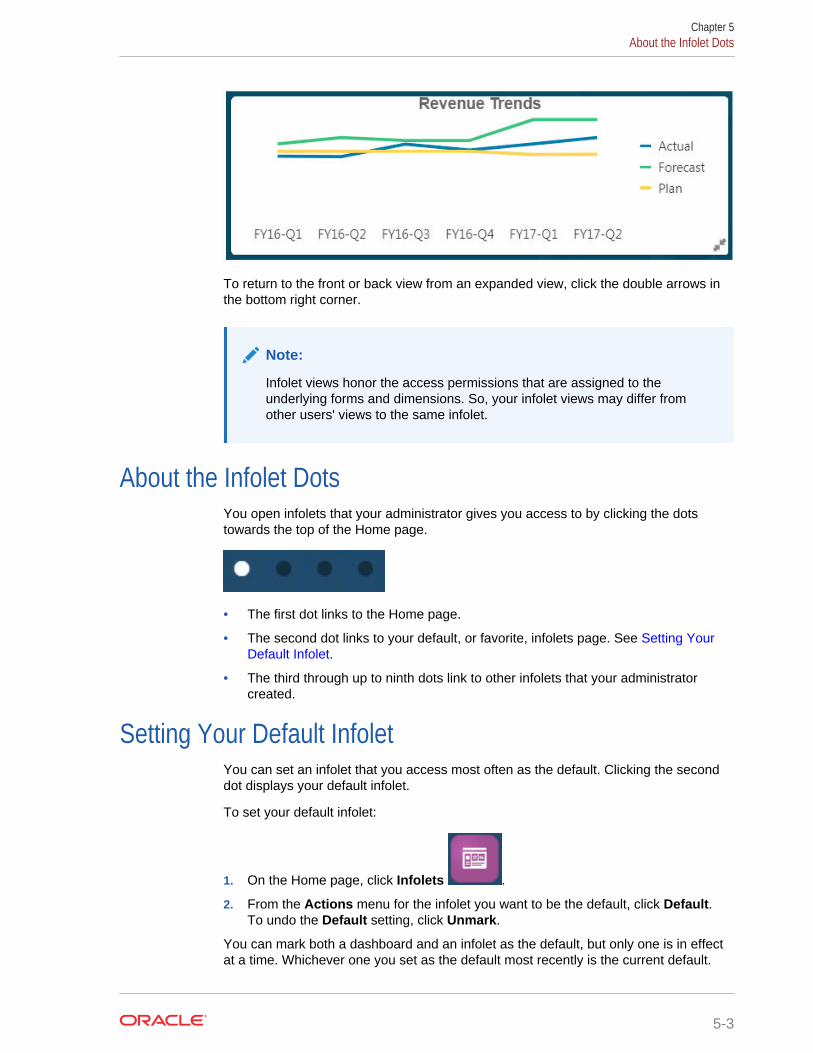
If an infolet has a back view, hover over the bottom right corner to see the flip arrow,and then click it. Back views typically present more analytical information, such as agraph. For example:
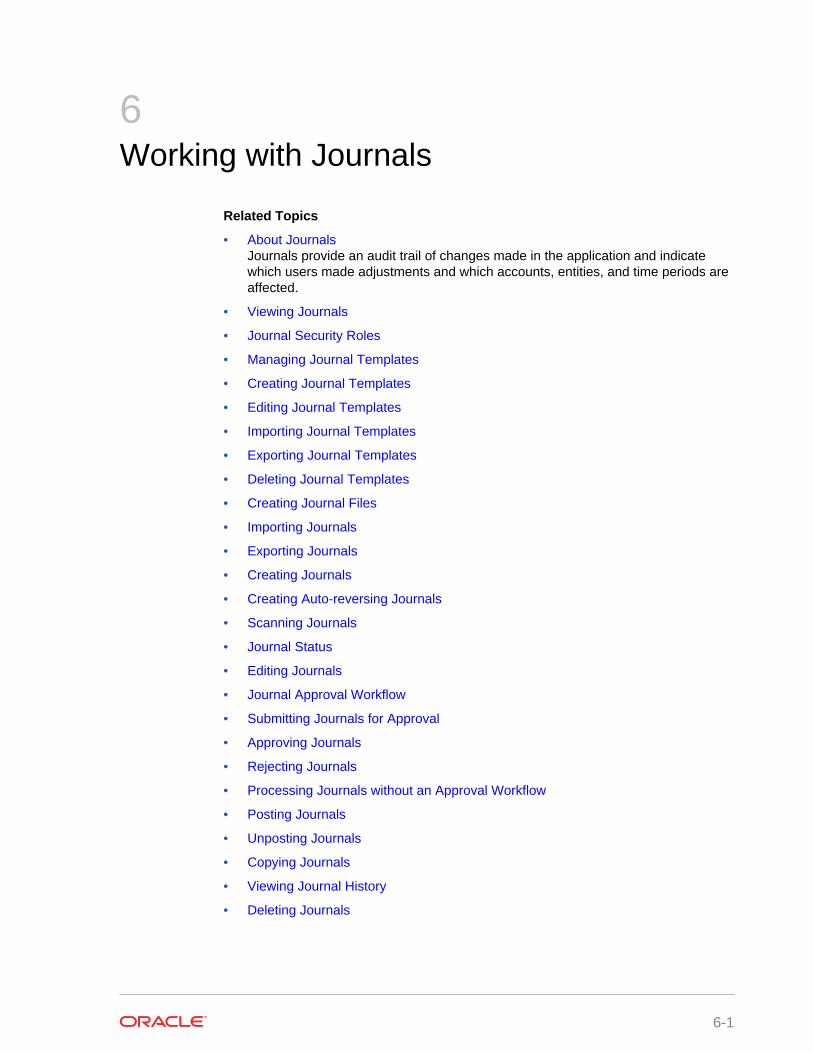
To flip to the front view again, hover over and then click the bottom left arrow. Aninfolet may have an expanded view to present even more detailed information. If so,hover over and then click the double arrow in the bottom right corner to see anexpanded view. For example:
Chapter 5About Infolet Views
5-2
To return to the front or back view from an expanded view, click the double arrows inthe bottom right corner.
Note:
Infolet views honor the access permissions that are assigned to theunderlying forms and dimensions. So, your infolet views may differ fromother users' views to the same infolet.
About the Infolet DotsYou open infolets that your administrator gives you access to by clicking the dotstowards the top of the Home page.
• The first dot links to the Home page.
• The second dot links to your default, or favorite, infolets page. See Setting YourDefault Infolet.
• The third through up to ninth dots link to other infolets that your administratorcreated.
Setting Your Default InfoletYou can set an infolet that you access most often as the default. Clicking the seconddot displays your default infolet.
To set your default infolet:
1. On the Home page, click Infolets .
2. From the Actions menu for the infolet you want to be the default, click Default.To undo the Default setting, click Unmark.
You can mark both a dashboard and an infolet as the default, but only one is in effectat a time. Whichever one you set as the default most recently is the current default.
Chapter 5About the Infolet Dots
5-3
6Working with Journals
Related Topics
• About JournalsJournals provide an audit trail of changes made in the application and indicatewhich users made adjustments and which accounts, entities, and time periods areaffected.
• Viewing Journals
• Journal Security Roles
• Managing Journal Templates
• Creating Journal Templates
• Editing Journal Templates
• Importing Journal Templates
• Exporting Journal Templates
• Deleting Journal Templates
• Creating Journal Files
• Importing Journals
• Exporting Journals
• Creating Journals
• Creating Auto-reversing Journals
• Scanning Journals
• Journal Status
• Editing Journals
• Journal Approval Workflow
• Submitting Journals for Approval
• Approving Journals
• Rejecting Journals
• Processing Journals without an Approval Workflow
• Posting Journals
• Unposting Journals
• Copying Journals
• Viewing Journal History
• Deleting Journals
6-1
About JournalsJournals provide an audit trail of changes made in the application and indicate whichusers made adjustments and which accounts, entities, and time periods are affected.
During a financial period, you may need to adjust data after it is entered or loaded intobase-level entities. Journals provide an audit trail of changes made in the applicationand indicate which users made adjustments and which accounts, entities, and timeperiods are affected.
Note:
The Journals feature is only available if it was enabled during applicationconfiguration. An administrator can optionally enable a workflow for journals.
The journal tasks that you can perform depend on the role assigned to you by theadministrator. If a journal task is not available due to security, or the state of the dataor journal status, it is either disabled or displayed with a message that you do not havethe rights to perform the action.
Watch the following video for an introduction to journals:
Getting Started with Journals
Viewing JournalsThe Journals list displays the journal autonumber, label, description, journaltype,status, Data Source member, currency, and group, sorted by autonumber. Youcan select which columns to display, sort the list by column, or sort it by alphabeticalascending or descending order. Entity, Created By, Approved By, Posted By, CreatedDate, Approved Date, Posted Date columns are hidden. If you select to view the Entitycolumn, the same journal displays multiple times for multiple-entity journals.
By default, journals also display the default currency at the end of the Entity name oralias.
The first column is the auto-numbering column. This is a system-generated sequencenumber created for a specific Scenario, Year, Period combination. The auto-number isassigned when a created journal is saved the first time.
You can filter the list of journals to display. This enables you to find journals based onselected criteria. You can filter the list by Label, Description, Group, Entity, User,Status, Data Source member, or Currency. You can enter text filters, including thepercent sign (%) as a wildcard, or leave a text box blank to avoid filtering on the text.
The journal actions that are available depend on the journal status and security. Forexample, if the journal has a status of Approved, the only actions available are Rejector Post. You can select one or more rows and perform a batch action using the iconabove the column. If you select multiple rows and try to perform an action that does
Chapter 6About Journals
6-2
not apply to one or more rows in the selection, the system applies the action to theremaining rows and displays a warning for the rows for which the action is notapplicable.
To view journals:
1. On the Home page, click Journals.
2. From the Point of View, select a Scenario, Year, and Period.
To select journal columns to display on the list:
1. On the Home page, click Journals.
2. From the journal list, click on the header Actions icon, click View, and then selectthe columns to display, or select Show All. To hide columns, de-select them.
3. Optional: To change the column sort order, click the header icons and select SortAscending or Sort Descending, or click on the column header and drag and dropit to the desired place.
Journal Security RolesAny user with the Viewer role or higher can view journals. If you have only the Viewerrole, only Posted journals are displayed. Users with the User role or higher can view alljournals.
If journal workflow is enabled, any user in the approval path must have Modify accessto all of the approval units in the journal. Any user who has Read access to all of theapproval units in the journal has View access to the journal. If you only have Read/Modify access to some of the approval units in a journal, you will not have access tothe journal.
Any user (User, Power User or Service Administrator) who has Write access to thePoint of View (for example, entities and accounts), can create a journal.. They can alsoedit and delete journals, and perform journal actions such as posting and unposting.
A Service Administrator can always create, submit, approve, reject, post and unpost ajournal. For example, if a user has left the company, a Service Administrator canapprove, reject, post or unpost a journal to continue the journal workflow regardless ofwhether they submitted the journal.
Managing Journal TemplatesYou can create a journal template to post adjustments that have common information,such as entities or accounts. Then you can use the template to create journals withsimilar information. Journal templates simplify the journal creation process and areuseful for journals that need to be created for every period.
You can create two types of journal templates:
• Standard templates, which contain accounts and entities for adjustments that youenter frequently.
• Recurring templates, which contain complete information for identical journalentries that occur for more than one period. When you open a journal period for arecurring template, journals are automatically created with a Working status.
Chapter 6Journal Security Roles
6-3
From the Templates page, you can view a list of all of the journal templates that youhave in the system. The Template list displays the label, description, template type,journal type, Data Source member, currency, and group. You can select whichcolumns to display, sort the list by column, or sort it by alphabetical ascending ordescending order. The Entity, Created By, and Created Date columns are hidden bydefault. If you select to view the Entity column, the templates display multiple times formultiple-entity templates.
You can filter the template list to find templates based on selected criteria. You canfilter the list by Label, Description, Entity, Template Type, Journal Type, Data Sourcemember, Currency, or Group. You can enter text filters, including the percent sign (%)as a wildcard, or leave a text block blank to avoid filtering on the text.
To view the list of journal templates:
1. On the Home page, click Journals.
2. Click Journal Templates.
3. To view template details, click a template label.
4. Optional: To filter the list of templates, click the Filter icon, select filter options,and then click Apply.
5. Optional: To select columns to display, click View, then Columns, and select thecolumns to display, or select Show All.
6. Optional: To change the column sort order, click the header icons and select SortAscending or Sort Descending.
7. To refresh the list of templates, click Refresh. Any new templates that you createdwill be displayed after the refresh.
Creating Journal TemplatesAny user with the User role and above can create and manage journal templates. Auser with only the Viewer role can view the templates in Read-Only mode, but othertemplate actions are not allowed.
You can create Standard or Recurring journal templates.
• Standard templates contain accounts and entities for adjustments that you enterfrequently.
• Recurring templates contain complete information for identical journal entries thatoccur for more than one period. If you have journals that need to be created forevery period, you can create Recurring templates for those journals. Recurringjournals are automatically created with a Working status when the period isopened.
When you create a journal, you can choose to create it using an existing template.When you select a template, a data security check is made to determine whether youhave access to all of the template entries.
After you enter data, you can scan the template to verify that all entries are valid. Thescan process enables you to identify errors and make any necessary changes beforeyou save the template. The following items are examples of system validation:
• Except for Entity, all other dimension members should be base/leaf and should notbe calculated members.
Chapter 6Creating Journal Templates
6-4
• Account types are Asset, Liability, Equity, Revenue, Expense, or SaveAssumption.
• All of the entries should belong to the same parent. The children currency must bethe same, but the parent currency can differ.
• You should have access to all of the template entry members in the template.
To create a journal template:
1. On the Home page, click Journals.
2. Click Journal Templates.
3. From the Templates screen, click Create.
The Template Details page is displayed.
4. For Label, enter a template label.
The label can contain a maximum of 20 characters. Do not use spaces or thesecharacters: . + - */ # {} ; , @ ”
5. Optional: Enter a template description.
6. From Journal Type, select Standard or Recurring.
7. From Data Source, select a Data Source member.
The Currency information is populated from the Source Currency type that youspecified when creating the Data Source member and is read-only.
8. From Template Type, select Standard or Recurring.
9. Optional: From Group, select a journal group to assign to the template.
10. To create a journal entry, click the Create button above the Debit and Creditcolumns.
11. To select dimension members, use one of these methods:
• Enter the member name in the text box.
• Select a row in the line item table and from the Actions icon, click PickMembers to open the Member Selector, select members for the dimensionson that row, and then click OK.
• Select an existing row, click Actions, and then Copy Row, then selectanother row and click Paste Row.
12. Optional: To delete one or more template entries, select the row and fromActions, click Delete.
13. Enter the adjustment amounts in the Debit or Credit columns.
14. Optional: To scan the template and verify that journal entries are valid, fromActions, click Scan.
15. Optional: To print the template details page, from Actions, click Print, and thenprint the page from your browser printing functionality.
16. Click Save to save the template.
17. Optional: From the main Templates page, click Refresh to refresh the templatelist and display the new template.
Chapter 6Creating Journal Templates
6-5
Editing Journal TemplatesYou can edit a journal template that you previously created. For example, you canchange the description of a journal or add adjustments.
Any user with the User Role and above can edit templates. You must also haveaccess to all the entities in the template.
To edit a journal template:
1. On the Home page, click Journals.
2. Click Journal Templates.
3. From the list of templates, click a template to edit.
4. Click Save to save your changes.
Importing Journal TemplatesFrom the Manage Templates screen, you can import Standard or Recurring journaltemplates. The groups used by the templates will also be imported.
Any user with the User role and above can import journal templates, but only if theyhave write access to all the dimension members in the template.
During the import process, the system creates a new journal template if a journaltemplate with the same name does not exist in the system.
If a journal template with the same name already exists, the import process deletes theexisting template and creates the journal template with the new details.
You can also import journal templates through Migration. The templates are importedas part of Journals under the Relational Data artifact. See Administering Migration forOracle Enterprise Performance Management Cloud.
1. On the Home page, click Journals.
2. Click Journal Templates.
3. From the Actions menu, click Import.
4. From the Template Import screen, click Create.
5. Select the location of the import file or files:
• Local—Loads the import file or files from a location on your computer. ClickBrowse to select the import file.
• Inbox—Loads the import file or files from the server. Enter the name of thefile.
6. For File Type, select an option:
• Comma delimited
• Tab delimited
• Other. Enter the delimiter character that is used in the import file.
7. If the selected location is Local:
a. Click Import.
Chapter 6Editing Journal Templates
6-6
b. From the "Job submitted successfully" confirmation, click Close.
8. If the selected location is Inbox:
a. Click Save as Job to save the import operation as a job, which you canschedule to run immediately, or at a later time.
b. Enter a job name and click Submit.
c. To import the file, click Import.
d. From the "Job submitted successfully" confirmation, click Close.
9. You can view the import status in the Jobs console. On the Home page, clickApplication, and then click Jobs.
Exporting Journal TemplatesYou can export Standard and Recurring journal templates. The groups used by thetemplates will also be exported.
Any user with the User role and above can export journal templates, but only if theyhave write access to all the dimension members in the template.
You can also export journal templates through Migration. The templates are exportedas part of Journals under the Relational Data artifact. See Administering Migration forOracle Enterprise Performance Management Cloud.
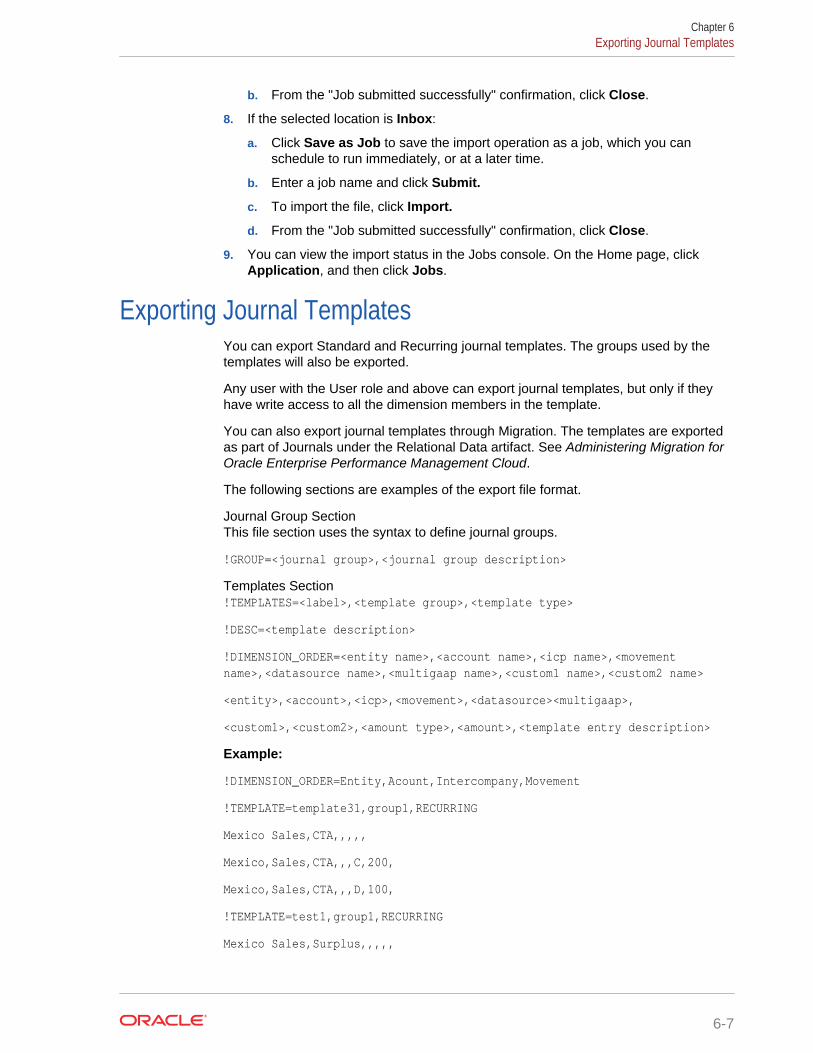
The following sections are examples of the export file format.
Journal Group SectionThis file section uses the syntax to define journal groups.
!GROUP=<journal group>,<journal group description>
Templates Section!TEMPLATES=<label>,<template group>,<template type>
!DESC=<template description>
!DIMENSION_ORDER=<entity name>,<account name>,<icp name>,<movementname>,<datasource name>,<multigaap name>,<custom1 name>,<custom2 name>
<entity>,<account>,<icp>,<movement>,<datasource><multigaap>,
<custom1>,<custom2>,<amount type>,<amount>,<template entry description>
Example:
!DIMENSION_ORDER=Entity,Acount,Intercompany,Movement
!TEMPLATE=template31,group1,RECURRING
Mexico Sales,CTA,,,,,
Mexico,Sales,CTA,,,C,200,
Mexico,Sales,CTA,,,D,100,
!TEMPLATE=test1,group1,RECURRING
Mexico Sales,Surplus,,,,,
Chapter 6Exporting Journal Templates
6-7
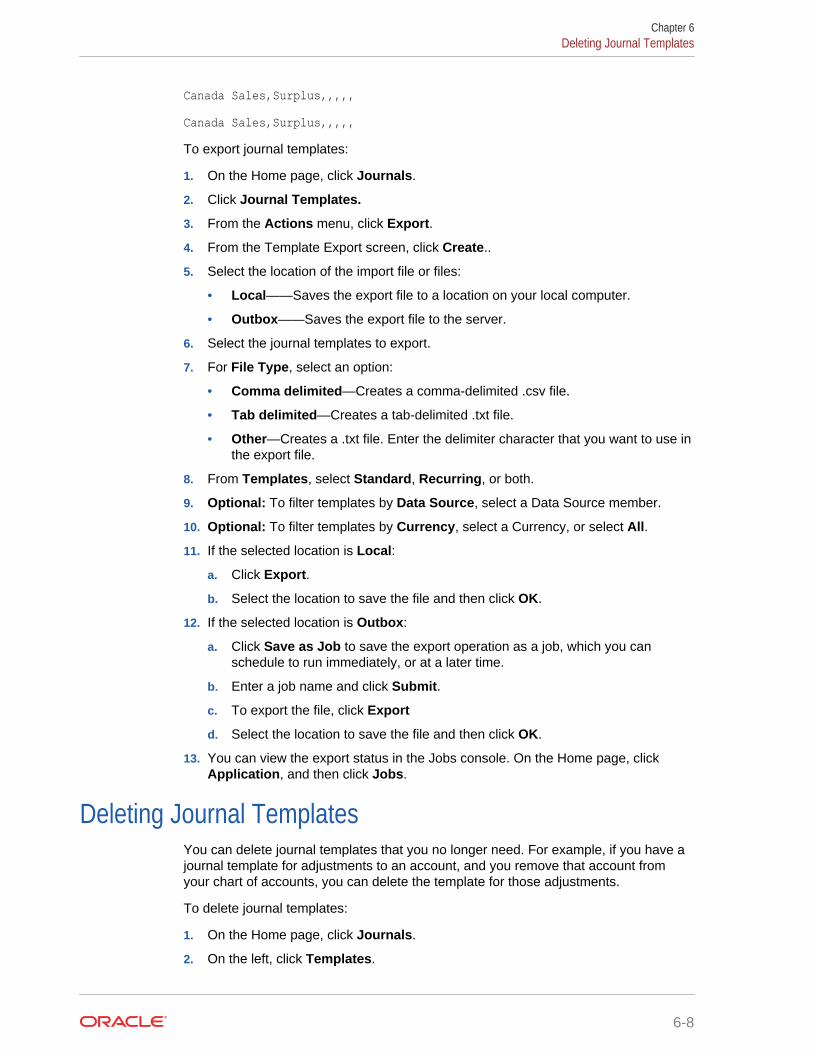
Canada Sales,Surplus,,,,,
Canada Sales,Surplus,,,,,
To export journal templates:
1. On the Home page, click Journals.
2. Click Journal Templates.
3. From the Actions menu, click Export.
4. From the Template Export screen, click Create..
5. Select the location of the import file or files:
• Local——Saves the export file to a location on your local computer.
• Outbox——Saves the export file to the server.
6. Select the journal templates to export.
7. For File Type, select an option:
• Comma delimited—Creates a comma-delimited .csv file.
• Tab delimited—Creates a tab-delimited .txt file.
• Other—Creates a .txt file. Enter the delimiter character that you want to use inthe export file.
8. From Templates, select Standard, Recurring, or both.
9. Optional: To filter templates by Data Source, select a Data Source member.
10. Optional: To filter templates by Currency, select a Currency, or select All.
11. If the selected location is Local:
a. Click Export.
b. Select the location to save the file and then click OK.
12. If the selected location is Outbox:
a. Click Save as Job to save the export operation as a job, which you canschedule to run immediately, or at a later time.
b. Enter a job name and click Submit.
c. To export the file, click Export
d. Select the location to save the file and then click OK.
13. You can view the export status in the Jobs console. On the Home page, clickApplication, and then click Jobs.
Deleting Journal TemplatesYou can delete journal templates that you no longer need. For example, if you have ajournal template for adjustments to an account, and you remove that account fromyour chart of accounts, you can delete the template for those adjustments.
To delete journal templates:
1. On the Home page, click Journals.
2. On the left, click Templates.
Chapter 6Deleting Journal Templates
6-8
3. From the list of templates, select the template to delete.
4. Click the Actions icon and then select Delete.
5. At the system prompt, click Confirm.
Creating Journal FilesYou use journal files to import and export journals in the system. You can createjournal files using an ASCII format supporting multibyte character sets (MBCS) or a fileencoded with the Unicode format, using Little Endian byte ordering. By default, journalfiles use the JLF file extension.
A journal file can contain these sections:
• Version
• Journal Group
• Standard
• Recurring
• Header - Scenario, Year, Period
• Journal
• History
• Journal Entry Header
• Dimension Order
A line starting with an exclamation point (!) indicates the beginning of a new section inthe journal file, and must be followed by a valid section name (for example,JOURNAL). A line starting with an apostrophe (') is considered a comment line and isignored by the system.
Journal Version Section
This file section contains the Financial Consolidation and Close version that you usedto extract journals. The version number is automatically generated when you extractjournals.
Note:
This section is optional.
This example specifies the version:
!Version = 19.05
Journal Group Section
This file section uses this syntax to define journal groups.
!GROUP=<journal group>;<journal group description>
For example, this example defines two journal groups:
Chapter 6Creating Journal Files
6-9
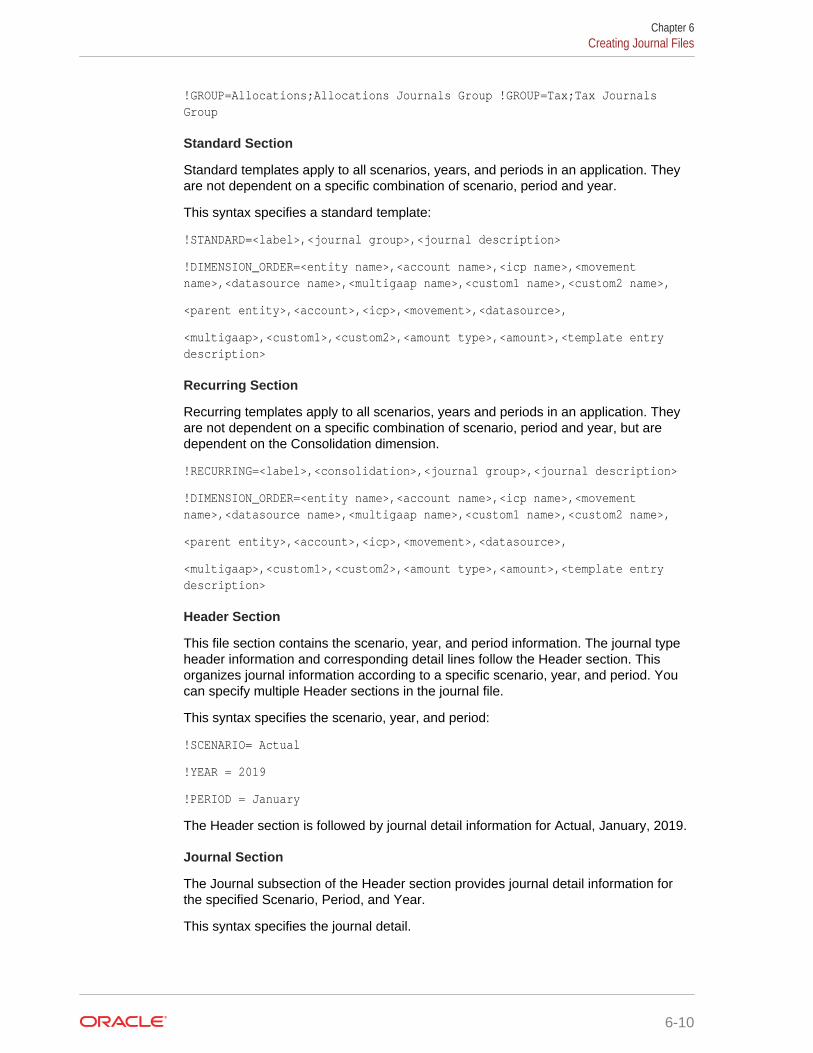
!GROUP=Allocations;Allocations Journals Group !GROUP=Tax;Tax JournalsGroup
Standard Section
Standard templates apply to all scenarios, years, and periods in an application. Theyare not dependent on a specific combination of scenario, period and year.
This syntax specifies a standard template:
!STANDARD=<label>,<journal group>,<journal description>
!DIMENSION_ORDER=<entity name>,<account name>,<icp name>,<movementname>,<datasource name>,<multigaap name>,<custom1 name>,<custom2 name>,
<parent entity>,<account>,<icp>,<movement>,<datasource>,
<multigaap>,<custom1>,<custom2>,<amount type>,<amount>,<template entrydescription>
Recurring Section
Recurring templates apply to all scenarios, years and periods in an application. Theyare not dependent on a specific combination of scenario, period and year, but aredependent on the Consolidation dimension.
!RECURRING=<label>,<consolidation>,<journal group>,<journal description>
!DIMENSION_ORDER=<entity name>,<account name>,<icp name>,<movementname>,<datasource name>,<multigaap name>,<custom1 name>,<custom2 name>,
<parent entity>,<account>,<icp>,<movement>,<datasource>,
<multigaap>,<custom1>,<custom2>,<amount type>,<amount>,<template entrydescription>
Header Section
This file section contains the scenario, year, and period information. The journal typeheader information and corresponding detail lines follow the Header section. Thisorganizes journal information according to a specific scenario, year, and period. Youcan specify multiple Header sections in the journal file.
This syntax specifies the scenario, year, and period:
!SCENARIO= Actual
!YEAR = 2019
!PERIOD = January
The Header section is followed by journal detail information for Actual, January, 2019.
Journal Section
The Journal subsection of the Header section provides journal detail information forthe specified Scenario, Period, and Year.
This syntax specifies the journal detail.
Chapter 6Creating Journal Files
6-10
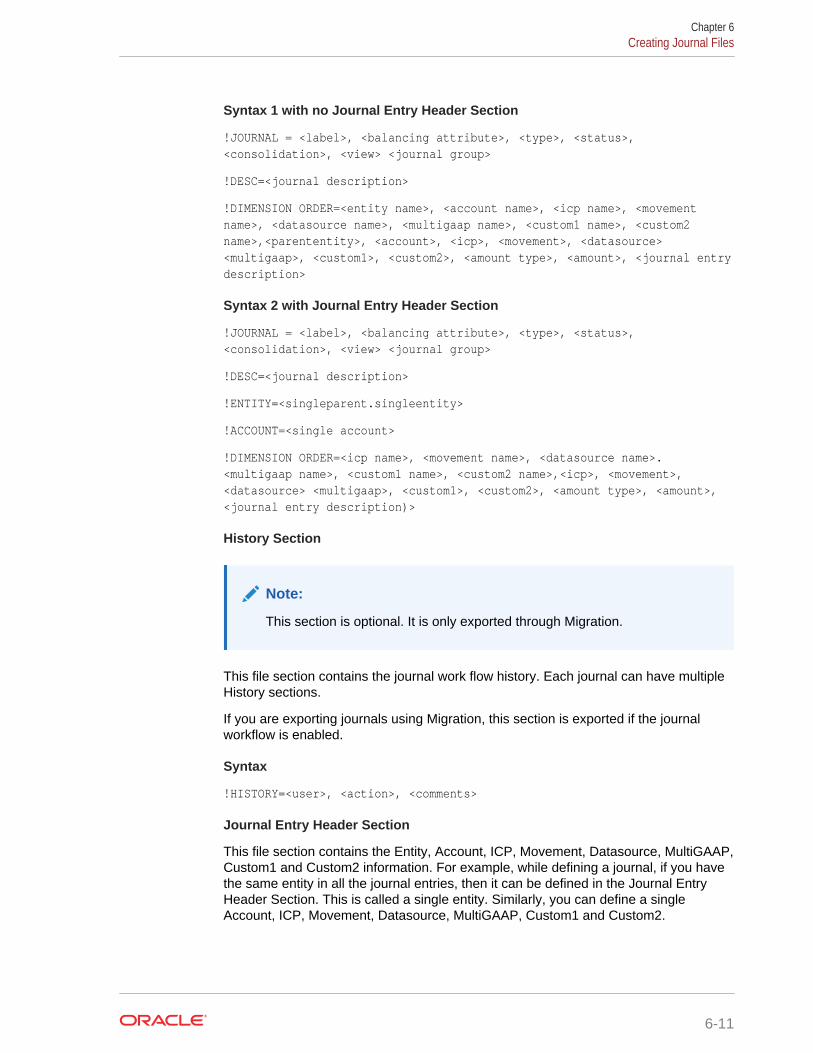
Syntax 1 with no Journal Entry Header Section
!JOURNAL = <label>, <balancing attribute>, <type>, <status>,<consolidation>, <view> <journal group>
!DESC=<journal description>
!DIMENSION ORDER=<entity name>, <account name>, <icp name>, <movementname>, <datasource name>, <multigaap name>, <custom1 name>, <custom2name>,<parententity>, <account>, <icp>, <movement>, <datasource><multigaap>, <custom1>, <custom2>, <amount type>, <amount>, <journal entrydescription>
Syntax 2 with Journal Entry Header Section
!JOURNAL = <label>, <balancing attribute>, <type>, <status>,<consolidation>, <view> <journal group>
!DESC=<journal description>
!ENTITY=<singleparent.singleentity>
!ACCOUNT=<single account>
!DIMENSION ORDER=<icp name>, <movement name>, <datasource name>.<multigaap name>, <custom1 name>, <custom2 name>,<icp>, <movement>,<datasource> <multigaap>, <custom1>, <custom2>, <amount type>, <amount>,<journal entry description)>
History Section
Note:
This section is optional. It is only exported through Migration.
This file section contains the journal work flow history. Each journal can have multipleHistory sections.
If you are exporting journals using Migration, this section is exported if the journalworkflow is enabled.
Syntax
!HISTORY=<user>, <action>, <comments>
Journal Entry Header Section
This file section contains the Entity, Account, ICP, Movement, Datasource, MultiGAAP,Custom1 and Custom2 information. For example, while defining a journal, if you havethe same entity in all the journal entries, then it can be defined in the Journal EntryHeader Section. This is called a single entity. Similarly, you can define a singleAccount, ICP, Movement, Datasource, MultiGAAP, Custom1 and Custom2.
Chapter 6Creating Journal Files
6-11
Note:
This section is optional.
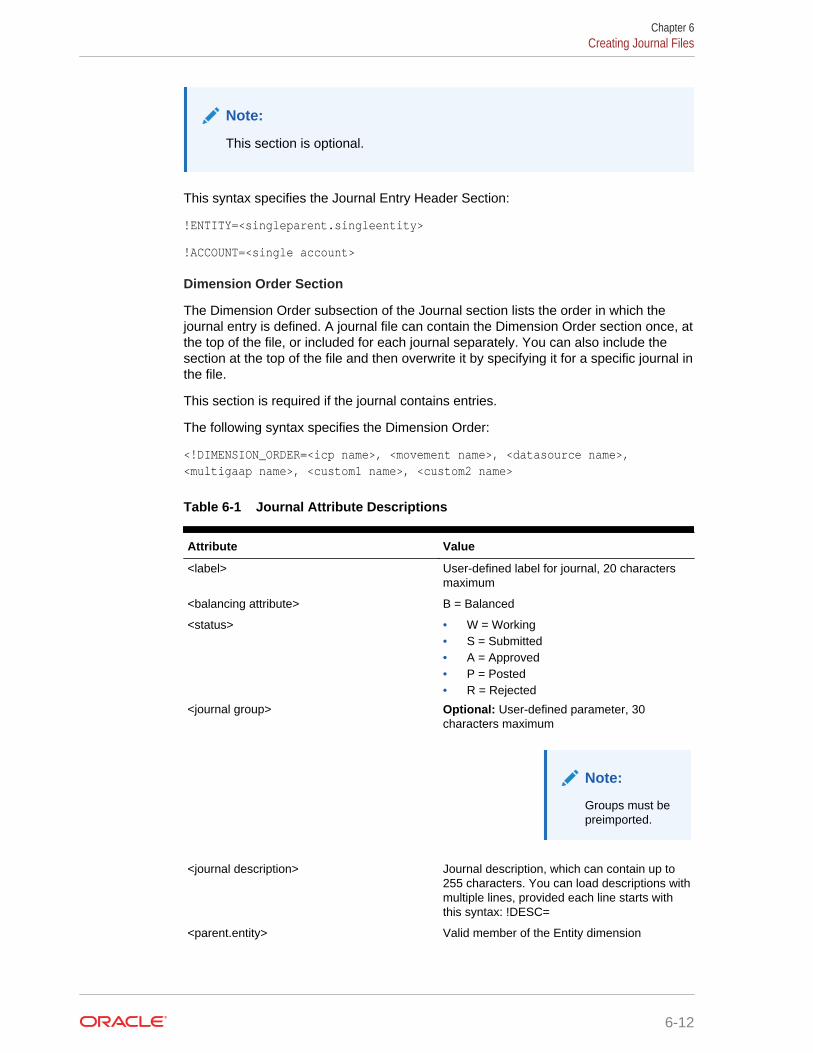
This syntax specifies the Journal Entry Header Section:
!ENTITY=<singleparent.singleentity>
!ACCOUNT=<single account>
Dimension Order Section
The Dimension Order subsection of the Journal section lists the order in which thejournal entry is defined. A journal file can contain the Dimension Order section once, atthe top of the file, or included for each journal separately. You can also include thesection at the top of the file and then overwrite it by specifying it for a specific journal inthe file.
This section is required if the journal contains entries.
The following syntax specifies the Dimension Order:
<!DIMENSION_ORDER=<icp name>, <movement name>, <datasource name>,<multigaap name>, <custom1 name>, <custom2 name>
Table 6-1 Journal Attribute Descriptions
Attribute Value
<label> User-defined label for journal, 20 charactersmaximum
<balancing attribute> B = Balanced
<status> • W = Working• S = Submitted• A = Approved• P = Posted• R = Rejected
<journal group> Optional: User-defined parameter, 30characters maximum
Note:
Groups must bepreimported.
<journal description> Journal description, which can contain up to255 characters. You can load descriptions withmultiple lines, provided each line starts withthis syntax: !DESC=
<parent.entity> Valid member of the Entity dimension
Chapter 6Creating Journal Files
6-12
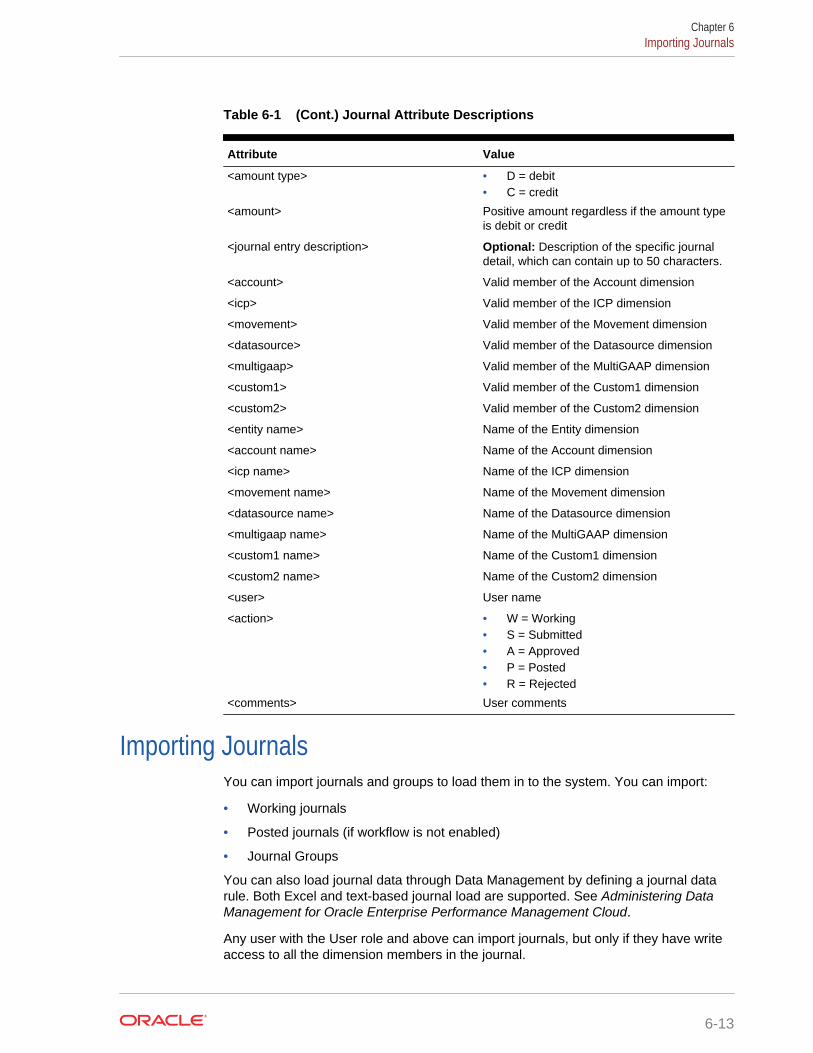
Table 6-1 (Cont.) Journal Attribute Descriptions
Attribute Value
<amount type> • D = debit• C = credit
<amount> Positive amount regardless if the amount typeis debit or credit
<journal entry description> Optional: Description of the specific journaldetail, which can contain up to 50 characters.
<account> Valid member of the Account dimension
<icp> Valid member of the ICP dimension
<movement> Valid member of the Movement dimension
<datasource> Valid member of the Datasource dimension
<multigaap> Valid member of the MultiGAAP dimension
<custom1> Valid member of the Custom1 dimension
<custom2> Valid member of the Custom2 dimension
<entity name> Name of the Entity dimension
<account name> Name of the Account dimension
<icp name> Name of the ICP dimension
<movement name> Name of the Movement dimension
<datasource name> Name of the Datasource dimension
<multigaap name> Name of the MultiGAAP dimension
<custom1 name> Name of the Custom1 dimension
<custom2 name> Name of the Custom2 dimension
<user> User name
<action> • W = Working• S = Submitted• A = Approved• P = Posted• R = Rejected
<comments> User comments
Importing JournalsYou can import journals and groups to load them in to the system. You can import:
• Working journals
• Posted journals (if workflow is not enabled)
• Journal Groups
You can also load journal data through Data Management by defining a journal datarule. Both Excel and text-based journal load are supported. See Administering DataManagement for Oracle Enterprise Performance Management Cloud.
Any user with the User role and above can import journals, but only if they have writeaccess to all the dimension members in the journal.
Chapter 6Importing Journals
6-13
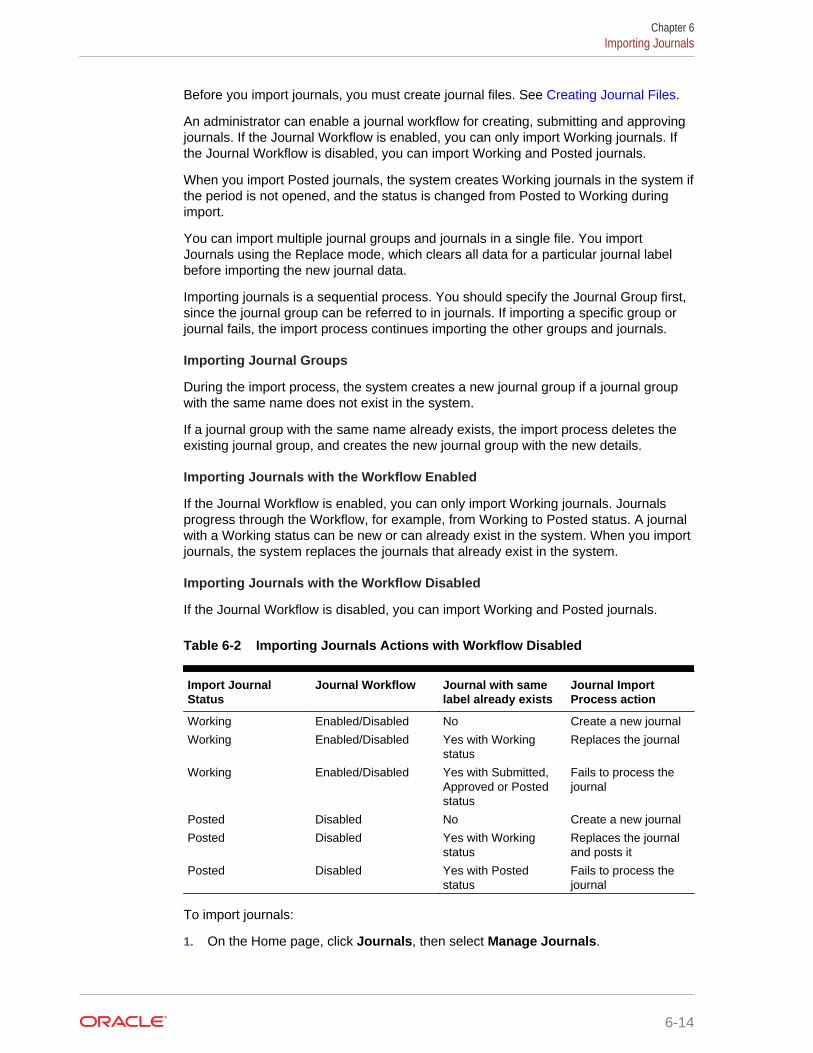
Before you import journals, you must create journal files. See Creating Journal Files.
An administrator can enable a journal workflow for creating, submitting and approvingjournals. If the Journal Workflow is enabled, you can only import Working journals. Ifthe Journal Workflow is disabled, you can import Working and Posted journals.
When you import Posted journals, the system creates Working journals in the system ifthe period is not opened, and the status is changed from Posted to Working duringimport.
You can import multiple journal groups and journals in a single file. You importJournals using the Replace mode, which clears all data for a particular journal labelbefore importing the new journal data.
Importing journals is a sequential process. You should specify the Journal Group first,since the journal group can be referred to in journals. If importing a specific group orjournal fails, the import process continues importing the other groups and journals.
Importing Journal Groups
During the import process, the system creates a new journal group if a journal groupwith the same name does not exist in the system.
If a journal group with the same name already exists, the import process deletes theexisting journal group, and creates the new journal group with the new details.
Importing Journals with the Workflow Enabled
If the Journal Workflow is enabled, you can only import Working journals. Journalsprogress through the Workflow, for example, from Working to Posted status. A journalwith a Working status can be new or can already exist in the system. When you importjournals, the system replaces the journals that already exist in the system.
Importing Journals with the Workflow Disabled
If the Journal Workflow is disabled, you can import Working and Posted journals.
Table 6-2 Importing Journals Actions with Workflow Disabled
Import JournalStatus
Journal Workflow Journal with samelabel already exists
Journal ImportProcess action
Working Enabled/Disabled No Create a new journal
Working Enabled/Disabled Yes with Workingstatus
Replaces the journal
Working Enabled/Disabled Yes with Submitted,Approved or Postedstatus
Fails to process thejournal
Posted Disabled No Create a new journal
Posted Disabled Yes with Workingstatus
Replaces the journaland posts it
Posted Disabled Yes with Postedstatus
Fails to process thejournal
To import journals:
1. On the Home page, click Journals, then select Manage Journals.
Chapter 6Importing Journals
6-14
2. From the Actions menu, click Import.
3. From the Journal Import screen, click Create.
4. Select the location of the import file or files:
• Local—Loads the import file or files from a location on your computer. ClickBrowse to select the import file.
• Inbox—Loads the import file or files from the server. Enter the name of thefile.
5. For File Type, select an option:
• Comma delimited
• Tab delimited
• Other. Enter the delimiter character that is used in the import file.
6. If the selected location is Local:
• Click Import.
• From the "Job submitted successfully" confirmation, click Close.
7. If the selected location is Inbox:
• Click Save as Job to save the import operation as a job, which you canschedule to run immediately, or at a later time.
• Enter a job name and click Submit.
• To import the file, click Import
• From the "Job submitted successfully" confirmation, click Close.
8. You can view the import status in the Jobs console. On the Home page, clickApplication, and then click Jobs.
Exporting JournalsYou can export journals and journal groups from an application for backup purposes.Any user with User role and above can export journals, but only if they have write/readaccess to the dimension members. For any line in the journal where a user has Noneaccess to a member, the data is blank for that line.
You select the Scenario, Year, Period, Entity, and Value dimensions for which toexport journals. You can also select the journal status and type to export.
When you export journals, all journals are exported. You cannot select to exportindividual journals.
When you export journals, they are saved to an ASCII file that supports multibytecharacter sets (MBCS). By default, journal files use the JLF file extension. After youexport journals, you can view and modify the journal information in a text editor.
The workflow history is not included when you export journals. To see the journalworkflow history, you can export journals using Migration.
To export journals:
1. On the Home page, click Journals, then click Manage Journals.
2. From the POV, select the Scenario, Year, and Period for which to export journals.
Chapter 6Exporting Journals
6-15
3. From the Actions menu, click Export.
4. Select the target location of the export file:
• Local—Saves the export file to a location on your local computer.
• Outbox—Saves the export file to the server.
5. Select the journals to export.
6. For File Type, select an option:
• Comma delimited—Creates a comma-delimited .csv file.
• Tab delimited—Creates a tab-delimited .txt file.
• Other—Creates a .txt file. Enter the delimiter character that you want to use inthe export file.
7. From Status, select one or more of these options:
• Working
• Posted
• Submitted ( if workflow is enabled)
• Approved (if workflow is enabled)
8. Optional: To filter journals by Data Source, select a Data Source member.
9. Optional: To filter journals by Currency, select a Currency, or select All.
10. If the selected location is Local:
a. Click Export.
b. Select the location to save the file and then click OK.
11. If the selected location is Outbox:
a. Click Save as Job to save the export operation as a job, which you canschedule to run immediately, or at a later time.
b. Enter a job name and click Submit.
c. To export the file, click Export
d. Select the location to save the file and then click OK..
12. You can view the export status in the Jobs console. On the Home page, clickApplication, and then click Jobs.
Creating JournalsYou use journals to enter adjustments to account balances and maintain an audit trailof changes to your data. They indicate which user made adjustments and whichaccounts, entities, and time periods are affected.
Any user with the User role and above can create journals.
You create journals by entering a journal label and description, point of view for thedata, adjustment amounts, and optional journal group that you can use to filter andsort journals. You can create a new journal, or create a journal from an existing journaltemplate. If you use a template, by default, the journal label created will be the sameas the template label.
Chapter 6Creating Journals
6-16
During application creation, the system creates the FCCS_Journal Input seededmember as a level 0 descendant under FCCS_TotalInputAndAdjusted in theDataSource dimension. It is automatically assigned Journal as the Source Data Typeattribute and Entity Currency as the Source Currency attribute.
If you want to create journals that use Input Currencies, you must first create a customData Source member. The member must be a level 0 descendant ofFCCS_TotalInputAndAdjusted. You then specify Journal as the Source Data attribute,and select an Input Currency for the Source Currency Type.
Note:
You must first set up currencies before you can create a custom Data Sourcemember and assign a currency attribute. After you have created journals thatuse the new Data Source member, you cannot modify the currencyassignment.
After you create a journal, its status is set to Working.
Watch the following video about creating journals:
Creating Journals
To create a journal:
1. On the Home page, click Journals.
2. Select one of these options:
• To create a new journal, click Create.
• To use a journal template, select Create from Template, select the templatefrom the list of available templates, and click Apply.
The Journal Details page is displayed.
3. For Label, enter a journal label.
The label can contain a maximum of 20 characters. Do not use these characters: .+ - */ # {} ; , @ ”
4. Optional: For Description, enter a journal description.
5. From Journal Type, select Regular.
6. Optional: From Group, select a group.
The journal group that you assign must exist in the application.
7. From Data Source, select a Data Source member.
The Currency information is populated from the Source Currency type that youspecified when creating the Data Source member and is read-only.
The Scenario, Year and Period dimensions are populated from the POV selectionin Manage Journals and are read-only.
8. From the Journal Details page, click Create.
9. To select dimension members, use one of these methods:
Chapter 6Creating Journals
6-17
• Enter the member name in the text box.
• Select a row in the line item table and from the Actions icon, click PickMembers to open the Member Selector, select members for the dimensionson that row, and then click OK.
• Select an existing row, click Copy Row, then select another row and clickPaste Row.
10. Enter the adjustment amounts.
Note:
The journals that you create are Balanced by Entity currency. The totaldebits and credits must balance for each entity currency included in thejournal entry.
11. Optional: Scan the journal and verify that the entries are valid. From Actions,click Scan.
12. Click Save to save the journal.
Creating Auto-reversing JournalsYou create auto-reversing journals to enter adjustments that you want to reverse in thenext period, for example, sales or expenses that are collected and paid in the nextperiod. Auto-reversing journals affect two periods of data. You post an auto-reversingjournal to adjust values in one period. When you post the auto-reversing journal, thesystem automatically creates a journal (called an auto-reversal journal) to reversethose adjustments for the next period, and assigns it Approved status. You post thisApproved journal for the reversal to take effect.
For example, you can create and post an auto-reversing journal that adjusts accountsin January. The system creates an auto-reversal journal that reverses thoseadjustments for February.
Table 6-3 Example: Auto-reversing journal
Account Movement Product Credit Debit
Common Stock No Movement No Product 199
Surplus No Movement No Product 199
199 199
Table 6-4 Example: System-generated Auto-reversal journal
Account Movement Product Credit Debit
Common Stock No Movement No Product 199
Surplus No Movement No Product 199
199 199
Chapter 6Creating Auto-reversing Journals
6-18
Because the auto-reversal journal is generated automatically by the system, it can onlybe posted or unposted, but not edited. If you unpost an auto-reversal journal, its statuschanges from Posted back to Approved.
If you unpost the original auto-reversing journal that you created, the system deletesthe automatically-generated auto-reversal journal in the next period. You cannotunpost an auto-reversing journal after its auto-reversal journal has been posted.
To create auto-reversing journals:
1. On the Home page, click Journals.
2. Click Create.
3. For Label, enter a journal label.
Note:
The label can contain a maximum of 20 characters. Do not use thesecharacters: . + - */ # {} ; , @ ”
4. Optional: For Description, enter a journal description.
5. From Journal Type, select Auto Reversing.
6. Optional: From Group, select a group for the journal.
Note:
The journal group that you assign must exist in the application.
7. From Data Source, select a Data Source member.
The Currency information is populated from the Source Currency type that youspecified when creating the Data Source member and is read-only.
8. To select dimension members, use one of these methods:
• Enter the member name in the text box.
• Select a row in the line item table and from the Actions icon, click PickMembers to open the Member Selector, select members for the dimensionson that row, and then click OK.
• Select an existing row, click Copy Row, then select another row and clickPaste Row.
Note:
Both entities must have the same parent. You cannot create journals forentities that have a different parent.
9. Enter an adjustment in the Debit or Credit column.
10. Optional: Scan the journal and verify that the entries are valid. From Actions,click Scan.
Chapter 6Creating Auto-reversing Journals
6-19

11. To save the journal, click Save.
Scanning JournalsAfter you enter journal data, you can scan the journal to verify that all entries are valid.The scan process enables you to identify errors and make any necessary changesbefore you submit or post the journal.
The system checks for these conditions:
• The period is opened.
• The entity is not locked.
• Except for Entity, all other dimension members should be level zero descendantsand should not have member formulas or be calculated.
• The account must be valid. It must be an Asset, Liability, Equity, Revenue,Expense or Statistical account type.
• Line items must exist for the journal.
• The journal should be balanced. Entities should have the same parent and samecurrency.
• The journal should have a valid status.
• Security check: The user should have access to all the journal entry members inthe journal.
To scan journals:
1. On the Home page, click Journals.
2. Create or open a journal.
3. From the Actions menu, click Scan.
Journal StatusThe journal status indicates the current state of the journal. The status of a journalchanges when you create, submit, approve, reject, or post the journal.
Table 6-5 Journal Statuses
Status Description
Working Journal is created. It has been saved, but itmay be incomplete. For example, more lineitems may need to be added.
Submitted Journal is submitted for approval.
If it is rejected, the status returns to Working.
Approved Journal is approved for posting.
If a journal is rejected, it returns to the Workingstatus.
Posted Journal adjustments are posted to thedatabase.
Chapter 6Scanning Journals
6-20

The journal actions that are available depend on the journal status. For example, if thejournal has a status of Approved, the only actions available are Reject or Post.
Editing JournalsYou can edit a journal that you previously created. For example, you can change thedescription of a journal or add adjustments.
You can only edit journals with a Working status. If you need to edit a journal, you canchange it to Working status by performing a journal action such as reject. Only userswith Write access to the dimension members in a journal can edit it.
Reject will go back to working, but unpost goes back to approved and still cannot beedited.
To edit journals:
1. On the Home page, click Journals.
2. To change the Point of View, click a dimension name, and from the memberselector, select dimension members.
3. From the list of journals, select a journal with a status of Working.
4. From the Actions menu, click Edit, and edit the journal as needed.
5. Click Save to save your changes.
Journal Approval WorkflowDuring application creation, an administrator can enable a journal workflow forcreating, submitting and approving journals. If a workflow is enabled, journals areprocessed through an approval sequence, based on the owner of the entities in thejournal. For example, if you create and submit a journal for approval in California, it issent to the approver for the West Region, which is the parent entity of California. Thesystem also sends a notification to the approver of the journal as needed.
Note:
You can enable or disable email notifications. See Setting Up Email forNotifications.
You can create and work with journals if you have the User role and Write access tothe entities in the journal.
You can approve journals if you have the User role and Write access to the parent ofthe entities in the journal, and at least Read access to the entities in the journal.
Chapter 6Editing Journals
6-21
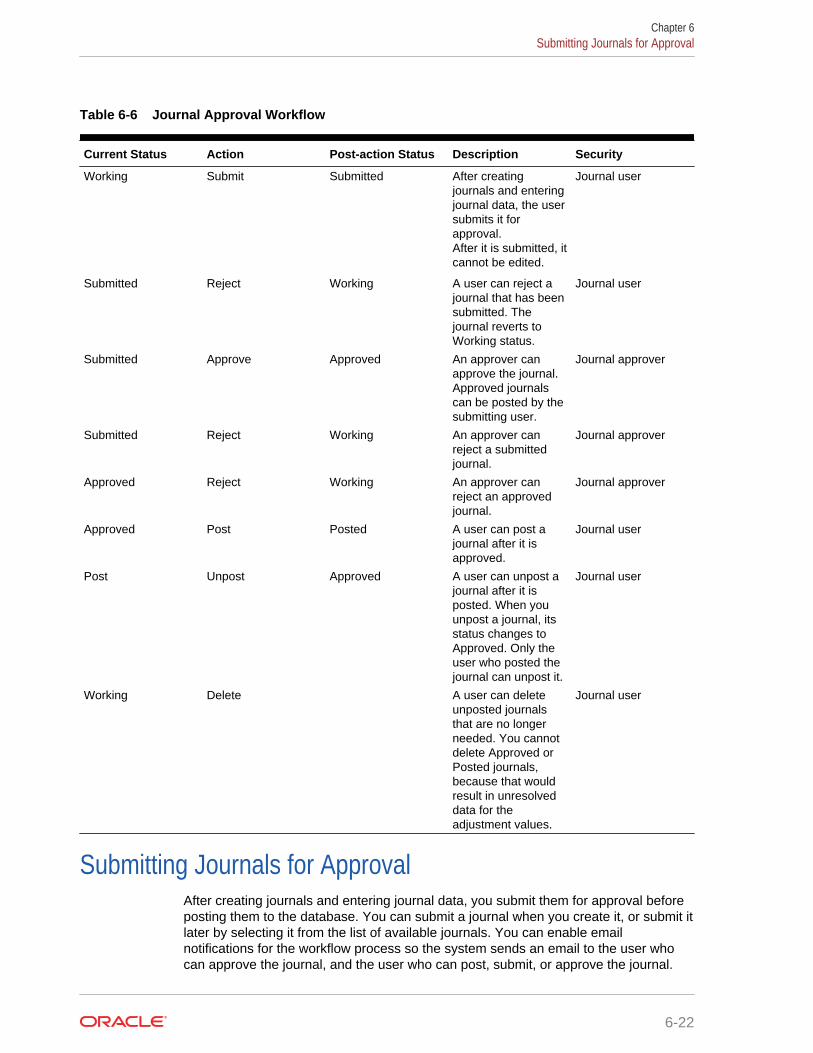
Table 6-6 Journal Approval Workflow
Current Status Action Post-action Status Description Security
Working Submit Submitted After creatingjournals and enteringjournal data, the usersubmits it forapproval.After it is submitted, itcannot be edited.
Journal user
Submitted Reject Working A user can reject ajournal that has beensubmitted. Thejournal reverts toWorking status.
Journal user
Submitted Approve Approved An approver canapprove the journal.Approved journalscan be posted by thesubmitting user.
Journal approver
Submitted Reject Working An approver canreject a submittedjournal.
Journal approver
Approved Reject Working An approver canreject an approvedjournal.
Journal approver
Approved Post Posted A user can post ajournal after it isapproved.
Journal user
Post Unpost Approved A user can unpost ajournal after it isposted. When youunpost a journal, itsstatus changes toApproved. Only theuser who posted thejournal can unpost it.
Journal user
Working Delete A user can deleteunposted journalsthat are no longerneeded. You cannotdelete Approved orPosted journals,because that wouldresult in unresolveddata for theadjustment values.
Journal user
Submitting Journals for ApprovalAfter creating journals and entering journal data, you submit them for approval beforeposting them to the database. You can submit a journal when you create it, or submit itlater by selecting it from the list of available journals. You can enable emailnotifications for the workflow process so the system sends an email to the user whocan approve the journal, and the user who can post, submit, or approve the journal.
Chapter 6Submitting Journals for Approval
6-22
You can submit journals one at a time or in batches. After you submit a journal, thestatus changes to Submitted. A reviewer then approves or rejects the journal, and if itis approved, you can post it.
Watch the following video about submitting journals:
Submitting Journals
To submit journals:
1. On the Home page, click Journals.
2. From the list of journals, select a Working journal to submit.
You can also submit a journal from the Journal Details page.
3. From the Actions menu, click Submit.
4. Optional: Enter a comment in Comments.
5. Optional: To attach a document for more detail supporting the action performed,click Browse to browse to the location of the file.
You can attach a document such as a text, Word or Excel file, PDF, audio, videoor image file. You can load a maximum of three documents as attachments.
To delete an attachment, click Delete (X) next to the file name.
6. Click Submit.
Approving JournalsAfter you submit a journal, you can approve it for posting. You can approve it after youcreate and submit it, or approve it later by selecting it from the journals list.
After you approve a journal, the status changes to Approved and the journal cannot beedited.
To approve journals:
1. On the Home page, click Journals.
2. From the list of journals, select the submitted journal to approve.
You can also approve a journal from the Journal Details page.
3. From the Actions menu, click Approve.
4. Optional: Enter a comment in Comments.
5. Optional: To attach a document for more detail supporting the action performed,click Browse to browse to the location of the file.
You can attach a document such as a text, Word or Excel file, PDF, audio, videoor image file. You can load a maximum of three documents as attachments.
To delete an attachment, click Delete (X) next to the file name.
6. Click Approve.
Chapter 6Approving Journals
6-23

Rejecting JournalsAfter a journal is submitted for approval, or approved, you can reject it. After you rejecta journal, the status changes to Working.
If email notifications have been set up, the system also sends a notification to thecreator of the journal or the user who submitted the journal, notifying them that thejournal has been rejected.
Note:
To enable or disable email notifications, see Setting Up Email forNotifications.
To reject journals:
1. On the Home page, click Journals.
2. From the list of journals, select the submitted or approved journal to reject.
You can also reject a journal from the Journal Details page.
3. From the Actions menu, click Reject.
4. Optional: Enter a comment in Comments.
5. Optional: To attach a document for more detail supporting the action performed,click Browse to browse to the location of the file.
You can attach a document such as a text, Word or Excel file, PDF, audio, videoor image file. You can load a maximum of three documents as attachments.
To delete an attachment, click Delete (X) next to the file name.
6. Click Reject.
Processing Journals without an Approval WorkflowWhen the approval workflow is disabled in the application for journals, you can directlypost a Working journal. You can also directly unpost a posted journal.
Table 6-7 Processing Journals without an Approval Workflow
Current Status Action Post-action Status Description Security
Working Post Posted After you create ajournal and enterjournal data, you canpost it. After it isposted, the changesare posted to thedatabase and thejournal cannot beedited.
Journal user
Chapter 6Rejecting Journals
6-24

Table 6-7 (Cont.) Processing Journals without an Approval Workflow
Current Status Action Post-action Status Description Security
Posted Unpost Working Unposting a journalchanges the status toWorking. You canthen edit the journal.
Journal user
Posting JournalsYou can post a journal after it is approved. You can post it after you submit it and it isapproved, or you can post it later by selecting it from the list of available journals.
You can post journals one a time or in batches. You must have the journal period openbefore you can post, and have access to the security classes of every entity for thedetail lines, and have Write access to every dimension member selected for each line.
When you post a journal, the system stores the adjustment value in the specifiedadjustment member for Data Source, View, and Currency.
If multiple journals are posted to the Entity Input member for the same account, theresults are cumulative. The total from the current journal is added to or subtracted fromthe existing total in Entity Input. The aggregation is done based on Account types.
The system then recalculates the account balances so that the database reflects theadjustments. The journal status changes to Posted, and you can view the adjustmentin a data grid.
When you post an auto-reversing journal, the system automatically creates a journal(called an auto-reversal journal) to reverse those adjustments for the next period. Youpost this Approved journal for the reversal to take effect.
If a journal with the same name exists in the next period, the system will not post theauto-reversing journal. You must delete the journal in the next period, or rename theauto-reversing journal in the current period.
To post journals:
1. On the Home page, click Journals.
2. From the list of journals, select the journals to post.
You can also post a journal from the Journal Details page.
You cannot post previously posted journals.
3. Click the Actions icon and then select Post.
4. Optional: Enter a comment in Comments.
5. Optional: To attach a document for more detail supporting the action performed,click Browse to browse to the location of the file.
You can attach a document such as a text, Word or Excel file, PDF, audio, videoor image file. You can load a maximum of three documents as attachments.
To delete an attachment, click Delete (X) next to the file name.
6. Click Post.
Chapter 6Posting Journals
6-25
Unposting JournalsYou can unpost a journal after it is posted. For example, suppose you post severaljournals with adjustments to an entity, and you receive new data for that entity. Youcan unpost the journals, load the new data, and post the journals again.
Only the user who posted the journal can unpost it. When you unpost a journal, itsstatus changes to Approved.
If you unpost an auto-reversing journal, the auto-reversing journal created in the nextperiod should be deleted. If the auto-reversal journal in the next period is alreadyposted, you cannot unpost the auto-reversing journal.
To unpost journals:
1. On the Home page, click Journals.
2. From the list of journals, select the posted journal to unpost.
You can also unpost a journal from the Journal Details page.
3. Click the Actions icon and then select Unpost.
4. Optional: Enter a comment in Comments.
5. Optional: To attach a document for more detail supporting the action performed,click Browse to browse to the location of the file.
You can attach a document such as a text, Word or Excel file, PDF, audio, videoor image file. You can load a maximum of three documents as attachments.
To delete an attachment, click Delete (X) next to the file name.
6. Click Unpost.
Copying JournalsYou can copy a journal to one or more periods so that you can easily create anotherjournal with similar information. You must have security rights to the journal and makesure that a journal with the same label does not already exist. For example, if you havea journal for January, you can copy the same journal to one or more periods. Thejournal is copied to the destination point of view and has a Working status.
To copy journals:
1. On the Home page, click Journals.
2. From the journals list, select the journal to copy.
3. Click the Actions icon and then select Copy.
4. For the Destination Point of View, select the Scenario, Year, and Period.
5. Click Copy.
Chapter 6Unposting Journals
6-26
Viewing Journal HistoryYou can view the journal approval history, including comments added by approvers.You can also view and download journal attachments.
To view journal history:
1. On the Home page, click Journals.
2. From the journals list, select a journal that has been approved.
3. Click the Actions icon and then select History.
4. If the journal includes an attachment, for each journal action history item, theattachment link is provided. Click the link to view or download the attachment.
5. Click Close.
Deleting JournalsYou can delete unposted journals that you no longer need. You cannot deleteSubmitted, Approved, or Posted journals, because that would result in unresolved datafor the adjustment values that the journal had created.
To delete journals:
1. On the Home page, click Journals.
2. From the journals list, select the journal to delete.
3. Click the Actions icon and then select Delete.
4. At the system prompt, click Confirm.
Chapter 6Viewing Journal History
6-27
7Working with Reports
Generate Journal reports, Intercompany Partner (ICP) Matching reports, and TaskManager reports in Financial Consolidation and Close.
You can generate these types of system reports for Financial Consolidation and Close:
• Journal reports, which display information for a journal or list of journals based onyour selected criteria. See Creating Journal Reports.
• Intercompany Partner (ICP) Matching reports, which display the intercompanytransactions that are to be eliminated during consolidation. See CreatingIntercompany Matching Reports.
• Task Manager reports, which display information about the business process. See Creating Task Manager Reports.
Opening ReportsYou can view the list of available reports, and open and edit reports from the Reportstabs.
You can also launch a financial report directly from the Home page if youradministrator has configured the navigation flow to display the report, and if you haveaccess. For example, an administrator can make the Cash Flows report an icon on theHome page and you can click on the icon to launch the Cash Flows report. You canview the report in the formats that the original report supports, for example, PDF,HTML, or Excel format.
To open reports:
1. On the Home page, click Reports.
2. Select a tab:
• Financial Reports— view or open the reports in the repository.
• Journal Reports—view or create a Journal report.
• Intercompany Reports—view or create an Intercompany Matching report.
• Task Manager Reports—view or create a Task Manager report.
3. For Financial Reports:
a. Optional: Select the Show POV Options check box. When you select areport that has a POV, the POV Member Selector is displayed. The POV thatyou set applies to all reports in the list that have a POV and persists for thecurrent session, until you log out.
The Show POV Options checkbox is selected by default. If you clear theShow POV Options check box, the report launches directly, withoutdisplaying the POV Member Selector. The POV members in the report are themost recently used members on the form, or the dimension's root if there areno most recently used members.
7-1
If you launch a report directly and bypass the POV Member Selector window,when the report is displayed, you can still change the POV members byclicking a link in the POV and selecting different members.
b. Select to display reports in Flat View or Tree View.
c. Select a report, and from Actions, select to view the report in HTML, PDF, orXLS format.
4. For Task Manager Reports:
a. From the list of reports, select a report.
b. From Output Format, select an option: XLSX, XLS, HTML, or PDF.
XLSX is not supported for graphs. HTML and XLS are not supported forgraphs and charts.
Managing Journal ReportsThe Journals Reports page displays a list of all of the journal reports in the application.From Journal Reports, you can open a report to view the details, or delete a report.
To create a journal report, see Creating Journal Reports.
To manage journal reports:
1. On the Home page, click Reports.
2. Click Journal Reports.
3. To view details of a journal report, click a report label.
4. Optional: To change the column sort order, click the header icons and select SortAscending or Sort Descending.
5. Optional: To delete a report, click on the report, then from Actions, click Delete,and then Confirm.
6. To refresh the list of templates, click Refresh. Any new templates that you createdwill be displayed after the refresh.
Creating Journal ReportsYou can create reports to view journal activity that has occurred in the system, checkthe status of journals and review journal adjustments. You can select the POV, formatoptions, and report format type, such as HTML, PDF or XLS.
To run a journal report, you must be a Power User or Administrator and have securityrights to the data for the report. If you do not have access to any of one or morecolumn members of a journal row, then the journal row amounts and totals aredisplayed as asterisks (*).
Watch this video to learn more about creating journal reports.
Creating Journal Reports
To create a Journal report:
1. On the Home page, click Reports.
Chapter 7Managing Journal Reports
7-2
2. Click Journal Reports.
3. Click Create.
4. From the Point of View, select the Scenario, Year, and Period members for thereport.
The dimension members that you select will be displayed in the header section ofthe generated report.
Tip:
The Dimension names (Consolidation, View, and so on) are displayed bydefault. To hide the Dimension names and display only the members,
click the Actions icon and then select Hide Dimension Name.
5. From Row Filter Options, select options:
• Entity - enter an entity name, or click the Member Selector and select anentity.
• Description - enter text to filter by description. You can use an asterisk (*) asa wildcard.
• Account - enter an account name or click the Member Selector and select anaccount.
• Label - enter text to filter by label. You can use an asterisk (*) as a wildcard.
• Group - select a journal group, or select All.
• Status - select one or more options: Working, Submitted, Approved,Posted, or select All.
• Journal Type - select one or more options: Regular, Auto Reversing, AutoReversal, or select All
• Movement - enter a member name, or click the Member Selector and select amember.
• Data Source - select a member.
• Currency - select a currency.
• Intercompany, Multi-GAAP and Custom - enter a member name, or click theMember Selector and select a member.
Note:
Intercompany, Multi-GAAP, and Custom are only displayed if theyare enabled for the application.
6. From Report Type, select an option:
• HTML
• XLS
Chapter 7Creating Journal Reports
7-3
7. To save the report definition, click Save, enter a label and description, and thenclick Submit.
8. To run the report, click Run Report and then select to open or save the report.
Managing Intercompany Matching ReportsIntercompany Matching reports help you track intercompany transactions for analysisand auditing purposes. They show matches for entities and intercompany partnerdimensions that have been set up with the Intercompany attribute enabled.
As part of the consolidation process, a company eliminates transactions betweenrelated entities and partners. Intercompany Matching reports help you ensure thatthese Entity and Partner intercompany transactions are matched correctly.
Note:
To run Intercompany Matching reports, the Intercompany feature must beenabled. If it is not, the Intercompany Reports tab is not displayed.
For details on security access to reports, see "Security for Intercompany MatchingReports".
When you run an Intercompany report, you can display or suppress dimensionmembers, and data cells associated with a specific variance. See Setting UpIntercompany Matching Reports.
Watch this video to learn more about managing intercompany matching reports.
Creating Intercompany Matching Reports
Security for Intercompany Matching ReportsTo run Intercompany Matching Reports, you must be an Administrator or a PowerUser.
If you are a Power User, you can run a report if you have access to the Entities andPartners used in the report as follows:
• If a Power User has access to an Entity, but doesn't have access to a Partner, andthere is an intercompany transaction between the Entity and Partner, the reportwill display the transaction for the Entity to which the user has access, and willdisplay #noaccess for the Partner to which the user doesn't have access.
• If a Power User has access to an Entity, but doesn't have access to a Partner, andthere is no intercompany transaction between the Entity and ICP_Partner, the rowwill not be part of the report.
• If a Power User doesn't have access to both the Entity and Partner, the row willnot be a part of the report, regardless of whether an intercompany transactionexists.
For example:
Chapter 7Managing Intercompany Matching Reports
7-4
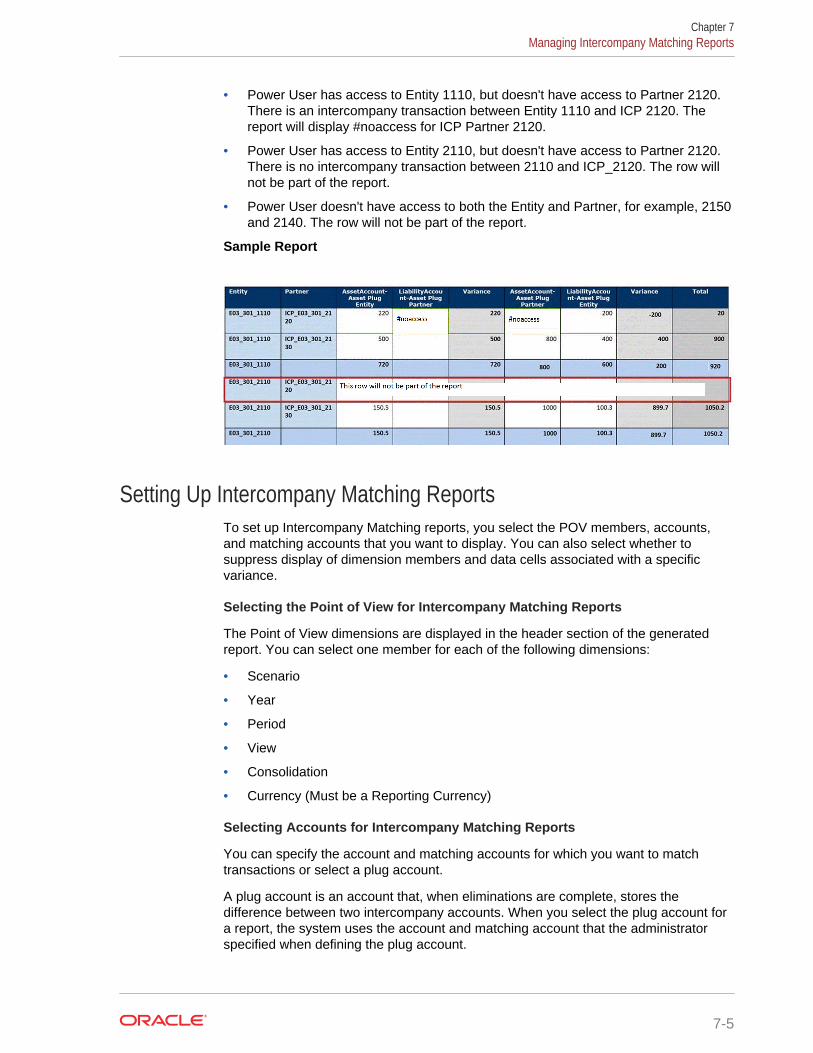
• Power User has access to Entity 1110, but doesn't have access to Partner 2120.There is an intercompany transaction between Entity 1110 and ICP 2120. Thereport will display #noaccess for ICP Partner 2120.
• Power User has access to Entity 2110, but doesn't have access to Partner 2120.There is no intercompany transaction between 2110 and ICP_2120. The row willnot be part of the report.
• Power User doesn't have access to both the Entity and Partner, for example, 2150and 2140. The row will not be part of the report.
Sample Report
Setting Up Intercompany Matching ReportsTo set up Intercompany Matching reports, you select the POV members, accounts,and matching accounts that you want to display. You can also select whether tosuppress display of dimension members and data cells associated with a specificvariance.
Selecting the Point of View for Intercompany Matching Reports
The Point of View dimensions are displayed in the header section of the generatedreport. You can select one member for each of the following dimensions:
• Scenario
• Year
• Period
• View
• Consolidation
• Currency (Must be a Reporting Currency)
Selecting Accounts for Intercompany Matching Reports
You can specify the account and matching accounts for which you want to matchtransactions or select a plug account.
A plug account is an account that, when eliminations are complete, stores thedifference between two intercompany accounts. When you select the plug account fora report, the system uses the account and matching account that the administratorspecified when defining the plug account.
Chapter 7Managing Intercompany Matching Reports
7-5
For each plug account, the accounts that are associated with it and that have thesame Account type are displayed. For example, Asset and Expense account types areassociated, and Liability, Revenue and Equity account types are associated.
Selecting Suppression Dimensions
The Data Source, Movement and Custom-defined dimensions are consideredsuppression dimensions. With these dimensions, you can select multiple members,using either the Member Selector or by specifying member names in text, withmember names delimited by a comma. The Member Selector provides these membercategories:
• Ancestors
• Children
• Descendants
• Siblings (All, Left, Right, Previous, Next)
• Parents
• Level 0 Descendants (All, Previous, Next)
• Left Siblings
• Generation (Previous, Next)
The Suppression dimensions are listed in the generated report header.
You can select one of the following Suppression options:
• Not Suppressed—This is the default selection. The dimension is included as acolumn in the Report Grid. There is a row of all combinations of outer-dimensions(dimensions to the left) members against each member of the Not Suppresseddimension.
• Suppressed—The dimension is not included as a column in the Report Grid.Each row data point implies a summation of all the members selected for thespecified suppression dimension. All dimensions suppressed are treated asthough they were at the end (right-most inner) dimensions in the grid.
• Group—This is the same as Not Suppressed, with the addition of summationrows. All outer-dimensions (dimensions to the left), together with the groupeddimension, form a group. When a group is displayed against all of its innerdimension members (all members to the right of the grouping), a summation ofvalues will is added as the next row.
Note:
The Group option limits the dimension selection members to basemembers only. The Intercompany dimension (Partner dimension) isautomatically groups, and a summation of values is derived for eachEntity/Partner combination.
Selecting Suppression Matches
In Intercompany Matching reports, you can suppress the display of data cellsassociated with a specific variance, as well as the variance itself, if a set of conditions
Chapter 7Managing Intercompany Matching Reports
7-6
are met. Suppressing the data in a data cell means that the system shows no value (ablank value) in that cell. If both variances are suppressed in the row, the system doesnot display the entire row.
You can suppress data by specifying a tolerance value (amount) or percentage. Forexample, if an Entity has an amount of 299 and the Partner Entity has 200, thedifference is 99. If the matching tolerance is 100 and the difference between the Entityand Partner is less than 100 as in this example, the system suppresses thetransactions because it is within the matching tolerance.
If you select not to suppress the Entity/Partner transactions, the system does notsuppress them even if the Entity and Partner amounts are within the matchingtolerance amount or percentage. Using the previous example, even if the differenceamount is 99 and if it is within the matching tolerance, the system does not suppressthe transactions. The matching tolerance is displayed in units.
You can suppress matches using one or both of these options:
• Tolerance Value - You can enter a Tolerance value. The value must be a positivenumber. If the absolute value of a specified variance is less than or equal to theTolerance value, the system suppresses the variance, accounts, and matchingaccount data cells for the specified variance in that row. By default, the Tolerancevalue is 0.
• Tolerance Percent - You can enter a Tolerance percent. The value must be apositive number less than or equal to 100. Determine the absolute value of theportion of the variance that was accounted by the Accounts. Determine theabsolute value of the portion of the variance that was accounted by the MatchingAccounts. Take the minimum of these two values (if there are no MatchingAccounts, then just use the portion from Accounts only), and apply the TolerancePercent. This is the Tolerance Percent Value. If the Tolerance Percent Value isgreater than the absolute value of the variance, then the Variance, Accounts, andMatching Account data cells for the specified Variance in that row are suppressed.
• Both Tolerance Value and Percent - Take the minimum of the Tolerance Valueand the Tolerance Percent Value. If this minimum is greater than the absolutevalue of the Variance, then the Variance, Accounts, and Matching Account datacells for the specified Variance in that row are suppressed.
Note:
A row that has no data for both transactions is automatically suppressed,regardless of whether any of the suppression options are enabled.
The Suppression Match options are displayed in the header section of the generatedreport.
Selecting Display Options
You can modify these default display options for the report:
• Scale Factor - You can enter a value between 0 and 9. The default value is 0. Thescale factor is applied to each data cell. For example, if the value is 1000 and thescale factor is 3, the value will be displayed as 1. All unsuppressed data cells aremultiplied by the Scale Factor. The system performs the calculation andsuppression operations prior to applying the Scale Factor.
Chapter 7Managing Intercompany Matching Reports
7-7
• Decimal Override - You can specify the number of digits shown in the fractionalportion of a decimal. You can enter an integer between 0 -6. The default value is0.
• Member Display - Specify whether to display members using their Name,Description, or both.
• Report Type - You can generate reports in HTML, PDF, XSL, or XSLX format.
• Report Title - You can enter a report title. The default title is IntercompanyReport.
Creating Intercompany Matching ReportsTo create Intercompany Matching reports, you select the POV members, accounts,and matching accounts that you want to display. You can also select whether tosuppress display of dimension members, and data cells associated with a specificvariance.
To create an Intercompany Matching report:
1. On the Home page, click Reports.
2. Click Intercompany Reports.
3. From the Point of View, select a single member for the following dimensions:Scenario, Year, Period, View, Consolidation, and Currency.
The Currency must be a Reporting Currency. The dimension members that youselect will be displayed in the header section of the generated report.
Tip:
The Dimension names (Consolidation, View, and so on) are displayed bydefault. To hide the Dimension names and display only the members,
click the Actions icon, and then select Hide Dimension Names.
4. For Entity and Partner, enter an entity name, or click the Member Selector andselect an entity.
Entities can be both ICP and non-ICP enabled.
5. Optional: For Plug Accounts, select the Plug Account checkbox, then select theaccounts to include, or select All.
6. If you do not select Plug Accounts, select the Accounts and Matching Accountsfor the report.
You must select both the Account and Matching Account. The accounts must bevalid Intercompany accounts. The selected Account and Matching Account cannothave a common account member. The report will be generated for the accounts towhich you have access.
7. For Suppression/Group Dimensions, select members and then select asuppression option:
To select members, you can click the Member Selector, or specify the membernames in text, with each member delimited by a comma.
Chapter 7Managing Intercompany Matching Reports
7-8
• Not Suppressed
• Suppressed
• Group - If you select this option, you can only select base members.
8. For Suppression Options, select one or more options:
• Suppress Matches - click to select this check box.
• Tolerance Value - enter a value.
• Tolerance Percent - enter a percent. The value must be a positive numberless than or equal to 100.
• Reversals - select this check box to suppress the reversal Entity/Partner rows.
For details on suppression options, see Setting Up Intercompany MatchingReports.
9. Select Display Options:
• Report Title - enter a report title or use the default.
• Scale Factor - enter a value between 0 and 9.
• Decimal Override - enter an integer between 0 and 6.
• Member Display - select Name, Description, or Both.
10. From Report Type, select an option:
• HTML
• XLS
• XLSX
11. To run the report, click Run Report and then select to open or save the report.
12. Optional: To save the report as a job, which you can schedule to run immediatelyor at a later time, click Save as Job, enter a job name and click Submit.
Creating Task Manager ReportsYou can create Task Manager reports to report on business process activity. Thesereport format types are available: CVS, XLS, XLSX, HTML, and PDF.
To create Task Manager reports, you must be a Service Administrator or Power User.
To create a report:
1. On the Home page, click Reports.
2. Click Task Manager Reports.
3. Click Generate.
4. Enter a name for the report.
5. From the Schedule drop-down list, select a schedule for the report.
6. From Period, select a period.
7. Select the From Date and To Date for the report.
Chapter 7Creating Task Manager Reports
7-9
8. Optional: To include tasks changed by users, click the selector next to ChangedBy, and select users.
9. Optional: To include other changes, from Field Changed, select a field, forexample, Alert.
10. Optional: For Task ID, enter a task ID for a specific task.
11. Click Generate.
Exporting Formatted Reports to Excel1. On the Home page, click Reports.
2. Select a report to export to Excel.
3. Under Actions, click the Excel icon .
4. If the report is dynamic, you can click to display different members in thePOV.
5. Click Continue, open or save the file, and view the formatted report in Excel.
Note:
You can export the report as fully-formatted to Excel. For example, if you'veexpanded rows and columns, use the Export to Excel toggle on the top leftof the page.
Chapter 7Exporting Formatted Reports to Excel
7-10
8Reviewing and Approving Data
Related Topics
• About Approvals
• Viewing Approval Units
• Approval Unit Actions by Template
• Approval Users and Available Actions
• Approval Unit Status
• Validating Approval Units
• Changing Approval Unit Status
• Approval Unit Ownership
• Adding or Viewing Approval Unit Annotations
• Setting Up Email for Approvals Notification
• Selecting an Alternate Reviewer
About ApprovalsAdministrators can set up an approval process to transfer ownership of data, providereview control, and ensure data privacy.
For the purpose of review, data is organized into approval units. An approval unit is thecombination of data for a specific Scenario, Year, Period, and Entity. For example:
• Actual/FY18/Jan/Massachusetts
• Budget/FY19/Feb/New York
The administrator defines an Approval Unit Hierarchy to show the promotional path forthe review process, and assigns Owners and Reviewers. When the approval processis started, the approval unit moves from one reviewer to another until the reviewprocess is completed. At the end of the review process, the approval unit changes toApproved status. After an approval unit is Approved, no more changes can be made.
You can access data in an approval unit based on a combination of these items:
• Your assigned security role
• The current review level of the approval unit
• Your access rights and reviewer role for the approval unit
From Approvals on the Home page, you can:
• Review and approve data
• Track the progress of the data
• View the promotional path of the data
8-1
• View reviewers' remarks through annotations
• Identify issues in the review process
Viewing Approval UnitsFrom the Approvals page, you can view the approval units assigned to you. You caneasily view the approvals status information, and can switch between a List view or aGraphical view.
If you are the Administrator, you have access to all approval units and all entitieswithin the approval unit hierarchy, and can perform all approval actions.
If you are a Power User or User, the system displays only the entities for which haveeither Read or Write access. Additionally, Power Users can perform all approvalactions.
To view approval unit status:
1. On the Home page, click Approvals.
2. To filter the list, click Filter , then filter by Scenario, Year, Period, ApprovalStatus, or Approval Unit and click Apply.
• To see only your approval units, click Display My Approval Units
• To filter approval units by other properties, click More at the bottom of thedialog box, and then select filter options.
3. From the View drop-down menu at the top right of the page, select how to displaythe information about the approval unit:
• List View
• Graphical View
4. Optional: From the Sort By drop-down list on the right, select an option to sortentities:
• Approvals Status
• Current Owner
• Approval Unit
• Hierarchy Order
Approval Unit Actions by TemplateDepending on the approval template assigned to the Approval Unit Hierarchy, thereview path and actions will vary.
• Consolidation – used only for Locking
• Consolidation Bottom Up – used for Process Management
Chapter 8Viewing Approval Units
8-2
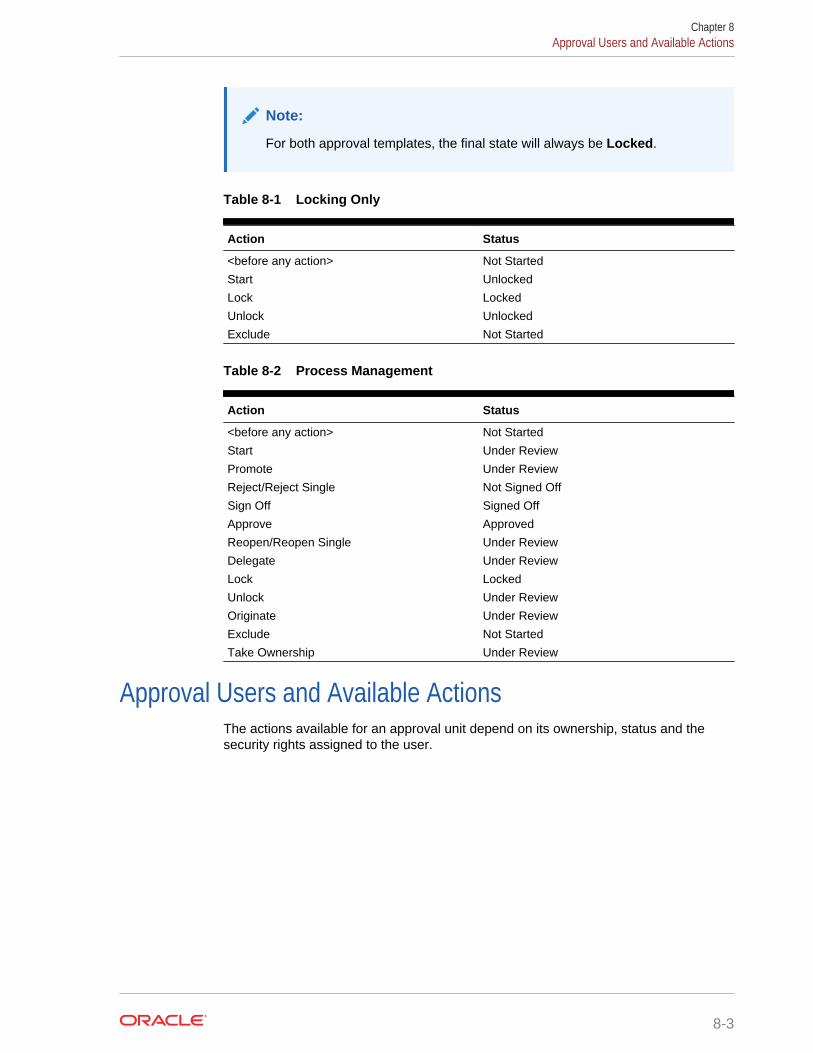
Note:
For both approval templates, the final state will always be Locked.
Table 8-1 Locking Only
Action Status
<before any action> Not Started
Start Unlocked
Lock Locked
Unlock Unlocked
Exclude Not Started
Table 8-2 Process Management
Action Status
<before any action> Not Started
Start Under Review
Promote Under Review
Reject/Reject Single Not Signed Off
Sign Off Signed Off
Approve Approved
Reopen/Reopen Single Under Review
Delegate Under Review
Lock Locked
Unlock Under Review
Originate Under Review
Exclude Not Started
Take Ownership Under Review
Approval Users and Available ActionsThe actions available for an approval unit depend on its ownership, status and thesecurity rights assigned to the user.
Chapter 8Approval Users and Available Actions
8-3
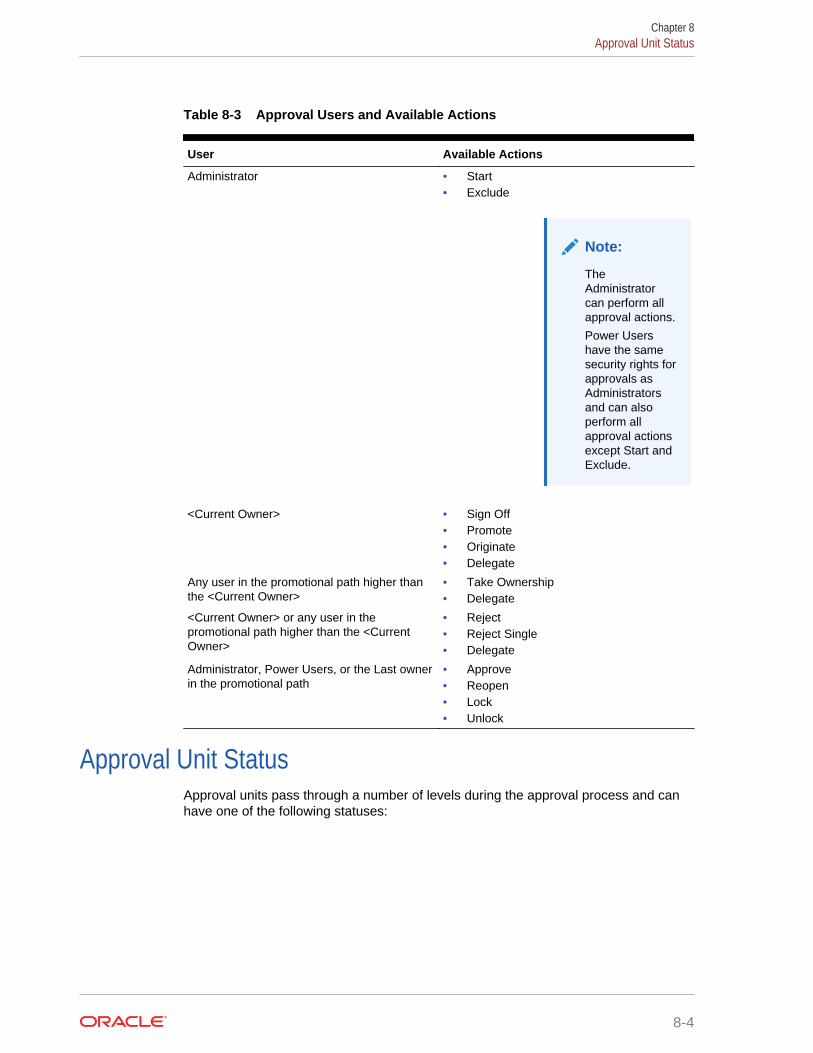
Table 8-3 Approval Users and Available Actions
User Available Actions
Administrator • Start• Exclude
Note:
TheAdministratorcan perform allapproval actions.
Power Usershave the samesecurity rights forapprovals asAdministratorsand can alsoperform allapproval actionsexcept Start andExclude.
<Current Owner> • Sign Off• Promote• Originate• Delegate
Any user in the promotional path higher thanthe <Current Owner>
• Take Ownership• Delegate
<Current Owner> or any user in thepromotional path higher than the <CurrentOwner>
• Reject• Reject Single• Delegate
Administrator, Power Users, or the Last ownerin the promotional path
• Approve• Reopen• Lock• Unlock
Approval Unit StatusApproval units pass through a number of levels during the approval process and canhave one of the following statuses:
Chapter 8Approval Unit Status
8-4
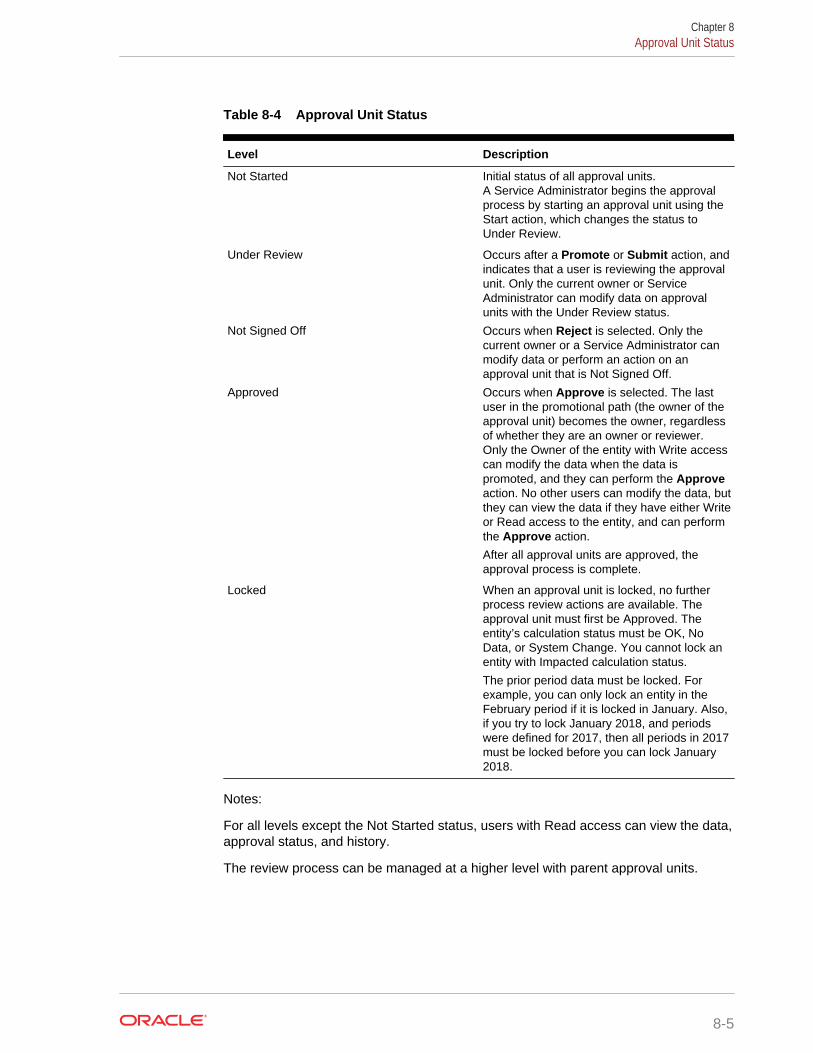
Table 8-4 Approval Unit Status
Level Description
Not Started Initial status of all approval units.A Service Administrator begins the approvalprocess by starting an approval unit using theStart action, which changes the status toUnder Review.
Under Review Occurs after a Promote or Submit action, andindicates that a user is reviewing the approvalunit. Only the current owner or ServiceAdministrator can modify data on approvalunits with the Under Review status.
Not Signed Off Occurs when Reject is selected. Only thecurrent owner or a Service Administrator canmodify data or perform an action on anapproval unit that is Not Signed Off.
Approved Occurs when Approve is selected. The lastuser in the promotional path (the owner of theapproval unit) becomes the owner, regardlessof whether they are an owner or reviewer.Only the Owner of the entity with Write accesscan modify the data when the data ispromoted, and they can perform the Approveaction. No other users can modify the data, butthey can view the data if they have either Writeor Read access to the entity, and can performthe Approve action.
After all approval units are approved, theapproval process is complete.
Locked When an approval unit is locked, no furtherprocess review actions are available. Theapproval unit must first be Approved. Theentity’s calculation status must be OK, NoData, or System Change. You cannot lock anentity with Impacted calculation status.
The prior period data must be locked. Forexample, you can only lock an entity in theFebruary period if it is locked in January. Also,if you try to lock January 2018, and periodswere defined for 2017, then all periods in 2017must be locked before you can lock January2018.
Notes:
For all levels except the Not Started status, users with Read access can view the data,approval status, and history.
The review process can be managed at a higher level with parent approval units.
Chapter 8Approval Unit Status
8-5
Validating Approval UnitsAn administrator can set up data validation rules that apply to approval units. Thevalidation process runs all data validation rules defined for the approval unit, andreports data errors or changes in the promotional path.
In the approval process, validation is run only for these actions:
• Promote
• Approve
• Lock
• Unlock
• Exclude (Administrator action; checks to ensure that the current period is notlocked)
Validation is not run when these actions are performed:
• Sign Off
• Reject
• Reopen
• Originate
• Take Ownership
• Start (administrator action)
To validate approval units:
1. On the Home page, click Approvals.
2. Select an approval unit.
3. Click Validate to run all data validation rules associated with the approval unit.
If the conditions in all associated data validation rules are met, the message NoAdditional Approval Needed is displayed in Sub-Status. This indicates that theapproval unit can be promoted.
Note:
You cannot validate an approval unit that has not been started.
Selecting Promote also runs the validation rules defined for the approvalunit. If the conditions in all associated data validation rules are met, theapproval unit is promoted to the next owner defined in the promotionalpath.
Changing Approval Unit StatusApproval units change status each time reviewers transfer the data to anotherreviewer. Approval units are assigned a status based on what action a reviewer takesto transfer the data to another reviewer.
Chapter 8Validating Approval Units
8-6
Note:
If the status of a parent approval unit changes, all its children change too,unless they were excluded or were approved.
Service Administrators, Power Users, and Users who have been assigned as Owneror Reviewers can perform approval actions. Service Administrators can also performall approval actions whether or not they are in the promotional path.
To change approval unit status:
1. On the Home page, click Approvals.
2. Select an approval unit.
3. From Action, select an action:
• Originate: Changes the ownership of all selected approval units (including alldescendants) to the first owner defined for that approval unit in the hierarchy.
• Start: Begins the approval process. This action is available in Tree View.
• Promote: Passes the approval unit to another user to review. This actionassigns ownership of an approval unit the first time, and thereafter transfersownership of the approval unit from one reviewer to another. Promote causesan implicit signoff by the current owner and changes the approval unit status toUnder Review.
• Exclude: Excludes an approval unit from the approval process. This action isavailable in Tree View.
• Reject: Indicates that the approval unit requires more work from the previousowner. Reject typically requires the previous owner to create another iteration.By default, Reject returns approval unit ownership to the previous owner, butyou may select the next owner. Reject changes the status to Not Signed Off.
• Approve: Approves the approval unit and changes its status to Approved.
• Take Ownership: Become the owner of the approval unit and units under theselected parent unit. Available to the current user and users above the currentapproval unit owner in the hierarchy.
• Delegate: Passes ownership to a user whether or not they are on thepromotional path. The delegated user can promote, reject, sign off or originateapproval units. A delegated user can select Promote when done to return theprocess unit to the user who selected Delegate. They can also select Reject toreturn the process unit to any previous user in the promotional path. Thisaction is only allowed on entities that are in Under Review, Sign Off, or NotSigned Off status. Delegate changes the process unit status to Under Review.
• Sign Off: Signs off on an approval unit. Sign Off does not transfer ownershipof the approval unit, but changes its status to Signed Off.
• Reopen: Reopen an approved approval unit.
4. Click the Change Status button.
5. From Owner, select a user from the list of users in the promotional path, or selectAutomatic to automatically pass the unit to the next reviewer in the path.
Chapter 8Changing Approval Unit Status
8-7
Approval Unit OwnershipThe actions available for an approval unit depend on its ownership, status and thesecurity rights assigned to the user.
Promoting Entities
You can only promote a parent entity when you promote its children to its level. Whenyou promote all the child entities to have the same owner as the parent, then you canpromote the parent, which will also promote all its children.
When promoting a parent entity along with its children, all entities must pass validationbefore any are promoted to the next level. If any entity fails validation, none will bepromoted.
Taking Ownership of Entities
Unless you are the Owner or Reviewer at the same level of the entity within thepromotional path, you cannot perform any approval action except to take ownership.
If you are in the promotional path above the current entity, you can take ownership tobring the entity to your level so that you can then take approval action for the entity.
If you take ownership of a parent entity, you can also take ownership of its children, ifthey are all at the same level.
Approval Users not in the Promotional Path
If you are not in the promotional path for an approval unit, you can view the list ofentities on the Approvals page for which you have Read or Write access, but youcannot perform any approval actions for any of the entities.
No Owner
If the entity has no assigned Owner, no users can take ownership, even if they are inthe promotional path above the entity. Only the Administrator can take ownership ofthe approval unit.
Rejecting Entities
If you reject a parent entity, all of its children are also rejected and their status changesto "Not Signed Off". They return to the previous owner in the path and have the sameowner as the parent entity.
If you want to reject a parent entity but not its children, then you can select RejectSingle. The parent entity will be rejected with its status changed to "Not Signed Off",and ownership will return to the previous owner, but there will be no action performedfor its children. The children retain the same "Under Review" status and stay with thesame Owner.
The default Owner when you reject an approval unit is "Automatic", which means thatit automatically returns to the previous Owner. When you reject an approval unit, youcan select a different Owner from the list of available Owners in the promotional pathbefore you.
Chapter 8Approval Unit Ownership
8-8
Originating Entities
If necessary, you can choose to have the review return to the original owner when itwas first started. When you perform the Originate action, the ownership returns to theoriginal Owner, and the status is "Under Review". The system does not clear any ofthe review process history. The Originate action only affects a base entity and doesnot affect the parent. If you originate the parent entity, it will also originate all of itschildren and they return to the original Owner of the promotional path.
Note:
The Originate action is different from the Exclude and Start action, whichcan only be performed by an Administrator. The Exclude action clears allreview process history, and the Start action sets the Owner to the firstOwner of the promotional path.
Approving Entities
You can only approve the entity when it reaches the end of the promotional path.When you approve an entity, its status changed to "Approved", but does not changeownership.
If you approve only a base entity, it does not affect the status of the parent entity.
If you approve a parent entity, all of its children are included as part of the reviewprocess. If any fail validation, none will be approved.
Reopening Entities
After an entity has been approved, you can either lock the entity or reopen it forreview. When you reopen an entity, the status changes to "Under Review" and theownership returns to the previous Owner in the promotional path.
The default Owner when you reopen an approval unit is "Automatic", which means thatit automatically returns to the previous Owner. When you reopen an approval unit, youcan select a different Owner from the list of available Owners in the promotional pathbefore you.
Locking Entities
The final state in the approval process is "Locked". The system ensure that all priorperiods are locked before locking the current period. Only the last Owner in thepromotional path can change the entity from "Approved" to "Locked".
Unlocking Entities
After an entity is locked, if you need to modify additional data or review the entity, youmust first unlock the entity. The system checks to ensure that all future periods are notlocked prior to unlocking the current period.
If you unlock a parent entity, all children will also be unlocked as part of the process. Ifyou want to unlock only a parent entity, you can select Unlock Single, so that thesystem unlocks only the selected entity.
Chapter 8Approval Unit Ownership
8-9
Signing Off on Entities
This action allows you to acknowledge that you have reviewed and signed off on theentity's data. The status is changed to "Signed Off".
Adding or Viewing Approval Unit AnnotationsAnnotations are comments about the data in a started approval unit. You must have atleast Read access to the approval unit to view or add an annotation.
To add an approval unit annotation:
1. On the Home page, click Approvals.
2. Select an approval unit.
3. Click Add Annotation.
4. Enter an annotation, and then click Post.
The annotation displays under the link. You can respond to an annotation byclicking Reply.
Note:
You can enter a URL that displays as a hyperlink when the annotation isviewed.
5. Click Done.
Setting Up Email for Approvals NotificationOwners and reviewers must enable approvals notifications if they want to receive anemail notice when there’s a change in approvals status or approvals ownership.Approvals notifications are enabled on the Application Settings page.
Approvals notification emails contain the following information:
• URL to Check Status
• Application Name
• Approval unit
• Current Owner
• Previous Owner
• Last Action
• Current Status
• Time
• Annotation Title
• Annotation Text
To enable approvals notifications:
Chapter 8Adding or Viewing Approval Unit Annotations
8-10
1. On the Home page, click Application, and then click Settings.
2. Under Notifications, select Approvals.
3. In Email Address, enter your email address.
4. Click Save.
Selecting an Alternate ReviewerWhen a reviewer is out of the office during the approval process, you can select analternate reviewer to handle review responsibilities while the user is away. Use theOut of Office Assistant to return the review responsibilities to users when they return.
To select an alternate reviewer:
1. On the Home page, click Tools, and then User Preferences.
2. Select the General tab.
3. Under Approvals, select I am currently out of the office.
4. Set what action to take when you're out:
• Promote: Promote the approval unit.
• Reject: Reject the approval unit.
• Submit: Submit the approval unit.
• Delegate: Select to designate an alternate reviewer to handle your reviewresponsibilities while you're away. You can delegate to the next reviewer or toa specific user. You can also include a message for the reviewer in theMessage text box.
5. Click Save.
Chapter 8Selecting an Alternate Reviewer
8-11
9Updating Tasks
Related Topics
• Working with Tasks from the Home Page
• Viewing Task Worklist
• Viewing Tasks from the Schedule Tasks Page
• Updating Task Information
• Creating Connections to the Task Manager and Supplemental Data Extensions
• Updating Tasks from Smart View
• Working with Alerts
• Viewing Related Tasks
• Viewing Task History
• Reassigning Tasks
• Submitting Tasks
• Approving or Rejecting Tasks
• Canceling Tasks
• Setting Tasks to Force Close Status
• Exporting Tasks from Task Lists
• Workflow for Teams
Working with Tasks from the Home PageWhen you launch Financial Consolidation and Close, the Home page displays asummary of tasks assigned to you and their status, such as Open, Late, Due Today, orDue in 7 Days. A number to the left of the status indicates the number of tasks withthat status. If your administrator has enabled the Upcoming Tasks option, you can alsosee items in the upcoming workflow, as well as tasks currently available.You can filterthe list of tasks by Year and Period. When you click a link in the Tasks summarypanel, the Tasks page opens, where you can further filter the list of tasks.
From Tasks on the Home page, you can view these tasks and their details:
• Worklist displays all tasks for a specified POV that you are authorized to view,including those created forTask Manager and Supplemental Data Manager. Alertsand their status are also displayed at the top of the list on the Worklist page and inthe Summary panel.
• Tasks displays tasks for Task Manager.
• Alerts displays an Alerts List and enables you to create and work with alerts.
• Supplemental Data Tasks displays tasks for Supplemental Data Manager.
9-1
• Supplemental Data Analysis displays the Collections for Supplemental DataManager.
You can also view and update tasks from the Task List page, which you can launchfrom a link in your email notification.
Viewing Task WorklistThe Worklist displays all tasks for a selected schedule or template for a specified POVwhich you are authorized to view, including tasks for Task Manager, and SupplementalData Manager. The tasks are listed, and can be easily filtered to display only the onesin which you are interested.
A schedule containing the selected dates for the task is created by the Administrator.
A Summary of the status for All Tasks or My Tasks is displayed, as well as adashboard for the source of the tasks.
From Worklist, you can perform the following tasks:
• Export to Excel
• Open Tasks
• Submit Tasks
• Force Close or Abort a task
• Reassign a Task
Search and Filter Capability
An easy way to access the task that you want is to use the Search field. You cansearch on any field (text or numeric) on the Worklist, except for Date.
You can also use the filtering capability to access particular lists of reconciliations by
clicking the Filter icon next to the Search field and then set the filters you want.
To view the Worklist:
1. From the Home page, click Tasks, and then the Tasks tab to open the Worklist.
2. Optional: In Search, perform the following steps to locate a task:
• Click the Tasks icon to toggle the display between All Tasks or My Tasks.
• Type the name of the required task. You can search on any field (text ornumeric) on the Worklist, except for Date.
3. Optional: Click Filter to select any filters you want to use to manage theworklist:
• Type
• Name
• Description
• Status (Detailed)
• Status
Chapter 9Viewing Task Worklist
9-2
• My End Date
4. Optional: Click the following dimension names to modify the POV:
• Year
• Period
• Due - (None Selected, Late, Seven Days or Today)
• Status - (None Selected, Closed, Open or Pending)
• Source - (Alerts, Tasks, Forms, Journals, Reassignment Request)
Note:
Click multiple entries to add multiple options. Click the selected entryagain to remove it from the list.
5. Optional: Click to open a selected task and view its details. Select the iconsto add or modify options, such as Properties, Instructions, Alerts, and so on.
6. Under Actions, you can perform one of the following actions:
• Submit Task. See Submitting Tasks.
• Abort Task--You abort a task, as opposed to performing a forced close, toprevent successors from continuing and to keep the process moving:
– When a Finish-to-Start or Finish-Error-to-Start predecessor is aborted, itssuccessors remain as Pending. To keep the process moving, you mustedit the successors to remove the aborted predecessor and to start thesuccessors.
– When a Finish-to-Finish or Finish-Error-to-Finish predecessor is aborted,to keep the process moving, the task owner/schedule owner/administratormust force a close of the successor.
• Force Close Task--You can force a task with a status of Open or Error tohave a status of Close.
• Request Reassignment--to temporarily or permanently reassign a task toanother user.
• Refresh
Viewing Tasks from the Schedule Tasks PageFrom the Schedule Tasks page, you can search for tasks, filter lists of tasks, and savelists. You can change views to display more columns or rows.
To view tasks from the Schedule Tasks page:
1. From the Home page, click Tasks.
2. Click the Schedule Tasks tab on the left.
3. Optional: In Search, type the name of the required task.
4. Optional: Under List, select a saved list.
5. Optional: Select a view for the list, as follows:
Chapter 9Viewing Tasks from the Schedule Tasks Page
9-3
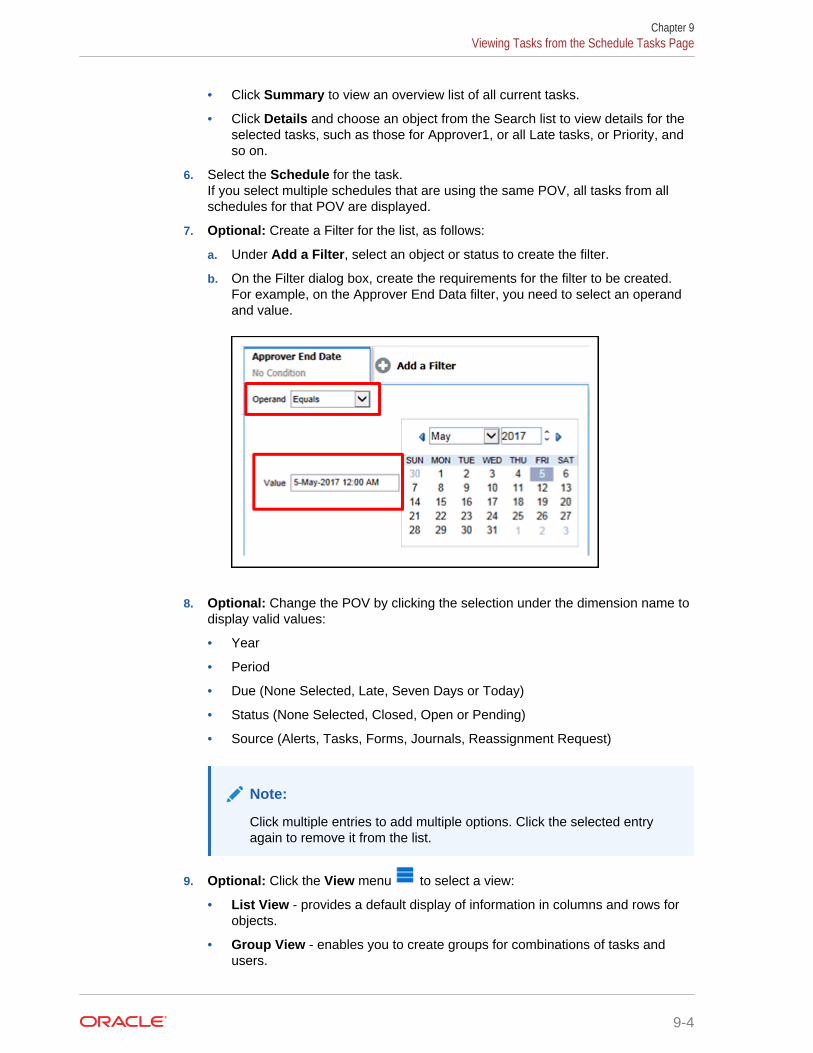
• Click Summary to view an overview list of all current tasks.
• Click Details and choose an object from the Search list to view details for theselected tasks, such as those for Approver1, or all Late tasks, or Priority, andso on.
6. Select the Schedule for the task.If you select multiple schedules that are using the same POV, all tasks from allschedules for that POV are displayed.
7. Optional: Create a Filter for the list, as follows:
a. Under Add a Filter, select an object or status to create the filter.
b. On the Filter dialog box, create the requirements for the filter to be created.For example, on the Approver End Data filter, you need to select an operandand value.
8. Optional: Change the POV by clicking the selection under the dimension name todisplay valid values:
• Year
• Period
• Due (None Selected, Late, Seven Days or Today)
• Status (None Selected, Closed, Open or Pending)
• Source (Alerts, Tasks, Forms, Journals, Reassignment Request)
Note:
Click multiple entries to add multiple options. Click the selected entryagain to remove it from the list.
9. Optional: Click the View menu to select a view:
• List View - provides a default display of information in columns and rows forobjects.
• Group View - enables you to create groups for combinations of tasks andusers.
Chapter 9Viewing Tasks from the Schedule Tasks Page
9-4
• Compact - is a toggle that can be turned on or off and displays more rows ofinformation than the List or Group View.
10. Review the selected tasks.
Updating Task InformationYou can update information for tasks with the Open status. You can answer questions,add comments, and attach references. You can also view status, priority, owner,assignee, schedule, start and end date, instructions, supporting documents or Weblinks, and workflow. The workflow shows the approval chain of the task and displaysthe user name, access role (assignee or approver), status, and dates on which usersperformed their actions. If an administrator has included instructions with referencesfor which there are links, you can link directly to the task.
See these topics:
• Working with Alerts
• Viewing Related Tasks
• Viewing Task History
• Reassigning Tasks
• Submitting Tasks
• Approving or Rejecting Tasks
• Canceling Tasks
• Setting Tasks to Force Close Status
Creating Connections to the Task Manager andSupplemental Data Extensions
You can use Oracle Smart View for Office to connect to your worklist and update yourTask Manager and Supplemental Data Manager tasks within Excel.
You must create two private connections to use with the Task Manager andSupplemental Data extensions.
Note:
Before you begin, ensure that you have installed Smart View and the TaskManager and Supplemental Data extensions. See “Installing and ConfiguringSmart View” and “Installing Smart View Extension for Task Manager andSupplemental Data Management” in Getting Started with Oracle EnterprisePerformance Management Cloud for Administrators.
To create connections to Financial Consolidation and Close Task Manager andSupplemental Data extensions:
1. Launch Excel, then select the Smart View tab, and then select Panel.
Chapter 9Updating Task Information
9-5

2. In the Smart View Panel, select Private Connections, and then, at the bottom ofthe panel, select Create new connection.
3. When prompted, select Smart View HTTP Provider to display the AddConnection wizard.
4. In Add Connection - URL, use the following syntax for the private connection,and then click Next.
• For Task Manager:http(s)://serviceURL/HyperionPlanning/cm/svp
• For Supplemental Data Manager:http(s)://serviceURL/HyperionPlanning/sdm/svp
You can create one connection at a time in the wizard. For example, firstcreate a connection to Task Managerr. Then perform the entire procedureagain to create a connection to Supplemental Data Manager.
5. When prompted, provide your login credentials: domain name, user name, andpassword to sign in.
6. In Add Connection - Application/Cube, navigate to the application and databaseto work with, select it, and then click Next.
7. In Add Connection - Name/Description, enter a name for the connection and anoptional description.
8. Click Finish.
9. Repeat these steps to create a second private connection.When finished, you should have two new private connections, one for TaskManager and one for Supplemental Data Manager. Continue with the followingtopics:
• Updating Tasks from Smart View
• Working with Supplemental Data in Smart View
Updating Tasks from Smart ViewUsing Oracle Smart View for Office, you can work directly with Task Manager tasksand schedules.
Your schedules and tasks for the selected period are displayed. You can only seethose tasks and schedules for which you are authorized. This is the "Display MyTasks" view of the worklist, so not all the tasks that you have visibility to see will beshown. Depending on your current role, for example, Assignee, Preparer, or Approver,the available options such as Approve or Reject will change to match the associatedrole. If you have different roles, you may need to log on as each role to performdifferent operations.
Chapter 9Updating Tasks from Smart View
9-6
Note:
Before you begin, ensure that you have installed Smart View and the TaskManager and Supplemental Data extensions and create private connectionsto use with the extensions. See “Installing and Configuring Smart View” and“Installing Smart View Extension for Task Manager and Supplemental DataManagement” in Getting Started with Oracle Enterprise PerformanceManagement Cloud for Administrators and Creating Connections to the TaskManager and Supplemental Data Extensions
When you click a schedule from the list, the system displays a list of the tasks that youare currently working on. After a task has been submitted or approved, it is no longerdisplayed on the list.
The available Actions depend on your user role:
• Assignee: Submit Task
• Approver: Approve and Reject Task
• Assignee or Approver: Reassign Task
If you submit a task that is incomplete, for example, you need to answer questionsfirst, a validation error displays when you submit the task. You can double-click on thetask or row to open the task and finish completing it.
For information on working with Smart View, see Oracle Smart View for Office User'sGuide.
To update tasks from Smart View:
1. Launch Excel, then select the Smart View tab, and then select Panel.
2. In the Smart View Panel, select Private Connections.
3. In the Private Connections panel, select the Task Manager connection from thedrop-down menu.
4. When prompted, provide your login credentials: domain name, user name, andpassword to sign in.
5. Under Private Connections, select a schedule.
6. Under Name, double-click the task that you want to view and open the TaskManager Task Dialog
7. Select the appropriate option for the selected task:
• Submit Task
• Approve
• Reject
• Reassign Task
Working with AlertsDuring the course of running a business process, you may encounter roadblocks thataffect your progress. For example, you may encounter a hardware or system failure, or
Chapter 9Working with Alerts
9-7
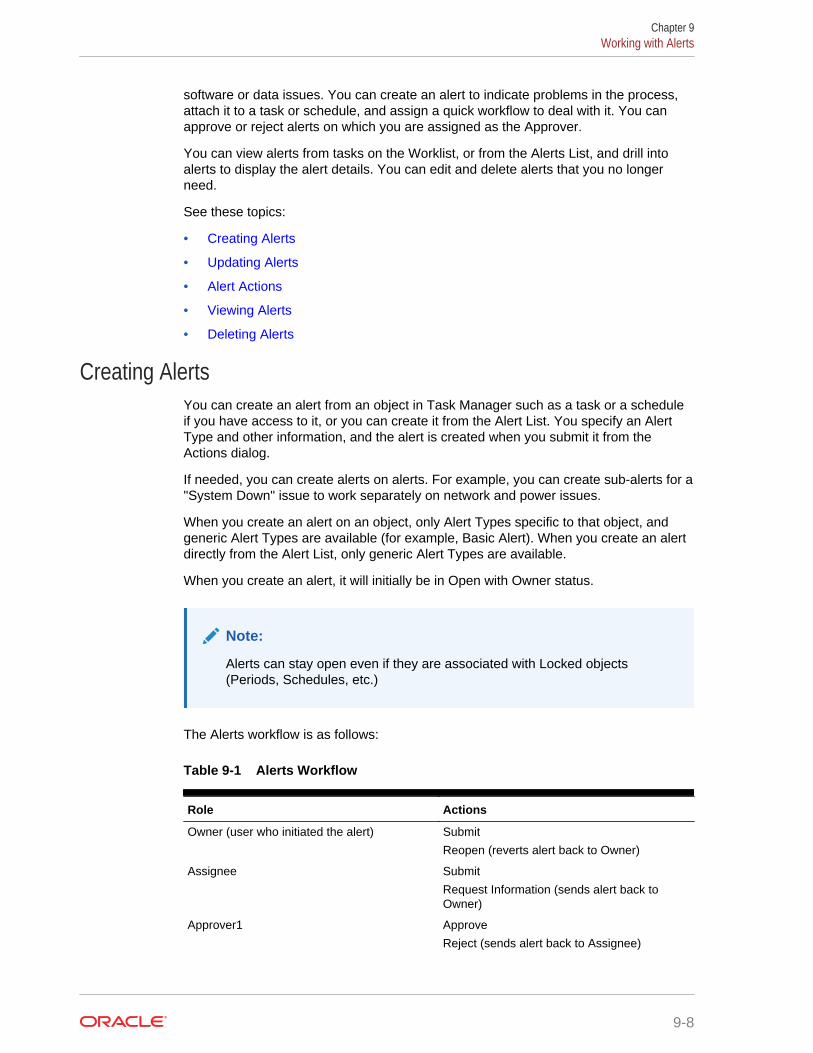
software or data issues. You can create an alert to indicate problems in the process,attach it to a task or schedule, and assign a quick workflow to deal with it. You canapprove or reject alerts on which you are assigned as the Approver.
You can view alerts from tasks on the Worklist, or from the Alerts List, and drill intoalerts to display the alert details. You can edit and delete alerts that you no longerneed.
See these topics:
• Creating Alerts
• Updating Alerts
• Alert Actions
• Viewing Alerts
• Deleting Alerts
Creating AlertsYou can create an alert from an object in Task Manager such as a task or a scheduleif you have access to it, or you can create it from the Alert List. You specify an AlertType and other information, and the alert is created when you submit it from theActions dialog.
If needed, you can create alerts on alerts. For example, you can create sub-alerts for a"System Down" issue to work separately on network and power issues.
When you create an alert on an object, only Alert Types specific to that object, andgeneric Alert Types are available (for example, Basic Alert). When you create an alertdirectly from the Alert List, only generic Alert Types are available.
When you create an alert, it will initially be in Open with Owner status.
Note:
Alerts can stay open even if they are associated with Locked objects(Periods, Schedules, etc.)
The Alerts workflow is as follows:
Table 9-1 Alerts Workflow
Role Actions
Owner (user who initiated the alert) Submit
Reopen (reverts alert back to Owner)
Assignee Submit
Request Information (sends alert back toOwner)
Approver1 Approve
Reject (sends alert back to Assignee)
Chapter 9Working with Alerts
9-8
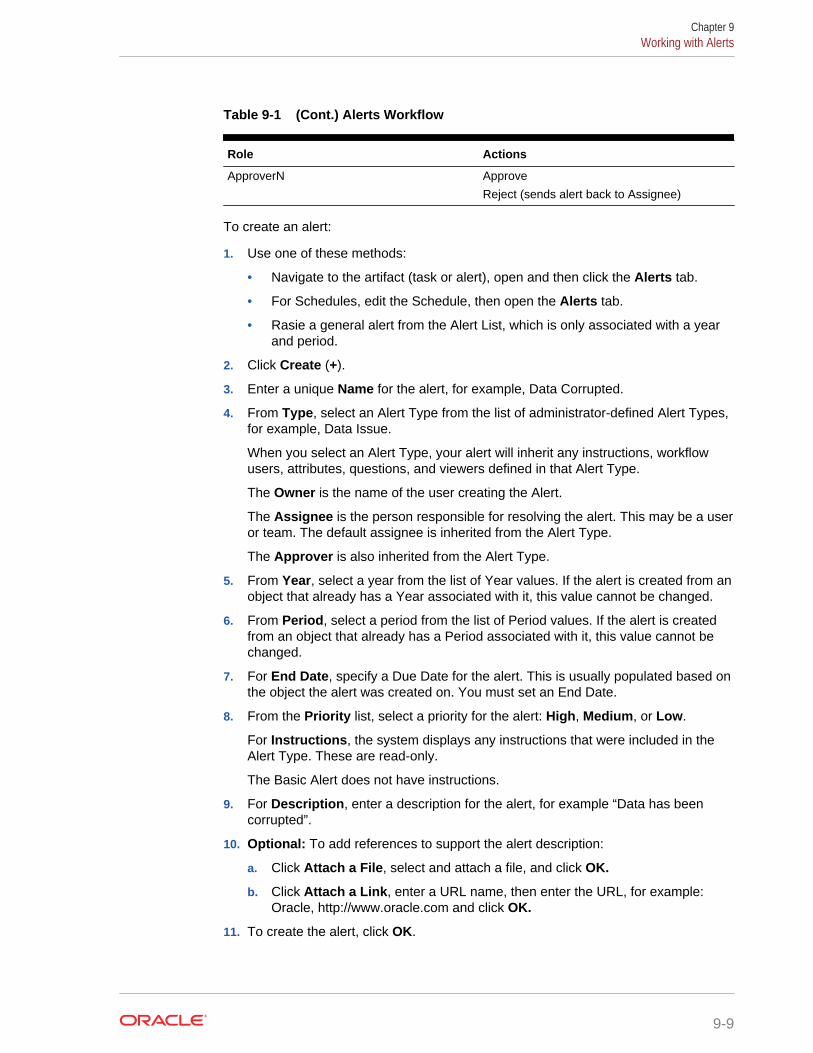
Table 9-1 (Cont.) Alerts Workflow
Role Actions
ApproverN Approve
Reject (sends alert back to Assignee)
To create an alert:
1. Use one of these methods:
• Navigate to the artifact (task or alert), open and then click the Alerts tab.
• For Schedules, edit the Schedule, then open the Alerts tab.
• Rasie a general alert from the Alert List, which is only associated with a yearand period.
2. Click Create (+).
3. Enter a unique Name for the alert, for example, Data Corrupted.
4. From Type, select an Alert Type from the list of administrator-defined Alert Types,for example, Data Issue.
When you select an Alert Type, your alert will inherit any instructions, workflowusers, attributes, questions, and viewers defined in that Alert Type.
The Owner is the name of the user creating the Alert.
The Assignee is the person responsible for resolving the alert. This may be a useror team. The default assignee is inherited from the Alert Type.
The Approver is also inherited from the Alert Type.
5. From Year, select a year from the list of Year values. If the alert is created from anobject that already has a Year associated with it, this value cannot be changed.
6. From Period, select a period from the list of Period values. If the alert is createdfrom an object that already has a Period associated with it, this value cannot bechanged.
7. For End Date, specify a Due Date for the alert. This is usually populated based onthe object the alert was created on. You must set an End Date.
8. From the Priority list, select a priority for the alert: High, Medium, or Low.
For Instructions, the system displays any instructions that were included in theAlert Type. These are read-only.
The Basic Alert does not have instructions.
9. For Description, enter a description for the alert, for example “Data has beencorrupted”.
10. Optional: To add references to support the alert description:
a. Click Attach a File, select and attach a file, and click OK.
b. Click Attach a Link, enter a URL name, then enter the URL, for example:Oracle, http://www.oracle.com and click OK.
11. To create the alert, click OK.
Chapter 9Working with Alerts
9-9
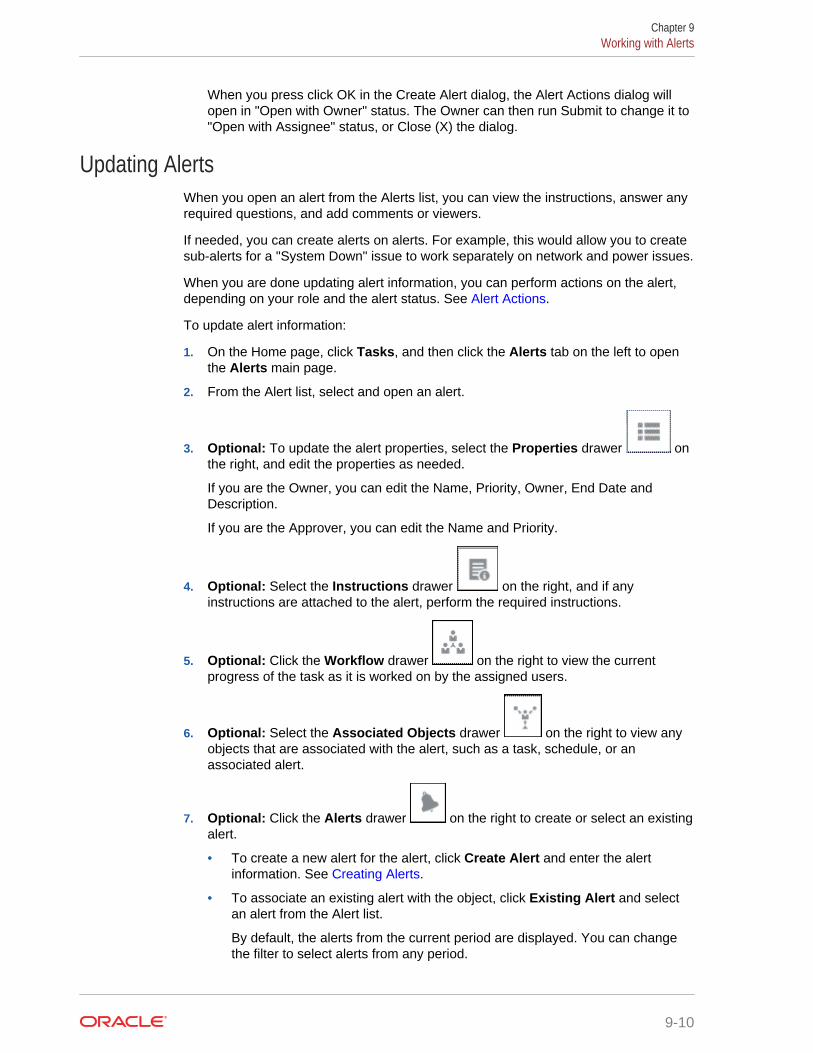
When you press click OK in the Create Alert dialog, the Alert Actions dialog willopen in "Open with Owner" status. The Owner can then run Submit to change it to"Open with Assignee" status, or Close (X) the dialog.
Updating AlertsWhen you open an alert from the Alerts list, you can view the instructions, answer anyrequired questions, and add comments or viewers.
If needed, you can create alerts on alerts. For example, this would allow you to createsub-alerts for a "System Down" issue to work separately on network and power issues.
When you are done updating alert information, you can perform actions on the alert,depending on your role and the alert status. See Alert Actions.
To update alert information:
1. On the Home page, click Tasks, and then click the Alerts tab on the left to openthe Alerts main page.
2. From the Alert list, select and open an alert.
3. Optional: To update the alert properties, select the Properties drawer onthe right, and edit the properties as needed.
If you are the Owner, you can edit the Name, Priority, Owner, End Date andDescription.
If you are the Approver, you can edit the Name and Priority.
4. Optional: Select the Instructions drawer on the right, and if anyinstructions are attached to the alert, perform the required instructions.
5. Optional: Click the Workflow drawer on the right to view the currentprogress of the task as it is worked on by the assigned users.
6. Optional: Select the Associated Objects drawer on the right to view anyobjects that are associated with the alert, such as a task, schedule, or anassociated alert.
7. Optional: Click the Alerts drawer on the right to create or select an existingalert.
• To create a new alert for the alert, click Create Alert and enter the alertinformation. See Creating Alerts.
• To associate an existing alert with the object, click Existing Alert and selectan alert from the Alert list.
By default, the alerts from the current period are displayed. You can changethe filter to select alerts from any period.
Chapter 9Working with Alerts
9-10

8. Optional: Click the Attributes tab on the right to view the Attributesrelevant to your role on the alert. If an attribute list is available, you can select anattribute for the alert.
9. Optional: Click the Questions tab on the right to view and answer anyquestions required for the alert.
If you are the Owner (the user who created the alert), you can also be askedquestions. This allows key details to be gathered from the user experiencing theissue.
10. Optional: Click the Comments tab on the right to enter a new comment,and then click Post.
If there are saved comments, they are displayed in chronological order below theentry area, with the latest comments first. If there are more than three comments,the system displays a Show All Comments link.
To attach a file or link to a URL as a reference:
• Click File, select and attach a file, and then click OK.
• Click Link, enter a URL, and click OK.
11. Optional: Click the Viewers tab on the right to add Viewers to the Alert.
• To select Viewers from the Member Selector, click Add , enter or selectthe name of the user, group or team that will have View access to the alert,and then click OK.
• To add a user outside the system who needs to be notified about the alert,
click Add External User . Enter a user Email Address, select aNotification Priority, and then click OK.
Note:
An external user will not have any visibility or access to the alert,they will only receive notifications about it.
Notifications will be sent for the priority level or Higher. For example,if set to High, the notification will only be sent when the alert is set toHigh. If set to Low, then they will be notified for all priority levels(Low, Medium, High).
Chapter 9Working with Alerts
9-11
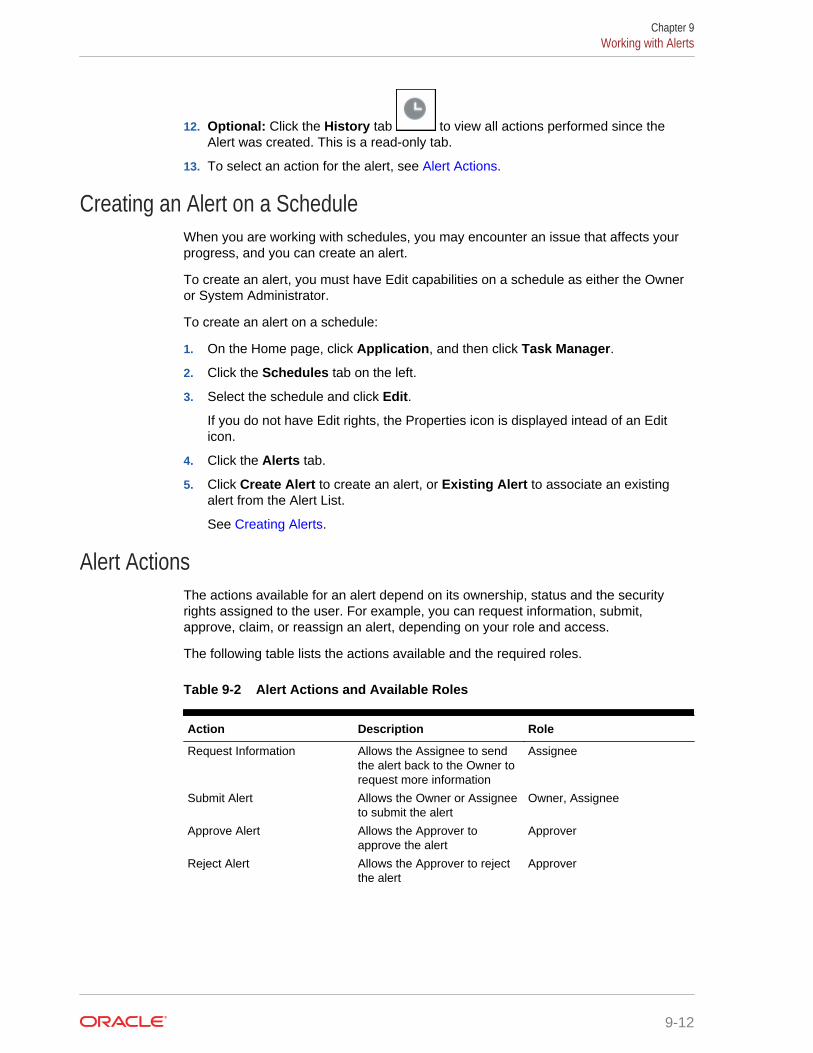
12. Optional: Click the History tab to view all actions performed since theAlert was created. This is a read-only tab.
13. To select an action for the alert, see Alert Actions.
Creating an Alert on a ScheduleWhen you are working with schedules, you may encounter an issue that affects yourprogress, and you can create an alert.
To create an alert, you must have Edit capabilities on a schedule as either the Owneror System Administrator.
To create an alert on a schedule:
1. On the Home page, click Application, and then click Task Manager.
2. Click the Schedules tab on the left.
3. Select the schedule and click Edit.
If you do not have Edit rights, the Properties icon is displayed intead of an Editicon.
4. Click the Alerts tab.
5. Click Create Alert to create an alert, or Existing Alert to associate an existingalert from the Alert List.
See Creating Alerts.
Alert ActionsThe actions available for an alert depend on its ownership, status and the securityrights assigned to the user. For example, you can request information, submit,approve, claim, or reassign an alert, depending on your role and access.
The following table lists the actions available and the required roles.
Table 9-2 Alert Actions and Available Roles
Action Description Role
Request Information Allows the Assignee to sendthe alert back to the Owner torequest more information
Assignee
Submit Alert Allows the Owner or Assigneeto submit the alert
Owner, Assignee
Approve Alert Allows the Approver toapprove the alert
Approver
Reject Alert Allows the Approver to rejectthe alert
Approver
Chapter 9Working with Alerts
9-12
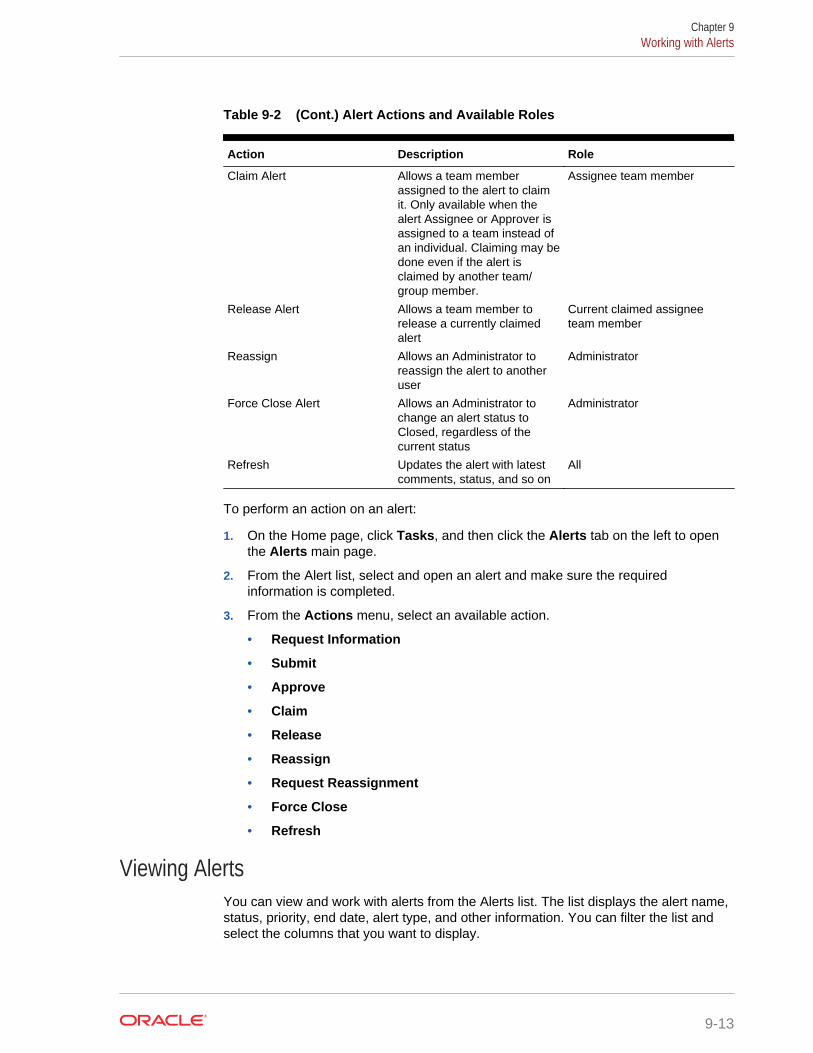
Table 9-2 (Cont.) Alert Actions and Available Roles
Action Description Role
Claim Alert Allows a team memberassigned to the alert to claimit. Only available when thealert Assignee or Approver isassigned to a team instead ofan individual. Claiming may bedone even if the alert isclaimed by another team/group member.
Assignee team member
Release Alert Allows a team member torelease a currently claimedalert
Current claimed assigneeteam member
Reassign Allows an Administrator toreassign the alert to anotheruser
Administrator
Force Close Alert Allows an Administrator tochange an alert status toClosed, regardless of thecurrent status
Administrator
Refresh Updates the alert with latestcomments, status, and so on
All
To perform an action on an alert:
1. On the Home page, click Tasks, and then click the Alerts tab on the left to openthe Alerts main page.
2. From the Alert list, select and open an alert and make sure the requiredinformation is completed.
3. From the Actions menu, select an available action.
• Request Information
• Submit
• Approve
• Claim
• Release
• Reassign
• Request Reassignment
• Force Close
• Refresh
Viewing AlertsYou can view and work with alerts from the Alerts list. The list displays the alert name,status, priority, end date, alert type, and other information. You can filter the list andselect the columns that you want to display.
Chapter 9Working with Alerts
9-13
Note:
Alerts and their status are also displayed at the top of the list on the Worklisttab.
When you open an alert, the system displays the alert information and a work area.The top bar displays the object name. The Alert name is displayed above the parentobject (task, schedule, and so on). The Actions menu contains available action optionsdepending on your role and the workflow for the alert. See Alert Actions.
If one of these actions is available, it is displayed as a separate button in the top bar:
• Submit
• Approve
• Reject
• Claim
• Release
• Request Information
• Reopen
The Summary board displays a graphic summary of the alert status. The itemsdisplayed depend on the workflow.
• Days Left - Indicates the days left before the alert is due to be resolved. If the alertis being worked on by a user, it will show the days remaining for their part of theworkflow. Otherwise, it will show the overall days remaining.
If there are only hours left, this is displayed as Hours Left or Minutes Left. If it isbeyond the End Date value, then it displays Days Past Due.
• Priority - Displays the current priority of the alerts.
• New Comments - Displays the number of comments that you have not yet viewed
• Questions - Displays the number of questions that you are required to answerbefore being able to submit or approve the alert.
• Attributes - Displays the number of attributes you are required to set before beingable to submit or approve the alert.
• Alerts - Displays the number of open alerts associated with this alert.
To view alerts:
1. From a task, click the Alerts tab on the right side.
2. Click an alert name to drill down and view additional detail about the alert, orselect an alert and click Open.
3. Optional: To search for an alert, in the Search box, enter search criteria.
4. Optional: To select columns to display, from Actions in the Alerts tab, clickSelect Columns, and select the columns to display, or select Show All.
5. To create an alert, see Creating Alerts.
6. To perform an action on the alert, see Alert Actions.
Chapter 9Working with Alerts
9-14
7. To refresh the alert list, click Refresh.
Deleting AlertsYou can delete alerts that you no longer need if you are an Administrator or AlertOwner. You must also have access to the object associated with the alert.
You can delete multiple alerts at the same time.
To delete an alert:
1. On the Home page, click Tasks, and then click the Alerts tab on the left to openthe Alerts main page.
2. From the Alerts list, select and open an alert.
3. Select Actions, and then click Delete, or select Delete from the row Actionsmenu.
4. From the confirmation prompt, click Yes.
Viewing Related TasksThe Related Tasks section enables you to view the predecessor and successors for atask. The predecessor/successor tasks show the Task Assignees and Task Ownersfor the dependent tasks.
Related Tasks also displays prior runs of the task in other schedules. This enables youto view comments or references from the prior task, which may help you complete thecurrent task run. From the Prior Tasks list, you can click on a task name to launch theTask Actions dialog box for that task and you can reassign a task to another user.
To view related tasks:
1. On the Home page, click Tasks, and then select the Schedule Tasks tab on theleft.
2. Double-click a task to open it.
3. Click the Related Tasks tab on the right.
4. From Display, select Predecessors or Successors.
5. Optional: To view information on a prior run of the task, click a task in the PriorTask list.
6. Optional: To reassign the task, click Reassign and select the user to whom toassign the task.
7. When finished, click Close.
Viewing Task HistoryThe system maintains a history of task activities, which you can view from the Historypage. Task history displays the components that were updated, the modification typesuch as added, created, or changed, the old and new values, the user who made thechange, and the change date. This information is read-only.
To view task history:
Chapter 9Viewing Related Tasks
9-15
1. On the Home page, click Tasks, and then Schedule Tasks.
2. Double-click a task to open it.
3. Click the History tab on the right.
4. From the top right of the page, select a View for the history: a Simple View timeline
of the history which only lists the basics, , or the Table View, to see allvalues.
5. Select to view history of All Activity, Today, or This Week.
6. When finished, click Close.
Reassigning TasksTask assignees can reassign their tasks to other users. For example, if an assignee isgoing to be out of the office for vacation, the assignee can reassign tasks to anotheruser.
When tasks are reassigned, email notifications are sent immediately to reassignedusers.
Note:
The Request Reassignment task is not available for Administrators or TaskOwners because they can edit the task to assign it to another assignee orapprover.
To reassign a task:
1. From the Home page, click Tasks, then select the Tasks tab, and click Worklist.
2. On the Worklist, select the task for which responsibility is to be reassigned.
3. On the selected Task action page, select Actions, and then RequestReassignment
4. From To User, click Select User to select the user who is assuming responsibilityfor the task.
5. Under Reassign, select the appropriate option:
• Selected Tasks only
• Selected and Future Tasks to permanently transfer responsibility.
• Enter the Justification for the transfer of responsibility, such as vacation,transfer of roles, and so on
6. Click OK.
Submitting TasksWhen you complete the actions required for the task, you submit the task to be movedthrough the workflow to the next assignee.
Chapter 9Reassigning Tasks
9-16
To submit tasks:
1. Select the tasks that you need to submit.
To select multiple tasks, press Ctrl and select multiple tasks, or press Shift whileyou click the first and last rows in a range.
2. Click Submit Task, or select Actions, then Submit Task.
3. Click Yes to confirm the submission. After it is submitted, you can no longer editthe task.
4. Review any errors, and click OK.
Approving or Rejecting TasksTo approve or reject tasks:
1. On the Home page, click Tasks, and then Schedule Tasks.
2. Double-click a task to open it.
3. Do one of these task actions:
• Right-click and select Approve or Reject.
• Actions panel: From Set Status, select Approve or Reject.
• Actions menu: Click Approve or Reject.
Click Yes in the confirmation dialog box.
4. Review any errors, and click OK.
Canceling TasksTask owners and the Service Administrator can stop a running task at any time. Whenyou cancel a task, the task status changes to Closed. Pending tasks with the task as apredecessor cannot run. If you have a sequence of tasks and you want to cancel theentire sequence, you can cancel the first task in the sequence.
To cancel a running task:
1. From your task list, select a task that you want to stop.
2. From the Properties tab, select Actions, then Abort.
Setting Tasks to Force Close StatusTo stop a task but allow subsequent tasks to run, if you are the task owner or ServiceAdministrator, you can force a task with a status of Open or Error to have a status ofClose. For example, if you have an automated task with an error, and you havereviewed the error for that task, but want subsequent tasks to run, you can force theClosed status.
Chapter 9Approving or Rejecting Tasks
9-17
Tip:
If you do not want the subsequent tasks to start, remove the predecessorlinks before force closing the tasks.
To set a task to Force Close status:
1. From your task list, select the task that you want to close.
2. From the Properties page, select Actions, then Force Close Task.
The status of the task changes to Closed.
Exporting Tasks from Task ListsYou can export tasks from the Task List to Microsoft Excel. You can export selectedrows, or export all the rows in the table. The export file is formatted for Excel.
To export tasks from the Tasks tab to Excel:
1. From the Home page, click Tasks.
2. Click the Tasks tab on the left.
3. Select one or more tasks.
4. From Actions, select Export to Excel.
5. Select an option: All Tasks or Selected Tasks.
By default, the format is Formatted data and it cannot be changed.
6. Click Export.
7. Select Open with Microsoft Office Excel (default) or Save File, and select alocation in which to save the file.
8. Click OK.
Workflow for TeamsTeams are lists of members defined in Task Manager. When you assign a team to atask role, any user in the team can then perform the role for that task.
Claiming Tasks
When a team is assigned the Assignee role, any member of the team can work onand submit the task, but only after a member has claimed the task. Prior to the claim, amember will have implicit Viewer access.
When a team is assigned the Approver role, any member of the team can approvethe task without first claiming it. However, any team member can claim the task, whichprevents other team members from approving it until it is released.
Once a task has been claimed, other members of the team still have the ability toclaim the task. Doing so will cause the initial user’s claim to terminate, thus revokingthat user’s ability to perform the role functions and granting the ability to the memberwith the most recent claim. The ability to claim a task away from another team member
Chapter 9Exporting Tasks from Task Lists
9-18
is required in order to accommodate cases where a claim has occurred; however, theuser with the claim is unavailable to complete the role functions (for example, due toan unexpected absence).
Require Action By
When you assign the Assignee or Approver roles, you can use the Required Action Byoption to specify the sign-off requirement for the tasks. You can require that all teammembers sign off on the task before the task is submitted or approved, or you canallow any team member to submit or approve the task.
Primary Users
You optionally can assign one team member as the primary user for the team. If youassign a primary user, that user is by default granted the claim to tasks to which theteam is assigned as assignee or approver.
Chapter 9Workflow for Teams
9-19
10Viewing Schedules
Related Topics
• About SchedulesA schedule defines a chronologically ordered set of tasks that must be executedfor a specific business period, and is the application of a template into thecalendar.
• Viewing Schedule Properties
• Viewing Schedule Instructions
• Viewing Schedule Viewers
• Viewing Schedule Attributes
• Viewing Day Labels in Schedules
• Viewing Schedule Rules
• Viewing Schedule Alerts
• Viewing Schedule History
About SchedulesA schedule defines a chronologically ordered set of tasks that must be executed for aspecific business period, and is the application of a template into the calendar.
A schedule defines a chronologically ordered set of tasks that must be executed for aspecific business period, and is the application of a template into the calendar. Forexample, you can apply the Quarterly template as Q119 Schedule for the first Quarter,then apply the template again as Q219 for the second quarter.
Schedules have a status of Pending, Open, Closed, or Locked. You can change thestatus of a schedule from Pending to Open, or from Open to Closed or Locked.
Viewing Schedule PropertiesWhen you open a schedule, you can view the name, description and other information.
To view schedule information:
1. On the Home page, click Application, and then click Task Manager.
2. Click the Schedules tab on the left.
3. Select a schedule and then click Properties
If you have Edit capabilities on the schedule (if you are the Owner or SystemAdministrator), an Edit icon is displayed instead of Properties.
10-1
Viewing Schedule InstructionsTo view schedule instructions:
1. On the Home page, click Application, and then click Task Manager.
2. Click the Schedules tab on the left.
3. Select a schedule and then click the Instructions tab.
Viewing Schedule ViewersTo verify viewer rights:
1. On the Home page, click Application, and then click Task Manager.
2. Click the Schedules tab on the left.
3. Select a schedule and then click the Viewers tab.
Viewing Schedule AttributesTo apply an attribute:
1. On the Home page, click Application, and then click Task Manager.
2. Click the Schedules tab on the left.
3. Select a schedule and then click the Attributes tab.
Viewing Day Labels in SchedulesYou use business day labels in the activity for a calendar day. Labels can mark amilestone day or specify the purpose of the day.
When you add Day Labels to a template, they are copied to schedules created fromthe template.
When schedules are opened, you see day labels in Task List views and Gantt views inthe start or end date of tasks.
Viewing Schedule RulesThe Rules tab lists the rules that apply to the schedule, their name, order ofprecedence, and the conditions that must exist before running the rule.
To view schedule rules:
1. On the Home page, click Application, and then click Task Manager.
2. Click the Schedules tab on the left.
3. Select a schedule and click the Rules tab.
Chapter 10Viewing Schedule Instructions
10-2
Viewing Schedule AlertsFrom the Alerts tab in a schedule, you can view alerts associated with the schedule.
Note:
To work with alerts, you must have Edit capabilities on a schedule as eitherthe Owner or System Administrator.
To view alerts:
1. On the Home page, click Application, and then click Task Manager.
2. Click the Schedules tab on the left.
3. Select the schedule and click Edit.
4. Click the Alerts tab.
Viewing Schedule HistoryThe system maintains a history of schedule actions, which you can view from theManage Schedules dialog box. The History tab displays the components that wereupdated, the modification type, the old and new values, the user who made themodification, and the change date. The information is read-only.
To view schedule history:
1. On the Home page, click Application, and then click Task Manager.
2. Click the Schedules tab on the left.
3. Select a schedule.
4. Select the History tab and review the schedule history.
• Modification Type—Indicates the type of change: Created, Changed, Added,Removed
• Modified On—Date of the modification
• Modified By—Name of user who modified the schedule
• Old Value
• New Value
5. Click OK.
Chapter 10Viewing Schedule Alerts
10-3
11Monitoring Dashboards
Related Topics
• Dashboard OverviewYou can monitor business process and supplemental data information using theTask, Compliance, and Financial dashboards.
• Task Overview Dashboard
• Compliance Dashboard
• Financial Dashboard
Dashboard OverviewYou can monitor business process and supplemental data information using the Task,Compliance, and Financial dashboards.
You can monitor business process and supplemental data information on thesedashboards:
• Task Overview Dashboard
• Compliance Dashboard
• Financial Dashboard
The Dashboards feature is enabled if you have access to at least one of thesedashboards.
Watch the following video for an introduction to Dashboards.
Dashboards Overview
Task Overview DashboardThe Task Overview Dashboard contains the Status dashboards for Overall status,Task Manager status, and Supplemental Data status.
To view the Total Overview status:
1. On the Home page, from Dashboards, click Task Overview.
2. On the left, click Total Overview.
3. From the POV, select a Year and Period.
The system displays the number of Open Tasks, Late, and On Time tasks.
4. Click on a status to drill down into the list of tasks with that status.
11-1
From the list of tasks, if you have access rights to a task, you can click the taskname to directly open and work with the task.
5. Optional: Sort the list of tasks using one of these methods:
• Count (Ascending)
• Count (Descending)
• Alphabetic (Ascending)
• Alphabetic (Descending)
Task Manager Overview
To view the Task Manager status Overview:
1. On the Home page, from Dashboards, click Task Overview.
2. On the left, click Schedule Tasks Overview.
3. From the POV, select a Year and Period.
4. From the Tasks drop-down list, select a task, or select All to view all tasks.
The system displays the number of Open Tasks, Late, and On Time tasks.
5. Click on a status to drill down into the list of tasks with that status.
From the list of tasks, if you have access rights to a task, you can click the taskname to directly open and work with the task.
6. Filter tasks by selecting View By, then select an option:
• Priority
• Schedule
• Task Type
• Organizational Unit
7. Optional: Sort the list of tasks using one of these methods:
• Count (Ascending)
• Count (Descending)
• Alphabetic (Ascending)
• Alphabetic (Descending)
• Attribute Order (Ascending)
• Attribute Order (Descending)
Supplemental Data Overview
To view the Supplemental Data status Overview:
1. On the Home page, from Dashboards, click Task Overview.
2. On the left, click Supplemental Data Overview.
3. From the Collection Interval drop-down list, select a collection interval.
4. Select members for the POV.
The POV dimensions are based on the frequency dimension selection for theselected Collection Interval.
Chapter 11Task Overview Dashboard
11-2
5. From the Forms drop-down list, select a form, or select All to view all forms.
The system displays the number of Open Forms, Late, and On Time forms.
6. Click on a status to drill down into the list of forms with that status.
From the list of forms, if you have access rights to a form you can click the formname to directly open and work with the form.
7. Filter tasks by selecting View By, then select an option:
• Workflow Dimensions
• Form
• Collection
• Frequency
8. Optional: Sort the list of tasks using one of these methods:
• Count (Ascending)
• Count (Descending)
• Alphabetic (Ascending)
• Alphabetic (Descending)
Compliance DashboardThe Compliance Dashboard provides metrics on how well the company achieved theircompliance objectives, distinguishing those tasks that were completed on time fromthose that were late, and providing a count of those that were approved or rejected.You can view user performance metrics by user and organizational unit.
Task Manager Compliance Dashboard
To view the Task Manager Compliance dashboard:
1. On the Home page, from Dashboards, click Compliance.
2. On the left, click Task Manager Compliance.
3. From the Point of View, select a Year and Period.
4. From the Tasks drop-down list, select a task, or select All to view all tasks.
The pie charts display the following status for tasks: number of Completed Tasks,Percentage of tasks Prepared On Time, Percentage of tasks Approved On Time,number of Rejected Tasks, and number of Alerts.
5. Click on one of the status charts to drill down into the list of tasks with that status.
From the list of tasks, if you have access rights to a task, you can click the taskname to directly open and work with the task.
6. Filter tasks by selecting View By, then select an option:
• User
You can click on a user name to view User Details.
• Organizational Unit
7. From Performance, select task performance metrics:
Chapter 11Compliance Dashboard
11-3
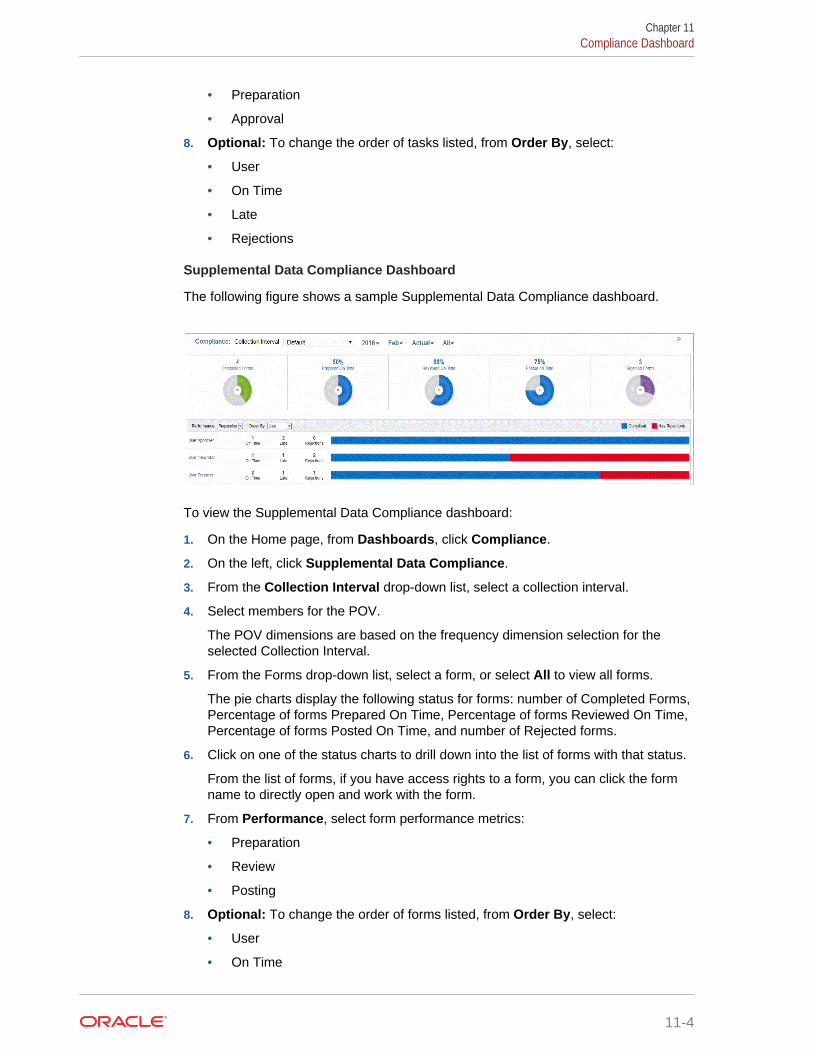
• Preparation
• Approval
8. Optional: To change the order of tasks listed, from Order By, select:
• User
• On Time
• Late
• Rejections
Supplemental Data Compliance Dashboard
The following figure shows a sample Supplemental Data Compliance dashboard.
To view the Supplemental Data Compliance dashboard:
1. On the Home page, from Dashboards, click Compliance.
2. On the left, click Supplemental Data Compliance.
3. From the Collection Interval drop-down list, select a collection interval.
4. Select members for the POV.
The POV dimensions are based on the frequency dimension selection for theselected Collection Interval.
5. From the Forms drop-down list, select a form, or select All to view all forms.
The pie charts display the following status for forms: number of Completed Forms,Percentage of forms Prepared On Time, Percentage of forms Reviewed On Time,Percentage of forms Posted On Time, and number of Rejected forms.
6. Click on one of the status charts to drill down into the list of forms with that status.
From the list of forms, if you have access rights to a form, you can click the formname to directly open and work with the form.
7. From Performance, select form performance metrics:
• Preparation
• Review
• Posting
8. Optional: To change the order of forms listed, from Order By, select:
• User
• On Time
Chapter 11Compliance Dashboard
11-4
• Late
• Rejections
Financial DashboardThe Financial dashboard provides a graphical depiction of the results for the company.For example, you can view a Balance Sheet dashboard, Cash Flow dashboard, orIncome dashboard. From any dashboard, you can drill down to view further detail.
Financial Consolidation and Close provides a predefined dashboard namedFCCS_Income Statement Dashboard with the following data:
• Key Income Accounts, which displays data from the FCCS_Income DashboardTile Chart form
• Quarterly Sales by Entity, which displays data from the FCCS_Quarterly Sales byEntity form
• Monthly Sales by Entity, which displays data from the FCCS_Monthly Sales byEntity form
• Quarterly Net Income by Entity, which displays data from the FCCS_Quarterly NetIncome by Entity form
• Monthly Net Income by Entity, which displays data from the FCCS_Monthly NetIncome by Entity form
Administrators can create dashboards by selecting data forms, external artifacts, andspecifying chart types. See "Designing Dashboards" in Administering FinancialConsolidation and Close.
To view a Financial dashboard:
1. On the Home page, from Dashboards, click Financial.
2. To search for an existing dashboard, enter text in the search box, and clickSearch.
Chapter 11Financial Dashboard
11-5
12Working with Supplemental Data
Related Topics
• Supplemental Data Process Overview
• Viewing Data in the Supplemental Data Analysis Dashboard
• Adding Dimensions for Supplemental Data
• Importing Dimension Members for Supplemental Data
• Exporting Dimension Members for Supplemental Data
• Creating Supplemental Data Ad-Hoc Forms
• Entering Data into Supplemental Data Forms
• Viewing Form History
• Reassigning Users in Supplemental Data Manager
• Bulk Loading of Data into Collections
• Working with Supplemental Data in Smart View
Supplemental Data Process OverviewSupplemental Data Manager helps you organize, update, edit, and managesupplemental data, typically financial transactions. It is a robust ad hoc data collectionprocess useful for footnotes, disclosures, and supporting details.
1. The Administrator creates an application enabling the Supplemental Data feature,and refreshes the database, which sets up the system settings information.
2. The Power User performs these procedures:
• Creates additional Dimensions which may be required within their datacollection.
• Creates the collection interval to define the frequency of the data collectionprocess, and the workflow dimensions on which their forms will be based.
• Creates collections and subcollections to store the data as part of the datacollection process.
• Creates attributes, and calculation and validation rules for the attributes.
• Creates Data Form Templates to ensure a consistent and repeatable datacollection process.
• Assigns workflow and access for each data form template.
• Deploys the form template to a specific data collection period to be ready forthe collection process.
– If the period is not open, then the form instances are in Pending status.
– If the period is open, then the form instance is active and available for dataentry.
12-1
3. The Administrator opens the Period after dimensions, collections, and forms arecreated in the system, and opens a Period to start the data collection process.
4. The User then performs these tasks:
• Loads data manually once the period is open or uses a CSV file to import formdata. Users can also act on any actions to be done, for example, enteringcomments and answering questions.
• Performs validation and ensures correctness of data.
• Submits data for approval.
5. The User assigned as the approver reviews and approves or rejects the data (mayhave multiple levels of approval).
6. The User views summarized data after the data is approved (depends on theworkflow option), and posts data.
7. The Administrator or Power User sends email alerts to assigned users for theirrelated data forms.
8. The Administrator closes and locks the Period for the data collection:
• Closes the Period for Data Collection (prevents additional form instances tostart)
• Locks the Period for Data Collection (allows no additional changes)
You can also manage the data collection process and work with supplemental dataforms using the Supplemental Data option in Oracle Smart View for Office. You mustfirst install the Smart View Extension for Supplemental Data. To install the extension,see the Getting Started with Oracle Enterprise Performance Management Cloud forAdministrators guide.
Viewing Data in the Supplemental Data Analysis DashboardThe Supplemental Data Analysis dashboard contains the details of collections andsub-collections, making it easy to view and filter the information. You can also selectand sort columns, and save lists.
To view Collections in the Data Analysis dashboard:
1. On the Home page, click Data.
2. From the left, click Supplemental Data Analysis.
3. From the Collection dropdown list, select a collection/subcollection and the datacollection period (frequency dimension member combination) for which you wantto access and analyze data.
For example:
Collection Name: Debt Details
Data Collection Period parameters: Year: 2020, Period: April, Scenario: Actual
4. Optional: Click Add a Filter, then enter a filter value. Available filters are basedon the collection you selected.
5. Optional: For more detailed filtering, from Add a Filter, click Advanced, thendefine filter criteria and create conditions.
To define a condition or group:
Chapter 12Viewing Data in the Supplemental Data Analysis Dashboard
12-2
a. Click Create Condition or Create Condition Group.
b. Conjunction: Select And or Or. These state how this condition or group relateto prior sibling conditions or groups.
c. Attribute: An attribute is a field or value that a condition compares to a valuefor inclusion in the result set of a filter. An attribute denotes more than the listof user-defined attributes.
d. Operand: States what kind of evaluation to perform against the attribute.
e. Value: Specifies what values to compare the attribute against. The type ofattribute determines what input field is available.
f. To save, clear, or manage filters, click the Filters (...) button on the right of thepage.
6. From Actions, choose Select Columns to select columns for the data that youwant to display.
7. Optional: To export data from the Collection, from Actions, select Export, andselect Export to Excel or Export to CSV.
8. Optional: From Actions, select Import to import data into the Collection.
Click Browse to select the file, select to Replace or Update the existing file, selecta date format, and then click Import.
9. Optional: From List, select another available saved list. The system displays thefilters and columns that you previously saved.
Adding Dimensions for Supplemental DataTo add dimensions:
1. On the Home page, click Application, and then click Supplemental Data.
2. Click the Dimensions tab on the left.
3. Click Actions, and then Add.
4. On the Properties tab, enter a name and description.
5. On the Attributes tab, add the dimension attributes.
Note:
The History tab logs changes to Dimensions, including changes inmodification types, supporting objects, modified by, and the old and newvalues.
Importing Dimension Members for Supplemental DataAdministrators and Power Users can import dimension members from standard flatcomma-separated value (CSV) files.
To import dimension members:
1. On the Home page, click Application, then click Supplemental Data.
Chapter 12Adding Dimensions for Supplemental Data
12-3
2. Click the Dimensions tab on the left.
3. Select a dimension.
4. In Members and Attributes, click Actions, and then Import.
5. Click Browse, and then navigate to the file you want to import.
6. Select one of these options:
• Replace: Clears any dimension members in the form and replaces them withthe members from the source file. Any values absent in the source file will beblank after the import process.
• Update: Updates only the members included in the source file. Othermembers are not affected.
7. Select a Date Format from the drop-down list of formats.
Date formats are not translated. By default, the date format is set to the locale dateformat of the exported file location.
8. Select a File Delimiter for the import file: Comma or Tab.
9. Click Import.
The Results screen displays the number of imported dimension members.
10. Click OK.
To clear the dialog and select another file to import, click Reset.
Exporting Dimension Members for Supplemental DataService Administrators and Power Users can export dimension members to standardflat comma-separated value (CSV) or XLS files.
To export dimension members:
1. On the Home page, click Application, then click Supplemental Data.
2. Click the Dimensions tab on the left.
3. Select a dimension.
4. In Members and Attributes, select a member.
5. Click Actions, then Export, and then select the CSV or XLS file format.
6. Browse to where you want to save the file.
7. Click OK.
Creating Supplemental Data Ad-Hoc FormsWhen creating Supplemental Data Form templates, Administrators can specifywhether the template can be used for creating Ad-Hoc forms, and then select theusers who are allowed to create the forms. Users who have been assigned the propersecurity rights can then create Supplemental Data Forms from the template asneeded.
To create a Supplemental Data Ad-Hoc Form:
1. From Tasks, select Supplemental Data Tasks.
Chapter 12Exporting Dimension Members for Supplemental Data
12-4
2. Select the Collection Interval, and then select members for the POV.
The POV dimensions depend upon the collection interval that is selected.
3. For Template, select the template for which the Ad-Hoc Form needs to becreated.
4. Click on the Create Ad-Hoc Form (+) icon to create an Ad-Hoc Form.
Note:
The Template must be deployed before you can create an Ad-Hoc Form.
5. Select a member for each workflow dimension and select users for the workflowoptions (Prepare, Prepare Approve, Prepare Approve Post).
Note:
The Form Preparer and Approver cannot be the same for Ad-Hoc Formcreation.
6. Click OK.
The Ad-Hoc Form is created and opened for data entry.
Entering Data into Supplemental Data FormsYou can enter data into Supplemental Data forms using these methods:
• Input it manually
• Import it from a file
• Enter it using Excel
Data is stored in its base format with as much detail as was input. For example, if youenter $123,456.789 in a currency field formatted with two decimal digits and nothousands separator, the number is stored as 123456.789 but redisplayedas $123456.79.
Form columns and rows are displayed in data entry mode. You can select the entry inthe POV bar for data entry. If multiple data entry sections are defined on the formtemplate, a corresponding data entry tab is displayed for each section.
If you import data, you can use either the Replace or Update options.
• Replace - Clears any data within the form and replaces it with the values from thesource file. Any fields absent in the source file will be blank in the form after theimport process.
• Update - Updates only the values that are included in the source file. Other valuesare not affected.
To enter data in Supplemental Data forms:
1. On the Home page, click Tasks.
Chapter 12Entering Data into Supplemental Data Forms
12-5
2. Select a Supplemental Data Form from your worklist or from within theSupplemental Data Tasks.
3. Enter data for the form:
• If the form has a header section, you can enter data into the fields in theheader.
• If the form has detail sections, click Add (+) to add detail rows and enter data.
4. Optional: Click Refresh to refresh the form data.
5. When you are done with the form, select an available action, for example, Submit,Approve, or Reject.
6. Optional: From the Action drop-down, select Print to print the form.
7. Optional: From the Action drop-down, select Import to import form data.
a. Click Browse, and then navigate to the file you want to import.
b. Select one of these options: Replace to clear all data and replace it with thedata from the source file, or Update to update only the data that is included inthe source file.
c. Select a Date Format from the drop-down list of allowed date formats.
d. Select a File Delimiter for the import file: Comma or Tab.
e. Click Import, and then from the Results screen, click OK.
To clear the dialog and select another file to import, click Reset.
8. Optional: To export the form data, from the Action drop-down, select Export andfollow the prompts.
Viewing Form HistoryThe system maintains a history of form actions, which you can view in the Form dialogbox. History displays the user, date, action, and the difference of the changes to theform.
To view the form history:
1. On the Home page, click Data.
2. Open a Supplemental Data form.
3. Click the History tab.
Reassigning Users in Supplemental Data ManagerYou may periodically need to reassign users to different tasks during the closeprocess. For example, when an employee who has assigned tasks leaves thecompany, the tasks can be reassigned to another employee. You can use theReassign feature in the Workflow Dashboard to automatically change assignmentsinstead of manually searching for, opening, and editing individual tasks. The Reassignfeature enables you to quickly find the tasks associated with a user and reassign themto another.
You can select the roles for which to reassign users. For example, if you select theOwner role, the system reassigns the user only in tasks in which the user wasassigned as the owner. It is not allowed for forms that are in a Closed Workflow status.
Chapter 12Viewing Form History
12-6
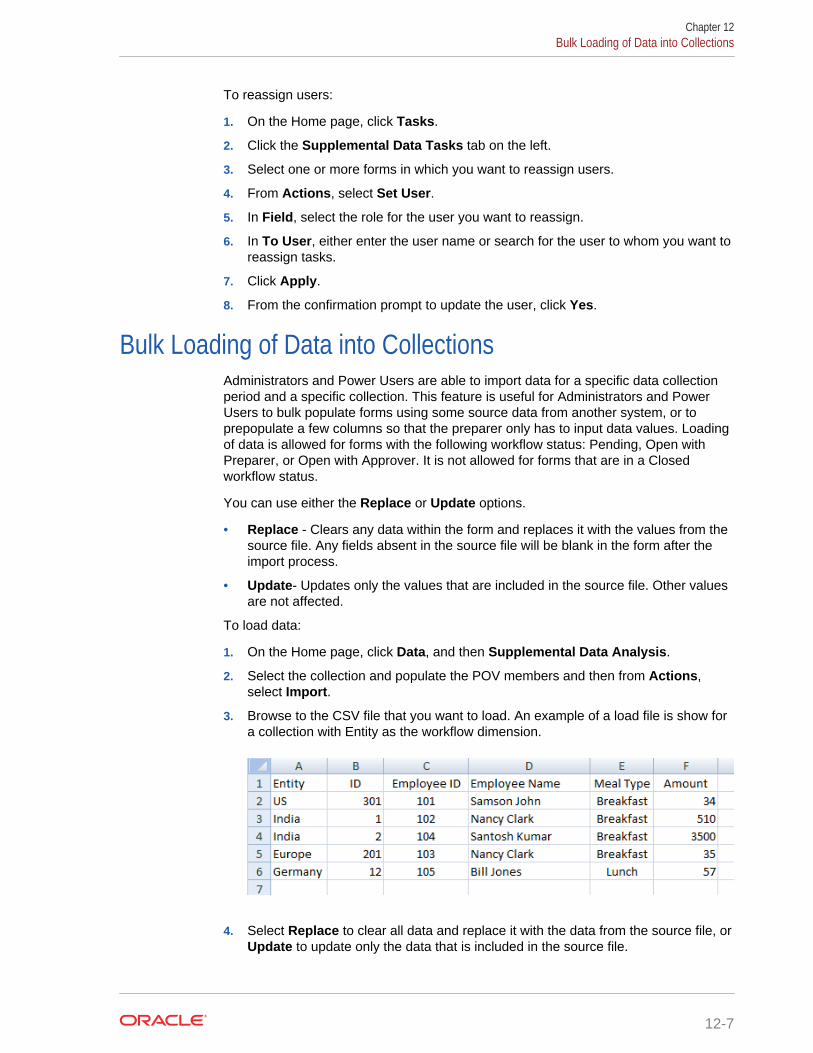
To reassign users:
1. On the Home page, click Tasks.
2. Click the Supplemental Data Tasks tab on the left.
3. Select one or more forms in which you want to reassign users.
4. From Actions, select Set User.
5. In Field, select the role for the user you want to reassign.
6. In To User, either enter the user name or search for the user to whom you want toreassign tasks.
7. Click Apply.
8. From the confirmation prompt to update the user, click Yes.
Bulk Loading of Data into CollectionsAdministrators and Power Users are able to import data for a specific data collectionperiod and a specific collection. This feature is useful for Administrators and PowerUsers to bulk populate forms using some source data from another system, or toprepopulate a few columns so that the preparer only has to input data values. Loadingof data is allowed for forms with the following workflow status: Pending, Open withPreparer, or Open with Approver. It is not allowed for forms that are in a Closedworkflow status.
You can use either the Replace or Update options.
• Replace - Clears any data within the form and replaces it with the values from thesource file. Any fields absent in the source file will be blank in the form after theimport process.
• Update- Updates only the values that are included in the source file. Other valuesare not affected.
To load data:
1. On the Home page, click Data, and then Supplemental Data Analysis.
2. Select the collection and populate the POV members and then from Actions,select Import.
3. Browse to the CSV file that you want to load. An example of a load file is show fora collection with Entity as the workflow dimension.
4. Select Replace to clear all data and replace it with the data from the source file, orUpdate to update only the data that is included in the source file.
Chapter 12Bulk Loading of Data into Collections
12-7
5. Select the date format, then click Import.The Status displays showing you whether there are any errors or warnings and theTotal Entities, Entities Updated, as well as Total Rows Created or Updated.
Working with Supplemental Data in Smart ViewUsing Oracle Smart View for Office, you can work directly with Supplemental DataManager forms.
Your schedules and tasks for the selected period are displayed. You can only seethose forms for which you are authorized. Depending on your current role, theavailable options such as Save Data, Approve, or Reject will change to match theassociated role. If you have different roles, you may need to log on as each role toperform different operations.
After an Administrator installs the extension and creates a connection, you canperform these Supplemental Data tasks in Smart View:
• View a worklist of the forms that you need to act upon for preparation, approvaland posting
• View a list of the Collections in the system for which you have View security rights
• Apply filters on the data collected as part of the data collection process
Any filters or lists that you previously created for supplemental data are availablein Smart View.
Note:
You will see only the forms and options that are available for your securityaccess rights.
Working with Supplemental Data Forms
To work with Supplemental Data Manager using Smart View:
1. Launch Excel, then select the Smart View tab, and then select Panel.
2. In the Smart View Panel, select Private Connections.
3. In the Private Connections panel, select the Supplemental Data Managerconnection from the drop-down menu.
4. When prompted, provide your login credentials: domain name, user name, andpassword to sign in.
5. Select the Supplemental Data ribbon, and then click Refresh.
Note:
All the forms for all periods for which the user is currently responsible aredisplayed.
Chapter 12Working with Supplemental Data in Smart View
12-8
6. Under Worklist, select the workbook that you want to open, and then click Opensummary dialog in the Private Connection panel.
7. From the list of forms, select a form.
You can view or modify forms, answer questions, and enter comments.
8. When you are finished, click Close, and then click Refresh.
9. Select the appropriate option for the selected form:
• Save Data
• Submit Data
• Approve
• Reject
• Post Data
Chapter 12Working with Supplemental Data in Smart View
12-9