workinstruction: how to submit and approve an invoice
TRANSCRIPT

1
How to Submit and Approve an Invoice
Purpose
The aim of this workinstruction is to provide a step-by-step procedure how to create, submit and approve an invoice in esa-p.
Content
• esa-p Login and basic navigation
• How to create an invoice
• How to complete all mandatory data
• How to partially invoice a milestone and use the Incidental Cost field
• How to add Notes or Attachments to an invoice
• How to check the invoice for correct and complete data
• How to submit an invoice for approval
• How to print an invoice as a subcontractor
• How to approve an invoice as an upper-tier supplier
• How to check the status of your invoice
• What to do when your invoice was rejected
For a short version on how to submit invoices (and confirmations) please also refer to the
Job Aid 'How to submit a MAC or Invoice in 6 steps' which is available when
acessing the Help section in esa-p.
Access
Enter esa-p via:
1. https://esa-p.sso.esa.int
2. or by navigation through the industry portal:
http://www.esa.int/SPECIALS/Industry/SEMYF4DKP6G_0.html

2
Procedure
1 Start esa-p by navigation through the ESA industry portal or via URL: https://esa-p.sso.esa.int
ESA Login
2 Enter your existing Username and Password and click the Login button to access esa-p.
In case you should encounter difficulties with the login or to request a user ID
please contact [email protected]
Welcome - SAP NetWeaver Portal –
3 This is the initial screen you see after you log in to esa-p. In the welcome section you
will find announcements to suppliers containing the latest info notes on procedures
and temporary workaround procedures for for blocking issues. In order to create
documents, click on the Order Collaboration tab. .

3
Oder Collaboration - SAP NetWeaver Portal –
4 In the Order Collaboration section, you can create new documents and view existing
documents. In the services menu on the left side, you can create confirmations and
invoices. On the right side of the screen, you can view existing documents by
activating one of the predefined active queries. You can specify your search query for
documents by entering additional criteria in the Quick Criteria Maintenance section
.
In order to create new documents, go to the Services Create Documents click on
Invoice link label . A new screen, Create Invoice/ Credit Memo, will open as
shown below.

4
Invoice - SAP NetWeaver Portal –
5 Select Invoice and click Start link label . The Create Invoice screen
will open in a new window.
In the create Invoice screen you will can enter all necessary information in order to
5
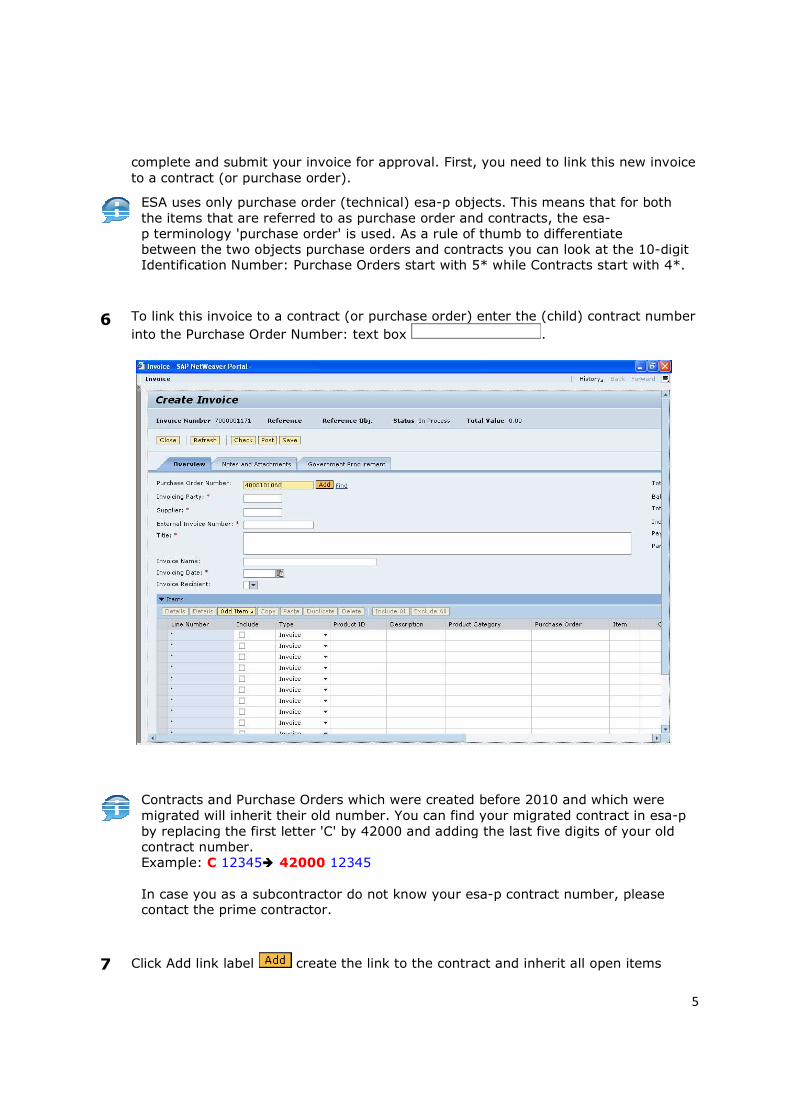
complete and submit your invoice for approval. First, you need to link this new invoice
to a contract (or purchase order).
ESA uses only purchase order (technical) esa-p objects. This means that for both
the items that are referred to as purchase order and contracts, the esa-
p terminology 'purchase order' is used. As a rule of thumb to differentiate
between the two objects purchase orders and contracts you can look at the 10-digit
Identification Number: Purchase Orders start with 5* while Contracts start with 4*.
6 To link this invoice to a contract (or purchase order) enter the (child) contract number
into the Purchase Order Number: text box .
Contracts and Purchase Orders which were created before 2010 and which were
migrated will inherit their old number. You can find your migrated contract in esa-p
by replacing the first letter 'C' by 42000 and adding the last five digits of your old
contract number.
Example: C 12345 42000 12345
In case you as a subcontractor do not know your esa-p contract number, please contact the prime contractor.
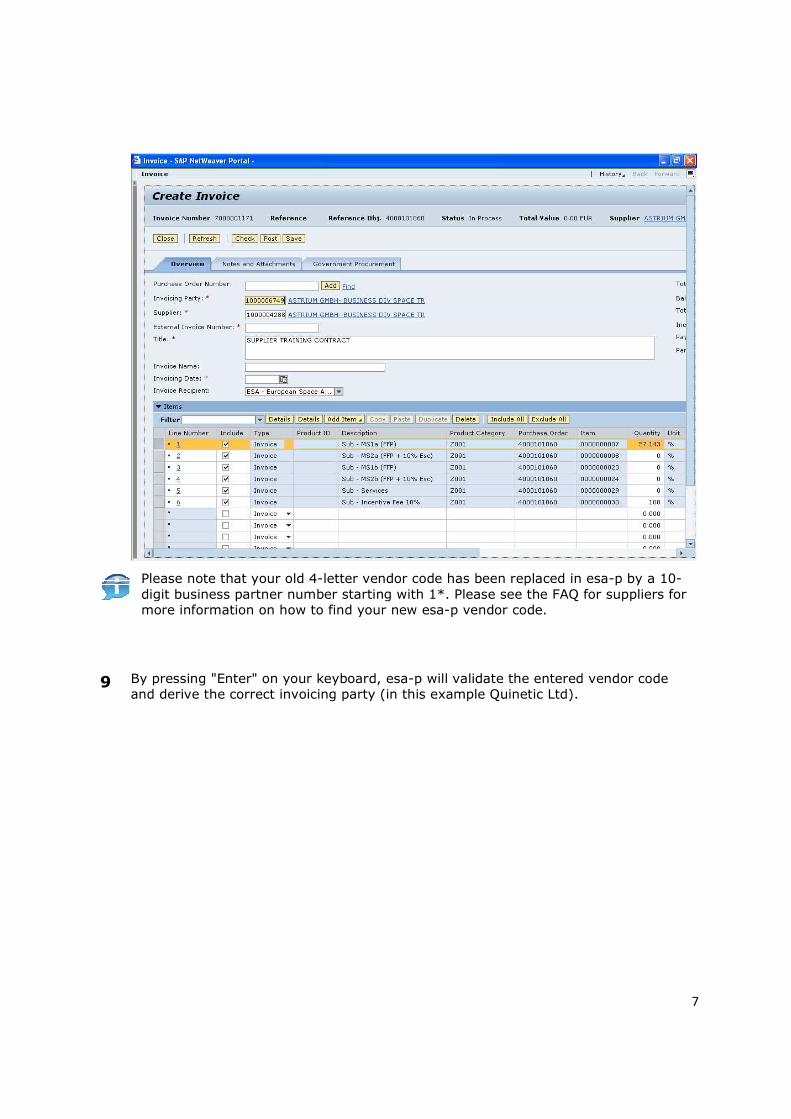
7 Click Add link label create the link to the contract and inherit all open items

6
(milestones) into the create invoice screen. An 'open' milestone in this case means,
that it is still open for invoicing (in this example, 6 line items). In addition,
the contract title and Prime supplier code are automatically populated in the relevant fields.
Please note that by default the system populates both the Supplier and the
Invoicing Party fields with the identification code of the prime contractor. Therefore,
in cases where the payee is NOT the prime contractor, the invoicing party needs to
be changed to reflect the supplier code of the real payee (subcontractor direct).
8 In this fictitious example, a directly paid subcontractor is creating an invoice against a
firm fixed price (FFP) milestone. In order to change the payee from the prime to the
directly paid subcontractor click the Invoicing Party: * text box and
change the prime vendor code 1000004288 to the supplier code of the subcontractor
supplier code 1000006749.
7
Please note that your old 4-letter vendor code has been replaced in esa-p by a 10-
digit business partner number starting with 1*. Please see the FAQ for suppliers for
more information on how to find your new esa-p vendor code.
9 By pressing "Enter" on your keyboard, esa-p will validate the entered vendor code
and derive the correct invoicing party (in this example Quinetic Ltd).

8
Please note the yellow warning message 'Invoicing party has changed, bank details
have been deleted, please update. How to update the bank details is described at a
later point in this work instruction.
10 It is technically NOT possible to invoice against multiple milestones. Therefore, the next step is to click the Exclude all button and Include only
the line item (milestone) that should be invoiced.
9
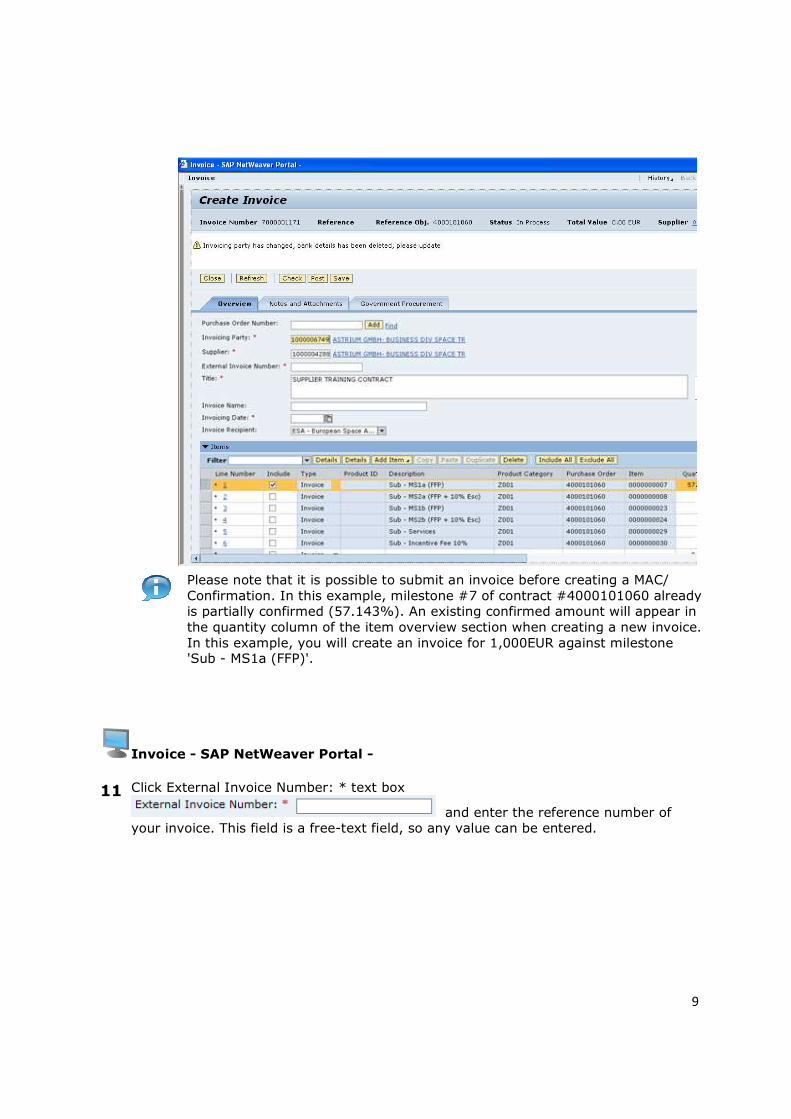
Please note that it is possible to submit an invoice before creating a MAC/
Confirmation. In this example, milestone #7 of contract #4000101060 already
is partially confirmed (57.143%). An existing confirmed amount will appear in
the quantity column of the item overview section when creating a new invoice.
In this example, you will create an invoice for 1,000EUR against milestone 'Sub - MS1a (FFP)'.
Invoice - SAP NetWeaver Portal -
11 Click External Invoice Number: * text box
and enter the reference number of
your invoice. This field is a free-text field, so any value can be entered.

10
12
Click Invoice Name: text box
and enter a name
for this invoice.

11
Although not mandatory, it is strongly recommended to enter an invoice name
(and match it with the Confirmation name). You may decide to either copy the
external invoice number reference again, or the confirmation number, or to copy
and paste the milestone description into the invoice name field. To do this, select
the description text of the line item and press CTRL+C on your keyboard. Then click
on the Invoice Name text field and press CTRL+V on your keyboard.
13 Enter the invoicing date in the format DD.MM.YYYY into the Invoicing Date: * text box. Alternatively, you can open a calendar and select the correct date by clicking on
this icon: next to the invoicing date text box.
14 Select the invoicing date from the calendar.

12
Please note that the Title field of the invoice has inherited the free text title of the
contract. As an invoice should be created against only one milestone (line item) of a
contract (or purchase order), it is recommended to copy the milestone description
text into the invoice title field.
15 Copy the milestone description by selecting the Description text of the milestone you want to invoice, in this example Line number 1, and
press CTRL+C on your keyboard.

13
16 Click into the invoice Title: * text box
and paste the copied milestone description into this field by pressing CTRL+V
on your keyboard.
Invoice - SAP NetWeaver Portal -
17 Drag the scroll bar to the right to view the remaining milestone data
.

14
In this example, the 57.143% (= 1,000EUR) of the total milestone value of
1,750EUR has been confirmed. This data is inherited into the create invoice screen.
Note that it is possible to change the invoiced quantity to a higher or lower
percentage of the total outstanding milestone value. Bear in mind though that if the
invoice amount is higher than the total confirmed value of the milestone, the
invoice will not be approved and hence not paid (invoice amount > confirmation amount = NO PAYMENT).
18 As it is currently not possible to enter an exact amount into the invoice (and confirmation), the next steps will illustrate how to calculate partial invoice amounts.
In this example, the total net invoice amount is 1,000EUR. Therefore, in case the unit
of measure is percentage (%) the corresponding percentage of the total invoicable
milestone value needs to be calculated. In this example, a total invoice amount of
1,000EUR represents 57.143% of 1,750EUR. Bearing in mind that the invoice amount
should be slightly lower than the confirmation amount (57.143%), it is recommended
to round the partial invoice amount down. Therefore, replace the value in
the Quantity Unit text box by 57.142.
Please note that that although the Net Value text box of the line item shows the
required value of 1,000EUR , the total value of the invoice is still 0EUR
. Moreover, the Balance field indicates that there is a mismatch
between the current total invoice value and the defined item value(s)
. The Balance must be zero in
order to correctly post an invoice. How to get the balance field value to zero is

15
explained in the following steps.
19 Click Calculate Total Value link label . The total invoice value of
999.99EUR is calculated.
20 Click Incidental Costs: text box and enter the difference value
between the net paper invoice amount (1,000EUR) and the total calculated invoice
value (1,000 - 999.99 = 0.01)

16
21 Click Calculate Total Value link label again after having entered
the incidental cost. This will recalculate the total value of the invoice including the
incidental cost amount and finally mach the paper invoice net amount of 1,000EUR.

17
Keep in mind that the incidental costs field is only used in case of partial invoicing
and as a workaround solution of the quantity based invoice creation (compared to
value based invoicing). In case of confirming and invoicing 100% of a milestone
(the total line item value), there is no need to use the incidental cost field.
22 Now that the incidental costs have been included in the net invoice amount you can continue to include the taxes to calculate the total gross invoice amount. Click
Calculate Total Taxes link label . As expected, the Balance field
shows a delta amount of 70EUR reflecting the 7% tax.

18
23 Click Calculate Total Value link label again. Check that the
Balance field value is zero.

19
24 After performing the steps to calculate the correct total (gross) invoice value the next step is to provide the bank details to enable payment of the invoice. Click Part. Bank:
text box . A new screen will pop up where you can select your company's bank
details.
Invoice - SAP NetWeaver Portal -
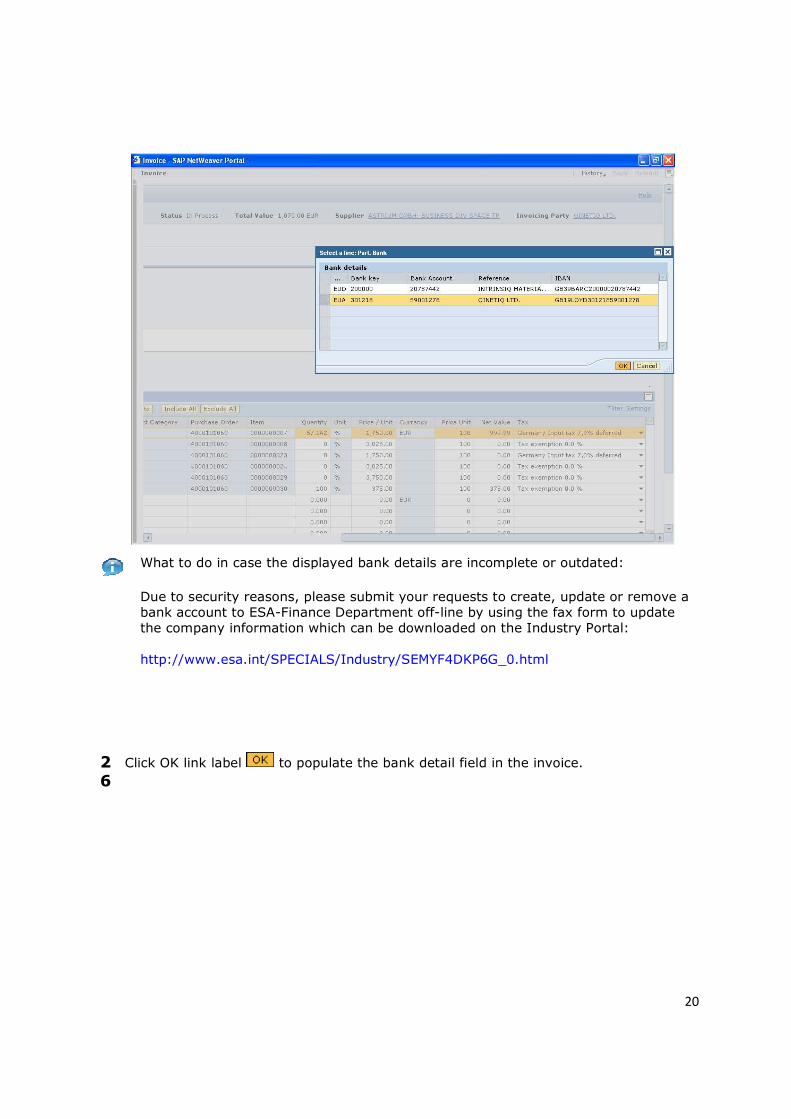
25 Click control to select the correct line.
20
What to do in case the displayed bank details are incomplete or outdated:
Due to security reasons, please submit your requests to create, update or remove a
bank account to ESA-Finance Department off-line by using the fax form to update
the company information which can be downloaded on the Industry Portal:
http://www.esa.int/SPECIALS/Industry/SEMYF4DKP6G_0.html
26
Click OK link label to populate the bank detail field in the invoice.

21
Please bear in mind that if the unit of measure in the contract/ purchase order is
'EA' (instead of '%') then the process to determine the invoice value is slightly
different.
If the field 'Unit' is 'EA', then the total net value of the invoice can directly be entered
in the field ‘Quantity'. In the screenshot below the invoice quantity = the total net value of the invoice = 1.000,00 EUR.

22
In the previous steps, you have learnt how to:
• Create an invoice
• Complete all mandatory data
• Partially invoice a milestone and use the Incidental Cost field
In the next steps, you will learn how to:
• Add Notes or Attachments to an invoice
• Check the invoice for correct and complete data
• Print an invoice as a subcontractor
• Submit an invoice for approval

23
Invoice - SAP NetWeaver Portal -
27 Drag the scroll bar to the left. .
28 Click Notes and Attachments label .

24
29 Click Add Attachment link label .

25
30 Click File: text box to to search for the file to attach (e.g. scanned invoice).
Choose file
31 Click Invoice.pdf list item .
32 Click Open button .
Invoice - SAP NetWeaver Portal -
33 Click Description: text box to enter a description of the attachment.
34
35
Click OK link label .
Click Overview label

26
.
36 Click Check link label to verify the entered data and check if the invoice is complete and contains no errors.

27
.
37 In case the invoice contains no errors, you will receive a green message to
Inform you that you can now post the invoice. Click Post link label
to submit the invoice for approval.

28
.
After posting the invoice, you will receive a message to inform you that the invoice
has been created. The status will change from 'In Process' to 'Awaiting Approval'
and your upper-tier will be notified. In case you are creating the invoice as a prime
vendor, the appropriate person within the agency will get a notification.
38 Click Close link label to return to the Order Collaboration screen.

29
.
Now that you have submitted the invoice for approval, the next steps will describe
how to locate the invoice by using the predefined active queries in the Order
Collaboration tab.
Oder Collaboration - European Space Agency - esa-p -
39 Go to the Invoices queries and click on All (26) link label to start the query for
invoices of all statuses.
40 To specify your search open the Quick Criteria Maintenance and enter the Invoice Number into the Invoice Number (Internal) text box .

30
41 Drag the scroll bar down and click the Apply button to start the query. The
invoice list will display the result(s).

31
42 Click button to hide the detailed navigation menu on the left hand side and enlarge
your screen.
Oder Collaboration - European Space Agency - esa-p -
43 Click 7000001171 link label to display the invoice details in a new screen.
In the display invoice screen you will notice that your invoice now contains several
new tabs: Header, Item, Tracking and Invoice List tabs appear now.
32
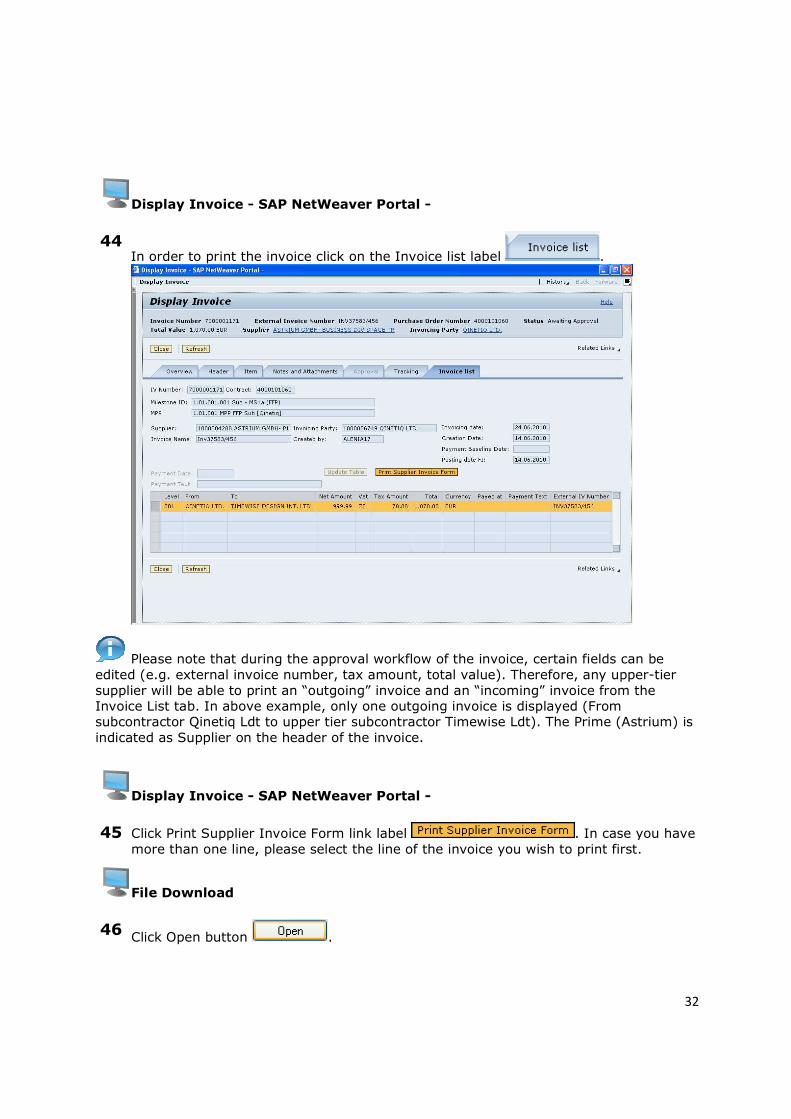
Display Invoice - SAP NetWeaver Portal -
44 In order to print the invoice click on the Invoice list label .
Please note that during the approval workflow of the invoice, certain fields can be
edited (e.g. external invoice number, tax amount, total value). Therefore, any upper-tier
supplier will be able to print an “outgoing” invoice and an “incoming” invoice from the
Invoice List tab. In above example, only one outgoing invoice is displayed (From
subcontractor Qinetiq Ldt to upper tier subcontractor Timewise Ldt). The Prime (Astrium) is
indicated as Supplier on the header of the invoice.
Display Invoice - SAP NetWeaver Portal -
45 Click Print Supplier Invoice Form link label . In case you have
more than one line, please select the line of the invoice you wish to print first.
File Download
46 Click Open button .

33
SupplierInvoiceForm[1].pdf - Adobe Reader
48 Click Print button to print the invoice and return to the display invoice screen.
Please note that the below screenshot illustrates and example of what a Prime supplier will
view in his Invoice tab (unrelated to the example of this document):
Welcome - European Space Agency - esa-p -
49 Click Home tab control .
In the previous steps you have learnt how to:
Create an invoice
Complete all mandatory data
Partially invoice a milestone and use the Incidental Cost field
Add Notes or Attachments to an invoice
Check the invoice for correct and complete data
Submit an invoice for approval
Print an invoice as a subcontractor
In the next steps, you will learn how to:
Approve an invoice as an upper-tier contractor

34
Check the status of your invoice
Welcome - European Space Agency - esa-p -
50 To view items you have received for approval, click on the Inbox tab control .
All users of the upper-tier vendor will receive in their inbox the 'Task' of
dispositioning an invoice (or confirmation) sent by a lower tier for approval.
Inbox - European Space Agency - esa-p -
51 The inbox contains all items you have received for approval (Tasks tab). A different tab contains Notifications. These are messages you receive when a document you
have posted has been finally approved or rejected. The tab Alerts is not used in esa-
p. Click label of column in order to chronologically sort the work items in your inbox, most recent on top.
Inbox - European Space Agency - esa-p -
52 Click label to open invoice number 7000001171 which is awaiting your approval.
Although it is possible to approve a task directly from the inbox (scroll to bottom of
the screen), it is strongly recommended to open the document and view the
contents before making the decision. Moreover, in order to view or add attachments
to your approval (or rejection) and to change the external invoice number, tax code
field and print the invoice form, it is always required to access the document via the hyperlink.
Invoice Details - SAP NetWeaver Portal -
53 Click External Invoice Number: * text box to enter your
company's invoice number reference.
Invoice Details - SAP NetWeaver Portal -
54 Drag the scroll bar to the right .
Invoice Details - SAP NetWeaver Portal -
55 Click icon in the Tax column to change the tax code and indicate that you (as
Prime) are tax exempted.

35
56 Click control .
57 Click Calculate Total Taxes link label . The total calculated tax will
be zero. The Balance field will show a discrepancy of 70EUR and needs to be set to
zero.

36
58 Click Calculate Total Value link label to recalculate the total gross
invoice value. The Balance field will be updated to show zero discrepancy.
Invoice Details - SAP NetWeaver Portal -
59 Drag the scroll bar to the left .

37
60 Click Invoice list label .

38
61 Click Print Supplier Invoice Form link label .
File Download
62 Click Open button .
SupplierInvoiceForm[2].pdf - Adobe Reader
63
Drag to .
64 Click Zoom Out button .
SupplierInvoiceForm[2].pdf - Adobe Reader

39
65
Drag to .
66 Click Close button .
Invoice Details - SAP NetWeaver Portal -
67 Click Notes and Attachments label .
68 Click Overview label .
Invoice Details - SAP NetWeaver Portal -
69 Click Approve link label to approve the document and send it to the next
approver. The Approve and Reject buttons will disappear as you already performed
this action. In this example, as you are the Prime approving, the work item will now
go to the inbox of the responsible person within the Agency to await approval by ESA.

40
70 Click Close link label .
Inbox - European Space Agency - esa-p -
71 Click button to hide the left hand menu structure and enlarge the screen.
72 Click the main menu icon left of the Hide Preview link label .
41
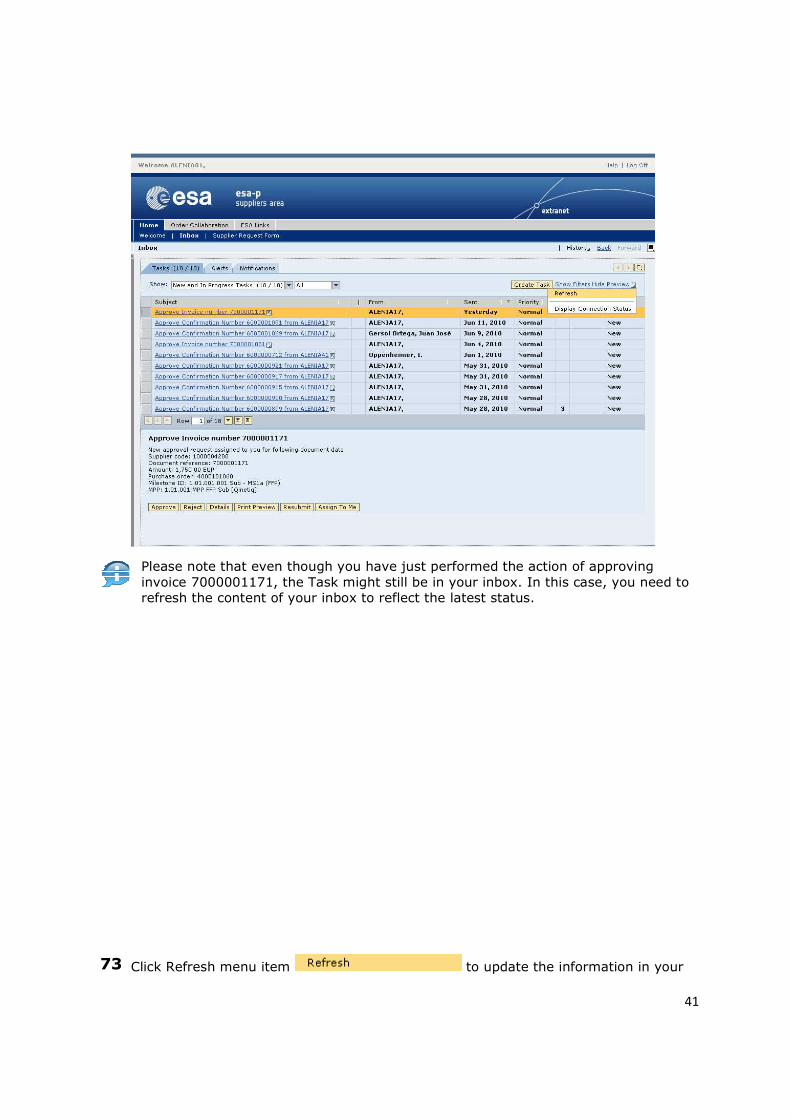
Please note that even though you have just performed the action of approving
invoice 7000001171, the Task might still be in your inbox. In this case, you need to
refresh the content of your inbox to reflect the latest status.
73 Click Refresh menu item to update the information in your

42
inbox. As you can see below, the task to approve invoice 700001171 has disappeared
from your New and In Progress Tasks list.

43
74 Click Show: combo box to select another list of
work items.

44
75 Click Completed Tasks list item . The task to
approve invoice number 7000001171 has moved to your Completed Tasks list.
In the previous steps, you have learnt how to approve and modify an invoice as a
Prime. In the next steps, you will learn how to check the status of your invoice.
76 Click Order Collaboration tab control .

45
Oder Collaboration - SAP NetWeaver Portal -
77 Click All (41) link label to view all invoices, regardless of the status they might
have.

46
78 Click Invoice Number (Internal) text box in the Quick Criteria Maintenance
section (you might need to open this section first) and enter the 10-digit esa-
p invoice number starting with 7*.

47
79 Delete any additional search criteria before activating the query. In case you don't know the status of your invoice, leave the Status criteria blank. Click Status: text box
to open the menu of available criteria values.
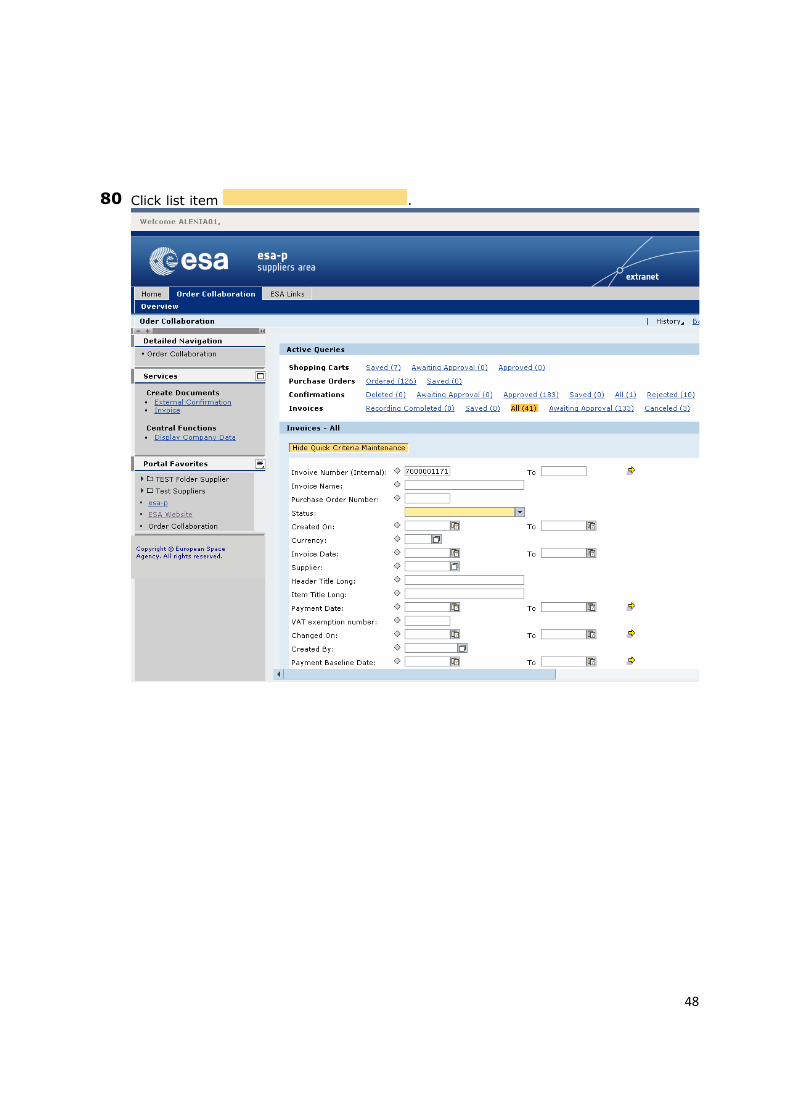
48
80 Click list item .

49
81 Drag the scroll bar down and click the Apply button to activate the search
according to the specified criteria. The list of invoices corresponding to the search
criteria is displayed.
82 Click button to hide the Detailed Navigation menu on the left hand side and enlarge
the screen. As you can see below, the status of the invoice is still Awaiting Approval.

50
Oder Collaboration - SAP NetWeaver Portal -
83 Click Refresh button to update the invoice list.
After final approval by the Payable Administrator of the Agency, the status of the
invoice has changed to Approved. Please note that no more action is required after
this status.

51
84 Click Refresh button .
The status Posted in the Backend indicates that the invoice has been replicated to
the backend Financial system and is ready for payment.
85 What to do when your invoice was rejected:
In case your invoice was rejected, you will receive a notification via esa-p. The
status will be 'Release Rejected' and a new invoice needs to be created.
For details and a rejection justification please check the Notes and Attachments tab
of the invoice.

52
You have now learnt how to:
• Create an invoice
• Complete all mandatory data
• Partially invoice a milestone and use the Incidental Cost field
• Add Notes or Attachments to an invoice
• Check the invoice for correct and complete data
• Submit an invoice for approval
• Print an invoice as a subcontractor
• Approve an invoice as an upper-tier supplier
• Check the status of your invoice
• What to do when your invoice was rejected
For further information, please regularly check the Home Welcome section in esa-p for
regular communication to suppliers containing workaround procedures for known errors
and links to further training materials.