www.fishman · 2016-09-27 · two metal endpin brackets are included with tripleplay: a...
TRANSCRIPT
Read Me First!Installation of this product is a simple procedure, but we recommend this job only if you are experienced performing minor adjustments to guitars. If you are uncomfortable with this work, consider having an experienced repair technician complete the installation.
RequirementsYou may require some or all of the following tools to properly complete this installation, in addition to those provided with your Fishman product: accurate six inch scale (ruler), action height adjustment tools, screwdrivers, painter’s tape.
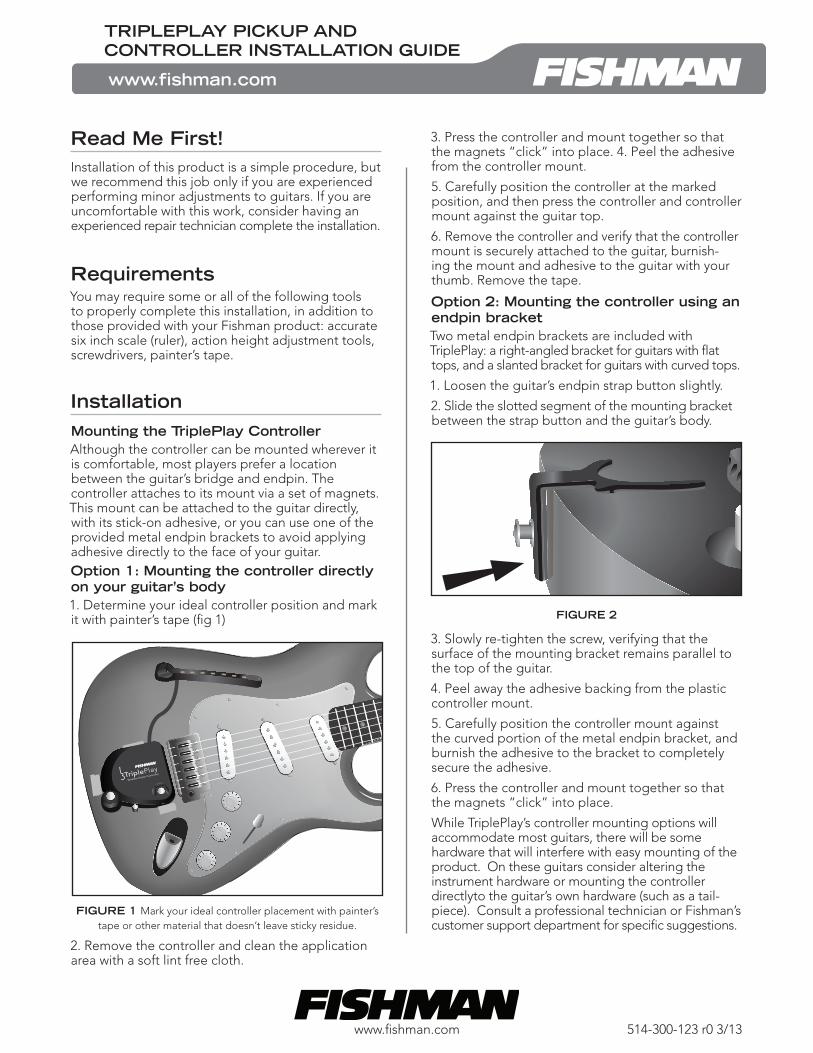
InstallationMounting the TriplePlay ControllerAlthough the controller can be mounted wherever it is comfortable, most players prefer a location between the guitar’s bridge and endpin. The controller attaches to its mount via a set of magnets. This mount can be attached to the guitar directly, with its stick-on adhesive, or you can use one of the provided metal endpin brackets to avoid applying adhesive directly to the face of your guitar.Option 1: Mounting the controller directly on your guitar’s body1. Determine your ideal controller position and mark it with painter’s tape (fig 1)
2. Remove the controller and clean the application area with a soft lint free cloth.
3. Press the controller and mount together so that the magnets “click” into place. 4. Peel the adhesive from the controller mount.
5. Carefully position the controller at the marked position, and then press the controller and controller mount against the guitar top.
6. Remove the controller and verify that the controller mount is securely attached to the guitar, burnish-ing the mount and adhesive to the guitar with your thumb. Remove the tape.
Option 2: Mounting the controller using an endpin bracketTwo metal endpin brackets are included with TriplePlay: a right-angled bracket for guitars with flat tops, and a slanted bracket for guitars with curved tops.
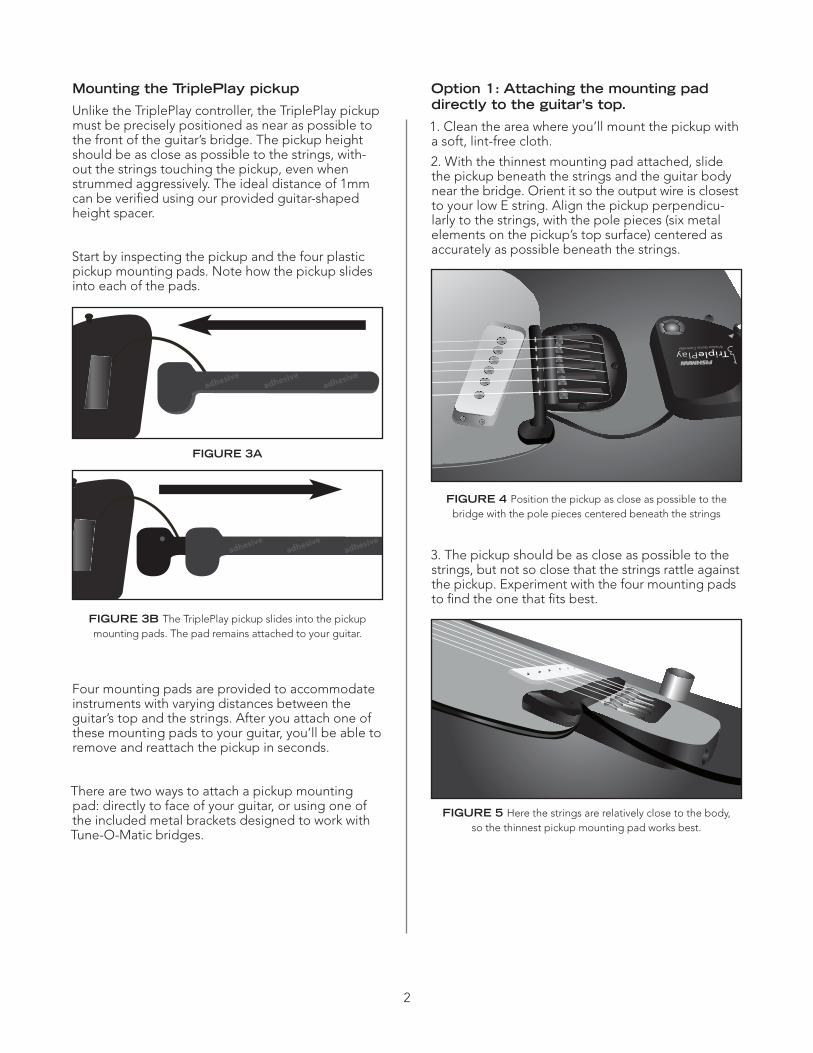
1. Loosen the guitar’s endpin strap button slightly.
2. Slide the slotted segment of the mounting bracket between the strap button and the guitar’s body.
3. Slowly re-tighten the screw, verifying that the surface of the mounting bracket remains parallel to the top of the guitar.
4. Peel away the adhesive backing from the plastic controller mount.
5. Carefully position the controller mount against the curved portion of the metal endpin bracket, and burnish the adhesive to the bracket to completely secure the adhesive.
6. Press the controller and mount together so that the magnets “click” into place.
While TriplePlay’s controller mounting options will accommodate most guitars, there will be some hardware that will interfere with easy mounting of the product. On these guitars consider altering the instrument hardware or mounting the controller directlyto the guitar’s own hardware (such as a tail-piece). Consult a professional technician or Fishman’s customer support department for specific suggestions.
TRIPlePlay PICkuP and COnTROlleR InSTallaTIOn GuIde
514-300-123 r0 3/13
www.fishman.com
www.fishman.com
FIGuRe 1 Mark your ideal controller placement with painter’s tape or other material that doesn’t leave sticky residue.
FIGuRe 2
Option 1: attaching the mounting pad directly to the guitar’s top.
1. Clean the area where you’ll mount the pickup with a soft, lint-free cloth.
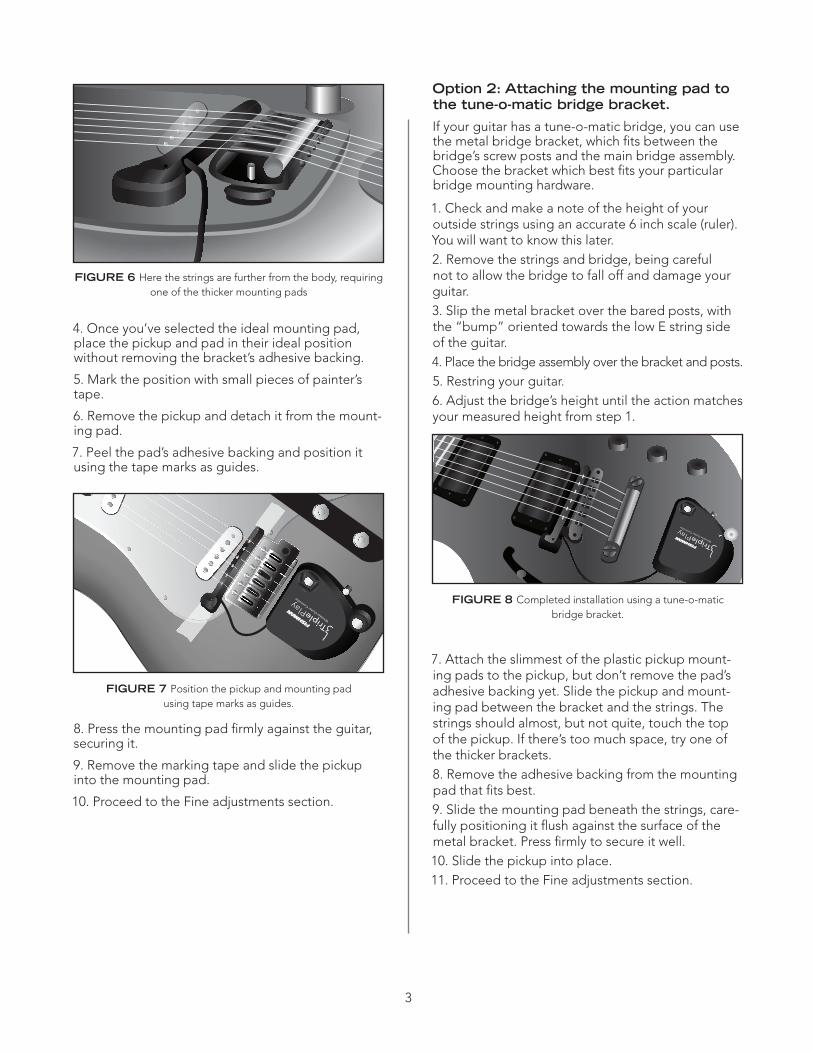
2. With the thinnest mounting pad attached, slide the pickup beneath the strings and the guitar body near the bridge. Orient it so the output wire is closest to your low E string. Align the pickup perpendicu-larly to the strings, with the pole pieces (six metal elements on the pickup’s top surface) centered as accurately as possible beneath the strings.
3. The pickup should be as close as possible to the strings, but not so close that the strings rattle against the pickup. Experiment with the four mounting pads to find the one that fits best.
2
Mounting the TriplePlay pickup
Unlike the TriplePlay controller, the TriplePlay pickup must be precisely positioned as near as possible to the front of the guitar’s bridge. The pickup height should be as close as possible to the strings, with-out the strings touching the pickup, even when strummed aggressively. The ideal distance of 1mm can be verified using our provided guitar-shaped height spacer.
Start by inspecting the pickup and the four plastic pickup mounting pads. Note how the pickup slides into each of the pads.
Four mounting pads are provided to accommodate instruments with varying distances between the guitar’s top and the strings. After you attach one of these mounting pads to your guitar, you’ll be able to remove and reattach the pickup in seconds.
There are two ways to attach a pickup mounting pad: directly to face of your guitar, or using one of the included metal brackets designed to work with Tune-O-Matic bridges.
FIGuRe 3b The TriplePlay pickup slides into the pickup mounting pads. The pad remains attached to your guitar.
FIGuRe 3a
FIGuRe 4 Position the pickup as close as possible to the bridge with the pole pieces centered beneath the strings
FIGuRe 5 Here the strings are relatively close to the body, so the thinnest pickup mounting pad works best.
3
Option 2: attaching the mounting pad to the tune-o-matic bridge bracket.
If your guitar has a tune-o-matic bridge, you can use the metal bridge bracket, which fits between the bridge’s screw posts and the main bridge assembly. Choose the bracket which best fits your particular bridge mounting hardware.
1. Check and make a note of the height of your outside strings using an accurate 6 inch scale (ruler). You will want to know this later.2. Remove the strings and bridge, being careful not to allow the bridge to fall off and damage your guitar.3. Slip the metal bracket over the bared posts, with the “bump” oriented towards the low E string side of the guitar.4. Place the bridge assembly over the bracket and posts.5. Restring your guitar.6. Adjust the bridge’s height until the action matches your measured height from step 1.
7. Attach the slimmest of the plastic pickup mount-ing pads to the pickup, but don’t remove the pad’s adhesive backing yet. Slide the pickup and mount-ing pad between the bracket and the strings. The strings should almost, but not quite, touch the top of the pickup. If there’s too much space, try one of the thicker brackets.8. Remove the adhesive backing from the mounting pad that fits best.9. Slide the mounting pad beneath the strings, care-fully positioning it flush against the surface of the metal bracket. Press firmly to secure it well.10. Slide the pickup into place.11. Proceed to the Fine adjustments section.
4. Once you’ve selected the ideal mounting pad, place the pickup and pad in their ideal position without removing the bracket’s adhesive backing.
5. Mark the position with small pieces of painter’s tape.
6. Remove the pickup and detach it from the mount-ing pad.
7. Peel the pad’s adhesive backing and position it using the tape marks as guides.
8. Press the mounting pad firmly against the guitar, securing it.
9. Remove the marking tape and slide the pickup into the mounting pad.
10. Proceed to the Fine adjustments section.
FIGuRe 6 Here the strings are further from the body, requiring one of the thicker mounting pads
FIGuRe 7 Position the pickup and mounting pad using tape marks as guides.
FIGuRe 8 Completed installation using a tune-o-matic bridge bracket.
4
If you have an excess length of cable, you can make things neater by winding a bit of cable around the spindles on the controller’s rear surface.
You may find at this point that one or more strings remain a little too close or a little too far from the pickup. Adjust the height of each saddle (when possible), so that all six strings are the same distance from the TriplePlay pickup’s pole pieces.
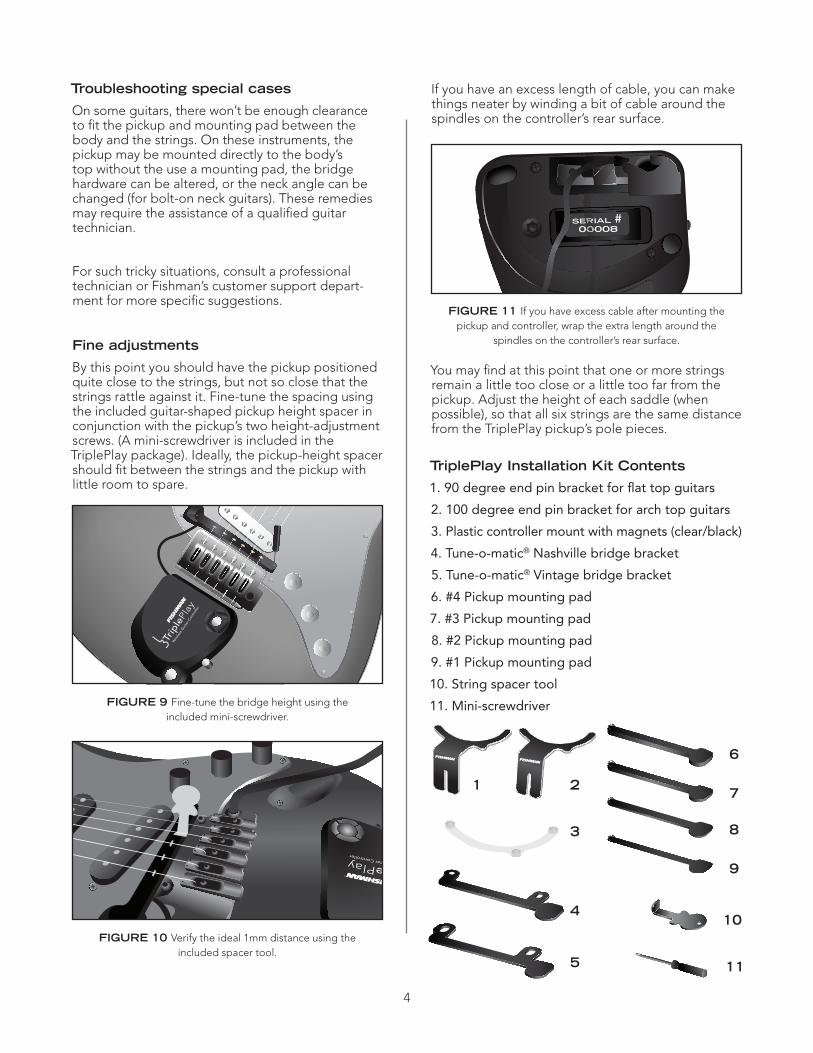
TriplePlay Installation kit Contents
1. 90 degree end pin bracket for flat top guitars
2. 100 degree end pin bracket for arch top guitars
3. Plastic controller mount with magnets (clear/black)
4. Tune-o-matic® Nashville bridge bracket
5. Tune-o-matic® Vintage bridge bracket
6. #4 Pickup mounting pad
7. #3 Pickup mounting pad
8. #2 Pickup mounting pad
9. #1 Pickup mounting pad
10. String spacer tool
11. Mini-screwdriver
Troubleshooting special cases
On some guitars, there won’t be enough clearance to fit the pickup and mounting pad between the body and the strings. On these instruments, the pickup may be mounted directly to the body’s top without the use a mounting pad, the bridge hardware can be altered, or the neck angle can be changed (for bolt-on neck guitars). These remedies may require the assistance of a qualified guitar technician.
For such tricky situations, consult a professional technician or Fishman’s customer support depart-ment for more specific suggestions.
Fine adjustments
By this point you should have the pickup positioned quite close to the strings, but not so close that the strings rattle against it. Fine-tune the spacing using the included guitar-shaped pickup height spacer in conjunction with the pickup’s two height-adjustment screws. (A mini-screwdriver is included in the TriplePlay package). Ideally, the pickup-height spacer should fit between the strings and the pickup with little room to spare.
FIGuRe 9 Fine-tune the bridge height using the included mini-screwdriver.
FIGuRe 11 If you have excess cable after mounting the pickup and controller, wrap the extra length around the
spindles on the controller’s rear surface.
FIGuRe 10 Verify the ideal 1mm distance using the included spacer tool.
1
4
3
2
5
6
7
8
9
10
11