x-plane user guide - milviz.com · x-plane 11 all operating systems which are supported by the...
TRANSCRIPT
Turbo 310RX-Plane user guide
This software is an artistic representation of the subject matter.
Any similarities to any commercial product, equipment, ve-hicle, device or other, present within this artistic represen-tation does not constitute or imply an endorsement (by, or of) the manufacturer(s) and/or trademark holder(s) of that which may be deemed similar.
This software, including any and all components and con-tent, © 2018 Military Visualizations Inc. All Rights Reserved.
No replication, reduction, reverse engineering or unauthor-ized addition to the software, either in whole or in part, is permitted in any form without the express written permis-sion of Military Visualizations Inc.
By installing this software, you are hereby agreeing to the above terms and conditions. Any breach of the above EULA will result in litigation, removal of license and/or forfeiture of continued support.
Any inquiries regarding academic or other professional use of this software should be directed via e-mail to [email protected].

Turbo 310R User Guide
Main Index
Introduction 1
Product Features 2
System Requirements 3
Installation Instructions 4
Uninstalling 6
Updating 6
Product Support 6
Aircraft Specifications 7
Recommended Speeds & Settings 7
Operational Limitations 8
Engine Limitations 8
Tutorial: Using the T310R Aircraft Menu 9
Tutorial: Starting the Turbo 310R 10

Turbo 310R User Guide
Welcome! This User Guide has been prepared to help you get started with your new Turbo 310R for X-Plane.
It contains useful information about your Turbo 310R’s equipment, operating procedures, and performance. It also contains instructions for in-stallation and updating. We recommend that you take some time to read through this guide from cover to cover, and to refer to it as needed.
Our interest in your simulation activity has not ceased with your purchase of the MilViz Turbo 310R. Worldwide, the Military Visualizations staff stands ready to assist and serve. For technical
support, please post a request on our Turbo 310R X-Plane support forum. Our dedicated and tal-ented staff is ready to help you.
For forum access please email [email protected] with your proof of purchase and your preferred or existing forum username.
Bringing the 310R to X-Plane This isn’t the first version of the 310R to wear the MilViz label. The original version of the MilViz 310R was released way back in 2010 in Microsoft Flight Simulator X, well known not only for it’s accurate portrayal of the iconic twin but also for the care-fully tuned and realistic flight model.
In the spring of 2018 we released the 310R Redux, for FSX and Prepar3d. This version was a com-plete overhaul of the original, with enhanced and updated systems programming, an updated vir-tual cockpit, new external textures, and a brand new soundset. In other words, pretty much ev-erything required in order to bring this aircraft up to current standards.
In bringing the 310R into the X-Plane world, we’ve retained the same excellent standards that we’re know for, while taking advantage of all of the modern technology available to us in X-Plane 11.
We’re happy to be here, and we’re very happy that you could join us. Thanks and enjoy the ride!
Page 1
Turbo 310R User Guide
Product Features
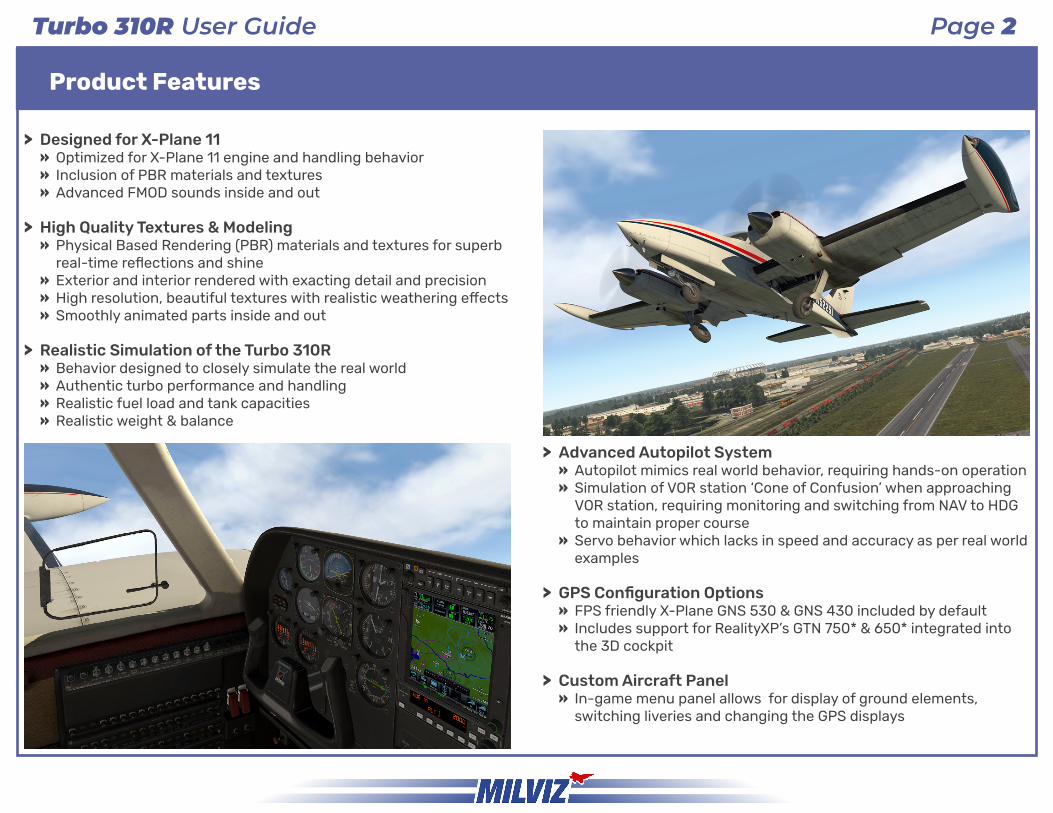
> Designed for X-Plane 11 » Optimized for X-Plane 11 engine and handling behavior » Inclusion of PBR materials and textures » Advanced FMOD sounds inside and out
> High Quality Textures & Modeling » Physical Based Rendering (PBR) materials and textures for superb real-time reflections and shine
» Exterior and interior rendered with exacting detail and precision » High resolution, beautiful textures with realistic weathering effects » Smoothly animated parts inside and out
> Realistic Simulation of the Turbo 310R » Behavior designed to closely simulate the real world » Authentic turbo performance and handling » Realistic fuel load and tank capacities » Realistic weight & balance
> Advanced Autopilot System » Autopilot mimics real world behavior, requiring hands-on operation » Simulation of VOR station ‘Cone of Confusion’ when approaching VOR station, requiring monitoring and switching from NAV to HDG to maintain proper course
» Servo behavior which lacks in speed and accuracy as per real world examples
> GPS Configuration Options » FPS friendly X-Plane GNS 530 & GNS 430 included by default » Includes support for RealityXP’s GTN 750* & 650* integrated into the 3D cockpit
> Custom Aircraft Panel » In-game menu panel allows for display of ground elements, switching liveries and changing the GPS displays
Page 2

Turbo 310R User Guide
X-Plane 11
All operating systems which are supported by the X-Plane 11 platform. At the time of publication, this includes:
• OS X: OS X 10.10 or newer• Windows: Windows 7, 8, or 10, 64-bit• Linux (While any distribution which successfully
runs X-Plane 11 should be capable of operating this aircraft, distribution specific issues with X-Plane 11 that may causes issues with this aircraft are not supported.)
Intel Core i3, i5, or i7 CPU with 2 or more cores,or AMD equivalent. (Recommended: Intel Corei5 6600K at 3.5 ghz or faster.)
DirectX 11-capable video card from NVIDIA, AMD or In-tel with at least 1 GB VRAM. (Recommended: DirectX 12-capable video card from NVIDIA, AMD or Intel with at least 4 GB VRAM, GeForce GTX 1070 or better or similar from AMD.)
8 GB RAM (Recommended: 16-24 GB RAM or more.)
1.5 GB or greater free hard drive space.
Joystick, yoke, or other gaming controller (a means of controlling the aircraft rudder, either with twist joy-stick function or dedicated pedals, is additionally rec-ommended).
System Requirements
The following requirements apply as a minimum to successfully install, con-figure and operate the MilViz Turbo 310R for X-Plane.
(Please that these requirements rep-resent the minimum required; your choice of scenery, location, and sim-ulator settings may place additional demands on your simulation platform that may ultimately affect your simu-lator experience.)
Supported Platforms:
Supported Operating Systems:
Processor (CPU):
Video Card (GPU):
System Memory (RAM):
Hard Drive:
Gaming Controller:
Page 3
Turbo 310R User Guide
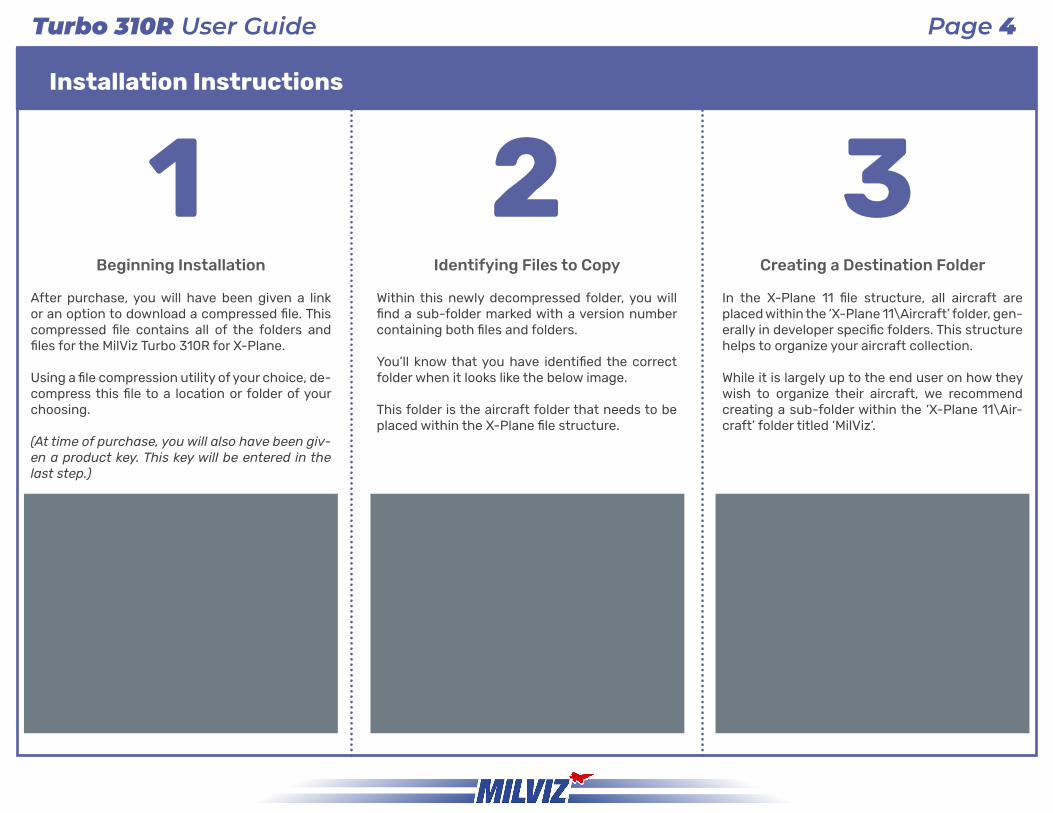
Beginning Installation
After purchase, you will have been given a link or an option to download a compressed file. This compressed file contains all of the folders and files for the MilViz Turbo 310R for X-Plane.
Using a file compression utility of your choice, de-compress this file to a location or folder of your choosing.
(At time of purchase, you will also have been giv-en a product key. This key will be entered in the last step.)
2Identifying Files to Copy
Within this newly decompressed folder, you will find a sub-folder marked with a version number containing both files and folders.
You’ll know that you have identified the correct folder when it looks like the below image.
This folder is the aircraft folder that needs to be placed within the X-Plane file structure.
Creating a Destination Folder
In the X-Plane 11 file structure, all aircraft are placed within the ‘X-Plane 11\Aircraft’ folder, gen-erally in developer specific folders. This structure helps to organize your aircraft collection.
While it is largely up to the end user on how they wish to organize their aircraft, we recommend creating a sub-folder within the ‘X-Plane 11\Air-craft’ folder titled ‘MilViz’.
Installation Instructions
1 3
Page 4

Turbo 310R User Guide
Copying the Aircraft
You should now have a folder structure that re-sembles the following:
‘X-Plane 11\Aircraft\MilViz’
Copy the aircraft folder you identified in Step 2 into this newly created MilViz folder. Done cor-rectly, it should closely resemble the following image.
Verify Installation
Once the aircraft folder is installed correctly, launch X-Plane 11.
On the left side of the Flight Configuration UI screen, you should be able to find your new Turbo 310R.
You may now select it and start a flight (making any other desired adjustments to starting loca-tion & weather, of course).
Product Key Registration
At time of purchase, you should also have been given a product key. This product key is used to register your aircraft, and is tied to your individual purchase.
On the first launch of the aircraft, a window will automatically show, asking for the product key. Enter the key you received and press the ‘Regis-ter’ button to continue.
You aircraft is now ready for use!
Installation Instructions (continued)
4 5 6
Page 5
Turbo 310R User Guide
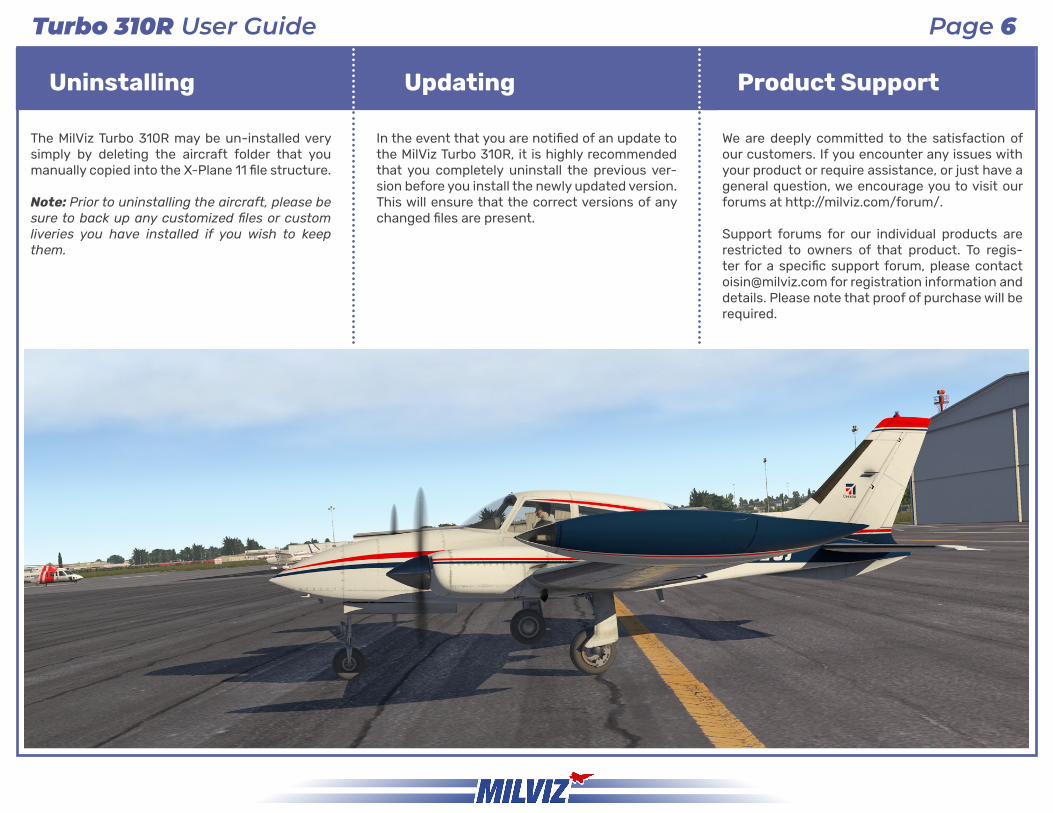
In the event that you are notified of an update to the MilViz Turbo 310R, it is highly recommended that you completely uninstall the previous ver-sion before you install the newly updated version. This will ensure that the correct versions of any changed files are present.
The MilViz Turbo 310R may be un-installed very simply by deleting the aircraft folder that you manually copied into the X-Plane 11 file structure.
Note: Prior to uninstalling the aircraft, please be sure to back up any customized files or custom liveries you have installed if you wish to keep them.
UpdatingUninstalling Product Support
We are deeply committed to the satisfaction of our customers. If you encounter any issues with your product or require assistance, or just have a general question, we encourage you to visit our forums at http://milviz.com/forum/.
Support forums for our individual products are restricted to owners of that product. To regis-ter for a specific support forum, please contact [email protected] for registration information and details. Please note that proof of purchase will be required.
Page 6

Turbo 310R User Guide
Aircraft Specifications
Number of Engines 2
Engine Model Number: TSIO-520-BB
Engine Type: Turbocharged, fuel injected, di-rect drive, air-cooled, horizontally opposed, six cylinder, 520 cubic-inch displacement.
Horsepower: 285 rated horsepower at 2700 RPM and 32.0 inches Hg. mani-fold pressure to the critical alti-tude of 16,000 feet.
Propellers: 2, 3-blade, 6’ 6” diameter, con-stant speed, full feathering, non-reversible hydraulically actuated.
Maximum Takeoff Weight: 5500 lbs
Maximum Landing Weight: 5400 lbs
Maximum Zero Fuel Weight: 5015 lbs
Standard Empty Weight: 3467 lbs
Maximum Useful Load: 2068 lbs
Main Fuel Tanks - Usable 100 U.S. Gallons (total)
Auxiliary Fuel Tanks - Usable 63 U.S. Gallons (total)
Total Wing Area: 179 square feet
Wing Loading: 30.73 lbs per square foot
Power Loading: 9.65 lbs per horsepower
Normal Takeoff: 2700 RPM, Full Throttle, Flaps 0° Raise nosewheel at 80 KIAS, Lift-off at 92 KIAS (5500 lbs Max Weight)
Max Performance Takeoff: 2700 RPM, Full Throttle, Flaps 15° Raise nosewheel at 70 KIAS, Lift-off at 82 KIAS (5500 lbs Max Weight)
Best Angle-of-Climb Speed (S.L.): 81 KIAS (at 5500 lbs Max Weight)
Best Rate-of-Climb Speed (S.L.): 105 KIAS (at 5500 lbs Max Weight)
Cruise Climb: 2350 RPM, 29 In. Hg. 115 to 140 KIAS
Maximum Climb: 2700 RPM, Full Throttle below 16,000 feet, Max allowable M.P. above 16,000 feet.
105 KIAS
Cruise: 2100 to 2350 RPM and 15.0 to 29.0 In. Hg. or 2200 to 2300 RPM and 15.0 to 30.0 In. Hg.
Minimum Multi-Engine Approach Speed:
93 KIAS (at 5400 lbs Max Weight)
Recommended Settings & Speeds
Page 7
Turbo 310R User Guide
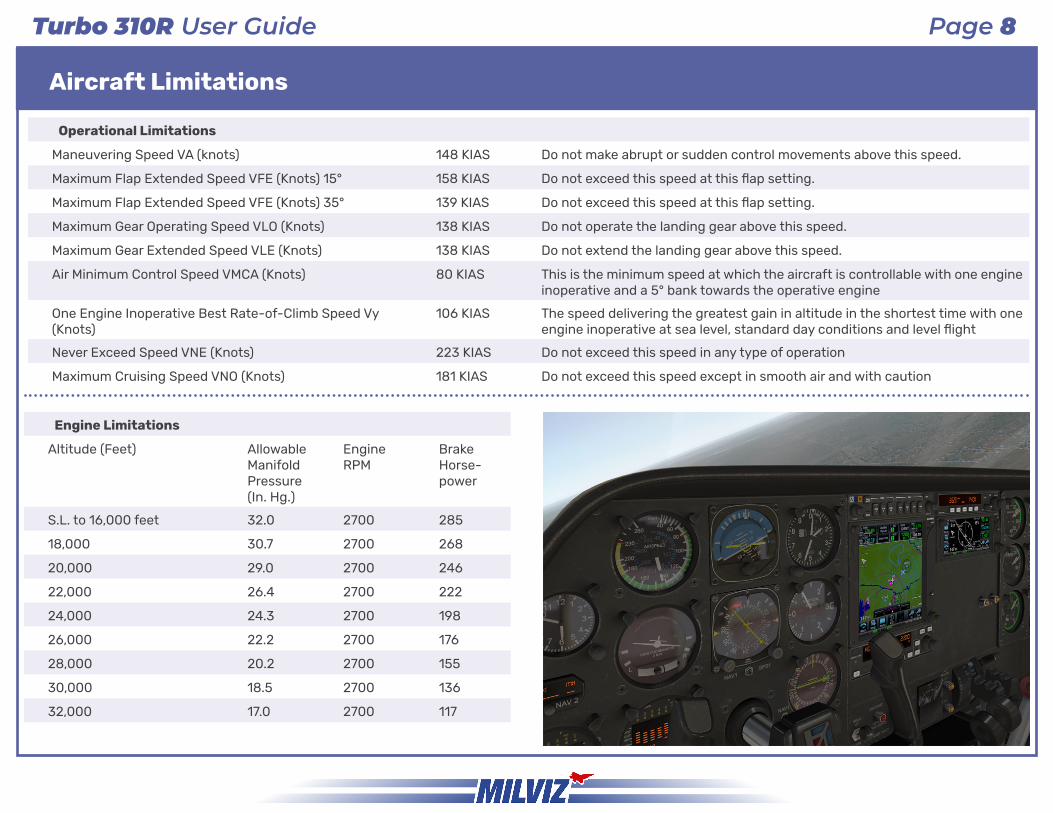
Aircraft Limitations
Engine Limitations
Altitude (Feet) Allowable Manifold Pressure (In. Hg.)
EngineRPM
Brake Horse-power
S.L. to 16,000 feet 32.0 2700 285
18,000 30.7 2700 268
20,000 29.0 2700 246
22,000 26.4 2700 222
24,000 24.3 2700 198
26,000 22.2 2700 176
28,000 20.2 2700 155
30,000 18.5 2700 136
32,000 17.0 2700 117
Operational Limitations
Maneuvering Speed VA (knots) 148 KIAS Do not make abrupt or sudden control movements above this speed.
Maximum Flap Extended Speed VFE (Knots) 15° 158 KIAS Do not exceed this speed at this flap setting.
Maximum Flap Extended Speed VFE (Knots) 35° 139 KIAS Do not exceed this speed at this flap setting.
Maximum Gear Operating Speed VLO (Knots) 138 KIAS Do not operate the landing gear above this speed.
Maximum Gear Extended Speed VLE (Knots) 138 KIAS Do not extend the landing gear above this speed.
Air Minimum Control Speed VMCA (Knots) 80 KIAS This is the minimum speed at which the aircraft is controllable with one engine inoperative and a 5° bank towards the operative engine
One Engine Inoperative Best Rate-of-Climb Speed Vy (Knots)
106 KIAS The speed delivering the greatest gain in altitude in the shortest time with one engine inoperative at sea level, standard day conditions and level flight
Never Exceed Speed VNE (Knots) 223 KIAS Do not exceed this speed in any type of operation
Maximum Cruising Speed VNO (Knots) 181 KIAS Do not exceed this speed except in smooth air and with caution
Page 8

Turbo 310R User Guide
Tutorial: Using the T310R Aircraft Menu
The MilViz Turbo 310R includes a custom aircraft menu panel which is accessible once the aircraft is loaded. From this menu, it’s possible to perform the following actions:
> Remove / Attach external features > Change Aircraft Liveries > Switch between GPS options
The menu panel may be opened (or closed) by uti-lizing the X-Plane Menu Bar located at the top of the screen, and choosing “Plugins > MilViz T310R > Show/Hide Options”.
Clicking on the images of the chocks or the ‘Re-move Before Flight’ flag allows you to hide or show those respective features on the aircraft.
The next section allows you to switch aircraft liv-eries on the fly by clicking the arrows to the left or right of the aircraft image.
The GPS options allow you to switch between the stock X-Plane GNS 530/430 and the RealityXP GTN 750/650 variants (not included).
To switch, click the image shown for either Nav 1 or Nav 2. The changes will immediately be re-flected in the aircraft.
IMPORTANT: When transitioning between the Reality XP GTN 750 and the stock X-Plane GNS 530, be sure to turn the GTN 750 OFF in the pl-ugins menu. This is found at ‘Plugins>Reality XP GTN> GTN1’.
Page 9

Turbo 310R User Guide
Tutorial: Starting the Turbo 310R
For this portion of the T310R user guide, we’ve elected to present a step-by-step walkthrough of how to take the Turbo 310R from a cold and dark state all the way up to being ready for taxi and takeoff.
This is provided in lieu of a pseudo-realistic se-ries of procedural checklists which, although of-ten containing a wealth of information of interest to those wanting to mimic the full scope of pilot activities, cover many areas not relevant to simu-lator use and don’t always do a lot to help a newer pilot find their bearings.
The systems and engine management in the Tur-bo 310R is not exceedingly complex and do not need in-depth coverage in order to successfully operate the aircraft, given that there is no cus-tom failure or wear-n-tear simulation included.
Instrumentation included in the T310R panel is fairly standard and the interpretation of such should be familiar to simulation pilots.
Failures that are a default part of the X-Plane plat-form are not within our scope of coverage. Such failure modes are generic to all aircraft within the
simulator and do not need to be addressed by our guide. The use of such modes is not discouraged nor recommended; it is purely left to user choice.
Aside from the specifications and limitations we’ve also listed within this user guide, our pri-mary advice is simply to pay attention to the limi-tations indicated on the instrumentation, primar-ily the airspeed indicator, the manifold pressure gauge and the RPM gauge.
Have fun and keep the blue side up!
Page 10

Turbo 310R User Guide
Preflight Actions
1) Adjust fuel quantities and weight as desired for flight
> Adjustments are made through the Flight Configuration UI
a) When selecting the aircraft, press the “Customize” button
b) Next, press the “Weight, Balance & Fuel” button
c) Adjust as desired
> Tanks 1 & 2 (the main tip tanks) are filled before aux tanks
> The usable C.G. range is from -1.5” (forward) to +2.8” (aft)
1-B
1-A
1-C
2) Remove wheel chocks and covers
> This action can be done through a custom menu panel
> This panel is opened through the top UI menu bar
> Choose “Plugins > MilViz T310R > Show/Hide Options”
2
Page 11
Turbo 310R User Guide
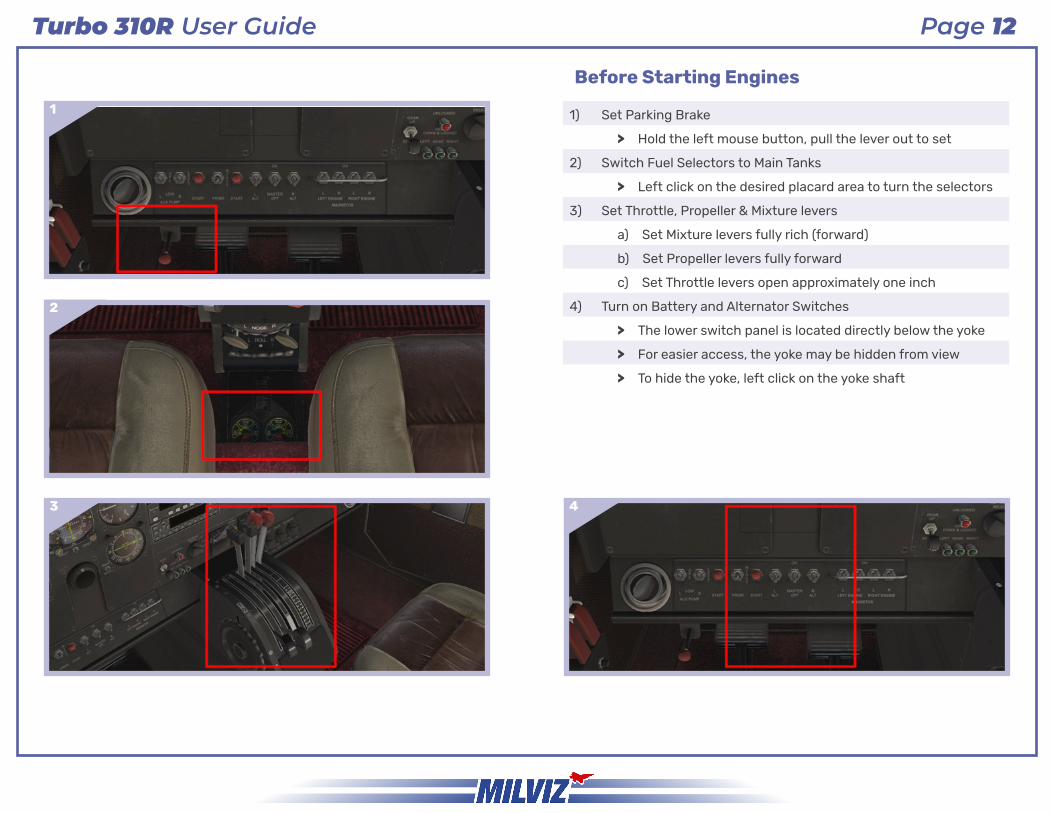
Before Starting Engines
1) Set Parking Brake
> Hold the left mouse button, pull the lever out to set
2) Switch Fuel Selectors to Main Tanks
> Left click on the desired placard area to turn the selectors
3) Set Throttle, Propeller & Mixture levers
a) Set Mixture levers fully rich (forward)
b) Set Propeller levers fully forward
c) Set Throttle levers open approximately one inch
4) Turn on Battery and Alternator Switches
> The lower switch panel is located directly below the yoke
> For easier access, the yoke may be hidden from view
> To hide the yoke, left click on the yoke shaft
1
2
43
Page 12

Turbo 310R User Guide
Before Starting Engines (continued)
5) Set lighting switches and dials as required
> Toggle switches ON/OFF with the left mouse button
> Rotate dials to adjust brightness with the mouse wheel
6) Set Altimeter to correct barometric pressure or elevation
> Use the adjustment knob at the bottom left of the altimeter
> Rotate the mouse wheel when over the adjustment knob
7) Open left and right Cowl Flaps
> Hold the left mouse button, pull or push control handles
5
6
7
Page 13

Turbo 310R User Guide
Starting Engines
(left engine is started first, then right engine)
1) Turn on Magneto Switches
> Toggle switches ON with the left mouse button
2) Start Engine
a) Press Start button for desired engine
> Click the button using the left mouse button
b) Engage the Primer left or right, depending on engine
> Click and hold the primer switch and drag to left or right
3) Turn Auxiliary Fuel Pump switch to LOW
> Toggle switch to LOW with the left mouse button
4) Set Throttle lever to obtain 800 to 1000 RPM
(repeat steps 1 through 4 for right engine)
1
2
3
4
Page 14
Turbo 310R User Guide
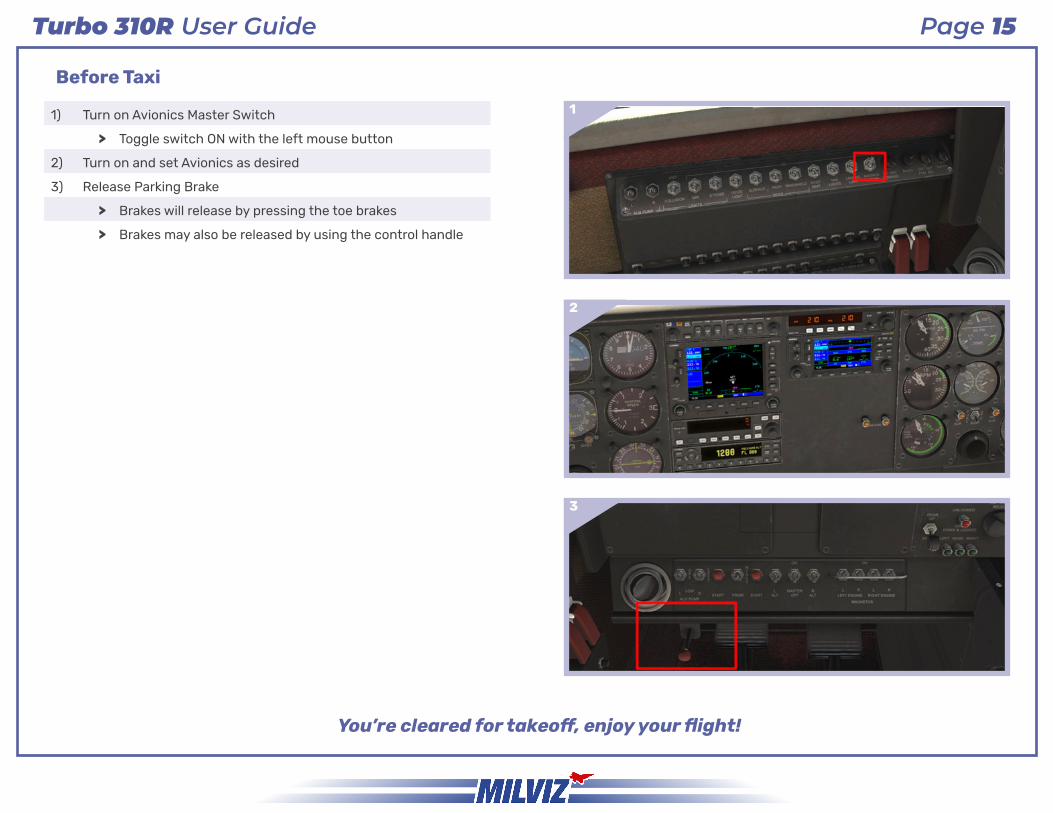
Before Taxi
1) Turn on Avionics Master Switch
> Toggle switch ON with the left mouse button
2) Turn on and set Avionics as desired
3) Release Parking Brake
> Brakes will release by pressing the toe brakes
> Brakes may also be released by using the control handle
1
2
3
You’re cleared for takeoff, enjoy your flight!
Page 15

MilViz Team
Modeling & Textures
Testers
Credits