x4 dosing pump user manual - theaquariumsolution.com · x4 dosing pump is an intelligent dosing...
TRANSCRIPT
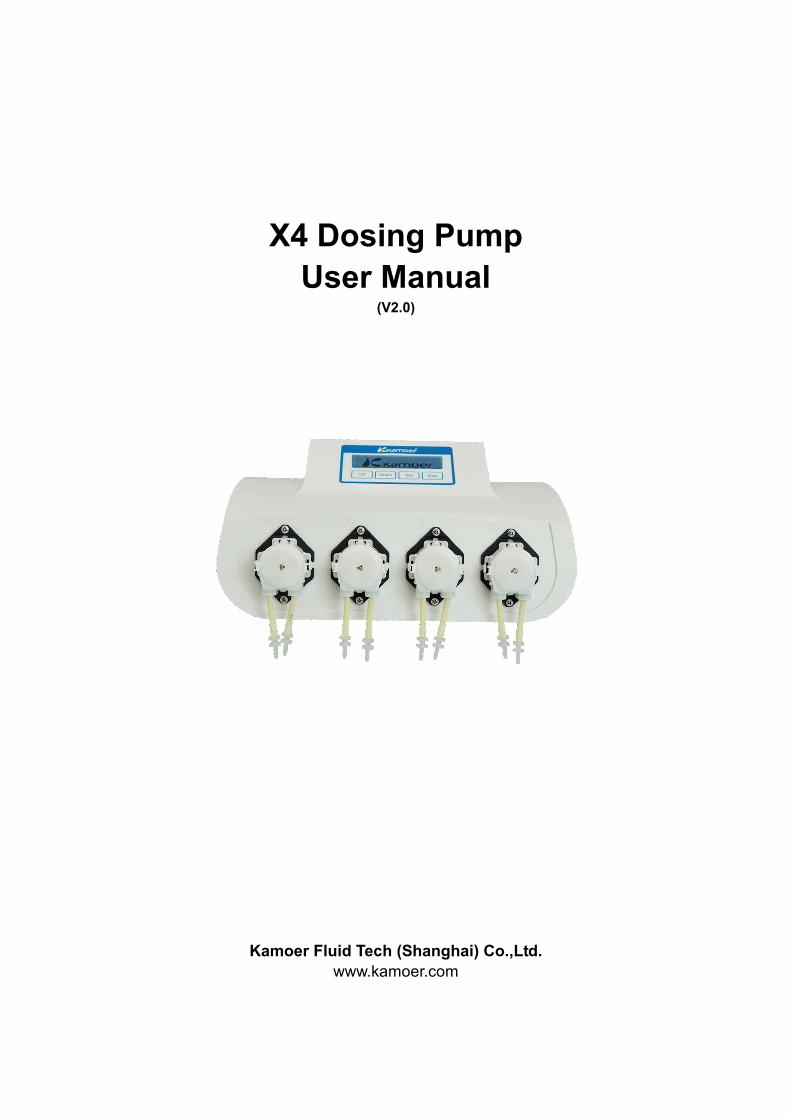
X4 Dosing Pump
User Manual
(V2.0)
Kamoer Fluid Tech (Shanghai) Co.,Ltd. www.kamoer.com

1
Contents
WARRANTY ........................................................................................................................ 2
NOTICE ............................................................................................................................... 3
1. INTRODUCTION ............................................................................................................. 4
1.1 ABOUT ....................................................................................................................................... 4
1.2 UNPACKING ................................................................................................................................ 5
1.3 STRUCTURE DIAGRAM ................................................................................................................... 5
1.4 INCLUDED ITEMS .......................................................................................................................... 6
1.5 TECHNICAL PARAMETER ................................................................................................................. 7
2. USE .................................................................................................................................. 8
2.1 SOFTWARE DOWNLOAD ................................................................................................................. 8
2.2 CONNECTION SETTING ................................................................................................................... 9
2.3 SOFTWARE USE .......................................................................................................................... 14
3.MAINTENANCE ........................................................................................................... 21
3.1 CHEMICAL COMPATIBILITY ............................................................................................................ 21
3.2 STORAGE .................................................................................................................................. 21
4.TECHNICAL SUPPORT .............................................................................................. 21
2
Warranty
We warrant your product against any defect in material and workmanship, under
normal use. In the event a product is found to be defective within the warranty period of
one year, we will, at our option, repair or replace the defective product. The warranty
period starts at the day of purchase. For warranty validation, a proof of purchase must be
furnished.
The followings are excluded from the warranty:
1. Improper use of the device causing malfunction;
2. The device is repaired or modified by an unauthorized person;
3. Use of non-produced material by our company i.e. pump tube;
4. Damage by disaster;
5. Improper maintenance causing damage;
6. Use of reagent or sample causing corrosion;
7. Damage by accident or over load;
8. Consumables, such as silicone tube and fuse etc.
To obtain warranty support, you may contact our local technical support. Our
technical support will attempt to diagnose and correct the problem. If the problem cannot
be rectified, our technical support will ask you to return the product. You will be asked to
furnish proof of purchase to confirm that the product is still under warranty.
Kamoer is registered trademark of Kamoer Fluid Tech (Shanghai) Co.,Ltd. We reserve
the right to improve or alter appearance and technical specifications without notice.
3
Notice
We have considered user safety in the design process. Please read this manual
carefully. Any improper operation may cause damage or danger.
1. Safety
The product belongs to Active Products. To avoid danger, you should observe
the following rules.
If you find any visible damage, please do not switch on;
Be sure not to add any acid, alkali, or volatile solvents;
Be sure not to use in humid environment, avoid damage by short circuit;
Temperature change or mechanical wear may increase the volume error.
2. Defect and anomalous situation
You must stop any operation immediately if the equipment is damaged. The
equipment may be damaged when the following situations occur:
1) There is visual damage.
2) The product suddenly does not work.
3) The product is located in an inappropriate position.
4
1. Introduction
1.1 About
X4 dosing pump is an intelligent dosing pump equipped with four micro-peristaltic
pump heads and WIFI modules. It is mainly used to add various elements needed for the
growth of marine life to aquarium regularly, quantitatively and accurately, such as calcium,
magnesium, KH agent, trace element and so on. Through automated addition, X4 dosing
pump greatly reduces the workload by manual and avoids missed addition, excessive
addition, insufficient addition and other mistakes caused by manual addition.
Features
Compact appearance, elegant, powerful
Equipped with LCD screen and key, both stand-alone operation, and support
iOS/Android app and windows PC client control dosing pump via WIFI
Contains real-time clock, automatically run according to the setting parameters, the
parameters are not lost in the case of power failure
1-24 dosing times a day can be set, support every other day, every two days and the
specified week day dosing
Support the flow rate calibration
Standard Pharmed BPT®pump tube, long life, heat resistance, acid, ozone and UV
rays, anti-aging and oxidation, no cytotoxicity and hemolysis
Optional temperature and liquid level sensor to monitor temperature and level status
Remote control can be achieved by access to kamoer aquarium cloud via kamoer
intelligent controller
Application
Aquarium feeding
Include hard coral (SPS), soft coral (LPS), and polyculture coral (SPS/LPS)
Plant feeding
Used to supplement the different elements consumed during plant growth
Other application
Timely, quantitatively and non-continuously added applications

5
1.2 Unpacking
Before unpacking, please check for damage by delivery.
Upon opening the package, please check that you have received all parts before
using. The parts list is shown in Appendix B - Packing List. Please check whether
the product has visible damage.
If any defects are found when unpacking, please contact us immediately.
1.3 Structure diagram
6
The dosing pump belongs to the self-priming pump, when the inlet and
outlet of the liquid gap is too large, may produce siphon or reflux phenomenon. In
order to avoid siphon and reflux phenomenon, the dosing pump should be placed
in a reasonable position, to ensure that the inlet and outlet of the height of the gap
within 0.5 meters.
The inlet tube shall be as short as possible, and the outlet tube shall be
suspended over the container.
Please carefully check the inlet and outlet tube direction is correct, must not be
reversed.
1.4 Included Items
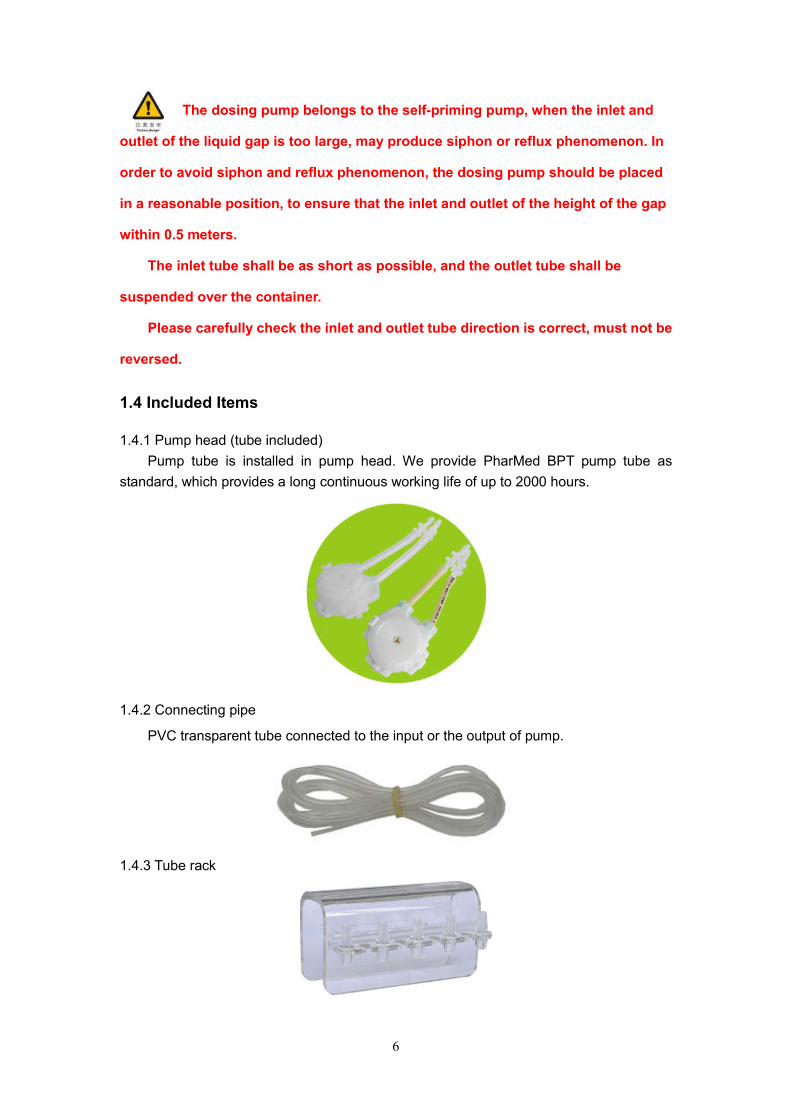
1.4.1 Pump head (tube included)
Pump tube is installed in pump head. We provide PharMed BPT pump tube as
standard, which provides a long continuous working life of up to 2000 hours.
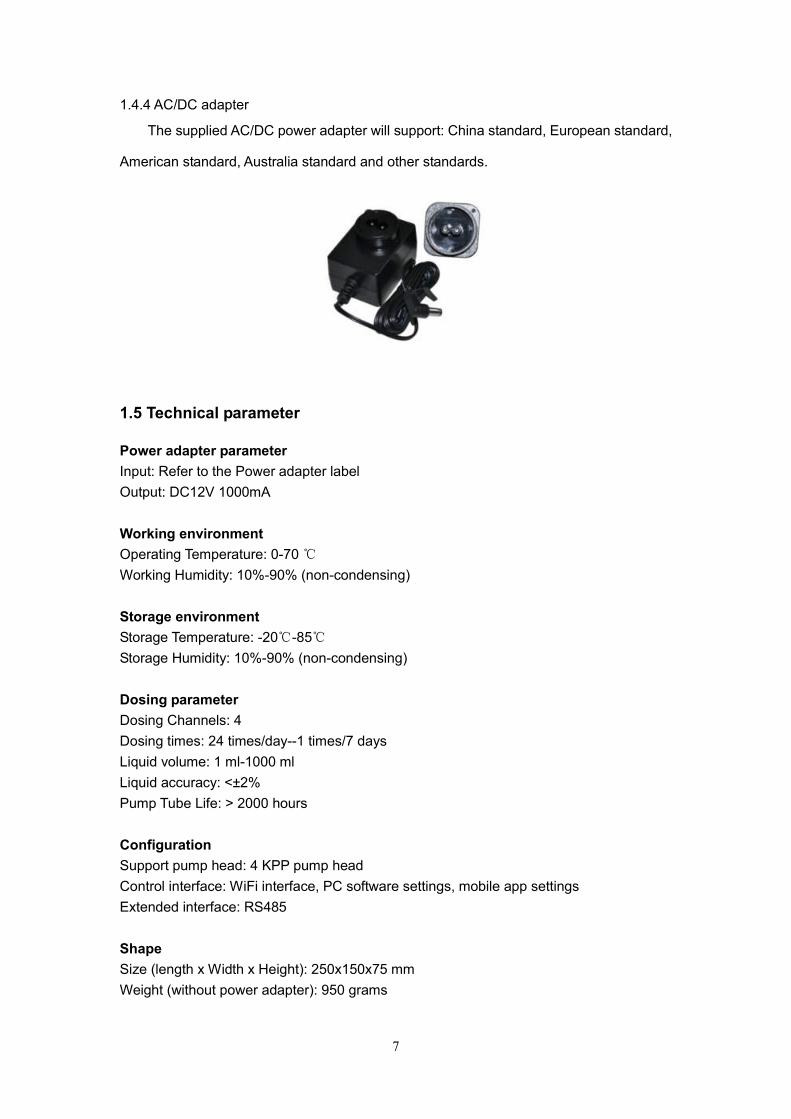
1.4.2 Connecting pipe
PVC transparent tube connected to the input or the output of pump.
1.4.3 Tube rack
7
1.4.4 AC/DC adapter
The supplied AC/DC power adapter will support: China standard, European standard,
American standard, Australia standard and other standards.
1.5 Technical parameter
Power adapter parameter
Input: Refer to the Power adapter label
Output: DC12V 1000mA
Working environment
Operating Temperature: 0-70 ℃
Working Humidity: 10%-90% (non-condensing)
Storage environment
Storage Temperature: -20℃-85℃
Storage Humidity: 10%-90% (non-condensing)
Dosing parameter
Dosing Channels: 4
Dosing times: 24 times/day--1 times/7 days
Liquid volume: 1 ml-1000 ml
Liquid accuracy: <±2%
Pump Tube Life: > 2000 hours
Configuration
Support pump head: 4 KPP pump head
Control interface: WiFi interface, PC software settings, mobile app settings
Extended interface: RS485
Shape
Size (length x Width x Height): 250x150x75 mm
Weight (without power adapter): 950 grams

8
2. Use
2.1 Software download
Apple mobile App
1. Scan QR code to download
2. Download via App Store
Go to App Store, search "Kamoer" and select "Dosing pump 2" download.
Android mobile App
1. Scan QR code to download
2. Download via Google Player
Go to Google Player, search "Kamoer" and select "Dosing pump 2" download.
Computer PC control software
Visit http://www.kamoer.com/en/, Click "Technical Library"-" Download"-"Product
catalog Download"-"x4-windows" to download.
9
2.2 Connection setting
2.2.1 View tutorials
After installing the app, open the app and click the Tutorials in the upper right
corner.
2.2.2 Introduction of connection
There are two ways for App to connect with dosing pump: Direct Connect and Auto
Connect, we recommend the way of Auto Connect.
Method Description Advantages Disadvantages
Direct
Connect
The mobile phone
and the dosing pump
are directly
connected, not
through the third party
The connection is
simple, just select the
WiFi of the dosing pump.
You need to select the
dosing pump WiFi to
connect manually, and the
same moment the mobile
can not access the Internet
Auto
Connect
Mobile and dosing
pumps are connected
by routers, and
routers act as
middleman
Once configured
successfully, the mobile
automatically connect to
the dosing pump through
the router
It is slightly complicated to
set up auto connect. some
routers may not support
auto connection (such as a
5G router)
Note:
a. The WiFi name of the X4 dosing pump begins with "KAMOER-X4-DP4" and
the connection password is 12345678
b. Auto Connect currently supports only 2.4G router, 5G router is not
supported
c. The dosing pump WiFi can not found in the WiFi list of the mobile after Auto
Connect successful
2.2.3 Reset the dosing pump WiFi
Reset the dosing pump WIFI, which is to allow the dosing pump WIFI to return to the
factory default settings, so you can find it in the mobile phone WiFi list, the WiFi name of
X4 dosing pump begins with "KAMOER-X4-DP4" . If you can find the WiFi from the dosing
pump in your mobile WiFi list, skip this step.
The specific steps to reset WiFi are as follows:
Step 1: Power on dosing pump, waiting for the startup to complete and enter the
“Run” page, press Set key to enter the Settings page;
10
Step 2: Press Up key to select "4 Option", press Set key to enter the “Option” page;
Step 3: Press Down key to select "3 Reset WiFi" and press Set key to enter the
"Reset WiFi" page;
Step 4: Press Up key to select "Yes", press Set key to reset WiFi, it will take about 3
seconds;
Step 5: WiFi reset complete will automatically return to the previous page, at this time
press Esc key twice back to the "Run" page;
Step 6: Finally unplug the power supply, wait 5 seconds then the power on again,
WiFi reset operation is finish.

11
2.2.4 Direct Connect
Step 1: Power on the dosing pump, after entering the "Run" page, select the WiFi
name begins with “KAMOER-X4-DP4” to connect in the WiFi list and the connection
password is 12345678
Step 2: Open the app, the dosing pump will be shown in the device list, click it to
connect the dosing pump;
2.2.5 Auto Connect
Step 1: Check if the firmware of dosing pump is 1.1.10 and above, if below 1.1.10
version, please follow the firmware upgrade tutorial to upgrade the firmware;
Step 2: Install the latest version of the dosing pump App on the mobile phone and
connect to the home router WiFi;
Step 3: Power on dosing pump, waiting for the startup to complete and enter the
“Run” page, press Set key to enter the Settings page;
Step 4: Press Up key to select "4 Option" and press Set key to enter the Option page;
12
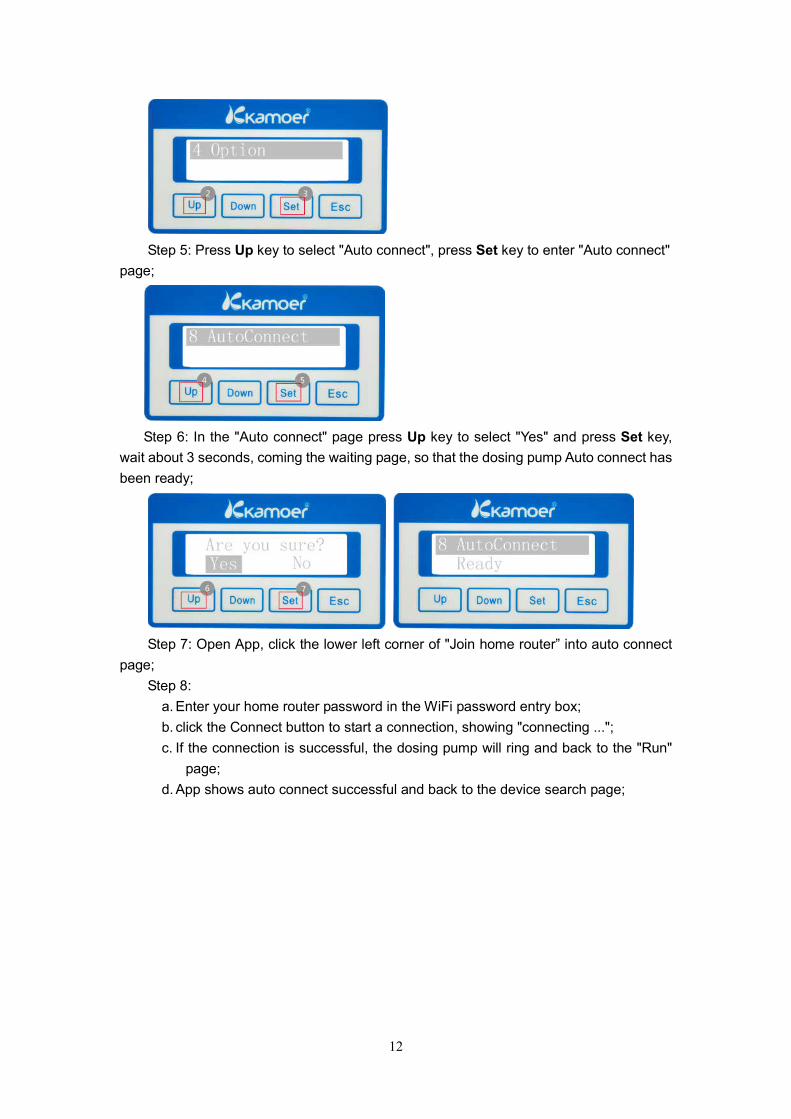
Step 5: Press Up key to select "Auto connect", press Set key to enter "Auto connect"
page;
Step 6: In the "Auto connect" page press Up key to select "Yes" and press Set key,
wait about 3 seconds, coming the waiting page, so that the dosing pump Auto connect has
been ready;
Step 7: Open App, click the lower left corner of "Join home router” into auto connect
page;
Step 8:
a. Enter your home router password in the WiFi password entry box;
b. click the Connect button to start a connection, showing "connecting ...";
c. If the connection is successful, the dosing pump will ring and back to the "Run"
page;
d. App shows auto connect successful and back to the device search page;
13
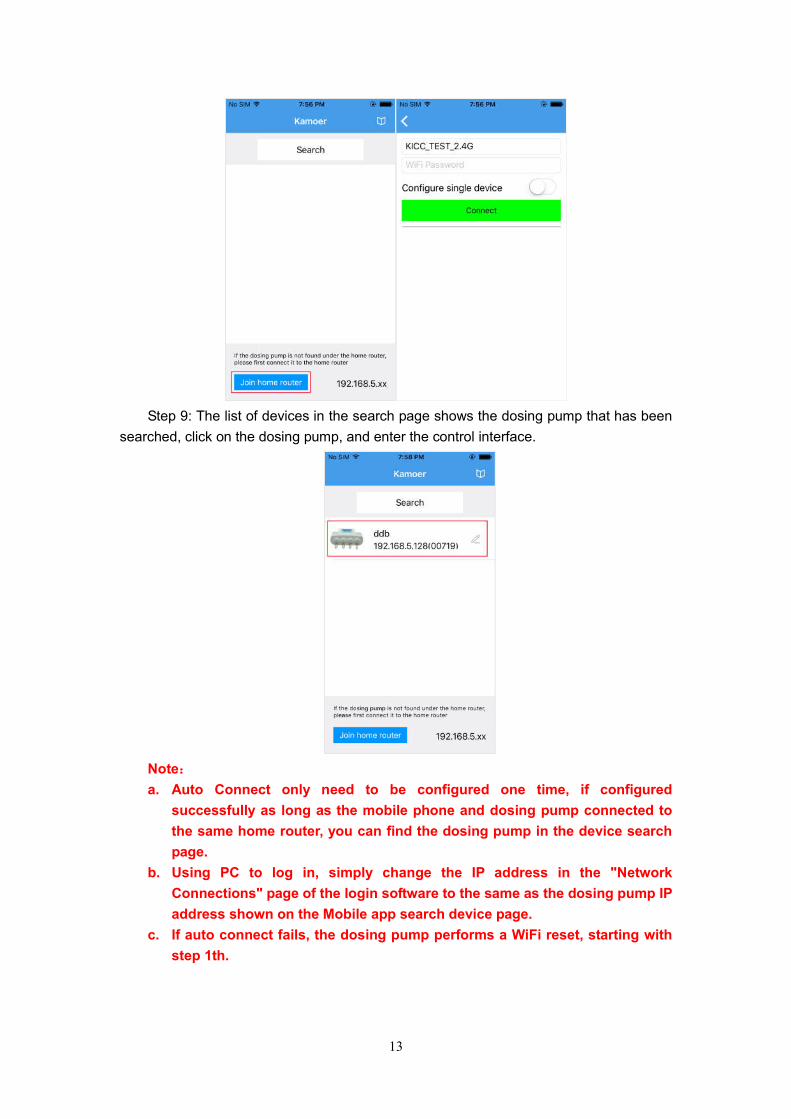
Step 9: The list of devices in the search page shows the dosing pump that has been
searched, click on the dosing pump, and enter the control interface.
Note:
a. Auto Connect only need to be configured one time, if configured
successfully as long as the mobile phone and dosing pump connected to
the same home router, you can find the dosing pump in the device search
page.
b. Using PC to log in, simply change the IP address in the "Network
Connections" page of the login software to the same as the dosing pump IP
address shown on the Mobile app search device page.
c. If auto connect fails, the dosing pump performs a WiFi reset, starting with
step 1th.
14
2.3 Software use
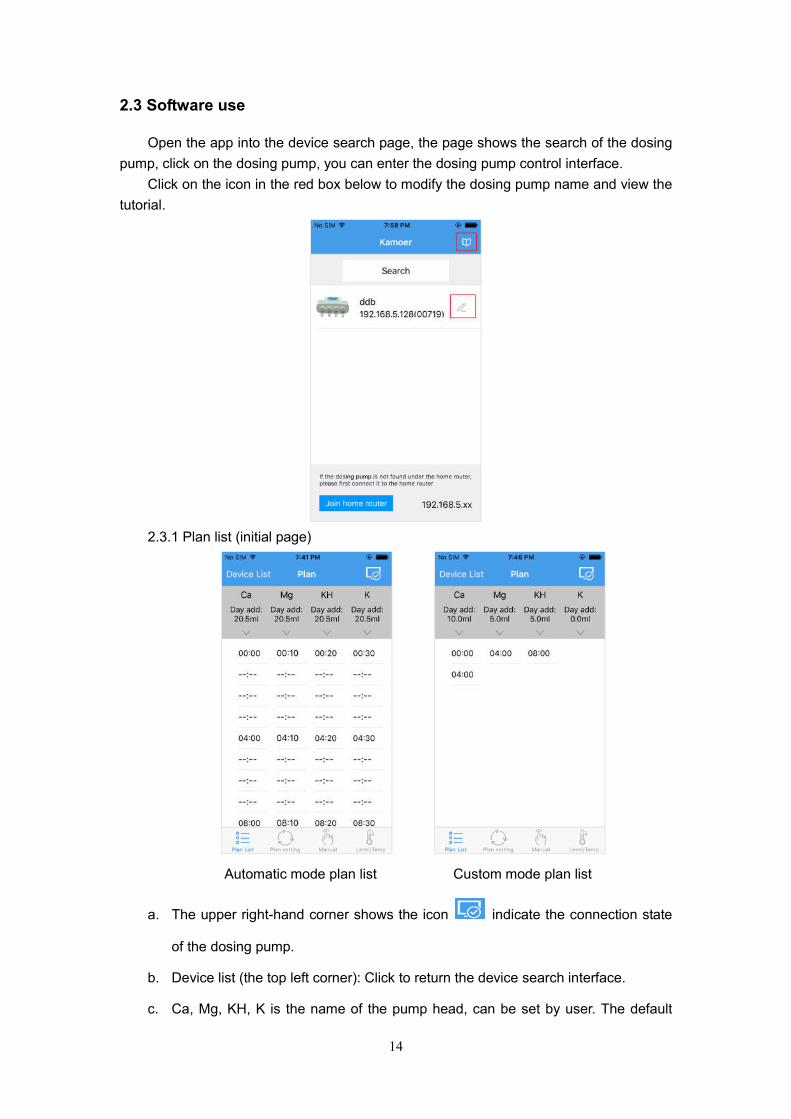
Open the app into the device search page, the page shows the search of the dosing
pump, click on the dosing pump, you can enter the dosing pump control interface.
Click on the icon in the red box below to modify the dosing pump name and view the
tutorial.
2.3.1 Plan list (initial page)
Automatic mode plan list Custom mode plan list
a. The upper right-hand corner shows the icon indicate the connection state
of the dosing pump.
b. Device list (the top left corner): Click to return the device search interface.
c. Ca, Mg, KH, K is the name of the pump head, can be set by user. The default

15
name is pump-1, pump-2, pump-3, pump-4.
d. "Day Add" means the total amount added per day.
The automatic mode plan list lists the pump head additions each hour within 24 hours
of the day, which "--:--" indicates that the pump is not running within that hour;
The custom plan list lists the user-defined start add plan of the pump in a day.
2.4.2 Plan setting
Plan setting interface
a. Plan mode
Setup the plan mode of the dosing pump, automatic mode or custom mode.
b. Anti-chemical interference
Setting up the chemical interference time of the dosing pump, preventing the
elements from adding chemical interference at the same time, preventing
chemical interference time is only valid for the automatic mode, which does not
work for the custom mode.

16
Automatic mode setting Custom mode setting
a. Enable plan
When enable, the corresponding pump head will be automatically run according
to the setting parameters, when disenable the pump head will stop running
automatically.
b. Daily dosing amount
The total amount of liquid per day, automatic mode needs to set this parameter,
custom mode does not need to set.
c. Daily dosing times (auto mode)
The add times per a day, the dosing pump will automatically calculates the added
time by the number of times, the specific start time can be viewed in the plan list;
d. Cycle mode
Every day": Add every day
Every two days": add every one days
Every three days": add every two days
Weekly": can choose to add in the days of the week
e. Custom plan (Custom mode)
Add a custom plan that contains a start time and a single drop amount similar to
"08:30", with a maximum of 24 plans per day.

17
Anti-chemical interference time to add, prevent the element at the same time to add
chemical interference, 4 channels of chemical interference cannot be more than 55
minutes, the chemical-resistant interference function is only valid for automatic mode,
custom mode needs user to set the interval time to achieve the effect of chemical
interference.
2.4.3 Manual page
After setting the amount, turn on the right switch, the pump starts to run and stops
automatically after the added amount is reached. If set to 0, turn on the switch then the
pump will keep running, you need to turn off the switch to stop running.
18
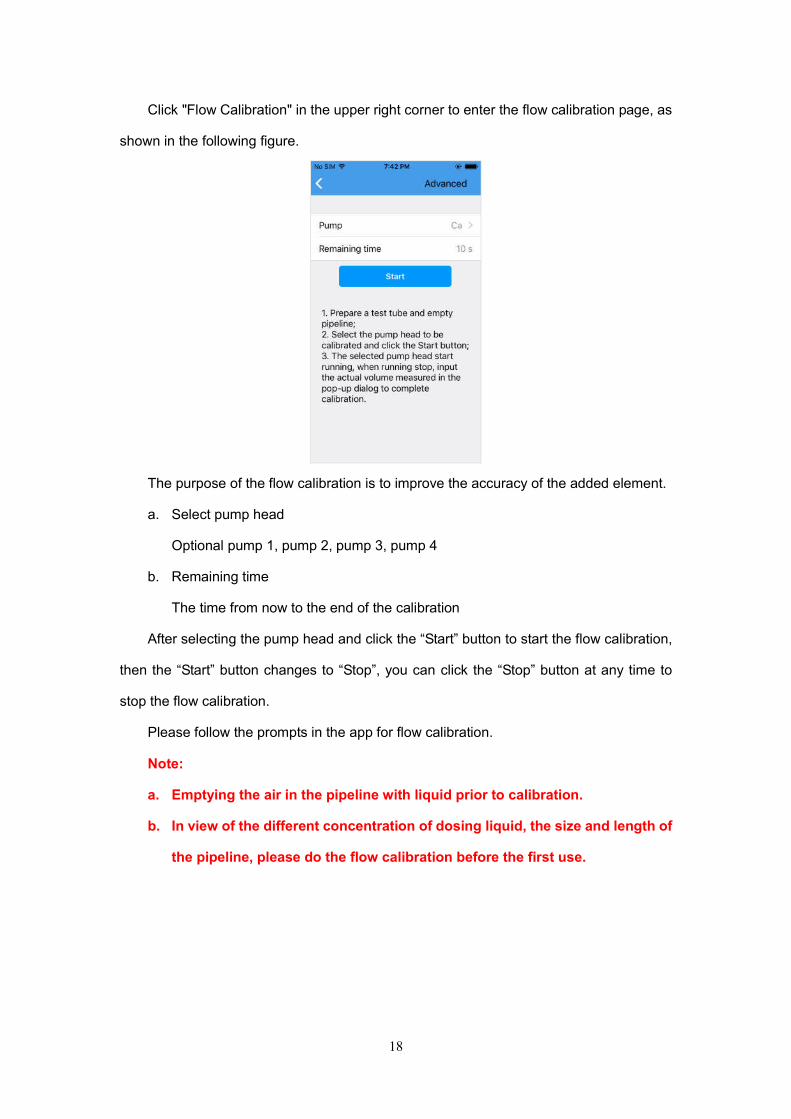
Click "Flow Calibration" in the upper right corner to enter the flow calibration page, as
shown in the following figure.
The purpose of the flow calibration is to improve the accuracy of the added element.
a. Select pump head
Optional pump 1, pump 2, pump 3, pump 4
b. Remaining time
The time from now to the end of the calibration
After selecting the pump head and click the “Start” button to start the flow calibration,
then the “Start” button changes to “Stop”, you can click the “Stop” button at any time to
stop the flow calibration.
Please follow the prompts in the app for flow calibration.
Note:
a. Emptying the air in the pipeline with liquid prior to calibration.
b. In view of the different concentration of dosing liquid, the size and length of
the pipeline, please do the flow calibration before the first use.
19
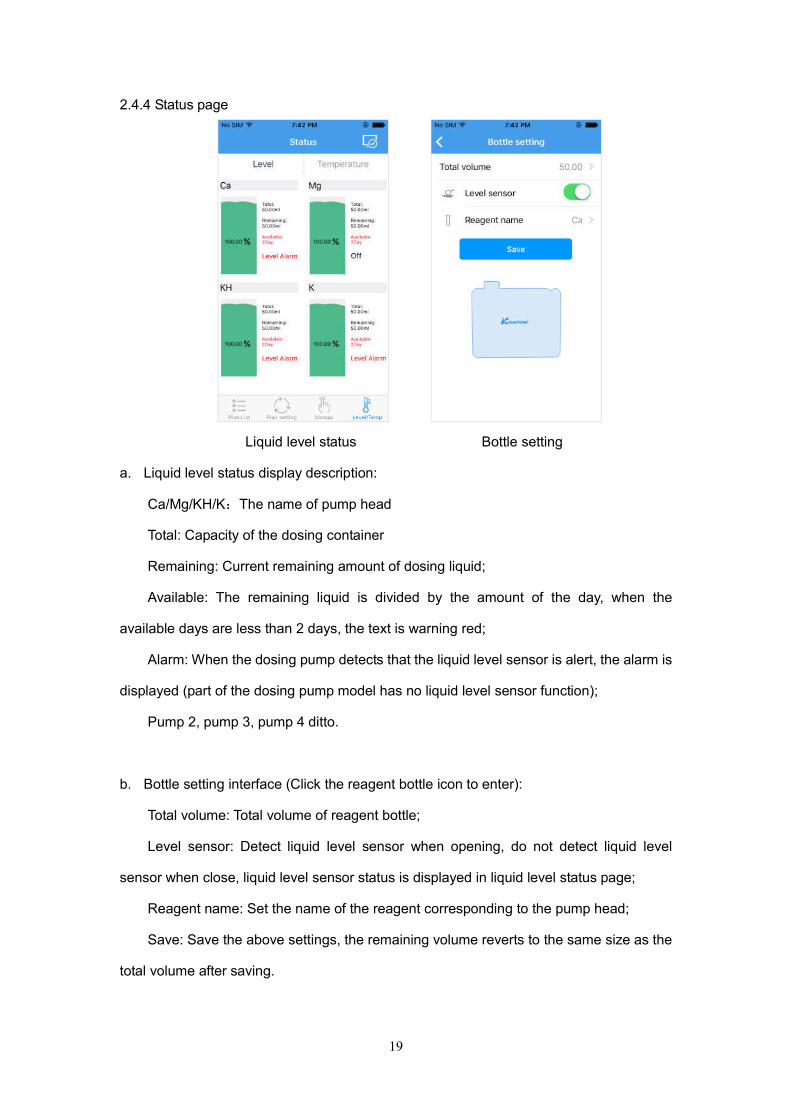
2.4.4 Status page
Liquid level status Bottle setting
a. Liquid level status display description:
Ca/Mg/KH/K:The name of pump head
Total: Capacity of the dosing container
Remaining: Current remaining amount of dosing liquid;
Available: The remaining liquid is divided by the amount of the day, when the
available days are less than 2 days, the text is warning red;
Alarm: When the dosing pump detects that the liquid level sensor is alert, the alarm is
displayed (part of the dosing pump model has no liquid level sensor function);
Pump 2, pump 3, pump 4 ditto.
b. Bottle setting interface (Click the reagent bottle icon to enter):
Total volume: Total volume of reagent bottle;
Level sensor: Detect liquid level sensor when opening, do not detect liquid level
sensor when close, liquid level sensor status is displayed in liquid level status page;
Reagent name: Set the name of the reagent corresponding to the pump head;
Save: Save the above settings, the remaining volume reverts to the same size as the
total volume after saving.
20
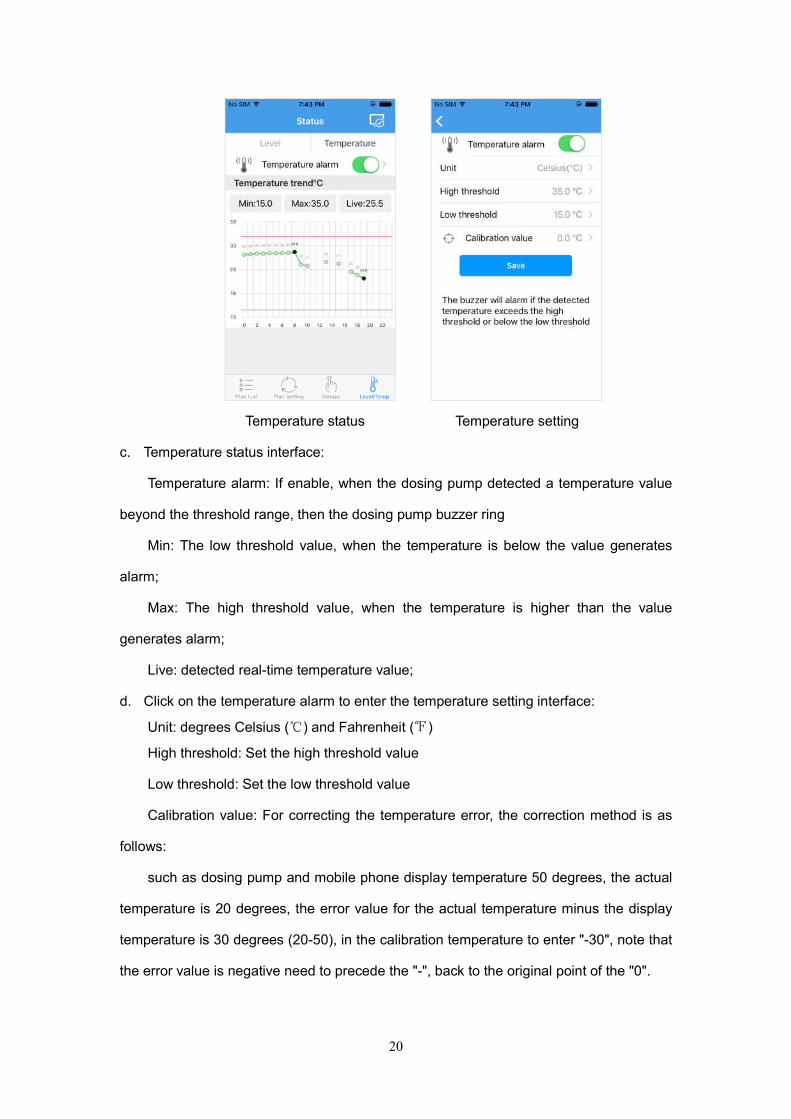
Temperature status Temperature setting
c. Temperature status interface:
Temperature alarm: If enable, when the dosing pump detected a temperature value
beyond the threshold range, then the dosing pump buzzer ring
Min: The low threshold value, when the temperature is below the value generates
alarm;
Max: The high threshold value, when the temperature is higher than the value
generates alarm;
Live: detected real-time temperature value;
d. Click on the temperature alarm to enter the temperature setting interface:
Unit: degrees Celsius ( ) and Fahrenheit ( )℃ ℉
High threshold: Set the high threshold value
Low threshold: Set the low threshold value
Calibration value: For correcting the temperature error, the correction method is as
follows:
such as dosing pump and mobile phone display temperature 50 degrees, the actual
temperature is 20 degrees, the error value for the actual temperature minus the display
temperature is 30 degrees (20-50), in the calibration temperature to enter "-30", note that
the error value is negative need to precede the "-", back to the original point of the "0".
21
3.Maintenance
3.1 Chemical compatibility
The standard pump tube is Pharmed BPT tube, it is suitable for most occasions, if
you are dosing a specific solution, please contact us to determine chemical compatibility.
3.2 Storage
If pump do not work for a long time, the adjustment knob should be loosened to avoid
the long time squeeze hose to produce plastic deformation
The roller of the pump should keep clean and dry, otherwise it will accelerate the wear
of the hose and shorten the service life of the hose.
4.Technical support
If you encounter any problems after use, please contact us, you can login our official
website contact the online customer service or call us.
To expedite the service, please inform your pump model or serial number. If there is a
special application of information (such as liquid) please specify otherwise.
Kamoer Fluid Tech (Shanghai) Co.,Ltd.
Tel:021-67742578 67741937
Fax:021-67741776
Website:www.kamoer.com
Email: [email protected]
Zip code:201611
Kamoer is registered trademark of Kamoer Fluid Tech (Shanghai) Co.,Ltd. We reserve
the right to improve or alter appearance and technical specifications without notice.