xapp498: source control and team-based design in ... free, open-source control system, other version...
TRANSCRIPT

XAPP498 (v1.0) January 15, 2010 www.xilinx.com 1
© Copyright 2010 Xilinx, Inc. XILINX, the Xilinx logo, Virtex, Spartan, ISE, and other designated brands included herein are trademarks of Xilinx in the United States and other countries. MATLAB and Simulink are registered trademarks of The MathWorks, Inc. All other trademarks are the property of their respective owners.
Summary This application note provides an overview on how to perform source version control and team-based design using the System Generator tool. These tasks can be accomplished using the version control features native to the MATLAB®Simulink® software environment, or with an external source control system. While this application note focuses on Subversion, a well-known, free, open-source control system, other version control software such as CVS, MS Source Safe, and Clear Case can also be used—depending on the design environment. This application note also demonstrates how to graphically compare and merge model-based designs using the SimDiff and SimMerge external software packages from Ensoft.
This application note provides designers using System Generator tools with options for source version control to determine the best tool flow and methodologies for team-based development.
Introduction Collaborative development allows developers that are physically dispersed to concurrently and collaboratively design, test, debug, and document the same design. Team-based design in MATLAB/Simulink requires coordination of modeling activities between team members. If properly managed, dozens of geographically dispersed developers can effectively share their work in a safe, secure, and productive design environment. However, if not managed well, dealing with many different design versions and their dependencies can lead to severe loss in productivity and reduced confidence in product quality. Version control is the key to managing an organization’s MATLAB/Simulink designs.
Three topics are covered in three main sections. The first section describes managing model versions using native Simulink software features. These features allow basic version control without any additional version control software. The second section illustrates using the Subversion control system to implement basic version control features similar to those provided in Simulink software, such as checking model files in and out. The third section focuses on the advantages of using the SimDiff and SimMerge tools to compare and merge models. These tools enable team-based designers to graphically compare and merge their System Generator models into a repository—graphical design files, unlike text-based source code files, are more challenging to graphically compare and merge.
Simulink Version Control
Managing Model Versions
The Simulink software is used to manage different model versions, create version history, and access version control properties via a GUI or the MATLAB software command line. It can prompt users to update the model history before saving changes. Additionally, it provides the Model Info block to display control information. This includes information maintained by an external version control system. This feature, when carefully managed, can be useful. This section also illustrates how these features can be applied to System Generator design models. No additional source control software is required. More detail on managing model versions is available in the Simulink software documentation [Ref 1].
Application Note: All Virtex and Spartan FPGA Families
XAPP498 (v1.0) January 15, 2010
Source Control and Team-Based Design in System GeneratorAuthor: Douang Phanthavong

Simulink Version Control
XAPP498 (v1.0) January 15, 2010 www.xilinx.com 2
System Generator Version Update
In this example, a System Generator model (Figure 1) is updated from System Generator 11.1 to 11.2. The purpose of this update is to gain access to the advanced features in the System Generator FIR Compiler 5.0 block that are available in System Generator 11.2.
The following three changes are made separately, creating three different versions of the model:
• Add the Model Info block to the top-level design to configure and add version control properties.
• Make these changes to the System Generator token block from the Xilinx® Filter subsystem:
• Change the target device from a Virtex-5 FPGA (XC5VSX50T–1FF1136) to a Virtex-6 FPGA (XC6VSX315T–FF1156).
• Change the target frequency from 10 to 5 ns.
• Update all three FIR Compiler 4.0 blocks in the Xilinx Filter subsystem from version 4.0 to 5.0.
X-Ref Target - Figure 1
Figure 1: Top-Level Simulink Software Model and Xilinx Filter Subsystem of a Complex FIR Compiler Model
Xilinx Filter Subsystem
XAPP498_01_101309

Simulink Version Control
XAPP498 (v1.0) January 15, 2010 www.xilinx.com 3
The following steps start version control on the first change and document it:
1. Open the model.
2. Open the Model Properties dialog box by selecting File→ Model Properties.
3. Select the History tab and change the Prompt to update the model history: attribute to When saving model, as shown in Figure 2. With this setting, the tool always prompts the user to update the model history before saving the model. This prompt is important because it allows the user to properly document changes. The Read Only box allows the user to edit version properties. However, to prevent unintentional changes this box should remain checked.
4. Add the Model Info block to the model. From the Simulink software Library Browser, select Simulink→ Model-Wide Utilities→ Model Info. The Model Info block should appear similar to Figure 3.
X-Ref Target - Figure 2
Figure 2: Model Properties Dialog Box
XAPP498_02_101309

Simulink Version Control
XAPP498 (v1.0) January 15, 2010 www.xilinx.com 4
5. Double-click the Model Info block to configure version control properties, and add text and properties, as shown in Figure 3. Click OK.
Note: Version control properties are now displayed on the Model Info block.
6. Save the model. This prompts the Log Change dialog box to open. Here, the user can input comments, as shown in Figure 4. The top-level design should be similar to the design in Figure 5.
X-Ref Target - Figure 3
Figure 3: Model Info Dialog Box
X-Ref Target - Figure 4
Figure 4: Log Change Dialog Box
XAPP498_03_101309
XAPP498_04_101309
Simulink Version Control
XAPP498 (v1.0) January 15, 2010 www.xilinx.com 5
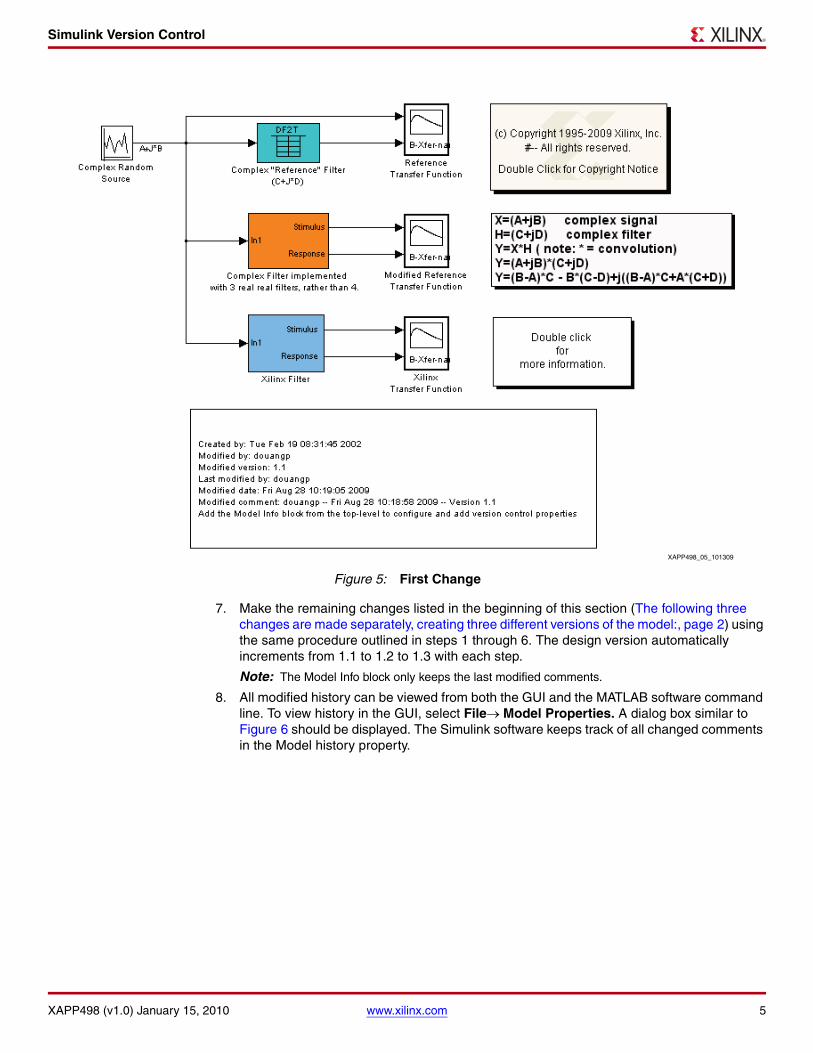
7. Make the remaining changes listed in the beginning of this section (The following three changes are made separately, creating three different versions of the model:, page 2) using the same procedure outlined in steps 1 through 6. The design version automatically increments from 1.1 to 1.2 to 1.3 with each step.
Note: The Model Info block only keeps the last modified comments.
8. All modified history can be viewed from both the GUI and the MATLAB software command line. To view history in the GUI, select File→ Model Properties. A dialog box similar to Figure 6 should be displayed. The Simulink software keeps track of all changed comments in the Model history property.
X-Ref Target - Figure 5
Figure 5: First Change
XAPP498_05_101309

Simulink Version Control
XAPP498 (v1.0) January 15, 2010 www.xilinx.com 6
To retrieve the same history information using the MATLAB software command line, use the get_param command in the MATLAB product console:
get_param('cplxfir_11_3','ModifiedHistory')
ans =
douangp -- Fri Aug 28 10:22:39 2009 -- Version 1.3Change all three FIR Compiler 4.0 blocks from the Xilinx Filter subsystem from the version 4.0 to 5.0
douangp -- Fri Aug 28 10:21:22 2009 -- Version 1.2Make these changes to the System Generator token block from the Xilinx Filter subsystem: - Change the target device from a Virtex-5 (xc5vsx50t-1ff1136) to Virtex-6 (xc6vsx315t-ff1156)
- Change the target frequency from 10 to 5 ns
douangp -- Fri Aug 28 10:18:58 2009 -- Version 1.1Add the Model Info block from the top-level to configure and add version control properties
Add the Model Info block from the top-level to configure and add version control properties
ModifiedHistory is one of the Version Control Properties stored in a model. In this case, the model is stored in the cplxfir_11_3.mdl file.
X-Ref Target - Figure 6
Figure 6: Model History from Version 1.1 to 1.3
XAPP498_06_101309
Subversion Version Control System
XAPP498 (v1.0) January 15, 2010 www.xilinx.com 7
Subversion Version Control System
This section gives a brief overview of the Subversion version control system and describes how to use limited version control internally inside the MATLAB/Simulink software environment or a separate source control MATLAB/Simulink software version externally as described by this application note. A typical use-case of a three-way merging methodology is when two designers are making changes on different sections of the same Simulink model, or when a system level engineer is integrating the work of others.
Subversion Defined
Subversion is a free and open-source version control system. Subversion manages files and directories as well as the changes made to them over time. This allows recovery of older versions of data or examination of the change history.
Some version control systems are also Software Configuration Management (SCM) systems. These systems are specifically tailored to manage trees of source code. As such, they have many features that are specific to software development, e.g., natively understanding programming languages or supplying tools for building software. Subversion is not one of these systems. It is a general system that can be used to manage any collection of files (e.g., txt, ASCII, C programming source files, lab instructions, and design examples).
Using Subversion
This application note presents two different methodologies for checking in and out model files using Subversion: one that operates internally in the MATLAB/Simulink software environment, and one that operates externally. This section gives an overview of both methodologies, explaining the benefits of each.
Using Subversion Internally with MATLAB/Simulink
The MATLAB/Simulink software environment can interface with source control systems through menu items in the MATLAB/Simulink software or through functions run in the MATLAB software Command Window.
Using the Windows operating system, the Simulink software can interface with any source control system that conforms to the Microsoft Common Source Control standard, version 1.1. Because Subversion does not conform to this standard, a Microsoft Source Code Control API plug-in product [Ref 2] (not open-source) must be used to interface with the MATLAB/Simulink software.
The MATLAB/Simulink software documentation [Ref 3] for source control systems uses the Microsoft Visual SourceSafe control system as an example. Because Visual SourceSafe might use different terminology than the user’s control system, support different options, or use the same options differently, details in this application note might be incorrect for the user’s control system. However, the user should be able to perform similar actions for their source control system based on this documentation.
For more specific instructions, see Appendix A, page 21.
Using Subversion Externally
To perform version control operations outside of the MATLAB/Simulink software, the user is not required to download any plug-in or perform any of the steps described in Using Subversion Internally with MATLAB/Simulink.
There are some advantages to operating Subversion externally. Operating Subversion externally does not require an additional plug-in. External operation also allows full access to all of Subversion's features. When operating internally to MATLAB/Simulink software, certain features can be limited or scaled down.

Comparing and Merging Model-Based Designs
XAPP498 (v1.0) January 15, 2010 www.xilinx.com 8
A disadvantage of using Subversion externally is that the user cannot perform version control operations inside the MATLAB/Simulink software environment. Furthermore, the user is responsible for individually checking into the repository the latest changes.
Because many developers are already familiar with Subversion or other version control software, this application note does not discuss setting up and using Subversion. The user is referred to the Subversion online documentation [Ref 4].
Comparing and Merging Model-Based Designs
The ability to graphically compare and merge design models is key to facilitating team-based design in a model-based design environment. Without these capabilities, the tool might have to rely on file timestamp changes and history logs when comparing two Simulink software model files, which is often unworkable when merging incremental changes from different developers.
SimDiff and SimMerge
SimDiff is a tool that compares two Simulink software model files for additions, deletions, and changes to blocks, lines, configuration parameters, model properties, subsystems, and annotations. In other words, it computes differences that affect the logic of the model, not layout changes.
SimMerge is a two- and three-way merge tool for Simulink software models. SimMerge performs a two- or three-way merge between the user’s local model and models in the repository. The user can then browse differences, automatically merge non-conflicting changes, and manually merge other changes.
Both SimDiff and SimMerge can be integrated with the model repository, enabling parallel development of Simulink models with the same flexibility enjoyed with source code.
The rest of this section illustrates how to compare two different System Generator models, verify the changes, and cross-probe from SimDiff to System Generator models. A three-way merge example is used to show how incremental changes can be merged accurately.
Comparing Two Models
The same model shown in Figure 1 is reused for this example. The first model is assumed to be from the repository and the second model is a local copy.
The second model has these changes:
• In the Xilinx Filter subsystem:
• The target device has been changed from a Virtex-5 FPGA (XC5VSX50T-1FF1136) to a Virtex-6 FPGA (XC6VSX315T-FF1156).
• The target frequency has been changed from 10 ns to 5 ns.
• In the Xilinx Filter subsystem, all three FIR Compiler 4.0 blocks have been changed to version 5.0.
Use the following steps to perform a quick comparison between these two models using the SimDiff GUI:
1. Select Start→ All Programs→ Ensoft→ SimDiff→ SimDiff to invoke SimDiff. The SimDiff GUI should appear as shown in Figure 7.

Comparing and Merging Model-Based Designs
XAPP498 (v1.0) January 15, 2010 www.xilinx.com 9
2. When launching SimDiff for the first time, select File→ Preferences and provide the MATLAB software installation path.
3. Select the two models being compared. After selecting the models, the Diff button on the top, right-hand corner of the SimDiff GUI should become active.
4. Leave the rest of settings as default and click on the Diff button. The change history should appear as shown in Figure 8.
X-Ref Target - Figure 7
Figure 7: SimDiff GUI
XAPP498_07_101309

Comparing and Merging Model-Based Designs
XAPP498 (v1.0) January 15, 2010 www.xilinx.com 10
Note: SimDiff displays all changes, including blocks, lines, etc. The changes should exactly match the changes made thus far.
SimDiff has many useful features, including:
1. Cross-probing capability from SimDiff to System Generator models: To cross-probe from a list of changes in SimDiff to the actual System Generator blocks, double-click on any of the changes. Both models appear with the changes highlighted, as shown in Figure 10. The blocks that have changed are outlined with a black shadow.
X-Ref Target - Figure 8
Figure 8: List of Model Differences
XAPP498_08_101309

Comparing and Merging Model-Based Designs
XAPP498 (v1.0) January 15, 2010 www.xilinx.com 11
2. Cross-probing and highlighting selected changes: A single change or multiple changes can be highlighted. To highlight changes, select them and click the View Difference button at the bottom of the screen. All selected blocks and lines are highlighted and flash for several seconds (flashing depends on how the tool options are set).
3. Auditing: SimDiff provides the necessary facilities for creating an audit trail. Users can check-off and comment on differences in the models after verification.
4. HTML report: An HTML report of changes made can be generated, as illustrated in Figure 10.
X-Ref Target - Figure 9
Figure 9: Cross-Probing between SimDiff and System Generator Models
HighlightedChange
XAPP498_09_101309

Comparing and Merging Model-Based Designs
XAPP498 (v1.0) January 15, 2010 www.xilinx.com 12
Merging Incremental Changes
In this section, the same model and changes from Comparing Two Models, page 8 are used to illustrate three-way merging. The three models being merged are:
• Target Model (cplxfir_11_target.mdl): This is the model the user has modified. Table 1 lists the changes that have been made.
• Contributor Model (cplxfir_11_contributor.mdl): This is a model modified by another contributor. In this case, the contributor has updated all three FIR Compiler 4.0 blocks to 5.0 blocks in the Xilinx Filter subsystem. Typically, this model was originally checked out from a repository previously committed by the user or another co-developer.
• Base Model (cplxfir_base.mdl): This model is the most recent “ancestor” to the target and contributor models.
To perform a quick comparison between these two models using SimDiff:
1. Select Start→ All Programs→ Ensoft→ SimMerge→ SimMerge to invoke SimMerge. The SimMerge GUI should appear as shown in Figure 11.
X-Ref Target - Figure 10
Figure 10: Example HTML Report
Table 1: User Modified Model
ID Property Old Value New Value
1 package ff1136 ff1156
2 part xc5vsx50t xc6vsx315t
3 sysclk_period 10 5
4 xilinxfamily virtex5 virtex6
XAPP498_10_101309

Comparing and Merging Model-Based Designs
XAPP498 (v1.0) January 15, 2010 www.xilinx.com 13
2. If this is the first time launching this program, select File→ Preferences and provide the MATLAB software installation path.
3. Select 3-way Merge.
4. Select all three models (Target, Contributor, and Base).
5. Click on the Start button to begin merging. A dialog box should appear, as shown in Figure 12.
X-Ref Target - Figure 11
Figure 11: SimMerge GUI
XAPP498_11_101309

Comparing and Merging Model-Based Designs
XAPP498 (v1.0) January 15, 2010 www.xilinx.com 14
The dialog box shows the target model on the left, the contributor on the right, and changes made to each below. All changes made to the contributor model are merged into the target model. As seen in Figure 12, changes made to both models are also indicated.
Two important SimMerge features enable team development in Simulink software:
• The ability to graphically merge each change in SimMerge while simultaneously observing the same change in System Generator models. Each individual change can be incrementally merged by clicking on the merge action buttons between the models, as shown in Figure 13.
X-Ref Target - Figure 12
Figure 12: Three-Way Merging Results
TargetModel
ContributerModel
InformationPanel
DetailedTabs
XAPP498_12_111009

Comparing and Merging Model-Based Designs
XAPP498 (v1.0) January 15, 2010 www.xilinx.com 15
• The user can manually merge changes by editing their model in its Simulink software window, then clicking the synchronize button in SimMerge.
Integrating SimDiff and SimMerge with TortoiseSVN
This section shows how to integrate the SimDiff and SimMerge tools with another source control system such as TortoiseSVN.
TortoiseSVN
TortoiseSVN is a free, open-source client for the Subversion version control system. It enables Subversion commands directly in Windows Explorer. This allows the user to continue using familiar tools. Furthermore, the user does not need to change applications each time a function of the version control system is needed.
The main motivation for having SimDiff and SimMerge integrated with the user’s repository is to enable parallel development of Simulink software models with the same flexibility enjoyed with source code. If not interested in integrating these tools with source control systems, the remainder of this section can be skipped.
Setting SimDiff to Work with TortoiseSVN
Follow these steps to integrate SimDiff with the TortoiseSVN source control system.
1. Open the TortoiseSVN Settings dialog by right-clicking on any file in the Explorer window and selecting TortoiseSVN→ Settings.
2. Select External Programs→ Diff Viewer.
3. Click the Advanced button to open the Advanced Diff Settings dialog box, as shown in Figure 14.
X-Ref Target - Figure 13
Figure 13: Cross-Probing between SimMerge and System Generator Models
Click on thisbutton to
merge thechange
x498_13_111009

Comparing and Merging Model-Based Designs
XAPP498 (v1.0) January 15, 2010 www.xilinx.com 16
4. Click Add… to add a new file type extension.
5. In the Add Extension Specific Diff Program dialog box, enter .mdl for the extension. Enter the SimDiff installation path in the External Program dialog box:
C:\Program Files\EnSoft\SimDiff\simdiffgui.exe %base %mine
Note: This is only an example path. Use the actual installation path for SimDiff.
6. Click OK for each open dialog to save settings.
Setting SimMerge to Work with TortoiseSVN1. Open the TortoiseSVN Settings dialog by right-clicking on any file in the Explorer window
and selecting TortoiseSVN→ Settings.
2. Select External Programs→ Merge Tool.
3. Click the Advanced button to open the Advanced Merge Settings dialog box, as shown in Figure 15.
4. Click Add… to add a new file type extension.
5. In the Add Extension Specific Merge Program dialog box, enter .mdl for the extension. Enter the SimMerge installation path in the External Program dialog box:
"C:\Program Files\EnSoft\SimMerge\simmerge.exe" %base %mine %theirs %merged
Note: This is only an example path. Make sure to use the actual installation path for SimMerge.
6. Click OK for each open dialog to save settings.
Comparing Model Files Using SimDiff and TortoiseSVN Integration
To compare two different models using SimDiff and TortoiseSVN integration, right-click on the file and select TortoiseSVN→ Diff with previous version, as shown in Figure 16. This invokes the SimDiff GUI with parameters passed from TortoiseSVN.
X-Ref Target - Figure 14
Figure 14: Setting Up File Extension in SimDiff
X-Ref Target - Figure 15
Figure 15: Setting Up File Extension in SimMerge
XAPP498_14_101309
XAPP498_15_101309

Comparing and Merging Model-Based Designs
XAPP498 (v1.0) January 15, 2010 www.xilinx.com 17
Merging Model Files Using SimMerge and TortoiseSVN Integration
TortoiseSVN only uses external merge tools to resolve conflicts it cannot handle on its own automatically. Therefore, SimMerge is not always invoked when merging model files. For example, suppose a model file is changed in a branch, but left unchanged in the main branch. If the model file is merged from the changed branch to the main branch, TortoiseSVN performs a simple file copy from the changed branch to the main branch, rather than invoke SimMerge to perform the merge.
Even when TortoiseSVN is unable to perform a simple merge, it does not immediately invoke SimMerge. Instead, it marks the file as being “in conflict.” SimMerge can then be invoked by right-clicking the file and selecting Edit conflict from the Context menu.
Here is an example of the steps taken when merging a branch with conflicting model files using TortoiseSVN:
1. Right-click on a file in Explorer and select TortoiseSVN→ Merge.
2. Select Merge a range of revisions for the merge type using the wizard and Click Next to begin the merge process.
3. In the Next Merge Options dialog box, click Merge (without changing the default settings). If there are any conflicting modifications, see the Resolved Conflict dialog box, as shown in Figure 17. TortoiseSVN notifies the user that one or more changes are in conflict that cannot be automatically resolved. At this point, select Resolve All Later.
X-Ref Target - Figure 16
Figure 16: Compare Model Files
XAPP498_16_101309

Comparing and Merging Model-Based Designs
XAPP498 (v1.0) January 15, 2010 www.xilinx.com 18
4. Inside the repository, the conflicting files are marked with a yellow triangle. To begin resolving conflicts, right-click a conflicting file and select TortoiseSVN→ Edit Conflicts.
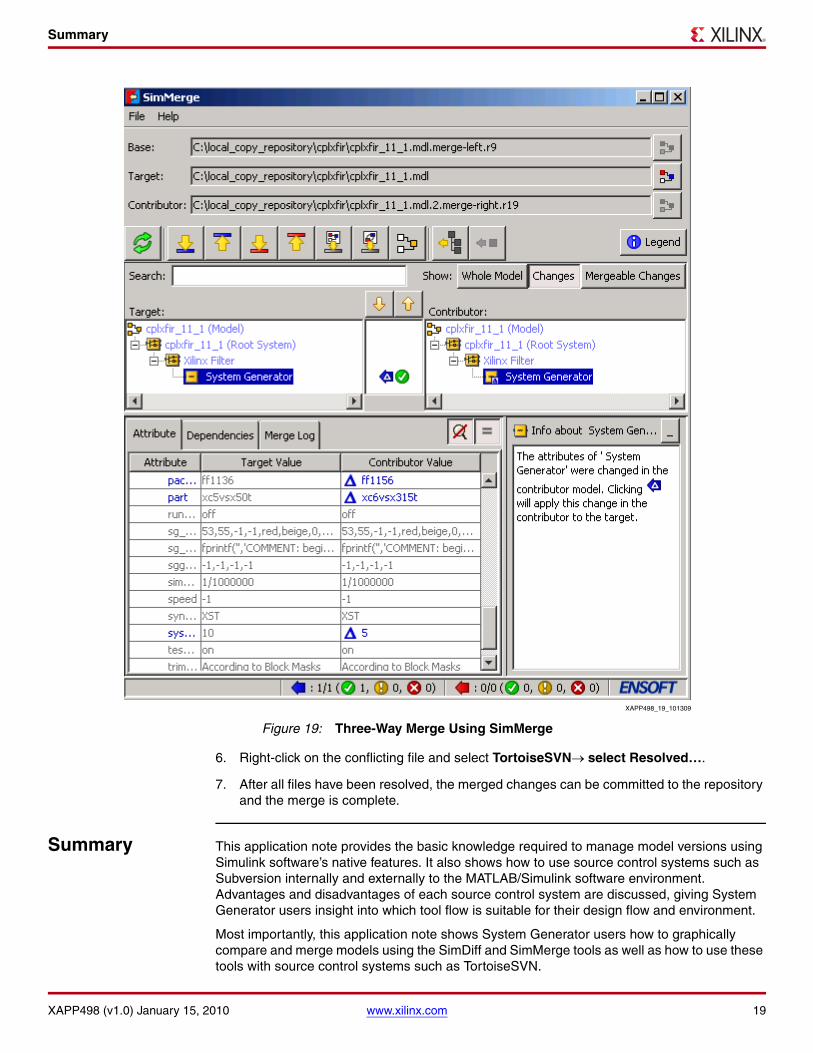
5. After merging the changes and resolving the conflicts, the SimMerge GUI should appear as shown in Figure 19.
X-Ref Target - Figure 17
Figure 17: Resolve Conflict Dialog Box
X-Ref Target - Figure 18
Figure 18: Invoke SimMerge from Explorer
XAPP498_17_101309
XAPP498_18_101309
Summary
XAPP498 (v1.0) January 15, 2010 www.xilinx.com 19
6. Right-click on the conflicting file and select TortoiseSVN→ select Resolved….
7. After all files have been resolved, the merged changes can be committed to the repository and the merge is complete.
Summary This application note provides the basic knowledge required to manage model versions using Simulink software’s native features. It also shows how to use source control systems such as Subversion internally and externally to the MATLAB/Simulink software environment. Advantages and disadvantages of each source control system are discussed, giving System Generator users insight into which tool flow is suitable for their design flow and environment.
Most importantly, this application note shows System Generator users how to graphically compare and merge models using the SimDiff and SimMerge tools as well as how to use these tools with source control systems such as TortoiseSVN.
X-Ref Target - Figure 19
Figure 19: Three-Way Merge Using SimMerge
XAPP498_19_101309
References
XAPP498 (v1.0) January 15, 2010 www.xilinx.com 20
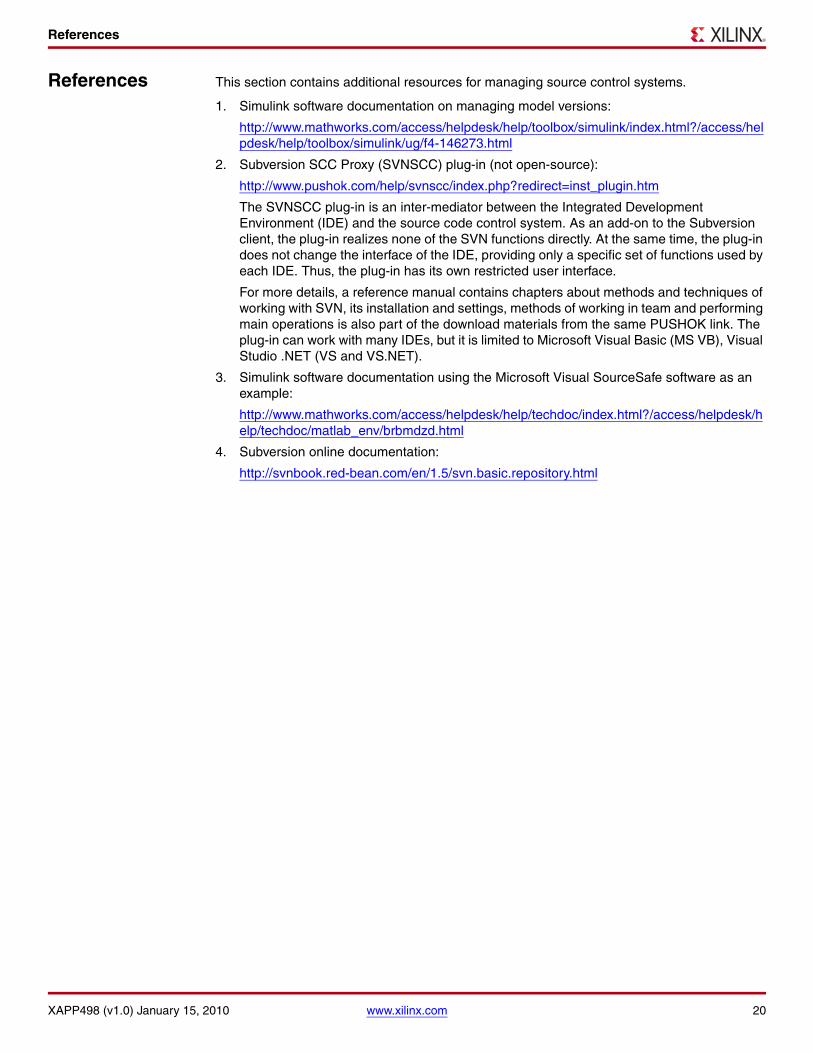
References This section contains additional resources for managing source control systems.
1. Simulink software documentation on managing model versions:
http://www.mathworks.com/access/helpdesk/help/toolbox/simulink/index.html?/access/helpdesk/help/toolbox/simulink/ug/f4-146273.html
2. Subversion SCC Proxy (SVNSCC) plug-in (not open-source):
http://www.pushok.com/help/svnscc/index.php?redirect=inst_plugin.htm
The SVNSCC plug-in is an inter-mediator between the Integrated Development Environment (IDE) and the source code control system. As an add-on to the Subversion client, the plug-in realizes none of the SVN functions directly. At the same time, the plug-in does not change the interface of the IDE, providing only a specific set of functions used by each IDE. Thus, the plug-in has its own restricted user interface.
For more details, a reference manual contains chapters about methods and techniques of working with SVN, its installation and settings, methods of working in team and performing main operations is also part of the download materials from the same PUSHOK link. The plug-in can work with many IDEs, but it is limited to Microsoft Visual Basic (MS VB), Visual Studio .NET (VS and VS.NET).
3. Simulink software documentation using the Microsoft Visual SourceSafe software as an example:
http://www.mathworks.com/access/helpdesk/help/techdoc/index.html?/access/helpdesk/help/techdoc/matlab_env/brbmdzd.html
4. Subversion online documentation:
http://svnbook.red-bean.com/en/1.5/svn.basic.repository.html
Appendix A
XAPP498 (v1.0) January 15, 2010 www.xilinx.com 21
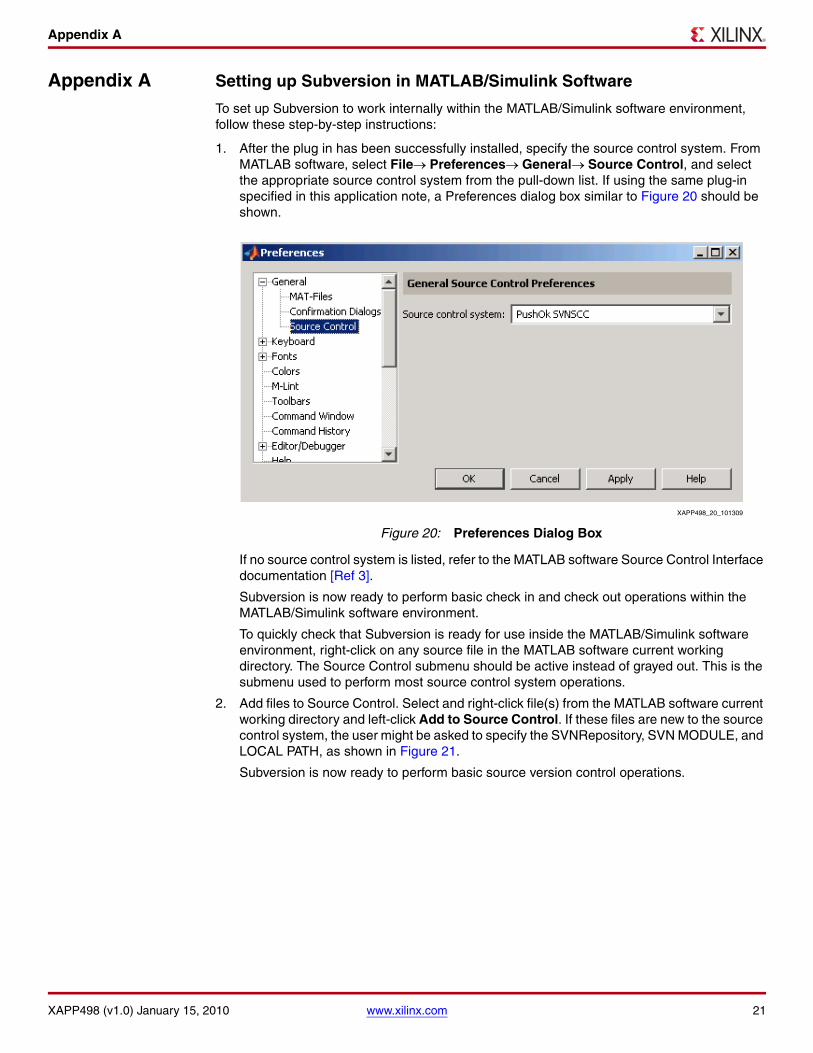
Appendix A Setting up Subversion in MATLAB/Simulink Software
To set up Subversion to work internally within the MATLAB/Simulink software environment, follow these step-by-step instructions:
1. After the plug in has been successfully installed, specify the source control system. From MATLAB software, select File→ Preferences→ General→ Source Control, and select the appropriate source control system from the pull-down list. If using the same plug-in specified in this application note, a Preferences dialog box similar to Figure 20 should be shown.
If no source control system is listed, refer to the MATLAB software Source Control Interface documentation [Ref 3].
Subversion is now ready to perform basic check in and check out operations within the MATLAB/Simulink software environment.
To quickly check that Subversion is ready for use inside the MATLAB/Simulink software environment, right-click on any source file in the MATLAB software current working directory. The Source Control submenu should be active instead of grayed out. This is the submenu used to perform most source control system operations.
2. Add files to Source Control. Select and right-click file(s) from the MATLAB software current working directory and left-click Add to Source Control. If these files are new to the source control system, the user might be asked to specify the SVNRepository, SVN MODULE, and LOCAL PATH, as shown in Figure 21.
Subversion is now ready to perform basic source version control operations.
X-Ref Target - Figure 20
Figure 20: Preferences Dialog Box
XAPP498_20_101309

Appendix A
XAPP498 (v1.0) January 15, 2010 www.xilinx.com 22
X-Ref Target - Figure 21
Figure 21: Select SVNURL, Model, and Local Path Dialog Box
XAPP498_21_101309

Appendix A
XAPP498 (v1.0) January 15, 2010 www.xilinx.com 23
3. From this point on, the Source Control submenu might display differently each time the user selects a file, depending on the state of the file. For example, Figure 22 shows the Source Control submenu for the cplxfir_11._1.mdl file. The options available show that the file has already been added to Source Control and that it has already been checked out from the repository. Any non-applicable items on the submenu are grayed out.
X-Ref Target - Figure 22
Figure 22: Submenu for File Checked Out from Repository
XAPP498_22_101309
Revision History
XAPP498 (v1.0) January 15, 2010 www.xilinx.com 24
Revision History
The following table shows the revision history for this document.
Notice of Disclaimer
Xilinx is disclosing this Application Note to you “AS-IS” with no warranty of any kind. This Application Noteis one possible implementation of this feature, application, or standard, and is subject to change withoutfurther notice from Xilinx. You are responsible for obtaining any rights you may require in connection withyour use or implementation of this Application Note. XILINX MAKES NO REPRESENTATIONS ORWARRANTIES, WHETHER EXPRESS OR IMPLIED, STATUTORY OR OTHERWISE, INCLUDING,WITHOUT LIMITATION, IMPLIED WARRANTIES OF MERCHANTABILITY, NONINFRINGEMENT, ORFITNESS FOR A PARTICULAR PURPOSE. IN NO EVENT WILL XILINX BE LIABLE FOR ANY LOSS OFDATA, LOST PROFITS, OR FOR ANY SPECIAL, INCIDENTAL, CONSEQUENTIAL, OR INDIRECTDAMAGES ARISING FROM YOUR USE OF THIS APPLICATION NOTE.
CRITICAL APPLICATIONS DISCLAIMERXILINX PRODUCTS (INCLUDING HARDWARE, SOFTWARE AND/OR IP CORES) ARE NOTDESIGNED OR INTENDED TO BE FAIL-SAFE, OR FOR USE IN ANY APPLICATION REQUIRINGFAIL-SAFE PERFORMANCE, SUCH AS IN LIFE-SUPPORT OR SAFETY DEVICES OR SYSTEMS,CLASS III MEDICAL DEVICES, NUCLEAR FACILITIES, APPLICATIONS RELATED TO THEDEPLOYMENT OF AIRBAGS, OR ANY OTHER APPLICATIONS THAT COULD LEAD TO DEATH,PERSONAL INJURY OR SEVERE PROPERTY OR ENVIRONMENTAL DAMAGE (INDIVIDUALLY ANDCOLLECTIVELY, “CRITICAL APPLICATIONS”). FURTHERMORE, XILINX PRODUCTS ARE NOTDESIGNED OR INTENDED FOR USE IN ANY APPLICATIONS THAT AFFECT CONTROL OF AVEHICLE OR AIRCRAFT, UNLESS THERE IS A FAIL-SAFE OR REDUNDANCY FEATURE (WHICHDOES NOT INCLUDE USE OF SOFTWARE IN THE XILINX DEVICE TO IMPLEMENT THEREDUNDANCY) AND A WARNING SIGNAL UPON FAILURE TO THE OPERATOR. CUSTOMERAGREES, PRIOR TO USING OR DISTRIBUTING ANY SYSTEMS THAT INCORPORATE XILINXPRODUCTS, TO THOROUGHLY TEST THE SAME FOR SAFETY PURPOSES. TO THE MAXIMUMEXTENT PERMITTED BY APPLICABLE LAW, CUSTOMER ASSUMES THE SOLE RISK ANDLIABILITY OF ANY USE OF XILINX PRODUCTS IN CRITICAL APPLICATIONS.
AUTOMOTIVE APPLICATIONS DISCLAIMERXILINX PRODUCTS ARE NOT DESIGNED OR INTENDED TO BE FAIL-SAFE, OR FOR USE IN ANYAPPLICATION REQUIRING FAIL-SAFE PERFORMANCE, SUCH AS APPLICATIONS RELATED TO: (I)THE DEPLOYMENT OF AIRBAGS, (II) CONTROL OF A VEHICLE, UNLESS THERE IS A FAIL-SAFEOR REDUNDANCY FEATURE (WHICH DOES NOT INCLUDE USE OF SOFTWARE IN THE XILINXDEVICE TO IMPLEMENT THE REDUNDANCY) AND A WARNING SIGNAL UPON FAILURE TO THEOPERATOR, OR (III) USES THAT COULD LEAD TO DEATH OR PERSONAL INJURY. CUSTOMERASSUMES THE SOLE RISK AND LIABILITY OF ANY USE OF XILINX PRODUCTS IN SUCHAPPLICATIONS.
Date Version Description of Revisions
01/15/10 1.0 Initial Xilinx release.