xd250 - car audio | multimedia · xd250 installation preparation ... wiring diagram ... er-2...
TRANSCRIPT

AM/FM/CD Receiver
XD250
Charge Port
INSTALLATION/OWNER'S MANUAL

2
XD250 INSTALLATION
Preparation
Removal Keys
Mounting Sleeve
Dashboard or Mounting Kit
Head Unit
TYPICAL MOUNTING METHOD
Please read entire manual before installation.
Before You Start•Disconnectnegativebatteryterminal.Consultaqualifiedtechnicianforinstructions.•Avoidinstallingtheunitwhereitwouldbesubjecttohightemperatures,suchasfromdirectsunlight,orwhereitwouldbesubjecttodust,dirtorexcessivevibration.
Getting Started•Remove2transitscrewslocatedontopoftheunit.•Insertthesuppliedkeysintotheslotsasshown,andslidetheunitoutofthemounting
sleeve.•Installmountingsleeveintoopening,bendingtabstosecure.•Connectwiringharnessandantenna.Consultaqualifiedtechnicianifyouareunsure.•Certainvehiclesmayrequireaninstallationkitand/orwiringharnessadapter(soldseparately).•Testforcorrectoperationandslideinto mountingsleevetosecure.•Snaptrimringintoplace.

3
XD250 INSTALLATION
Rear Preamp OutputConnect to amplifier RCA input
Antenna Connector
RCA Cable(sold separately)
AMPBLUE
BLACK
RED
YELLOW
Remote Turn-OnConnect to amplifier or powerantenna. Insulate wire if not used.
GroundConnect to vehiclechassis ground.
AccessoryConnect to ignition circuit or switched 12 volt source.
MemoryConnect to battery circuit or constant 12 volt source.
Right FrontGray/Black (-)Gray (+)
Left FrontWhite/Black (-)White (+)
Right RearViolet/Black (-)Violet (+)
Left RearGreen/Black (-)Green (+)
5 AMPAGC Fuse
Wiring Diagram
* Caution-Donotattachanyspeakerleadstogroundasseveredamagewilloccur.
FUSEWhenreplacingthefuse,makesurenewfuseisthecorrecttypeandamperage.Usinganincorrectfusecould
damagetheradio.TheXD250usesone5ampAGCfuselocated
in-line.

4
XD250 OPERATION
Control Locations
Release
Source
Display
Volume
Tune/TrackUp
Audio / Menu
Eject
USBChargingPort
AuxiliaryInput
Preset 6
1
2
3
4
5
6
7
8
9
10
Preset5
Preset4/Play/Pause
Preset3/Intro
Preset 2 / Random
Preset1/Repeat
Tune/TrackDown
Band/Escape
Mute
Loud
Power
11
12
13
14
15
16
17
18
19
20
9
TheXD250hasaneasy-to-useinterfacethatprovidesarewardingexperience,aswellassupportforyourfavoritetunes.AudioCD-RandCD-RWdiscplaybackensurescompatibilitywithyourmusiccollection,andtheRCApreampoutputprovidestherightconnectionstoexpandyoursystem.FromitsfrontpanelauxiliaryinputforconnectingyourMP3player,tothedetachablefaceforsecurityassurance,thisheadunithasyoucovered.
4 75 6 8
101112131415161719 1820
321
5
XD250 OPERATION
General OperationPress RELEASEandpullawayfromtheleftsidetoremove.Tore-install,insertrightsideoffaceplatefirstthenpushleftside to secure.
Removetrimringandinstallsupplied#1x7/32”Phillipsheadscrewthroughleftsideofmountingframeintofaceplate.
Press toturntheuniton.InsertingaCDwillturntheunitonautomatically.Pressandholdforthreeseconds to turntheunitoff.
Press MODEtoselectbetweenAM/FM,CDorauxiliaryinput.Modesofoperationareindicatedinthedisplay.
Inserta3.5mmconnectorinthefrontpanelAUXport.Connecttheotherendofthe3.5mmconnectortotheheadphoneoutputofanaudiodevice,MP3player,etc.PressMODEtoselectAUXmode.
Adjustvolumeusingthe volume knob(00-46).
Theradiofrequency(tunermode)andCDtrack/elapsedtime(CDplayermode)willbeshownbydefault.PressDISPtodisplaytheclock,andpressDISPagaintoreturntodefaultdisplay.
PressandholdDISPfor2seconds,theclockwillbegintoflash.PressTRACK nntoadjustthehoursandTRACK lltoadjusttheminutes.PressDISPorwait5secondstosavetheclocksettings.
Theclockwilldisplay12-hourAM/PMtimeinUSAfrequencyspacingmode(PM10:00).InEuropeanfrequencyspacingmode,theclockwilldisplay24-hourtime(22:00).
Pressandholdformorethan2secondstoRESETtheunituponinitialinstallation.TheRESETbuttonislocatedbehindthefaceplate.
Faceplate Removal
Semi-permanent Faceplate Installation
Power On/Off
Mode
Auxiliary Input
Volume
Display
Set the Clock
12/24-hour Clock
Reset

6
XD250 OPERATION
InserttheUSBconnectorofabatterypoweredUSBdeviceintotheUSBchargingportonthefrontpanel,whichprovides5voltsDCand1.0amps.TheUSBdevicewillimmediatelybegincharging.
Note: TheUSBchargingportmaynotbecompatiblewitheverydeviceduetodifferencesinpowerrequirements.
Note:ThisUSBportprovidespoweronly,andwillnotplaybackmusicfromaUSBdevice.
Press AUDIOtoselectbetweenVolume(default),Bass,Treble,Balance,FaderandEQ.
USB Charging Port
Audio
BASS VOLUME TREBLE BALANCE FADER EQ
General OperationPressandholdAUDIO/MENUformorethan3secondstoaccessthesetupmenu,thenpressAUDIO/MENUtocyclethroughmenuoptions.Whendesiredoptionappearsinthedisplay,rotatethevolume knobleft/righttoadjustoractivatethedesiredfunction.
Setup Menu
Menu Function Options Action
TunerFrequency
Spacing
FREUSAProgramstheunittoUSAtunerspacing.(200kHzforFMand10kHzforAM).(Tuner mode only)
FRE EUProgramstheunittoEuropeantunerspacing.(50kHzforFMand9kHzforAM).(Tuner mode only)
Local/Distance Tuning
LOC OFF Activatesdistancetuning.LOC ON Activateslocaltuningforstrongstationreceptiononly.
Clock Display
CLK ONProgramsunittodisplaytheclockwhenthepowerisoff.
CLK OFFProgramsunittonotdisplaytheclockwhenthepoweris off.
Beep Confirmation
BEEP OFF Disablestheconfirmationbeep.BEEPON Enablestheconfirmationbeep.
IlluminationDimmer
ILLUHI ProgramstheLCDtothebrightestilluminationlevel.ILLULO LowerstheLCDilluminationlevel.

7
XD250 OPERATION
Audio OperationPress AUDIOuntilBASappearsRotatethevolume knobleft/righttoadjust(-6minimum/6maximum)
Press AUDIOuntilTREappearsRotatethevolume knobleft/righttoadjust(-6minimum/6maximum)
Press AUDIOuntilBALappearsRotatethevolume knobleft/righttoadjust(L12-R12)"BALR=L"representsequalbalance.
Press AUDIOuntilFADappearsRotatethevolume knobleft/righttoadjust(F12-R12)"FADR=F"representsequalbalance.
Press AUDIOuntilEQappears.Rotatevolumeknobleft/righttoadjustbetweenPOP,CLS,ROCandOFF(default)equalizationcurves.AnyadjustmenttotheBassorTreblesettingsautomaticallycancelsthecurrentEQcurve.
Press LOUDtoenable/disabletheloudnessfeature,whichenhancesthebassandtreblefrequenciesatlowvolumes.
Press TUNE nn or TUNE llformorethan2secondstoseektothenextstrongstation.
Press TUNE nn or TUNE llmomentarilytochangetheradiofrequencyupordownonestepatatime.Pressandholdtoadvancequickly.
Press BANDformorethan2secondstoselectmonoorstereo(default)receptionofthebroadcastsignal.
Press BANDtoselectbetweenFM1,FM2,FM3andAM1,AM2 bands.
Upto18FMstationsand12AMstationscanbestored.Tostoreastation,selectthedesiredbandandstation.Pressandholdthedesiredpresetbuttonformorethan2seconds.Whenstored,thepresetnumberwillappearinthedisplay.Thestationcanberecalledanytimebypressingthecorrespondingpresetbutton.
Bass
Treble
Balance
Fader
Preset EQ Curves
Loudness
Seek Tuning
Manual Tuning
FM Stereo/Mono
Band
Storing and Recalling Station Presets
Tuner Operation

8
XD250 OPERATION
CD Player OperationWiththelabelfacingup,insertastandardsizeCDintotheCDslot.TheCDwillautomaticallybeginplayback.
PresstheEJECTbuttontostopandejecttheCD.Theunitwillchangetotunermode.
Press TRACK lltoskiptothebeginningofthenexttrack.Press TRACK nntoreturntothebeginningofthecurrenttrack.PressingTRACK nnagainskipstothebeginningoftheprevioustrack.
PressandholdTRACK ll or TRACK nntofastforwardorreverseatrack.
Press l/ IItotemporarilystopCDplayback.Press l/ IIagaintoresumeplayback.
Press INTtoplaythefirst10secondsofeachtrack.Press INT to cancel.
Press RPTtocontinuouslyrepeatselectedtrack. Press RPT to cancel.
Press RDMtoplayalltracksinrandomorder.Press RDMagaintocancel.
SomeCD-RsandCD-RWsmaybeincompatiblewiththisunit,dependingonmediatypeandrecordingmethod.
Note:CD-Rrecordingsessionsmustbeclosed(finalized)forplayback.
Insert CD
Eject CD
Track Select
Fast Forward and Reverse
Pause
Intro
Repeat
Random
CD-R/CD-RW Compatibility
9
XD250 OPERATION
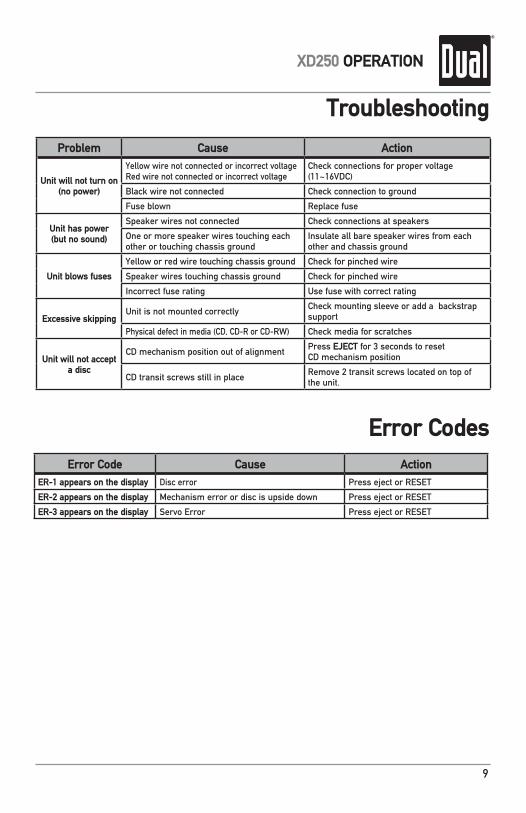
Troubleshooting
Error Codes
Problem Cause Action
Unit will not turn on (no power)
YellowwirenotconnectedorincorrectvoltageRedwirenotconnectedorincorrectvoltage
Checkconnectionsforpropervoltage(11~16VDC)
Blackwirenotconnected Checkconnectiontoground
Fuseblown Replacefuse
Unit has power (but no sound)
Speakerwiresnotconnected Checkconnectionsatspeakers
Oneormorespeakerwirestouchingeachotherortouchingchassisground
Insulateallbarespeakerwiresfromeachotherandchassisground
Unit blows fuses
Yelloworredwiretouchingchassisground Checkforpinchedwire
Speakerwirestouchingchassisground Checkforpinchedwire
Incorrectfuserating Usefusewithcorrectrating
Excessive skippingUnitisnotmountedcorrectly Checkmountingsleeveoraddabackstrap
support
Physicaldefectinmedia(CD,CD-RorCD-RW) Checkmediaforscratches
Unit will not accepta disc
CDmechanismpositionoutofalignment Press EJECT for 3 seconds to resetCDmechanismposition
CDtransitscrewsstillinplace Remove2transitscrewslocatedontopoftheunit.
Error Code Cause ActionER-1 appears on the display Disc error PressejectorRESET
ER-2 appears on the display Mechanismerrorordiscisupsidedown PressejectorRESET
ER-3 appears on the display ServoError PressejectorRESET

10
XD250 OPERATION
Limited One Year Warranty
Thiswarrantygivesyouspecificlegalrights.Youmayalsohaveotherrightswhichvaryfromstatetostate.
DualElectronicsCorp.warrantsthisproducttotheoriginalpurchasertobefreefromdefectsinmaterialandworkmanshipforaperiodofoneyearfromthedateoftheoriginalpurchase.
DualElectronicsCorp.agrees,atouroption,duringthewarrantyperiod,torepairanydefectinmaterialorworkmanshiportofurnishanequalnew,renewedorcomparableproduct(whicheverisdeemednecessary)inexchangewithoutcharges,subjecttoverificationofthedefectormalfunctionandproofofthedateofpurchase.Subsequentreplacementproductsarewarrantedforthebalanceoftheoriginalwarrantyperiod.
Who is covered?ThiswarrantyisextendedtotheoriginalretailpurchaserforproductspurchasedfromanauthorizedDualdealerandusedintheU.S.A.
What is covered?Thiswarrantycoversalldefectsinmaterialandworkmanshipinthisproduct.Thefollowingarenotcovered:software,installation/removalcosts,damageresultingfromaccident,misuse,abuse,neglect,productmodification,improperinstallation,incorrectlinevoltage,unauthorizedrepairorfailuretofollowinstructionssuppliedwiththeproduct,ordamageoccurringduringreturnshipmentoftheproduct.Specificlicenseconditionsandcopyrightnoticesforthesoftwarecanbefoundviawww.dualav.com.
What to do? 1.Beforeyoucallforservice,checkthetroubleshootingguideinyourowner’smanual.Aslightadjustmentofanycustomcontrolsmaysaveyouaservicecall.
2.Ifyourequireserviceduringthewarrantyperiod,youmustcarefullypacktheproduct(preferablyintheoriginalpackage)andshipitbyprepaidtransportationwithacopyoftheoriginalreceiptfromtheretailertoan authorizedservicecenter.
3.Pleasedescribeyourprobleminwritingandincludeyourname,areturnUPSshippingaddress(P.O.Boxnotacceptable),andadaytimephonenumberwithyourshipment.
4.Formoreinformationandforthelocationofthenearestauthorizedservicecenterpleasecontactusbyoneofthefollowingmethods:
•Callustoll-freeat1-866-382-5476•[email protected]
ExclusionofCertainDamages:Thiswarrantyisexclusiveandinlieuofanyandallotherwarranties,expressedorimplied,includingwithoutlimitationtheimpliedwarrantiesofmerchantabilityandfitnessforaparticularpurposeandanyobligation,liability,right,claimorremedyincontractortort,whetherornotarisingfromthecompany’snegligence,actualorimputed.Nopersonorrepresentativeisauthorizedtoassumeforthecompanyanyotherliabilityinconnectionwiththesaleofthisproduct.Innoeventshallthecompanybeliableforindirect,incidentalorconsequentialdamages.

11
XD250 OPERATION
FCC ComplianceThisdevicecomplieswithPart15oftheFCCRules.Operationissubjecttothefollowingtwoconditions:
(1)thisdevicemaynotcauseharmfulinterference,and
(2)thisdevicemustacceptanyinterferencereceived,includinginterferencethatmaycauseundesiredoperation. Warning:Changesormodificationstothisunitnotexpresslyapprovedbythepartyresponsibleforcompliancecouldvoidtheuser’sauthoritytooperatetheequipment.
Note:ThisequipmenthasbeentestedandfoundtocomplywiththelimitsforaClassBdigitaldevice,pursuanttoPart15oftheFCCRules.Theselimitsaredesignedtoprovidereasonableprotectionagainstharmfulinterferenceinaresidentialinstallation.Thisequipmentgenerates,usesandcanradiateradiofrequencyenergyand,ifnotinstalledandusedinaccordancewiththeinstructions,maycauseharmfulinterferencetoradiocommunications.However,thereisnoguaranteethatinterferencewillnotoccurinaparticularinstallation.Ifthisequipmentdoescauseharmfulinterferencetoradioortelevisionreception,whichcanbedeterminedbyturningtheequipmentoffandon,theuserisencouragedtotrytocorrecttheinterferencebyoneormoreofthefollowingmeasures:
• Reorientorrelocatethereceivingantenna.
• Increasetheseparationbetweentheequipmentandreceiver.
• Connecttheequipmentintoanoutletonacircuitdifferentfromthattowhichthereceiver is connected.
• Consultthedealeroranexperiencedradio/TVtechnicianforhelp.
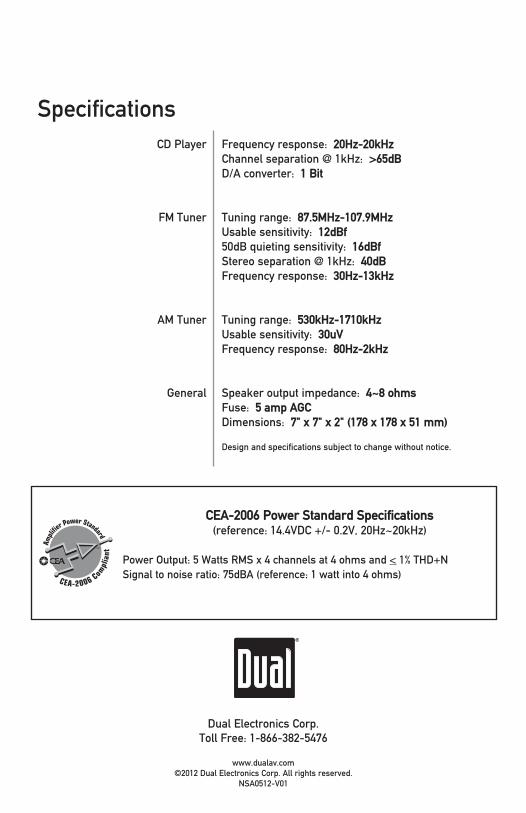
SpecificationsFrequencyresponse:20Hz-20kHzChannelseparation@1kHz:>65dBD/Aconverter:1 Bit
Tuningrange:87.5MHz-107.9MHzUsablesensitivity:12dBf50dBquietingsensitivity:16dBfStereoseparation@1kHz:40dBFrequencyresponse:30Hz-13kHz
Tuningrange:530kHz-1710kHzUsablesensitivity:30uVFrequencyresponse: 80Hz-2kHz
Speakeroutputimpedance: 4~8 ohmsFuse:5 amp AGCDimensions:7" x 7" x 2" (178 x 178 x 51 mm)
Designandspecificationssubjecttochangewithoutnotice.
CDPlayer
FMTuner
AMTuner
General
CEA-2006 Power Standard Specifications(reference:14.4VDC+/-0.2V,20Hz~20kHz)
PowerOutput:5WattsRMSx4channelsat4ohmsand<1%THD+NSignaltonoiseratio:75dBA(reference:1wattinto4ohms)
DualElectronicsCorp.TollFree:1-866-382-5476
www.dualav.com©2012DualElectronicsCorp.Allrightsreserved.
NSA0512-V01