xerox 4112™/4127™ enterprise printing systems quick start...
TRANSCRIPT
Xerox® 4112™/4127™Enterprise Printing SystemsQuick Start Guide
Version 3.0May 2009701P49401

©2009 Xerox Corporation. All rights reserved. Xerox, the sphere of connectivity design, and Xerox 4112/4127 Enterprise Printing Systems, are trademarks of Xerox Corporation in the United States and/or other countries.
Microsoft, MS-DOS, Windows, Microsoft Network, and Windows Server are either trademarks or registered trademarks of Microsoft Corporation in the United States and/or other countries.
Novell, NetWare, IntranetWare and NDS are registered trademarks of Novell, Inc. in the United States and other countries.
Adobe, Acrobat, PostScript, PostScript3, and PostScript Logo are trademarks of Adobe Systems Incorporated.
Apple, AppleTalk, EtherTalk, LocalTalk, Macintosh, MacOS and TrueType are trademarks of Apple Computer, Inc., registered in the U.S. and other countries.
HP, HPGL, HPGL/2, and HP-UX are registered trademarks of Hewlett-Packard Corporation.
Changes are periodically made to this document. Changes, technical inaccuracies, and typographic errors will be corrected in subsequent editions.
Table of Contents
Quick Start Guide i
Table of Contents
1 Introduction . . . . . . . . . . . . . . . . . . . . . . . . . . . . . . . . . . . . . . . . . . . 1-1Introducing your new Xerox 4112/4127 EPS . . . . . . . . . . . . . . . . . . . . . . . . . . . . . . . . 1-1
System components . . . . . . . . . . . . . . . . . . . . . . . . . . . . . . . . . . . . . . . . . . . . . . . . . . . 1-1The User Interface (UI) . . . . . . . . . . . . . . . . . . . . . . . . . . . . . . . . . . . . . . . . . . . . . . . . 1-2
Powering on and off . . . . . . . . . . . . . . . . . . . . . . . . . . . . . . . . . . . . . . . . . . . . . . . . . . . . . . . 1-4Power on . . . . . . . . . . . . . . . . . . . . . . . . . . . . . . . . . . . . . . . . . . . . . . . . . . . . . . . . . . . . . 1-4Power off . . . . . . . . . . . . . . . . . . . . . . . . . . . . . . . . . . . . . . . . . . . . . . . . . . . . . . . . . . . . . 1-4
2 Using basic features. . . . . . . . . . . . . . . . . . . . . . . . . . . . . . . . . . . . 2-1Exercise 1: Loading paper . . . . . . . . . . . . . . . . . . . . . . . . . . . . . . . . . . . . . . . . . . . . . . . . . . 2-1
Loading paper into Tray 1 . . . . . . . . . . . . . . . . . . . . . . . . . . . . . . . . . . . . . . . . . . . . . 2-1Loading Paper into Tray 3 . . . . . . . . . . . . . . . . . . . . . . . . . . . . . . . . . . . . . . . . . . . . . 2-2
Exercise 2: How to print a file from the FreeFlow Print Server. . . . . . . . . . . . . . . . . 2-4Exercise 3: How to check the status of your job. . . . . . . . . . . . . . . . . . . . . . . . . . . . . . 2-7Exercise 4: How to check the machine status . . . . . . . . . . . . . . . . . . . . . . . . . . . . . . . . 2-9Exercise 5: How to call for service . . . . . . . . . . . . . . . . . . . . . . . . . . . . . . . . . . . . . . . . . .2-12
3 Computer operations. . . . . . . . . . . . . . . . . . . . . . . . . . . . . . . . . . . 3-1Network Printing. . . . . . . . . . . . . . . . . . . . . . . . . . . . . . . . . . . . . . . . . . . . . . . . . . . . . . . . . . . 3-1
Printing with the PS print drivers . . . . . . . . . . . . . . . . . . . . . . . . . . . . . . . . . . . . . . . 3-1Printing with the PCL print drivers . . . . . . . . . . . . . . . . . . . . . . . . . . . . . . . . . . . . . . 3-2
CentreWare Internet Services . . . . . . . . . . . . . . . . . . . . . . . . . . . . . . . . . . . . . . . . . . . . . . 3-5Print a job from CentreWare Internet Services . . . . . . . . . . . . . . . . . . . . . . . . . . 3-5
4 Quick Reference for Users . . . . . . . . . . . . . . . . . . . . . . . . . . . . . . 4-1Getting Help. . . . . . . . . . . . . . . . . . . . . . . . . . . . . . . . . . . . . . . . . . . . . . . . . . . . . . . . . . . . . . . 4-1System messages. . . . . . . . . . . . . . . . . . . . . . . . . . . . . . . . . . . . . . . . . . . . . . . . . . . . . . . . . . 4-1User Interface components . . . . . . . . . . . . . . . . . . . . . . . . . . . . . . . . . . . . . . . . . . . . . . . . 4-2

Table of Contents
ii Quick Start Guide

Quick Start Guide 1-1
1Introduction
Introducing your new Xerox 4112/4127 EPSYour Xerox 4112/4127 is a black and white printer. The 4112 prints at 110 pages per minute. The 4127 prints at 125 pages per minute.
System components
No. Component Function
1 FreeFlow Print Server Provides a graphical User Interface (UI) for customizing the printer; setting up and printing jobs; managing fonts, security, accounting; and many other activities.
2 Power Switch Switches on/off the machine power.
3 User Interface (UI) Control Panel and Touch Screen used to enter and view information.
4 Trays 1, 2, 3, and 4 Holds the paper that is used to copy and print.
5 Bypass Tray (Tray 5) Load nonstandard paper, such as heavy stock or other special media, that cannot be loaded in trays 1-4.
12
3
4
5
Introduction Xerox 4112/4127 EPS
1-2 Quick Start Guide
For more detailed information, refer to the User Guide and Administrator Guide that were supplied with your machine.
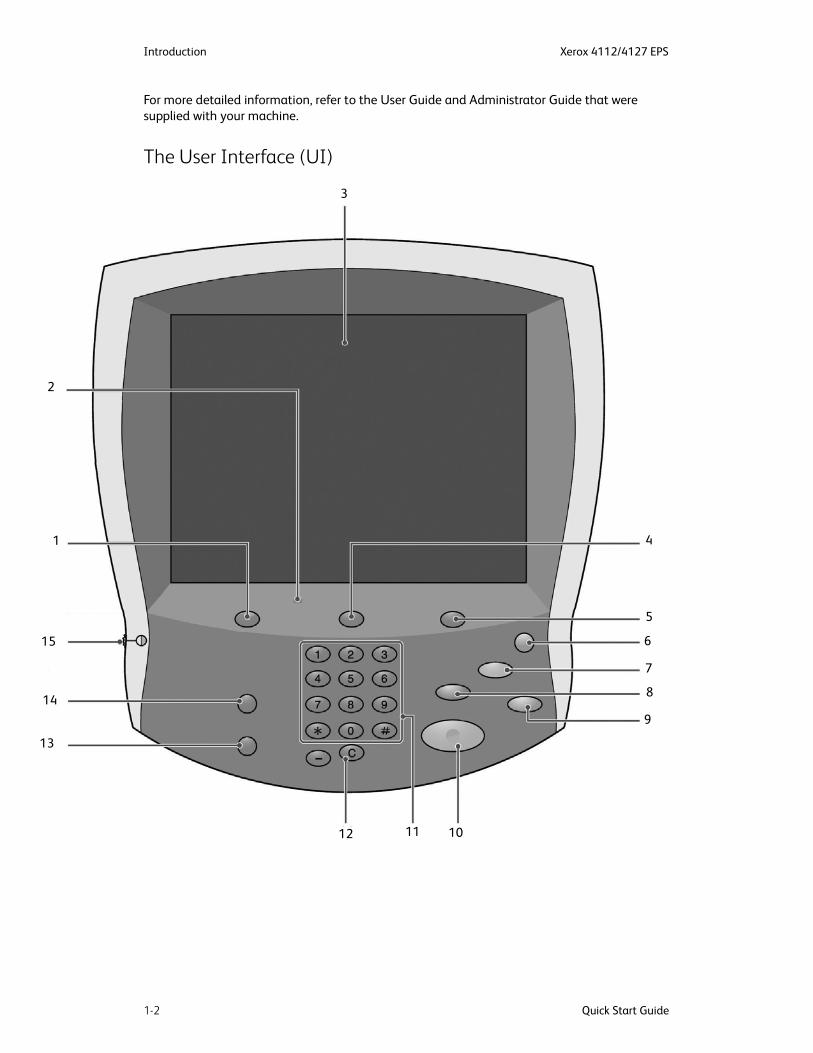
The User Interface (UI)
2
15
1
13
149
8
7
6
5
4
101112
3
Xerox 4112/4127 EPS Introduction
Quick Start Guide 1-3
No. Component Function
1 Services Press this button to access the various service screens.Services may not be available on EPS systems.
2 Control panel Select features with buttons and the keypad.
3 Touch Screen Select the available programming by touching the screen.
4 Job Status Displays the Job Status feature screens.
5 Machine Status Displays the current status of the machine on the touch screen.
6 Energy Saver This button lights when the machine is in the Power Saver mode. Press this button to exit Power Saver mode.
7 Clear All Clears all programming and returns the machine to its default settings.
8 Interrupt Temporarily stops the current copy job to allow a priority job to be run.
9 Stop Temporarily stops the current job. Follow the message to cancel or resume your job.
10 Start Starts the job.
11 Numeric keypad Enter the number of copies, a password, and other numerical values.
12 Clear Deletes numeric values or the last digit entered.
13 Language Changes text to an alternative language.
14 Log In/Out Provides password protected access to the System Administration menu, which is used to adjust the defaults on the machine.
15 Brightness dial Adjusts the brightness of the Touch screen.

Introduction Xerox 4112/4127 EPS
1-4 Quick Start Guide
Powering on and offSwitch on the power before operating the machine. The machine warms up in approximately five minutes, after which you can make copies. Switch off the machine at the end of the day or when it is not in use for a long period of time.
Power on
To power on the machine:
1. Open the cover.
2. Press the power switch to the on position [|].
NoteThe "Please wait..." message on the UI indicates that the machine is warming up. The machine cannot be used while it is warming up.
Power off
1. Wait until all copy and print jobs have completely finished.
2. Press the power switch to the off position [ ].
Quick Start Guide 2-1
2Using basic features
Exercise 1: Loading paperFor this exercise, you will load 8.5 X 11 in. or A4 paper in tray 1 and load 11 X 17 in. or A3 paper in tray 3.
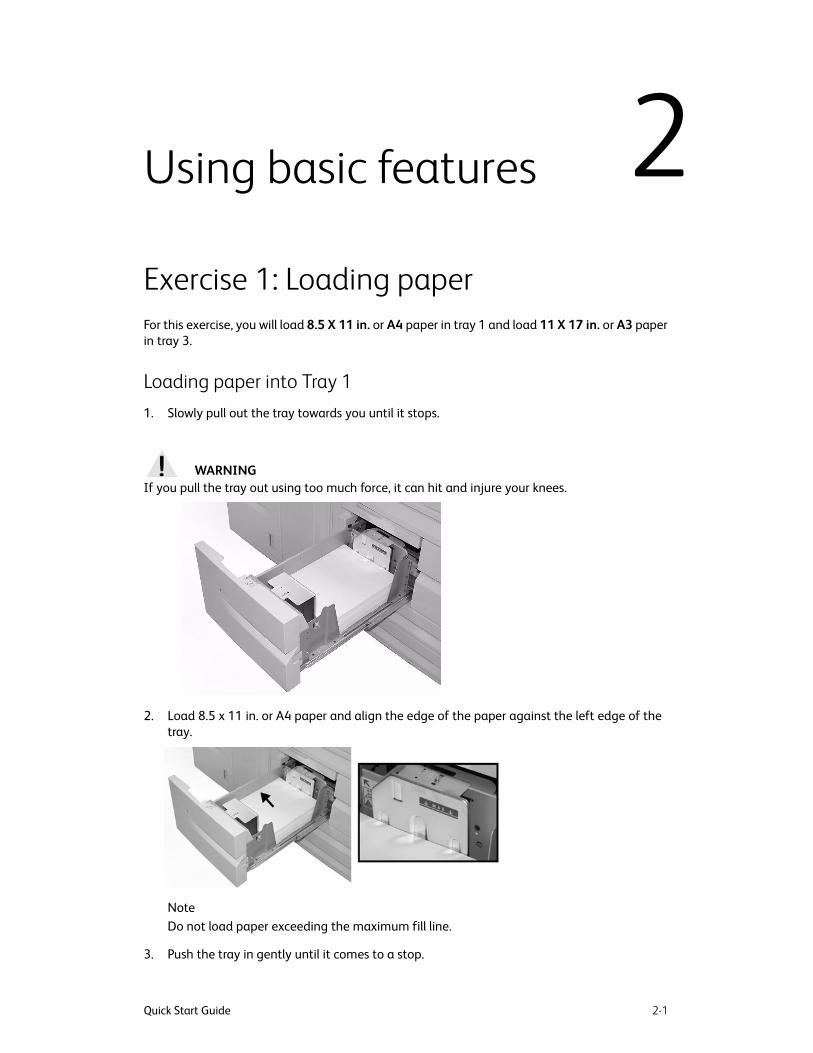
Loading paper into Tray 11. Slowly pull out the tray towards you until it stops.
2. Load 8.5 x 11 in. or A4 paper and align the edge of the paper against the left edge of the tray.
NoteDo not load paper exceeding the maximum fill line.
3. Push the tray in gently until it comes to a stop.
WARNINGIf you pull the tray out using too much force, it can hit and injure your knees.
Using basic features Xerox 4112/4127 EPS
2-2 Quick Start Guide
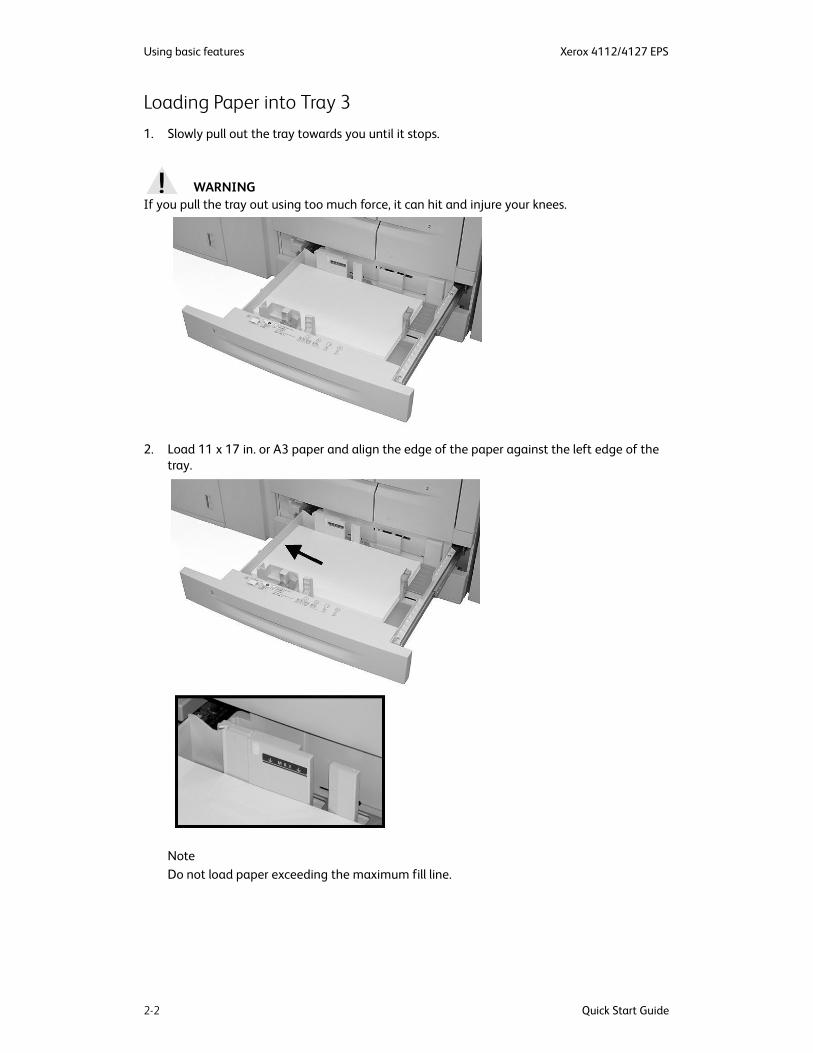
Loading Paper into Tray 31. Slowly pull out the tray towards you until it stops.
2. Load 11 x 17 in. or A3 paper and align the edge of the paper against the left edge of the tray.
NoteDo not load paper exceeding the maximum fill line.
WARNINGIf you pull the tray out using too much force, it can hit and injure your knees.
Xerox 4112/4127 EPS Using basic features
Quick Start Guide 2-3
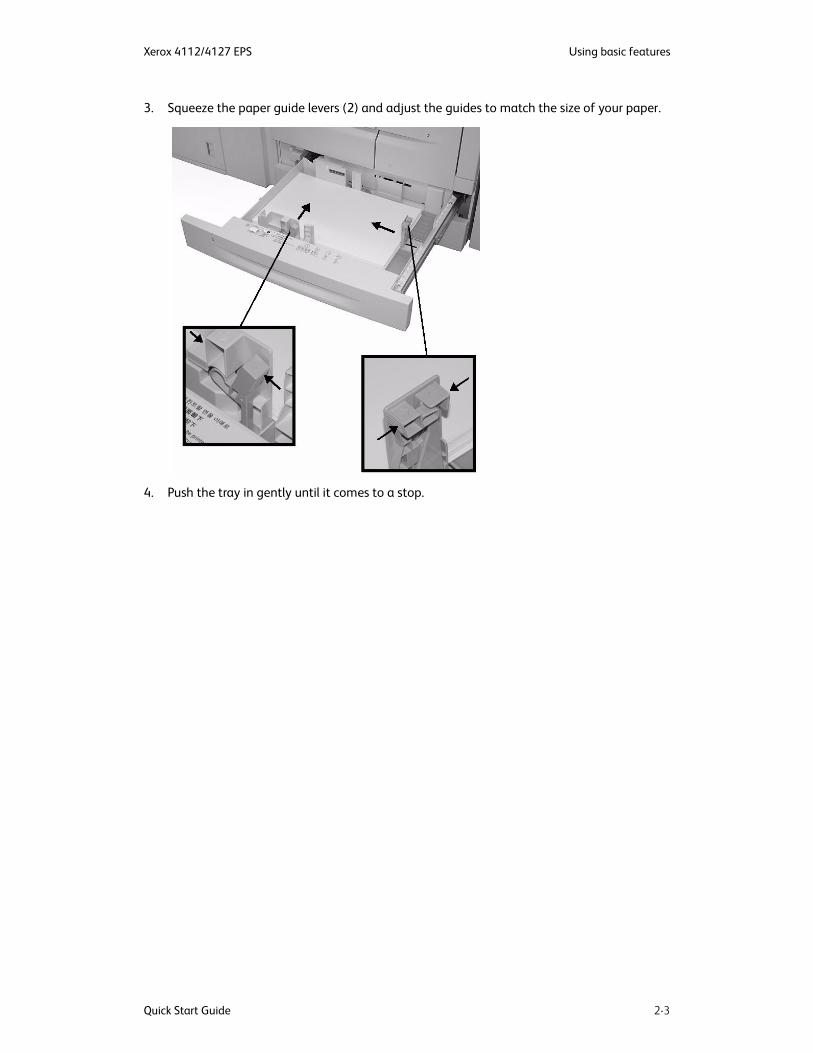
3. Squeeze the paper guide levers (2) and adjust the guides to match the size of your paper.
4. Push the tray in gently until it comes to a stop.
Using basic features Xerox 4112/4127 EPS
2-4 Quick Start Guide
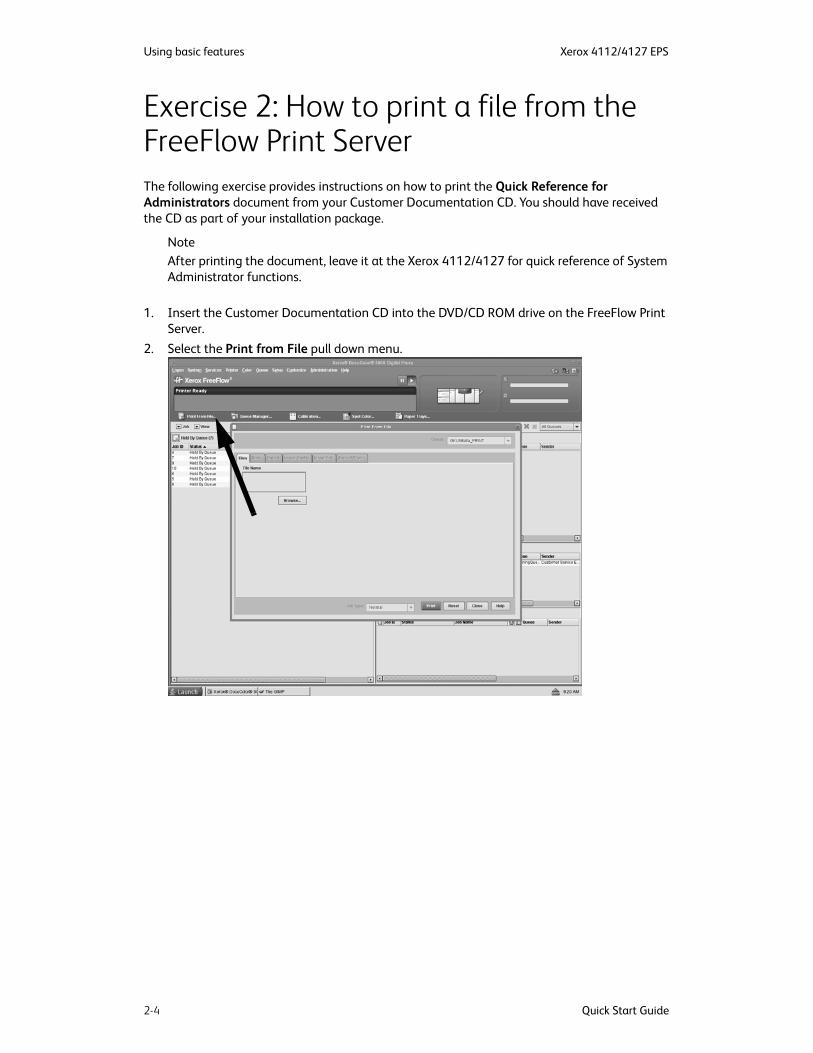
Exercise 2: How to print a file from the FreeFlow Print ServerThe following exercise provides instructions on how to print the Quick Reference for Administrators document from your Customer Documentation CD. You should have received the CD as part of your installation package.
NoteAfter printing the document, leave it at the Xerox 4112/4127 for quick reference of System Administrator functions.
1. Insert the Customer Documentation CD into the DVD/CD ROM drive on the FreeFlow Print Server.
2. Select the Print from File pull down menu.
Xerox 4112/4127 EPS Using basic features
Quick Start Guide 2-5
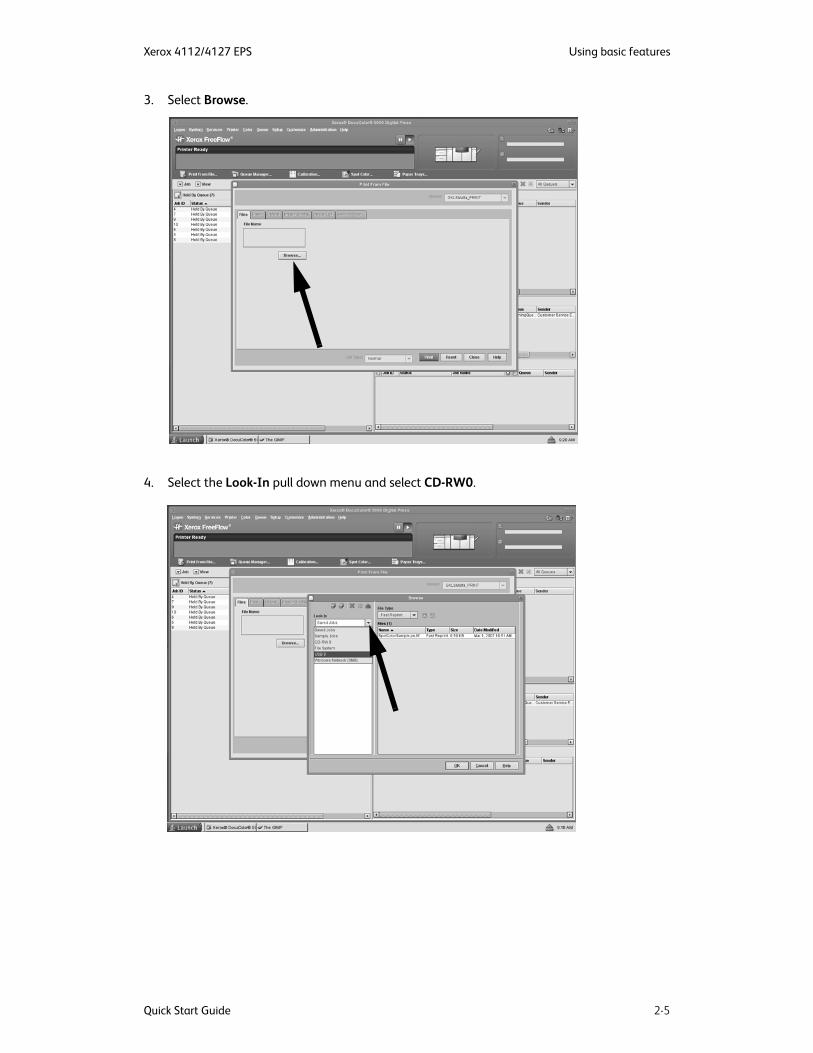
3. Select Browse.
4. Select the Look-In pull down menu and select CD-RW0.
Using basic features Xerox 4112/4127 EPS
2-6 Quick Start Guide
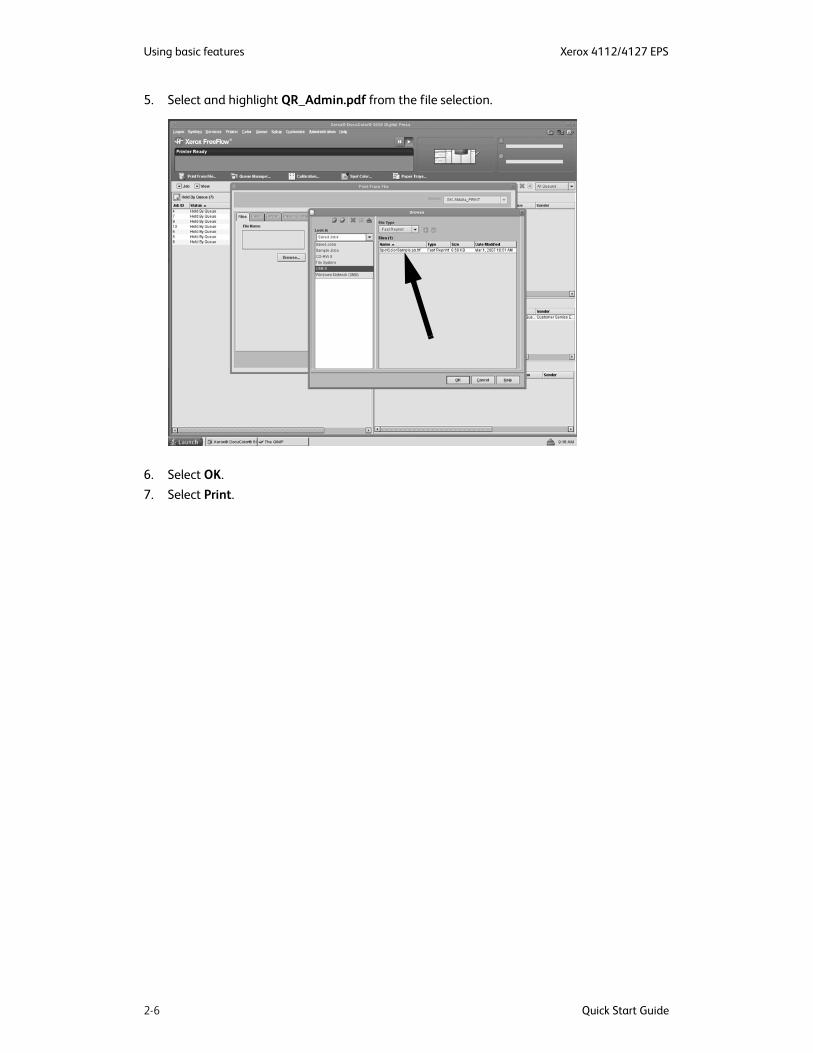
5. Select and highlight QR_Admin.pdf from the file selection.
6. Select OK.7. Select Print.
Xerox 4112/4127 EPS Using basic features
Quick Start Guide 2-7
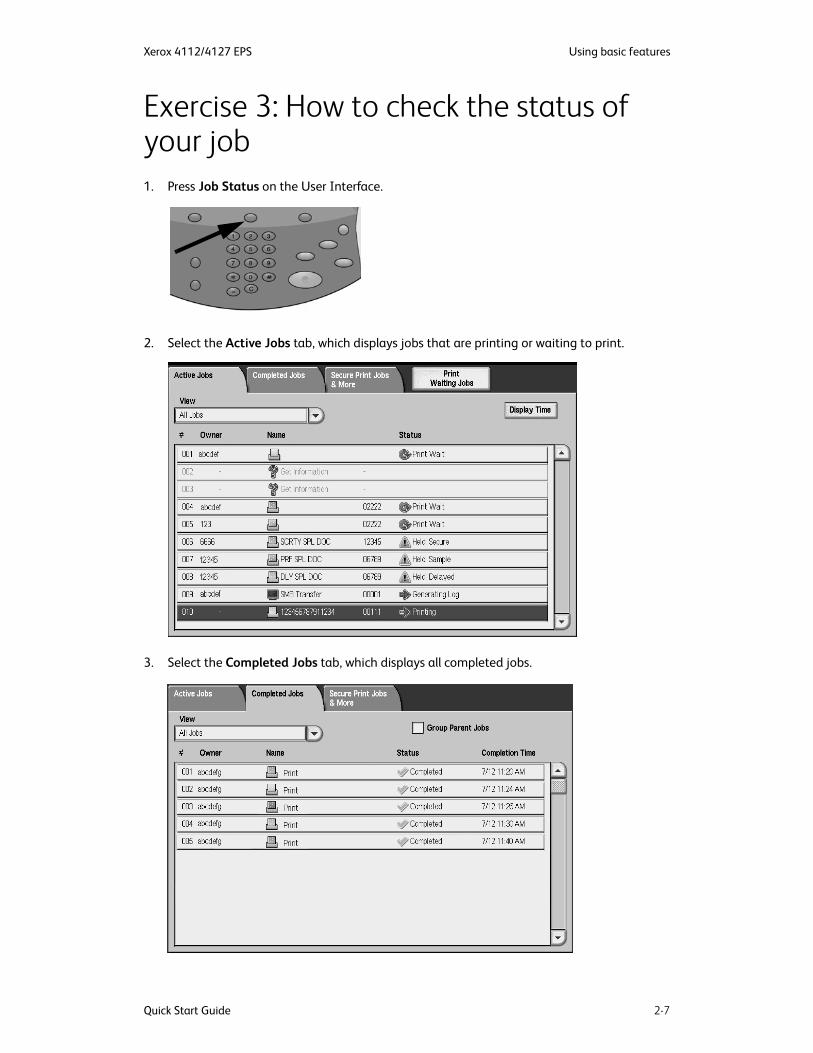
Exercise 3: How to check the status of your job1. Press Job Status on the User Interface.
2. Select the Active Jobs tab, which displays jobs that are printing or waiting to print.
3. Select the Completed Jobs tab, which displays all completed jobs.
Using basic features Xerox 4112/4127 EPS
2-8 Quick Start Guide
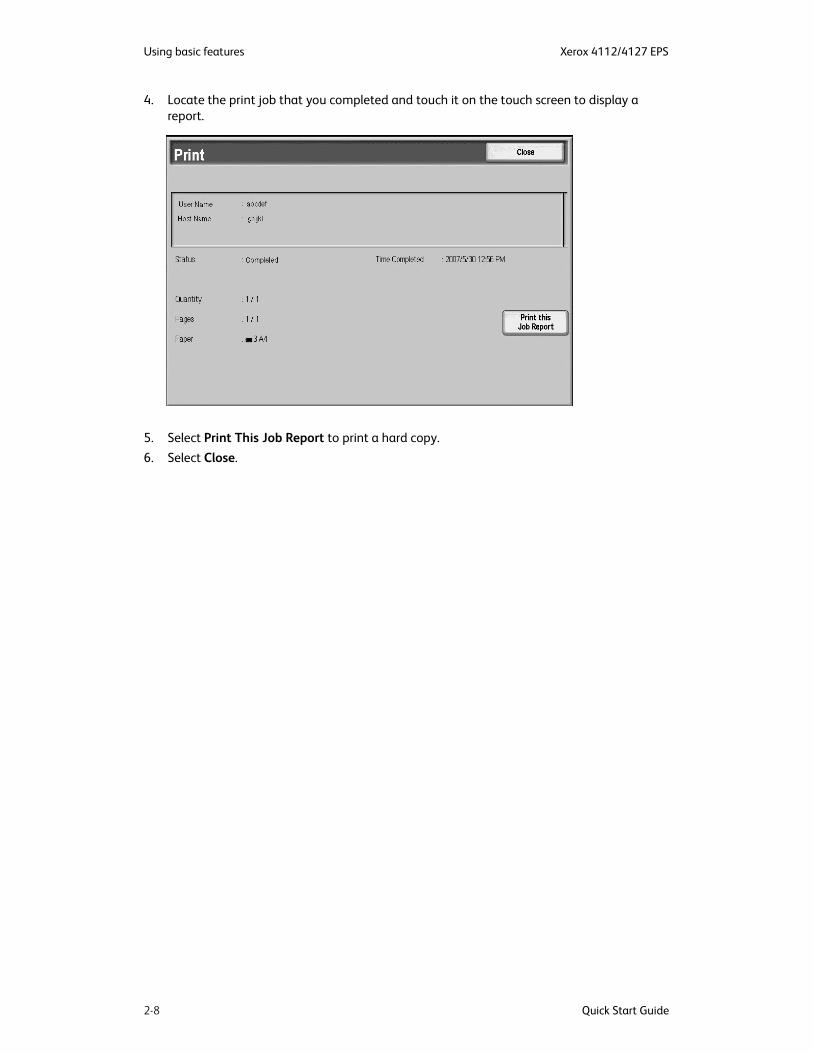
4. Locate the print job that you completed and touch it on the touch screen to display a report.
5. Select Print This Job Report to print a hard copy.6. Select Close.
Xerox 4112/4127 EPS Using basic features
Quick Start Guide 2-9
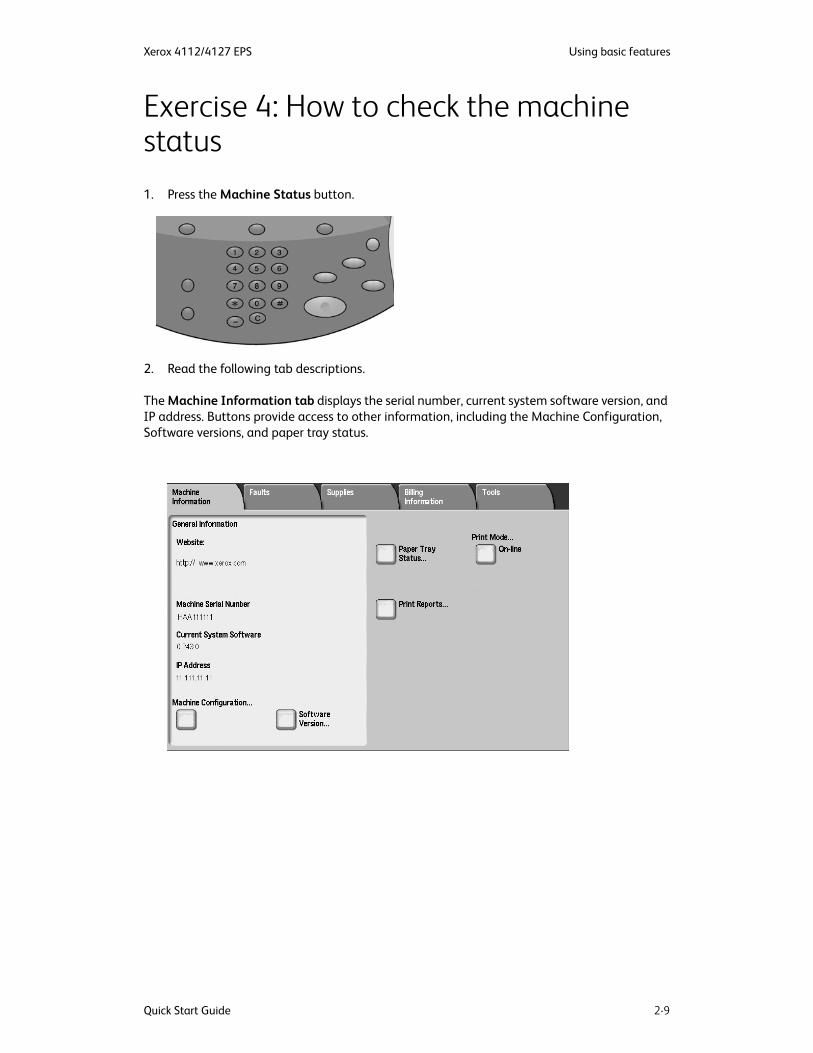
Exercise 4: How to check the machine status1. Press the Machine Status button.
2. Read the following tab descriptions.
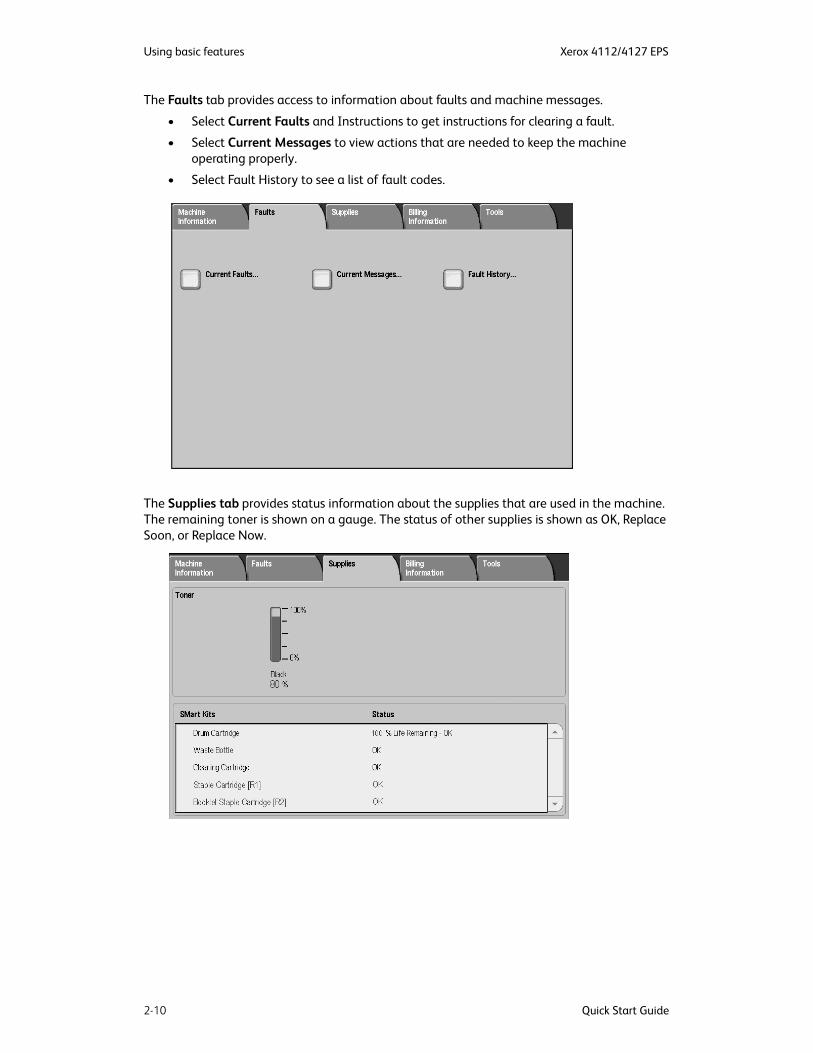
The Machine Information tab displays the serial number, current system software version, and IP address. Buttons provide access to other information, including the Machine Configuration, Software versions, and paper tray status.
Using basic features Xerox 4112/4127 EPS
2-10 Quick Start Guide
The Faults tab provides access to information about faults and machine messages.
• Select Current Faults and Instructions to get instructions for clearing a fault.
• Select Current Messages to view actions that are needed to keep the machine operating properly.
• Select Fault History to see a list of fault codes.
The Supplies tab provides status information about the supplies that are used in the machine. The remaining toner is shown on a gauge. The status of other supplies is shown as OK, Replace Soon, or Replace Now.
Xerox 4112/4127 EPS Using basic features
Quick Start Guide 2-11
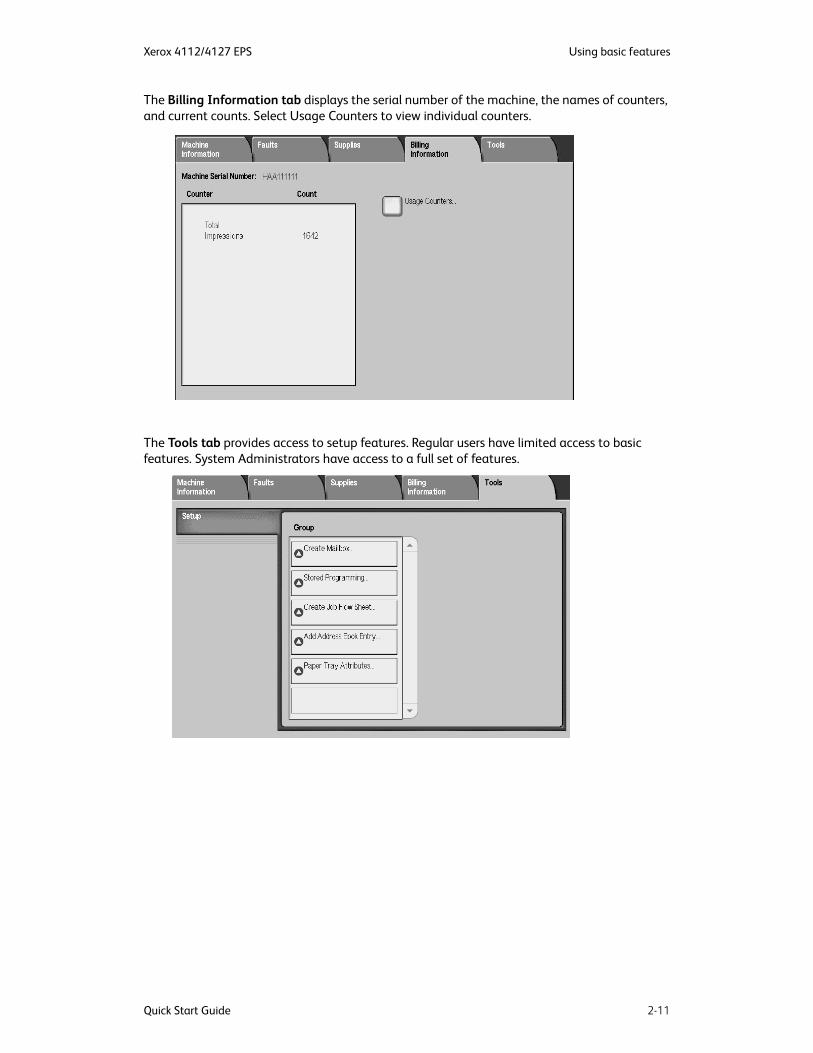
The Billing Information tab displays the serial number of the machine, the names of counters, and current counts. Select Usage Counters to view individual counters.
The Tools tab provides access to setup features. Regular users have limited access to basic features. System Administrators have access to a full set of features.
Using basic features Xerox 4112/4127 EPS
2-12 Quick Start Guide
Exercise 5: How to call for serviceRefer to the User Interface when you have a problem with the machine. A status code and suggested solutions may be displayed on the screen. Follow all steps in the suggested solutions until the problem is corrected. If the problem persists, call for assistance.
Before calling Xerox for assistance, gather the following information:
1. A complete description of the problem.If copy quality is a problem, have a sample available to help you describe the defect.
2. Any Fault Codes that are displayed on the User Interface.3. The machine serial number.
Press Machine Status and locate the serial number on the Machine Information tab.
In the US, call 1-800-275-9376 extension 871.
In Canada, call 1-800-939-3769.
In Europe, go to www.xerox.com and select the Contact Us link to locate a telephone number for your country.
NoteIf possible, call from a phone that is near the 4112/4127.
Quick Start Guide 3-1
3Computer operations
NoteThe screens shown in this section may or may not reflect your print driver screens. The screens may vary depending on your drivers configuration and marketplace. The screens shown here are a representation only.
Network PrintingPrint procedures vary depending on the application software you are using. For more information, refer to the documentation provided with each application.
NoteTo learn about print features, click Help in the print driver screen and refer to the online help.
Printing with the PS print drivers1. Load the paper in the paper tray. See the Paper and other Media chapter in the User
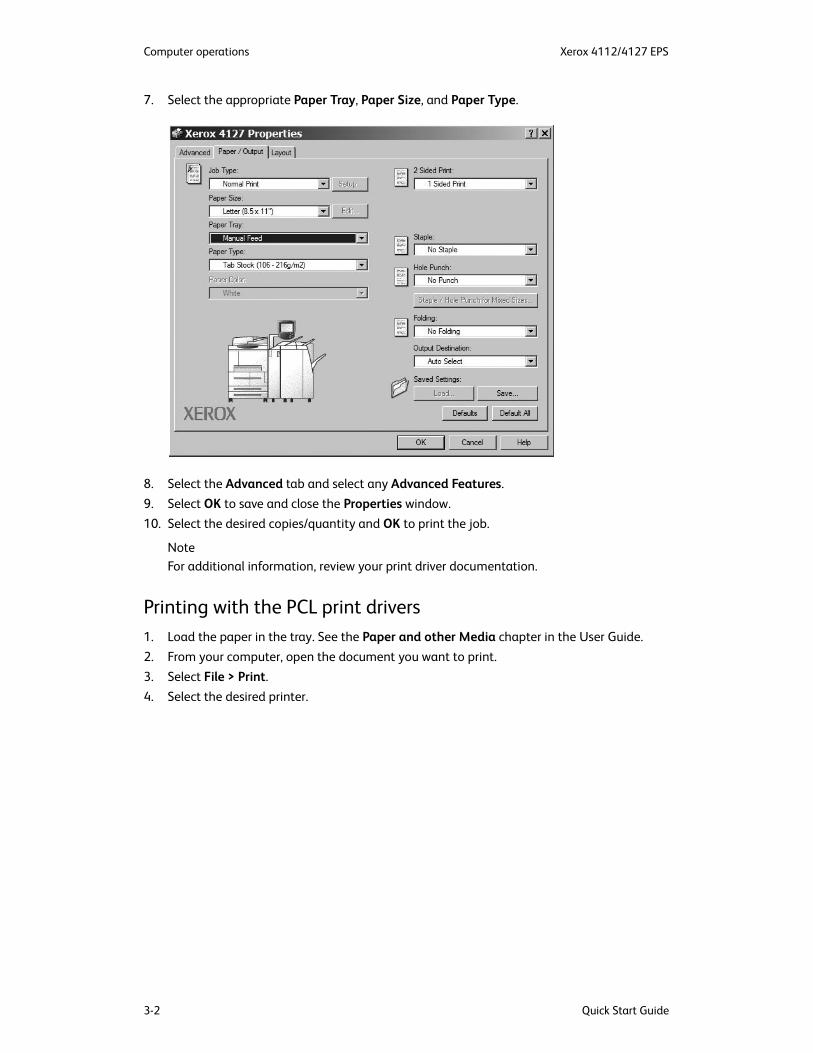
Guide.2. From your computer, open the document you want to print.3. Select File > Print.4. Select the desired printer.5. Select Properties.6. Select the Paper/Output tab.
Computer operations Xerox 4112/4127 EPS
3-2 Quick Start Guide
7. Select the appropriate Paper Tray, Paper Size, and Paper Type.
8. Select the Advanced tab and select any Advanced Features.9. Select OK to save and close the Properties window.10. Select the desired copies/quantity and OK to print the job.
NoteFor additional information, review your print driver documentation.
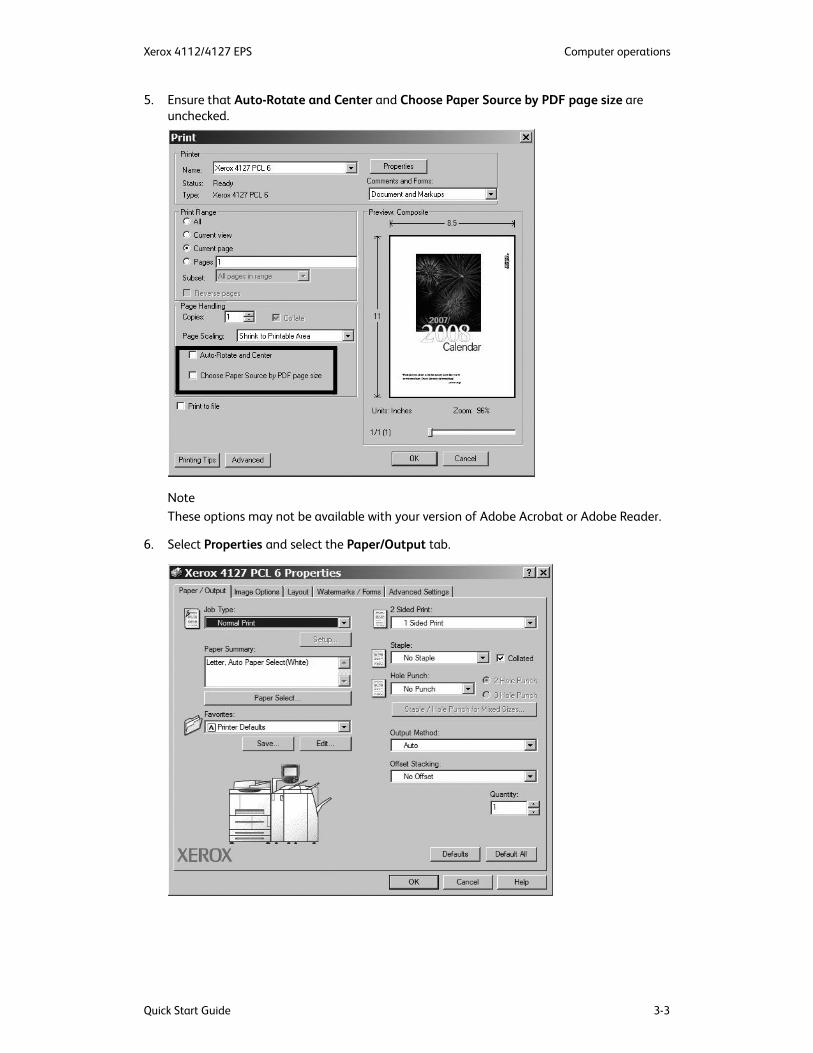
Printing with the PCL print drivers1. Load the paper in the tray. See the Paper and other Media chapter in the User Guide.2. From your computer, open the document you want to print.3. Select File > Print.4. Select the desired printer.
Xerox 4112/4127 EPS Computer operations
Quick Start Guide 3-3
5. Ensure that Auto-Rotate and Center and Choose Paper Source by PDF page size are unchecked.
NoteThese options may not be available with your version of Adobe Acrobat or Adobe Reader.
6. Select Properties and select the Paper/Output tab.
Computer operations Xerox 4112/4127 EPS
3-4 Quick Start Guide
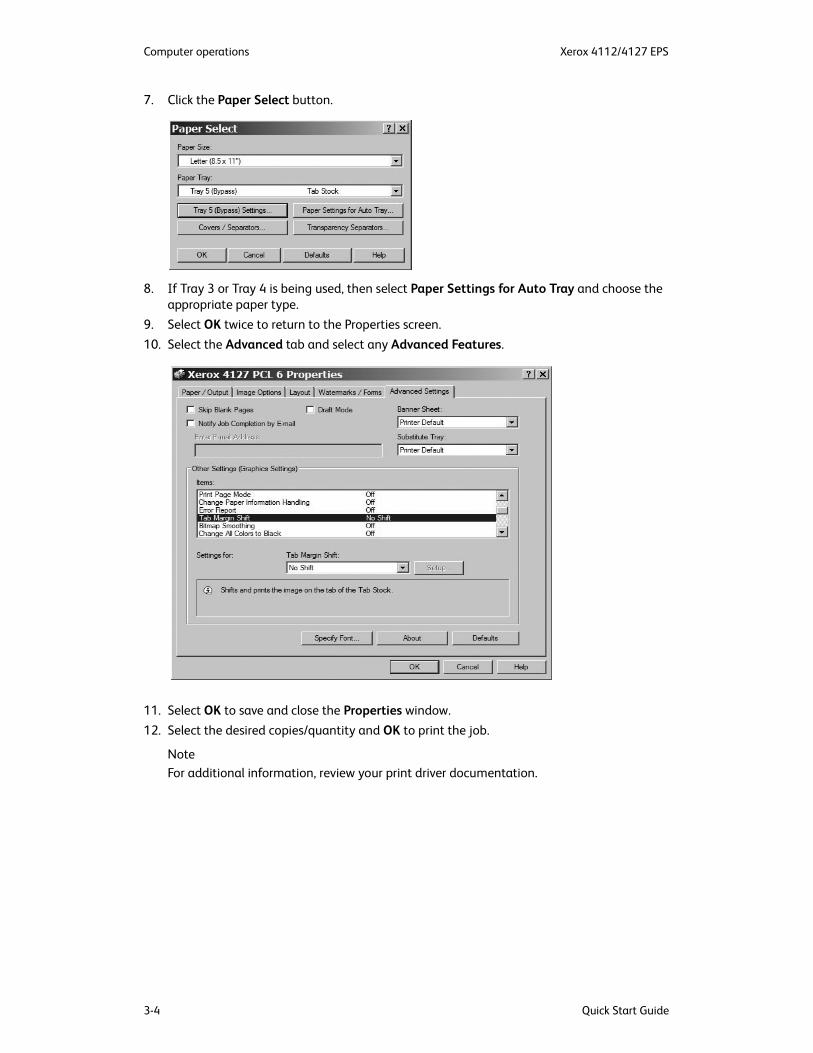
7. Click the Paper Select button.
8. If Tray 3 or Tray 4 is being used, then select Paper Settings for Auto Tray and choose the appropriate paper type.
9. Select OK twice to return to the Properties screen.10. Select the Advanced tab and select any Advanced Features.
11. Select OK to save and close the Properties window.12. Select the desired copies/quantity and OK to print the job.
NoteFor additional information, review your print driver documentation.
Xerox 4112/4127 EPS Computer operations
Quick Start Guide 3-5
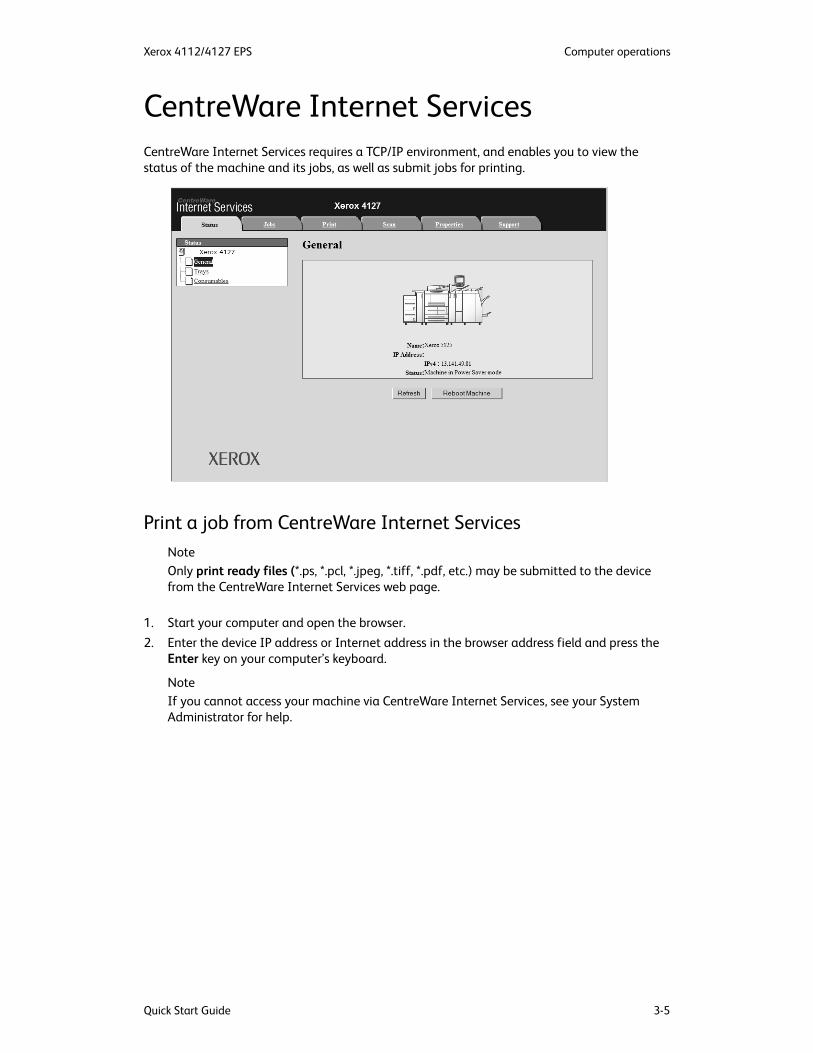
CentreWare Internet ServicesCentreWare Internet Services requires a TCP/IP environment, and enables you to view the status of the machine and its jobs, as well as submit jobs for printing.
Print a job from CentreWare Internet ServicesNoteOnly print ready files (*.ps, *.pcl, *.jpeg, *.tiff, *.pdf, etc.) may be submitted to the device from the CentreWare Internet Services web page.
1. Start your computer and open the browser.2. Enter the device IP address or Internet address in the browser address field and press the
Enter key on your computer’s keyboard.
NoteIf you cannot access your machine via CentreWare Internet Services, see your System Administrator for help.
Computer operations Xerox 4112/4127 EPS
3-6 Quick Start Guide
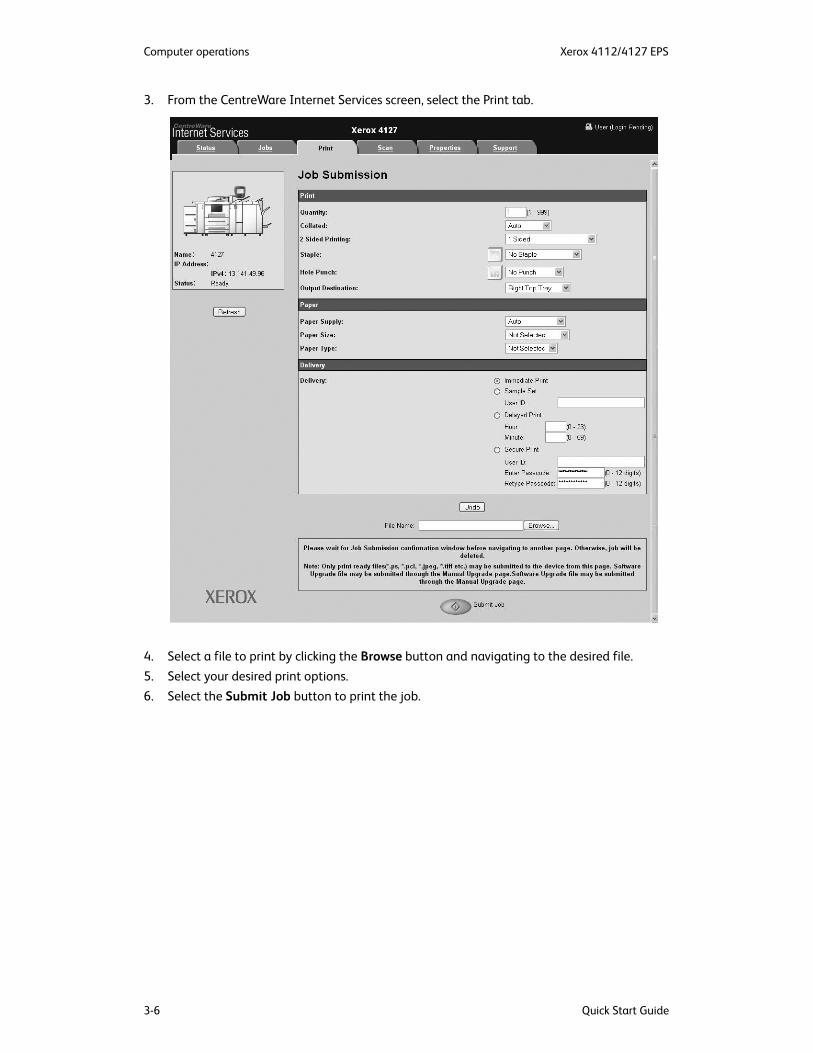
3. From the CentreWare Internet Services screen, select the Print tab.
4. Select a file to print by clicking the Browse button and navigating to the desired file.5. Select your desired print options.6. Select the Submit Job button to print the job.

Quick Start Guide 4-1
4Quick Reference for Users
Getting HelpFor information/assistance, check the following:
• User Guide for information on how to use the Xerox 4112/4127 EPS.
• For online assistance go to: www.xerox.com
• Click the Support and Drivers link.
• In Product Name, type 4112 or 4127 and click Search.
• From the list presented, locate your model (4112 or 4127).
• Click the appropriate link for the desired information: Support, Drivers & Download, or Documentation
• You may also call for technical assistance.
• In the US, call 1-800-275-9376 extension 871.
• In Canada, call 1-800-939-3769.
• In Europe, go to www.xerox.com and select the Contact Us link to locate a telephone number for your country.
System messagesIf the system displays a message on the screen, be sure to follow the steps in the order presented in order to solve the problem. Failure to do so may cause additional problems.

Quick Reference for Users Xerox 4112/4127 EPS
4-2 Quick Start Guide
User Interface componentsComponent Function Component Function
Control Panel Allows keypad selection of features.
Press to stop the current print job or communications.
Touch Screen Allows selections by touching the screen.
Press the Start button to start the printing process.
Services Does not contain features applicable to the EPS system.
Numeric keypad Press these buttons to enter passwords and other numerical values.
Job Status Press this button to display the job features on the touch screen.
Clear Press this button if you have entered the wrong numeric value or if instructed to do so on the User Interface.
Machine Status Select Machine Status features such as billing and consumable information.
Language Use this button to select the display language.
Energy Saver Lights when the machine is in Power Saver mode. Press to cancel Power Saver mode.
Log In/Out This button is used by the System Administrator to log into the System Administrator mode.
Clear All Clears all programming and returns to all default settings.
Brightness dial Use to adjust the brightness of the touch screen.
Interrupt Not available for this product.
Start