xerox 700 digital color press...system administrator menu overview 17 loading paper and media 21...
TRANSCRIPT

Quick Start Guide
Xerox 700 Digital Color Press
Prepared by:Xerox CorporationGlobal Knowledge and Language Services800 Phillips RoadBuilding 218Webster, New York 14580Translated by:XeroxGKLS European OperationsBessemer RoadWelwyn Garden CityHertfordshireAL7 1BUUK© Copyright 2008 by Xerox Corporation. All Rights Reserved.
Copyright protection claimed includes all forms and matters of copyrighted material and information now allowed by statutory or judicial law or hereinafter granted, including without limitation, material generated from the software programs that are displayed on the screen such as styles, templates, icons, screen displays, looks, etc. Xerox® and all Xerox product names and product numbers mentioned in this publication are trademarks of XEROX CORPORATION. Other company brands and product names may be trademarks or registered trademarks of the respective companies and are also acknowledged. Microsoft, MS-DOS, Windows, Windows NT, Microsoft Network, and Windows Server are either trademarks or registered trademarks of Microsoft Corporation in the United States and/or other countries. Novell, NetWare, IntranetWare and NDS are registered trademarks of Novell, Inc. in the United States and other countries. Adobe, Acrobat, PostScript, PostScript3, and PostScript Logo are trademarks of Adobe Systems Incorporated. Apple, AppleTalk, EtherTalk, LocalTalk, Macintosh, MacOS and TrueType are trademarks of Apple Computer, Inc., registered in the U.S. and other countries. HP, HPGL, HPGL/2, and HP-UX are registered trademarks of Hewlett-Packard Corporation. All product/brand names are trademarks or registered trademarks of the respective holders.
ii
Quick Start Guide
Xerox 700 Digital Color Press

Control Panel
Reports
Using Separator Pages
Simple Network Scanning
Booklet Creation
Simple Copying
1
5
7
9
11
13
Billing Meters 15
System Administrator Menu Overview 17
Loading Paper and Media 21
Replacing the Toner Cartridges 25
Where to Find Help 3
Table of Contents
Xerox 700 Digital Color Press iii

Quick Start Guide
Xerox 700 Digital Color Pressiv

1
2
3
4
Touch ScreenThe touch screen allows you to select all the available programming features. It also displays fault clearance procedures and general machine information.
Machine Status ButtonDisplays the current status of the machine on the touch screen.
Services ButtonDisplays the job features on the touch screen.
Job Status ButtonDisplays job progress information on the touch screen.
Copy
Xerox 700 Digital Color Press
Network Scanning
Home
Web Applications
This product will allow you to make copies and perform a number of other operations which may include sending E-mails, faxes, and storing documents in electronic forms, depending on what Services it is equipped with.Press any button to select a service.
Control Panel
1Xerox 700 Digital Color Press

Quick Start Guide
5
6
7
11
12
10
9
8 Clear AllIf pressed once, resets the default settings and displays the first screen for the current pathway. If pressed twice, resets all the features to their machine default settings.
StartStarts the job.
Log In/OutProvides password protected access to the System Administration menu used to adjust the defaults of the machine.
InterruptTemporarily stops the current copy job to allow a priority job to be run.
StopTemporarily stops the current job. Follow the message to cancel or resume your job.
ClearDeletes numeric values or the last digit entered.
Power Saver
Your machine has energy saver features which significantly reduce the power consumption during periods of inactivity. When your machine is in a power saver mode the Power Saver indicator light is lit.
LanguageChanges text to an alternative language (when available).
Xerox 700 Digital Color Press2

For system support, user help, and service support, call the appropriate number:
US: 1-800-821-2797 (Includes TTY Support)
Canada: 1-800-939-3769
Xerox also provides web-based customer support.
Go to: www.xerox.com/eSupportCentre
It may be helpful to know your machine serial number when calling for support. The machine serial number is shown on the Machine Information tab.
Where to Find Help
1-800 Telephone numbers
3Xerox 700 Digital Color Press
Machine Information
Faults Supplies Billing Information
Print Reports
Paper Tray Status
Machine Status
Tools
Overwrite Hard Disk
Machine Configuration
Software Version
Machine Serial Number:xxxxxxxxxx
Current System Software
0.210.0
Website:

Quick Start Guide
Press the Machine Status button on the control panel.
Touch the Machine Information tab.
The machine serial number is displayed.
You can also open the front doors of the machine to locate the serial number plate on the frame.
Locating the Machine Serial Number
Xerox 700 Digital Color Press4
Machine Information
Faults Supplies Billing Information
Print Reports
Paper Tray Status
Machine Status
Tools
Overwrite Hard Disk
Machine Configuration
Software Version
Machine Serial Number:xxxxxxxxxx
Current System Software
0.210.0
Website:

1. Load the documents.
2. Press the Services button.
Simple Copying
5Xerox 700 Digital Color Press
1.2.31.2.3
2.2.1.1.
Paper SupplyReduce / Enlarge Output Color Copy Output
100
Plain
100%
%
Auto%
64%
78%
129%
More... More...
Plain
Plain
Plain
Auto Detect
Color
Black and White
More...
Dual Color
Single Color
(Red/Black)
(Red)
2 Sided Copying
Original Type
Lighten / Darken
Auto Paper Select
Quantity
Image Quality Layout Adjustment Output Format Job AssemblyCopy
Auto Paper Select
1
2
3
4
1 > 1 Sided
Copy All Services
Ready To Copy
C o p y
Xer ox 700 Digit al Color Pr ess
N e t w o r k
S c a n n in g
H o m e
W e b
A p p lic a t io n s
T h is p r o d u c t w ill
a llo w y o u t o
m a k e c o p ie s
a n d p e r f o r m
a n u m b e r o f
o t h e r
o p e r a t io n s
w h ic h m a y
in c lu d e s e n d in g
E - m a ils ,
f a x e s , a n d
s t o r in g
3. Select the Features.
The features available on the Copy tab are the ones used most often. They allow you to program the standard features for a copy job. On touching the button for the required feature, the button changes to blue. If a More... button is selected additional options for that feature become available.

Quick Start Guide
Xerox 700 Digital Color Press6
4. Enter the Quantity.
5. Press Start.
Print Waiting Jobs
Owner Status
Active Jobs Secure Print Jobs and More
Completed Jobs
Name#
View
All Jobs
Smith, J. PrintingXYZ.DOC001
6. Identify your job in the Queue.

1.
Booklet creation enables the production of booklets or multi-page copies from 1 or 2-sided originals. The machine will scan your originals and automatically reduce and arrange the images in the correct sequence on your selected copy paper so that a booklet is created when the copy set is folded in half.
7Xerox 700 Digital Color Press
2. Select the Booklet Creation button.
Original Type
Color Effects
Quantity
Image Quality Layout Adjustment Output Format Job AssemblyCopy
Photo and Text
Off Y 000
Color Balance Color Shift
Normal
Image Options
M 000
K 000C 000
Auto SuppressionAuto Contrast
Lighten / Darken NormalSharpness Normal
Image Enhancement
Printed Original
CopyAll Services
C o p y
Xer ox 700 Digit al Color Pr ess
N e t w o r k
S c a n n in g
H o m e
W e b
A p p lic a t io n s
T h is p r o d u c t
w ill a llo w y o u t o
m a k e c o p ie s
a n d p e r f o r m
a n u m b e r o f
o t h e r
o p e r a t io n s
w h ic h m a y
in c lu d e s e n d in g
E - m a ils ,
f a x e s , a n d
Color Saturation Normal
Ready To Copy
Booklet Creation
Page Layout
Off
Multiple-Up: Off
Annotations
Off
Poster Folding
Covers
Off
Transparency Options
No SeparatorsNo Covers
Tab Margin Shift
Watermark
Face Up/Down Output
Auto
Off
Off
Image Quality Layout Adjustment Output Format Job AssemblyCopy
ID Card Copying
Off
NoneRepeat Image: Off
1.2.31.2.3
2.2.1.1.
Paper SupplyReduce / Enlarge Output Color Copy Output
100
Plain
100%
%
Auto%
64%
78%
129%
More... More...
Plain
Plain
Plain
Auto Detect
Color
Black and White
More...
Dual Color
Single Color
(Red/Black)
(Red)
2 Sided Copying
Original Type
Lighten / Darken
Auto Paper Select
Quantity
Image Quality Layout Adjustment Output Format Job AssemblyCopy
Auto Paper Select
1
2
3
4
1 > 1 Sided
Copy All Services
Ready To Copy
C o p y
Xer ox 700 Digit al Color Pr ess
N e t w o r k
S c a n n in g
H o m e
W e b
A p p lic a t io n s
T h is p r o d u c t w ill
a llo w y o u t o
m a k e c o p ie s
a n d p e r f o r m
a n u m b e r o f
o t h e r
o p e r a t io n s
w h ic h m a y
in c lu d e s e n d in g
E - m a ils ,
f a x e s , a n d
s t o r in g
Select the Output Format tab.
Booklet Creation

Quick Start Guide
Xerox 700 Digital Color Press8
3. Depending on your finisher, you may also have the option to choose from the following Fold and Staple selections:> No Fold or Staple> Fold and Staple> Fold Only.
Ready To Copy
Quantity
Binding Shift
Off
Off
Booklet Creation
Off
On
SaveCancel
Original Input
Covers
Rotate Side 2
2 Sided Originals
1 Sided Originals
Booklet Options Fold and Staple
Fold Only
Fold and Staple
No Fold or Staple
Divide Output
Off
Right Top Tray
Output Destination/Offset
4. In addition to folding and stapling, you can also include a Binding Shift, or Divide Output (sub-dividing a large booklet into subsets) on the Booklet Creation screen.
That concludes the description of the Booklet Creation feature.
5. Select the appropriate buttons to create your booklets.
You can create left bound, top bound, or right bound booklets.
When you have selected the appropriate input, select Save.
Ready To Copy
Quantity
Binding Shift
Off
Off
Booklet Creation
Off
On
SaveCancel
Original Input
Covers
Rotate Side 2
2 Sided Originals
1 Sided Originals
Booklet Options Fold and Staple
Fold Only
Fold and Staple
No Fold or Staple
Divide Output
Off
Right Top Tray
Output Destination/Offset

Color Scanning
Grayscale
Network Scanning
Go to
Color
Black
Original Type
Photo and Text
Text
Photo
Scan Presets
for Sharing and Printing
for Archival Record
for OCR
More...
2 Sided
2 Sided Scanning
1 Sided
2 Sided Rotate Side 2
Auto Detect
All Services
Template Description
Update Templates
Ready to scan your job
Network Scanning
Advanced Settings
Filing OptionsLayout Adjustment
1. Load the documents.
2.
3. Select the template.
Press the Services button. Touch the All Services icon, then touch the Network Scanning icon.
9Xerox 700 Digital Color Press
Simple Network Scanning

Quick Start Guide
Print Waiting Jobs
Owner Status
Active Jobs Secure Print Jobs and More
Completed Jobs
Name#
View
All Jobs
Smith, J. PrintingXYZ.DOC001
4. Select the features.
5. Press Start.
6. Identify your job in the Queue.
Color Scanning
Grayscale
Network Scanning
Go to
Color
Black
Original Type
Photo and Text
Text
Photo
Scan Presets
for Sharing and Printing
for Archival Record
for OCR
More...
2 Sided
2 Sided Scanning
1 Sided
2 Sided Rotate Side 2
Auto Detect
All Services
Template Description
Update Templates
Ready to scan your job
Network Scanning
Advanced Settings
Filing OptionsLayout Adjustment
Xerox 700 Digital Color Press10

When making a set of transparencies you can insert a divider between each transparency in order to make it easier to manage your presentation slides. This option is reached from the Output Format tab on the touch screen. Transparency Separators are not available if the Auto Paper Supply option is selected.
Follow the steps below to access and use this feature.
1. Press the Services button on the control panel.
2. Touch the Copy icon on the touch screen.
3. Select the Output Format tab.
11Xerox 700 Digital Color Press
Copy
Xerox 700 Digital Color Press
Network Scanning
Home
Web Applications
This product will allow you to make copies and perform a number of other operations which may include sending E-mails, faxes, and storing documents in electronic forms, depending on what Services it is equipped with.Press any button to select a service.
Using Separator Pages

Quick Start Guide
Original Type
Color Effects
Quantity
Image Quality Layout Adjustment Output Format Job AssemblyCopy
Photo and Text
Off Y 000
Color Balance Color Shift
Normal
Image Options
M 000
K 000C 000
Auto SuppressionAuto Contrast
Lighten / Darken NormalSharpness Normal
Image Enhancement
Printed Original
CopyAll Services
C o p y
Xer ox 700 Digit al Color Pr ess
N e t w o r k
S c a n n in g
H o m e
W e b
A p p lic a t io n s
T h is p r o d u c t
w ill a llo w y o u t o
m a k e c o p ie s
a n d p e r f o r m
a n u m b e r o f
o t h e r
o p e r a t io n s
w h ic h m a y
in c lu d e s e n d in g
E - m a ils ,
f a x e s , a n d
Color Saturation Normal
Ready To Copy
Booklet Creation
Page Layout
Off
Multiple-Up: Off
Annotations
Off
Poster Folding
Covers
Off
Transparency Options
No SeparatorsNo Covers
Tab Margin Shift
Watermark
Face Up/Down Output
Auto
Off
Off
Image Quality Layout Adjustment Output Format Job AssemblyCopy
ID Card Copying
Off
NoneRepeat Image: Off
4. Touch the Transparency Options button.
5. Touch Save.
When you select the No Separators option, your transparencies will be delivered to the output destination without a blank sheet of paper separating each transparency.
When you select the Blank Separators option, your transparencies will be delivered to the output destination with a blank sheet of paper separating each transparency.
The Blank Separators and Handouts option will insert a blank sheet of paper between each printed transparency. In addition, a distribution set of copies will also be printed on the stock you specify using the Paper Tray Settings button.
When you select the Transparency Set and Handouts option, the transparencies will be produced without separators. However, a distribution set of copies will be printed on the stock you specify using the Paper Tray Settings button.
Xerox 700 Digital Color Press12

Machine Information
Faults Supplies Billing Information
Print Reports
Paper Tray Status
Machine Status
Tools
Overwrite Hard Disk
Machine Configuration
Software Version
Machine Serial Number:xxxxxxxxxx
Current System Software
0.210.0
Website:
Press the Machine Status button on the control panel.
1.
Copy
Xerox 700 Digital Color Press
Network Scanning
Home
Web Applications
This product will allow you to make copies and perform a number of other operations which may include sending E-mails, faxes, and storing documents in electronic forms, depending on what Services it is equipped with.Press any button to select a service.
Touch the Machine Information tab.2.
Touch the Print Reports button.3.
Machine Information
Faults Supplies Billing Information
Print Reports
Paper Tray Status
Machine Status
Tools
Overwrite Hard Disk
Machine Configuration
Software Version
Machine Serial Number:xxxxxxxxxx
Current System Software
0.210.0
Website:
13Xerox 700 Digital Color Press
Reports

Quick Start Guide
An example of a typical Print Reports screen is shown here.
To print any of the reports shown, simply touch the corresponding report button on the touch screen, then press the Start button on the control panel.
NOTE: The reports available will differ depending on your machine configuration.
Xerox 700 Digital Color Press14
Close
Job Status
Print Reports
Copy Reports
Scan Reports

The Billing Meters feature provides access to machine usage and billing information. The meters vary depending on your machine configuration and setup.
Press the Machine Status button on the control panel.
1.
Touch the Billing Information tab.2.
15Xerox 700 Digital Color Press
Machine Information
Faults Supplies Billing Information
Print Reports
Paper Tray Status
Machine Status
Tools
Overwrite Hard Disk
Machine Configuration
Software Version
Machine Serial Number:xxxxxxxxxx
Current System Software
0.210.0
Website:
Copy
Xerox 700 Digital Color Press
Network Scanning
Home
Web Applications
This product will allow you to make copies and perform a number of other operations which may include sending E-mails, faxes, and storing documents in electronic forms, depending on what Services it is equipped with.Press any button to select a service.
Billing Meters

Quick Start Guide
Machine Information
Faults Supplies Billing Information
Usage Counters
Machine Status
Tools
Machine Serial Number UGW22222
Color Impressions 5608
7209
1601
Total Impressions
Black Impressions
Counter Count
The Billing Meters information is shown here. Customers can view the various billing meters, and machine serial number for tracking purposes.
This completes the Billing Meters topic.
Xerox 700 Digital Color Press16

17Xerox 700 Digital Color Press
Machine Information
Faults Supplies Billing Information
Machine Status
Tools
System Settings
Setup and Calibration
Accounting
Authentication/Security Settings
Group Features
Machine Clock/Timers
Audio Tones
Screen/Button Settings
Paper Tray Settings
Reports
Image Quality Adjustments
Common Service Settings
Copy Service Settings
Scan Service Settings
Network Controller Settings
The system administrator tools enable the system administrator to set-up, customize and maintain the machine. Some of the settings in this function are critical to the operation of the machine so the screens are password protected so that they cannot be accidentally changed or corrupted.
Use these tools to:
- Set-up the initial settings and system configuration - Change the factory settings or defaults. - Perform basic maintenance tasks. - Perform a variety of system tests.
The next few screens briefly explain the function of each tool or set of tools.
System Administrator Menu Overview

Quick Start Guide
Copy
Xerox 700 Digital Color Press
Network Scanning
Home
Web Applications
This product will allow you to make copies and perform a number of other operations which may include sending E-mails, faxes, and storing documents in electronic forms, depending on what Services it is equipped with.Press any button to select a service.
Xerox 700 Digital Color Press18
Press the Log In/Out button on the control panel.
1.
Copy
Xerox 700 Digital Color Press
Network Scanning
Home
Web Applications
This product will allow you to make copies and perform a number of other operations which may include sending E-mails, faxes, and storing documents in electronic forms, depending on what Services it is equipped with.Press any button to select a service.
Enter the System Administrator's Login ID in the field provided.
2.
Touch Enter on the touch screen.3.
Press the Machine Status button on the control panel.
4.
Touch the Tools tab.5.

Quick Start Guide
19Xerox 700 Digital Color Press
Machine Information
Faults Supplies Billing Information
Machine Status
Tools
System Settings
Setup and Calibration
Accounting
Authentication/Security Settings
Group Features
Stored Programing
Create Job Flow Sheet
Create Job Flow Sheet Keyword
Paper Tray Attributes
Setup
Calibration
Machine Information
Faults Supplies Billing Information
Machine Status
Tools
System Settings
Setup and Calibration
Accounting
Authentication/Security Settings
Group Features
Machine Clock/Timers
Audio Tones
Screen/Button Settings
Paper Tray Settings
Reports
Image Quality Adjustments
Common Service Settings
Copy Service Settings
Scan Service Settings
Network Controller Settings
The System Settings menu allows administrators to access submenus for Common Settings, Copy Mode Settings, Scan Mode Settings, and Network Controller Settings.
The Setup and Calibration menu allows administrators to access settings for Stored Programming, Job Flow Sheets, and Paper Tray Attributes. This screen also provides access to a calibration tool for optimizing the quality of copy and print jobs.

Quick Start Guide
Xerox 700 Digital Color Press20
Machine Information
Faults Supplies Billing Information
Machine Status
Tools
System Settings
Setup and Calibration
Accounting
Authentication/Security Settings
Group
Create/ViewUser Accounts
Reset User Accounts
System Administrator'sMeter (Copy Job)
Accounting Type
Auto Reset of UserBilling Information
Copy Activity Report
Machine Information
Faults Supplies Billing Information
Machine Status
Tools
System Settings
Setup and Calibration
Accounting
Authentication/Security Settings
Group Features
System Administrator Login ID
System Administrator Passcode
System Administrator Settings
Authentication
Allow User to Disable Active Settings
Job Status Default
Overwrite Hard Disk
The Accounting menu allows you to set restrictions on users using specific machine features, or set restrictions on individual users.
The Authentication/Security Settings menu allows you to set the system administrator ID and system administrator password used to enter System Administration mode.

Open the paper tray.1.
Fan the sheets before loading them into the tray. Register the stack of paper or media against the right side of the tray. The paper or media must not be loaded above the maximum fill line.
2.
21Xerox 700 Digital Color Press
Trays 1, 2, and 3 can take 550 sheets of 20lb. from 8.5"x5.5" to 11"x17" paper in a variety of different media stock.
The following procedure shows you how to load Tray 1 with 8.5"x11" paper.
Caution: A paper jam may occur if a tray is opened while it is being used to feed stock.
Loading Paper and Media
Quick Start Guide
3. The paper guides in the trays must be adjusted so that they touch the stock.
4. To position the right side guide, squeeze the clamp mechanism and slide the guide to touch the edge of the stock.
5. To position the front and rear guides, squeeze the clamp mechanism and slide the guide to touch the edge of the stock.
Xerox 700 Digital Color Press22

Quick Start Guide
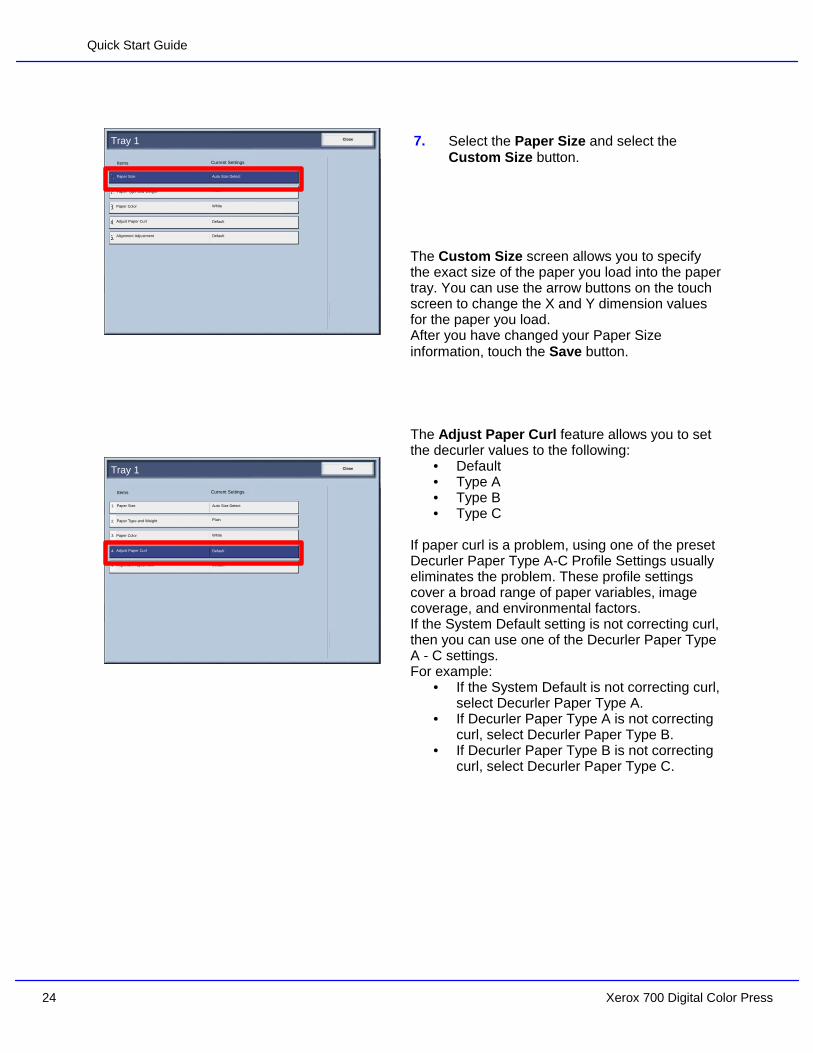
Whenever you change paper in a paper tray, you will need to change the paper type and paper size values on the Paper Tray Settings screen.
If enabled by your System Administrator, the Paper Tray settings screen may be displayed on the touch screen.
Select the Change Settings button.
The Paper Type options allow you to select the paper type (Heavyweight, Transparency, Tabs, Hole Punched, etc.) from a list of available paper types.
The Paper Size options allow you to specify the size of the paper you load into the paper tray.The Auto Size Detect option allows standard sized paper loaded in the trays to be automatically detected by the machine.
6..CancelTray 1 Confirm
Change Settings
8.5"x11"PlainHeavyweight
White
23Xerox 700 Digital Color Press
Quick Start Guide
The Adjust Paper Curl feature allows you to set the decurler values to the following:
Default•Type A•Type B•Type C•
If paper curl is a problem, using one of the preset Decurler Paper Type A-C Profile Settings usually eliminates the problem. These profile settings cover a broad range of paper variables, image coverage, and environmental factors.If the System Default setting is not correcting curl, then you can use one of the Decurler Paper Type A - C settings.For example:
If the System Default is not correcting curl, •select Decurler Paper Type A.If Decurler Paper Type A is not correcting •curl, select Decurler Paper Type B.If Decurler Paper Type B is not correcting •curl, select Decurler Paper Type C.
Select the Paper Size and select the Custom Size button.
The Custom Size screen allows you to specify the exact size of the paper you load into the paper tray. You can use the arrow buttons on the touch screen to change the X and Y dimension values for the paper you load.After you have changed your Paper Size information, touch the Save button.
7.
Off
Default
Off
Default
Paper Size
Close
Image Enhancement
Items Current Settings
Tray 1
Auto Size Detect
Paper Type and Weight
White
Plain
Adjust Paper Curl
Alignment Adjustment
Background Suppression:
Paper Color
Off
Default
Off
Default
Paper Size
Close
Image Enhancement
Items Current Settings
4.
3.
2.
5.
1.
Tray 1
Auto Size Detect
Paper Type and Weight
White
Plain
Adjust Paper Curl
Alignment Adjustment
Background Suppression:
Paper Color
Xerox 700 Digital Color Press24

1. Replace the toner cartridge while the machine
is on. Open the toner cover, located just above the machine front door.
CAUTION: Before you begin the procedure, ensure that the machine has been allowed to cool down. Failure to do so may result in burns if certain parts of the machine are touched.
2. Lay paper on the floor before removing the
cartridge. This will allow any excess toner to fall on the paper. Hold the handle of the color indicated in the message, and gently pull it out.
3. Remove the toner cartridge by holding the
handle on the top of the cartridge while gently pulling it straight out. Be careful to not get toner on clothing.
4. Dispose the toner cartridge as normal office waste or recycle the cartridge.
Replacing the Toner Cartridges
25Xerox 700 Digital Color Press

Quick Start Guide
5. Remove the new toner cartridge from its
packaging.
6. Gently tilt the new cartridge up and down, and
then left and right to redistribute the toner.
7. Install the toner cartridge by aligning the
arrows on the cartridge evenly with the printer until you hear a click.
8. Close the Front Door. If the door will not close
completely, make sure the cartridge is in the lock position and the toner cartridge is installed into the appropriate toner location.
CAUTION:Never use a vacuum cleaner when you clean spilled toner. It can cause explosion as the toner fills the vacuum cleaner and gets sparks. Use a broom or a cloth moistened with a neutral detergent.
That completes the procedure for replacing the toner cartridge.
Xerox 700 Digital Color Press26

