xlsform tutorial...or_other construct for large scale data collection efforts. see the relevant...
TRANSCRIPT

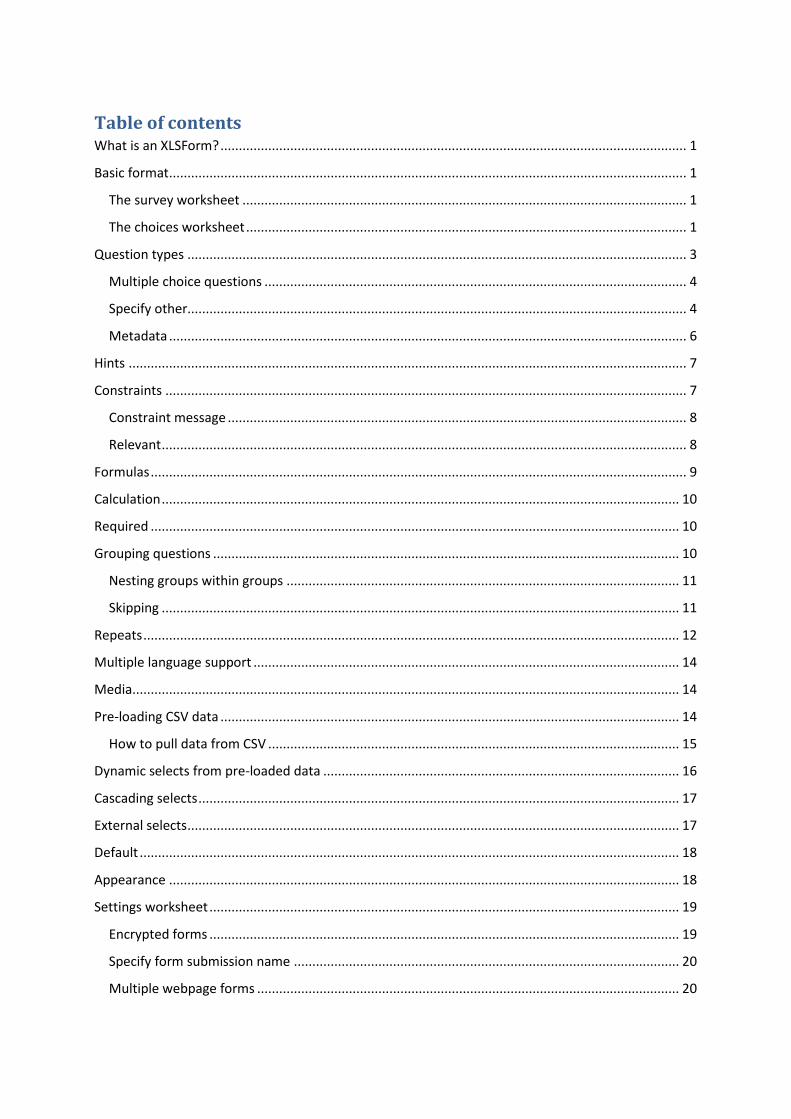
Table of contents What is an XLSForm? ............................................................................................................................... 1
Basic format ............................................................................................................................................. 1
The survey worksheet ......................................................................................................................... 1
The choices worksheet ........................................................................................................................ 1
Question types ........................................................................................................................................ 3
Multiple choice questions ................................................................................................................... 4
Specify other........................................................................................................................................ 4
Metadata ............................................................................................................................................. 6
Hints ........................................................................................................................................................ 7
Constraints .............................................................................................................................................. 7
Constraint message ............................................................................................................................. 8
Relevant ............................................................................................................................................... 8
Formulas .................................................................................................................................................. 9
Calculation ............................................................................................................................................. 10
Required ................................................................................................................................................ 10
Grouping questions ............................................................................................................................... 10
Nesting groups within groups ........................................................................................................... 11
Skipping ............................................................................................................................................. 11
Repeats .................................................................................................................................................. 12
Multiple language support .................................................................................................................... 14
Media ..................................................................................................................................................... 14
Pre-loading CSV data ............................................................................................................................. 14
How to pull data from CSV ................................................................................................................ 15
Dynamic selects from pre-loaded data ................................................................................................. 16
Cascading selects ................................................................................................................................... 17
External selects ...................................................................................................................................... 17
Default ................................................................................................................................................... 18
Appearance ........................................................................................................................................... 18
Settings worksheet ................................................................................................................................ 19
Encrypted forms ................................................................................................................................ 19
Specify form submission name ......................................................................................................... 20
Multiple webpage forms ................................................................................................................... 20

Grid theme forms .............................................................................................................................. 21
Advanced notes ..................................................................................................................................... 21
Visually combining notes ................................................................................................................... 21
Styling notes ...................................................................................................................................... 21
Platforms/Tools that support XLSForms ............................................................................................... 22
More resources ..................................................................................................................................... 22
About this site ....................................................................................................................................... 22
History ................................................................................................................................................... 22

1
What is an XLSForm?
XLSForm is a form standard created to help simplify the authoring of forms in Excel.
Authoring is done in a human readable format using a familiar tool that almost everyone
knows - Excel. XLSForms provide a practical standard for sharing and collaborating on
authoring forms. They are simple to get started with but allow for the authoring of complex
forms by someone familiar with the syntax described below.
The XLSForm is then converted to an XForm, a popular open form standard that allows you
to author a form with complex functionality like skip logic in a consistent way across a
number of web and mobile data collection platforms. XLSForms are compatible with the
subset of XForm functionality supported by Javarosa Project. XLSForms are supported by a
number of popular data collection platforms.
Basic format
Each Excel workbook usually has two worksheets: survey and choices. A third optional
worksheet called settings can add additional specifications to your form and is described
below.
The survey worksheet
This worksheet gives your form its overall structure and contains most of the content of the
form. It contains the full list of questions and information about how they should appear in the
form. Each row usually represents one question; however, there are certain other features
described below that you can add to the form to improve the user experience.
The choices worksheet
This worksheet is used to specify the answer choices for multiple choice questions. Each row
represents an answer choice. Answer choices with the same list name are considered part of a
related set of choices and will appear together for a question. This also allows a set of choices
to be reused for multiple questions (for example, yes/no questions).
Both of these worksheets have a set of mandatory columns that must be present for the form
to work. Additionally, each worksheet has a set of optional columns that allow further control
over the behavior of each entry in the form, but are not essential to have. Every entry must
have values for each of the mandatory columns, but the optional columns may be left blank.

2
• The survey worksheet has 3 mandatory columns: type, name, and label.
o The type column specifies the type of entry you are adding.
o The name column specifies the unique variable name for that entry. No two
entries can have the same name.
o The label column contains the actual text you see in the form. Alternatively,
label translation columns (see below) can be used.
• The choices worksheet has 3 mandatory columns as well: list name, name, and label.
o The list name column lets you group together a set of related answer choices,
i.e., answer choices that should appear together under a question.
o The name column specifies the unique variable name for that answer choice.
o The label column shows the answer choice exactly as you want it to appear on
the form. Alternatively, label translation columns can be used.
The columns you add to your Excel workbook, whether they are mandatory or optional, may
appear in any order. Optional columns may be left out completely. Any number of rows may
be left blank. All .xls file formatting is ignored, so you can use dividing lines, shading, and
other font formatting to make the form more readable.
One thing to keep in mind when authoring forms in Excel is that the syntax you use must be
precise. For example, if you write Choices or choice instead of choices, the form won’t work.

3
Question types
XLSForm supports a number of question types. These are just some of the options you can
enter in the type column in the survey worksheet in your XLSForm:
Question type Answer input
integer Integer (i.e., whole number) input.
decimal Decimal input.
text Free text response.
select_one [options] Multiple choice question; only one answer can be selected.
select_multiple [options] Multiple choice question; multiple answers can be selected.
note Display a note on the screen, takes no input.
geopoint Collect a single GPS coordinates.
geotrace Record a line of two or more GPS coordinates.
geoshape Record a polygon of multiple GPS coordinates; the last point is the same as the first
point.
date Date input.
time Time input.
dateTime Accepts a date and a time input.
image Take a picture.
audio Take an audio recording.
video Take a video recording.
barcode Scan a barcode, requires the barcode scanner app to be installed.
calculate Perform a calculation; see the Calculation section below.
acknowledge Acknowledge prompt that sets value to “OK” if selected.
For example, to collect the name and GPS coordinates of a store, you would write the
following:
survey
type name label
text store_name What is the name of this store?
geopoint store_gps Collect the GPS coordinates of this store.
See the question_types XLSForm for a look at each question type being used in a form.

4
Multiple choice questions
XLSForm supports both select_one (select only one answer) and select_multiple (select
multiple answers) questions. Writing a multiple choice question requires adding a choices
worksheet to your Excel workbook. Here is an example of a select_one question:
survey
type name label
select_one yes_no likes_pizza Do you like pizza?
choices
list name name label
yes_no yes Yes
yes_no no No
Note that the yes_no in the survey worksheet must match the yes_no in the list name column
in the choices worksheet. This ensures that the form displays the correct list of answer choices
for a particular question.
We can also add multiple choice questions that allow multiple answers to be selected, like so:
survey
type name label
select_multiple pizza_toppings favorite_toppings What are your favorite pizza toppings?
choices
list name name label
pizza_toppings cheese Cheese
pizza_toppings pepperoni Pepperoni
pizza_toppings sausage Sausage
Specify other
For multiple choice questions, surveys often include an option of marking other when their
answer choice is not listed. Then they are usually asked to specify the other option. This is
possible through XLSForm by including or_other after the answer choice list name in the
survey worksheet. The choices worksheet stays the same. See below:
survey
type name label
select_multiple pizza_toppings or_other favorite_topping What are your favorite pizza toppings?
choices
list name name label
pizza_toppings cheese Cheese
pizza_toppings pepperoni Pepperoni
pizza_toppings sausage Sausage

5
Click on the link to look at the complete pizza_questionnaire.
Caveat
When you export data using this or_other option, in the favorite_topping column, you will
see a value other. A separate column will have the answer for the questions in which the user
selected other. This makes data analysis more cumbersome, so we do not recommend the
or_other construct for large scale data collection efforts. See the Relevant section below for
an alternative method more appropriate for large scale projects.

6
Metadata
XLSForm has a number of data type options available for metadata collection:
Metadata type Meaning
start Start date and time of the survey.
end End date and time of the survey.
today Day of the survey.
deviceid IMEI (International Mobile Equipment Identity)
subscriberid IMSI (International Mobile Subscriber Identity)
simserial SIM serial number.
phonenumber Phone number (if available).
Note that some metadata fields only apply for mobile phone-based forms.
If I wanted my survey to collect all of these metadata, I would put the following at the
beginning of the survey:
survey
type name label
start start
end end
today today
deviceid deviceid
subscriberid subscriberid
simserial simserial
phonenumber phonenumber
Notice that there are no labels associated with the metadata question types. This is because the
phone captures these variables automatically. These questions will not appear on the screen of
the phone, but you will see them when viewing your submitted survey data. The Tutorial
XLSForm shows how metadata is used in a form.
7
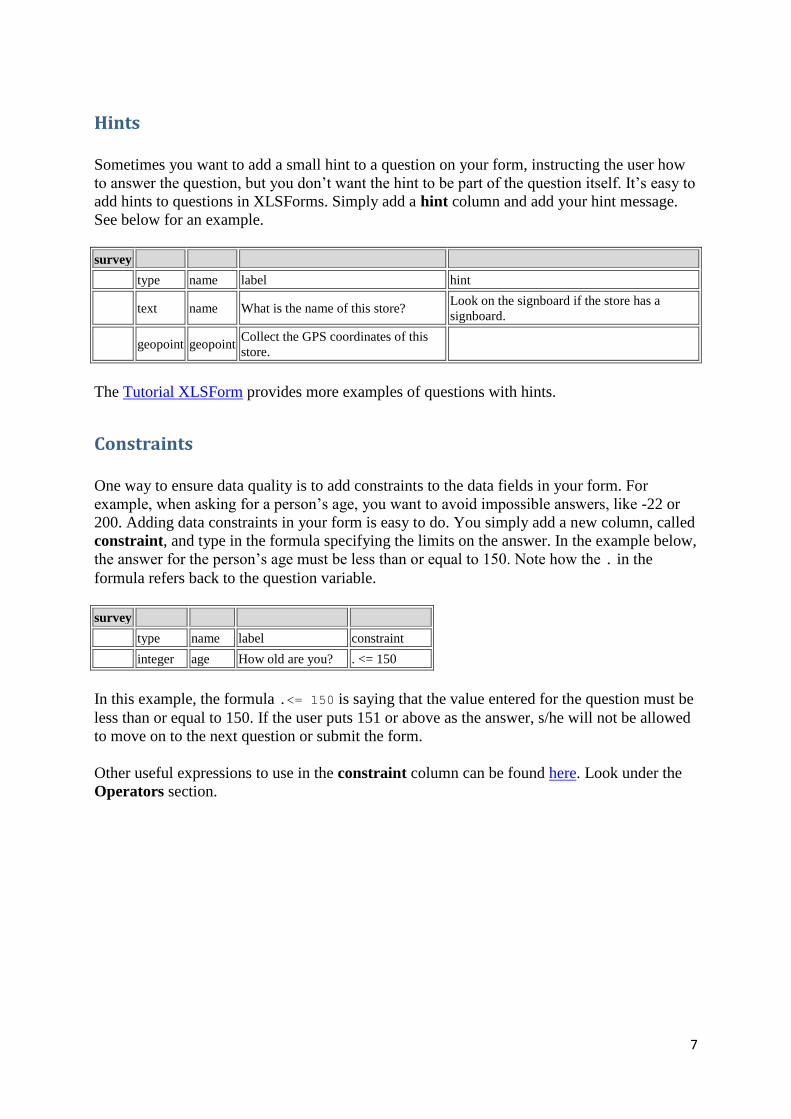
Hints
Sometimes you want to add a small hint to a question on your form, instructing the user how
to answer the question, but you don’t want the hint to be part of the question itself. It’s easy to
add hints to questions in XLSForms. Simply add a hint column and add your hint message.
See below for an example.
survey
type name label hint
text name What is the name of this store? Look on the signboard if the store has a
signboard.
geopoint geopoint Collect the GPS coordinates of this
store.
The Tutorial XLSForm provides more examples of questions with hints.
Constraints
One way to ensure data quality is to add constraints to the data fields in your form. For
example, when asking for a person’s age, you want to avoid impossible answers, like -22 or
200. Adding data constraints in your form is easy to do. You simply add a new column, called
constraint, and type in the formula specifying the limits on the answer. In the example below,
the answer for the person’s age must be less than or equal to 150. Note how the . in the
formula refers back to the question variable.
survey
type name label constraint
integer age How old are you? . <= 150
In this example, the formula .<= 150 is saying that the value entered for the question must be
less than or equal to 150. If the user puts 151 or above as the answer, s/he will not be allowed
to move on to the next question or submit the form.
Other useful expressions to use in the constraint column can be found here. Look under the
Operators section.

8
Constraint message
If you want to include a message with your constraint, telling the user why the answer is not
accepted, you can add a constraint_message column to your form. See the example below.
survey
type name label constraint constraint_message
integer respondent_age Respondent’s age . >=18 Respondent must be 18 or older to
complete the survey.
In this example, if the user enters an age less than 18, then the error message in the
constraint_message column appears. More examples on constraints have been illustrated in
this XLSForm.
Relevant
One great feature of XLSForm is the ability to skip a question or make an additional question
appear based on the response to a previous question. Below is an example of how to do this
by adding a relevant column for a select_one question, using our pizza topping example from
before:
survey
type name label relevant
select_one yes_no likes_pizza Do you like pizza?
select_multiple pizza_toppings or_other favorite_topping Favorite toppings ${likes_pizza} = ‘yes’
In this example, the respondent is asked, “Do you like pizza?” If the answer is yes, then the
pizza topping question appears below. Note the ${ } around the variable likes_pizza. These
are required in order for the form to reference the variable from the previous question.
In the next example, below, we use relevant syntax for a select_multiple question, which is
slightly different from the select_one question example above.
survey
type name label relevant
select_one yes_no likes_pizza Do you like pizza?
select_multiple
pizza_toppings or_other favorite_topping Favorite toppings ${likes_pizza} = ‘yes’
text favorite_cheese What is your favorite
type of cheese?
selected(${favorite_topping},
‘cheese’)
choices
list name name label
pizza_toppings cheese Cheese
pizza_toppings pepperoni Pepperoni
pizza_toppings sausage Sausage
9
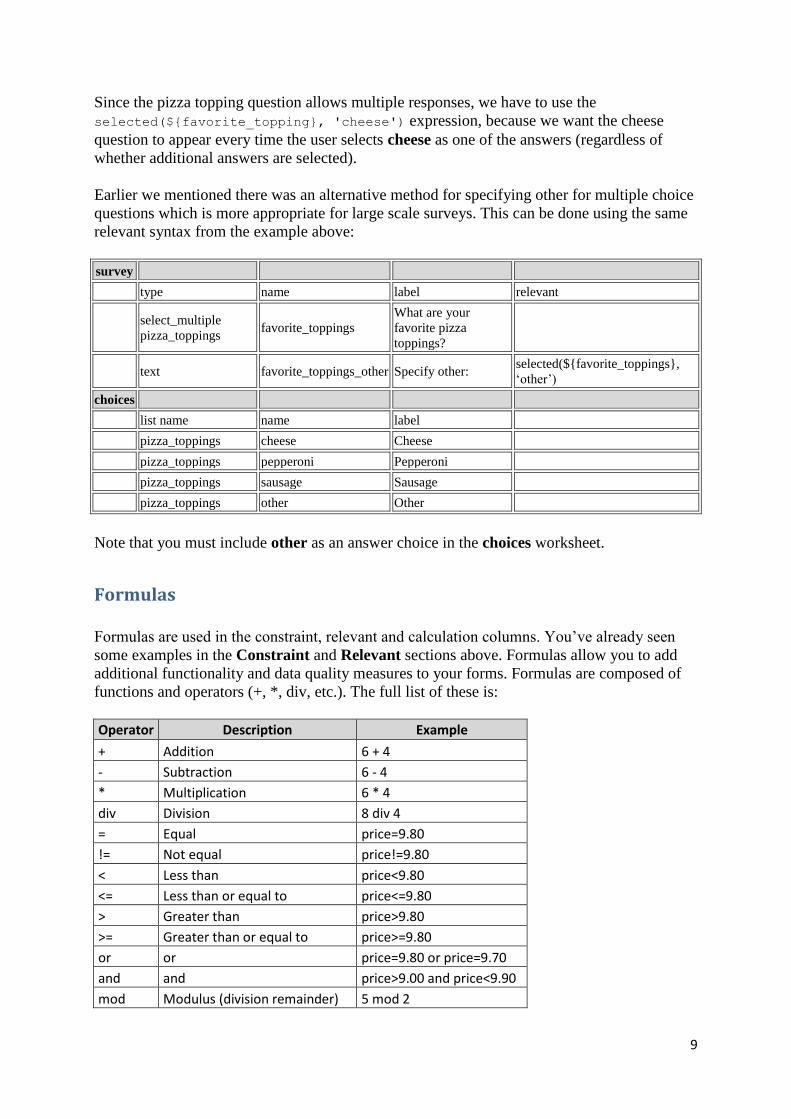
Since the pizza topping question allows multiple responses, we have to use the
selected(${favorite_topping}, 'cheese') expression, because we want the cheese
question to appear every time the user selects cheese as one of the answers (regardless of
whether additional answers are selected).
Earlier we mentioned there was an alternative method for specifying other for multiple choice
questions which is more appropriate for large scale surveys. This can be done using the same
relevant syntax from the example above:
survey
type name label relevant
select_multiple
pizza_toppings favorite_toppings
What are your
favorite pizza
toppings?
text favorite_toppings_other Specify other: selected(${favorite_toppings},
‘other’)
choices
list name name label
pizza_toppings cheese Cheese
pizza_toppings pepperoni Pepperoni
pizza_toppings sausage Sausage
pizza_toppings other Other
Note that you must include other as an answer choice in the choices worksheet.
Formulas
Formulas are used in the constraint, relevant and calculation columns. You’ve already seen
some examples in the Constraint and Relevant sections above. Formulas allow you to add
additional functionality and data quality measures to your forms. Formulas are composed of
functions and operators (+, *, div, etc.). The full list of these is:
Operator Description Example
+ Addition 6 + 4
- Subtraction 6 - 4
* Multiplication 6 * 4
div Division 8 div 4
= Equal price=9.80
!= Not equal price!=9.80
< Less than price<9.80
<= Less than or equal to price<=9.80
> Greater than price>9.80
>= Greater than or equal to price>=9.80
or or price=9.80 or price=9.70
and and price>9.00 and price<9.90
mod Modulus (division remainder) 5 mod 2

10
Calculation
Your survey can perform calculations using the values of preceding questions. In most cases
this will require inserting a calculate question. For example, in the survey below, we have
calculated the tip for a meal and displayed it to the user:
survey
type name label calculation
decimal amount What was the price of the meal?
calculate tip ${amount} * 0.18
note display 18% tip for your meal is: ${tip}
Note that the ${tip} in the last line will be replaced with the actual tip amount when viewing
and filling out the form.
Required
It’s simple to mark certain questions as required in your form. Marking them as required
means the user will not be able to move on to the next question or submit the form without
entering an answer for that question.
To make questions required, add a required column to your survey worksheet. Under that
column, mark questions as required by writing yes. See the example below:
survey
type name label constraint required
integer age How old are you? . <= 150 yes
Grouping questions
To create a group of questions in your form try the following:
survey
type name label
begin group respondent Respondent
text name Enter the respondent’s name
text position Enter the respondent’s position within the school.
end group
This is a good way to group related questions for data export and analysis. Notice how end
group doesn’t require a name or label, because it is hidden in the form.

11
Nesting groups within groups
Groups of questions can be nested within one another:
survey
type name label
begin group hospital Hospital
text name What is the name of this hospital?
begin group hiv_medication HIV Medication
select_one yes_no have_hiv_medication Does this hospital have HIV medication?
end group
end group
You always have to end the most recent group that was created first. For instance, the first
end group you see closes the HIV medication group, and the second one closes the beginning
hospital group. When working with groups and you keep getting error messages when trying
to upload your form, double-check that for each begin group you have one end group.
Skipping
One neat feature of XLSForm is the ability to skip a group of questions by combining the
group feature with relevant syntax. If you want to skip a group of questions all at once, put the
relevant attribute at the beginning of a group like follows:
type name label relevant
integer age How old are you?
begin group child Child ${age} <= 5
integer muac Record this child’s mid-upper arm circumference.
select_one yes_no mrdt Is the child’s rapid diagnostic test positive?
end group
In this example, the two child group questions (muac and mrdt) will only appear if the
child’s age from the first question is less than or equal to five.
12
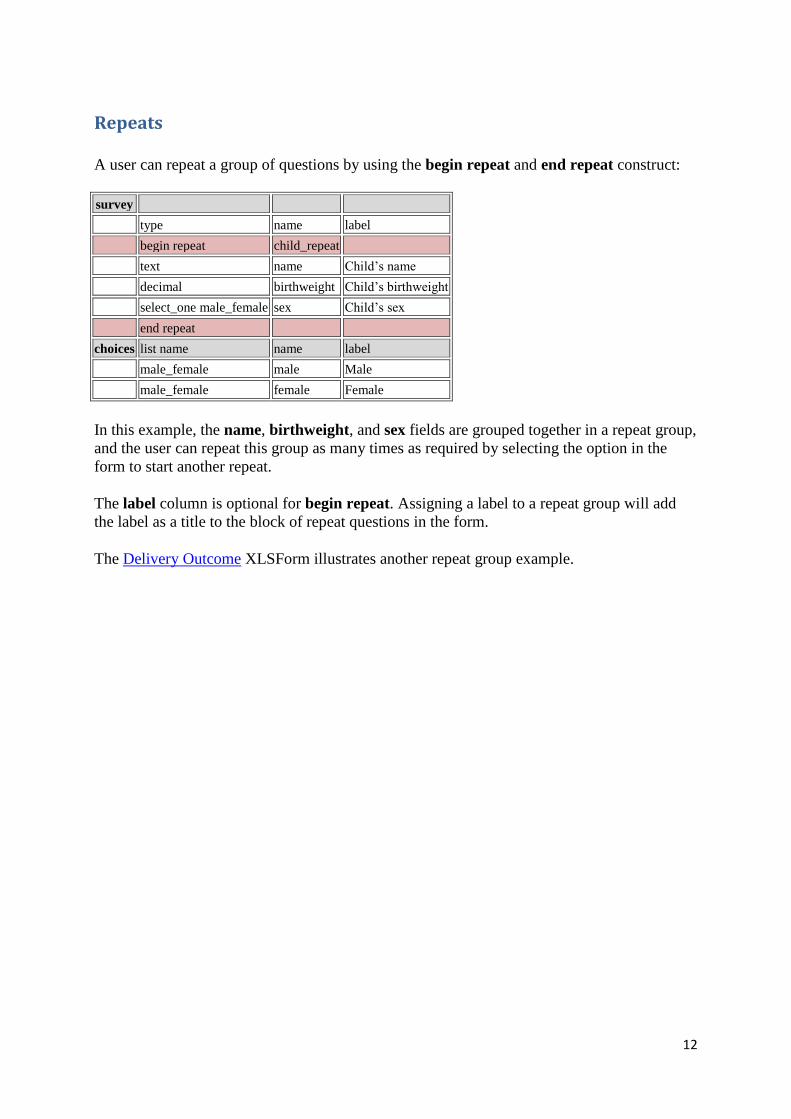
Repeats
A user can repeat a group of questions by using the begin repeat and end repeat construct:
survey
type name label
begin repeat child_repeat
text name Child’s name
decimal birthweight Child’s birthweight
select_one male_female sex Child’s sex
end repeat
choices list name name label
male_female male Male
male_female female Female
In this example, the name, birthweight, and sex fields are grouped together in a repeat group,
and the user can repeat this group as many times as required by selecting the option in the
form to start another repeat.
The label column is optional for begin repeat. Assigning a label to a repeat group will add
the label as a title to the block of repeat questions in the form.
The Delivery Outcome XLSForm illustrates another repeat group example.
13
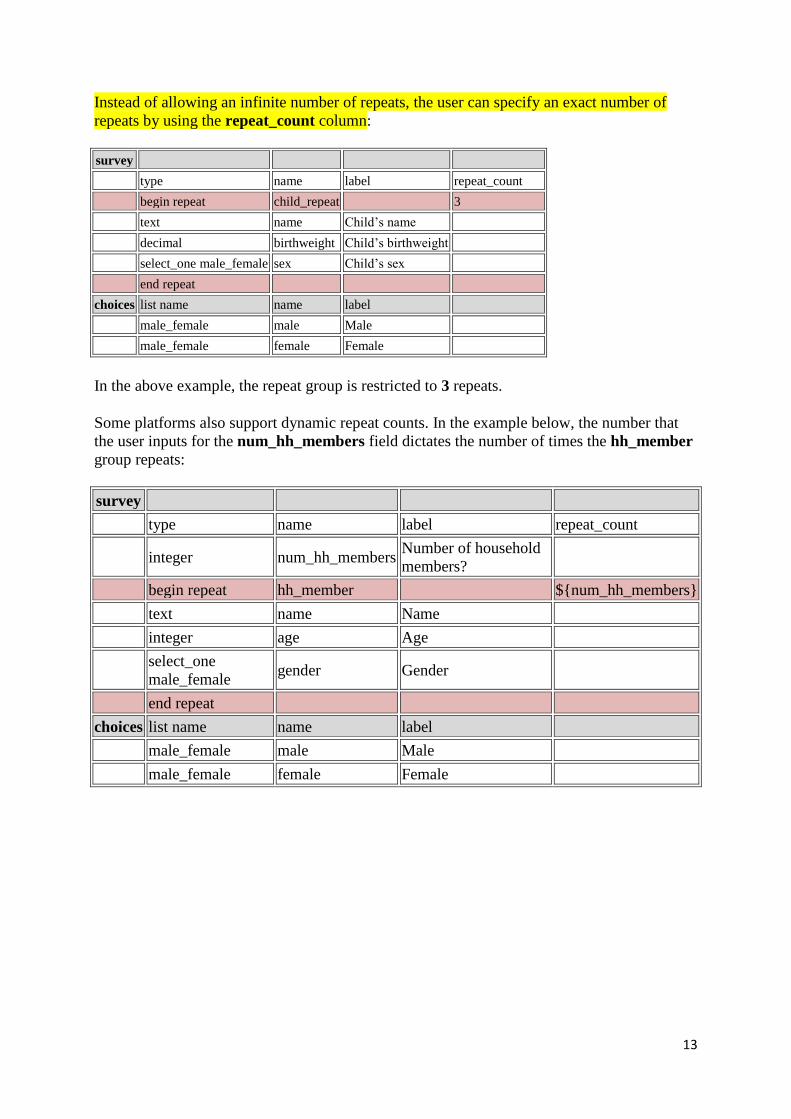
Instead of allowing an infinite number of repeats, the user can specify an exact number of
repeats by using the repeat_count column:
survey
type name label repeat_count
begin repeat child_repeat 3
text name Child’s name
decimal birthweight Child’s birthweight
select_one male_female sex Child’s sex
end repeat
choices list name name label
male_female male Male
male_female female Female
In the above example, the repeat group is restricted to 3 repeats.
Some platforms also support dynamic repeat counts. In the example below, the number that
the user inputs for the num_hh_members field dictates the number of times the hh_member
group repeats:
survey
type name label repeat_count
integer num_hh_members Number of household
members?
begin repeat hh_member ${num_hh_members}
text name Name
integer age Age
select_one
male_female gender Gender
end repeat
choices list name name label
male_female male Male
male_female female Female

14
Multiple language support
It’s easy to add multiple languages to a form. You simply have to name your
label::language1, label::language2, etc., and your forms will be available in multiple
languages. See the example below. To select a different language on the phone, press the
Menu key, and theChange Language option. For the form below, English and Español will
show up as the possible options.
survey
type name label::English label::Español constraint
integer age How old are you? ¿Cuántos años tienes? . <= 150
Note
You can also add a different language column for hints and media files; you simply use the
::language construct again. See the XLSForm standard document to see exactly what kinds
of column headers can accept a language modification.
Media
You can include questions in your form that display images or that play video or audio files.
If using the ODK mobile client for form submission, you need to put the media files that you
want to include in the /odk/forms/formname-media folder on your phone, and then reference
the exact file name in the media column in your form. See below for an example of how to do
this.
survey
type name label media::image media::video
note media_example Media example example.jpg example.mp4
Check out the Birds XLSForm which illustrates the use of media files. You can also click on
the link to see the Birds webform .
Pre-loading CSV data
Pre-loading data is done when one wants to reference pre-existing data in a survey form. You
can be able to reference data in your survey form (the survey you are now authoring), from a
pre- existing data in a specific survey form or any other source. For example if you have pre-
existing data from a household survey and you want to collect follow-up data about the
household occupants. You can be able to reference the household survey data in your survey
form. To reference pre-existing data in a survey form:
• Upload one or more .csv files as support files when you upload your form definition
(the same way you upload media support files as explained in the Media section).The
first row of each .csv file should be a header that includes short:

15
o unique names for each column
o subsequent rows which should contain the data itself
Each csv file should contain at least one column that can be used to uniquely identify each
row. Such columns will be used, at survey time, to look up which row’s data to pull into the
survey. For the columns that will be used for looking up rows add _key to the end of the
column name in the first row. Any columns with names ending in _key will be indexed for
faster look-ups on your survey devices. See below an example of the columns on a .csv file:
name_key name
mango Mango
orange Orange
How to pull data from CSV
You can be able to pull data from .csv file by including one or more .csv files in your form
during the survey time. For each data field that you want to pull into your survey:
• Add a calculate field to your survey.
• Give that field a name
• Then in its calculation column, call the pulldata() function, indicating which field to
pull from which row of which .csv file.
See below for an example:
survey
type name label calculation
calculate fruit pulldata(‘fruits’, ‘name’,’name’, ‘mango’)
note note_fruit The fruit ${fruit} pulled from csv
Once you have loaded .csv data into a survey field using the pulldata() function, you can
reference that field in later relevance conditions, constraints, and labels, just as you would
reference any other field that was filled in by the user.
Click on the link to see an example of a pre-loading sample form and the .csv file used with
form can be found here
Important notes on usage of pre-loaded data
• Compress a large .csv file into a .zip archive before uploading it.
• Save .csv file in UTF-8 format if pre-loaded data contains non-English fonts or
special characters this enables your Android device to render the text correctly.
• Data fields pulled from a .csv file are considered to be text strings therefore use the
int() or number() functions to convert a pre-loaded field into numeric form.
• If the .csv file contains sensitive data that you may not want to upload to the server,
upload a blank .csv file as part of your form, then replace it with the real .csv file by
hand-copying the file onto each of your devices.

16
Dynamic selects from pre-loaded data
Once your form has one or more pre-loaded .csv files, you can dynamically pull the choice
lists for select_one and select_multiple fields from those .csv files. Multiple-choice fields
with dynamic choice lists follow the same general syntax as regular, static select_one and
select_multiple fields as previously covered in the Multiple choice questions section.
The following should be done:
• specify select_one listname or select_multiple listname in the type column (where
listname is the name of your choice list)
• specify any special appearance styles in the appearance column
• include one or more rows for your listname on the choices worksheet.
Below is an example of the survey worksheet:
survey
type name labe appearance
select_one fruits fruits Select a fruit search(‘fruits’)
There are three differences when the choice list should be pulled from one of your pre-loaded
.csv files:
• In the appearance column:
• Include a search() expression that specifies which .csv rows to include in the choice
list.
• If the field should use a non-default appearance style. The non-default appearance
style goes into the column first, followed by a space, then the search() expression.
[e.g., quick search()]
• On the choices worksheet:
• a row should indicate which .csv columns to use for the label and selected value. As
follows:
o list_name column: specify the name of your choice list as you normally
would.
o name column: include the name of the .csv column to use for uniquely
identifying selected choices.
o label column: include the name of the .csv column to use for labeling the
choices.
Note:
If you wish to include multiple columns in the labels, include a comma-
separated list of all columns to include. The name column will be dynamically
populated based on the column name you put there, and the label column will
be dynamically populated based on the column name(s) you put there.
• In your choices worksheet row, you may also include a .csv column name in the image
column. If you do, the image filename to use will be pulled from the specified .csv
column.
Note:
If you refer to image files in this way, you must always upload those image files as
17
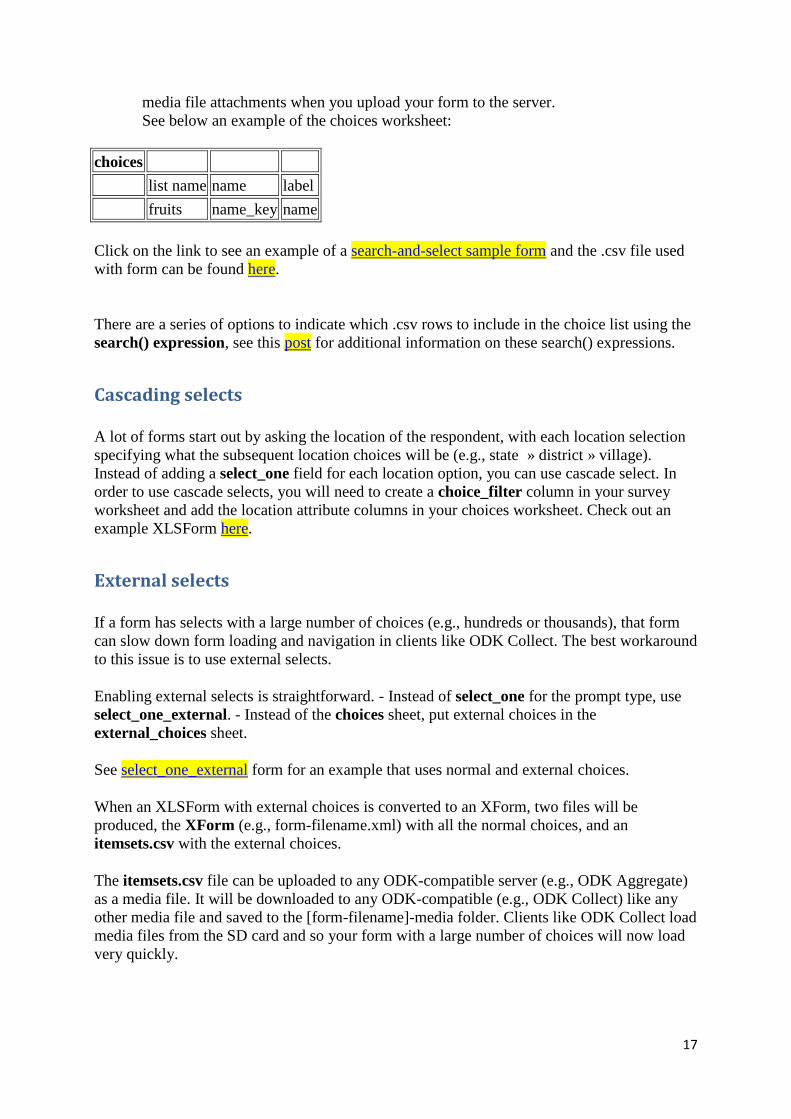
media file attachments when you upload your form to the server.
See below an example of the choices worksheet:
choices
list name name label
fruits name_key name
Click on the link to see an example of a search-and-select sample form and the .csv file used
with form can be found here.
There are a series of options to indicate which .csv rows to include in the choice list using the
search() expression, see this post for additional information on these search() expressions.
Cascading selects
A lot of forms start out by asking the location of the respondent, with each location selection
specifying what the subsequent location choices will be (e.g., state » district » village).
Instead of adding a select_one field for each location option, you can use cascade select. In
order to use cascade selects, you will need to create a choice_filter column in your survey
worksheet and add the location attribute columns in your choices worksheet. Check out an
example XLSForm here.
External selects
If a form has selects with a large number of choices (e.g., hundreds or thousands), that form
can slow down form loading and navigation in clients like ODK Collect. The best workaround
to this issue is to use external selects.
Enabling external selects is straightforward. - Instead of select_one for the prompt type, use
select_one_external. - Instead of the choices sheet, put external choices in the
external_choices sheet.
See select_one_external form for an example that uses normal and external choices.
When an XLSForm with external choices is converted to an XForm, two files will be
produced, the XForm (e.g., form-filename.xml) with all the normal choices, and an
itemsets.csv with the external choices.
The itemsets.csv file can be uploaded to any ODK-compatible server (e.g., ODK Aggregate)
as a media file. It will be downloaded to any ODK-compatible (e.g., ODK Collect) like any
other media file and saved to the [form-filename]-media folder. Clients like ODK Collect load
media files from the SD card and so your form with a large number of choices will now load
very quickly.
18
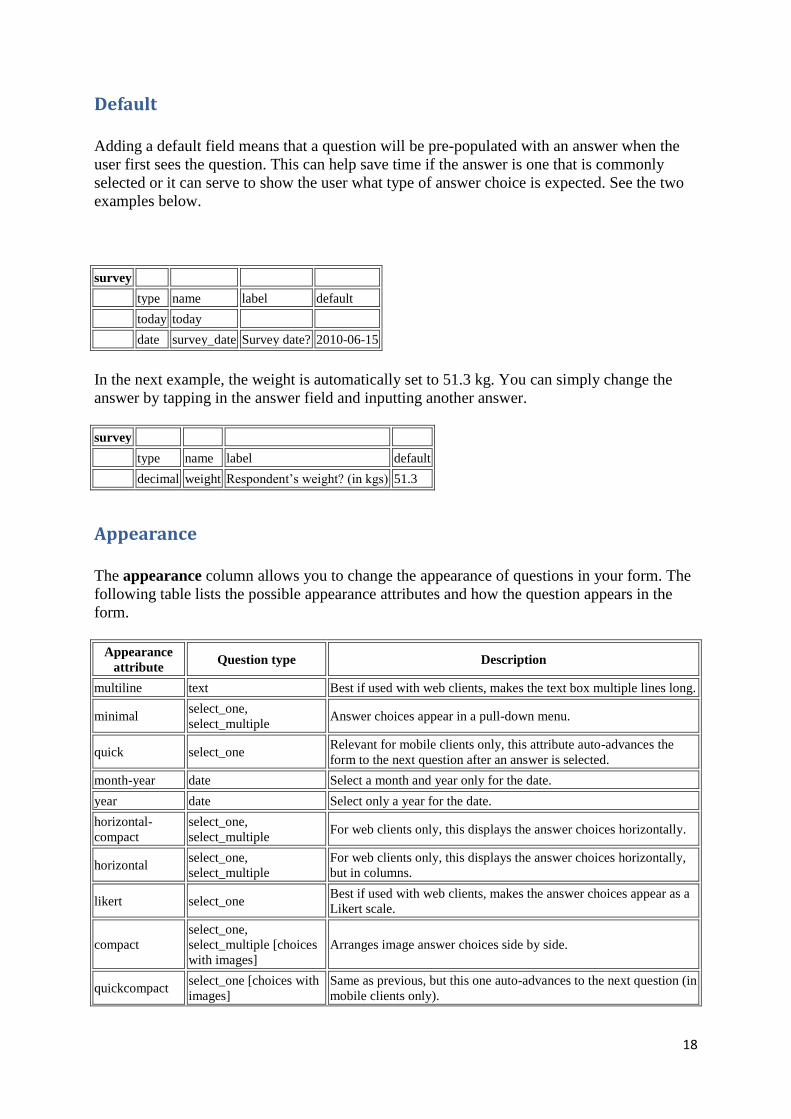
Default
Adding a default field means that a question will be pre-populated with an answer when the
user first sees the question. This can help save time if the answer is one that is commonly
selected or it can serve to show the user what type of answer choice is expected. See the two
examples below.
survey
type name label default
today today
date survey_date Survey date? 2010-06-15
In the next example, the weight is automatically set to 51.3 kg. You can simply change the
answer by tapping in the answer field and inputting another answer.
survey
type name label default
decimal weight Respondent’s weight? (in kgs) 51.3
Appearance
The appearance column allows you to change the appearance of questions in your form. The
following table lists the possible appearance attributes and how the question appears in the
form.
Appearance
attribute Question type Description
multiline text Best if used with web clients, makes the text box multiple lines long.
minimal select_one,
select_multiple Answer choices appear in a pull-down menu.
quick select_one Relevant for mobile clients only, this attribute auto-advances the
form to the next question after an answer is selected.
month-year date Select a month and year only for the date.
year date Select only a year for the date.
horizontal-
compact
select_one,
select_multiple For web clients only, this displays the answer choices horizontally.
horizontal select_one,
select_multiple
For web clients only, this displays the answer choices horizontally,
but in columns.
likert select_one Best if used with web clients, makes the answer choices appear as a
Likert scale.
compact
select_one,
select_multiple [choices
with images]
Arranges image answer choices side by side.
quickcompact select_one [choices with
images]
Same as previous, but this one auto-advances to the next question (in
mobile clients only).

19
Appearance
attribute Question type Description
field-list groups Entire group of questions appear on one screen (for mobile clients
only).
label select_one,
select_multiple Displays answer choice labels (and not inputs).
list-nolabel select_one,
select_multiple
Used in conjunction with label attribute above, displays the answer
inputs without the labels (make sure to put label and list-nolabel
fields inside a group with field-list attribute if using mobile client).
table-list groups
An easier way to achieve the same appearance as above, apply this
attribute to the entire group of questions (might slow down the form
a bit).
signature image Allows you to trace your signature into your form (mobile clients
only).
draw image Allows you to sketch a drawing with your finger on the mobile
device screen.
An XLSForm with all of the appearance attributes in this table is available here.
Settings worksheet
The settings worksheet is optional, but it allows you to further customize your form,
including encrypting your form or setting an overall style theme to your form, among others.
An example settings worksheet is below:
settings
form_title form_id public_key submission_url default_language
Example
Title example_id IIBIjANBg…
https://example-odk-
aggregate.appspot.com/submission English
The column headings in this example settings worksheet do the following:
• form_title: The title of the form that is shown to users. The form title is pulled from
form_id if form_title is blank or missing.
• form_id: The name used to identify the form submission. The form id is pulled from
the XLS file name if form_id is blank or missing.
• public_key: For encrypted forms, this is where the public key is copied and pasted.
• submission_url: For encrypted forms, this url specifies the server where finalized
forms are submitted to.
• default_language: In localized forms, this sets which language should be used as the
default.
Encrypted forms
Encrypted forms provide a mechanism to keep your data private using http for
communication. Form submissions sent to the Aggregate server are encrypted and completely
inaccessible to anyone not possessing the private key.
20
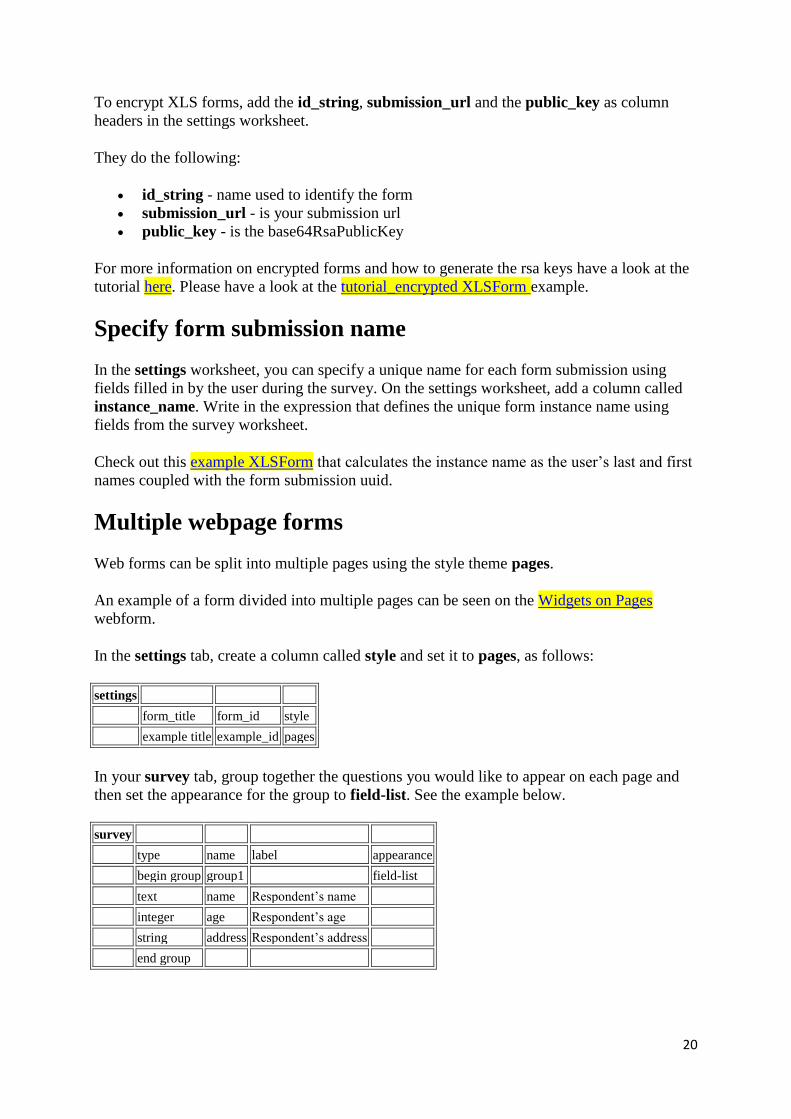
To encrypt XLS forms, add the id_string, submission_url and the public_key as column
headers in the settings worksheet.
They do the following:
• id_string - name used to identify the form
• submission_url - is your submission url
• public_key - is the base64RsaPublicKey
For more information on encrypted forms and how to generate the rsa keys have a look at the
tutorial here. Please have a look at the tutorial_encrypted XLSForm example.
Specify form submission name
In the settings worksheet, you can specify a unique name for each form submission using
fields filled in by the user during the survey. On the settings worksheet, add a column called
instance_name. Write in the expression that defines the unique form instance name using
fields from the survey worksheet.
Check out this example XLSForm that calculates the instance name as the user’s last and first
names coupled with the form submission uuid.
Multiple webpage forms
Web forms can be split into multiple pages using the style theme pages.
An example of a form divided into multiple pages can be seen on the Widgets on Pages
webform.
In the settings tab, create a column called style and set it to pages, as follows:
settings
form_title form_id style
example title example_id pages
In your survey tab, group together the questions you would like to appear on each page and
then set the appearance for the group to field-list. See the example below.
survey
type name label appearance
begin group group1 field-list
text name Respondent’s name
integer age Respondent’s age
string address Respondent’s address
end group

21
See this blog post for more information on creating multi-page web forms. The XLSForm
source is here.
Grid theme forms
The theme-grid style allows your form to mimic the look of traditional paper surveys by
compacting multiple questions into one row. This style is best used with larger screens (e.g.,
computers or tablets). It also makes a nice print out!
Please click on the link to see an example of a Grid theme webform.
To create a Grid form, in the settings tab, under the style column, write theme-grid, as
follows:
settings
form_title form_id style
example title example_id theme-grid
In your survey tab, group together the questions you would like to appear in each section and
then set the appearance for each field according to the desired width (the default width is 4).
See the example below.
survey
type name label appearance
begin group group1
text name Respondent’s name w3
integer age Respondent’s age w1
string address Respondent’s address w4
end group
See this blog post for more information on creating Grid forms. The Grid theme XLSForm
example is here.
Advanced notes
Visually combining notes
The XLSForm format only allows one of each type of media (image, video, audio) to be
added to a note question (ie, you cannot have more than one media file or type in a single
note field). To work around this limitation, subsequent notes will now be visually merged
together so that they appear as one note in your form. Practically speaking, this means you
can include multiple note fields one after another in your XLSForm. When viewing the form,
the notes will automatically appear as one note. See the example web form here, and the
XLSForm source here.
Styling notes

22
XLSForm supports a limited subset of Markdown syntax for styling notes in your form.
• emphasize words by wrapping them inside _ or *
• strongly emphasize words by wrapping them inside __ or **
• a link can be added by using [name of link](url)
• add a line break where you want it with Ctrl-Enter or Ctrl-Alt-Enter (may be different
key combination for some spreadsheet software)
Check out the blog post on styling and combining notes here.
Platforms/Tools that support XLSForms
• Open Data Kit (ODK)
• Formhub
• Ona
• SurveyCTO
• Enketo
• Kobo ToolBox
• CommCare
• Nafundi’s XLSForm Offline
• Nathan Breit’s xlsform.exe
• DataWinners
More resources
The XLSform standard document can guide you through the specific input types, column
headers, and so on that are legitimate syntax in XLSForms. If you want to dig in deeper to
understand XForms and go beyond XLSForms, here are some resources to understand them:
• Form guidelines: http://code.google.com/p/opendatakit/wiki/XFormDesignGuidelines
• Form design tutorial: https://bitbucket.org/javarosa/javarosa/wiki/buildxforms
• Sample forms: http://code.google.com/p/opendatakit/source/browse/?repo=forms
• Formhub University
• Ona Form Gallery
• XForms as supported by JavaRosa: https://bitbucket.org/javarosa/javarosa/wiki/xform-
jr-compat
About this site
XLSForm.org is a community-supported project aiming to create a common reference point
for the XLSForm standard.
History
The XLSForm was originally developed by Andrew Marder and Alex Dorey of the
Sustainable Engineering Lab at Columbia University. As XLSForms became adopted by the

23
ODK Community, SEL worked with the ODK Team at the University of Washington to
develop the current specification. PyXForm, the library used to convert XLSForms to
XForms, is an open source project supported by members of ODK, SEL, Ona, SurveyCTO,
and Kobo.
This site will help you author XLSForms. XLSForm is a tool used to simplify the creation of
forms. XLSForm will convert forms authored in Excel into XForms that can be used with a
number of web or mobile platforms.