xnth user guide - c105417.r17.cf3.rackcdn.comc105417.r17.cf3.rackcdn.com/xnth_documentation v1.739...
TRANSCRIPT
1 ©2010 Visual Media Systems LLC PRELIMINARY DRAFT
XNTH USER GUIDE
VISUAL MEDIA SYSTEMS LLC Los Angeles, CA
2 ©2010 Visual Media Systems LLC PRELIMINARY DRAFT
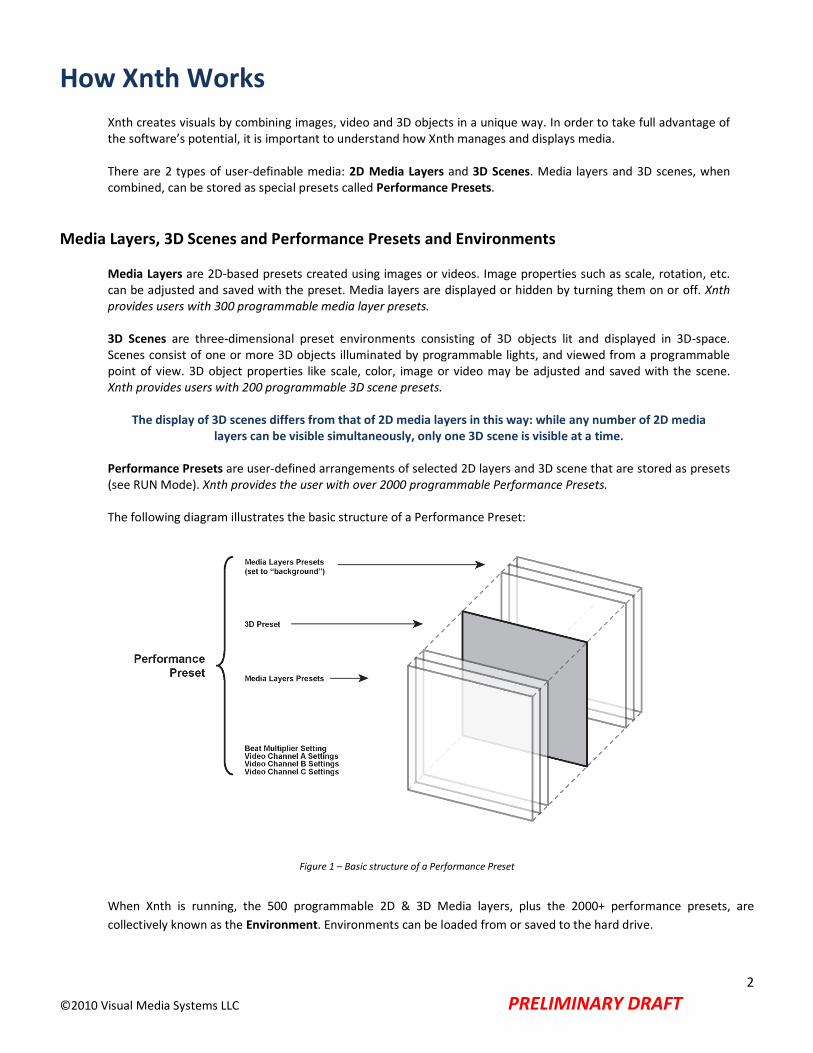
How Xnth Works Xnth creates visuals by combining images, video and 3D objects in a unique way. In order to take full advantage of the software’s potential, it is important to understand how Xnth manages and displays media. There are 2 types of user-definable media: 2D Media Layers and 3D Scenes. Media layers and 3D scenes, when combined, can be stored as special presets called Performance Presets.
Media Layers, 3D Scenes and Performance Presets and Environments
Media Layers are 2D-based presets created using images or videos. Image properties such as scale, rotation, etc. can be adjusted and saved with the preset. Media layers are displayed or hidden by turning them on or off. Xnth provides users with 300 programmable media layer presets. 3D Scenes are three-dimensional preset environments consisting of 3D objects lit and displayed in 3D-space. Scenes consist of one or more 3D objects illuminated by programmable lights, and viewed from a programmable point of view. 3D object properties like scale, color, image or video may be adjusted and saved with the scene. Xnth provides users with 200 programmable 3D scene presets.
The display of 3D scenes differs from that of 2D media layers in this way: while any number of 2D media
layers can be visible simultaneously, only one 3D scene is visible at a time.
Performance Presets are user-defined arrangements of selected 2D layers and 3D scene that are stored as presets (see RUN Mode). Xnth provides the user with over 2000 programmable Performance Presets. The following diagram illustrates the basic structure of a Performance Preset:
Figure 1 – Basic structure of a Performance Preset
When Xnth is running, the 500 programmable 2D & 3D Media layers, plus the 2000+ performance presets, are collectively known as the Environment. Environments can be loaded from or saved to the hard drive.

3 ©2010 Visual Media Systems LLC PRELIMINARY DRAFT
The Media Folders
Xnth accesses different media types through its media folders located in the VMS/Xnth folder in the user’s “Documents” (or “My Documents”) folder.
The graphics hardware in current day 3D video cards performs best when images are optimized to X/Y dimensions that are in ‘powers-of-two’. This goes for video as well as image files. For this reason, Xnth limits access to images, video and 3D geometry to the following media folders:
My Documents\VMS\Xnth\AVI Although virtually any size AVI can be used, because of 3D hardware performance considerations, a power-of-two dimension is preferred. Since every non-power-of-two video frame must be internally re-sized to a power-of-two resolution first, AVIs rendered to one of the following resolutions bypass this step and perform much better:
• 256x256 • 512x512 • 1024x1024
Xnth utilizes the Video for Windows (VFW) API to read AVI files. VFW has a 1GB limit for file size so AVIs placed in this folder need to be 1GB or smaller.
My Documents\VMS\Xnth\Bitmaps Although there is no restriction on the dimensions of a bitmap image, a power-of-two dimension is preferred. Bitmaps (i.e. image files) must be in one of the following formats:
• .TGA (RGB/RGBA) • .BMP • .PNG (RGB/RGBA) • .JPG
Xnth can process a special type of image file known as animated or ‘flipbook’ images. When a non-square image file is selected, Xnth will automatically analyze the image and determine if a series of frames can be constructed into an animated sequence. Following the power-of-two rule on image dimensions, the following image dimensions would be processed as animated image sequences: • 256x2048 – processed as a 256x256 flipbook image with 8 frames of animation. • 512x1024 – processed as a 512x512 flipbook image with 2 frames of animation. • 64x4096 – processed as a 64x64 flipbook image with 64 frames of animation.
My Documents\VMS\Xnth\Meshes 3D Meshes are in a proprietary format that uses the .VTX file extension. 3D geometry can be imported into Xnth through a 3DStudio Max™ MaxScript™ tool included. See the section on importing user 3D content for more information.
My Documents\VMS\Xnth\MP3 This folder is for MP3 audio files. All bitrates and formats are supported.

4 ©2010 Visual Media Systems LLC PRELIMINARY DRAFT
Xnth.cfg Configuration File
The xnth.cfg is a configuration file used to set startup options for Xnth and is located in:
My Documents\VMS\Xnth\xnth.cfg
These are the default values for all the options in xnth.cfg:
fullscreen:1 dontspan:1 xvideores:1024 yvideores:768 maxcapturex:1024 maxcapturey:1024 videum:0 progressive:1
Option Descriptions
• fullscreen Setting this value to 0 starts Xnth in ‘windowed’ mode that floats over the OS desktop.
Setting this value to 1 (default) starts Xnth in a single-display ‘full screen’ mode.
Setting this value to 2 starts Xnth in dual-display mode. Note that the primary and secondary displays must both be active via the video card’s system settings for this feature to work.
• dontspan Setting this value to 0 “spans” the Xnth’s output across both connected displays for a “double-wide” display format. Note that for this feature to have an effect, ‘fullscreen’ must be set to ‘2’.
Setting this value to 1 (default) “clones” the output on each display when the UI is hidden.
• x/yvideores Sets the X or Y display resolution, respectively for the primary UI and secondary displays. The combination of xvideores and yvideores settings must match a valid resolution on one or both displays or the program will display an error.
• maxcapturex/y Sets the maximum allowable resolution for a video capture device. This value does not need to match a capture resolution – Xnth will automatically choose the highest resolution capture mode that does not go over these values. Specific hardware compatible resolutions can also be specified. Check the xnth.log after running xnth to see what capture modes are available.
• videum Set this value to 1 only if you have a Winnov Videum™ 4x00 series capture card installed on your system.
• progressive This option is used only in conjunction with the videum:1 option. Setting this value to 0 halves the vertical scan lines in order to remove interlacing artifacts from live video. Setting this value to 1 (default) maintains the full interlaced video resolution from live video.

5 ©2010 Visual Media Systems LLC PRELIMINARY DRAFT
Xnth.log File
The Xnth log file is located in My Documents\VMS\Xnth\xnth.cfg and is written to every time the Xnth software closes.
Refer to this file after exiting Xnth for information collected during the last Xnth session.
Some of the information contained in this file includes:
• System PC Specs • Time and date of each event • Available video card screen resolutions • Video capture initialization information • Audio initialization information • Missing asset information • Warnings and errors occurring during the last Xnth session

6 ©2010 Visual Media Systems LLC PRELIMINARY DRAFT
Using the Mouse and Keyboard Using the Mouse
Xnth uses a simple arrow cursor that can be used to activate toggles, press buttons, drag sliders, modify parameter values and more. The user interface responds to single and double left-clicks as well as right-clicks, depending on the situation.
Another way the mouse can be used is as an X/Y controller driving the Mouse Modulator control. Refer to the section, 3D Modulator Bank for more information on using the mouse as a modulator input.
Modifying Parameters
Double-clicking a numerical or alphanumeric parameter allows the user to manually type in a new value for that parameter. To indicate manual entry mode, the value’s window appears red while accepting user input. Pressing ESC key at any time during manual entry will cancel-out any changes and revert the parameter’s value to its previous state. Pressing Enter after completing manual entry commits the new value to the parameter and the value’s window returns to its normal color.
In addition to manual entry, many numerical values in Xnth can also be quickly modified by clicking the value then dragging the mouse up or down to increase or decrease the value.
Zoomable UI (ZUI)
The mouse-wheel can be used to zoom into any part of the UI. Scroll the mouse wheel upward to enlarge the view or scroll downwards to return to normal. Pressing the Esc key while the UI is zoomed-in will return the UI back to normal size. Pressing the Enter key will lock the position of the zoomed UI. Pressing Enter or Esc unlocks the UI view.
Using the QWERTY Keyboard
The keyboard can be used to manually enter alphanumeric values into the many settings and parameters in Xnth. To enter a value into a particular data window, double-click the value with the mouse. The value turns red to indicate that you are in data-entry mode. The value will change as you type alphanumeric characters. If you change your mind and want the data window restored to the value it was prior to editing, simply press the ESC key to cancel-out. The original value will be restored. When finished typing the value, press enter to commit the change.
7 ©2010 Visual Media Systems LLC PRELIMINARY DRAFT
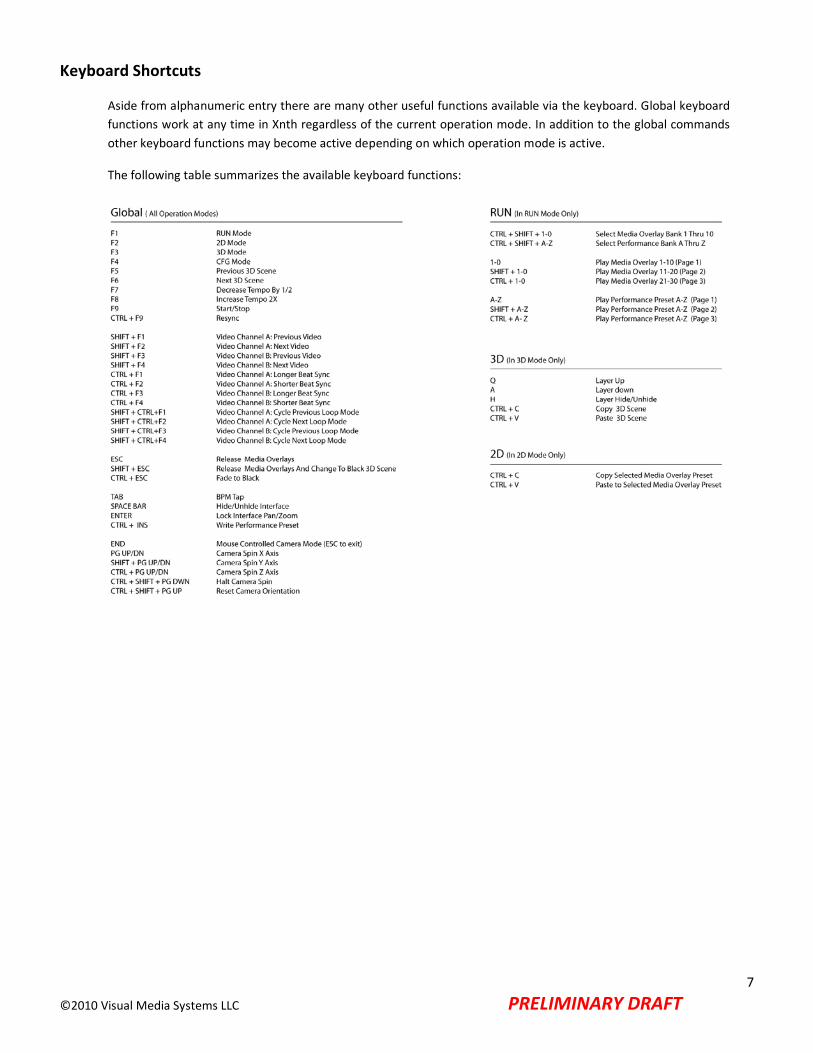
Keyboard Shortcuts
Aside from alphanumeric entry there are many other useful functions available via the keyboard. Global keyboard functions work at any time in Xnth regardless of the current operation mode. In addition to the global commands other keyboard functions may become active depending on which operation mode is active.
The following table summarizes the available keyboard functions:

8 ©2010 Visual Media Systems LLC PRELIMINARY DRAFT
Navigating the UI The Xnth user interface is made up of a context-sensitive “Operational Display” area surrounded by a series of control modules known as the Global UI. The contents of the operational display depend on which Operation Mode is selected.
Figure 2 – The Xnth User Interface
Selecting the Operation Mode
Use the Operation Mode buttons to change the user interface to perform different tasks in Xnth. The contents of the operational display depend on which of the five Operation Modes is selected:
RUN Provides access to the performance preset display 2D Provides access to the 2D editor display 3D Provides access to the 3D editor display CFG Provides access to additional system settings display EXIT Use to exit the software. Prevents accidental exiting of the program

9 ©2010 Visual Media Systems LLC PRELIMINARY DRAFT
The Global Modules The Environment Module
Load and save xnth environments to/from memory by using this module. An ‘active” environment refers to the environment currently loaded into memory.
Figure 5 – The Environment Load/Save Module (needs update)
• Select: Use the up/down arrows to select an environment name. Each name represents a data file stored on the user’s hard drive.
• Load Name: Displays the name of the environment to load.
• Load: Press to load from disk, the environment name shown in the load name window. All data in the currently active environment will be overwritten and lost.
• Save Name: Displays the name of the active environment and performs a number of other functions: To manually enter a new name, double-click the window then type in the desired name followed by
ENTER. Pressing Save (see below) will create a data file on disk using this name. If the name listed appears darkened then it means that the name is unused. You can safely save to disk
without fear of overwriting anything. If the name listed is white it means that the name matches an existing environment on disk - and
pressing save will overwrite the data on disk.
• Save: Press to save the active environment to disk using the name shown in the save name window.
We recommend that you make regular backup copies of your environments by re-naming them.
In addition to media layers, 3D scenes and performance presets, a saved Xnth environment stores the following information:
MIDI mapping configured using the MIDI Learn tool (see MIDI Learn section for more information). The settings in the CFG Mode such as mouse settings and GUI color. The currently loaded MP3. The current performance preset bank. The current media layer bank.

10 ©2010 Visual Media Systems LLC PRELIMINARY DRAFT
The Playback Module
The playback module is used to control the passage of time. The playback of MP3s, AVIs and 3D modulators are performed in conjunction with the playback module. The playback module also establishes a system tempo or BPM (beats per minute) rate and provides different controls for setting adjusting tempo.
Figure 6 – The Playback Module
• Stop: Halts playback.
• Play: Starts or pauses playback.
• Beat Indicator: Provides a visual representation of the current BPM by pulsing in time. Left-click the Beat Indicator to reset modulation and AVI playback to the moment clicked.
• Tempo Multiplier: Halves or doubles the base BPM for the secondary beat (see the section on modulators for more information on BPM and secondary BPM).
• Secondary Beat Indicator: Provides a visual representation of the multiplied tempo BPM.
• Current BPM: Displays the current system BPM. Click/hold the up or down arrows to the left of “Current BPM” to adjust the BPM in fine increments.
• Auto Detect ON/Off: Toggles automatic BPM detection on or off. The Auto BPM feature automatically
calculates the BPM of MP3 or Live audio streams (see “The Audio Module” for more information).
• Detected BPM: Displays the current tempo detected by the Auto BPM system. When this number is red, it means that the Auto BPM system is has not yet acquired a BPM from the audio stream.

11 ©2010 Visual Media Systems LLC PRELIMINARY DRAFT
The Audio Module
Use the Audio Module to access live audio or mp3 audio streams in Xnth. The Audio Module also provides audio spectrum and BPM information for Auto BPM.
Figure 7 – The Audio Module.
• Audio Input Off: Select to disable the audio features in Xnth.
• External Audio Input: Enables audio sampling from the OS’s active recording input.
• MP3 File: Enables playback of the MP3 file that is listed in the MP3 File Name window.
• Volume: Displays the current output volume (0% - 100%). Left-click and drag the mouse up or down to raise or lower the volume, respectively.
• Progress Bar: Provides a visual representation of the current position in the MP3 file. The left side represents the beginning at time 0:00:00 and the right side represents the end of the MP3 file stream. Left-click and drag the mouse within the progress bar to instantly reposition the current playback time point.
• Audio Level Display: Provides a visual representation of the audio spectrum as an MP3 is played. The left-side represents low-frequency activity and the right-side represents high-frequency audio activity. The brightness of the vertical lines represents the audio-level at that frequency.
• MP3 Filename: Displays the file name of the currently selected MP3.
• MP3 Select: Use the up or down arrows to select the next or previous MP3 file. MP3 files are located in the MP3 media folder (see the previous section on Media Folders for more information).
• MP3 Position: Displays the current time offset in hrs:min:sec, based on the current location of the progress bar.

12 ©2010 Visual Media Systems LLC PRELIMINARY DRAFT
The Output Preview Module
The output preview module shows the output currently being generated by Xnth.
Figure 8 – The Output Preview Module
• Preview On/Off: turns the preview window on/off.
• Hide GUI: Press to hide the UI. Press the keyboard SPACEBAR to restore.
• Preview Window: Displays the output image being generated by Xnth. Note that the master fade control does not affect this display.
• FPS: Current video Frames being rendered Per Second.

13 ©2010 Visual Media Systems LLC PRELIMINARY DRAFT
The Media Control Grid
Near the top of the Xnth UI there is a special module called the media control grid (figure 9). The media control grid displays the active state of the 500 user-programmable 2D/3D layers in Xnth. In addition to displaying the on/off status of media layers and the current 3D scene selection, the control grid allows the user to select individual objects for editing using the 2D or 3D editors (see 2D/3D Operation Modes for more information on creating and modifying media layers).
Figure 9 – The Media Control Grid
The two distinct grids within this module represent all of the 3D scenes and all 2D media layers programmable by the user. Although they look similar the two grids behave somewhat differently:
The 3D Scene Grid
• The grid is a 100 x 2 grid of cells for a total of 200 scenes. • The yellow outline around one of the cells indicates that that 3D scene is the one currently being
displayed. Only one 3D scene can be selected at a time. • Left-clicking the cell with the mouse will select that scene for display. • Empty cells represent existing 3D scenes that contain no 3D layers. • Hovering the mouse over a cell previews the scene in the Output Preview Module.
The Media Layer Grid
• The grid is a 100 x 3 grid of cells for a total of 300 media layers. • When a particular layer is triggered, the corresponding cell’s color brightens. Dim colored cells are
untriggered and off. Empty cells are undefined layers. • Left-clicking a cell selects the corresponding layer for editing while in 2D Mode. The selected layer is
indicated by a yellow outline around the cell. Triggering any media layer also makes its cell the current selected layer.
• The yellow outline indicates the last media layer that was triggered or selected. Unlike 3D scenes, any number of media layers can be active at once.
• Right-clicking a will toggle the on/off state of the corresponding media layer. • Black cells represent undefined media layers. • Gray cells represent media layers linked to bitmap images. • Red and Green cells represent media layers linked to the A or B video streams, respectively. • Blue cells represent media layers linked to the C external video stream.

14 ©2010 Visual Media Systems LLC PRELIMINARY DRAFT
Figure 10 – The Video File Stream Modules
15 ©2010 Visual Media Systems LLC PRELIMINARY DRAFT
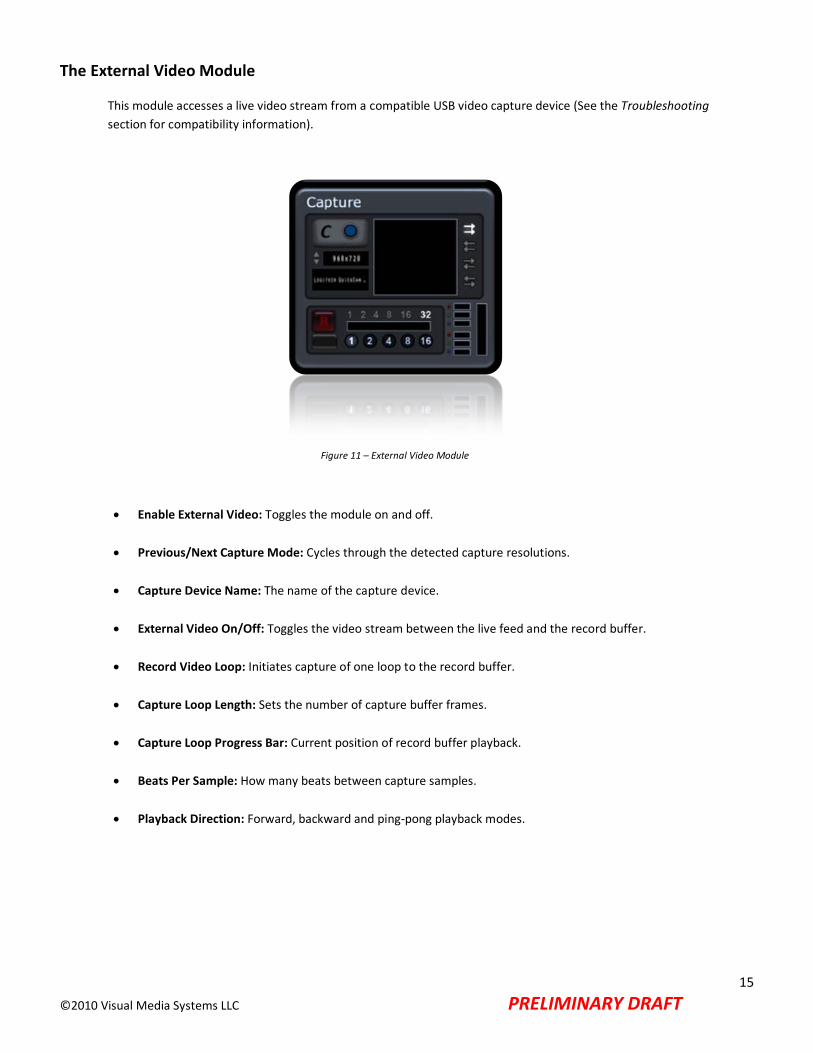
The External Video Module
This module accesses a live video stream from a compatible USB video capture device (See the Troubleshooting section for compatibility information).
Figure 11 – External Video Module
• Enable External Video: Toggles the module on and off.
• Previous/Next Capture Mode: Cycles through the detected capture resolutions.
• Capture Device Name: The name of the capture device.
• External Video On/Off: Toggles the video stream between the live feed and the record buffer.
• Record Video Loop: Initiates capture of one loop to the record buffer.
• Capture Loop Length: Sets the number of capture buffer frames.
• Capture Loop Progress Bar: Current position of record buffer playback. • Beats Per Sample: How many beats between capture samples.
• Playback Direction: Forward, backward and ping-pong playback modes.

16 ©2010 Visual Media Systems LLC PRELIMINARY DRAFT
The System Toolbar
There are additional functions are available on the System Toolbar:
Figure 12 – The System Toolbar
• 3D Grid On/Off: Displays/Hides the coordinate system axis display
• Camera Mode: Switches the current 3D scene camera between free mode and programmed modes.
• MIDI Learn Mode On/Off: Enables/Disables MIDI Learn function.
To assign a MIDI note to a UI button: Enable MIDI Learn. Hover the mouse cursor over the UI button you wich to map to a MIDI note. While hovering over the UI item, simultaneously press the desired note to assign it to that UI item. Assigned items display a green outline with note name and octave.
• Master Fade Trigger: Triggers an automatic fade-in or fade-out of the master output using the current fade-time.
• Master Fade Time: Automatic fade-time measured in tempo beats (i.e., 4.0 = 4 beats at the current BPM)

17 ©2010 Visual Media Systems LLC PRELIMINARY DRAFT
RUN Mode The Run Mode is the most important part of controlling Xnth because it is from here we can recall multi-layered Performance Presets or create new ones.
Figure 13 – The RUN Mode User Interface
• Panic Button: Releases all triggered media layers, except for locked layers.
• Media Layer Lock Toggle: Enabling a layer lock will force the layer to remain triggered indefinitely.
• Tempo Tap Button: Actively measures and adjusts BPM based on a series of synchronized mouse-clicks on each beat. More taps establishes a more precise measurement. After 3 seconds of inactivity, the Temp Tap resets it’s accumulated history of click times, allowing a fresh measurement.

18 ©2010 Visual Media Systems LLC PRELIMINARY DRAFT
RUN Mode Continued…
The Auto-Pilot module provides a simple way to automatically trigger performance presets within a particular performance preset bank.
Figure 14 – The RUN Mode Auto Pilot
• Auto-Pilot On/Off: Starts or stops the Auto-Pilot.
• Tag Presets for Auto-Pilot: When this function is turned on, the mouse can be used to tag and untag any preset in the current bank. Use the Shift and Control keys to access Page-2 and Page-3 for tagging. When Auto-Pilot is enabled, only the tagged presets are chosen during auto-pilot. Each of the 26 performance preset banks stores its own tag information.
• Preset Play Length: Amount of time between preset changes. 1 unit = 4 tempo beats at current BPM.
• Random Order: Presets in the current bank are chosen randomly from all three pages of presets in the current bank.
• Sequential Order: Presets in the current bank are chosen sequentially starting with Page-1 ‘Q’ and moving left to
right across the keyboard, then down the rows until Page-1 ‘M’. This continues for the remaining Page-2 and Page-3, and then repeats.

19 ©2010 Visual Media Systems LLC PRELIMINARY DRAFT
The following illustrates how banks and presets are organized using a QWERTY keyboard:
Figure 15 – Bank and Preset selection

20 ©2010 Visual Media Systems LLC PRELIMINARY DRAFT
2D Mode

21 ©2010 Visual Media Systems LLC PRELIMINARY DRAFT
Media Layer: Bank Grid
Media Layer: Material
22 ©2010 Visual Media Systems LLC PRELIMINARY DRAFT
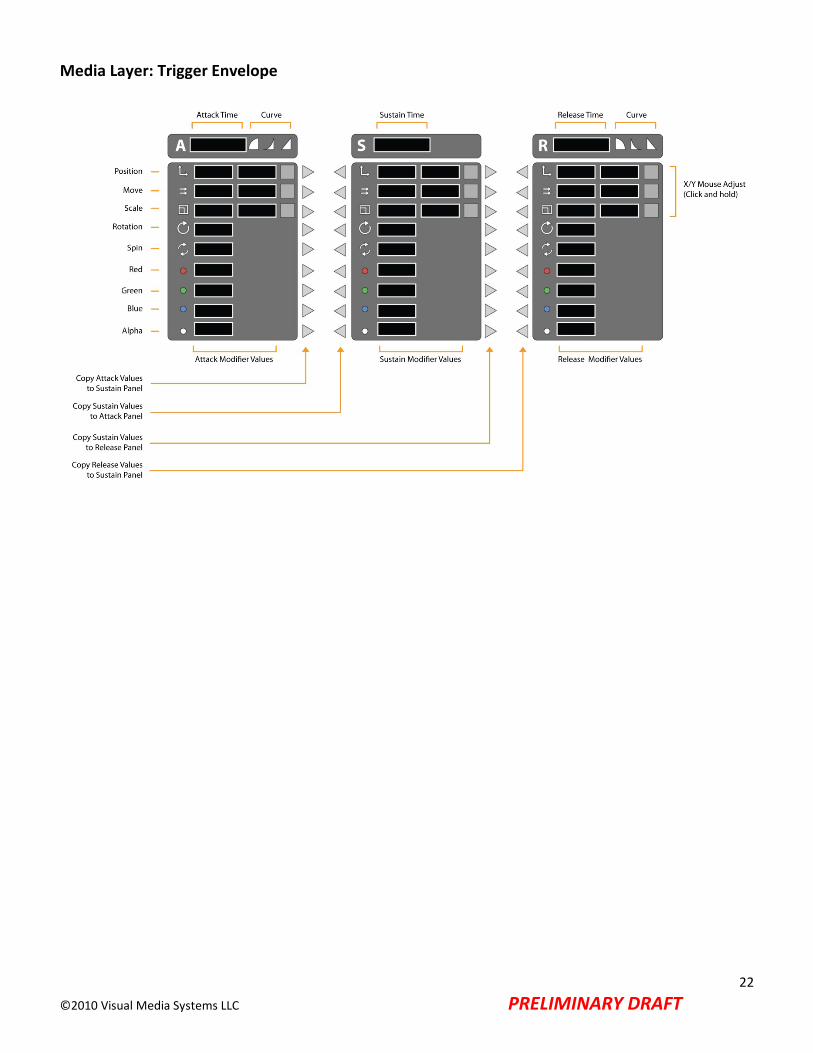
Media Layer: Trigger Envelope

23 ©2010 Visual Media Systems LLC PRELIMINARY DRAFT
3D Mode Overview…

24 ©2010 Visual Media Systems LLC PRELIMINARY DRAFT
3D Scene Bank
The Modulator Bank

25 ©2010 Visual Media Systems LLC PRELIMINARY DRAFT
3D Layers

26 ©2010 Visual Media Systems LLC PRELIMINARY DRAFT
3D Layer: Edit
3D Layer: Material

27 ©2010 Visual Media Systems LLC PRELIMINARY DRAFT
3D Layer: Attributes

28 ©2010 Visual Media Systems LLC PRELIMINARY DRAFT
Scene Trigger and Screen Blur
Scene Background Color and Fog Depth

29 ©2010 Visual Media Systems LLC PRELIMINARY DRAFT
The Scene Camera

30 ©2010 Visual Media Systems LLC PRELIMINARY DRAFT
Scene Lighting

31 ©2010 Visual Media Systems LLC PRELIMINARY DRAFT
CFG Mode Within this panel the user can adjust the values for MIDI channel, mouse size & sensitivity and the UI base color. These values are saved as part of the environment and restore back to the values they were set to at the time an environment was saved.
Figure 4 – Configuration Mode Settings (needs update)
The MIDI display windows shows the state of 128 MIDI controller channels, represented by colored bars with the height indicating the value.

32 ©2010 Visual Media Systems LLC PRELIMINARY DRAFT
Installation Scenarios Single PC
A single PC running the Xnth Visual Media Synthesizer can drive one or two displays (when using a typical dual-head style 3D video card such as the nVidia or ATI series of graphic card adapters).
Figure 1 – Possible Single-PC Installations (needs update)
Multiple PCs Controlled by MIDI Controller
Through MIDI/DMX control, multiple PCs running Xnth can be linked together to create custom display environments:
Figure 2 – Example of a MIDI Controlled Multi-PC Installation