xplornet hub 2 · 2018-11-26 · getting started thank you for signing up with xplornet. your...
TRANSCRIPT

Version 4.0
Xplornet Hub 2.0
User Guide
Xplornet Hub Manual UPDATE DEC 2017


CONTENTS
Getting Started ....................................................................1
Safety Precautions ................................................................2
In the Box .............................................................................3
Indicators .............................................................................4
Ports and Buttons .................................................................5
Connecting Your Xplornet Hub .............................................6
Record Your Xplornet Hub 2.0 GUI Password ........................7
What are the Xplornet Hub 2.0 GUI Password and Default Xplornet SSID names used for? ................................. 7
Connect the Xplornet Hub 2.0 to a Computer .......................8
Activate your Home Phone Service .............................................. 9
Connect the Xplornet Hub 2.0 to your Personal Wireless Router ......................................... 10
Activate your Home Phone Service ............................................ 11
Set Your Own SSID Home Network Name and Passphrase ..12-13
What is the SSID? ...................................................................... 12
Connect a Wireless Device to the Internet ................................. 14
Connection Troubleshooting ...................................................... 15
Xplornet Hub Wi-FI FAQ’s .......................................................... 16
Router Features ......................................................................... 17
Xplornet Home Phone ........................................................ 18
Home Phone Features .......................................................... 18-19
Troubleshooting for Home Phone .........................................19-20
Important 9-1-1 Emergency Services ................................... 21
About Xplornet .................................................................. 22

.

Getting Started
Thank you for signing up with Xplornet. Your Xplornet Hub provides Home Phone and Wi-Fi Router service.
This guide will help you set up your device. Just follow the easy step-by-step instructions and start connecting to what matters to you.
X P L O R N E T H U B U S E R G U I D E 1

X P L O R N E T H U B U S E R G U I D E
Safety Precautions
Before connecting your Xplornet Hub, please read the following safety precautions:
• Always use the power adapter that came with the device.
• Do not put anything on top of the unit.
• Keep the Xplornet Hub dry, clean and well-ventilated.
• Use a soft, dry cloth to clean the device – do not use liquid or spray toclean it.
• Keep the air vent clean and clear of debris and keep all liquid away fromthe device’s surface. Should anything fall into the Xplornet Hub throughthe air vent, it could result in fire or damage to the device.
• To avoid injury, do not open the Xplornet Hub. Tampering with thedevice could void your warranty.
• To prevent unauthorized access into your Wi-Fi network, we recommendyou setup a secure SSID connection with a unique password. Pleasereview page 12 for a step by step guide.
2

X P L O R N E T H U B U S E R G U I D E
Xplornet Hub
AC Power Adapter
RJ-45 LAN Network Cable
RJ-45 WAN Network Cable
RJ-11 Telephone Cable
3
In the Box
You will find the following items included:
If any parts are missing, please contact Xplornet Support:By Email: [email protected]
By Phone: 1-866-841-6001

X P L O R N E T H U B U S E R G U I D E4
Indicators
The following indicators are arranged across the top of the Xplornet Hub.
WLAN refers to the wireless local area network, also known as WiFi. The WiFi function is available only when the Wi-Fi Router service is activated.
WPS refers to the Wi-Fi Protected Setup™, a feature that lets you easily connect WPS-supported client devices (such as wireless printers) to your router wirelessly.
LED Indicator Status Description
PowerSolid Green Hub is powered onSolid Red Hub is not working
Off Hub is powered off
Broadband(The WAN link is established)
Solid Green The link is activatedFlashing Green Data is being transmitted
Off The equipment is not powered on or the WAN port is disabled
InternetSolid Green The connection is established and a correct IP address obtainedSolid Red Internet connection failed
Flashing Green Data is being transmitted
WLANSolid Green The WLAN RF switch is on
Flashing Green Data is being transmittedOff Hub is not powered on or the WLAN RF switch is off
WPS
Solid GreenWPS access is successful. This solid-on light will be automatically off after 5 minutes
Fast Flashing Green The WPS has an errorSlowly Flashing
GreenWLAN is being accessed
OffNo WPS access or the WPS access to the terminal exceeds 5 minutes
Phone
Solid Green Hub has registered on the VoIP networkFlashing Green Indicates when the associated telephone is off-hook
OffHub is not powered on or not been registered on the VoIP network
USBSolid Green
The USB interface is connected and operating in host mode, but no data is being transmitted
Flashing Green Data is being transmitted on the interfaceOff Hub is not powered on or the USB interface is not connected

X P L O R N E T H U B U S E R G U I D E 5
Ports and Buttons
Power plug, on/off switch and ports are located on the back and side of the Xplornet Hub.
Side
Buttons Description
USB USB2.0 host port in right panel: Used for the USB storage device, or printer
On/Off Power switch. Power on or power off the Hub
Back
Ports DescriptionPhone1~Phone2 RJ-11 port is used to connect to the phone through the telephone line
LAN1~LAN4RJ-45 port is used to connect the modem to computer or other network devices
WAN RJ-45 port is used to connect to your Xplornet modem
WPS WLAN Protected Setup
ResetReset button should not be used unless advised by an Xplornet representative. This button is used to restore the factory default settings when pressed for more than 5 seconds.
WLAN Turn the WLAN on or turn off
Power Power supply port is connected to the power adapter

X P L O R N E T H U B U S E R G U I D E6
Connecting Your Xplornet Hub
The Xplornet Hub is your main connection point for your Xplornet Internet service. These steps will guide you in the setup of the Xplornet Hub.
The Xplornet Hub should be the only device directly attached to the Xplornet service modem.
COMPLETE SETUP:
1 USB interface
2 On/Off button
3 Phone interface
4 LAN interface
5 WAN interface
6 WPS button
7 WLAN button
8 Power port
7 863 4 5
ModemComputer
AC Power Adapter
Phone
1
2

Record Your Xplornet Hub 2.0 GUI Password
Before you start connecting cords and plugs be sure to first record or take a photo the last four digits of the D-SN number found on the back of your Xplornet Hub.
What are the Xplornet Hub 2.0 GUI Password and Default Xplornet SSID names used for?
X P L O R N E T H U B U S E R G U I D E 7
Xplornet Hub 2.0 GUI PasswordExample: admin0340
2.4 GHz SSID Default
5 GHz SSID DefaultXplornet Default SSID Names
Xplornet Hub 2.0 GUI Password
You use the combination of the last 4 numbers of your Xplornet Hub 2.0 D-SN serial number with admin, for example: admin0340, to login to your Xplornet Hub 2.0 GUI
Your Xplornet Hub 2.0 GUI is where you can reset your Home Network name (SSID) and Wi-Fi Protected Access (WPA) passphrase which are used to connect wireless devices to the Internet.
For instructions see, Set Your Own SSID Home Network Name and Passphrase, Page 12
Xplornet Default SSID Names
You look for the SSID Name (your Home Network name) in your wireless device’s Wi-Fi settings to make the connection.
To get you started, Xplornet provides you with default SSID names and WPA passphrases (listed as WLAN Security on the sticker) for both your 2.4 and 5 GHz channels. We recommend that you change these default settings.
For instructions see, Connect a Wireless Device to the Internet, Page 14
My Xplornet Hub 2.0 GUI PasswordRecord the last four numbers of your serial number for your password:
GUI Browser URL 192.168.219.1 Username Admin Password admin _____________
X P L O R N E T H U B U S E R G U I D E8
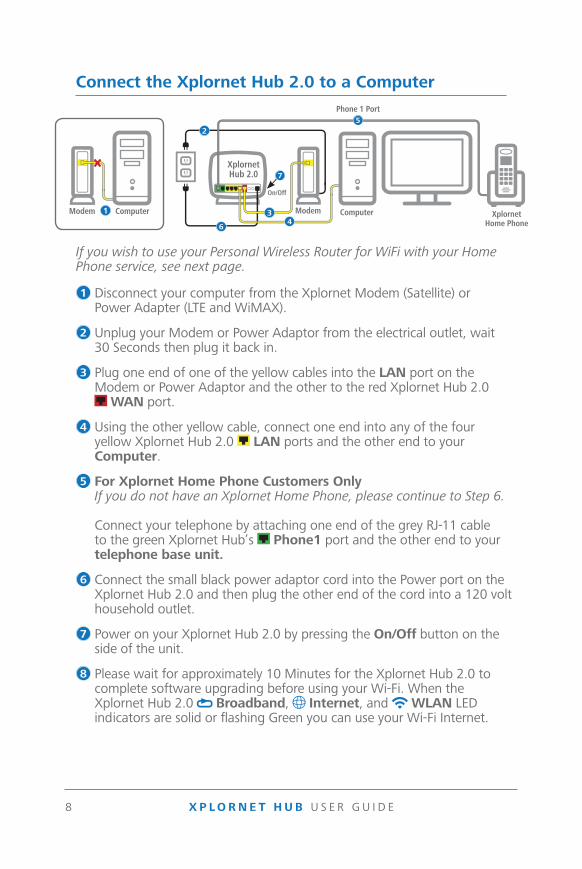
Connect the Xplornet Hub 2.0 to a Computer
If you wish to use your Personal Wireless Router for WiFi with your Home Phone service, see next page.
1 Disconnect your computer from the Xplornet Modem (Satellite) or Power Adapter (LTE and WiMAX).
2 Unplug your Modem or Power Adaptor from the electrical outlet, wait 30 Seconds then plug it back in.
3 Plug one end of one of the yellow cables into the LAN port on the Modem or Power Adaptor and the other to the red Xplornet Hub 2.0
WAN port.
4 Using the other yellow cable, connect one end into any of the four yellow Xplornet Hub 2.0 LAN ports and the other end to your Computer.
5 For Xplornet Home Phone Customers Only If you do not have an Xplornet Home Phone, please continue to Step 6.
Connect your telephone by attaching one end of the grey RJ-11 cable to the green Xplornet Hub’s Phone1 port and the other end to your telephone base unit.
6 Connect the small black power adaptor cord into the Power port on the Xplornet Hub 2.0 and then plug the other end of the cord into a 120 volt household outlet.
7 Power on your Xplornet Hub 2.0 by pressing the On/Off button on the side of the unit.
8 Please wait for approximately 10 Minutes for the Xplornet Hub 2.0 to complete software upgrading before using your Wi-Fi. When the Xplornet Hub 2.0 Broadband, Internet, and WLAN LED indicators are solid or flashing Green you can use your Wi-Fi Internet.
Xplornet Hub 2.0
Modem
On/Off
3
5
6
7
4Modem Computer1
2
Phone 1 Port
Computer Xplornet Home Phone

X P L O R N E T H U B U S E R G U I D E 9
Activate your Home Phone Service
9 New Xplornet Home Phone Customers
Go to www.myxplornet.com and enter your User Name and Password to login.
Existing Xplornet Home Phone Customers
Upgrading to Xplornet Hub 2.0 Wi-Fi: If you are upgrading to Xplornet Hub 2.0 Wi-Fi from an Xplornet Hub (Home Phone) device, please call 1-866-841-6001 to ensure that your Home Phone service is transferredto your new Xplornet Hub 2.0.
Exchanging the Xplornet Hub 2.0: If you are exchanging one Xplornet Hub 2.0 for another Xplornet Hub 2.0 with no service changes, your Home Phone is now ready for Phone calls.
10 Now you are ready to use your Xplornet Home Phone.
For more help on setting up or activating your Xplornet Home Phone service, visit www.xplornet.com/support.

Connect the Xplornet Hub 2.0 to Your Personal Wireless Router
Only connect to your Personal Wireless Router if you do not wish to use Wi-Fi through the Xplornet Hub 2.0.
1 Disconnect your computer from the Xplornet Modem (Satellite) or Power Adapter (LTE and WiMAX).
2 Unplug your Modem or Power Adaptor from the electrical outlet, wait 30 Seconds then plug it back in.
3 Plug one end of one of the yellow cables into the LAN port on the Modem or Power Adaptor and the other end to the red Xplornet Hub 2.0 WAN port.
4 Using the other yellow cable, connect one end into any of the four yellow Xplornet Hub 2.0 LAN ports and the other end to the WAN port on your Personal Wireless Router.
5 For Xplornet Home Phone Customers Only If you do not have an Xplornet Home Phone, please continue to Step 6.
Connect your telephone by attaching one end of the grey RJ-11 cable to the green Xplornet Hub’s Phone1 port and the other end to your telephone base unit.
6 Connect the small black power adaptor cord into the Power port on the Xplornet Hub 2.0 and then plug the other end of the cord into a 120 volt household outlet.
7 Power on your Xplornet Hub 2.0 by pressing the On/Off button on the side of the unit.
8 Please wait for approximately 10 Minutes for the Xplornet Hub 2.0 to complete software upgrading before using your Wi-Fi. When the Xplornet Hub 2.0 Broadband, Internet, and WLAN LED indicators are solid or flashing Green you can use your Wi-Fi Internet.
X P L O R N E T H U B U S E R G U I D E10
Xplornet Hub 2.0
Modem
On/Off
3
5
6
7
Modem Computer1
2
Phone 1 Port
Personal WirelessRouter
Xplornet Home Phone4

X P L O R N E T H U B U S E R G U I D E 11
Activate your Home Phone Service
9 New Xplornet Home Phone Customers
Go to www.myxplornet.com and enter your User Name and Password to login.
Existing Xplornet Home Phone Customers
Upgrading to Xplornet Hub 2.0 Wi-Fi: If you are upgrading to Xplornet Hub 2.0 Wi-Fi from an Xplornet Hub (Home Phone) device, please call 1-866-841-6001 to ensure that your Home Phone service is transferredto your new Xplornet Hub 2.0.
Exchanging the Xplornet Hub 2.0: If you are exchanging one Xplornet Hub 2.0 for another Xplornet Hub 2.0 with no service changes, your Home Phone is now ready for Phone calls.
10 Now you are ready to use your Xplornet Home Phone.
For more help on setting up or activating your Xplornet Home Phone service, visit www.xplornet.com/support.

X P L O R N E T H U B U S E R G U I D E12
Set Your Own SSID Home Network Name and Passphrase
Before you connect a wireless device to your Xplornet Hub 2.0, we recommend that you first change the default Xplornet SSID Name and WPA Passphrase (listed as WLAN Security on the sticker) (See Record Your Xplornet Hub 2 GUI Password, Page 7) to your own Name and Passphrase. The SSID is the unique name of your Home Network that you look for whenever you want to connect a wireless device to the Internet. You find the name of your network in the Wi-Fi settings of your device.
1 Disconnect your personal wireless router from the Xplornet Modem or Power Adapter if you have one.
2 Ensure the yellow Ethernet cord is securely connected from the Xplornet Hub 2.0 yellow LAN port to your computer.
3 Type the IP address 192.168.219.1 into your Internet browser and press Enter on your keyboard to open the Xplornet Hub 2.0 GUI.
4 To login, enter the Username: admin and Password: adminXXXX (last 4 numbers of your serial number) found on the back of your actual Hub and press Login.
What is the SSID?
Your Xplornet Hub 2.0 uses 2.4 GHz and 5 GHz channels that send and receive signals to and from your wireless devices. These two channels make up your Home Network. The SSID (Service Set Identifier) is the technical term for the Network names given for these two channels.
To connect to the Internet, your wireless device scans for your SSID (Network) name which appears in the Networks list of your wireless device’s Wi-Fi Settings. You complete the connection to your Network by selecting one of the SSIDs from the list. For example, a default Xplornet SSID name could appear as XCI_a2fdfxv5-5G. The 2.4 and 5 GHz SSID entries in the GUI are the security settings for your two Network channels.
Example Password: admin0340
X P L O R N E T H U B U S E R G U I D E
Set Your Own SSID Home Network Name and Passphrase (cont’d)
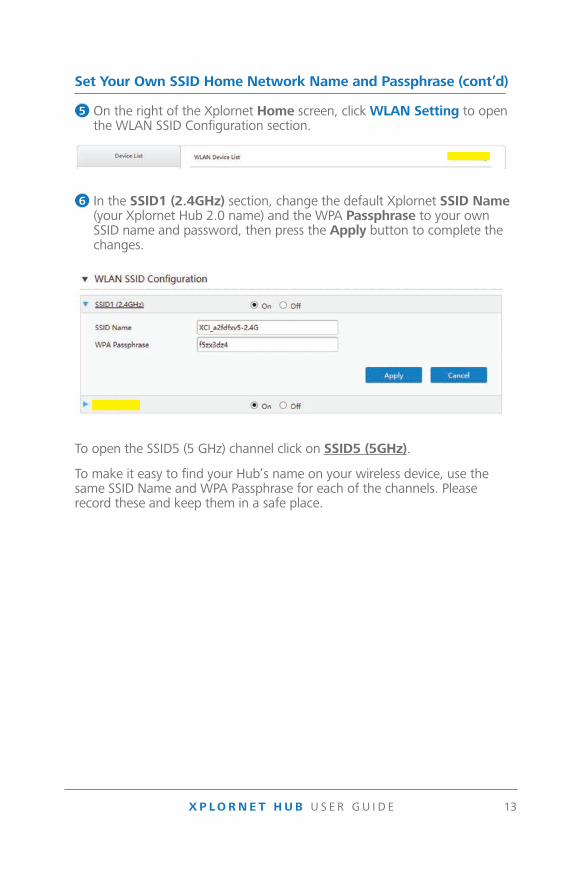
5 On the right of the Xplornet Home screen, click WLAN Setting to open the WLAN SSID Configuration section.
6 In the SSID1 (2.4GHz) section, change the default Xplornet SSID Name (your Xplornet Hub 2.0 name) and the WPA Passphrase to your own SSID name and password, then press the Apply button to complete the
changes.
To open the SSID5 (5 GHz) channel click on SSID5 (5GHz).
To make it easy to find your Hub’s name on your wireless device, use the same SSID Name and WPA Passphrase for each of the channels. Please record these and keep them in a safe place.
13

X P L O R N E T H U B U S E R G U I D E14
Connect a Wireless Device to the Internet
1 Ensure that your devices are within range of the Wi-Fi connection (and inside the home). Also ensure that the Ethernet cord is securely connected from the Xplornet Hub 2.0 LAN port to your computer.
2 On the back of your Xplornet Hub 2.0, locate your default SSID names on the white sticker. If you have already changed the SSID name, locate that.
You can chose to connect to either the 2.4 GHz or 5 GHz channel.
3 On the wireless device you wish to connect, locate Wi-Fi settings then look for the SSID name of your Xplornet Hub 2.0 and press Connect. You will be prompted to enter your WLAN Security passphrase, which is also located on the same sticker at the back of your Xplornet Hub 2.0 unless you have already changed it.
4 You should now be connected to Wi-Fi Internet. Remember to store your password somewhere secure for your convenience.
Which SSID should I connect to?
You can connect to either SSID *. The 2.4 GHz is best suited for wireless devices that are more than 1.5 Meters (5 FT) from the Xplornet Hub 2.0. The 5 GHz is best suited for wireless devices that are 1.5 Meters (5 FT) or less from the Xplornet Hub 2.0.
* Not all wireless devices support 5 GHz and you may not see your 5 GHzSSID5 in your device’s Wi-Fi Settings.

X P L O R N E T H U B U S E R G U I D E 15
Connection Troubleshooting
To maximize your Wi-Fi connection:
• Reduce the number of walls and ceilings between your Hub and other networkdevices
• Place Hub upright with lights facing towards the centre of the home
• Keep at least 6 feet away from electrical devices or components that generateinterference like a microwave oven, home security system or blue tooth devices
• Ensure that the Broadband, Internet and WLAN lights are green
• If there are no lights working on the device, please ensure that you have insertedthe black power adapter into a known working power socket.
• Ensure the Hub has been powered “On” (the switch on the side panel is presseddown)
• Check that all cables are inserted into the correct port

X P L O R N E T H U B U S E R G U I D E16
Xplornet Hub Wi-Fi FAQ’s
How many devices can be connected wirelessly to the Xplornet Hub at the same time?
There is no limit to the number of wirelessly connected devices to the Hub, however, Wi-Fi performance could degrade if there are large number of devices connected at the same time.
What should I do if I can’t find my SSID name?
If the original or updated SSID name is not visible within your network settings, check that the SSID has not been hidden. To unhide it, login to the Router while your Router is connected by clicking “Local Network”, “WLAN”, “WLAN Basic”, “WLAN SSID Configuration” and then turning “Hide” off. If you are still unable to find your SSID name, restart your computer.
One of my devices won’t connect to Wi-Fi – what should I do?
Check to see if the “WLAN” light is on and green. If not, please make sure the Wi-Fi button on the side of the Hub is turned to “ON”.
To troubleshoot a specific device, please ensure that the device is connected to the correct SSID. If it is not, please disconnect and connect to the SSID of the Xplornet Hub 2.0.
My devices are connected, but I can’t access the Internet – what should I do?
Ensure the “Broadband” light is on (green) on the Hub. If the light is not on, you will need to test your Internet connection through a hard-wired connection. Using the yellow Ethernet cable, connect one of the “LAN” ports on the Hub to your computer. This will confirm if you have a connection to the Internet. If you do not have an Internet connection, check that your modem and Internet equipment are properly plugged in and connected.
What should I do if my Hub 2.0 stops working?
Please power cycle the Hub by unplugging the black AC power adaptor for 30 seconds, and then plugging it back in.
X P L O R N E T H U B U S E R G U I D E 17
Router Features
• Dual Band Wi-Fi – Provides both 2.4 and 5 GHz
• GB Ethernet Port – 1GB LAN Ethernet port for home networking
• WLAN On or Off (2.4 and 5 GHz) – Wireless “on” or “off” for 2.4 or 5GHz channels
• WLAN SSID Password (2.4 and 5 GHz) – Password setting for 2.4 or 5GHz channels
• WLAN SSID Name Change (2.4 and 5 GHz) – Change SSID networkname for 2.4 or 5 GHz channels
Advanced features:
• Customer Configurable Channels, Bandwidth and Power Settings– Allows home owner to select level of power and optimal uncongestedchannel
• Guest SSID’s – Provides the ability to setup and additional 2.4 and 5GHz band that is open to visitors
• Quality Metric – Score between 0-100% that indicates quality of Wi-Fisignal
• Transit Rate – Identifies throughput capability of wireless devicesconnected to Wi-Fi
• Parental Controls – Allows home owner to limit network access byconnected wireless device, time of day or bandwidth allotment
• Site Survey – Allows home owner to view other Wi-Fi connectionswithin their immediate proximity.
• Firewall – Protection of harmful files and data into the home
• DMZ, ALG, DDNS, DHCP, port forwarding, port triggering, portmapping – Advanced networking features

X P L O R N E T H U B U S E R G U I D E18
Xplornet Home Phone Features
Voicemail Access(Default Voicemail PIN: 1234)
Call ForwardingEnable or disableForward to voicemail whenbusy / no answer
Last call return
*98
*72
*90
*69
Call ID BlockSingle Call
Call waitingEnableDisable
Call Trace
*67
*57*56
*55
Features with Star (*) Codes
• Voicemail• Call Display• Call Waiting• Caller ID Block• Do Not Disturb
• Call Forwarding• Call Return• Call Screening• 3-way Calling• Voicemail to E-mail
• Online Self-Service• E911 Support• Find Me / Follow Me
Home Phone N11 Services
211 – Provincial Government Information Services Provincial government information services for health and social services such as housing, language training and employment
311 – Local Municipal Government Information Services Non emergency information from your local municipal government
411 – Information / Directory Assistance Helps you find phone numbers and other contact information about businesses and people in your area
511 – Road Conditions / Traffic Advisory Information on transportation and infrastructure to guide your travel plans
611 – Xplornet Direct Support Helps you contact Xplornet directly and (like 911) will work even if Xplornet Home Phone is suspended
711 – TDD / TTY Services Telecommunications Relay Service that helps those who are hearing impaired to converse with others over the phone through an operator by translating from TDD to speech and vice versa
911 – E911 Emergency Services Enhanced 911 service is routed through a call centre which validates your address prior to dispatching emergency services

X P L O R N E T H U B U S E R G U I D E 19
Troubleshooting for Home Phone
• Follow the Home Phone “Easy Setup Guide” steps if installing at home byyourself. Alternatively, your Xplornet certified installer will complete theprocess using the same instructions
• Use a standard power outlet to connect the power adaptor, but do notuse the pre-wired land line jacks in your home as these will not workwith the Xplornet Voice Over IP (VOIP) phone
• Ensure that you have plugged the correct cables into the ports of theHub
• The Xplornet Hub should be the only device directly connected to yourmodem
• Be sure to go through the Xplornet Activation Portal to activate yourHome Phone service
• In order to login to the Xplornet Activation portal, you need yourpassword. In most cases, your username will be the email address youprovided to Xplornet when you signed up. If you require help resetting,please call Xplornet at 1-866-876-3993.
Find Me (simultaneous ring)
Direct your calls so that they ring your home phone, cell phone or other phones at the same time
Follow Me (sequential ring)
Direct your calls so that they ring your home phone, cell phone, or other phones one after the other
All at the same time
OfficePhone
MobilePhone
HomePhone Goes to Voicemail,
then email
If no answer
Rings to:
Incoming Call
Goes to Voicemail, then email
If no answer
Rings to:
Incoming Call OfficePhone
MobilePhone
HomePhone
You’ll never miss a call with Find Me / Follow Me feature
Xplornet Home Phone Features (Cont’d)
X P L O R N E T H U B U S E R G U I D E20
Troubleshooting for Home Phone (Cont’d)
• Ensure you have accepted the 911 emergency terms and conditions andcompleted all required information
• Once your Home Phone has been activated, please restart the Hub byturning it “off” and “on” which is found on the side near the USB port
• To update your phone features online, visit myxplornet.com whichwill allow you to view your phone usage, change your preferences andcustomize your account based on your needs
• If you plan to port your existing phone number, please complete theLocal Number Portability form which is included in your welcome email.Once complete, sign the completed Letter of Authorization and thenfax to 1-866-485-4156 or email a picture or scanned copy [email protected] and we will complete the port in 15 businessdays or under.

X P L O R N E T H U B U S E R G U I D E 21
Important 9-1-1 Emergency Services
9-1-1 emergency services operate differently on Voice Over Internet Protocol (VoIP) phone systems as compared to traditional 9-1-1 services. With traditional phone services, when you call 9-1-1, your call is sent directly to the nearest emergency response centre. With VoIP phone service, your 9-1-1 call is forwarded to a third-party service provider that will route your call to an emergency response centre.
Because your call is routed through a third-party provider, you will need to register your address upon activation of your service.
Xplornet will also provide the emergency response centre with the service address on your account, so please ensure that your information is correct and and kept up-to-date.
If you move your VoIP phone between locations (for example, from your home to your cottage), it is important that you inform the emergency operator of your location and contact details any time you call 9-1-1. If you do not inform the emergency operator of your location, there is a risk of sending emergency services to the wrong address.
Be prepared during any service interruption
Your VoIP phone service requires Internet connectivity, power (electricity), and a current service subscription. In the event of a power, network, or Internet outage (including congestion), or if your service is disconnected or suspended due to non-payment or Seasonal Service arrangement, you may experience a disruption or delay in your 9-1-1 service. We recommend that you keep an alternative phone service (such as a mobile phone) available in case of emergency.
Do not disconnect
In the event that you need to call 9-1-1, please do not disconnect your 9-1-1 call unless you are instructed by an emergency dispatcher. If you are disconnected, please call back immediately.
Inform other users
To ensure the safety of any users of your VoIP phone service, we strongly recommend that you advise them of the nature and limitations of 9-1-1 emergency calls.
Limitations of liability
Please carefully read Xplornet’s terms of service related to 9-1-1 service detailed at http://www.xplornet.com/legal/xplornet-e911-terms/

About Xplornet
Headquartered in Woodstock, New Brunswick, Xplornet Communications Inc. is Canada’s leading rural broadband provider. We believe everyone should have access to the transformative benefits of broadband, so we make our service available everywhere in Canada, including the hard-to-reach places. We overcome the challenges of Canada’s vast geography through our deployment of Canada’s first national 4G network, which leverages both fixed-wireless towers on the ground and next-generation satellites in space. Our customers live in the farthest reaches of the country and just outside of major urban centres, and through our coast-to-coast network of local dealers, we connect them to all that the Internet offers. Xplornet is high-speed Internet – for all of Canada.
Xplornet connects you to what matters.
X P L O R N E T H U B U S E R G U I D E22

X P L O R N E T H U B U S E R G U I D E 23
Canada Statement
This device complies with Industry Canada’s licence-exempt RSSs. Operation is subject to the following two conditions:
1. This device may not cause interference.2. This device must accept any interference, including interference that maycause undesired operation of the device.
The device meets the exemption from the routine evaluation limits in section 2.5 of RSS 102 and compliance with RSS-102 RF exposure, users can obtain Canadian information on RF exposure and compliance.
This transmitter must not be co-located or operating in conjunction with any other antenna or transmitter. This equipment should be installed and operated with a minimum distance of 20 centimeters between the radiator and your body.
The device for operation in the band 5150-5250 MHz is only for indoor use to reduce the potential for harmful interference to co-channel mobile satellite systems.
This product meets the applicable Innovation, Science and Economic Development Canada technical specifications.
The Ringer Equivalence Number (REN=0.11) indicates the maximum number of devices allowed to be connected to a telephone interface. The termination of an interface may consist of any combination of devices subject only to the requirement that the sum of the RENs of all the devices not exceed five.
300 Lockhart Mill Road P.O. Box 9060
Woodstock, NB E7M [email protected] | 1-866-841-6001
Wi-Fi®, the Wi-Fi logo, the Wi-Fi CERTIFIED logo, Wi-Fi Protected Access® (WPA), WiGig®, the Wi-Fi ZONE logo, the Wi-Fi Protected Setup logo, Wi-Fi Direct®, Wi-Fi Alliance®, WMM®, and Miracast® are registered trademarks of Wi-Fi Alliance. Wi-Fi CERTIFIED™, Wi-Fi Protected Setup™, Wi-Fi Multimedia™, WPA2™, Wi-Fi CERTIFIED Passpoint™, Passpoint™, Wi-Fi CERTIFIED Miracast™, Wi-Fi ZONE™, WiGig CERTIFIED™, Wi-Fi Aware™, the Wi-Fi Alliance logo, and the WiGig CERTIFIED logo are trademarks of Wi-Fi Alliance. Xplornet® is a trademark of Xplornet Communications Inc. © 2017 Xplornet Communications Inc.