nuccapalmernucca.yolasite.com/resources/nucca xrays 1.pdf · nucca "adjusting all the bones of...
TRANSCRIPT
NUCCA"Adjusting all the bones of the body with one lever,'
I.:tiX-ray Analysis
LateralNasiumVertex
BiomechanicsResources
page124
4 14957
I
This workbook was initially written by Dr. Kathy Doyle, D.C.in 1988. lt was completely updated in 2005/06. Much newmaterial has been added, including biomechanics andresources.
---Steve Danaher
Atlas olane line
b.
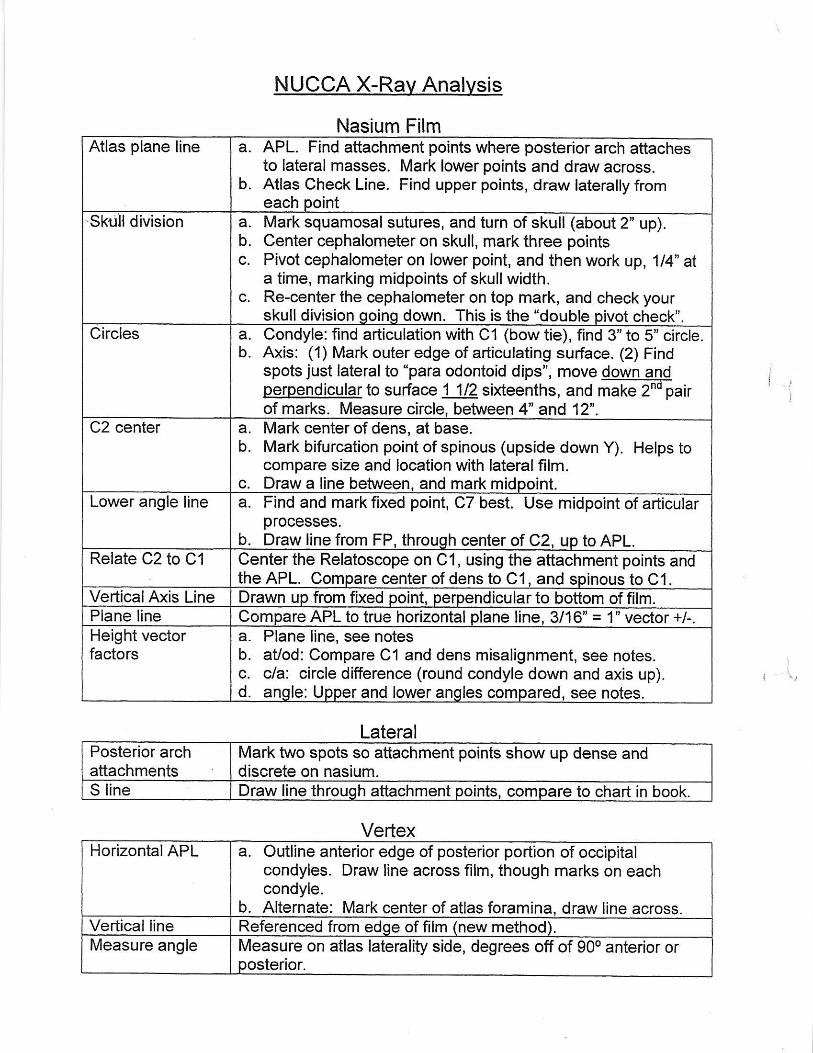
APL. Find attachment points where posterior arch attachesto lateral masses. Mark lower points and draw across.Atlas Check Line. Find upper points, draw laterally fromeach ooint
'Skull division a. Mark squamosal sutufes, and turn of skull (about 2" up).b. Center cephalometer on skull, mark three pointsc. Pivot cephalometer on lower point, and then work up, 114" at
a time, marking midpoints of skull width.c. Re-center the cephalometer on top mark, and check your
skull division going down. This is the 'double pivot check".Circles Condyle: find articulation with C1 (bow tie), find 3" to 5" circle.
Axis: (1) Mark outer edge of articulating surface. (2) Findspots just lateral to "para odontoid dips", move down aldperpendicular to surtace 1 112 sixteenths, and make 2no pairof marks. Measure circle, between 4" and 12".
b .
C2 center a. Mark center of dens. at base.b. Mark bifurcation point of spinous (upside down Y). Helps to
compare size and location with lateral film.c. Draw a line between. and mark midpoint.
Lower angle line a. Find and mark fixed point, C7 best. Use midpoint of articularprocesses.
b. Draw line from FP, through center of C2, up to APL.Relate C2 to C1 Center the Relatoscope on C1, using the aftachment points and
the APL. Compare center of dens to C1, and spinous to C1.Vertical Axis Line Drawn up from fixed point, perpendicular to bottom of film.Plane l ine Compare APL to true horizontal plane line, 3/16" = l" vector +/-.Height vectorfacto rs b .
d .
Plane line, see notesatlod: Compare C'l and dens misalignment, see notes.c/a: circle difference (round condyle down and axis up).angle: Upper and lower angles compared, see notes.
NUCCA X-Rav AnalvsisNasium Film
i ,
LateralPosterior archattachments
Mark two spots so attachment points show up dense anddiscrete on nasium.
S l ine Draw line through attachment points, compare to chart in book.
VertexHorizontal APL a. Outline anterior edge of posterior portion of occipital
condyles. Draw line across film, though marks on eachcondyle.
b. Alternate: Mark center of atlas foramina, draw line across.Vertical line Referenced from edge of film (new method).Measure angle Measure on atlas laterality side, degrees off of 90o anterior or
posterior.

BasicX-Ray
NUCCAAnalysis
Lateral
NasiumVertex

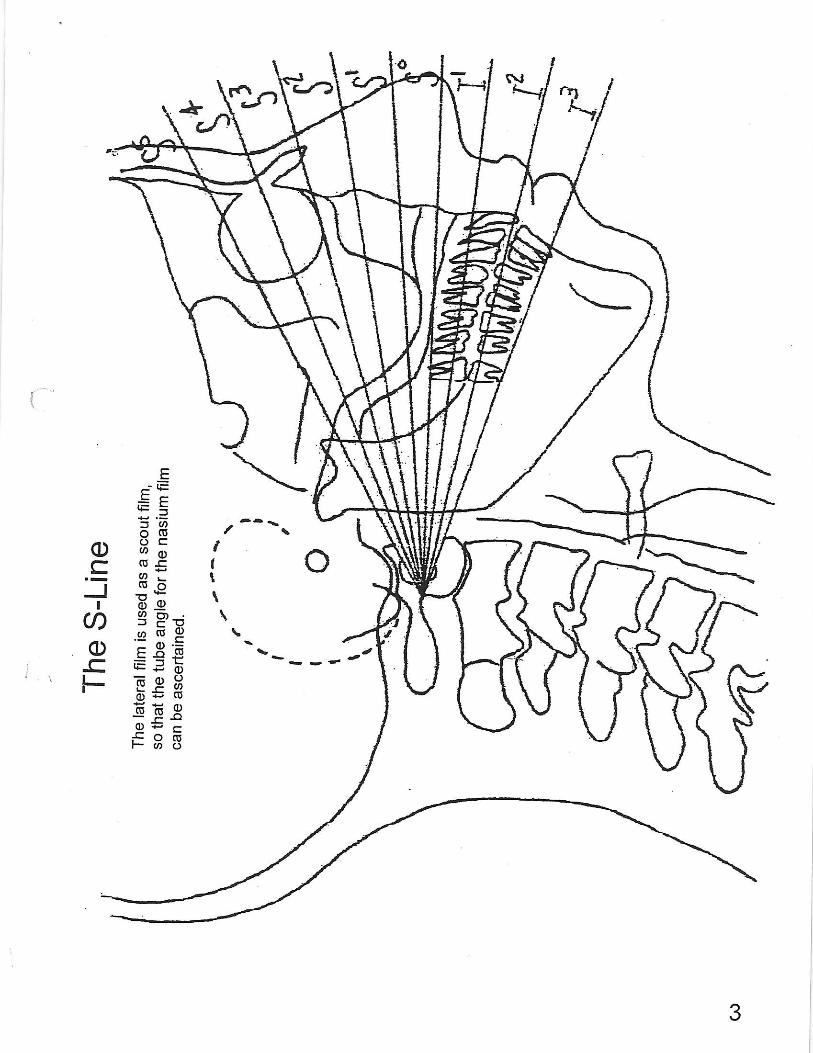
The S-Line
The lateral film is used as a scout film, so that thetube angle for the nasium film can be determined.
!$ two dots on the posterior arch of aflas, as shown.This is to give a clear image, on the A-p, where theposterior arch meets the lateral masses.Then use a straightedge to draw the line,projecting it fonrvard past the skull.
,-/ --.-, / ' ' -
2
Pn\'-o
s s - - - z
Ei rF-
O ( Eo ; ; !( g - c a' - i i i b r- f t
r d oC D s p p \
r / ) f i r po ; s ;= = f
r -I- t= .= 6I = . r r O!u : a/,' d = ( 6
g E - ES o E
3

NasiumThe nasium film determines the height vector. There are a number of steosnecessary for measurement and calculation of this vector. provided the locationscan be found on the film, the basic determination of the height vector is fairly easy.The steps are as follows:
. Atlas plane line and check line
. Skull division, atlas laterality, and head tilt
. Condylar and axial circle measurement
. C2 body, dens, and spinous center and misalignment
. Fixed point, lower angle, and vertical axis line
. Horizontal plane line
. The Four Elements
vertical axis lineI
4
central skull line
point
checkline
APL

Aflas plane Line!t19 1,ao11vnere the inferior margin of the posterior archmeets the lateral mass on both the left and ,igf,i"iIO"..
'-' '
!-.f pt"T_goF where the superior marsins Jitir"iiJ"rio,arch meet the lateral mass.
On film, place the dots at the center of the white intersections.
i
5

Ailas plane LineDraw a line though the two lower dots and extend it to theedges of the fitm. This is the Aflas plane Line (ApL).
b
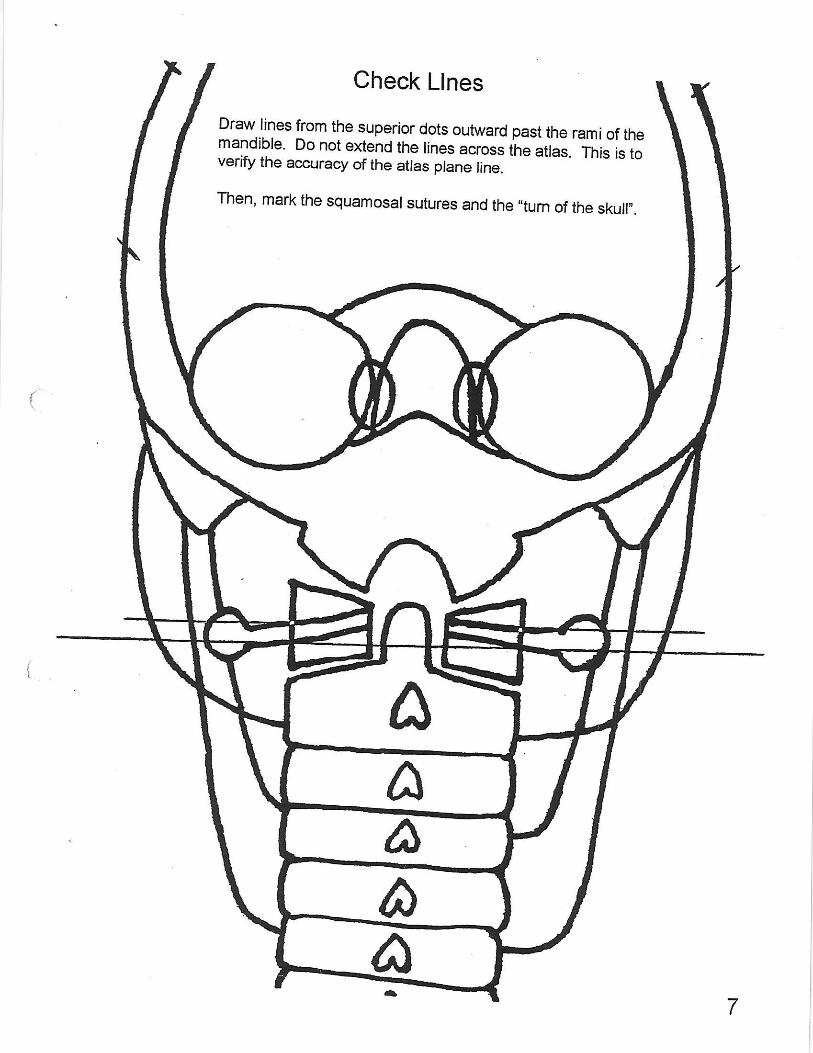
Check LlnesDraylines from the superior dots outward past the rami of themandible. Do not extend the lines
"oo., ih" aGs. ftris is toverifu the accuracy of the aflas plane line.Then, mark the squamosal sutures and the .tum of the skull".
I

center the cepha rometer on,nT"tFrnS k' | | D ivisj onprimarily using the area between the \squamosat sutures and the .tum of ihe skull,.Be very careful at this steD.
Place three marks in the slot of the cephalometer.One at the top, one at the horizontaf fine, anJ one at
urn of theskull
the bottom of the slot. Use .one siOe, ot'tne sbt.
Oesign by tLU.Cl / l on roe , M i ch .
8
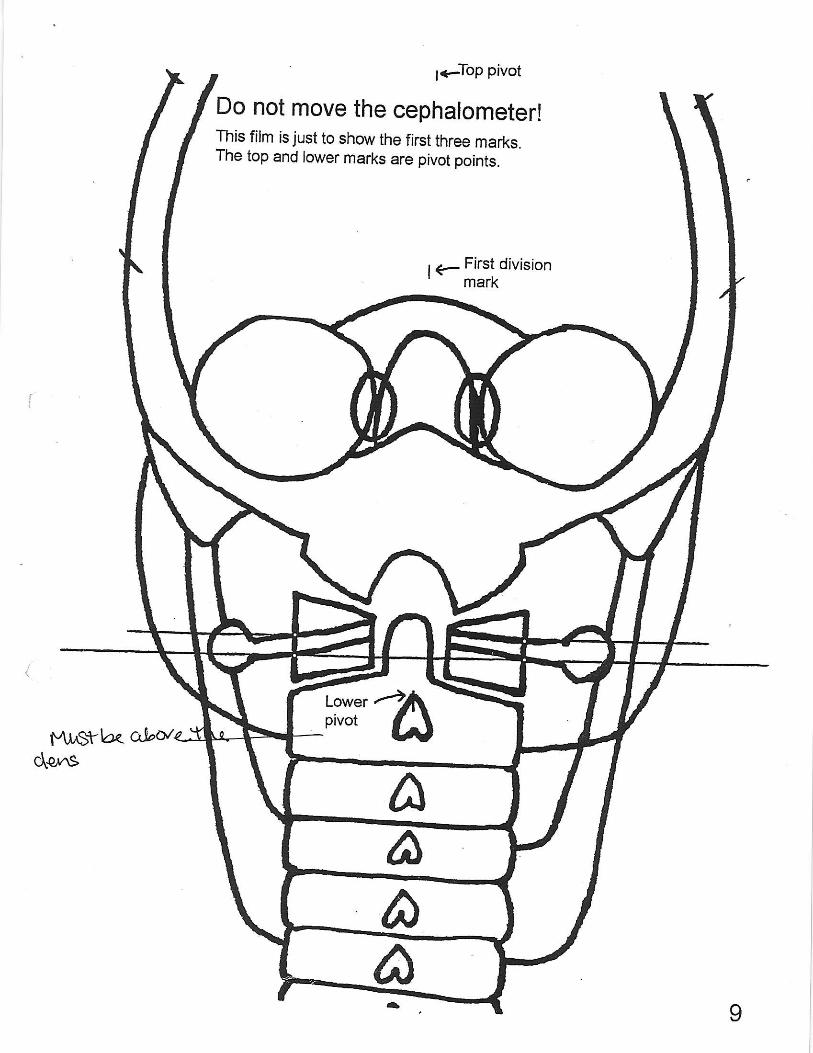
Do not move the cephalometer!This film is just to show the first three marks.The top and lower marks are pivot points.
|^r^Sfb( al"ordc,,^s
I

Raise the cephalometer 1/4,.Pivoting on the lower mark,re-center the horizontal lineMake a short mark in the slot.
Repeat this process until youreach the "turn of the skull,,.
Oes ign by i l .U .l l on roe , M i ch .
1 0

\Mren you are done, themarks will look somethinolike this.
1 1
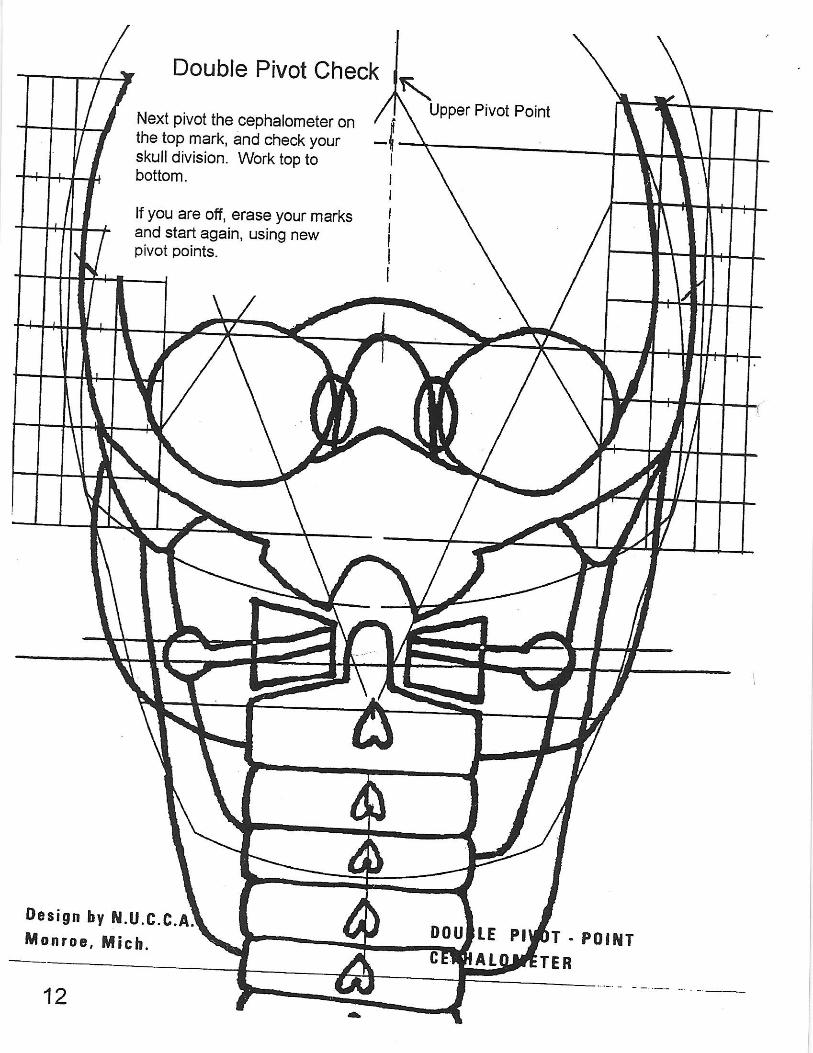
Double Pivot CheckNext pivot the cephalometer onthe top mark, and check yourskull division, Work top tobottom.
lf you are off, erase your marksand start again, using newpivot points.
Upper Pivot Point
Des ign by i t .U .C .C .A li l on roe , f , t i ch .
1 2
T . PO I I {T

III
Draw the Central Skull LineDraw a line hrough as many ofthe marks as possible. Start atthe top of the film, and continuedown to the APL.
1 3

r/ Measure Atlas LateralityUsing a protractor, measure the acute angleformed. This is the side of aflas laterality,-which is ihe side aflas has subluxated/riddenup on the condyles.On the side of ailas laterality, mark: af, R orL, and the number of degrees less than 90.
clt Rl
!t 'lt
1 4
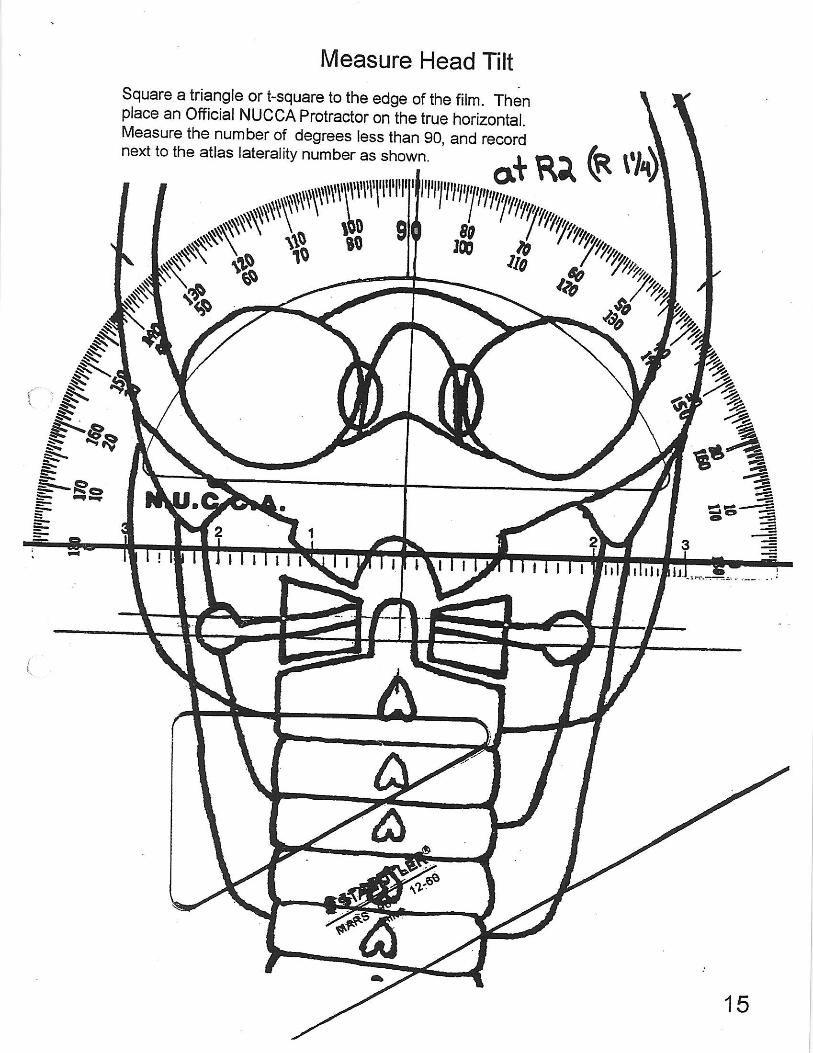
Measure Head TiftSguare a triangle or t-square to the edge of the film. Thenplace an Official NUCCA protractor on the true horizontal.Measure the number of degrees less than g0, and recordnext to the atlas laterality number as shown_ ro t R l G t
1 5

Condylar and Axial CirclesTo understand how the skull and neck move with aflas, we need toknow the shape of the articulating surfaces. The occipital condylesusually match a circle of between B and 3 1/2 inches in diameter.The axial circle measures between 4 and 12 inches.
tl
R
1 6
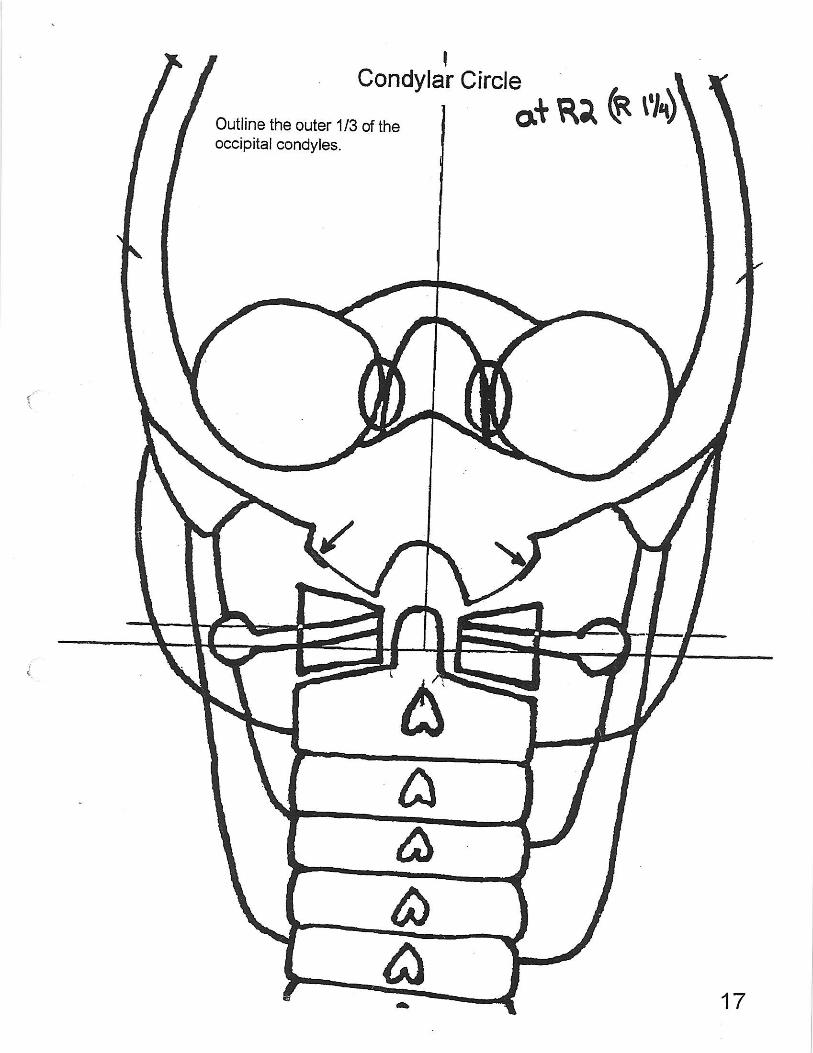
' lCondylar Circle I
ourinetheouterl/3orthe i -
Lt RI G t''{)occipital condyles.
1 7

/ Condylar Circte
lffi1;yll"a;x,?irffi"' I cl+ Rr G f'0condyles best.
gTvcsNncarc1 8

r l Axial CircleWrite the condylar circle measurement abovethe APL on the side of laterality.
Then, just lateral to the ,,para-odontoid dips,, measure downand perpendicular to the articulating surface one and a half 16th,s(3132' or 2.4 mm). Make a smail mark. Rtso outijiEl6Esuperlor,lateral surFace of C2.
ct+ Re G t'r.)
Condylar measurement
J3c
1 9

IAxial Circle
ot Rl G u.)Use the circumscale to findthe best fit circle for the fourmarKs.
