yarra valley bonsai - bonsai northwest inc.yarravalleybonsai.org.au/yabb/attachments/bonsai... ·...
TRANSCRIPT

Sponsored by:
178 Forrest St. Ardeer, VIC 3022
Melway ref. 26 A12
Tel: (03) 8390 0942 Mob: 0425 795 352
Open: 9am – 5pm, 7 days
After hours please contact by phone
Established:1973 A-19332L
Sponsored by:
President: David Nassar
Phone: Barry 0422 619 641
Find us on Facebook.
Twitter: #BonsaiNorthwest
Next meeting at 7.30pm, Monday 6 February 2017.
OLOGY
Supplying specialist potting mix components for Bonsai growers.
Currently in stock. Mount Sylvia Diatomite, Zeolite, 5-7mm Pine nuggets, Pumice and Sphagnum moss.
Our aim is to save you time and money.
Ology.net.au Damian 0412 698 259
Bonsai Northwest Inc.
Sponsored by:
CLUB DETAILS
www.bonsainorthwest.com.au
178 Forrest St. Ardeer, VIC 3022
Melway ref. 26 A12
Tel: (03) 8390 0942 Mob: 0425 795 352
Open: 9am – 5pm, 7 days
After hours please contact by phone
PO Box 1091, Niddrie Victoria 3042
Meetings are held at The Aberfeldie
Community Club, Batman St Essendon,
7:30pm on the first Monday of the month
(no meeting in January)
Electronic Newsletter To receive your newsletter electronically email [email protected]. Extra cost of $20 if you want a hard copy posted. Exceptions apply.
‘Like us’ on Facebook http://www.facebook.com/bonsainorthwest
Ology.net.au - Damian 0412 698 259
Newsletter February 2017
BNW Committee 2017
Welcome back everyone to a brand new year of bonsai at Bonsai Northwest Inc!!! Hope you all had a great Christmas and New Year break and your bonsai have flourished. This month we’ll be having a workshop. Just a reminder on how workshops are conducted: if you bring along your tree, remember to bring your own tools and wire so that you can work on your tree once you’ve received advice/instructions/ideas on what to do by our experienced member. The experienced members are there to guide you on your tree only, which then allows them to continue to move around the room and help others. This will allow everyone a chance at seeking advice and guidance. The Library will be open from 7.00pm and will close at 8pm. Please return books and magazines from your holiday reading. The Sales table will be open.
Last chance to renew membership If you haven’t renewed your membership yet for 2017 then this is the last newsletter that you will receive. Please see Barry to renew ASAP. We don’t want to be chasing you on workshop nights as it means less time
helping members with their trees.
Beginners’ classes 2017 We are in the final stages of preparing to run the hugely popular beginner’s class run by Ian. This is a fantastic opportunity for anyone starting out in bonsai to start with proper fundamentals and techniques. Some of you have already been contacted about the beginner’s classes but if there are other members interested then please see Barry. At our workshop nights, Ian will have a special table allocated to him for any members that have previously participated in his class to bring back their trees and seek further advice. This is a fantastic chance to keep improving, learning and developing your tree further.
Thank you Ian for doing this.
Master Sharp Tool Sharpener Sharp tools are important in bonsai. We will have Jon from Master Sharp at the club in February
sharpening tools. Prices and instructions attached.
It’s great to see a few new faces on the committee this year with Glenn Flood, Luke Dalli and Michael Pearce joining returning committee members David Nassar (President), Barry Woods (Secretary), Ted Marks (Treasurer), Maria Malacria, Matthew Robison and Jos Winthorst. We have another great team
this year.

We had a lot of fun at out final meeting of 2016. At the AGM, awards were presented to members who have given so much to the club. Jos Winthorst received a special thanks award for all his tireless work. Luke Dalli received the Ron Anderson award for his commitment to the club and great potential in bonsai. We welcomed 3 new committee members to the 2017 committee; Glenn Flood, Luke Dalli and Michael Pearce join the existing committee and it’s always fantastic to have new blood on the team. We also had our free Christmas BBQ and our hugely
popular mini auction which saw a frenzy of bidding!!!
Last Meeting – Dec 2016
Coming Events Victorian Native Bonsai Club Exhibition 2017 March 4 & 5, 9am to 4pm Main House, Dallas Brooks Drive, Royal Melbourne Botanical Gardens. Adults $5, children under 15 free Mornington Peninsula Bonsai Show 2017 April 15 & 16, Balcombe Grammar, 389 Nepean Highway, Mt Martha.
Adults $5, Concession $4. Children free with adult
Tanuki Bonsai by Ian Barnes
To create a tanuki bonsai, a young leggy plant (most often a juniper) is fixed to a large and interesting piece of
deadwood. The composite creation is shaped using traditional bonsai techniques and takes on the appearance of an ancient tree.
Juniper tanuki bonsai by Tony Bebb. Shimpaku juniper tanuki bonsai. Ancient foxtail pine.
Tanuki
The word “tanuki” (狸 or たぬき) is Japanese for the Japanese Raccoon Dog (Nyctereutes procyonoides viverrinus).
Tanuki appear often in Japanese folklore as shape-shifters with supernatural powers and mischievous tendencies. So the word “tanuki” came to mean “something that is not what it appears to be”. The Japanese therefore do not regard
tanuki bonsai as valid.
Today, the tanuki are cheerful, lovable, and benevolent rogues who bring prosperity and business success. Ceramic
statues of tanuki are found everywhere in modern Japan, especially outside bars and restaurants, where a pudgy tanuki effigy typically beckons drinkers and diners to enter and spend generously.
It is an atypical species of dog that can grow up to 60cm in length,
with distinctive stripes of black fur under its eyes. In old Japan,
Tanuki were hunted for their meat (reputed to have medicinal
qualities), their fur (used for brushes and clothing) and their scrotal
skin (used as a malleable sack for hammering gold into gold leaf).
They live in burrows, and come out after sunset.
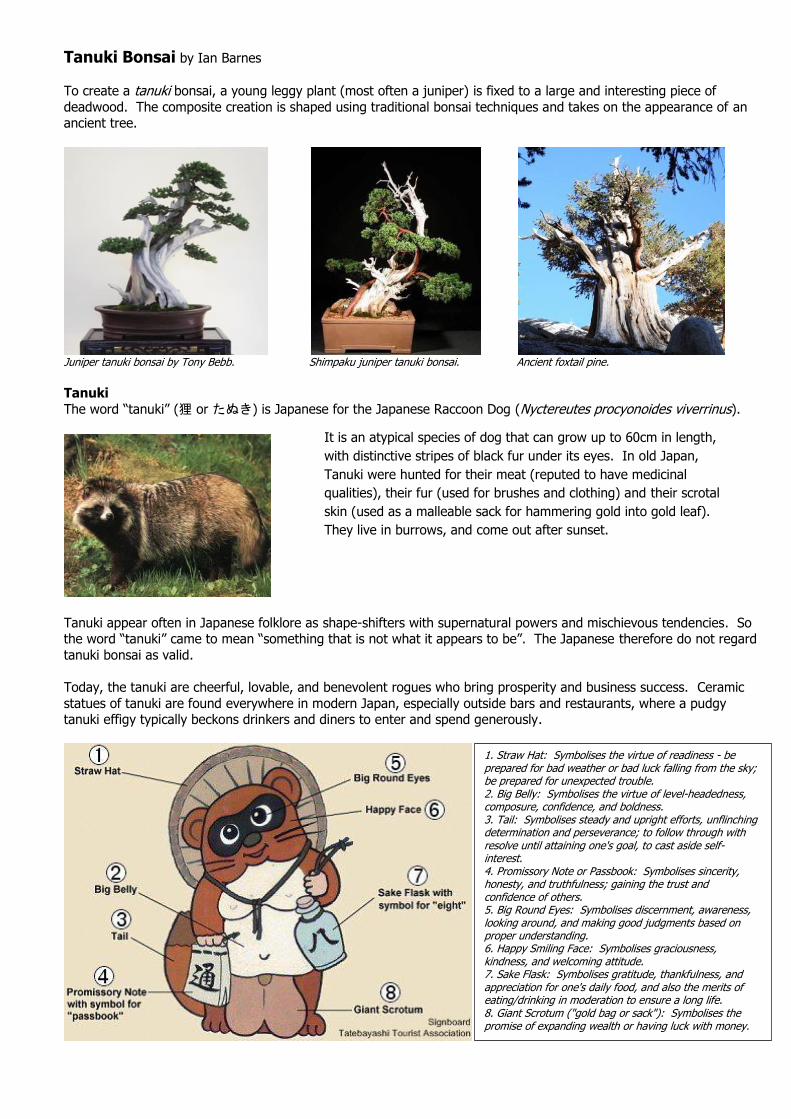
1. Straw Hat: Symbolises the virtue of readiness - be prepared for bad weather or bad luck falling from the sky; be prepared for unexpected trouble. 2. Big Belly: Symbolises the virtue of level-headedness, composure, confidence, and boldness. 3. Tail: Symbolises steady and upright efforts, unflinching determination and perseverance; to follow through with resolve until attaining one's goal, to cast aside self-interest. 4. Promissory Note or Passbook: Symbolises sincerity, honesty, and truthfulness; gaining the trust and confidence of others. 5. Big Round Eyes: Symbolises discernment, awareness, looking around, and making good judgments based on proper understanding. 6. Happy Smiling Face: Symbolises graciousness, kindness, and welcoming attitude. 7. Sake Flask: Symbolises gratitude, thankfulness, and appreciation for one's daily food, and also the merits of eating/drinking in moderation to ensure a long life. 8. Giant Scrotum ("gold bag or sack"): Symbolises the promise of expanding wealth or having luck with money.

Is it “valid” bonsai?
The Japanese do not regard tanuki bonsai as valid. Like the tanuki of fable, such bonsai are not what they appear to be. They are, in fact, fake. This technique is not currently an accepted part of the Japanese bonsai tradition, and
tanuki would not be displayed at a formal Japanese bonsai show. (I understand that you can exhibit a tanuki bonsai in Japan, but you will never win a prize, because it is not
considered a “natural tree”. Therefore very few people exhibit tanuki in Japan).
This is not to say the Japanese never make tanuki bonsai... they do. They regard it as a fun and enjoyable diversion,
but not to be considered in the same category as regular bonsai. Tanuki by Kimura:
Before After
The term “phoenix graft” was first coined by American bonsai artist Dan Robinson and is now commonly used in the West. Like the phoenix bird of classical Greek mythology, rising reborn and more glorious than ever from the ashes
of its own funeral pyre, the phoenix bonsai uses long dead ancient wood and young new plant material to create a
new artistic vision greater than the sum of its parts. (In England the technique is called “wrap-around”).
In the hands of a skilled bonsai artist the finished creation can be spectacular, but is it “valid” bonsai?
The Japanese term “tanuki”, implies deception or cheat. The phrase “phoenix graft”, views the process from an
entirely different perspective. I suspect that if you set out to make a tanuki, a deception, there will be no respect for your work. But if you set out to create a phoenix graft, the implication is that you are embarking on a more noble
quest. What could possibly be wrong with combining a magnificent piece of driftwood, nature’s art, with a healthy young plant, to create an object of great dignity and beauty? If you do it, do it well and above all, don’t lie about it.
It’s only a deception if it is your intention to deceive.
If, like a painter or sculptor, our objective is to create a work of art which evokes an emotional or intellectual reaction
from the viewer, then perhaps this type of bonsai is as valid as any other.
With the increasing discussion on the ethics of collecting rare and ancient yamadori, I feel tanuki will become more and more common and accepted as an art form and not be seen so much as a cheat. Grafting “better” foliage, air-
layering or extreme carving are all accepted methods and are not shunned, so why should tanuki?
How to create a tanuki bonsai
So, here are the mechanics and techniques for creating a tanuki bonsai:
Select deadwood:
As well as having an interesting shape, the piece of deadwood chosen
needs to be dense and very hard. The upper portions of the deadwood which do not come into contact with the soil mass should weather well,
but those portions which extend into the soil mass will be in contact with moisture and will rot quickly if they are not dense enough.
Consider painting the bottom area of the deadwood with a wood preservative to ward off the effects of moisture, but take care that the
chemical will not leach into the soil and damage the live tree planted
next to it.
Lime Sulphur can be applied to deadwood to bleach. Paint it on to soak into the wood and then let it touch dry. Hose the wood so the surface
coat is removed and the wood looks more natural and bleached.

Select container: Tanuki bonsai are not instant bonsai. The relatively young plant material needs time to grow. (Assume you are a good five years away from having a convincing bonsai). So, select an appropriate container. Eventually you will
transfer the planting to a pot suitable for showing.
Select plant:
A Shimpaku juniper “whip”.
Assembly Step 1: Prepare the container as you would with any bonsai.
Assembly Step 2: Determine the angle at which the deadwood will be positioned in the container. Using a hand saw, cut the wood so
that the bottom is flat and parallel with the bottom of the container.
Assembly Step 3: Screw eyelets into hard, solid wood, positioned in proximity to the holes in the bottom of the container. The eyelets will eventually be threaded with copper wire to hold the deadwood firmly in place. They will not show when covered
with soil.
Assembly Step 4: Place spacers into the bottom of the container to elevate the amount of deadwood buried under the soil, thereby decreasing the amount of deadwood exposed to moisture and slowing down the inevitable decay. Broken paving
stones or slate can be used and stacked to achieve the desired height.
Step 2 – cut bottom of deadwood. Step 3 – screw in eyelets. Step 4 – spacers.
Assembly Step 5: Select your plant material and determine which way the trunk should be positioned onto the deadwood. This may
take some time and planning on your part. Don’t rush! Once you have decided, remove all foliage which will be located between the trunk of the deadwood and the trunk of the live juniper. Use a marking pencil to draw a line on
the deadwood indicating where the groove you wish to cut will go. Next, remove the juniper from its container, wrap it in a plastic bag and tie very tightly with string. This step is very important. The roots must remain unharmed and
not dry out during the lengthy process which follows.
Junipers are most often the plant material of choice for making a tanuki
bonsai. Most ancient trees with this much dead wood usually fall into the evergreen class and more often than not, they are junipers.
Fairly young, spindly plant material is required with a trunk diameter not
much larger than your index finger. The material selected should be
very flexible and able to put up with the kind of treatment it will receive during the assembly process. Junipers (and pines) are very flexible and
put up with this kind of treatment. (If you choose an azalea, for instance, you will discover that the trunk and branches snap easily and
that its delicate bark cannot withstand the bruising it will receive).

Assembly Step 6: Use a die grinder or dremel fitted with a round nose router bit to cut a groove into the deadwood. The groove needs to be deeper and wider than the trunk diameter. If you make the groove too shallow, the tree will eventually push
itself out of the groove. (Note that it is considered “good bonsai” to ensure that a portion of live trunk - the “life line” - is visible from the front view of the tree as it emerges from the soil).
Assembly Step 7: Starting at the base, begin to fit the juniper into the groove in the deadwood. Use screws, nails, wire, string, cable
ties, etc, to secure the juniper snugly into its groove in the deadwood. (If using screws, also use a washer. If nailing, cross-nail using two nails at angles. Use brass screws or nails; steel, even stainless or coated steel, kills plants if
allowed to contact the cambium. If not using screws, be watchful that the bark isn't damaged by the pressure of the ties as the young tree grows). Work slowly and from the bottom of the tree up. It may be necessary during this
process to deepen or round off the groove to allow for passage of the tree trunk or to cut a vent to allow a side
branch to escape from the channel. Make sure you secure the base of the tree (which contains the root mass) slightly to the left, right, front or back of the deadwood and not directly below it. You don’t want the root ball located
directly below the bottom of the deadwood.
Step 5 – protect root ball. Step 6 – cut groove. Step 7 – fix tree in groove.
Assembly Step 8: Remove the plastic from around the tree’s root mass and position the tanuki into the container.
Assembly Step 9: Tie the tanuki in place by threading copper wire through each eyelet and twist to secure. (Use copper not aluminium which has a tendency to stretch and break in these situations). The deadwood and live tree MUST be immobilised.
Place bonsai soil into the container and chopstick to eliminate air pockets in the customary fashion. Afterwards soak
the planting in water and protect from sun and drying winds for about two weeks. Then return the planting to full sun. Begin feeding after 3 to 4 weeks. Feed heavily for the next two years. You want to promote as much growth
as possible. Do not repot the tree for at least two years.
Assembly Step 10: The completed tanuki is now ready to begin developing as a bonsai. Once you know the tree is thriving and healthy, begin wiring and shaping branches and carving and treating the areas of deadwood. After about a year the tree will
have hardened into the shape it was bent and the screws or ties may be removed without fear that the tree will spring back.
Step 9 – tie tanuki in place. Step 10 – completed tanuki. Computer rendering of tree in future.
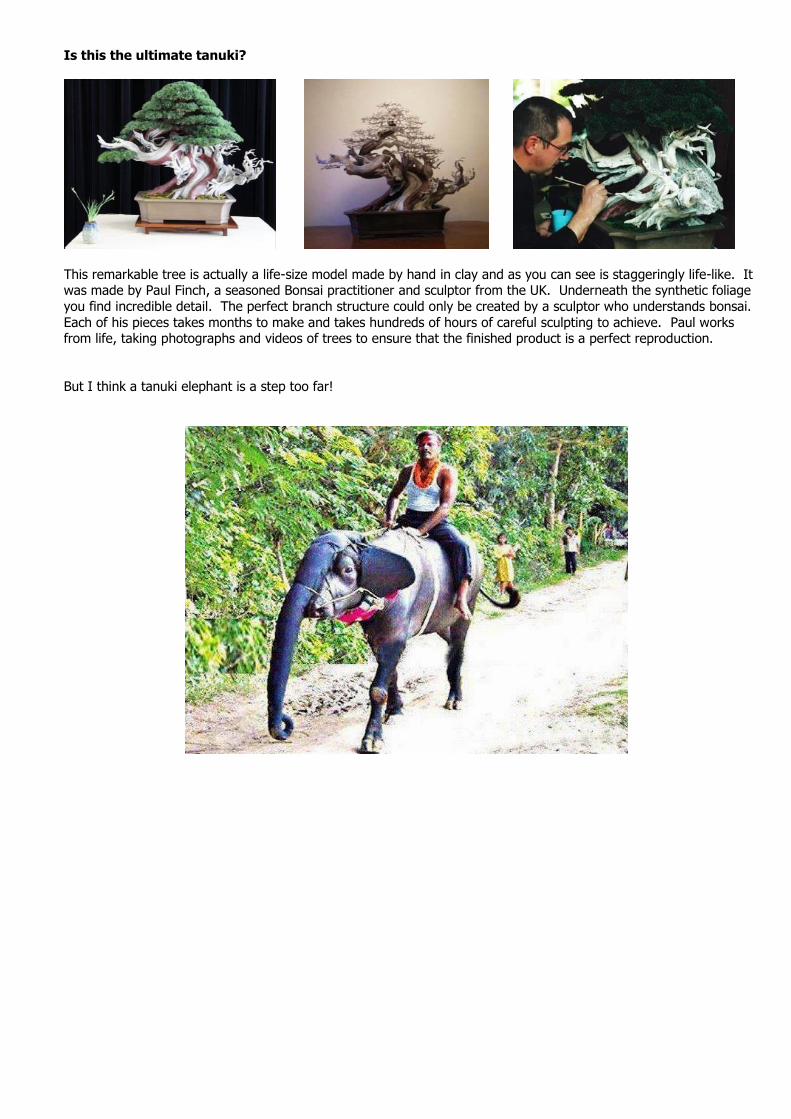
Is this the ultimate tanuki?
This remarkable tree is actually a life-size model made by hand in clay and as you can see is staggeringly life-like. It was made by Paul Finch, a seasoned Bonsai practitioner and sculptor from the UK. Underneath the synthetic foliage
you find incredible detail. The perfect branch structure could only be created by a sculptor who understands bonsai.
Each of his pieces takes months to make and takes hundreds of hours of careful sculpting to achieve. Paul works from life, taking photographs and videos of trees to ensure that the finished product is a perfect reproduction.
But I think a tanuki elephant is a step too far!