ybbeerrooaamm coonnssoollee guuiiddee … · gujarat, india. phone: +91-79- 6405600 ... 5.4...
TRANSCRIPT
CCCYYYBBBEEERRROOOAAAMMM CCCOOONNNSSSOOOLLLEEE GGGUUUIIIDDDEEE
VVVEEERRRSSSIIIOOONNN::: 555...000...666

IMPORTANT NOTICE Elitecore has supplied this Information believing it to be accurate and reliable at the time of printing, but is presented without warranty of any kind, expressed or implied. Users must take full responsibility for their application of any products. Elitecore assumes no responsibility for any errors that may appear in this document. Elitecore reserves the right, without notice to make changes in product design or specifications. Information is subject to change without notice.
SOFTWARE LICENSE
The software described in this document is furnished under the terms of Elitecore’s software license agreement. Please read these terms and conditions carefully before using the software. By using this software, you agree to be bound by the terms and conditions of this license. If you do not agree with the terms of this license, promptly return the unused software and manual (with proof of payment) to the place of purchase for a full refund.
LIMITED WARRANTY
Software: Elitecore warrants for a period of ninety (90) days from the date of shipment from Elitecore: (1) the media on which the Software is furnished will be free of defects in materials and workmanship under normal use; and (2) the Software substantially conforms to its published specifications except for the foregoing, the software is provided AS IS. This limited warranty extends only to the customer as the original licenses. Customers exclusive remedy and the entire liability of Elitecore and its suppliers under this warranty will be, at Elitecore or its service center’s option, repair, replacement, or refund of the software if reported (or, upon, request, returned) to the party supplying the software to the customer. In no event does Elitecore warrant that the Software is error free, or that the customer will be able to operate the software without problems or interruptions.
DISCLAIMER OF WARRANTY
Except as specified in this warranty, all expressed or implied conditions, representations, and warranties including, without limitation, any implied warranty or merchantability, fitness for a particular purpose, non-infringement or arising from a course of dealing, usage, or trade practice, and hereby excluded to the extent allowed by applicable law. In no event will Elitecore or its supplier be liable for any lost revenue, profit, or data, or for special, indirect, consequential, incidental, or punitive damages however caused and regardless of the theory of liability arising out of the use of or inability to use the product even if Elitecore or its suppliers have been advised of the possibility of such damages. In the event shall Elitecore’s or its suppliers liability to the customer, whether in contract, tort (including negligence) or otherwise, exceed the price paid by the customer. The foregoing limitations shall apply even if the above stated warranty fails of its essential purpose. In no event shall Elitecore or its supplier be liable for any indirect, special, consequential, or incidental damages, including, without limitation, lost profits or loss or damage to data arising out of the use or inability to use this manual, even if Elitecore or its suppliers have been advised of the possibility of such damages.
RESTRICTED RIGHTS
Copyright 2000 Elitecore Technologies Ltd. All rights reserved. Cyberoam, Cyberoam logo are trademark of Elitecore Technologies Ltd. Information supplies by Elitecore Technologies Pvt. Ltd. Is believed to be accurate and reliable at the time of printing, but Elitecore Technologies assumes no responsibility for any errors that may appear in this documents. Elitecore Technologies reserves the right, without notice, to make changes in product design or specifications. Information is subject to change without notice
Corporate Headquarters
Elitecore Technologies Ltd. 904 Silicon Tower, Off. C.G. Road, Ahmedabad – 380015, INDIA
www.cyberoam.com
Cyberoam Console Guide Introduction
eLitecore Technologies Ltd. 1
Welcome to Cyberoam Console Guide
Welcome to the console guide of Cyberoam - IT resource management software. Cyberoam Console guide helps you administer, monitor and manage Cyberoam with the help of Console. Note that by default, Cyberoam Console password is ‘admin’. It is recommended to change the default password immediately after Installation.
Guide Audience
Cyberoam Console Guide provides functional and technical information of the Cyberoam Software. This Guide is written to serve as a technical reference and describes features that are specific to the Console. Guide also provides the brief summary on using the Console commands. This guide is intended for the Network Administrators and Support personnel who perform the following tasks: 1. Configure System & Network 2. Manage and maintain Network 3. Manage various services 4. Troubleshooting
This guide is intended for reference purpose and readers are expected to possess basic-to-advanced knowledge of systems networking.
Note The Corporate and individual names, data and images in this guide are for demonstration purposes only and do not reflect the real data
If you are new to the software, use this guide along with the ‘Cyberoam User Guide’
Guide Sets
Guide Describes
Installation & Registration Guide Installation & registration process User Guide Part I – Basic Configuration Basic configuration of Cyberoam Part II – Management Management and Customization of
Cyberoam Detailed statistics – Reports Detailed reports Console Guide Console Management
These documents are available at the site: www.cyberoam.com/cyberoam/product.htm

Cyberoam Console Guide Introduction
eLitecore Technologies Ltd. 2
Technical Support
You may direct all questions, comments, or requests concerning the software you purchased, your registration status, or similar issues to Customer care/service department at the following address: Corporate Office eLitecore Technologies Ltd. 904, Silicon Tower Off C.G. Road Ahmedabad 380015 Gujarat, India. Phone: +91-79- 6405600 Fax: +91-79-6462200 Web site: www.elitecore.com Cyberoam contact: Technical support (Corporate Office): +91-79- 6400707 Email: [email protected] Web site: www.cyberoam.com Visit www.cyberoam.com for the regional and latest contact information.
Typographic Conventions
Material in this manual is presented in text, screen displays, or command-line notation.
Item Convention Example
Server Machine where Cyberoam Software - Server component is installed Client Machine where Cyberoam Software - Client component is installed User The end user Username Username uniquely identifies the user of the system Topic titles Shaded font
typefaces Introduction
Subtitles Bold and Black typefaces
Notation conventions
Navigation link
Bold typeface
Group Management →→→→ Groups →→→→ Create it means, to open the required page click on Group management then on Groups and finally click Create tab
Notes & points to remember
Bold typeface between the black borders
Note
Cyberoam Console Guide Introduction
eLitecore Technologies Ltd. 3
Contents
Welcome to Cyberoam Console Guide .......................................................................................................... 1 Guide Audience .............................................................................................................................................. 1 Guide Sets....................................................................................................................................................... 1 Technical Support........................................................................................................................................... 2 Typographic Conventions............................................................................................................................... 2
Introduction ....................................................................................................................................... 6
Accessing Cyberoam Console........................................................................................................... 6 Accessing Console via TELNET.................................................................................................................... 6
00. Post Installation wizard .............................................................................................................. 8 Change the Deployment mode........................................................................................................................ 8
1. Network configuration................................................................................................................ 13 Set IP Address .............................................................................................................................................. 13 Set Alias........................................................................................................................................................ 14
2. System configuration................................................................................................................... 15 2.1 Set Console Password............................................................................................................................. 15 2.2 Set System Date...................................................................................................................................... 15 2.3 View Access logs.................................................................................................................................... 16 2.4 Set Cyberoam Administrator Email ID................................................................................................... 17 2.5 Traceroute Utility.................................................................................................................................... 18 2.6 Set Module Info ...................................................................................................................................... 18 2.7 Bandwidth Graph Setting ....................................................................................................................... 18 2.8 Advanced NIC Setting............................................................................................................................ 19 2.10 Qmail Server Menu............................................................................................................................... 19 2.0 Exit ......................................................................................................................................................... 21
3. Route configuration..................................................................................................................... 22 3.1 Add Route............................................................................................................................................... 22 3.2 Delete Route ........................................................................................................................................... 23 3.3 Show Route............................................................................................................................................. 23 3.0 Exit ......................................................................................................................................................... 24
4. Cyberoam Console ...................................................................................................................... 25
5. Cyberoam Management.............................................................................................................. 26 5.1 Restart Management Services................................................................................................................. 26 5.2 Remove Firewall Rules........................................................................................................................... 26 5.3 Reset Management Password ................................................................................................................. 27 5.4 Database Utilities.................................................................................................................................... 27 5.5 Restore Backup....................................................................................................................................... 28 5.6 DHCP Client Settings ............................................................................................................................. 28 5.7 View Audit Logs .................................................................................................................................... 28 5.0 Exit ......................................................................................................................................................... 29
Cyberoam Console Guide Introduction
eLitecore Technologies Ltd. 4
6. Upgrade version........................................................................................................................... 30
7. Dialup Connection....................................................................................................................... 32 7.1 Connect Dialup ....................................................................................................................................... 32 7.2 Disconnect Dialup .................................................................................................................................. 32 7.3 Edit PPP Settings .................................................................................................................................... 33 7.4 View PPP Logs ....................................................................................................................................... 33 7.5 View Current PPP Logs.......................................................................................................................... 34 7.6 Initialize Modem..................................................................................................................................... 34 7.7 Start DialonDemand Service .................................................................................................................. 34 7.8 Stop DialonDemand Service................................................................................................................... 35 7.0 Exit ......................................................................................................................................................... 35
8. Register Mail server and Webmail ............................................................................................ 36 8.1 Register Mail Server ............................................................................................................................... 37 8.2 Register Webmail Services..................................................................................................................... 37 8.0 Exit ......................................................................................................................................................... 38
9. DNS Services................................................................................................................................ 39 9.1 Create Domain........................................................................................................................................ 39 9.2 Delete Domain........................................................................................................................................ 39 9.3 Modify entry on Domain ........................................................................................................................ 40 9.4 List of Domains ...................................................................................................................................... 41 9.0 Exit ......................................................................................................................................................... 41
10. Mail Services .............................................................................................................................. 42 10.1 Configure Mail Domains ...................................................................................................................... 42 10.2 Edit Virtual User File............................................................................................................................ 43 10.3 Edit Access Table File .......................................................................................................................... 43 10.4 Flush Mail Queue ................................................................................................................................. 43 10.5 View Mail Logs .................................................................................................................................... 43 10.6 Restart Mail services............................................................................................................................. 44 10.7 Check User Mailbox space ................................................................................................................... 44 10.8 Check Mail Server Partition Size.......................................................................................................... 44 10.11 Exit ..................................................................................................................................................... 44
11. Webmail Services ...................................................................................................................... 45 11.1 Edit Webmail Configuration file .......................................................................................................... 45 11.2 Edit LDAP Configuration file............................................................................................................... 46 11.3 Exit ....................................................................................................................................................... 46
12. Bandwidth Monitor................................................................................................................... 47
13. Shutdown/Reboot Cyberoam ................................................................................................... 48
0. Exit................................................................................................................................................ 48 Annexure I --------------------------------------------------------------------------------------------------------------------------49
Cyberoam Console Guide Introduction
eLitecore Technologies Ltd. 5
Annexure I - Contents
arp______________________________________________________________________49 arping ___________________________________________________________________49 cacheclient _______________________________________________________________50 cacheusage _______________________________________________________________50 clear ____________________________________________________________________50 cpuinfo __________________________________________________________________50 date _____________________________________________________________________51 deletecache _______________________________________________________________53 diskusage ________________________________________________________________53 dmesg ___________________________________________________________________53 exit______________________________________________________________________54 ifconfig __________________________________________________________________55 livemaillog _______________________________________________________________56 lsmod____________________________________________________________________56 mailq ____________________________________________________________________57 meminfo _________________________________________________________________57 netstat ___________________________________________________________________58 ping _____________________________________________________________________60 reboot ___________________________________________________________________63 route ____________________________________________________________________63 shutdown_________________________________________________________________67 tcpdump _________________________________________________________________68 telnet ____________________________________________________________________84 traceroute ________________________________________________________________85 uptime ___________________________________________________________________88 viewmaillog_______________________________________________________________89 vmstat ___________________________________________________________________89 quit _____________________________________________________________________91
Cyberoam Console Guide Introduction
eLitecore Technologies Ltd. 6
IP address of Cyberoam server
Introduction Cyberoam console provides a collection of tools to administer, monitor and control certain Cyberoam system components.
Accessing Cyberoam Console There are two ways to access Cyberoam Console as explained below 1. Direct Console connection - attaching a keyboard and monitor directly to the Cyberoam
server 2. Remote connection - Using remote login utility TELNET - Telnet provides user support for the
Telnet protocol, a remote access protocol you can use to log on to a remote computer, network device, or private TCP/IP network.
Accessing Console via TELNET
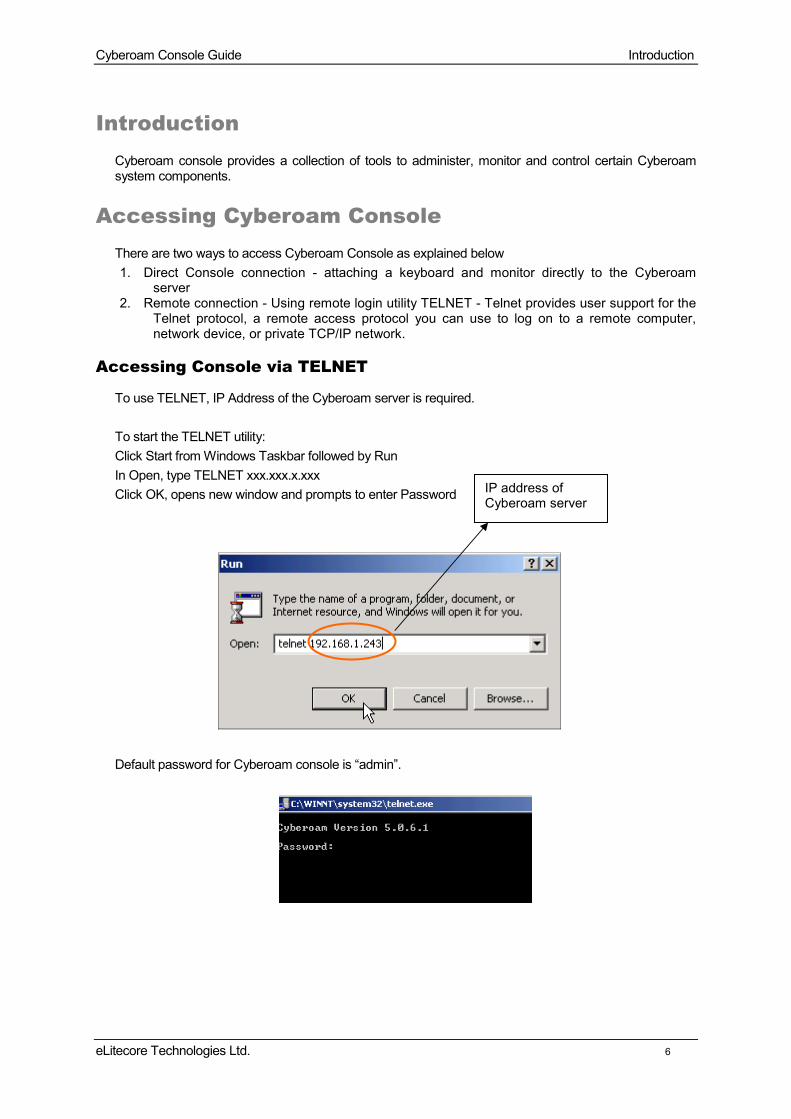
To use TELNET, IP Address of the Cyberoam server is required. To start the TELNET utility: Click Start from Windows Taskbar followed by Run In Open, type TELNET xxx.xxx.x.xxx Click OK, opens new window and prompts to enter Password Default password for Cyberoam console is “admin”.
Cyberoam Console Guide Introduction
eLitecore Technologies Ltd. 7
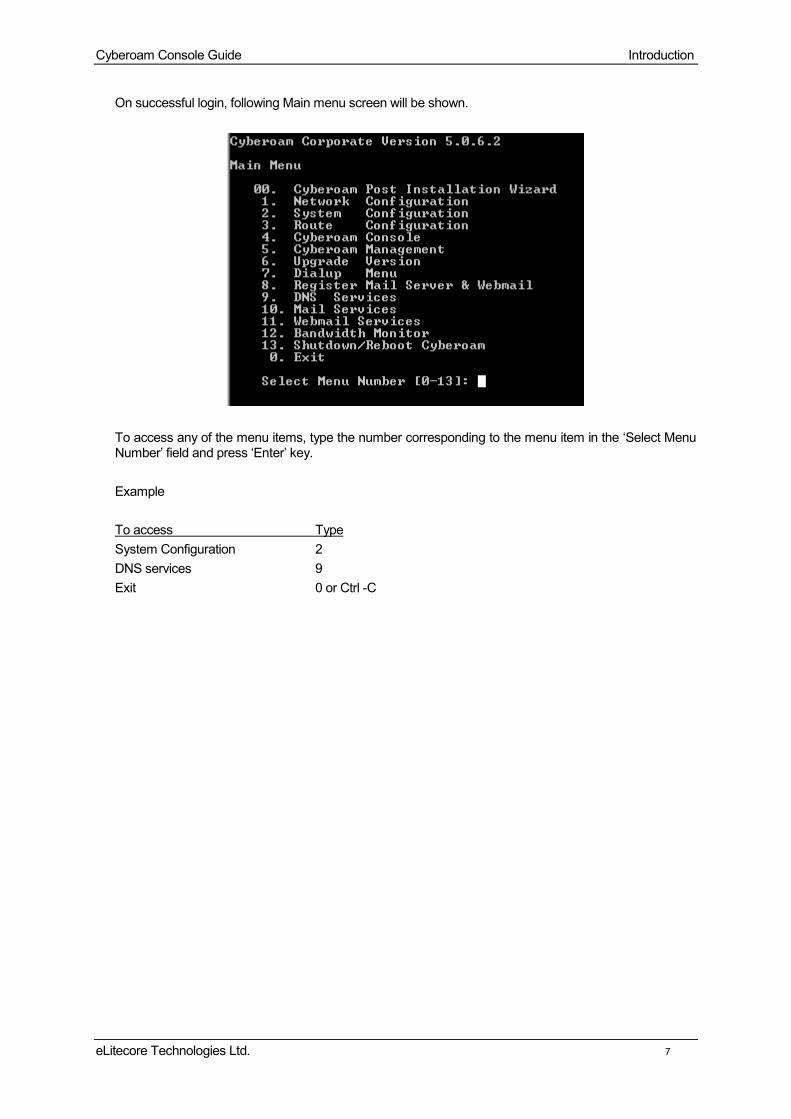
On successful login, following Main menu screen will be shown.
To access any of the menu items, type the number corresponding to the menu item in the ‘Select Menu Number’ field and press ‘Enter’ key. Example To access Type System Configuration 2 DNS services 9 Exit 0 or Ctrl -C

Cyberoam Console Guide Post Installation Wizard
eLitecore Technologies Ltd. 8
00. Post Installation wizard Use this menu to
• View current server configuration • Change deployment mode
Following screen displays the current Ethernet configuration of Internal and External Interface i.e. IP address and Net mask, Gateway details and deployment mode of Cyberoam.
Change the Deployment mode
To change the deployment mode of Cyberoam i.e. from Transparent to Route or vice versa, type ‘Y’ or ‘N’ accordingly and press ‘Enter’ key
Installation of Cyberoam in Network Transparent Mode
Step 1: For placing Cyberoam in Transparent mode, press ‘y’ or ‘Y’ followed by <Enter> Step 2: Enter the IP address by which you wish to manage Cyberoam through the telnet console as well as the Web console

Cyberoam Console Guide Post Installation Wizard
eLitecore Technologies Ltd. 9
Step 3: Enter the Default Gateway name & IP address, all the traffic will be routed to the IP address defined in this screen
Step 4: Update the time zone and current date, if not properly set
Step 5: Enter Administrator Email Id. Please enter the correct Email Id as it will be used to by Cyberoam to send system Alerts
Cyberoam Console Guide Post Installation Wizard
eLitecore Technologies Ltd. 10
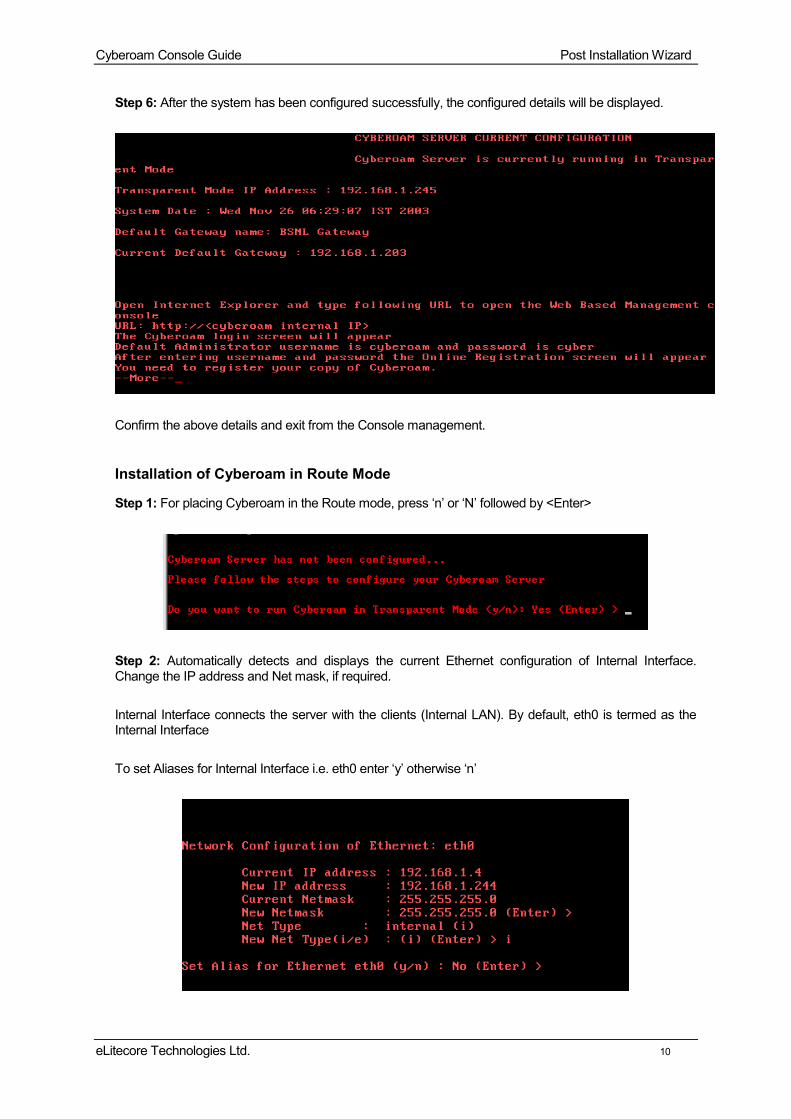
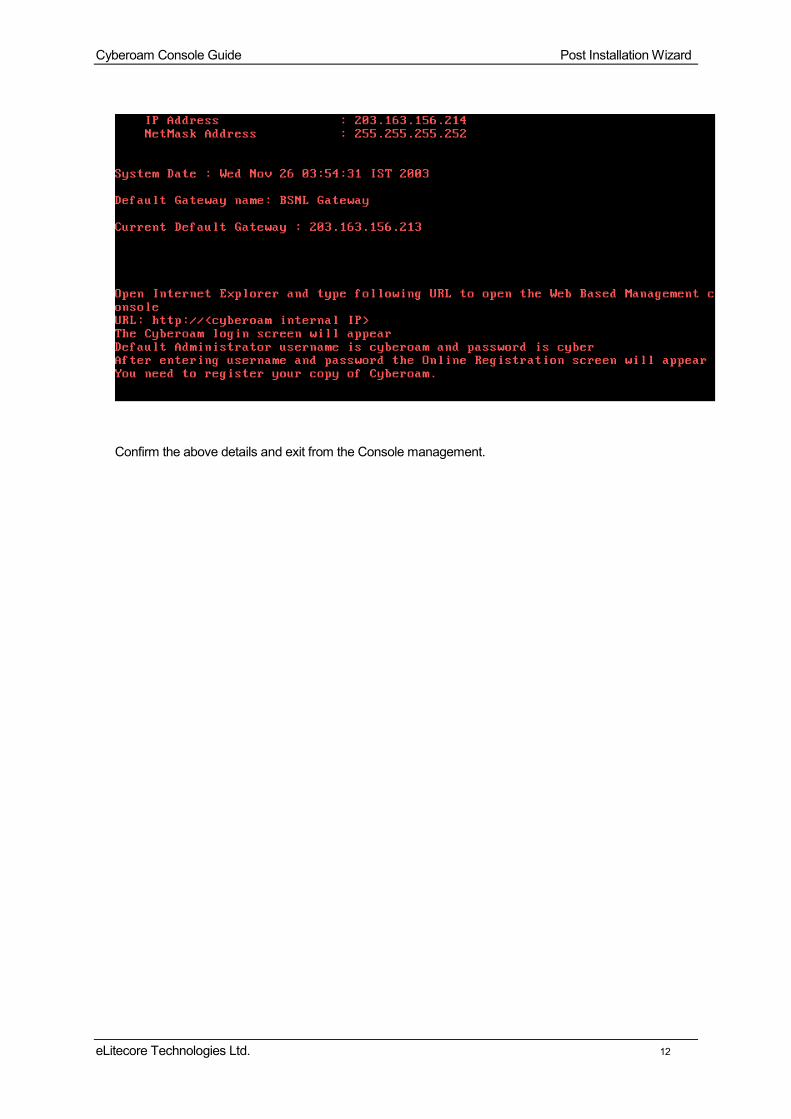
Step 6: After the system has been configured successfully, the configured details will be displayed.
Confirm the above details and exit from the Console management.
Installation of Cyberoam in Route Mode
Step 1: For placing Cyberoam in the Route mode, press ‘n’ or ‘N’ followed by <Enter>
Step 2: Automatically detects and displays the current Ethernet configuration of Internal Interface. Change the IP address and Net mask, if required. Internal Interface connects the server with the clients (Internal LAN). By default, eth0 is termed as the Internal Interface To set Aliases for Internal Interface i.e. eth0 enter ‘y’ otherwise ‘n’

Cyberoam Console Guide Post Installation Wizard
eLitecore Technologies Ltd. 11
Step 3: Automatically detects and displays the current Ethernet configuration of External Interface. Change IP address and subnet mask for the External Interface By default, eth1 is termed as the External Interface To set Aliases for External Interface i.e. eth1 enter ‘y’ otherwise ‘n’
Step 4: Update the time zone and current date, if not properly set
Step 5: If the system is configured successfully, configuration details will be displayed.
Cyberoam Console Guide Post Installation Wizard
eLitecore Technologies Ltd. 12
Confirm the above details and exit from the Console management.
Cyberoam Installation Guide Network Configuration
eLitecore Technologies Ltd. 13
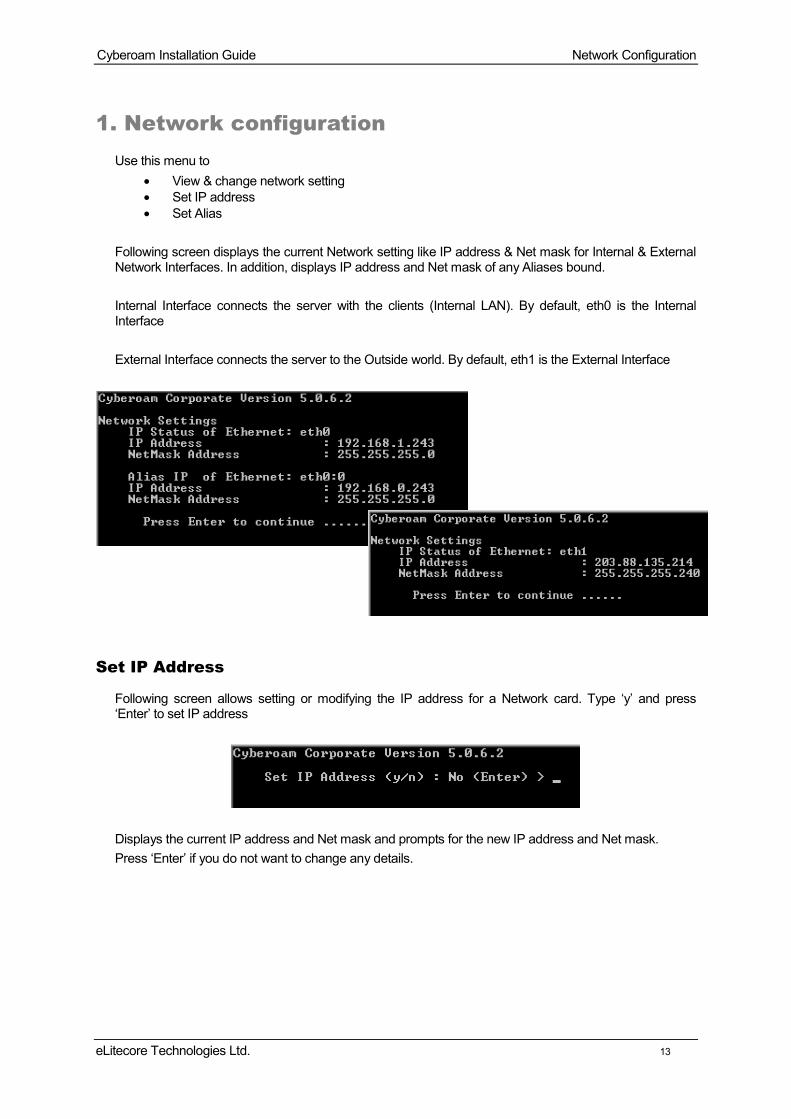
1. Network configuration Use this menu to
• View & change network setting • Set IP address • Set Alias
Following screen displays the current Network setting like IP address & Net mask for Internal & External Network Interfaces. In addition, displays IP address and Net mask of any Aliases bound. Internal Interface connects the server with the clients (Internal LAN). By default, eth0 is the Internal Interface External Interface connects the server to the Outside world. By default, eth1 is the External Interface
Set IP Address
Following screen allows setting or modifying the IP address for a Network card. Type ‘y’ and press ‘Enter’ to set IP address
Displays the current IP address and Net mask and prompts for the new IP address and Net mask. Press ‘Enter’ if you do not want to change any details.
Cyberoam Installation Guide Network Configuration
eLitecore Technologies Ltd. 14
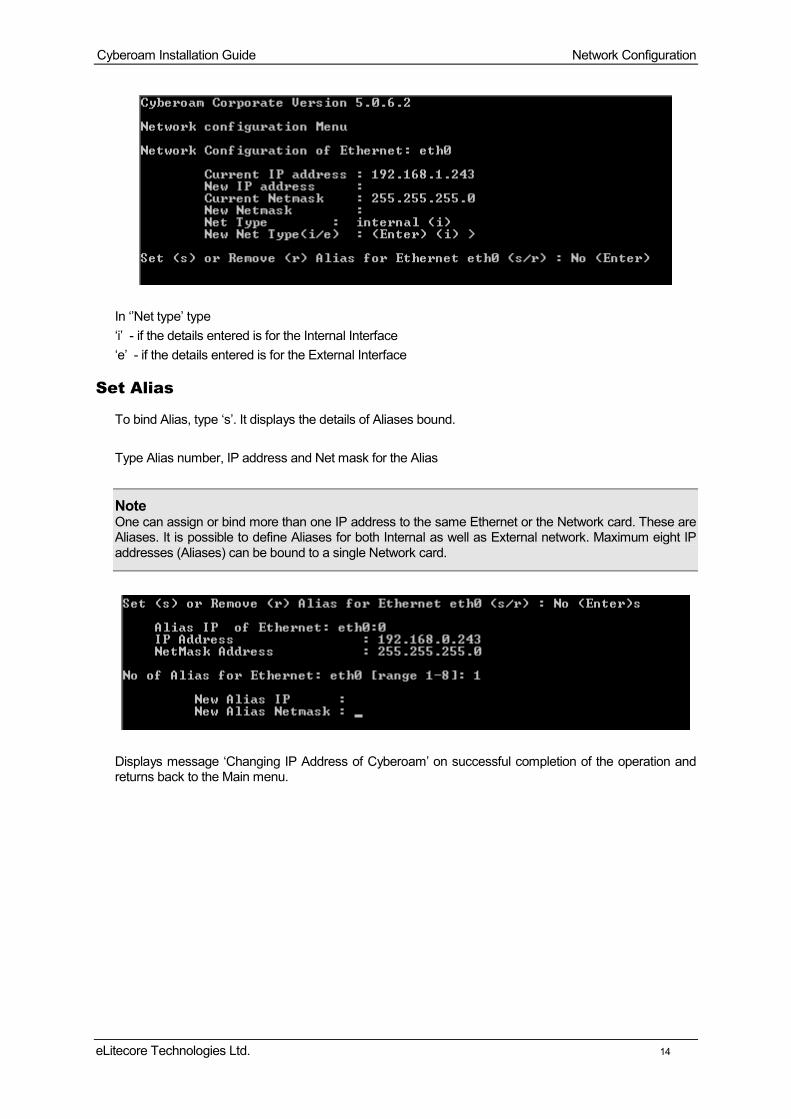
In ‘’Net type’ type ‘i’ - if the details entered is for the Internal Interface ‘e’ - if the details entered is for the External Interface
Set Alias
To bind Alias, type ‘s’. It displays the details of Aliases bound. Type Alias number, IP address and Net mask for the Alias
Note One can assign or bind more than one IP address to the same Ethernet or the Network card. These are Aliases. It is possible to define Aliases for both Internal as well as External network. Maximum eight IP addresses (Aliases) can be bound to a single Network card.
Displays message ‘Changing IP Address of Cyberoam’ on successful completion of the operation and returns back to the Main menu.

Cyberoam Installation Guide System Configuration
eLitecore Technologies Ltd. 15
2. System configuration Use this menu to
• View & change various system properties
2.1 Set Console Password
Allows changing the Console password Type new password, retype for confirmation, and press ‘Enter’ key
Displays ‘Password Changed’ if password is changed successfully Press Enter to return to the System Setting Menu.
2.2 Set System Date
Allows changing Time zone and date Type ‘y’ to reset the time followed by ‘Enter’ key
Select the appropriate zone by using ‘Tab’ key and press ‘OK’ followed by ‘Enter’ key
Cyberoam Installation Guide System Configuration
eLitecore Technologies Ltd. 16
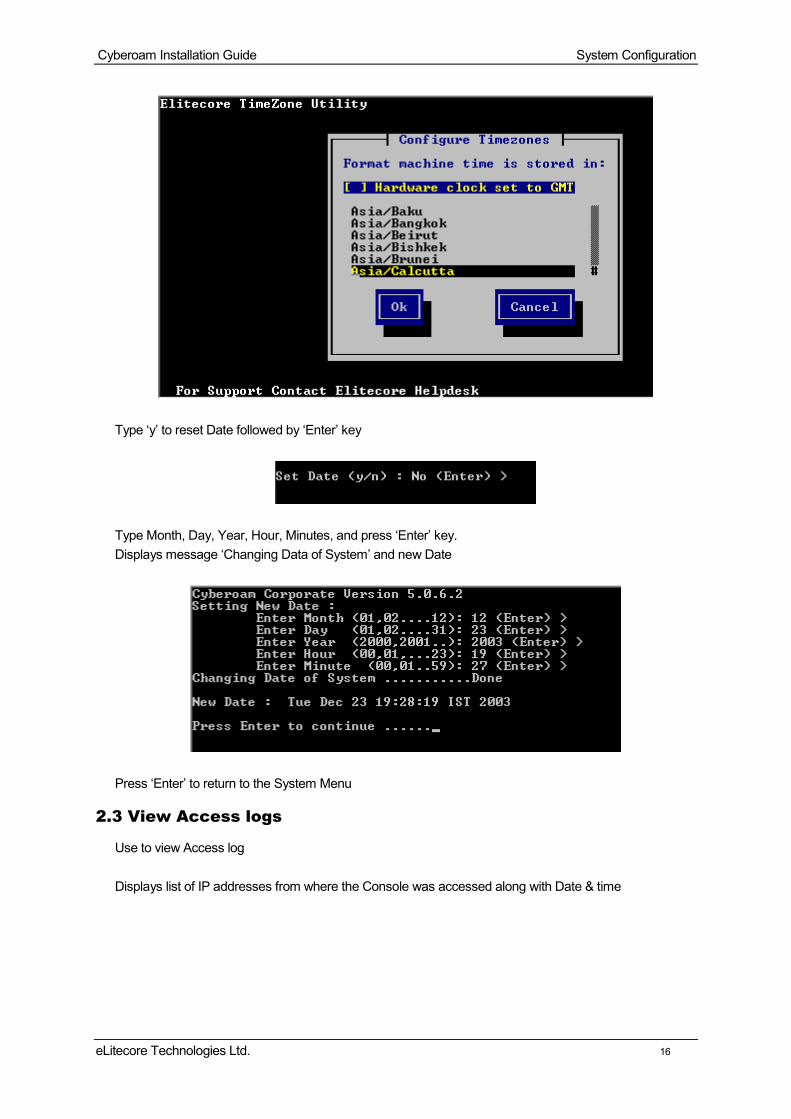
Type ‘y’ to reset Date followed by ‘Enter’ key
Type Month, Day, Year, Hour, Minutes, and press ‘Enter’ key. Displays message ‘Changing Data of System’ and new Date
Press ‘Enter’ to return to the System Menu
2.3 View Access logs
Use to view Access log Displays list of IP addresses from where the Console was accessed along with Date & time

Cyberoam Installation Guide System Configuration
eLitecore Technologies Ltd. 17
2.4 Set Cyberoam Administrator Email ID
Use to change the email id of the Cyberoam Administrator. Cyberoam server uses this Email ID to send various System Alerts. Type the Email ID and press ‘Enter’. It displays the new Email ID that has been set.
Press ‘Enter’ to return to the System Menu
Cyberoam Installation Guide System Configuration
eLitecore Technologies Ltd. 18
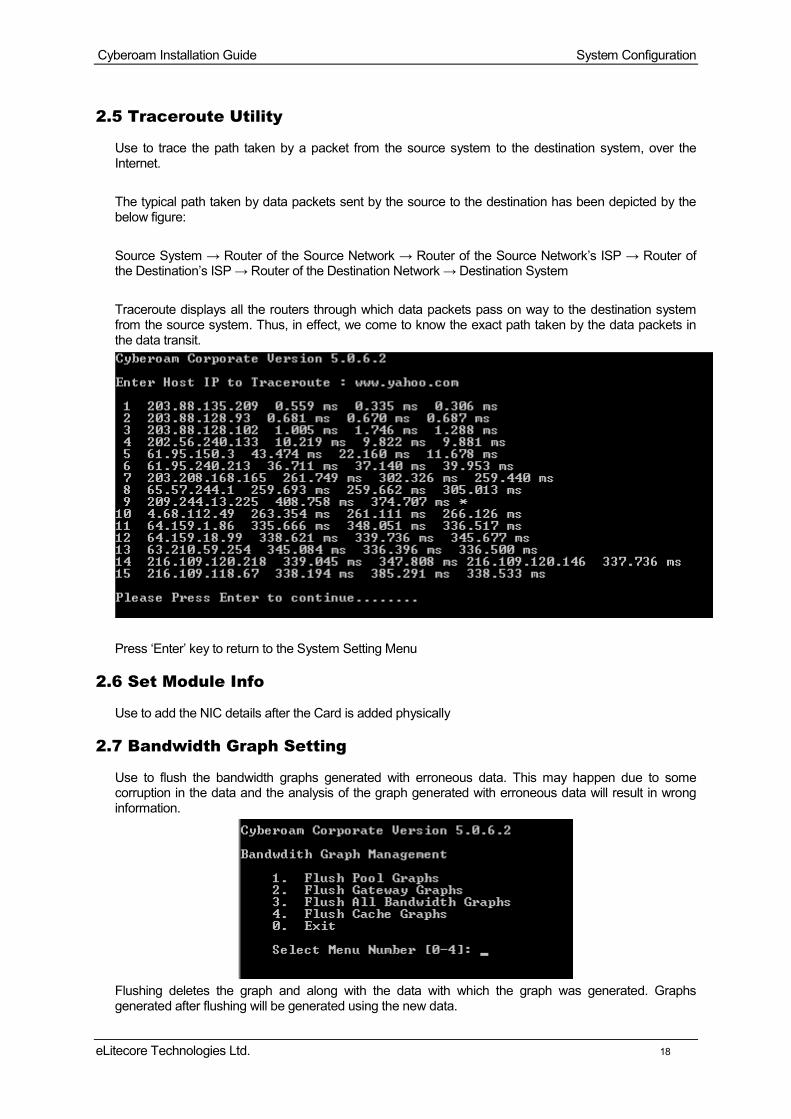
2.5 Traceroute Utility
Use to trace the path taken by a packet from the source system to the destination system, over the Internet. The typical path taken by data packets sent by the source to the destination has been depicted by the below figure: Source System → Router of the Source Network → Router of the Source Network’s ISP → Router of the Destination’s ISP → Router of the Destination Network → Destination System Traceroute displays all the routers through which data packets pass on way to the destination system from the source system. Thus, in effect, we come to know the exact path taken by the data packets in the data transit.
Press ‘Enter’ key to return to the System Setting Menu
2.6 Set Module Info
Use to add the NIC details after the Card is added physically
2.7 Bandwidth Graph Setting
Use to flush the bandwidth graphs generated with erroneous data. This may happen due to some corruption in the data and the analysis of the graph generated with erroneous data will result in wrong information.
Flushing deletes the graph and along with the data with which the graph was generated. Graphs generated after flushing will be generated using the new data.
Cyberoam Installation Guide System Configuration
eLitecore Technologies Ltd. 19
2.7.1 Flush Host group Graphs
Use to flush the graph generated for different Host groups defined in the Cyberoam
2.7.2 Flush Gateway Graphs
Use to flush the graph generated for different Gateways defined in the Cyberoam
2.7.3 Flush All Bandwidth Graphs
Use to flush all the Bandwidth graphs generated
2.7.4 Flush Cache Graphs
Use to flush the Cache graphs generated
2.7.0 Exit
Type ‘0’ to exit from the Bandwidth Graph Menu and return to the System Settings Menu
2.8 Advanced NIC Setting
Use to add a new Network card Displays total cards configured in the Server. Press ‘Enter’ followed by ‘y’ to add a new card
Searches for the newly added card and if not found returns back to the System setting menu otherwise allows to enter the details of the card.
2.10 Qmail Server Menu
Use to add and configure Mail server other than Cyberoam mail server, which is SendMail by default.
2.10.1 Domain Name of Qmail server
Define the domain name for which the Qmail server will accept mails Type domain name and press ‘Enter’ key

Cyberoam Installation Guide System Configuration
eLitecore Technologies Ltd. 20
Message ‘Domain Added Successfully’ displayed if domain added successfully
Press ‘Enter’ key to return to the Qmail menu
2.10.2 User Migration Utility for Qmail
Cyberoam mail server – SendMail uses LDAP based Authentication for Users and Qmail does not support LDAP. To use the Users created in SendMail by Qmail you have to make Qmail compatible with the SendMail. Use this menu to modify the User entries in LDAP so that it becomes compatible with Qmail and Qmail server can use the Cyberoam LDAP server for user authentication. Type ‘y’ to modify the user entries Message ‘User migration completed successfully’ displayed if users are migrated successfully
Press ‘Enter’ key after the to return to the Qmail menu
2.10.3 Configuration Menu
Use to configure the Qmail for Users
2.10.3.1 Modify User Quota
Use to limit the size of messages the User can receive and send.

Cyberoam Installation Guide System Configuration
eLitecore Technologies Ltd. 21
Type the User name whose limit you want to change and specify the size
2.10.3.2 Modify User Account Status
Use to change the user status, can Activate or Deactivate the User
2.10.3.3 Modify User Detail
Use to modify the User details like Address, ID, Account date
2.10.3.4 Disable Forwarding of User
If enabled, disables the message forwarding for the user
2.10.3.5 Disable Autoresponder of User
If enabled, disables the Autoresponder option
2.10.3.6 Check User property
Use to view the User properties set
2.10.3.7 Exit
Type ‘7’ to exit from the Qmail Domain and User script menu and return to the Qmail Menu
2.10.4 Exit
Type ‘4’ to exit from the Qmail menu and return to the System setting Menu
2.0 Exit
Type ‘0’ to exit from the System setting menu and return to the Cyberoam Main Menu

Cyberoam Installation Guide Route Configuration
eLitecore Technologies Ltd. 22
3. Route configuration Cyberoam supports two types of Routes: 1. Permanent – These routes once created, are saved permanently until you explicitly delete them. In
this section, we are talking about permanent routes. 2. Temporary – Flushed when the system is rebooted. Use option 4 – Cyberoam Console in
Cyberoam Main menu to define them. Use to configure and view permanent Route details
3.1 Add Route
Use to add 1) Network route 2) Host route
3.1.1 Add Network Route
Use to add route for the Network Type Network, Net mask and Gateway Address and press ‘Enter’

Cyberoam Installation Guide Route Configuration
eLitecore Technologies Ltd. 23
3.1.2 Add Host route
Use to add route for a single Host Type Host and Gateway Address and press ‘Enter’
3.1.0 Exit
Type ‘0’ to exit from the Add Route menu and return to the Routing tables Main Menu
3.2 Delete Route
Use to delete Network or Host route
3.2.1 Delete Network Route
Use to delete the Network route already created. Type the Network, Subnet mask and Gateway address for the Network to be deleted.
3.2.2 Delete Host Route
Use to delete the Host route already created. Type the IP address of the Host to be deleted.
3.2.0 Exit
Type ‘0’ to exit from the Add Route menu and return to the Routing tables Main Menu
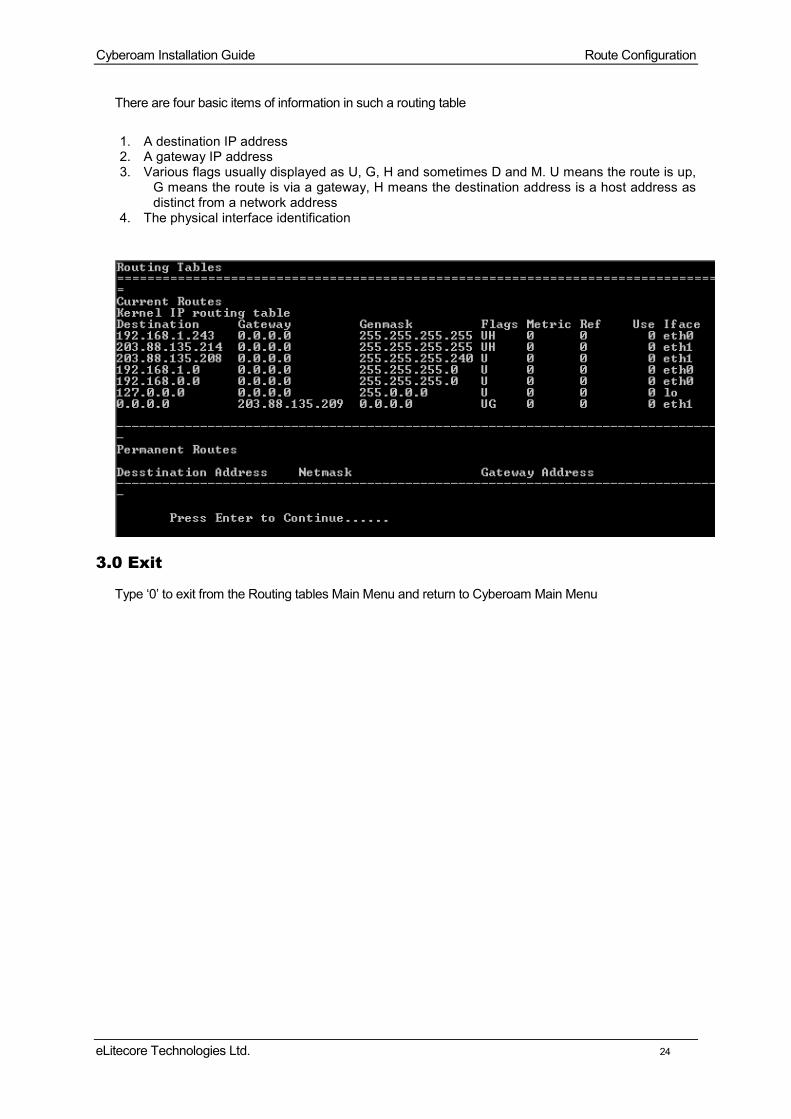
3.3 Show Route
Use to view the routing table Routing is the technique by which data finds its way from one host computer to another. Within any host, there will be a routing table that the host uses to determine which physical interface address to use for outgoing IP datagrams.
Cyberoam Installation Guide Route Configuration
eLitecore Technologies Ltd. 24
There are four basic items of information in such a routing table 1. A destination IP address 2. A gateway IP address 3. Various flags usually displayed as U, G, H and sometimes D and M. U means the route is up,
G means the route is via a gateway, H means the destination address is a host address as distinct from a network address
4. The physical interface identification
3.0 Exit
Type ‘0’ to exit from the Routing tables Main Menu and return to Cyberoam Main Menu

Cyberoam Installation Guide Cyberoam Console
eLitecore Technologies Ltd. 25
4. Cyberoam Console Use to perform various checks and view logs for troubleshooting Refer to Annexure I for the details of various commands that can be used. Type ‘help’ and press ‘Enter’ at the prompt to view the list of commands supported.

Cyberoam Console Guide Cyberoam Management
eLitecore Technologies Ltd. 26
5. Cyberoam Management Use this menu to
• Restart management services • Reset Web management password • Restore Backup • Remove Firewall rules • Manage various Databases • Setup/Configure DHCP client • View Audit logs
5.1 Restart Management Services
Use to restart the Authentication server Message ‘Restarting Authentication service ...... Done’ displayed Press ‘Enter’ to return to the Cyberoam Management menu.
5.2 Remove Firewall Rules
Firewall defines certain rules that determine what traffic should be allowed in or out of the Internal network. One can restrict access to certain IP addresses or domain names, or block certain traffic by blocking the TCP/IP ports used.
Cyberoam Console Guide Cyberoam Management
eLitecore Technologies Ltd. 27
By default, Cyberoam does not allow outbound traffic to pass through. Removing all the firewall rules will allow all the inbound and outbound traffic to pass through Cyberoam.
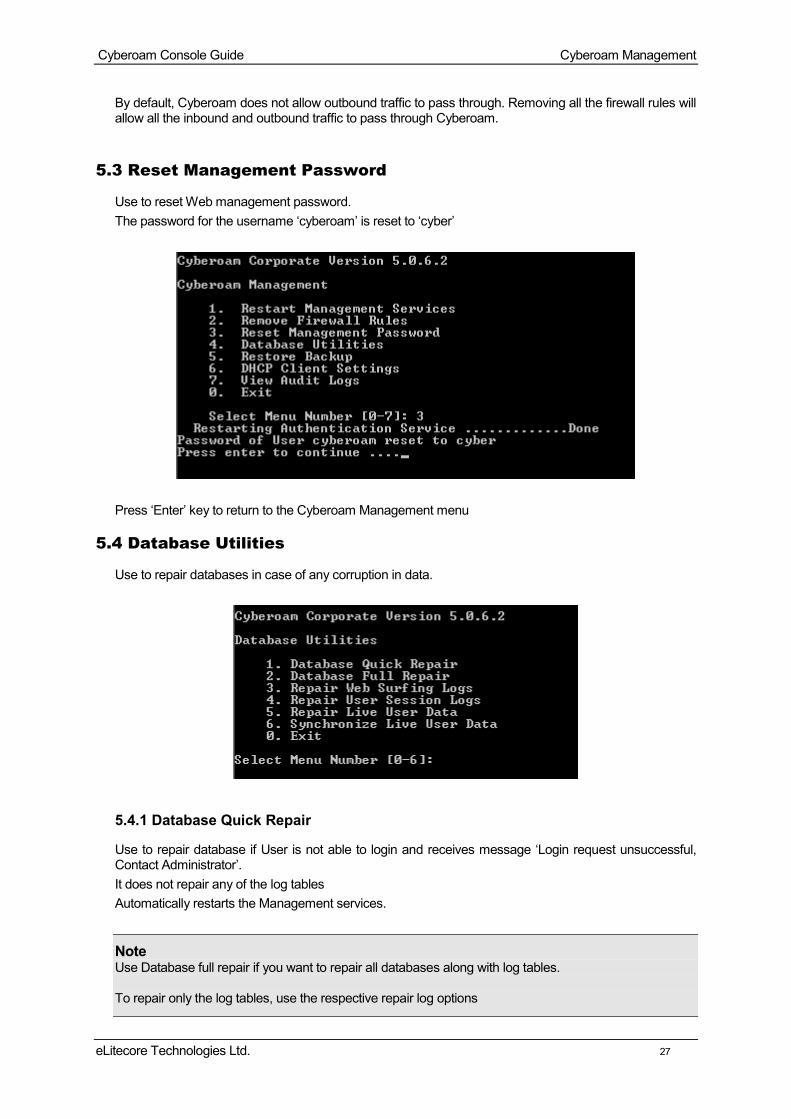
5.3 Reset Management Password
Use to reset Web management password. The password for the username ‘cyberoam’ is reset to ‘cyber’
Press ‘Enter’ key to return to the Cyberoam Management menu
5.4 Database Utilities
Use to repair databases in case of any corruption in data.
5.4.1 Database Quick Repair
Use to repair database if User is not able to login and receives message ‘Login request unsuccessful, Contact Administrator’. It does not repair any of the log tables Automatically restarts the Management services.
Note Use Database full repair if you want to repair all databases along with log tables. To repair only the log tables, use the respective repair log options

Cyberoam Console Guide Cyberoam Management
eLitecore Technologies Ltd. 28
5.4.2 Database Full Repair
Use this repair if any inconsistency found in any of the log data tables or user database. Automatically restarts the Management services.
5.4.3 Repair Web Surfing logs
Use to repair Web surfing log tables if any inconsistency found in the log data tables. Web surfing log stores the information of all the websites visited by all the users.
5.4.4 Repair User Session logs
Use to repair User Session log tables Every time the user logs in, session is created. User session log stores the session entries of all the users and specifies the login and logout time.
5.4.5 Repair Live User Data
Use to repair Live User data table
5.4.6 Synchronize Live User Data
Use to synchronize Live User data table
5.4.0 Exit
Type ‘0’ to exit from the Database Utilities Menu and return to Cyberoam Management Menu
Note Following options does not automatically restart the Management services: 1. Repair Web surfing log 2. Repair User session log 3. Repair Live User data 4. Synchronize Live User data
5.5 Restore Backup
Use to restore backup taken from Web Interface
5.6 DHCP Client Settings
Use to enable DHCP for a particular interface. The configured interface will obtain an IP address automatically from a DHCP server running on the network connected to that interface.
5.7 View Audit Logs
Use to view Audit log This log stores the details of all the actions performed the User administrating Cyberoam. Displays operation performed, IP address of the User and result of the operation
Cyberoam Console Guide Cyberoam Management
eLitecore Technologies Ltd. 29
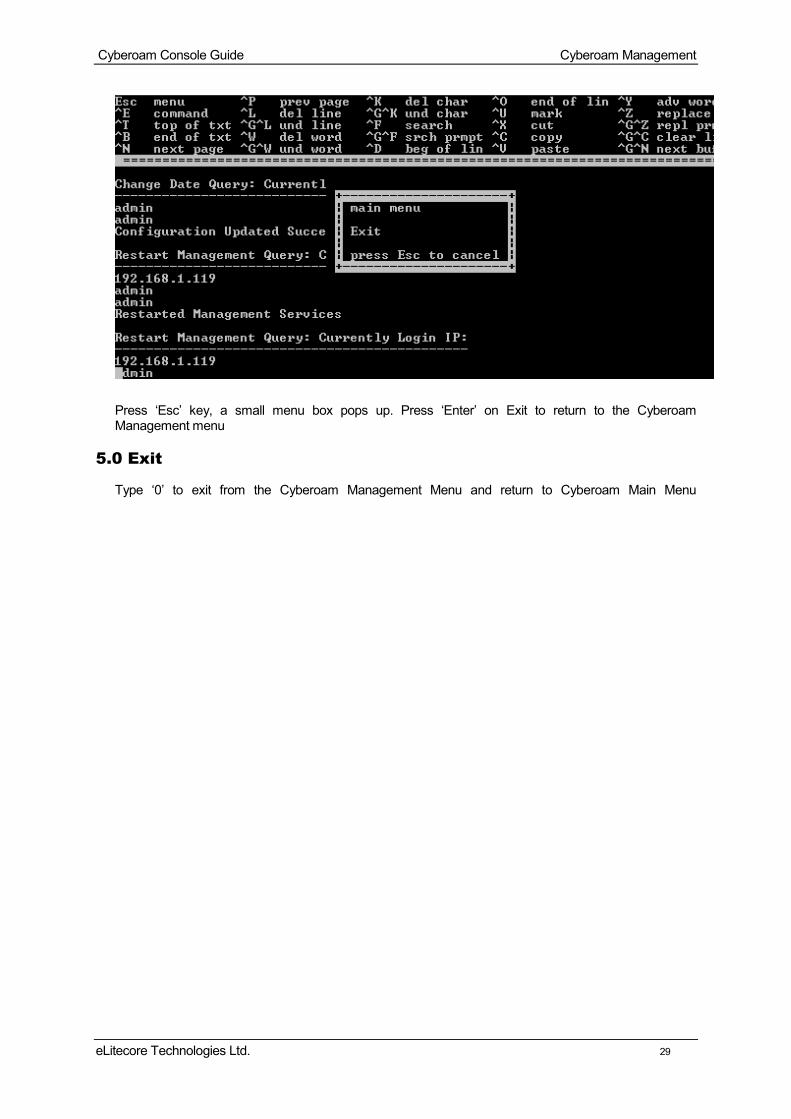
Press ‘Esc’ key, a small menu box pops up. Press ‘Enter’ on Exit to return to the Cyberoam Management menu
5.0 Exit
Type ‘0’ to exit from the Cyberoam Management Menu and return to Cyberoam Main Menu
Cyberoam Console Guide Upgrade Version
eLitecore Technologies Ltd. 30
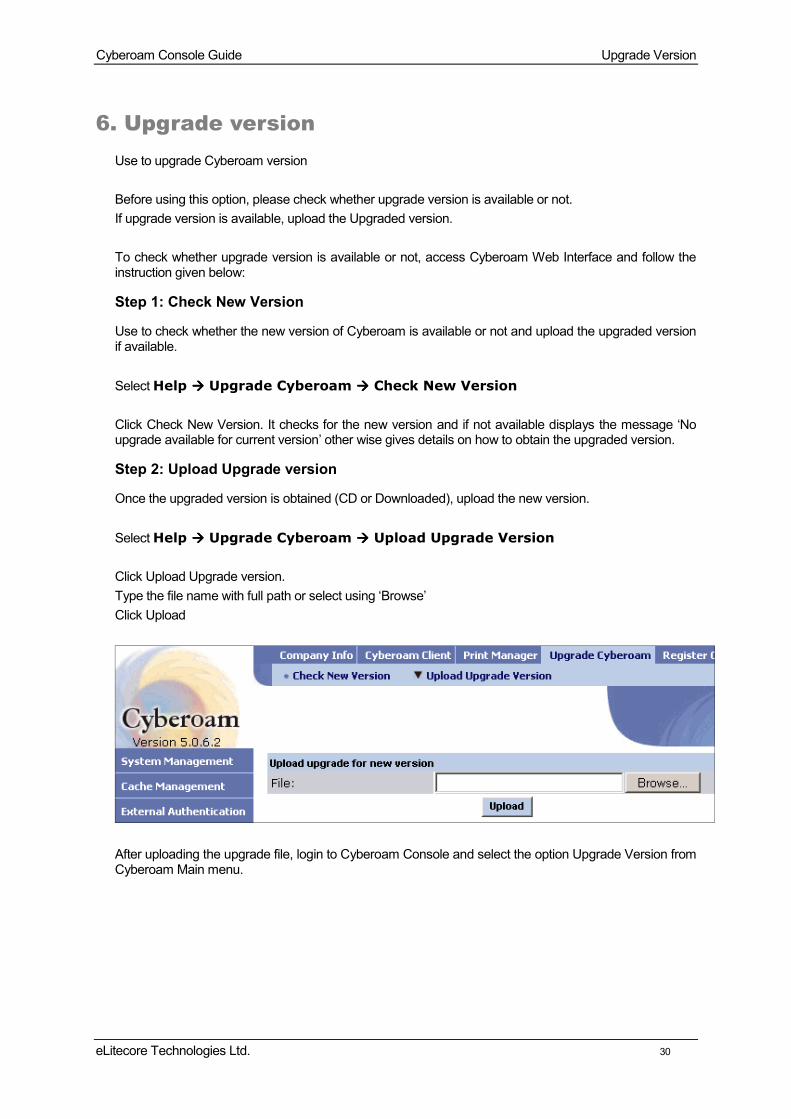
6. Upgrade version Use to upgrade Cyberoam version Before using this option, please check whether upgrade version is available or not. If upgrade version is available, upload the Upgraded version. To check whether upgrade version is available or not, access Cyberoam Web Interface and follow the instruction given below:
Step 1: Check New Version
Use to check whether the new version of Cyberoam is available or not and upload the upgraded version if available. Select Help Upgrade Cyberoam Check New Version Click Check New Version. It checks for the new version and if not available displays the message ‘No upgrade available for current version’ other wise gives details on how to obtain the upgraded version.
Step 2: Upload Upgrade version
Once the upgraded version is obtained (CD or Downloaded), upload the new version. Select Help Upgrade Cyberoam Upload Upgrade Version Click Upload Upgrade version. Type the file name with full path or select using ‘Browse’ Click Upload
After uploading the upgrade file, login to Cyberoam Console and select the option Upgrade Version from Cyberoam Main menu.

Cyberoam Console Guide Upgrade Version
eLitecore Technologies Ltd. 31
Follow the screen instructions and upgrade the Cyberoam version Some error you may come across at the time of upgrading the version:
1. Error message: “Upgrade File not found. Please upload version File Properly” Reason/Solution: This error may occur if the upgrade file is not uploaded from Cyberoam Web Interface. Go to Cyberoam Web Interface and upload the file again
2. Error message: “System requires Restart of Cyberoam, Please reboot System before
doing upgrade” Reason/Solution: This error may occur if system is in inconsistent state, reboot the system from Cyberoam Console and try again. If still not able to upgrade contact Cyberoam Support
3. Error message/Solution: “Could not extract upgrade file, Please upload upgrade file properly” Reason/Solution: This error may occur if upgrade file is corrupted, download Upgrade file again and repeat the above steps to upgrade
4. Error message: “Could not find upgrade file, Please upload upgrade file properly” Reason/Solution: This error may occur if upgrade file is corrupted, download Upgrade file again and repeat the above steps to upgrade
5. Error message: “Cyberoam already Upgraded to Version” Reason/Solution: This error may occur if you try to upgrade to the same version that is running currently
6. Error message: “Cyberoam can not be upgraded from Current Version to Newer Version” Reason/Solution: This error may occur if you are trying to upgrade the version, which is lower than the current version i.e. from Version 5.0.6.2 to Version 5.0.6.0 or from Version 5.0.6.2 to Version 4.0.0
Cyberoam Console Guide Dialup Connection
eLitecore Technologies Ltd. 32
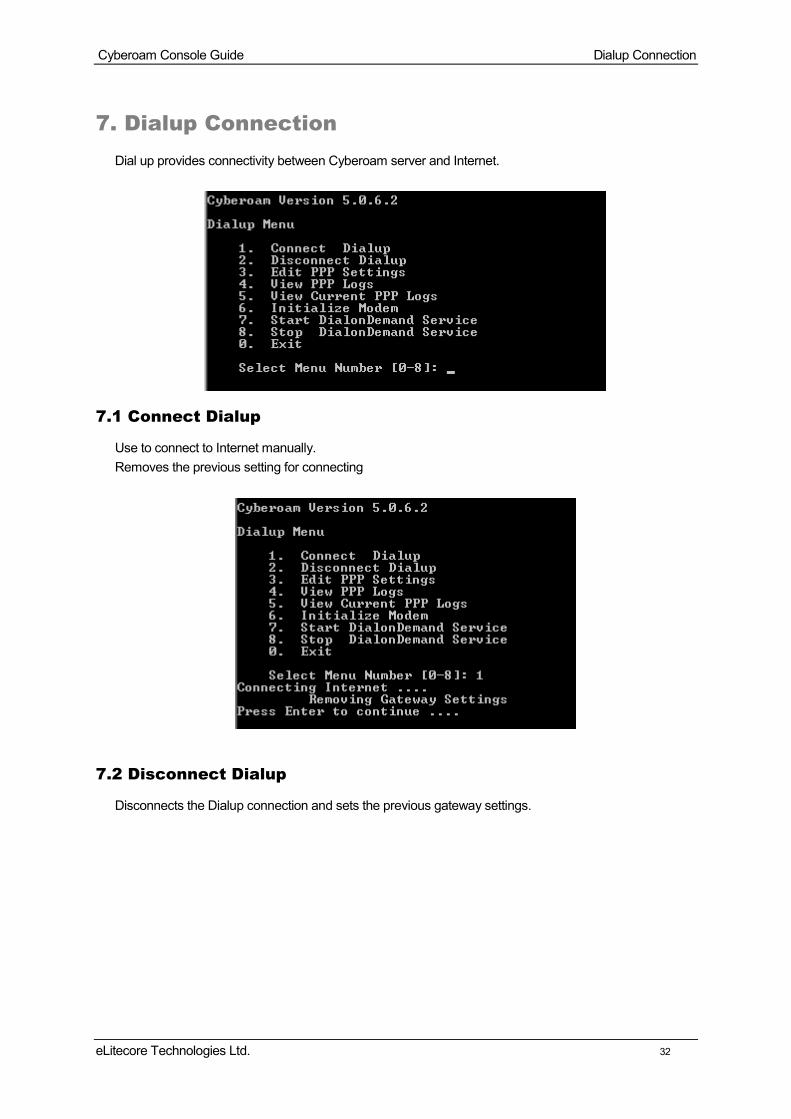
7. Dialup Connection Dial up provides connectivity between Cyberoam server and Internet.
7.1 Connect Dialup
Use to connect to Internet manually. Removes the previous setting for connecting
7.2 Disconnect Dialup
Disconnects the Dialup connection and sets the previous gateway settings.
Cyberoam Console Guide Dialup Connection
eLitecore Technologies Ltd. 33
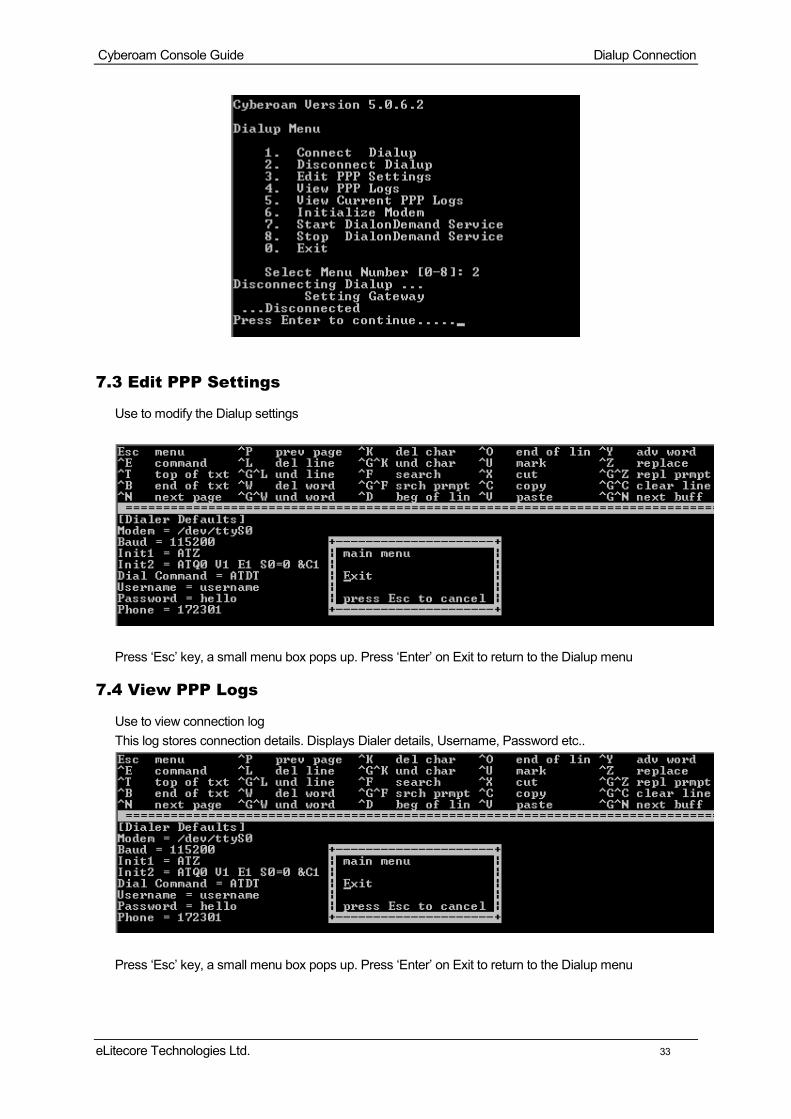
7.3 Edit PPP Settings
Use to modify the Dialup settings
Press ‘Esc’ key, a small menu box pops up. Press ‘Enter’ on Exit to return to the Dialup menu
7.4 View PPP Logs
Use to view connection log This log stores connection details. Displays Dialer details, Username, Password etc..
Press ‘Esc’ key, a small menu box pops up. Press ‘Enter’ on Exit to return to the Dialup menu
Cyberoam Console Guide Dialup Connection
eLitecore Technologies Ltd. 34
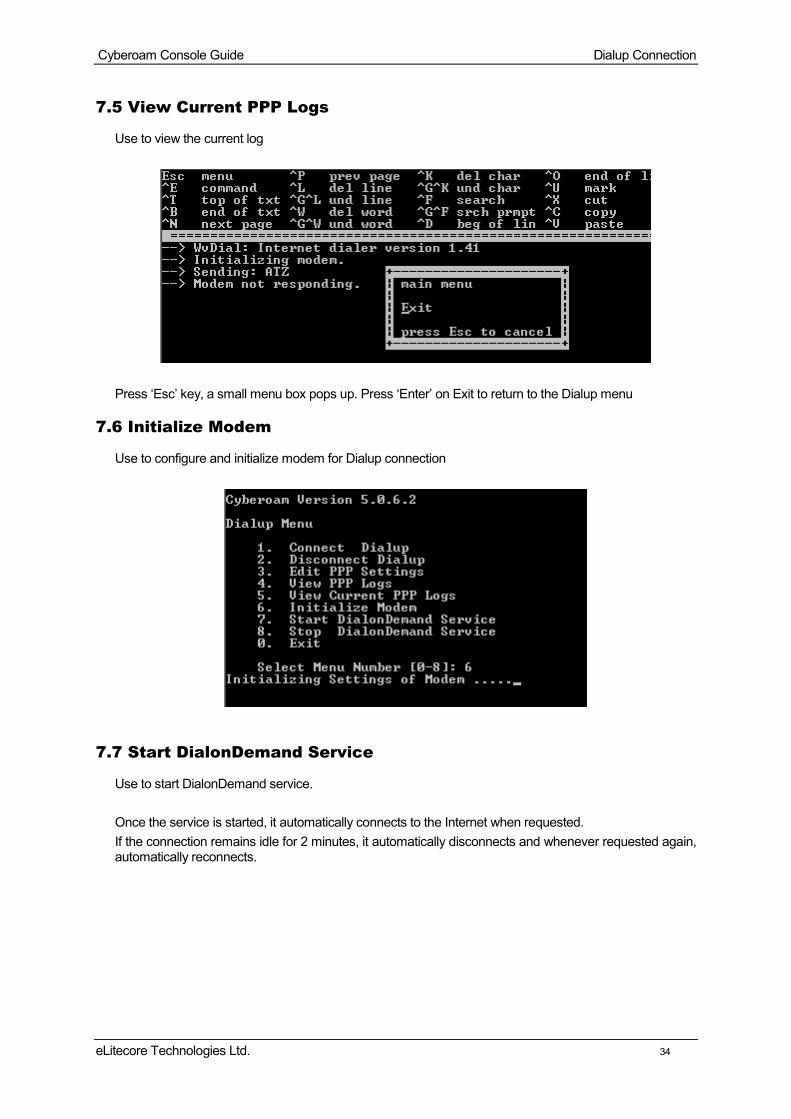
7.5 View Current PPP Logs
Use to view the current log
Press ‘Esc’ key, a small menu box pops up. Press ‘Enter’ on Exit to return to the Dialup menu
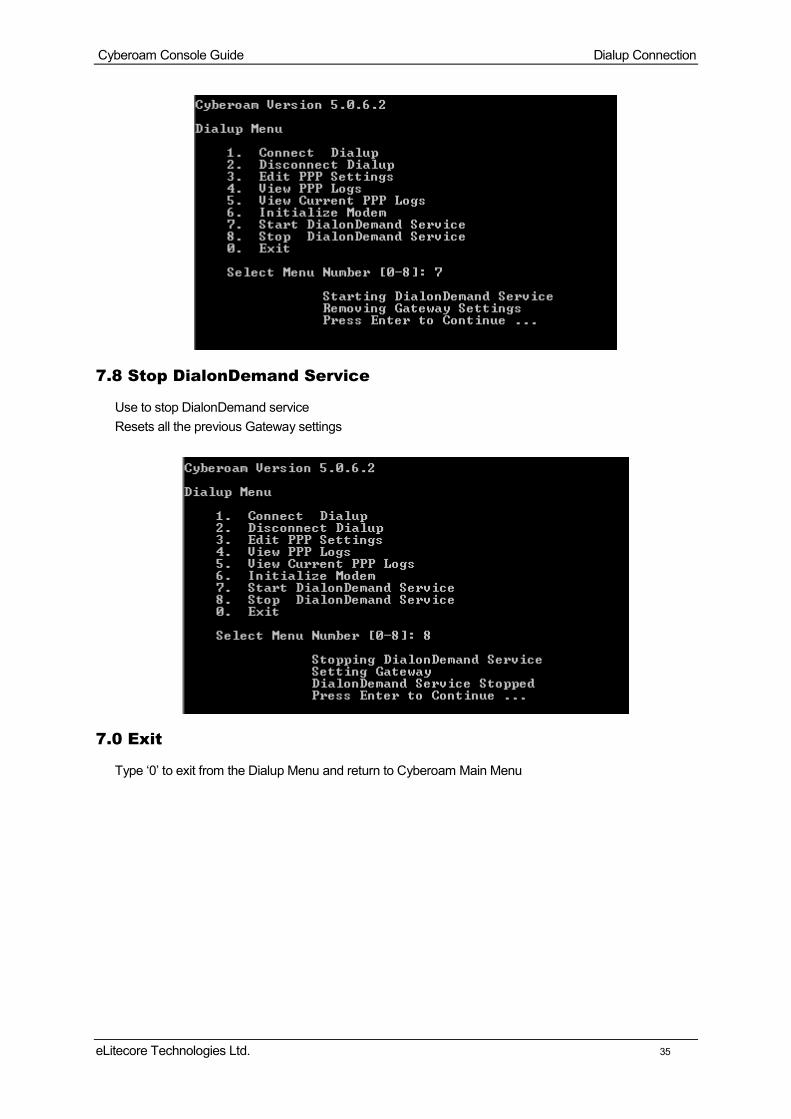
7.6 Initialize Modem
Use to configure and initialize modem for Dialup connection
7.7 Start DialonDemand Service
Use to start DialonDemand service. Once the service is started, it automatically connects to the Internet when requested. If the connection remains idle for 2 minutes, it automatically disconnects and whenever requested again, automatically reconnects.
Cyberoam Console Guide Dialup Connection
eLitecore Technologies Ltd. 35
7.8 Stop DialonDemand Service
Use to stop DialonDemand service Resets all the previous Gateway settings
7.0 Exit
Type ‘0’ to exit from the Dialup Menu and return to Cyberoam Main Menu
Cyberoam Console Guide Register services
eLitecore Technologies Ltd. 36
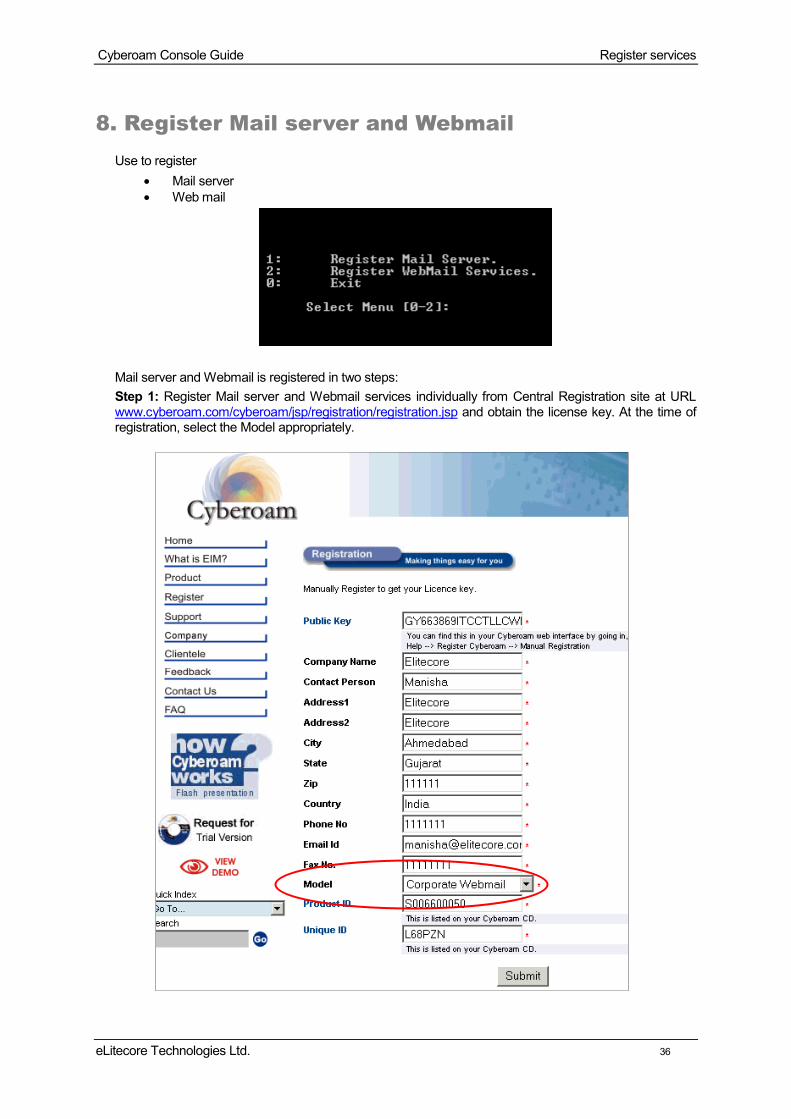
8. Register Mail server and Webmail Use to register
• Mail server • Web mail
Mail server and Webmail is registered in two steps: Step 1: Register Mail server and Webmail services individually from Central Registration site at URL www.cyberoam.com/cyberoam/jsp/registration/registration.jsp and obtain the license key. At the time of registration, select the Model appropriately.
Cyberoam Console Guide Register services
eLitecore Technologies Ltd. 37
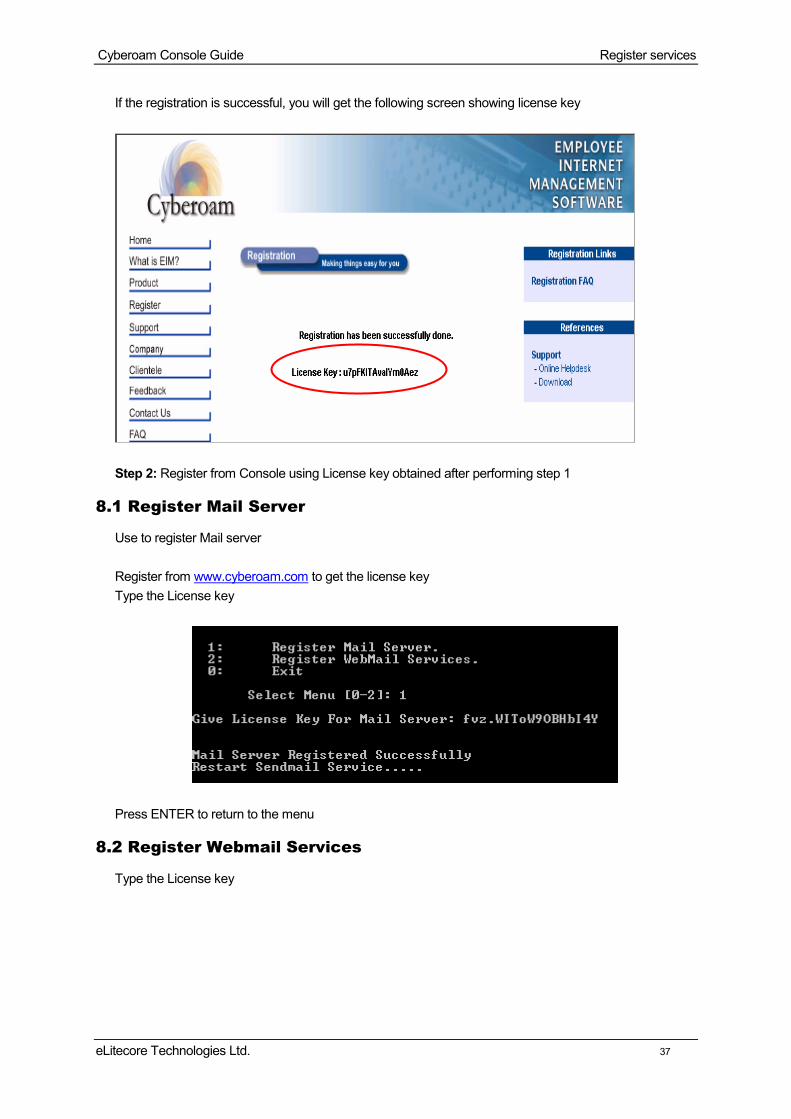
If the registration is successful, you will get the following screen showing license key
Step 2: Register from Console using License key obtained after performing step 1
8.1 Register Mail Server
Use to register Mail server Register from www.cyberoam.com to get the license key Type the License key
Press ENTER to return to the menu
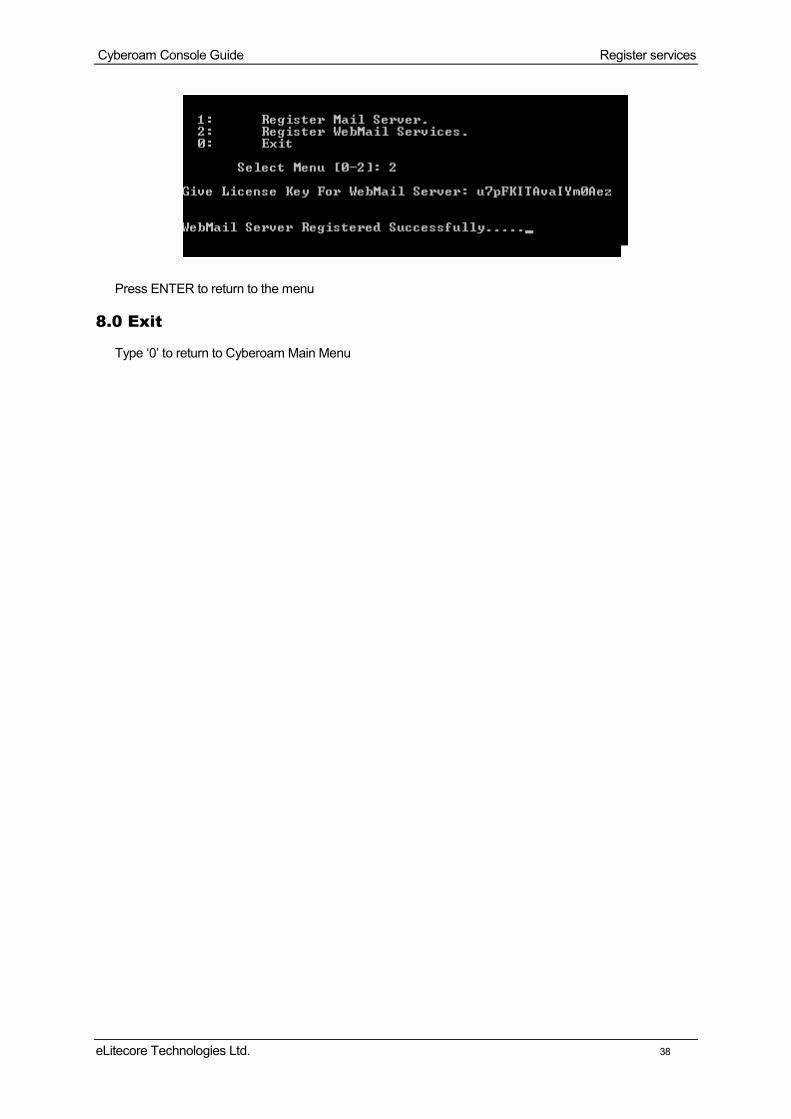
8.2 Register Webmail Services
Type the License key
Cyberoam Console Guide Register services
eLitecore Technologies Ltd. 38
Press ENTER to return to the menu
8.0 Exit
Type ‘0’ to return to Cyberoam Main Menu

Cyberoam Console Guide DNS Services
eLitecore Technologies Ltd. 39
9. DNS Services Use to configure/setup DNS A Domain Name Server translates domain names to IP addresses
9.1 Create Domain
Use to add Domain name Type Name & IP address of a Domain. With this entry, users that try to go to the domain will get the right IP address. MX (Mail Exchange) records are used to have mail delivered to users on your domain. Domain MUST have an MX record, primarily because people typically use an E-mail address with your domain name ("[email protected]"). Type ‘y’ to create MX record
Message ‘MX entry created successfully’ displayed after successful creation and press ‘Enter’ to return to the DNS configuration menu
9.2 Delete Domain
Use to delete Domain Type Domain name

Cyberoam Console Guide DNS Services
eLitecore Technologies Ltd. 40
After message ‘Domain Deleted successfully’ displayed and press ‘Enter’ to return to the DNS configuration menu
9.3 Modify entry on Domain
Use to modify entry in Domain
Type Domain name to be modified and press ‘Enter’. Open a new menu
9.3.1 Add Entry in Domain
Use to add Host or MX entry to Domain To add Host entry Type ‘h’ followed by Host name and IP address To add MX entry Type ‘m’ followed by Domain name
Press ‘Enter’ to return to the menu
9.3.2 Delete Entry from Domain
Use to delete the entry from Domain To add Host entry Type ‘h’ followed by Host name To add MX entry Type ‘m’ followed by Domain name

Cyberoam Console Guide DNS Services
eLitecore Technologies Ltd. 41
After message ‘Entry Deleted successfully’ displayed and press ‘Enter’ to return to the menu
9.3.3 List Entry in Domain
Use to view the list of Entries in Domain Press ‘Enter’ to return to the menu
9.3.0 Exit
Type ‘0’ to return to the DNS configuration menu
9.4 List of Domains
Use to view list of domains created
Press ‘Enter’ to return to the DNS configuration menu
9.0 Exit
Type ‘0’ to return to the Cyberoam Main menu
Cyberoam Console Guide Bandwidth Monitor
eLitecore Technologies Ltd. 42
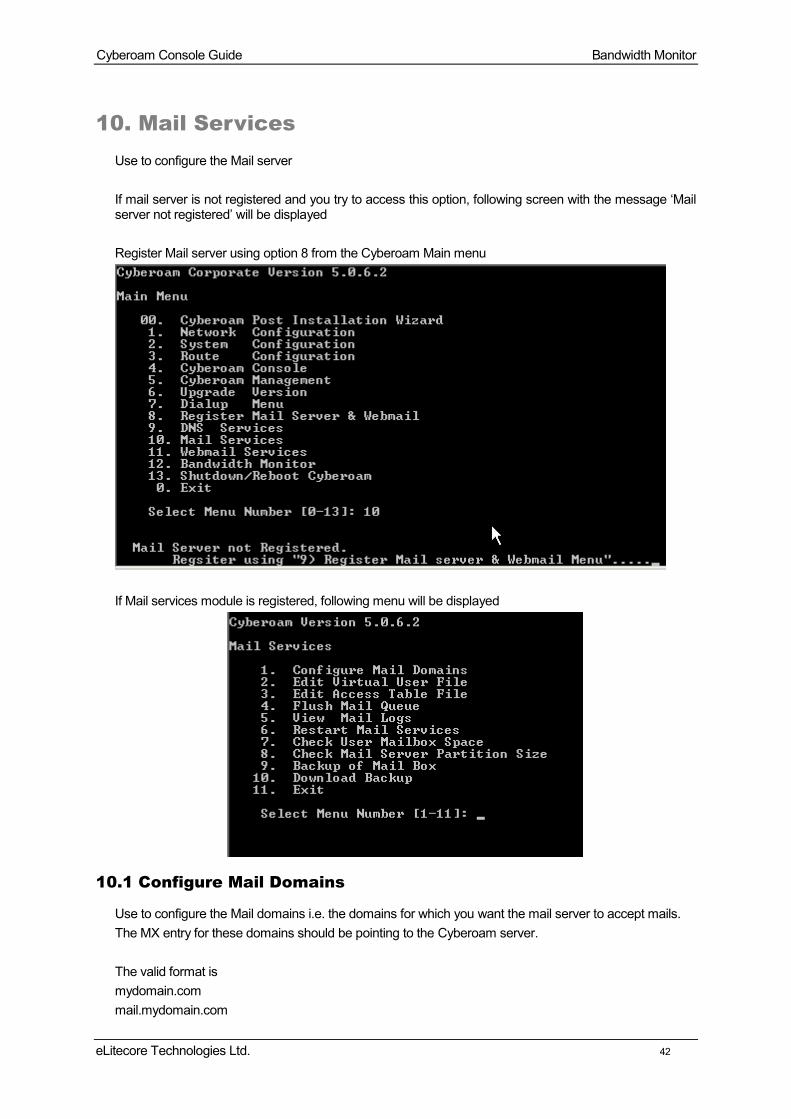
10. Mail Services Use to configure the Mail server If mail server is not registered and you try to access this option, following screen with the message ‘Mail server not registered’ will be displayed Register Mail server using option 8 from the Cyberoam Main menu
If Mail services module is registered, following menu will be displayed
10.1 Configure Mail Domains
Use to configure the Mail domains i.e. the domains for which you want the mail server to accept mails. The MX entry for these domains should be pointing to the Cyberoam server. The valid format is mydomain.com mail.mydomain.com

Cyberoam Console Guide Bandwidth Monitor
eLitecore Technologies Ltd. 43
10.2 Edit Virtual User File
Use this option to set aliases to virtual domains hosted on the same server. The Virtual User table is a database that maps virtual addresses into real addresses. The valid format and examples
Address Local User Description
[email protected] jay The address will be mapped with local user jay
[email protected] [email protected] The address is mapped to the remote user [email protected]
[email protected] sam_1 The address will be mapped with local user sam_1
[email protected] sam_2 The address will be mapped with local user sam_2
10.3 Edit Access Table File
Access table file is created to accept or reject mail from selected domains. For example, you may choose to reject all mail originating from known spammers, or to accept to relay all mail from your local network. Following values that can be mapped with the Email address, domain names or Networks: OK – Accept mail RELAY – Accept mail to the indicated domain or received from the indicated domain for relaying through your SMTP server REJECT - Reject the sender or recipient with a general-purpose message
10.4 Flush Mail Queue
Use to flush or delete all the mails in the Mail Queue
10.5 View Mail Logs
Use to view the mail logs
Cyberoam Console Guide Bandwidth Monitor
eLitecore Technologies Ltd. 44
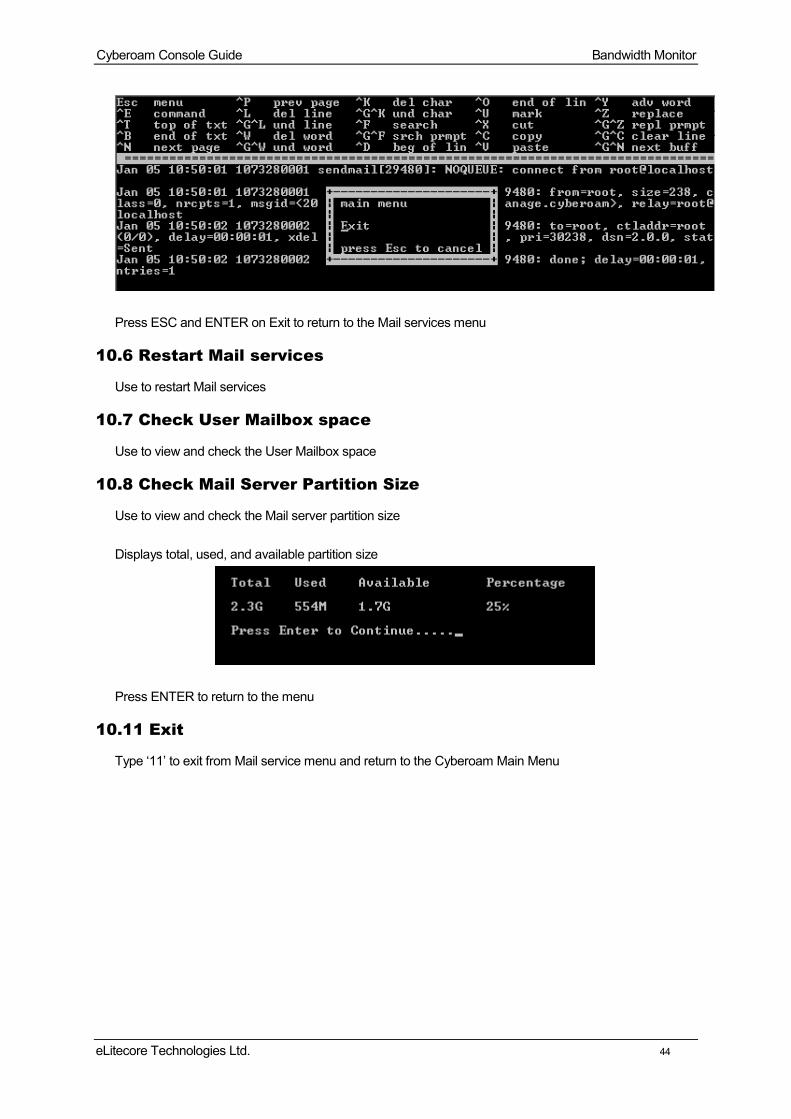
Press ESC and ENTER on Exit to return to the Mail services menu
10.6 Restart Mail services
Use to restart Mail services
10.7 Check User Mailbox space
Use to view and check the User Mailbox space
10.8 Check Mail Server Partition Size
Use to view and check the Mail server partition size Displays total, used, and available partition size
Press ENTER to return to the menu
10.11 Exit
Type ‘11’ to exit from Mail service menu and return to the Cyberoam Main Menu
Cyberoam Console Guide Bandwidth Monitor
eLitecore Technologies Ltd. 45
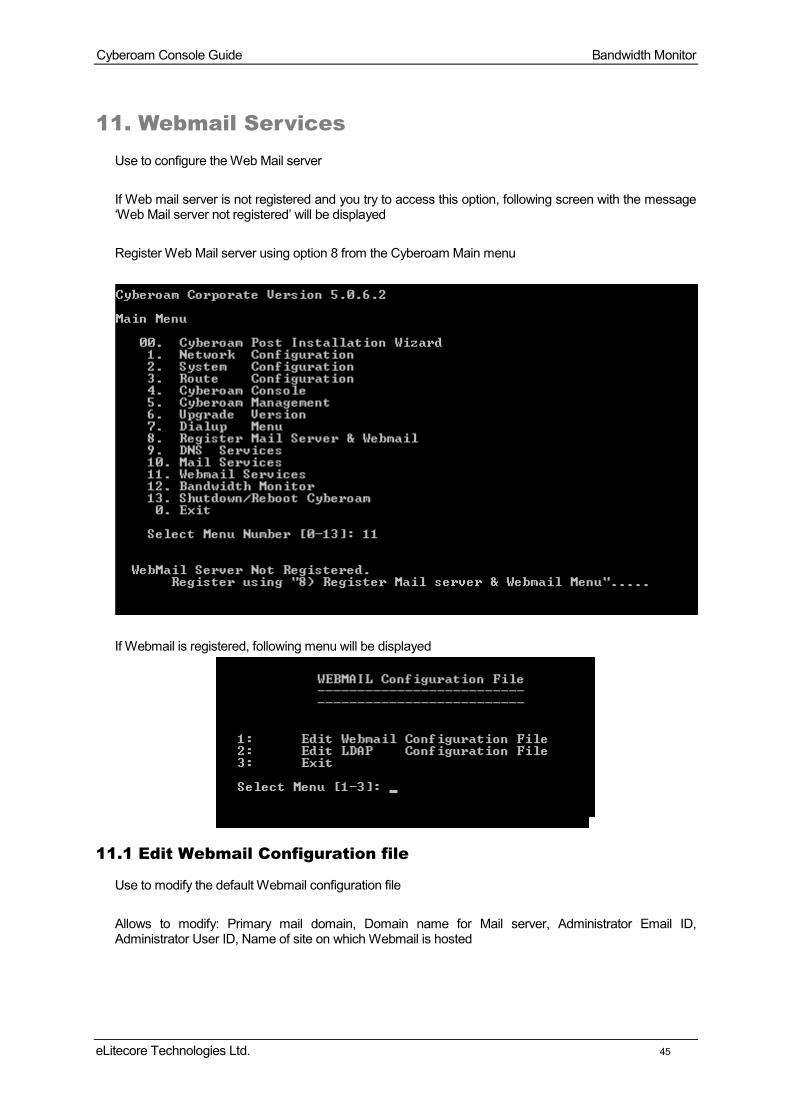
11. Webmail Services Use to configure the Web Mail server If Web mail server is not registered and you try to access this option, following screen with the message ‘Web Mail server not registered’ will be displayed Register Web Mail server using option 8 from the Cyberoam Main menu
If Webmail is registered, following menu will be displayed
11.1 Edit Webmail Configuration file
Use to modify the default Webmail configuration file Allows to modify: Primary mail domain, Domain name for Mail server, Administrator Email ID, Administrator User ID, Name of site on which Webmail is hosted
Cyberoam Console Guide Bandwidth Monitor
eLitecore Technologies Ltd. 46
Press ESC and ENTER on Exit to return to the Mail services menu
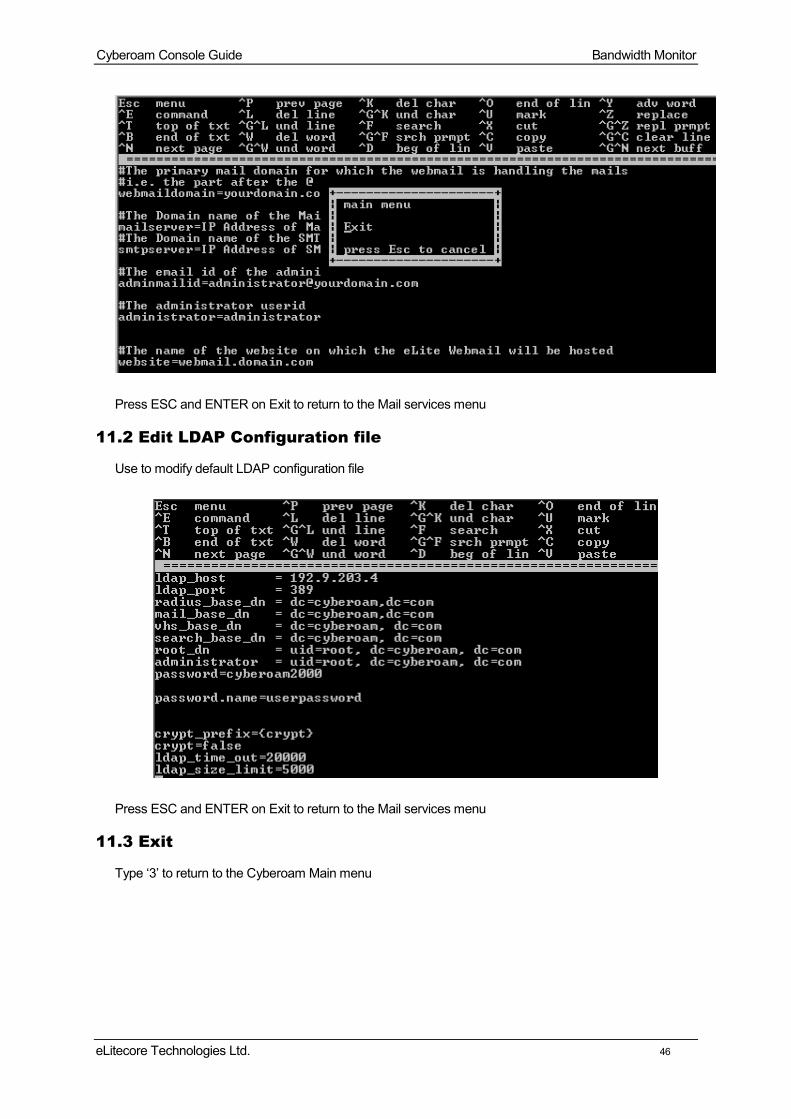
11.2 Edit LDAP Configuration file
Use to modify default LDAP configuration file
Press ESC and ENTER on Exit to return to the Mail services menu
11.3 Exit
Type ‘3’ to return to the Cyberoam Main menu
Cyberoam Console Guide Bandwidth Monitor
eLitecore Technologies Ltd. 47
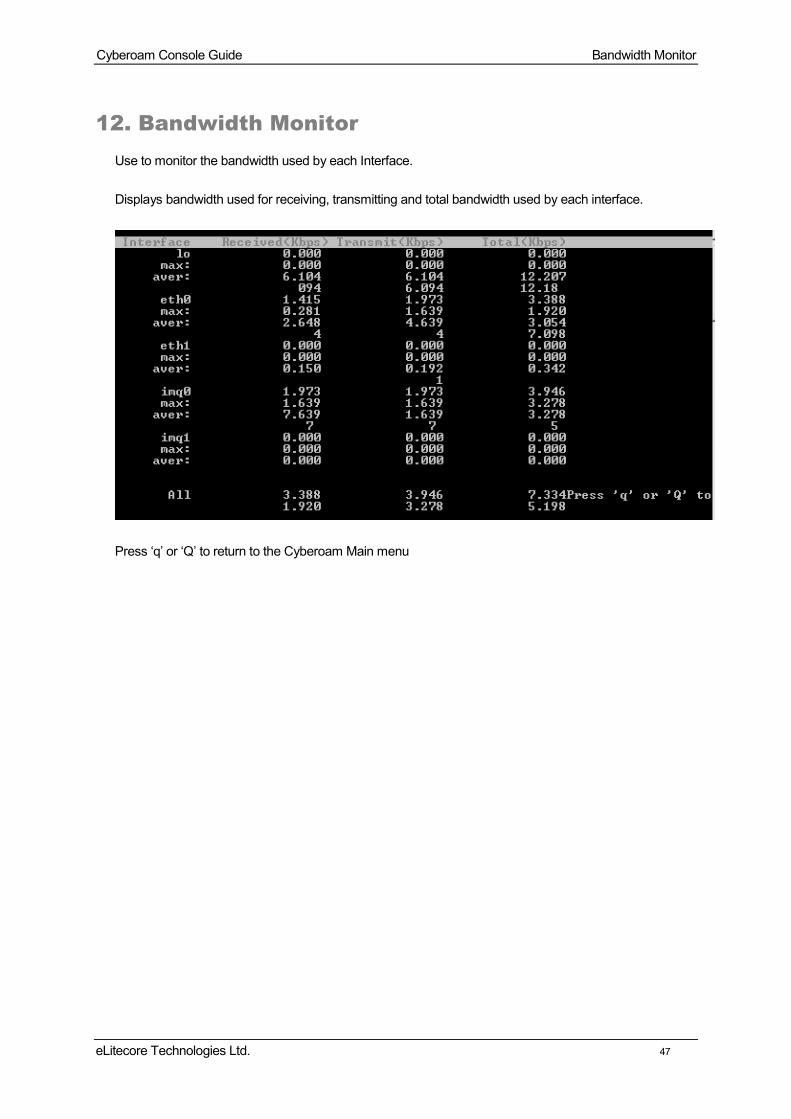
12. Bandwidth Monitor Use to monitor the bandwidth used by each Interface. Displays bandwidth used for receiving, transmitting and total bandwidth used by each interface.
Press ‘q’ or ‘Q’ to return to the Cyberoam Main menu

Cyberoam Console Guide Shutdown/Reboot Cyberoam
eLitecore Technologies Ltd. 48
13. Shutdown/Reboot Cyberoam Use to shutdown or reboot the Cyberoam server.
0. Exit Type ‘0’ to exit from the Cyberoam Console Management
Cyberoam Installation Guide Annexure - I
eLitecore Technologies Ltd. 49
Annexure I
arp Used for debugging purposes, to get a complete dump of the ARP cache. SYNTAX
arp
arping Ping <address> on device <interface> by ARP packets, using source address <source>. SYNTAX
arping [ -D ] [ -U ] [ -A ] [ -c count ] [ -w timeout ] [ -s source ] -I interface address
PARAMETERS -c count
number of pings
-w timeout stop after this time.
-D duplicate address detection mode. Returns 0, if DAD suceeded i.e. no replies are received.
-U Unsolicited ARP mode to update neighbours' ARP caches
-A The same as -U, but ARP REPLY packets used instead of ARP REQUEST. If -s option is absent, source address is: 1. In normal mode calculated from routing tables. 2. In DAD (-D) mode set to 0.0.0.0 3. In Unsilicited ARP mode (-U,-A) set to <address>

Cyberoam Installation Guide Annexure - I
eLitecore Technologies Ltd. 50
cacheclient
Use to check whether Cyberoam cache is working or not. If cache is not working, relevant message will be displayed. SYNTAX
cacheclient URL
cacheusage Displays the disk space used by the Cyberoam HTTP cache engine for caching SYNTAX
cacheusage
clear clear clears your terminal screen if this is possible. It looks in the environment for the terminal type and then in the terminfo database to figure out how to clear the screen. SYNTAX
clear
cpuinfo Displasy cpu information like processor, vendor, model, model name, speed, cache size. SYNTAX
cpuinfo
Cyberoam Installation Guide Annexure - I
eLitecore Technologies Ltd. 51
date
Use to print the system date and time SYNTAX
date [OPTION]... [+FORMAT] PARAMETERS Display the current time in the given FORMAT -I, --iso-8601[=TIMESPEC] output an ISO-8601 compliant date/time string.
TIMESPEC=`date' (or missing) for date only, `hours', `minutes', or `seconds' for date and time to the indicated precision.
-R, --rfc-822 output RFC-822 compliant date string
-u, --utc, --universal print Coordinated Universal Time
FORMAT controls the output. The only valid option for the second form specifies Coordinated Universal Time. Interpreted sequences are:
%% a literal % %a locale's abbreviated weekday name (Sun..Sat) %A locale's full weekday name, variable length (Sunday..Saturday) %b locale's abbreviated month name (Jan..Dec) %B locale's full month name, variable length (January..December) %c locale's date and time (Sat Nov 04 12:02:33 EST 1989) %d day of month (01..31) %D date (mm/dd/yy) %e day of month, blank padded ( 1..31) %h same as %b %H hour (00..23) %I hour (01..12) %j day of year (001..366) %k hour ( 0..23) %l hour ( 1..12) %m month (01..12)
Cyberoam Installation Guide Annexure - I
eLitecore Technologies Ltd. 52
%M minute (00..59) %n a newline %p locale's AM or PM %r time, 12-hour (hh:mm:ss [AP]M) %s seconds since `00:00:00 1970-01-01 UTC' (a GNU extension) %S second (00..60) %t a horizontal tab %T time, 24-hour (hh:mm:ss) %U week number of year with Sunday as first day of week (00..53) %V week number of year with Monday as first day of week (01..53) %w day of week (0..6); 0 represents Sunday %W week number of year with Monday as first day of week (00..53) %x locale's date representation (mm/dd/yy) %X locale's time representation (%H:%M:%S) %y last two digits of year (00..99) %Y year (1970...) %z RFC-822 style numeric timezone (-0500) (a nonstandard extension) %Z time zone (e.g., EDT), or nothing if no time zone is determinable
Cyberoam Installation Guide Annexure - I
eLitecore Technologies Ltd. 53
deletecache Deletes the HTTP cache SYNTAX
deletecache
diskusage Shows the records of disk space used. Also displays distribution of disk space, used and unused disk space by the various file systems on a volume. SYNTAX
diskusage
dmesg
Use to examine or control the kernel ring buffer The program helps users to print out their bootup messages used for debug SYNTAX
dmesg

Cyberoam Installation Guide Annexure - I
eLitecore Technologies Ltd. 54
exit
Exits from Cyberoam Console and returns to the Cyberoam Main menu SYNTAX
exit

Cyberoam Installation Guide Annexure - I
eLitecore Technologies Ltd. 55
ifconfig
Use to configure a network interface ifconfig displays the status of the currently active interfaces. If a single interface argument is given, it displays the status of the given interface only; if a single -a argument is given, it displays the status of all interfaces, even those that are down. SYNTAX
ifconfig –a [interface]

Cyberoam Installation Guide Annexure - I
eLitecore Technologies Ltd. 56
livemaillog
livemaillog shows information about all the mails sent and received like date and time, size of mail, mailer used and information of any mails sent & received currently. SYNTAX
livemaillog
lsmod lsmod shows information about all loaded modules. The format is name, size, use count, list of referring modules. If the module controls its own unloading via a can_unload routine then the user count displayed by lsmod is always -1, irrespective of the real use count. SYNTAX
lsmod
Cyberoam Installation Guide Annexure - I
eLitecore Technologies Ltd. 57
mailq
mailq prints a summary of the mail messages queued for future delivery. The first line printed for each message shows the internal identifier used on this host for the message with a possible status character, the size of the message in bytes, the date and time the message was accepted into the queue, and the envelope sender of the message. The second line shows the error message that caused this message to be retained in the queue; it will not be present if the message is being processed for the first time. The status characters are either * to indicate the job is being processed; X to indicate that the load is too high to process the job; and - to indicate that the job is too young to process. The following lines show message recipients, one per line. SYNTAX
mailq
meminfo Displays the memory information like total, used, free, and shared memory. Also displays memory used by buffers, caches. SYNTAX
meminfo
Cyberoam Installation Guide Annexure - I
eLitecore Technologies Ltd. 58
netstat
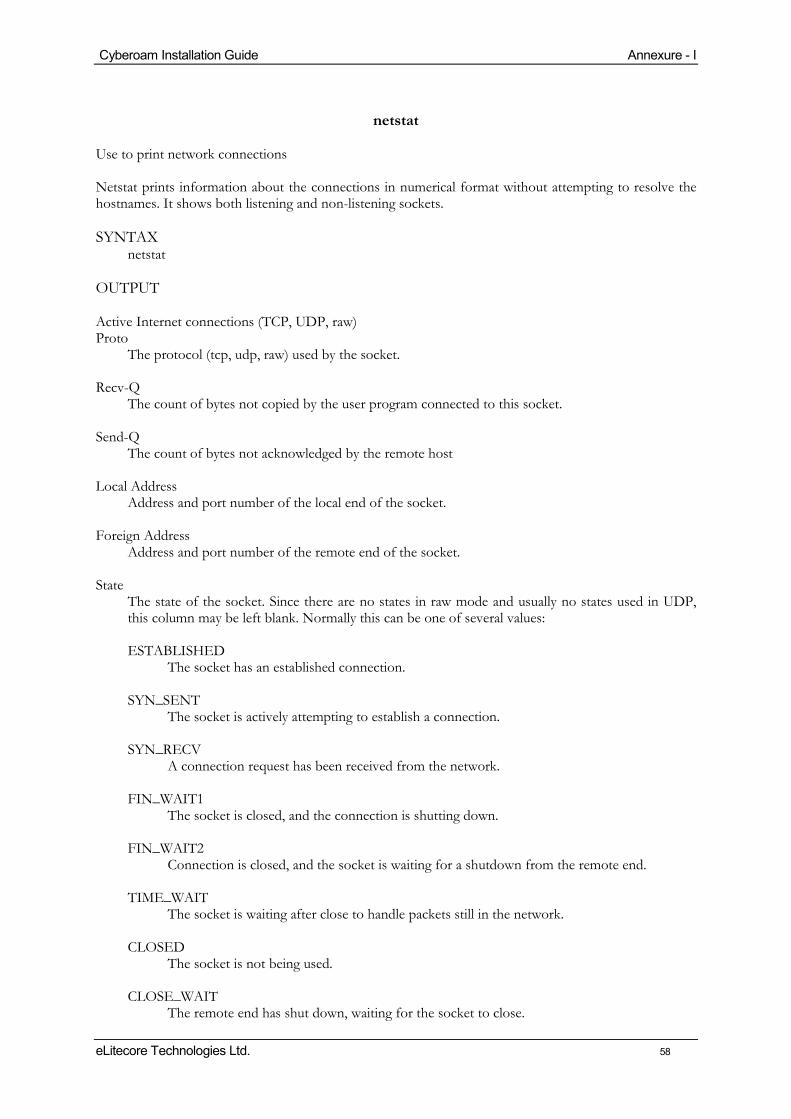
Use to print network connections Netstat prints information about the connections in numerical format without attempting to resolve the hostnames. It shows both listening and non-listening sockets. SYNTAX
netstat OUTPUT Active Internet connections (TCP, UDP, raw) Proto
The protocol (tcp, udp, raw) used by the socket. Recv-Q
The count of bytes not copied by the user program connected to this socket. Send-Q
The count of bytes not acknowledged by the remote host Local Address
Address and port number of the local end of the socket. Foreign Address
Address and port number of the remote end of the socket. State
The state of the socket. Since there are no states in raw mode and usually no states used in UDP, this column may be left blank. Normally this can be one of several values: ESTABLISHED
The socket has an established connection.
SYN_SENT The socket is actively attempting to establish a connection.
SYN_RECV
A connection request has been received from the network.
FIN_WAIT1 The socket is closed, and the connection is shutting down.
FIN_WAIT2
Connection is closed, and the socket is waiting for a shutdown from the remote end.
TIME_WAIT The socket is waiting after close to handle packets still in the network.
CLOSED
The socket is not being used.
CLOSE_WAIT The remote end has shut down, waiting for the socket to close.

Cyberoam Installation Guide Annexure - I
eLitecore Technologies Ltd. 59
LAST_ACK
The remote end has shut down, and the socket is closed. Waiting for acknowledgement.
LISTEN The socket is listening for incoming connections. Such sockets are not included in the output unless you specify the --listening (-l) or --all (-a) option.
CLOSING
Both sockets are shut down but we still don't have all our data sent.
UNKNOWN The state of the socket is unknown.

Cyberoam Installation Guide Annexure - I
eLitecore Technologies Ltd. 60
ping
Use to send ICMP ECHO_REQUEST packets to network hosts Ping uses the ICMP protocol's mandatory ECHO_REQUEST datagram to elicit an ICMP ECHO_RESPONSE from a host or gateway. ECHO_REQUEST datagrams (``pings'') have an IP and ICMP header, followed by a ``struct timeval'' and then an arbitrary number of ``pad'' bytes used to fill out the packet. SYNTAX
ping [-LRUbdfnqrvV] [-c count] [-i interval] [-s packetsize] [-t ttl] [-w deadline] [-I interface address] [-T timestamp option] [-Q tos] [-M hint] host
PARAMETERS -b
Allow pinging a broadcast address. -c count
Stop after sending count ECHO_REQUEST packets. With deadline option, ping waits for count ECHO_REPLY packets, until the timeout expires.
-d
Set the SO_DEBUG option on the socket being used. -f
Flood ping Outputs packets as fast as they come back or one hundred times per second, whichever is more. For every ECHO_REQUEST sent a period ``.'' is printed, while for ever ECHO_REPLY received a backspace is printed. This provides a rapid display of how many packets are being dropped. Only the super-user may use this option. This can be very hard on a network and should be used with caution.
-i wait
Wait wait seconds between sending each packet. The default is to wait for one second between each packet. This option is incompatible with the -f option.
-I interface address
Set source address to specified interface address. -L
Suppress loopback of multicast packets. This flag only applies if the ping destination is a multicast address.
-n
Numeric output only. No attempt will be made to lookup symbolic names for host addresses. -q
Quiet output. Nothing is displayed except the summary lines at startup time and when finished. -R
Record route.

Cyberoam Installation Guide Annexure - I
eLitecore Technologies Ltd. 61
Includes the RECORD_ROUTE option in the ECHO_REQUEST packet and displays the route buffer on returned packets. Note that the IP header is only large enough for nine such routes. Many hosts ignore or discard this option.
-r
Bypass the normal routing tables and send directly to a host on an attached network. If the host is not on a directly-attached network, an error is returned. This option can be used to ping a local host through an interface that has no route through it.
-s packetsize
Specifies the number of data bytes to be sent. The default is 56, which translates into 64 ICMP data bytes when combined with the 8 bytes of ICMP header data.
-t ttl
Set the IP Time to Live for multicasted packets. This flag only applies if the ping destination is a multicast address.
-M hint
Select Path MTU Discovery strategy. hint may be either do (prohibit fragmentation, even local one), want (do PMTU discovery, fragment locally when packet size is large), or dont (do not set DF flag).
-U
Print true user-to-user latency (the old behavior). -v
Verbose output -V
Show version. -w deadline
Specify a timeout, in seconds, before ping exits regardless of how many packets have been sent or received.
When using ping for fault isolation, it should first be run on the local host, to verify that the local network interface is up and running. Then, hosts and gateways further and further away should be ``pinged''. Round-trip times and packet loss statistics are computed. If duplicate packets are received, they are not included in the packet loss calculation, although the round trip time of these packets is used in calculating the minimum/average/maximum round-trip time numbers. When the specified number of packets have been sent (and received) or if the program is terminated with a SIGINT, a brief summary is displayed. If ping does not receive any reply packets at all it will exit with code 1. If a packet count and deadline are both specified, and fewer than count packets are received by the time the deadline has arrived, it will also exit with code 1. On other error, it exits with code 2. Otherwise, it exits with code 0. This makes it possible to use the exit code to see if a host is alive or not. This program is intended for use in network testing, measurement and management. Because of the load it can impose on the network, it is unwise to use ping during normal operations or from automated scripts. ICMP PACKET DETAILS
An IP header without options is 20 bytes. An ICMP ECHO_REQUEST packet contains an additional 8 bytes worth of ICMP header followed by an arbitrary amount of data. When a packet size is given, this indicated the size of this extra piece of data (the default is 56). Thus, the amount
Cyberoam Installation Guide Annexure - I
eLitecore Technologies Ltd. 62
of data received inside of an IP packet of type ICMP ECHO_REPLY will always be 8 bytes more than the requested data space (the ICMP header). If the data space is at least eight bytes large, ping uses the first eight bytes of this space to include a timestamp, which it uses in the computation of round trip times. If less than eight bytes of pad are specified, no round trip times are given.
DUPLICATE AND DAMAGED PACKETS Ping will report duplicate and damaged packets. Duplicate packets should never occur, and seem to be caused by inappropriate link-level retransmissions. Duplicates may occur in many situations and are rarely (if ever) a good sign, although the presence of low levels of duplicates may not always be cause for alarm. Damaged packets are obviously serious cause for alarm and often indicate broken hardware somewhere in the ping packet's path (in the network or in the hosts).
TTL DETAILS The TTL value of an IP packet represents the maximum number of IP routers that the packet can go through before being thrown away. In current practice, you can expect each router in the Internet to decrement the TTL field by exactly one. The TCP/IP specification states that the TTL field for TCP packets should be set to 60, but many systems use smaller values (4.3 BSD uses 30, 4.2 used 15). The maximum possible value of this field is 255, and most UNIX systems set the TTL field of ICMP ECHO_REQUEST packets to 255. This is why you will find you can ``ping'' some hosts, but not reach them with telnet (1) or ftp (1). In normal operation ping prints the ttl value from the packet it receives. When a remote system receives a ping packet, it can do one of three things with the TTL field in its response: Not change it; this is what Berkeley Unix systems did before the 4.3BSD-Tahoe release. In this case, the TTL value in the received packet will be 255 minus the number of routers in the round-trip path. Set it to 255; this is what current Berkeley Unix systems do. In this case, the TTL value in the received packet will be 255 minus the number of routers in the path from the remote system to the pinging host. Set it to some other value. Some machines use the same value for ICMP packets that they use for TCP packets, for example either 30 or 60. Others may use completely wild values.
Cyberoam Installation Guide Annexure - I
eLitecore Technologies Ltd. 63
reboot
Use to reboot the Cyberoam system To boot a computer is to load an operating system into the computer's main memory or random access memory (RAM). Once the operating system is loaded (and, for example, on a PC, you see the initial Windows or Mac desktop screen), it is ready for users to run applications. Sometimes you will see an instruction to "reboot" the operating system. This simply means to reload or restart the operating system. On larger computers including mainframes, the equivalent term for "boot" is "initial program load" (IPL) and for "reboot" is "re-IPL." SYNTAX
reboot
route Use to view / manipulate the IP routing table Route manipulates the kernel’s IP routing tables. Its primary use is to set up static routes to specific hosts or networks via an interface. When the add or del options are used, route modifies the routing tables. Without these options, route displays the current contents of the routing tables. SYNTAX
route [-CFvnee] route [-v] [-A family] add [-net|-host] target [netmask Nm] [gw Gw] [metric N] [mss M] [window W] [irtt I] [reject] [mod] [dyn] [reinstate] [[dev] If] route [-v] [-A family] del [-net|-host] target [gw Gw] [netmask Nm] [metric N] [[dev] If] route [-V] [--version] [-h] [--help]
PARAMETERS -A family
use the specified address family (eg `inet'; use `route --help' for a full list).
-F operate on the kernel's FIB (Forwarding Information Base) routing table. This is the default. -C operate on the kernel's routing cache. -v
select verbose operation. -n
Cyberoam Installation Guide Annexure - I
eLitecore Technologies Ltd. 64
shows numerical addresses instead of trying to determine symbolic host names. This is useful if you are trying to determine why the route to your nameserver has vanished.
-e use netstat(8)-format for displaying the routing table. -ee will generate a very long line with all parameters from the routing table.
del delete a route
add
add a new route
target the destination network or host. You can provide IP addresses in dotted decimal or host/network names.
-net
the target is a network.
-host the target is a host.
netmask NM
when adding a network route, the netmask to be used.
gw GW route packets via a gateway.
NOTE: The specified gateway must be reachable first. This usually means that you have to set up a static route to the gateway beforehand. If you specify the address of one of your local interfaces, it will be used to decide about the interface to which the packets should be routed to. This is a BSDism compatibility hack.
metric M
set the metric field in the routing table (used by routing daemons) to M. mss M
set the TCP Maximum Segment Size (MSS) for connections over this route to M bytes. The default is the device MTU minus headers, or a lower MTU when path mtu discovery occured. This setting can be used to force smaller TCP packets on the other end when path mtu discovery does not work (usually because of misconfigured firewalls that block ICMP Fragmentation Needed)
window W set the TCP window size for connections over this route to W bytes. This is typically only used on AX.25 networks and with drivers unable to handle back to back frames.
irtt I
set the initial round trip time (irtt) for TCP connections over this route to I milliseconds 1-12000). This is typically only used on AX.25 networks. If omitted the RFC 1122 default of 300ms is used.
reject install a blocking route, which will force a route lookup to fail. This is for example, used to mask out networks before using the default route. This is NOT for firewalling.
mod, dyn, reinstate
Cyberoam Installation Guide Annexure - I
eLitecore Technologies Ltd. 65
install a dynamic or modified route. These flags are for diagnostic purposes, and are generally only set by routing daemons.
dev If force the route to be associated with the specified device, as the kernel will otherwise try to determine the device on its own (by checking already existing routes and device specifications, and where the route is added to). In most normal networks you won't need this. If dev If is the last option on the command line, the word dev may be omitted, as it is the default. Otherwise, the order of the route modifiers (metric - netmask - gw - dev) doesn't matter.
EXAMPLES route add -net 127.0.0.0
adds the normal loopback entry, using netmask 255.0.0.0 (class A net, determined from the destination address) and associated with the "lo" device (assuming this device was prviously set up correctly with ifconfig(8)).
route add -net 192.56.76.0 netmask 255.255.255.0 dev eth0 adds a route to the network 192.56.76.x via "eth0". The Class C netmask modifier is not really necessary here because 192.* is a Class C IP address. The word "dev" can be omitted here.
route add default gw mango-gw adds a default route (which will be used if no other route matches). All packets using this route will be gatewayed through "mango-gw". The device which will actually be used for that route depends on how we can reach "mango-gw" - the static route to "mango-gw" will have to be set up before.
route add ipx4 sl0 Adds the route to the “ipx4" host via the SLIP interface (assuming that "ipx4" is the SLIP host).
route add -net 192.57.66.0 netmask 255.255.255.0 gw ipx4
This command adds the net "192.57.66.x" to be gatewayed through the former route to the SLIP interface.
route add -net 224.0.0.0 netmask 240.0.0.0 dev eth0 This is an obscure one documented so people know how to do it. This sets all of the class D (multicast) IP routes to go via "eth0". This is the correct normal configuration line with a multicasting kernel.
route add -net 10.0.0.0 netmask 255.0.0.0 reject This installs a rejecting route for the private network "10.x.x.x."
OUTPUT The output of the kernel routing table is organized in the following columns Destination
The destination network or destination host
Gateway The gateway address or '*' if none set
Genmask
Cyberoam Installation Guide Annexure - I
eLitecore Technologies Ltd. 66
The netmask for the destination net; '255.255.255.255' for a host destination and '0.0.0.0' for the default route
Flags Possible flags include U (route is up) H (target is a host) G (use gateway) R (reinstate route for dynamic routing) D (dynamically installed by daemon or redirect) M (modified from routing daemon or redirect) A (installed by addrconf) C (cache entry) ! (reject route)
Metric The ‘distance’ to the target (usually counted in hops). It is not used by recent kernels, but may be needed by routing daemons.
Ref
Number of references to this route. (Not used in the Linux kernel.) Use
Count of lookups for the route. Depending on the use of -F and -C this will be either route cache misses (-F) or hits (-C).
Iface Interface to which packets for this route will be sent
MSS
Default maximum segement size for TCP connections over this route. Window Default window size for TCP connections over this route.
irtt Initial RTT (Round Trip Time). The kernel uses this to guess about the best TCP protocol parameters without waiting on (possibly slow) answers. HH (cached only) The number of ARP entries and cached routes that refer to the hardware header cache for the cached route. This will be -1 if a hardware address is not needed for the interface of the cached route (e.g. lo).
Arp (cached only) Whether or not the hardware address for the cached route is up to date.
Cyberoam Installation Guide Annexure - I
eLitecore Technologies Ltd. 67
shutdown shutdown brings the system down in a secure way. It is possible to shut the system down immediately or after a specified delay. SYNTAX
/sbin/shutdown [-rhcfF] time PARAMETERS
-r
Reboot after shutdown. -h
Halt after shutdown. -f
Skip file system check on reboot. -F
Force file system check on reboot. -c
Cancel an already running shutdown. With this option it is of course not possible to give the time argument.
Time When to shutdown.
The time argument can have different formats. First, it can be an absolute time in the format hh:mm, in which hh is the hour (1 or 2 digits) and mm is the minute of the hour (in two digits). Second, it can be in the format +m, in which m is the number of minutes to wait. The word now is an alias for +0. The -f flag means `reboot fast'. The -F flag means `force file system check’. ACCESS CONTROL ‘shutdown’ can be called when the magic keys CTRL-ALT-DEL are pressed. This means that everyone who has physical access to the console keyboard can shut the system down.

Cyberoam Installation Guide Annexure - I
eLitecore Technologies Ltd. 68
tcpdump
tcpdump prints out the headers of packets on a network interface that match the boolean expression. Only packets that match expression will be processed by tcpdump. Tcpdump will, if not run with the -c flag, continue capturing packets until it is interrupted by a SIGINT signal (generated, for example, by typing your interrupt character, typically control-C); if run with the -c flag, it will capture packets until it is interrupted by a SIGINT signal or the specified number of packets have been processed. SYNTAX
tcpdump [ -adeflnNOpqRStuvxX ] [ -c count ] [ -i interface ] [ -s snaplen ] [ -T type ] [ -E algo:secret ] [ expression ]
PARAMETERS -a
Attempt to convert network and broadcast addresses to names. -c
Exit after receiving count packets. -d
Dump the compiled packet-matching code in a human readable form to standard output and stop. -dd
Dump packet-matching code as a C program fragment. -ddd
Dump packet-matching code as decimal numbers (proceeded with a count). -e
Print the link-level header on each dump line. -E
Use algo : secret for decrypting IPsec ESP packets. Algorithms may be des-cbc, 3des-cbc, blowfish-cbc, rc3-cbc, cast128-cbc, or none. The default is des-cbc. The ability to decrypt packets is only present if tcpdump was compiled with cryptography enabled. secret the ascii text for ESP secret key. We cannot take arbitrary binary value at this moment. The option assumes RFC2406 ESP, not RFC1827 ESP. The option is only for debugging purposes, and the use of this option with truly `secret' key is discouraged.
-f
Print `foreign' internet addresses numerically rather than symbolically (this option is intended to get around serious brain damage in Sun's yp server -- usually it hangs forever translating nonlocal internet numbers).
-i Listen on interface. If unspecified, tcpdump searches the system interface list for the lowest numbered, configured up interface (excluding loop back). Ties are broken by choosing the earliest match.
-l
Make stdout line buffered. Useful if you want to see the data while capturing it.
Cyberoam Installation Guide Annexure - I
eLitecore Technologies Ltd. 69
-n
Don't convert addresses (i.e., host addresses, port numbers, etc.) to names. -N
Does not print domain name qualification of host names. E.g., if you give this flag then tcpdump will print ``nic'' instead of ``nic.ddn.mil''.
-O Do not run the packet-matching code optimizer. This is useful only if you suspect a bug in the optimizer.
-p Do not put the interface into promiscuous mode. Note that the interface might be in promiscuous mode for some other reason; hence, `-p' cannot be used as an abbreviation for `ether host {local-hw-addr} or ether broadcast'.
-q Quick (quiet?) output. Print less protocol information so output lines are shorter.
-R Assume ESP/AH packets to be based on old specification (RFC1825 to RFC1829). If specified, tcpdump will not print replay prevention field. Since there is no protocol version field in ESP/AH specification, tcpdump cannot deduce the version of ESP/AH protocol.
-S Print absolute, rather than relative, TCP sequence numbers.
-s
Snarf snaplen bytes of data from each packet rather than the default of 68 (with SunOS's NIT, the minimum is actually 96). 68 bytes is adequate for IP, ICMP, TCP and UDP but may truncate protocol information from name server and NFS packets (see below). Packets truncated because of a limited snapshot are indicated in the output with ``[|proto]'', where proto is the name of the protocol level at which the truncation has occurred. Note that taking larger snapshots both increases the amount of time it takes to process packets and, effectively, decreases the amount of packet buffering. This may cause packets to be lost. You should limit snaplen to the smallest number that will capture the protocol information you are interested in. Setting snaplen to 0 means use the required length to catch whole packets.
-T Force packets selected by "expression" to be interpreted the specified type. Currently known types are cnfp (Cisco NetFlow protocol), rpc (Remote Procedure Call), rtp (Real-Time Applications protocol), rtcp (Real-Time Applications control protocol), snmp (Simple Network Management Protocol), vat (Visual Audio Tool), and wb (distributed White Board).
-t Don't print a timestamp on each dump line.
-tt
Print an unformatted timestamp on each dump line. -ttt
Print a delta (in microseconds) between current and previous line on each dump line. -tttt
Print a timestamp in default format proceeded by date on each dump line.
Cyberoam Installation Guide Annexure - I
eLitecore Technologies Ltd. 70
-u Print undecoded NFS handles.
-v (Slightly more) verbose output. For example, the time to live, identification, total length and options in an IP packet are printed. Also enables additional packet integrity checks such as verifying the IP and ICMP header checksum.
-vv Even more verbose output. For example, additional fields are printed from NFS reply packets, and SMB packets are fully decoded.
-vvv Even more verbose output. For example, telnet SB ... SE options are printed in full. With -X telnet options are printed in hex as well.
-x Print each packet (minus its link level header) in hex. The smaller of the entire packet or snaplen bytes will be printed.
-X When printing hex, print ASCII too. Thus if -x is also set, the packet is printed in hex/ascii. This is very handy for analysing new protocols. Even if -x is not also set, some parts of some packets may be printed in hex/ascii.
expression selects which packets will be dumped. If no expression is given, all packets on the net will be dumped. Otherwise, only packets for which expression is `true' will be dumped. The expression consists of one or more primitives. Primitives usually consist of an id (name or number) proceeded by one or more qualifiers. There are three different kinds of qualifier:
type qualifiers
says what kind of thing the id name or number refers to. Possible types are host, net and port. E.g., `host foo', `net 128.3', `port 20'. If there is no type qualifier, host is assumed.
dir qualifiers specify a particular transfer direction to and/or from id. Possible directions are src, dst, src or dst and src and dst. E.g., `src foo', `dst net 128.3', `src or dst port ftp-data'. If there is no dir qualifier, src or dst is assumed. For `null' link layers (i.e. point-to-point protocols such as slip) the inbound and outbound qualifiers can be used to specify a desired direction.
proto qualifiers restrict the match to a particular protocol. Possible protos are: ether, fddi, tr, ip, ip6, arp, rarp, decnet, tcp and udp. E.g., `ether src foo', `arp net 128.3', `tcp port 21'. If there is no proto qualifier, all protocols consistent with the type are assumed. E.g., `src foo' means `(ip or arp or rarp) src foo' (except the latter is not legal syntax), `net bar' means `(ip or arp or rarp) net bar' and `port 53' means `(tcp or udp) port 53'.
[`fddi' is actually an alias for `ether'; the parser treats them identically as meaning ``the data link level used on the specified network interface.'' FDDI headers contain Ethernet-like source and destination addresses, and often contain Ethernet-like packet types, so you can filter on these FDDI fields just as with the analogous Ethernet fields. FDDI headers also contain other fields, but you cannot name them explicitly in a filter expression. Similarly, `tr' is an alias for `ether'; the previous paragraph's statements about FDDI headers also apply to Token Ring headers.]
Cyberoam Installation Guide Annexure - I
eLitecore Technologies Ltd. 71
In addition to the above, there are some special `primitive' keywords that do not follow the pattern: gateway, broadcast, less, greater and arithmetic expressions. All of these are described below. More complex filter expressions are built up by using the words and, or and not to combine primitives. E.g., `host foo and not port ftp and not port ftp-data'. To save typing, identical qualifier lists can be omitted. E.g., `tcp dst port ftp or ftp-data or domain' is the same as `tcp dst port ftp or tcp dst port ftp-data or tcp dst port domain'. Allowable primitives are: dst host host
True if the IPv4/v6 destination field of the packet is host, this may be either an address or a name.
src host host True if the IPv4/v6 source field of the packet is host.
host host True if either the IPv4/v6 source or destination of the packet is host. Any of the above host expressions can be prepended with the keywords, ip, arp, rarp, or ip6 as in:
ip host host
which is equivalent to:
ether proto \ip and host host
If host is a name with multiple IP addresses, each address will be checked for a match.
ether dst ehost True if the ethernet destination address is ehost. Ehost may be either a name or a number.
ether src ehost True if the ethernet source address is ehost.
ether host ehost True if either the ethernet source or destination address is ehost.
gateway host
True if the packet used host as a gateway. i.e., the ethernet source or destination address was host but neither the IP source nor the IP destination was host. Host must be a name and must be found both by the machine's host-name-to-IP-address resolution mechanisms (host name file, DNS, NIS, etc.) and by the machine's host-name-to-Ethernet-address resolution mechanism. (An equivalent expression is ether host ehost and not host host, which can be used with either names or numbers for host / ehost.) This syntax does not work in IPv6-enabled configuration at this moment.
dst net net True if the IPv4/v6 destination address of the packet has a network number of net. Net may be either a name or a network number
src net net True if the IPv4/v6 source address of the packet has a network number of net.
net net True if either the IPv4/v6 source or destination address of the packet has a network number of net.
Cyberoam Installation Guide Annexure - I
eLitecore Technologies Ltd. 72
net net mask netmask True if the IP address matches net with the specific netmask. May be qualified with src or dst. Note that this syntax is not valid for IPv6 net.
net net/len True if the IPv4/v6 address matches net with a netmask len bits wide. May be qualified with src or dst.
dst port port True if the packet is ip/tcp, ip/udp, ip6/tcp or ip6/udp and has a destination port value of port. The port can be a number or a name. If a name is used, both the port number and protocol are checked. If a number or ambiguous name is used, only the port number is checked (e.g., dst port 513 will print both tcp/login traffic and udp/who traffic, and port domain will print both tcp/domain and udp/domain traffic).
src port port
True if the packet has a source port value of port.
port port True if either the source or destination port of the packet is port. Any of the above port expressions can be prepended with the keywords, tcp or udp, as in: tcp src port port, which matches only tcp packets whose source port is port.
less length
True if the packet has a length less than or equal to length. This is equivalent to: len <= length.
greater length True if the packet has a length greater than or equal to length. This is equivalent to: len >= length.
ip proto protocol True if the packet is an IP packet of protocol type protocol. Protocol can be a number or one of the names icmp, icmp6, igmp, igrp, pim, ah, esp, vrrp, udp, or tcp. Note that the identifiers tcp, udp, and icmp are also keywords and must be escaped via backslash (\), which is \\ in the C-shell. Note that this primitive does not chase the protocol header chain.
ip6 proto protocol
True if the packet is an IPv6 packet of protocol type protocol. Note that this primitive does not chase the protocol header chain.
ip6 protochain protocol True if the packet is IPv6 packet, and contains protocol header with type protocol in its protocol header chain. For example, ip6 protochain 6 matches any IPv6 packet with TCP protocol header in the protocol header chain. The packet may contain, for example, authentication header, routing header, or hop-by-hop option header, between IPv6 header and TCP header. The BPF code emitted by this primitive is complex and cannot be optimized by BPF optimizer code in tcpdump, so this can be somewhat slow.
ip protochain protocol Equivalent to ip6 protochain protocol, but this is for IPv4.

Cyberoam Installation Guide Annexure - I
eLitecore Technologies Ltd. 73
ether broadcast
True if the packet is an ethernet broadcast packet. The ether keyword is optional.
ip broadcast True if the packet is an IP broadcast packet. It checks for both the all-zeroes and all-ones broadcast conventions, and looks up the local subnet mask.
ether multicast True if the packet is an ethernet multicast packet. The ether keyword is optional. This is shorthand for `ether[0] & 1 != 0'.
ip multicast True if the packet is an IP multicast packet
ip6 multicast
True if the packet is an IPv6 multicast packet
ether proto protocol True if the packet is of ether type protocol. Protocol can be a number or one of the names ip, ip6, arp, rarp, atalk, aarp, decnet, sca, lat, mopdl, moprc, iso, stp, ipx, or netbeui. Note these identifiers are also keywords and must be escaped via backslash (\). [In the case of FDDI (e.g., `fddi protocol arp') and Token Ring (e.g., `tr protocol arp'), for most of those protocols, the pro tocol identification comes from the 802.2 Logical Link Control (LLC) header, which is usually layered on top of the FDDI or Token Ring header.
When filtering for most protocol identifiers on FDDI or Token Ring, tcpdump checks only the protocol ID field of an LLC header in so-called SNAP format with an Organizational Unit Identifier (OUI) of 0x000000, for encapsulated Ethernet; it doesn't check whether the packet is in SNAP format with an OUI of 0x000000. The exceptions are iso, for which it checks the DSAP (Destination Service Access Point) and SSAP (Source Service Access Point) fields of the LLC header, stp and netbeui, where it checks the DSAP of the LLC header, and atalk, where it checks for a SNAP-format packet with an OUI of 0x080007 and the Appletalk etype. In the case of Ethernet, tcpdump checks the Ethernet type field for most of those protocols; the exceptions are iso, sap, and netbeui, for which it checks for an 802.3 frame and then checks the LLC header as it does for FDDI and Token Ring, atalk, where it checks both for the Appletalk etype in an Ethernet frame and for a SNAP-format packet as it does for FDDI and Token Ring, aarp, where it checks for the Appletalk ARP etype in either an Ethernet frame or an 802.2 SNAP frame with an OUI of 0x000000, and ipx, where it checks for the IPX etype in an Ethernet frame, the IPX DSAP in the LLC header, the 802.3 with no LLC header encapsulation of IPX, and the IPX etype in a SNAP frame.]
decnet src host True if the DECNET source address is host, which may be an address of the form ``10.123'', or a DECNET host name. [DECNET host name support is only available on Ultrix systems that are configured to run DECNET.]
decnet dst host True if the DECNET destination address is host.
decnet host host True if either the DECNET source or destination address is host.
Cyberoam Installation Guide Annexure - I
eLitecore Technologies Ltd. 74
ip, ip6, arp, rarp, atalk, aarp, decnet, iso, stp, ipx, netbeui
Abbreviations for: ether proto p where p is one of the above protocols.
lat, moprc, mopdl Abbreviations for: ether proto p where p is one of the above protocols. Note that tcpdump does not currently know how to parse these protocols.
vlan [vlan_id] True if the packet is an IEEE 802.1Q VLAN packet. If [vlan_id] is specified, only true is the packet has the specified vlan_id. Note that the first vlan keyword encountered in expression changes the decoding offsets for the remainder of expression on the assumption that the packet is a VLAN packet.
tcp, udp, icmp Abbreviations for: ip proto p or ip6 proto p where p is one of the above protocols.
iso proto protocol True if the packet is an OSI packet of protocol type protocol. Protocol can be a number or one of the names clnp, esis, or isis.
clnp, esis, isis Abbreviations for: iso proto p where p is one of the above protocols. Note that tcpdump does an incomplete job of parsing these protocols.
expr relop expr True if the relation holds, where relop is one of >, <, >=, <=, =, !=, and expr is an arithmetic expression composed of integer constants (expressed in standard C syntax), the normal binary operators [+, -, *, /, &, |], a length operator, and special packet data accessors. To access data inside the packet, use the following syntax: proto [ expr : size ] Proto is one of ether, fddi, tr, ip, arp, rarp, tcp, udp, icmp or ip6, and indicates the protocol layer for the index operation. Note that tcp, udp and other upper-layer protocol types only apply to IPv4, not IPv6 (this will be fixed in the future). The byte offset, relative to the indicated protocol layer, is given by expr. Size is optional and indicates the number of bytes in the field of interest; it
Cyberoam Installation Guide Annexure - I
eLitecore Technologies Ltd. 75
can be either one, two, or four, and defaults to one. The length operator, indicated by the keyword len, gives the length of the packet. For example, `ether[0] & 1 != 0' catches all multicast traffic. The expression `ip[0] & 0xf != 5' catches all IP packets with options. The expression `ip[6:2] & 0x1fff = 0' catches only unfragmented datagrams and frag zero of fragmented datagrams. This check is implicitly applied to the tcp and udp index operations. For instance, tcp[0] always means the first byte of the TCP header, and never means the first byte of an intervening fragment. Some offsets and field values may be expressed as names rather than as numeric values. The following protocol header field offsets are available: icmptype (ICMP type field), icmpcode (ICMP code field), and tcpflags (TCP flags field). The following ICMP type field values are available: icmp-echoreply, icmp-unreach, icmp-sourcequench, icmp-redirect, icmp-echo, icmp-routeradvert, icmp-routersolicit, icmp- timxceed, icmp-paramprob, icmp-tstamp, icmp-tstampreply, icmp-ireq, icmp-ireqreply, icmp-maskreq, icmp-maskreply. The following TCP flags field values are available: tcp-fin, tcp-syn, tcp-rst, tcp-push, tcp-push, tcp-ack, tcp-urg.
Primitives may be combined using:
A parenthesized group of primitives and operators (parentheses are special to the Shell and must be escaped).
Negation (`!' or `not'). Concatenation (`&&' or `and'). Alternation (`||' or `or').
Negation has highest precedence. Alternation and concatenation have equal precedence and associate left to right. Note that explicit and tokens, not juxtaposition, are now required for concatenation. If an identifier is given without a keyword, the most recent keyword is assumed. For example, not host vs and ace is short for not host vs and host ace which should not be confused with not ( host vs or ace ) Expression arguments can be passed to tcpdump either as a single argument or as multiple arguments, whichever is more convenient. Generally, if the expression contains Shell metacharacters, it is easier to pass it as a single, quoted argument. Multiple arguments are concatenated with spaces before being parsed. EXAMPLES
Cyberoam Installation Guide Annexure - I
eLitecore Technologies Ltd. 76
To print all packets arriving at or departing from sundown:
tcpdump host sundown To print traffic between helios and either hot or ace:
tcpdump host helios and \( hot or ace \) To print all IP packets between ace and any host except helios:
tcpdump ip host ace and not helios To print all traffic between local hosts and hosts at Berkeley:
tcpdump net ucb-ether To print all ftp traffic through internet gateway snup: (note that the expression is quoted to prevent the shell from (mis-)interpreting the parentheses):
tcpdump 'gateway snup and (port ftp or ftp-data)' To print traffic neither sourced from nor destined for local hosts (if you gateway to one other net, this stuff should never make it onto your local net).
tcpdump ip and not net localnet To print the start and end packets (the SYN and FIN packets) of each TCP conversation that involves a non-local host.
tcpdump 'tcp[tcpflags] & (tcp-syn|tcp-fin) != 0 and not src and dst net localnet' To print IP packets longer than 576 bytes sent through gateway snup:
tcpdump 'gateway snup and ip[2:2] > 576' To print IP broadcast or multicast packets that were not sent via ethernet broadcast or multicast:
tcpdump 'ether[0] & 1 = 0 and ip[16] >= 224' To print all ICMP packets that are not echo requests/replies (i.e., not ping packets):
tcpdump 'icmp[icmptype] != icmp-echo and icmp[icmptype] != icmp-echoreply' OUTPUT FORMAT The output of tcpdump is protocol dependent. The following gives a brief description and examples of most of the formats. Link Level Headers If the '-e' option is given, the link level header is printed out. On ethernets, the source and destination addresses, protocol, and packet length are printed. On FDDI networks, the '-e' option causes tcpdump to print the `frame control' field, the source and destination addresses, and the packet length. (The `frame control' field governs the interpretation of the

Cyberoam Installation Guide Annexure - I
eLitecore Technologies Ltd. 77
rest of the packet. Normal packets (such as those containing IP datagrams) are `async' packets, with a priority value between 0 and 7; for example, `async4'. Such packets are assumed to contain an 802.2 Logical Link Control (LLC) packet; the LLC header is printed if it is not an ISO datagram or a so-called SNAP packet. On Token Ring networks, the '-e' option causes tcpdump to print the `access control' and `frame control' fields, the source and destination addresses, and the packet length. As on FDDI networks, packets are assumed to contain an LLC packet. Regardless of whether the '-e' option is specified or not, the source routing information is printed for source-routed packets. N.B.: The following description assumes familiarity with the SLIP compression algorithm described in RFC-1144.) On SLIP links, a direction indicator (``I'' for inbound, ``O'' for outbound), packet type, and compression information are printed out. The packet type is printed first. The three types are ip, utcp, and ctcp. No further link information is printed for ip packets. For TCP packets, the connection identifier is printed following the type. If the packet is compressed, its encoded header is printed out. The special cases are printed out as *S+n and *SA+n, where n is the amount by which the sequence number (or sequence number and ack) has changed. If it is not a special case, zero or more changes are printed. A change is indicated by U (urgent pointer), W (window), A (ack), S (sequence number), and I (packet ID), followed by a delta (+n or -n), or a new value (=n). Finally, the amount of data in the packet and compressed header length are printed. For example, the following line shows an outbound compressed TCP packet, with an implicit connection identifier; the ack has changed by 6, the sequence number by 49, and the packet ID by 6; there are 3 bytes of data and 6 bytes of compressed header: O ctcp * A+6 S+49 I+6 3 (6) ARP/RARP Packets Arp/rarp output shows the type of request and its arguments. The format is intended to be self explanatory. Here is a short sample taken from the start of an `rlogin' from host rtsg to host csam: arp who-has csam tell rtsg arp reply csam is-at CSAM The first line says that rtsg sent an arp packet asking for the ethernet address of internet host csam. Csam replies with its ethernet address (in this example, ethernet addresses are in caps and internet addresses in lower case). This would look less redundant if we had done tcpdump -n: arp who-has 128.3.254.6 tell 128.3.254.68 arp reply 128.3.254.6 is-at 02:07:01:00:01:c4 If we had done tcpdump -e, the fact that the first packet is broadcast and the second is point-to-point would be visible: RTSG Broadcast 0806 64: arp who-has csam tell rtsg CSAM RTSG 0806 64: arp reply csam is-at CSAM For the first packet this says the ethernet source address is RTSG, the destination is the ethernet broadcast address, the type field contained hex 0806 (type ETHER_ARP) and the total length was 64 bytes. TCP Packets

Cyberoam Installation Guide Annexure - I
eLitecore Technologies Ltd. 78
(N.B.: The following description assumes familiarity with the TCP protocol described in RFC-793. If you are not familiar with the protocol, neither this description nor tcpdump will be of much use to you.) The general format of a tcp protocol line is: src > dst: flags data-seqno ack window urgent options Src and dst are the source and destination IP addresses and ports. Flags are some combination of S (SYN), F (FIN), P (PUSH) or R (RST) or a single `.' (no flags). Data-seqno describes the portion of sequence space covered by the data in this packet (see example below). Ack is sequence number of the next data expected the other direction on this connection. Window is the number of bytes of receive buffer space available the other direction on this connection. Urg indicates there is `urgent' data in the packet. Options are tcp options enclosed in angle brackets (e.g., <mss 1024>). Src, dst and flags are always present. The other fields depend on the contents of the packet's tcp protocol header and are output only if appropriate. Here is the opening portion of an rlogin from host rtsg to host csam.
rtsg.1023 > csam.login: S 768512:768512(0) win 4096 <mss 1024> csam.login > rtsg.1023: S 947648:947648(0) ack 768513 win 4096 <mss 1024> rtsg.1023 > csam.login: . ack 1 win 4096 rtsg.1023 > csam.login: P 1:2(1) ack 1 win 4096 csam.login > rtsg.1023: . ack 2 win 4096 rtsg.1023 > csam.login: P 2:21(19) ack 1 win 4096 csam.login > rtsg.1023: P 1:2(1) ack 21 win 4077 csam.login > rtsg.1023: P 2:3(1) ack 21 win 4077 urg 1 csam.login > rtsg.1023: P 3:4(1) ack 21 win 4077 urg 1
The first line says that tcp port 1023 on rtsg sent a packet to port login on csam. The S indicates that the SYN flag was set. The packet sequence number was 768512 and it contained no data. (The notation is `first:last (nbytes)' which means `sequence numbers first up to but not including last which is nbytes bytes of user data'.) There was no piggybacked ack, the available receive window was 4096 bytes and there was a max-segment-size option requesting an mss of 1024 bytes. Csam replies with a similar packet except it includes a piggy-backed ack for rtsg's SYN. Rtsg then acks csam's SYN. The `.' Means no flags were set. The packet contained no data so there is no data sequence number. Note that the ack sequence number is a small integer (1). The first time tcpdump sees a tcp `conversation', it prints the sequence number from the packet. On subsequent packets of the conversation, the difference between the current packet’s sequence number and this initial sequence number is printed. This means that sequence numbers after the first can be interpreted as relative byte positions in the conversation's data stream (with the first data byte each direction being `1'). `-S' will override this feature, causing the original sequence numbers to be output. On the 6th line, rtsg sends csam 19 bytes of data (bytes 2 through 20 in the rtsg -> csam side of the conversation). The PUSH flag is set in the packet. On the 7th line, csam says it's received data sent by rtsg up to but not including byte 21. Most of this data is apparently sitting in the socket buffer since csam's receive window has gotten 19 bytes smaller. Csam also sends one byte of data to rtsg in this packet. On the 8th and 9th lines, csam sends two bytes of urgent, pushed data to rtsg. If the snapshot was small enough that tcpdump didn't cap ture the full TCP header, it interprets as much of the header as it can and then reports ``[|tcp]'' to indicate the remainder could not be interpreted. If the header contains a bogus option (one with a length that's either too small or beyond the end of the header), tcpdump reports it as ``[bad opt]'' and does not interpret any further options (since it's impossible to tell where they start). If the header length indicates options are
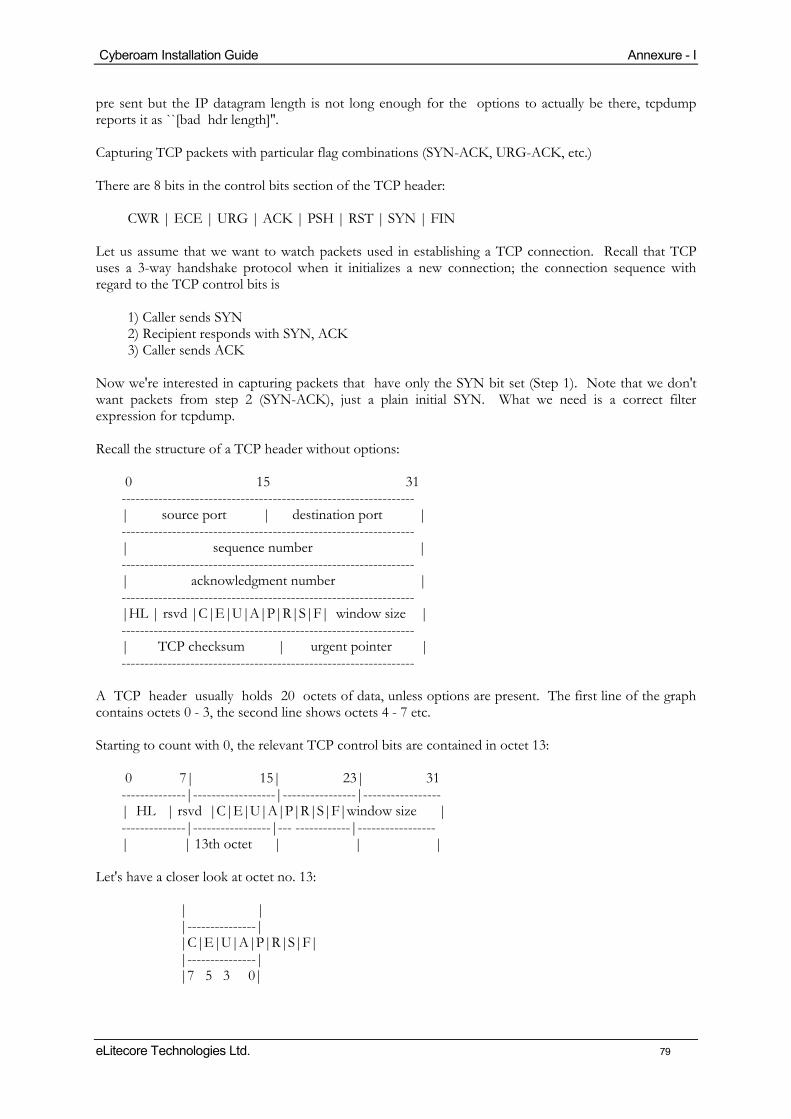
Cyberoam Installation Guide Annexure - I
eLitecore Technologies Ltd. 79
pre sent but the IP datagram length is not long enough for the options to actually be there, tcpdump reports it as ``[bad hdr length]''. Capturing TCP packets with particular flag combinations (SYN-ACK, URG-ACK, etc.) There are 8 bits in the control bits section of the TCP header:
CWR | ECE | URG | ACK | PSH | RST | SYN | FIN Let us assume that we want to watch packets used in establishing a TCP connection. Recall that TCP uses a 3-way handshake protocol when it initializes a new connection; the connection sequence with regard to the TCP control bits is
1) Caller sends SYN 2) Recipient responds with SYN, ACK 3) Caller sends ACK
Now we're interested in capturing packets that have only the SYN bit set (Step 1). Note that we don't want packets from step 2 (SYN-ACK), just a plain initial SYN. What we need is a correct filter expression for tcpdump. Recall the structure of a TCP header without options: 0 15 31 ---------------------------------------------------------------- | source port | destination port | ---------------------------------------------------------------- | sequence number | ---------------------------------------------------------------- | acknowledgment number | ---------------------------------------------------------------- |HL | rsvd |C|E|U|A|P|R|S|F| window size | ---------------------------------------------------------------- | TCP checksum | urgent pointer | ---------------------------------------------------------------- A TCP header usually holds 20 octets of data, unless options are present. The first line of the graph contains octets 0 - 3, the second line shows octets 4 - 7 etc. Starting to count with 0, the relevant TCP control bits are contained in octet 13: 0 7| 15| 23| 31 --------------|------------------|----------------|----------------- | HL | rsvd |C|E|U|A|P|R|S|F|window size | --------------|-----------------|--- ------------|----------------- | | 13th octet | | | Let's have a closer look at octet no. 13: | | |---------------| |C|E|U|A|P|R|S|F| |---------------| |7 5 3 0|

Cyberoam Installation Guide Annexure - I
eLitecore Technologies Ltd. 80
These are the TCP control bits we are interested in. We have numbered the bits in this octet from 0 to 7, right to left, so the PSH bit is bit number 3, while the URG bit is number 5. Recall that we want to capture packets with only SYN set. Let us see what happens to octet 13 if a TCP datagram arrives with the SYN bit set in its header: |C|E|U|A|P|R|S|F| |---------------| |0 0 0 0 0 0 1 0| |---------------| |7 6 5 4 3 2 1 0| Looking at the control bits section we see that only bit number 1 (SYN) is set. Assuming that octet number 13 is an 8-bit unsigned integer in network byte order, the binary value of this octet is 00000010 and its decimal representation is 7 6 5 4 3 2 1 0 0*2 + 0*2 + 0*2 + 0*2 + 0*2 + 0*2 + 1*2 + 0*2 = 2 We are almost done, because now we know that if only SYN is set, the value of the 13th octet in the TCP header, when interpreted as a 8-bit unsigned integer in network byte order, must be exactly 2. This relationship can be expressed as
tcp[13] == 2 We can use this expression as the filter for tcpdump in order to watch packets which have only SYN set:
tcpdump -i xl0 tcp[13] == 2 The expression says "let the 13th octet of a TCP datagram have the decimal value 2", which is exactly what we want. Now, let us assume that we need to capture SYN packets, but we do not care if ACK or any other TCP control bit is set at the same time. Let's see what happens to octet 13 when a TCP datagram with SYN-ACK set arrives: |C|E|U|A|P|R|S|F| |------------------| |0 0 0 1 0 0 1 0| |------------------| |7 6 5 4 3 2 1 0| Now bits 1 and 4 are set in the 13th octet. The binary value of octet 13 is 00010010 which translates to decimal 7 6 5 4 3 2 1 0 0*2 + 0*2 + 0*2 + 1*2 + 0*2 + 0*2 + 1*2 + 0*2 = 18

Cyberoam Installation Guide Annexure - I
eLitecore Technologies Ltd. 81
Now we can't just use 'tcp[13] == 18' in the tcpdump filter expression, because that would select only those packets that have SYN-ACK set, but not those with only SYN set. Remember that we don't care if ACK or any other control bit is set as long as SYN is set. In order to achieve our goal, we need to logically AND the binary value of octet 13 with some other value to preserve the SYN bit. We know that we want SYN to be set in any case, so we will logically AND the value in the 13th octet with the binary value of a SYN: 00010010 SYN-ACK 00000010 SYN AND 00000010 (we want SYN) AND 00000010 (we want SYN) -------- -------- = 00000010 = 00000010 We see that this AND operation delivers the same result regardless whether ACK or another TCP control bit is set. The decimal representation of the AND value as well as the result of this operation is 2 (binary 00000010), so we know that for packets with SYN set the following relation must hold true: ( ( value of octet 13 ) AND ( 2 ) ) == ( 2 ) This points us to the tcpdump filter expression
tcpdump -i xl0 'tcp[13] & 2 == 2' Note that you should use single quotes or a backslash in the expression to hide the AND ('&') special character from the shell. UDP Packets UDP format is illustrated by this rwho packet: actinide.who > broadcast.who: udp 84 This says that port who on host actinide sent a udp datagram to port who on host broadcast, the Internet broadcast address. The packet contained 84 bytes of user data. Some UDP services are recognized (from the source or destination port number) and the higher level protocol information printed. In particular, Domain Name service requests (RFC-1034/1035) and Sun RPC calls (RFC-1050) to NFS. UDP Name Server Requests (N.B.:The following description assumes familiarity with the Domain Service protocol described in RFC-1035. If you are not familiar with the protocol, the following description will appear to be written in greek.) Name server requests are formatted as
src > dst: id op? flags qtype qclass name (len) h2opolo.1538 > helios.domain: 3+ A? ucbvax.berkeley.edu. (37)
Host h2opolo asked the domain server on helios for an address record (qtype=A) associated with the name ucbvax.berkeley.edu. The query id was `3'. The `+' indicates the recursion desired flag was set. The query length was 37 bytes, not including the UDP and IP protocol headers. The query operation was the normal one, Query, so the op field was omitted. If the op had been anything else, it would have been printed between the `3' and the `+'. Similarly, the qclass was the normal one, C_IN, and omitted. Any other qclass would have been printed immediately after the `A'.

Cyberoam Installation Guide Annexure - I
eLitecore Technologies Ltd. 82
A few anomalies are checked and may result in extra fields enclosed in square brackets: If a query contains an answer, authority records or additional records section, ancount, nscount, or arcount are printed as `[na]', `[nn]' or `[nau]' where n is the appropriate count. If any of the response bits are set (AA, RA or rcode) or any of the `must be zero' bits are set in bytes two and three, `[b2&3=x]' is printed, where x is the hex value of header bytes two and three. UDP Name Server Responses Name server responses are formatted as
src > dst: id op rcode flags a/n/au type class data (len) helios.domain > h2opolo.1538: 3 3/3/7 A 128.32.137.3 (273)
helios.domain > h2opolo.1537: 2 NXDomain* 0/1/0 (97). In the first example, helios responds to query id 3 from h2opolo with 3 answer records, 3 name server records and 7 additional records. The first answer record is type A (address) and its data is internet address 128.32.137.3. The total size of the response was 273 bytes, excluding UDP and IP headers. The op (Query) and response code (NoError) were omitted, as was the class (C_IN) of the A record. In the second example, helios responds to query 2 with a response code of non-existent domain (NXDomain) with no answers, one name server and no authority records. The `*' indicates that the authoritative answer bit was set. Since there were no answers, no type, class or data were printed. Other flag characters that might appear are `-' (recursion available, RA, not set) and `|' (truncated message, TC, set). If the `question' section doesn't contain exactly one entry, `[nq]' is printed. Note that name server requests and responses tend to be large and the default snaplen of 68 bytes may not capture enough of the packet to print. Use the -s flag to increase the snaplen if you need to seriously investigate name server traffic. `-s 128' has worked well for me. SMB/CIFS decoding tcpdump now includes fairly extensive SMB/CIFS/NBT decoding for data on UDP/137, UDP/138 and TCP/139. Some primitive decoding of IPX and NetBEUI SMB data is also done. By default a fairly minimal decode is done, with a much more detailed decode done if -v is used. Be warned that with -v a single SMB packet may take up a page or more, so only use -v if you really want all the gory details. If you are decoding SMB sessions containing unicode strings then you may wish to set the environment variable USE_UNICODE to 1. A patch to auto-detect unicode srings would be welcome. For information on SMB packet formats and what all the fields mean see www.cifs.org or the pub/samba/specs/ directory on your favourite samba.org mirror site. IP Fragmentation Fragmented Internet datagrams are printed as (frag id:size@offset+) (frag id:size@offset) (The first form indicates there are more fragments. The second indicates this is the last fragment.) Id is the fragment id. Size is the fragment size (in bytes) excluding the IP header. Offset is this fragment's offset (in bytes) in the original datagram.
Cyberoam Installation Guide Annexure - I
eLitecore Technologies Ltd. 83
The fragment information is output for each fragment. The first fragment contains the higher level protocol header and the fraginfo is printed after the protocol info. Fragments after the first contain no higher level protocol header and the frag info is printed after the source and destination addresses. For example, here is part of an ftp from arizona.edu to lbl-rtsg.arpa over a CSNET connection that does not appear to handle 576 byte datagrams:
arizona.ftp-data > rtsg.1170: . 1024:1332(308) ack 1 win 4096 (frag 595a:328@0+) arizona > rtsg: (frag 595a:204@328) rtsg.1170 > arizona.ftp-data: . ack 1536 win 2560
There are a couple of things to note here: First, addresses in the 2nd line don't include port numbers. This is because the TCP protocol information is all in the first fragment and we have no idea what the port or sequence numbers are when we print the later fragments. Second, the tcp sequence information in the first line is printed as if there were 308 bytes of user data when, in fact, there are 512 bytes (308 in the first frag and 204 in the second). If you are looking for holes in the sequence space or trying to match up acks with packets, this can fool you. A packet with the IP do not fragment flag is marked with a trailing (DF). Timestamps By default, all output lines are preceded by a timestamp. The timestamp is the current clock time in the form hh:mm:ss.frac and is as accurate as the kernel's clock. The timestamp reflects the time the kernel first saw the packet. No attempt is made to account for the time lag between when the ethernet interface removed the packet from the wire and when the kernel serviced the `new packet' interrupt.
Cyberoam Installation Guide Annexure - I
eLitecore Technologies Ltd. 84
telnet Is the user interface to the TELNET protocol The telnet command is used to communicate with another host using the TELNET protocol. If telnet is invoked without the host argument, it enters command mode, indicated by its prompt (telnet>). In this mode, it accepts and executes the commands listed below. If it is invoked with arguments, it performs an open command with those arguments. SYNTAX
telnet [-8ELdx] [-b hostalias] [-e escapechar] [-l user] [host [port]]
PARAMETERS -8
Specifies an 8-bit data path. This causes an attempt to negotiate the TELNET BINARY option on both input and output.
-E
Stops any character from being recognized as an escape character. -L
Specifies an 8-bit data path on output. This causes the BINARY option to be negotiated on output. -b hostalias
Uses local socket to bind it to an aliased address or to the address of another interface than the one naturally chosen by connect. This can be useful when connecting to services which use IP addresses for authentication and reconfiguration of the server is undesirable (or impossible).
-d Sets the initial value of the debug toggle to TRUE
-e escapechar Sets the initial telnet escape character to escapechar. If escapechar is omitted, then there will be no escape character.
-x Turns on encryption of the data stream if possible
Host Indicates the official name, an alias, or the Internet address of a remote host
port Indicates a port number (address of an application). If a number is not specified, the default telnet port is used.
The line ~^] escapes to the normal telnet escape prompt. Once a connection has been opened, telnet will attempt to enable the TELNET LINEMODE option. While connected to a remote host, telnet command mode may be entered by typing the telnet ``escape character'' (initially ``^]''). When in command mode, the normal terminal editing conventions are available. Note that the escape character will return to the command mode of the initial invocation of telnet that has the controlling terminal. Use the send escape command to switch to command mode in subsequent telnet processes on remote hosts.
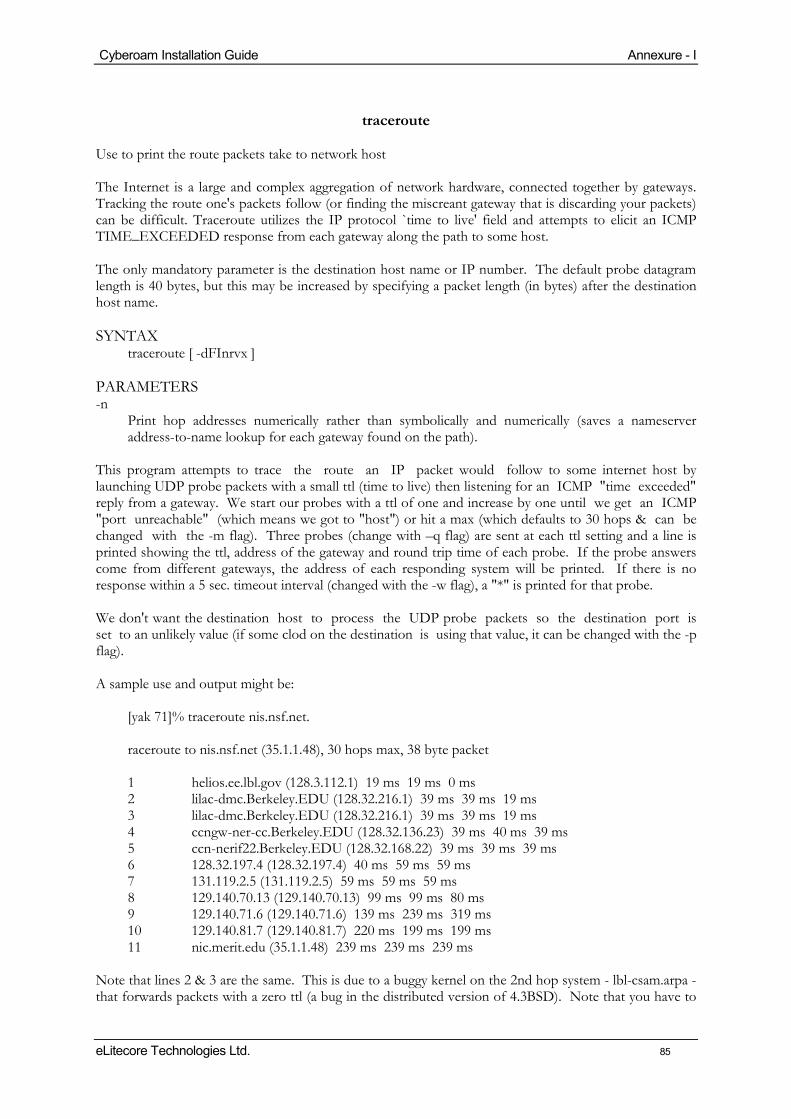
Cyberoam Installation Guide Annexure - I
eLitecore Technologies Ltd. 85
traceroute
Use to print the route packets take to network host The Internet is a large and complex aggregation of network hardware, connected together by gateways. Tracking the route one's packets follow (or finding the miscreant gateway that is discarding your packets) can be difficult. Traceroute utilizes the IP protocol `time to live' field and attempts to elicit an ICMP TIME_EXCEEDED response from each gateway along the path to some host. The only mandatory parameter is the destination host name or IP number. The default probe datagram length is 40 bytes, but this may be increased by specifying a packet length (in bytes) after the destination host name. SYNTAX
traceroute [ -dFInrvx ] PARAMETERS -n
Print hop addresses numerically rather than symbolically and numerically (saves a nameserver address-to-name lookup for each gateway found on the path).
This program attempts to trace the route an IP packet would follow to some internet host by launching UDP probe packets with a small ttl (time to live) then listening for an ICMP "time exceeded" reply from a gateway. We start our probes with a ttl of one and increase by one until we get an ICMP "port unreachable" (which means we got to "host") or hit a max (which defaults to 30 hops & can be changed with the -m flag). Three probes (change with –q flag) are sent at each ttl setting and a line is printed showing the ttl, address of the gateway and round trip time of each probe. If the probe answers come from different gateways, the address of each responding system will be printed. If there is no response within a 5 sec. timeout interval (changed with the -w flag), a "*" is printed for that probe. We don't want the destination host to process the UDP probe packets so the destination port is set to an unlikely value (if some clod on the destination is using that value, it can be changed with the -p flag). A sample use and output might be:
[yak 71]% traceroute nis.nsf.net. raceroute to nis.nsf.net (35.1.1.48), 30 hops max, 38 byte packet 1 helios.ee.lbl.gov (128.3.112.1) 19 ms 19 ms 0 ms 2 lilac-dmc.Berkeley.EDU (128.32.216.1) 39 ms 39 ms 19 ms 3 lilac-dmc.Berkeley.EDU (128.32.216.1) 39 ms 39 ms 19 ms 4 ccngw-ner-cc.Berkeley.EDU (128.32.136.23) 39 ms 40 ms 39 ms 5 ccn-nerif22.Berkeley.EDU (128.32.168.22) 39 ms 39 ms 39 ms 6 128.32.197.4 (128.32.197.4) 40 ms 59 ms 59 ms 7 131.119.2.5 (131.119.2.5) 59 ms 59 ms 59 ms 8 129.140.70.13 (129.140.70.13) 99 ms 99 ms 80 ms 9 129.140.71.6 (129.140.71.6) 139 ms 239 ms 319 ms 10 129.140.81.7 (129.140.81.7) 220 ms 199 ms 199 ms 11 nic.merit.edu (35.1.1.48) 239 ms 239 ms 239 ms
Note that lines 2 & 3 are the same. This is due to a buggy kernel on the 2nd hop system - lbl-csam.arpa - that forwards packets with a zero ttl (a bug in the distributed version of 4.3BSD). Note that you have to
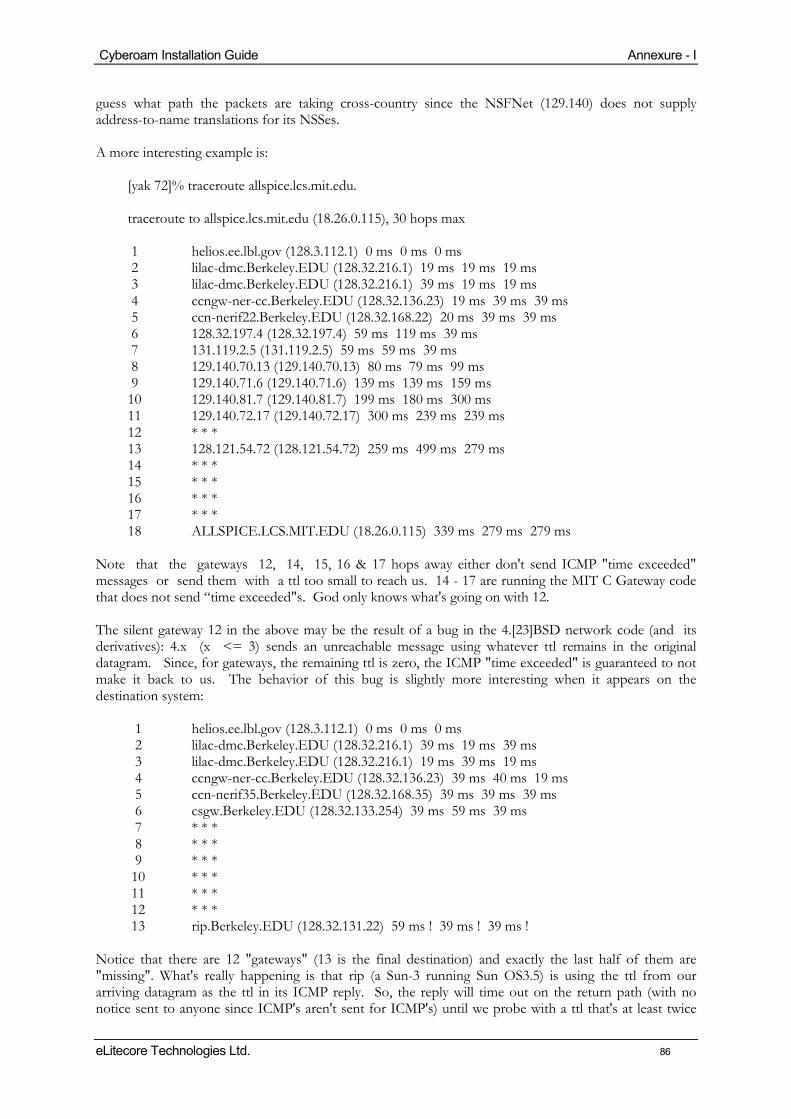
Cyberoam Installation Guide Annexure - I
eLitecore Technologies Ltd. 86
guess what path the packets are taking cross-country since the NSFNet (129.140) does not supply address-to-name translations for its NSSes. A more interesting example is:
[yak 72]% traceroute allspice.lcs.mit.edu. traceroute to allspice.lcs.mit.edu (18.26.0.115), 30 hops max 1 helios.ee.lbl.gov (128.3.112.1) 0 ms 0 ms 0 ms 2 lilac-dmc.Berkeley.EDU (128.32.216.1) 19 ms 19 ms 19 ms 3 lilac-dmc.Berkeley.EDU (128.32.216.1) 39 ms 19 ms 19 ms 4 ccngw-ner-cc.Berkeley.EDU (128.32.136.23) 19 ms 39 ms 39 ms 5 ccn-nerif22.Berkeley.EDU (128.32.168.22) 20 ms 39 ms 39 ms 6 128.32.197.4 (128.32.197.4) 59 ms 119 ms 39 ms 7 131.119.2.5 (131.119.2.5) 59 ms 59 ms 39 ms 8 129.140.70.13 (129.140.70.13) 80 ms 79 ms 99 ms 9 129.140.71.6 (129.140.71.6) 139 ms 139 ms 159 ms 10 129.140.81.7 (129.140.81.7) 199 ms 180 ms 300 ms 11 129.140.72.17 (129.140.72.17) 300 ms 239 ms 239 ms 12 * * * 13 128.121.54.72 (128.121.54.72) 259 ms 499 ms 279 ms 14 * * * 15 * * * 16 * * * 17 * * * 18 ALLSPICE.LCS.MIT.EDU (18.26.0.115) 339 ms 279 ms 279 ms
Note that the gateways 12, 14, 15, 16 & 17 hops away either don't send ICMP "time exceeded" messages or send them with a ttl too small to reach us. 14 - 17 are running the MIT C Gateway code that does not send “time exceeded"s. God only knows what's going on with 12. The silent gateway 12 in the above may be the result of a bug in the 4.[23]BSD network code (and its derivatives): 4.x (x <= 3) sends an unreachable message using whatever ttl remains in the original datagram. Since, for gateways, the remaining ttl is zero, the ICMP "time exceeded" is guaranteed to not make it back to us. The behavior of this bug is slightly more interesting when it appears on the destination system:
1 helios.ee.lbl.gov (128.3.112.1) 0 ms 0 ms 0 ms 2 lilac-dmc.Berkeley.EDU (128.32.216.1) 39 ms 19 ms 39 ms 3 lilac-dmc.Berkeley.EDU (128.32.216.1) 19 ms 39 ms 19 ms 4 ccngw-ner-cc.Berkeley.EDU (128.32.136.23) 39 ms 40 ms 19 ms 5 ccn-nerif35.Berkeley.EDU (128.32.168.35) 39 ms 39 ms 39 ms 6 csgw.Berkeley.EDU (128.32.133.254) 39 ms 59 ms 39 ms 7 * * * 8 * * * 9 * * * 10 * * * 11 * * * 12 * * * 13 rip.Berkeley.EDU (128.32.131.22) 59 ms ! 39 ms ! 39 ms !
Notice that there are 12 "gateways" (13 is the final destination) and exactly the last half of them are "missing". What's really happening is that rip (a Sun-3 running Sun OS3.5) is using the ttl from our arriving datagram as the ttl in its ICMP reply. So, the reply will time out on the return path (with no notice sent to anyone since ICMP's aren't sent for ICMP's) until we probe with a ttl that's at least twice

Cyberoam Installation Guide Annexure - I
eLitecore Technologies Ltd. 87
the path length. I.e., rip is really only 7 hops away. A reply that returns with a ttl of 1 is a clue this problem exists. Traceroute prints a "!" after the time if the ttl is <= 1. Since vendors ship a lot of obsolete (DEC's Ultrix, Sun 3.x) or non-standard (HPUX) software, expect to see this problem frequently and/or take care picking the target host of your probes. Other possible annotations after the time are !H, !N, or !P (host, network or protocol unreachable), !S (source route failed), !F-<pmtu> (fragmentation needed - the RFC1191 Path MTU Discovery value is displayed), !X (communication administratively prohibited), !V (host precedence violation), !C (precedence cutoff in effect), or !<num> (ICMP unreachable code <num>). These are defined by RFC1812 (which supersedes RFC1716). If almost all the probes result in some kind of unreachable, traceroute will give up and exit. This program is intended for use in network testing, measurement and management. It should be used primarily for manual fault isolation. Because of the load it could impose on the network, it is unwise to use traceroute during normal operations or from automated scripts.

Cyberoam Installation Guide Annexure - I
eLitecore Technologies Ltd. 88
uptime
Tells how long the system has been running. uptime gives a one line display of the following information. The current time, how long the system has been running, how many users are currently logged on, and the system load averages for the past 1, 5, and 15 minutes. This is the same information contained in the header line displayed by w(1). SYNTAX
uptime uptime [-V]

Cyberoam Installation Guide Annexure - I
eLitecore Technologies Ltd. 89
viewmaillog
viewmaillog shows information about all the mails sent and received like date and time, size of mail, mailer used SYNTAX
viewmaillog
vmstat
vmstat reports virtual memory statistics about processes, memory, paging, block IO, traps, and cpu activity. The first report produced gives averages since the last reboot. Additional reports give information on a sampling period of length delay. The process and memory reports are instantaneous in either case. SYNTAX
vmstat [-n] [delay [ count]] vmstat[-V]
PARAMETERS The -n switch causes the header to be displayed only once rather than periodically. delay is the delay between updates in seconds. If no delay is specified, only one report is printed with the average values since boot. count is the number of updates. If no count is specified and delay is defined, count defaults to infinity. The -V switch results in displaying version information. FIELD DESCRIPTIONS Procs
r: The number of processes waiting for run time. b: The number of processes in uninterruptable sleep. w: The number of processes swapped out but otherwise runnable. This field is calculated, but Linux never desperation swaps.
Memory swpd: the amount of virtual memory used (kB). free: the amount of idle memory (kB). buff: the amount of memory used as buffers (kB).
Swap si: Amount of memory swapped in from disk (kB/s). so: Amount of memory swapped to disk (kB/s).

Cyberoam Installation Guide Annexure - I
eLitecore Technologies Ltd. 90
IO bi: Blocks sent to a block device (blocks/s). bo: Blocks received from a block device (blocks/s).
System in: The number of interrupts per second, including the clock. cs: The number of context switches per second.
CPU These are percentages of total CPU time. us: user time sy: system time id: idle time

Cyberoam Installation Guide Annexure - I
eLitecore Technologies Ltd. 91
quit
quits from Cyberoam Console and return to the Cyberoam Main menu SYNTAX
quit