yc^i i ^*-*l.— i** 'jflii v^ - industrial sewing machine parts · as the owner of a singer*...
TRANSCRIPT
WWVWVj
L i
\1111111111
I11
It
iwwvwMI
1ti111i
ii«I
V..JI V..,^^•"••••'"yC I I *-*l.— i**1
'jfli<^ li v^X^^^^H I ,SA
1
ii
I111i11!''\
BA
^H
i ii ti !i
i!1
i11
!
i ii1
iI n
III 1II1 '1J!/J »'/M '/^« i' ^•* i
^^H I ". ^ ^H i ' I•> ^^^M! .!
•i 3NIHOVIAI ONIM3S
H 3 O N I S

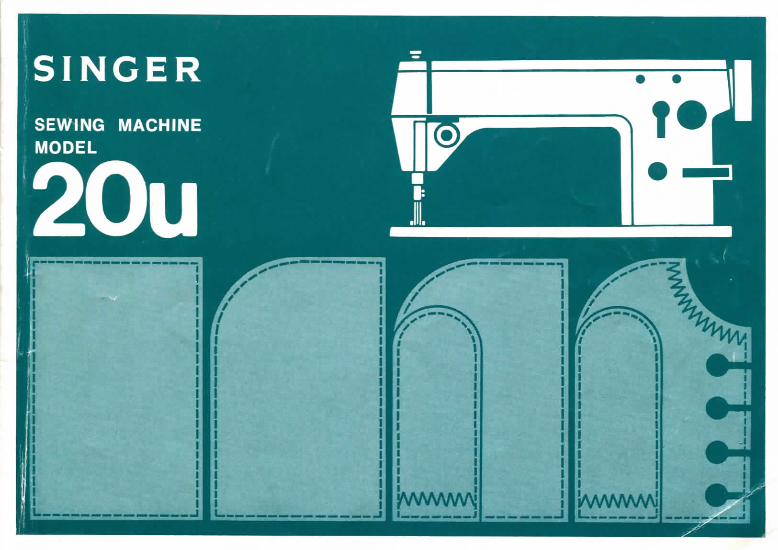
Congratulations!
As the owner of a SINGER* artisan zigzag sewing machine Model20U, you are about to enter a wonderful new world of sewing!From the moment you begin to sew at your Model 20U, you willbe delighted with its easy dependable operation.
• Perfect straight stitching.• Zigzag and ornamental stitching in a variety of width and stitch
lengths.• Superfine control of stitch length insures perfect satin stitching.• Speeds up to 2,000 stitches per minute at maximum zigzag stitch
width (9mm) and 2,500 stitches per minute at zigzag stitch widthof 5mm or less depending on material being sewn and type ofwork being done.
May we recommend that, before you begin to sew, you discover allthe many advantages of your Model 20U by going through thisinstruction book step by step while seated at your machine.SINGER* Service is always close at hand. If your sewing machineshould need servicing, call your local SINGER CENTER to be sureof warranted SINGER* Parts and SINGER Service. You will findthe address under SINGER COMPANY in the classified telephone
directory.
* A Trademark of THE SINGER COMPANYCopyright ©1987 SINGER SEWING MACHINE COMPANY
All Rights Reserved Throughout The World
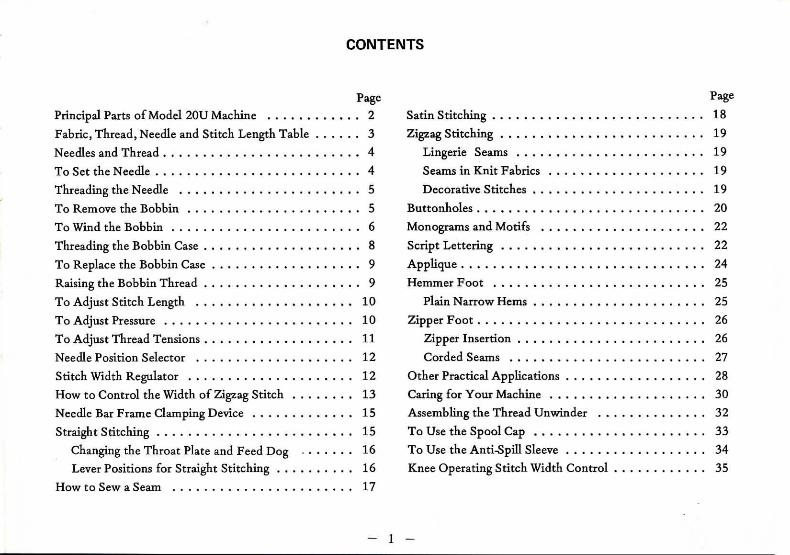
CONTENTS
Page
Principal Parts of Model 20U Machine 2
Fabric, Thread, Needle and Stitch Length Table 3
Needles and Thread 4
To Set the Needle 4
Threading the Needle 5
To Remove the Bobbin 5
To Wind the Bobbin 6
Threading the Bobbin Case 8
To Replace the Bobbin Case 9
Raising the Bobbin Thread 9
To Adjust Stitch Length 10
To Adjust Pressure 10
To Adjust Thread Tensions 11
Needle Position Selector 12
Stitch Width Regulator 12
How to Control the Width of Zigzag Stitch 13
Needle Bar Frame Clamping Device 15
Straight Stitching 15
Changing the Throat Plate and Feed Dog 16
Lever Positions for Straight Stitching 16
How to Sew a Seam 17
Page
Satin Stitching 18
Zigzag Stitching 19
Lingerie Seams 19
Seams in Knit Fabrics 19
Decorative Stitches 19
Buttonholes 20
Monograms and Motifs 22
Script Lettering 22
Applique 24
Hemmer Foot 25
Plain Narrow Hems 25
Zipper Foot 26
Zipper Insertion 26
Corded Seams 27
Other Practical Applications 28
Caring for Your Machine 30
Assembling the Thread Unwinder 32
To Use the Spool Cap 33
To Use the Anti-Spill Sleeve 34
Knee Operating Stitch Width Control 35

PRINCIPAL PARTS OF MODEL 20U MACHINE
Thread Guide
Take-up Lever Guard
Take-up Lever
Pressure Regulating Thumb Screw
Arm Top Cover
Face Plate
Thread Guard (upper)
Slack Thread Regulator
Needle Bar Frame ClampingThumb Screw
Thread Guard (lower) -
Needle Bar
Presser Foot Screw
Presser Foot
Thread Guide Holder
Spool Pin
Bobbin Winder
Bed Slide Throat Plate
Stitch Width RegulatingPlate Thumb Screw
Hand Wheel
Feed Regulating Dial
Stitch Width Regulator
Feed Reverse Lever
Needle Position Selector
Tension (complete)
Needle Clamp Thumb Screw
-2-
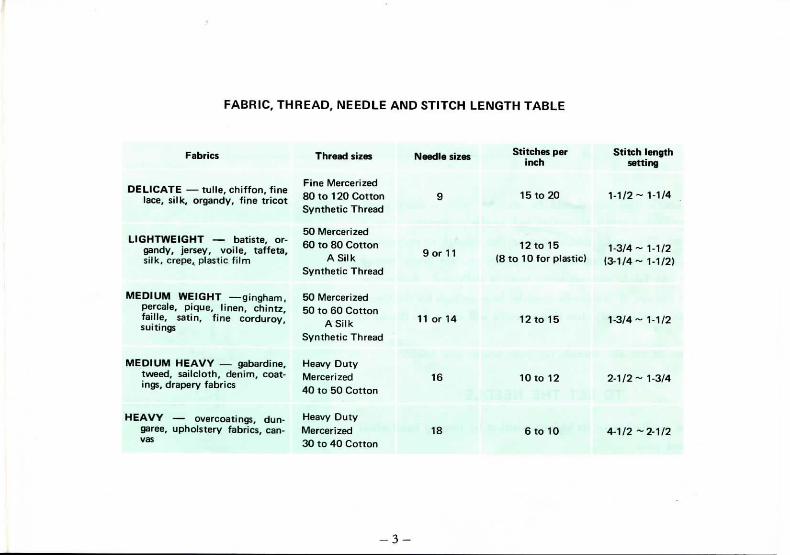
FABRIC, THREAD, NEEDLE AND STITCH LENGTH TABLE
Fabrics
DELICATE — tulle, chiffon, finelace, silk, organdy, fine tricot
LIGHTWEIGHT — batiste, or-gandy, jersey, voile, taffeta,silk, crepe,, plastic film
MEDIUM WEIGHT —gingham,percale, pique, linen, chintz,faille, satin, fine corduroy,suitings
Thread sizes
Fine Mercerized80 to 120 CottonSynthetic Thread
50 Mercerized60 to 80 Cotton
A SilkSynthetic Thread
50 Mercerized50 to 60 Cotton
A SilkSynthetic Thread
Needle sizes
9 or 11
11 or 14
Stitches perinch
15 to 20
Stitch lengthsetting
1-1/2- 1-1/4
12 to 15 1-3/4- 1-1/2(8 to 10 for plastic) (3-1/4 ~ 1-1/21
12 to 15 1-3/4- 1-1/2
MEDIUM HEAVY — gabardine,tweed, sailcloth, denim, coat-ings, drapery fabrics
Heavy DutyMercerized40 to 50 Cotton
16 10 to 12 2-1/2- 1-3/4
HEAVY — overcoatings, dun-garee, upholstery fabrics, can-vas
Heavy DutyMercerized30 to 40 Cotton
18 6 to 10 4-1/2 -2-1/2
-3-

NEEDLES AND THREAD
This machine uses needle Catalog 1910-05, available
in sizes 9, 11, 14, 16 and 18.
The needle you use should be straight, with a sharp point,
to ensure perfect stitch formation and needle penetration through
the fabric. The needle should also be fine enough to prevent the
fabric from being marred with large punctures, yet heavy enough
to pierce the fabric without being bent or deflected. Remember,
too, that the eye of the needle must be large enough for the thread
to pass through it freely; too fine a needle will cause the thread to
fray.
Be sure to use like threads for both needle and bobbin.
TO SET THE NEEDLE
1. Raise needle bar to its highest position by turning hand wheel
toward you.
2. Loosen the needle clamp screw and insert needle into clamp
as far as it will go, with the long groove toward you. Then
tighten the needle clamp screw.
LONG GROOVETOWARD YOU
-4 -

THREADING THE NEEDLE
1. Turn hand wheel toward you to raise take-up lever
to its highest position.
2. Raise the presser foot.
3- Lead thread from the thread unwinder through all the
threading points shown. Thread the needle from front
to back.
4. Draw about 3 inches of thread through eye of needle.
TO REMOVE THE BOBBIN
1. Turn hand wheel toward you until needle is at itshighest position.
2. Open bed slide.
3. Reach up from under the table with left hand, open
bobbin case latch A, and lift out bobbin case B.
4. Release latch and remove bobbin from bobbin case.
B \ 5 -
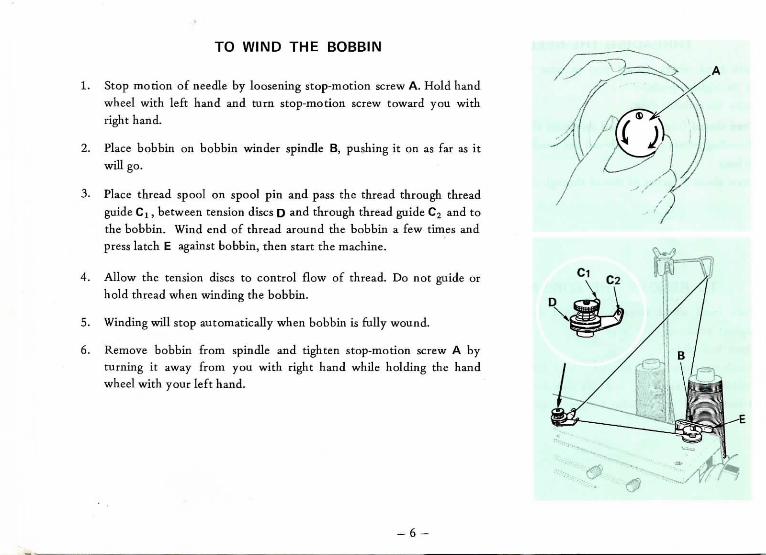
TO WIND THE BOBBIN
1. Stop motion of needle by loosening stop-motion screw A. Hold hand
wheel with left hand and turn stop-motion screw toward you withright hand.
2. Place bobbin on bobbin winder spindle B, pushing it on as far as it
will go.
3. Place thread spool on spool pin and pass the thread through threadguide G! , between tension discs D and through thread guide C2 and tothe bobbin. Wind end of thread around the bobbin a few times andpress latch E against bobbin, then start the machine.
4. Allow the tension discs to control flow of thread. Do not guide orhold thread when winding the bobbin.
5. Winding will stop automatically when bobbin is fully wound.
6. Remove bobbin from spindle and tighten stop-motion screw A byturning it away from you with right hand while holding the handwheel with your left hand.
-6-

TO WIND THE BOBBIN (cont'd)
Bobbins can be wound while the machine is stiching. To wind bobbins
while the machine is stiching, follow the preceding instructions only do
not loosen the stop-motion screw.
To adjust the amount of thread on the bobbin, loosen screw F on latch
E and while holding stud G with a screwdriver, swing latch E away from
you or toward you, as required.
• For more thread on bobbin, swing latch E away from you.
• For less thread on bobbin, swing latch E toward you.
• Tighten screw F
if thread winds unevenly on bobbin, loosen screw H and move tension
bracket I up or down, as required, then tighten screw H.
G F

THREADING THE BOBBIN CASE
1. Hold bobbin so that thread unwinds in the direc-
tion shown, and put bobbin in bobbin case.
2. Pull thread into notch A and draw it under tension
spring B.
3. Draw thread out from slot on end of spring and
pass it through bobbin case thread guard C. Allow
about 4 inches of thread to hang freely from
bobbin.
NOTE: When straight stitching, a better result can
be obtained if bobbin-thread is not threaded through
bobbin case thread guard C.

TO REPLACE THE BOBBIN CASE
Hold bobbin case by latch A and place it on spindle of bobbin case holder
B so that position finger C enters notch D at right of bobbin case holder.
Release latch and press bobbin case firmly in place to assure proper position.
Close bed cover.
RAISING THE BOBBIN THREAD
Hold needle thread lightly with left hand. Turn hand wheel so that needle
enters throat plate and brings up bobbin thread. Pull end of bobbin thread up
through throat plate and place both needle and bobbin threads diagonally
under the presser foot.
-9
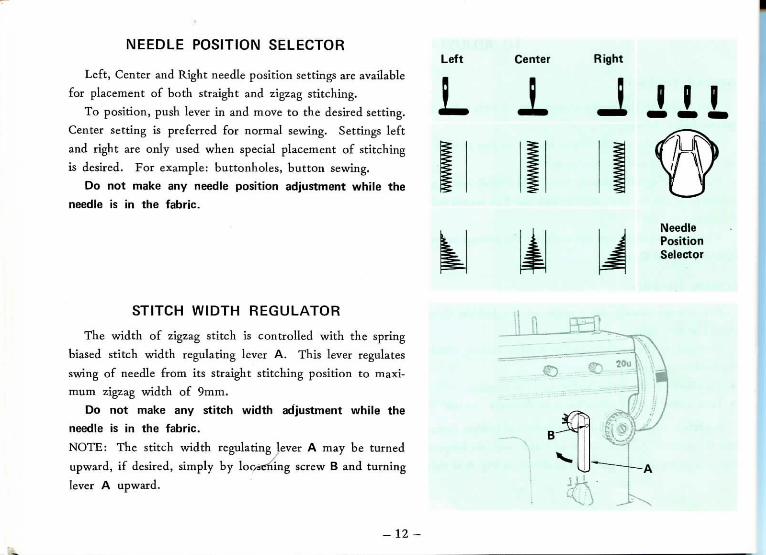
NEEDLE POSITION SELECTOR
Left, Center and Right needle position settings are available
for placement of both straight and zigzag stitching.
To position, push lever in and move to the desired setting.
Center setting is preferred for normal sewing. Settings left
and right are only used when special placement of stitching
is desired. For example: buttonholes, button sewing.
Do not make any needle position adjustment while the
needle is in the fabric.
Left Center Right
L ± J I L L
NeedlePositionSelector
STITCH WIDTH REGULATOR
The width of zigzag stitch is controlled with the spring
biased stitch width regulating lever A. This lever regulates
swing of needle from its straight stitching position to maxi-
mum zigzag width of 9mm.
Do not make any stitch width adjustment while the
needle is in the fabric.
NOTE: The stitch width regulating lever A may be turned
upward, if desired, simply by loosening screw B and turning
lever A upward.
-12-

HOW TO CONTROL THE WIDTH OF ZIGZAG STITCH
The two thumb screws A and B provided on front of arm allow
you to control the width of zigzag stitches. Thumb screw A is used
to control the width of the wider zigzag stitch and thumb screw B to
control the narrower zigzag stitch.
1. To obtain minimum to maximum width (9mm) zigzag stitches,
first loosen thumb screw B to permit the stitch width regulator
C to return to its zero position and retighten thumb screw B.
Then loosen thumb screw A, turn stitch width regulator C
clockwise as far as it will go and while holding the regulator C in
this position, retighten thumb screw A. You can now regulate
the stitch width regulator within the range of zero to 9mm.
2. To make narrower zigzag stitches, for example, a zero to 5mm
wide zigzag stitches, loosen thumb screws A and B and retighten
thumb screw B as explained above. Then turn stitch width
regulator C to 5mm setting and while holding regulator C,
retighten thumb screw A.
Setting For Zero To 9mm
Wide Zigzag Stitch
- 13

3. To sew zigzag stitches in fixed width, loosen thumb screws A
and B, turn stitch width regulator C to desired stitch width and
while holding regulator C in this position, tighten thumb screw
B. Then tighten thumb screw A. This will lock the stitch width
regulator in desired position and leave both hands free to handle
the fabric.
4. For sewing two different width ornamental zigzag stitches, set
the machine as instructed below.
First, loosen thumb screws A and B. Turn stitch width regulator
C to desired width for the narrow zigzag stitch and while
holding the regulator C, tighten thumb screw B. Then turn
stitch width regulator C to desired width for the wider zigzag
stitch and tighten thumb screw A.
Having set the machine as instructed above, the narrow width
zigzag can now be sewn without regulating the stitch width
regulator C. To sew the wider zigzag, the stitch width regulator
must be turned as far it will go and held in this position until
the wider zigzag stitching is completed.
This method of setting the stitch width is very convenient when
sewing the side stitches and bar tacks of a buttonhole.
o
Setting For Zero To 5mm
Wide Zigzag Stitch
Setting For Desired FixedWidth Zigzag Stitch
Setting For Dual Width
Ornamental Zigzag Stitch

NEEDLE BAR FRAME CLAMPING DEVICE
When straight stitching, a better sewing result can be
obtained by locking the needle bar frame immovable with
the clamping device.
To clamp the needle bar frame, turn knob clockwise as
far as it will go (about 1/4 turn).
When zigzag stitching, be sure the clamp is released.
To release the clamp, turn knob counterclockwise as far
as it will go until the white mark on the knob is located at
the top.
STRAIGHT STITCHING
General Purpose Presser Foot, Throat Plate and Feed
Dog are used for all utility sewing and where there is
occasion to alternate between straight and zigzag stitching
in the sewing procedure.
Straight Stitch Presser Foot, Throat Plate and Feed Dog
are used for straight stitching only. These Fittings are suited
especially for stitching delicate or spongy fabrics, syn-
thetics, knits and tricot. Additional maneuverability is also
obtained when sewing curved and shaped seams, precision
edging and hard-to-reach areas.
- 15 -

CHANGING THE THROAT PLATE AND FEED DOG
1. Open bed slide; then remove throat plate. (Use
screwdriver A furnished with machine for removal and
replacement of throat plate and feed dog.)
2. Using a screwdriver, remove bed plate B as shown in
sketch at right and remove feed dog C.
3. To replace general purpose or straight stitch feed dog,
fasten feed dog to machine temporarily and replace
general purpose or straight stitch throat plate. Set feed
dog correctly in position so that it will not hit the
edges of the feed dog slots in the throat plate.
4. Replace bed plate and press it firmly in place.
LEVER POSITIONS FOR STRAIGHT STITCHING
Before you begin to straight-stitch, be sure the stitch
width regulator is set in position as shown in sketch.
For ordinary stitching, center needle position is pre-
ferred, but a line of stitching may be placed to left or right
of center when special placement of stitching is desired.
The general purpose fittings must be used when placing a
line of stitching to left or right of center.UJ
I I I
- 16 -

rHOW TO SEW A SEAM
1. Set feed regulating dial for desired stitch length.
2. Raise take-up lever to its highest point and place
fabric under presser foot.
3. Position needle in fabric, lower presser foot and
stitch to end of seam.
4. To reinforce seam ends, press stitch reverse lever
down to its lowest position and backstitch.
5. With take-up lever at its highest point, raise presser
foot and remove fabric.
6. Cut threads on thread cutter at rear of presser bar.
Most fabrics need to be guided in front of the
presser foot only. Some fabrics, however, require support
while being stitched.
—- For filmy sheers, knits, tricots, etc., apply gentle
tension by holding seam in front and back of presser
foot.
17 -

SATIN STITCHING
Satin stitching, a series of closely spaced zigzag stitches that
form a smooth, satin-like surface, is useful for both utility and
decorative work.
When you wish to produce a satin stitch, make a test sample
first so that you can adjust the stitch length and thread tension
properly.
Soft fabric may require a backing to ensure firm satin stitching.
Crisp organdy or lawn is suitable for this purpose.
Adjusting Stitch Length for Satin Stitching
If you wish a closely packed satin stitch, turn feed regulating
dial clockwise until stitches are closely spaced and form a smooth
surface.
Adjusting Tension for Satin Stitching
All zigzag stitching requires less tension than straight stitching;
and satin stitching requires even less than open zigzag stitching.
Furthermore, the wider the satin stitch, the lighter the tension
on the thread must be.
Notice the stitching on your sample. If the stitching looks
too taut, or if the fabric is puckering, lower the needle-thread
tension by turning the tension dial counterclockwise. A proper-
ly balanced satin stitch should lie flat across the material.

rZIGZAG STITCHING
LINGERIE SEAMS
Dainty lingerie seams can be made durable with plain zigzag
stitching.
1, After straight-stitching seam on the wrong side, press both
seam allowances in the same direction.
2. From the right side, top-stitch with a fine zigzag letting the
needle alternately enter the seam line and the seam thickness.
SEAMS IN KNIT FABRICS
A narrow, closely spaced, zigzag stitch is ideal for seaming knit
fabrics. It is particularly desirable for underarm seams where
elasticity and give are needed.
For neckline and waistline seams, where a stay is needed to
prevent undue stretching, this same stitch can be used to apply seam
tape. To insure a flat, smooth stayed finish, position tape with edge
exactly on seam line. If seam is curved, pre-shape tape to fit by
steam pressing, and baste in place. Stitch, allowing the needle to
enter seam tape and seam allowance alternately.
DECORATIVE STITCHES
Various decorative stitches, as shown at right, can be made by
using LEFT, CENTER and RIGHT needle positions, and also by
regulating the stitch width regulator.
- 19 -

BUTTONHOLES
Needle Position Selector: Left
Stitch Width Regualtor: 2mm and 4mm or
21/£mm and 5mm
Stitch Length: Satin Stitch
Throat Plate: General Purpose
Presser Foot: Buttonhole FootMarking
LineButtonhole FootFor buttonholes, use a satin stitch as
described on page 18. You will need two
stitch width settings, one for side stitching and one for the bar tacks.
Two practical combinations are shown in sketch at right.
Always make a test buttonhole on a sample of your fabric. Be
sure' to duplicate the thickness of the garment and include
interfacing if appropriate.
First, decide how long the opening needs to be. This will depend
on the diameter and the thickness of the button. Add at least 1/8
inch (1/16 inch for each bar tack}, and mark buttonhole length on
fabric. This bar-tack measurement is approximate; on some button-
holes, you may need to increase it to arrive at pleasing proportions.
Preparation: Set needle position selector at LEFT and stitch width
regulator for side stitch width (2mm or 2^mm) and bar tack width
(4mm or 5mm) as explained in page 14.
Length ofCuttingSpace

r
NOTE: Having made the above adjustments, you need not regulate
the stitch width regulator when sewing the side stitches. To sew the
bar tack, the stitch width regulator must be turned to the previously
set bar tack width and held in this position until bar tack is
completed.
Side Stitching: Position needle in fabric at point A, lower presser
foot and stitch to point B. Leave needle in fabric. Raise presser foot
and pivot work on needle. Lower foot and take one stitch without
changing width setting, bringing work to point C. Leave needle in
fabric.
Bar Tack: Turn stitch width regulator to previously set bar tack
width and while holding the stitch width regulator in this position,
take approximately 6 stitches to complete tack. Leave needle in
fabric at point D.
Side Stitching: With needle in fabric at point D, stitch to point E.
Leave needle in fabric.
Final Bar Tack: Turn stitch width regulator to bar tack width and
while holding the regulator in this position, duplicate bar tack
previously made. Leave needle in fabric at point F.
Fastening Stitch: With needle in fabric, set stitch width regulator
for straight stitching and back tack approximately 3 stitches to point
G. Remove work, draw threads to wrong side and trim. Cut opening
for button with sharp scissors.
\ 21 -

MONOGRAMS AND MOTIFS
Needle Position Selector: Center
Stitch Width Regulator: 2mm ~ 5mm
Stitch Length: Satin Stitch
Throat Plate and Presser Foot: General Purpose
Select a design from many transfer patterns available or
sketch one to suit your purpose. Always make a sample
first to find the right stitch length, thread tension, and pres-
sure.
1. Transfer the design (by tracing, usually) to the right side
of fabric.
2. If the fabric is soft or loosely woven, baste a backing of
lawn or organdy onto the wrong side.
3. Stitch, following the outline of the design.
4. After stitching, trim the backing close to the stitch-
ing.
SCRIPT LETTERING (FREE-MOTION WORK)
Needle Position Selector: Center
Stitch Width Regulator: Setting Desired
Stitch Length: "0"
Throat Plate: General Purpose
Presser Foot: None
In free-motion stitching, you sew without a presser foot
and control fabric movement (and hence stitch length) your-
self, by means of an embroidery hoop. Either a straight
or a zigzag stitch setting can be used.
If you are embroidering, you can vary the length
of stitches simply by moving the hoop faster or slower.
The faster you move it, the more open the stitches will
be. A slow hoop movement will produce closely pack-
ed stitches. You can also vary the width of the stitches
- 22 -

from a hairline to the full width of whatever stitch width
setting you have chosen, simply by moving the hoop, or
by regulating the stitch width regulator as you sew. If you
move it sideways and stitch in a horizontal line, you will
get a hairline; if you move it forward or backward and stitch
in a vertical line, you will get full stitch width.
Thus you can produce a ribbon-like effect in script let-
tering. This takes practice but you can achieve some lovely
effects that look much like hand embroidery.
1. Always make a sample first to find the right stitch set-
tings and spacing.
2. Trace or mark lettering on right side of fabric. If the
fabric is soft or loosely woven, add an underlay of crisp
lawn or organdy.
3. Place work in embroidery hoop large enough to encom-
pass the entire design. Be sure fabric is held taut.
4. Position work under needle and lower presser bar to en-
gage tension.
5. Hold needle thread loosely and turn hand wheel
toward you to bring bobbin thread up through
fabric at start of design. Hold both threads and
lower the needle into the fabric.
6. Stitch, following the outline of the lettering. Main-
tain an even rate of speed so that the stitches are
uniformly spaced.
7. After stitching, trim the backing close to the
stitchina.
- 23 -

APPLIQUE
Needle Position Selector: Center
Stitch Width Regulator: Zigzag Width Desired
Throat Plate: General Purpose
Presser Foot: General Purpose
Applique adds beauty and interest to clothes and household
linens. The stitch most commonly used in appliqueing is zigzag
stitch, closely spaced to form a satin stitch. The width of this
stitch can be varied to accommodate fabrics of different weaves
and textures.
Procedure
1. Position the design and pin or baste it to the fabric.
2. Set stitch width regulator for straight stitching and outline
the entire design with a short stitch.
3- Trim any excess fabric on the outer edges of the stitching.
Remove basting.
4. Readjust stitch width regulator for desired stitch width and
stitch, following the straight-stitch outline. This step will
produce a smooth overedged finish, with no raw edges to
be trimmed.
24 -

HEMMER FOOT
You can turn and stitch a narrow hem in a single operation
if you use the hemmer foot. Thus, you can eliminate basting
or pinning whenever you are making ruffle edges, lingerie fin-
ishes, and the like.
PLAIN NARROW HEMS
Needle Position Selector: Center
Stitch Width Regulator: Straight Stitching Position
Throat Plate: Straight Stitch
Presser Foot: Hemmer Foot
Feed Dog: Straight Stitch
Form a double 1/8 inch fold at edge of fabric; crease fold
for about 2 inches. Draw bobbin and needle threads under
hemmer foot. Place fabric under the foot and stitch through
creased fold for several stitches. Hold thread ends in left hand
and guide raw edge in front of hemmer evenly into scroll. Sew
slowly, still holding thread ends until hem is well started. Feed
material evenly into hemmer scroll.
HEMMER FOOT
- 25 -

ZIPPER FOOT
This foot is designed to facilitate the placement of stitching
close to a raised edge. It is attached to the machine in place
of the regular presser foot and may be adjusted to either the
right or left side of the needle.
APPLICATIONS
Zipper Insertion
Corded Seams
ZIPPER INSERTION
Tubular Cording
Slip Cover Welting
Needle Position Selector: Center
Stitch Width Regulator: Straight Stitching Position
Throat Plate: General Purpose or Straight Stitch
Presser Foot: Zipper Foot
Feed Dog: General Purpose or Straight Stitch
When the zipper is to the right of the needle:
1. Loosen the thumb screw B at the back of the foot, and
slide the foot to the left of the needle.
2. Check the position of the foot by lowering the needle into
the side notch A of the foot, making sure it clears the foot.
3. Lock the foot into position by tightening the thumb screw.
When the zipper is to the left of the needle, adjust the
foot to the right of the needle in the same way.
ZIPPER FOOT
- 26

CORDED SEAMS
Needle Position Selector: Center
Stitch Width Regulator: Straight Stitching Position
Throat Plate: General Purpose or Straight Stitch
Presser Foot: Zipper Foot
Feed Dog: General Purpose or Straight Stitch
The corded seam is a typical treatment for slip covers, child-
ren's clothes, blouses, and lingerie. To make a corded seam,
make the welting first, then stitch it into the seam.
To make the welting
1. Cut bias strips of fabric (width: three times the diameter
of the cord plus 1-1/4 inches).
2. Sew strips together on the lengthwise grain to obtain desired
length.
3. Fold resulting strip over cord, raw edges even.
4. Adjust zipper foot to the left side of the needle.
5- Lower zipper foot.
6. Stitch close to the cord (but do not crowd stitching against
cord), pulling gently on the strip, both in front and in
back of the zipper foot.
To stitch welting into seam
1. Place the corded welting between two fabrics.
2, Stitch, this time crowding the foot against the cord.
- 27 -

OTHER PRACTICAL APPLICATIONS
Felling Interfacing to Outer GarmentPreparing the Interfacing
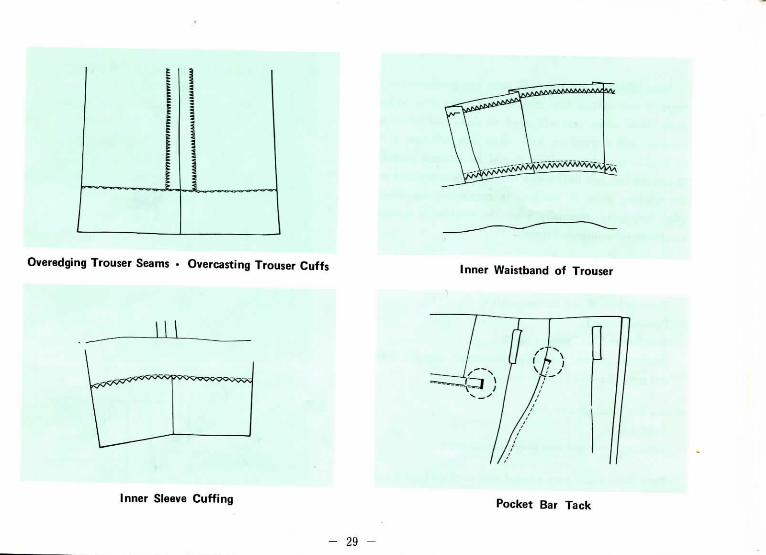
Overedging Trouser Seams • Overcasting Trouser CuffsInner Waistband of Trouser
Inner Sleeve CuffingPocket Bar Tack
- 29 -

CARING FOR YOUR MACHINE
Your SINGER machine will serve you perfectly for many
years if you take a few moments of your time to keep it
clean. How often you will need to clean and lubricate the
machine will depend on how often you will use it. When
in regular use, the machine should be cleaned periodically
to remove lint and fluff which may have accumulated around
the working parts. A machine in continuous use should be
oiled frequently, especially when the machine is operated at
maximum recommended speed.
With a soft cloth, clean:
Thread retainer A
Take-up lever B and thread guard C
Tension discs D
Needle bar E and presser bar F
Machine arm and bed G (If necessary, dampen the cloth
and use mild soap to clean machine surface).
With a lint brush, clean:
Feed dog H
Rotating hook and area under throat plate.
Turn hand wheel over toward you until oil hole in rotating
hook appears in sight. Apply one or two drops of oil to the
oil hole.
- 30 -
Loosen and remove screws
and remove face plate by
sliding it downward. Re-
move screws and lift off
arm top cover. Clean and
oil the places indicated.
Also apply a drop of oil to
all other oiling points
shown. Keep oil pad under
arm top cover saturated
with oil.
Grease Grease
Grease
- 31 -

ASSEMBLING THE THREAD UNWINDER
Hold the thread unwinder mounting bracket against thearm side cover and check that the collapsible thread guide
holder is in its collapsed position. Then fasten the mounting
bracket securely to the arm side cover with the two screwsfurnished with the thread unwinder as shown in the illustra-
tion at right.
Before you begin to sew, or wind a bobbin, set the collap-
sible thread guide holder in its upright position as shown at
right.

TO USE THE SPOOL CAP
When using a reel type thread spool, fit the spool cap sup-plied with the machine onto the thread spool.
SPOOL CAP
THREAD SPOOL
Set height of spool rest so there is approximately 2 mmclearance between top end of spool pin and the tip of theslotted spigot of the spool cap. The spool cap should neverbe fitted on the spool pin. Forcing it onto the spool pin mayresult in breaking the slotted spigot of the spool cap. 2mm
CLEARANCE
SPOOL REST
o x
-33
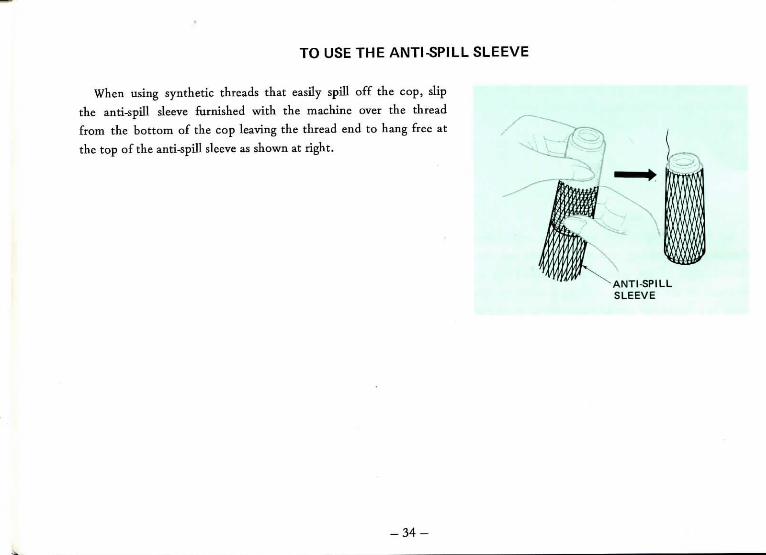
TO USE THE ANTI-SPILL SLEEVE
When using synthetic threads that easily spill off the cop, slip
the anti-spill sleeve furnished with the machine over the thread
from the bottom of the cop leaving the thread end to hang free at
the top of the anti-spill sleeve as shown at right.
ANTI-SPILLSLEEVE
-34-

KNEE OPERATING STITCH WIDTH CONTROL
A knee operated bell crank complete (A and B) shown in thesketch at right is fastened to the underside of the bed. Bell crank Ais used for lifting the presser foot, and bell crank B is used for regu-
lating the stitch width with your knee.
To control the width of zigzag stitches with your knee and leave
both hands free to handle the fabric, loosen screw D and move lift-
ing arm C so that it is positioned just under the bell crank B; then
tighten screw D.
The stitch width can now be controlled from zero to maximum
width of 9 mm with your knee by pushing the knee plate E to the
right. The further you push the knee plate to the right, the widerthe stitch width you will obtain.
NOTE: The presser foot cannot be raised with the knee lifter when
machine is set up for knee operating stitch width control. If there
is an occasion you wish to use the knee lifter, merely move liftingarm C away from you and position it just under bell crank A.
35-

HOW TO SET KNEE LIFTER WHEN USED ONLY FOR LIFTING PRESSER FOOT
Move lifting arm C to the position where bell crank A
which is connected to lifting lever can be operated. Then
tighten screw D.
Make certain that the point end of the lifting arm C does
not interfer with the oil pan, and then fix rock shaft stop dog
F.
Raise presser foot with presser bar lifter and push knee
plate E to the right until the presser bar lifter comes down
(height of presser foot above throat plate approximately
9 mm). Make certain that the knee plate does not move any
further and secure rock shaft stop dog G.
-36-

PERFORMANCE CHECK LIST
If machine fails to start:
• Are eiectrical plugs properly connected?
• Is power and light switch on?
If thread breaks:
• Is machine properly threaded?• Is needle the correct size for the thread and fabric you are using? Is a catalog 191 0-05 needle securely tightened
in the needle clamp?
• Is thread free of slubs and knots?
• Is needle-thread tension too tight?
• Are thread guides, tension discs, and bobbin area lint-free?
If fabric fails to feed:
• Is presser foot down?
« Is pressure adjusted properly for the weight and texture of your fabric?
* Is feed regulating dial properly adjusted?
Remember to:
Refer to your instruction book. It was written to explain the most efficient way to operate and use this versatile
new machine.
Keep your machine in good working condition by following the easy at-home-care steps outlined in the instruction book.
Remove the belt when machine is not in use. This is to prevent stretching the leather belt.

R E V I S I O N
Before Revision : Slack Thread Regulator
After Revision : Thread Guide Pin
Page2 PRINCIPAL PARTS OF MODEL 2 0 U MACHINE
Thread Guide Pin

Page5 THREADING THE NEEDLE
1. Turn hand wheel toward you to raise take-up lever toits highest position.
2. Raise the presser foot.
3. Lead thread from the thread unwinder through all thethreading points shown. Thread the needle from frontto back.
4. Draw about 3 inches of thread through eye of needle.
Insert for 20U31, 33Form U3990

Form U3147 (Rev. 388)Part No. 543177-002 (Rev. 2)Printed in Japan