yes you can create your own e-book
TRANSCRIPT

Yes You Can: Create Your Own E-book
By Sharon and Mike King

Yes You Can: Create Your Own E-book
Published at smashwords in 2014 by Sharon and Mike King
Copyright 2014 Sharon and Mike King
This book is a work created from my own experience, any resemblance to any other guides to creating an e-book is purely coincidental.
All Rights Reserved

Introduction
Hi future author,
I won’t waffle on about grammar and punctuation, how you write is up to you, it’s your baby after all. Some people may get a bit sniffy about it, so at least try and spell the words write err sorry right.
What I’m offering up is a simplified guide to actually getting your book finished and looking like the real e-book that you dream of and can be proud of.
So here goes.
Disclaimer alert: the help in this book is from my own experience, I hope that it helps you. I’m not an expert, just an amateur who loves words and the adventures they take you on.

Table Of Contents
Introduction
Chapter 1: Write your story
Chapter 2: Make it look how the reader is used to seeing it
Chapter 3: Add the extras, bookmarks and hyperlinks
Chapter 4: Create your cover
Chapter 5: Snazzy optionals: pictures etc.
Chapter 6: Publishing it

Chapter 1: Write your story
You got a story in your head, we all have, but you don’t know how to put it together. I’m here to help. I’ll show you how I do it, who knows my formula might just work for you to.
I use a piece of paper to make my plan, just like a journey from A to Z.
You’ll get the idea as I use a short story about a mouse to demonstrate my method.
Start and finish
Title: Grandma’s birthday
Start: Gordon bakes a cake
End: Grandma’s birthday party
Next I add the in-between chapters like the route from the start to the end.
Title: Grandma’s birthday
Start: Gordon bakes a cake
Chapter 2: Gordon plans the safest route
Chapter 3: Cousin Jeffry
Chapter 4: Picking flowers
Chapter 5: Cat trouble
End: Grandma’s birthday party
Now even at this stage nothing’s set in stone and you can add or remove chapters to enhance your story, I’ll just continue for the moment with the 6.
Next I add a very brief idea for each of the chapters; just a flavour for me to write about later, not the full version.
Grandma’s birthday
Chapter 1: Gordon bakes a cake. Searches internet to find a recipe, burns the first one, people think their house is on fire.
Chapter 2: Gordon plans the safest route. Along skirting boards, past the kids in the garden, keep away from the cat.
Chapter 3: Cousin Jeffry. Nearly drop cake when cousin Jeffry comes running round the corner, have a chat.
Chapter 4: Picking flowers. Jeffry hasn’t got a present for grandma, they have to get one.
Chapter 5: Cat trouble. Jeffry saves Gordon and the cake.
Chapter 6: Grandma’s birthday party. Lots to eat and party games to play.
Now you have the bones of your story and it’s time to get onto the computer and start writing.
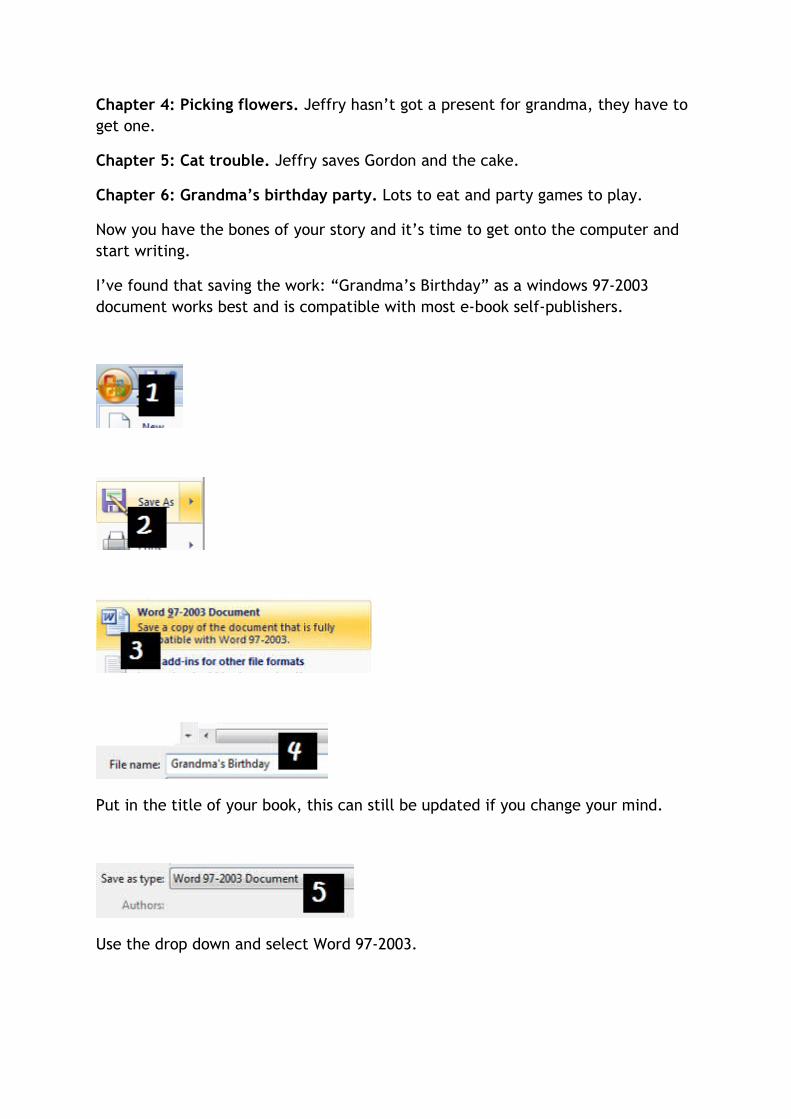
I’ve found that saving the work: “Grandma’s Birthday” as a windows 97-2003 document works best and is compatible with most e-book self-publishers.
Put in the title of your book, this can still be updated if you change your mind.
Use the drop down and select Word 97-2003.

I usually save onto an external drive, or send to myself on e-mail. That way if you computer packs up or you want to work on it elsewhere you can. Remember to save often, I learnt the hard way and lost over 5000 words, now I save every half an hour or so, or if I leave the computer to do something else, just in case.
So now you have your chapters and a brief description; so fill in the details and let your mind run riot over the keypad. Make the story interesting and exciting, but remember it’s your story and not everyone enjoys the same thing so you can’t please them all. The best thing to do is just to please yourself.
Now that you are writing your story, remember to save it regularly.
A few weeks, months or even years later when you’ve finished writing, read it through in its entirety to ensure it makes sense.
Read it again to correct any typos.
Read it out loud to yourself or someone you trust to be honest. Don’t take what they say as personal, it isn’t, although it does feel like it is.
Make any changes and read it again. Don’t forget to keep saving.
I tend to save my first write as “Grandma’s birthday”. The read through changes as “Grandma’s Birthday 2nd draft”. The next re-read and changes “Grandma’s

Birthday 3rd draft”. That way if you make a complete mess of it you can go back a step. I know that sounds like you’re over doing it, but it works for me.

Chapter 2: Make it look how the reader is used to seeing it.
Now if you look at most books, they have a format that people are used to seeing, I’ll now give you some pointers as to how to do this.
The chapter list is often in a straight line and might include a link to a picture of the front cover, a summary of, or introduction to the book to entice people to read it and sometimes, with factual books, a link to where you got your information.
Cover page - optional some e-publishers insert your cover for you
Summary or Introduction
Chapter 1: Gordon bakes a cake
Chapter 2: Gordon plans the safest route
Chapter 3: Cousin Jeffry
Chapter 4: Picking flowers
Chapter 5: Cat trouble
Chapter 6: Grandma’s birthday party
References
Do not use the windows table of contents short cut to create your chapter list, type it in yourself, it works much better later on and does not cause conflicts when uploading to the self publishing sites.
Leave a blank line between the title and the start of your writing, for example:
Chapter 1: Gordon bakes a cake
Gordon didn’t know what to give his grandma for her birthday so he decided to bake an enormous chocolate cake.
I like to align all the writing to the left, but you can put an indent into the writing if you prefer.


When placing dialogue in the text, do not flow in the same paragraph, leave a blank line.
“What are you doing?” The reader asked anxious to find out what was going on.
“I’m writing a book!” She excitedly replied, her only thoughts on what she was going to write about next.
You get the idea; it makes it easier to read and helps stop the reader from getting confused about who’s saying what.

Chapter 3: Add the extras, page breaks, bookmarks and hyperlinks.
In this section we will see how to add formatting to improve the look and readability of your book.
Page breaks
When you start a new chapter you insert a page break so that it starts neatly on a whole page and doesn’t leave you with a one-liner as you read and look like this.
As you can see it would be very annoying to look at a book like this, so the page break makes it neater and more pleasing to the eye.
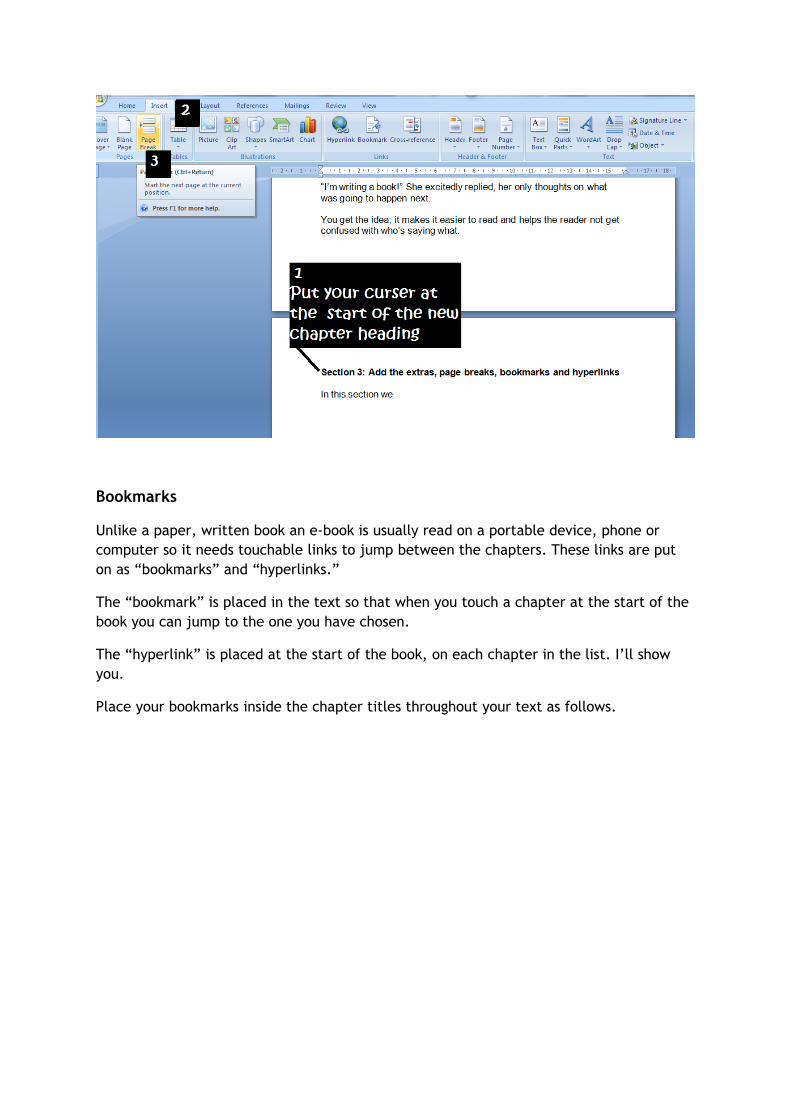
Bookmarks
Unlike a paper, written book an e-book is usually read on a portable device, phone or computer so it needs touchable links to jump between the chapters. These links are put on as “bookmarks” and “hyperlinks.”
The “bookmark” is placed in the text so that when you touch a chapter at the start of the book you can jump to the one you have chosen.
The “hyperlink” is placed at the start of the book, on each chapter in the list. I’ll show you.
Place your bookmarks inside the chapter titles throughout your text as follows.

Hyperlinks
Hyperlinks are placed at the beginning of the book in the chapter list. It is easier than you think.


Chapter 4: Create your cover
Now how you create your cover is to you. Some people seek professional help others do it themselves. I like playing around with photos or mucking around using the paint program on windows, it all depends how confident you are.
Some e-publishing sites have programs to help you get creative, you pick colours or styles from their selection and they do it for you.
For the cover of this book I used windows paint program.
I set the size at an approximate ratio of 2 wide x 3 long, 1400 x 2100 pixels. Some sites require the image as a jpeg, some accept PNG, I save both options just in case.

Now go play and let your imagination run riot, but remember it should say something about the book to the potential reader or it’s just a pretty picture.

Chapter 5: Snazzy optionals: copyright, pictures etc.
Copyright
A copyright notice placed at the beginning of the book, is your disclosure that the piece of work you have created is all yours and that you haven’t just coped someone else’s. It is your responsibility to make sure it follows legal guidelines. You can see different options anywhere on the internet, but I go with a straight forward simple one. At smashwords.com they like you to have a hyperlink to their page, just insert it as per te previous instructions, you’ve done it before so you know what to do.
Yes You Can: Create your own e-book
Published at smashwords in 2014 by Sharon and Mike King
Copyright 2014 Sharon and Mike King
This book is a work created from my own experience, any resemblance to any other guides to creating an e-book is purely coincidental.
All Rights Reserved
If you’re writing a fictional book like the one about Grandma’s Birthday I’d put something like:
Grandma’s Birthday
Published smashwords in 2014 by Sharon and Mike King
Copyright 2014 Sharon and Mike King
This book is a work of fiction, any resemblance to the names and characters; living or dead, is purely coincidental.
All rights reserved

Pictures
You can add just about any picture you like as long as it is yours to add. By that I mean you haven’t just grabbed it off of the internet or pinched someone else’s.
Check on the sites that have pictures to use that you closely follow their guidelines as to what you can use it for, how much you have to pay, how long you have use of it and if you have to name the owner of the picture.
I save any picture I use and add it into the book using the insert tab and I always have it run in line with the text, just click on ten ex line in your word document and insert it as below. I tend to save as PNG as I think it gives a better quality picture, but some sites only accept pictures saved as jpeg.
Leave a blank line between the text and where you want the picture to be.
Now you have your picture in place, good job!
You can add any picture you like such as maps or photos, hyperlinks to other sites or other books that you have out, your personal web pages even.
Above all have fun and don’t expect to be a best seller straight away or retire on the proceeds. Not everyone has the stamina to finish what they start, if you’ve got that far then you’re an author.

Section 6: Publishing it
You’ve made it this far so congratulations, you only have three stages left to go: getting paid, uploading and getting people to buy it.
You’ve read it through yet again, probably found a typo, I usually do.
You’ve checked that all of the hyperlinks work.
You’re happy with your cover page.
1 Go to your bank or building society and get your “SWIFTBIC” or “IBAN” code, you can usually find it at the top of your bank statement with the sort code and account number that you use every day. If not pop in or give them a call. You will need this when uploading your details and so that you get paid for any sales.
2 Choose your e-publisher, I like smashwords they have a user friendly system that tells you if there are any formatting errors in your document when you upload it.
Disclaimer alert: I don’t work for smashwords, I just like them.
Now follow their easy to use system and upload your details, it can take a day or so for your book to be out there for people to look at or buy; so don’t pop the champagne yet even though you’re grinning like a Cheshire cat.
When they tell you that it’s all done, get popping.
3 Advertise: tell all your friends and family, get them to tell everyone they know, get on all the networking sites that you can, even create a blog, do whatever you can to get it noticed.
There are a lot of e-books out there now and you’re a newbie, don’t expect the money to come rolling in by the barrel load and don’t expect the people you know who say they’re going to buy it to actually do just that.
Life’s full of disappointments, sorry but it’s true. Just bask in the glory of what you’ve achieved and carry on having fun with your writing, I intend to.
I look forward to seeing your name out there.
Thank you for reading.
Disclaimer alert: the help in this book is from my own experience, I hope that it helps you. I’m not an expert, just an amateur who loves words and the adventures they take you on.