yoga preparatory movements
TRANSCRIPT

Username:
Password:
forgot password? | Register Login
Basic MovementsAsana for BeginnersIntermediate AsanaAdvanced Asana
Forward BendsBack BendsSide BendsTwistsStretchesInversionsBalancing PosturesRelaxing PosesMeditative Poses
ObesityAnxiety & Depression
Home > Yoga Poses > Basic to Advance Asana > Basic Movements
Yoga for Beginners - Basic Movements (Yoga Positions or Postures or Asanas)
Basic Movements (click below mentioned links for more details)
Pre PositionNeck
MovementShoulder Movement
Hand
MovementLeg Movement
Knee
Movement
Preparatory Movements (click here for more details)
Yoga Basic Movements
These movements are very useful to beginners, who want to start doing yoga but don't have any experience of yoga or anyother exercise.
There are several joints in our body, which needs lubrication and movements. The food we consume supplies thelubrication and Yoga and other activities provide the movements. In our regular life some of these joints are overused andsome are rarely used which may create problems at later stage in your life. To help these joints maintain their healthycondition Basic Movements are necessary also they are useful to prepare your body to take up Yoga.Benifits
As your body relaxes all your muscles also relax except those muscles, which are used in the movements, so onecan easily concentrate on the movement / particular muscle (effort).Aged and persons having diseases also can do these movements without much strain.
234Like Share
Tradition Yoga Types Yoga Poses Pranayama Cleansing Meditation Life Style Yog Vidya Gurukul(University)

ArthritisDiabetesBack PainHigh Blood PressureThyroid ProblemsMenstrual ProblemsMenopauseInfertilityDigestive ProblemsAsthmaHeart ProblemsCancerHIVInsomnia
PregnancyMenstruationkidsOld AgeStress ManagementWeight Loss
Prerequisites for Yoga
Below 12 years of age Yoga postures should not be practiced for long duration and asanas are to be maintained forvery short duration.Every day you should practice Yoga for at least 30 to 45 minutes to get maximum results.
The best suited time to practice is early morning hours, but it can be practiced in the afternoon after following foodrestrictions.Food restrictions - stomach should be empty while practicing, that is you should consume solid food 3.5 hours beforepracticing and liquid 1 hour before.Place should be spacious, clean, airy, bright and away from disturbances.
Yoga should not be practiced on bare floor but keep mat or carpet below.
Clothes should be comfortable, loose, clean. Undergarments are necessary.
Yoga prefers vegetarian diet. But avoid spicy and hot diet as much as possible.
Women should not practice Yoga during Pregnancy and menstruation.
One should have faith in Yoga and what he is doing.
Yoga Positions or Asanas
Asana system is the 3rd in ashtanga Yoga, yogasana help achieve physical health, control over mind and power ofconcentration.Patanjali has described Yogasana as "Sthir Sukham Asanam", which means a posture that is stable and pleasant. Amore broad definition of Yogasana according to Patanjali is "Tatodwanabhighatah" which means practice ofYogasana leads to disappearance of duality of cold-hot, sadness-joy, happiness-sorrow and so on.Yoga is different from exercise as it doesn't involve speedy movements, but instead very slow and steadymovements.Yoga helps achieve relaxation which reduces stress & strain.
Very few calories are consumed during Yogasana practice and metabolism rate of the body also drops whichmeans reduced Aging Process.Less food is required as digestive power is increased.
PRE POSITION
StandingPosition
Sitting Position Supine Position Prone Position

Aim - To increase the flexibility and stamina ofneck muscles.Precaution - People with neck problems likespondylitis should avoid forward bending.Procedure - Sit in the Vajrasana Position, keepyour neck straight, then slowly but without jerkbend your neck forward as much as possible,back to normal position then bend it backwardand then back to normal, then to the right and tothe left.
NECK MOVEMENT - 1
NECK MOVEMENT - 2
Aim - To increase the flexibility and stamina of neck muscles.
Precaution - People with neck problems like spondilytis shouldavoid forward bending.Procedure - Sit in the Vajrasana Position, keep your neckstraight, then slowly but without jerk start rotating neck clockwisefrom left shoulder to backwards then to the right shoulder and tofront. Repeat this in anticlockwise direction starting from rightshoulder.
Aim - To increase the flexibility and stamina of neck muscles.
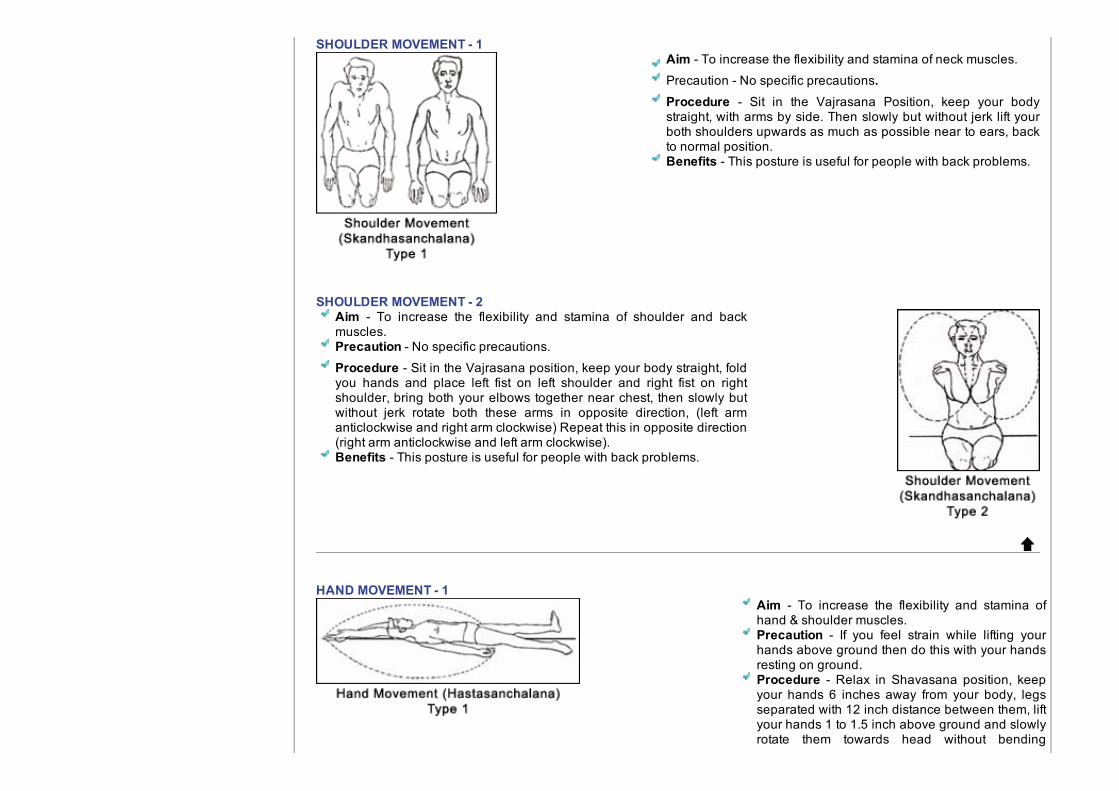
Precaution - No specific precautions.Procedure - Sit in the Vajrasana Position, keep your bodystraight, with arms by side. Then slowly but without jerk lift yourboth shoulders upwards as much as possible near to ears, backto normal position.Benefits - This posture is useful for people with back problems.
Aim - To increase the flexibility and stamina ofhand & shoulder muscles.Precaution - If you feel strain while lifting yourhands above ground then do this with your handsresting on ground.Procedure - Relax in Shavasana position, keepyour hands 6 inches away from your body, legsseparated with 12 inch distance between them, liftyour hands 1 to 1.5 inch above ground and slowlyrotate them towards head without bending
SHOULDER MOVEMENT - 1
SHOULDER MOVEMENT - 2
Aim - To increase the flexibility and stamina of shoulder and backmuscles.Precaution - No specific precautions.Procedure - Sit in the Vajrasana position, keep your body straight, foldyou hands and place left fist on left shoulder and right fist on rightshoulder, bring both your elbows together near chest, then slowly butwithout jerk rotate both these arms in opposite direction, (left armanticlockwise and right arm clockwise) Repeat this in opposite direction(right arm anticlockwise and left arm clockwise).Benefits - This posture is useful for people with back problems.
HAND MOVEMENT - 1

elbows, keep the hands parallel to the ground tillboth the palms meet, place left palm on right palmand stretch hands upwards and legs downwardsfor 5 to 10 seconds, then slowly but without jerkrotate both the hands back to the normal positionvia the same path.Benefits - This posture is useful in increasing thestrength of neck, shoulders and the stretchinghelps retain normal posture.
Aim - To increase the flexibility and stamina ofhand & shoulder muscles.Precaution - do not bend elbows while doing this.Procedure - Relax in Shavasana position, keepyour hands 6 inches away from your body, legsseparated with 12 inch distance between them,raise your hands above ground and slowly takethem towards head without bending elbows, placeboth hands on the ground, stretch hands upwardsand legs downwards for 5 to 10 seconds. Thenslowly but without jerk bring both the hands back tothe normal position via the same path.Benefits - This posture is useful in increasing thestrength of neck, shoulders and hands, thestretching helps retain normal posture.
HAND MOVEMENT - 2
HAND MOVEMENT - 3

Aim - To increase the flexibility and stamina ofhand & shoulder muscles.Precaution - If you feel strain while lifting yourhands above ground then do this with your handsresting on ground. The movements should beslow and continuous.Procedure - Relax in Shavasana position, keepyour hands 6 inches away from your body, legsseparated with 12 inch distance between them, liftyour hands 1 to 1.5 inch above ground and slowlyrotate them towards head without bendingelbows, keep the hands parallel to the ground tillboth forearms cross, in this same cross positionraise the arms above and on to the stomach, thenslowly bring both the hands back to the normalposition.Benefits - This posture is useful in increasing thestrength of neck, shoulders and the stretchinghelps retain normal posture.
LEG MOVEMENT - 1
Aim - To increase the flexibility and stamina oflegs & hip muscles.Precaution - The movements should be slow &continuous.Procedure - Relax in Supine position, keep yourhands around head rotating them side ways, thenlift your left leg and bring it near to the hip, repeatthis procedure for the right leg. Then slowly bringboth the hands back to the normal position.Benefits - This helps development of the legmuscles and hip joints.

Aim - To increase the flexibility and strength of legs& hip muscles.Precaution - The movements should be slow &continuous. Do not bend the knees.Procedure - Relax in Supine position, keep yourhands close to your body, then lift your left leg 30 to40 degrees above ground level and rotate it in theclockwise direction without bending knees, repeatthis procedure for the right leg.Benefits - This helps leg muscles and hip joints.
LEG MOVEMENT - 2
LEG MOVEMENT - 3
Aim - To increase the flexibility and stamina oflegs & hip muscles.Precaution - The movements should be slow &continuous. Do not bend the knees.Procedure - Relax in Supine position, Move yourhands around and place them at shoulder height,parallel to the ground, then lift your left leg andturn it to the right side as far as possible touchingthe ground. Repeat this procedure for the right leg.Then slowly bring both the hands back to thenormal position.Benefits - This helps leg muscles and hip joints.

Aim - To increase the flexibility and strength ofknee & waist muscles.Precaution - The movements should be slow &continuous.Procedure - Relax in Supine position, Move yourhands around your head, then bend your left legin knee and rest foot near to hips , then turn theknee to the right side as far as possible. Repeatthis procedure for the right leg. Then slowly bringboth the hands back to the normal position.Benefits - This helps knee joints and hip joints.
KNEE MOVEMENT - 1
KNEE MOVEMENT - 2
Aim - To increase the flexibility and strength ofknee & waist muscles.

Aim - To increase the flexibility and strength ofknee & waist muscles .Precaution - The movements should be slow &continuous, don't take unnecessary strains whileperforming this exercise.Procedure - Relax in Supine position. Move yourhands around your head, then bend your legs inknee and rest feet near to hips , keep 12 inchesdistance between them, then turn the left leg tothe right side to touch the right toe, press the rightleg to the left thigh, relax all the muscles, continuenormal breathing. Repeat this for right leg, thenslowly bring both the hands back to the normalposition.Benefits - This helps knee joints, hip joints andalso the spinal column.
Precaution - The movements should be slow &continuous, don't take unnecessary strains whileperforming this exercise.Procedure - Relax in Supine position, Move yourhands around your head, then bend your legs inknee and rest feet near to hips , then turn the legsto the left side as far as possible, touch the leftknee to the ground and turn the neck to the rightside and relax all the muscles, continue normalbreathing, then slowly bring both the hands backto the normal position.Benefits - This helps knee joints, hip joints andalso the spinal column.
KNEE MOVEMENT - 3

Preparatory Movements (click below mentioned links for more details)
1 2 3 4 5 6 7 8 9 10 11 12
Preparatory Movements
Yogic practices create lot of strain on different organs or parts of the body, our body should have enough strength to bear this,one should build this stamina with practice. The preparatory movements provide just the same and help you build thenecessary strength and prepare the whole body for Yogasana. Following precautions should be taken while performing these movements -
1 Movements should be without jerk or swings.
2 Movements should be slow and smooth.
3 Movements to be tuned with breathing.
Normal Breathing Principles1 When the physical movements is in the direction of gravitational pull, i.e. downwards, exhaling should take place.
2 During upward movement, inhaling should take place.
3 When there is no movement, normal breathing should be resumed.
PREPARATORY MOVEMENT PREPOSITIONS
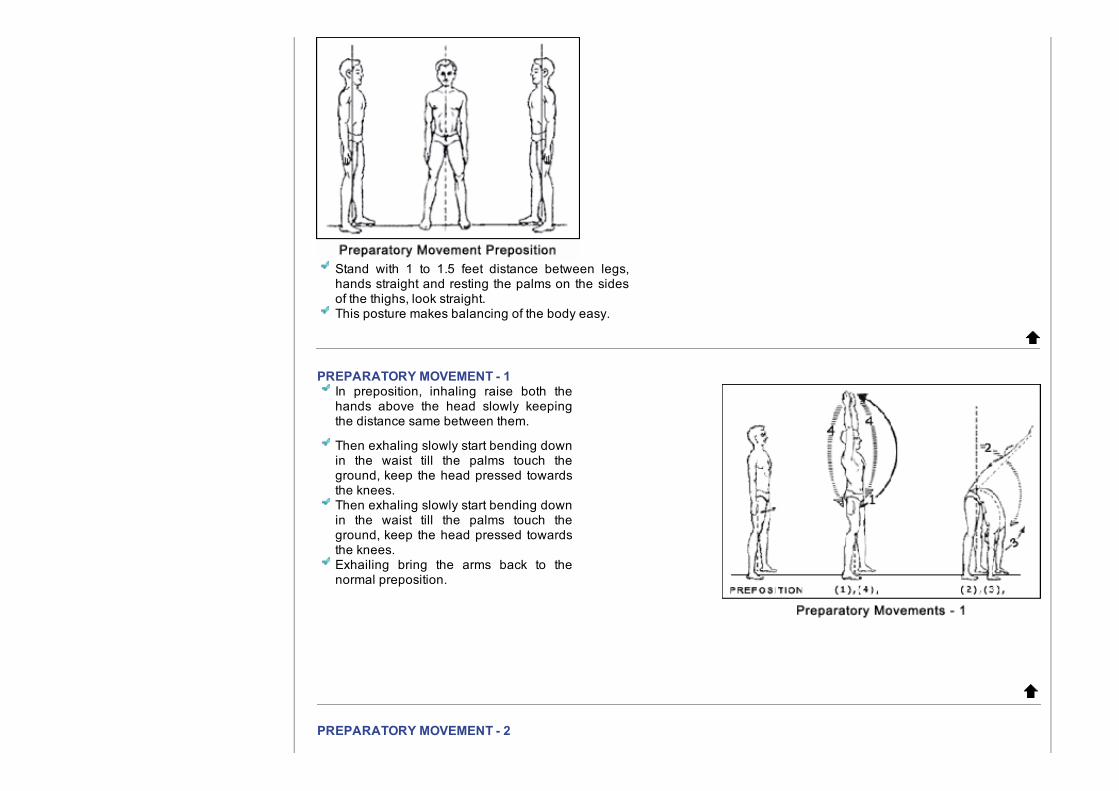
Stand with 1 to 1.5 feet distance between legs,hands straight and resting the palms on the sidesof the thighs, look straight.This posture makes balancing of the body easy.
PREPARATORY MOVEMENT - 1
In preposition, inhaling raise both thehands above the head slowly keepingthe distance same between them.
Then exhaling slowly start bending downin the waist till the palms touch theground, keep the head pressed towardsthe knees.Then exhaling slowly start bending downin the waist till the palms touch theground, keep the head pressed towardsthe knees.Exhailing bring the arms back to thenormal preposition.
PREPARATORY MOVEMENT - 2

In preposition, inhaling raise both the hands from sides, slowly bringing them at shoulder height and parallel to theground.Then exhaling slowly start bending forward in the waist, touch the thumb of right foot by your left hand, keeping the rightarm straight above.Inhaling take position as in 1.
Then exhaling slowly start bending forward in the waist, touch the thumb of left foot by your right hand keeping the left armstraight above.Inhaling take position as in 1.
Exhaling bring the arms down to the normal preposition.
PREPARATORY MOVEMENT - 3

In preposition, inhaling raise both the hands from sides, slowly bringing them at shoulder height and parallel to theground.Then exhaling slowly start bending forward in the waist, touch the thumb of right foot by your left hand, keeping the rightarm straight above.Inhaling take position as in 1.
Then exhaling slowly start bending forward in the waist, touch the thumb of left foot by your right hand keeping the left armstraight above.Inhaling take position as in 1.
Exhaling bring the arms down to the normal preposition.
PREPARATORY MOVEMENT - 4

In preposition, inhaling bring both the hands onwaist in such a way that fingers come to the frontside and thumb to the back.Then exhaling slowly start bending forwards in thewaist keeping knees straight. Try to bring the headbetween the legs.Inhaling take position as in 1.
Then exhaling slowly start bending backwards inthe waist keeping knees straight. Try to bend asmuch as possible and maintain your balance.Inhaling take position as in 1.
Exhaling bring the arms down to the initial position.
PREPARATORY MOVEMENT - 5
In preposition, inhaling bring both the hands onwaist in such a way that fingers come to the frontside and thumb to the back.Then exhaling slowly start bending forwards in thewaist keeping knees straight. Try to bring the headbetween the legs.Inhaling take position as in 1.
Then exhaling slowly start bending backwards inthe waist keeping knees straight. Try to bend asmuch as possible and maintain your balance.Inhaling take position as in 1.
Exhaling bring the arms down to the initialposition.
PREPARATORY MOVEMENT - 6

In preposition, inhaling bring both the hands on waist in such a way that fingers come to the front side and thumb to theback.Then exhaling slowly bend forward in the waist.
Inhaling rotate to the left in the waist and try to attain position no. 2 as in Preparatory Movement 5.
Continue inhaling and rotate backwards as in the position 4 in Preparatory Movement 4.
Exhaling further rotate to the right and attain the position no. 4.
Continue exhaling rotate to the front and take position no.2, as above.
Inhaling, rotate to the right and take position no.5 above.
Continue inhaling, rotate backwards, and take the position no.4 above.
Exhaling further rotate to the left and attain the position no. 3 above.
Continue exhaling and rotate to the front and attain the position no. 2 above.
Inhaling raise the waist and attain the position no. 1 above.
Exhaling bring the hands down to the normal position.
PREPARATORY MOVEMENT - 7

Bring both the hands on the waist.
Bend the neck forward as much as possible. The chin should get fixed into the pit below theAdam's Apple.Straighten the neck.
Bend the neck backward so much that its front side feels the strain.
Straighten the neck.
Bend the neck on the left shoulder creating pressure on the right side.
Straighten the neck.
Bend the neck on the right shoulder creating pressure on the left side.
Straighten the neck.
Bring both the hands down and come to the initial position.
PREPARATORY MOVEMENT - 8

Keep both the hands on the waist.
Bend the neck forward at ease.
Rotate the neck round to the left and have the position No.6of Preparatory Movement type 7.Rotate the neck further to the back and have the positionNo.4 of Preparatory Movement type 7.Then rotate the neck to the right and bring it on the rightshoulder (Position No. 8 of Preparatory Movement type 7).Rotate the neck down to the front (Position No.2 above).
Now start rotating the neck to the right as in Position No.5above.Rotate the neck further to the back as in Position No.4above.Then rotate the neck to the left and keep it on the leftshoulder as in Position No.3 above.Rotate the neck down to the front as in Position No.2 above.
Straighten the neck.
Bring both the hands down and come to the initial position.
PREPARATORY MOVEMENT - 9
In preposition, inhaling raise both the hands up above the head as in the position no. 1 in Preparatory Movement 1.
Then exhaling slowly bend forward in the waist and try to touch the fingers to the ground as in the position no. 2 inPreparatory Movement 1, then bring palms together and keep knees straight.Inhaling rotate to the left in the waist and try to attain position no. 2 Preparatory Movement 5.

In preposition, inhaling raise both the heels, then hands from front tothe shoulder level, keep them parallel to the ground.Then exhaling slowly start bending down in the knees, sit on the toes,try to maintain the balance with the stretched arms.Inhaling raise your body and take position as in 1.
Exhaling bring the arms back to the normal preposition.
Continue inhaling and rotate backwards as in the position 4 in Preparatory Movement 4.Exhaling further rotate to the right in the same bent position.
Continue exhaling rotate to the front and take position no.2 as above.
Inhaling, rotate to the right and take position no.5 above.
Continue inhaling, rotate backwards, and take the position no.4 above.
Exhaling further rotate to the left and attain the position no. 3 above.
Continue exhaling and rotate to the front and attain the position no. 2 above.
Inhaling raise the waist and arms stretched above your head.
Exhaling bring the hands down to the normal position.
PREPARATORY MOVEMENT - 10
PREPARATORY MOVEMENT - 11
Bend the left hand in the elbow and raise it to the level of 90 degreeangle. The arms and the elbows be kept close to the body.Catch the wrist of the left hand by the right hand lightly.
Close the fingers of the left hand and rotate the wrist slowly from left toright anticlockwise and complete the cycle.Then rotate the wrist of the left hand from right to left clockwise andcomplete the cycle.

Bend the left leg in the knee and raise it to the level of 90 degree
angle.
Hold the thigh of the left leg with both the hands and be stable.
Now rotate the foot of the left leg in the ankle from left to right
anticlockwise and complete the cycle.
Then rotate the same foot from the right to left clockwise and complete
the cycle.
Bring both the hands to their places.
Bring the left leg to its place. Now take up the right leg and repeat
through the above mentioned process.
Bring the right hand down.
Bring the left hand down and take the initial position. Now take up the right
hand and repeat the above mentioned process.
PREPARATORY MOVEMENT - 12

Relaxation Shavasana
Yoga Nidra Omkar Chanting
Pranayama Meditation
Yoga Research Papers
Articles On Yoga
Downloads
- Yoga Teachers
- Therapy
Bhajan Kirtan
Mantras
Music
Yog Nidra & Meditation
Search
Home | About Us | Contact Us | Site Map | Disclaimer | Terms & Conditions
© 2013 Privacy Policy - Vishwamitra Systems Pvt. Ltd. All rights reserved.