york sss style b liquid cooled solid state ... - johnson...
TRANSCRIPT

MODELS SSS 7L-B, 14L-B, 26L-B, 33L-B7LK-B, 14LK-B, 26LK-B, 33LK-B
(STYLE B)
NOTEUnless otherwise noted, information in this instruction
is applicable to all style starters of the same size.Example: 26L-B and 26LK-B
00282VIP
LIQUID COOLEDSOLID STATE STARTER
OPERATION Supersedes: 160.00-O2 (200) Form 160.00-O2 (611)
Issue Date: June 10, 2011

JOHNSON CONTROLS2
FORM 160.00-O2 ISSUE DATE: 6/10/2011
This equipment is a relatively complicated apparatus. During installation, operation maintenance or service, individuals may be exposed to certain components or conditions including, but not limited to: refrigerants, materials under pressure, rotating components, and both high and low voltage. Each of these items has the potential, if misused or handled improperly, to cause bodily injury or death. It is the obligation and respon-sibility of operating/service personnel to identify and recognize these inherent hazards, protect themselves, and proceed safely in completing their tasks. Failure to comply with any of these requirements could result in serious damage to the equipment and the property in
IMPORTANT!READ BEFORE PROCEEDING!
GENERAL SAFETY GUIDELINES
which it is situated, as well as severe personal injury or death to themselves and people at the site.
This document is intended for use by owner-authorized operating/service personnel. It is expected that this in-dividual posseses independent training that will enable them to perform their assigned tasks properly and safe-ly. It is essential that, prior to performing any task on this equipment, this individual shall have read and un-derstood this document and any referenced materials. This individual shall also be familiar with and comply with all applicable governmental standards and regula-tions pertaining to the task in question.
SAFETY SYMBOLSThe following symbols are used in this document to alert the reader to specific situations:
Indicates a possible hazardous situation which will result in death or serious injury if proper care is not taken.
Indicates a potentially hazardous situa-tion which will result in possible injuries or damage to equipment if proper care is not taken.
Identifies a hazard which could lead to damage to the machine, damage to other equipment and/or environmental pollu-tion if proper care is not taken or instruc-tions and are not followed.
Highlights additional information useful to the technician in completing the work being performed properly.
External wiring, unless specified as an optional connection in the manufacturer’s product line, is not to be connected inside the OptiView cabinet. Devices such as relays, switches, transducers and controls and any external wiring must not be installed inside the micro panel. All wiring must be in accordance with Johnson Controls’ published specifications and must be performed only by a qualified electrician. Johnson Controls will NOT be responsible for damage/problems resulting from improper connections to the controls or application of improper control signals. Failure to follow this warn-ing will void the manufacturer’s warranty and cause serious damage to property or personal injury.

JOHNSON CONTROLS 3
FORM 160.00-O2 ISSUE DATE: 6/10/2011
CHANGEABILITY OF THIS DOCUMENT
In complying with Johnson Controls’ policy for contin-uous product improvement, the information contained in this document is subject to change without notice. While Johnson Controls makes no commitment to up-date or provide current information automatically to the manual owner, that information, if applicable, can be obtained by contacting the nearest Johnson Controls Service office.
Operating/service personnel maintains the responsi-bility of the applicability of these documents to the competitive equipment the kit is installed on. If there is any question regarding the applicability of these documents, the technician should verify whether the equipment has been modified and if current literature is available with the owner of the equipment prior to performing any work on the chiller.
ASSOCIATED LITERATURE
MANUAL DESCRIPTION FORM NUMBER
Operation (Unit) - Model YT, Style G or Later (Centrifugal) 160.55-O1
Operation (Unit) - Model YK, Style E or Later (Centrifugal) 160.54-O1
Operation (Unit) - Model YS, Style E or Later (Screw Chiller) 160.80-NOM1
Operation (Unit) - Model YR, Style A or Later (Screw Chiller) 160.81-O1
Operation (OptiView Control Center) - Model YT, Style G or Later (Centrifugal) 160.55-O1
Operation (OptiView Control Center) - Model YK, Style E or Later (Centrifugal) 160.54-O1
Operation (OptiView Control Center) - Model YS, Style E or Later (Screw Chiller) 160.80-O1
Operation (OptiView Control Center) - Model YR, Style A or Later (Screw Chiller) 160.81-O1
Service (OptiView Control Center) - Model YT, Style G or Later (Centrifugal) 160.55-M1
Service (OptiView Control Center) - Model YK, Style E or Later (Centrifugal) 160.54-M1
Service (OptiView Control Center) - Model YS, Style E or Later (Screw Chiller) 160.80-M1
Service (OptiView Control Center) - Model YR, Style A or Later (Screw Chiller) 160.81-M1
Wiring Diagram (OptiView Control Center) - Model Style G or Later (Centrifugal) 160.55-PW2
Wiring Diagram (OptiView Control Center) - Model YK, Style E or Later (Centrifugal) 160.54-PW8
Wiring Diagram (OptiView Control Center) - Model YS, Style E or Later (Screw Chiller) 160.80-PW2
Wiring Field Connections (Solid State Starter) - Model YT, Style G or Later (Centrifugal) 160.55-PW5
Wiring Field Connections (Solid State Starter) - Model YK, Style E or Later (Centrifugal) 160.54-PW5
Wiring Field Connections (Solid State Starter) - Model YS, Style E or Later (Screw Chiller) 160.80-PW4
Replacement Parts List (Solid State Starter) 160.00-RP3

JOHNSON CONTROLS4
FORM 160.00-O2 ISSUE DATE: 6/10/2011
THIS PAGE INTENTIONALLY LEFT BLANK
JOHNSON CONTROLS 5
FORM 160.00-O2 ISSUE DATE: 6/10/2011
TABLE OF CONTENTS
SECTION 1 – THEORY OF OPERATION .................................................................................................................9Style “B” Liquid Cooled Solid State Starter Overview ......................................................................................9General ........................................................................................................................................................... 11System Microprocessors ................................................................................................................................ 11Solid State Starter Cooling Loop ....................................................................................................................13Electrical Conditions .......................................................................................................................................14Motor Protection .............................................................................................................................................14
SECTION 2 – SYSTEM ARCHITECTURE .............................................................................................................15
SECTION 3 – LOGIC/TRIGGER BOARD ...............................................................................................................17General Information ........................................................................................................................................17Current Scaling ...............................................................................................................................................17Logic/Trigger Board Indicator LED’s ...............................................................................................................18Relay Functions ..............................................................................................................................................18
SECTION 4 – SAFETY SHUTDOWNS ...................................................................................................................21General Information ........................................................................................................................................21105% Motor Current Overload .......................................................................................................................21High Temperature ...........................................................................................................................................21High Instantaneous Current ...........................................................................................................................21Open SCR ......................................................................................................................................................22Output Current Imbalance ..............................................................................................................................22Phase Rotation ...............................................................................................................................................22Shorted SCR ..................................................................................................................................................23
SECTION 5 – CYCLING SHUTDOWNS .................................................................................................................25General Information ........................................................................................................................................25High Supply Line Voltage ...............................................................................................................................25Initialization Failed ..........................................................................................................................................25Invalid Current Scale ......................................................................................................................................26Logic Board Power Supply .............................................................................................................................26Logic Board Processor ...................................................................................................................................26Low Phase Temperature.................................................................................................................................26Low Supply Line Voltage ................................................................................................................................26Phase Locked Loop ........................................................................................................................................27Phase Loss .....................................................................................................................................................27Power Fault ....................................................................................................................................................28Run Signal ......................................................................................................................................................28Serial Communications ..................................................................................................................................28Stop Contacts Open .......................................................................................................................................29
SECTION 6 – START INHIBIT ................................................................................................................................31High Temperature ...........................................................................................................................................31
SECTION 7 – START-UP INSTRUCTIONS ............................................................................................................33Start-Up Checklist ..........................................................................................................................................33Fill Cooling Loop ............................................................................................................................................33

JOHNSON CONTROLS6
FORM 160.00-O2 ISSUE DATE: 6/10/2011
SECTION 8 – MAINTENANCE AND TROUBLESHOOTING .................................................................................35Manually Running The Closed Loop Coolant Pump ......................................................................................35Coolant Maintenance .....................................................................................................................................35Troubleshooting The Closed Loop Coolant Pump ..........................................................................................35Troubleshooting Processes ............................................................................................................................35Verify Shorted SCR ........................................................................................................................................36Verify Open or Shorted SCR Gate .................................................................................................................36Verify Gate Driver Output ...............................................................................................................................36Verify Real Phase Current Imbalance ............................................................................................................37Verify False Phase Current Imbalance ...........................................................................................................38Removing SCR Assemblies ..........................................................................................................................38Installing SCR Assemblies ............................................................................................................................39
TABLE OF CONTENTS (CONT’D)

JOHNSON CONTROLS 7
FORM 160.00-O2 ISSUE DATE: 6/10/2011
LIST OF FIGURES
LIST OF TABLES
FIGURE 1 - LCSSS – Front View, Exterior ................................................................................................................9FIGURE 2 - LCSSS – Basic Block Diagram ............................................................................................................ 11FIGURE 3 - LCSSS – Rear View, Exterior ..............................................................................................................12FIGURE 4 - LCSSS – Interior, Connection Section - Fuses And Logic/Trigger Board ............................................15FIGURE 5 - LCSSS – Interior, Power Section .........................................................................................................16FIGURE 6 - LCSSS – Logic/Trigger Board Detail ...................................................................................................18FIGURE 7 - Logic/Trigger Board Pin Location Diagram ..........................................................................................20FIGURE 8 - Current Imbalance Due To Voltage Imbalance ....................................................................................37FIGURE 9 - LCSSS – Power Components .............................................................................................................39
TABLE 1 - Style “B” LCSSS Variations ...................................................................................................................10TABLE 2 - CT Ratio ................................................................................................................................................17TABLE 3 - Current Capability ..................................................................................................................................17TABLE 4 - Logic/Trigger Board Inputs And Outputs................................................................................................19TABLE 5 - High Supply Line Voltage ......................................................................................................................25TABLE 6 - Low Supply Line Voltage .......................................................................................................................27TABLE 7 - Phase Loss ............................................................................................................................................28TABLE 8 - LCSSS Thermistor Characteristics ........................................................................................................32TABLE 9 - Required Material ..................................................................................................................................33

JOHNSON CONTROLS8
FORM 160.00-O2 ISSUE DATE: 6/10/2011
THIS PAGE INTENTIONALLY LEFT BLANK

JOHNSON CONTROLS 9
FORM 160.00-O2 ISSUE DATE: 6/10/2011
1SECTION 1 – THEORY OF OPERATION
STYLE “B” LIQUID COOLED SOLID STATE STARTER OVERVIEW
The Style “B” Liquid Cooled Solid State Starter (LCSSS) is a state of the art, soft start for YORK compressor motors. New features include a com-bined Logic/Trigger Board, improved data collec-tion, better generator operation, and easier set-up. The Style “B” LCSSS is to be applied only to the YORK OptiView Control Center.
This instruction is a description of the operation, start-up and troubleshooting of the Style “B” YORK LCSSS. It should be read thoroughly before servicing this product. Due to the integration of the Solid State Starter with the YORK OptiView Control Center, an understanding of the OptiView Control Center is nec-essary. Therefore, this document should be used with ASSOCIATED LITERATURE on page 3.
FIGURE 1 - LCSSS – FRONT VIEW, EXTERIOR
00283VIP
OPTIONALCIRCUITBREAKER
CONDUIT CONNECTION TO OPTIVIEW CONTROL CENTER
LOCK AND KEYS
COOLANTPUMP
1.5 KVA CONTROLPOWER TRANSFORMER
HIGH HAT FOR OPTIONAL DISCONNECT SWITCH AND CIRCUIT BREAKER
INLET CONDENSER WATER CONNECTION
TO HEAT EXCHANGER

JOHNSON CONTROLS10
FORM 160.00-O2ISSUE DATE: 6/10/2011SECTION 1 – THEORY OF OPERATION
TABLE 1 - STYLE “B” LCSSS VARIATIONS
MODEL LINE VOLTAGE APPLICATION (VAC)
PART NUMBER FOR A STARTER WITH LUG KIT
7L-40 380 371-02506-102
7L-46 440 / 460 / 480 371-02506-103
7L-58 550 / 575 / 600 371-02506-104
7L-50 380 / 400 / 415 50Hz 371-02506-105
14L-17 200 / 208 371-02506-106
14L-28 220 / 230 / 240 371-02506-107
14L-40 380 371-02506-108
14L-46 440 / 460 / 480 371-02506-109
14L-58 550 / 575 / 600 371-02506-110
14L-50 380 / 400 / 415 50Hz 371-02506-111
26L-17 200 / 208 371-02507-102
26L-28 220 / 230 / 240 371-02507-103
26L-46 440 / 460 / 480 371-02507-104
26L-40 380 371-02507-105
26L-58 550 / 575 / 600 371-02507-106
26L-50 380 / 400 / 415 50Hz 371-02507-107
33L-17 200 / 208 371-02507-108
33L-28 220 / 230 / 240 371-02507-109
33L-40 380 371-02507-110
33L-46 440 / 460 / 480 371-02507-111
33L-50 380 / 400 / 415 50Hz 371-02507-112
The New Style “B” LCSSS is also available with a disconnect switch or a circuit breaker. Consult the sales information for additional part numbers for those models.

JOHNSON CONTROLS 11
SECTION 1 – THEORY OF OPERATIONFORM 160.00-O2 ISSUE DATE: 6/10/2011
1GENERAL
The Style ‘B’ LCSSS provides a soft continuous-cur-rent start for the compressor motor. During the start-ing sequence, the inrush motor current is limited to the programmed value of the starting current, by reduc-ing the voltage applied to the motor. This reduction in voltage is accomplished when the silicon controlled rectifiers (SCRs) are turning on in a “phase-back” technique during motor acceleration. The trigger por-tion of the Logic/Trigger Board provides the firing (Turn-ON) pulses to the SCRs based upon a control voltage (VCON or Delay angle) provided by the Logic portion of the Logic/Trigger Board located in the Solid State Starter cabinet. After the motor has accelerated to synchronous speed, the SCRs are turned full on to conduct the full AC line voltage to the motor.
The Logic/Trigger Board provides safety functions to protect the compressor motor and the starter from many different conditions, such as high and low AC line voltage problems, high motor current, and pos-sible SCR failure.
In order to reduce size of the starter, the cooling to the SCR assemblies is provided by a water-to-water heat exchanger between the chiller condenser water loop and the coolant in the closed loop. The heat exchanger length has been reduced and is now mounted on the starter itself. To reduce the length of the heat exchanger, the diameter of the tube has been increased.
SYSTEM MICROPROCESSORS
The system microprocessors have back-up protection in case they fail to function. A watch dog circuit is used, in which, the system microprocessor will strobe an output at a regular time interval. If the output strobe is missing, the Logic/Trigger Board will safely shut down the chiller. Another back-up circuit requires that the LCSSS receive a hardware and software signal from the OptiView Control Center, for the chiller to be started. If the two signals are not received within a certain period of time, a shutdown will occur.
TT
SCRASSY.
TT
SCRASSY.
TT
SCRASSY.
OA
OB
OC
CURRENTTRANSFORMERS
CONTROLPOWERXFMR
LOGIC/TRIGGER BOARD
MOTORCURRENT
115VACCONTROL POWER TO
OPTIVIEW CONTROL CENTER
COOLANTPUMPPOWER
SUPPLY
I/OBOARD
MICROBOARD
STARTER INITIATED SHUTDOWN
SERIAL COMMUNICATIONS LINK
OPTIVIEWCONTROLCENTER
HEATSINKTEMP.
COMPRESSORMOTOR
FIGURE 2 - LCSSS – BASIC BLOCK DIAGRAM
LD05246

JOHNSON CONTROLS12
FORM 160.00-O2ISSUE DATE: 6/10/2011SECTION 1 – THEORY OF OPERATION
The main system microprocessor performs many func-tions. It provides the serial communications link be-tween the Logic/Trigger Board, and the Micro Board in the OptiView Control Center. It determines the proper current scaling for the size of starter, and in-terrogates the RUN/STOP signal from the OptiView Control Center. This processor also interrogates feed-back signals to determine Open and Shorted SCR, Phase Loss, Phase Rotation, Motor Overload, High In-stantaneous Current, High Line Voltage, and Low Line Voltage shutdowns.
The VCON signal is generated by the main system microprocessor. It is a digital signal placed on the data bus. This processor compares the starting current value, programmed at the OptiView Control Center, with the current feedback from the three output cur-rent transformers. A new value of VCON is generated every line cycle. This signal is then sent to the pro-grammable logic device (PLD). The PLD determines the proper firing order for the SCRs to maintain the programmed starting current value. As the speed of the motor approaches synchronous speed output cur-rent drops off, the VCON value increases, and the PLD turns the SCRs full on. The output of the PLD is sent
to a digital driver chip and then to six optical couplers, one for each SCR.
The optical couplers are the first stage of the trigger portion of the Logic/Trigger Board. They isolate the high power circuit from the low power circuit. The power for the high power circuit is supplied from the J5 connector. The trigger section is made up of six out-put drivers, one for each SCR. Each output driver has a dedicated transformer, that steps down the incoming voltage, and provides isolation between each output driver.
A digital signal processor (DSP) is used for many timing and calculation functions. Root Mean Square (RMS) calculations require that input line voltage and output current values be calculated on a cycle-by-cycle basis. These calculations are used to display the RMS voltage and current for each phase, kW, and kWh on the OptiView Control Center. The DSP is also used to interpret the feedback signals from the thermistors mounted on the SCR’s assemblies. All of these values are placed on the data bus for the main system micro-processor to generate faults, if required, and to send data on to the OptiView Control Center via the serial communication link.
FIGURE 3 - LCSSS – REAR VIEW, EXTERIOR
PIPE PLUG WATER
RESERVOIR
WATER PUMP
DRAIN CAPHEAT EXCHANGER
00284VIP

JOHNSON CONTROLS 13
SECTION 1 – THEORY OF OPERATIONFORM 160.00-O2 ISSUE DATE: 6/10/2011
1SOLID STATE STARTER COOLING LOOP
The SCRs in the LCSSS generate heat during normal running conditions and become very hot during start-up of the chiller. This heat is generated by the fact that all of the current flowing to the motor is conducted through the SCRs. The SCRs are very reliable, but they do have a slight resistance value when they are turned on. The resistance, along with the load current of the motor, generates the heat.
The heat must be dissipated, or the SCRs will fail from an overheating condition. Two methods are commonly used to dissipate the heat. The first method, which was employed on older solid state starters was forced air cooling. This method works well, but requires a larg-er cabinet and the addition of many fans. The second method for dissipating the heat is to employ a water cooling system similar to that used in automobiles.
The cooling system for the LCSSS is different from the system in an automobile. In automobiles, heat is transferred to the air, but the starter transfers heat to the condenser water.
Condenser water is used to cool the starter for many reasons. One, the condenser water will always be avail-able since it is part of the chiller system. The cooling is free since the condenser water will be cooled in the cooling towers for the chiller needs, and does not add any load to the chiller. If the chilled water was used to cool the starter, this would add to the chiller load and add cost to the customer. In a few applications where chilled water is being used because of extremely high condenser water pressure, a temperature regulating valve must be used. The temperature regulating valve should be set to 85°F so that condensation does not occur inside the starter cabinet. Using condenser wa-ter eliminates the concern for condensation occurring inside of the starter cabinet, which could damage the starter. The reliability of the starter is improved from the standpoint that the three forced air fans are re-placed with one circulating pump.
The SCR assemblies are cooled by a pump circulating coolant in a closed loop through the SCR’s heatsink and the outer tube of the tube-in-tube heat exchanger. When the coolant passes through the heatsink, it ab-sorbs heat from the heatsink. As the coolant passes through the heat exchanger, it gives up its heat to the system condenser water that is flowing through the in-ner tube of the tube-in-tube heat exchanger. The design of the heat exchanger prevents the closed loop coolant
from mixing with the condenser water. The condenser water is forced through the heat exchanger by the pres-sure differential across the condenser shell input and output.
The cooling loop is filled with coolant at system start-up commissioning by the service technician. Refer to start-up in-structions. As maintenance, the coolant must be changed every year. If the coolant is not replaced within this time interval, a potential for corrosion of the SCR’s heatsink is greatly increased.
The Logic/Trigger Board constantly monitors the tem-perature of the three SCR heatsink assemblies with a thermistor attached to each assembly. The temperature of each thermistor is sent to the Micro Board in the OptiView Control Center via the serial communica-tions link. Refer to ASSOCIATED LITERATURE on page 3 for details on where this data can be viewed on the OptiView Control Center.
If the temperature of any assembly exceeds a high value during a running condition, the Logic/Trigger Board will initiate a shutdown. Further, anytime the temperature of any assembly exceeds a high value and the starter is not running, the chiller will be prevented from starting and the closed loop coolant pump will be operated until the temperature has fallen. Also, if the temperature of any assembly falls below a preset val-ue, the Logic/Trigger Board will initiate a shutdown.
Changes have been made to the OptiView Control Cen-ter software to improve the restart time of the starter. These changes allow for the control of the condenser water pump when a style ‘B’ LCSSS is used with the following OptiView Control Center software. On a YK chiller, the software is C.MLM.01.04 or later. On a YT chiller, the software is C.MLM.02.01 or later. On a YS chiller, the software is C.MLM.03.01 or later.
The condenser water pump will be turned on any time the chiller is started, and will continue to run until coastdown is complete. After coastdown is completed, the condenser water pump will continue to run if any one of the three thermistors indicated that the SCR as-semblies are too hot. Once the temperature has fallen to a specified level, the condenser water pump will turn off.

JOHNSON CONTROLS14
FORM 160.00-O2ISSUE DATE: 6/10/2011SECTION 1 – THEORY OF OPERATION
This new control will cool down the SCR assemblies more quickly after the chiller has been stopped. Then the LCSSS can be started sooner, as long as the anti-recycle timer has been satisfied.
ELECTRICAL CONDITIONS
Proper starter operation requires that all phases of the AC power line voltage are present, and in the correct rotation. A “Power Fault” circuit provides protection from rapid power line current interruptions and tran-sient switching. The AC power line voltage also must be relatively free of spikes and noise. If these condi-tions are not met, safety circuitry on the Logic/Trig-ger Board will cause a shutdown of the LCSSS. These shutdowns will protect the chiller from rotating in the wrong direction, or causing transient torque conditions on the compressor shaft. As well, the LCSSS will shut down and protect itself and the compressor motor if the AC power line voltage is too high or too low.
If the LCSSS is intended to be used on a generator application, then the JP1 jumper on the Logic/Trigger Board may need to be cut. Even if the starter will be connected to a generator for emergency power, the JP1 jumper may need to be cut. The JP1 jumper changes how the Logic/Trigger Board will track the frequency
of the incoming line voltage. (Refer to Fig 6 for loca-tion of JP1.) If the Logic/Trigger Board is a Rev. C, then the JP1 jumper must be cut for generator opera-tion. If the Logic/Trigger Board is a Rev. D or later, the JP1 jumper has been removed, and the Logic/Trigger Board will function properly regardless of whether the starter is connected to the utility or generator power.
MOTOR PROTECTION
Compressor motor protection circuits are provided on the Logic/Trigger Board. These circuits protect the motor from continuous or instantaneous high current levels. Another circuit is used to determine if the cur-rent transformers are connected to the Logic/Trigger Board. This ensures that the LCSSS has current feed-back before the chiller is started. Without the current feedback, the inrush current cannot be regulated. Also, if the output current becomes imbalanced due to AC power line voltage instability, or faulty SCR, a shut-down will occur. Other circuits are employed to sense a signal phase condition to the motor, or if one of the SCRs is open.
JOHNSON CONTROLS 15
FORM 160.00-O2 ISSUE DATE: 6/10/2011
2
SECTION 2 – SYSTEM ARCHITECTURE
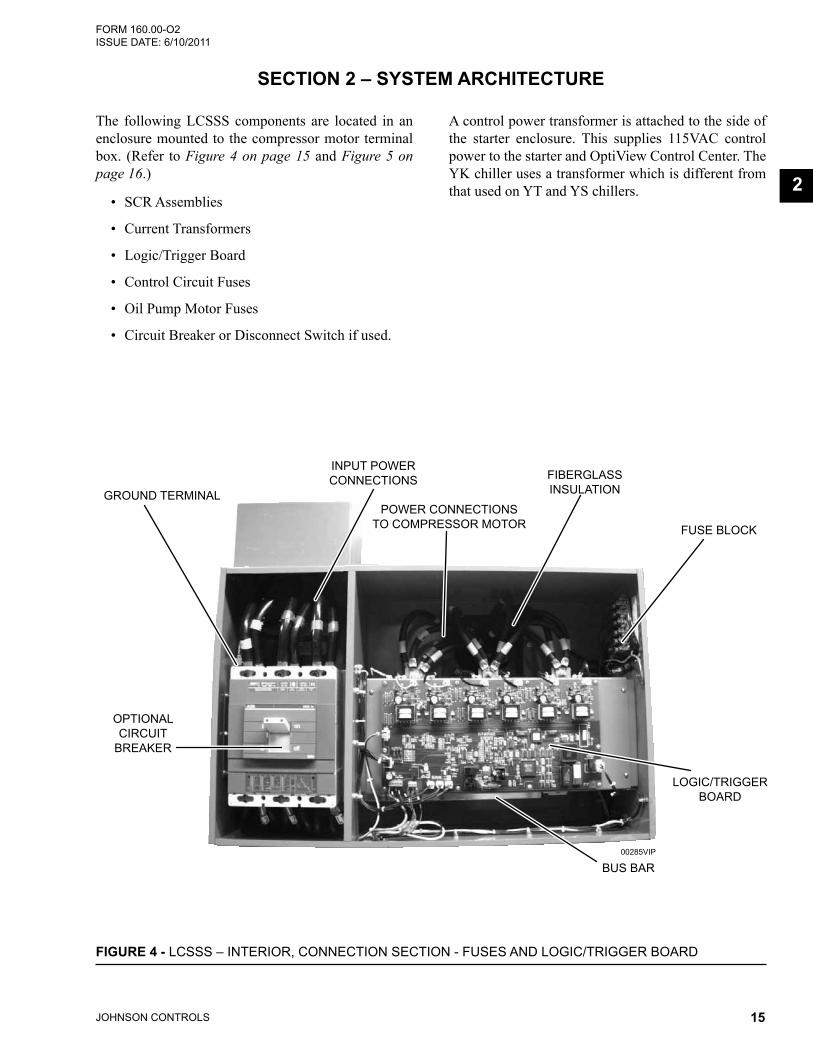
The following LCSSS components are located in an enclosure mounted to the compressor motor terminal box. (Refer to Figure 4 on page 15 and Figure 5 on page 16.)
• SCR Assemblies
• Current Transformers
• Logic/Trigger Board
• Control Circuit Fuses
• Oil Pump Motor Fuses
• Circuit Breaker or Disconnect Switch if used.
A control power transformer is attached to the side of the starter enclosure. This supplies 115VAC control power to the starter and OptiView Control Center. The YK chiller uses a transformer which is different from that used on YT and YS chillers.
FIGURE 4 - LCSSS – INTERIOR, CONNECTION SECTION - FUSES AND LOGIC/TRIGGER BOARD
OPTIONALCIRCUIT
BREAKER
GROUND TERMINAL
INPUT POWERCONNECTIONS
POWER CONNECTIONSTO COMPRESSOR MOTOR
FIBERGLASSINSULATION
FUSE BLOCK
LOGIC/TRIGGERBOARD
BUS BAR00285VIP

JOHNSON CONTROLS16
FORM 160.00-O2ISSUE DATE: 6/10/2011SECTION 2 – SYSTEM ARCHITECTURE
FIGURE 5 - LCSSS – INTERIOR, POWER SECTION
SCRGATE
LEADS
SCRHEATSINK
ASSEMBLIESINPUTBUS
BARS
SCRGATE
LEADS
OUTPUTCURRENT
TRANSFORMERS
00286VIP

JOHNSON CONTROLS 17
FORM 160.00-O2 ISSUE DATE: 6/10/2011
3
SECTION 3 – LOGIC/TRIGGER BOARD
GENERAL INFORMATION
The new Logic/Trigger Board is basically an integra-tion of the functions in the Logic and Trigger Board in the style ‘A’ LCSSS. The new board uses a micro-processor, a digital signal processor, and a program-mable logic device to duplicate the functions of the older analog boards. This new board is located in the LCSSS cabinet.
The Logic/Trigger Board communicates with the Mi-cro Board in the OptiView Control Center via a serial communications link made up of a three-wire cable connected to TB1. The serial communications link is used to send all displayed data related to the starter, fault messages, and history data. This data is transmit-ted every 2 seconds, and then the data on the display of the OptiView Control Center is updated.
CURRENT SCALING
In order for the motor current to be properly scaled by the Micro Board, the Logic/Trigger Board sends a scaling code via the serial communications link to the Micro Board in the OptiView Control Center. The scal-ing code is determined by how jumpers are arranged on the J1 connector on the Logic/Trigger Board. Also, each model size of starter uses a different CT ratio. (See Table 2 on page 17.)
Since these jumpers are used to determine the size of the starter, a common Logic/Trigger Board can be used for 60Hz applications. This will simplify the replace-ment of the Logic/Trigger Board. Each model has a different current capability, as outlined in Table 3 on page 17.
The motor FLA and the Starting Current are pro-grammed on the OptiView Control Center. Refer to ASSOCIATED LITERATURE on page 3 for details about which form is needed to program these values. Also, within these model classifications, there are vari-ous line voltage applications.
TABLE 3 - CURRENT CAPABILITY
LCSSS MODEL MIN FLA
MAX FLA
MAX LRA
MIN START CURRENT
MAX START CURRENT
MAX DISPLAY
AMPS
7L-40, 46, 58 and 50 35 260 1556 310 700 1163
14L-17, 28,40, 46, 58 and 50 65 510 3111 620 1400 2326
26L-17, 28, 40, 46, 58 and 50 125 850 5780 1150 2600 4319
33L-17, 28, 40, 46, and 50 215 1050 7335 1460 3300 5482
TABLE 2 - CT RATIOMODEL SIZE PINS JUMPERED TOGETHER ON J1 CT RATIO
7L J1-7 TO J1-8, J1-8 TO J1-9, J1-9 TO J1-10 700:1
14L J1-8 TO J1-10, J1-9 TO J1-10 1400:1
26L J1-7 TO J1-10, J1-9 TO J1-10 2600:1
33L J1-9 TO J1-10 3300:1

JOHNSON CONTROLS18
FORM 160.00-O2ISSUE DATE: 6/10/2011SECTION 3 – LOGIC/TRIGGER BOARD
LOGIC/TRIGGER BOARD INDICATOR LED’S
The Logic/Trigger Board contains only two LED’s. Since all of the shutdown messages are displayed on the OptiView Control Center, there is no need for LED’s to annunciate a shutdown condition. The two LED’s are used to verify that the serial communica-tions link is working.
CR6 is the Receive LED. This LED will flash green every 2 seconds to indicate that the Logic/Trigger Board has received data from the OptiView Control Center. (Refer to Figure 6 on page 18 for location of LED.)
CR7 is the Transmit LED. This LED will flash red ev-ery 2 seconds to indicate that the Logic/Trigger Board has sent data to the OptiView Control Center. (Refer to Figure 6 on page 18 for location of LED.)
RELAY FUNCTIONS
Relay K1 shall provide a hardware shutdown signal to the OptiView Control Center via wires 16 and 53. The relay will provide a normally open set of contacts that are driven closed when the LCSSS is operating satis-
factorily, and the contacts will open when the LCSSS initiates a Cycling or Safety shutdown. These contacts will remain open until the cause of the shutdown has been rectified.
Relay K2 controls the operation of the closed loop coolant pump. When the Micro Board commands the LCSSS to run, the main system microprocessor, via an output driver, causes the K2 relay contacts to close. As long as the K2 contacts are closed, the closed loop cool-ant pump will run. When the Micro Board commands the LCSSS to stop, the main system microprocessor, via an output driver, causes the K2 relay contacts to open (provided all of the thermistor temperatures are below 110°F). This will stop the closed loop coolant pump. Therefore, the closed loop coolant pump may start and stop with the compressor motor. Also, the K2 relay will be energized by the main system microprocessor when any heatsink temperature exceeds 110°F regardless of whether the chiller is running or not. When the temperature falls below 110°F, the main system micro-processor will de-energize K2 relay causing the pump to stop.
FIGURE 6 - LCSSS – LOGIC/TRIGGER BOARD DETAIL
J11 J10 J9 J8 J7 J6
J5
J1
TB-2 TB-1 J4 J3 J2 JP1 CR7 CR6 U15 RAM CHIP U16 EPROM
J12
00287VIP
JOHNSON CONTROLS 19
SECTION 3 – LOGIC/TRIGGER BOARDFORM 160.00-O2 ISSUE DATE: 6/10/2011
3
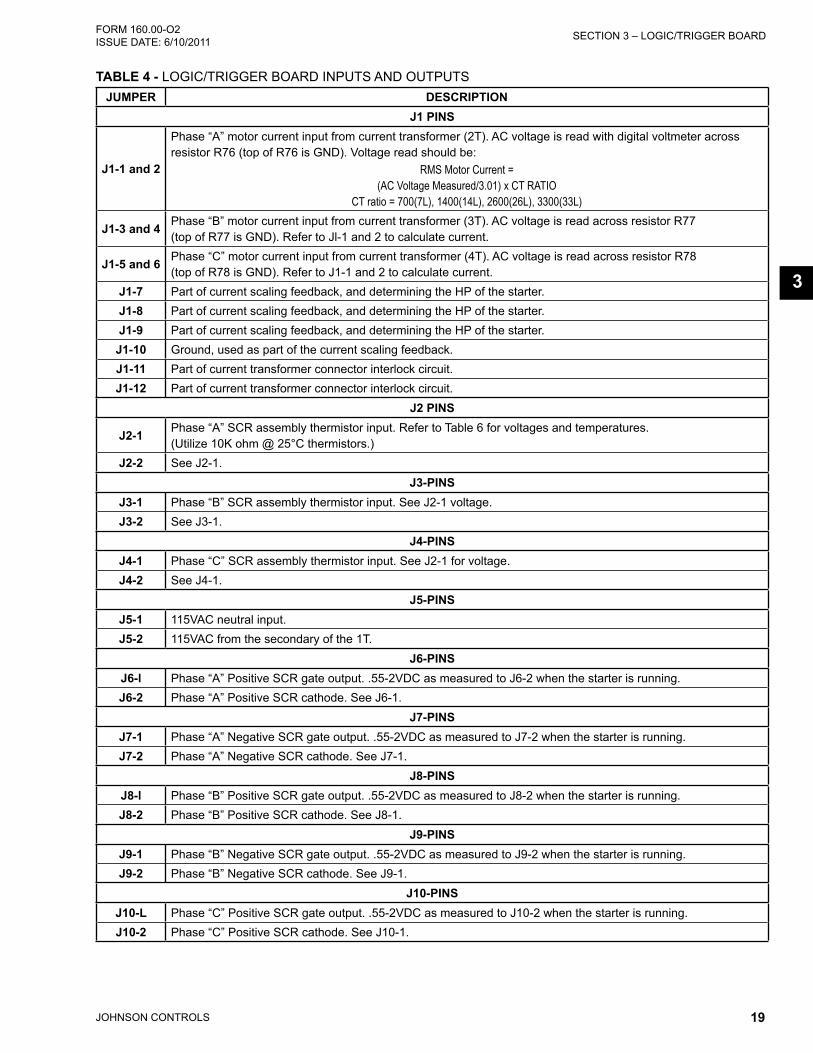
TABLE 4 - LOGIC/TRIGGER BOARD INPUTS AND OUTPUTSJUMPER DESCRIPTION
J1 PINS
J1-1 and 2
Phase “A” motor current input from current transformer (2T). AC voltage is read with digital voltmeter across resistor R76 (top of R76 is GND). Voltage read should be:
RMS Motor Current = (AC Voltage Measured/3.01) x CT RATIO
CT ratio = 700(7L), 1400(14L), 2600(26L), 3300(33L)
J1-3 and 4 Phase “B” motor current input from current transformer (3T). AC voltage is read across resistor R77 (top of R77 is GND). Refer to Jl-1 and 2 to calculate current.
J1-5 and 6 Phase “C” motor current input from current transformer (4T). AC voltage is read across resistor R78 (top of R78 is GND). Refer to J1-1 and 2 to calculate current.
J1-7 Part of current scaling feedback, and determining the HP of the starter.J1-8 Part of current scaling feedback, and determining the HP of the starter.J1-9 Part of current scaling feedback, and determining the HP of the starter.
J1-10 Ground, used as part of the current scaling feedback.J1-11 Part of current transformer connector interlock circuit.J1-12 Part of current transformer connector interlock circuit.
J2 PINS
J2-1 Phase “A” SCR assembly thermistor input. Refer to Table 6 for voltages and temperatures. (Utilize 10K ohm @ 25°C thermistors.)
J2-2 See J2-1.J3-PINS
J3-1 Phase “B” SCR assembly thermistor input. See J2-1 voltage.J3-2 See J3-1.
J4-PINSJ4-1 Phase “C” SCR assembly thermistor input. See J2-1 for voltage.J4-2 See J4-1.
J5-PINSJ5-1 115VAC neutral input.J5-2 115VAC from the secondary of the 1T.
J6-PINSJ6-l Phase “A” Positive SCR gate output. .55-2VDC as measured to J6-2 when the starter is running.J6-2 Phase “A” Positive SCR cathode. See J6-1.
J7-PINSJ7-1 Phase “A” Negative SCR gate output. .55-2VDC as measured to J7-2 when the starter is running.J7-2 Phase “A” Negative SCR cathode. See J7-1.
J8-PINSJ8-l Phase “B” Positive SCR gate output. .55-2VDC as measured to J8-2 when the starter is running.J8-2 Phase “B” Positive SCR cathode. See J8-1.
J9-PINSJ9-1 Phase “B” Negative SCR gate output. .55-2VDC as measured to J9-2 when the starter is running.J9-2 Phase “B” Negative SCR cathode. See J9-1.
J10-PINSJ10-L Phase “C” Positive SCR gate output. .55-2VDC as measured to J10-2 when the starter is running.J10-2 Phase “C” Positive SCR cathode. See J10-1.

JOHNSON CONTROLS20
FORM 160.00-O2ISSUE DATE: 6/10/2011SECTION 3 – LOGIC/TRIGGER BOARD
FIGURE 7 - LOGIC/TRIGGER BOARD PIN LOCATION DIAGRAMLD05282
RED REDREDREDREDREDWHT WHTWHTWHTWHTWHT
PHASE C PHASE B PHASE A
J11 J10 J9 J8 J7 J6
J12
J2J3J4TB1TB2
J1
J51
2
12
11
10
9
8
7
6
5
4
3
2
1
1 2 3 4 5 1 2 3 2 1 2 12 1
2
1
2 12 12 12 12 12 1
JUMPER DESCRIPTIONJ11-PINS
J11-1 Phase “C” Negative SCR gate output. .55-2VDC as measured to J11-2 when the starter is running.J11-2 Phase “C” Negative SCR cathode. See J11-1.
J12-PINS
J12-1 Switched 115VAC to cooling loop water pump motor, 115VAC when pump is commanded to run. 0VAC when commanded to stop. Measured to J5-1.
J12-2 115VAC as measured to J5-1.TB1 PINS
TB1-1, 16 Stop Contact between the LCSSS and the OptiView Control Center. Measure 115VAC to J5-2 when no faults are active. Measure 0VAC to J5-2 when faults are active.
TB1-2, 53 115 VAC supply voltage from the OptiView Control Center for the Stop Contact. Measure 115VAC to J5-2 whenever power is applied.
TB1-3, 24 Run / Stop connections from the OptiView Control Center. Measure 115VAC to J5-2 when in a run condition. Measure 0VAC to J5-2 when in a stop condition.
TB2 PINSTB2-1 The transmit line for the Serial Communications Link from the Micro Board in the OptiView Control Center J15-1.TB2-2 The receive line for the Serial Communications Link from the Micro Board in the OptiView Control Center J15-2.TB2-3 The ground line for the Serial Communications Link from the Micro Board in the OptiView Control Center J15-3.
TB2-4 The 24VDC power supply. Connected to J30 / P30 Pin 12. Refer to ASSOCIATED LITERATURE on page 3 for the proper connection on the J2 connector of the power supply. Measure 24VDC to TB2-5.
TB2-5 The ground connection for the power supply. Connected to J30 / P30 Pin 6, and J2 Pin 6 on the power supply inside the OptiView Control Center.
All measurements made to GND (J3-1) unless otherwise noted.
TABLE 4 - LOGIC/TRIGGER BOARD INPUTS AND OUTPUTS

JOHNSON CONTROLS 21
FORM 160.00-O2 ISSUE DATE: 6/10/2011
4
SECTION 4 – SAFETY SHUTDOWNS
GENERAL INFORMATION
Whenever a Safety Shutdown is generated by the Log-ic/Trigger Board a series of events will occur:
• If the chiller is running at the time of the shut-down, the Logic/Trigger Board will turn off the SCR gate outputs.
• If the chiller is running at the time of the shut-down, the OptiView Control Center will start a coastdown period (150 seconds for centrifugal chillers, or a 2 minute lockout for screw chillers).
• The K1 relay will de-energize causing an open circuit between TB1-1 wire #16 and TB1-2 wire #53. This action will indicate to the OptiView Control Center that the LCSSS has shutdown. The K1 relay will remain de-energized until the cause of the shutdown has been corrected.
• The Logic/Trigger Board will send a shutdown code via the serial communications link to the Micro Board in the OptiView Control Center. The Micro Board will interpret the shutdown code, and display a shutdown message on the display of the OptiView Control Center.
After the coastdown period has timed out, the chiller may be restarted, if the shutdown is no longer active. Place the Compressor Switch in the Stop/Reset posi-tion, and then into the Start position and release. The chiller will start if no faults are active.
105% MOTOR CURRENT OVERLOAD
The main system microprocessor receives from the OptiView Control Center a value of current that cor-responds to 100% FLA. The Digital Signal Processor gathers the current information from the output CT’s and converts this information to RMS current. The RMS current is sent to the main system microproces-sor where the highest value of the three phase currents is compared with the 100% FLA times 1.05. When the highest value of current exceeds this threshold, a 40 second time is started. If this value of current is main-tained for a period of 40 seconds a Safety shutdown will occur.
The shutdown message displayed will be “LCSSS - 105% MOTOR CURRENT OVERLOAD”.
Possible Problems• Verify that the programmed FLA is correct on the
OptiView Control Center.
• Verify that the output CT’s are reading current correctly.
• Ensure that the output current is balanced.
• Verify that the pre-rotation vanes or slide valve are working properly.
HIGH TEMPERATURE
The starter contains three SCR assemblies. Each as-sembly has a temperature sensor mounted on the mass block in front of the SCR. The feedback from the tem-perature sensors is compared in the main system mi-croprocessor against a shutdown threshold of 212°F. If any one of the three sensors exceeds the shutdown threshold, a Safety shutdown will occur. The coolant pump will continue to run until all temperatures are below 109°F.
The shutdown message displayed will be “LCSSS – HIGH PHASE X HEATSINK TEMPERATURE - RUNNING”, where X is either A, B or C, correspond-ing to SCR phase assemblies A, B or C respectively.
Possible Problems• Ensure that the coolant level is proper.
• Verify that the coolant is pink or clear.
• Verify that the coolant pump is working.
• Verify that the heat exchanger is clean, and that thereiscondenserwaterflow.
• Ensure that the heatsink assembly is not clogged.
HIGH INSTANTANEOUS CURRENT
The RMS starting current is programmed on the OptiView Control Center to a value of 20 – 45% x Delta LRA (normal value is 45% delta LRA). The RMS starting current is converted to peak starting current times 115% to generate a shutdown thresh-old. If the motor current in any phase ever reaches this threshold and is maintained for one second, a Safety shutdown will occur. If the motor current reaches this threshold for less than one second, a shutdown will not occur.

JOHNSON CONTROLS22
FORM 160.00-O2 ISSUE DATE: 6/10/2011SECTION 4 – SAFETY SHUTDOWNS
The shutdown message displayed will be “LCSSS - HIGH INSTANTANEOUS CURRENT”.
Possible Problems• Check for a shorted SCR.
• Disconnect the motor and test for shorts phase to ground, and phase to phase.
• If the shutdown occurs during the ramp up of the motor, an open SCR maybe the problem.
• Verify that the gate of the SCR is not open.
• Verify that the programmed starting current is correct on the OptiView Control Center.
• Verify that the output CT’s are reading current correctly.
• Check for an open input fuse.
OPEN SCR
This shutdown becomes active after the first 40 sec-onds of starter operation. The main system micropro-cessor looks at the voltage across each SCR via an op-to-coupler. When the SCR is turned on, the output of the opto-coupler is high, and when the SCR is turned off, the output of the opto-coupler is low. If this signal is low for 5 consecutive seconds, a Safety shutdown will occur.
To help eliminate nuisance trips, this shutdown can be disabled from the OptiView Control Center. Refer to the OptiView Control Center Service form for your style of chiller (refer to ASSOCIATED LITERATURE in this form, page 3, for the proper form number).
The shutdown message displayed will be “LCSSS - OPEN SCR”.
Possible Problems• Verify operation of the gate drivers.
• Verify that the starting current value is correct.
• Ensure that the motor is not overloaded on start. This has been a problem on screw compressors.
• Verify that the motor is connected.
• Verify that the gate of the SCR is not open.
• Check for an open input fuse.
OUTPUT CURRENT IMBALANCE
This shutdown will become active after the starter has been running for 45 seconds, and when the highest of the three motor currents exceeds 80% of the pro-grammed FLA. After these conditions are met, if any one phase of motor current exceeds 30% of the aver-age current for 45 seconds, a Safety shutdown will oc-cur. Review the following example.
Ifcurrent in the A phase = 200A current in the B phase = 200A current in the C phase = 118A
Then IAVE = 200 + 200 + 118 3
IAVE = 173A
IACCEPTABLE = 173 x + 30% = 121A, 225A
Therefore,Since phase “C” current = 118A which is less than the acceptable 121A, the chiller would shut down if this imbalance exists for 45 seconds.
The shutdown message displayed will be “LCSSS – MOTOR OR STARTER-CURRENT IMBAL-ANCE”.
Possible Problems• Verify the input voltage to the starter.
• Verify that the output CT’s are reading current correctly.
• Verify the gate drive on the Logic/Trigger Board.
PHASE ROTATION
The Logic/Trigger Board contains circuitry that gener-ates a waveform for each of the input phase voltages. These waveforms are compared to each other by the main system microprocessor. When the “A” phase volt-age transitions positive, the “C” phase voltage must be positive. Also, when the “A” phase voltage transitions negative, the “B” phase voltage must be positive. This shutdown is only active during the first 30 line cycles after power is applied to the starter. After the first 30 line cycles, the shutdown is no longer active.

JOHNSON CONTROLS 23
SECTION 4 – SAFETY SHUTDOWNSFORM 160.00-O2 ISSUE DATE: 6/10/2011
4
The YR chiller has a “MOTOR – PHASE ROTA-TION” fault. This is not a fault of the LCSSS. This fault is caused when the motor is turning in the wrong direction. This fault is caused by the motor wiring be-tween the LCSSS and the chiller motor being reversed.
The shutdown message displayed will be “LCSSS - PHASE ROTATION”.
Possible ProblemsVerify the phasing of the input power wiring.
SHORTED SCR
This shutdown is active any time the starter is not run-ning. Once this shutdown becomes active the main sys-tem microprocessor starts to evaluate the voltage across the SCRs via an opto-coupler. If the output of the opto-coupler is low (implying the SCR is turned on or short-ed) for 5 continuous seconds, and the RMS phase volt-
age for that phase is approximately 90% of the selected input voltage range a Safety shutdown will occur. If no voltage range has been selected on the OptiView Control Center, than the voltage check will not be performed. To help eliminate nuisance trips, this shutdown can be disabled from the OptiView Control Center. Refer to the OptiView Control Center Service form for your style of chiller (refer to ASSOCIATED LITERATURE in this form, page 3, for the proper form number).
The shutdown message displayed will be “LCSSS - PHASE X SHORTED SCR”, where X is either A, B or C, corresponding to SCR phase assemblies A, B or C respectively.
Possible ProblemsVerify if one of the SCRs are shorted.

JOHNSON CONTROLS24
FORM 160.00-O2 ISSUE DATE: 6/10/2011SECTION 4 – SAFETY SHUTDOWNS
THIS PAGE INTENTIONALLY LEFT BLANK

JOHNSON CONTROLS 25
FORM 160.00-O2 ISSUE DATE: 6/10/2011
5
SECTION 5 – CYCLING SHUTDOWNS
GENERAL INFORMATION
Whenever a Cycling Shutdown is generated by the Logic/Trigger Board, a series of events will occur.
• If the chiller is running at the time of the shut-down, the Logic/Trigger Board will turn off the SCR gate outputs.
• If the chiller is running at the time of the shut-down, the OptiView Control Center will start a coastdown period (150 seconds for centrifugal chillers, or a 2 minute lockout for screw chillers).
• The K1 relay will de-energize causing an open circuit between TB-1-16 and TB-1-53. This ac-tion will indicate to the OptiView Control Center that the LCSSS has shutdown. The K1 relay will remain de-energized until the cause of the shut-down has been corrected.
• The Logic/Trigger Board will send a shutdown code via the serial communications link to the Micro Board in the OptiView Control Center. The Micro Board will interpret the shutdown code, and display a shutdown message on the display of the OptiView Control Center.
After the coastdown period has timed out, the chiller will automatically restart, if the shutdown is no longer active, and if the Compressor Switch is still in the Run position.
HIGH SUPPLY LINE VOLTAGE
The Logic/Trigger Board monitors the three phases of input voltage via the negative SCR cathode connec-tion. The DSP will determine the phase to phase RMS voltage and send this information to the main system microprocessor. The main system microprocessor will
compare these voltages to shutdown thresholds in the chart below. If the input voltage exceeds the shutdown threshold for 20 continuous seconds, then a Cycling shutdown will occur. This shutdown is disabled for the first 20 seconds of the starter run, to prevent nuisance shutdowns from voltage spikes during start. The voltage range is programmed on the OptiView Control Center. If no voltage range is programmed, then this shutdown will be disabled. Refer to OptiView Control Center Ser-vice form for your style of chiller (refer to ASSOCIAT-ED LITERATURE in this form, page 3, for the proper form number).
The shutdown message displayed will be “LCSSS - HIGH SUPPLY LINE VOLTAGE”.
Possible Problems• Verify that the proper voltage range is selected on
the OptiView Control Center.
• Verify proper line voltage is being applied to the starter.
INITIALIZATION FAILED
After power has been applied to the OptiView Control Center, the Micro Board attempts to communicate with the Logic/Trigger Board via the serial communication link. If the Micro Board has tried to communicate with the Logic/Trigger Board ten times, and the Logic/Trig-ger Board has not responded, a Cycling shutdown will occur. Even though the shutdown was recorded, the Micro Board will continue to try to communicate with the Logic/Trigger Board. Since the Micro Board at-tempts to communicate with the Logic/Trigger Board every two seconds, the shutdown will occur approxi-mately 20 seconds after power was applied.
TABLE 5 - HIGH SUPPLY LINE VOLTAGEVOLTAGE RANGE HIGH SUPPLY LIMIT – STOPPED HIGH SUPPLY LIMIT – RUNNING
Disabled None None200 - 208 226 227220 - 240 261 262
380 414 415400 435 436415 453 454
440 - 480 523 524550 - 600 654 655
JOHNSON CONTROLS26
FORM 160.00-O2 ISSUE DATE: 6/10/2011SECTION 5 – CYCLING SHUTDOWNS
The shutdown message displayed will be “LCSSS INITIALIZATION FAILED”.
Possible Problems• Verify the communication cable between the
OptiView Control Center and the Logic/Trigger Board.
• If CR6 is blinking, but CR7 is not blinking, the Logic/Trigger Board has failed. If both CR6 and CR7 are blinking every two seconds continue to the next step
• If problem is still not detected, then perform the communication loop back test (ASSOCIATED LITERATURE listed on page 3 for OptiView Control Center Service).
INVALID CURRENT SCALE
To protect the motor and starter from high current con-ditions, and the chiller from Power Fault conditions, the current transformers must be properly connected to the Logic/Trigger Board. The current transformers are connected to the Logic/Trigger Board via the P1/J1 connector. This connection also determines starter HP size, and allows the use of only one Logic/Trigger Board. If P1 is not connected to J1, the three inputs to determine the starter size will be pulled high and a Cycling shutdown will occur. The presence of the P1/J1 connector is verified when power is applied to the starter. During the period that the connector is not connected to J1, the three phase currents and the KW values will be displayed as zero on the display of the OptiView Control Center.
Generally, this shutdown will occur during the start-up of the chiller.
The shutdown message displayed will be “LCSSS - INVALID CURRENT SCALE SELECTION”.
Possible Problems• Verify that the J1 connector is installed on the
Logic/Trigger Board.
• Verify the wiring of the J1 connector.
LOGIC BOARD POWER SUPPLY
Whenever power is applied to the LCSSS this shut-down is indicated.
The shutdown message displayed will be “LCSSS - Logic Board Power Supply”.
Possible ProblemsCheck for possible input power problems.
LOGIC BOARD PROCESSOR
A watchdog type of system is used to determine if the main system microprocessor and the DSP are still communicating. Normally, the main system micro-processor and the DSP communicate every 3 mSec. A watchdog counter is set-up in the main system mi-croprocessor to a count of 80. If after 80 attempts to communicate between the main system microproces-sor and the DSP, and the DSP still does not respond, a Cycling shutdown will occur. At the same point in time the DSP will be rebooted. The watchdog timer will only reset if communications have been established.
The shutdown message displayed will be “LCSSS - LOGIC BOARD PROCESSOR”.
Possible ProblemsIf the problem continues replace the Logic/Trigger Board.
LOW PHASE TEMPERATURE
The value of each thermistor mounted on the SCR as-semblies is constantly compared to a shutdown thresh-old value of 37°F in the main system microprocessor. If any one of the three thermistors has a value that cor-responds to 37°F or lower, a Cycling shutdown will occur. The thermistors are connected to the Logic/Trigger Board at plugs P2, P3, P4.
The shutdown message displayed will be “LCSSS - LOW PHASE X TEMPERATURE SENSOR”, where X is either A, B or C corresponding to SCR phase assemblies A, B or C respectively.
Possible Problems• This problem is normally associated with a open
thermistor.
• Verify that P2, P3, and P4 are connected to the Logic/Trigger Board.
• Verify the interconnection between the thermistor and the P2, P3, and P4 connectors.
LOW SUPPLY LINE VOLTAGE
The Logic/Trigger Board monitors the three phases of input voltage via the negative SCR cathode connec-tion. The DSP determines the phase to phase RMS voltage and sends this information to the main sys-

JOHNSON CONTROLS 27
SECTION 5 – CYCLING SHUTDOWNSFORM 160.00-O2 ISSUE DATE: 6/10/2011
5
tem microprocessor. The main system microprocessor will compare these voltages to shutdown thresholds in Table 4. If the input voltage falls below the shutdown threshold for 20 continuous seconds, then a Cycling shutdown will occur. This shutdown is disabled for the first 20 seconds of the starter run, to prevent nuisance shutdowns from heavily loaded transformers. The voltage range is programmed on the OptiView Control Center. If no voltage range is programmed, then this shutdown will be disabled (ASSOCIATED LITERA-TURE listed on Page 3).
The shutdown message displayed will be “LCSSS - LOW SUPPLY LINE VOLTAGE”.
Possible Problems• Verify that the proper voltage range is selected on
the OptiView Control Center.
• Verify proper line voltage is being applied to the starter.
• If the problem occurs during generator operation, add some standby load to the generator so that the generator can respond more quickly to load changes.
PHASE LOCKED LOOP
The cathode connection of the negative SCRs is con-nected to the 3-phase AC power line. This informa-tion is sent to the Logic/Trigger Board, where a circuit generates a waveform that is synchronized to the ‘A’ phase voltage. This waveform and the ‘A’ phase volt-age are compared, and the deviation is used to generate an error signal. The error signal is then used to correct the waveform and maintain synchronization with the ‘A’ phase voltage. The synchronized waveform is used for the firing control of all the SCRs. If the error sig-
nal becomes too large then the synchronization with the ‘A’ phase voltage will be lost. If synchronization is not maintained, the SCRs will misfire and damage the chiller.
The shutdown message displayed will be “LCSSS - PHASE LOCKED LOOP”.
Possible Problems• Although this circuit is very fast, storms or power
problems can cause the frequency of the ‘A’ phase voltage to change too rapidly.
• If the problem occurs during generator operation, ensure that the JP1 jumper has been cut (on Rev C. or earlier Logic/Trigger Boards).
• If the problem occurs during generator operation, add some standby load to the generator so that the generator responds more quickly to load changes.
PHASE LOSS
The three phases of input line voltage are fed back to the Logic/Trigger Board via the cathode connections of the negative SCRs. The RMS voltage is then com-pared against a threshold value, that is 30% of the pro-grammed input voltage range. For example, if the pro-grammed input voltage range is 440-480VAC, then the threshold value will be 132VAC. If the voltage range is disabled in the OptiView Control Center then the shut-down value will be 30% of 200VAC. Thus, the thresh-old value will be 60VAC. Anytime one of the three phases of input line voltage drops below the threshold value, a Cycling shutdown will occur.
The shutdown message displayed will be “LCSSS - PHASE LOSS”.
TABLE 6 - LOW SUPPLY LINE VOLTAGEVOLTAGE RANGE HIGH SUPPLY LIMIT – STOPPED HIGH SUPPLY LIMIT – RUNNING
Disabled None None200 - 208 174 160220 - 240 200 185
380 331 305400 349 320415 362 335
440 - 480 400 370550 - 600 502 460

JOHNSON CONTROLS28
FORM 160.00-O2 ISSUE DATE: 6/10/2011SECTION 5 – CYCLING SHUTDOWNS
TABLE 7 - PHASE LOSSINPUT VOLTAGE RANGE
OF THE LCSSS SHUTDOWN VALUE
Disabled 60VAC200 - 208 60VAC220 - 240 66VAC
380 114VAC400 120VAC415 125VAC
440 - 480 132VAC550 - 600 165VAC
Possible Problems• Many times this is a normal fault related to a
storm or lightning.
• Verify the presence of all three phase of input voltage. An input fuse may be open.
• Verify that the proper voltage range is selected on the OptiView Control Center.
POWER FAULT
The Power Fault Detector prevents compressor dam-age due to a momentary interruption of motor current (transient torque condition). This shutdown is active after the first four seconds of a chiller start, and after all three phases of motor current have exceeded 25% of FLA for one second. Then, if any one phase of mo-tor current drops below a threshold of 10% FLA for three line cycles, a Cycling shutdown will occur. To prevent nuisance shutdowns, this shutdown is disabled just before the chiller is placed into a coastdown con-dition.
The shutdown message displayed will be “LCSSS - POWER FAULT”.
Possible Problems• Many times this is a normal fault related to a
storm or lighting.
• Verify that the output CT’s are reading current correctly.
RUN SIGNAL
To start the compressor motor, the OptiView Control Center sends a 115VAC start signal to the Logic/Trig-ger Board. The start signal is applied between J5-2 wire #2, and TB1-3 wire #24 (hardware signal). This signal
is opto-coupled, and then sent to the main system mi-croprocessor, where it is compared with a run signal sent from the OptiView Control Center via the serial communications link (software signal). When either of these two signals are received by the main system microprocessor, a 5 second timer is started. The timer stops when the second of the two signals is received by the main system microprocessor. If both of the signals are not received within 5 seconds, a Cycling shutdown will occur.
The shutdown message displayed will be “LCSSS - RUN SIGNAL”.
Possible Problems• Verify that 115VAC is applied between J5-2 wire
#2, and TB1-3 wire #24.
• Check for solder cracks around J5 and TB-1.
• Verify the serial communication link cable.
SERIAL COMMUNICATIONS
This shutdown becomes active after a successful com-pletion of initialization. If the Micro Board has tried to communicate with the Logic/Trigger Board ten times, or if the Logic/Trigger Board does not receive a transmission from the Micro Board within 20 seconds, then a Cycling shutdown will occur. Since the Micro Board attempts to communicate with the Logic/Trig-ger Board every two seconds, the shutdown will occur in approximately 20 seconds. Under this condition, all information about the starter displayed on the OptiV-iew Control Center will be zero.
The shutdown message displayed will be “LCSSS - SERIAL COMMUNICATIONS”.
Possible Problems• Verify the communication cable between the
OptiView Control Center and the Logic/Trigger Board.
• If CR6 is blinking, but CR7 is not blinking, the Logic/Trigger Board has failed. If both CR6 and CR7 are blinking every 2 seconds, continue to the next step.
• If problem is still not detected, then perform the communication loop back test (ASSOCIATED LITERATURE listed on page 3 for OptiView Control Center Service).

JOHNSON CONTROLS 29
SECTION 5 – CYCLING SHUTDOWNSFORM 160.00-O2 ISSUE DATE: 6/10/2011
5
STOP CONTACTS OPEN
Whenever a shutdown occurs, the K1 relay de-energiz-es and the contacts open on the Logic/Trigger Board. If the K1 contacts open, and no fault is detected in the serial communications link, then a Cycling shutdown will occur.
The shutdown message displayed will be “LCSSS - STOP CONTACTS OPEN”.
Possible Problems• Verify that the J1 connector is installed on the
Logic/Trigger Board, and that there is a wire in-stalled between J1-11 and J1-12.
• Verify that TB1-1 and TB1-2 are properly wired.
• Verify the communication cable between the OptiView Control Center and the Logic/Trigger Board.
• Verify operation of the K1 relay. If the function of K1 is not working properly, replace the Logic/Trigger Board.
• If CR6 is blinking, but CR7 is not blinking, the Logic/Trigger Board has failed. If both CR6 and CR7 are blinking every two seconds, continue to the next step.
• If problem is still not detected, then perform the communication loop back test (ASSOCIATED LITERATURE listed on page 3 for OptiView Control Center Service).

JOHNSON CONTROLS30
FORM 160.00-O2 ISSUE DATE: 6/10/2011SECTION 5 – CYCLING SHUTDOWNS
THIS PAGE INTENTIONALLY LEFT BLANK

JOHNSON CONTROLS 31
FORM 160.00-O2 ISSUE DATE: 6/10/2011
6
SECTION 6 – START INHIBIT
HIGH TEMPERATURE
During the ramp up period, when starting current is being conducted to the motor, the internal die of the SCR becomes very hot. Since the SCRs become very hot, they must be cooled before each start of the chiller or they will fail. To ensure that the SCRs are cooled before each start, a Start Inhibit threshold is used. This threshold is 110°F. Under normal running conditions of the LCSSS, the SCR temperature is typically great-er than 110°F. So, when the chiller has completed a coastdown, it is normal for the Start Inhibit message of “LCSSS - HIGH PHASE X HEATSINK TEM-PERATURE – STOPPED” to appear on the OptiV-iew Control Center display. The X in the message will indicate which phase is above the threshold. The cool-ant pump will continue to run as long as the Start In-hibit is active. The Remote Ready Relay contacts will be open during this condition. When the temperature of all three phases has fallen below 109°F, the coolant pump will stop running and the LCSSS will now be able to start. Since the Start Inhibit is not a fault condi-tion, no events are logged into the History Log.
To minimize the time it takes to cool down the SCRs, and allow the chiller to restart sooner if the anti-recy-cle has timed out, a condenser water pump control has been added to the OptiView Control Center software. This added feature is available only for Mod. ‘B’ start-ers with the following OptiView Control Center soft-ware. On a YK chiller, the software is C.MLM.01.04 or later. On a YT chiller, the software is C.MLM.02.01 or later. On a YS chiller, the software is C.MLM.03.01 or later.
This new condenser water pump control will continue to run the condenser water pump after the chiller has been placed into a coastdown, as long as the following conditions are met. If any one of the three SCR as-semblies thermistors indicates a temperature of greater than 105°F, and if it has been less than one hour since the chiller was last stopped. The condenser water pump will also turn on, when power is restored after a power fault, if any one of the three SCR assemblies thermis-tors indicates a temperature of greater than 105°F, and it has been less than one hour since the chiller was last stopped or shutdown due to a safety or cycling shut-down. Once the temperature of all three thermistors is below 105°F, the condenser water pump will turn off, and will not turn on until the next compressor start.

JOHNSON CONTROLS32
FORM 160.00-O2 ISSUE DATE: 6/10/2011SECTION 6 – START INHIBIT
TABLE 8 - LCSSS THERMISTOR CHARACTERISTICSTEMP °F
NOMINALTEMP °C NOMINAL
R-THERMISTOR IN OHMS* V-THERMISTOR** V-INPUT***
70 21.11 11882 3.44 1.0675 23.89 10502 3.33 1.1680 26.67 9299 3.21 1.2685 29.44 8253 3.09 1.3795 35.00 6530 2.84 1.59
105 40.56 5208 2.59 1.82106 41.11 5094 2.57 1.84107 41.67 4982 2.54 1.86108 42.22 4874 2.52 1.89109 42.78 4767 2.49 1.91110 43.33 4664 2.47 1.93111 43.89 4562 2.44 1.95112 44.44 4465 2.42 1.98113 45.0 4367 2.39 2.00114 45.56 4274 2.37 2.02115 46.11 4182 2.34 2.04120 48.89 3757 2.22 2.15130 54.44 3048 1.98 2.37140 60.00 2487 1.75 2.57150 65.56 2042 1.54 2.76160 71.11 1687 1.35 2.93170 76.67 1401 1.18 3.08180 82.22 1170 1.03 3.22190 87.78 981 0.90 3.34200 93.33 827 0.78 3.44207 97.22 736 0.71 3.51208 97.78 724 0.698 3.52209 98.33 713 0.688 3.53210 98.88 701 0.679 3.53211 99.44 690 0.669 3.54212 100.00 678 0.660 3.55213 100.56 667 0.651 3.56214 101.11 657 0.642 3.567215 101.67 646 0.633 3.575216 102.22 636 0.624 3.583217 102.77 626 0.616 3.591
This chart assumes a 5VDC supply.* Resistance measured across J2, J3, and J4.** Voltage measured across J2, J3, and J4.*** Voltage measured from Pin J2-1 to Gnd., J3-1 to Gnd., and J4-1 to Gnd.

JOHNSON CONTROLS 33
FORM 160.00-O2 ISSUE DATE: 6/10/2011
7
SECTION 7 – START-UP INSTRUCTIONS
START-UP CHECKLIST
• IMPORTANT!!! - Remove all debris from the starter cabinet where AC powerline cables at-tach to starter bus bars. This includes nuts, bolts, washers, hand tools, test equipment, metal shav-ings etc. Motor starting current creates strong magneticfieldsthatcanpullmetalobjectsintothestarter bus bars possibly causing short circuits, and damaging the Solid State Starter!!
• Drain andfill theSCRheatsink assembly cool-ing loop with coolant (refer to Fill Cooling Loop section).
• Connect wiring to the starter per the proper wir-ing diagram.
• If the LCSSS is intended for generator operation, and the Logic/Trigger Board is a Rev. C or earlier, the JP1 jumper must be cut. If the LCSSS is intend-ed for generator operation, and the Logic/Trigger Board is a Rev. D or later no jumpers need to be cut. (Refer to Figure 6 on page 18 for location of JP1)
• Apply power to the chiller and the LCSSS.
• On the OptiView Control Center, verify the fol-lowing have been properly entered: (Refer to AS-SOCIATED LITERATURE for Opti-View Con-trol Center Operation Instruction form for your chiller type on page 3 of this form).
A. Local motor current limit setpoint
B. Pulldown demand limit
C. Chiller full load amps setpoint.
D. Supply voltage range setpoint.
E. Chiller starting amps setpoint.
F. KWH Reset
• The LCSSS is now ready to start the chiller.
FILL COOLING LOOP
The following procedure details the method of fill-ing the cooling loop. The Style “B” LCSSS is shipped with a 50/50 mix of Propylene Glycol and YORK Cor-rosion Inhibitor. This type of coolant is being used to protect the cooling loop from damage due to freezing conditions during the shipping process. This coolant mixture does not have the thermodynamic properties required by the LCSSS during a running condition. Thus, this 50/50 mixture must be drained and replaced with YORK coolant as currently used in the LCSSS. Propylene Glycol is the same material used to winter-ize recreational vehicles. Although it is non-toxic fol-low local guidelines for proper disposal.
TABLE 9 - REQUIRED MATERIALITEM DESCRIPTION QUANTITY
1 Funnel wide mouth 1 EA.2 Bucket one gallon 1 EA.3 Gallon container of YORK Coolant 1 EA.4 Teflon tape
Drain Procedure1. Assemble the material listed above.
2. Remove the plastic pipe plug from the top of the coolant reservoir. Be sure to hold the coolant res-ervoir when removing the pipe plug.
3. Position the bucket under the drain cap. The drain cap is located below the coolant pump on the heat exchanger.
4. Remove the drain cap, capture the 50/50 mixture and discard the used coolant as suggested above. Do not reuse coolant. Remove J2, J3, J4 tempo-rarily. The coolant pump will turn on to remove the rest of the coolant from the system.
5. After most of the 50/50 mixture has been drained, wrapthedraincapwithTeflontape,andreplacethe drain cap. Do not over-tighten the cap.

JOHNSON CONTROLS34
FORM 160.00-O2 ISSUE DATE: 6/10/2011SECTION 7 – START-UP INSTRUCTIONS
Fill Procedure1. Fill the coolant reservoir with YORK Coolant un-
til the level is 1/2 inch from the top of the coolant reservoir.
2. Remove J2, J3, J4 connectors and allow the cool-ant pump to run for a period of 5 minutes. Top off the level of the coolant.
3. Verify that the level of the coolant is within ¼ inch from the top of the coolant reservoir. If the coolant level is low, then add more YORK cool-ant.
4. Run the coolant pump for 10 minutes. Verify that the level of the coolant is proper. If the coolant level is low, then add more YORK coolant, and repeat this step.
5. Verify that all of the air has been worked out of the coolant. If not, continue to run the coolant pump, and add YORK coolant as required.
6. Reinstall the J2, J3, J4 connectors.
7. WraptheplasticpipeplugwithTeflontape,andinstall on the coolant reservoir. Be sure to hold the coolant reservoir when installing the pipe plug.

JOHNSON CONTROLS 35
FORM 160.00-O2 ISSUE DATE: 6/10/2011
8
SECTION 8 – MAINTENANCE AND TROUBLESHOOTING
MANUALLY RUNNING THE CLOSED LOOP COOLANT PUMP
The Style B LCSSS is now controlled by a micropro-cessor. The software for the microprocessor requires the LCSSS and the OptiView panel to be communicat-ing through the communication link before the LCSSS closed loop coolant pump control software is enabled.
In order to manually run the closed loop coolant pump, all three of the thermistor connectors must be removed from the Logic/Trigger board. Refer to SECTION 7 – START-UP INSTRUCTIONS for more LCSSS start-up information.
COOLANT MAINTENANCE
The LCSSS cooling loop coolant must be changed ev-ery year. Refer to Fill Cooling Loop on Page 33 for detailed LCSSS cooling loop fill information.
The probability of SCR heatsink corrosion is greatly increased if the coolant is not replaced within the stated time interval. If a unit failure occurs due to improper maintenance during the warranty period, Johnson Controls will not be liable for costs incurred to return the system to satisfactory operation.
Should the coolant become cloudy or brown in color, it must be drained and discarded. Fill the cooling system with a 50/50 mix of ethylene glycol. Run the cooling pump for 15 minutes. Drain this mixture from the cool-ing system, and discard following local guidelines for proper disposal. Fill the cooling system with distilled water. Run the cooling pump for 15 minutes. Drain the distilled water from the cooling system and discard. Fill the cooling system with the normal running inhibitor. The part number for the inhibitor is 013-02987-000.
Clear Coolant There is no need to change the coolant should it be-come clear. Many samples of clear coolant were tested and determined to have the same properties as pink coolant.
Coolant Change IntervalsTo ensure that the coolant maintains the designed properties the coolant must be changed every year. A coolant failure can result in a very expensive repair.
Do Not Reuse CoolantIn the event that the coolant must be removed to fa-cilitate a repair to the LCSSS. All of the coolant must be drained, discarded, and new coolant installed. There have been a few events where the drained coolant be-came contaminated in the storage container. The con-taminated coolant later failed in the LCSSS. NEVER REUSE COOLANT!
TROUBLESHOOTING THE CLOSED LOOP COOLANT PUMP
Should the closed loop coolant pump not function:
• First, verify that the OptiView panel is NOT dis-playing a LCSSS INITIALIZATION FAILED message. This is only a problem on initial pow-er-up of the LCSSS. If communication between the LCSSS and the OptiView panel had been es-tablished and then is broken, the manual opera-tion of the closed loop coolant pump would func-tion. Refer to Initialization Failed on Page 25 for details about the LCSSS INITIALIZATION FAILED message.
• Verify that 7FU and 8FU in the LCSSS are not open. If they are open, then isolate the circuit to determine which circuit is shorted. Refer to the wiring diagram label inside the starter.
• Verify 115 VAC from wire 107 to wire 2. If 115 VAC is not measured, then verify 4FU and 5FU in the LCSSS. If these fuses are okay, then verify input voltage to T1, and T1’s primary wiring.
• Ifalloftheaboveareverified,thenremovetheJ12connector and place a jumper in it. If the closed loop coolant pump starts running, then a circuit on the Logic/Trigger board has failed. The Logic/Trigger board must be replaced. If the closed loop coolant pump does not run, then verify the wiring to the pump. If the wiring is okay, then replace the closed loop coolant pump.
TROUBLESHOOTING PROCESSES
The following procedures are designed to guide the ser-vice technician along the path that leads to the identifi-cation of the cause of the problem. The service techni-cian should understand the operation of the LCSSS and function of each major component and Logic/Trigger Board. It is recommended that the service technician read and understand the information contained in this

JOHNSON CONTROLS36
FORM 160.00-O2 ISSUE DATE: 6/10/2011SECTION 8 – MAINTENANCE AND TROUBLESHOOTING
instruction prior to troubleshooting this product. Also, the service technician must understand the system in-terface, and be able to utilize system wiring diagrams to follow signal flow throughout the system. Due to the integration of the LCSSS with the OptiView Control Center, a good working knowledge of the OptiView Control Center is also necessary (Refer to ASSOCI-ATED LITERATURE Forms listed on page 3).
Several levels of documentation are required for the troubleshooting process. The LCSSS wiring diagram, supplied with every starter, is the top level document. It provides the overall wiring and configuration. Sections of this instruction provide the required lower levels, specifically, block diagrams provide signal flow and simplified representations of Logic/Trigger Board cir-cuitry. The “Inputs and Outputs” of the Logic/Trigger Board provide details of the required voltage levels at all connectors.
Begin the troubleshooting process by selecting the ap-propriate procedure. It is not necessary to sequentially perform all of them. Perform a procedure only if there is a problem with that function.
VERIFY SHORTED SCR
• Remove main input power to the starter.• Set ohm meter to Rx1 range. If the ohm meter is a
digital model, and has a diode test scale, place the meter in the diode test mode.
• Connect the ohm meter from L1 to T1. If the SCR is shorted, the ohm meter will display a value less than 5 ohms. A reading greater than 5 ohms, but less than 5K ohms may indicate a leaky SCR or faulty snubber. Such SCRs and snubbers should be further evaluated.
• Continue with the other two phases.• Replace the shorted SCR Assembly.
VERIFY OPEN OR SHORTED SCR GATE
• Remove main input power to the starter.
• Set ohm meter to Rx1 range. If the ohm meter is a digital model, and has a diode test scale, place the meter in the diode test mode.
• Remove the suspected gate connection J6 – J11.
• Insert the ohm meter probes into the connector. The meter should display a good value of 10 – 20 ohms in both polarities.
• If the ohm value is lower than 5 ohms the gate is shorted, replace the SCR Assembly.
• If the ohm value is greater than 50 ohms the gate is open, replace the SCR Assembly.
VERIFY GATE DRIVER OUTPUT
• Remove main input power to the starter.
• Set ohm meter to Rx1 range. If the ohm meter is a digital model, and has a diode test scale, place the meter in the diode test mode.
• Remove the suspected gate connection J6 – J11 from the Logic/Trigger Board.
• Connect the ohm meter negative lead to pin 1 and positive lead to pin 2 of the suspected Logic/Trigger Board output. The meter should display a good value of 10 – 20 ohms.
• Connect the ohm meter positive lead to pin 1 and negative lead to pin 2 of the suspected Logic/Trigger Board output. The meter should display a good value of around 200 ohms.
• If the ohm value is lower than 5 ohms, the gate driver is shorted.
• If the ohm value is greater than 500 ohms, the gate driver is open. If the values are okay, continue.
• Reconnect connector J6 – J11. Reapply main in-put power to the starter.
• Connect a DC volt meter across the suspected J6-J11, pin 2 is ground. Without the starter running a voltage of 0VDC should be displayed on the meter. With the starter running, a voltage of .55 – 2.0VDC should be displayed.
• A higher voltage of around 5 – 10VDC on the J6 – J11 connector would indicate a poorly conducting SCR. Replace the SCR Assembly.
• A lower voltage during the running condition would indicate a shorted gate on the SCR, or a bad Logic/Trigger Board. Replace the appropriate part.

JOHNSON CONTROLS 37
SECTION 8 – MAINTENANCE AND TROUBLESHOOTINGFORM 160.00-O2 ISSUE DATE: 6/10/2011
8
VERIFY REAL PHASE CURRENT IMBALANCEThe starter cabinet contains high voltages that can cause injury or loss of life. Ex-treme care should be taken when working on this equipment.
• Use this section to determine if the current imbal-ance is real or a reporting problem.
• Start the chiller.
• Connect another current measuring device around the output wire to the motor.
• Compare the measured three phase currents to each other.
• If the currents are imbalanced, then continue. If they are not imbalanced, continue to section titled “Verify False Phase Current Imbalance”.
• While the starter is running, record the three phases of input voltage.
• Add the 3 values of voltage together, and divide by 3 to get the average voltage. Then take each measured value, subtract the average value, and divide this difference by the average value, and
multiply by 100. The result is the percentage phase imbalance for that phase. Depending on the load of the motor a value of 1.5% can cause a cur-rent imbalance of 15%. If this is not the source of the problem continue.
Example:Phase A 480, Phase B 475, Phase C 482. 480 + 475 + 482 = 1437 / 3 = 479 avg. 475 – 479 = –4 / 479 x 100 = -0.8%
• Referring to the chart below, the current imbal-ance due to the voltage imbalance is 7.5 % at 60% load
• A typical motor of today may induce a current imbalanceofupto6%,butfactoryspecificationsallow for up to 8% before rejecting a motor. So, if the measured current imbalance is 13.5% or less, this is normal for the above example, and no more investigation is required. If this is not the source of the problem, continue.
Typical input voltage imbalance is 1 to 1½%. Ex-cessive input voltage imbalance is 2% or greater. Most often imbalances are due to unequal distribu-tion of single phase loads within the building.
• Connect an AC voltage meter from L-1 to T-1.
FIGURE 8 - CURRENT IMBALANCE DUE TO VOLTAGE IMBALANCE
30
25
20
15
10
5
0 0.2 0.4 0.6 0.8 1.0 1.2 1.4 1.6 1.8 2.0 2.2 2.4
% C
UR
REN
T IM
BA
LAN
CE
% VOLTAGE IMBALANCE
NO LOAD
20% LOAD
40% LOAD
60% LOAD
80% LOAD
FULL LOAD
LD05247

JOHNSON CONTROLS38
FORM 160.00-O2 ISSUE DATE: 6/10/2011SECTION 8 – MAINTENANCE AND TROUBLESHOOTING
• After the chiller has been running for one minute, measure the voltage across the SCR. The voltage should measure between .70 – 2.0VAC. The volt-age should remain stable. If the voltage is not stable, or is higher than 9.0VAC, there could be a problem with the gate driver on the Logic/Trigger Board, or the SCR is not latching on. In the case of the SCR not latching on, this is typical of older starters. Ver-ify each SCR pole by moving the meter to L-2 and T-2,andL-3andT-3.Thistestverifiestheopera-tion of the starter. If these voltages are correct, then the problem is most likely other than the starter.
VERIFY FALSE PHASE CURRENT IMBALANCE
Use this section if the current imbalance is not real, but is a reporting problem.
• Verify that the OptiView Control Center has the correct model of starter selected. If not, verify wiring of the J1 connector. Refer to the current scaling section in this form.
• If this is not the source of the problem, continue.
• Remove main input power to the starter.
• Set ohm meter to Rx1 range. If the ohm meter is a digital model, and has a diode test scale, place the meter in the diode test mode.
• Remove the J1 connector, and measure the resis-tance of the three output CT’s. The resistance val-ue will vary depending on the model of the starter.
MODEL STARTER CT RESISTANCE RANGE7L 2.4 – 4.3 OHMS
14L 5.0 – 7.3 OHMS26L 8.0 – 16.8 OHMS33L 10.7 – 22.0 OHMS
• If this is not the source of the problem, continue.
• Measure resistance across J1 pin 1-2. A resistance value of 3.0 ohms should be displayed on your meter. This resistor is a 0.1% tolerance compo-nent. If it is out of tolerance, replace the Logic/Trigger Board. Repeat this step with J1 pin 3-4, and J1 pin 5-6.
• Reconnect the J1 connector.
• If this is not the source of the problem, continue.
• Start the chiller.
• Connect another current measuring device around the output wire to the motor.
• Compare the three phase current from the OptiV-iew Control Center to the three measured currents.
• Replace the CT in the phase in which the current does not measure correctly.
REMOVING SCR ASSEMBLIES
Refer to the Replacement Parts List Form 160.00-RP3 for replacement SCR assembly kit part numbers.
• Remove AC power from system. If the starter has a circuit breaker, place it in the off position.
• Drain coolant as directed in the Fill Cooling Loop Section.
• Loosen the hose clamps and remove the hoses from the defective heatsink assembly.
• Place tape over the hose barbs, so that the coolant does not leak into the cabinet of the starter.
• Remove all electrical connections from the Logic/Trigger Board. Remove Logic/Trigger Board as-sembly by removing 4 panel mounting screws and the 6 screws holding the gate wire clamps.
• Disconnect the thermistor wire connector for the failed SCR (J/P16, J/P17, J/P18).
• Mark and then remove the output wires to the mo-tor. Fold out of the way if possible.
• Remove the current transformer mounting bracket by removing the four screws on the back of the starter. Move CT assembly out of the way.
• Remove the two bolts connecting the SCR assem-bly to the bus bar.
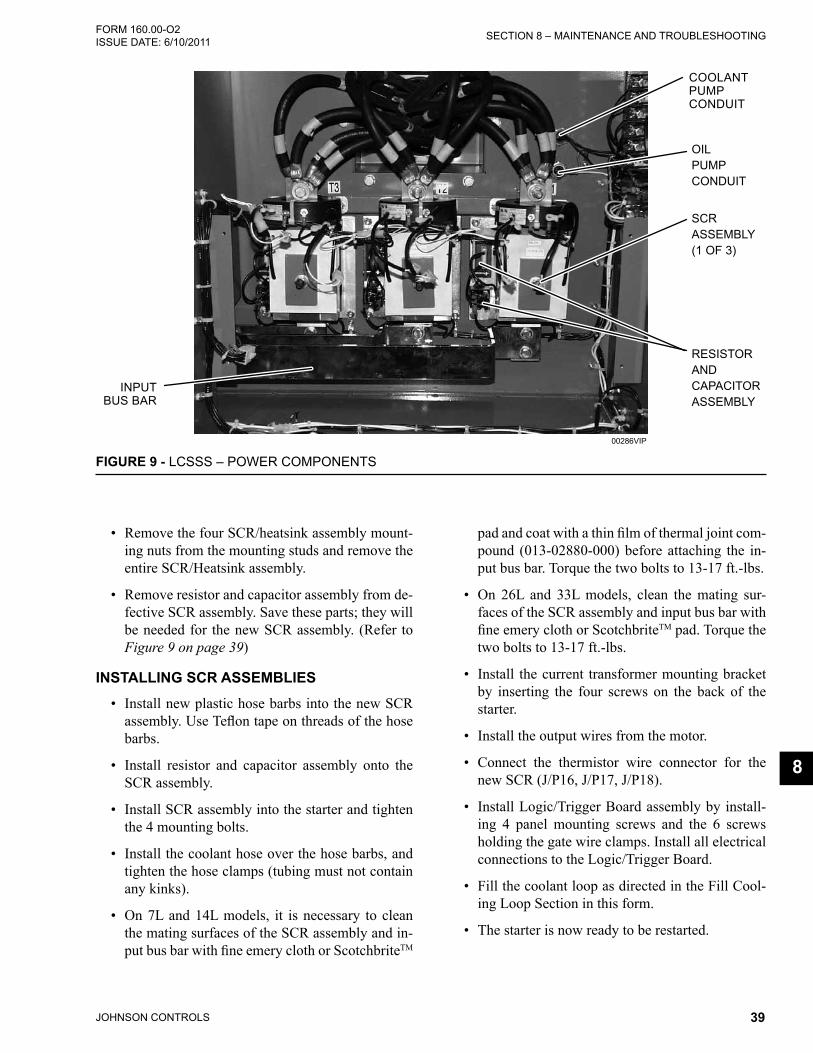
JOHNSON CONTROLS 39
SECTION 8 – MAINTENANCE AND TROUBLESHOOTINGFORM 160.00-O2 ISSUE DATE: 6/10/2011
8
FIGURE 9 - LCSSS – POWER COMPONENTS
00286VIP
COOLANT PUMP CONDUIT
OIL PUMP CONDUIT
SCR ASSEMBLY (1 OF 3)
RESISTOR AND CAPACITOR ASSEMBLY
INPUT BUS BAR
• Remove the four SCR/heatsink assembly mount-ing nuts from the mounting studs and remove the entire SCR/Heatsink assembly.
• Remove resistor and capacitor assembly from de-fective SCR assembly. Save these parts; they will be needed for the new SCR assembly. (Refer to Figure 9 on page 39)
INSTALLING SCR ASSEMBLIES
• Install new plastic hose barbs into the new SCR assembly.UseTeflontapeonthreadsofthehosebarbs.
• Install resistor and capacitor assembly onto the SCR assembly.
• Install SCR assembly into the starter and tighten the 4 mounting bolts.
• Install the coolant hose over the hose barbs, and tighten the hose clamps (tubing must not contain any kinks).
• On 7L and 14L models, it is necessary to clean the mating surfaces of the SCR assembly and in-putbusbarwithfineemeryclothorScotchbriteTM
padandcoatwithathinfilmofthermaljointcom-pound (013-02880-000) before attaching the in-put bus bar. Torque the two bolts to 13-17 ft.-lbs.
• On 26L and 33L models, clean the mating sur-faces of the SCR assembly and input bus bar with fineemeryclothorScotchbriteTM pad. Torque the two bolts to 13-17 ft.-lbs.
• Install the current transformer mounting bracket by inserting the four screws on the back of the starter.
• Install the output wires from the motor.
• Connect the thermistor wire connector for the new SCR (J/P16, J/P17, J/P18).
• Install Logic/Trigger Board assembly by install-ing 4 panel mounting screws and the 6 screws holding the gate wire clamps. Install all electrical connections to the Logic/Trigger Board.
• Fill the coolant loop as directed in the Fill Cool-ing Loop Section in this form.
• The starter is now ready to be restarted.

Tele. 800-861-1001www.york.com
P.O. Box 1592, York, Pennsylvania USA 17405-1592 Subject to change without notice. Printed in USACopyright © by Johnson Controls 2011 ALL RIGHTS RESERVEDForm 160.00-O2 (611) Issue Date: June 10, 2011Supersedes: 160.00-O2 (200)