you will need to put down your name on the reservation …biop.epfl.ch/pdf/leica dmi4000...
TRANSCRIPT

1
Leica DMI 4000 tutorialBefore using the Leica
DMI 4000,
You will need to put down your name on the reservation system =

2
Welcome to the Leica DMI4000 Microscope tutorial
How to start up the system (p.3)How to use the stand DMI4000 (p.5)How to use the stand from the soft (p.10)The Differential Interference Contrast (DIC) (p.11)Fluorescence (p.12)How to acquire an image and its different adjustments (p.13)How to focus easier (p.17)How to acquire several images and overlay them (p.18)How to see, to save your images and their information (p.21)How to annotate your image (p. 22)How to shut down the system (p.23)

3
System Start up (step1)
Turn on the Fluorescence lamp (Xcite)
Turn on the Microscope button
You have to turn on the light only if it is cold (approximately 30 minutes after its last use)

4
System Start up (step2)Turn on the PC
Introduce your UsernameIntroduce your password
Start the Leica Application suite software

5
Microscope ( left side)
Intensity of halogen or fluorescence lamp (+/-) (INT)
Condenser Aperture for the contrast (+/-) (AP)
Fluorescence to transmitted lightselection

6
Microscope (front part)Eyes piece position
Camera position
Shutter for the fluorescence (Xcite)
Filters (BLUE/GREEN/RED/DEEP RED)

7
Microscope (right side)Choose your objective manually:
HCX PL S-APO 5x 0.15
HCX PL APO 10x 0.30
N PLAN 10x 0.25
HC PL APO 20x 0.7 IMM CORR λbl
HCX PL APO 63x 1.40-0.6 OIL
To put a magnifying lens (1.6 x)
To move the stage

8
Microscope (up part)
Field diaphragm, for Köhler adjustment (close/open)
condenser

9
Check your sample through the eyes piece
Select the objective
For bright field
On the left side, Press on the TL/BF buttonSetup the intensity, with the buttons INTsetup the aperture diaphragm, with the button APFocus the sample
For fluorescence
On the front part,Select the filter (BLUE / GREEN / RED / DEEP RED )Press the shutterFocus the sample

10
Microscope on the softUnder Acquire and Mic1,
you can see the objective that you’re using
You can change the kind of contrast in transmitted light, or select fluorescence
For Fluorescence, you can change filters and press the shutter
You can select the eye piece or camera position
For Acquiring your image after all settings done

11
Differential interference contrast (DIC)
Under Acquire and MIC1, select a DICcontrast
You can change the aperture diaphragm and the intensity of the light
To change and choose the right contrast , turn this button

12
FluorescenceUnder Acquire and MIC1, select
FLUO, so you can
setup the field diaphragm
Setup the intensity of the fluorescent light
Change the filters
Press the shutter

13
Acquire an imageUnder Acquire and Camera, you can adjust
the exposure time
The contrast (gamma)
14
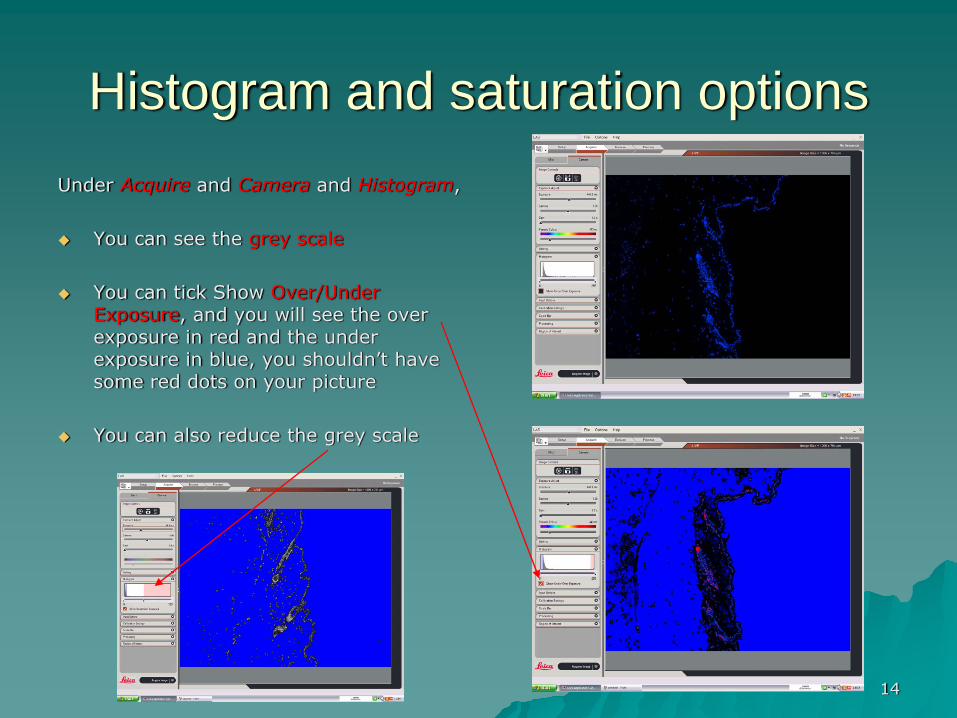
Histogram and saturation optionsUnder Acquire and Camera and Histogram,
You can see the grey scale
You can tick Show Over/Under Exposure, and you will see the over exposure in red and the under exposure in blue, you shouldn’t have some red dots on your picture
You can also reduce the grey scale

15
The Input optionsUnder Acquire and camera and input
option, you can choose
if you want some pseudo color
The bit depth
The right format (HQ 1600x1200)

16
The binning
Under Acquire and Camera and Input option,
You can choose a binning, it will increase the camera sensitivity, reduce the exposure time
But you will lose some resolution

17
How to focus easierUnder Acquire and Camera
and Region of interest,
If you select zoom focus, it will zoom the region you want so you can easily find the right focus

18
How to acquire several images and overlay them
Under Select Acquisition Mode, select Image Overlay
The window “lambda” will be opened
With the play button, you can start and stop the live and the shutter

19
To do the overlay and save the configuration
For each channelyou have to select the filterChoose the exposure timeChoose a pseudo-color
You can save your configuration
When it’s done you can Acquire your overlay

20
To see the overlay imageUnder Browse and λ, you can see
Each channelAnd the overlay picture
You can also tick the images that you want to see in overlay mode and click on overlay show

21
How to see, to save your images and their information
Under Browse and file information, you can see the information linked to the image
Under Browse and File directory, you can see in which file your images are saved

22
How to annotate your imageUnder Process and Annotate, you can choose to note some information about the image
The name , description , date and time
The scale bar
Lines, measurements (ex. distance line)
To save the picture with the information, you have to select Merge.
Be careful, if you do it, you can’t go back. So if you need the original picture, copy it before you annotate it

23
How to shut down the system
If you was using oil/glycerol objective, clean the objective with ethanol/water
Before shutting down the system, you have to look if there is somebody using this microscope after you. In this case you haven’t to shut it down but you have to log off your session
Shut down the PCTurn off the microscopeTurn off the light